Community Brag Posts

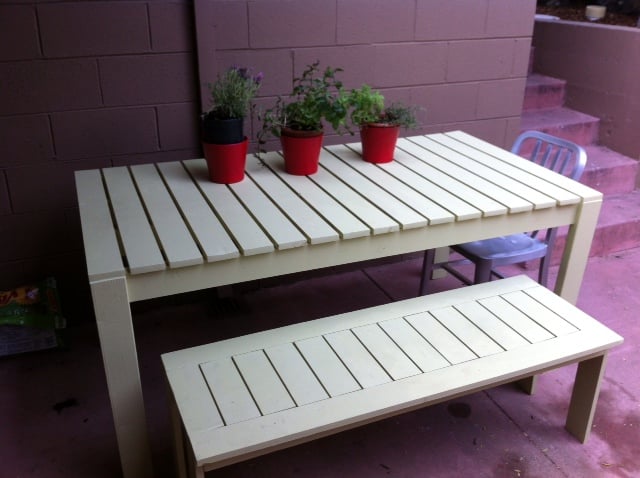
Replacing Our Outdoor Furniture

Submitted by Anonymous (not verified) on Mon, 04/25/2022 - 15:42

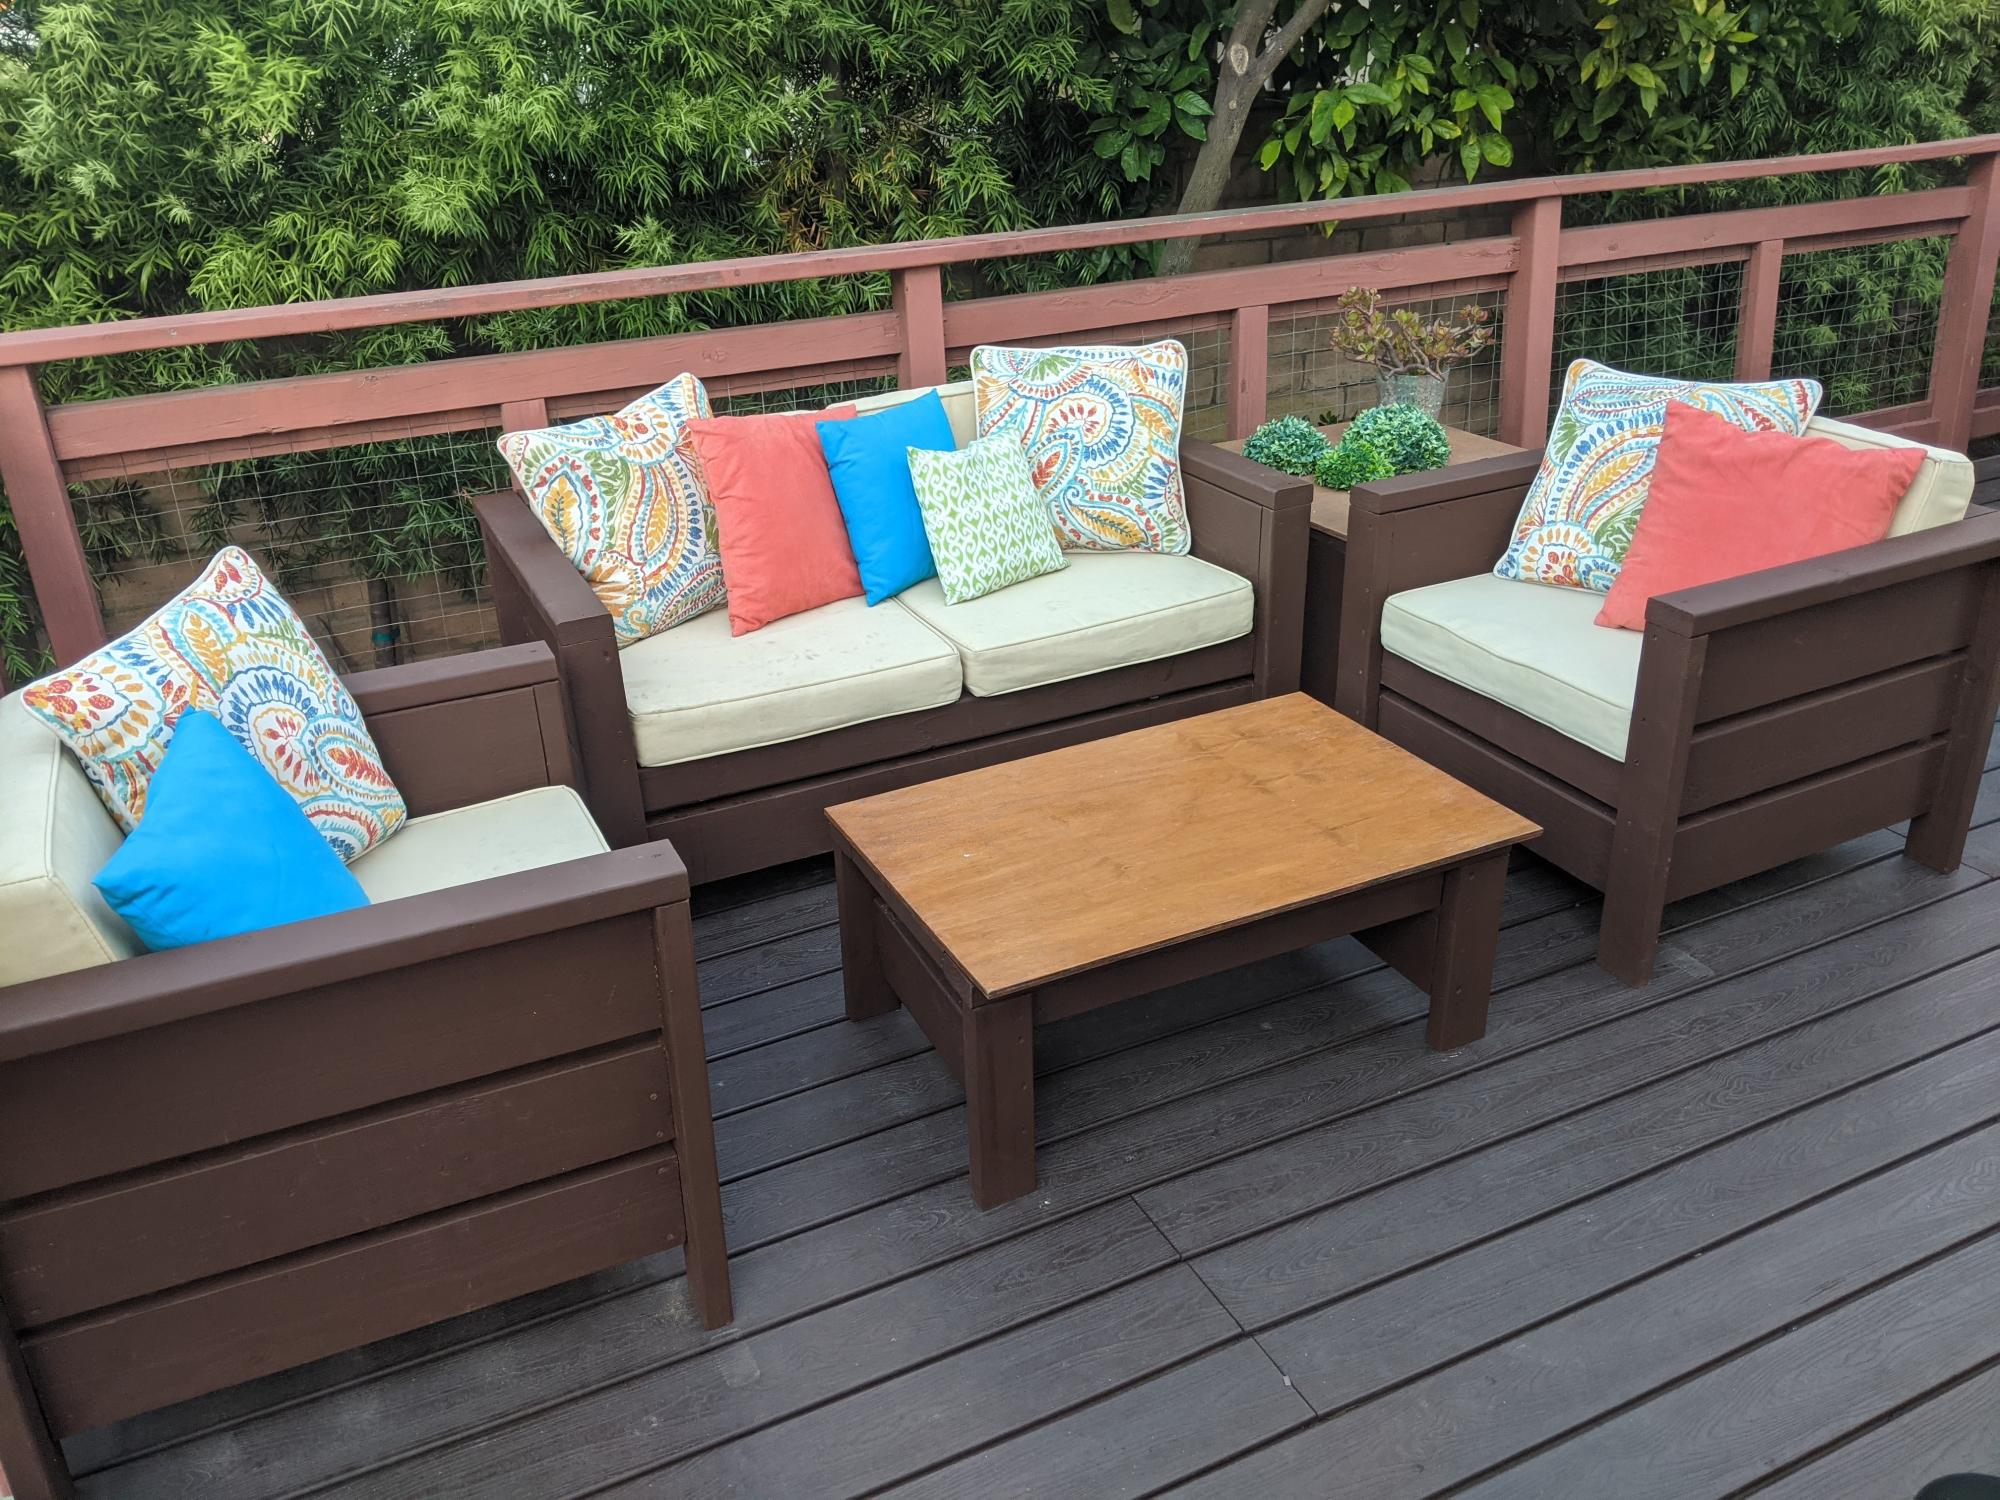
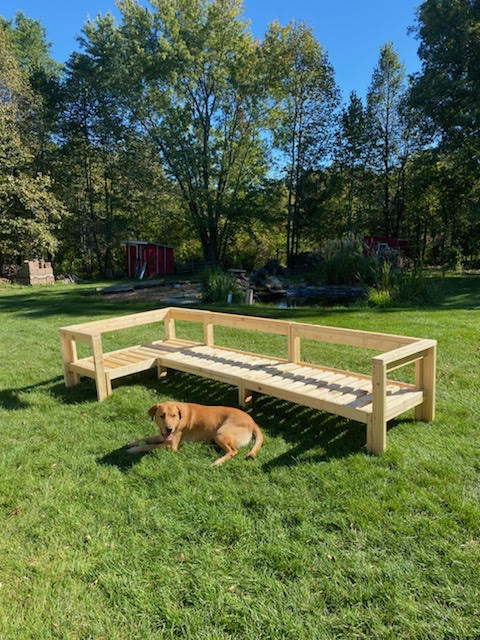
When our outdoor furniture started falling apart, we decided it was too expensive to replace until we found your plans for the “Modern Outdoor Chair from 2x4s and 2x6s.”
The design was almost exactly right.
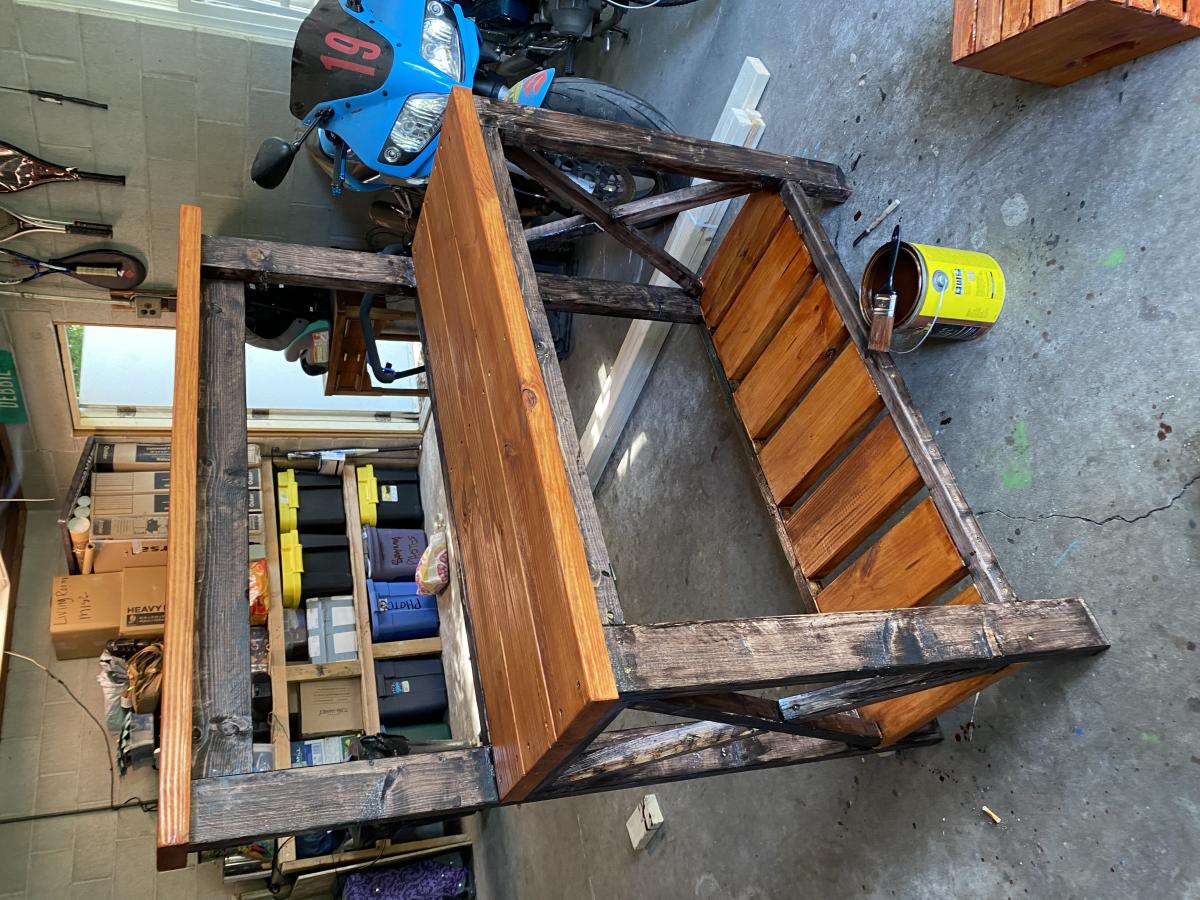
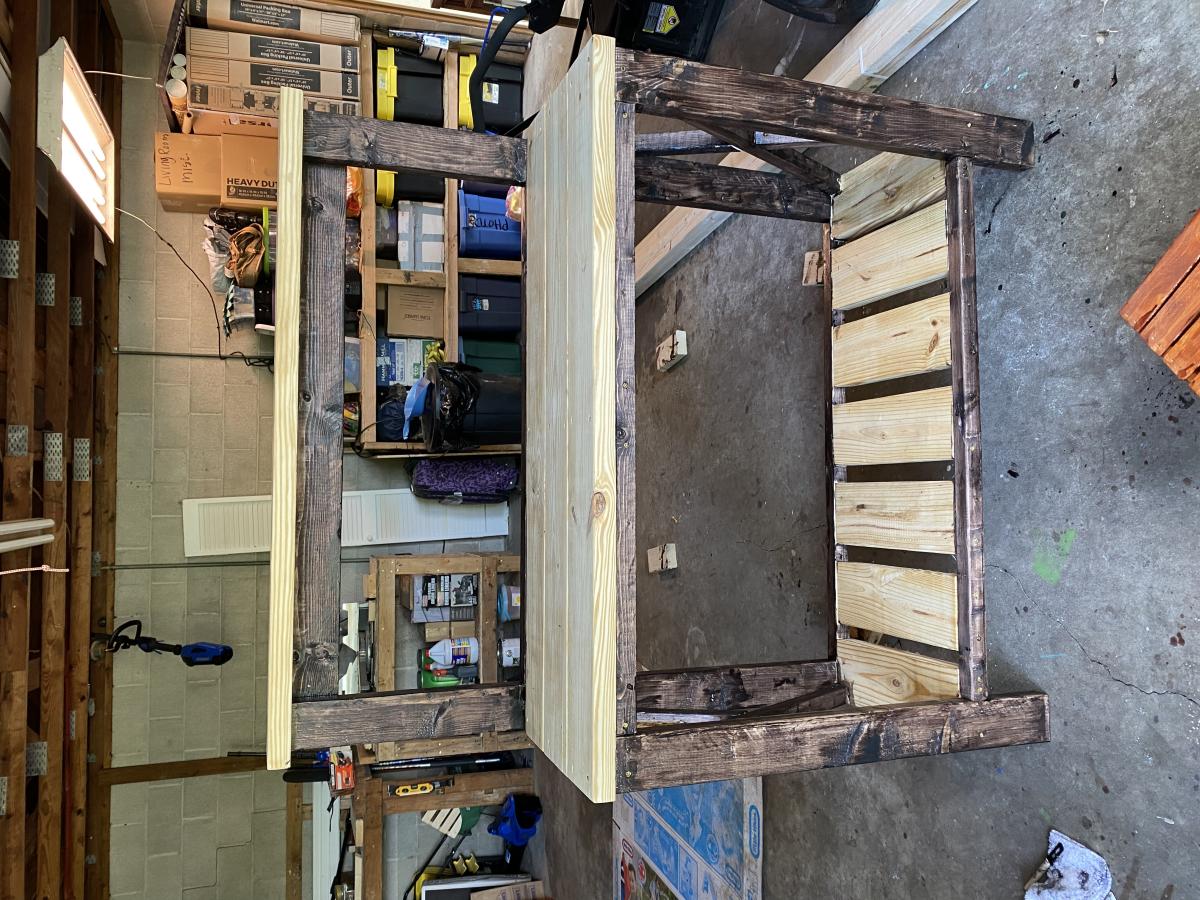
The only change we made was to make the arms taller so the cushions from our original set would work. Instead of 2x6s for the sides we changed one of the boards to 2x8 and adjusted the arm height by a couple of inches. We made the chair first.
We then used the plans for the Loveseat and completed our set.
After painting the first chair after assembly, we decided it was easier to cut the wood and paint the parts prior to assembly and touch it up after.
The design adjustment matched perfectly. We also created a coffee table using the same type of assembly.
We know these loveseat and chairs will last!!!
Thanks so much
Kim and Scott Griffin

Comments

Armoire

Submitted by Smokeydog on Thu, 09/03/2015 - 13:56

Built this armoire for the master bedroom  and constructed it to match the existing furnishings.  This thing is huge and weighs a ton.  7 1/2 feet by 4 feet.  I had to make sections in the shop and then assemble and paint it in the second story bedroom.  If we ever need to move it out of the house we are fortunate to have a balcony off the bedroom.  With help from a whole bunch of guys we should be able to lower it down ... if it ever comes to that!

Estimated Cost
450.00
Estimated Time Investment
Week Long Project (20 Hours or More)
Finish Used
BEHR paint. Home Depot matched the paint perfectly.
Recommended Skill Level
Intermediate

Rustic X Console

This was my first project after discovering the "Ana White" web site.  After looking through the brag photos I zeroed in the Rustic X Console.  I was specifically inspired by the photos from "Celeste808" and "aDIYguy".  It also gave me an opportunity to try out my new Kreg Pocket jig. I hope you like the pictures.

Built from Plan(s)
Estimated Cost
I figure i spent about $95 in materials at the local Home depot. I already had some items at home that I used.
Estimated Time Investment
Weekend Project (10-20 Hours)
Finish Used
Miniwax Gunstock #231, Miniwax fast drying Polyurethane (1/2 pint), Behr-ultra Pure white eggshell finish paint and primer in one (quart)
Recommended Skill Level
Beginner

Easy Build Wood Headboard

Submitted by Anneke on Fri, 07/08/2011 - 01:01

This was actually my first build. I had just about had it, went with all three kids, got the wood, and built it while my hubby was at work (24 hr. shifts at the fire station). And yes, that was after I finally Googled, "How to unlock a Dewalt Compound Miter Saw" after 30 minutes of unsuccessful prodding! :-) I'm super happy with how it came out (despite the poor flashy picture)! And it was great "practice" for doing my girl's farmhouse beds.

Estimated Cost
$80
Estimated Time Investment
Afternoon Project (3-6 Hours)
Finish Used
Minwax PolyShades Bombay Mahogany Satin - 2 coats with 3rd touch ups
Recommended Skill Level
Beginner

Comments

JamieRiehl (not verified)

Sun, 05/20/2012 - 22:18

I think it is beautiful! I love the stain! This was my first build also, I used old red barnwood, but a friend wants me to build her one, so I'm thinking about going with the same finish you used, absolutely gorgeous!

Super Hero House

Submitted by carongirls on Sun, 08/11/2013 - 13:48

This was hard for me because I am horrible at using the jigsaw. If I do another one I'll probably not do as many door openings.
It took longer than expected due to filling in all the pocket holes an waiting for the wood filler to dry.
My grandson loves it, he didn't care about my mistakes on it.

Built from Plan(s)
Estimated Time Investment
Weekend Project (10-20 Hours)
Finish Used
None
Recommended Skill Level
Beginner

computer desk

Submitted by xmasfish on Sun, 09/06/2015 - 17:44

I modified the plans in several ways.  First I made the desk smaller to fit the space.  In doing so I decided it would work better to have only one part of the desk flip up for storage.  I also made the box that makes up the base larger to fit a printer.  That left a smaller space for a chair.  Turns out the chair I had fit perfectly.  I decided not to finish with paint, stain or varnish.  I may do that later.  Over all I am very happy with this project.

Estimated Time Investment
Week Long Project (20 Hours or More)
Recommended Skill Level
Intermediate

Rear foyer bench!

Submitted by Anonymous (not verified) on Mon, 05/09/2022 - 13:19

Used the warming hut bench plan to build this rear foyer bench! I used Behr Stain & Poly in Mission oak (2 coats) and love the way it ties in with the rest of our house. Plus I love saying "Thanks, I made it!" when people see it and ask where I found something that fit so perfectly. :)

Comments

Whitney's Play Kitchen

I used Ana's plans for the play stove, fridge and sink. I LOVED Crafting Chick's take on it so I copied her great accessories. I found my knobs at Walmart and my hooks at Hobby Lobby. I also found the fabric at Hobby Lobby. I used 3/4" hardwood plywood, but if I could do it again I would have used MDF. It's much smoother! I still love it though! Oh... So do the kids ;-)) You can read more details at http://www.shanty-2-chic.com/2011/07/play-kitchen-reveal.html.

Estimated Cost
$150
Estimated Time Investment
Weekend Project (10-20 Hours)
Finish Used
2 coats of Valspar Arctic Edge.
Recommended Skill Level
Beginner

Comments

Guest (not verified)

Thu, 12/22/2011 - 16:05

Hi! We are building this kitchen right now and can not figure out how to mount the hinges!
Not sure what kind of hinges you used? we bought some regular door hinges but they are only able to mount to the outside of the doors. please help. thanks!

Outdoor Dining Table

Submitted by sonnenerin on Tue, 08/13/2013 - 11:55

We started with the bench as a weekend project. After counter-sinking and filling all those screw holes we borrowed a Kreg jr and took onothe table project. However we ended up countersinking the top boards for the table as well; it was easier for us to visualize the spacing between boards and make sure everything was as square and level as we could make it... We used behr paint and primer in one in a satin finish and opted for a punchy green to brighten up our courtyard.
We plan to build another bench since it will tuck in nicely under the table when not in use, and we can pull the table out and use the bench when we need more seating.
We love our new outdoor furniture!! Thanks Ana!

Estimated Cost
$150
Estimated Time Investment
Week Long Project (20 Hours or More)
Finish Used
behr outdoor paint and primer in one
Recommended Skill Level
Beginner

Bead board desk

Here is a desk I recently built.  It is a Pottery Barn piece.  It features full extension drawers slides and simulated maple melamine drawer interiors. 

Estimated Time Investment
Weekend Project (10-20 Hours)
Finish Used
Primer and paint
Recommended Skill Level
Intermediate

Blanket ladder

Submitted by scoricha on Fri, 08/03/2018 - 21:35

Very easy to cut/assemble and very pleased with the result! It took about an hour to cut the boards and screw then together. Then another hour to same/pretreat/stain. Love it!

Built from Plan(s)
Estimated Cost
$10 not including stain (I already had)
Estimated Time Investment
Afternoon Project (3-6 Hours)
Finish Used
Minwax Early American
Recommended Skill Level
Starter Project

Rolling BBQ Cart with removable tray

Submitted by dananryan on Thu, 07/14/2011 - 17:26

This was a father's day present. My husband was quite impressed!

Estimated Cost
$30 including stain and hardware.
Estimated Time Investment
Weekend Project (10-20 Hours)
Finish Used
MinWax Bombay Mahogany and 2 coats of Spray acrylic polyurethane.
Recommended Skill Level
Beginner

Comments

dananryan

Sat, 11/26/2011 - 08:43

Hi, this look is the result of trying to fix a very VERY sloppy stain job. I had applied the stain much to thick and uneven and had runs all over the cart. So I decided to sand off the excess and even it out a little. I finished it off with a coat of clear poly. We like the way it looks too and it was really easy.

Our Version of Michaela's Kitchen Island

We needed more counter space in our kitchen and I saw the plan for Michaela's kitchen island I thought it would be perfect. I asked my husband to alter it to fit our space. We used Poplar for the base and Walnut for the top. My husband planed and joined the walnut from rough cut boards. We then shellacked and polyed the top. On the bottom we used SW Urbane Bronze with a walnut stain over the top. I Love how it tuned out! Thanks for the great plans!

Built from Plan(s)
Estimated Cost
$200
Estimated Time Investment
Week Long Project (20 Hours or More)
Finish Used
Sherwin Williams Urbane Bronze with Floetrol as the base with a walnut stain over it and then the whole thing had poly over that.
Recommended Skill Level
Beginner

Comments

JoanneS

Fri, 08/16/2013 - 16:26

Your island is beautiful! Love the finish, and the walnut top is just gorgeous!

Just finished needs pillows :)

Loved building this :) think it came out great. Only thing is i wish i had the screws ana talks abt bc the boards split over and over :( what kind of screws do u use ana? Also couldnt find 2 3/4 deck screws, only 2 1/4"

Estimated Cost
40 per bench pine
36 for 5 lbs of deck screws
Estimated Time Investment
Day Project (6-9 Hours)
Finish Used
Havent yet
Recommended Skill Level
Intermediate

Potting Bench / garage bar

Submitted by Anonymous (not verified) on Tue, 05/31/2022 - 15:46

So easy… about 3 hours to cut and assemble. Will make another one for sure when I go to visit my mom at Thanksgiving. I absolutely love it!

Built from Plan(s)

Comments

Bathroom Vanity

Submitted by jazberg on Fri, 07/15/2011 - 13:04

We remodeled our basement and added a master bathroom. The vanity space we had needed a custom vanity. We saw the Balin Console Table here and thought it would work nicely. It does! The four 12x12 drawers hold everything we need to use and keep discrete and the storage space underneath works nicely for extras that need to be away but quickly accessed.

Built from Plan(s)
Estimated Cost
$150
Estimated Time Investment
Weekend Project (10-20 Hours)
Finish Used
Black Stain, several coats of poly.
Recommended Skill Level
Intermediate

Comments

In reply to by dananryan

jazberg

Fri, 07/15/2011 - 23:16

We had to make some changes, especially in its depth as it needed to hold a sink. It came out at 31 3/4" tall, 57" wide and 20" deep. We also added a shelf at the bottom. Thanks for the compliment!

briggsy13

Wed, 08/10/2011 - 12:41

It looks like you have a glass top on this vanity? Or maybe its just the finish? I am very interested in doing this build for our bathroom remodel. I too would like the shelf for extra storage, and advice on how you added that?

I'm going to have to shorten it some as we only have like 53 inches for the vanity. Might just make it 48 inches which is still a plenty big vanity and just make 3 drawers instead of 4.

It looks awesome!!! Great work!

Guest (not verified)

Sat, 08/13/2011 - 14:04

Yes, it has a glass top. We had the glass guy cut it to size and sand the edges and put a sealing sticky tape around the edges to make it safe and water proof. We also had to have a hole drilled in the middle for the drain and I put a bead of clear caulk to water seal that spot.

The shelf was easy. Just a couple of ledger pieces nailed with a nail gun (or screwed if you pre-drill) to the legs on each side (from back to front). Then glued the ply wood for the shelf on to the ledgers. I then measured and cut facing to cover the plywood edge and add stiffness to the plywood. I just glued and clamped those on. You may have to cut out a slot in the shelf if your drain pipes are low on the wall (I had to).

Careful is you're going to do three drawers. You'll have a drain pipe going down the middle of the vanity! I had to offset the inside drawers so that they would not hit the drain pipe. I offset them about an inch on both sides (one offset to the left, the other to the right). You can't tell from the front as I sized all four drawer faces the same. If you do three drawers, that middle drawer might need to be less deep (6" verses 12 or more) or you might just make it a false drawer...one that doesn't open at all. Either way, the four drawers (12x12x10) are plenty large enough for our needs. if I had just two drawers i would make them deeper. Good luck! Share a picture with us when you're done!

Bath Shelf Customized

Submitted by Hreyff on Mon, 08/19/2013 - 18:15

I used the Martina Bath Wall Shelf as a design element and extended the length to 49.75" to create a custom piece to hang over my little one's dresser in the nursery. I used select pine, pre-stain and dark walnut for the finish. I spent a little more than what can be expected as I didn't have scrap pieces in the desired size as well as spent $20 on bar brackets that can hold 200 lbs. I went a little overboard on the strength capacity but its for a baby's nursery.

Estimated Cost
$135.00
Estimated Time Investment
Afternoon Project (3-6 Hours)
Finish Used
Minwax Pre-stain and Dark Walnut stain
Recommended Skill Level
Beginner

Comments

Val Manchuk

Mon, 08/19/2013 - 22:17

I love this take on the Martina Bath Wall Shelf! I built the smaller one for our bathroom, but I'm thinking one similar to yours would look really nice on the wall over our bed. Beautiful work!
Val