Community Brag Posts
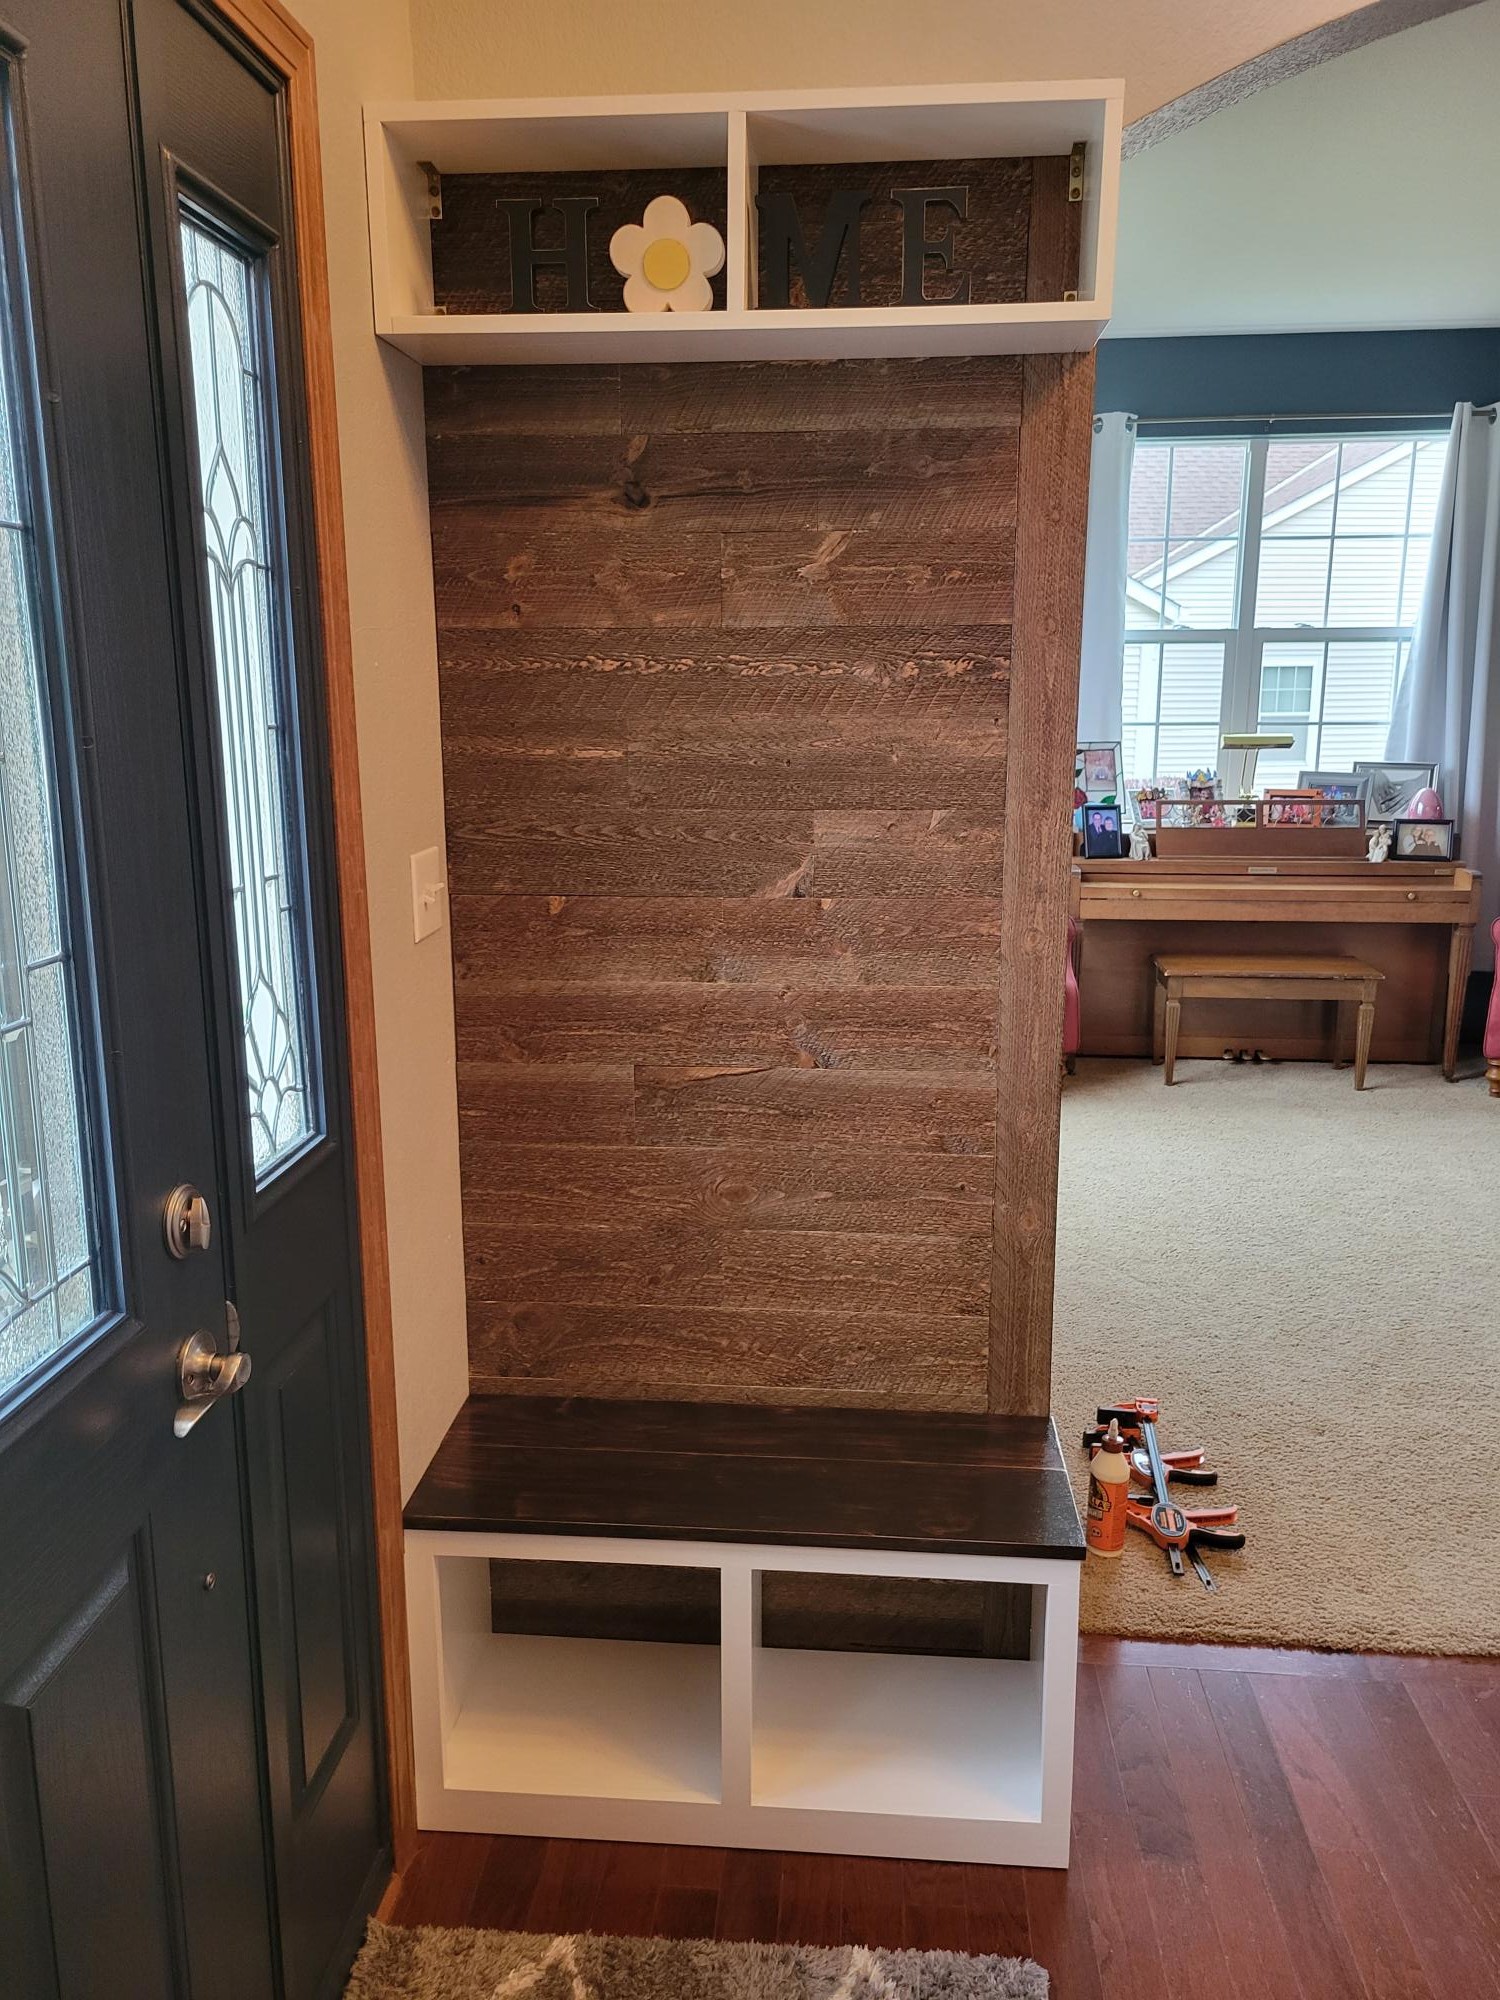
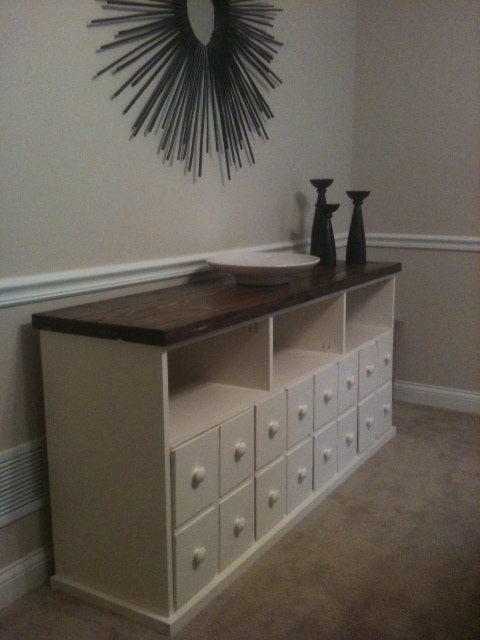
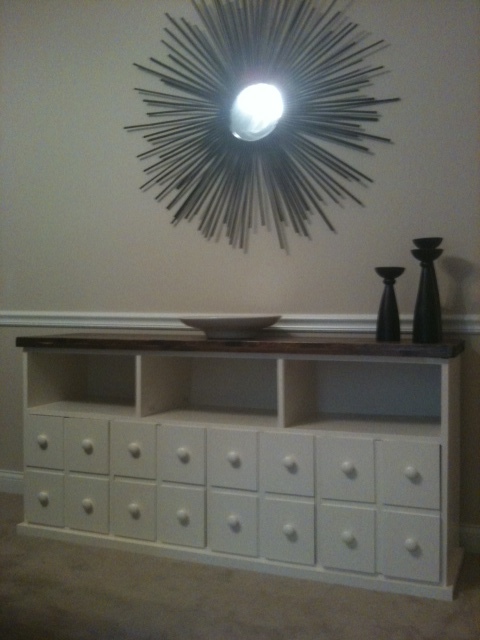
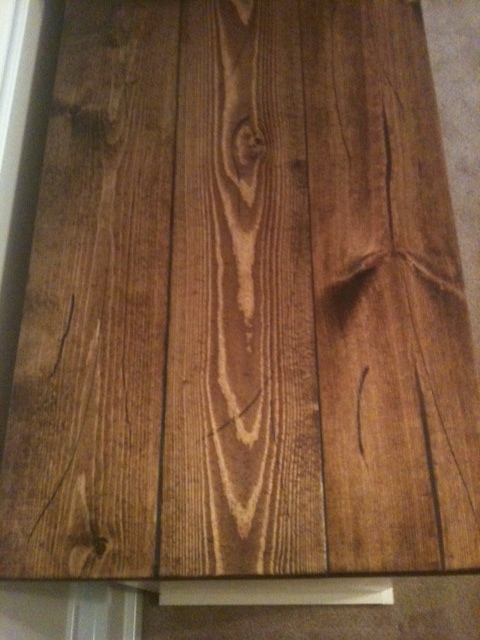
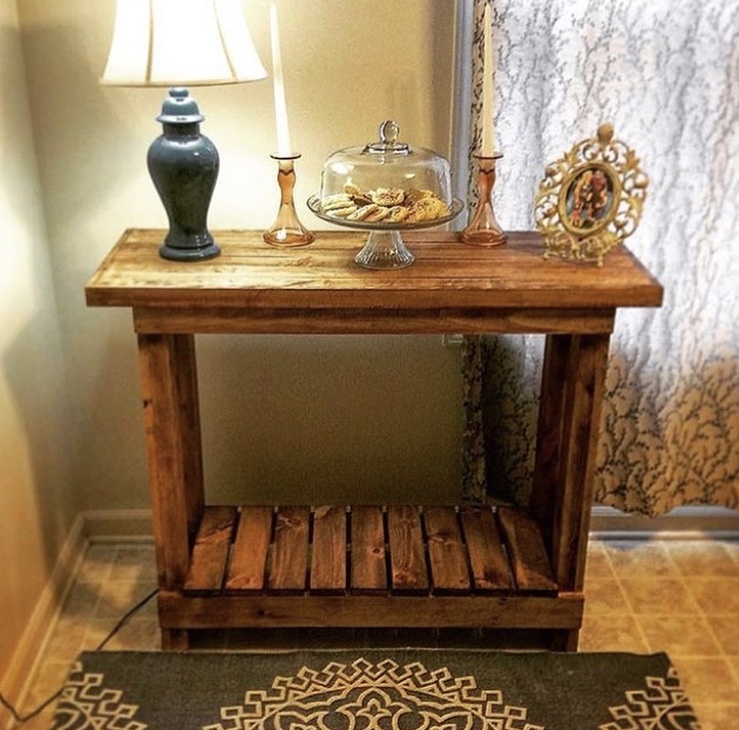
My modified simple, cheap, and easy console
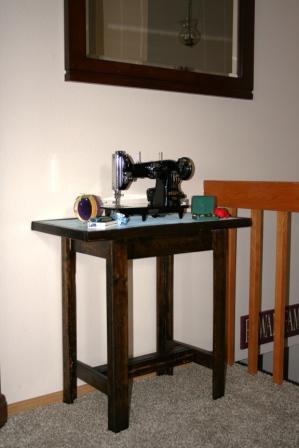
I wanted a simple table to highlight this retro sewing machine I inherited from my grandma. I had to modify a few of the dimensions of this table and add a different trim up top, but I really like the results!

Built from Plan(s)
Estimated Cost
FREE (used leftover boards/paint from a different project)
Estimated Time Investment
Afternoon Project (3-6 Hours)
Finish Used
2 coats of Minwax Dark Walnut stain
1 distressed coat of Valspar Sea Breeze, semi-gloss
1 coat of Minwax Polyurethane finish, satin
1 distressed coat of Valspar Sea Breeze, semi-gloss
1 coat of Minwax Polyurethane finish, satin
Recommended Skill Level
Beginner
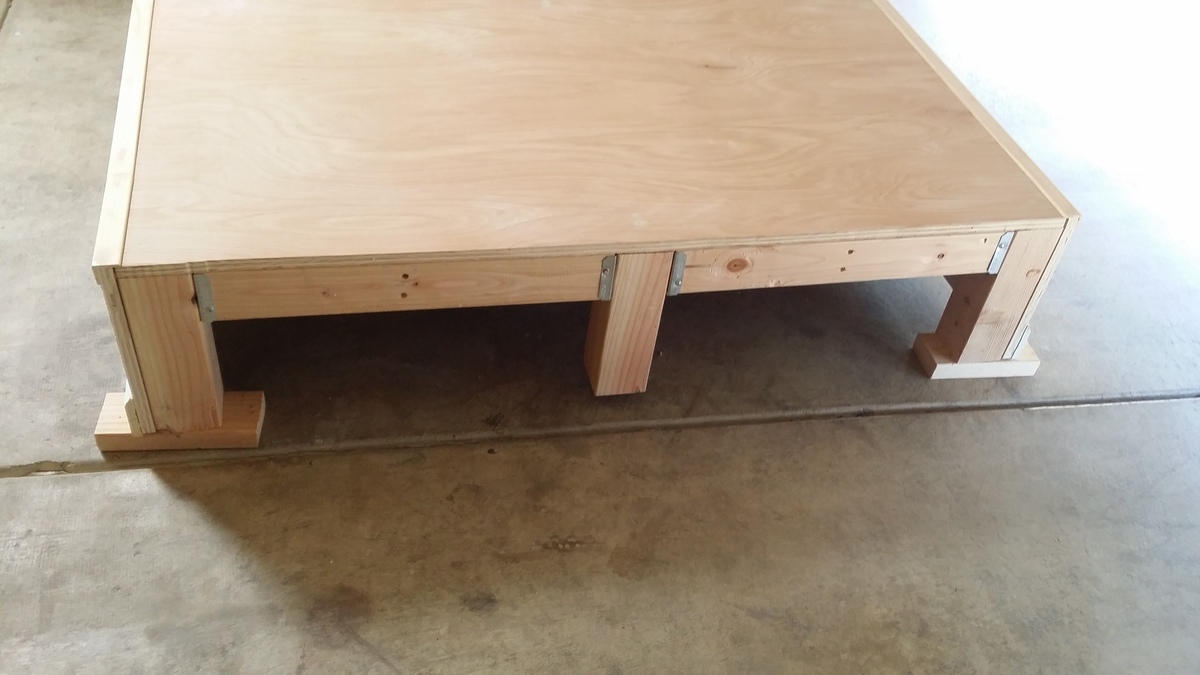
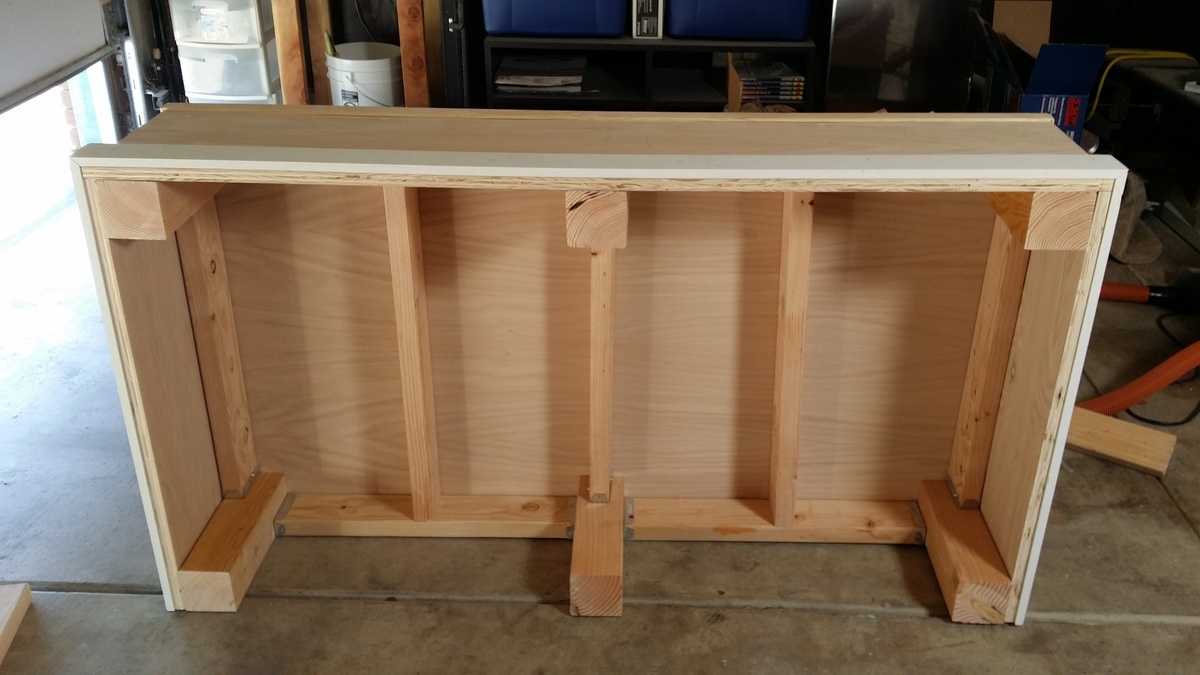
Elijah's Washer & Dryer Pedestal
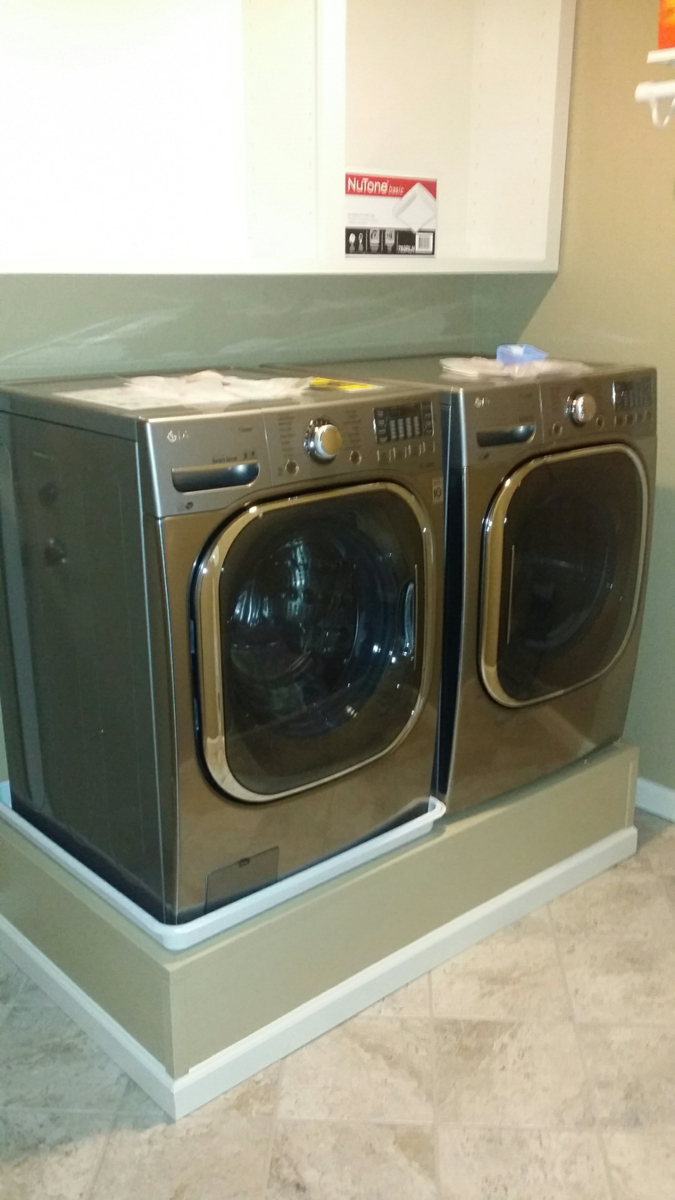
I got this Idea from Sausha's washer dryer pedestal post. Before then i didnt know people even built pedestals for their washer and dryer. Just purchased new front load washer and dryer and they wanted 250 bucks extra for each pedestal. That is 500 bucks and is absolutely rediculous. So i opted out of those and thought to myself maybe I can build something instead. So I began my search online and stumbled across this post which seems to be the most popular pedestal build on the web. I think sausha's build is fantastic and absolutely beautiful though I went another way with mine.
I tend to like to overbuild things. Especially in this case, seeing as the washer weighs a beastly 200 pounds by itself. I figured with clothes and water it would be about 235 pounds just for the washer. I noticed that with the aluminum drawer pedestals that you can purchse with the washer and dryer the support is only where the legs from the washer and dryer will sit. That was all I needed to get on my way. Purchased some regular old douglas fir 2x4's, 4x4's, and a 4'x8' sheet of 3/4 inch plywood. I opted to use fence post brackets to tie everything together because I didnt feel like driller pocket holes in each 2x4 when you were not going to see them once its all said and done. The fence brackets are not structural so they lack ridgidity untill you tie everything together with the legs, slats, and top. Cut the top from the 3/4 plywood sheet and used the left over plywood to cover the front and the sides. I left the back open as it is not seen anyway.
Total size of the pedestal is 56" wide x 31" deep x 12 3/4 inches tall, but you can build it as wide, deep or as tall as you need it. When i was done putting it together. I tested it by jumping up and down on it and I weigh 230 pounds. So this thing is quite strong. I finished it up by covering the edges where the plywood meet with Edge moulding and the bottom with baseboard to match my laundry room. I used Behr premium plus ultra paint on most of it and, behr alkyd paint for the baseboards. Gave the top a couple coats of General Finishes High Performance Polyurethane. Which isnt neccessary but I opted to do so because of the weight of the washer and dryer and the General Finishes High performance dries harder than most other polys that I have used. I only used it on the top though.
Taking into account that I used the paint and baseboards left over from renovating my laundry room. This project cost about 150 bucks. 200 if you have to purchase the paint and moulding. Quite easy to do and though I made the cutes I needed with my table saw. This can be done with a circular saw and a drill. No exotic tools are needed. Will post finished pictures when my washing machine and dryer are delivered on friday and they are sitting on top of the pedestal.
Built from Plan(s)
Estimated Cost
150 give or take a few bucks.
Estimated Time Investment
Day Project (6-9 Hours)
Finish Used
Paint
Polyurethane
Polyurethane
Recommended Skill Level
Beginner
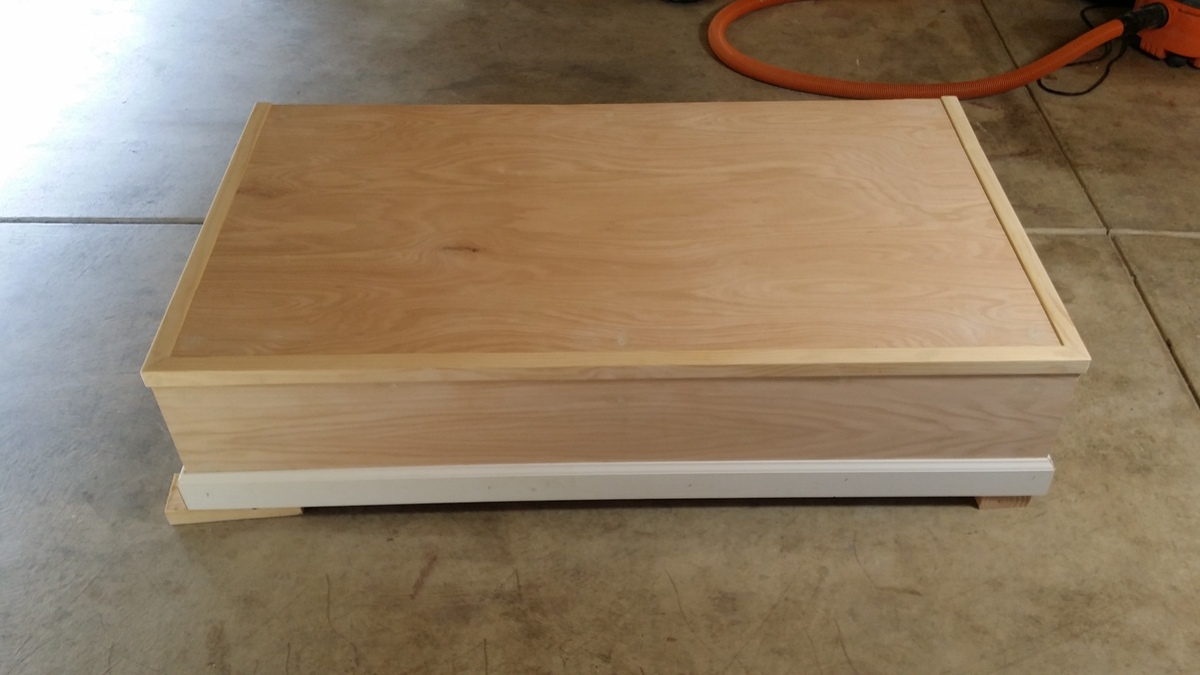
Poplar toy chest
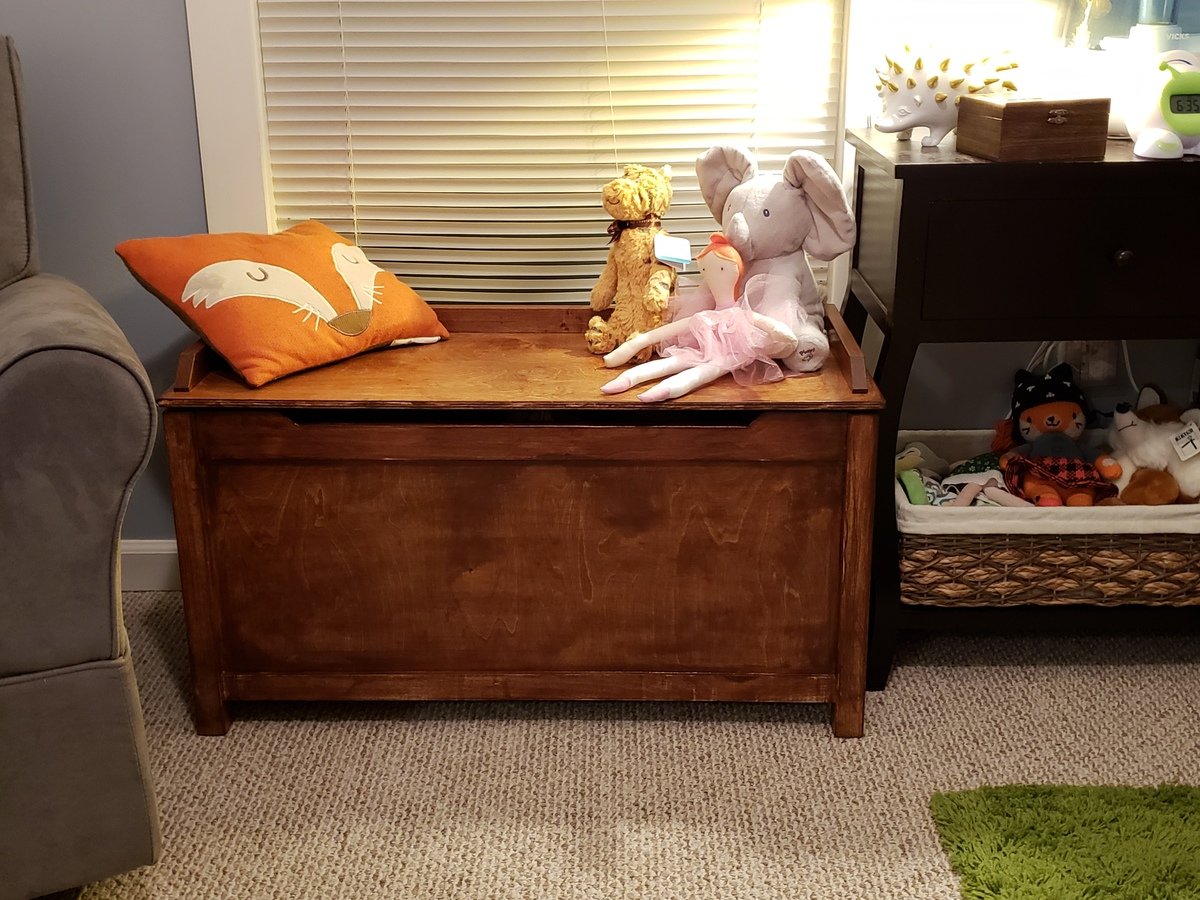
Toy chest for our daughter.
Comments

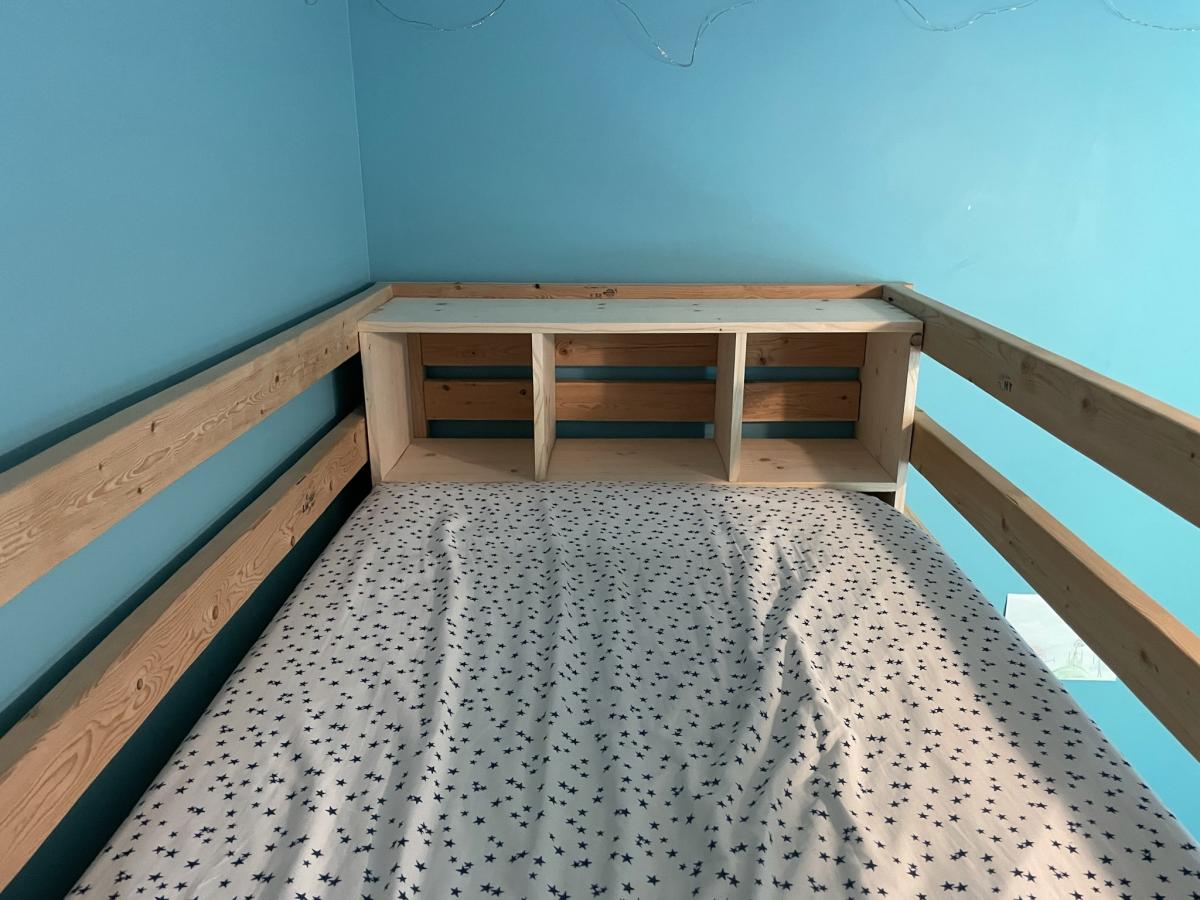
Loft bed

I used the Camp Loft Bed plans and adapted the stairs to have storage and a place for laundry (from another plan from Ana White). I also added a small bookshelf to one end. They wanted the bed to extend to the full width of the wall. The bookshelf helps hold the mattress in place and also gives great storage for books and stuffed animals. I wish I had a pic of the bed completely painted, but as you can see, my granddaughter moved her stuff in immediately! She was so excited to sleep up there. (It has since been completely painted.)
Built from Plan(s)
Comments
My Apothecary Cabinet
I have always loved apothecary consoles! Then my grandmother gave me her huge collection of pottery, which I have admired since I was a kid. I had nowhere to put it, so it was a perfect excuse to build this.
I used MDF for the cabinet and pine for the top. I did a thick top, I stacked two 1x6s on top of each other, giving me 1.5" thick top. I also distressed in and filled in with Ebony Wood filler. I absolutely love how it turned out. I hadn't used pine before, I always use poplar. This project made me love pine!
I modified the plan slightly...I made 4 doors instead of drawers. I also made the top cubbies 2" taller, just to add extra height. I still need baskets for the cubbies, though!
Built from Plan(s)
Estimated Cost
$180
Estimated Time Investment
Weekend Project (10-20 Hours)
Finish Used
For the top, I used Minwax stain in Provincial. I then distressed it with a screwdriver and filled in the scratches with ebony wood filler. I did two coats of wipe on poly on top, sanding between coats. For the base, I used Vaslpar kitchen and bath paint, can't remember exact color.
Recommended Skill Level
Beginner
Comments
Fri, 08/26/2011 - 08:29
Beautiful
You did an amazing job! This piece has been on my to-do list for awhile now. I think that's the beauty of Ana's site, seeing the wonderful finished projects of other amateur builders gives us all the confidence to tackle things we'd never otherwise dare. I hope when I finally get around to building this, it will turn out as lovely as yours has, thanks for sharing.
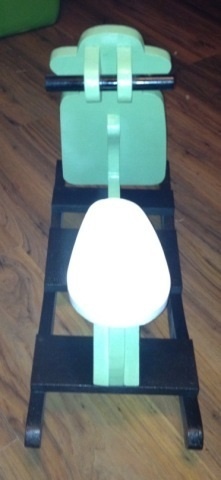
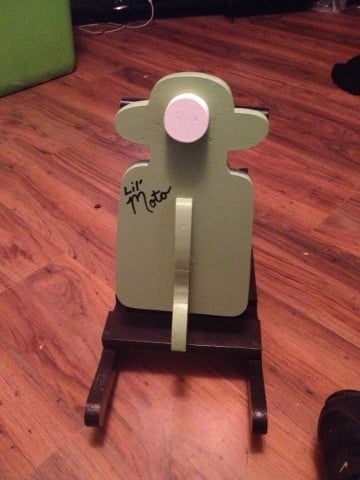
My creation

I've built 6 of these so far. They are fun to build. The # 1 request is for one that is bigger so I'm working on that next. A couple of things I changed iS the dowel rod from 1/2" to 7/8" and the body I thought wasn't rigid enough being cut from 1"x 10"x 10' and there wasn't sufficient room for screws and glue so I'm now using 2"x10"x10" it's working a lot better and is a lot more sturdy and easier to assemble. Another thing I have done is once assembled the the plans is I transcribed them to rigid cardboard so can use them over and over cuts the time down considerably. I'll post more pictures soon. I have named mine Lil' Moto
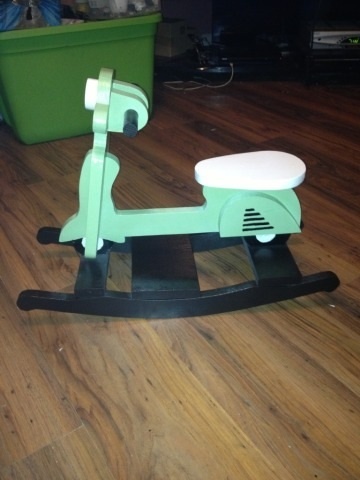
Built from Plan(s)
Estimated Cost
$12
Estimated Time Investment
Week Long Project (20 Hours or More)
Finish Used
I don't have a set plan for painting or a specialized finish. I just use what I have on hand or goto my local habitat for humanity repurpose store and pick up paint and stain for next to nothing. Also if you want a specialized color just go to Lowe's or Home Depot and pick out the cold you are looking for and just get sample jar for a couple of bucks it's enough to paint the whole ( at least it has been for me)
Recommended Skill Level
Beginner
Comments
X coffee table
Ran on the wood through planer to get rid of that rounded edge stud look on the wood. Fun little project.
Estimated Cost
$55
Estimated Time Investment
Afternoon Project (3-6 Hours)
Finish Used
Behr white veil base with gray paint brushed to distress on base. Miniwax jacobean with semi gloss waterbase on top
Recommended Skill Level
Intermediate
Shoe crates

We desperately needed something next to the door to put shoes in. I didn't quite yet have the courage to attempt the shoe dresser (http://ana-white.com/2011/01/shoe-dresser) and there are lots of scraps in our shop from my husbands projects. I tried these crates out and they were super easy and super fast to throw together during nap time. I primed and painted because I used plywood instead of 1x12.


Built from Plan(s)
Estimated Cost
FREE!!!!!
Estimated Time Investment
An Hour or Two (0-2 Hours)
Finish Used
primed and painted with left over paint we had from misc. projects.
Recommended Skill Level
Starter Project
Comments
Fri, 09/09/2011 - 08:54
I loved the vintage crate
I loved the vintage crate plans but hadn't thought of a good use. We have a shoe problem in our house too. With 3 kids, they all get mixed up and it drives me crazy! We've tried an over the door shoe organizer; but that hasn't been especially helpful because the 2 youngest would need a stool to reach anything about the bottom 2 rows. I think I just found my weekend project - one for them each in a different color should do the trick. Thanks for sharing
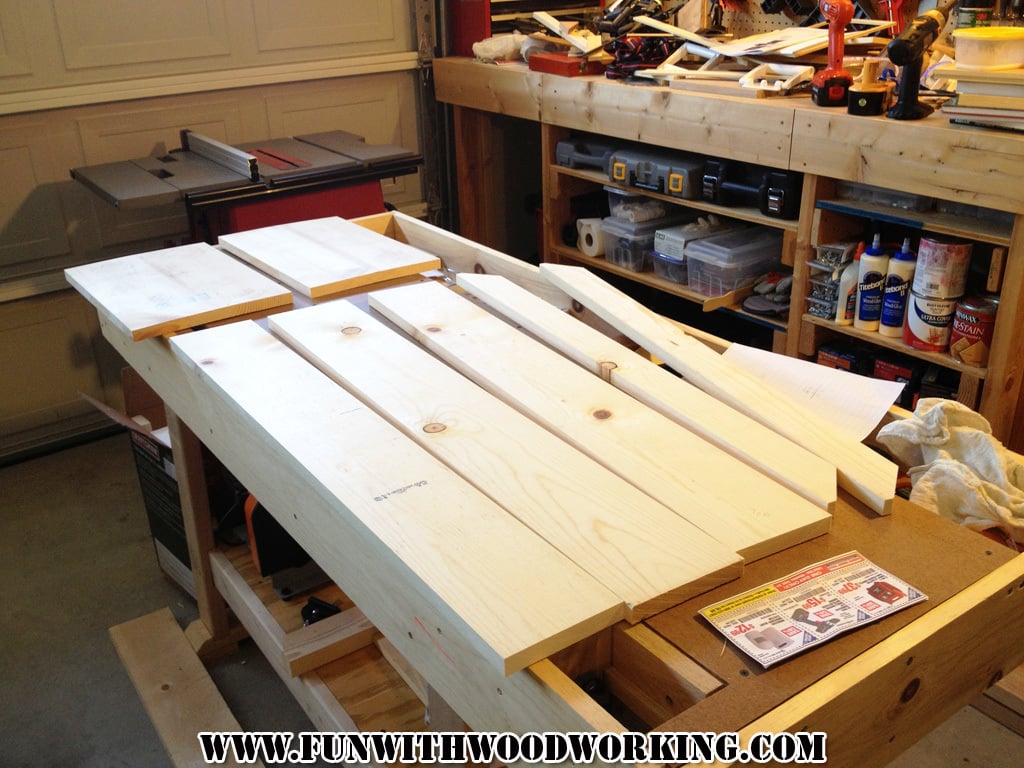
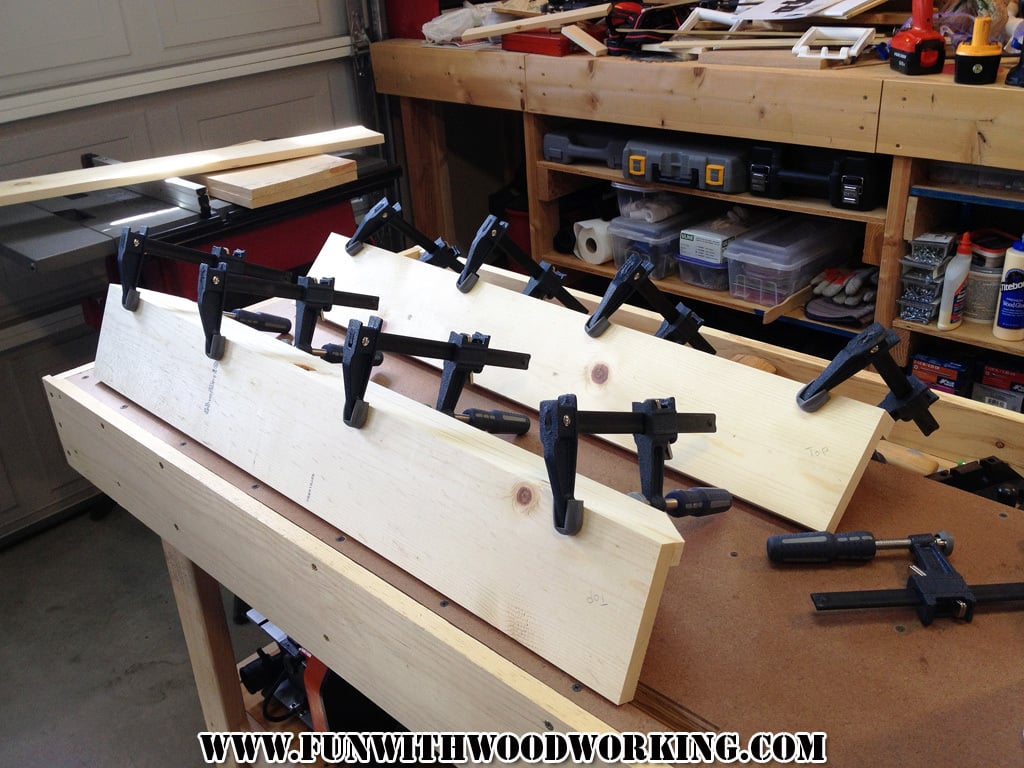
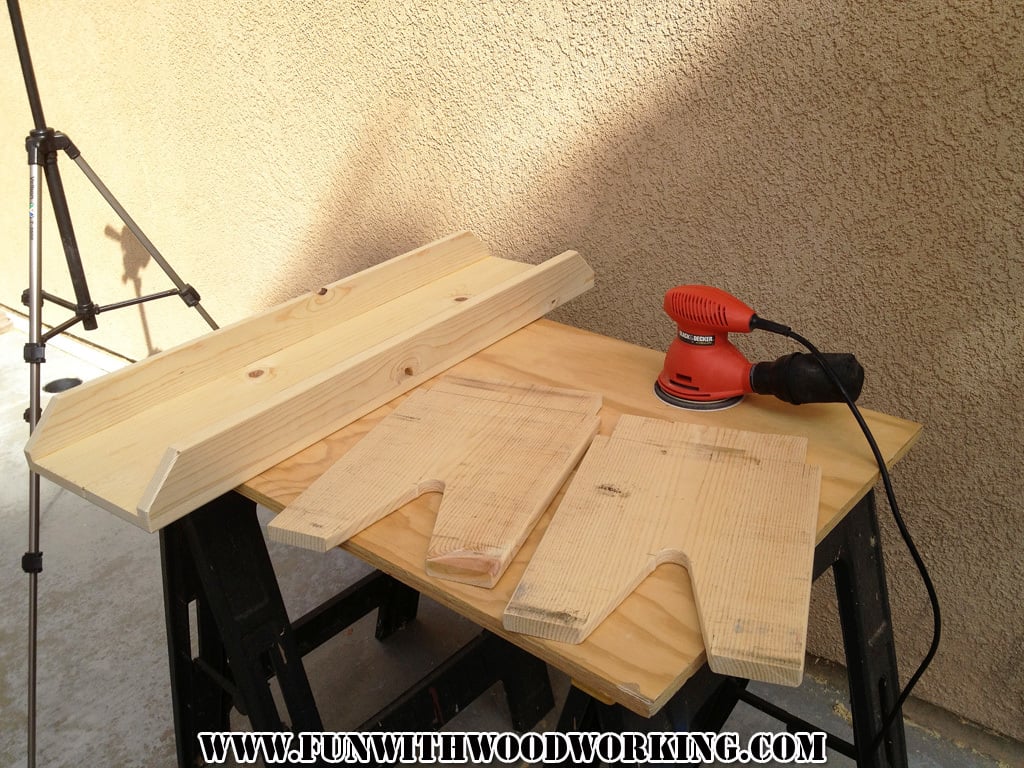
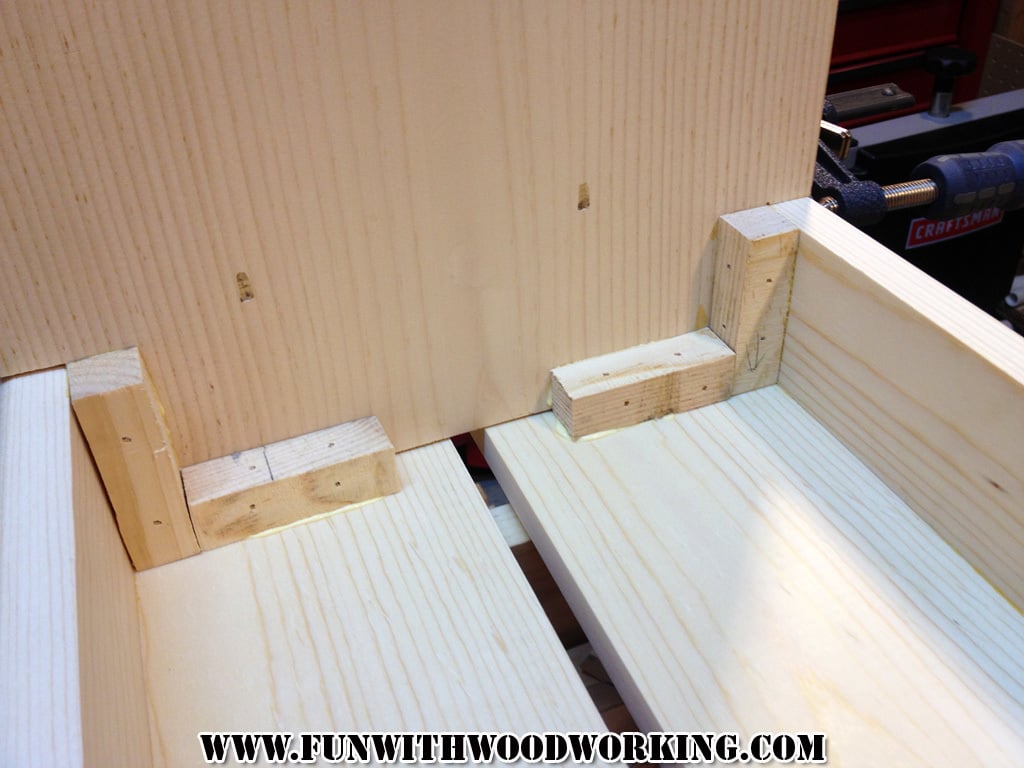
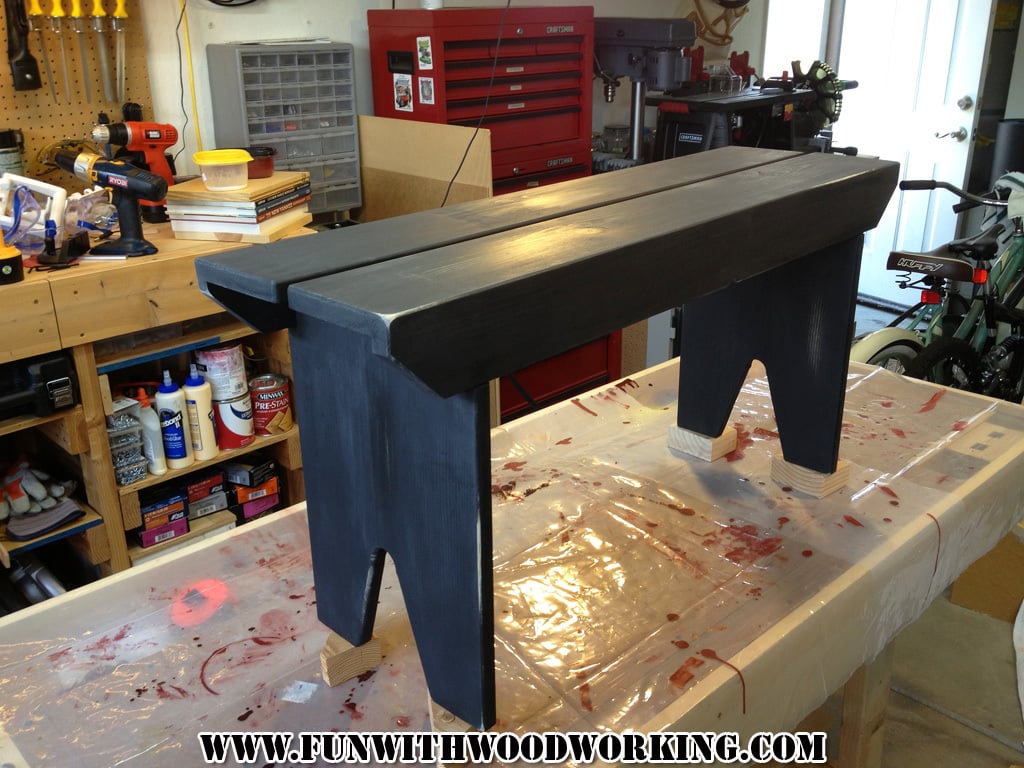
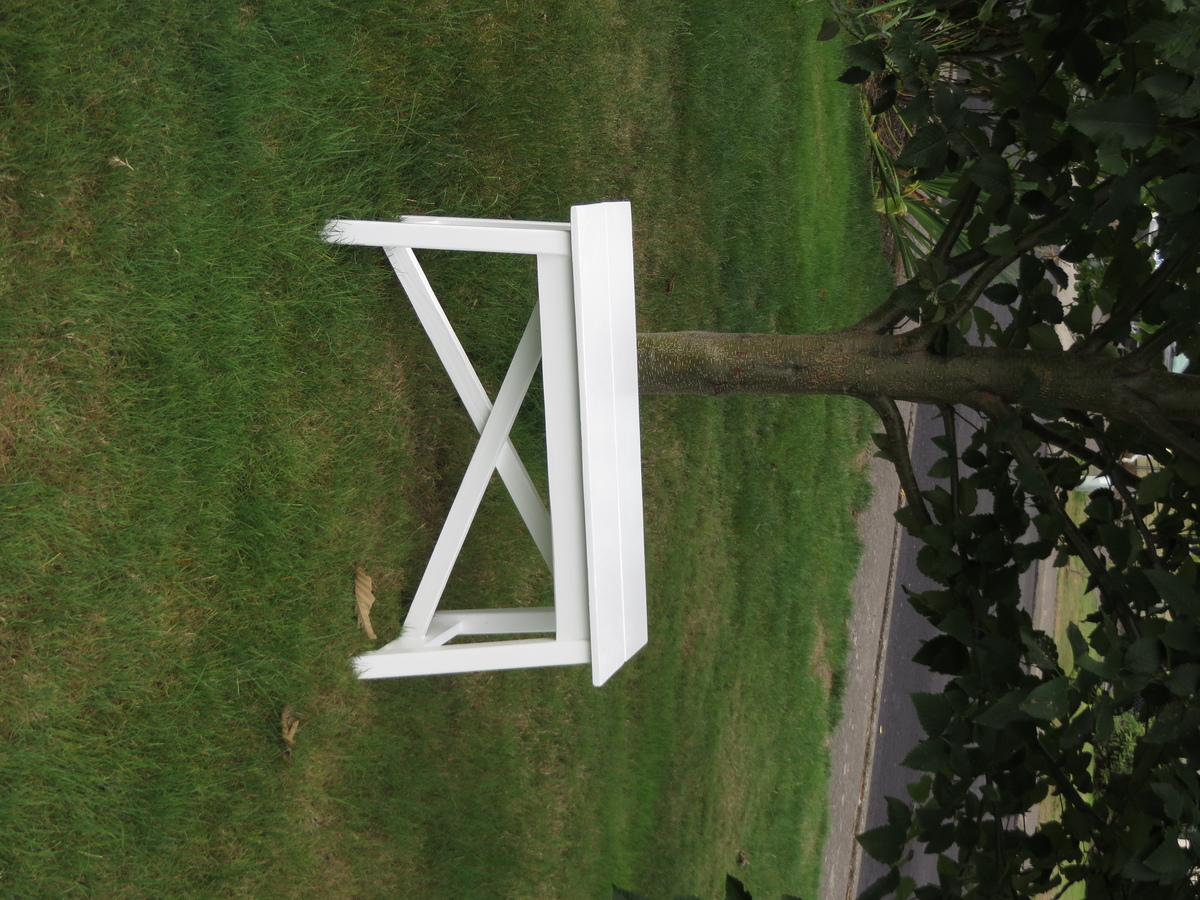
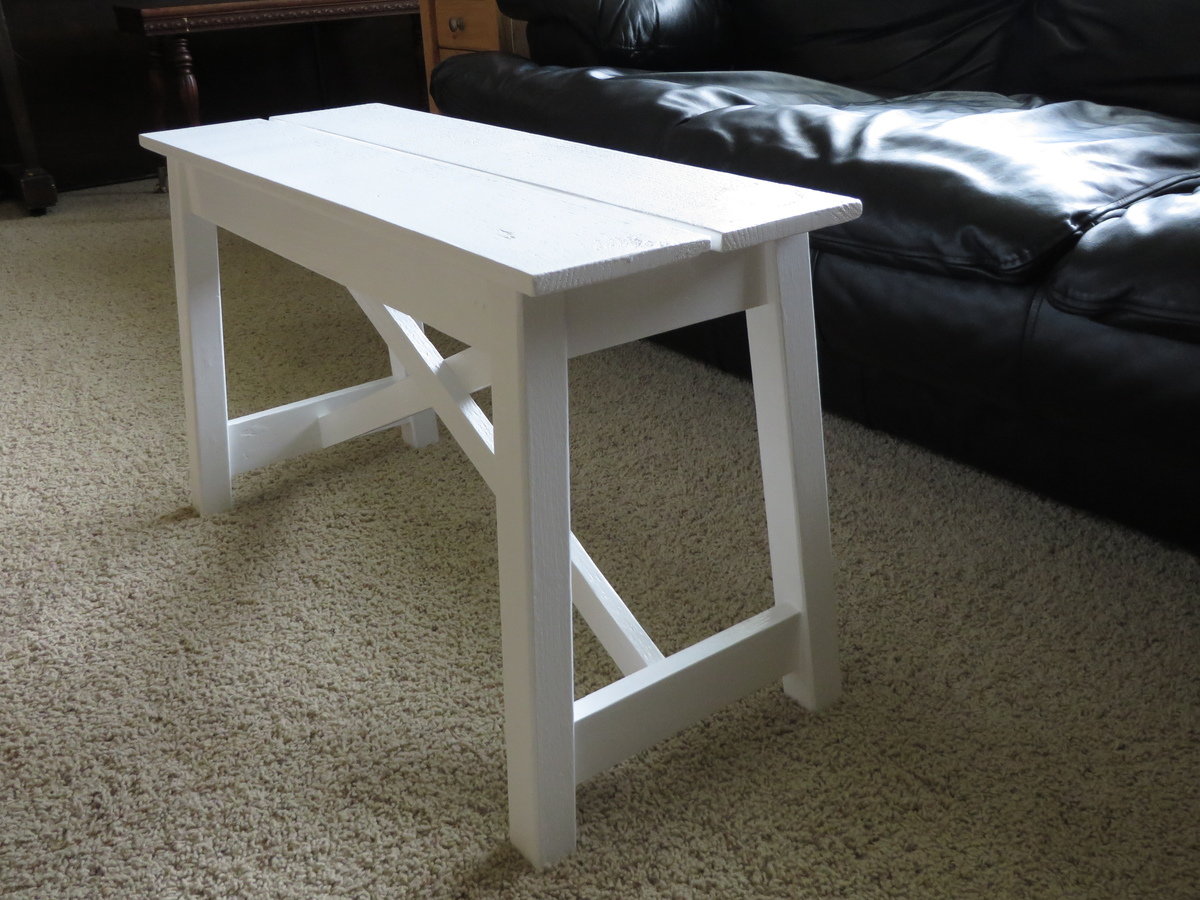
5 Board Bench
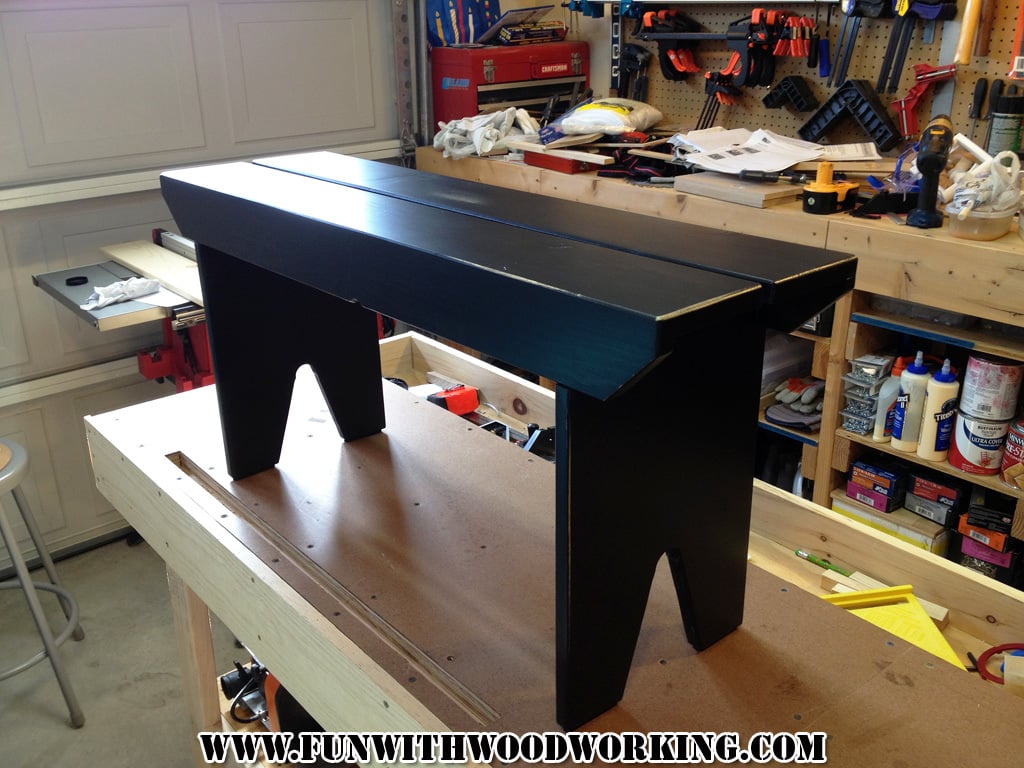
I was looking for a plan for a 5 board bench so naturally I came to your site. I made your basic design but made it a little bit smaller in all dimensions and I put a half inch split down the middle of the top. I built it out of pine and painted it flat black. I gave the legs and underneath 3 coats of satin polyurethane and the top and sides received 5.
You can follow the build on my blog at :
http://funwithwoodworkingtoo.blogspot.com/2013/09/project-how-to-build-…
You can also watch a video of the build on my YouTube page at:
http://youtu.be/1_hz2n7v9ss
Thanks for the free plans!
Estimated Time Investment
Day Project (6-9 Hours)
Finish Used
MINWAX water based satin polyurethane
Recommended Skill Level
Beginner
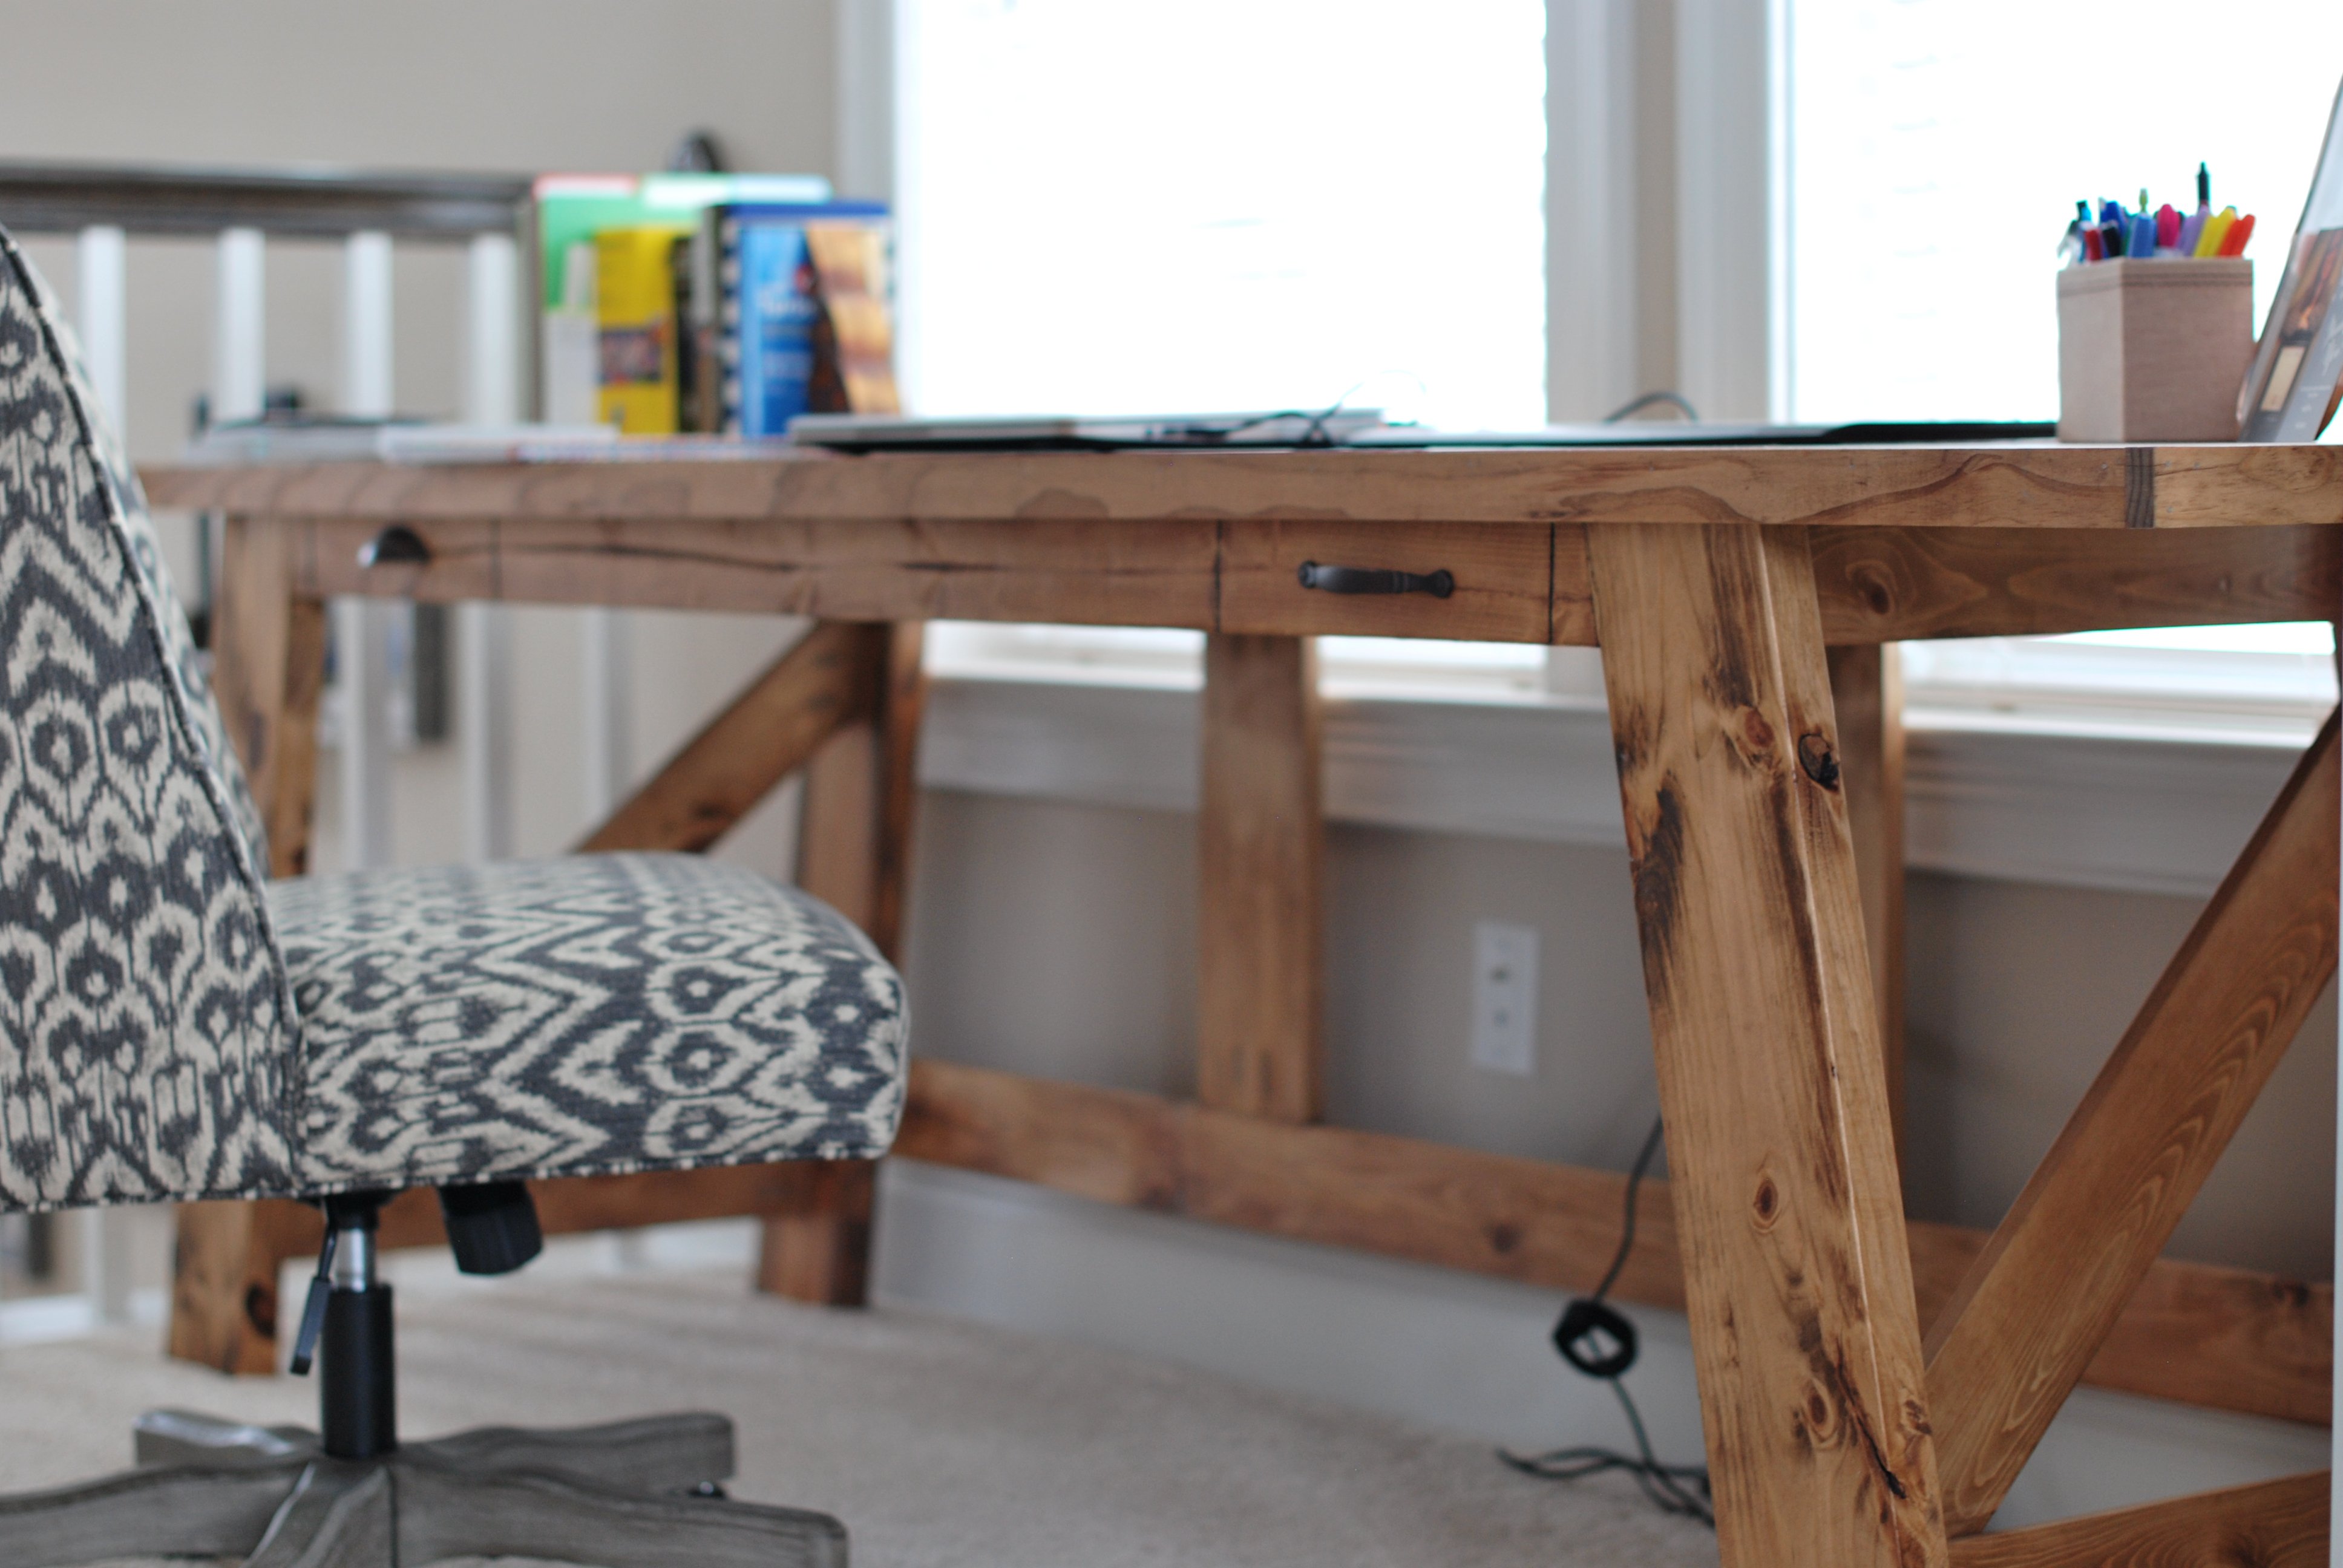
Modified Henry Desk
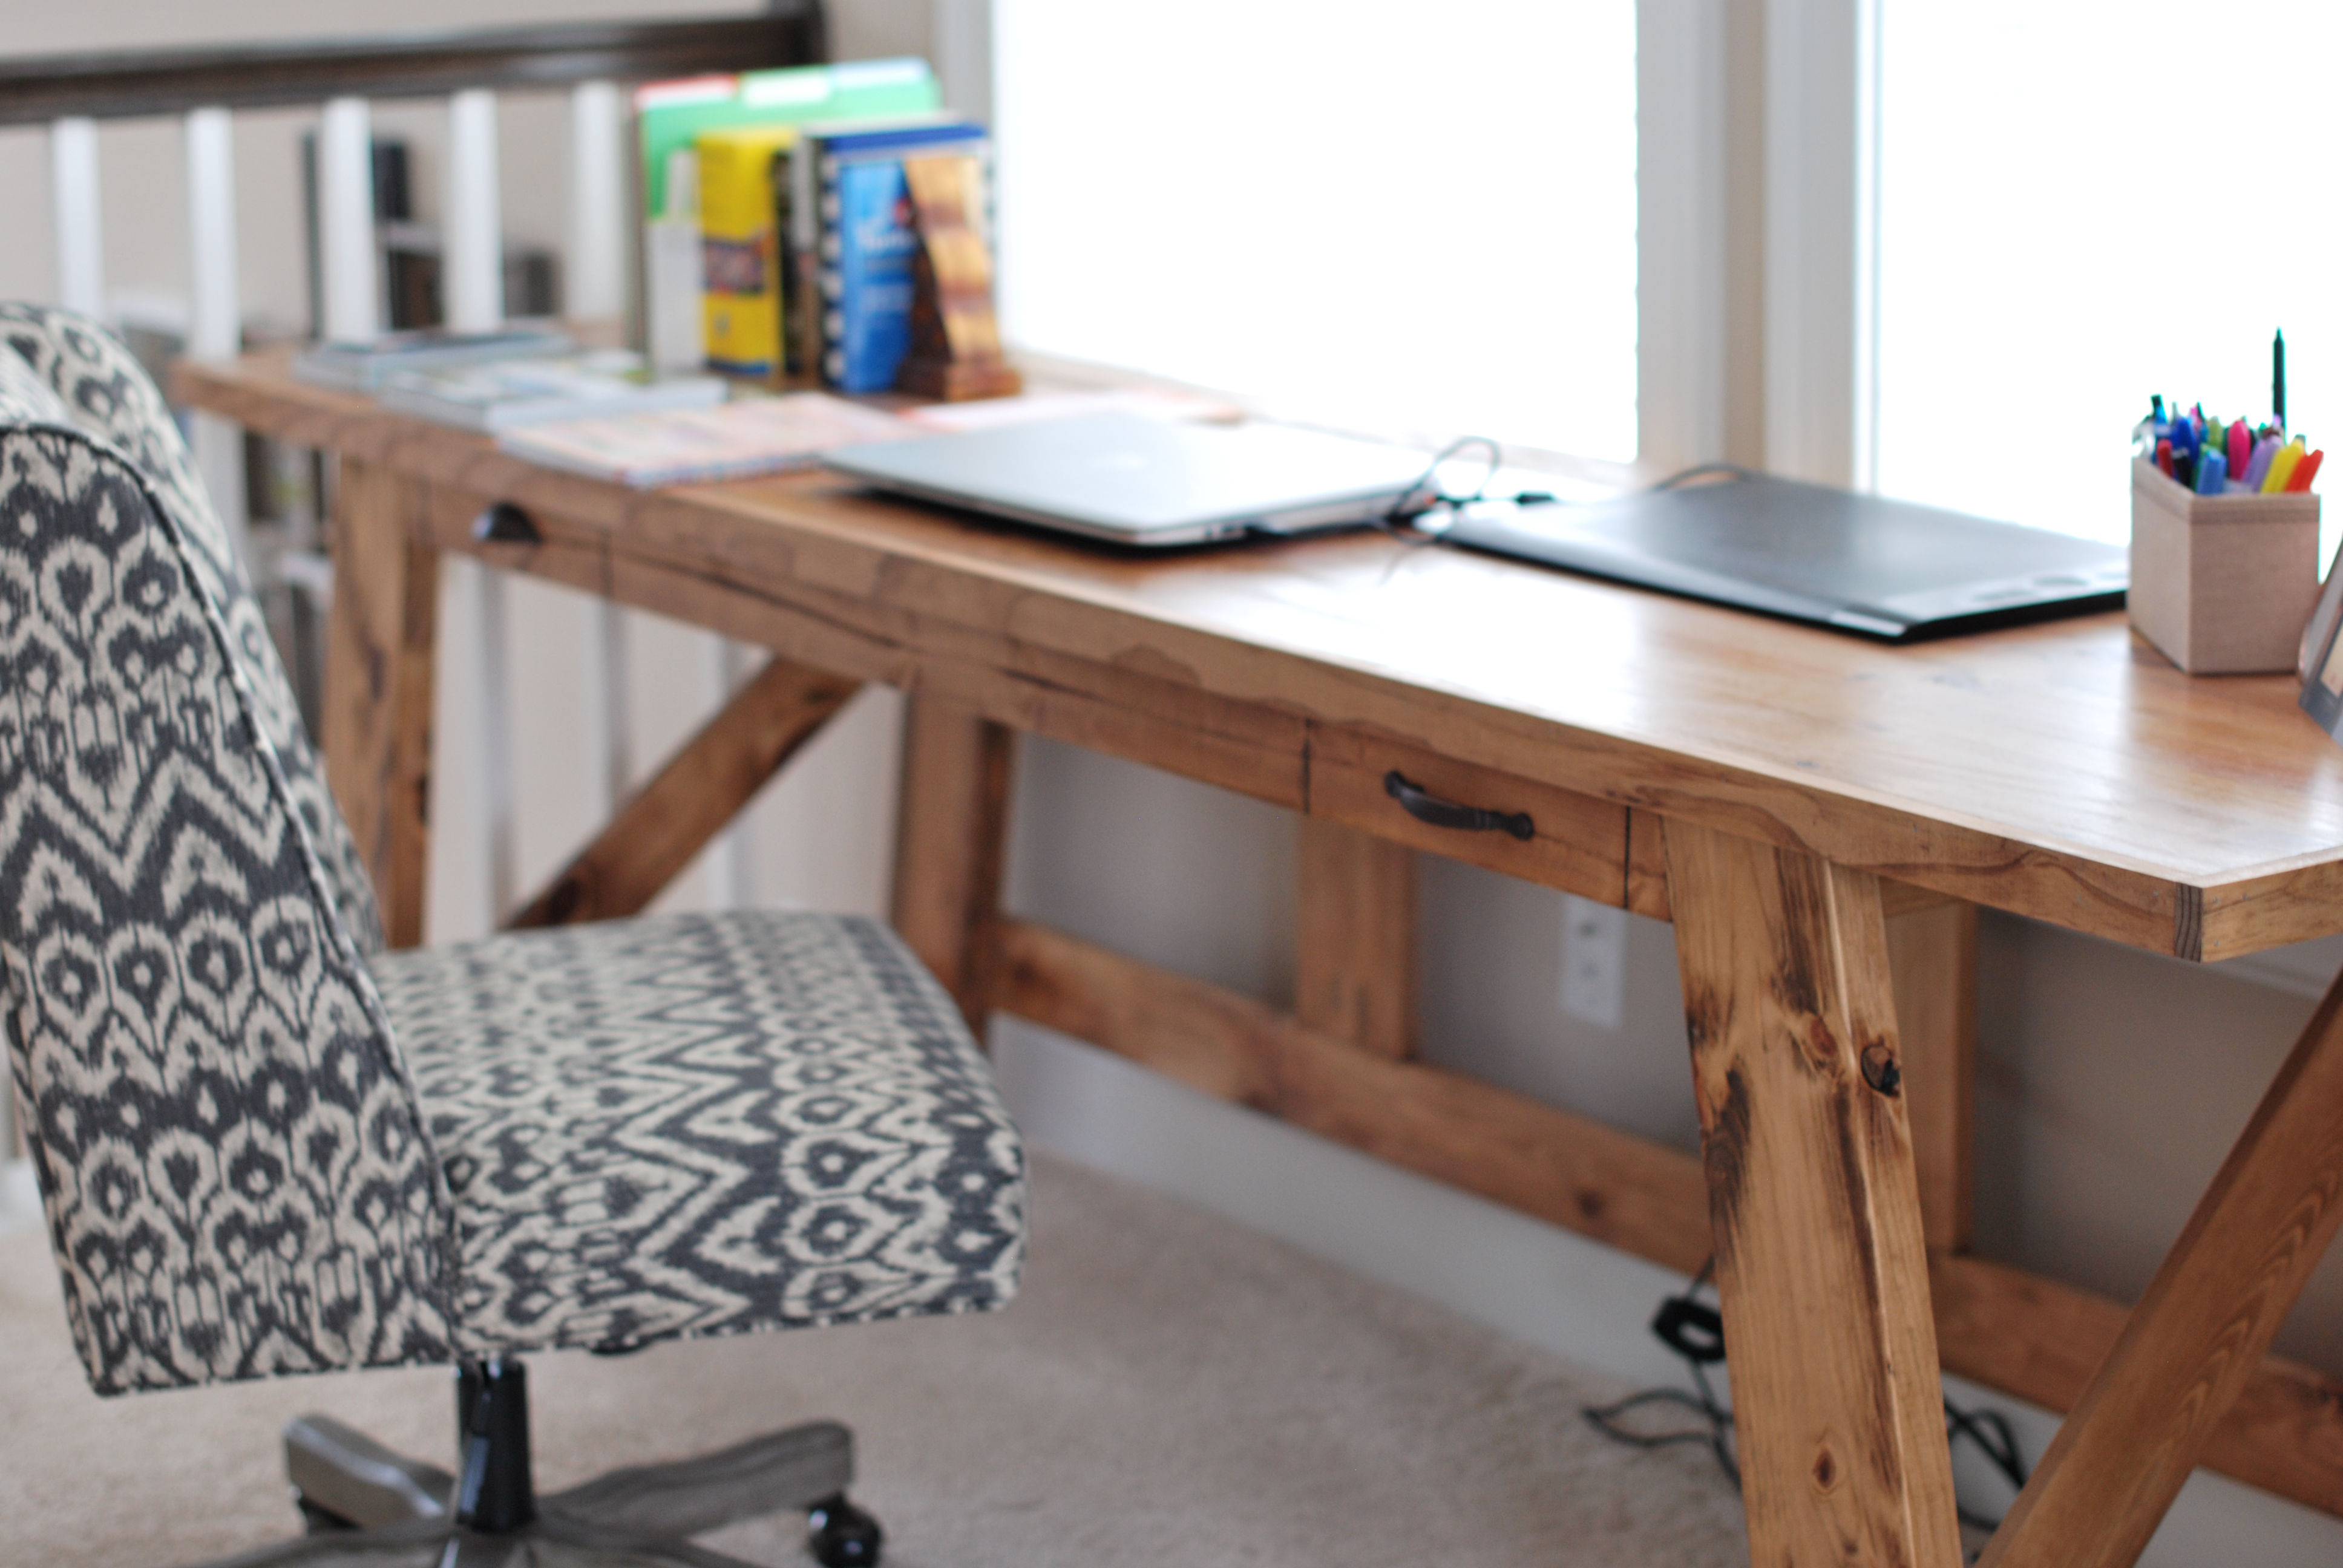
I build this desk from Ana White's Pottery Barn inspired Henry desk plan. I modified it a little in that I made the top almost 8 feet long to fit my space.
Built from Plan(s)
Estimated Time Investment
Weekend Project (10-20 Hours)
Finish Used
The stain is Minwax Early American
Recommended Skill Level
Beginner
Comments

Mon, 11/23/2015 - 19:09
The finish looks gorgeous. I
The finish looks gorgeous. I love the look, and beautiful photography!

In reply to The finish looks gorgeous. I by handmadewithash
Wed, 11/25/2015 - 16:25
Thank you, Ashley!
Thank you, Ashley! ![]()

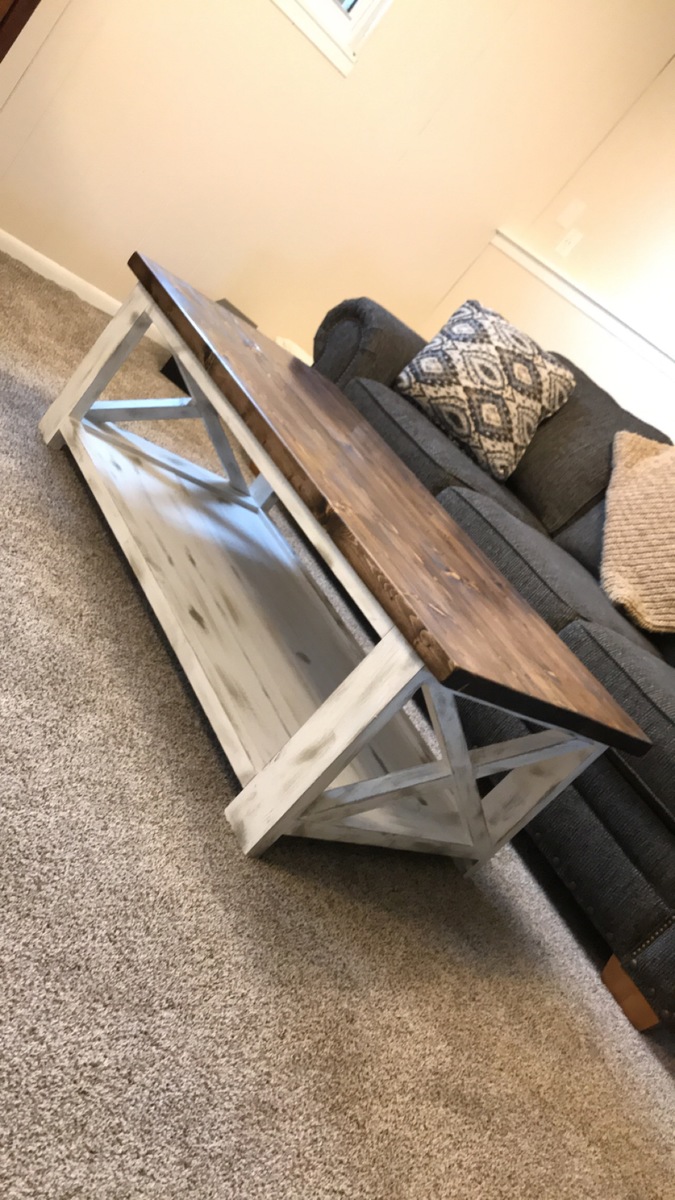
Farmhouse Coffee table
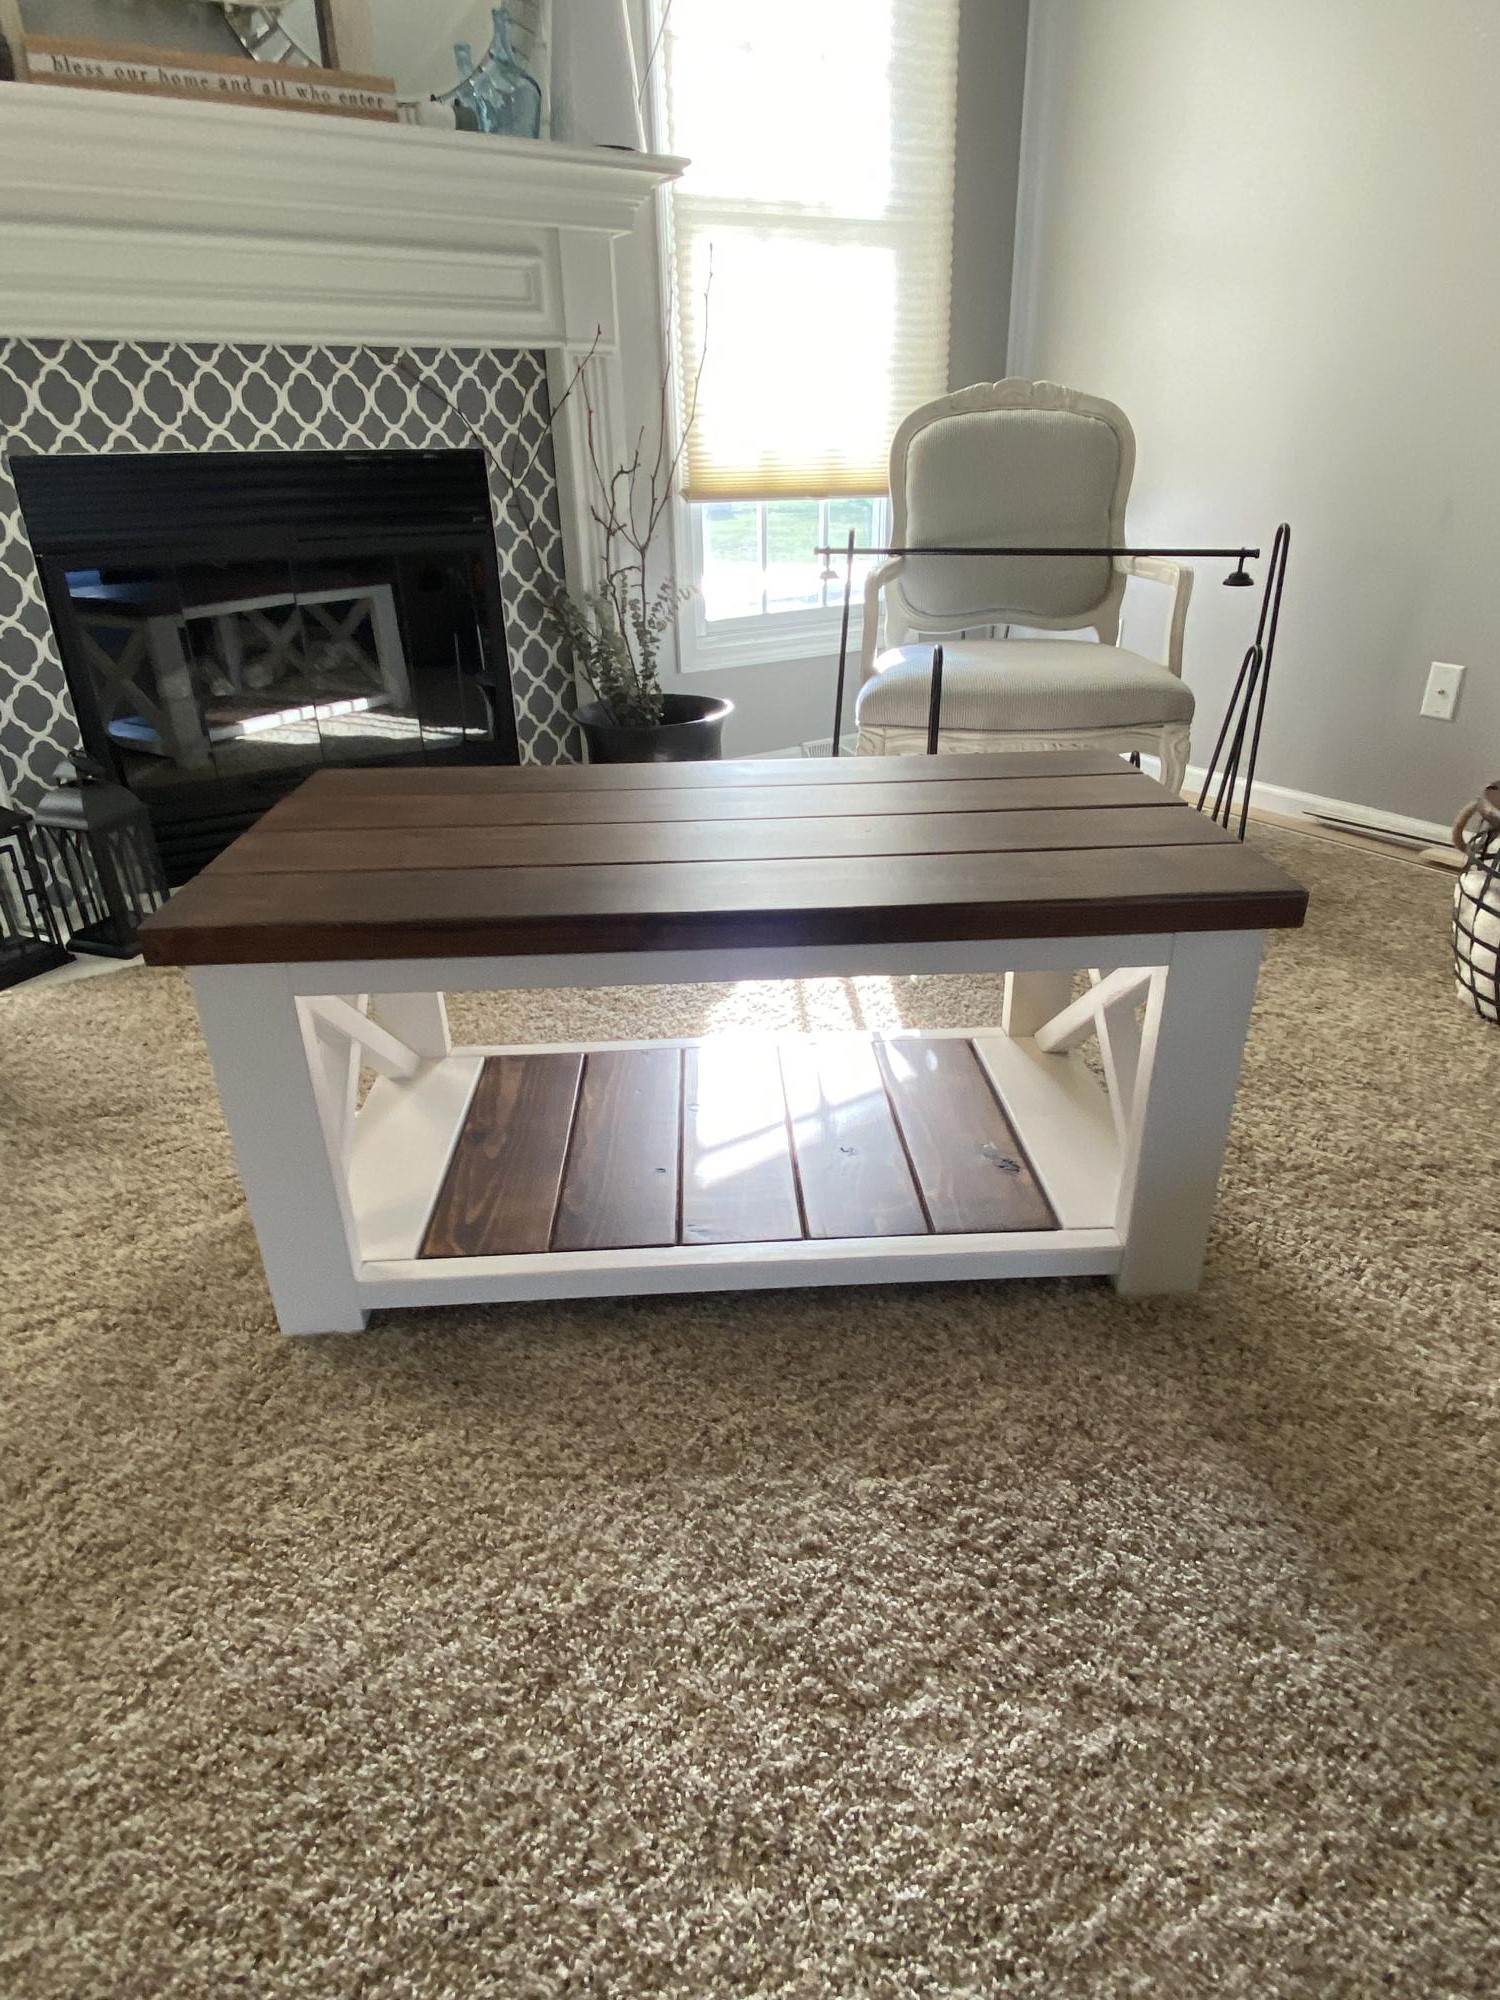
Ana, thank you so much for all your beginning wood working plans. My husband and I worked together to do this farmhouse coffee table for our daughter-in-law Danielle and she loved it.
Comments
Thu, 10/27/2022 - 09:58
Wonderful gift!
This is beautiful, you both did a fantastic job! Thank you for sharing.
Reclaimed Wood Night Stand
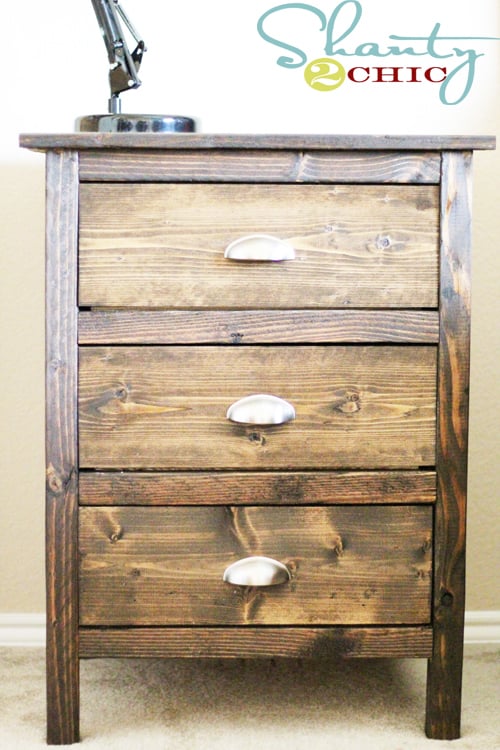
Love these night stands! I spent $40 on lumber for two night stands and $30 on the hardware! You can see more pics of my finished night stands at www.shanty-2-chic.com
Built from Plan(s)
Estimated Cost
$50 - $70
Estimated Time Investment
Day Project (6-9 Hours)
Finish Used
Minwax Dark Walnut Stain and Minwax Polycrylic
Recommended Skill Level
Intermediate
Comments
Mon, 08/29/2011 - 20:10
Love the handles
We made two of these same night stands earlier this month. I haven't taken a good enough picture to post on here. I need to do that. Great job!
Wed, 09/28/2011 - 22:17
This is wonderful. I'm
This is wonderful. I'm looking for something similar to build in the next couple weeks. Could you share the plans for it please?
Mon, 05/28/2012 - 06:25
My hubby made these for my
My hubby made these for my daughter and they turned out awesome.So now I have to have them too. He is working on them now, but we are making them out of some oak we already had. Can't wait. Now I need a matching headboard!! Looking for plans...
Rustic Bench
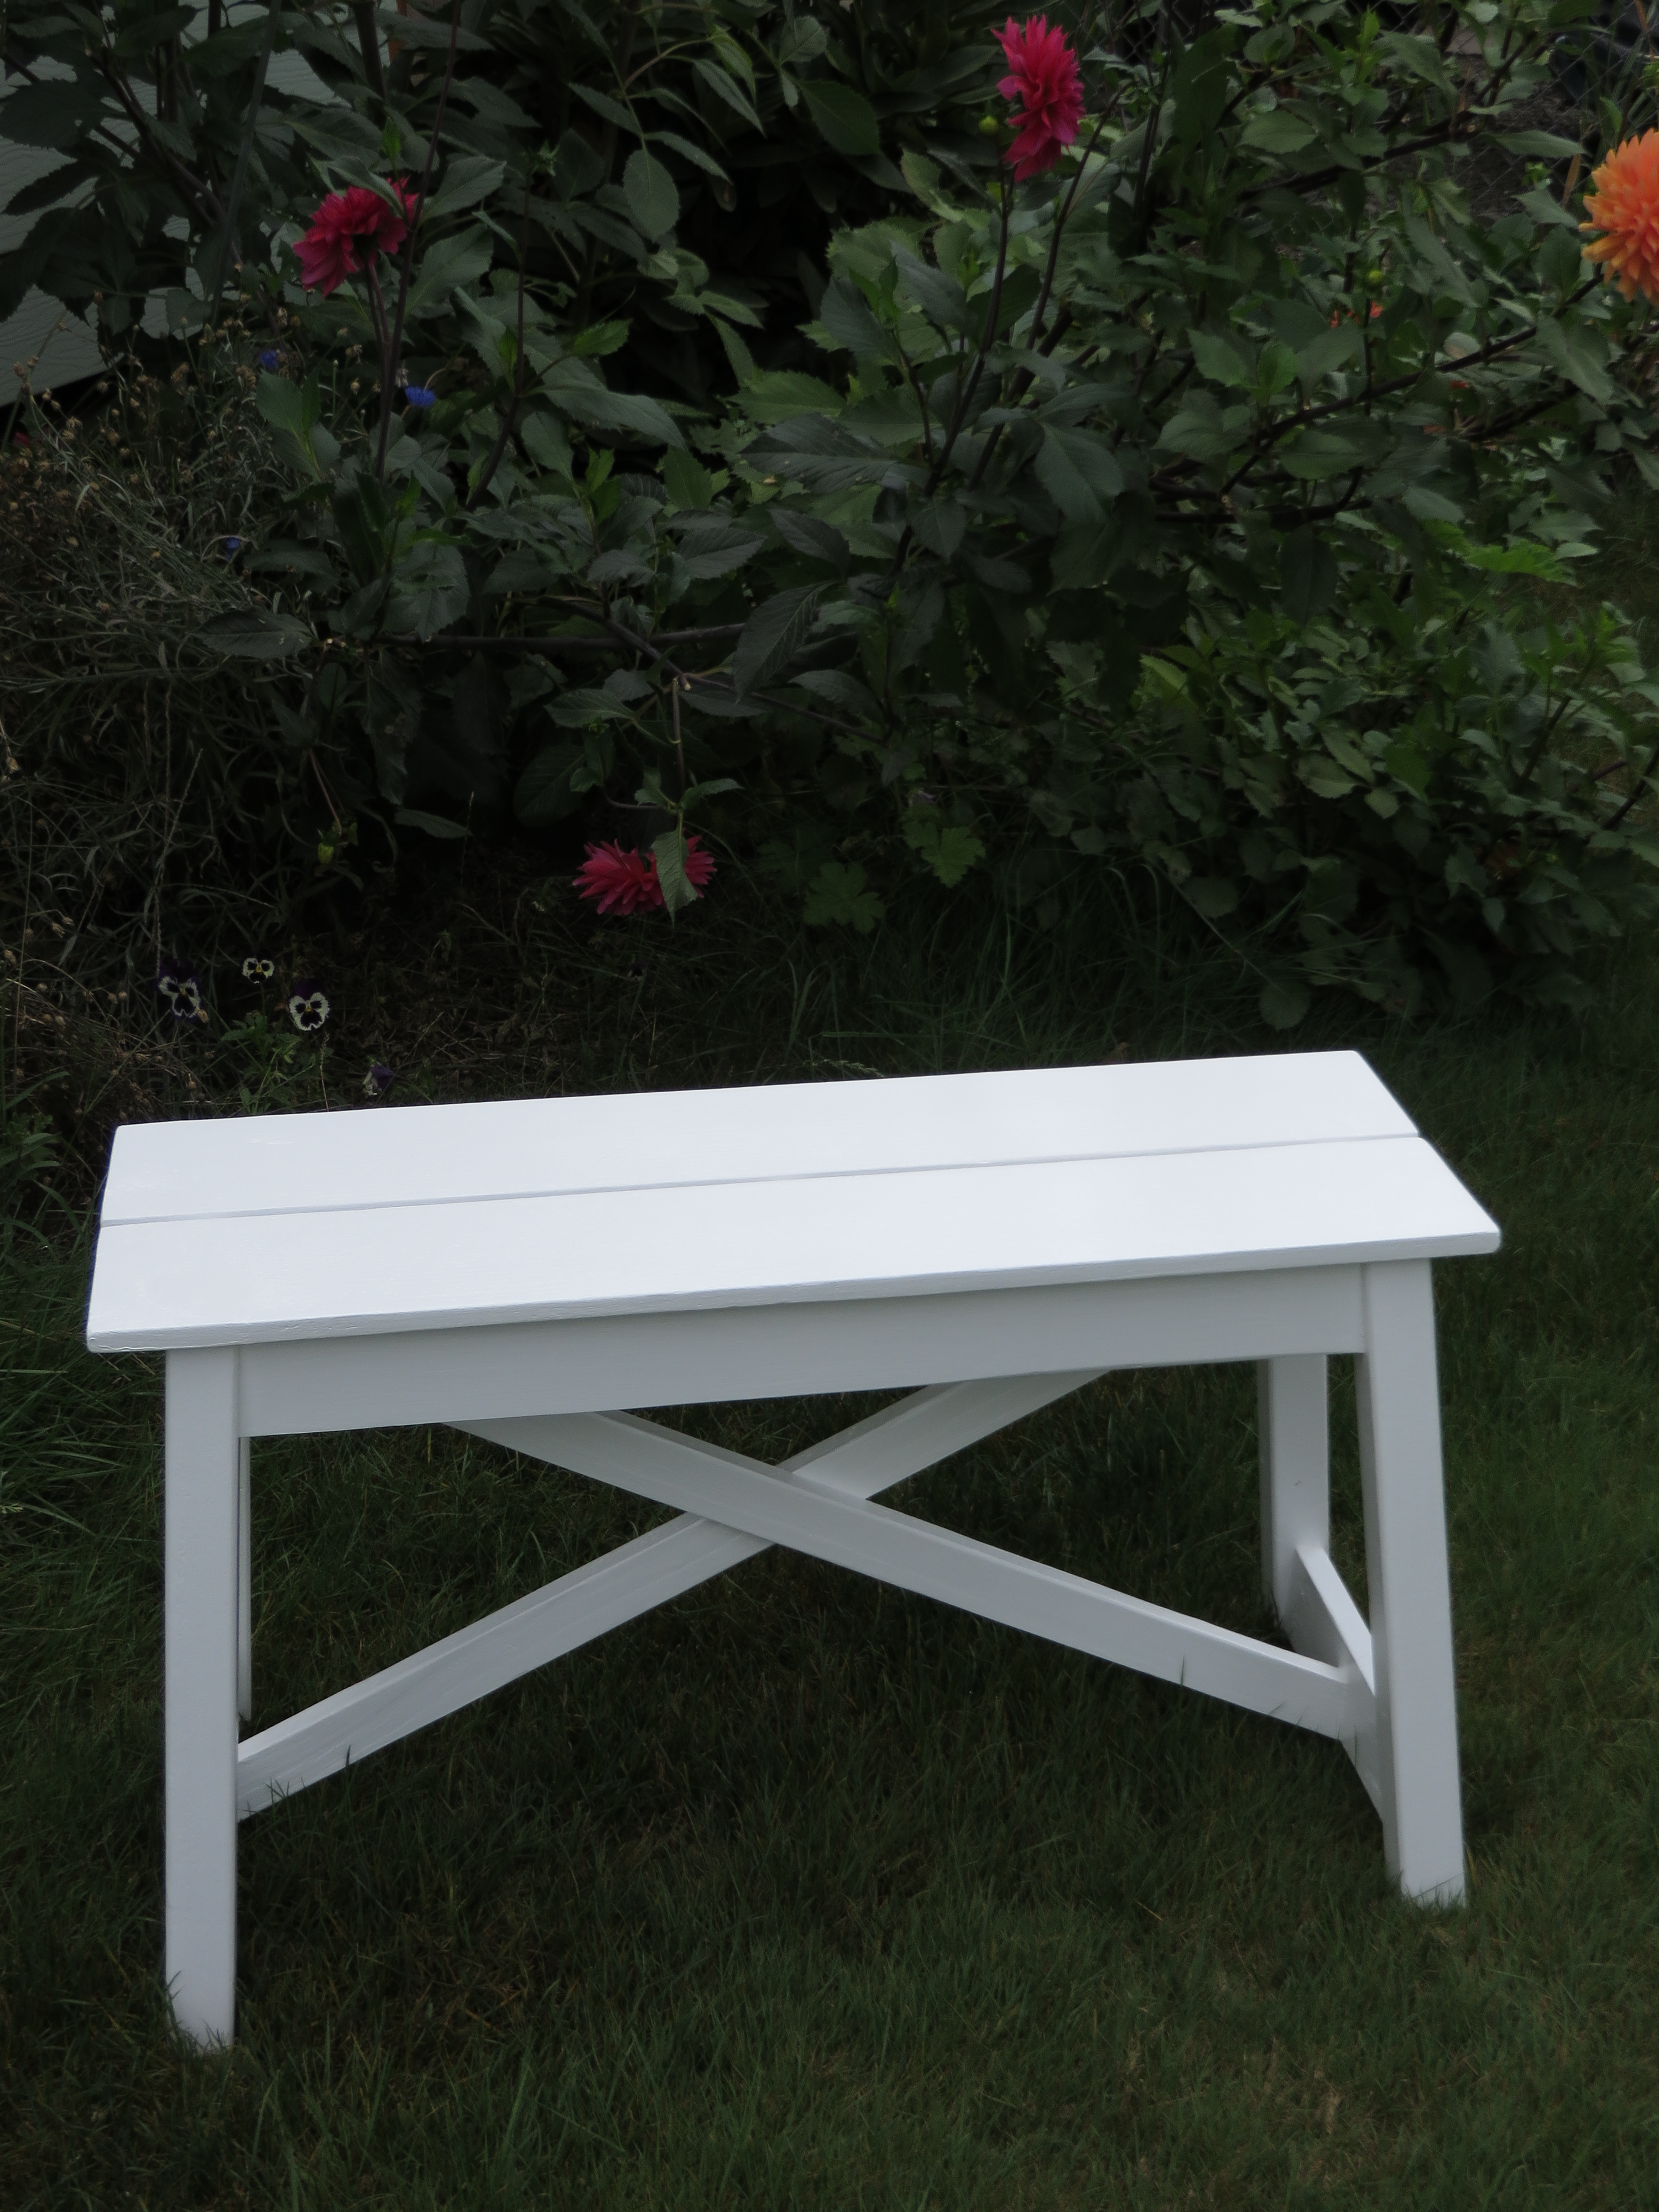
I wanted a simple bench for my yard during the summer. This was a fun, simple build with a little bit of extra style. I used a fence picket for the seat and added a center support underneath, since it was a bit bendy. Sanded the top really well before finishing. Built with Kreg jig.
Built from Plan(s)
Estimated Cost
$20
Estimated Time Investment
Afternoon Project (3-6 Hours)
Finish Used
The finish takes way more time than the building. Sanded first with 60, then 150 grit paper. One coat water-based primer, two coats white Behr enamel, two coats clear spray-on lacquer.
Recommended Skill Level
Beginner
Kids table and chairs
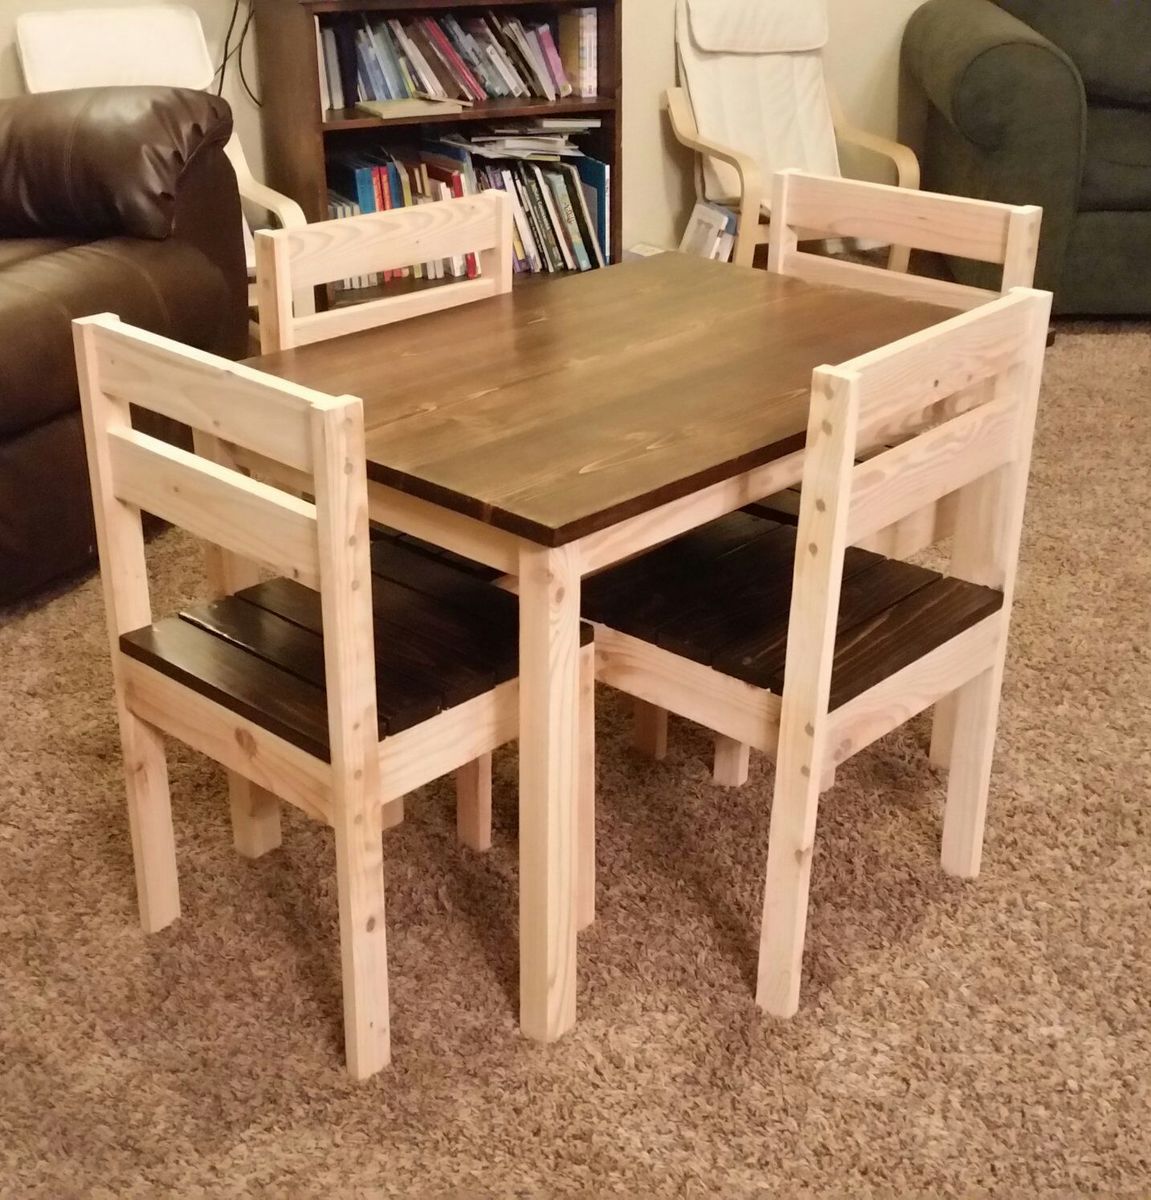
Great little project. Finished just in time for Thanksgiving.
Andy
Built from Plan(s)
Estimated Cost
50
Estimated Time Investment
Day Project (6-9 Hours)
Finish Used
Mirrowax, polyurethane semi gloss
Recommended Skill Level
Beginner
Comments

Miter Saw Cart
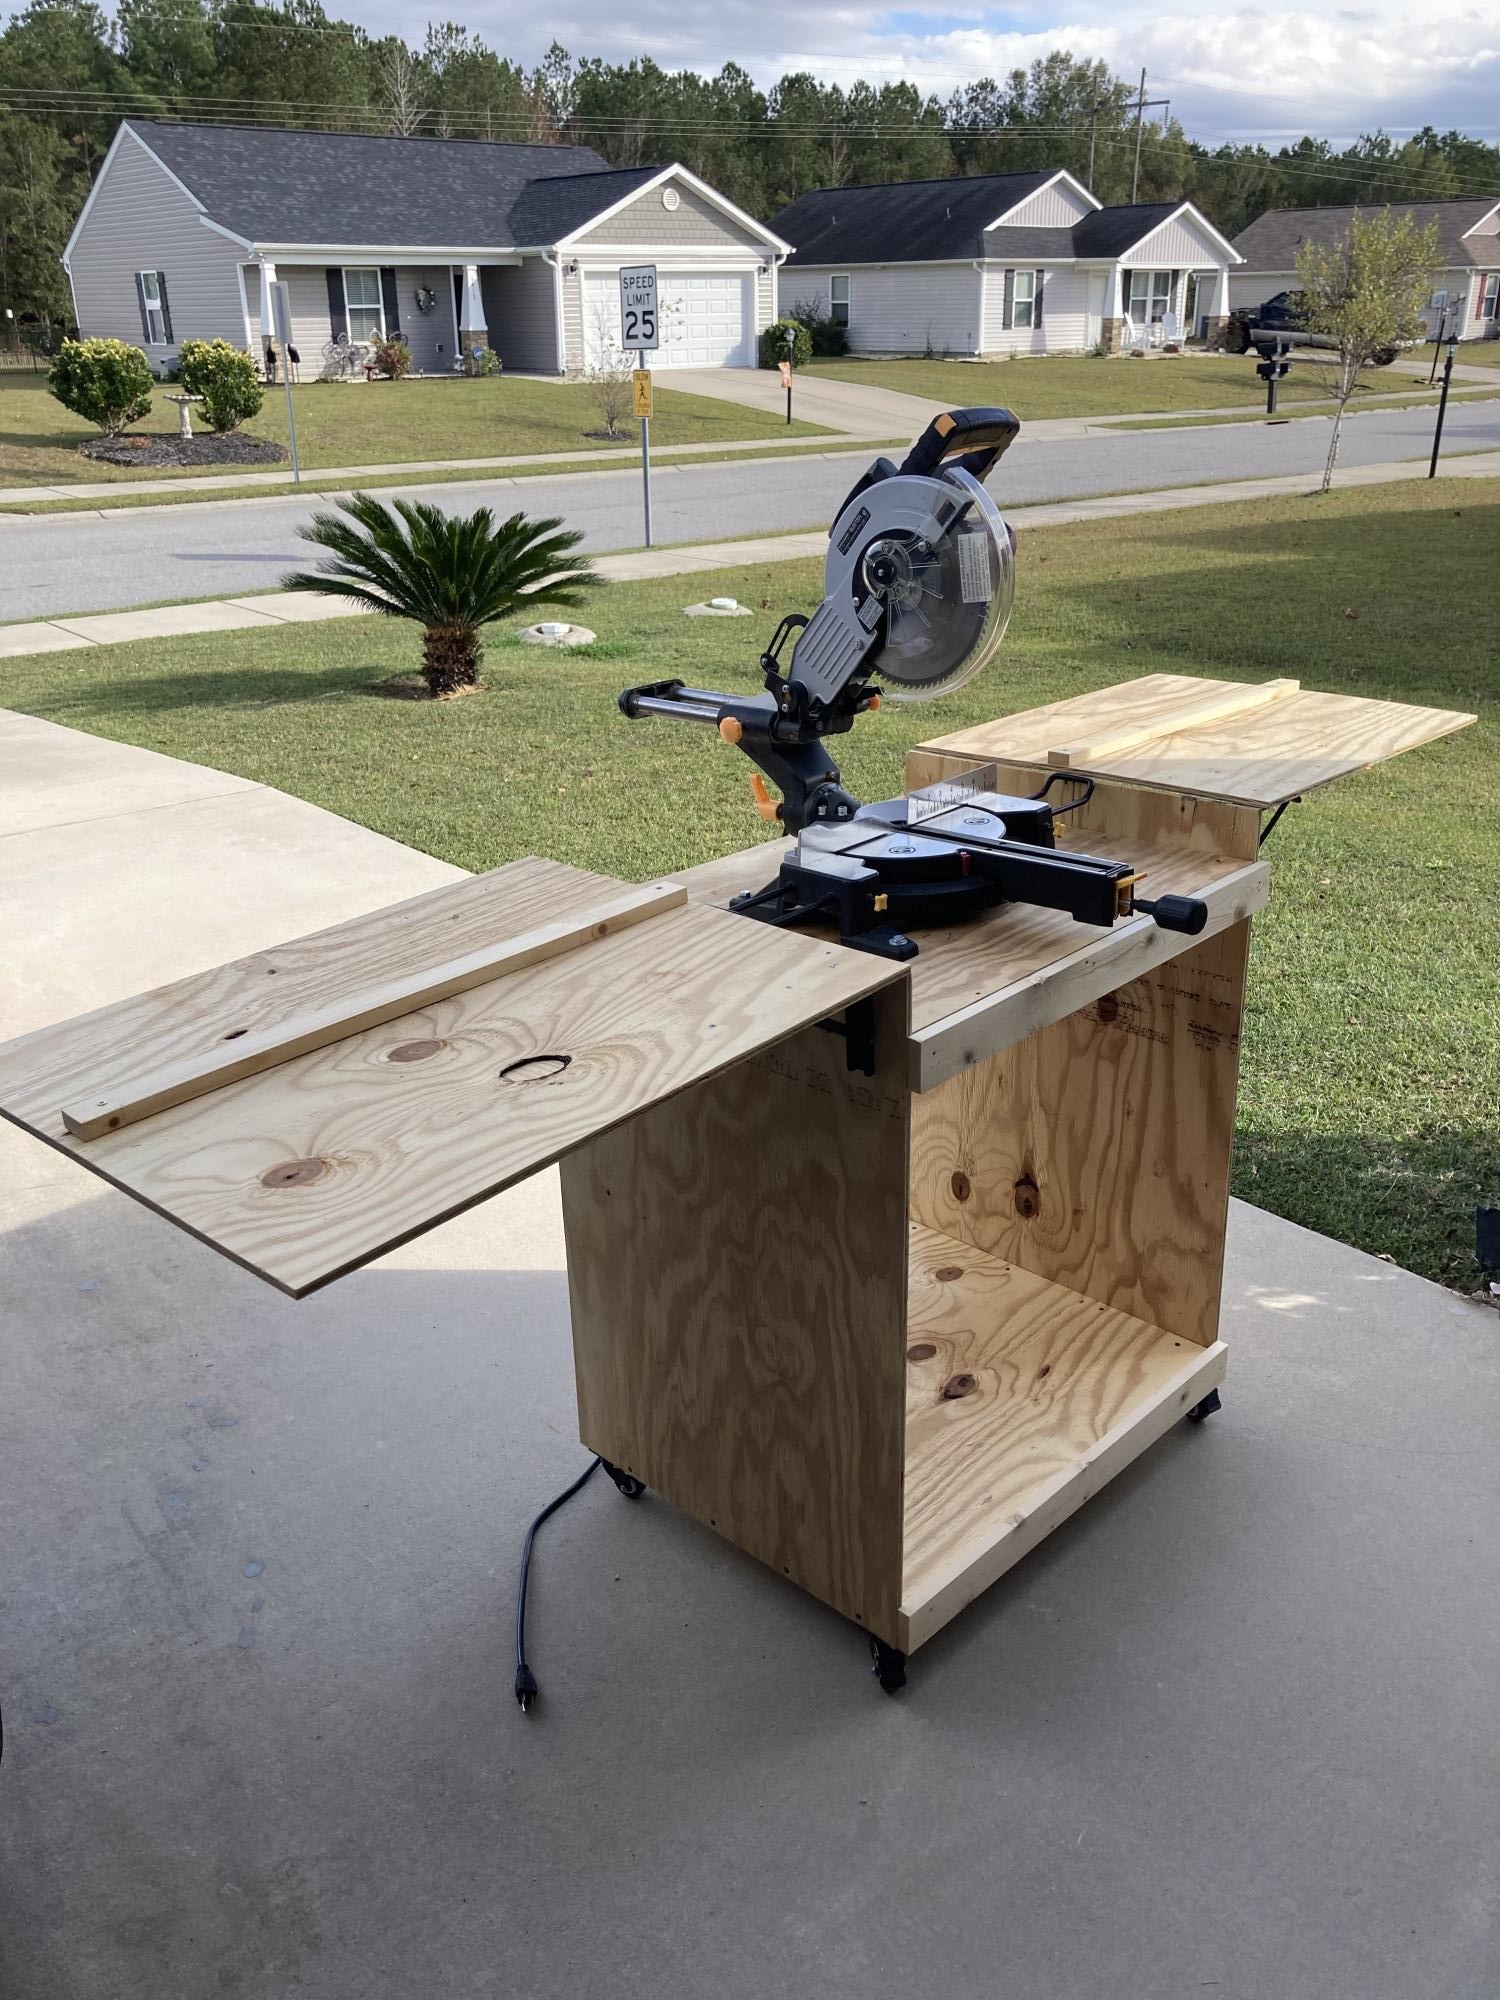
I had my mitre saw on a stand I had purchased and it was ok. Hard to move around, but it supported the saw ok. Frustrated over having to drag it around every time I was using it. This cart is smaller than the old stand and easier to move around.
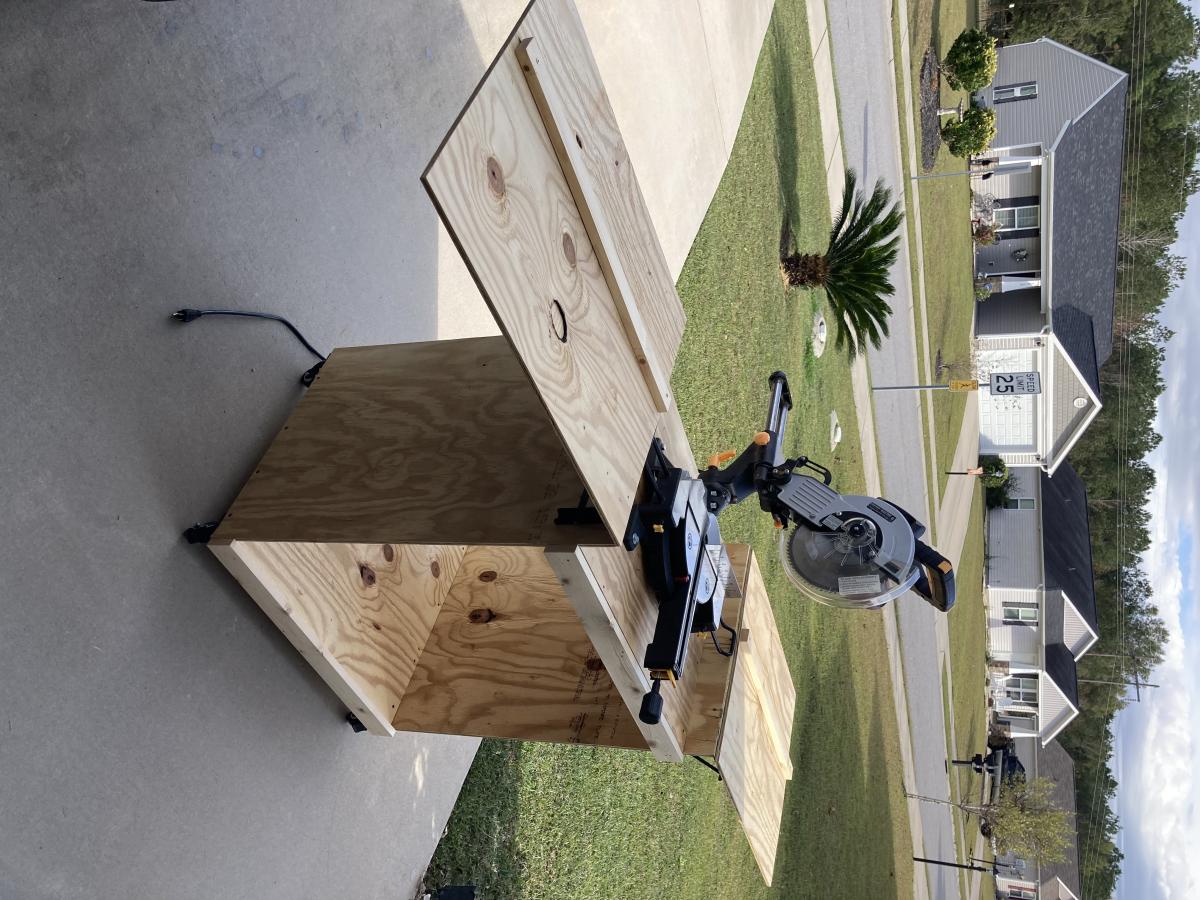
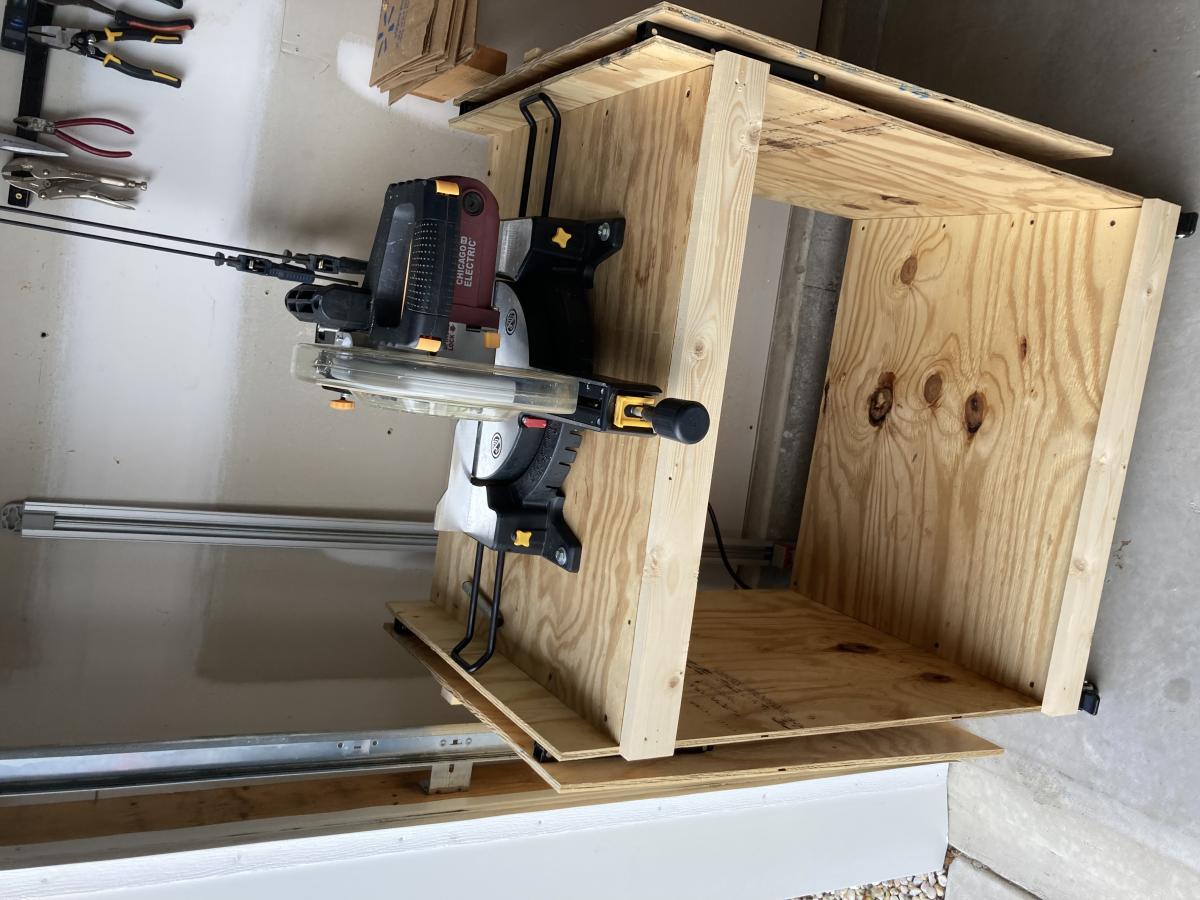
Built from Plan(s)
Comments
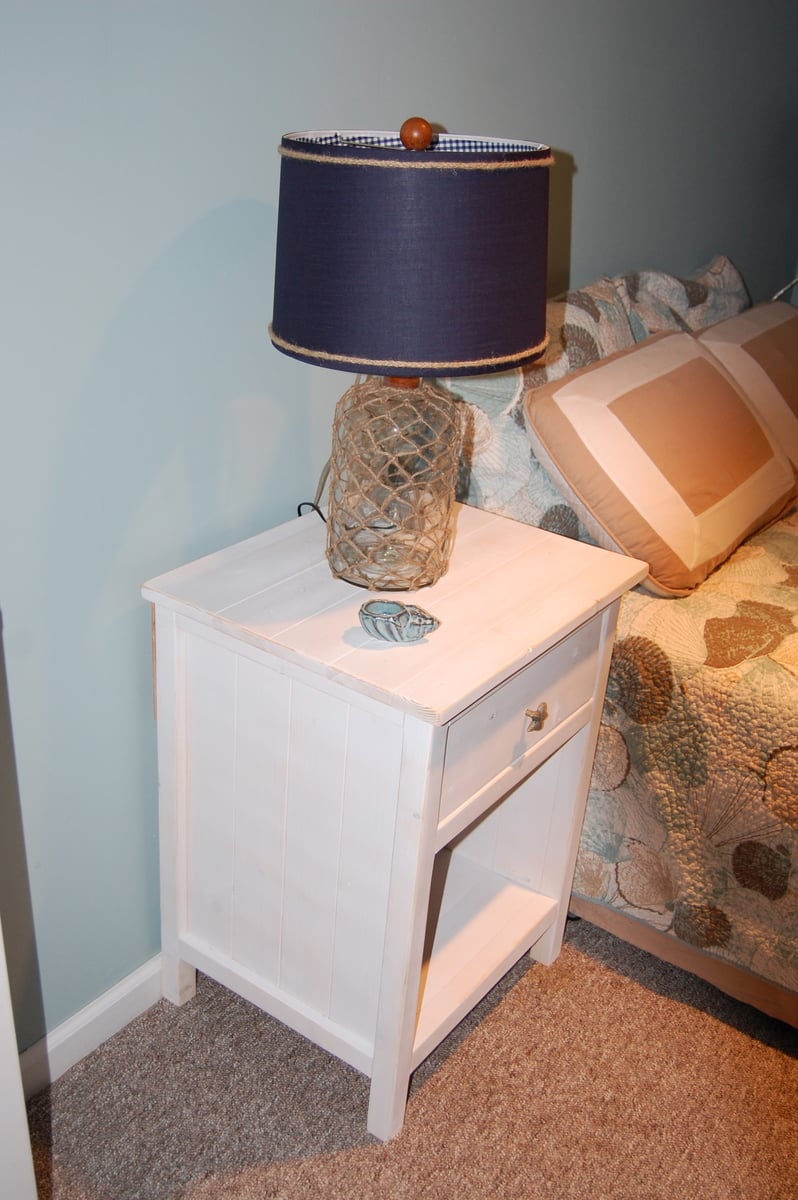
Reclaimed Wood Look Bedside Table - Modified
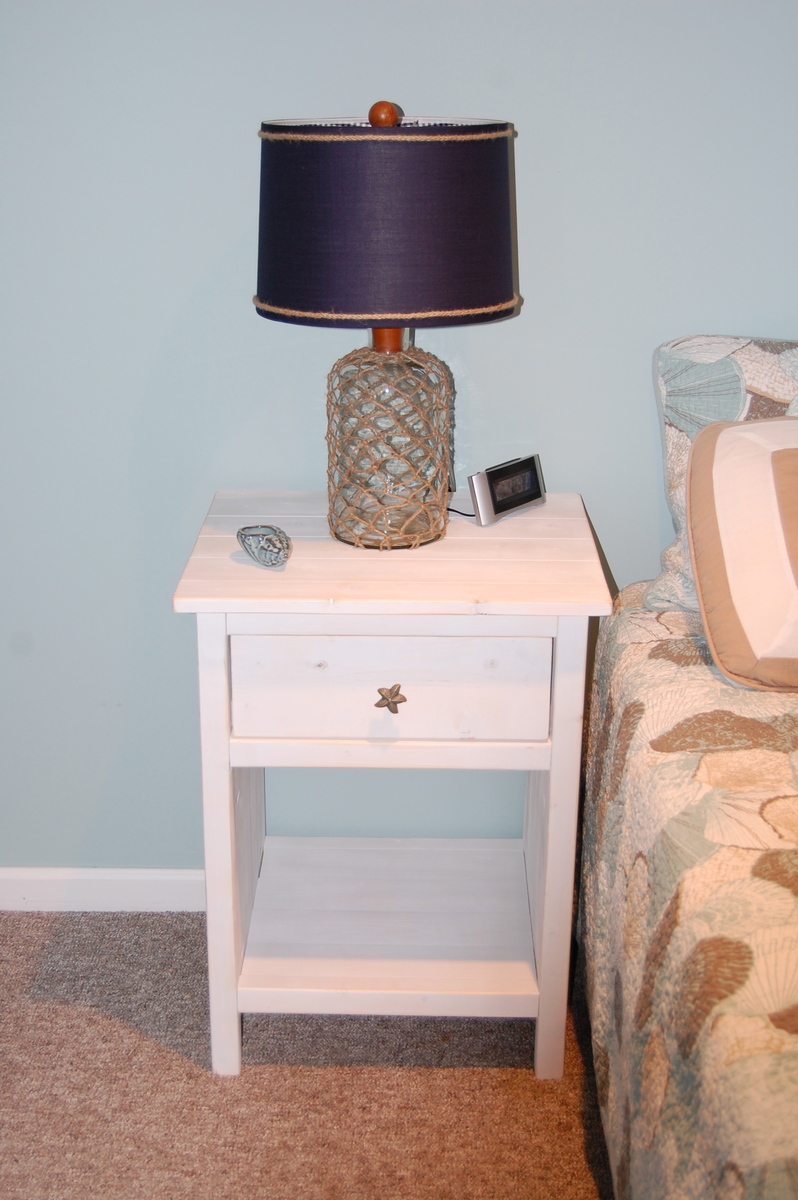
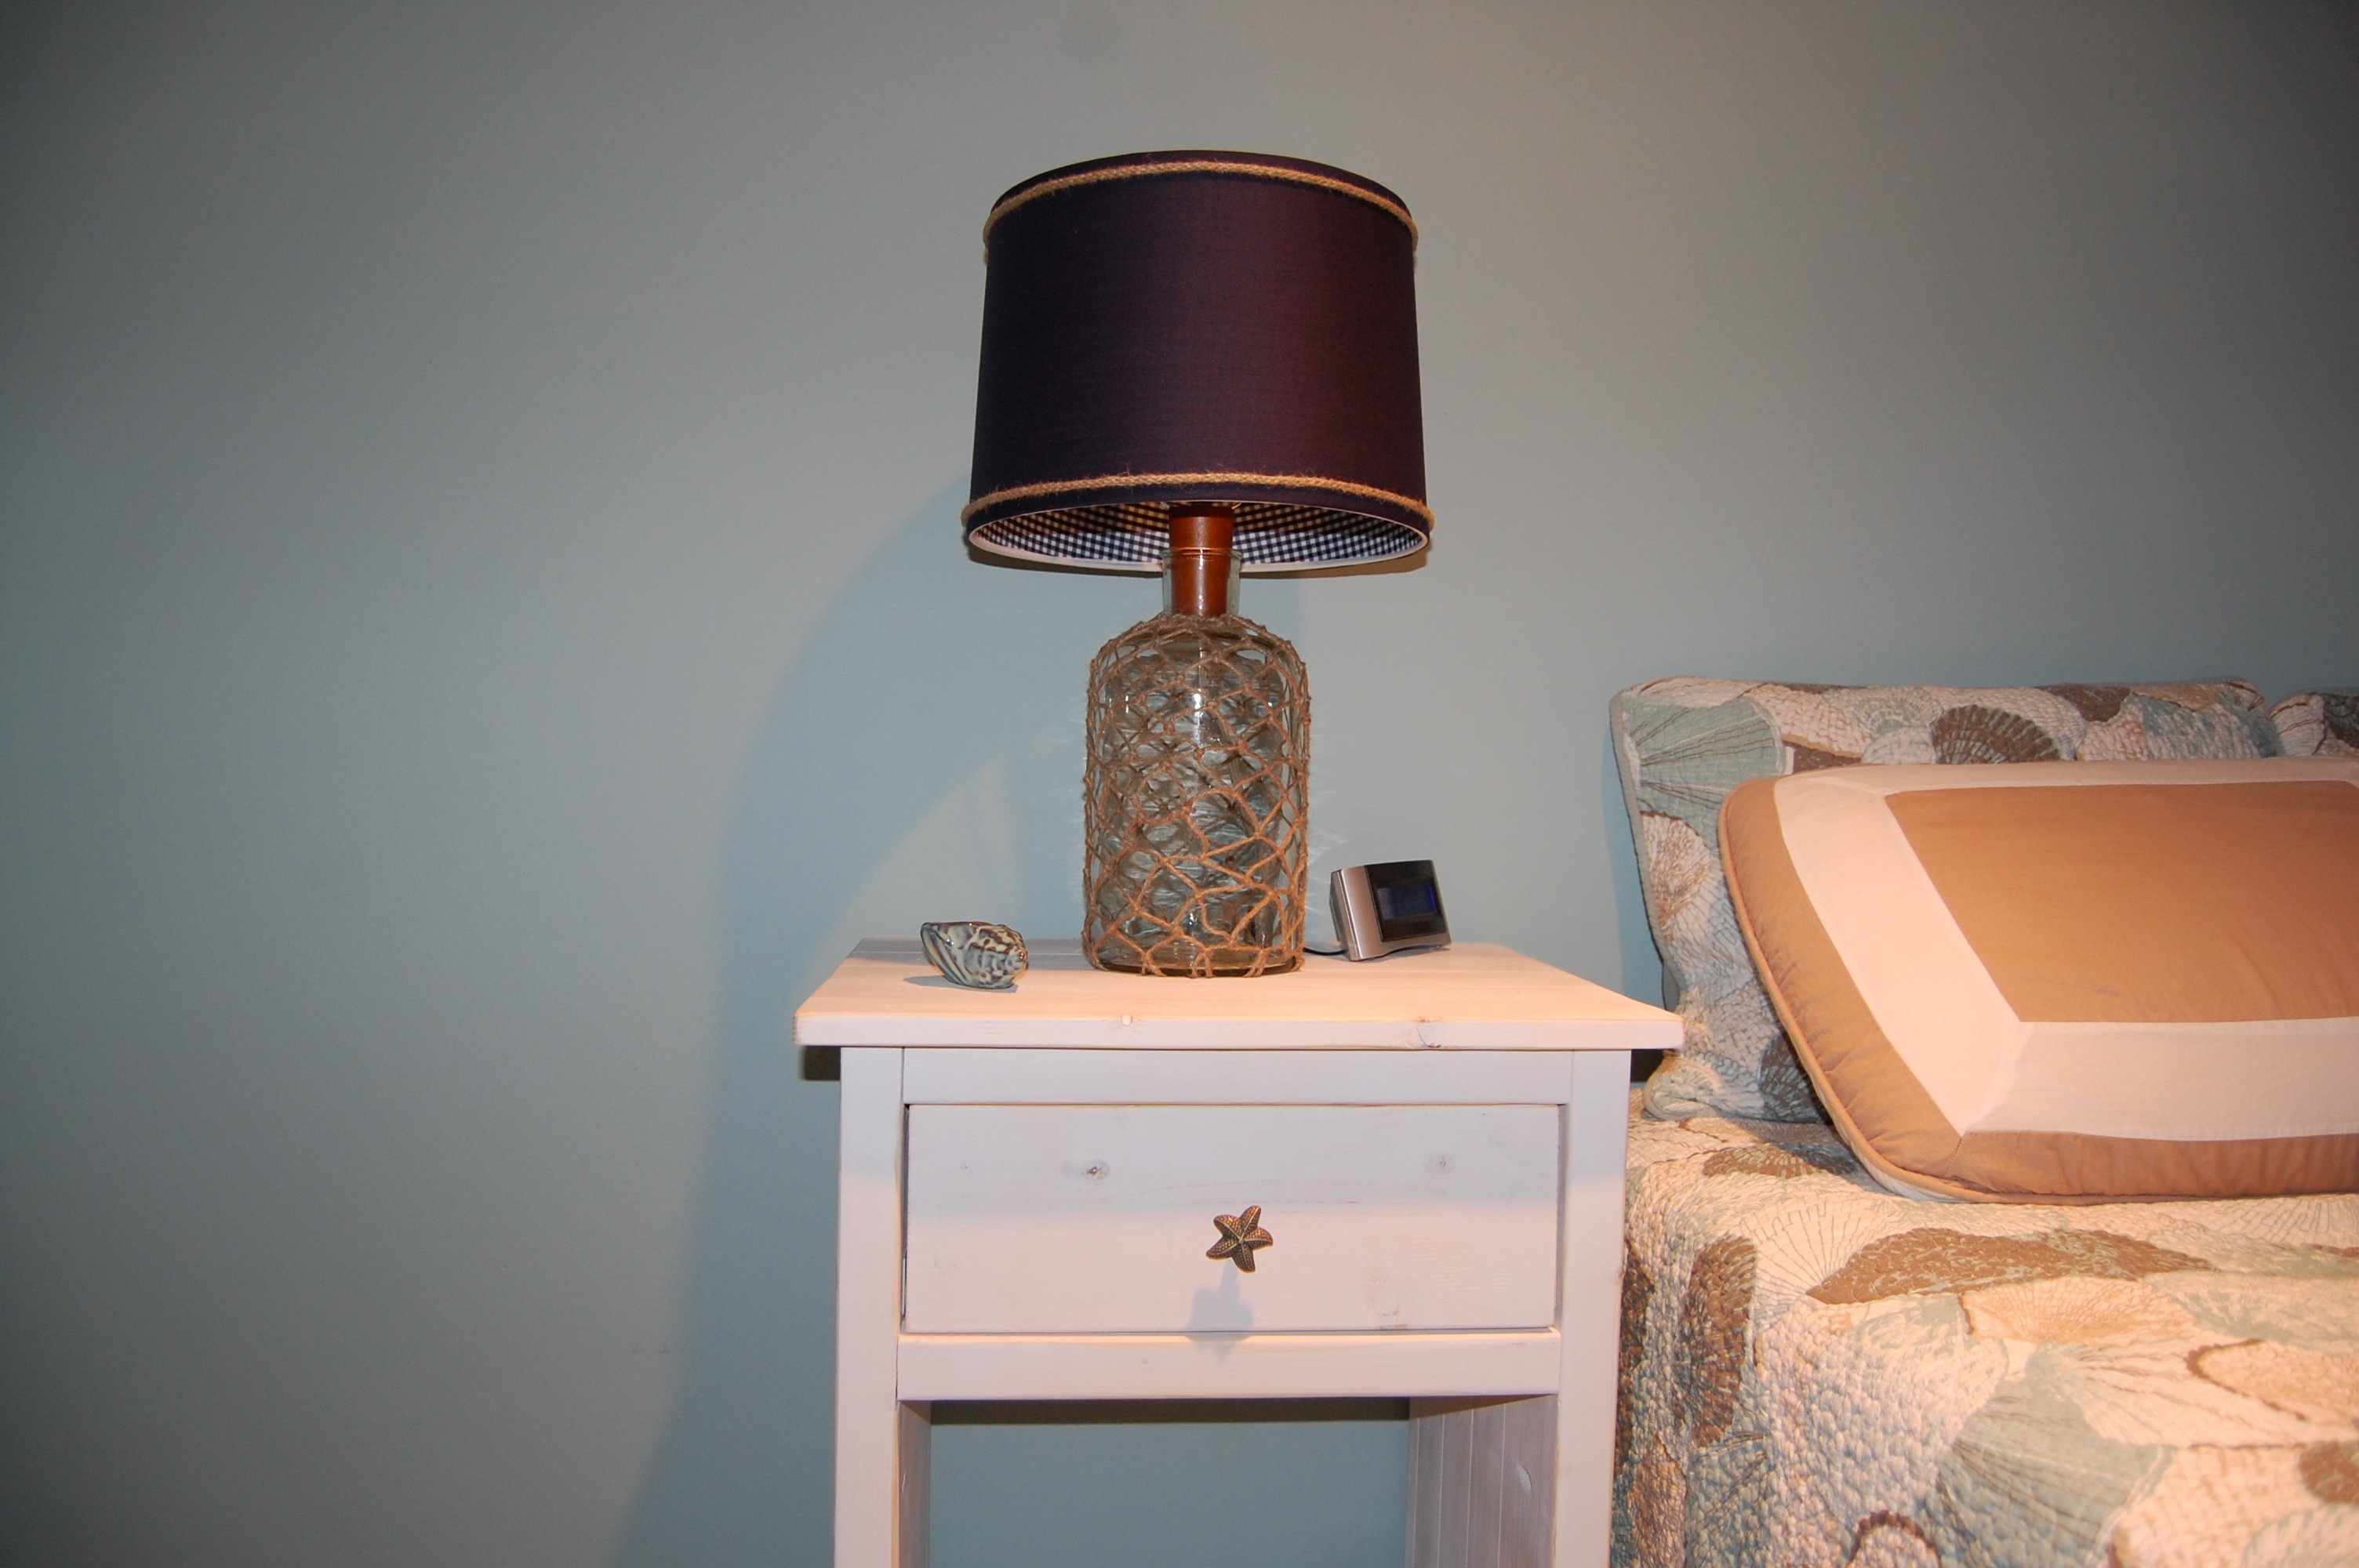
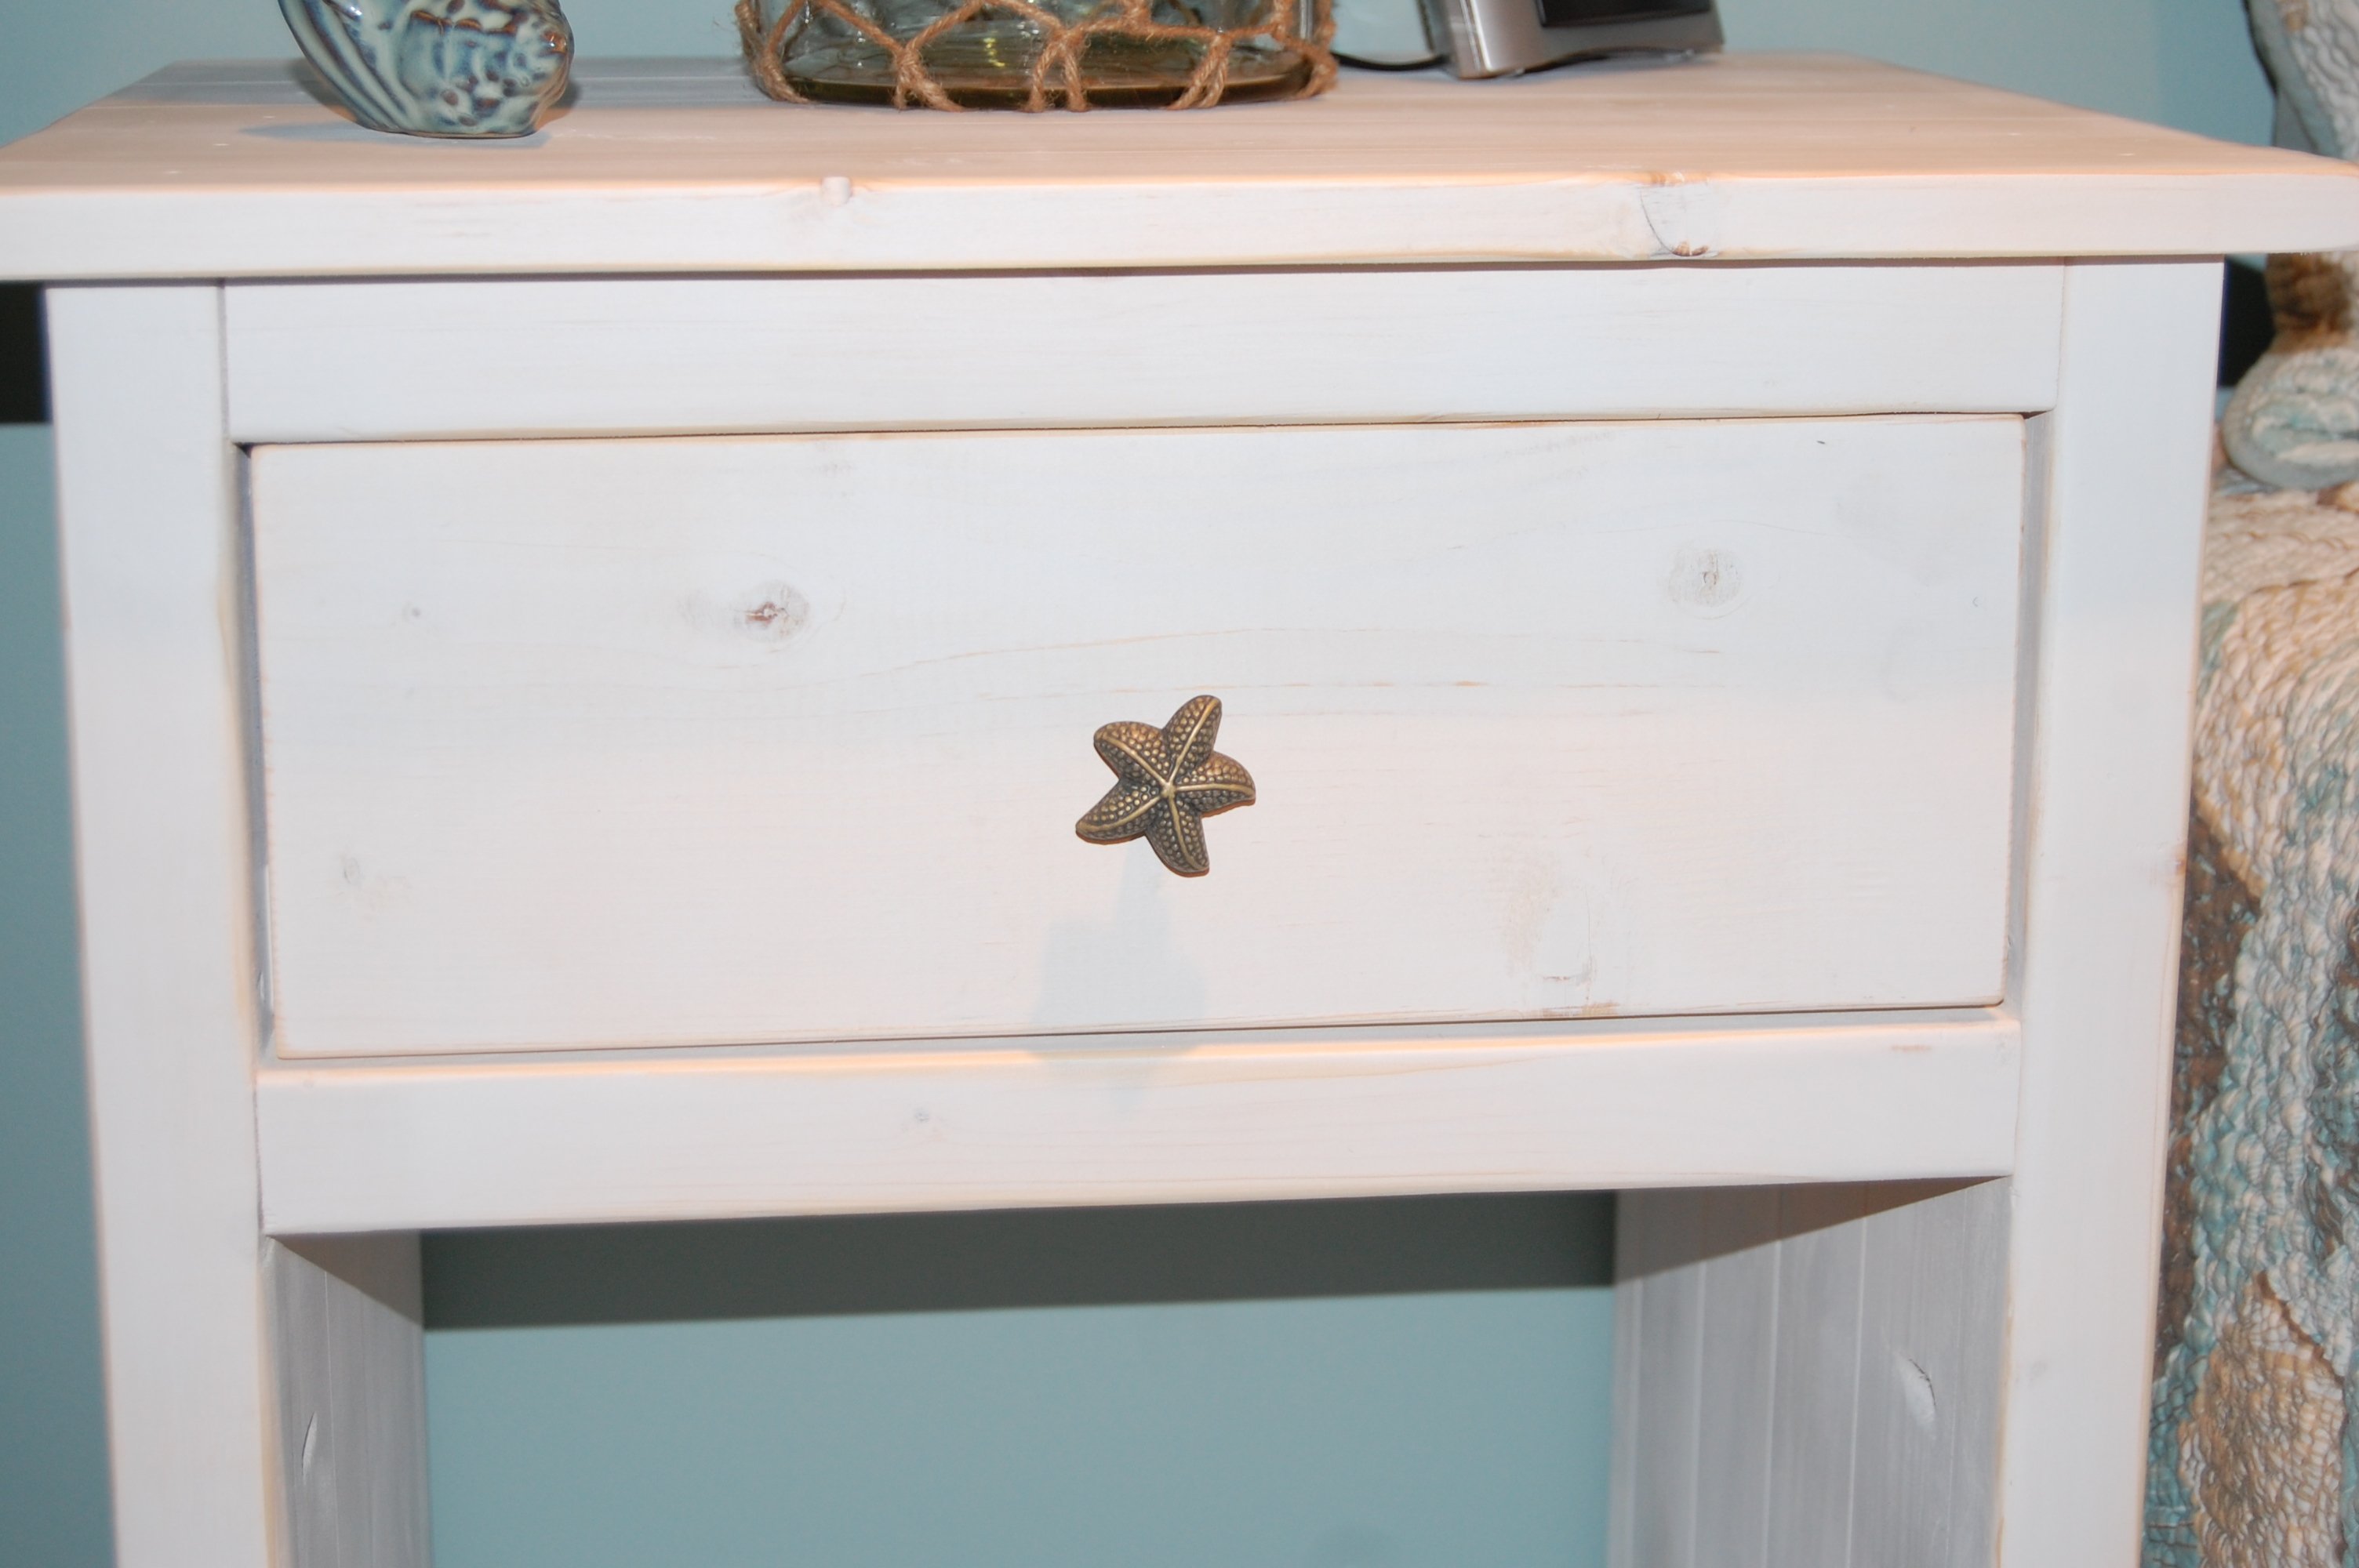
I built the reclaimed wood headboard for our master bedroom, and then found some awesome reclaimed-look stools at Pottery Barn on sale. About a month after that, Ana came out with her reclaimed wood bedside table plans. I was slightly bummed that I already had these cool stools, but then I realized that I had a whole guest room that I could build for! My guest room has a beach theme so I painted my tables white. The room is also kind of small, so I decided that I would put in one drawer and put in a shelf on the bottom. That way it wouldn't look so huge in the room. I love it! And I found these cool bronze starfish knobs at Lowe's. I got a little overzealous at times and I have pocket hole screws in places that are visible, but not that visible. It could be better. All in all, I'm very happy with the way it turned out.
Built from Plan(s)
Estimated Cost
$60 (for two)
Estimated Time Investment
Day Project (6-9 Hours)
Finish Used
Valspar Flat White Spray Paint and Valspar Clear Flat topcoat. I sanded all the edges with 150 grit sandpaper before applying the topcoat. After the topcoat dried, I lightly sanded it again with 220 grit sandpaper to smooth out all the bumps.
Recommended Skill Level
Beginner
Comments

Thu, 09/01/2011 - 19:21
I like just having the one
I like just having the one drawer...looks awesome!
Wed, 09/07/2011 - 04:55
Thanks - it works out really
Thanks - it works out really well for this tiny room!
Wed, 09/07/2011 - 13:49
Love the starfish knobs -
Love the starfish knobs - really want to build myself some like this!
Marshall's Crib Grandad's First
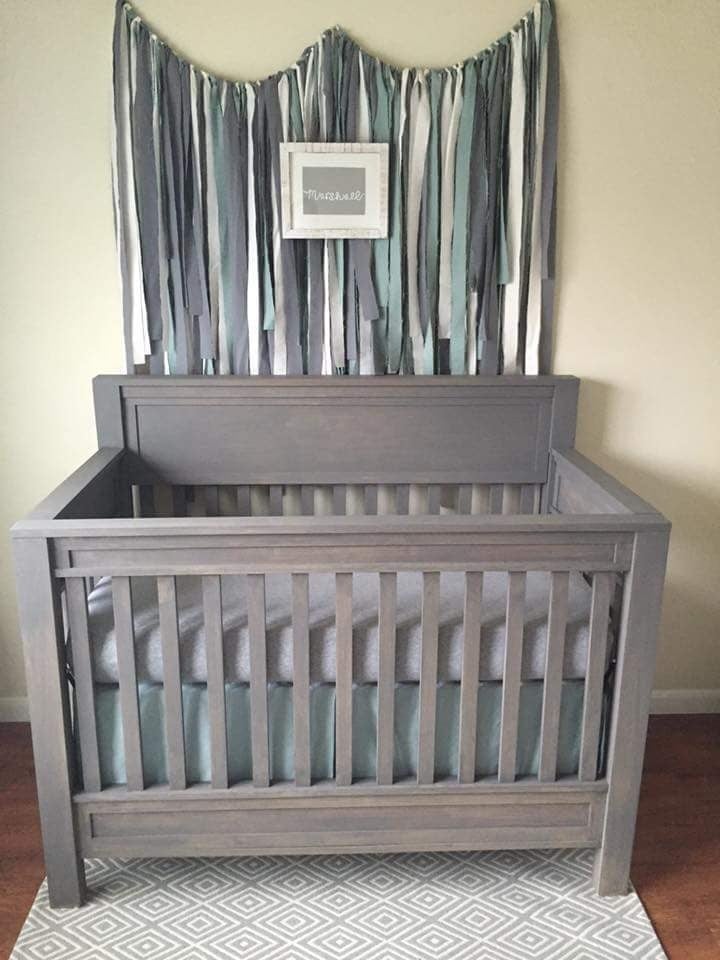
Delivered the nursury Furniture and have a very satisfied daughter preparing to bring our Grandchild into the world.
From Ariel "My sweet baby boy has the most beautiful nursery I've ever seen! I am so thankful for my father who hand built this furniture. It is definitely made with love and it's everything I dreamed of. I'm also thankful for my husband and brother in law who set up this entire nursery for me this morning. Thank you"
I started with plans and inspiration and then added some creativity. For the legs on this crib I laminated three 1x4 poplar and used threaded inserts. #anawhite
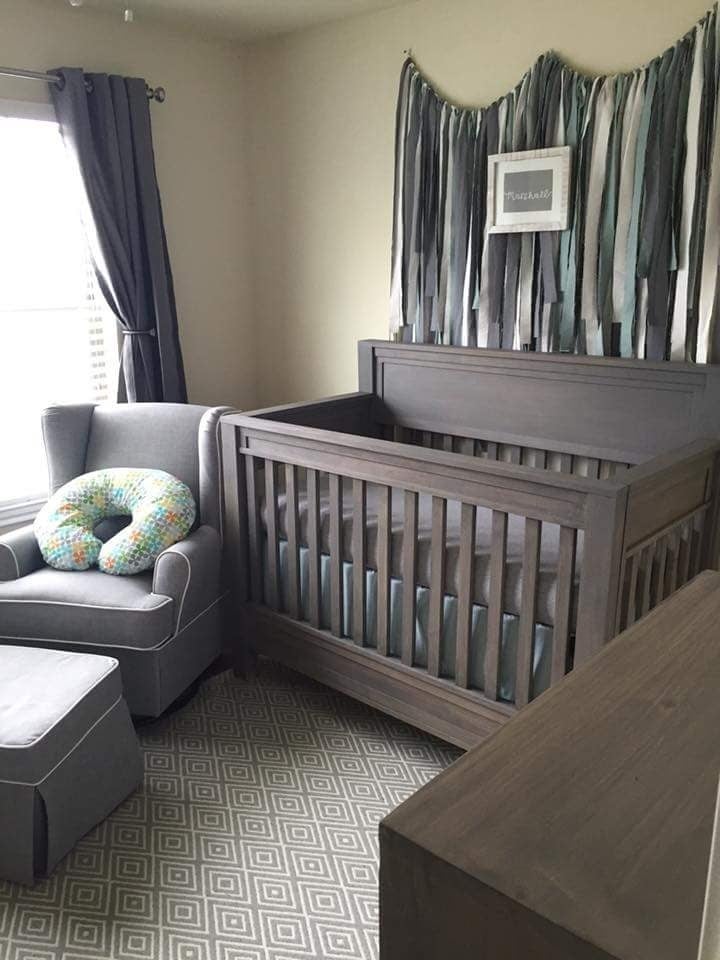
Built from Plan(s)
Estimated Cost
between special hardware, screws and lumber $400. The picture that my daughter gave me a disired end product had a retail of $975.
Estimated Time Investment
Week Long Project (20 Hours or More)
Finish Used
Actually used Sherwin Williams exterior Stain custom
Recommended Skill Level
Intermediate
Comments
Tue, 10/18/2016 - 18:33
Color was a Sherwin Williams Exterior Grey Stain
With the help of taking wood sample to Sherwin Williams along with our daughter we picked the stain and the color. Interesting thing is that the exterior stain actually goes on easier than interior and is as safe as interior.
Fri, 03/11/2016 - 09:20
Crib plans
My husband would like to build our son a crib and I love this one! Is there a way to get the plans??
Mon, 11/07/2016 - 19:14
Did you ever get those plans?
I like your husband really like and want to build this crib. However pondrider hasn't replied so i was wondering if he/she sent them to you by chance.
Thu, 06/30/2016 - 16:33
Marshall's crib
I love this crib and was wondering if there is plans for this. I would love to build it for my sister!
Tue, 10/18/2016 - 18:51
The Plans
Folks I am going to tell you to suggest you get the frame and hardware at place called products america .They have a link to plans that were on a magazine web site for sale. I got the plans but the crib you see only used those plans to get started. If you look at each side independently you will notice that you can build this with Free and better written plans for Ana-White farmhouse bed. yes, you'll do a little modifying for the sides but as we build that is beauty of everything we build in that we build for the size we need. The plans from build America will help with dimensions. The other key with a crib safety and the fact that it must be assembled and disassembled in the room. The plans from build america will attempt to show how to install threaded inserts. I found Youtube and other instructions to be much better. My build has fixed sides meaning the front and the back do not come down. And I did not set it up to be convertable.
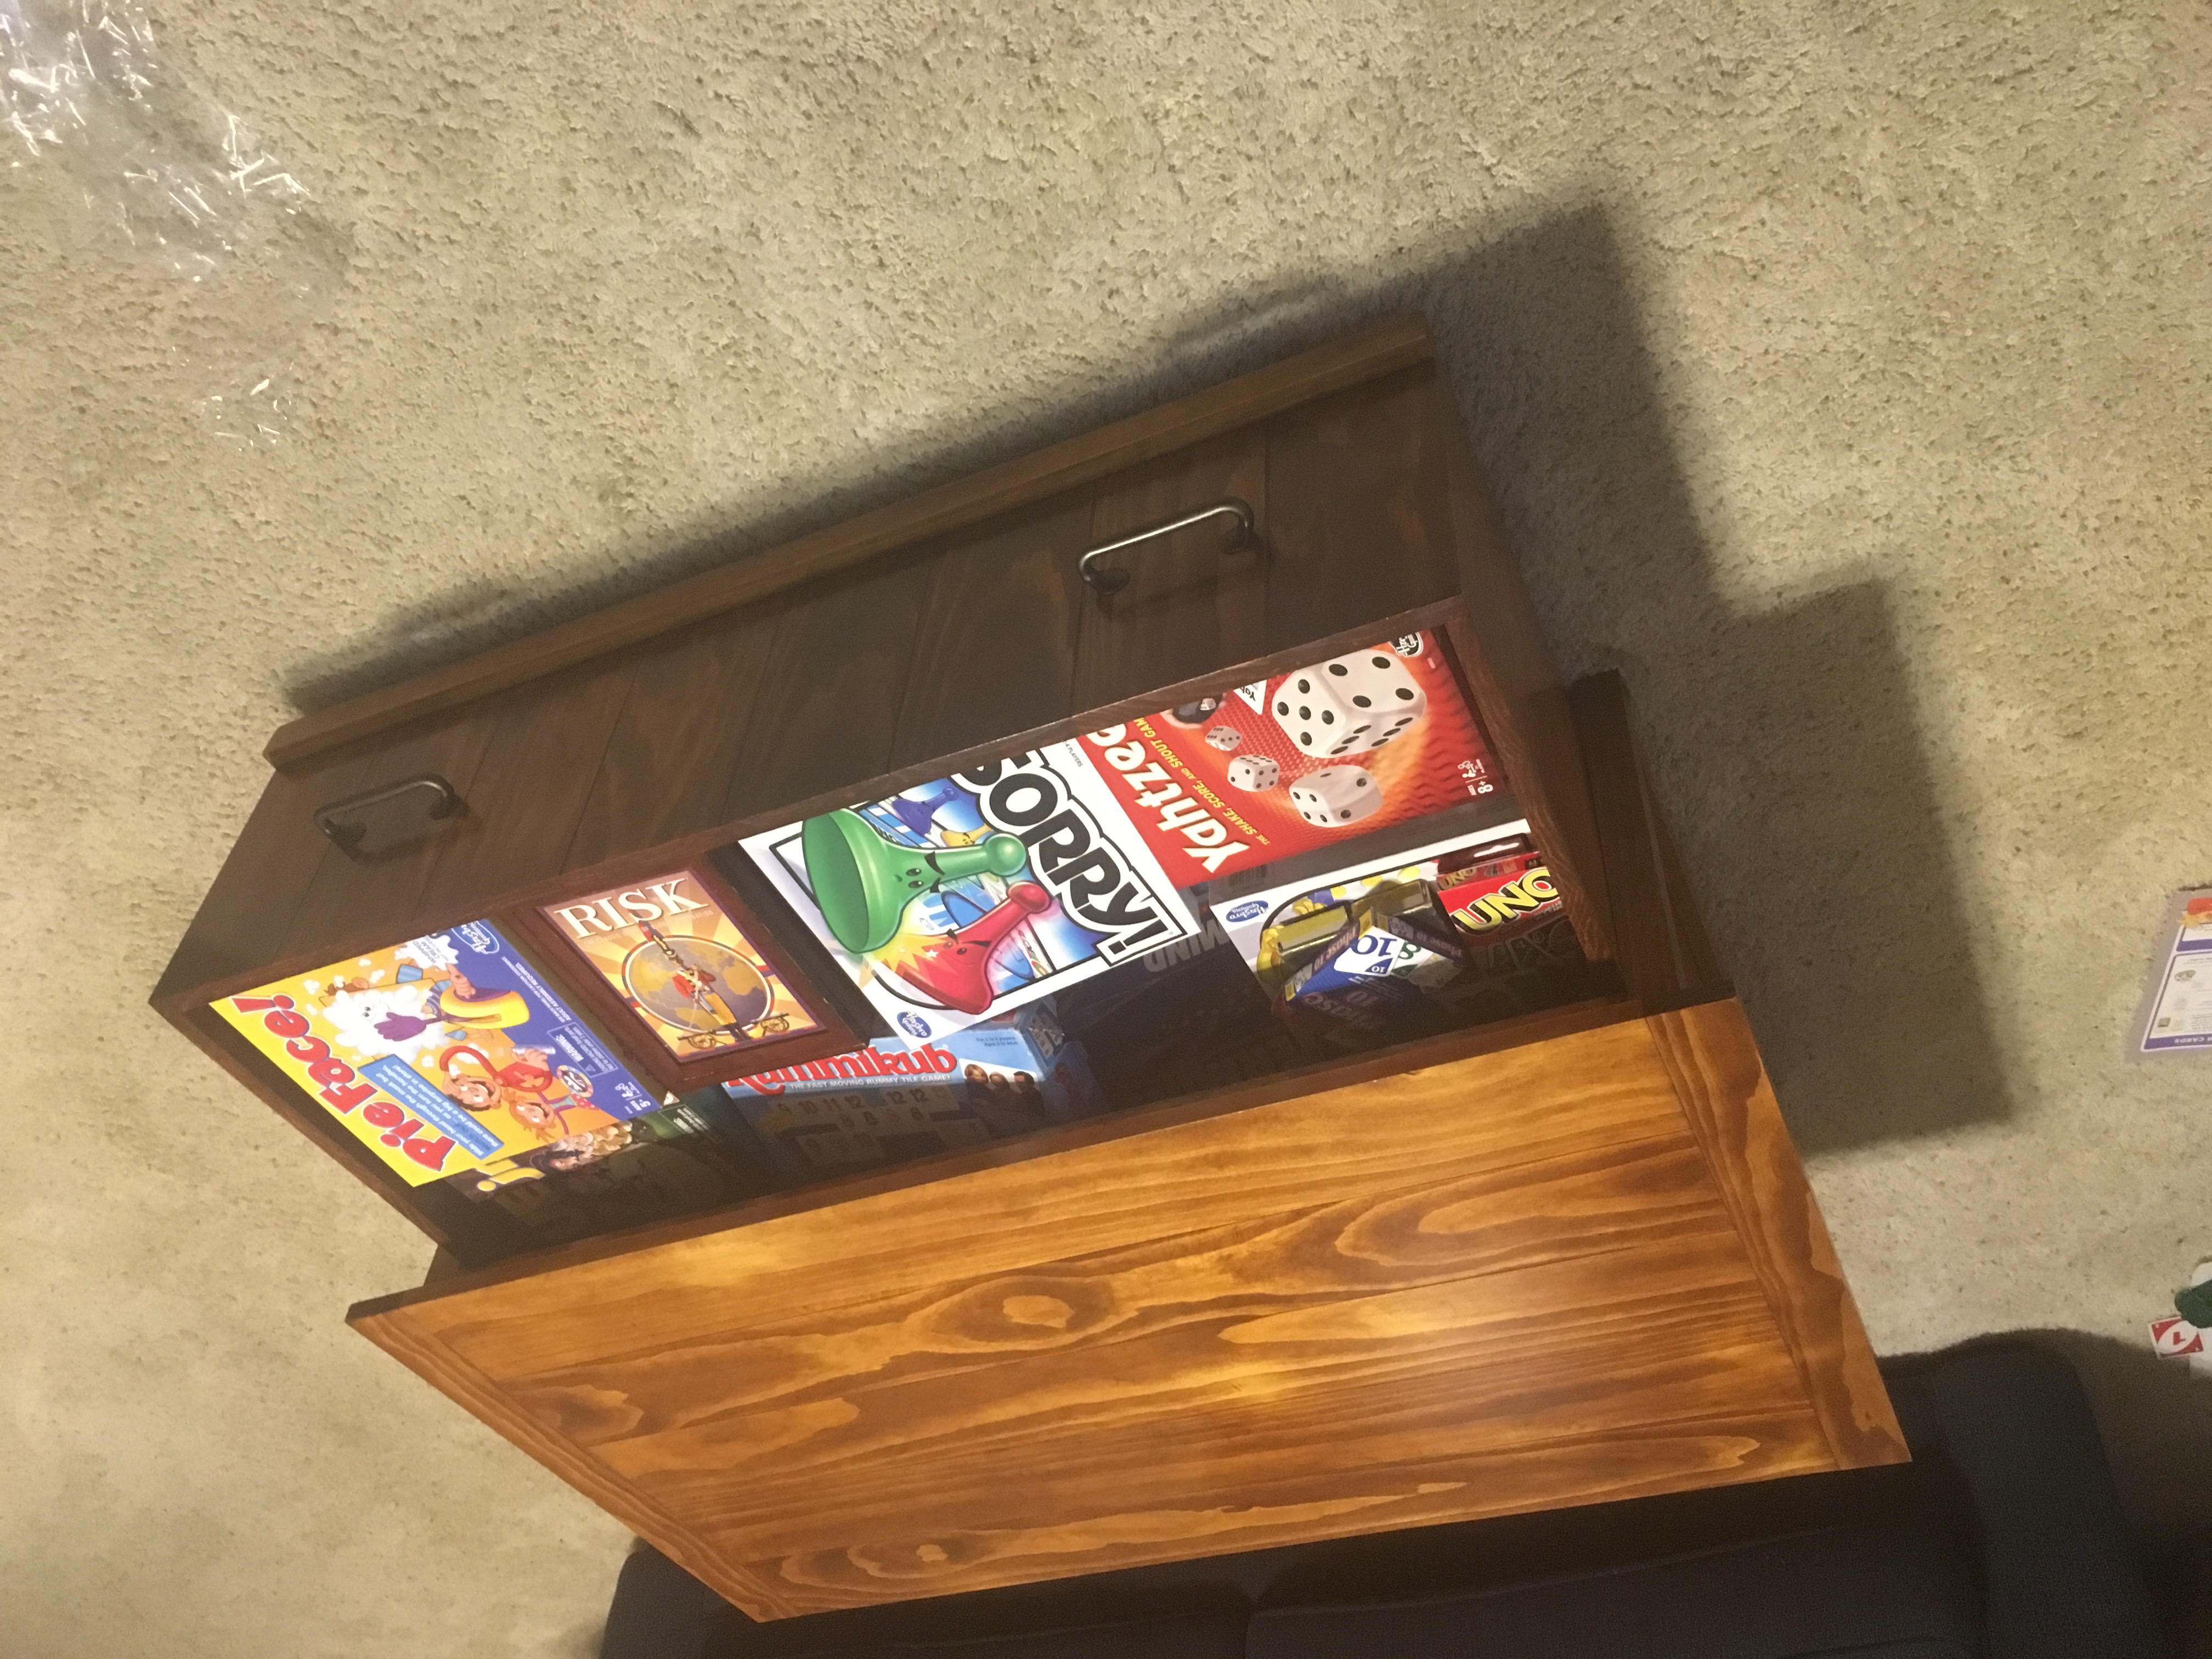
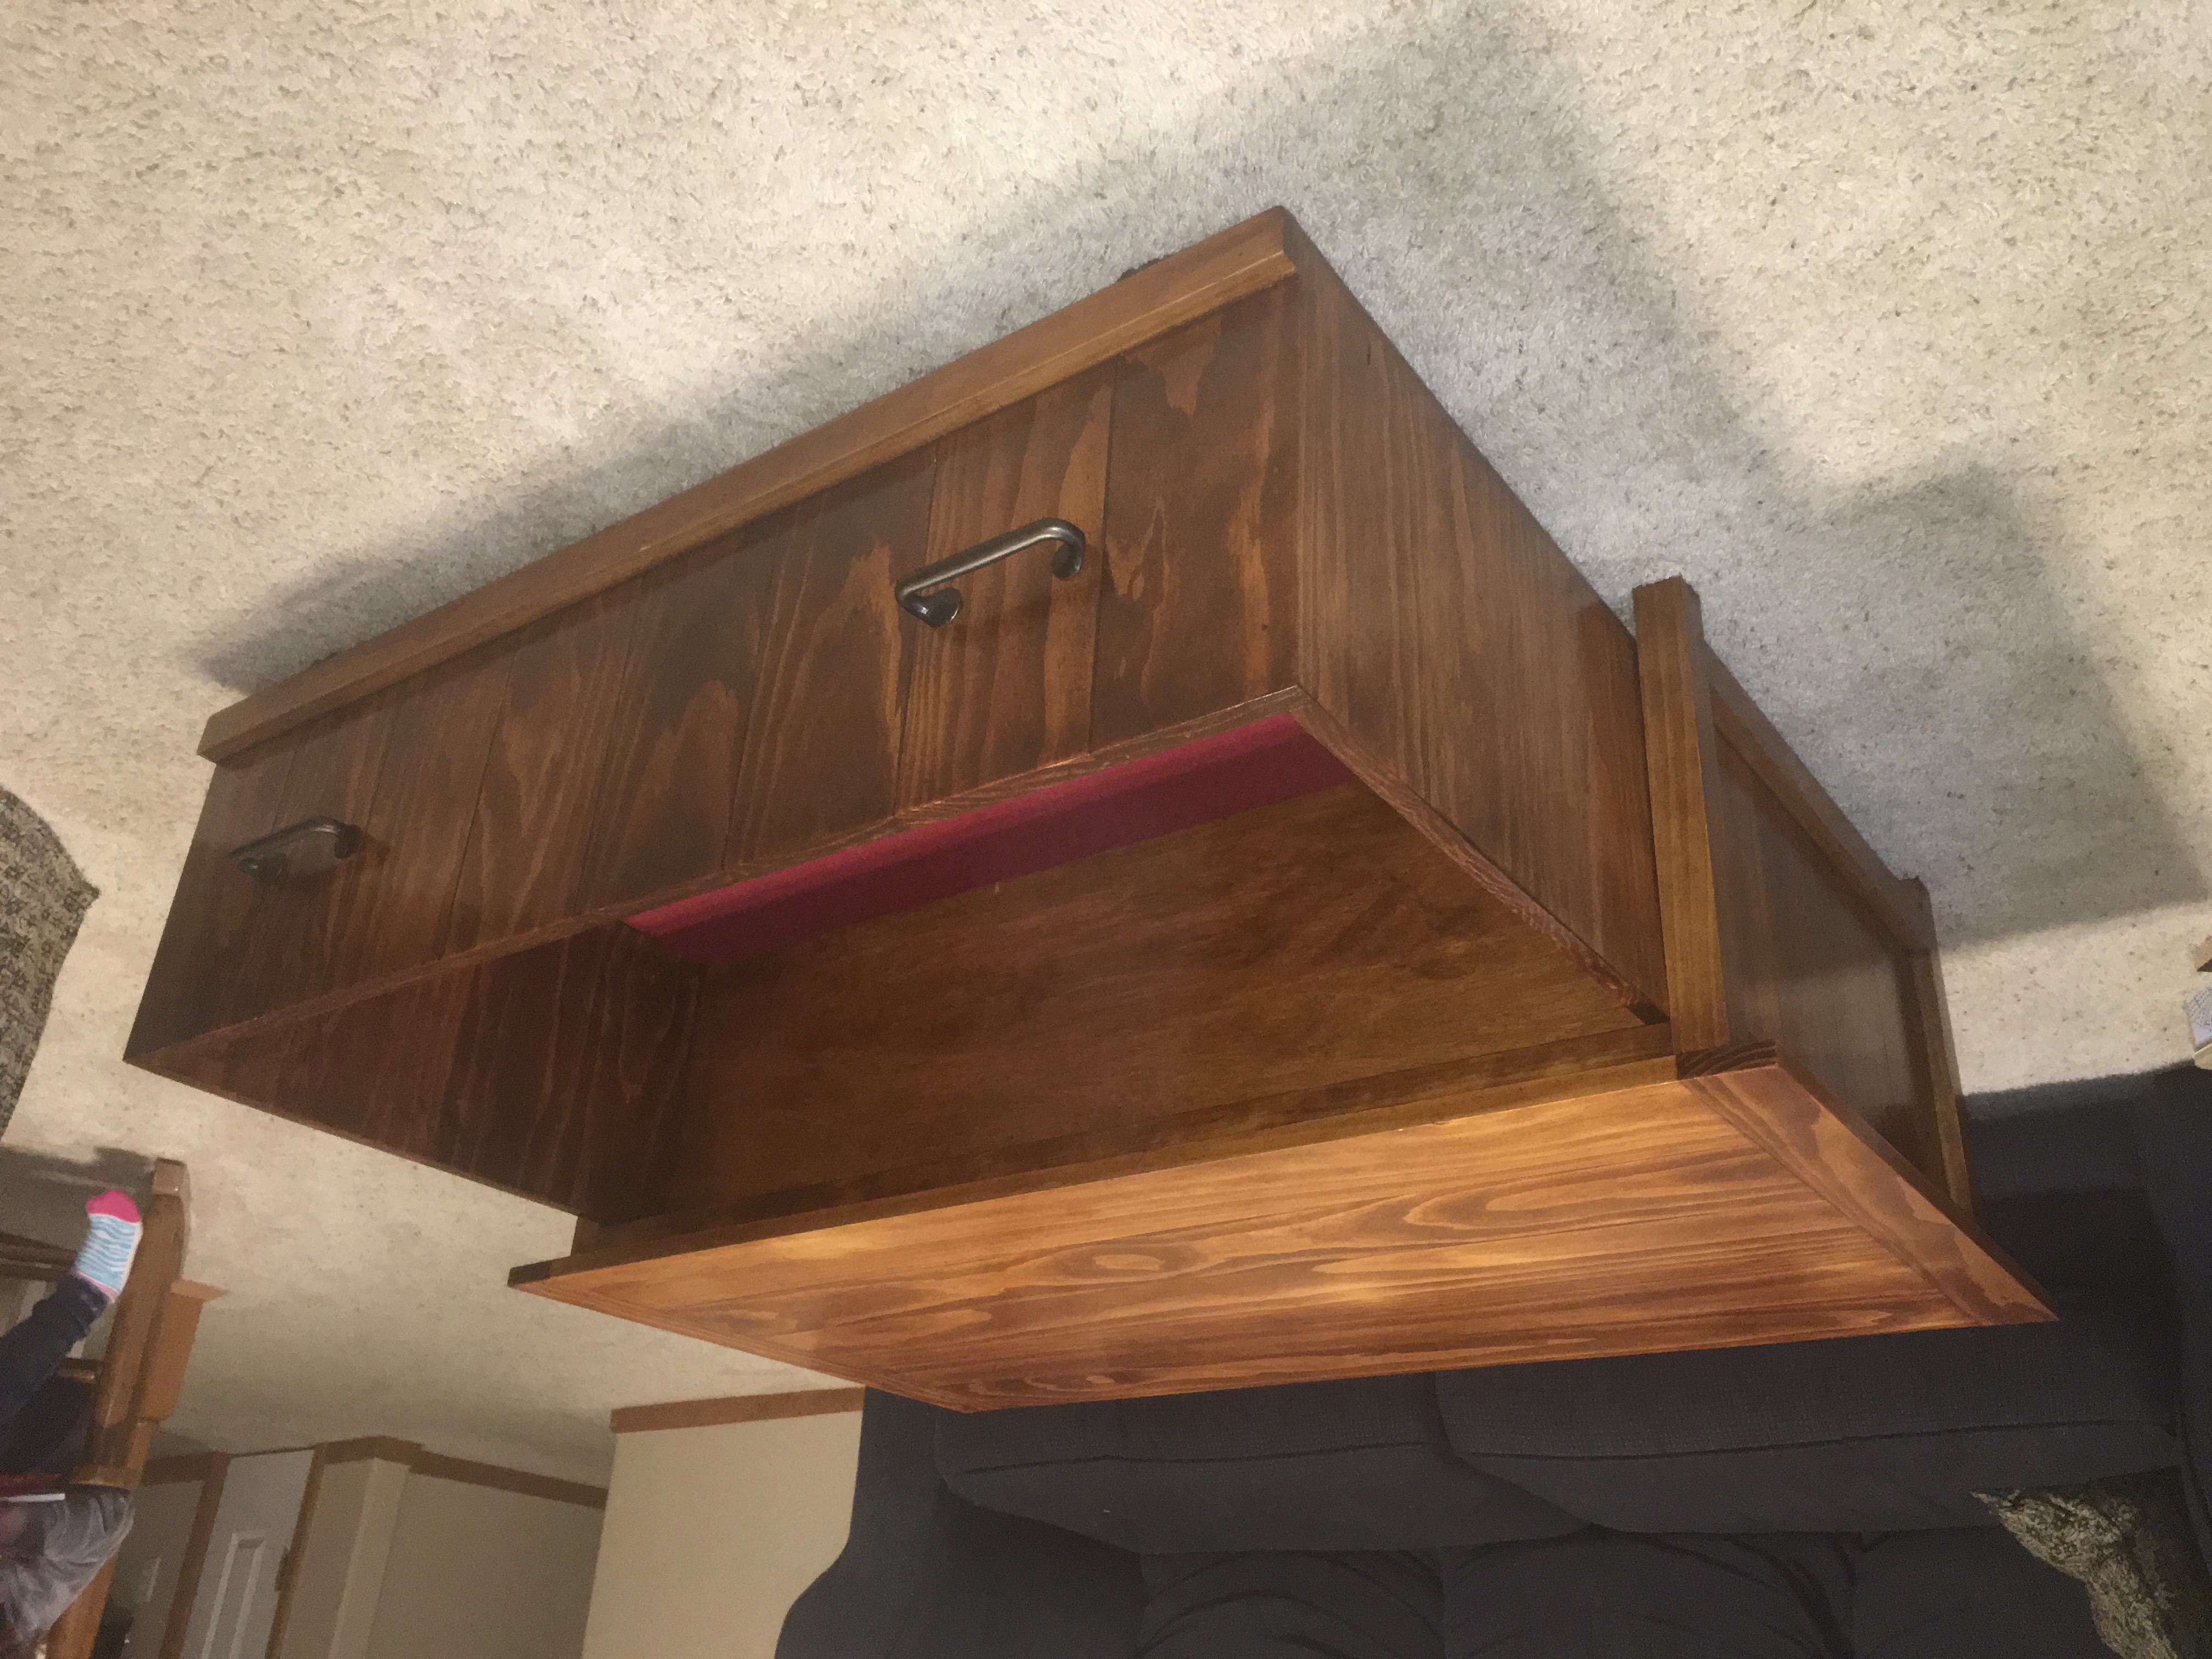
Coffee Table
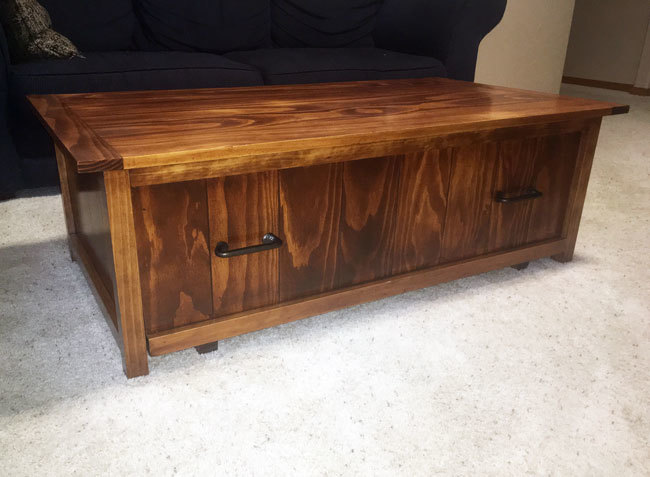
This project was a Christmas present to my wife. I used the plans from the 20-second tidy up coffee table and made some slight modifications.
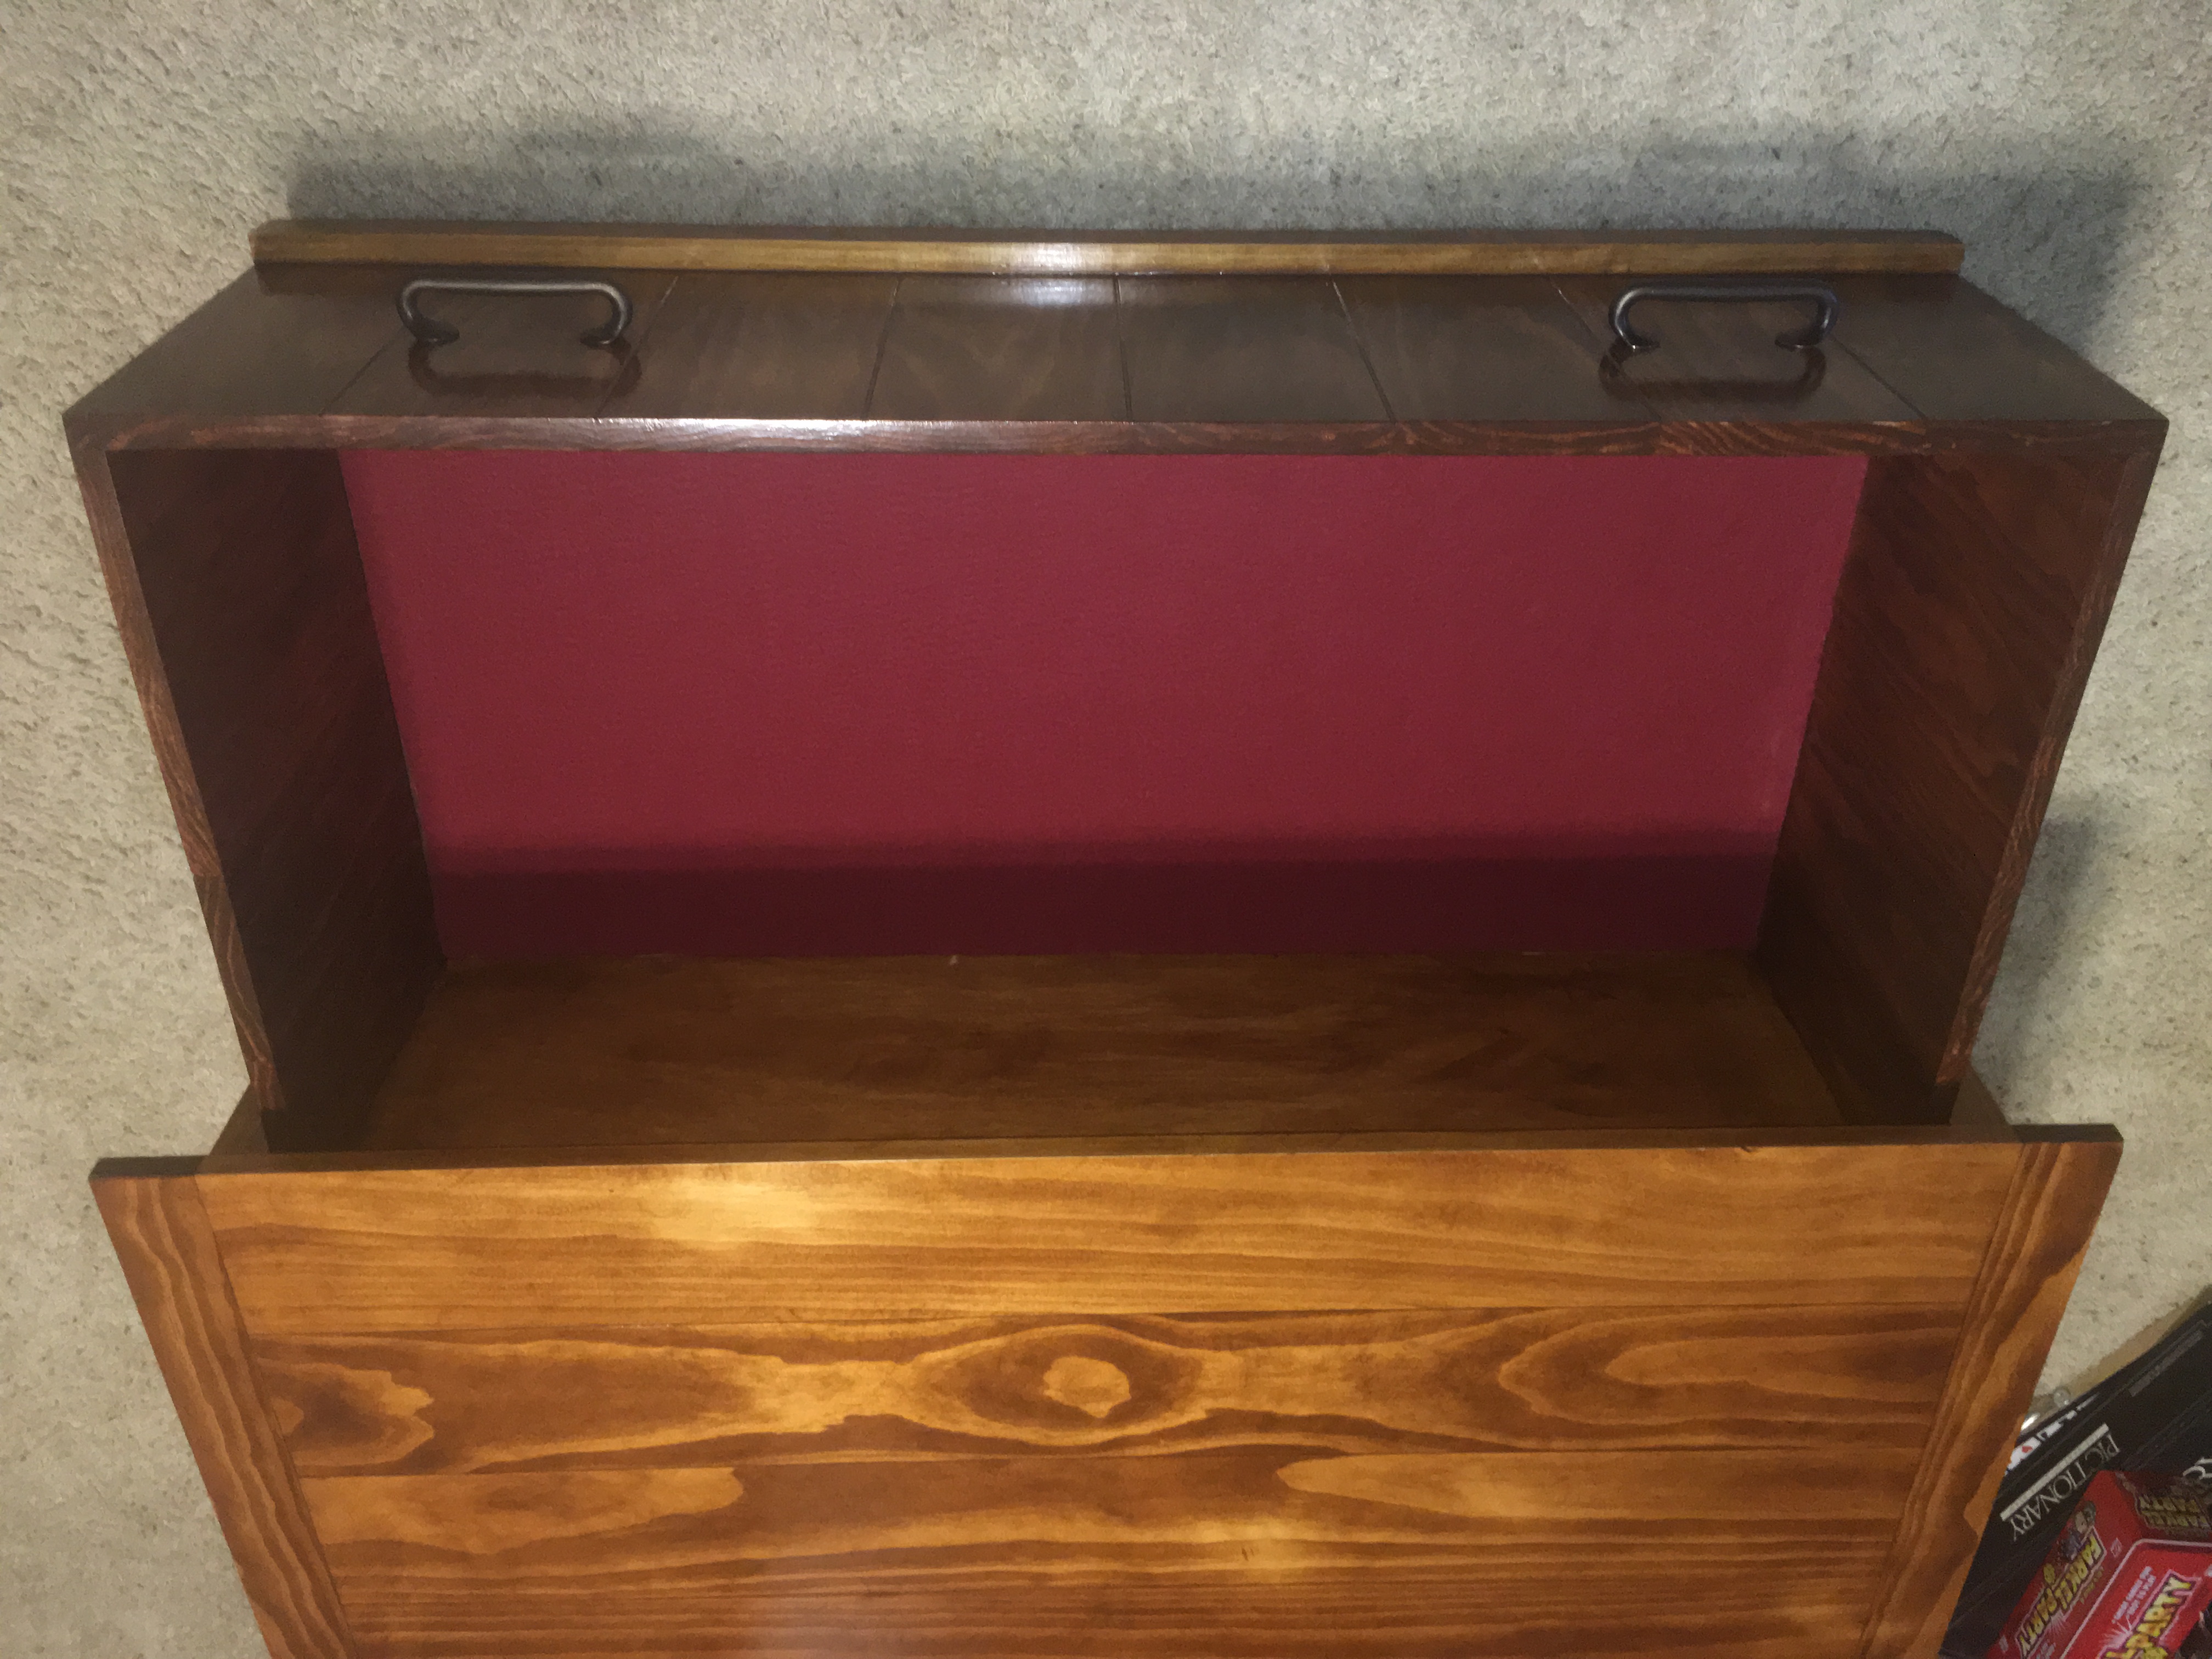
Built from Plan(s)
Estimated Time Investment
Week Long Project (20 Hours or More)
Finish Used
Early American stain. Water-based polyurethane.
Recommended Skill Level
Beginner
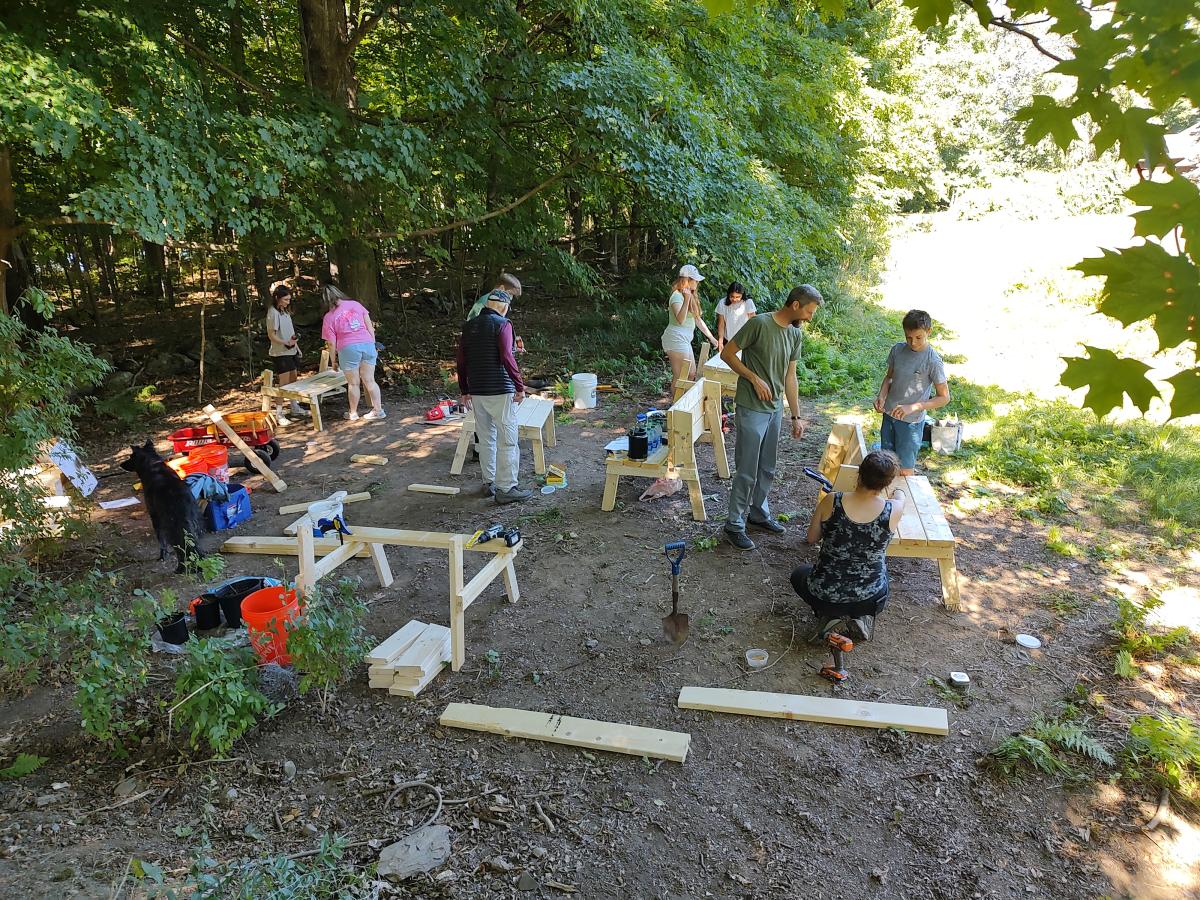
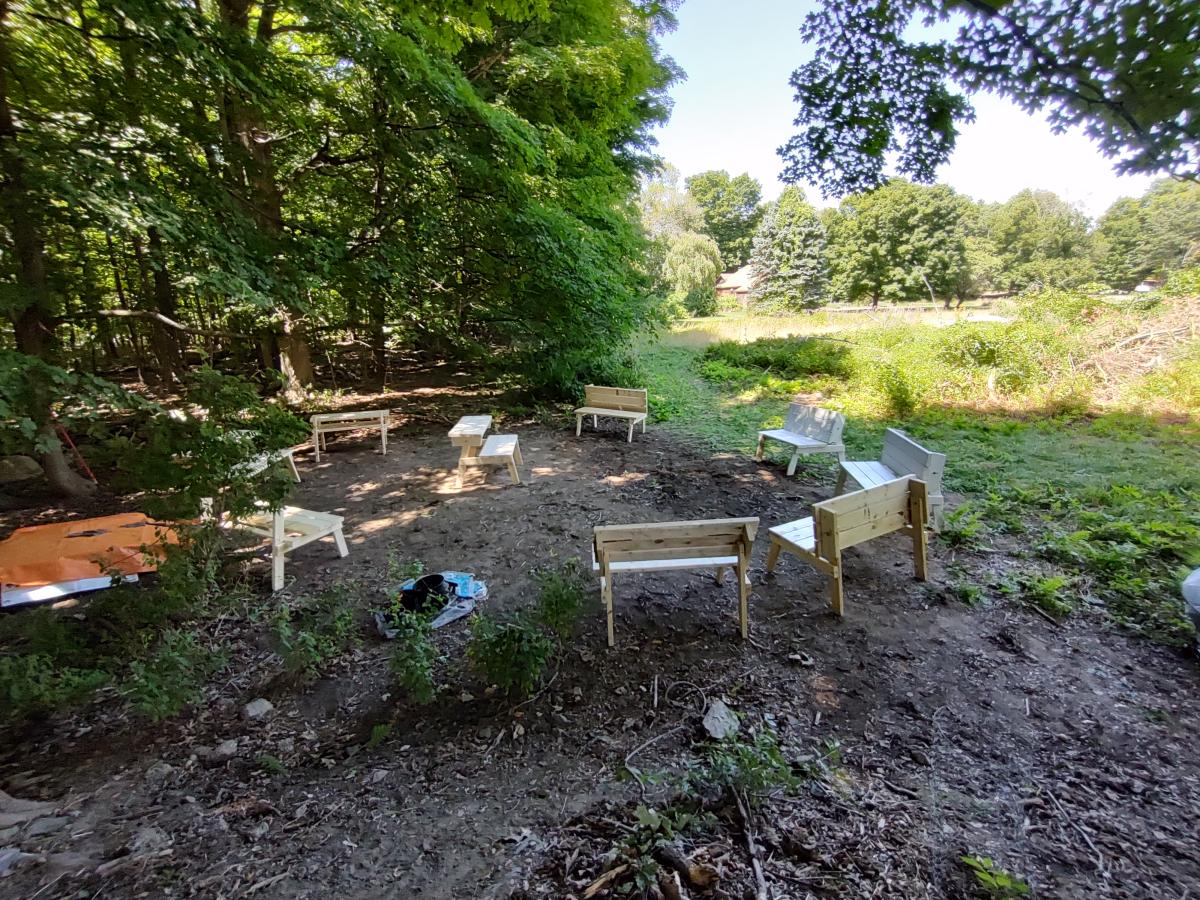
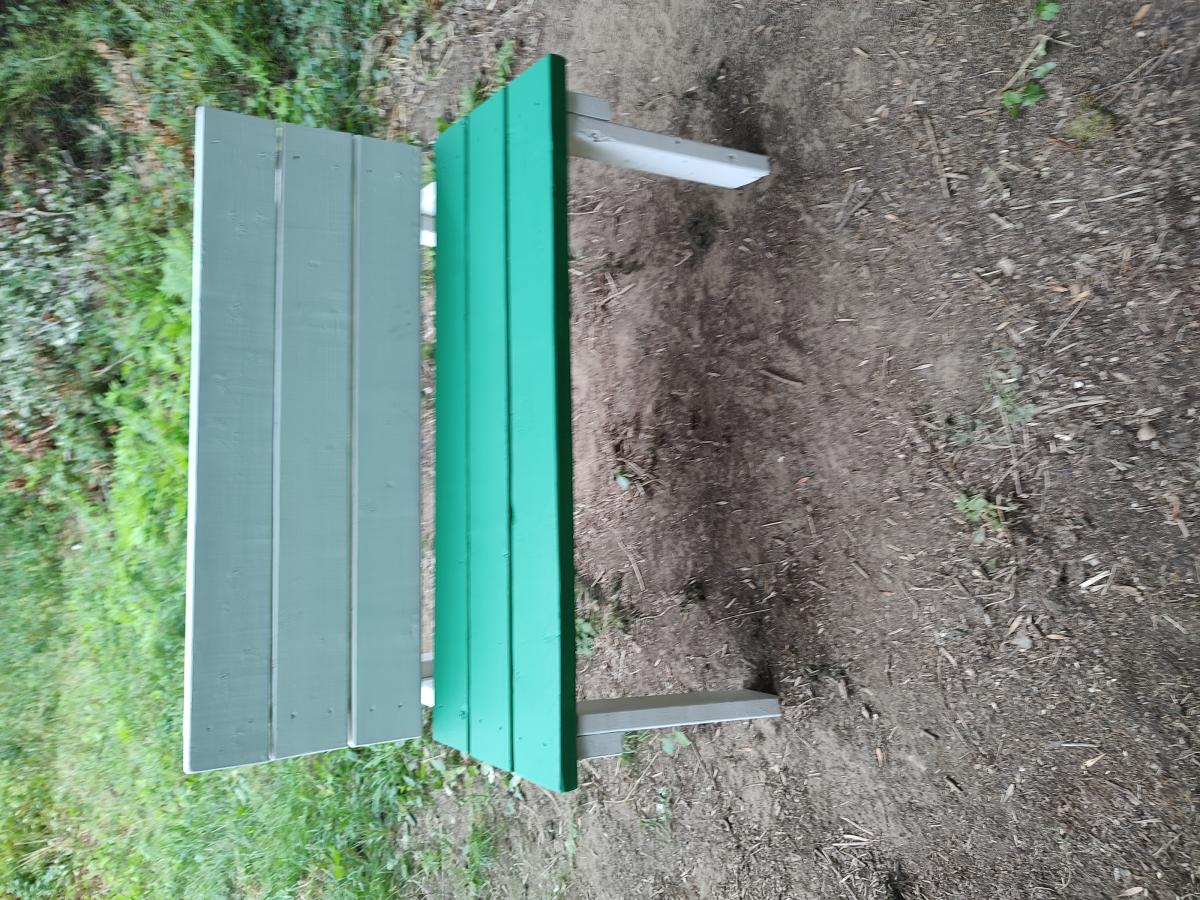
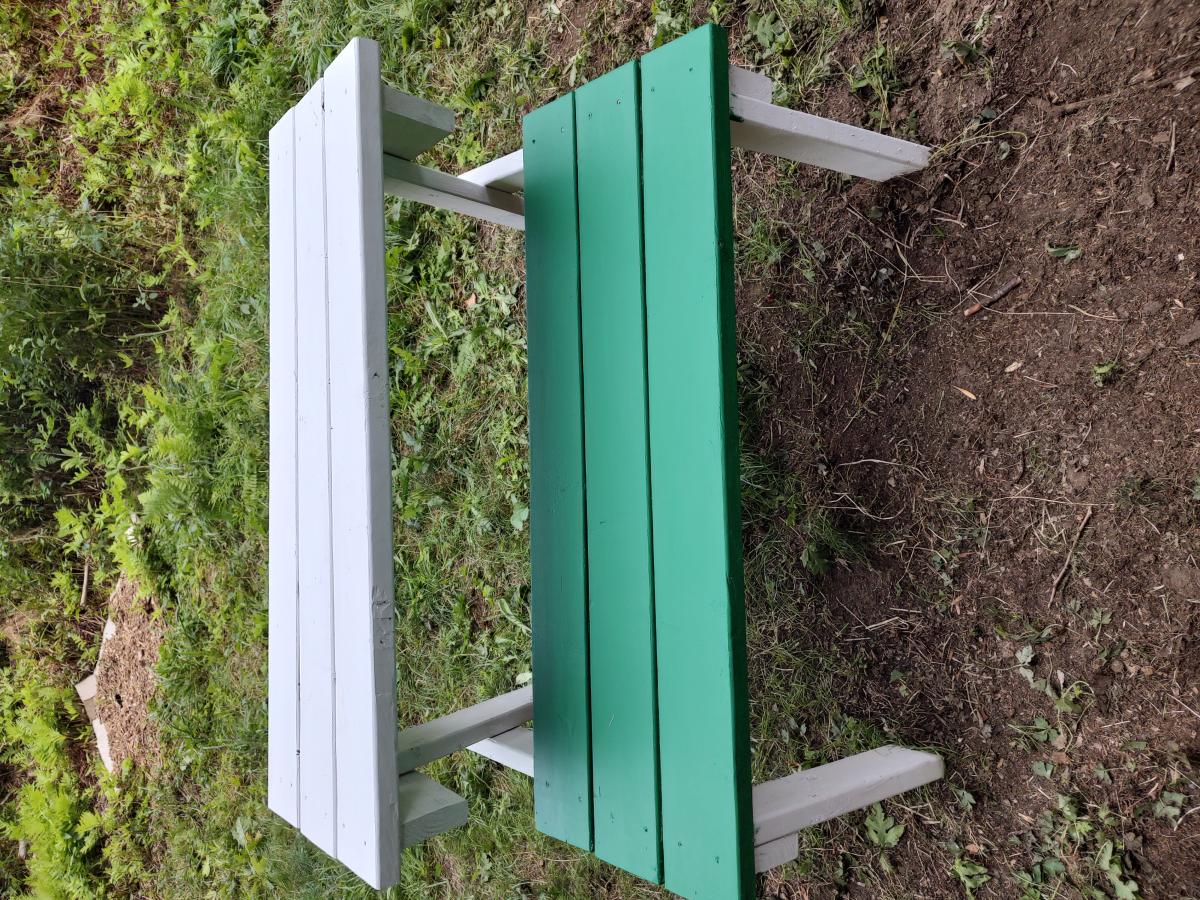
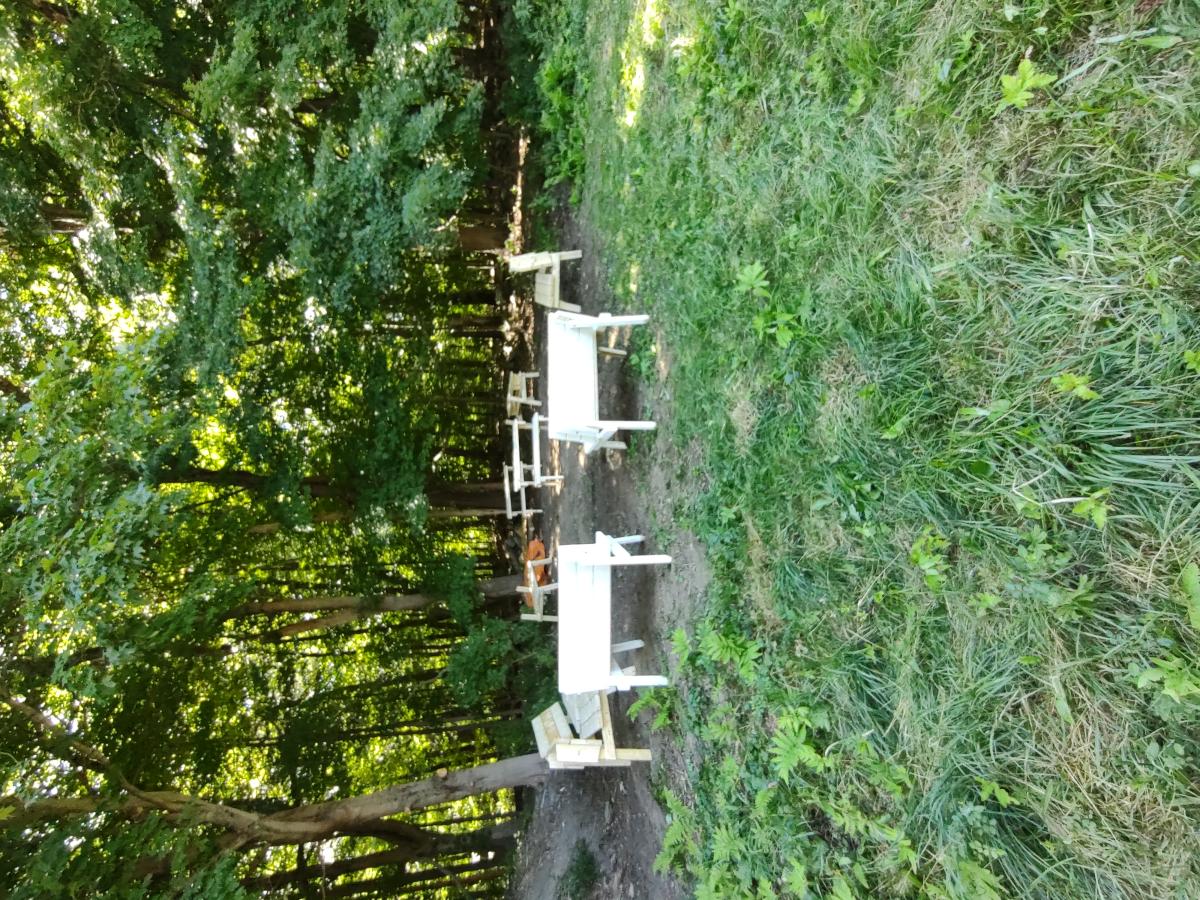
Students build an Outdoor Classroom
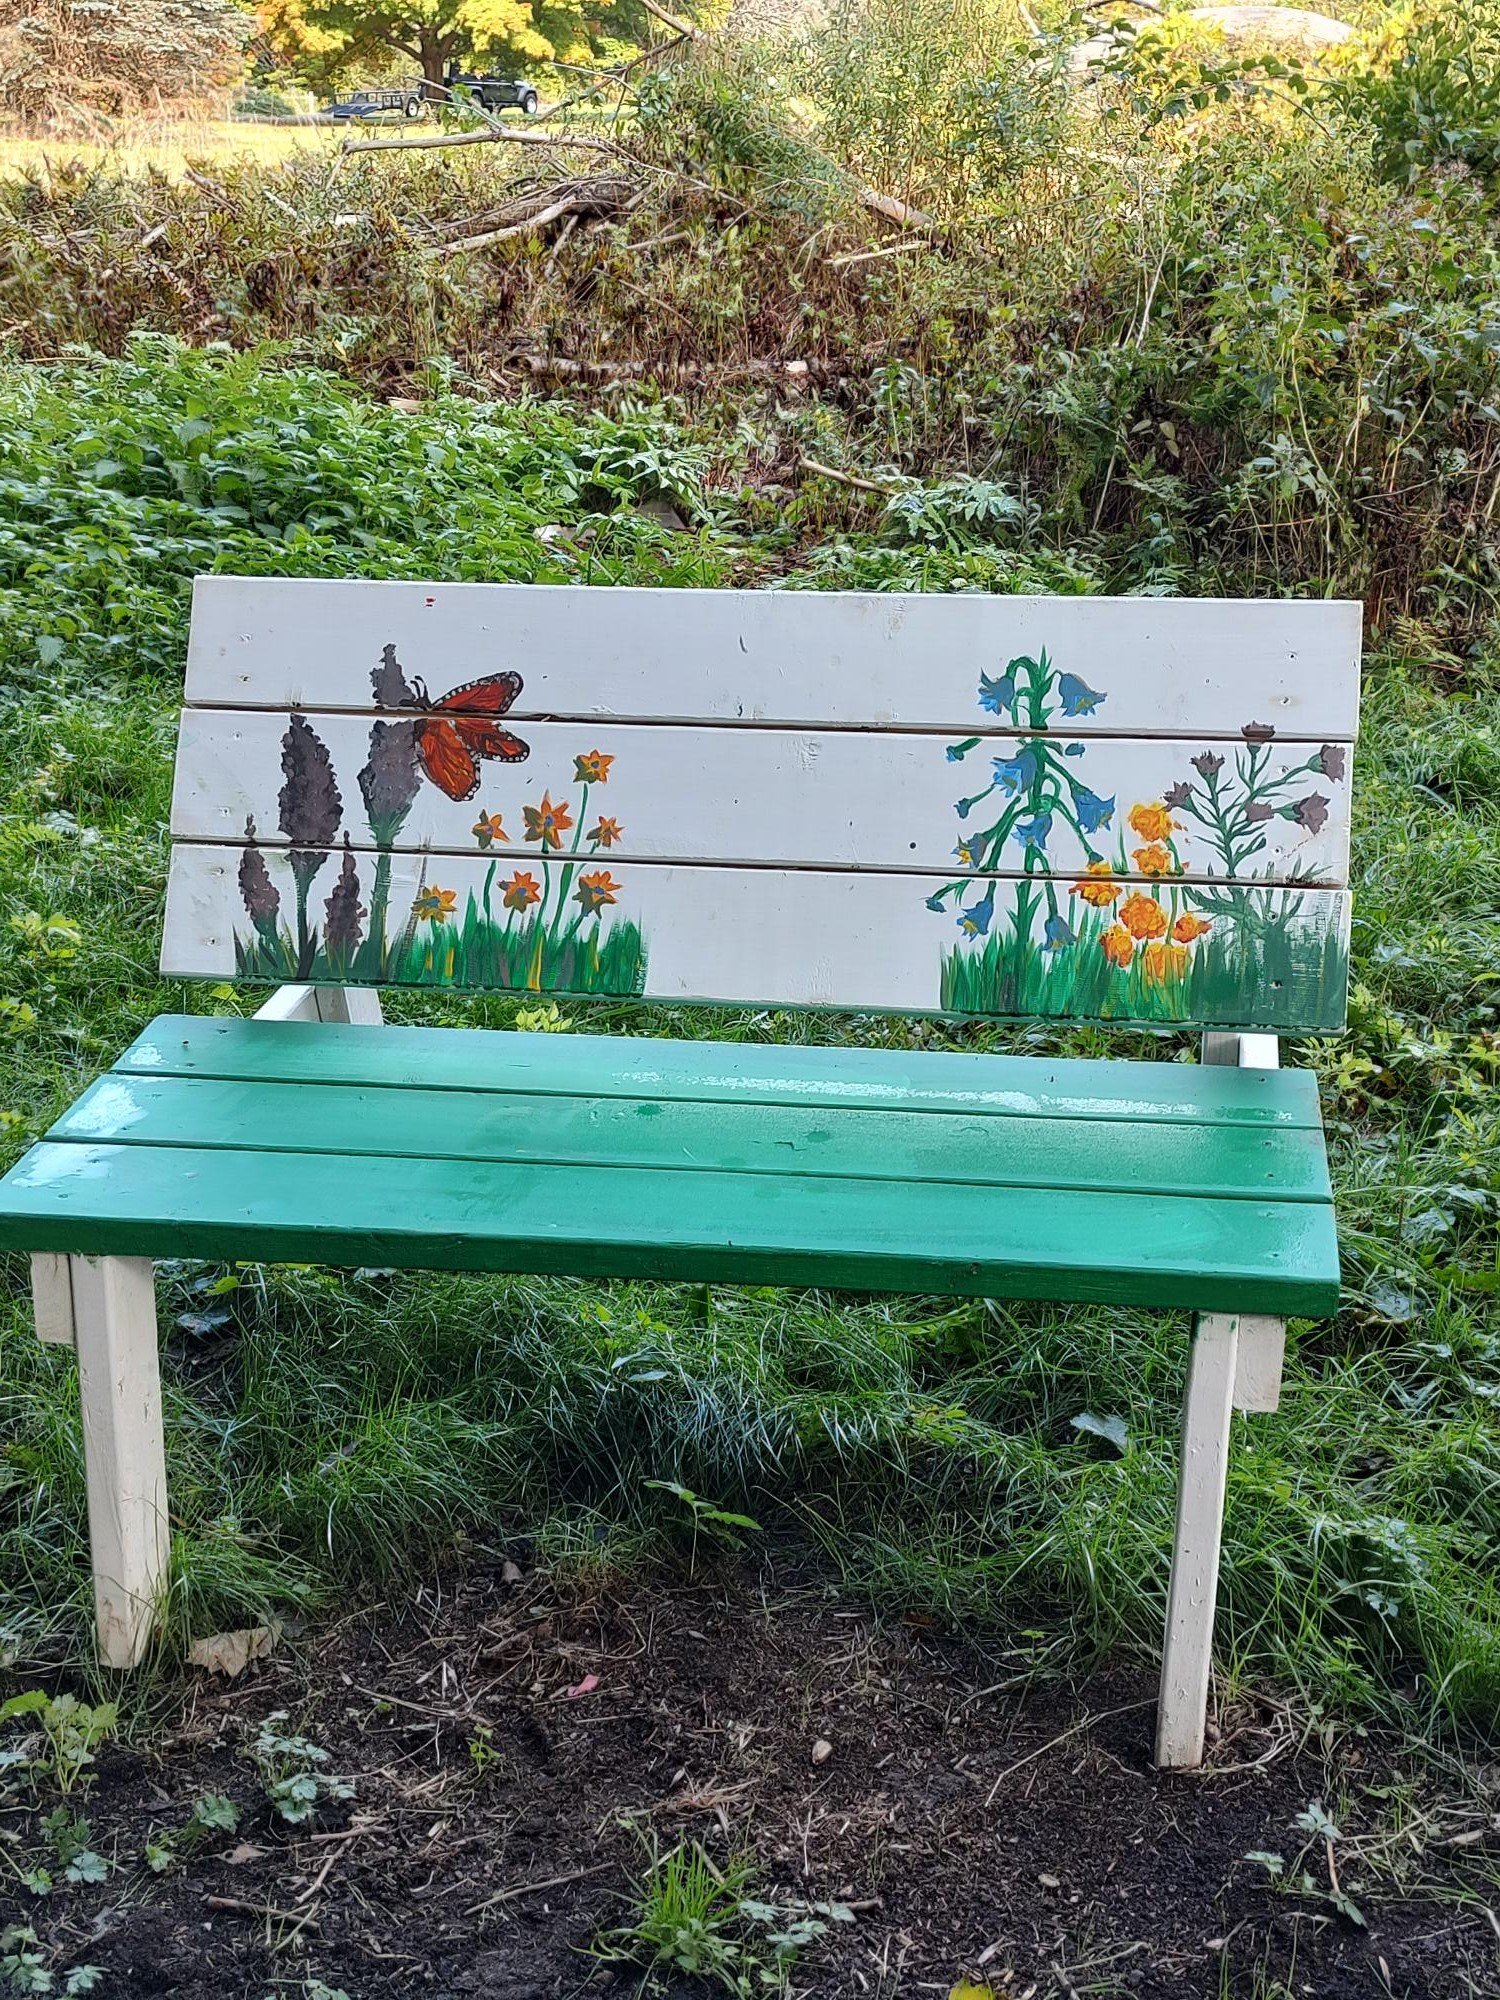
The high school environmental club built an outdoor learning space for classes. The plans were super easy to follow and the students were able to put them together with minimum direction. Imagine being able to take your lessons while out in a field beside the woods! Thank you Ana!
Built from Plan(s)
Comments
Ana White Admin
Wed, 09/28/2022 - 08:41
Perfect fit!
Looks great in your space, thank you so much for sharing!