Community Brag Posts

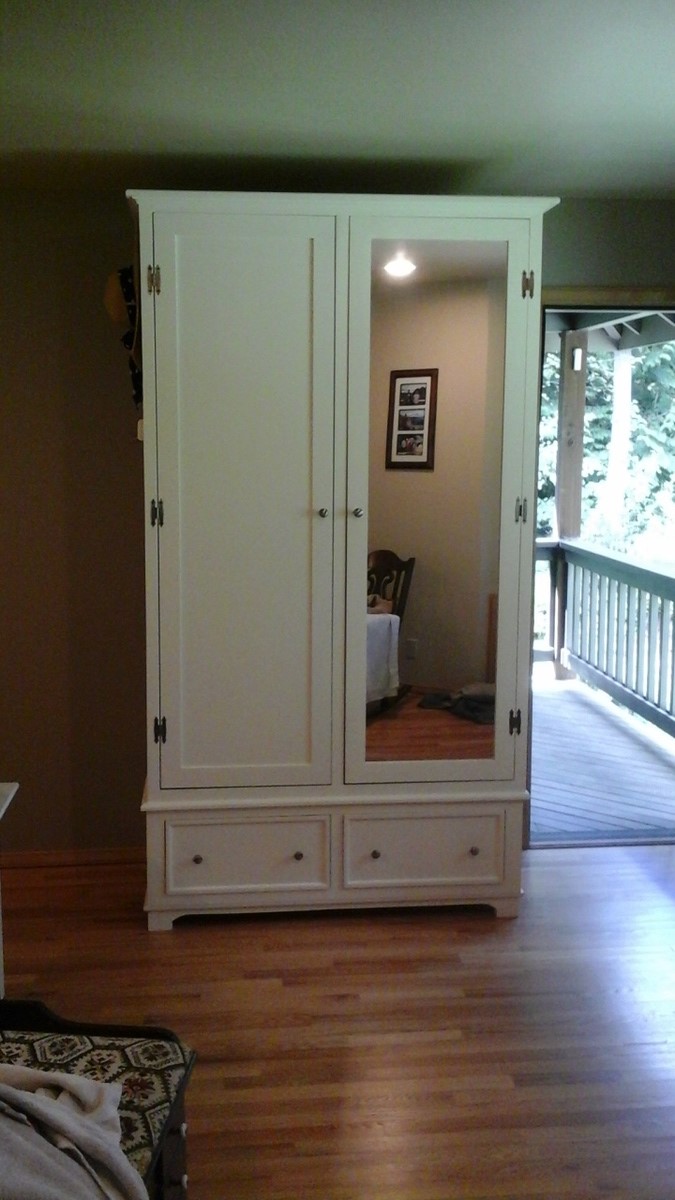
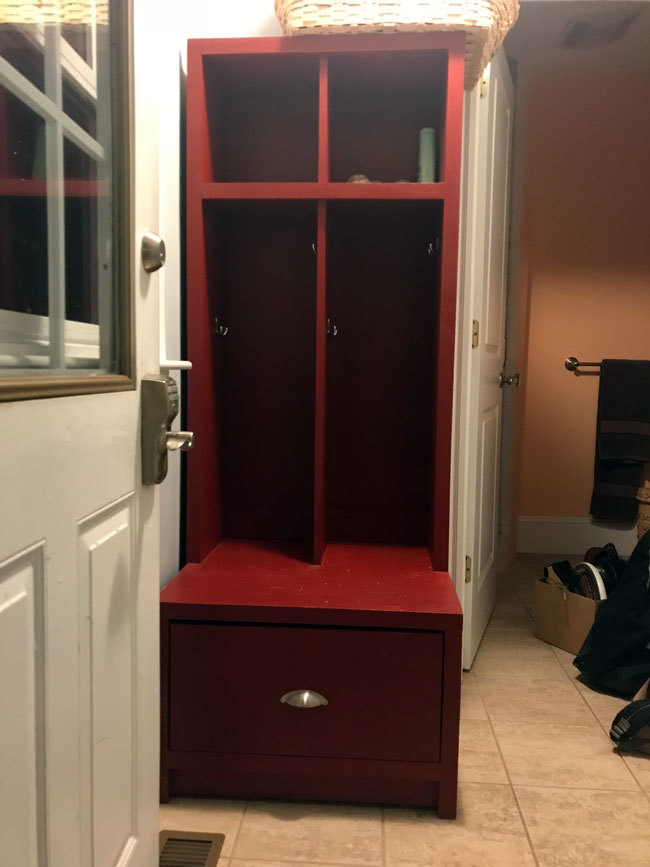
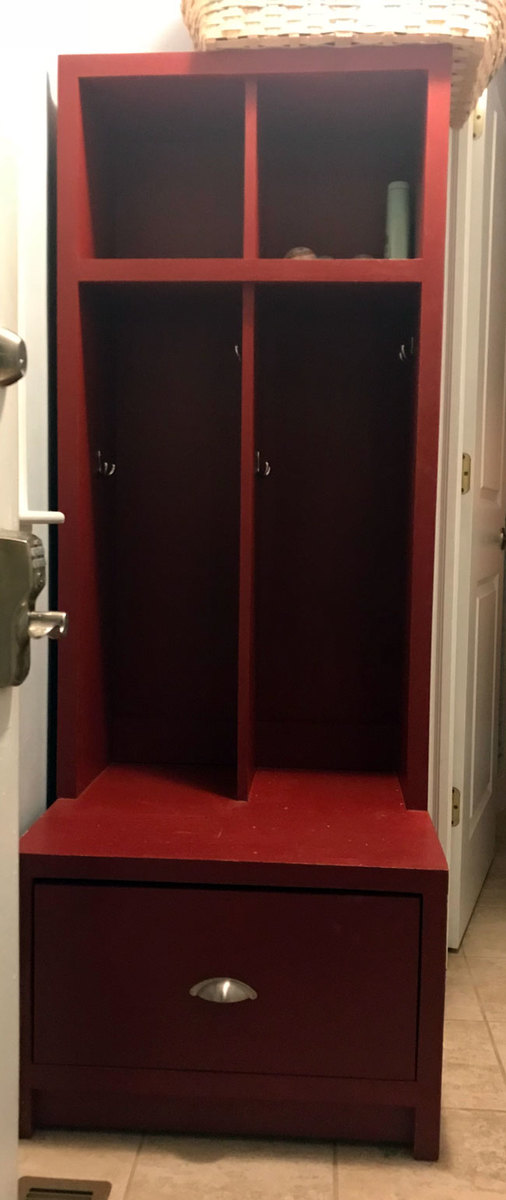
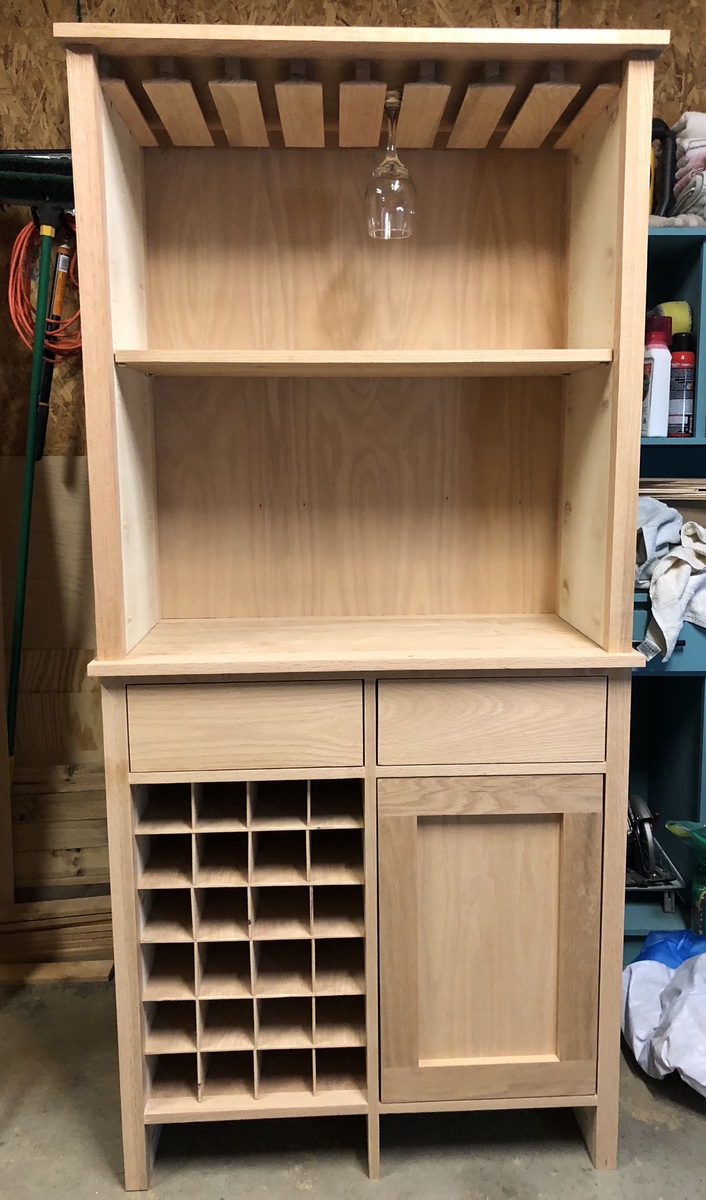
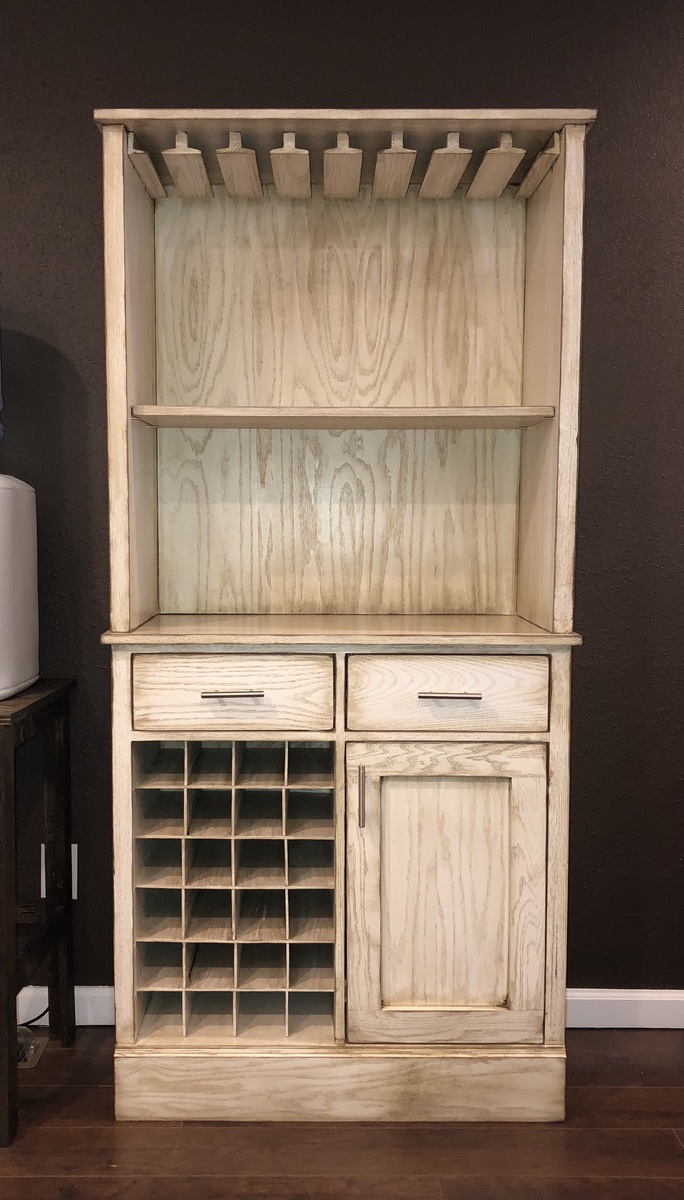
Sliding Door Console

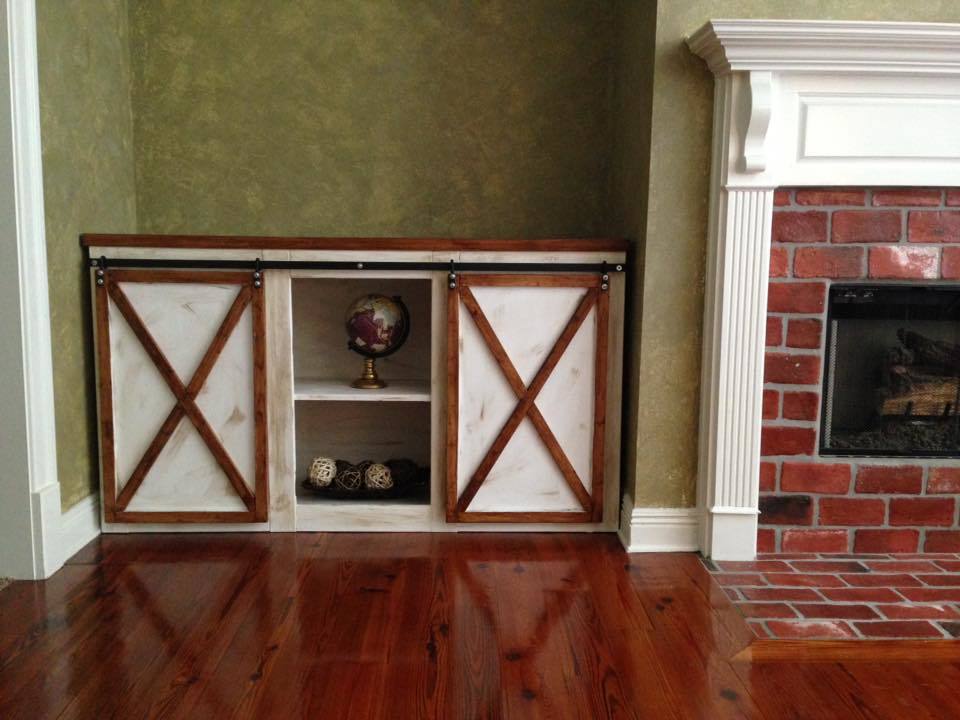
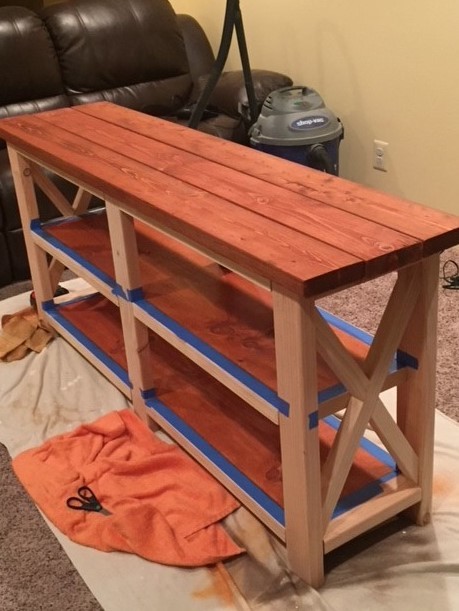
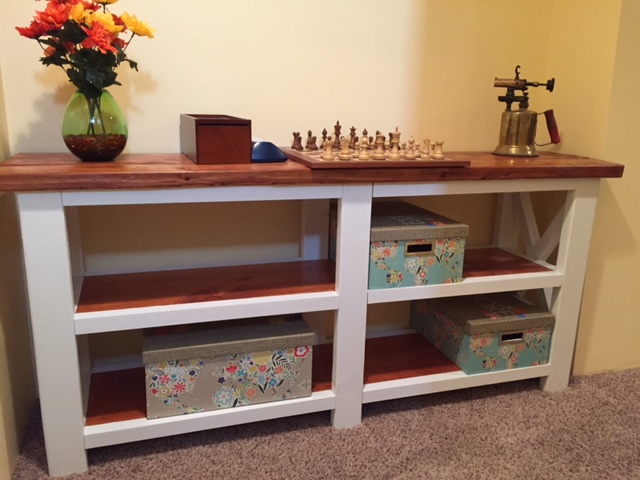
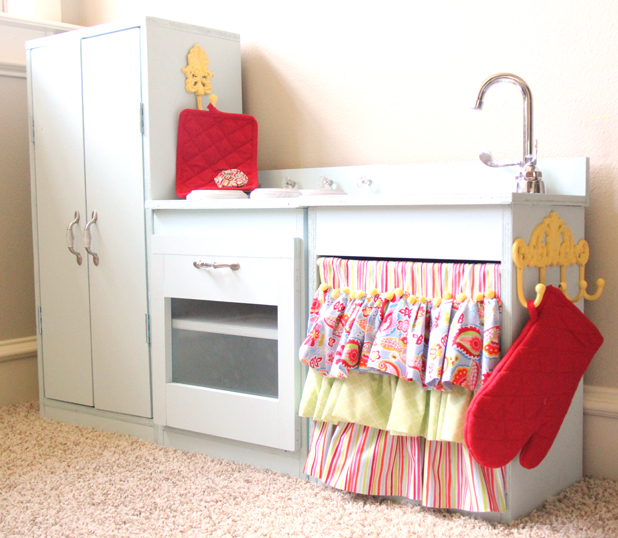
I loved the sliding doors on this project! We decided to go with J hooks instead of wheels and did three spaces for shelves instead of 4 due to the amount of space we were filling. 


This was an easy plan to follow, I just wish it would have had specific instructions for the sliding doors itself. I had to go on a search for an explanation on how to achieve it. 


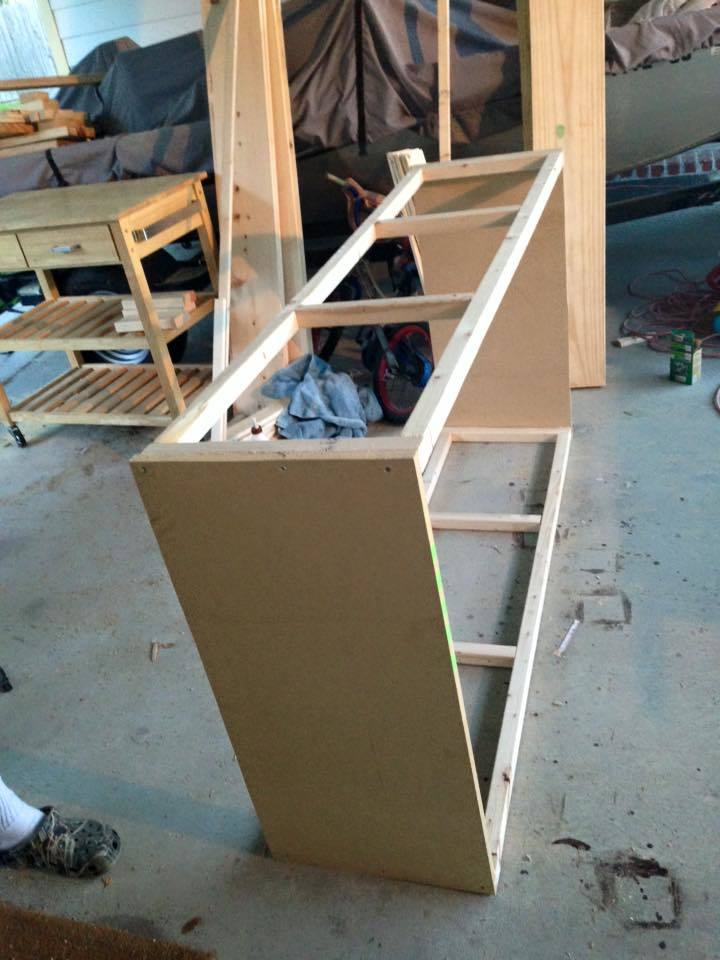
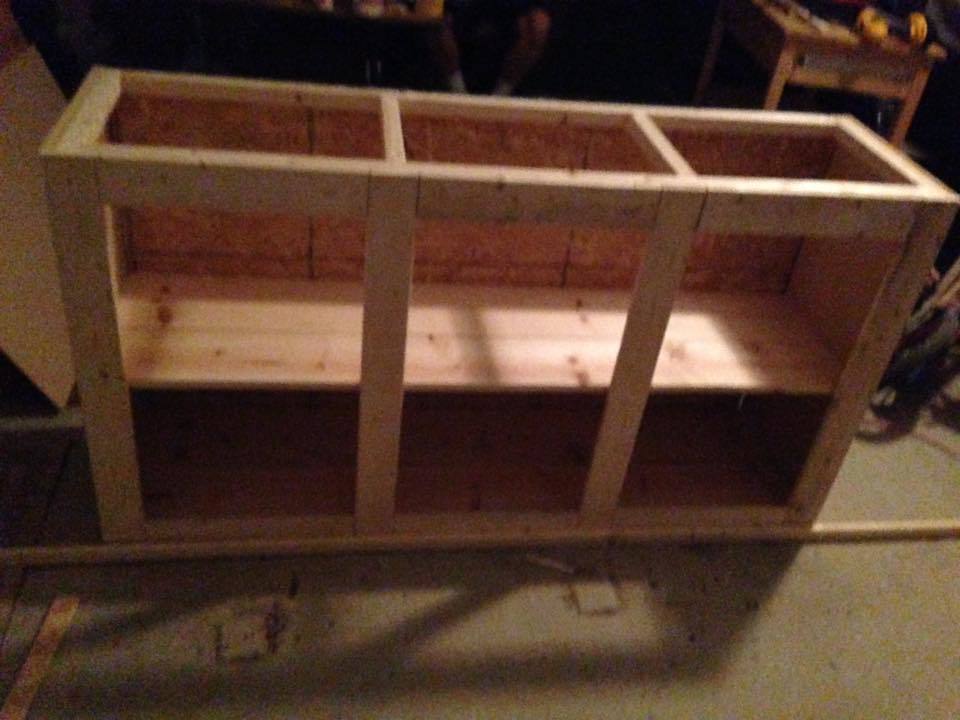
My husband and I work on our projects a few couple hours a day, so I would say this took about 6-8 hours, the staining of course takes time to dry, so I did not include that in the assembly time line. 


Built from Plan(s)
Estimated Cost
I want to say we spent about $250.

We had stain and a few supplies from our previous project, but we did have to buy chalk paint and the brown gloss for finishing. I also excluded the cost for us buying the brad nailer.
Estimated Time Investment
Day Project (6-9 Hours)
Recommended Skill Level
Beginner

Comments

Mountainrivers

Sun, 02/12/2017 - 08:25

Can you please tell me where you got the hardware for this project? I see the link to Amazon, but no indication if I can purchase two additional hangers for the two doors.

Sister project

Submitted by shannarae on Sun, 05/13/2018 - 17:49

Built for my sister. Bolts from Home Depot. Flat corner brackets are spray painted and hinges ordered from Lowe’s. 

Estimated Cost
About 475 with custom glass panes.
Estimated Time Investment
Week Long Project (20 Hours or More)
Finish Used
Used a white paint with enamel finish for hardness. Doors are stained for trim match in my sisters house but have a coat of wipe on poly on top.
Recommended Skill Level
Intermediate

Comments

Replacing Our Outdoor Furniture

Submitted by Anonymous (not verified) on Mon, 04/25/2022 - 15:42

When our outdoor furniture started falling apart, we decided it was too expensive to replace until we found your plans for the “Modern Outdoor Chair from 2x4s and 2x6s.”
The design was almost exactly right.
The only change we made was to make the arms taller so the cushions from our original set would work. Instead of 2x6s for the sides we changed one of the boards to 2x8 and adjusted the arm height by a couple of inches. We made the chair first.
We then used the plans for the Loveseat and completed our set.
After painting the first chair after assembly, we decided it was easier to cut the wood and paint the parts prior to assembly and touch it up after.
The design adjustment matched perfectly. We also created a coffee table using the same type of assembly.
We know these loveseat and chairs will last!!!
Thanks so much
Kim and Scott Griffin

Comments

Bigger Kids Workbench

Submitted by beccadale on Tue, 07/05/2011 - 05:26

I made this workbench for my son's 5th birthday. It's a bigger style real workbench for kids. He also received real tools for his birthday. I modeled after a one that PBK used to sell.

Built from Plan(s)
Estimated Cost
$50
Estimated Time Investment
Afternoon Project (3-6 Hours)
Finish Used
Stain, chalkboard paint, and stainless steel paint. I used peg board on the back.
Recommended Skill Level
Beginner

Comments

melehes

Sat, 08/06/2011 - 19:50

This is perfect for my little boys, and I really want to build this for my son's birthday in September. I am just learning how to build though so I can't look at a picture and figure out how to build it. Would it be possible for you to send me the measurements and as much information as possible? You did such an amazing job.

Denise DuBois (not verified)

Tue, 09/13/2011 - 20:39

Hi,

I would love to make this for my soon-to-be sever year old son, for his birthday. I'm a total novice where building something like this is concerned; any chance you could send me the measurements? Gabe would be so grateful!

Thanks again, and amazing work!

Denise

Bonnie Jean (not verified)

Thu, 09/22/2011 - 12:08

I want to make this in a MOMMY size for my garage. It looks PERFECT. Can someone e-mail me the original specs so I can adapt it to my work space?

Thank you for sharing!!
BonnieJean

kimmyshell (not verified)

Sat, 10/08/2011 - 11:10

Does anyone have the plans for this - I would love to make it for my son.

Any Dimensions would be greatly appreciated!!!!

THANK YOU

Guest (not verified)

Tue, 12/27/2011 - 16:12

This is an awesome workbench!!!! My husband and I would love to make this for my sons seventh birthday. If possible could you please email me the dimensions and details foe this project. I love your work and creativity!! Thanks for the inspiration!!!

Guest (not verified)

Sun, 03/04/2012 - 11:45

My 6 year old is begging me to make this for him,
Can anyone send me the specs or dimentions/ directions?
I think he has more building skills than I do.

spiceylg

Wed, 08/22/2012 - 05:52

Hi. Love your mod using the pegboard. Can you please tell me exactly how you put the frame around it? Did you sandwich between two trim pieces or router in a grove for it to sit? Thinking of making some of these in the smaller size for a craft show so any tidbits to make it go faster would be much appreciated!

jessie283

Fri, 05/24/2013 - 07:48

I would love the plan details for this workbench.
Are they available some where on your site?
Thanks!

Babsy225

Tue, 05/28/2013 - 07:24

I would love to make this for my son for his birthday. He would be thrilled! Could you please send me the plans/dimensions?

etrautman

Fri, 12/11/2015 - 21:40

I would love to make this for my son for Christmas and am not seeing the dimensions/cut list of the bigger kids version. Can you email them to me? Thanks!

Armoire

Submitted by Smokeydog on Thu, 09/03/2015 - 13:56

Built this armoire for the master bedroom  and constructed it to match the existing furnishings.  This thing is huge and weighs a ton.  7 1/2 feet by 4 feet.  I had to make sections in the shop and then assemble and paint it in the second story bedroom.  If we ever need to move it out of the house we are fortunate to have a balcony off the bedroom.  With help from a whole bunch of guys we should be able to lower it down ... if it ever comes to that!

Estimated Cost
450.00
Estimated Time Investment
Week Long Project (20 Hours or More)
Finish Used
BEHR paint. Home Depot matched the paint perfectly.
Recommended Skill Level
Intermediate

Rustic X Console

This was my first project after discovering the "Ana White" web site.  After looking through the brag photos I zeroed in the Rustic X Console.  I was specifically inspired by the photos from "Celeste808" and "aDIYguy".  It also gave me an opportunity to try out my new Kreg Pocket jig. I hope you like the pictures.

Built from Plan(s)
Estimated Cost
I figure i spent about $95 in materials at the local Home depot. I already had some items at home that I used.
Estimated Time Investment
Weekend Project (10-20 Hours)
Finish Used
Miniwax Gunstock #231, Miniwax fast drying Polyurethane (1/2 pint), Behr-ultra Pure white eggshell finish paint and primer in one (quart)
Recommended Skill Level
Beginner

Easy Build Wood Headboard

Submitted by Anneke on Fri, 07/08/2011 - 01:01

This was actually my first build. I had just about had it, went with all three kids, got the wood, and built it while my hubby was at work (24 hr. shifts at the fire station). And yes, that was after I finally Googled, "How to unlock a Dewalt Compound Miter Saw" after 30 minutes of unsuccessful prodding! :-) I'm super happy with how it came out (despite the poor flashy picture)! And it was great "practice" for doing my girl's farmhouse beds.

Estimated Cost
$80
Estimated Time Investment
Afternoon Project (3-6 Hours)
Finish Used
Minwax PolyShades Bombay Mahogany Satin - 2 coats with 3rd touch ups
Recommended Skill Level
Beginner

Comments

JamieRiehl (not verified)

Sun, 05/20/2012 - 22:18

I think it is beautiful! I love the stain! This was my first build also, I used old red barnwood, but a friend wants me to build her one, so I'm thinking about going with the same finish you used, absolutely gorgeous!

computer desk

Submitted by xmasfish on Sun, 09/06/2015 - 17:44

I modified the plans in several ways.  First I made the desk smaller to fit the space.  In doing so I decided it would work better to have only one part of the desk flip up for storage.  I also made the box that makes up the base larger to fit a printer.  That left a smaller space for a chair.  Turns out the chair I had fit perfectly.  I decided not to finish with paint, stain or varnish.  I may do that later.  Over all I am very happy with this project.

Estimated Time Investment
Week Long Project (20 Hours or More)
Recommended Skill Level
Intermediate

Rear foyer bench!

Submitted by Anonymous (not verified) on Mon, 05/09/2022 - 13:19

Used the warming hut bench plan to build this rear foyer bench! I used Behr Stain & Poly in Mission oak (2 coats) and love the way it ties in with the rest of our house. Plus I love saying "Thanks, I made it!" when people see it and ask where I found something that fit so perfectly. :)

Comments

Whitney's Play Kitchen

I used Ana's plans for the play stove, fridge and sink. I LOVED Crafting Chick's take on it so I copied her great accessories. I found my knobs at Walmart and my hooks at Hobby Lobby. I also found the fabric at Hobby Lobby. I used 3/4" hardwood plywood, but if I could do it again I would have used MDF. It's much smoother! I still love it though! Oh... So do the kids ;-)) You can read more details at http://www.shanty-2-chic.com/2011/07/play-kitchen-reveal.html.

Estimated Cost
$150
Estimated Time Investment
Weekend Project (10-20 Hours)
Finish Used
2 coats of Valspar Arctic Edge.
Recommended Skill Level
Beginner

Comments

Guest (not verified)

Thu, 12/22/2011 - 16:05

Hi! We are building this kitchen right now and can not figure out how to mount the hinges!
Not sure what kind of hinges you used? we bought some regular door hinges but they are only able to mount to the outside of the doors. please help. thanks!

Outdoor Dining Table

Submitted by sonnenerin on Tue, 08/13/2013 - 11:55

We started with the bench as a weekend project. After counter-sinking and filling all those screw holes we borrowed a Kreg jr and took onothe table project. However we ended up countersinking the top boards for the table as well; it was easier for us to visualize the spacing between boards and make sure everything was as square and level as we could make it... We used behr paint and primer in one in a satin finish and opted for a punchy green to brighten up our courtyard.
We plan to build another bench since it will tuck in nicely under the table when not in use, and we can pull the table out and use the bench when we need more seating.
We love our new outdoor furniture!! Thanks Ana!

Estimated Cost
$150
Estimated Time Investment
Week Long Project (20 Hours or More)
Finish Used
behr outdoor paint and primer in one
Recommended Skill Level
Beginner

Bead board desk

Here is a desk I recently built.  It is a Pottery Barn piece.  It features full extension drawers slides and simulated maple melamine drawer interiors. 

Estimated Time Investment
Weekend Project (10-20 Hours)
Finish Used
Primer and paint
Recommended Skill Level
Intermediate

Blanket ladder

Submitted by scoricha on Fri, 08/03/2018 - 21:35

Very easy to cut/assemble and very pleased with the result! It took about an hour to cut the boards and screw then together. Then another hour to same/pretreat/stain. Love it!

Built from Plan(s)
Estimated Cost
$10 not including stain (I already had)
Estimated Time Investment
Afternoon Project (3-6 Hours)
Finish Used
Minwax Early American
Recommended Skill Level
Starter Project

Rolling BBQ Cart with removable tray

Submitted by dananryan on Thu, 07/14/2011 - 17:26

This was a father's day present. My husband was quite impressed!

Estimated Cost
$30 including stain and hardware.
Estimated Time Investment
Weekend Project (10-20 Hours)
Finish Used
MinWax Bombay Mahogany and 2 coats of Spray acrylic polyurethane.
Recommended Skill Level
Beginner

Comments

dananryan

Sat, 11/26/2011 - 08:43

Hi, this look is the result of trying to fix a very VERY sloppy stain job. I had applied the stain much to thick and uneven and had runs all over the cart. So I decided to sand off the excess and even it out a little. I finished it off with a coat of clear poly. We like the way it looks too and it was really easy.

Our Version of Michaela's Kitchen Island

We needed more counter space in our kitchen and I saw the plan for Michaela's kitchen island I thought it would be perfect. I asked my husband to alter it to fit our space. We used Poplar for the base and Walnut for the top. My husband planed and joined the walnut from rough cut boards. We then shellacked and polyed the top. On the bottom we used SW Urbane Bronze with a walnut stain over the top. I Love how it tuned out! Thanks for the great plans!

Built from Plan(s)
Estimated Cost
$200
Estimated Time Investment
Week Long Project (20 Hours or More)
Finish Used
Sherwin Williams Urbane Bronze with Floetrol as the base with a walnut stain over it and then the whole thing had poly over that.
Recommended Skill Level
Beginner

Comments

JoanneS

Fri, 08/16/2013 - 16:26

Your island is beautiful! Love the finish, and the walnut top is just gorgeous!

Just finished needs pillows :)

Loved building this :) think it came out great. Only thing is i wish i had the screws ana talks abt bc the boards split over and over :( what kind of screws do u use ana? Also couldnt find 2 3/4 deck screws, only 2 1/4"

Estimated Cost
40 per bench pine
36 for 5 lbs of deck screws
Estimated Time Investment
Day Project (6-9 Hours)
Finish Used
Havent yet
Recommended Skill Level
Intermediate