Community Brag Posts

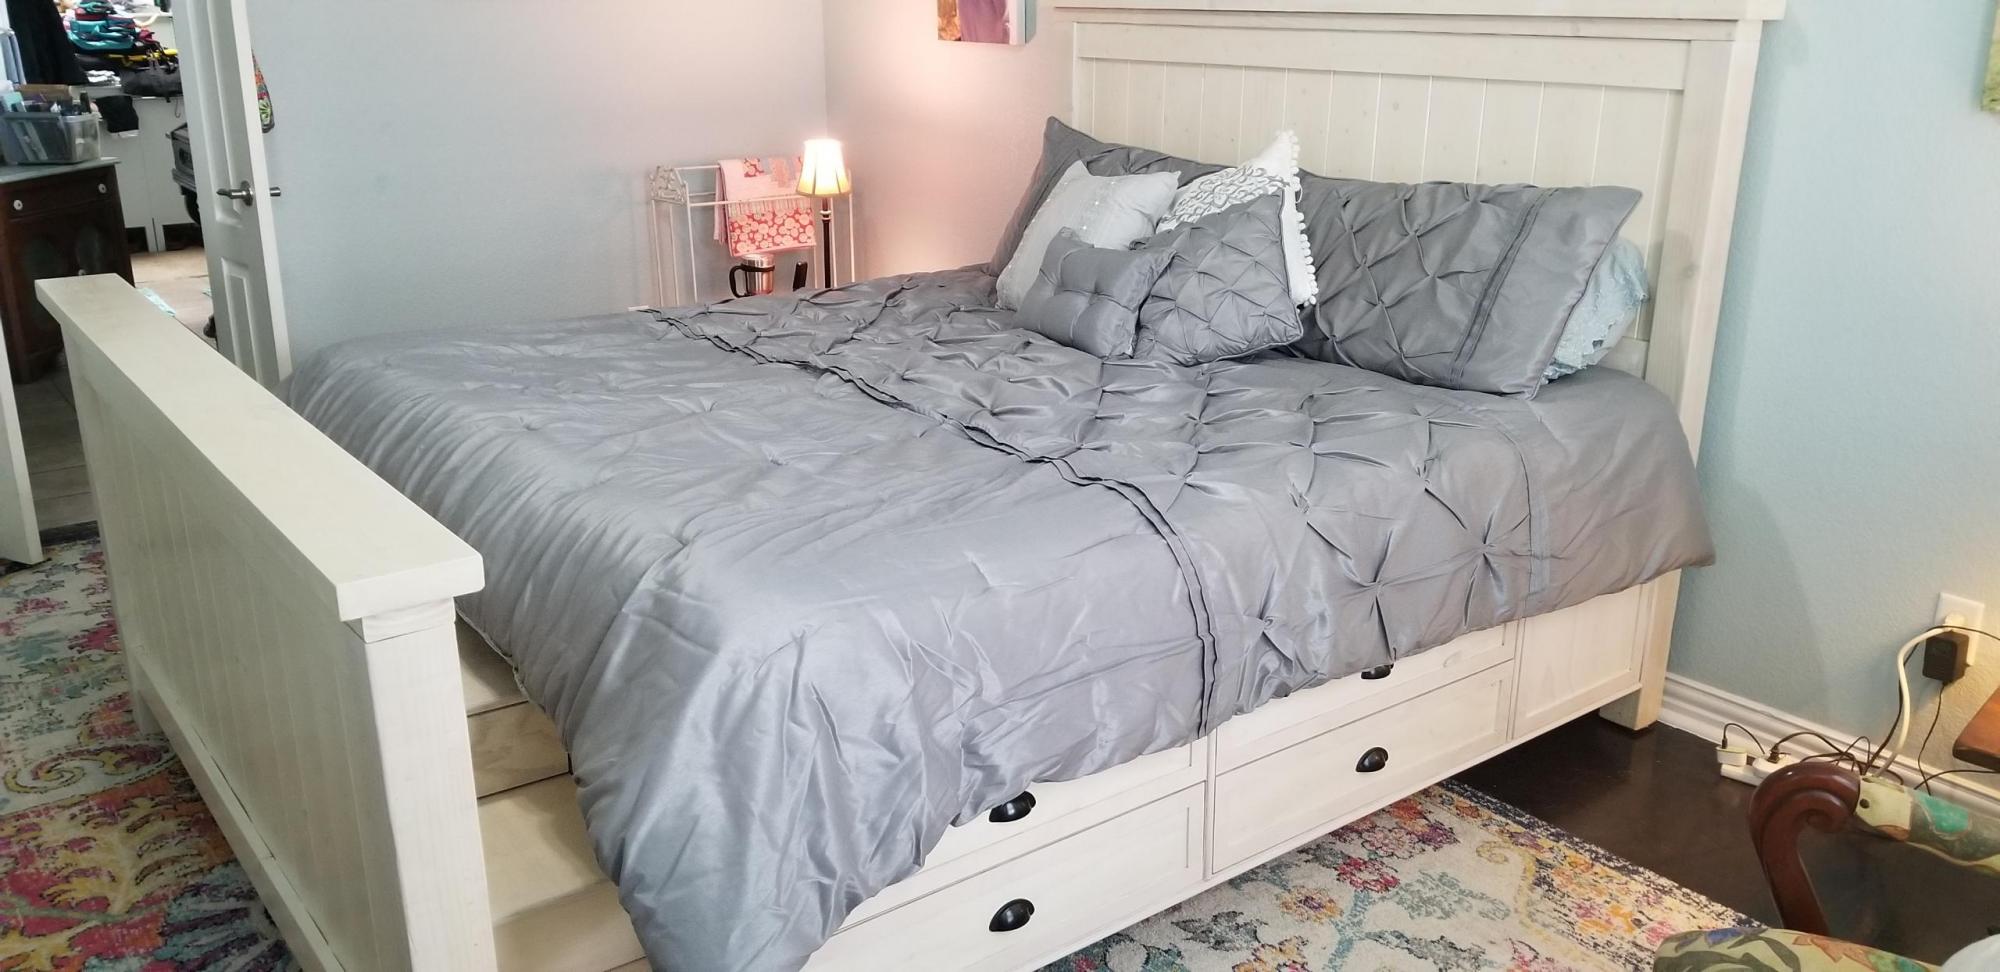
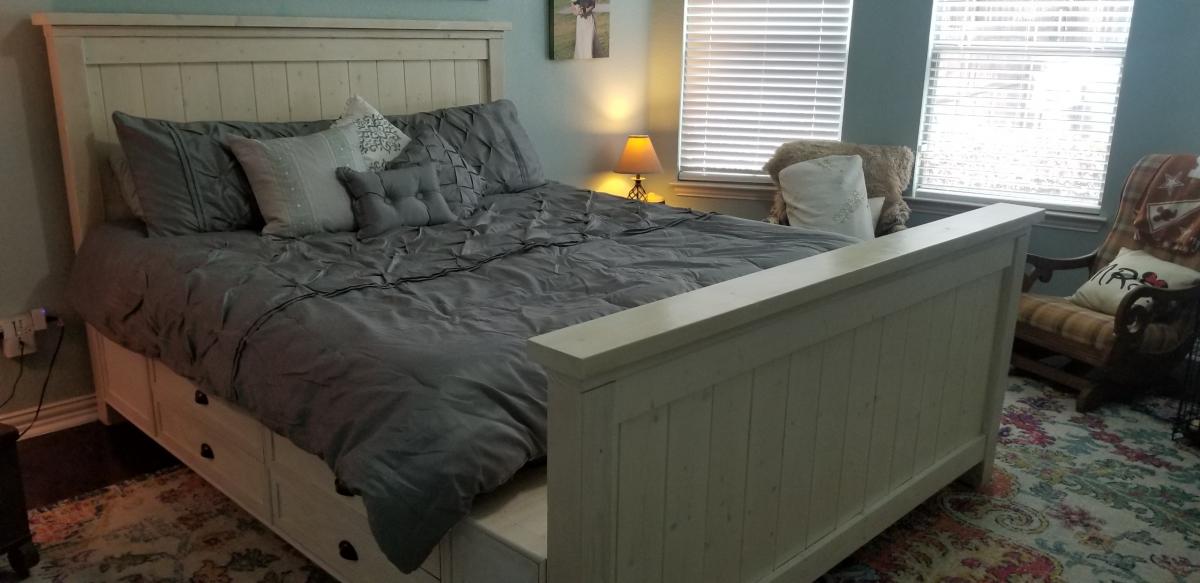
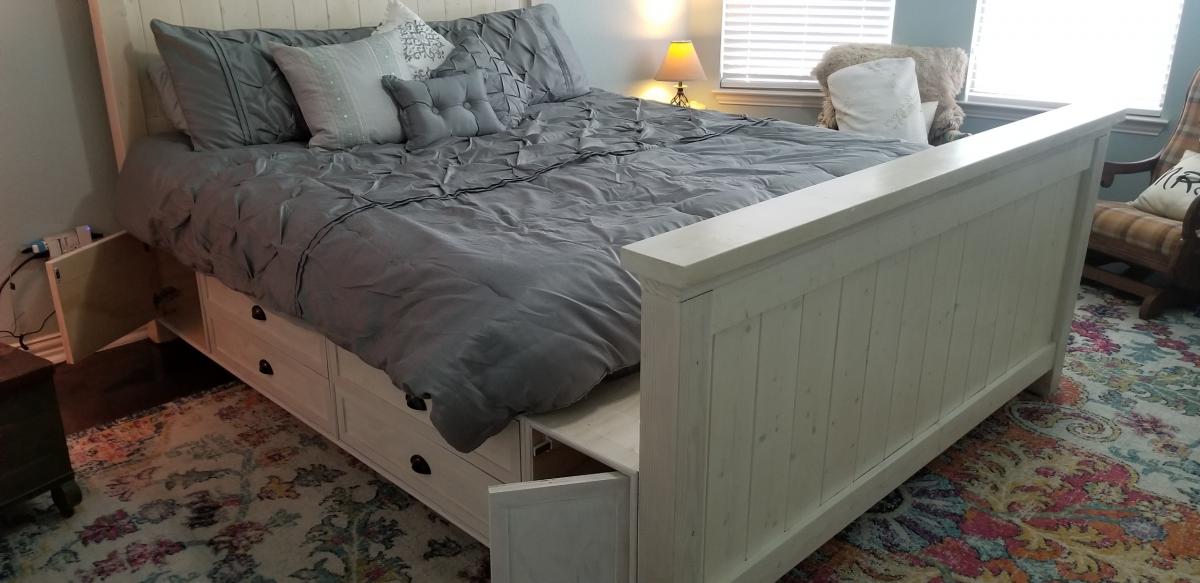
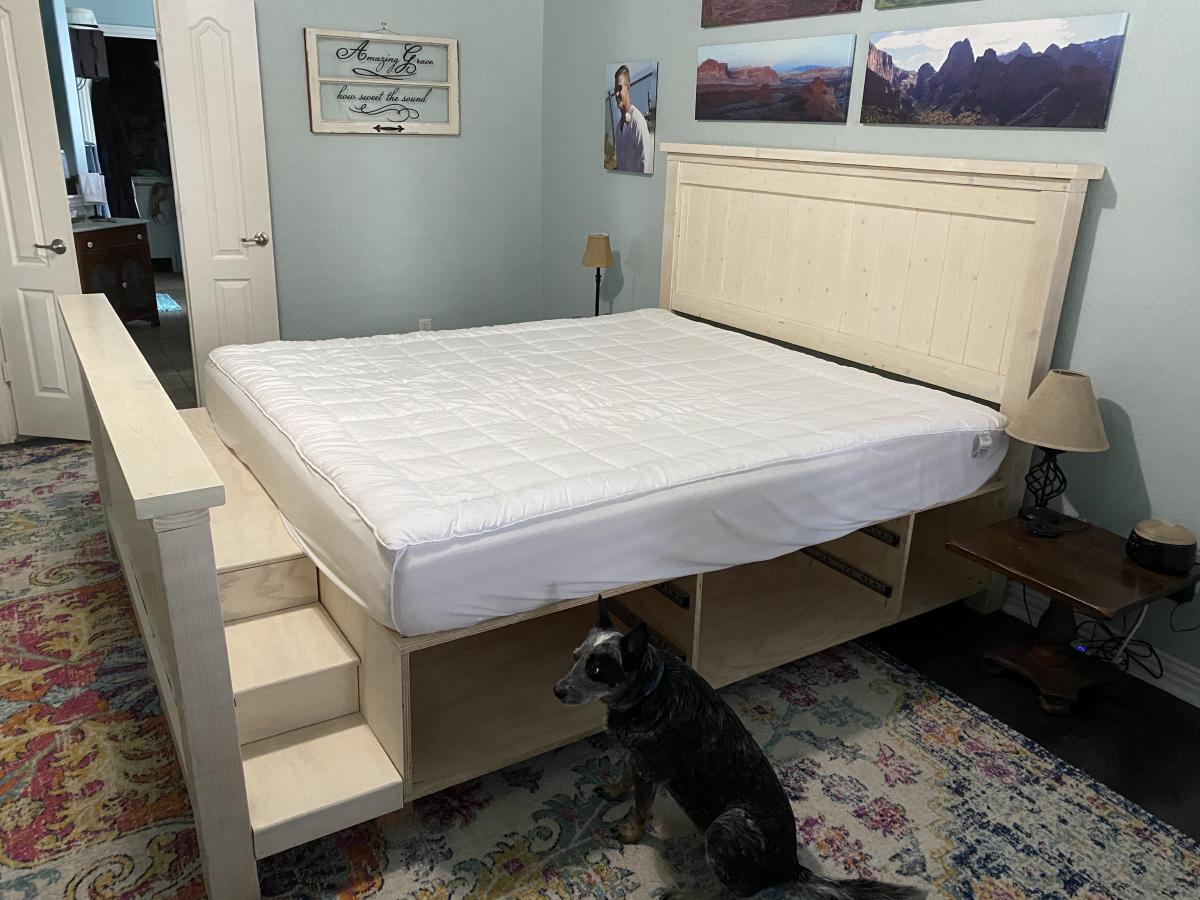
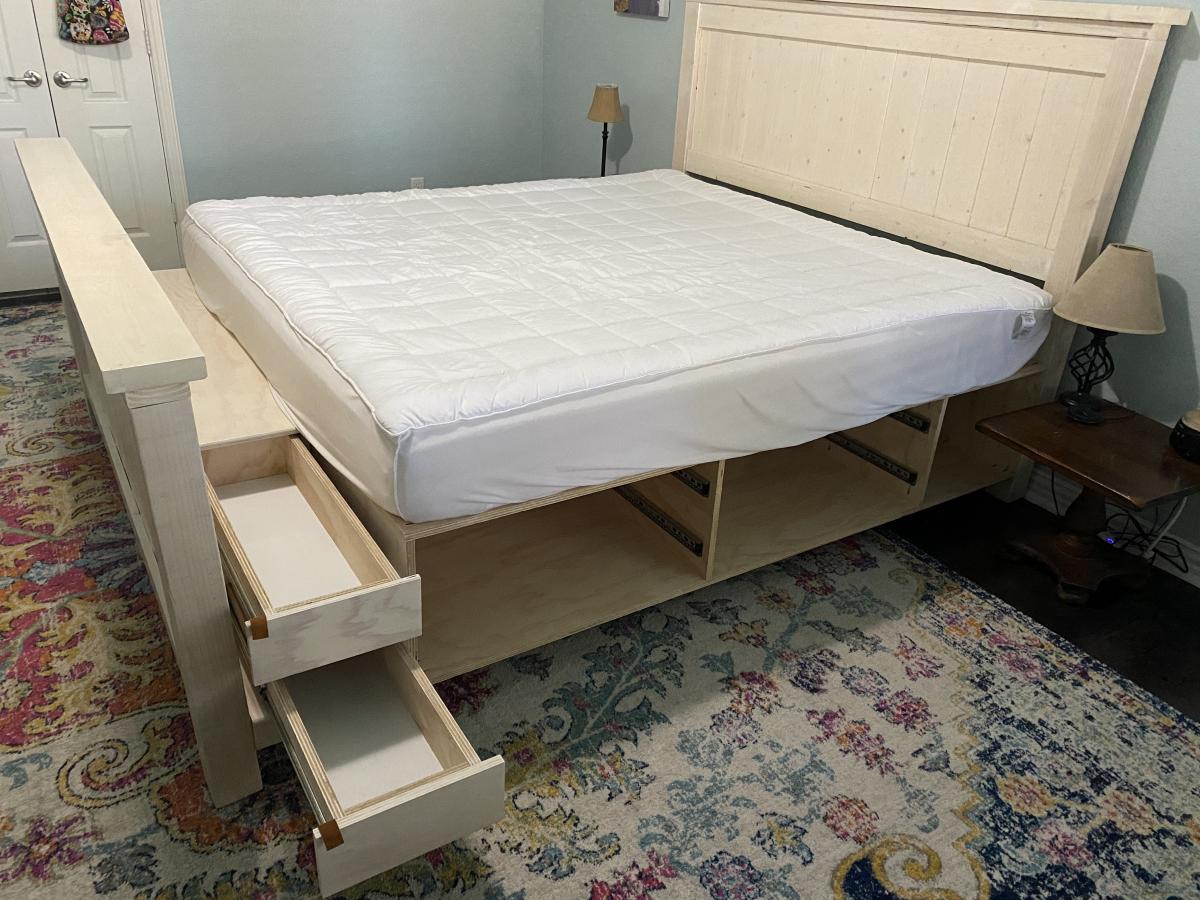
Farmhouse Storage Bed With Hidden Drawer

Submitted by Beekeeper on Wed, 12/10/2014 - 17:35

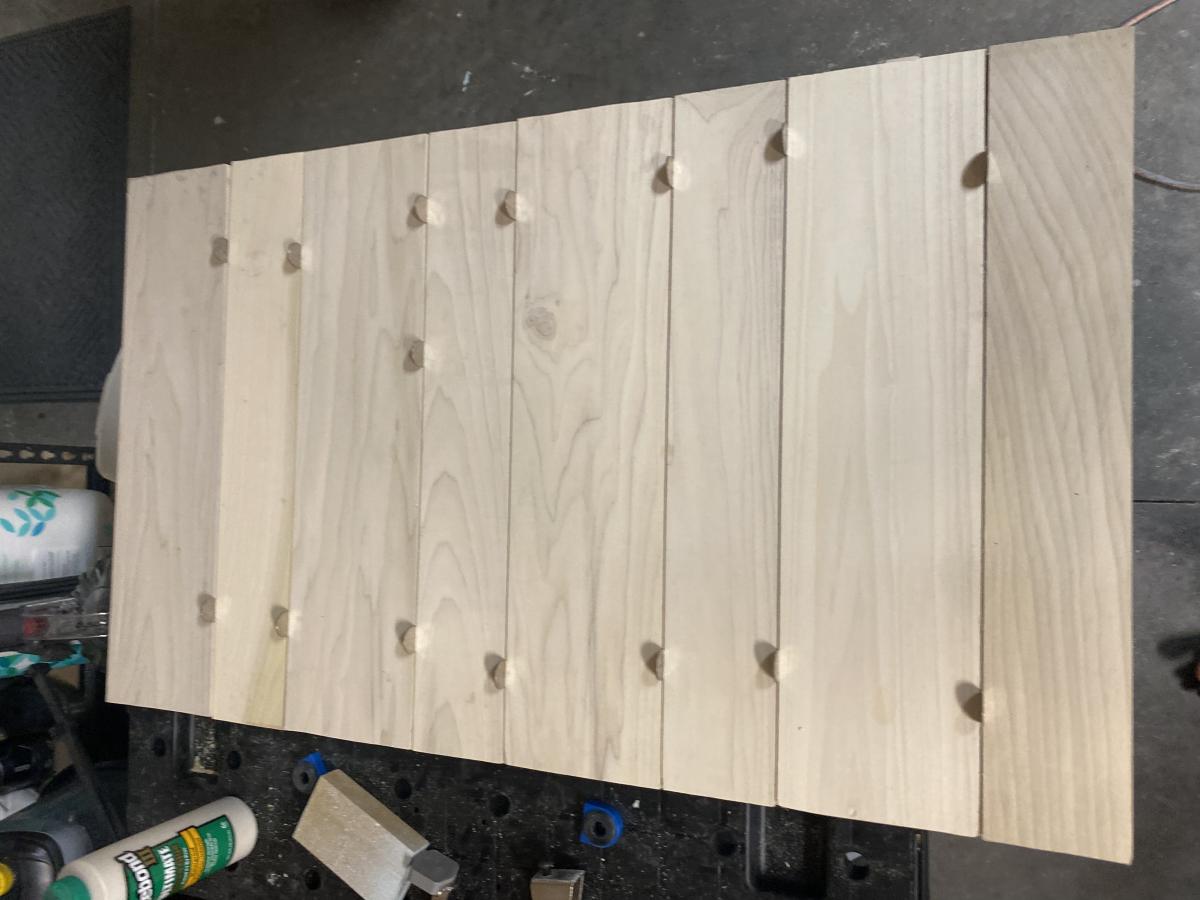
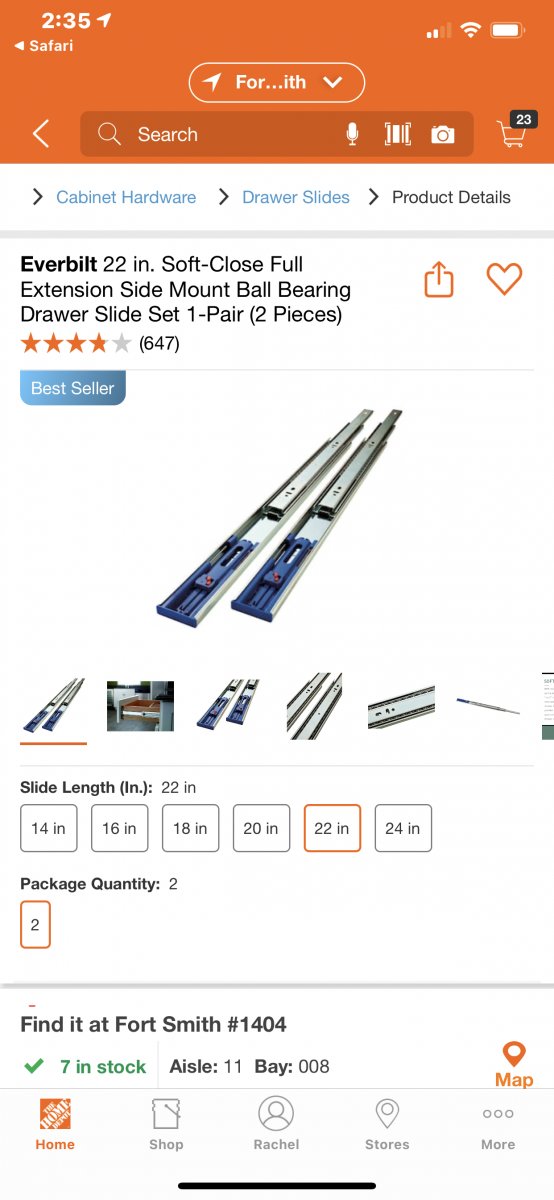
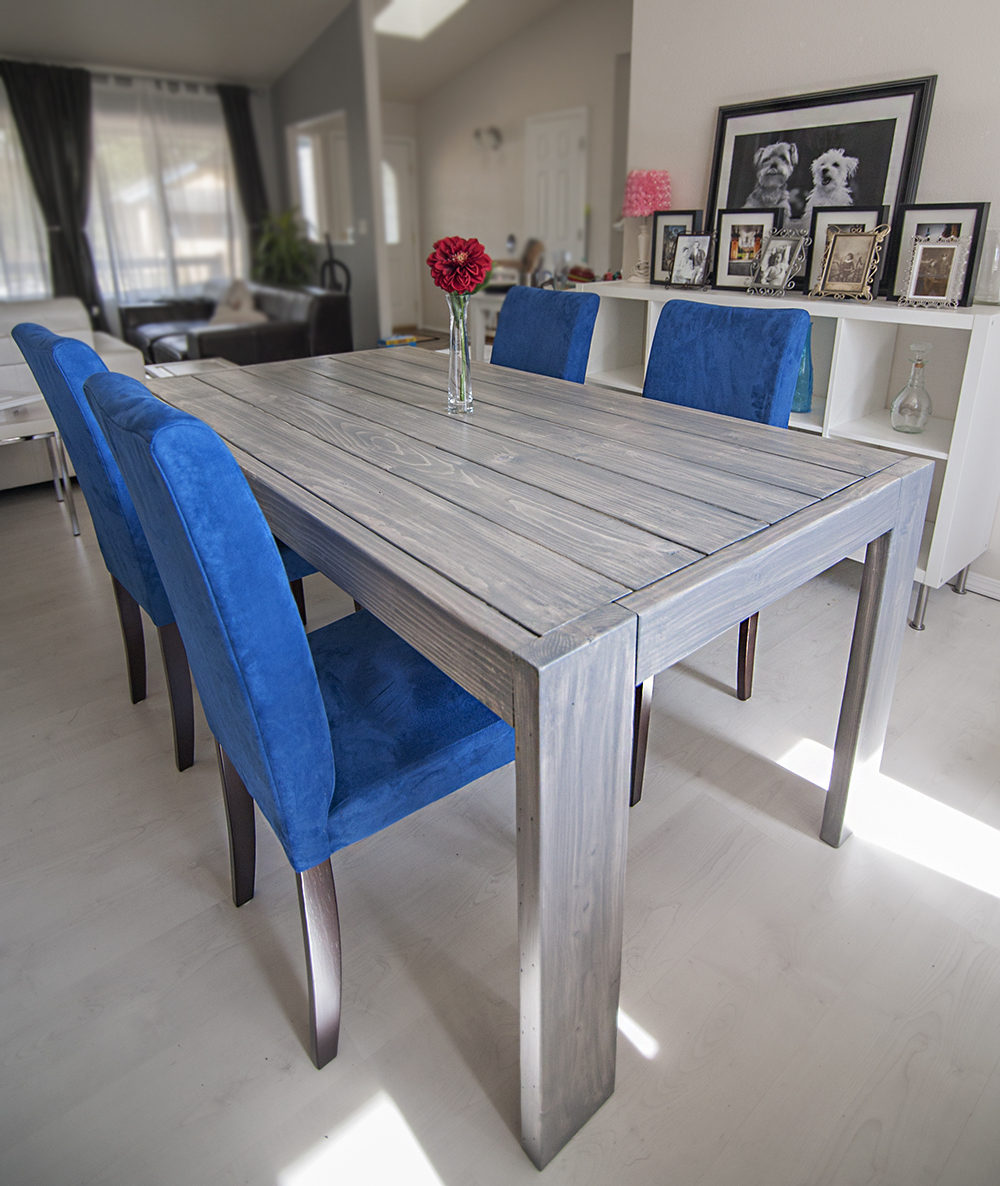
Ana, thanks for these plans! They inspired me to make my first bed build. I also want to thank all of you that added brag posts! They gave me ideas for some of the modifications that I made. I did this build by mixing your Queen Farmhouse and Queen Farmhouse Storage bed plans. I also added a number of modifications to suit my own preferences. The drawer boxes I changed by building a faceplate (I didn't want the plywood ends exposed), and by increasing in depth to maximize some additional storage. Since I increased the drawer sizes, I went with the euro roller bearing slides. I increased the foot-board height to be slightly higher than the mattress. I also designed the footboard to have a removable inner section with hidden latches on the inside. I did this because I wanted to make use of the "dead space" between the drawer boxes. I then used this space to house a hidden drawer, that is approx six feet deep (I couldn't help myself-I love hidden drawers wink). Because I added the hidden drawer, I changed the opptional center support to 4X4 blockes that were pocket screwed under the center of the boxes. I ended up using birch plywood and fir for this build. For my first bed build I'm fairly happy with how it came out. Thanks again!

Estimated Cost
I didn't keep exact track of the cost of this bed, but I think it was about $800.
Estimated Time Investment
Week Long Project (20 Hours or More)
Finish Used
I haven't got there yet, but I am planning on putting a mahogany stain and then a polyurethane. All
Recommended Skill Level
Intermediate

Comments

spiceylg

Thu, 12/11/2014 - 07:41

This is your first build and you did all of those awesome modifications?! Really impressive and it looks perfect! Congrats and welcome to the community!

In reply to by spiceylg

Beekeeper

Sun, 12/14/2014 - 06:03

Thanks for the compliments! It was a fun learning experience. Making all the modifications definitely slowed down the build, but also made it more rewarding!

beckbg

Fri, 12/12/2014 - 13:18

I just started my bed (mostly out of Baltic Birch) and am wondering where you were able to find such nice 4x4s. Your bed is gorgeous! No luck here. I bought redwood, but really wanted fir for the sharper edges. It's my first project, too. I also bought same drawer slides, but the soft close. Didn't want the slam. I figure building it will be the easy part compared to procuring nice 4x4s! Hope you can help!

In reply to by beckbg

Beekeeper

Sun, 12/14/2014 - 06:01

Thanks! The 4x4s I found at a place called Better Living Building Supply. They had a pretty nice assortment of fir, including the 4x4s, so that is why I chose it for the build. Finding the 4x4s slowed down my start on the build. Our local Lowes only had them in treated pine.

athingvall

Sat, 09/05/2015 - 20:47

Thank you for the pictures, the bed turned out Awesome.  I was wondering about the latching system for the foot of the bed.  Do you think a piano hinge on the lower would work too?  Also on the center drawer did you use rollers or is it just friction?  Can't wait to start the build.

Thanks

Codding58

Mon, 02/15/2016 - 14:11

This is excellent!!!   I really like this, so much in fact that the wife is going to have to get used to it too. lol   But really, GREAT work!    Any chance you could post a pic and or comment about how you attached that removeable end?    i think this is the best part!    Cheers!

Kmaynard19

Tue, 12/10/2019 - 08:42

Beekeeper,  Awesome build!!!  Have you posted your altered plans anywhere?  I'm very interested in your build, I was wondering about some aspects of it and how you approached it.  Plans would clear it up instead of bothering you with all my questions.

NinjaPinky

Sat, 06/20/2020 - 09:06

I, like many others, have been wondering if you'd share your plans for this modification. It just looks so great!

tammis50401

Mon, 11/16/2020 - 15:42

Bed turned out awesome. I was wondering if you have the plans for the bed with a list of supplies it took to make this bed. I so want this bed it's just what we are needing

Great job

First Project

Submitted by dragondad on Thu, 08/06/2020 - 11:34

Well, I started with one chair and finished with a full set. Not bad for a first timer. Definitely room to improve. Little tip if you're going to make this amazing set... raise the backs as they are too low with thicker cushions. I built a casing to go on top after the fact. Pretty happy with how it all turned out. Thanks Ana for the plans... now onto the next project!

Comments

My new and amazing outdoor bench

Submitted by ישראל on Sat, 11/16/2013 - 21:57

Thank you for the easy and fun bench plan.
It was really easy to install.
Even my 2 little daughters had fun (-:

Estimated Time Investment
Afternoon Project (3-6 Hours)
Finish Used
Bondex walnut
Recommended Skill Level
Starter Project

Comments

Chachamation

Thu, 10/02/2014 - 07:21

This is absolutely amazing!

This "ישראל" person is super talented comes to the final touches!!  From now on, I will start following your work...

Fancy Jewelry Box built by my daughter and me

Submitted by wowmom_cs on Tue, 05/07/2019 - 09:25

My 10 year old daughter is always creating. She recently decided that she wanted to do a woodworking project with me. We started by searching online for a design that looked doable and came up with the Fancy Jewelry Box from the Ana White website.

We decided that using the full thickness of 1x stock gave the piece a bit more of a clunky look than we were after. And since I have a thickness plainer, we milled our stock down to just under 1/2”. But that meant that we had to rework many of the measurements on the plan. This also made the drawers deeper and wider. Which is nice. A happy mistake happened when, while rough cutting the individual pieces before milling them down, I inadvertently cut the pieces between the drawers too narrow. We ended up turning them 90 degrees which allowed them to fit. This is why you see the end grain on those pieces. But we like it.

We also altered the plan a bit so that the edges of the plywood on the faces of the drawers and doors do not show. We added a nice border to the top of the box with a curved router bit. We lined the drawers with felt and then added some dividers here and there using some scraps of oak which we sawed thin with a bandsaw.

The original plan was to paint the box, as opposed to staining it. It wasn't until after I had nailed on the top and the drawer fronts that my daughter decided she wanted to stain it. That's why you can see those nail holes!

We had such fun making this Jewelry box. 

Built from Plan(s)
Estimated Cost
I don't remember. Not much.
Estimated Time Investment
Week Long Project (20 Hours or More)
Finish Used
Stain and water based polyurethane. We used 2 coats of poly "sanding" it between coats with fine steel wool.
Recommended Skill Level
Beginner

Comments

2x4 Essential Adirondack Chair

Submitted by mricks1960 on Mon, 11/16/2020 - 11:31

I used Western red cedar to build my chairs. The build was a little more expensive but well worth it. The chairs were stained with Cabot’s Australian Timber Oil ( Jarrah Brown). Thanks for the plans Ana, your site is awesome and you do a great job! Mark


Comments

Modern Dorm Mini Refrigerator Microwave Cabinet

Submitted by rachelcb on Sat, 07/31/2021 - 12:35

I changed plan to make deeper. I also modified the bottom trim and top. I put a ball bearing soft door drawer guide on modern door so it can slide back and forth. I feel we need more modern plans on here but with a bit of creativity and using plans you can make anything. I have never built anything before. I love General Finishes Milk Paint in Snow White and I brushed rolled it on (sanded between 3 coats). It’s basically self leveling and leaves a nice matte finish. Used door glide in picture bought from homedepot in the 24 inch and that’s how wide door was and it was 36” tall. Door glide I only used one on top of the door not on bottom as well. Door piece of fiberboard with just strips glued on and quarters spacing them correct.

Estimated Cost
$200
Estimated Time Investment
Weekend Project (10-20 Hours)
Finish Used
Dorm mini refrigerator microwave cabinet
Recommended Skill Level
Starter Project

Comments

Modern Farm table

My first real project, can't wait to do another one.

Built from Plan(s)
Estimated Cost
70.00
Estimated Time Investment
Day Project (6-9 Hours)
Finish Used
White wash/weather oak grey stain
Recommended Skill Level
Starter Project

Comments

leejinhaeng

Tue, 06/02/2015 - 12:38

Great job!!
I was wondering how did you do the finish on the Pine to come out like that?

cris_stroud@ya…

Thu, 06/04/2015 - 03:15

Thanks! Sorry for the late reply. Didn't get a notice.
1. 3 coats of white wash
2. 3 coats of weathered oak grey stain
3. 2 coats of polyurethane matte finish.

RobA

Thu, 06/02/2016 - 11:00

I know this is an old post. But just wondering about your finish as well. So when u say white wash what did you use?

Beautiful by the way!

Mudroom Closet Makeover

Submitted by Anonymous (not verified) on Thu, 01/21/2021 - 07:10

The concept of hidden boot storage at the back is genius!!! I knew as soon as I saw your plan that I needed that in this space! Thank you so much for what you do!

Finish Used
Bench seat was wood conditioner, minwax early American, minwax weathered oak. Then finished with shellac. The coat hooks are from Amazon. The ring pull is from Lee Valley.

Comments

King Size Farmhouse Bed with Dog Stairs and Storage

Submitted by jkjackson on Sun, 05/30/2021 - 15:21

We have a frosty faced blind girl and an aging tri-pawed that we wanted to be able to continue snuggling with us so we adapted the Farmhouse Bed with Storage to make it a king size. We made the drawer boxes deeper which allowed us to get rid of our dresser to create more space in our room. And we added a flight of stairs for the pups.

Estimated Time Investment
Weekend Project (10-20 Hours)
Finish Used
General Finishes White Wash with Arm R Seal Oil Based Satin Finish top coat. (If you want the white wash to be more white and less amber, use water based.)
Recommended Skill Level
Intermediate

Comments

Cedar Fence Board Planter Box

Submitted by iowachap on Sat, 03/15/2014 - 19:40

Using Ana's 10 dollar raised garden planter box idea, I made my own using the cedar fence boards and then used 2 x 3 x 8 studs for the L corner supports and mid center support along with top rail. This photo is the first 3, I will have a total of 6 boxes. Will post more as I progress.

Estimated Cost
20 to 25 dollars per box
Estimated Time Investment
Afternoon Project (3-6 Hours)
Finish Used
I used 6 fence boards, 2 for each side of the 6' long runs, and 1 for each short 3' section cut in half.

I got the 6' x 5 1/2 " x 5/8 " cedar fence boards at the orange box

I used 2 x 3 x 8 boards for the corners the middle support and the top rail. I got these at the blue box

I used 2 " and 2 1/2" exterior star bit screws.

NOTE: I pre drilled holes in the fence boards and screwed all the boards to the L corner sections from the inside out, so the screws are on the inside of the box, they did not poke through the 2 x 3 boards.

Instead of trying to measure how far off the side of the board I needed to go to match the vertical 2 x 3 boards, I just cut 10 11 inch long 2 x3 sections, and then used the 2 1/2" screws and made 4 L corner pieces the shorter side I screwed the short 3 foot length fence boards too, once I had both my short sections screwed to the L corner sections, I then stood one up and screwed 2 of the 6' length boards to the L corner section. Then the other side.

Once all 4 walls were done, I would then measure 3' in the middle of the 6' long side runs, and put in an additional 2 x 3 x 11" again screwed from the inside of the box out.

Now that all the 2 x 3 x 11" L corners and side support sections were connected to the fence boards I then cut 76 1/4" 2 x3 boards one for each length run, and then 2 26" 2 x 3 sections that were all cut on 45 degree angle to complete the top rail.
Recommended Skill Level
Starter Project

Recessed cabinet

Submitted by Anonymous (not verified) on Fri, 09/02/2022 - 14:14

My bathroom has very little storage space. So during our recent remodeling of the room, I decided to add this cabinet. Changed the plan a little to make it recessed in the wall. I love how it turned out!

Comments

Barbecue/BBQ Quick Built-in

This was just a standard BBQ with an attached folding table. I used a combo of Ana's plans to add a little character and style to the BBQ and it made a huge difference in not only the BBQ, but also the backyard. 

Estimated Time Investment
Weekend Project (10-20 Hours)
Finish Used
Golden Oak
Recommended Skill Level
Beginner

Comments

mdwstgrl

Mon, 05/23/2016 - 12:29

Hello:  Very interested in which plans you used to build the BBQ Built In. Thank you.

Lift Top Coffee Table

Submitted by JJones0925 on Fri, 03/16/2018 - 20:48

Instead of attaching the top to the coffee table base as done in the plans, the top is attached using a set of coffee table lift top hinges. 

Built from Plan(s)
Estimated Time Investment
Weekend Project (10-20 Hours)
Recommended Skill Level
Beginner

Comments

Custom Modern Chicken Coop

Submitted by Anonymous (not verified) on Wed, 08/30/2023 - 08:49

I made this coop twice as wide like Ana suggested since I have 4 chickens and wanted to make sure there was some extra wiggle room in case “chicken math” got the best of us. I made a nesting box to mount on the outside. I also used plywood for the sides like Ana did in the video. I installed a Run Chicken automatic door that opens at sunrise and closes at sunset. I added some hasps and clasps to make sure all my doors would close tightly. I put hardware cloth across the top before installing the roof panels. I stapled and buried hardware cloth around the perimeter for predator protection. I also spray painted the hardware cloth flat black so that it would be easier for us to see inside the coop. I stained the rest of the wood with Varathane Semi-Transparent stain, color “Carbon Gray.” I also added some roosts and cedar shingle siding for some extra protection during our New England winters at to match our house. Working 2-4 hours a day, off and on, with a bum shoulder and weak hands, this took me about a week! Thanks for the great plan, Ana!

Built from Plan(s)

Comments

Seasonal And Holiday

Modern Outdoor Patio Set

Submitted by dlangford on Sat, 09/05/2020 - 16:08

Built this over the weekend for my girlfriends sister. It was a great project and the whole family was able to work together on it, sanding and waterproofing it before assembling. The loveseat plans need a little tweaking. We ran ran the slats the same direction as the chair plans call for so we added a middle support for extra stability. We also pitched the seating down towards the back by 5* to make a more natural sitting position.

Estimated Cost
$300
Estimated Time Investment
Weekend Project (10-20 Hours)
Finish Used
Behr Cedar Natural Tone Waterproofing Stain and Sealer
Recommended Skill Level
Beginner
Seasonal And Holiday

Drop Leaf Mobile Kitchen Island

Submitted by jkjackson on Sun, 03/14/2021 - 11:19

This was born out of the need for more counter space in our galley kitchen. We don't have the space to add an island. Especially around the holidays, it would be great to have extra space for making cookies, serving big meals, etc. I used Ana's Small Kitchen Island Prep Cart plans for inspiration. I adapted the dimensions to fit at the end of our counters when not in use and added a drop leaf to give us almost 4 additional feet of butcher block counter top when we need it. I used scrap lumber that I had for the cabinet and had an extra drawer handle that matches our kitchen cabinets but bought the butcher block, locking casters, drawer slide and hardware for the legs. Also, the weight of the butcher block makes it want to tip when it's away from the cabinet with the drop leaf down so I added a lead counter weight inside the drawer.

Estimated Cost
$150-200
Estimated Time Investment
Weekend Project (10-20 Hours)
Finish Used
Behr paint for the cabinet, food grade mineral oil and cutting board wax for the butcher block
Recommended Skill Level
Advanced

Comments

jkjackson

Sat, 07/24/2021 - 16:59

Sure! I used a 4 foot butcher block and cut it down. The horizontal part is 13 1/2" and the drop leaf part is 32 1/8" attached with a piano hinge. The legs need to be cut and hinged to fit when folded up. This one is made so that the drop leaf fits right under the overhang of the kitchen countertop that it is next to so it's snug against the cabinet and not an issue but, if you want it to be freestanding, the weight of the butcher block will pull it over if you don't weight the cabinet down with something as well. I got a 5 pound lead bar from Amazon in case we need to use it somewhere else. I hope that helps! Let me know if you have any other questions.

Modern Outdoor Chair with a twist

Submitted by Anonymous (not verified) on Wed, 07/05/2017 - 16:05

Taken from the Modern Outdoor chair project and added a back. Then decided that I love the andorak style chair arms and thus the Andrmodern chair was born.. 

Estimated Cost
$35.00
Estimated Time Investment
Afternoon Project (3-6 Hours)
Finish Used
Will use the Behr two in one
Recommended Skill Level
Beginner

Comments

jkess44

Tue, 06/09/2020 - 13:36

Wow! I really like this look, Im sure its very comfortable. Do you have plans to share? I am very much a beginner and need guidance, lol.

Treehouse/Playhouse

Submitted by Bigbill99 on Sun, 01/10/2016 - 00:07

Thank you! You've helped me look like a true carpenter who knows what he's doing! My whole family is impressed with my woodwork lately, and now I'm addicted. I've done your seesaw, bar table and stools plus the treehouse in 2 weeks. Thank you for sharing your plans!

Estimated Cost
$500.00
Estimated Time Investment
Week Long Project (20 Hours or More)
Finish Used
Spar urethane
Recommended Skill Level
Beginner

Great Plan for Garage Shelf!

Submitted by edapina on Wed, 11/26/2014 - 07:35

This was an easy project to complete in an afternoon that does not require any advance woodworking skills

Estimated Cost
About a $120 bucks considering that I had to buy all the wood and a box of 2 1/2 In screws!
Estimated Time Investment
Afternoon Project (3-6 Hours)
Finish Used
No finish used.
Recommended Skill Level
Beginner

Comments

edapina

Wed, 12/10/2014 - 09:41

This is my second completed project with plans and ideas from your website. Thanks for your good work!