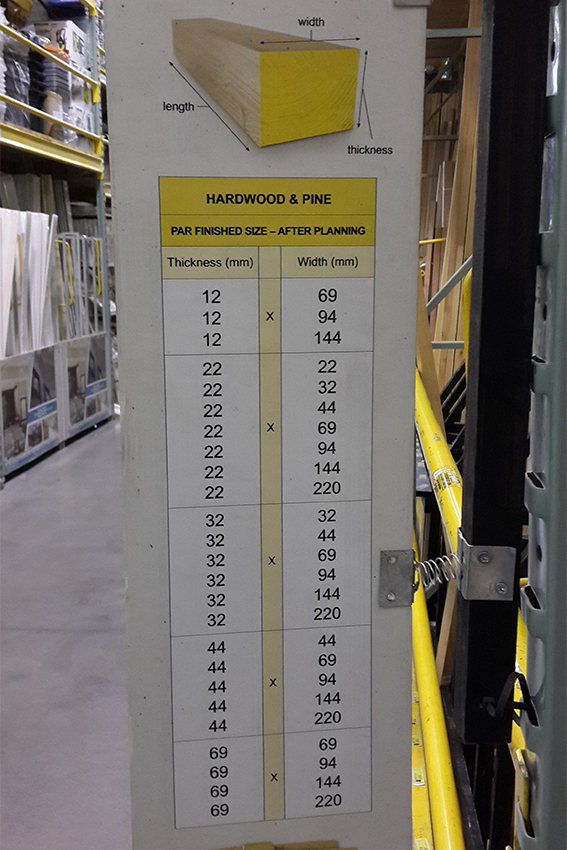
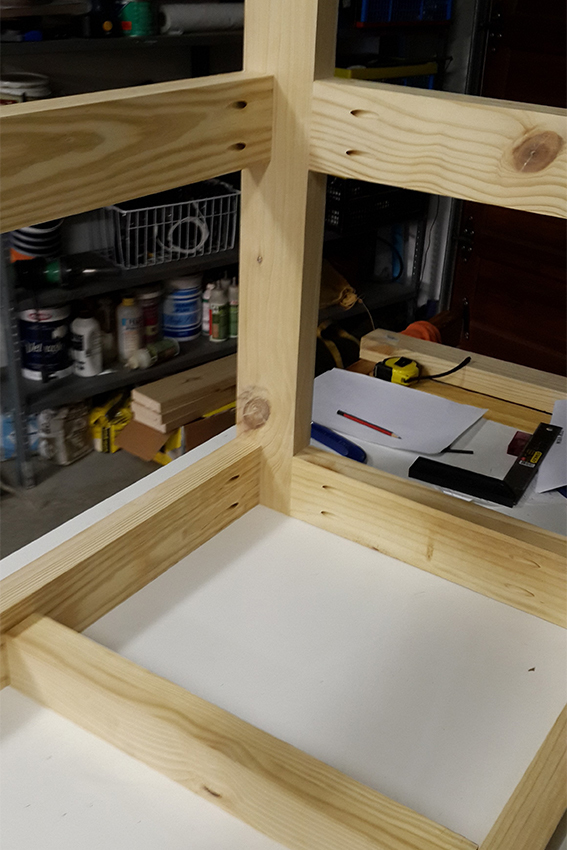
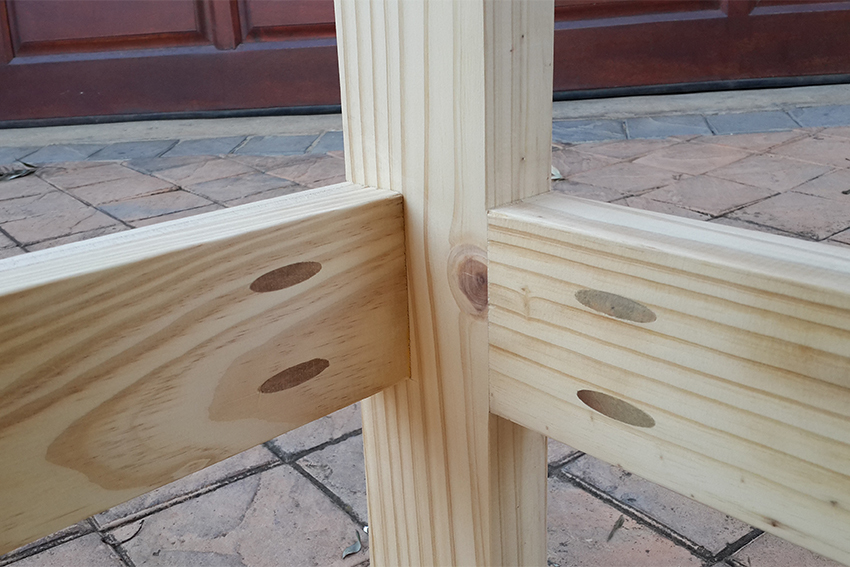
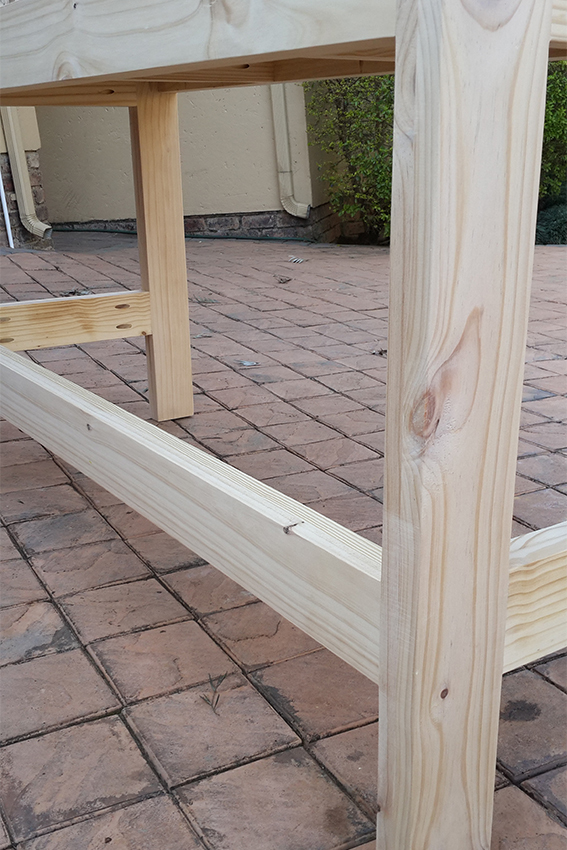
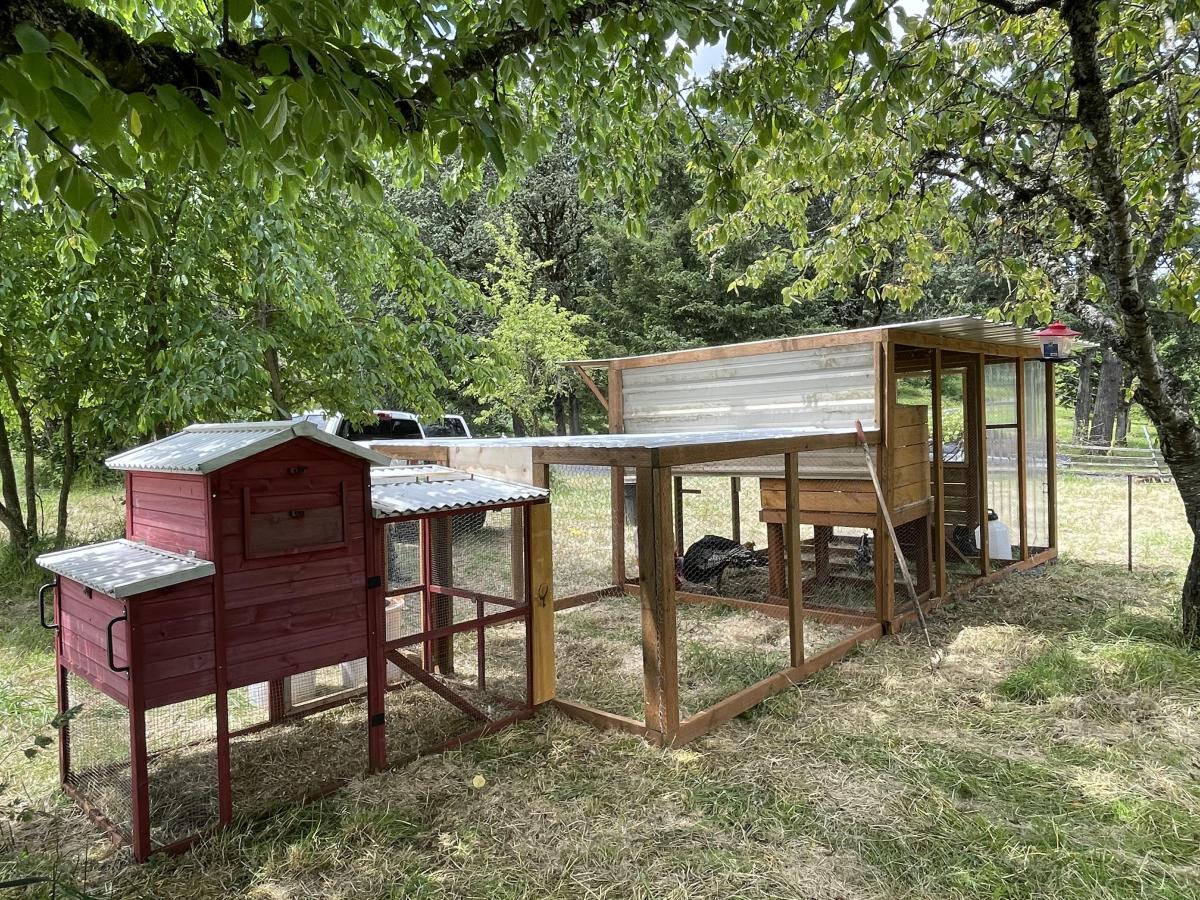
Community Brag Posts

Coop Update

Submitted by vendo on Mon, 06/20/2022 - 15:37

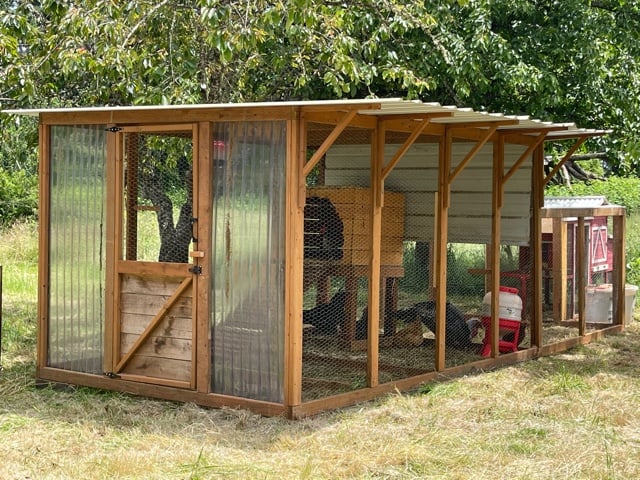
I had to move our original coop to another property, so decided to do a little upgrade. We used Ana's Chicken Run plan for both of the large sections and just added a roof. We attached the run to a small red coop that we purchased. Ana's plans are great for modifying for any size, as you can see the main tall portion is from her run plan just built taller and we added a door to the front.

Built from Plan(s)
Seasonal And Holiday

Library Coffee Table with Reclaimed Barn Wood Top

Submitted by wendywmp on Wed, 08/21/2013 - 19:42

Modified the plans to be only 3 drawers which saved on weight and hardware. Used reclaimed 100+ year old barn wood for the top, adding lots of character.

Estimated Time Investment
Week Long Project (20 Hours or More)
Finish Used
Cabinet: Minwax gel stain in Red Elm, and Winwax wipe-on satin poly. Top: West System epoxy to stabilize and fill 'defects', sanding sealer and wipe-on satin poly.
Recommended Skill Level
Intermediate

Comments

Rustic X

Submitted by Burrel on Sat, 10/03/2015 - 08:22

I built this for my daughters house warming gift.

Estimated Cost
125.00
Estimated Time Investment
Weekend Project (10-20 Hours)
Recommended Skill Level
Intermediate

DIY farm house table

Submitted by Anonymous (not verified) on Mon, 10/15/2018 - 21:41

Followed the farmhouse the design but with my ite dimensions and 4x4 legs. Also painted base and blue/gray to pop through when sanding eyese.

Estimated Cost
175
Estimated Time Investment
Weekend Project (10-20 Hours)
Recommended Skill Level
Intermediate

Daun Family Coffee Table

Submitted by stevendaun on Sun, 08/25/2013 - 08:10

This was an excellent set of plans and the finished product looks great in our home.

Estimated Time Investment
Week Long Project (20 Hours or More)
Recommended Skill Level
Intermediate

Garage Shelves

Submitted by Anonymous (not verified) on Wed, 10/24/2018 - 08:43

This was a pretty easy project, but I had to adjust the vertical legs to accommodate the sloping garage floor. I drew a  horizontal line for the top edge then measured to the floor at the spacing I wanted the vertical legs. I used these measurements to cut the three vertical legs. It’s level and straight, even though my garage is sloped. 

Estimated Cost
$300
Estimated Time Investment
Week Long Project (20 Hours or More)
Finish Used
Garage shelving
Recommended Skill Level
Beginner

My Ikea Lack Inspired Bookshelf

This was my third project, but it is my favorite to date!

Estimated Time Investment
Day Project (6-9 Hours)
Finish Used
2 coats of Benjamin Moore Natura paint in Banana Yellow
2 Coats of poly acrylic
Recommended Skill Level
Beginner

Comments

joyreneeb (not verified)

Tue, 09/20/2011 - 12:16

Can you give a price estimate on your project? Looks great, btw!

In reply to by joyreneeb (not verified)

CapriciousElle

Fri, 09/30/2011 - 21:21

The lumber was about $25 and the paint I ordered online with a few other colors, but it is listed at $21.99. I only ordered a quart. Everything else I already had around the house. I hope that helps!

simple stool

Submitted by vic b on Mon, 08/26/2013 - 19:27

I shortened the legs to 20 inches and left the lower rung off.
It lives in the playroom and is just the right height for our sons desk.

Built from Plan(s)
Estimated Time Investment
An Hour or Two (0-2 Hours)
Recommended Skill Level
Starter Project

Media and Storage unit

Submitted by jpurp on Sun, 10/11/2015 - 18:47

I followed the basic plans but adapted it to fit in my cabin.  The whole unit is 82" high by 126" wide.  I also put in more drawers and made the fronts in a shaker style. I used 2x4's that I ripped down to 2x2's and 3/4 inch birch plywood.  I trimmed out the birch with 1" pine boards. I sanded the whole unit, primed with an oil primer and painted 2 coats of latex from General Paint in Grayling.   I don't know how many hours I put into it.  A lot.  Probably around 80.  Mostly by myself.  My husband helped with getting the 4x8 sheets of plywood through the table saw and occaisonally when I needed a 3rd hand to pursuade some wood to do my bidding.  I love how it turned out.  Tons of much needed storage in my cabin.

Estimated Cost
Wood, screws, sandpaper, primer and paint. Approximately $600. I'm in BC Canada. Most things cost more.
Estimated Time Investment
Week Long Project (20 Hours or More)
Finish Used
Oil primer and latex paint from General Paint. Colour Grayling.
Recommended Skill Level
Intermediate

Comments

Modified Wide Cabin Dresser

Submitted by bcarter_1 on Tue, 10/30/2018 - 04:32

We modified these plans to make this, liked the sides.

Estimated Time Investment
Week Long Project (20 Hours or More)
Recommended Skill Level
Intermediate

Comments

Simple Oudoor Dining Table

Submitted by kmatt55 on Wed, 08/03/2011 - 17:15

I know, I know...Where are the legs? Unfortunately, I have to store this until December while our multi-family mountain house is being constructed. This way I can store it up against a wall and save a lot room in storage for more Ana White projects. FYI - The legs will be white 2x4's about 29.5 inches tall. For the top I used 1x4 cedar slats spaced 1/4 inch apart. As for the painted white frame, I used treated pine. Why spend money on nice cedar if I am just going to paint over it, right? The contrast of the white and natural cedar was appealing to me for some reason. I used Thompson's clear wood protector/water sealer on the slats to prolong the natural cedar. BTW, if you can build the simple outdoor bench you can definitely take on this project. The two are not very different. I'll have to take pictures of the finished table with legs when I haul these up to the Blue Ridge Parkway and upload them again. Thanks again Ana!

Built from Plan(s)
Estimated Cost
$100
Estimated Time Investment
Day Project (6-9 Hours)
Finish Used
Semi gloss white, Thompson clear wood protector/water sealer.
Recommended Skill Level
Intermediate

Comments

Casual 2x4 (sort of) Desk

Submitted by Sox on Thu, 08/29/2013 - 03:30

I had to a quick conversion from the original plans as we get metric wood sizes so decided to use the following:-
Desk frame: 44 x 94
Desk frame front: 44 x 69
Desk Top: 32 x 144
I drew up new plans to fit my 1500mm space I needed the desk to fill, with the new wood sizes.
The purchase of the Kreg Jig was my best investment as it made construction so easy.
I finished the desk off in Antique Oak after wanting to add a little Antique White to it, but got scared that I would mess it up!
Total cost for wood and finishing materials was R1,500.

Estimated Time Investment
Day Project (6-9 Hours)
Finish Used
Nova 18 - Novadye (Antique Oak)
Woodoc 10 Indoor Polywax Sealer (Velvet)
Recommended Skill Level
Beginner

Comments

Sox

Thu, 09/05/2013 - 08:39

Many thanks for the compliment. The design is based on the casual 2x4 desk on this site, however I made adjustments and redrew them due to the standard timber size I could get hold of and also a bit of personal preference. I have the plans in electronic format should you wish to have a copy.

Fancy Farmhouse Bed to attach to existing frame

Submitted by Kboshers on Wed, 11/07/2018 - 10:00

This was a fun and quick build!  Because I had an existing bed frame (and didn't want to headboard to stick out past the mattresses) I narrowed this by eliminating (1) tongue and groove board and changing the "legs" to 2 x 6 boards instead of the 2 x 4's in the plan -- overall width ended up at 76-1/2".  Before framing out the tongue and groove, I cut the exposed tongue off of the last board so the frame would attach better. After getting it all together, I wished I had used a 1 x 4 (or perhaps even a 2x4) as the very top piece so it hung over the moulding more.  I painted it with Old-Fashioned Milk Paint in Tavern Green and sealed that with Howard's Citrus Shield.  The wax turned it a little too John Deere green so I'm thinking I'll go back with a Burnt Umber Wax to darken the color a little.  Overall this was a great project that got me back in Dad's wood shop and refueled my love of building things.  I'm searching out my next project now.

Built from Plan(s)
Estimated Cost
Boards were just about $40 but mouldings almost doubled that price to just around $75 total (I had all the needed fasteners). There were much cheaper moulding available in narrower widths, but I wanted them to be more substantial.
Estimated Time Investment
Afternoon Project (3-6 Hours)
Finish Used
Milk paint and wax
Recommended Skill Level
Intermediate

Rustic barn style door

Submitted by Anonymous (not verified) on Fri, 08/05/2022 - 03:59

Using cedar fence slats, my son and I built this barn style hanging door for a space between two rooms in his partially finished basement. We planed each fence slat to achieve a smoother surface and to join the boards together. We finished it with a liberal amount of butcher block oil and beeswax to keep the wood from drying too quickly. We think it turned out beautifully!!

Comments

First Furniture Console

Submitted by cjohnston on Sun, 08/07/2011 - 14:10

This is my version of the Balin Console, presented by Ana White.

I used knotty pine for the wood and finished the piece first in two layers of walnut stain.

Over the stain, I painted two layers of Vast Sky blue by Sherwin Williams.

To finish it off, I used a polyurethane satin finish varnish--two coats.

Built from Plan(s)
Estimated Cost
$200.00
Estimated Time Investment
Week Long Project (20 Hours or More)
Finish Used
Stain the piece with a dark colored oil based stain--2 layers.

Rub a candle on the corners and edges where you plan to sand to give a distressed appearance.

Coat the piece with 2 layers of polyurethane paint.

Use fine grit sandpaper to sand edges to give a distressed vintage look. The candle wax applied to the stain will protect the wood from the sandpaper--sanding will only remove the paint layer and leave the stain layer intact.

Cover with two coats of a satin finish varnish to protect. Make sure there is plenty of drying time between the varnish layers--2 days +
Recommended Skill Level
Beginner

Comments

debandtom25

Fri, 08/12/2011 - 04:38

It's a very impressive looking piece. It would catch my eye if I saw it in someone's house. Great job!

windjamer812

Thu, 03/22/2012 - 23:25

You did a wonderful job on this project. It looks like it came straight from a 1930's country kitchen.

Cozy outdoor seating at last!

This project seemed to take forever, but it was so worth it! We finally have a great cozy outdoor space to gather around the fire pit comfortably. Thanks so much for the plans Ana!
I should mention I used 2x3's instead of 2x2's for all legs because pressure treated 2x2's here are only 1 1/4"??

Estimated Cost
$175 lumber & $225 cushions
Estimated Time Investment
Week Long Project (20 Hours or More)
Finish Used
Behr premium weatherproofing stain in Padre Brown
Recommended Skill Level
Intermediate

Comments

Reclaimed beauty

Submitted by mkrgolf on Thu, 10/22/2015 - 20:38

All wood used was reclaimed. Some tabletop pieces were warped, but added character to the table. Took about four 6-hour days with interruptions in between. I bought the stain from the Habitat store for $1.50 and the poly was left at the house we recently moved into. The stain was brushed on then rubbed in with a rag. I originally used about six coats of oil-based poly and when that didn't seem to work, I applied 2 coats of Polycrylic.

Estimated Cost
$20
Estimated Time Investment
Weekend Project (10-20 Hours)
Finish Used
Colonial maple stain with water-based satin poly.
Recommended Skill Level
Beginner

Grandy sliding console

Submitted by Brad Wills on Mon, 11/19/2018 - 14:51

Finally took the time to use a lot if my scrap pile.  This one is a bit of a beast to manhandle around the shop, but well worth the finished project!

Built from Plan(s)
Estimated Cost
150
Estimated Time Investment
Weekend Project (10-20 Hours)
Finish Used
Valspar dark walnut stain. Under Behr Flat white paint. Distressed then cleared with valspar poly.
Recommended Skill Level
Intermediate

My wife's new Craft table

Submitted by MattB on Tue, 08/09/2011 - 23:29

This is actually my third project from your site Ana.

I acctually decided to make this table ten inch wider since my wife has a loooooooot of crafts :)

This project took a little longer then I thought.
It was my own fault!!! I thought I would safe some time and get some of the wood cut buy the clerk at Home Depot. That turned out to be a really bad idea. Most of my cuts were uneven and even after I gave the clerk the exact measurements, a few of the boards were up to 2 inches too long. At the end I had to buy two more boards because I had to cut peaces away to have straight edges.
Lesson learned!!!

I love building wood furniture. And I already got my next plan from your site that I'm going to build.

Built from Plan(s)
Estimated Cost
$160
Estimated Time Investment
Weekend Project (10-20 Hours)
Finish Used
Valspar-Dove tail white(Eggshell)
Behr- Surfer(eggshell)
2 coats of clear Polyurethane Semi-Gloss
Recommended Skill Level
Beginner

Comments

Guest (not verified)

Wed, 09/07/2011 - 04:18

awesome job! im in the middle of making one of these at the moment. but just to be a tad different i have put a small cutout hole on the top, theres a little bin that sits on the shelf under it, so all i have to do when ive finished with all my paper cuts is swipe it down the hole! hehe how nifty. oh and where did your wife get the black cricut machine?? lol

Kids table and chairs

This is a table and chair set I made for my 3 year old son and he loves it! I changed a couple of things. One of the things was with the table top, instead of making it rectangular I did mine square. The second thing was instead of doing the three pieces of wood I used a single 3/4" 2'x2' piece of birch plywood I found at Lowes. With the chairs I also did solid piece seats instead of the slats and I decided to do the legs with 2"x2" wood instead of 1"x2" and I found those modified plans here http://thatsmyletter.blogspot.com/2011/12/t-is-for-table.html?m=1

Built from Plan(s)
Estimated Cost
$50
Estimated Time Investment
Afternoon Project (3-6 Hours)
Finish Used
For the table I used Minwax stain in Early American then sealed it with Minwax Polycrylic in a semi gloss finish. Then for the chairs I just used red paint.
Recommended Skill Level
Beginner

Comments

Pam the Goatherd

Tue, 09/03/2013 - 08:44

I really like the modifications you made. These look like the chairs I remember from my kindergarten days. I have the table and chairs in my "to do" list. Now I know what to do to make them look more like the kid-sized chairs I like the most.