Community Brag Posts

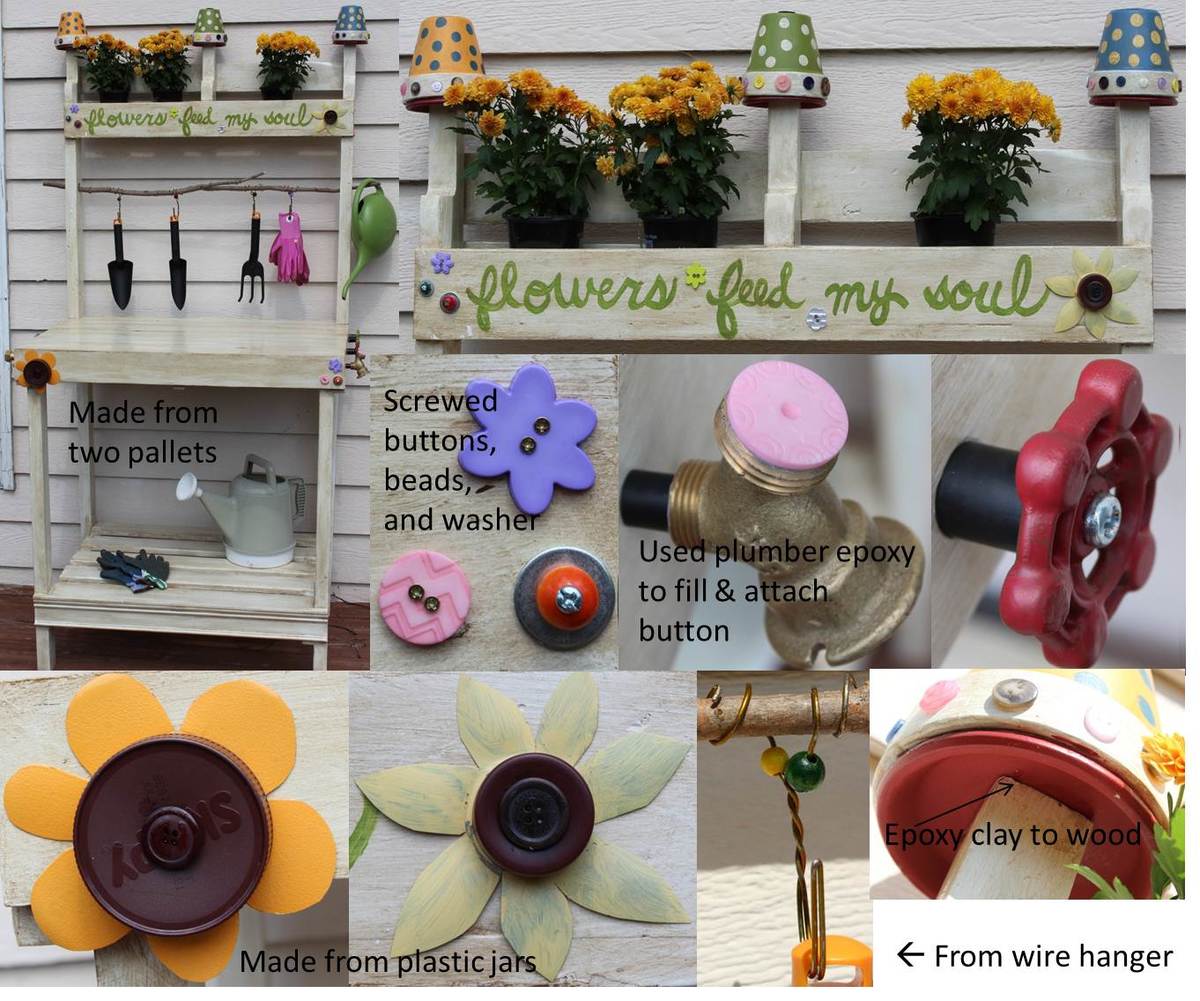
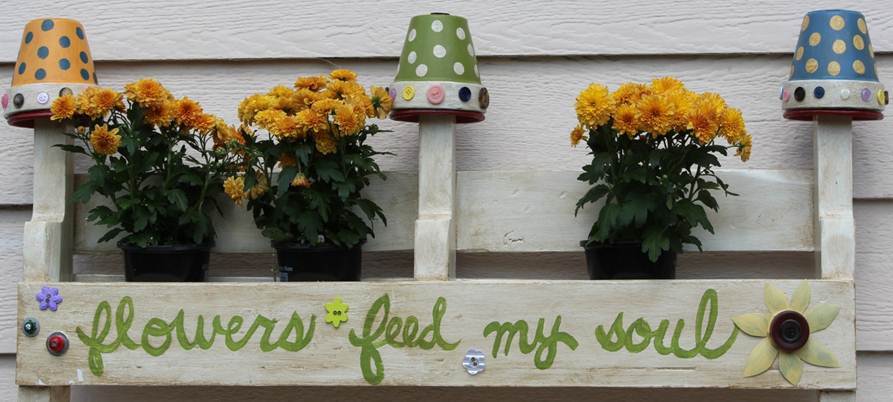
Cute DIY Pallet Potting Bench

Submitted by shampbel on Wed, 09/12/2012 - 20:33

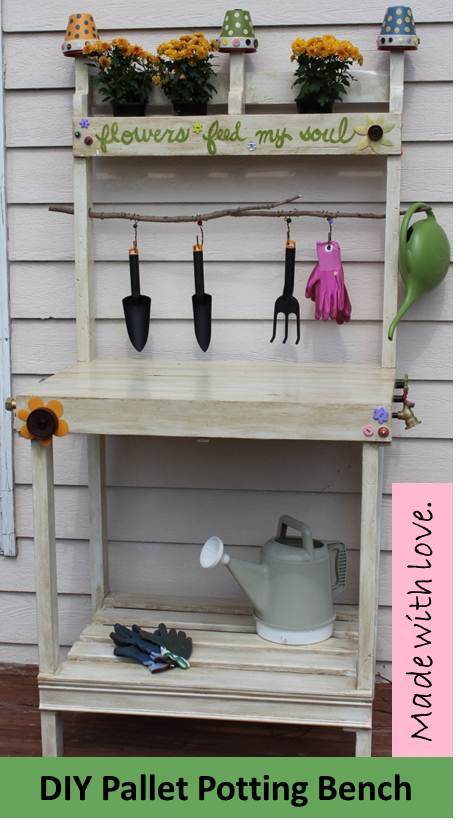
Made from 2 pallets, 2 x 6 x 8, leftover trim from my house, wood branch from my backyard. Attached shelf with pocket holes.

Accents:
-Handpainted lettering; painted prior to glazing entire piece
-Finials made from 4.25 inch spray painted and glazed clay pots and saucers coated with Valspar clear finish and attached together with epoxy; buttons attached to pots with E6000 adhesive
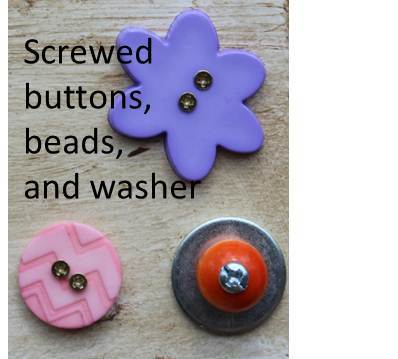
-Buttons attached mostly with small screws; a few with holes too small for screws were attached with epoxy
-Plastic flowers made from mayo and water bottles and lids; sanded, primed, spray painted, coated with Valspar clear coating; attached with screws
-Faucet knobs sanded, spray painted, glazed and attached with screws
-Plumbing pipe filled with plumber epoxy puttty; insert screw into putty before it hardened, then screwed into wood
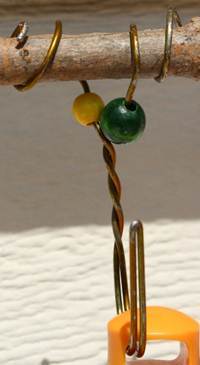
-Gardening tool hooks made from pant wire hangers with a few beads attached; wire simply wrapped around tree branch

Not sure that I will use pallet wood again since difficult to pull apart pallets, uneven and some split boards could not be used, and required tons of sanding for those boards that could be used. I think I paid more for orbital sanding pads than the cost of buying new wood. Will use pallet wood for other non-furniture projects not requiring a perfect finish.

Estimated Cost
$40.00
Estimated Time Investment
Week Long Project (20 Hours or More)
Finish Used
Kids distressed with hammers, sanded with 80 grit, Kilz Primer (1 coat), Sherwin Williams Exterior White Latex Paint (1 coat), Behr Glaze tinted with Brown Latex, Spar Urethane (3 coats)
Recommended Skill Level
Beginner

Simple Bird Feeder

Submitted by mtairymd on Thu, 12/29/2016 - 12:58

This is a simple project for the beginning woodworker. There are a variety of bird feeder designs available on the web but I wanted to try something a little different. Anyway, this is my try at a simple bird feeder.

Build Instructions:

http://www.instructables.com/id/Simple-Bird-Feeder-1/

Estimated Cost
$10
Estimated Time Investment
Afternoon Project (3-6 Hours)
Finish Used
Paint for pillars and perch
Recommended Skill Level
Starter Project

ENTRYWAY bench with drawers

Submitted by Anonymous (not verified) on Fri, 10/16/2020 - 13:31

Built from scratch. First DIY build ever! Thank you for your plans. I customized it for my space 💜 instagram @onefortyfour_

Built from Plan(s)
Estimated Cost
250.00
Estimated Time Investment
Weekend Project (10-20 Hours)
Finish Used
Behr white paint. Polycrylic seal
Recommended Skill Level
Intermediate

Comments

Dining Room Buffet

We built this huge 7' buffet for our living/dining room area.

Built from Plan(s)
Estimated Cost
$300
Estimated Time Investment
Weekend Project (10-20 Hours)
Finish Used
Custom stain blend
Recommended Skill Level
Intermediate

Comments

Seasonal And Holiday

Outdoor Canopy Bed

Completed this project last week off of the plans here under outdoor! I Love it and plans were soooo easy to follow!

Estimated Cost
150
Estimated Time Investment
An Hour or Two (0-2 Hours)
Finish Used
Painted white with exterior paint, outdoor fabric and twin size air mattress.

Comments

Small Cedar Shed

Here is our version of the small cedar shed. Had to raise the door up a bit to clear the rocks. All built from cedar fence boards and a few 2x4's

Built from Plan(s)
Estimated Time Investment
Afternoon Project (3-6 Hours)
Finish Used
None - age naturally
Recommended Skill Level
Intermediate

Comments

Ana White Admin

Fri, 11/06/2020 - 08:18

Love that you used all cedar fence boards, do you have an estimated cost for this project? Thanks for sharing!

Fancy Jewelry Box

Submitted by mmihelcic on Thu, 12/25/2014 - 21:18

My first real wood project with no help from my father. I wanted to make this for my mother for christmas and I got it done 2 hours before church. I recently purchased a kreg jig r 3 and put it to good use. I made a few changes to the plan that helped me achieve the look that I desired. First, through trial and error I adjusted the kreg jig to be able to drill pocket holes to secure the shelves without the need to go back and wood putty the scrww heads that normal would have been exposed on the outer walls. There is a picture of this set up that I uploaded. Also, when byielding the drawers I made two changes. From what I could tell, the plans called for 1/4 inch plywood for the bottoms of the shelves and that is the way I made them at the beginning. However I was not happy with the appearance of the plywood on the nice face boards I was using for the drawers. So I decided to rip down the two side pieces and the back piece of the drawers ( should be 1 - 5 1/2 inch back piece and 2 - 5 3/4 inch pieces ) but I left the face Plate the full inch and a half that way the plywood wous not show from the front. The last change I made on the drawers was I made 2 pocket holes on each side piece to attach the face to the drawers that way the nail holes would not be showing from the front view. While these steps might not have be necessary , it worked for me. Thank
you very much for the plan my mom cried when she opened the box for the first time.

Built from Plan(s)
Finish Used
Minwax early American
Recommended Skill Level
Intermediate

Comments

JoanneS

Fri, 12/26/2014 - 16:25

Great job! What a lovely gift for your Mom! It turned out beautiful!

Counter stools for our breakfast bar

Submitted by Anonymous (not verified) on Sun, 04/09/2017 - 15:48

I made these to use as counter stools for our breakfast bar. They're shown in the pics at our outdoor grill island but that's only until the finish dries completely. I built the set of three in "assembly line" fashion - in other worlds I built 12 leg assemblies, 3 seats, etc and then assembled it all. Total it took me around 8 -10 hours to build all three. My 11 year old daughter even helped.  I taught her how to use the drill press and had her drill and countersink all of the pilot holes on the legs. I used pocket holes to attach the cross braces and the seats are attached with just wood glue. A pretty easy project and we ended up with a nice, simple set of counter stools.

Estimated Cost
$30 per stool
Estimated Time Investment
Day Project (6-9 Hours)
Finish Used
Minwax colonial maple for base; Minwax English chestnut for seats. Three coats of poly coat. The distressed look of the seats was accidental but we decided it looked nice so we stuck with it. For some reason I had a weird piece of pine that wasn't taking stain well (it was not drying after 24 hours). I ended up re-sanding and re-doing the stain only to have the exact same results. This time I tried wiping off the stain that wasn't drying with mineral spirits and it gave me this distressed look, which my wife and I decided looked nice, so we kept it.
Recommended Skill Level
Beginner

American Girl doll house with stable and carport

Really good plans helped make these.

Estimated Cost
500
Estimated Time Investment
Week Long Project (20 Hours or More)
Recommended Skill Level
Intermediate

Comments

Doggy loft bed!

Submitted by Anonymous (not verified) on Sat, 06/03/2017 - 17:31

My dog loves to people watch all day while I'm at work and she needed a new bed so I took the plans for the lower platform and modified them so it would stand alone. Took the platform and put it on the bottom so that her bed would sit inside instead of on top where she could more easily fall off.

I tried building without PH screws at first and all I ended up with was a lot of cracked and wasted lumber. Got the PH jig and finished the whole build myself in 2 hours. Sanding, staining, and sealing tomorrow but I'm just so excited about it I had to post now!

Estimated Cost
With the two sets of lumber, having to buy the jig, hardware, stain, and electric sander it cost me about $130
Estimated Time Investment
Afternoon Project (3-6 Hours)
Recommended Skill Level
Beginner

Comments

2x4 Leaning Hall Tree

Submitted by Anonymous (not verified) on Wed, 10/20/2021 - 14:13

I used this wonderful and easy plan to make a leaning hall tree for this awkward space in my dining room. Finally solved an 8 year old problem of what to put in this space! Thanks for the awesome plans!!

Built from Plan(s)

Comments

square planter

Submitted by gale on Thu, 08/01/2013 - 11:40

My first project! The legs are shorter than in the plans-my fault for not reading thoroughly before I printed just the cut list and headed to the store. Still, I love it. I used the Square Planters with Finials plan for this. Painted it with a stencil in place, then stained over that. Also used a kreg jig.

Estimated Time Investment
Afternoon Project (3-6 Hours)
Finish Used
paint: glidden, stain: minwax, clear coat: rustoleum water based spar varnish
Recommended Skill Level
Starter Project

Rustic Modern TV Console

Just finished up this unique TV console.  Built from reclaimed pallet wood. 

Estimated Cost
$150.00
Estimated Time Investment
Weekend Project (10-20 Hours)
Finish Used
Clear coat of wax
Recommended Skill Level
Advanced

Comments

Templar

Mon, 12/02/2019 - 22:10

Hi there Im new to site and also have the issue of not seeing the plans for this Rustic Modern TV Console. Are they available and Im doing something wrong or??

Finally Built a Platform Bed!

Submitted by Anonymous (not verified) on Mon, 07/25/2022 - 10:39

I've been wanting to build this bed for awhile and finally got around to it. I made a few small changes to the plans:

-I used 2x8's instead of 2x6s, so it wouldn't be so low to the ground.
-I ripped 3/8" off of the 2x8 supports in the middle so the mattress would nest inside the frame and not slide around
-I didn't add the headboard because it seemed a bit chunky/rustic for my taste. I will come back and do something else for the headboard. Maybe a cool paneled wall with built in sconces? We'll see!

Love these plans though, appreciate it!

Comments

Camp Loft bed - modified

Submitted by Milhouse on Tue, 09/24/2013 - 12:04

I liked the simple design of the camp loft bed, so I took the plan and modified it to fit over top of our existing Ikea daybed. I adjusted the width of the loft bed and made it a little taller, so that I could sit on the bottom bed and read to the kids with out hitting my head on the loft bed all the time.


I built the ladder into the side of the loft bed so that it wouldn't interfere with the drawers on the front of the daybed. This worked out well, as it also gives the girls more room to play!

This build is super easy, but I have to say that I don't like working with 2x4s. They are so rough....I spent a lot of time sanding and filling, and it's still not perfect. But I'm ok with it ;) I may add another cross support because it is a bit wobbly (probably b/c I made it taller).


The finish is a color matched 'All surface enamel' from Sherwin Williams.


Estimated Time Investment
Weekend Project (10-20 Hours)
Recommended Skill Level
Intermediate

Comments

roxanne89

Wed, 08/04/2021 - 06:38

Hello Millhouse. I love the loft bed you created. I have the exact hemnes daybed for my daughter and I beg to build the same loft bed. Do you have the exact modified plan you used with the measurements that fit the bottom bed? This would be super helpful!! Thanks in advance!

Markham Workbench Console and Rustic Hutch

I first saw this workbench and hutch on Ana's website, but didn't commit to the project until I saw them in person, as part of a model home that had been decorated by local Pottery Barn design services. I was sold. I built this for roughly $1900.00 less than PB charges. It was an easy weekend build for a guy with less than one years' experience in this arena.

Estimated Cost
150.00
Estimated Time Investment
Weekend Project (10-20 Hours)
Finish Used
Before I applied stain, I had my two youngest sons whack away (under my supervision, of course) at the piece with a hammer, hatchet, and chain to give it a distressed look. I took a page from Ana's playbook and used Minwax Early American with a Minwax oil-modifed water-based gloss polyeurethane topcoat. I moved the towel bar to the other end of the facade in order to reduce the depth of the piece and added a stationary bottle opener to the other side. Also, I added four lag screws toward the juncture of the legs and feet (a la PB's version), but these were purely cosmetic. All visible hardware was spray-painted with Rustoleum's textured black spray paint. Finally, I carved a heart with "A+A" inside one of the hutch cubbies to add a truly personalized element to the piece. I plan to build another for my father to use as a functional workbench. By far my favorite build (my wife kind of loves it, too). One last thing - if you don't have a Kreg jig, get one. Now. This was my first build using one and I cannot overstate its worth. Trust me.
Recommended Skill Level
Beginner

Comments

kmatt55

Thu, 09/15/2011 - 16:20

Nice dude! I just finished my console last weekend. Was it worth it making the matching hutch? I haven't decided if I'll do it yet.....Great job though.

anthony alejandre (not verified)

Thu, 09/22/2011 - 11:23

Absolutely. It's minimal time investment, and it really seems to finish the piece off. I went with seven 1x6's (instead of a plywood backing) to give the hutch a planked look.

Jennifer Babjak (not verified)

Sat, 09/17/2011 - 15:19

Very very nice. This has been on my build list for way toooo long. It is beautiful and inspiring! Thanks!!!

gsumarcinko

Fri, 02/24/2012 - 05:43

Great job! I'm starting this same project and just purchased the kreg jig system but I'm stuck on assembling the table legs using pocket holes. I don't want to have visible pocket holes, could you give a quick description on how you assembled the legs and attached them to the feet using pocket holes? Thanks!

Guest (not verified)

Wed, 02/29/2012 - 10:34

Where did you find the cool towel bar?! I am trying to get my boyfriend to make me one of these, but i am having the hardest time finding a towel bar like that online? I appreciate your help!!!
Jenna

Cedar Outdoor Side Table First Project

Submitted by Amy.Mapes on Sat, 05/04/2019 - 09:35

This was my first attempt at making anything out of wood.  I was thankful for guidance from my husband but I did it myself!!!

Built from Plan(s)
Estimated Time Investment
Afternoon Project (3-6 Hours)
Finish Used
Minwax Colonial Maple Stain
Recommended Skill Level
Starter Project

Comments

Seasonal And Holiday

Factory Cart Coffee Table with Storage

I have been longing to make a factory cart coffee table for years after seeing one in a local antique store in Jacksonville Florida. I started by following the dimensions from Ana Whites table and then decided to make the table top with the ability to open up into storage. I followed the plans and updated with hardware that I (painstakingly) pieced together from various sites online. I love the industrial feel the cast iron hardware brings to this adaptation and cannot wait to start building matching end tables. Thank you Ana for the inspiration!

Built from Plan(s)
Estimated Cost
$200
Estimated Time Investment
Week Long Project (20 Hours or More)
Finish Used
Minwax provincial stain for the primary and minwax espresso to detail the distressing and edges. Finished with 4 coats of minwax water based polyurethane
Recommended Skill Level
Intermediate

Comments

jahnkekong

Wed, 11/06/2013 - 17:11

Could you share any details about how you finished the wheels? I have a cart I am trying to refinish but stalling out on the cast iron parts. I really don't want to paint them, and I don't want them to rust.

Just noticed the Kupo Nut reference! I love it!

In reply to by jahnkekong

TongueAndTeak

Wed, 11/06/2013 - 19:16

Thank you so much for catching the Kupo nut reference! Haha I only felt it was fitting to add a little nerd flair :) rust oleum has a hammered black paint that also doubles as a rust inhibitor so it worked perfectly to touch up the cast iron parts and keep that rustic feel to the hardware. I finished with a clear top coat as I'm sure that I will end up constantly kicking the wheels by accident haha.

Cyber Sapp

Wed, 12/04/2013 - 18:45

I know you mentioned it was painstaking to find all of hardware, but can you share where you found the front casters? Also how did you put your stamp on it? I'm knew to woodworking so please excuse my ignorance.

In reply to by Cyber Sapp

TongueAndTeak

Wed, 12/04/2013 - 19:18

Hi cyber sapp! I was able to piece them together from eBay and etsy items. I searched for key words: "antique cast iron caster" or "factory/industrial cart wheel" and you should be able to find ones that work. I held out for the best deals I could. Be prepared to search quite a lot if you want to find the best deal.
As far as the decal is concerned, I created the template on illustrator and used it as a template to paint the decal on. I checked online and saw a few examples of transferring images on to wood that will probably be easier than hand painting. Hope this helps!!

Cyber Sapp

Wed, 12/04/2013 - 22:25

Thanks for the update. I made one similar to your modifications. I'm using storage too, I will share once I get the soft close installed. I'm looking for something that want slam fingers when it is closed. I also used Walnut to build it. It is solid like a tank with the hardwood, but came out pretty good. I made a few minor mistakes and now want to make one closer to yours.

Mandymoochops

Mon, 12/16/2013 - 23:30

What an amazing job you did, I'm still holding out for my end wheels too and you are so right about search search search. It doesn't help being in Canada with shipping costing so much for these too.

Love love love, well done

TongueAndTeak

Tue, 12/17/2013 - 21:23

Thank you very much!! I do not envy you right now as the search took me forever to find the right wheel that matched one I already had. I have had good luck in the past asking eBay sellers about changing to flat rate shipping options. Not sure if they have that option for shipping internationally but it never hurts to try! Keep up the good fight as the wheels REALLY pay off in the end.