Community Brag Posts
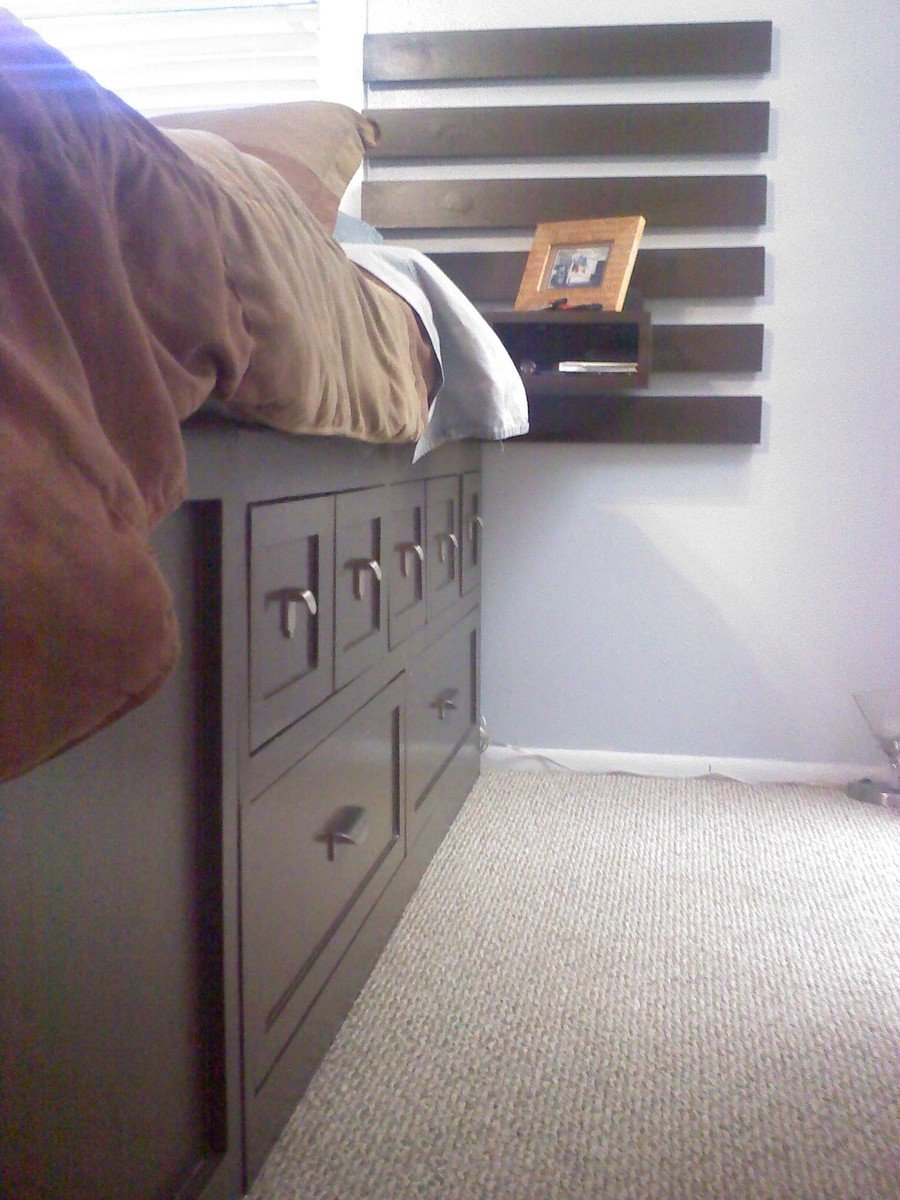
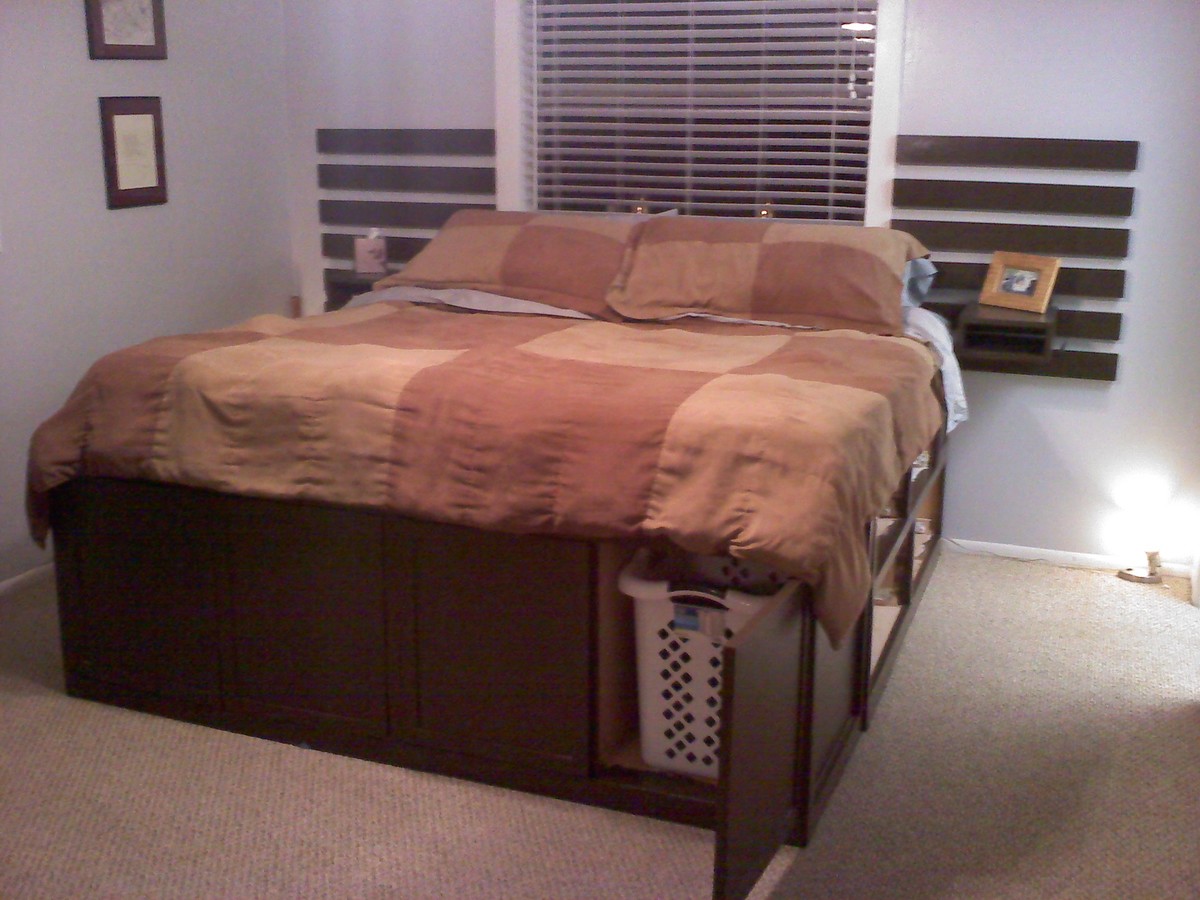
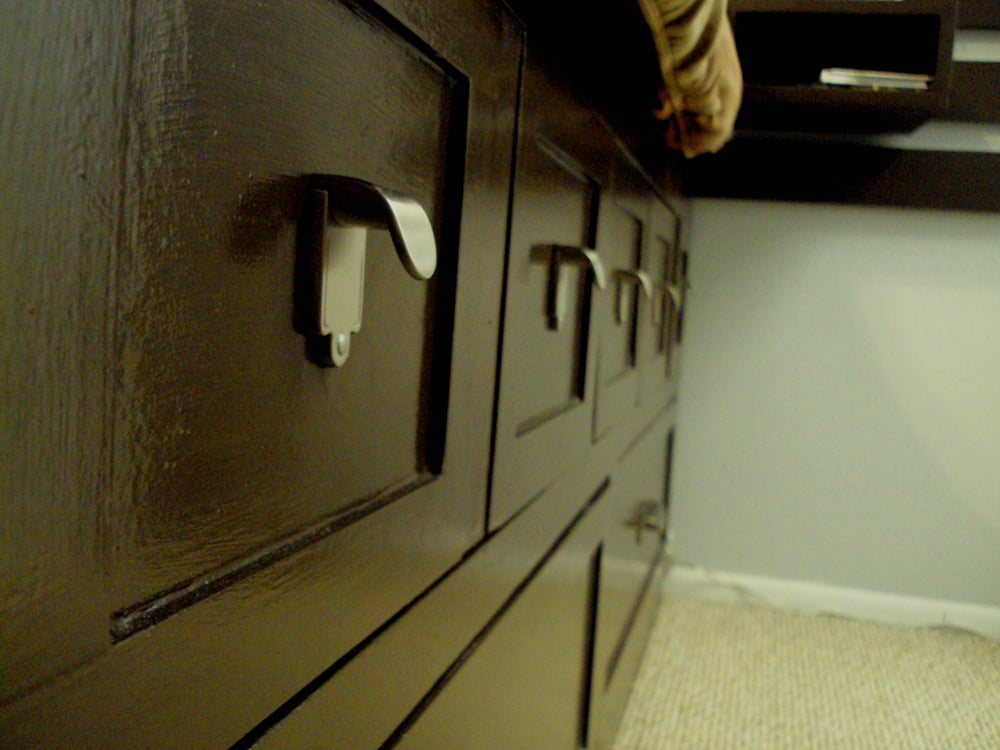
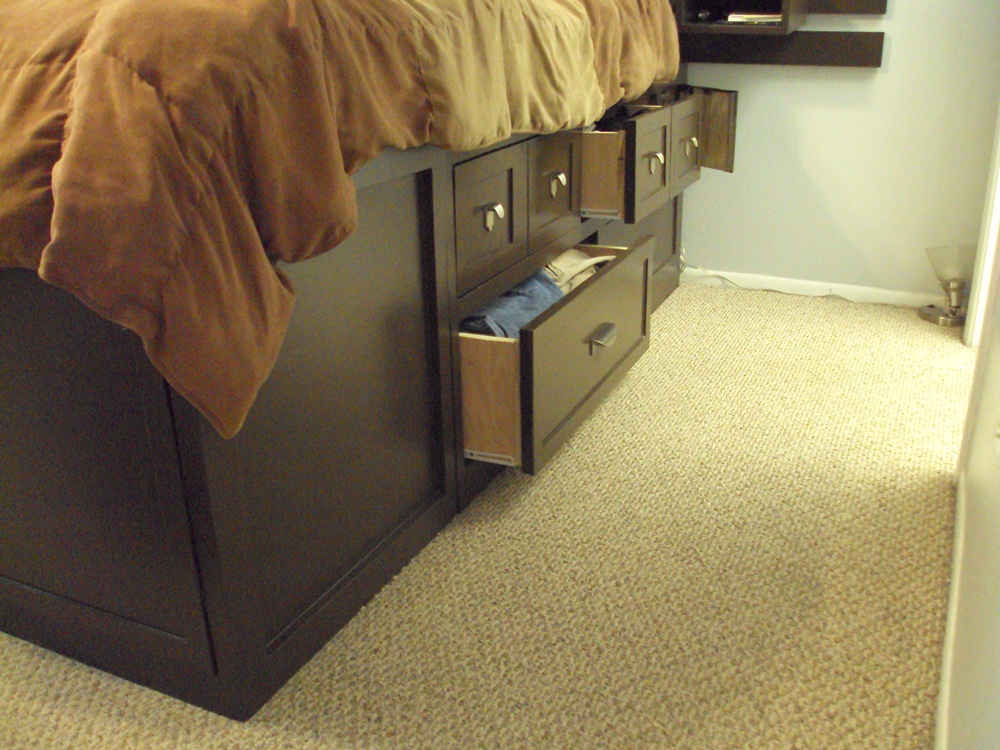
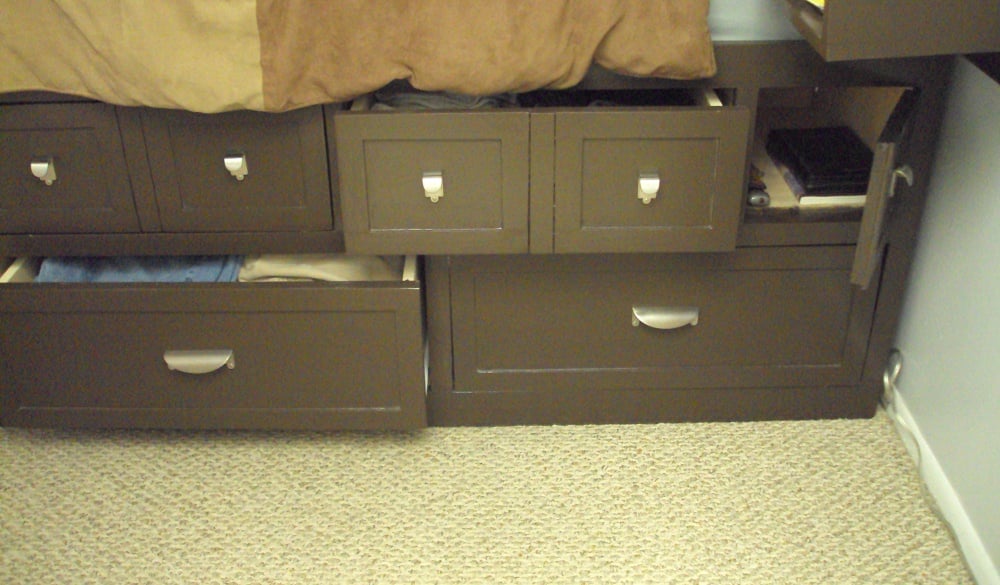
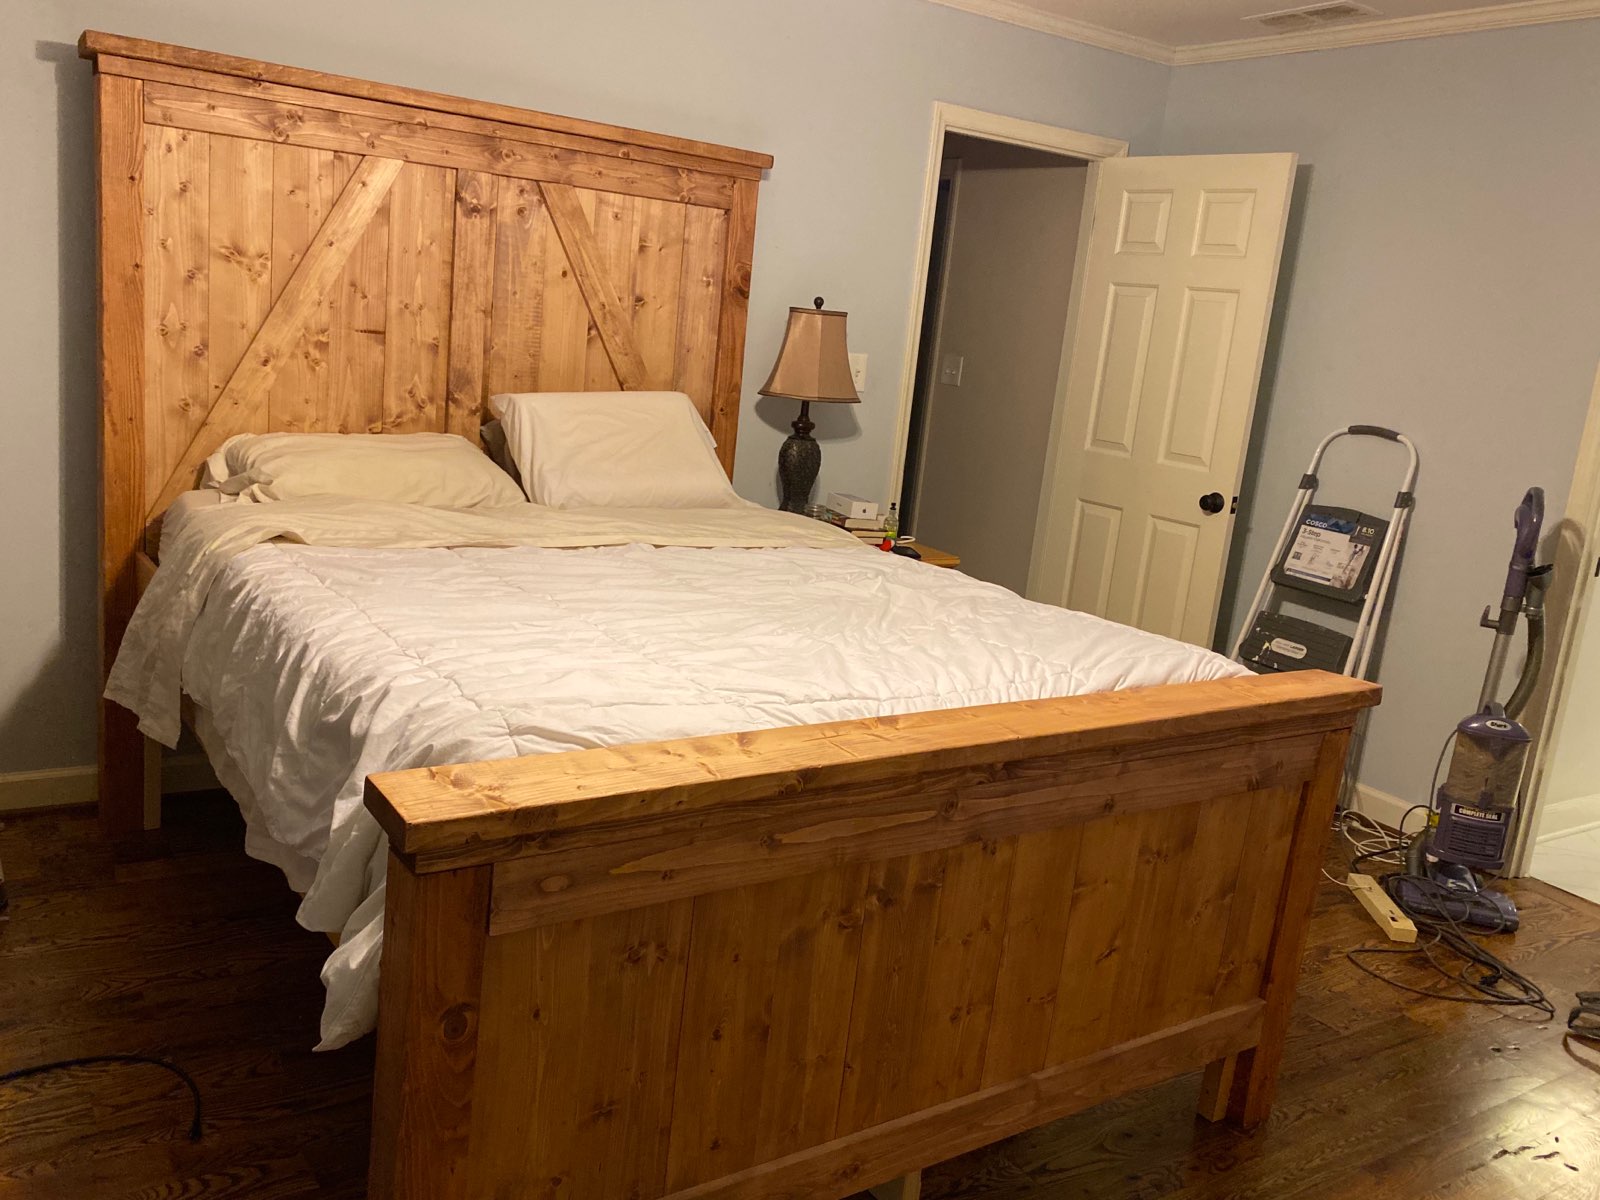
King size Storage Bed - Highly Modified
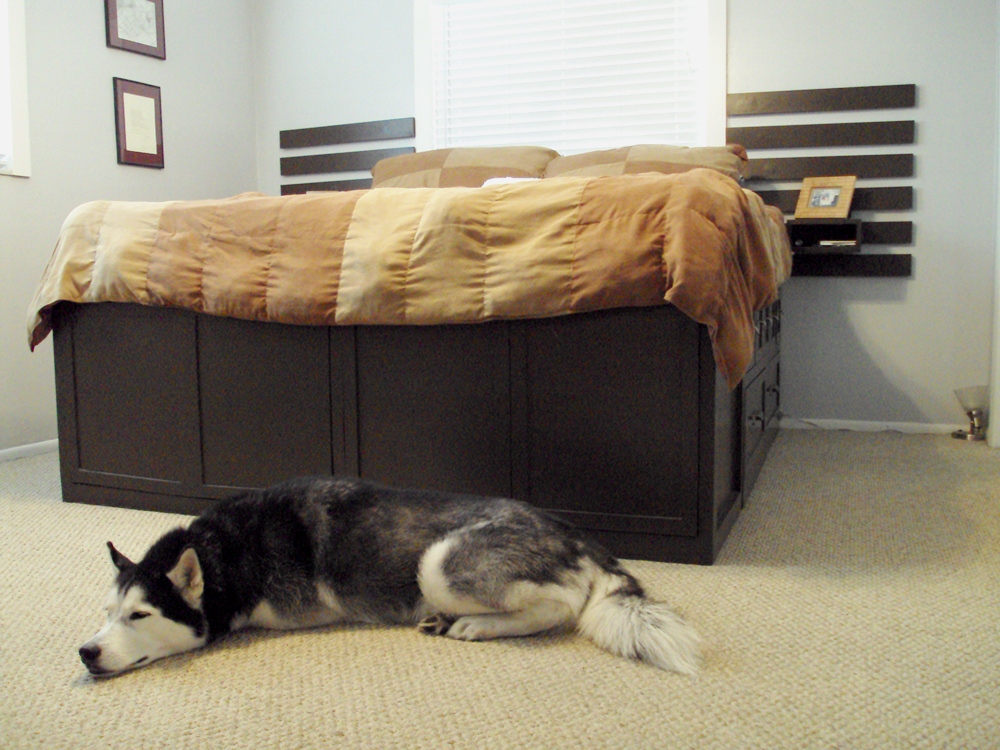
In an effort to gain some space in our home, I decided to build up. The Bed is tall (not a problem for us) but not too tall. The added heigh allowed for an extra 2 LARGE drawers on each side and an additional storage space we refer to as the "cubby." This last space has a pop open latch insted of a drawer due to the side table above them. The cabinets at the foot of the bed have the same pop open latch system and house 4 large laundry bins.
The bed feels incredibly solid and I've already had several compliments from friends. One of the best came from a rather neat and organized contractor friend of ours who's home decor is wonderful. He asked where I bought it. My response: Lowes , in a pile of lumber :)
The time it took to build this was months, due to only working a night or two a week after my toddler went to bed. It could easily be week project.
Built from Plan(s)
Estimated Cost
less than 700
Finish Used
Chocolate Brown paint with Polyacryllic over.
Recommended Skill Level
Intermediate
Comments
Mon, 03/19/2012 - 17:33
Absolutely stunning!
This is wonderful. You created practical beauty. Great job!

Wed, 03/21/2012 - 14:35
Measurements...
I did...
But today is my first chance to start playing with sketchup. I'll see if I can put those together for you. In the meantime. Here's some numbers to look at. Remember, the bed is TALL, but my wife and I are both around 6 feet.
Each side cabinet is 60 inches wide by 20.5 deep by 22.5 tall (to the platform itself). The entire bed is 77.25 wide at the base, with trim.
Mon, 09/07/2015 - 10:30
Platfrom Bed
First of all......
Amazing work!!! This is exactly what I am looking for to make for my daughters BDay. She has a small bedroom. I have never been afraid to take on a new project. Saying that I will be having the lumber company cut all the pieces for me. It will house all her clothes/shoes and hamper.
Please tell me that you have the dimensions for this platfrom bed.
Sat, 04/30/2016 - 22:05
Measurements
Great job. Do you have the measurements for this bed. If so can you email them to me, [email protected]. Thanks
Wed, 04/18/2012 - 10:36
thank you
Thanks HK
Having the laundry hampers on all sides is quite doable. Email me if you want [email protected] and let me know what types of hampers you are thinking...how many... do you need doors... how tall...what materials you want to use and what size bed. I can help you with the design/modification.
Thu, 06/28/2012 - 14:05
Absolutely gorgeous!
I love the modifications you have made! I want my husband to make me this same bed that you have done. With our 3rd baby arriving in 2 months I really need the space that our clothes are currently occupying. Have you been able to make up plans for this bed? If not, do you have a list of measurements and supplies needed to make this?
Mon, 07/16/2012 - 21:12
Awesome Storage Bed!
Hey BJ,
This is the other BJ (or as Greta would term it, "chick BJ")! I was looking at this site, and saw a picture of the bed you made, with the caption "BJ D made this." So I clicked on it, and it showed a picture of you, and I was like, "Hey, I know that guy! That's the guy that married my best friend! And that's their daughter! Wow, small world!"
Anyway, I was thoroughly amused, and also, I really like the modifications you made on the bed. I'm totally stealing some of your ideas when we make our new bed frame!
-BJ
Fri, 04/18/2014 - 15:18
Sketches
Hi, I emailed you, but just in case you don't still have that email or it doesn't go through to you. Did you ever make plans for your modifications? If so, I would love to see them. My email is [email protected]
Thank you!
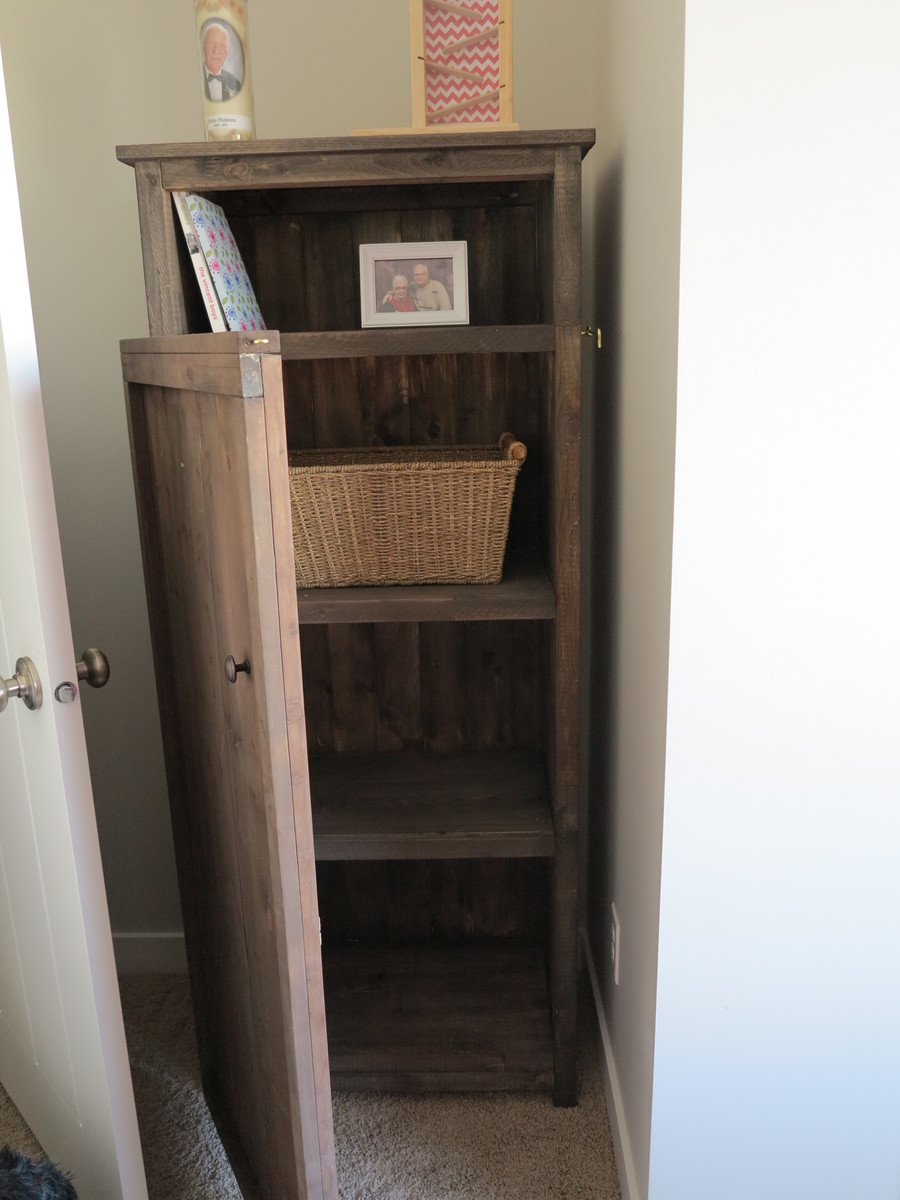
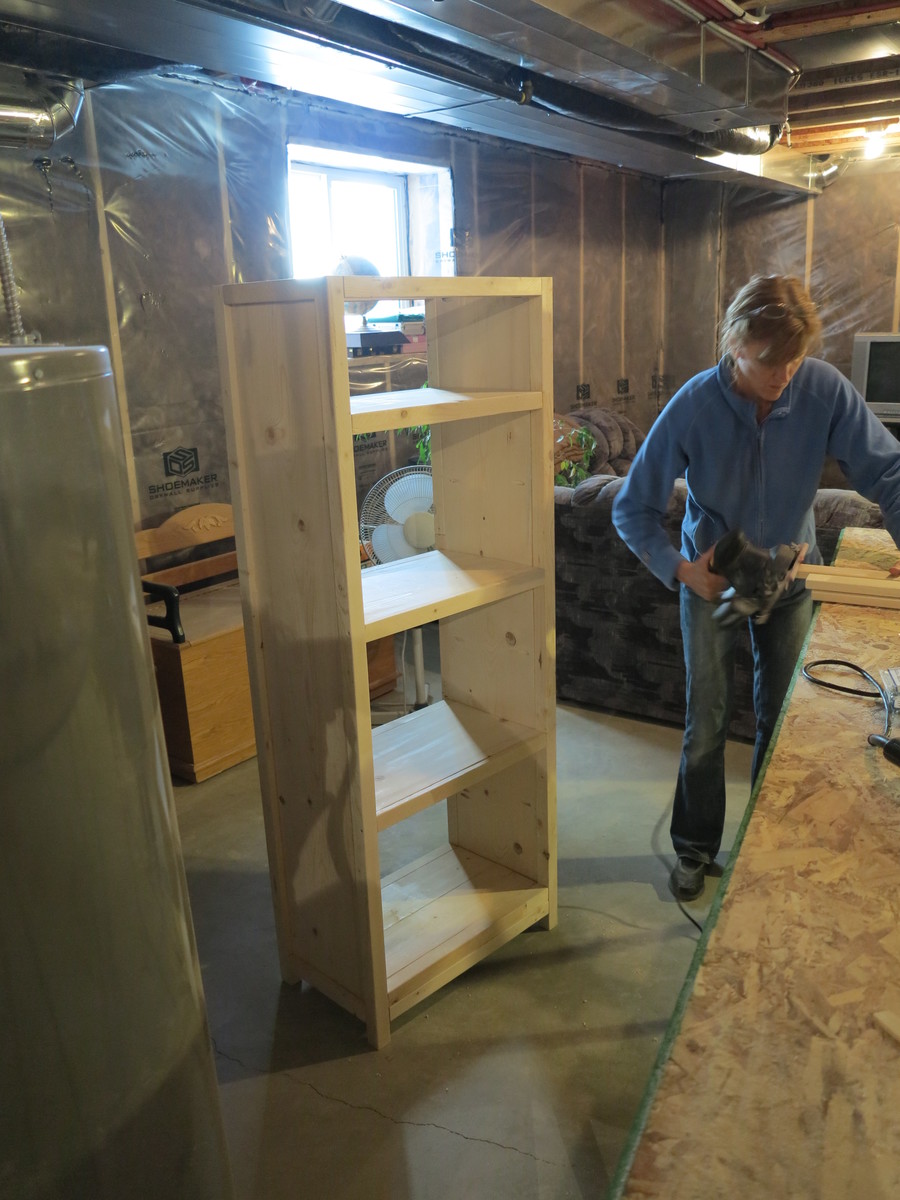
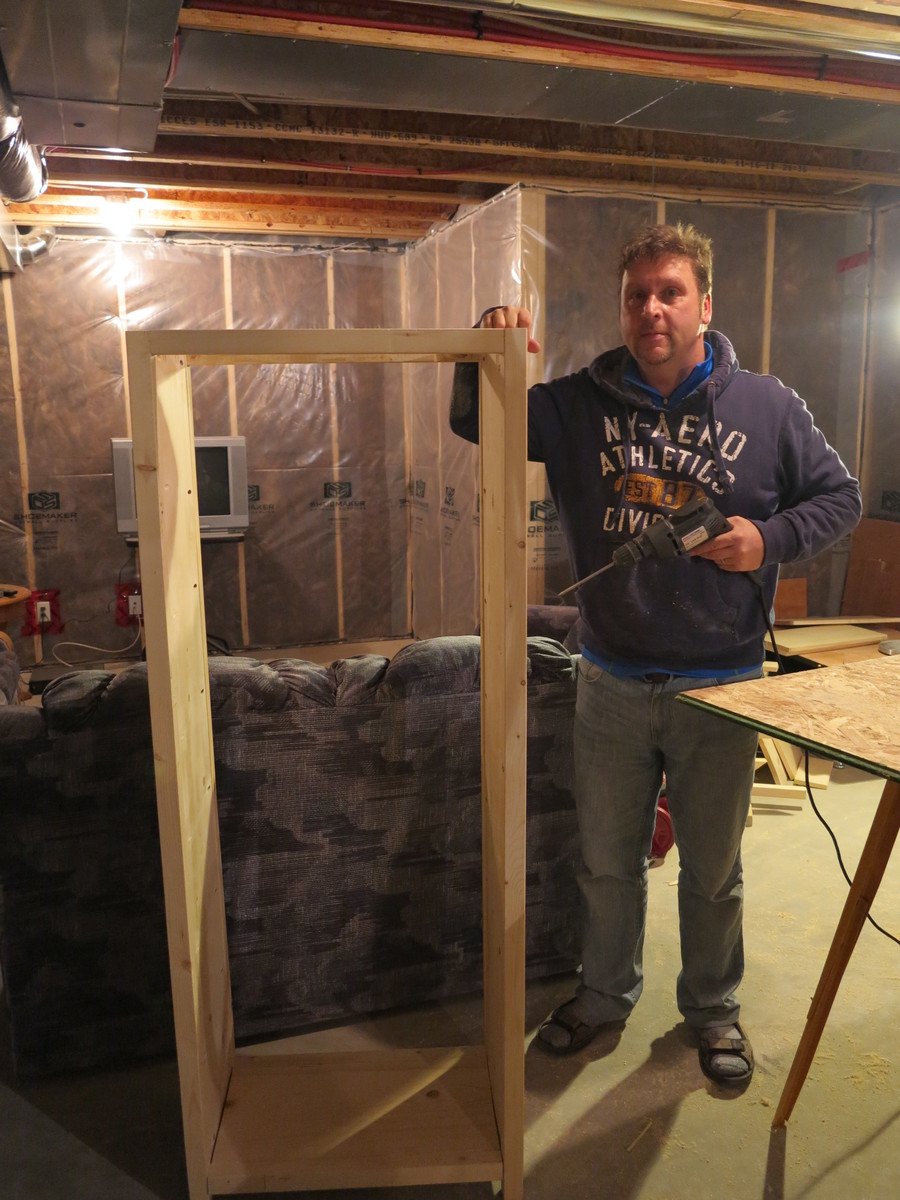
Rustic Bookshelf with Door
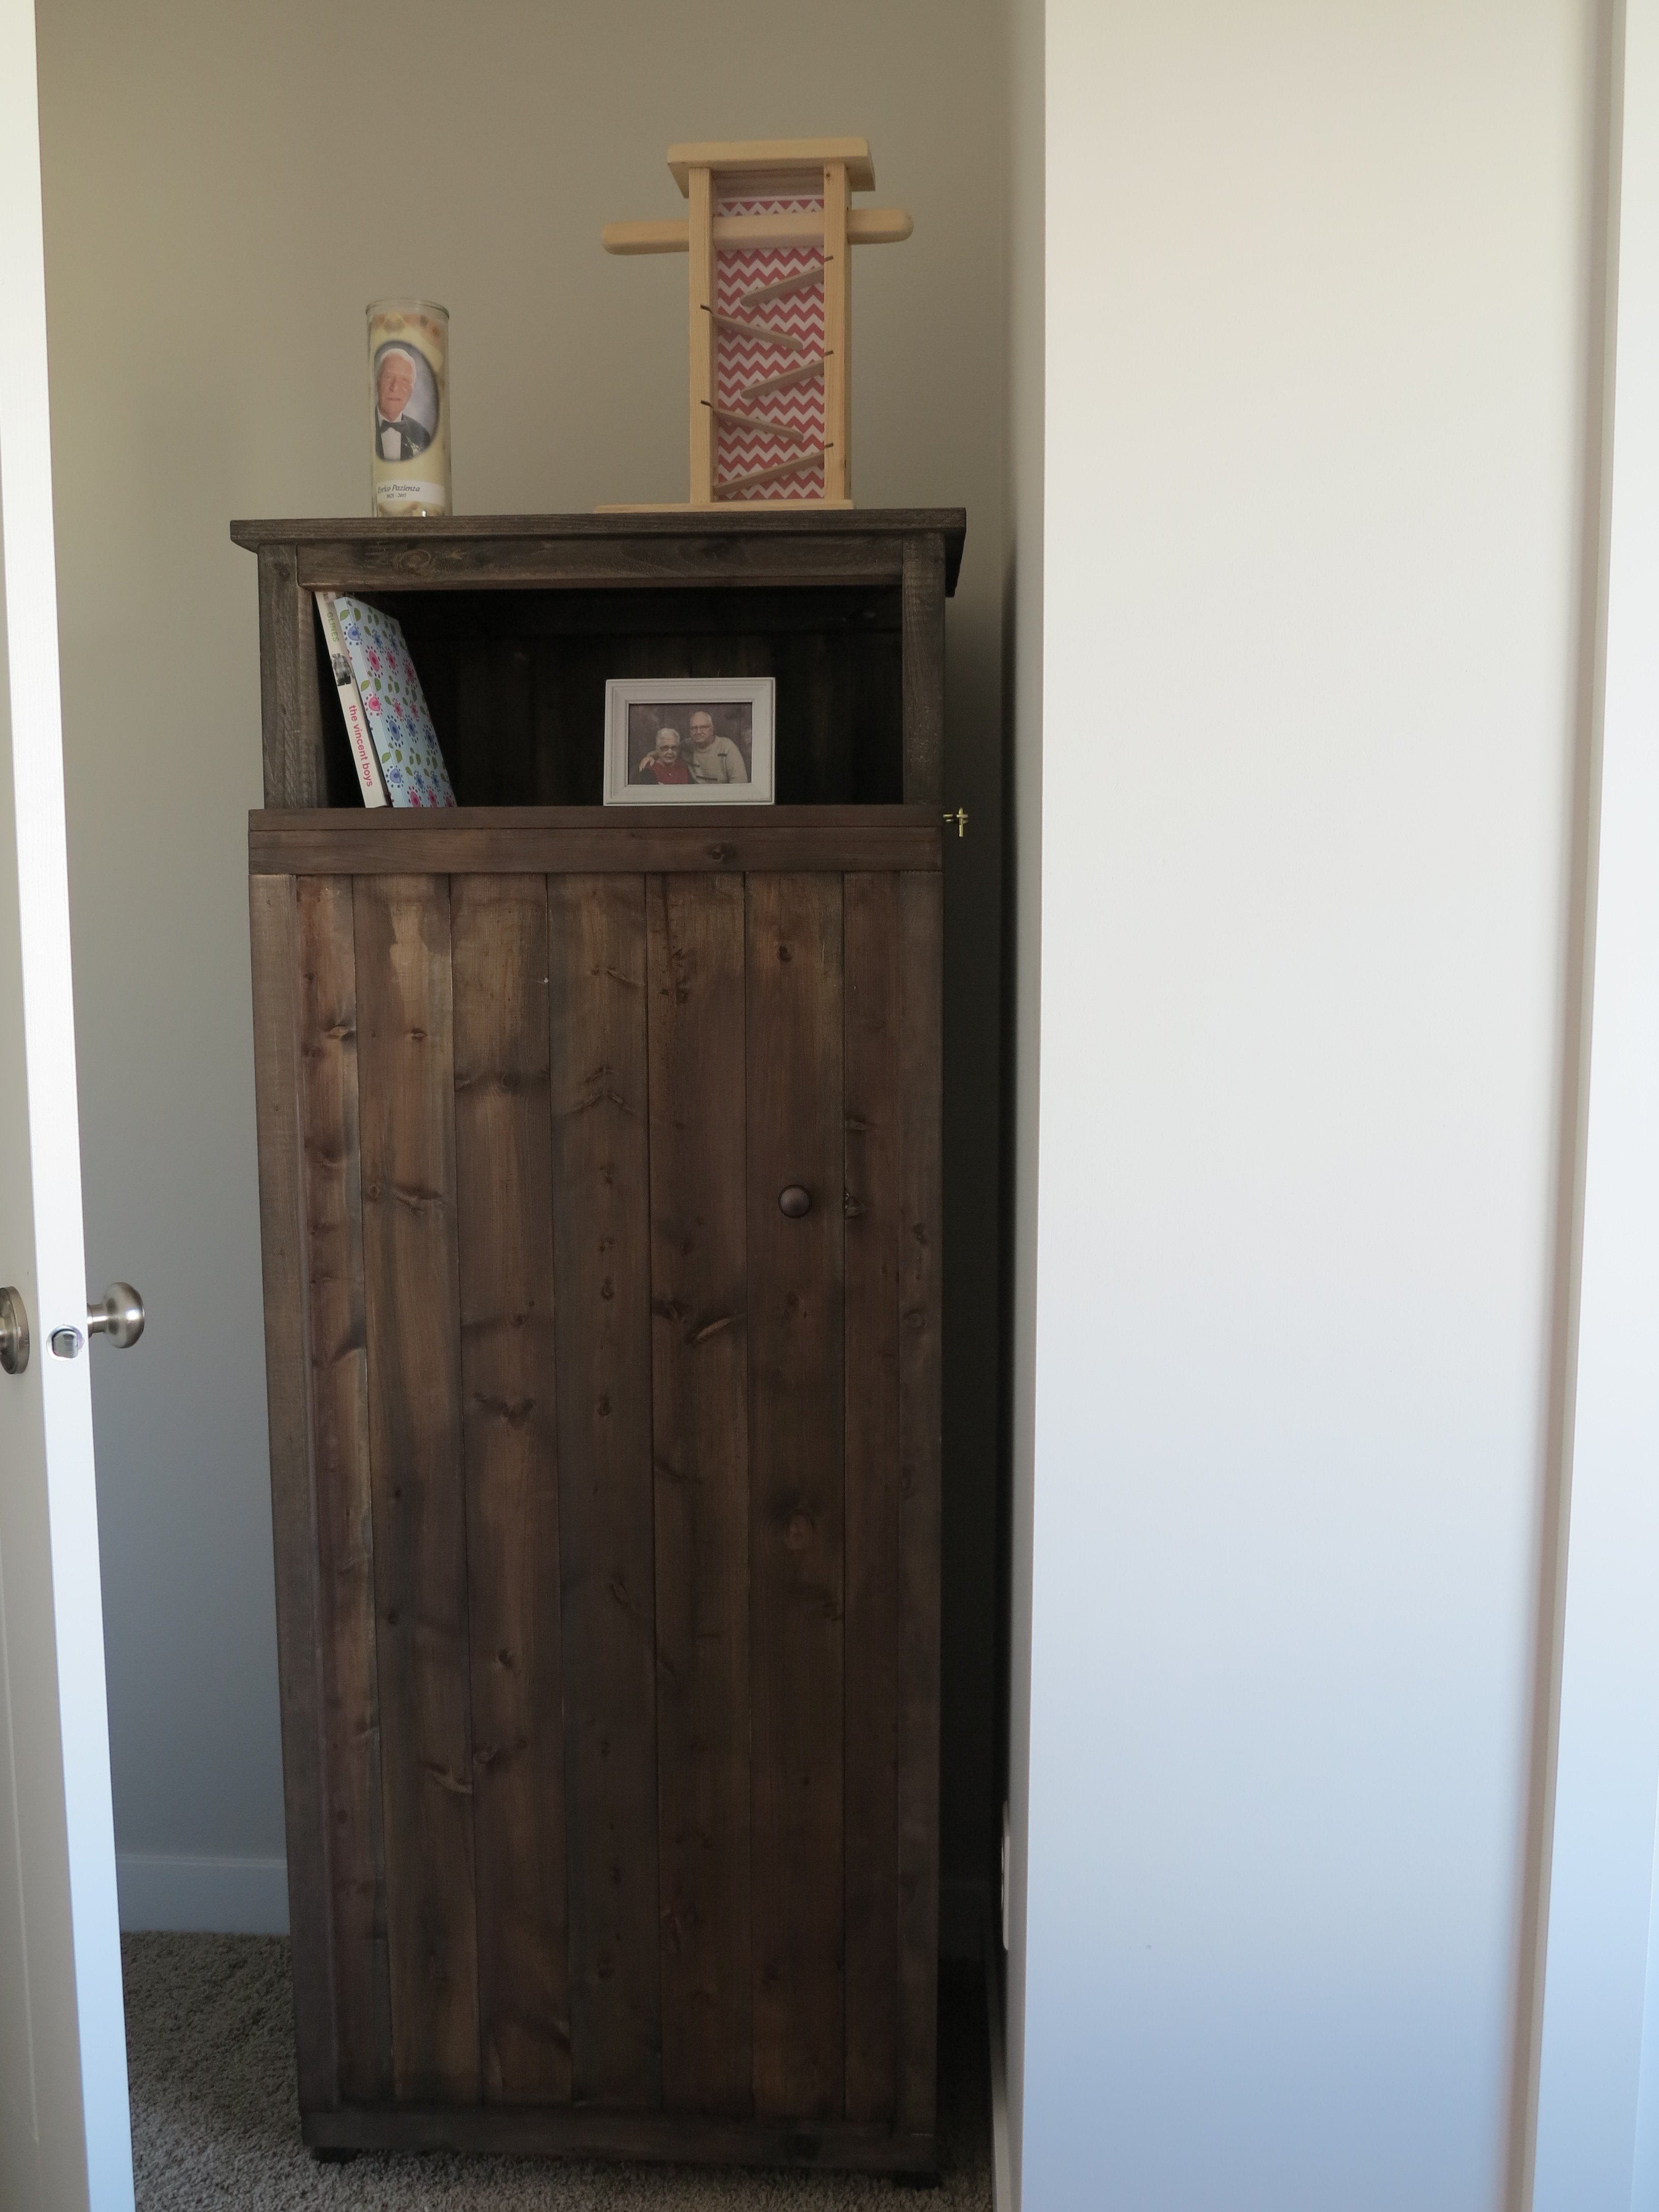
Our second project after successfully creating the X coffee table. I used 1 x 4's both for the back and the door that I added.
Built from Plan(s)
Estimated Time Investment
Day Project (6-9 Hours)
Finish Used
Vinegar and wire wool oxidisation achieved by applying 24 hrs after the application of strong tea.
Recommended Skill Level
Beginner
Farmhouse bed
I made a few changes to the queen size farmhouse bed plans. Going to add drawers underneath so we can maximize space in our room.
Built from Plan(s)
Estimated Cost
$400
Estimated Time Investment
Weekend Project (10-20 Hours)
Finish Used
Cherry
Recommended Skill Level
Intermediate
DIY Greenhouse
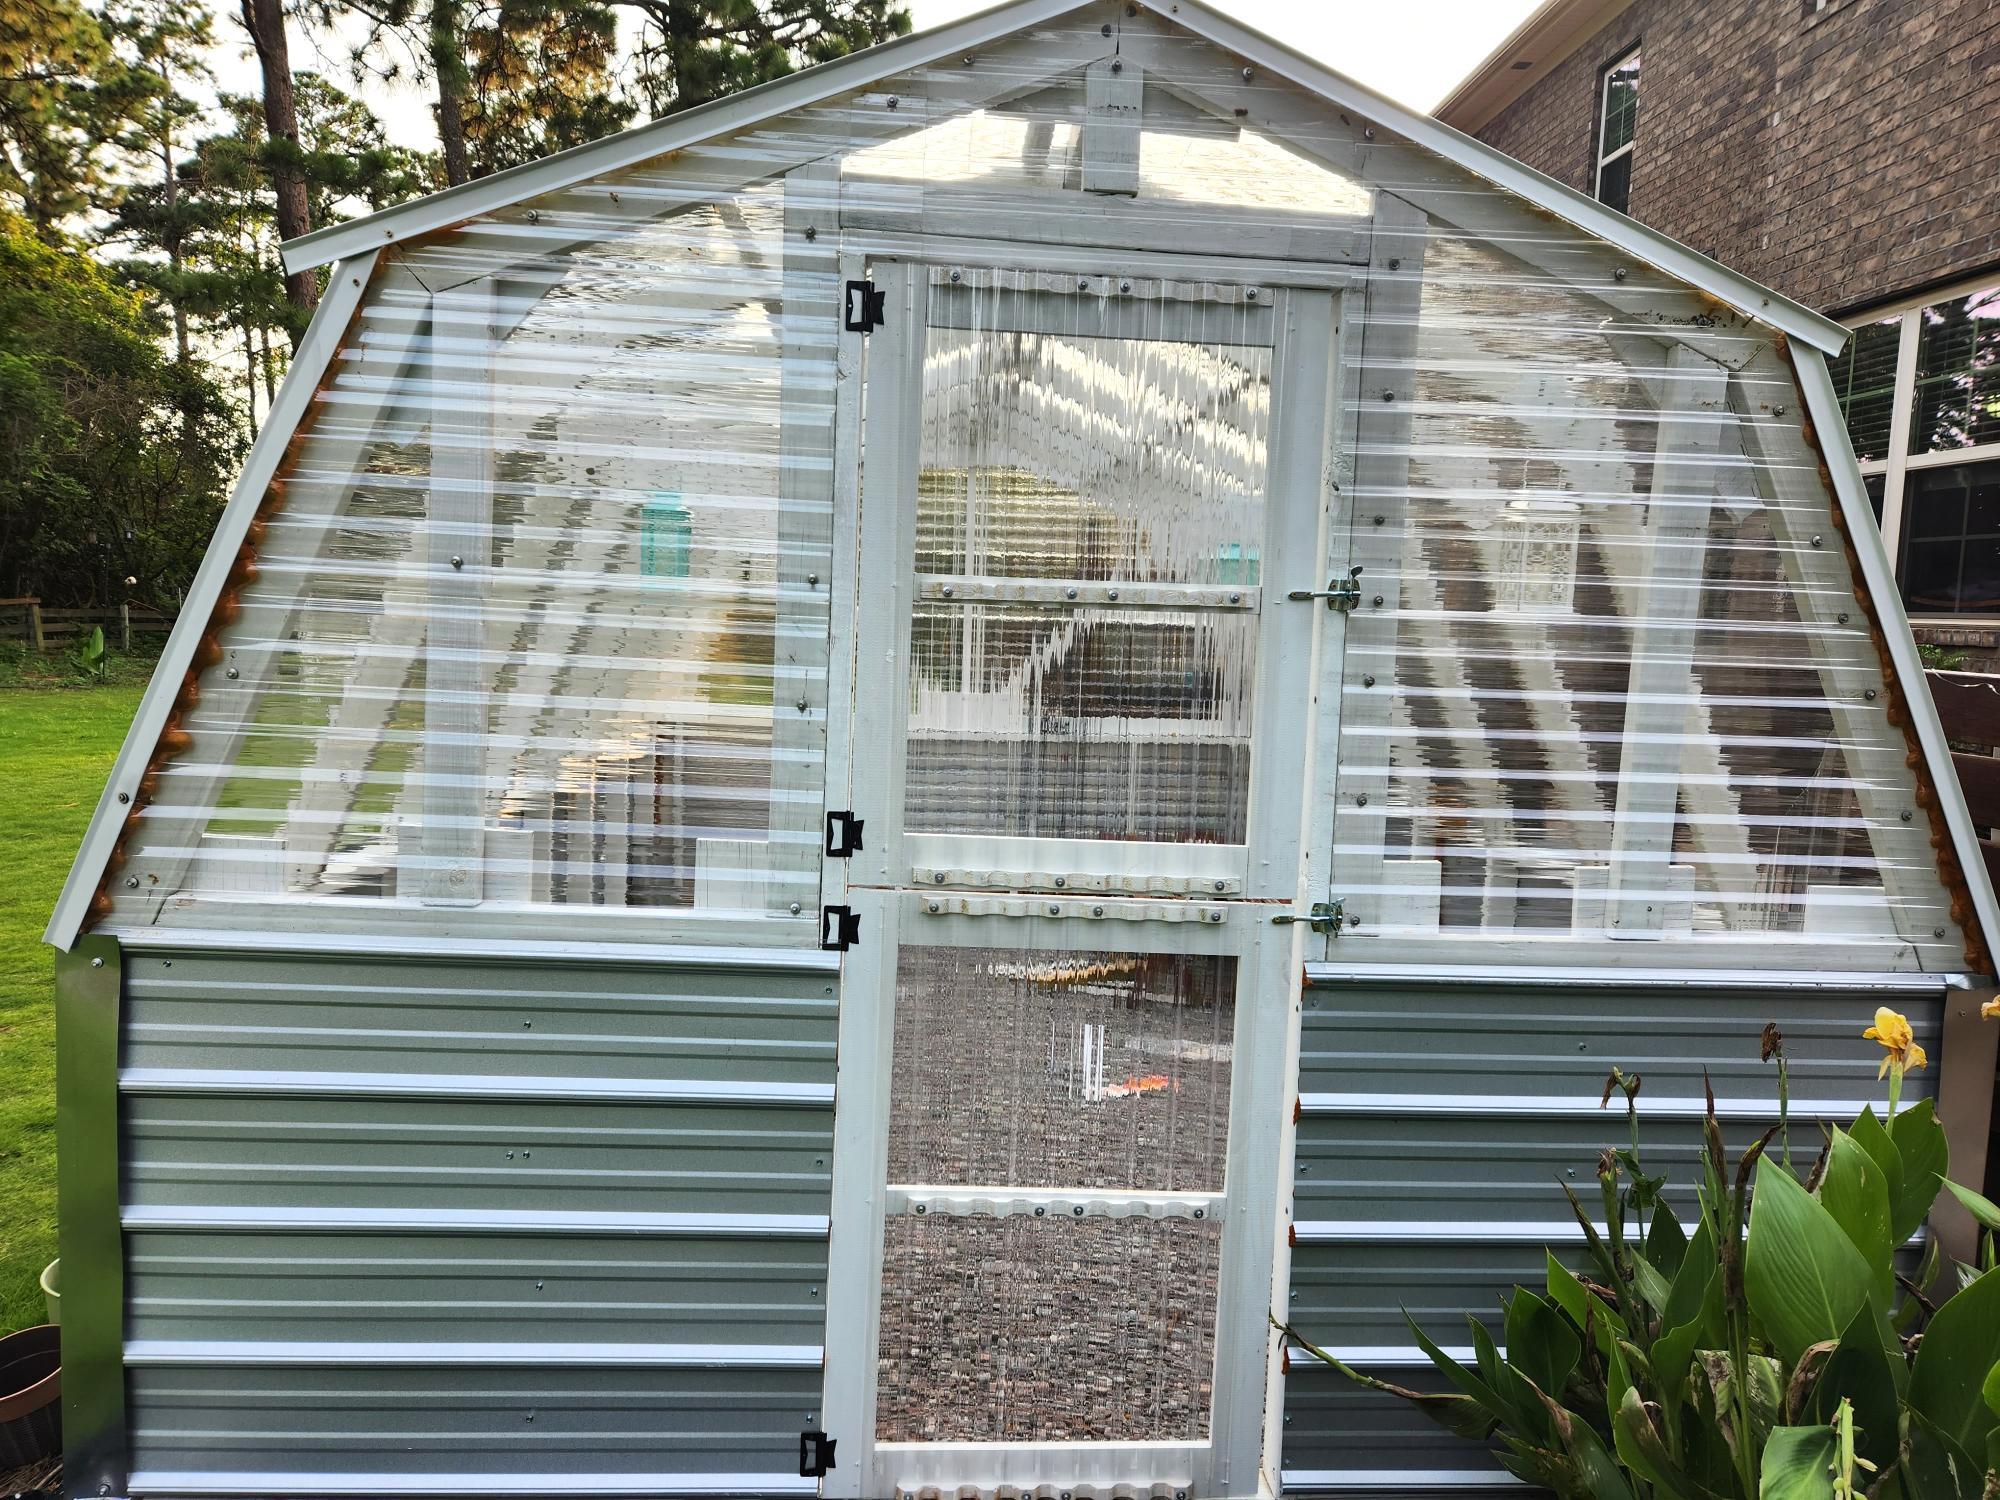
Modified roof orientation and extended to 16
Built from Plan(s)
Storage Bench
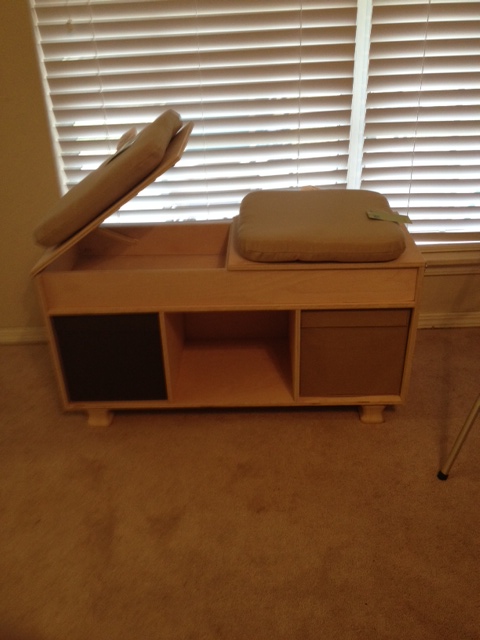
This is my secend ever furniture build. I build it inspired by this storage bench from bed bath and beyond. http://www.bedbathandbeyond.com/product.asp?SKU=132657
I am pretty happy with it!

Estimated Time Investment
Day Project (6-9 Hours)
Finish Used
none
Recommended Skill Level
Beginner
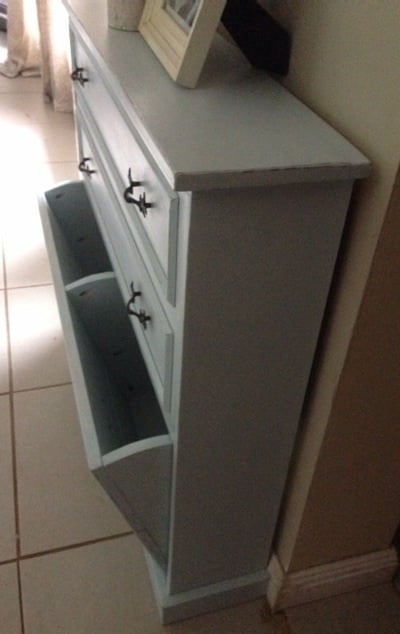
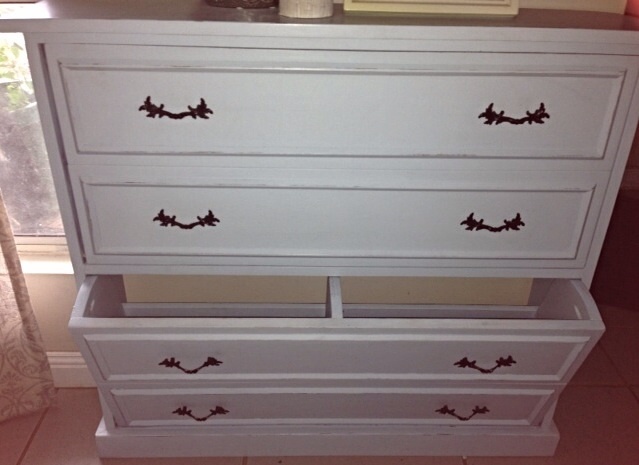
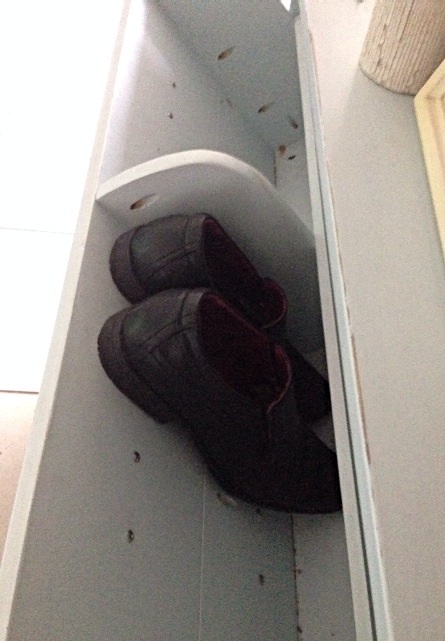
Shoe dresser
I loved the idea of the shoe dresser and decided to fancy it up a bit. I changed the dimensions a little to suit the space in my home where I wanted it to go. I decided to use the dowel pins for the doors because I didn't want to be able to see the hinges - which I found to be the hardest part - you need to make sure you get them as low in the corner as you can otherwise your doors won't open. I also found that I didn't cut enough off the top of the dividers which prevented the doors from opening - they needed to be more slanted than round at the top - I ended up having to use a planer to take the excess off. Very happy with the way it turned out - just have to train the kids to put their shoes away now instead of all over the floor :)
Built from Plan(s)
Estimated Cost
$100 (Australian)
Estimated Time Investment
Week Long Project (20 Hours or More)
Finish Used
I mixed some paint together that I had leftover from other projects to get the colour I was after and made up some chalk paint. I had never used chalk paint before and was very pleased with the outcome. I lightly sanded and paid more attention to some areas more than others to give a slightly distressed look then applied a coat of wax.
Recommended Skill Level
Intermediate
Comments
Tue, 01/14/2014 - 00:22
Thank you! I have added the
Thank you! I have added the plan link and some more photos - not the best quality photos sorry :)
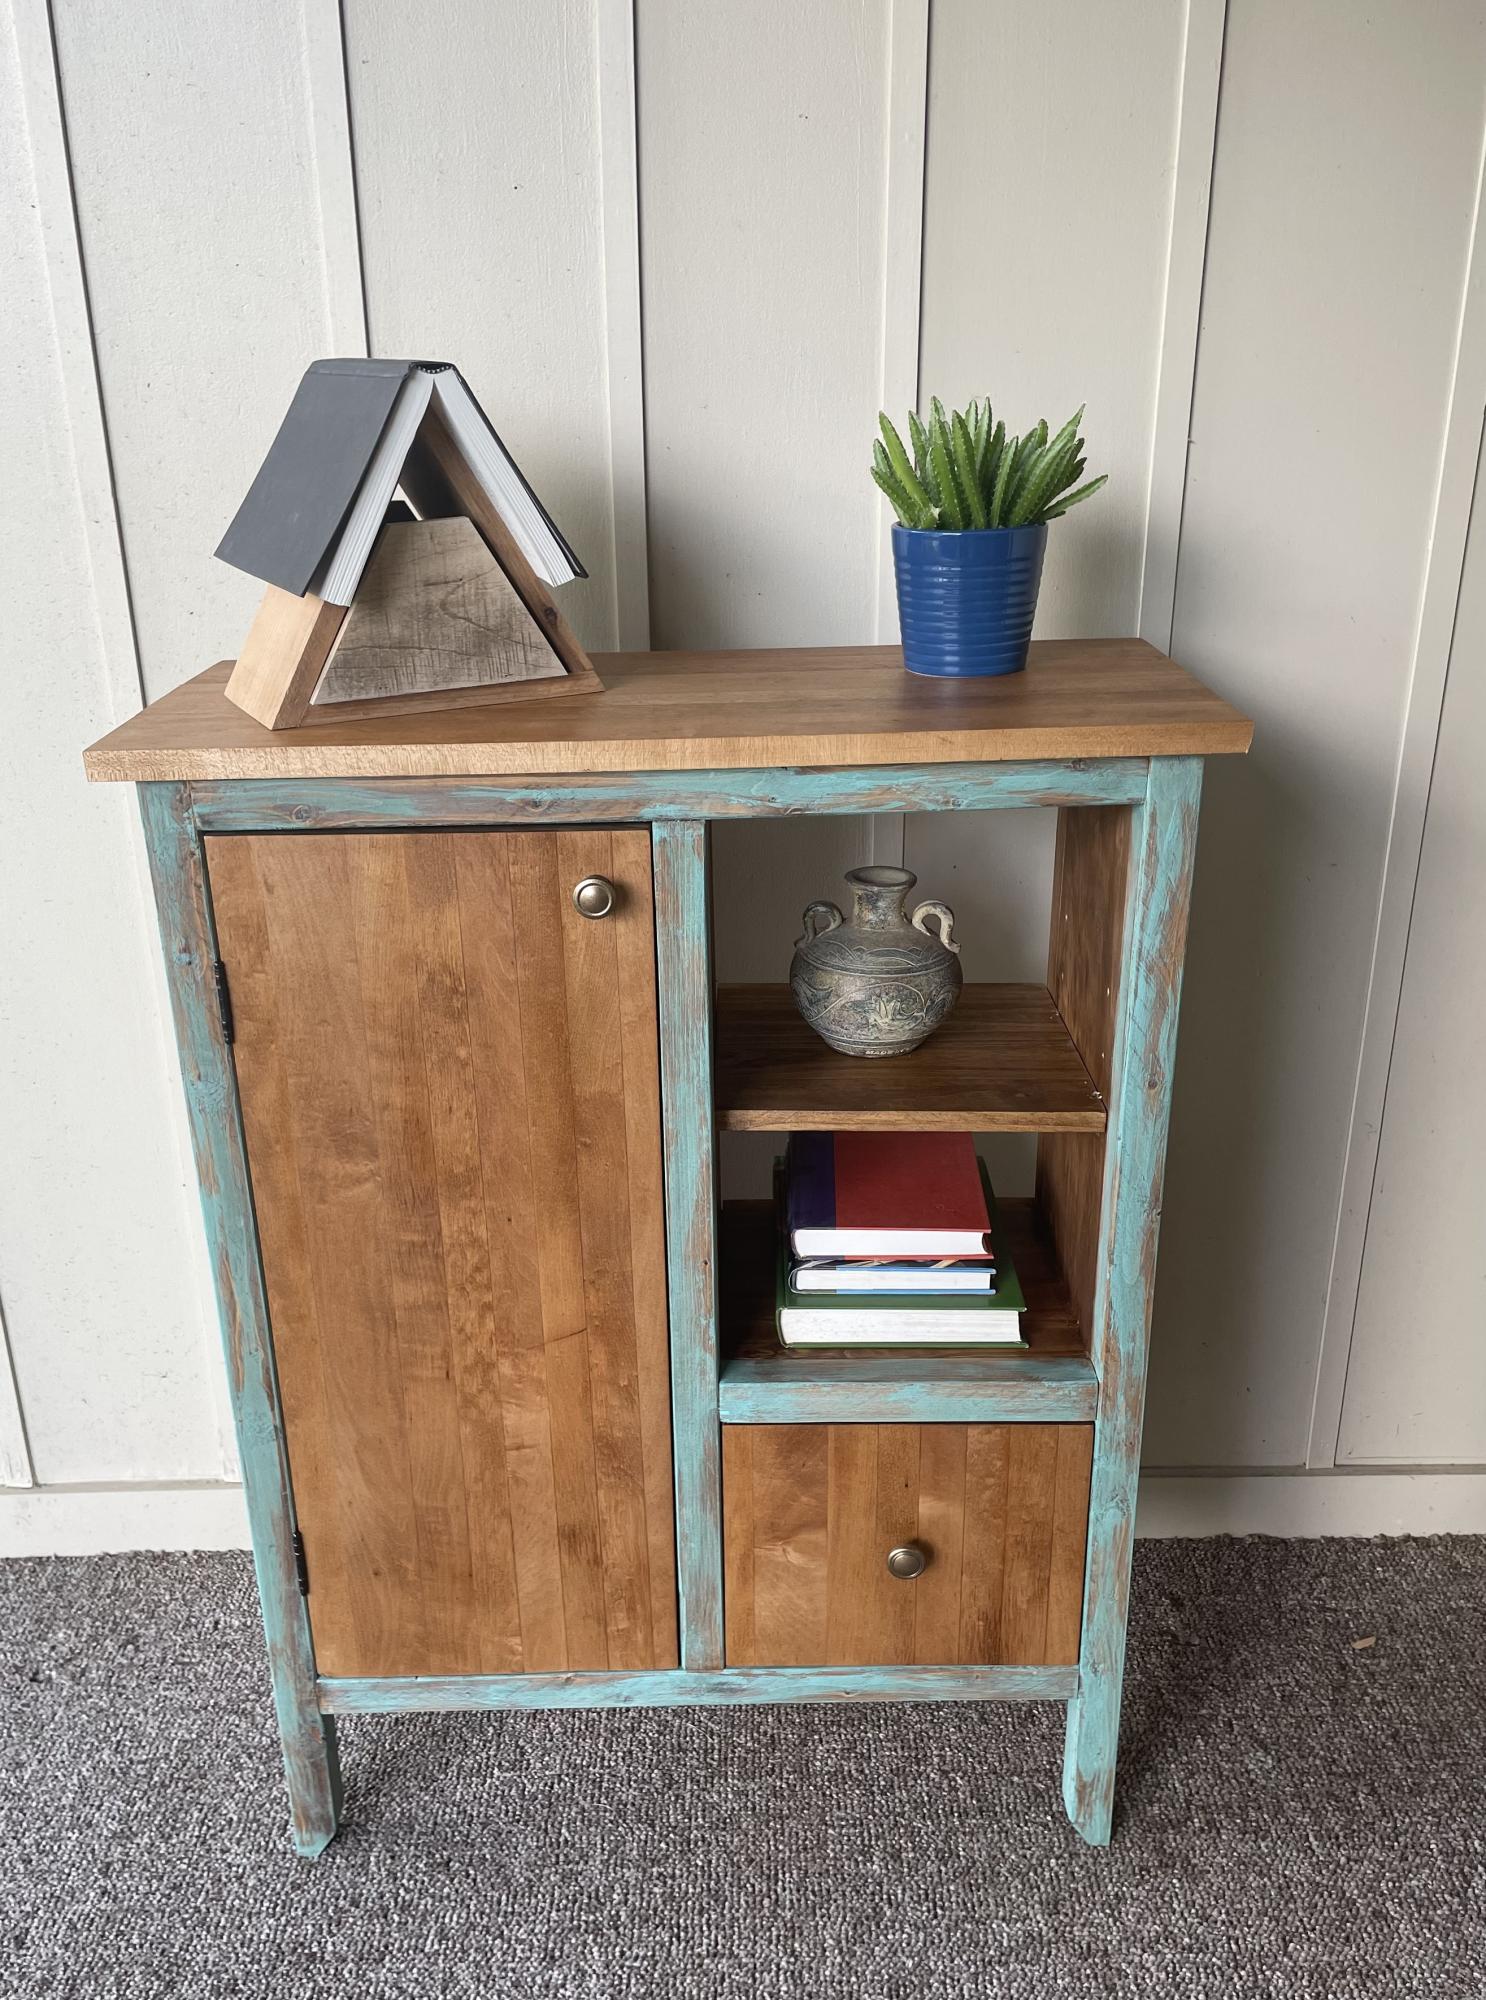
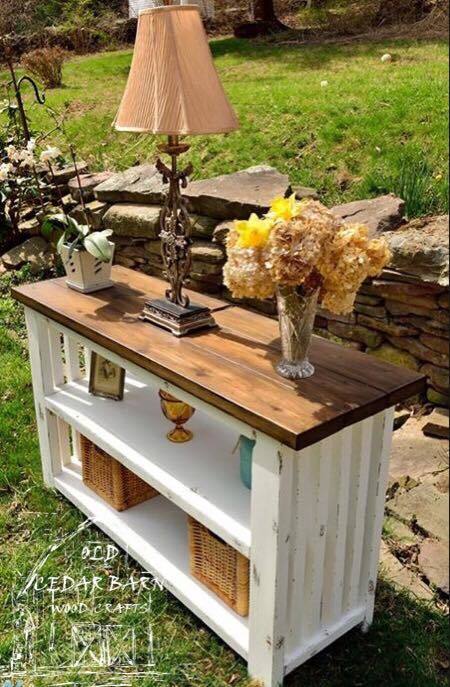
Modified Rustic XX Console Table
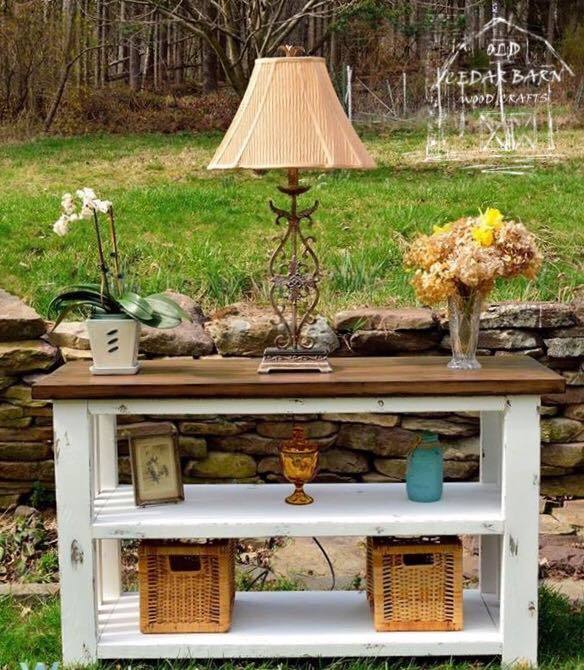
I wanted a smaller table than the plans called for, so I built this one at 51 inches. The side design is slatted rather than built with an X. I love the more modern look with this mission-style modification. This was my first build and I'm pretty happy with it and how easy these plans were to follow.
Built from Plan(s)
Estimated Cost
$100
Estimated Time Investment
Weekend Project (10-20 Hours)
Finish Used
DIY chalk paint and vinegar stain.
Recommended Skill Level
Beginner
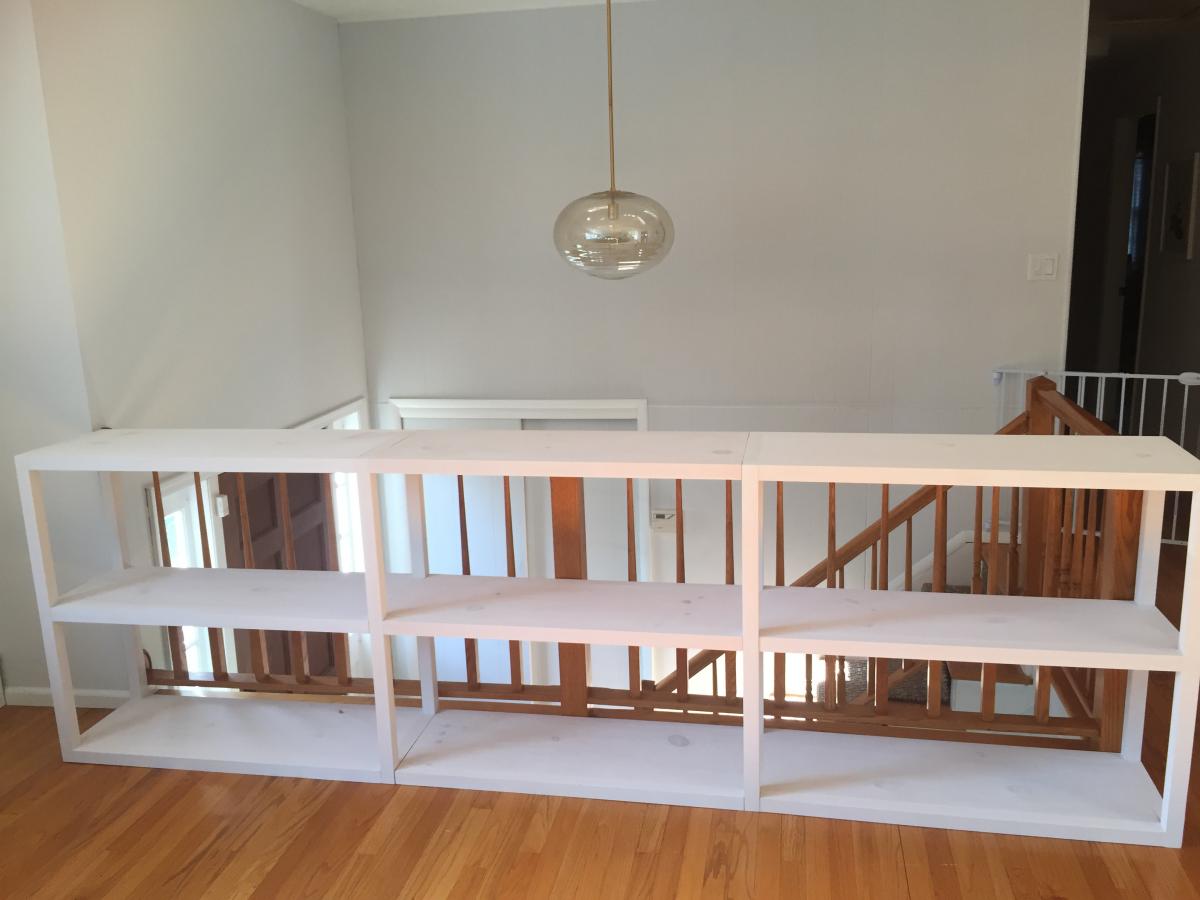
Parsons Bookcase
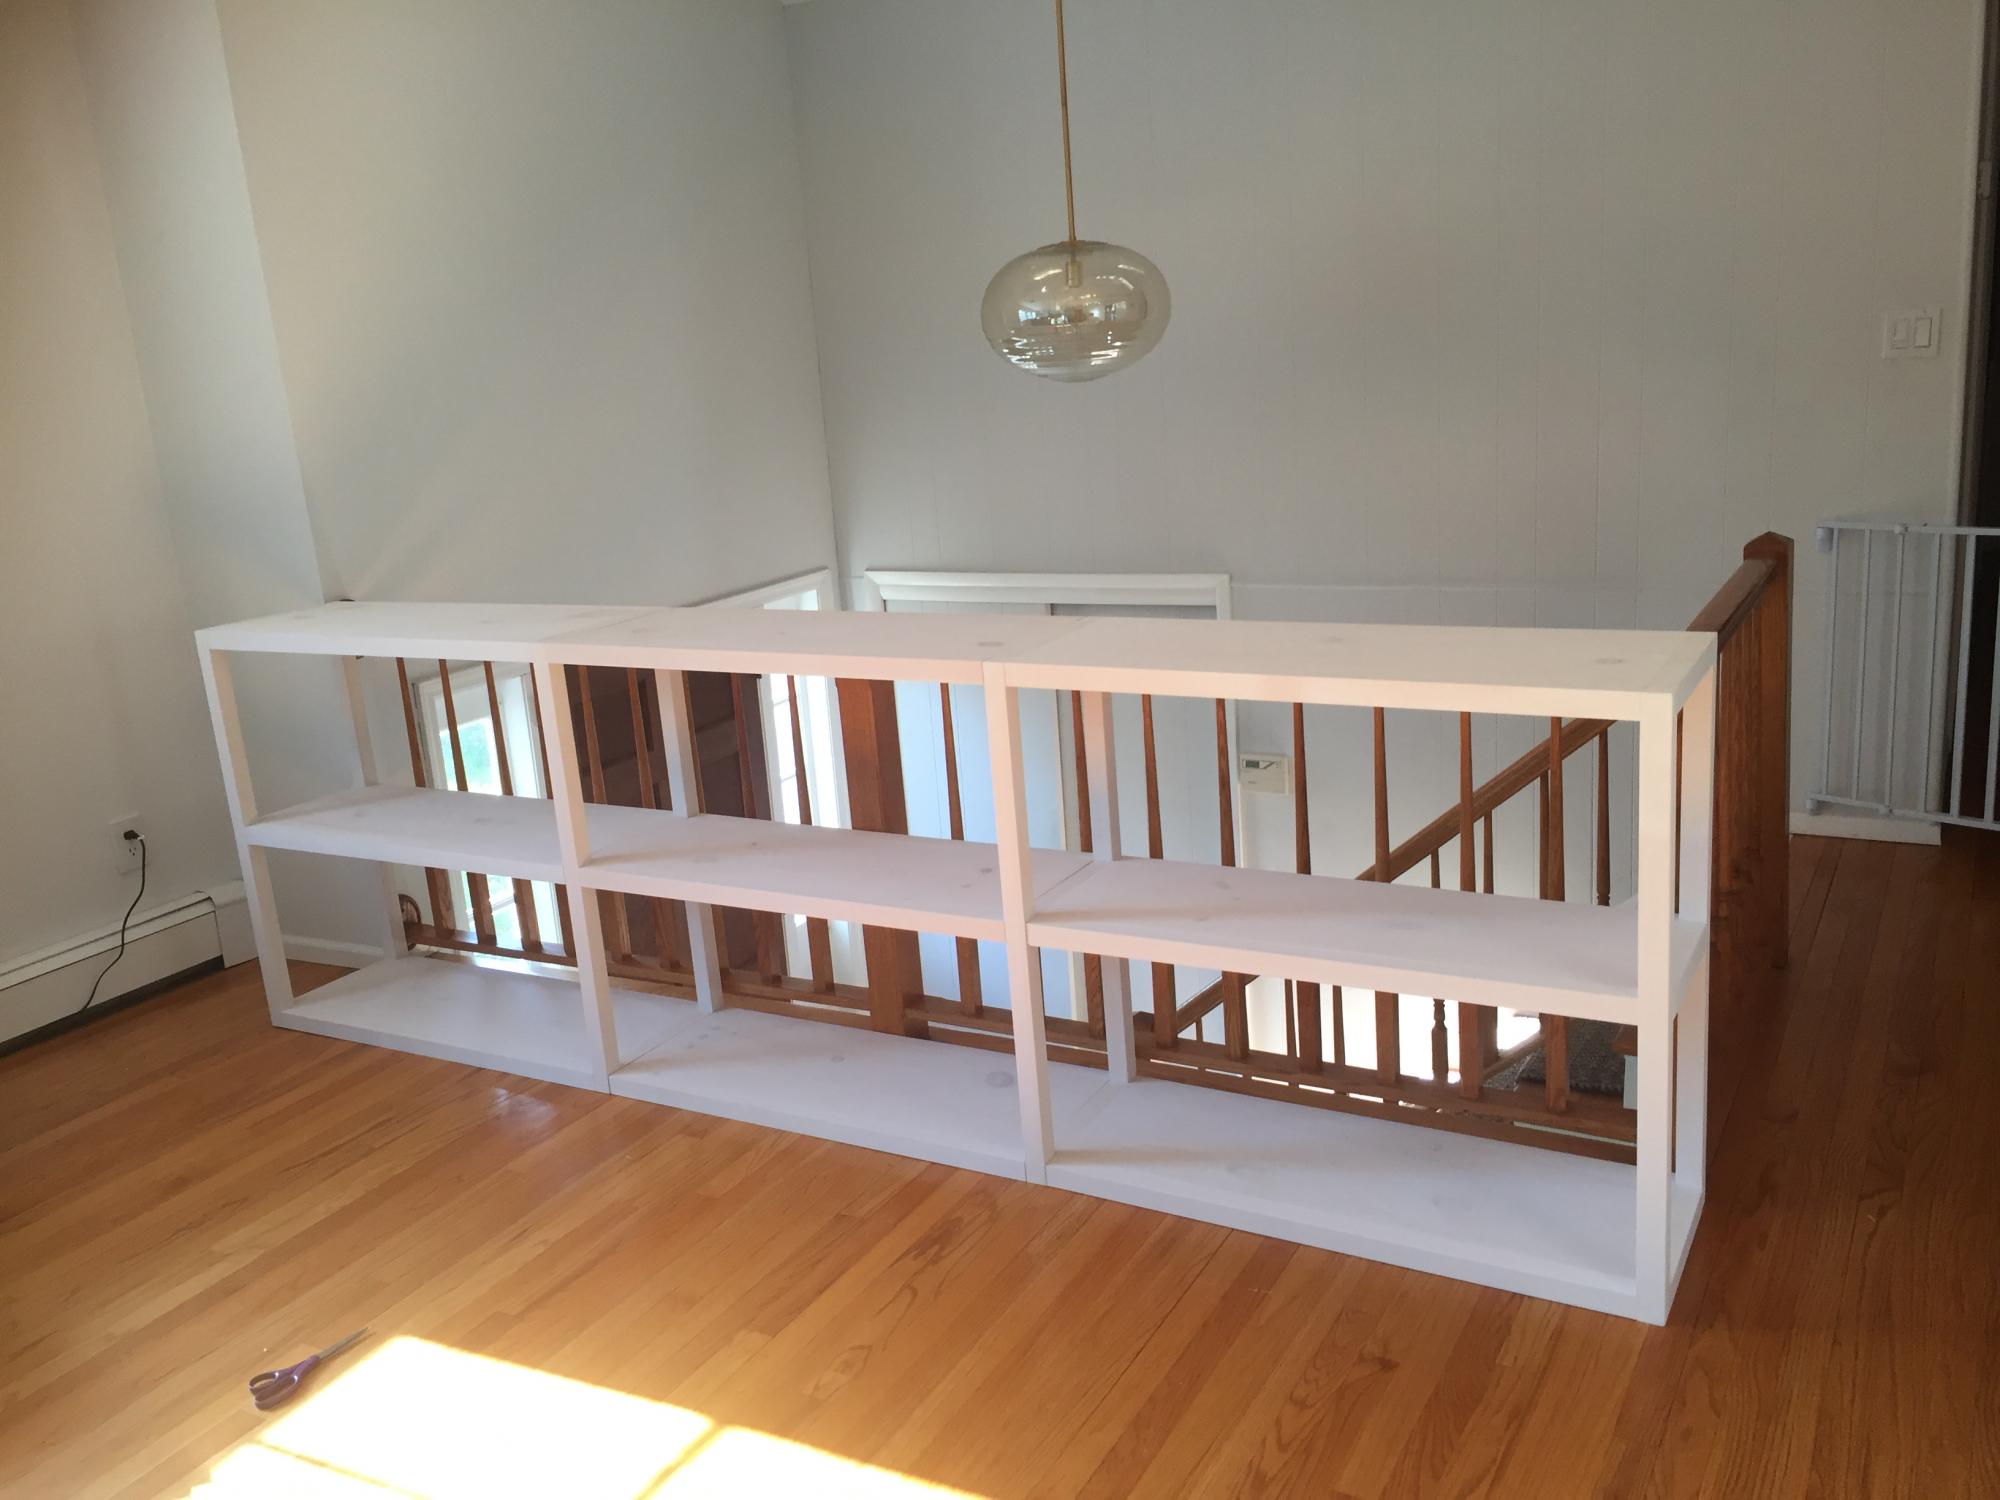
Built two bookcases, and connected with three extra shelves (minus side pieces on extra shelves). Whitewashed pine. Based on parson plans but adjusted dimensions to height and width of railing in my living room area.
Built from Plan(s)
Estimated Time Investment
Weekend Project (10-20 Hours)
Finish Used
Behr white paint color to match walls, diluted 1:1 for whitewash.
Recommended Skill Level
Intermediate
Waterfall Framed Coffee Table
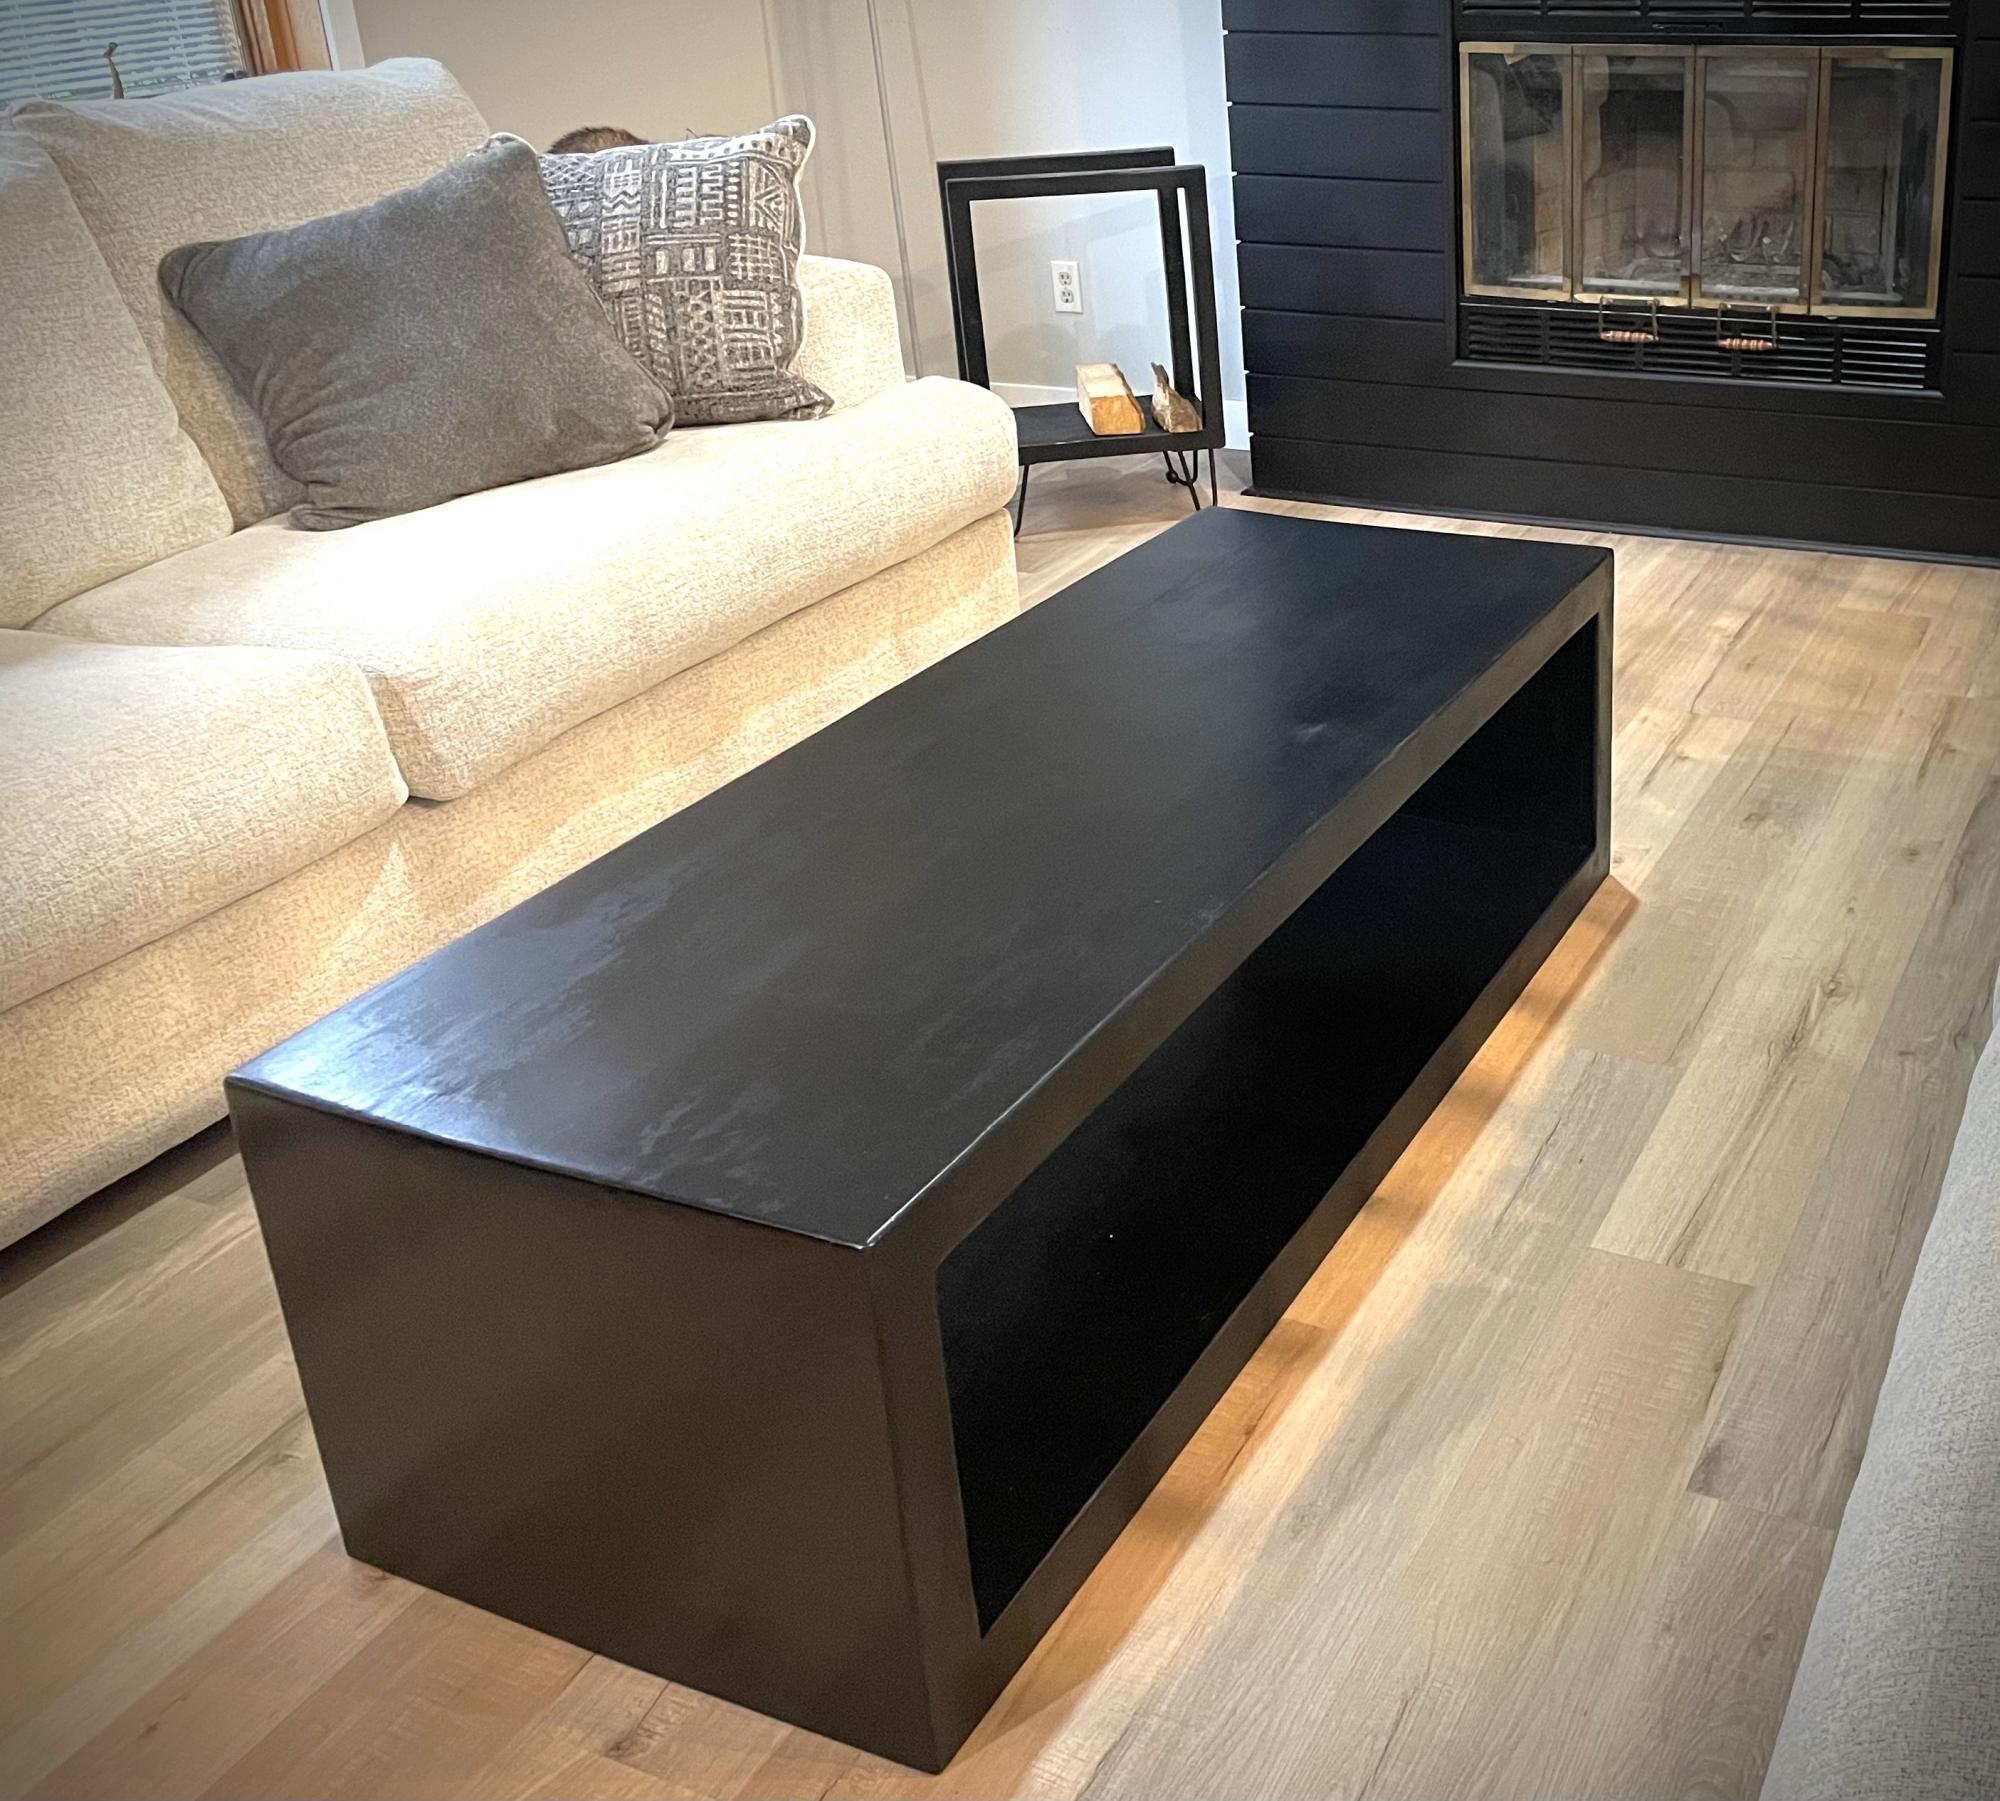
Thanks for the plan; I’m proud of how it turned out and my family loves it!
Built from Plan(s)
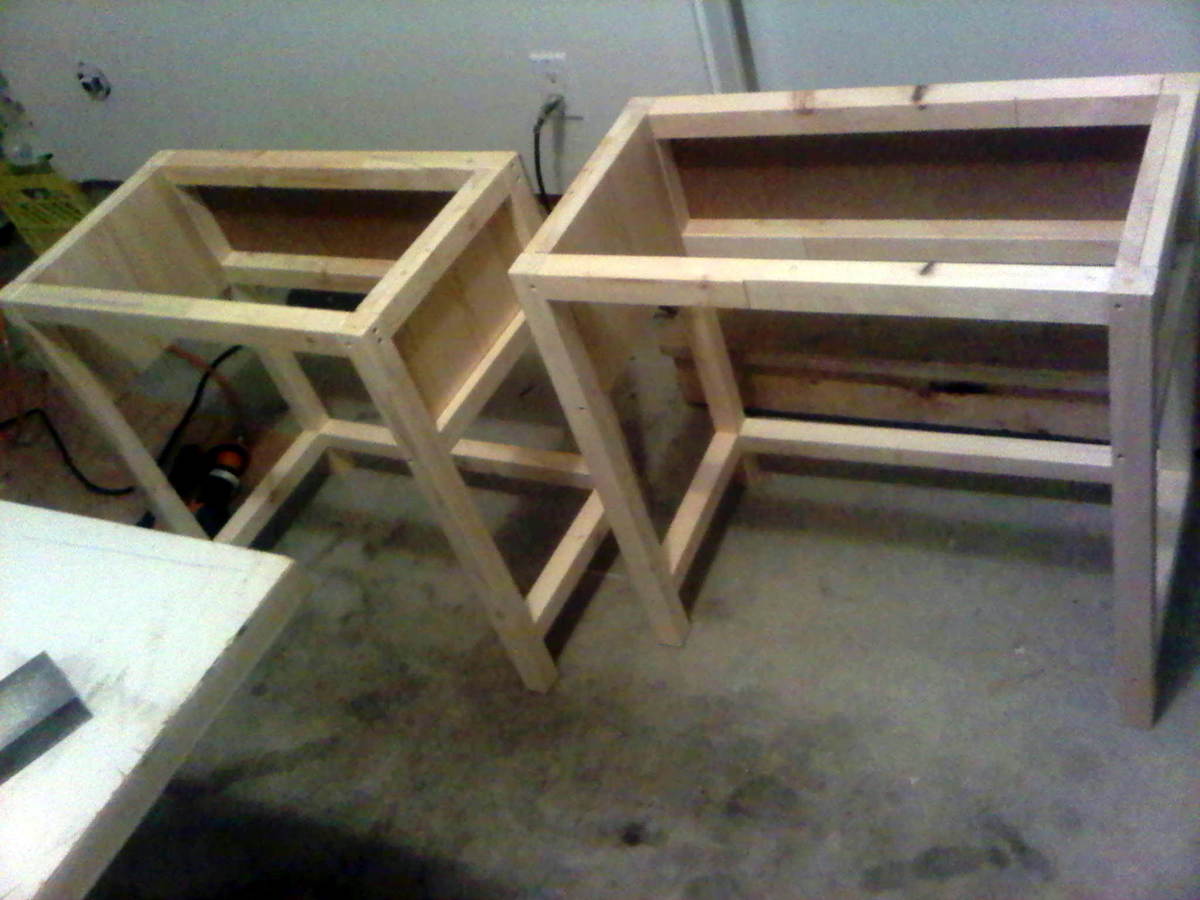
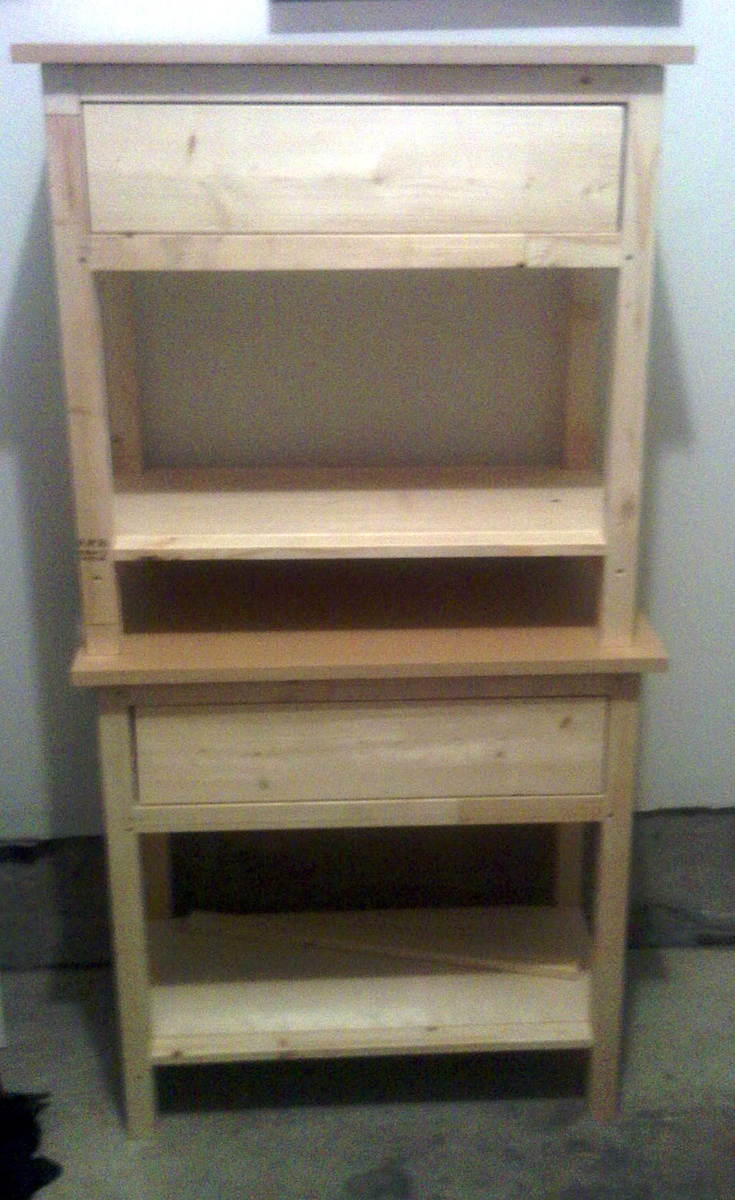
Farmhouse Bedside Tables

We followed the plans, but did run into a couple snags. Because we were making two tables, we thought it might be easier to do all the cuts first, and then assemble both together. We agreed it was easiest in the end (so we weren't going back and forth to the saw), but the cut list called for one extra trim piece that the plans never used... lucky for us, we realized this before doing the cuts so just skipped it. The cut list left out one piece that the plans asked for at the end (for the life of me, I can't remember what it was), but we had quite a bit of extra lumber thanks to carefully thought out cuts so it wasn't a big deal.
We found that the plans really forced us to think out our approach along the way. We are true beginners, and we even ended up having to think about where we were sinking the screws and making sure to sand the pieces prior to assembling.
As far as our materials went, we purchased most of it at Home Depot. For the tops, we decided to use some scrap MDF that we had leftover from another project. Otherwise, we just used the cheapest lumber we could find, and pine for the 1x6 and 1x12's. Our Home Depot bill was $104, but we have a few pieces of lumber and pine that we didn't use, so plan to take them back. We already had the paint, and we bought the hardware at Lee Valley in Vancouver (BC), which was $24. We figure that the end price for each table is about $60.
For more details, check out my blog post on the project: http://www.andreakrisourchaos.blogspot.ca/2012/03/pinterest-challenge-b…
Built from Plan(s)
Estimated Cost
$60 per table
Estimated Time Investment
Day Project (6-9 Hours)
Finish Used
Rustoleum White Primer Spray Paint - 2 coats
Rustoleum White Gloss Spray Paint - 3 coats
Rustoleum Clear Lacquer Spray Paint - 2 coats
Rustoleum White Gloss Spray Paint - 3 coats
Rustoleum Clear Lacquer Spray Paint - 2 coats
Recommended Skill Level
Beginner
Bunk Beds with Steps
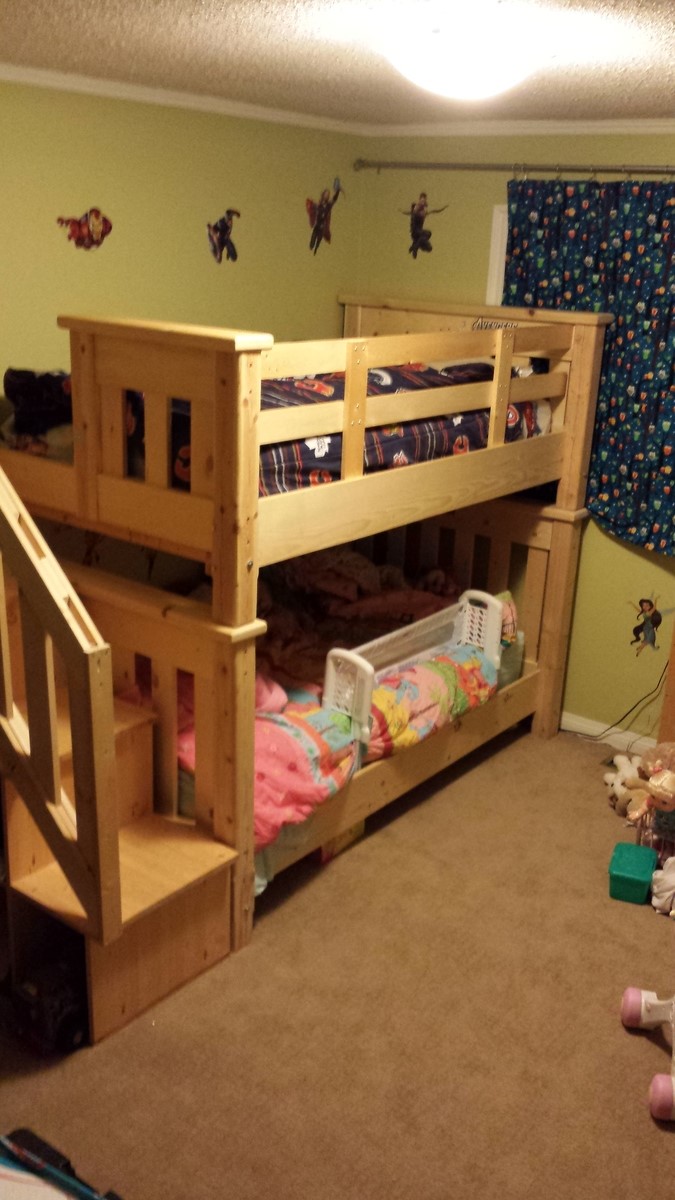
Well, this is my first post and my first real project. Bunk beds out of knotty Pine that can be used as single beds when the kids no longer want to share a room. I wasn't willing to spend $1500-$2000 on bunk beds when I knew I could make some myself. So here it is, I would do it a little different if I was too do it again. I know it's not perfect, but I'm proud of it.......always room for improvement.
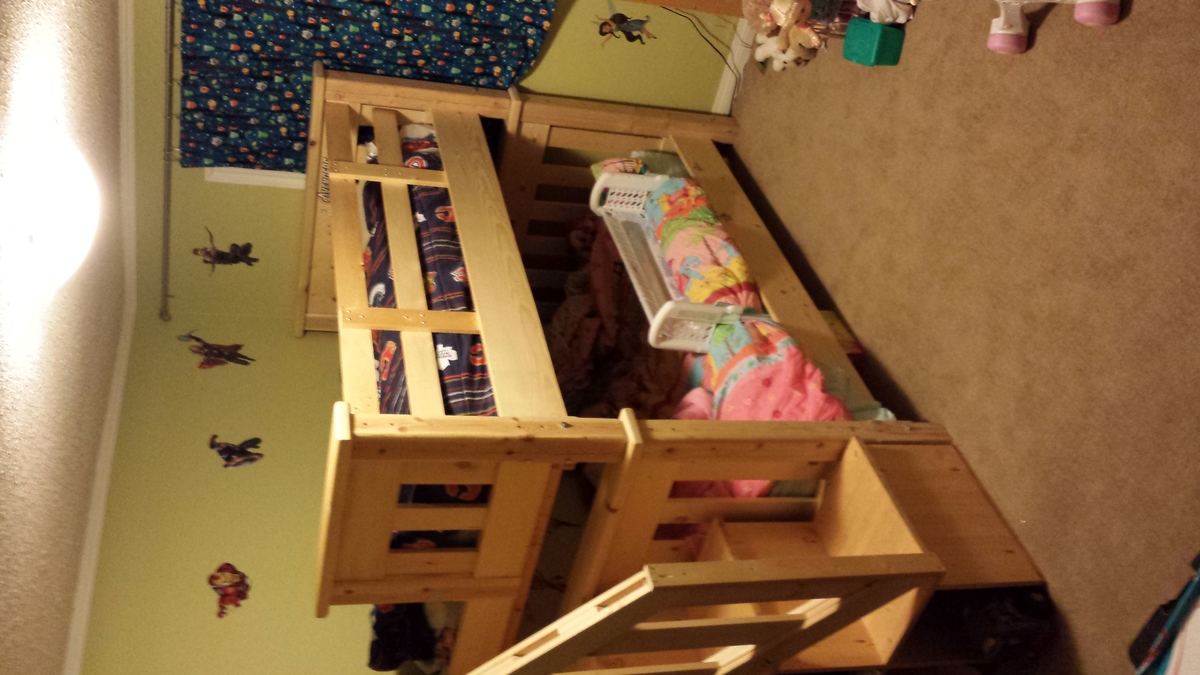
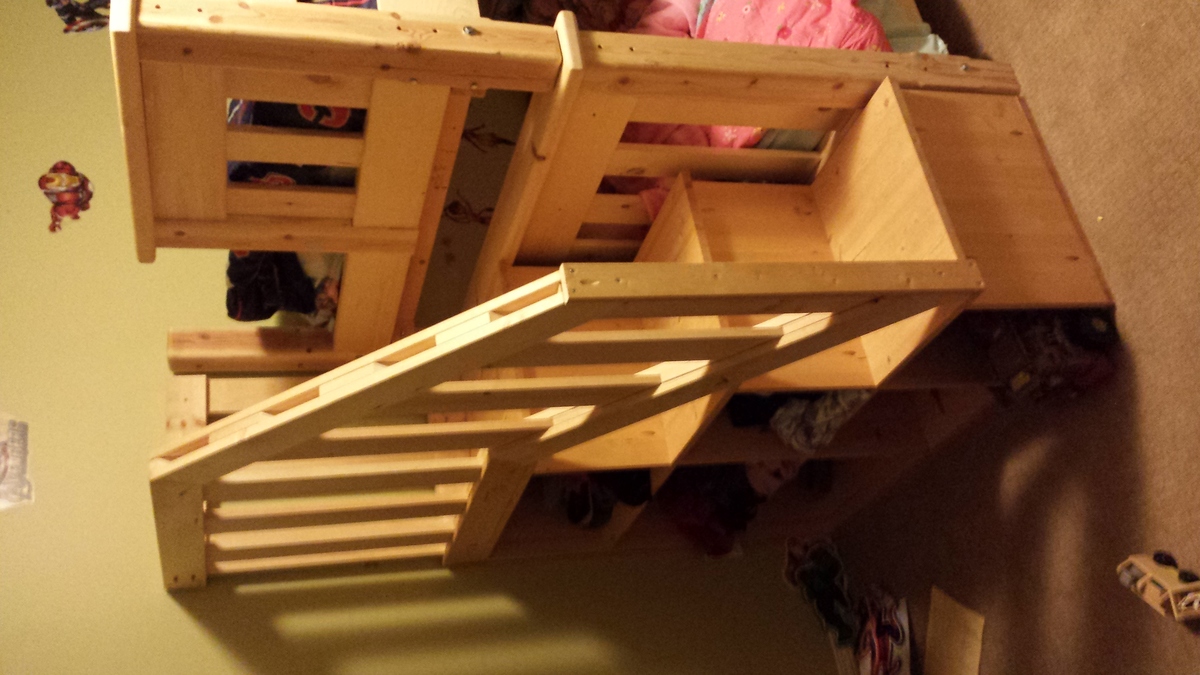
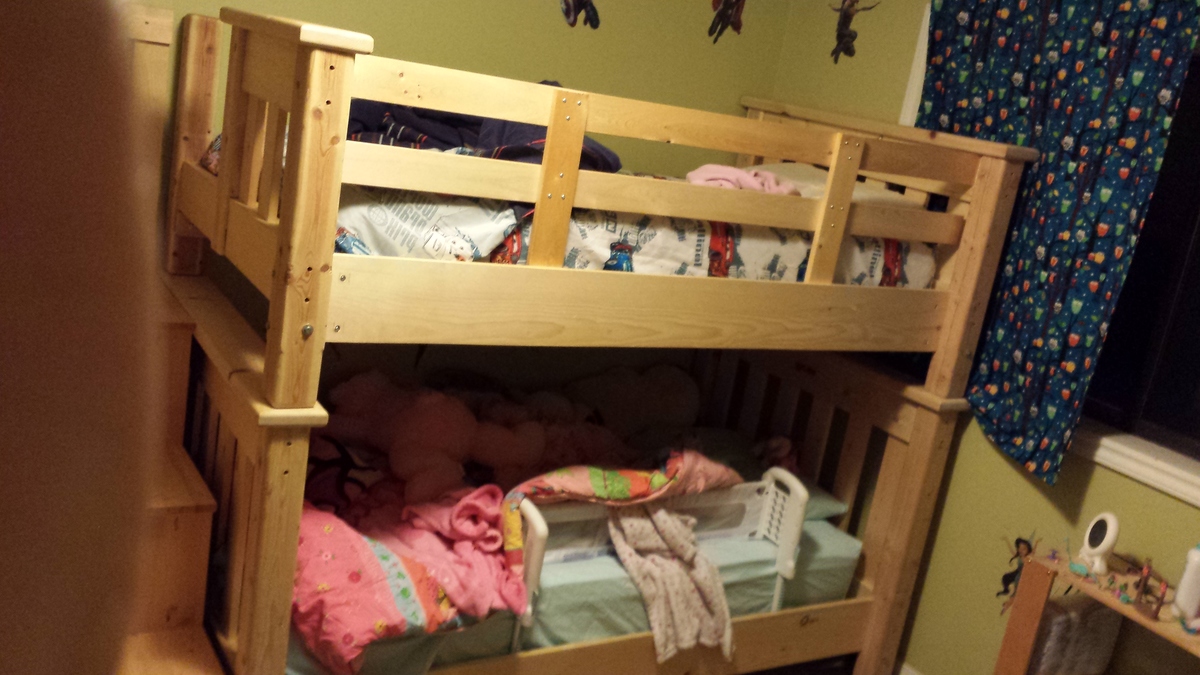
Estimated Cost
$500-$600
Estimated Time Investment
Weekend Project (10-20 Hours)
Recommended Skill Level
Starter Project
Comments
Child's Picnic Table/Sandbox
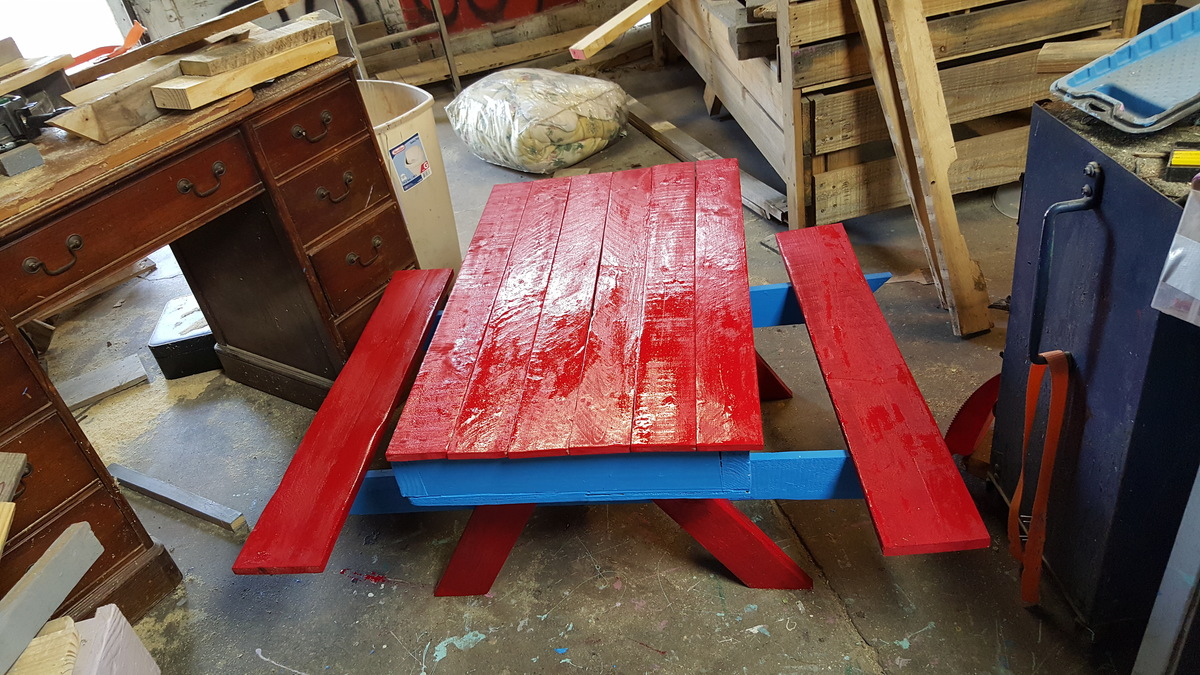
I saw this on pintrest and took the big Kids picnic table and modified it to include a removable top and sandbox.
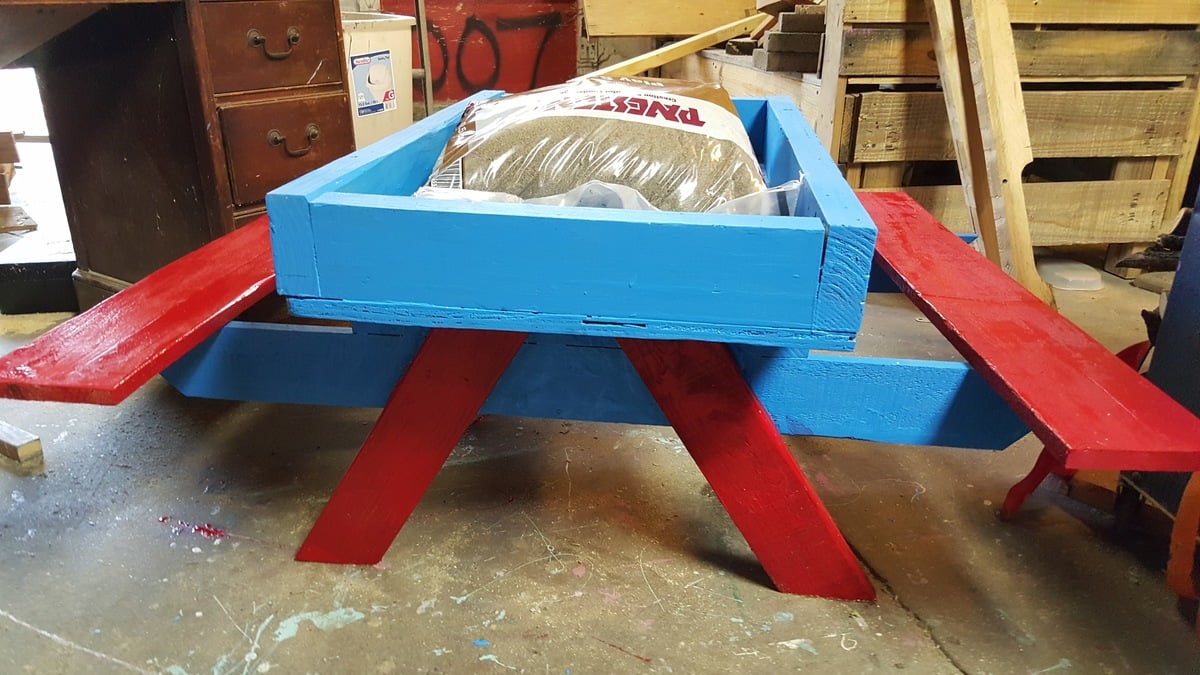
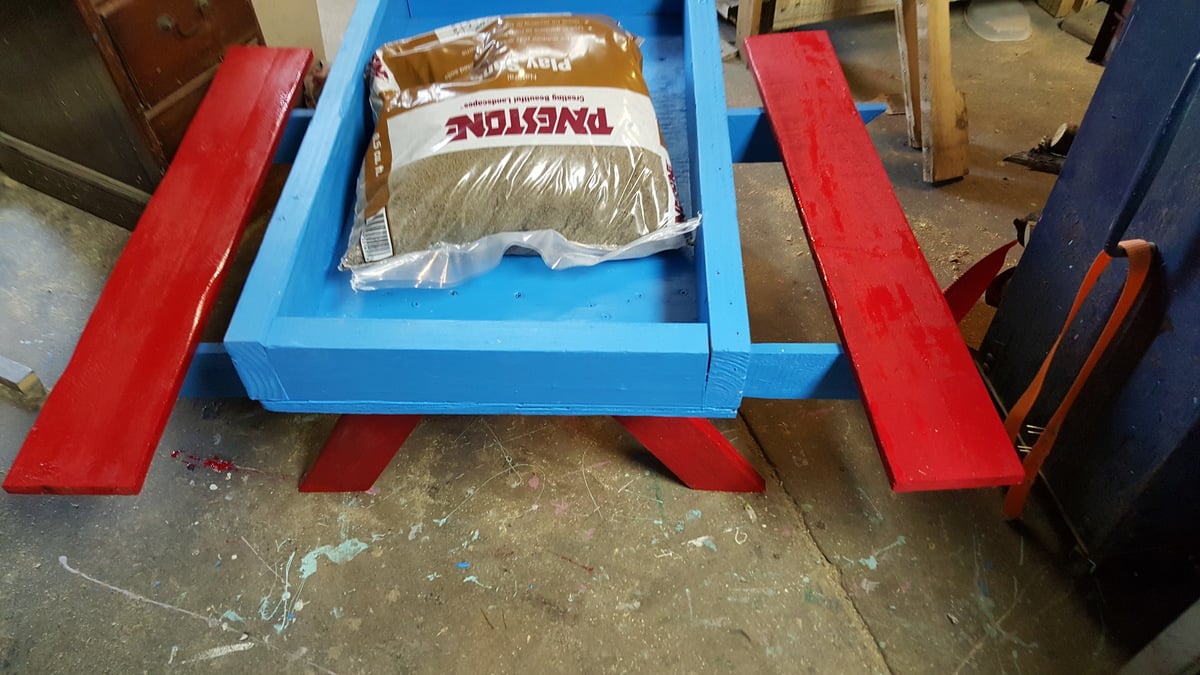
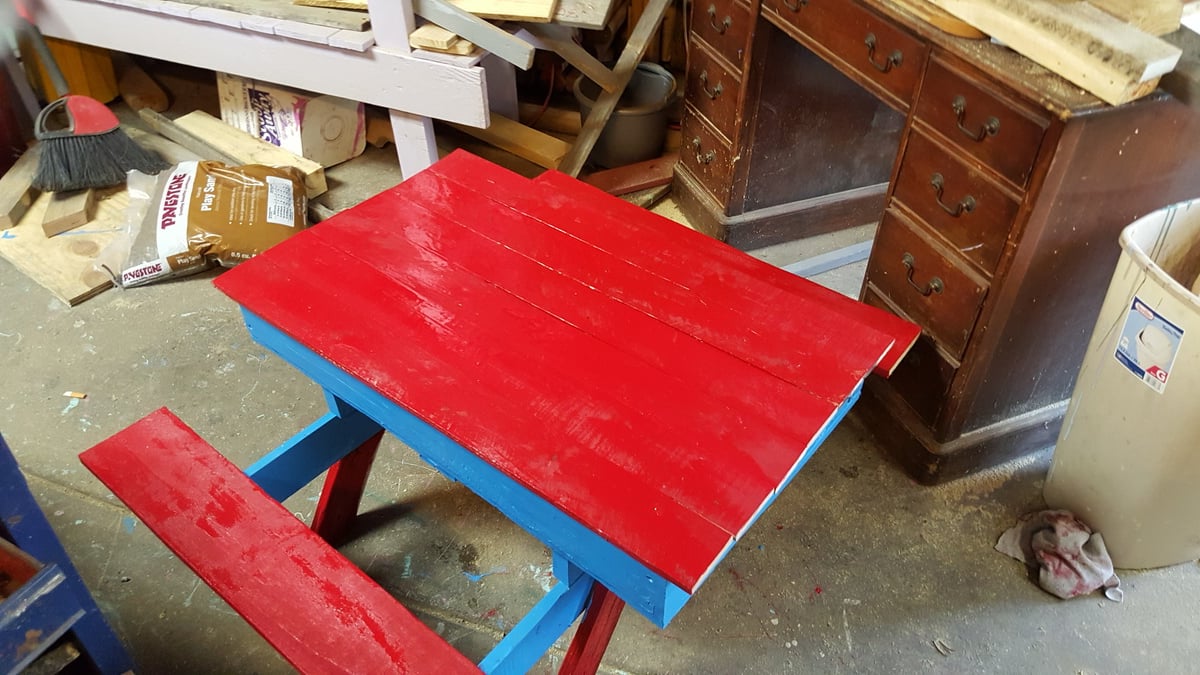
Built from Plan(s)
Estimated Time Investment
Afternoon Project (3-6 Hours)
Recommended Skill Level
Starter Project
Christmas Tree Shelf
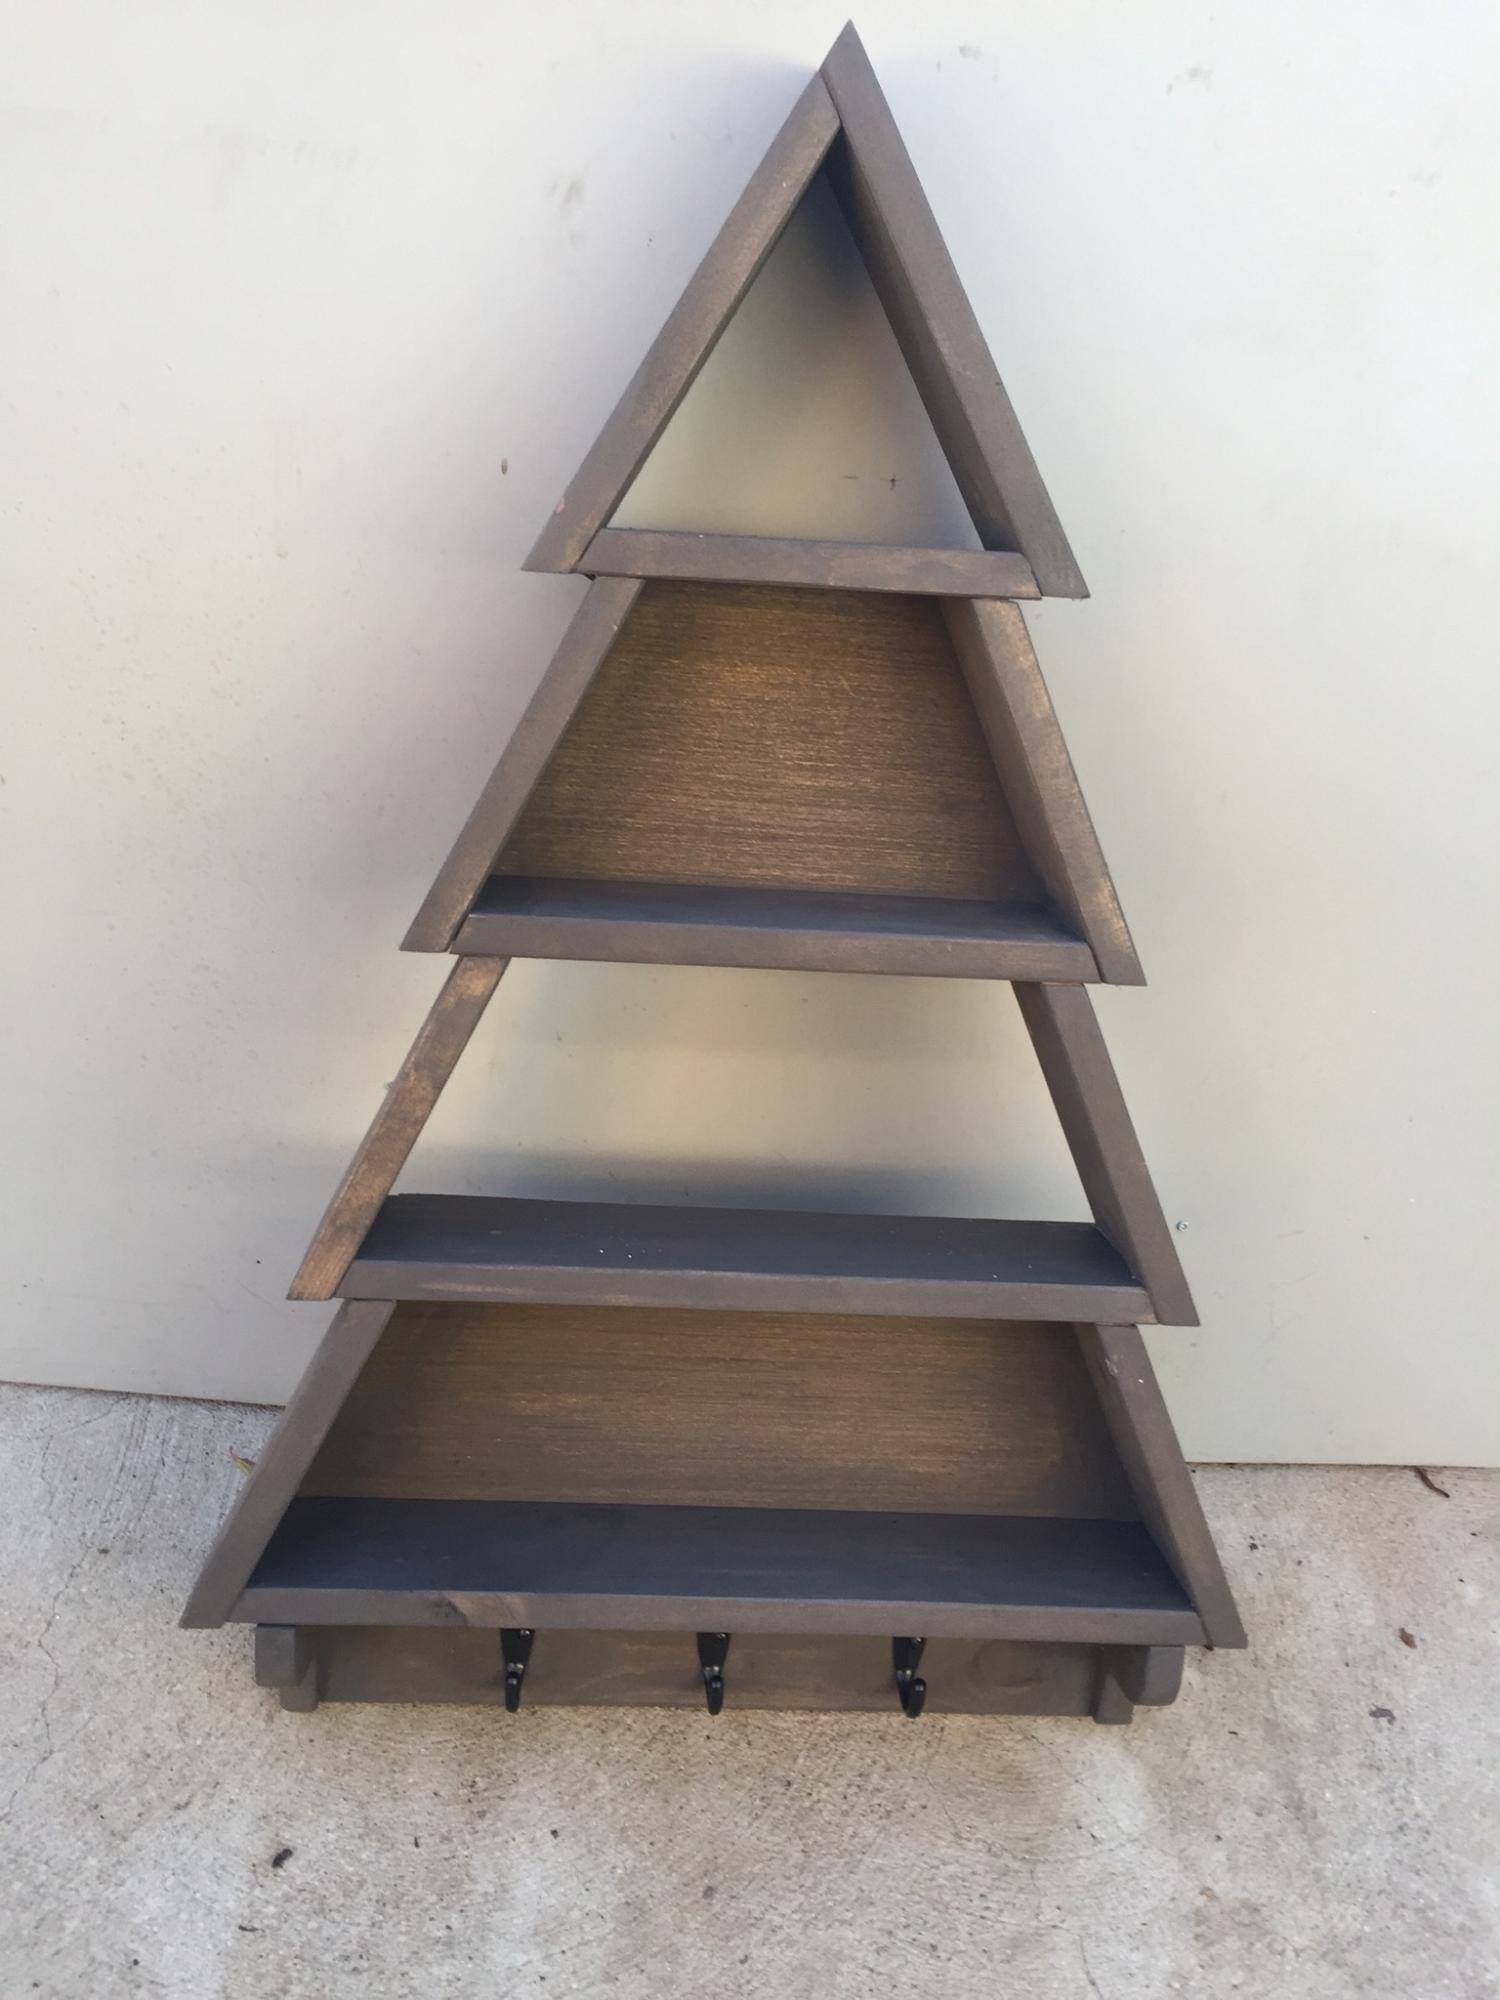
Made this for my MIL as part of her Christmas gift! It was a quick, easy and fun build. I’ll update photos once she hangs it and add her decor
Built from Plan(s)
Estimated Cost
$30
Estimated Time Investment
An Hour or Two (0-2 Hours)
Finish Used
Briarsmoke
Recommended Skill Level
Beginner
Hotel Room Bed and Wall Project
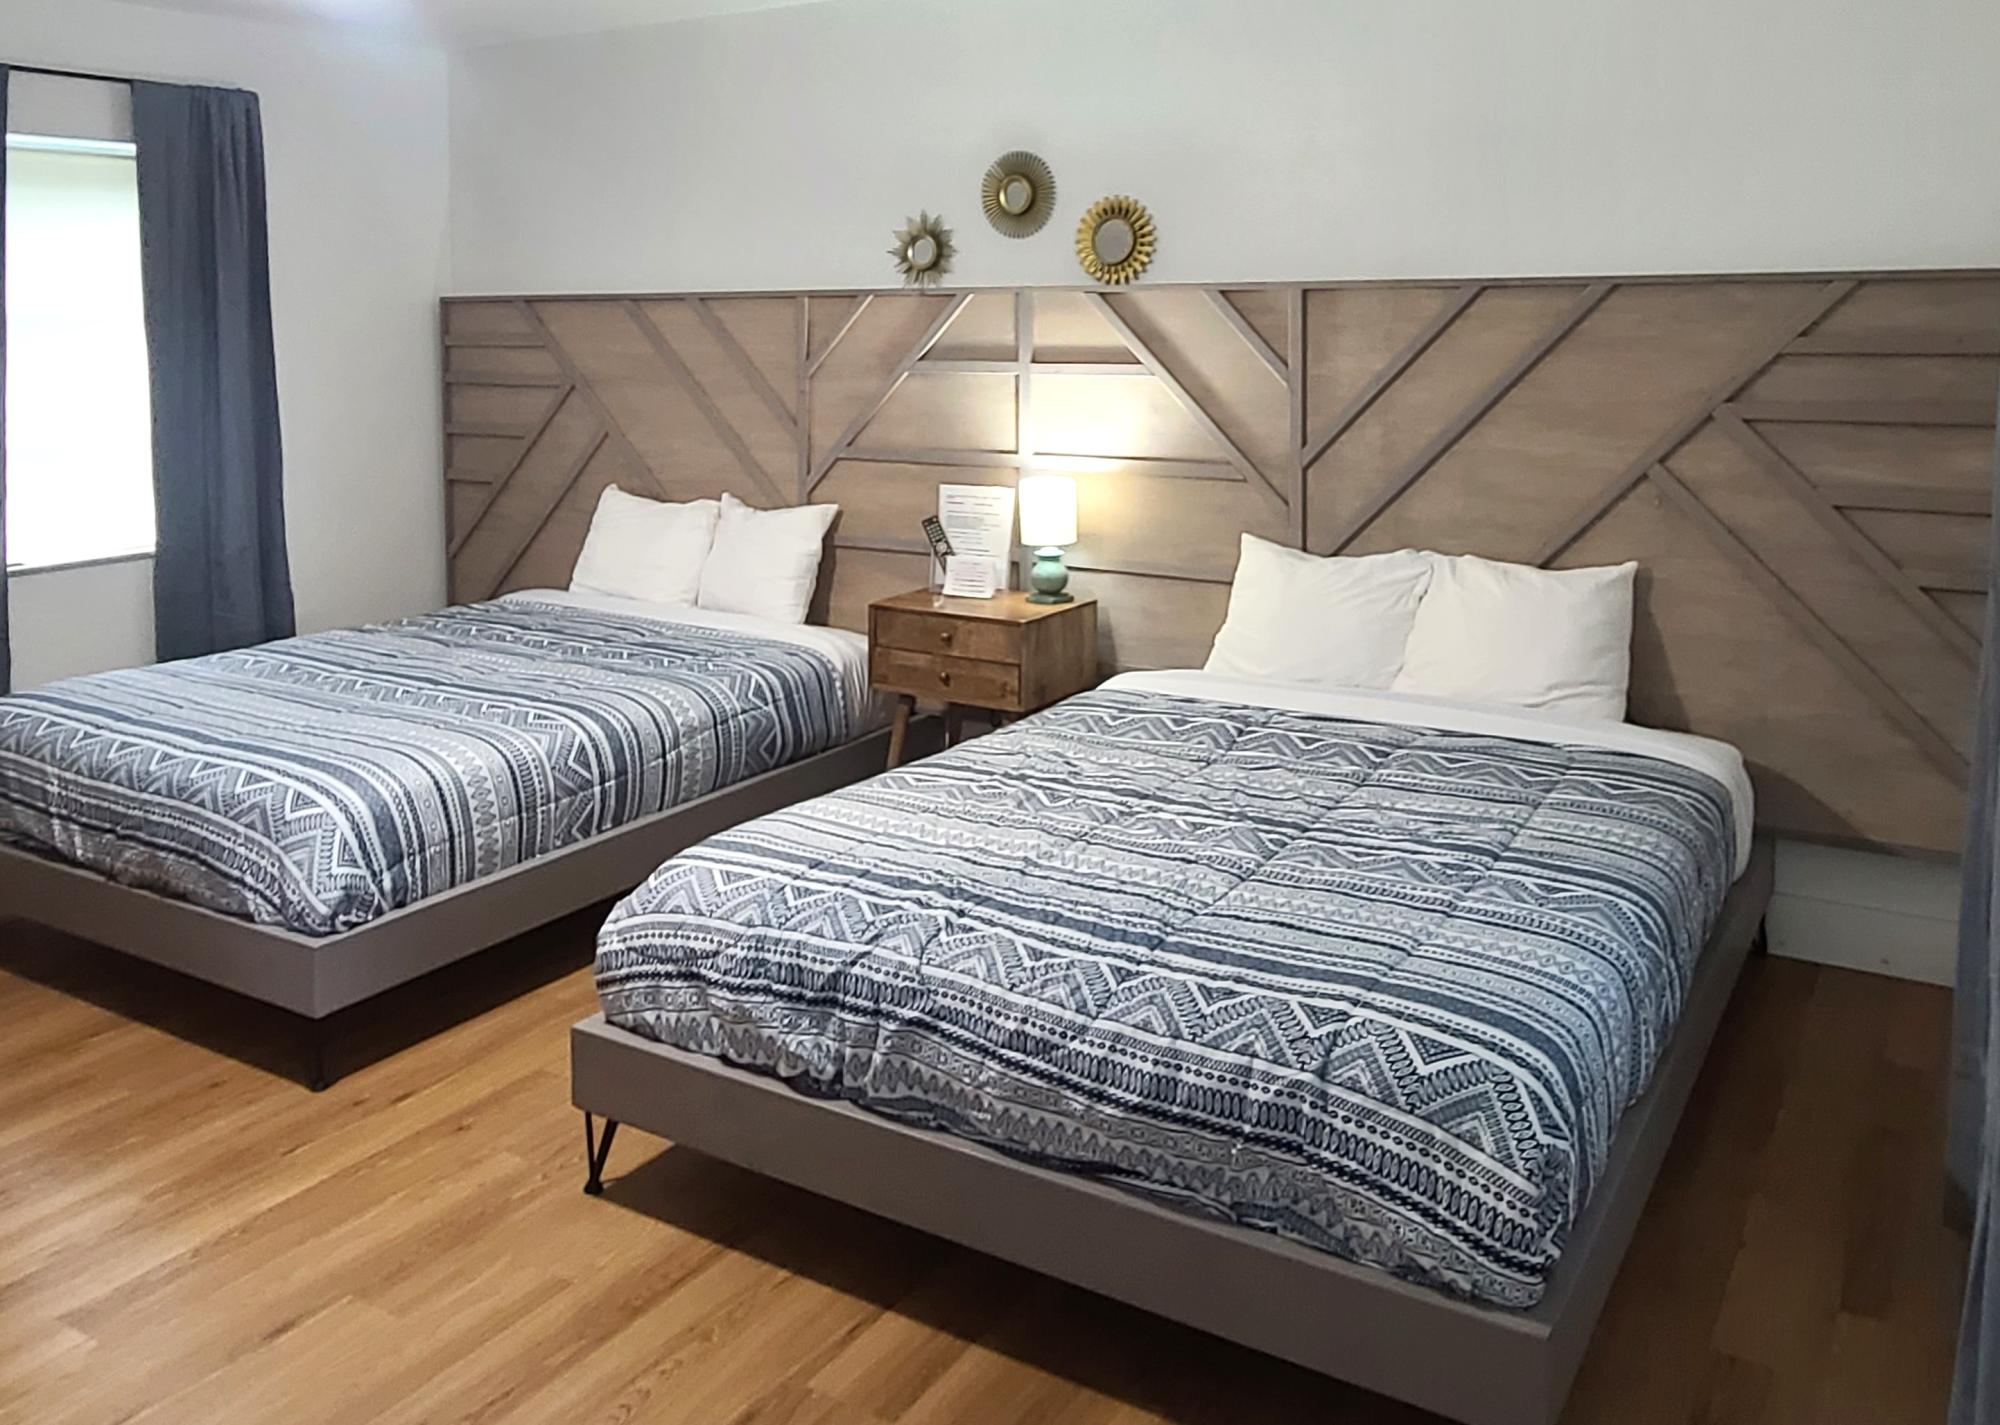
Built these bedframes and headboards for a local motel
Built from Plan(s)
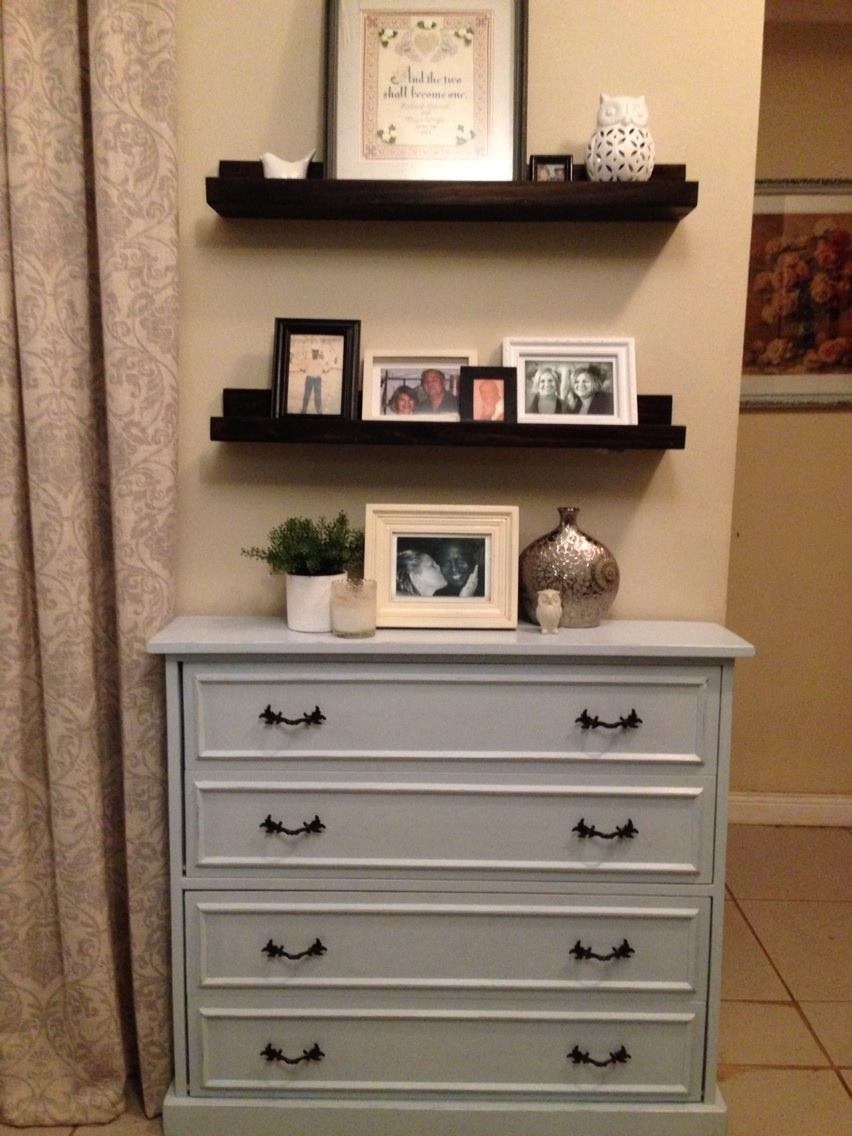
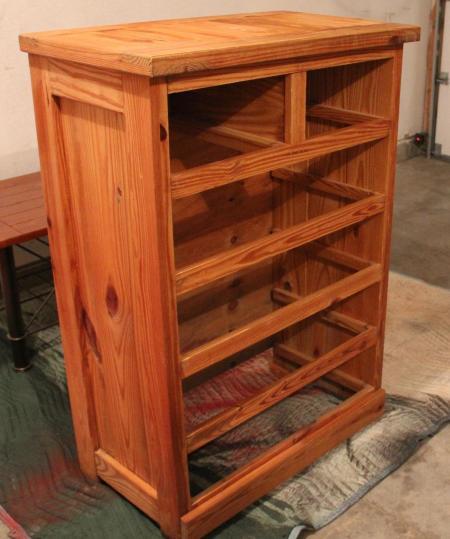
Tall Dresser
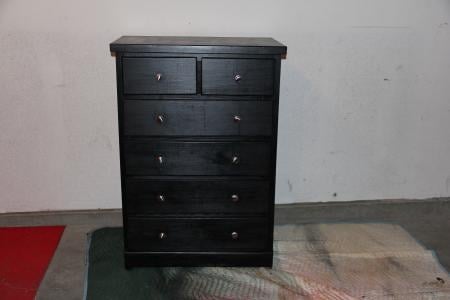
My wife Tracy and I wanted a dresser like this for one of the bedrooms in the new house. Well Tracy went to work looking for one on Craigslist and E Bay ( She is the best at hunting down a bargain). After only one day she found an add for a solid wood dresser for sale in our area. When I came home from work she let me know there was a project in the back of her vehicle for me.
I was very impressed with what she had found. This was a serious solid wood dresser. With me having a couple of days off prior to our trip to Cabo (and Tracy needing me out of her hair while she finished all the details needed for the trip) I started on this right away.
The dresser had never been finished, it was just raw wood. This was a plus for me because no stripping was needed. Just a little light sanding is all it required for prep work.
I discovered that the knobs did not match. After a quick trip to Menards the dresser was complete.
Total cost of our dresser $65.00
See more pictures at buildandsave-mike.blogspot.com
Estimated Cost
$65
Recommended Skill Level
Starter Project
Comments
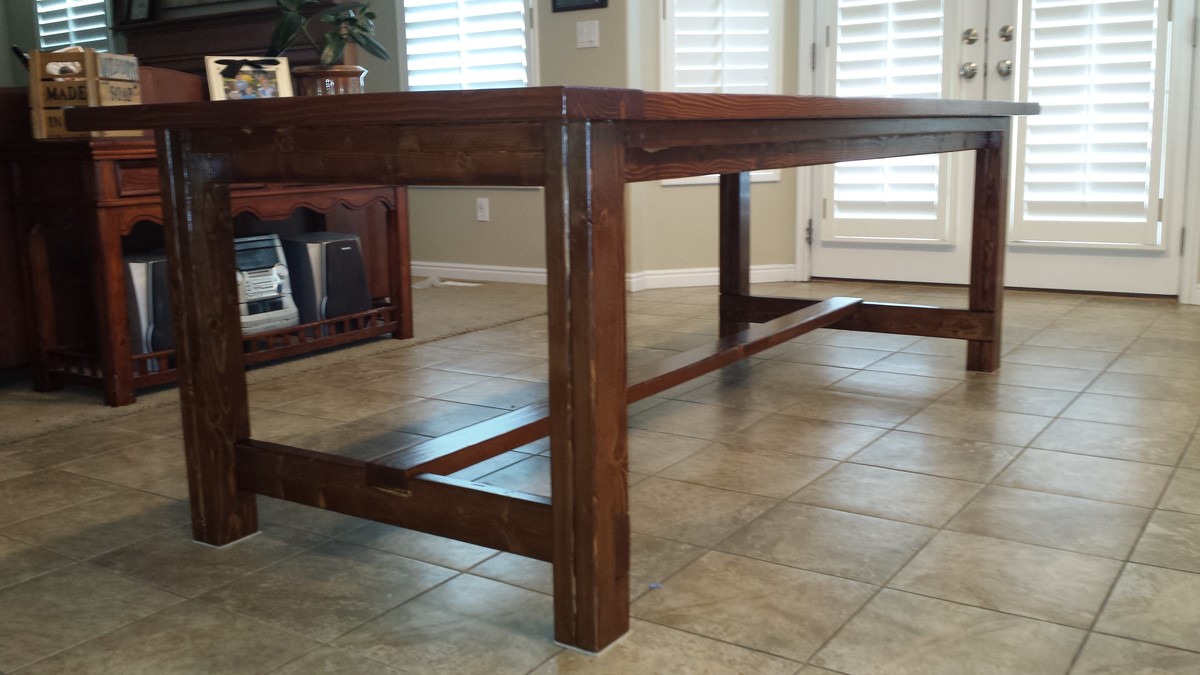
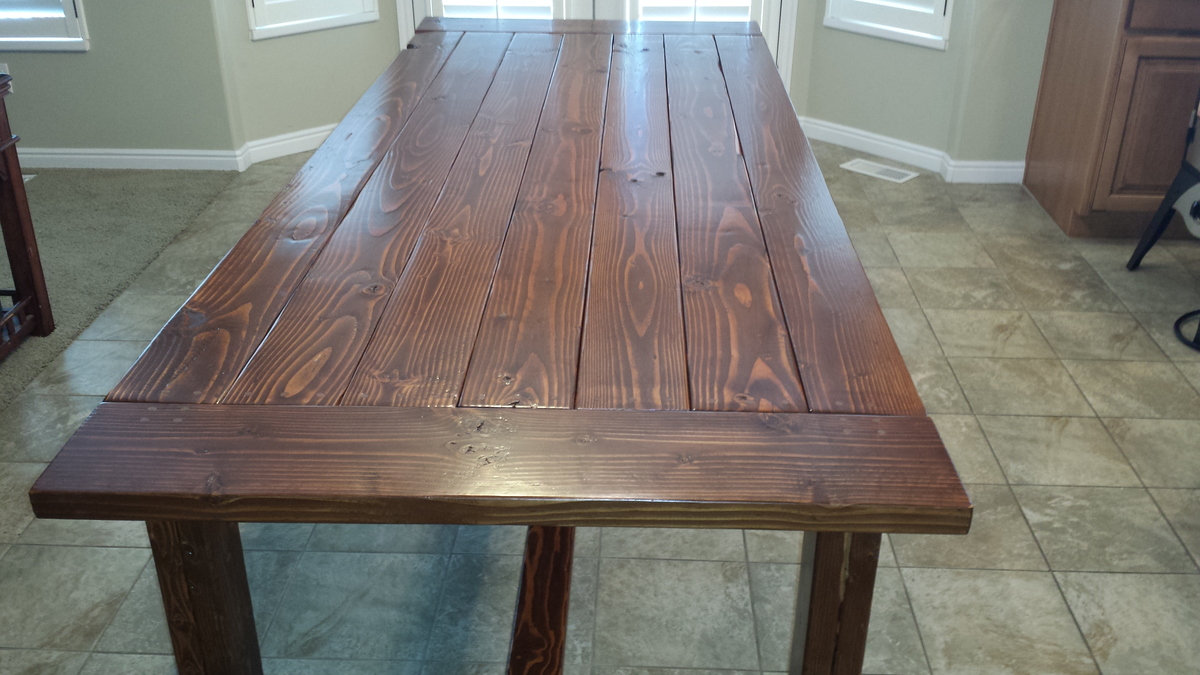
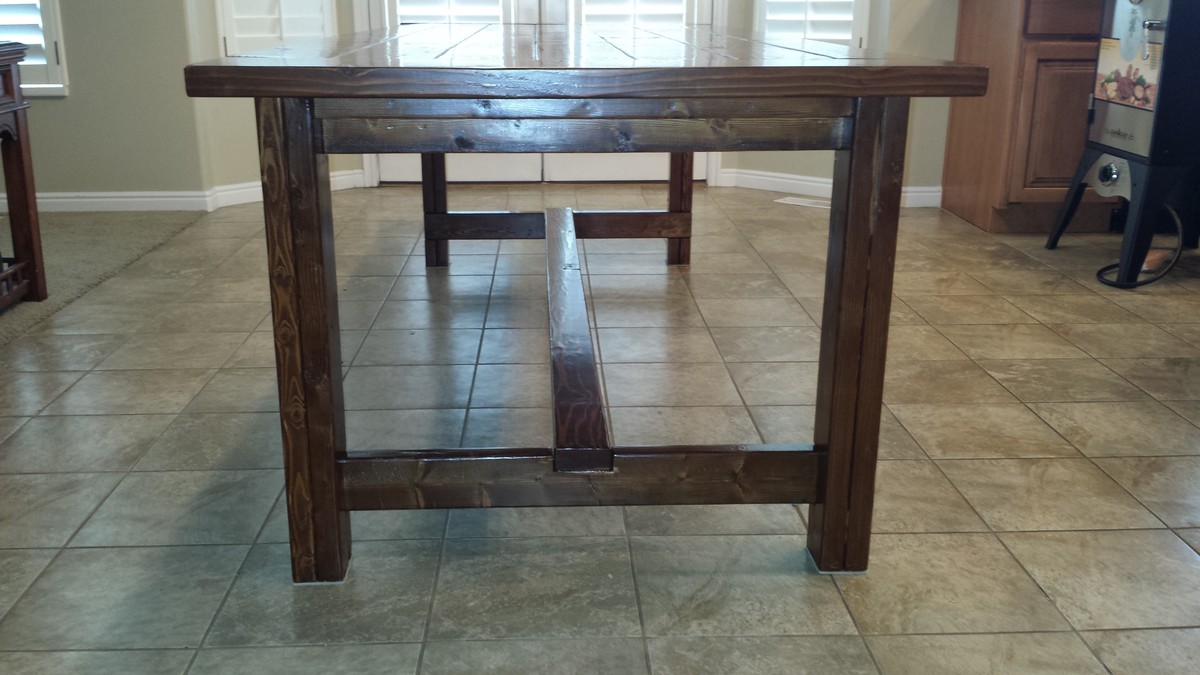
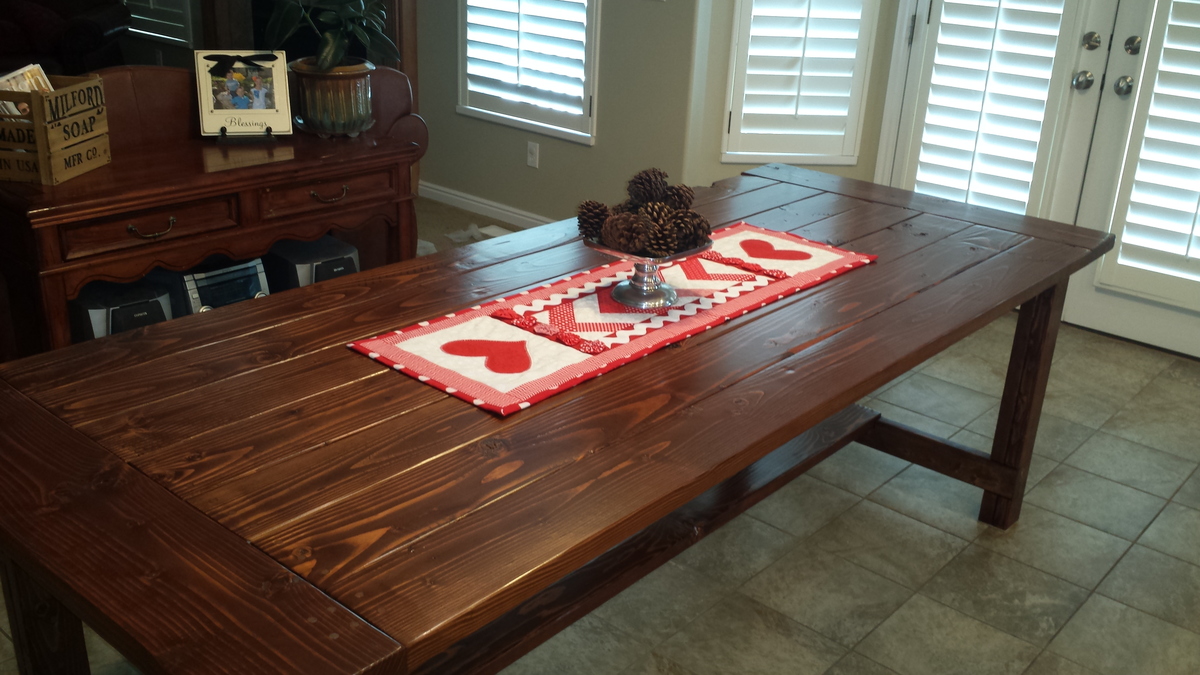
Farmhouse Table
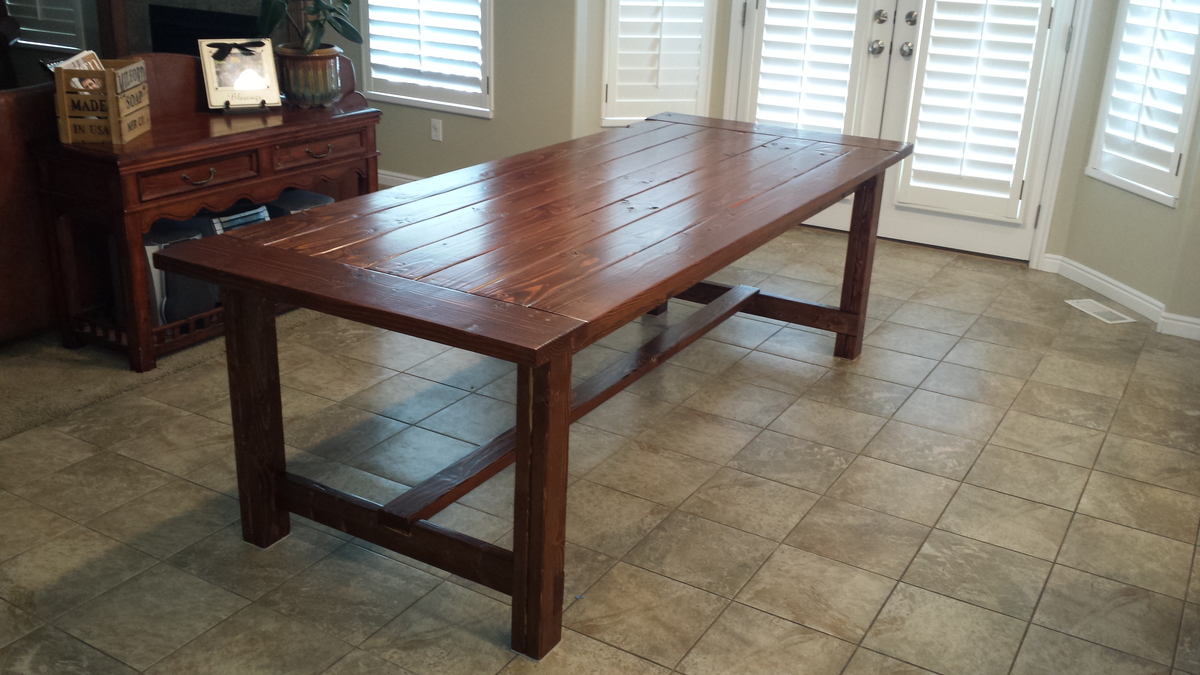
My husband surprised me with a big pile of wood in the garage on Christmas morning. 3 weeks later, this beautiful table is in my kitchen. The pictures do not do it justice - it turned out amazing. We have plans to make the matching bench when it warms a bit - our garage is freezing!
It took at least 20 hours to cut the wood, sand and assemble. It took another 10+ plus hours to stain and put 3 coats of the polyurethane.
The great people at Orange cut our wood for us, and we took it home and notched it out using a jigsaw. Once we got the hang of it, it was really easy.
We had a hard time finding 2 3/4 screws, so we used 2 1/2. It worked great. We used Elmer's Carpenter's Wood Filler in natural to fill the screw holes. It turned out so nice and looks great with the stain on top.
Neither my husband or I have very much experience building anything, so we took our time - measuring about 60 times and cutting once. However, it paid off. The table looks so great and I cannot wait to make the matching bench!
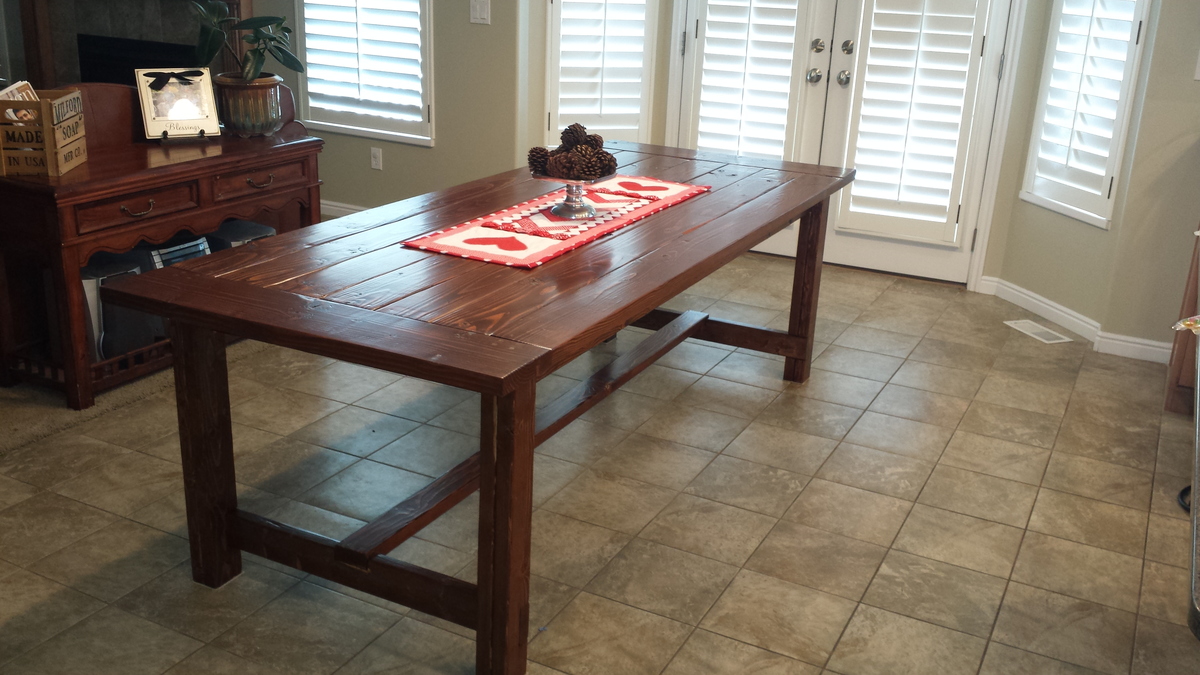
Built from Plan(s)
Estimated Cost
Around $250 (including stain and polyurethane)
Estimated Time Investment
Week Long Project (20 Hours or More)
Finish Used
Minwax English Chestnut 233 - wiped on with a cotton cloth
Minwax Polyurethane Clear Semi-Gloss - brushed on with a Purdy brush
We left the stain on, without wiping any off - 1 coat.
3 coats of polyurethane
Minwax Polyurethane Clear Semi-Gloss - brushed on with a Purdy brush
We left the stain on, without wiping any off - 1 coat.
3 coats of polyurethane
Recommended Skill Level
Beginner
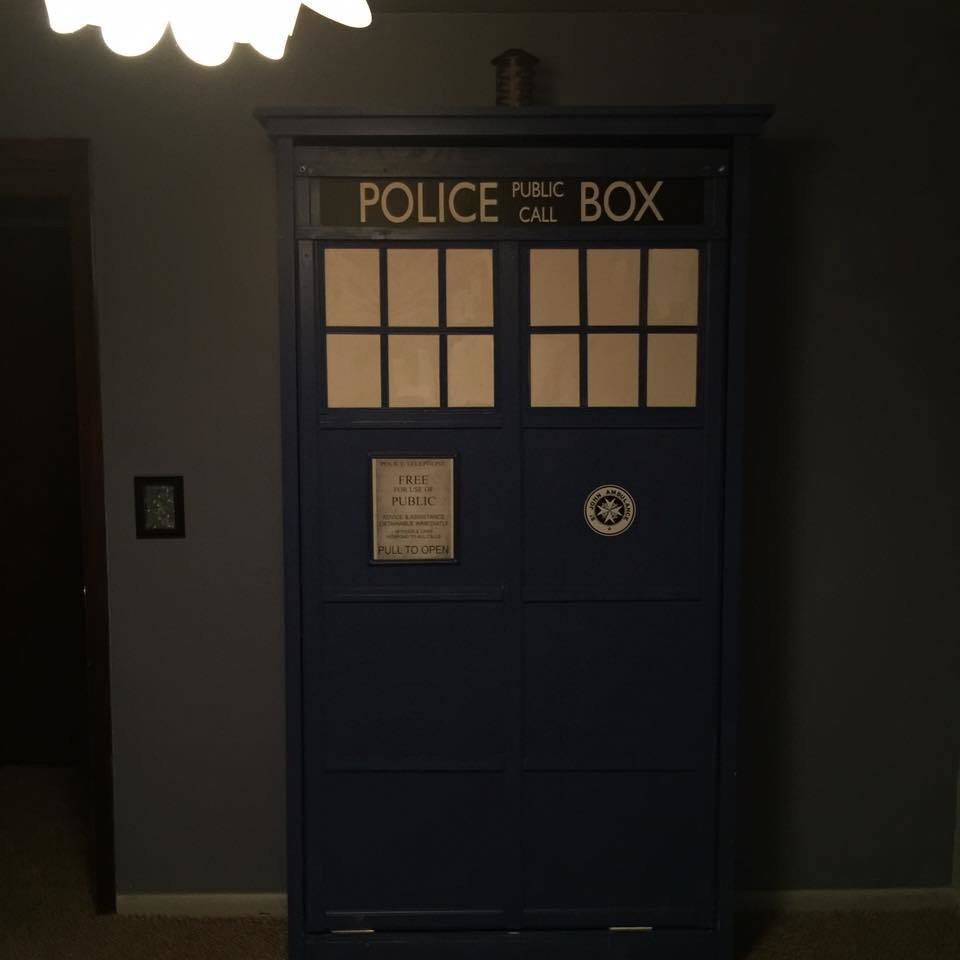
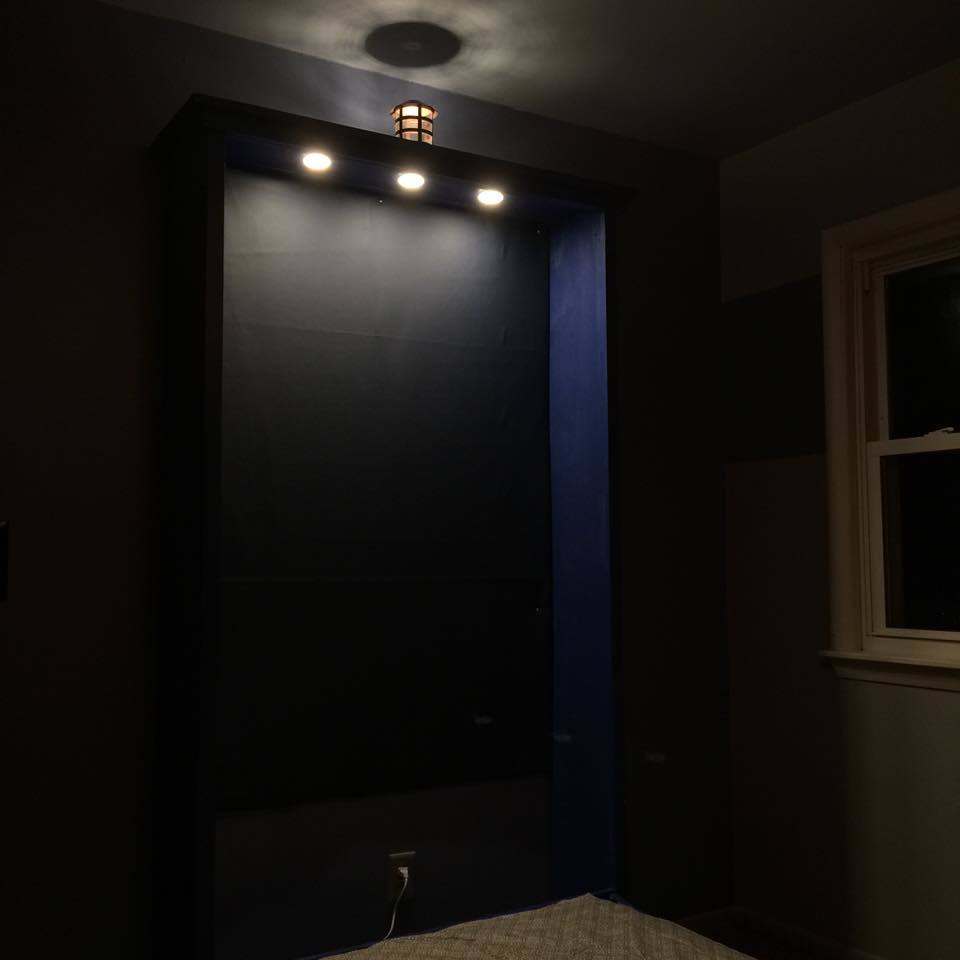
Tardis Murphy Bed
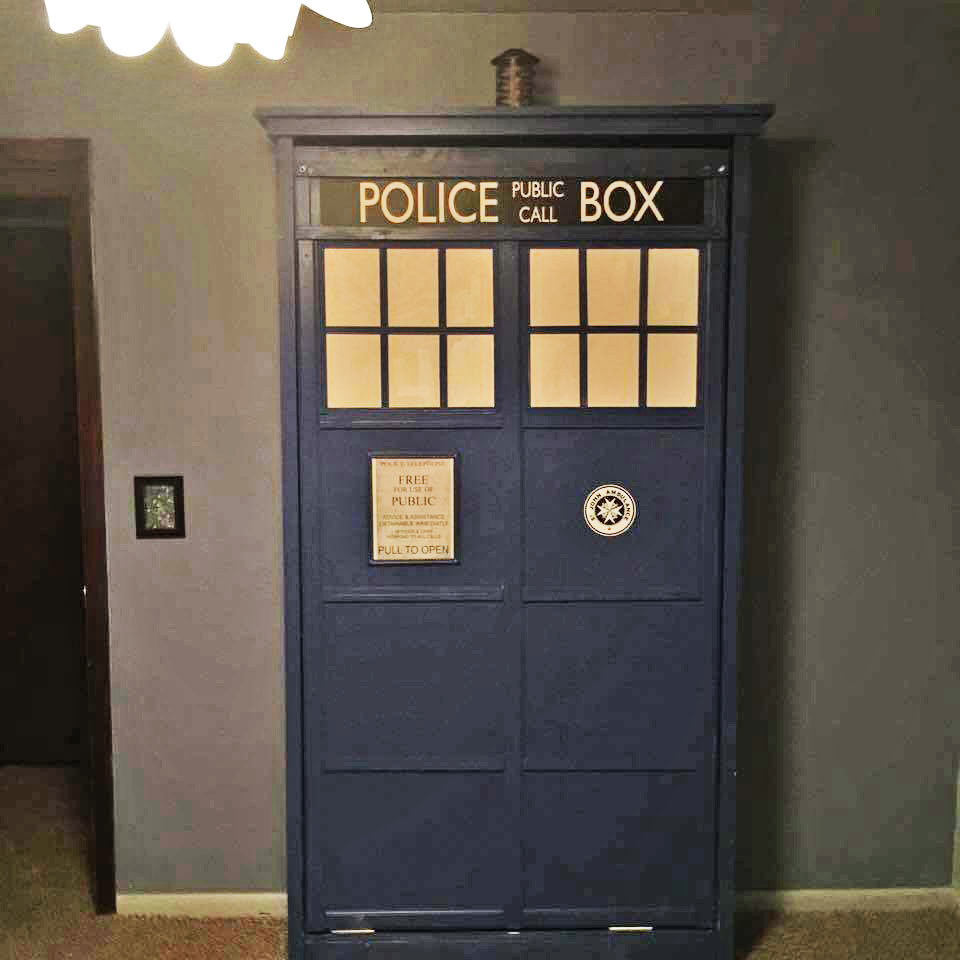
I took the original plan design for a Murphy bed - it was inspired by a Dr. Who themed bed that used a Murphy Bed Kit - I've used Ana White's plans before and thought why spend $$$ on a kit when you don't have to. I few trips to the store and a weekend later I have my very own Tardis Murphy Bed. It cost about $140 to build not including the mattress and accessories cost (light kit/upholstery panel/police box sign etc) I raised it up about 4" to attach legs and added some puck lights for a lighting effect. I think it came together rather nicely. I just have to add handles and the magnetic closures and it will be all done.
It took me all weekend to build by myself - had my brother help me with mounting the mattress box in the cabinet. I would suggest having wood cut at the lumbar yard as it is difficult to cut the 8 and 12" boards unless you have a bigger table saw that I do.
Built from Plan(s)
Estimated Cost
$140 not including accessories which added about another $40 to cost. Mattress was additional $180.
Estimated Time Investment
Weekend Project (10-20 Hours)
Recommended Skill Level
Beginner
Comments

Free- Standing Faux Mantle
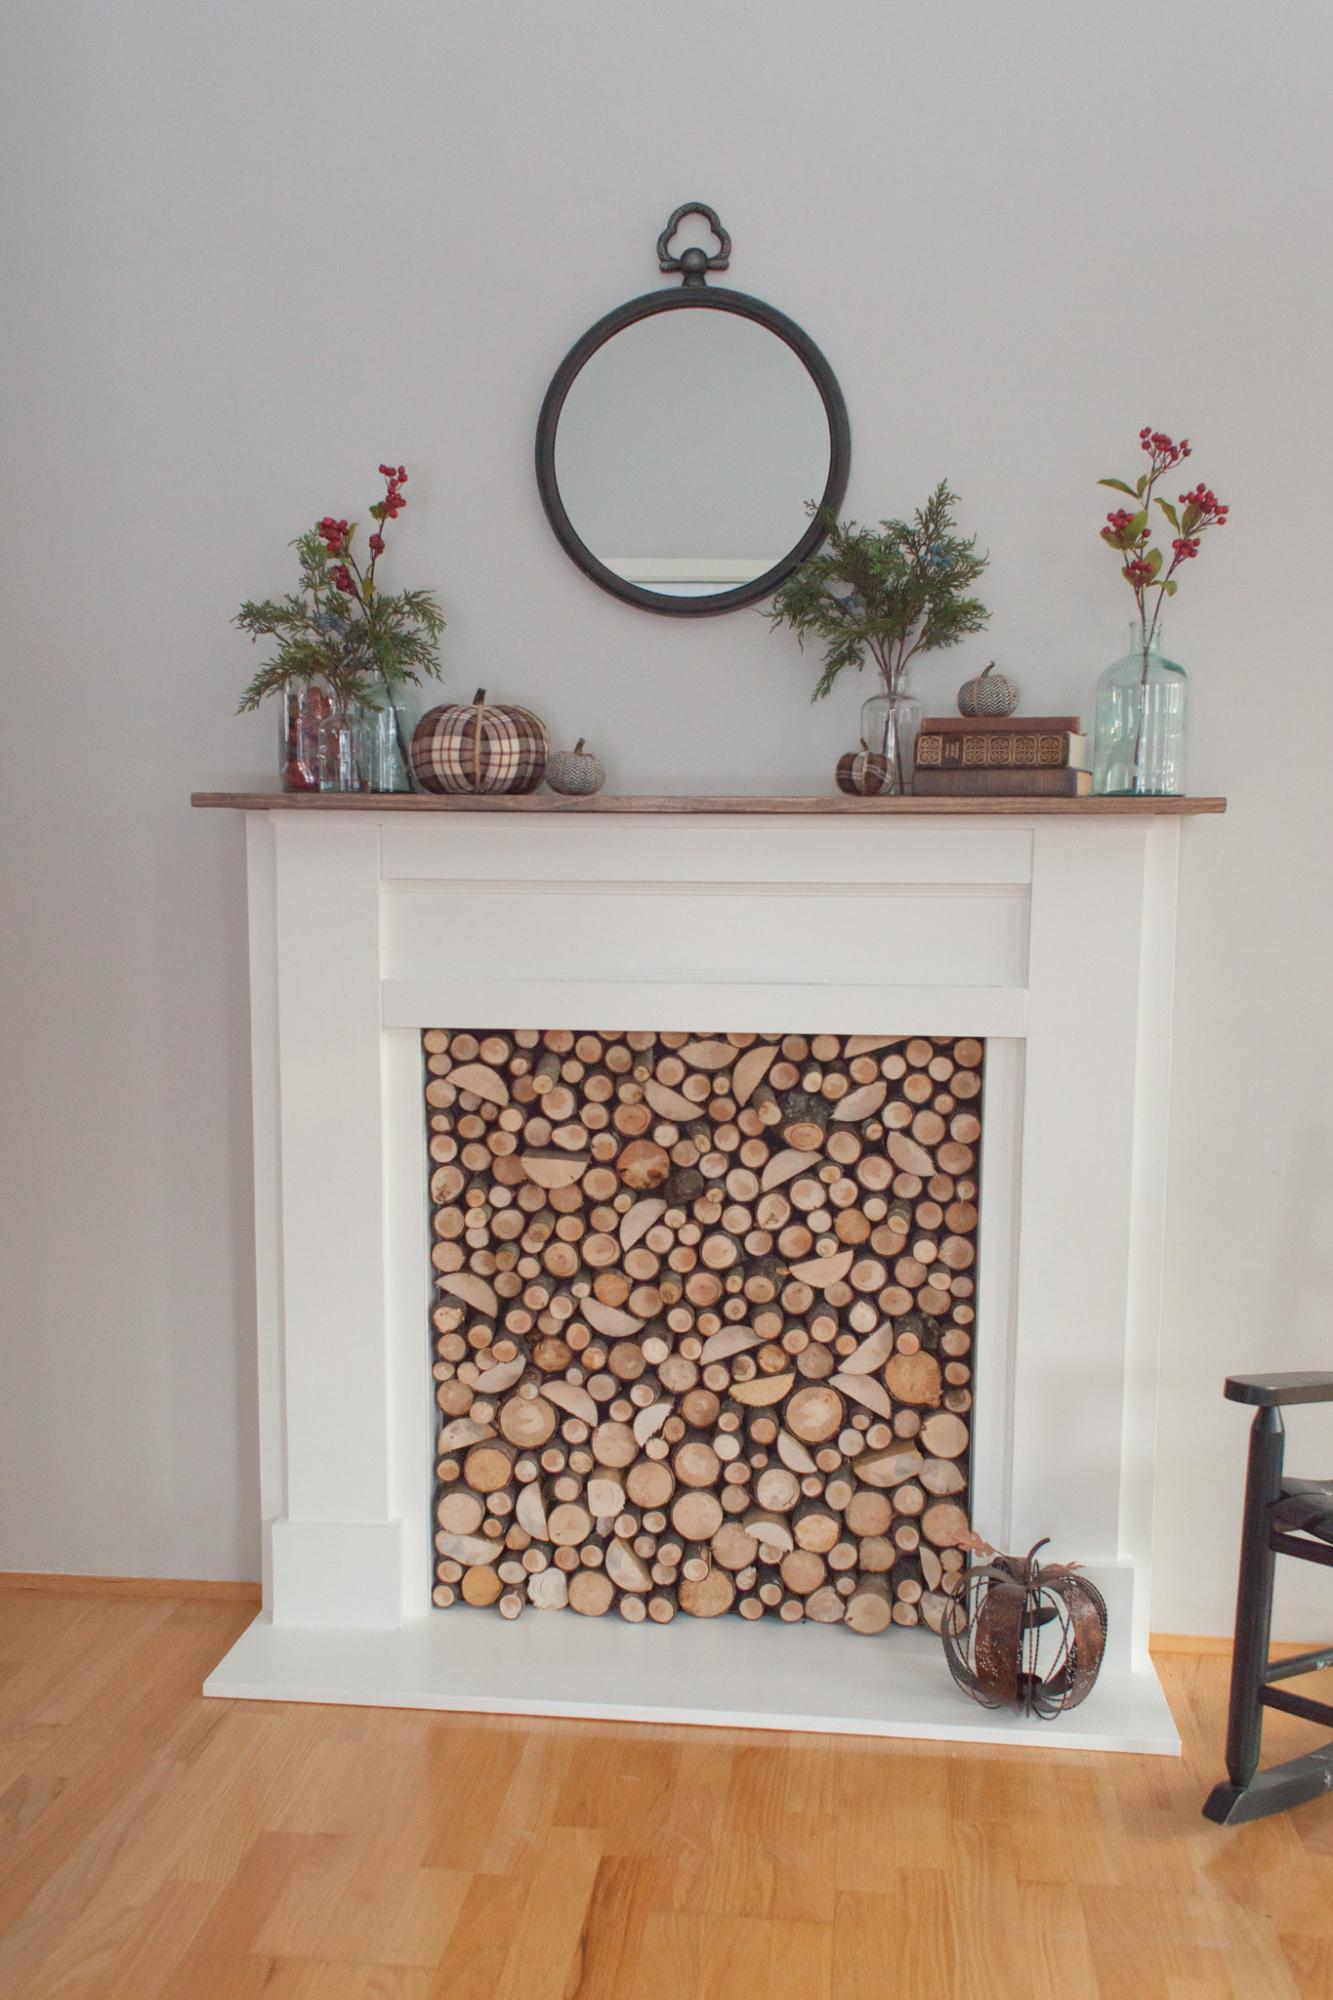
I added a 1x12 as a base so that it could be free-standing, in case we ever want to move it to a different spot. I also added an insert by gluing slices of tree branches to a piece of plywood . This was a fun, quick and easy project, even for a relative beginner. I love the character it adds to this room!
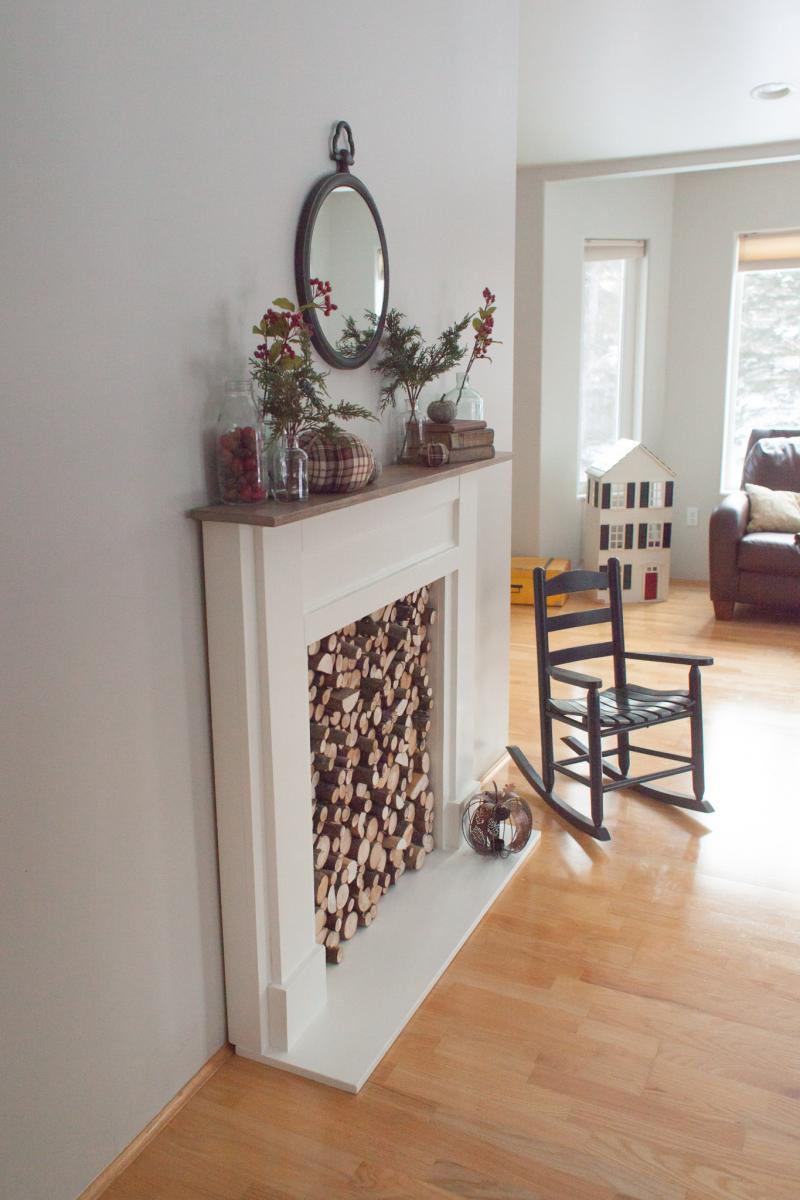

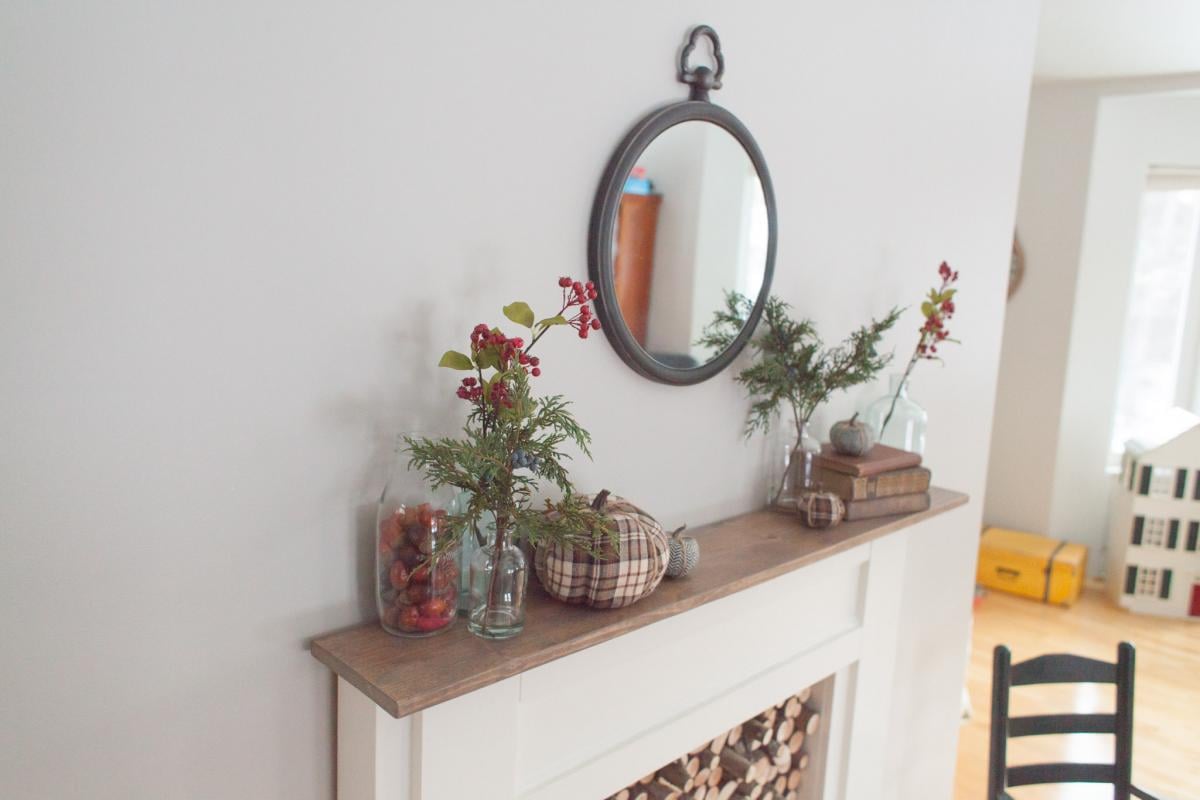
Built from Plan(s)
DIY Dog Crate Console
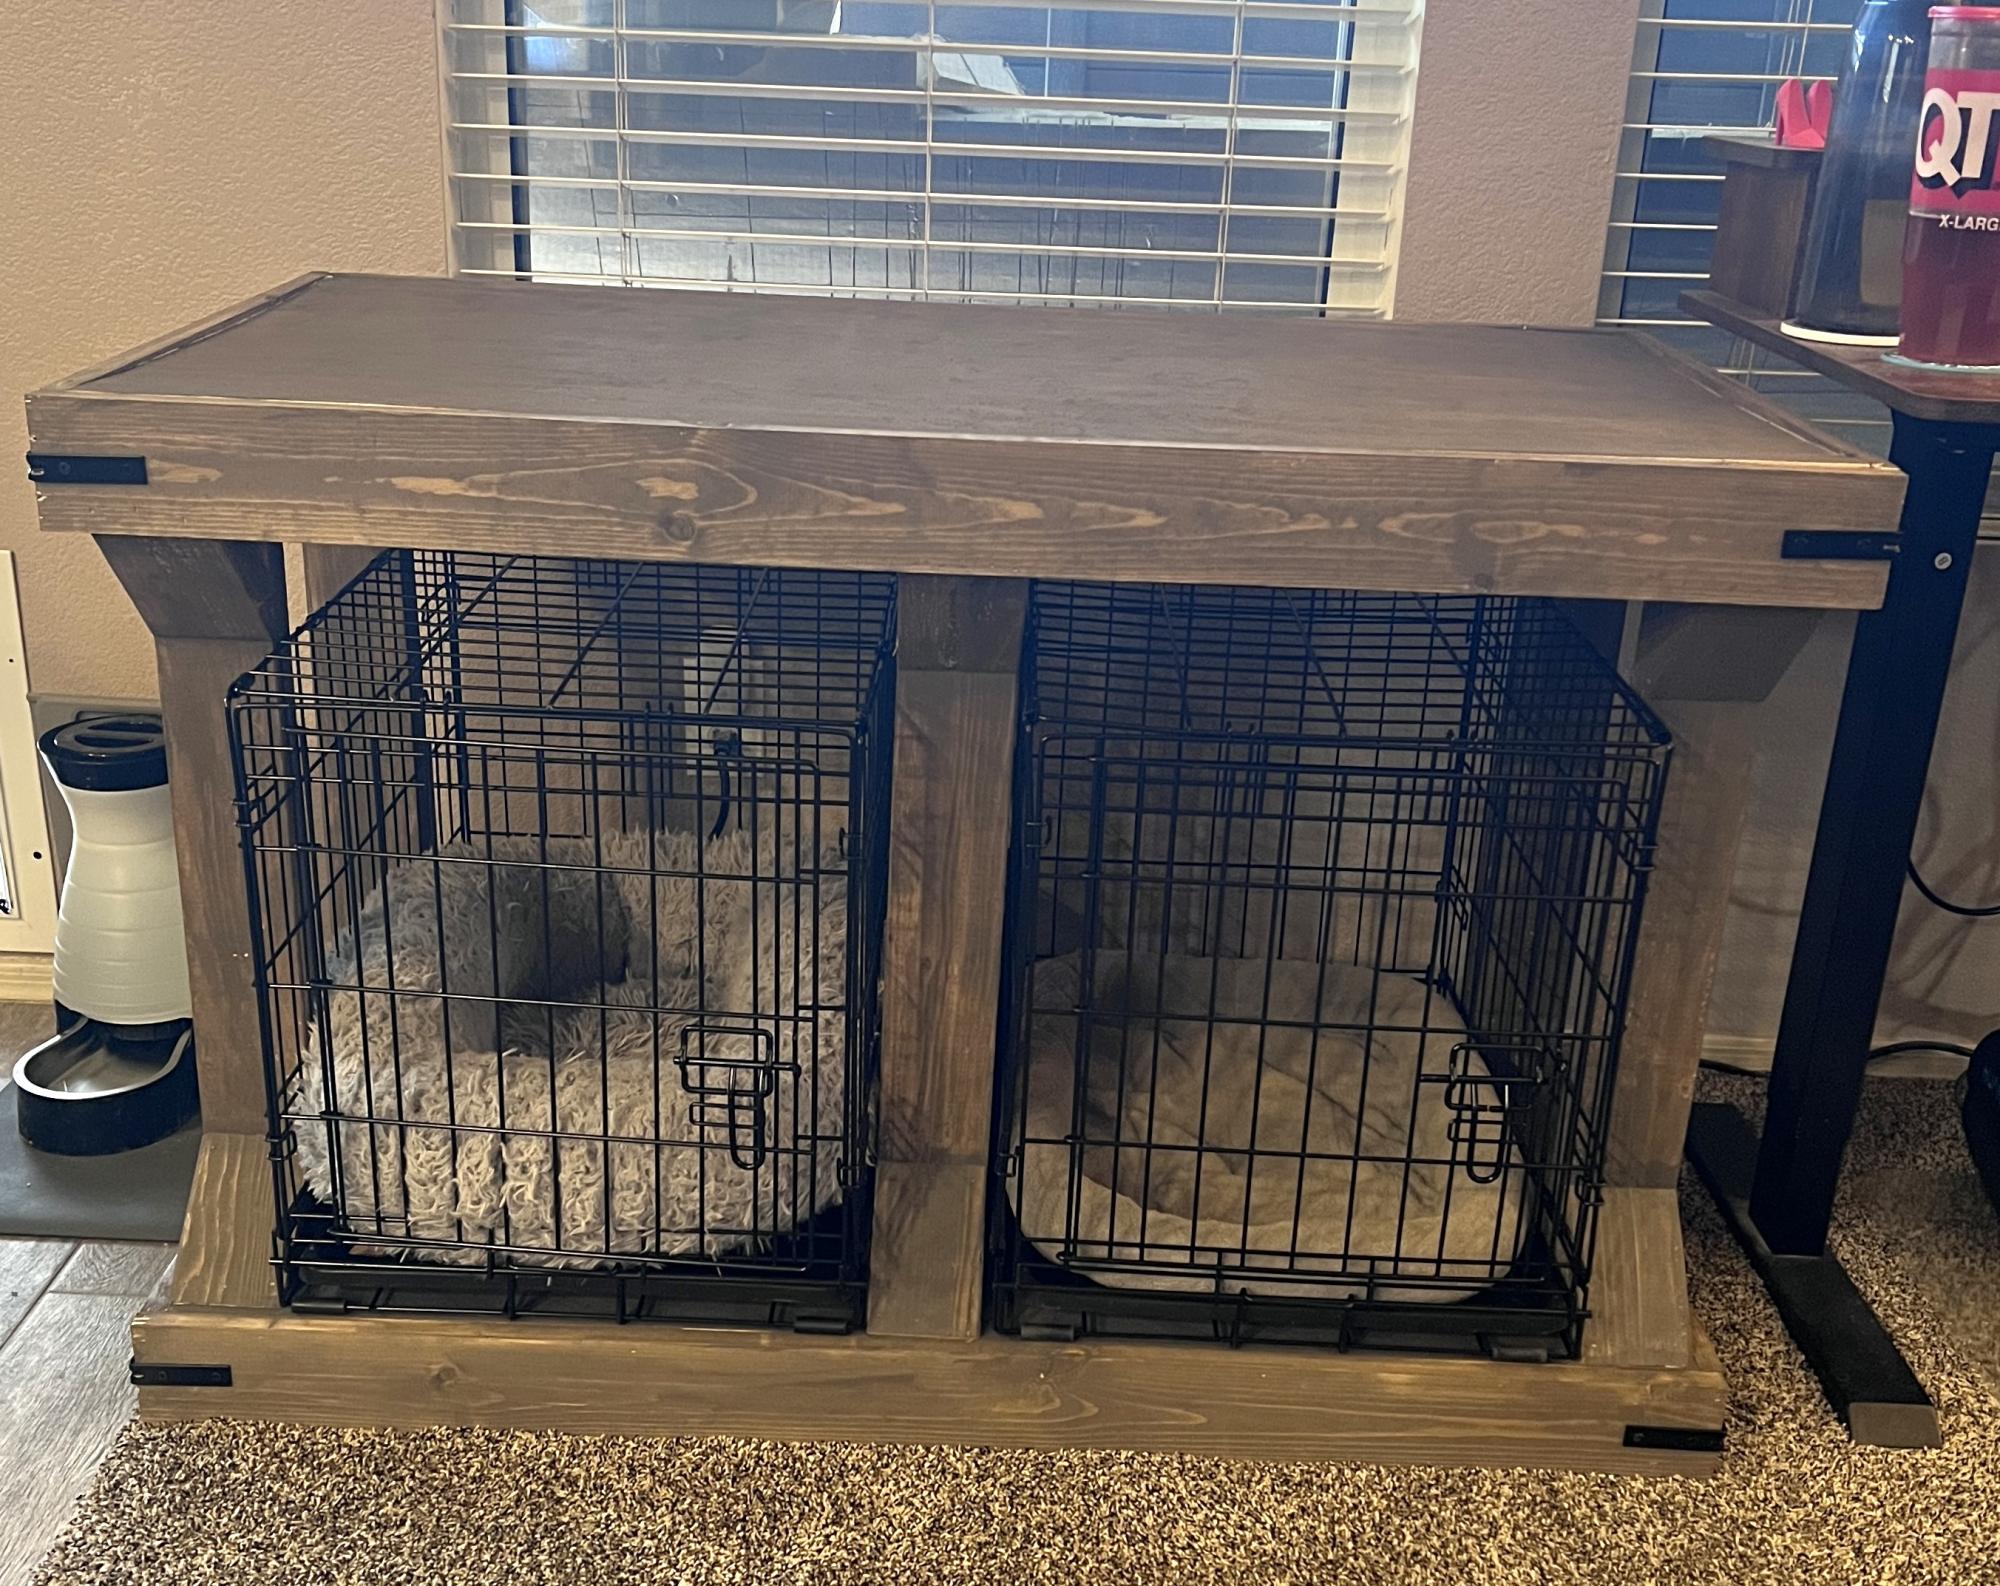
Dog Console from Modern Farmhouse Console.
Marivic Ferguson
Built from Plan(s)
Garden chairs and table
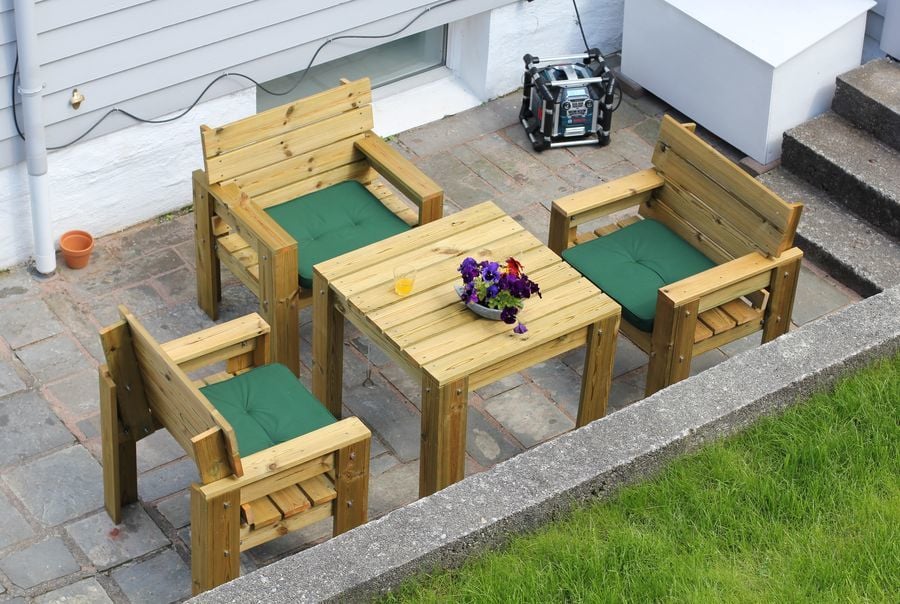
It was after getting to know your website and seeing all your nice craftsgirlship we decided to make our own garden furniture.
We are wery satisfied with the results, thanks a lot for the inspiration!
PS) Time investment = per item.

Built from Plan(s)
Estimated Time Investment
Afternoon Project (3-6 Hours)
Finish Used
Saturating wood oil.
Recommended Skill Level
Beginner