Community Brag Posts

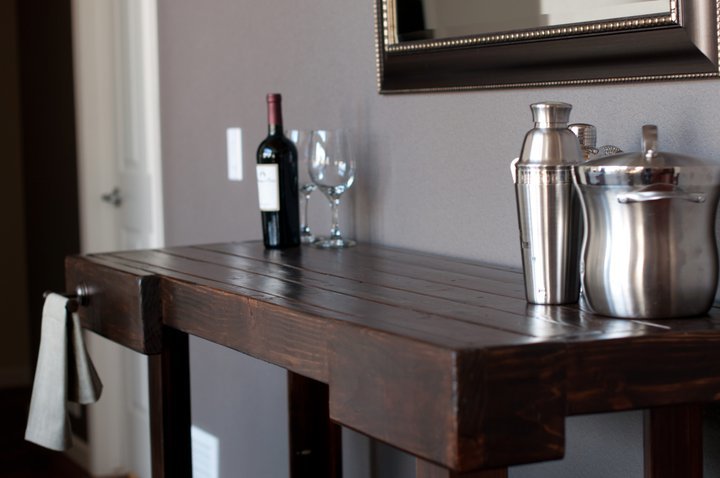
4X4 Truss Beam Table

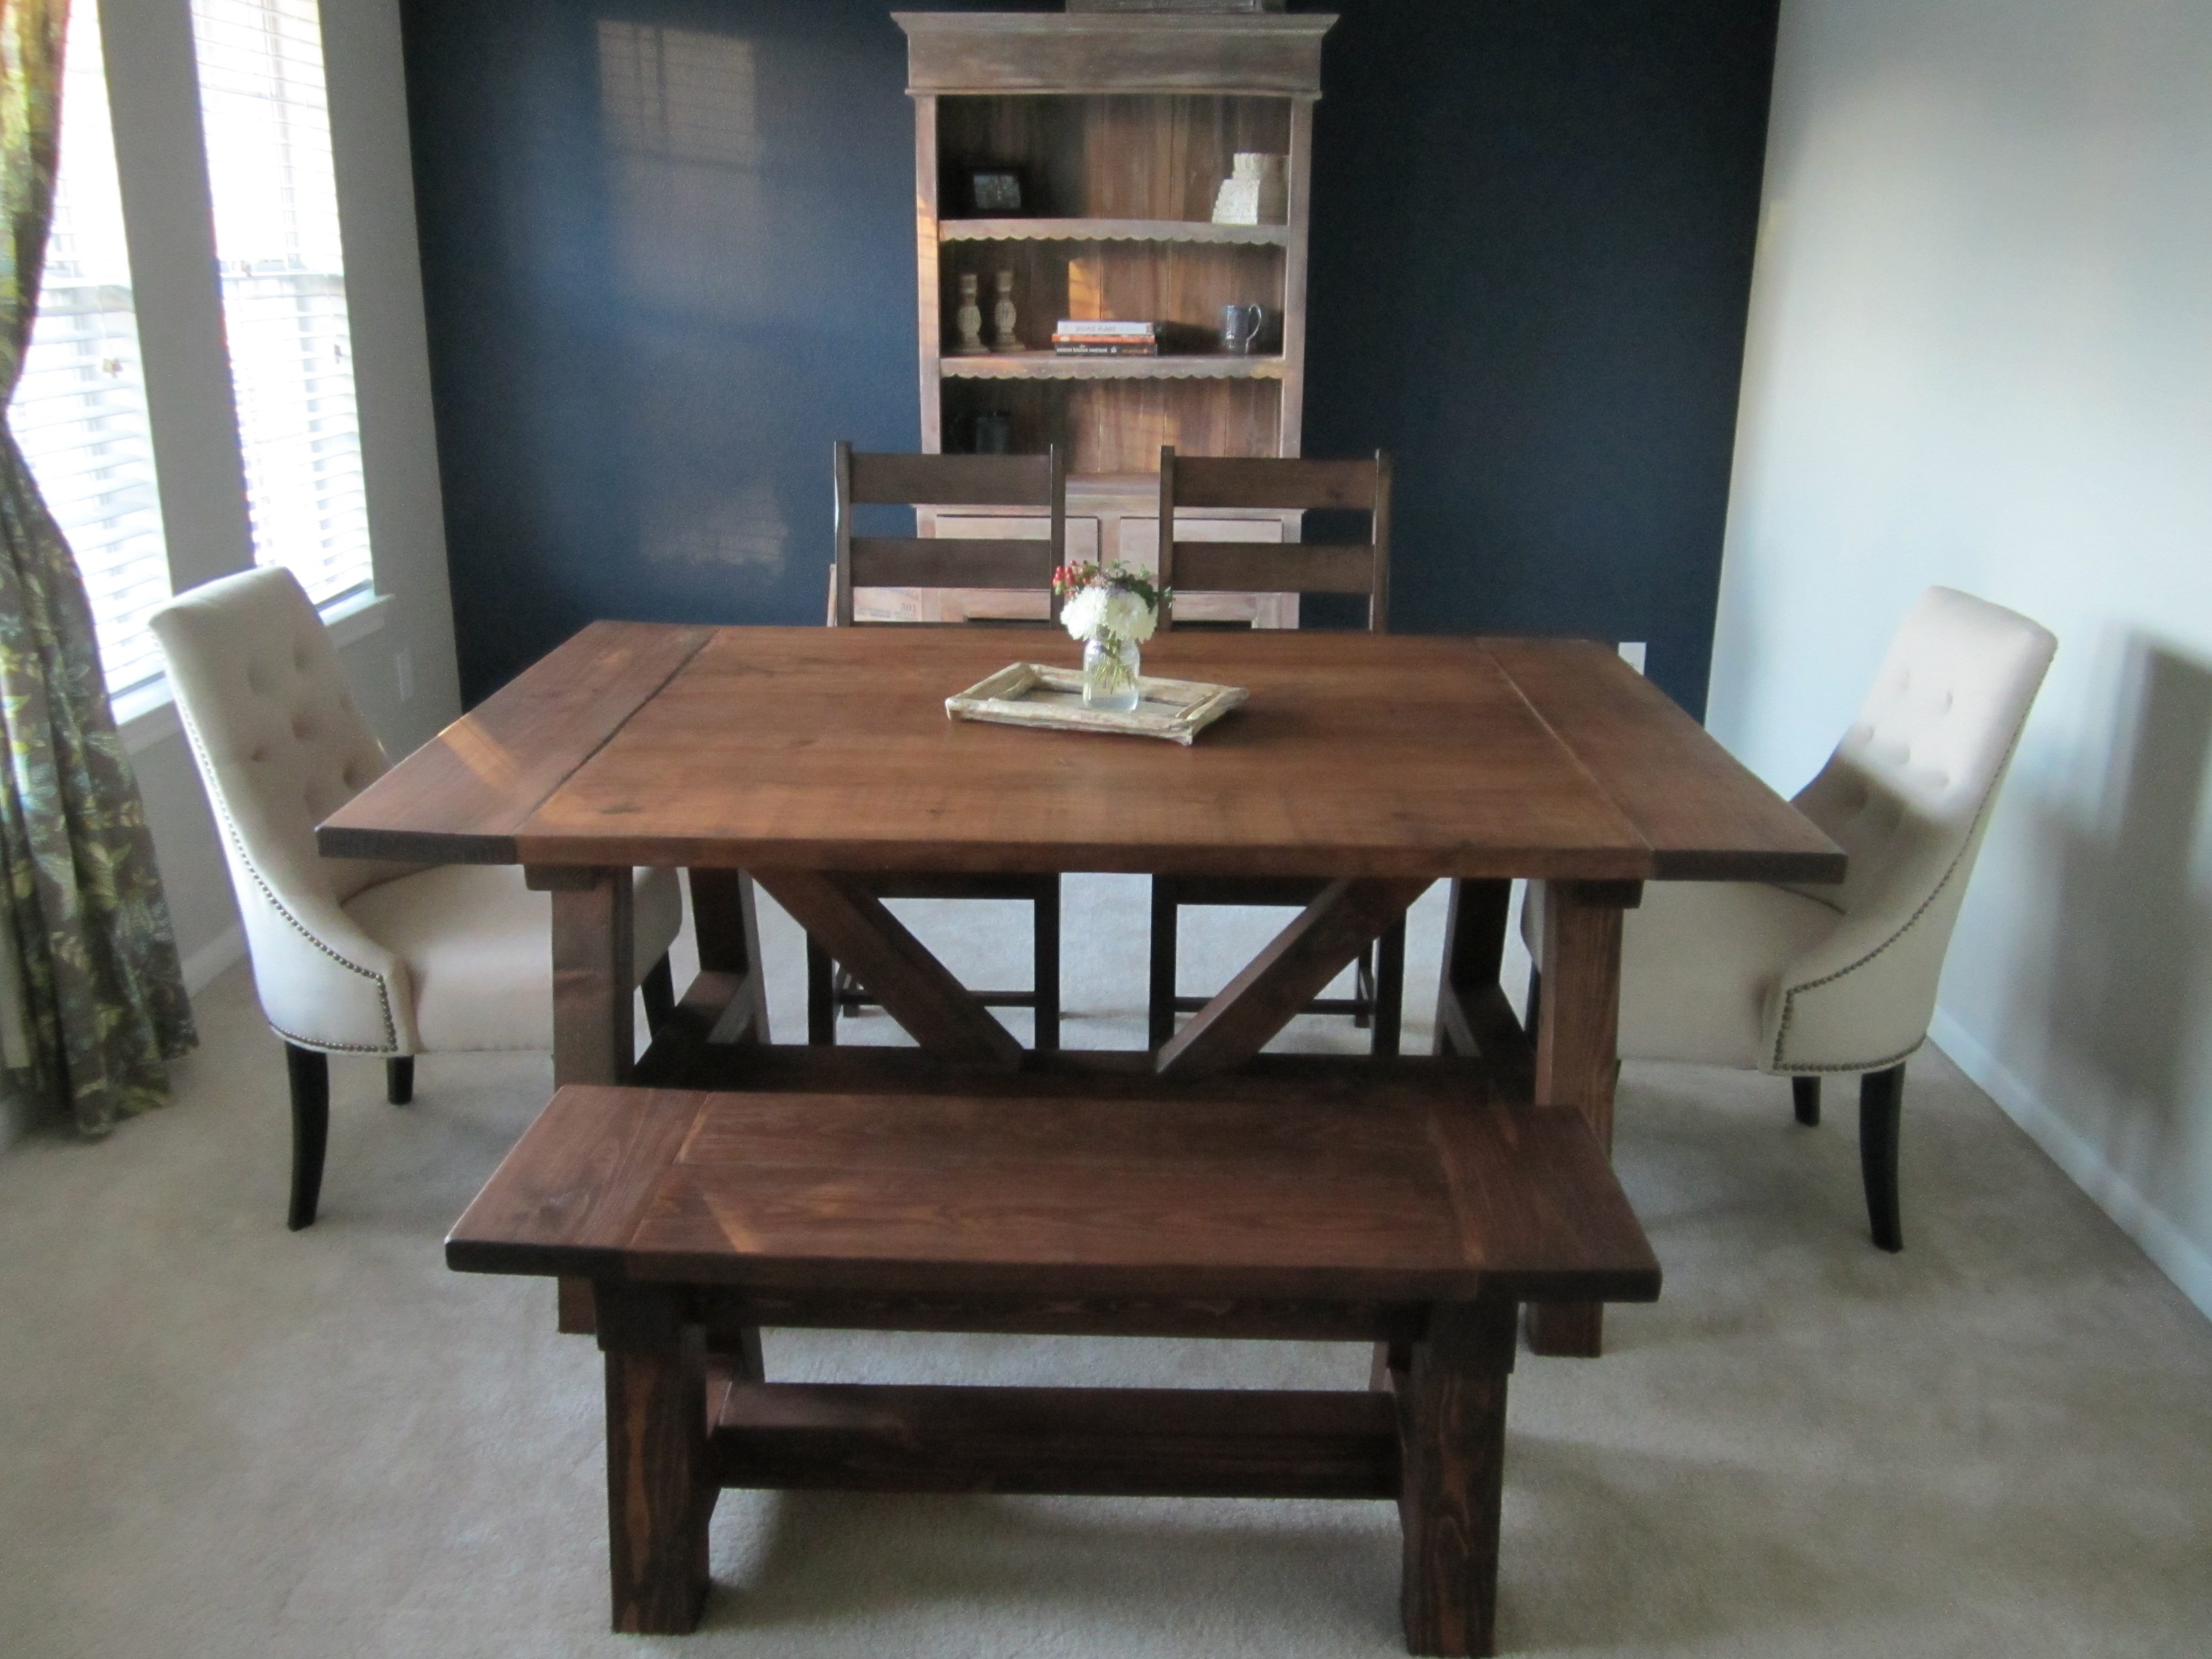
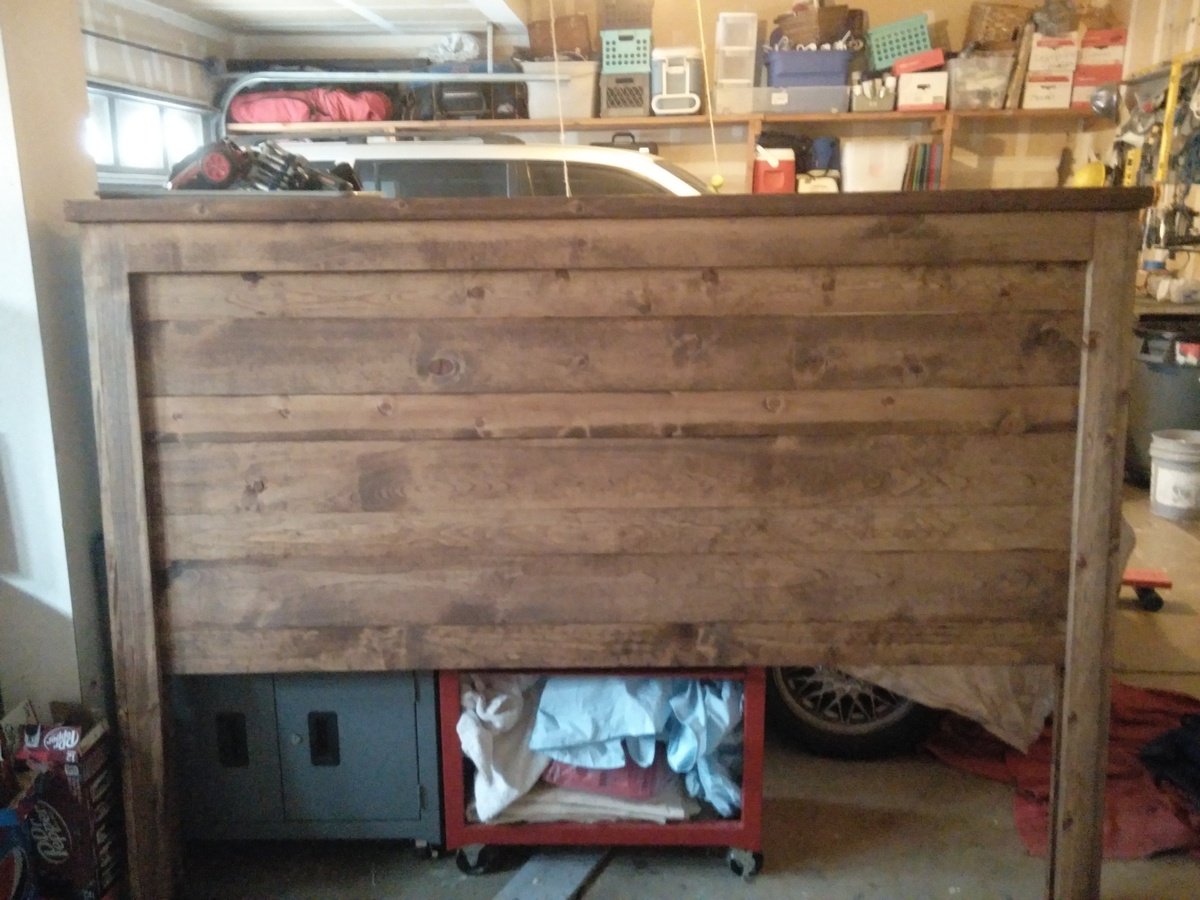
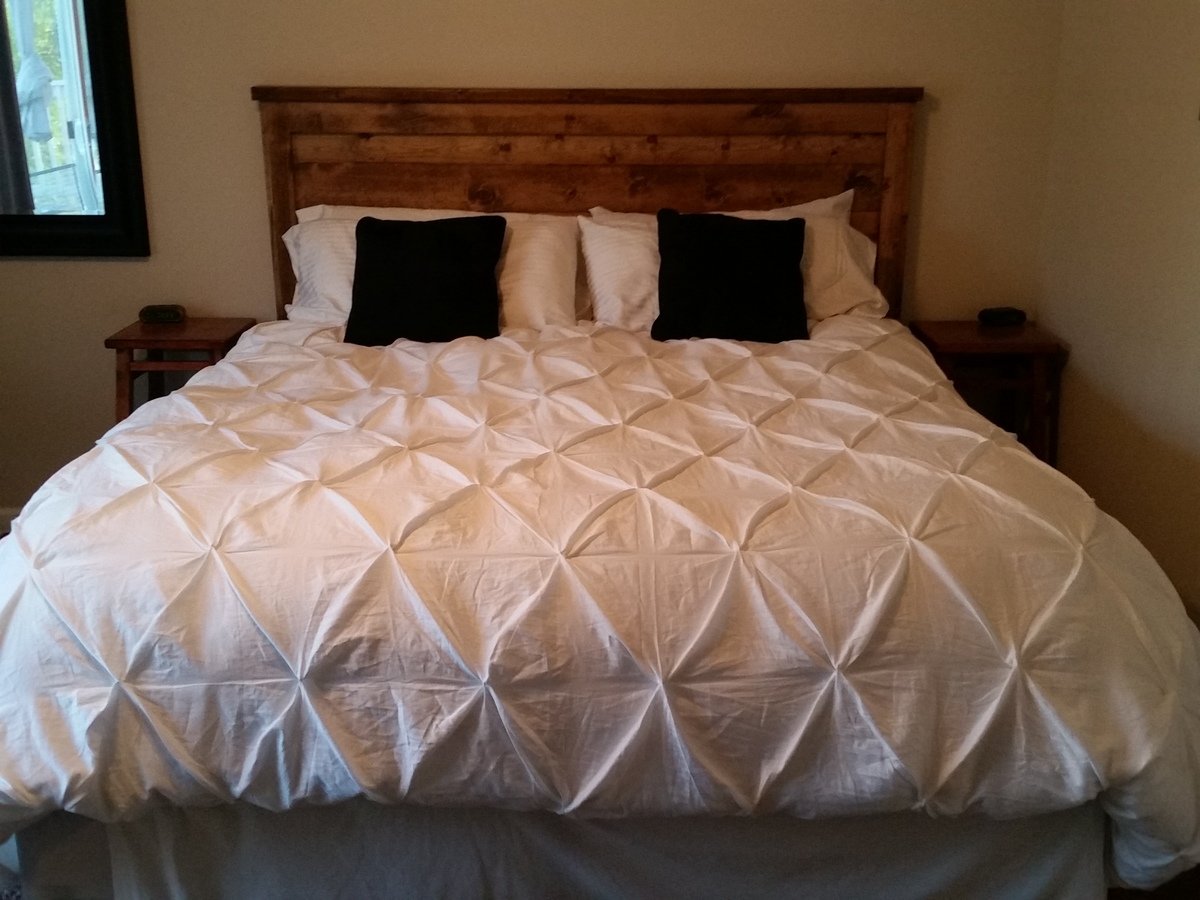
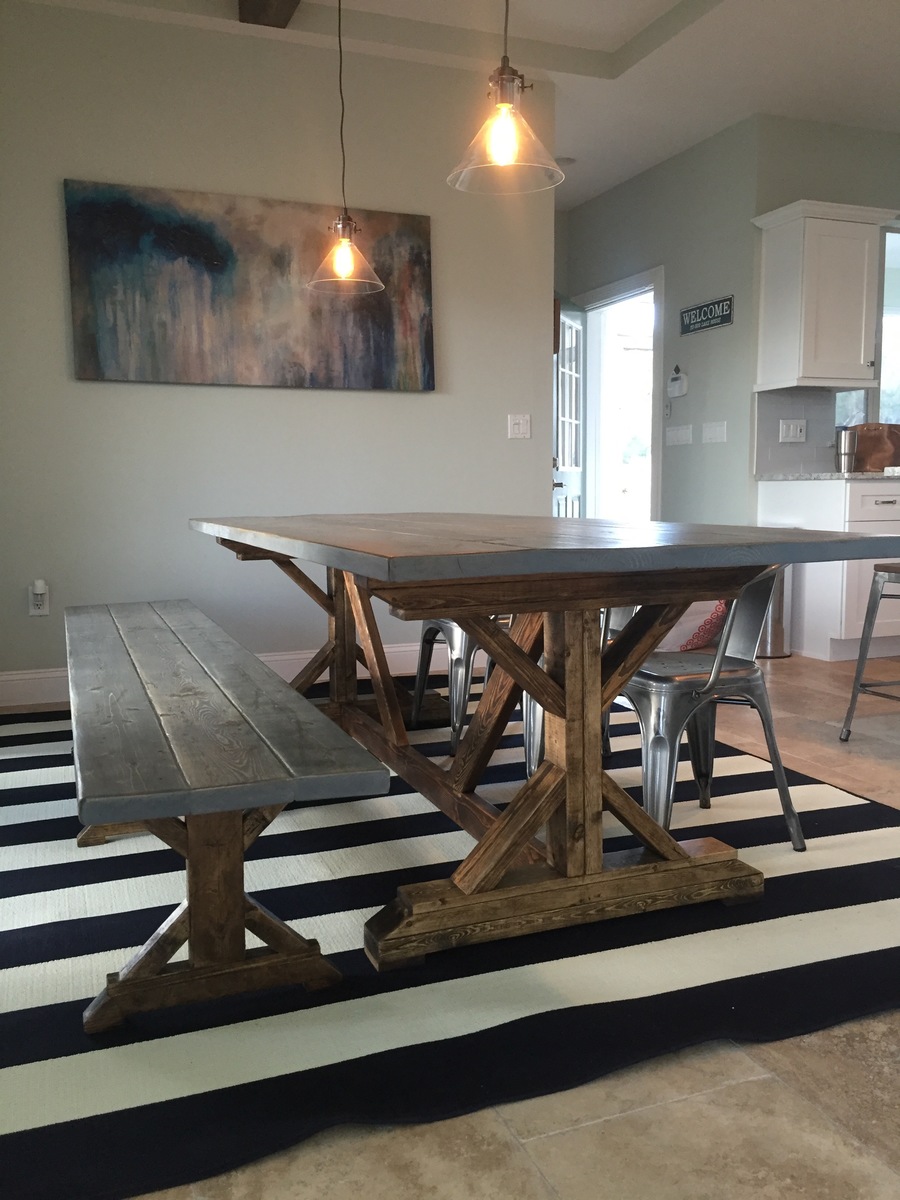
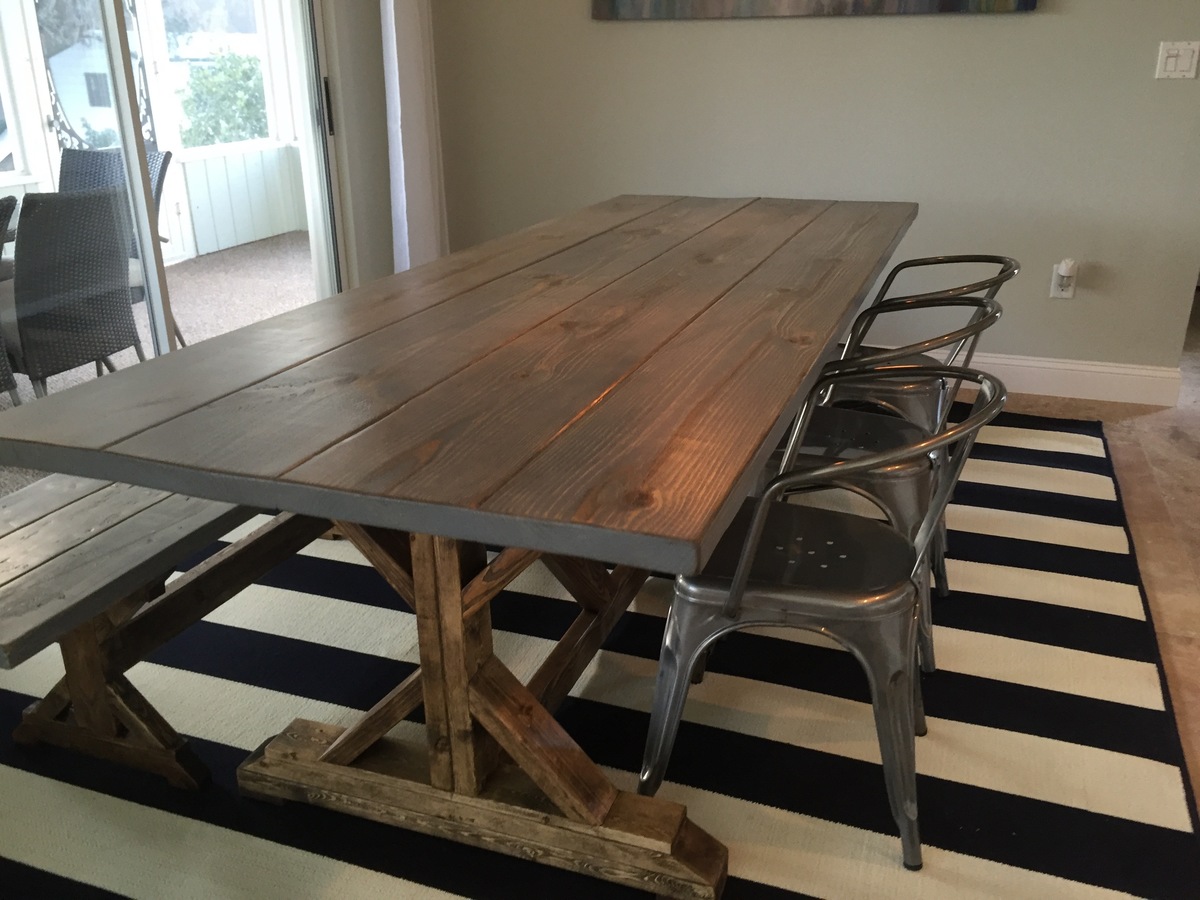
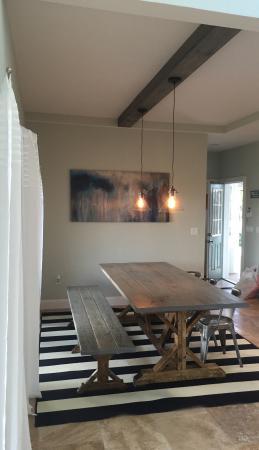
This was my first project. It's not perfect, but I love the way it turned out! The original plans were too large for my dining room, so I altered the plans to make it a 5-foot table. I actually ended up making it a little bit wider as well by adding an additional 2X10 to the table top to make the table look more proportional. The wider table top has made it perfect for family-style meals! For the finish, I did one layer of Rustoleum American Walnut stain applied with a foam brush and wiped off with a clean cloth after one minute. After the first layer of stain, I sanded the table with a very fine paper and then did two layers of Rustoleum Dark Walnut applied with a foam brush and wiped off with a clean cloth after only a few seconds of setting. Finally, I did three layers of Rustoleum Matte Finish polyurethane.

Estimated Cost
$120
Estimated Time Investment
Weekend Project (10-20 Hours)
Recommended Skill Level
Beginner

Comments

daydra

Tue, 03/06/2018 - 19:15

Your table is beautiful!!! You done a stunning job on it!!! This is the same size that I need for my table but I'm having a hard time figuring out the measurements for the legs and the length of the benches I need!!! My table needs to be 60"x32" would you mind helping me with the measurements of your bench and also of your legs on the table?? I plan to make the table legs the same height as hers but need to make the top board and middle brace to match the 60" top!!

Noah's Modern Dresser

Submitted by Anonymous (not verified) on Wed, 02/24/2016 - 17:31

Thanks so much for this build post.  We actually were about to purchase the dresser that this is designed after, but I couldn't stomach the 900 price tag.  I headed to anna-white.com to see if she had plans for anything similar and voila! the plans for the exact dresser we wanted were here!  

Built from Plan(s)
Estimated Cost
I spent about $300 in materials.
Estimated Time Investment
Weekend Project (10-20 Hours)
Finish Used
I used red oak stain from minwax, and white paint. We coated it all in a rub-on poly finish for durability.
Recommended Skill Level
Intermediate

Comments

In Drawer Knife Block Includes Steak Knife Storage

I watched your video and modified mine to take up less space by using 1 x material instead of 2X material, and I cut a notch in the top to allow steak knives to store on top.  Once a cut a notch, then I used my table saw to create the space where the steak knife blades fit. 


From there, lots of sanding and gluing. I made the plywood base about 1/4” shorter than the depth of my drawer so it could be easily placed inside my drawers that don’t fully extend out. 


I finished it with pre-stain conditioner, stain, and then an oil/beeswax blend (used for cuttting boards) applied with 0000 steel wool for a super smooth, satiny finish. 

Angie 

Built from Plan(s)

Wine Rack

Submitted by Bredimi on Tue, 02/07/2012 - 15:35

I loved the Holman Entertaining Shleves from Pottery Barn, however, I didn't like the price. Taking the $10 ledge plans and modifying them, I set out to make my own. I used a 1 x 10 (bottom), 1 x 6 (back) and a 1 x 3 (front). They are 23 7/8 inches long to get the 3 shelves out of 6 foot boards. To get the holes to hold the top of the bottle, I used a 1 and 1/4 inch forstner bit. Since I had gift cards left from Christmas I splurged on the wood and bought the select pine.

Built from Plan(s)
Estimated Cost
I had gift cards, but my out of pocket expenses for the 3 shelves was $22.89
Estimated Time Investment
Afternoon Project (3-6 Hours)
Finish Used
I painted them Valspar Lincoln Cottage Black
Recommended Skill Level
Intermediate

Comments

babysteps

Tue, 01/14/2014 - 10:55

I love your adaptation of the original design. I have been looking for an example of someone who made this plan into a wider shelf. Has it held up well? I was worried about the stress on the joints when you make it deeper. Has yours handled the weight of the bottles?

Modern King Farmhouse Bed with Canopy

Although I have experience building projects and using tools, this was my first Ana White project. I am a huge fan! I wanted a little bit more modern take on the Farmhouse bed with canopy, so I attached the headboards and foot boards directly to the 88" tall 4 x 4 posts. This was done instead of creating the king farmhouse bed first and adding the canopy on top of it like the plans show. I used solid 3/4" birch plywood instead of the planks for the headboard/footboard for a more streamlined look. I also used 1 x 4's around the entire perimiter of the headboard/foot board instead of just the top and bottom. I am thrilled with how it turned out, it looks exactly the way I wanted it to! Step-by-step information on how I built the bed are on my blog at decorsanity.com. Thank you Ana, you rock!!

Estimated Cost
$350
Estimated Time Investment
Week Long Project (20 Hours or More)
Finish Used
1 sprayed coat primer, 1 sprayed coat Behr flat paint in Polar Bear White, 1 coat sprayed Minwax Polycrylic
Recommended Skill Level
Intermediate

Comments

BeaxBuilt

Fri, 01/24/2014 - 23:28

It looks very sturdy. I like your idea of the 1x4 around the entire perimeters and making the canopy the actual bed frame. Thats what I would have done too. I am always trying to think of ways to use 2 x's or 4 x's instead of 1 x's I like the chunkier look. Great job

Loft bed

Submitted by Anonymous (not verified) on Sun, 02/28/2016 - 18:35

I loved making this bed. This was my first experience using a Kreg Jig and it was great! We added three inches to the height of the bed so that my daughter could stand up for the next two years or so without bonking her head. We opted for rungs instead of stairs to save more space. We also used 2x4s cut to width for bed slats instead of a bunkie board.

Estimated Cost
$90 for all lumber, wood condition, stain and PH screws
Estimated Time Investment
Weekend Project (10-20 Hours)
Finish Used
Minwax wood conditioner
Minwax Ipswich Pine
Recommended Skill Level
Starter Project

American Girl Doll House

Submitted by Anonymous (not verified) on Sun, 10/06/2019 - 18:59

This Project was a Challenge mostly because of its size. Standing 6ft Tall and 4ft wide it was hard to handle at times but easy enough and fun to build.
I followed Ana's Three Story American Girl or 18" Dollhouse plans.
We also made the American Girl or 18" Doll Sofa or Couch.

Estimated Cost
$150
Estimated Time Investment
Weekend Project (10-20 Hours)
Finish Used
I used White Latex Paint and Walnut Mini Wax stain for the floors
Recommended Skill Level
Beginner

Planters for Steps

Submitted by Anonymous (not verified) on Tue, 06/27/2023 - 12:10

Very happy with how these planters turned out. Beautiful with red Geraniums and ping wave petunias.

Built by Dave

Built from Plan(s)

Comments

Factory Cart Coffee Table

Submitted by Syndee on Fri, 02/10/2012 - 22:11

(Sorry my photos aren't the best, there is a black spot on my lens which shows up on some pictures.)

I had a lot of fun making this! I'd been wanting a vintage factory cart for over a year when I found this plan on Pinterest which led me here. I wanted to get a rustic industrial look so I made the table in the picture from the Ana White site that is stained and not the green one. After getting the base built, my husband and I decided we wanted it taller (since we have a dog who would love to sniff at whatever we put on it). And while I'm at it, why not add some storage? So I added more 2x4s and attached them to both the base and additional 1x6s. I put the 1x6s on the front and both sides, leaving the back open. I flipped the whole thing over, put the casters on and added plywood to the bottom of those 2x4s. then added two small boards give support to the plywood, which created a storage shelf. I then sanded and stained it and finished it off with two coats of semi-gloss poly. I did not counter-sink my screws or used wood filler as I was going for the rustic industrial look and I love the way it looks. It is very sturdy, too. I have moved it all around, slid it on its side trying to get some decent pictures and its just as sturdy as ever.

Built from Plan(s)
Estimated Cost
< $100
Estimated Time Investment
Weekend Project (10-20 Hours)
Finish Used
Stain color is Kona. Two coats of poly.
Recommended Skill Level
Beginner

Comments

A letter shelf

A built these shelves for my nieces birthdays. I reversed the color schemes to keep them separate. The plans provided are great! I would certainly use the added 1 x 2 supports if hanging on the wall because the shelf is heavy (about 14 pounds).

Built from Plan(s)
Estimated Time Investment
Afternoon Project (3-6 Hours)
Finish Used
Valspar paint sample from Lowes
Recommended Skill Level
Beginner

Garden Bench

Submitted by sidman on Tue, 02/14/2012 - 02:50

When I saw this we had to build it. Hope you like!

Estimated Cost
45.00
Estimated Time Investment
Day Project (6-9 Hours)
Finish Used
Painted black with a poly coating.
Recommended Skill Level
Starter Project

Comments

Margaret Kubiszyn (not verified)

Tue, 02/14/2012 - 07:11

I love this, but the link to the plans is broken!

Beach Cottage Dresser

Submitted by Emendia on Mon, 12/23/2013 - 23:18

This was my first dresser. The original plans say to lay the dresser on its back and center the drawer fronts then nail in place; in my opinion it is faster and more accurate to hold them in place and have a helper nail them in place. Also, the original plans suggest a certain jig for installing the slides which requires a locking c-clamp to hold the jig in place. Well, in my opinion the locking c clamp, along with a magnetic small torpedo level is faster and easier than the jig. A six in steel rule with a slider clamp is also helpful.This was fun project - learned a lot!  Thanks Ana & Patrick!

Estimated Cost
$250
Estimated Time Investment
Weekend Project (10-20 Hours)
Finish Used
DIY chalk paint, knobs from World Plus Market, and lightly distressed along edges so antique white primer would show through along edges. Base for chalk paint is latex plus calcium carbonate. Be sure to dissolve chalk in water before mixing into paint! I did two coats of antique white tinted primer, followed by two coats of chalk paint, then sealed with wax Also, the chalk will whiten your final color, so buy paint a couple of shades darker than what you would like your final finish to be.
Recommended Skill Level
Intermediate

Comments

Emendia

Tue, 12/24/2013 - 08:23

Oh, another lesson I learned: The drawers are made by attaching drawer fronts to the boxes. This makes the front 1.5 inches thick - this means most drawer knobs won't fit unless you use a Forstner or spade bit to bore a hole on the back side of the drawer face - in turn you may need to do this before you assemble the drawer!

Full Length Mirror

Submitted by AndyH on Fri, 03/04/2016 - 18:03

A $10 Mirror framed out with some 1 by 2, 1 by 3 and 1 by 4.

Stained black and then 2 coats of white paint sanding after each to give a rustic/antique look.

Estimated Cost
$35
Estimated Time Investment
Day Project (6-9 Hours)
Finish Used
Stained in black and then two coats of white paint sanded between coats to give antique finish.
Recommended Skill Level
Beginner

Leaning Desk

Submitted by Anonymous (not verified) on Sun, 10/13/2019 - 12:59

I needed a desk to get my computer off the kitchen table. After remodeling my bedroom and sealing a doorway to make the wall space, I needed something that would take up a little amount of floor space. Of course I couldn't find exactly what I wanted so I decided to build it. Found this little gem of a plan and modified it to my liking and needs. I’ve had it up for about a year and I love it.

Built from Plan(s)
Estimated Cost
50.00
Estimated Time Investment
Weekend Project (10-20 Hours)
Finish Used
White washed with a water based pay finish.
Recommended Skill Level
Intermediate

My new sewing table!!

Submitted by sattaway on Sun, 02/19/2012 - 20:46

I consider this my first build...notice the ribbon rack and painter's ladder shelf also in the photo. Those were just confidence boosters to help me tackle the craft table I've been asking my hubby to build me for years. I just got tired of waiting, and decided to give it a try. With a 2 and 6 year old in the house, this took me a few weeks to complete...building during nap time and forgoing sleep on some evenings just to get it done. :) The drawers were by far the trickiest part of the whole thing. My first attempt was with 16" euro side mount slides, and I couldn't get the drawers in because they are inset under the tabletop. I ended up going with just a regular side mount drawer slide ($4.30 per drawer). The bookcases and the drawers are just your standard white cabinet paint, but the tabletop is finished in Martha Stewart's Potter's Clay textured paint (Hacienda) with a top coat of polyurethane. I also made the table top twice as thick by gluing 2 pieces of plywood together and screwing them together through the bottom piece. The height of the table is perfect for cutting fabric...no more backaches from bending over a table to cut fabric. I can't wait to move on to my next project! :)

Estimated Cost
$150
Estimated Time Investment
Weekend Project (10-20 Hours)
Recommended Skill Level
Beginner

Comments

Sandie

Mon, 02/20/2012 - 14:28

Great job! I love it when women finally figure out that they CAN build! Everything looks great!!!!

Shoe Storage Flip Top Bench - First Attempt at "Woodworking"

Submitted by rskeels on Thu, 12/26/2013 - 07:48

This is my first attempt at building and your website made it possible. There were a couple of mistakes, I admit. This was especially true with the finish. I did my best, but I'm a little impatient with letting things dry.

I am also having a difficult time estimating how long it took to build as I am the sometimes proud father of 3 boys...aged 2, 4, and 5....resulting in frequent stopping, starting, and intermittent chasing down the street. I need an exterior lock on the garage.

Thanks so much for your website Ana.

Estimated Time Investment
Day Project (6-9 Hours)
Finish Used
Minwax English Chestnut - Two Coats
Minwax Jacobean - One coat
Minwax Polyurethane
Recommended Skill Level
Starter Project

Comments

Distressed Fancy X Farmhouse Table

Submitted by Anonymous (not verified) on Mon, 03/07/2016 - 04:50

We used the Fancy X Farmhouse plans and matching bench to create a wonderful new farmhouse table and bench for the lake house. We distressed the tops of the bench and table and stained them Weathered Grey with the base of the table and bench stained Ash.  We absolutely love it!

Estimated Cost
Less than $200 for both pieces
Estimated Time Investment
Weekend Project (10-20 Hours)
Finish Used
We used a stain called weathered grey on the top and sanded some of the stain away in areas that would be typically used a lot and in the areas that showed bare wood we added the Ash stain and rubbed it in and lightly sanded the whole tops before applying final polyurethane coats. The bases were stained Ash.
Recommended Skill Level
Advanced

Comments

Propane Tank Storage Table

Submitted by Anonymous (not verified) on Fri, 07/07/2023 - 11:12

I had inquire on your Facebook about you making a new plan... i had wanted a side table to hide my propane tank. I used the planter plans as an inspiration for this table. It is regiment rough looking as I managed to build it using only scrap on hand. I did have one cedar board in my pile that was leftover from another project that I used for the top... pretty happy but know it would have been better with new wood that was the right size and not warped! The space at the top is on purpose to be able to teach in and turn the gas on and off.

Debbie Hertz

Argie Bedside Table (Nightstand)

Submitted by mstarnes on Fri, 02/24/2012 - 09:40

Used the Argie Bedside Table plans, but instead of using plywood for the top I used 1x4's joined together. Painted it a semi-gloss black and put the stainless pull on the drawer front

Built from Plan(s)
Estimated Cost
$75
Estimated Time Investment
Afternoon Project (3-6 Hours)
Finish Used
Semi-Gloss Black Paint
Recommended Skill Level
Intermediate
Back