Community Brag Posts

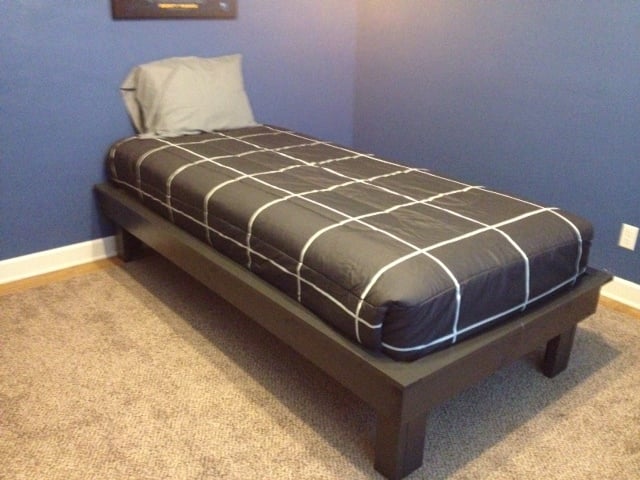
Hailey platform bed for teenager

Submitted by daveandamy on Thu, 08/01/2013 - 11:53

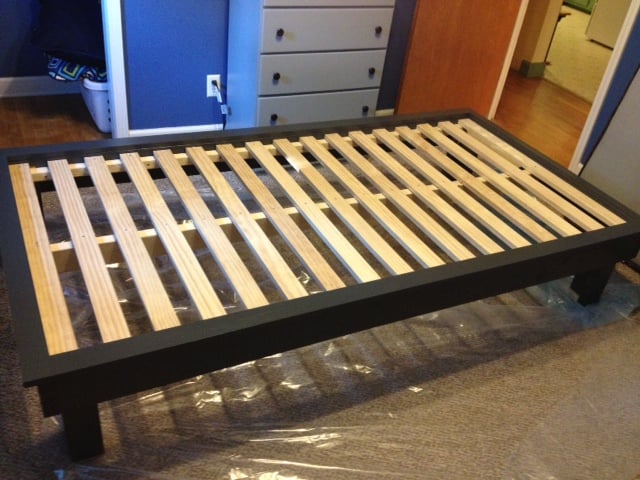
We needed a twin XL for our 17 year old grandson. This platform bed was perfect. It didn't take much to change the plans for the XL since it's the same length as a queen bed. We added the center support simply for added strength and changed the legs to make them longer so I can put wheeled drawers underneath the bed for added storage.

Built from Plan(s)
Estimated Cost
$100.00
Estimated Time Investment
Weekend Project (10-20 Hours)
Finish Used
Painted with semi gloss in charcoal gray.
Recommended Skill Level
Intermediate

Laptop Table

Submitted by brittanyj on Wed, 08/19/2015 - 13:29

I saw Jen's one board challenge post and realized that some wood I got for free off CL a year ago included the right amount of walnut.  This seemed like the perfect plan to utilize this beautiful wood in a worthy way.  I did not have a 1x8, so I made a butcher block kind of top, which I think I like even better since the colors and grain vary.  

Placement of the connecting bolts is quite tricky and led to some misplaced holes : ( The stop blocks to the side of the legs aren't mentioned in her plan, but pictured, and are recommended in order to stop the legs from splaying too far.  I used pocket holes for all joinery and no stain, just poly for the finish.  The final coat I watered down some water based poly and wiped on for a smooth finish.  Love it!   

Built from Plan(s)
Estimated Cost
I used wood I got free off CL, so only the bolts were paid for and that was around $10
Estimated Time Investment
Day Project (6-9 Hours)
Finish Used
polyurethane
Recommended Skill Level
Beginner

Children's Toy box

Submitted by jjunge08 on Sun, 03/18/2018 - 14:03

My wife and I are expecting our first child so I wanted to make a toybox for his toys.  I liked the plan that i found on this website since the front piece had the cutout to reduce fingers getting pinched.  I also added some spring assisted hinges to make help the lid stay up and also close a little softer than just regular hinges.  

Built from Plan(s)
Estimated Cost
Total cost for lumber is about $50-70
Hinges and Spring Hinges - $15
Estimated Time Investment
Weekend Project (10-20 Hours)
Finish Used
Painted
Recommended Skill Level
Beginner

Farmhouse Dinner Table

Farmhouse Table Plans. 8ft long, Antique Walnut Stain. Absolutely adore!

Estimated Cost
$75
Estimated Time Investment
Weekend Project (10-20 Hours)
Finish Used
Antique Walnut
Recommended Skill Level
Starter Project

Comments

Rachel Horschler (not verified)

Mon, 12/10/2012 - 10:11

Thanks for posting the pictures!! This is really close to what I had in mind!

Wood Chaise Lounge from $35 plans

Submitted by gr_blake on Sat, 08/03/2013 - 07:22

My wonderful husband helped me with this project. This was our first project from Ana White plans. This took us longer than we anticipated but I think it was due to the finish and dry time of each layer. We plan on making a second one to give us a set. I added a decorative knob on the back piece to hang a towel from or bag. This was so much fun, a huge money saver and now a one of a kind piece. Thank Ana your site is amazing.

Estimated Cost
$40
Estimated Time Investment
Week Long Project (20 Hours or More)
Finish Used
Distressed Turquoise, Gunstock Stain also from Ana White post. Embellished with a decorative knob to hang a towel, bag etc
Recommended Skill Level
Beginner

Comments

kitchen Island

Saw this table and wanted to put it in my kitchen, looks great.

Built from Plan(s)
Estimated Cost
$100.00
Estimated Time Investment
Weekend Project (10-20 Hours)
Finish Used
Min wax clear acrylic, latex paint from Lowes. color (moss) Rubbed some brown glazing over the green before putting on the clear coat.
Recommended Skill Level
Beginner

Comments

Farm House Table

I built the table and bench with the plans on this site and it turned out great.  My finace stained the top with a miniwax stain and spray painted the bases white and distressed them.  Also applied polyurethane to the stained tops.  Probably have $100 invested in this project.

Estimated Cost
$100
Estimated Time Investment
Afternoon Project (3-6 Hours)
Recommended Skill Level
Beginner

Coffee Mug Rack

Submitted by KSOlene01 on Sun, 04/24/2022 - 09:52

We had too many disorganized coffee mugs and needed a better storage solution. I took a couple of old cassette (remember those?) storage crates, did a chevron style back from old pallet wood, added shelves from the former dividers, and added a lot of clear coat. It functions well for us and was completely upcycled materials.

by Kevin

Library Book Cart!

Submitted by vpihoney on Mon, 06/27/2011 - 07:14

I built the library book cart to organize all my toddler and preschooler's books. What we were using just wasn't cutting it; the books end up being scattered everywhere. I love the idea of a pretend library cart (I used to work in one...), and the kids can feel like they have the library in their room! They're playing "library" as I type!

This was an easy build. I used 1 1/4" screws for the 2-in castor wheels for 3 out of 4 screws per castor where I had enough depth. I also used wood glue. For the 4th screw per castor, I used 1/2" screws. This was mainly due to being all I had on hand...not sure if it was correct. We'll see if the wheels hold up with the weight of all the books! Other than those changes, I followed Ana's plans.

Oh, and I managed to create handles without really knowing what I was doing! They turned out OK. I tried two different methods for each handle, but basically used a drill, chisel, and jigsaw and then sanded, sanded, sanded after I made the cut. I think I can do better next time!

Built from Plan(s)
Estimated Cost
30
Estimated Time Investment
Afternoon Project (3-6 Hours)
Finish Used
I used a spray primer in white and then painted a leftover semi-gloss finish in an eggshell color using a roller and paint brush.
Recommended Skill Level
Starter Project

Comments

tonjacoy101

Mon, 06/27/2011 - 09:13

Your library cart looks great! Good Job. My daughter loves playing with hers too, and the best part is how easy they are to put away :)

Girl's Playhouse Loft Bed

Submitted by Lthomas on Mon, 08/05/2013 - 11:23

When I saw this bed plan, I knew it was a must have for my 4-yr old daughter. It was a fairly easy build as long as you have the right tools (ie Kreg Jig). Due to the size of the finished product, I built the 5 sides out in the garage, put one coat of paint on everything, and then carried them into the bedroom for assembly. I then put on a second coat of paint. Needless to say painting this bed was tedious, and if I had to do things over, I would consider a power sprayer and at least priming the entire thing before final assembly. I went with the toy boxes in the steps per Ana's plan and it is perfect for all of my daughter's "babies". We found some wall stickers at Target that fit our theme perfectly and added them to the bed. She loves it!! Thanks Ana for the plans!

Estimated Cost
$600
Estimated Time Investment
Week Long Project (20 Hours or More)
Recommended Skill Level
Intermediate

Printers Triple Console Sideboard

This was such a fun build!  First time working with plywood - definitely won't be the last.  Really love how it came out.

Built from Plan(s)
Estimated Cost
About $200
Estimated Time Investment
Weekend Project (10-20 Hours)
Finish Used
Early American Stain, polycrylic
Recommended Skill Level
Beginner

Comments

handmadewithash

Wed, 08/26/2015 - 20:56

this looks gorgeous!  Where did you purchase your drawer pulls?  I started this project in November and I hope to finish it before the summer is up! (heh I'm such a procrastinator!)

Blanket Ladder

Submitted by Liz Miller on Sat, 04/14/2018 - 08:10

I've been eyeing blanket ladders in Pottery Barn and other stores for a while. No way was I paying over $200 for one, so I turned to Ana! I had some supplies on hand so this project only took me 20 minutes to make (minus staining) and cost $12! I set the rungs higher up because it's going behind my couch so I left the bottom open. I didn't bother with wood filler for the screws because I was going for rustic and the blankets would be covering it anyways. I used 1 x3's instead of 2 x 4's since I wanted it to be a little thinner. I stained it with Minewax Dark Walnut and used a little water on the wood before I stained to bring the woodgrain out.  I'm going to make a few more as gifts now that I know how easy it is!

Estimated Cost
$12 (I already had stain and screws on hand)
Estimated Time Investment
An Hour or Two (0-2 Hours)
Finish Used
Minewax Dark Walnut. I did use a papertowel to brush some water on it first and let it dry (very very little water) to bring out the wood grain. I also sanded it before staining.
Recommended Skill Level
Starter Project

Comments

Modern Adirondack Chairs

Submitted by Anonymous (not verified) on Sun, 04/24/2022 - 12:05

I made these from your plans thanks for sharing your ideas with us.

by Jeff

Outdoor Sectional

I have wanted an outdoor sectional for our Atrium for a really long time, but I didn't want to spend the thousands on it that Pottery Barn/West Elm Charged. I built the entire sofa for $220, which is less than the cost of one armless piece from west Elm. (To get the pieces that I built from West Elm it would have cost $1116 which includes the extra delivery charge, but not tax or shipping.) I also sewed my own cushions to save a little extra dough (even though I'm a TERRIBLE sewer) for aprox $29 a cushion. (Their cushions are $59 a piece!) I also used leftover stain and poly that we had from some window trim we had freshened up a few weeks prior. So, total, I saved myself about $1000!

I mention that this project is probably a week long project, but that is only because there are so many pieces. In reality, I probably made one part of the sectional per day, including all of the sanding, staining, and poly.

I'm so proud to have such a beautiful piece to lounge around on and entertain this summer while still keeping a budget!

Estimated Cost
$220 for Sofa, $115 for the cushions
Estimated Time Investment
Week Long Project (20 Hours or More)
Finish Used
Varathane Gel Stain in Dark Walnut plus Varathane Premium Spar Urethane as the sealer.
Recommended Skill Level
Beginner

Comments

britskie

Thu, 07/07/2011 - 23:51

This is just beautiful. I love how you used pillows for the backs instead of matching cushions. I've been planning on building this for over a month now. I think I'm definitely going to use your cute pillow idea.

Awesome job!

LGmontana

Wed, 09/17/2014 - 19:37

Hi, love the look of this! The links to the plans seem to be broken or missing... Any chance you could repost the plans?

Thanks!

Shanty Console turns Wine Cabinet

Submitted by lscrandall on Tue, 08/06/2013 - 20:53

Happy Tuesday everyone! Today I am going to share a project with you that I built with the help of some plans from Ana-White.com.In a weekend we carved out a custom wine cabinet we will be donating to a local children’s charity here in St Peter’s, MO. This lovely cabinet was created from the SHANTY OPEN SHELF CONSOLE, which was designed for the Shanty sisters at Shanty-2-Chic blog site. We altered the plan to make it a wine cabinet which came out spectacular! Ana, thank's again for providing your free plans. I will be happy to upload the altered plans in a couple days so you can all enjoy them! Happy wood working!

Built from Plan(s)
Estimated Cost
$175.00
Estimated Time Investment
Weekend Project (10-20 Hours)
Finish Used
Anne Sloan Old Ocher chalk pain and wax set clear/brown
Recommended Skill Level
Intermediate

Comments

JLDunlap

Wed, 08/07/2013 - 14:43

Thinking this would make a great Christmas Gift idea for quite a few of my friends! Can't wait for the altered plans!

Cody9691

Sun, 08/18/2013 - 08:46

Looks great! Any idea when the altered plans will be available? Itching to get this built for my SO.

Joeboxer1013

Tue, 08/27/2013 - 13:51

I'm adding this to the top of my build list as soon as the modified plans are uploaded! Thanks for taking the time to add them.

lscrandall

Wed, 08/28/2013 - 17:10

Wine Console Altered Plans

Sorry it took me so long, our blog over at Hello...I Live Here has kept us busy with all our new visitors. But as promised here are the altered plans to help you make the wine bottle holder and stemware holder.

MAKING THE WINE BOTTLE HOLDER:

Start your project with Ana White's plans. Finish the whole thing, but only make one door. Leave the other side open and alter as follows to get your wine holders:

1. First cut 3 additional shelves 17 5/8" wide. Make sure you Kreg 3/4" holes on the right and left side of the shelves, connect to the sides with 1 1/4" PH (pocket hole screws - Kreg).

2. We spaced each of our shelves 3 1/2" apart, allowing 12 bottles to be stored in the wine case.

3. Cut in half length wise a 1x2 board. This will give you a horizontal stringer about .75" wide.

4. We customized the top shelf board to fit the distance - we did not want the board to hang down interfering with the wine storage. We trimmed this board to 3/4" to match the shelf thickness. Then glued and nailed into place.

5. Once the top board is in place, measure the distance from the bottom shelf to the top shelf to just under the top shelf board from step 4. With a pencil mark the stringer and cut to size, and install with glue and nails. This step needs to be completed 3 times 3 1/2" apart from each other. You should now have 12 square boxes making your wine storage.

6. On each shelf behind the three stringers, we placed a divider to keep the bottles from hitting one another. Each divider is 1/2" square, and 11 1/4 long, to match the shelf depth.

MAKING THE WINE STEM HOLDERS:

Now that you are done building the box for the wine holder, we can move on to the stemware holder.

1. We purchased .25 x 1.5" x 36" poplar flat wood. This will make the bottom of the T's and L's stem ware holders.

2. Then we used 1/2" square pieces of poplar to make the L and T mounts. Mount the flat poplar to the 1/2" squares making 2 L shaped pieces for the Right and Left side of the unit, then make 3 T's for the centers. You will use glue, and clamp them down tight, then nail together.

3. Hang each L shape on the Left and Right Side of the unit with finish nails. The next part is kind of trick and depends on the size of the stem bottom you will be hanging not all base bottoms are the same. Once your L's are hung, take the stem wear you will be hanging and rest it into the L shape holding the glass (do not let go of the glass it will break if dropped). Then position the T shaped molding to accommodate your stemware. Move the glass in and out of the L and T until you get your desired width for your stemware. Mark the T you are holding with a pencil , carefully sit down the stemware and mount the T shaped holder. Continue until all 3 of the T's are hung ( we used glue and nails to complete this process).

We used a bead-board backer instead of plywood to give it that French country feel.

We hope these plans help you build a piece you love! This piece of furniture brought the charity we donated it to $500 extra dollars to help their children. We at Hello...I Live Here were very proud of the job we did and that we got to help some wonderful children!

Visit us at www.helloilivehere.com or stop by our Facebook page and give us a big like once you complete your project!

Happy building ;-)
- LC

Joeboxer1013

Thu, 08/29/2013 - 13:01

Thanks so much for posting the plans! My sister has been asking me to make this for her since she saw the pics a couple of weeks ago.

Side note: I'm from St. Louis, MO, so seeing you were from St. Charles caught my eye!

Treehouse for a sweet little boy!

Submitted by hyounger11 on Sun, 08/30/2015 - 06:05

If you are wondering if you can do this, I just learned to use a saw a week ago! So... YES, you can! =)

Took me all weekend to do the cutting and building. Was able to do everything alone except final assembly. I just didn't have enough hands.

Feel free to ask any questions. Also, take a look at my site for custom signs!! =)

www.heathersvinylcreations.com


Built from Plan(s)
Estimated Cost
$300.00
Estimated Time Investment
Weekend Project (10-20 Hours)
Recommended Skill Level
Intermediate

Comments

Simple Bar Stools

I used Ana's idea for the plan, but modified it slightly to stand up to my wrecking crew (aks the kiddos). I posted a step by step plan with photos on my blog if you want to use the information for yourself.

Estimated Time Investment
An Hour or Two (0-2 Hours)
Finish Used
Walnut stain and three coats of poly
Recommended Skill Level
Beginner

Comments

jsle_bel

Tue, 07/05/2011 - 08:26

I tried posting on your blog but for some reason it wouldn’t allow me.

Okay, I seriously LOVE them! I'm in the process of making my own pub table for outside entertaining and was considering altering Ana's stool plans....now no need to! Thanks for posting, I'll just need to lengthen the legs a little and for that reason reinforce it a bit to make them sturdy (I've got three boys and a daughter that can be a rough as the boys). Thanks again and I'll be back to check out future posts. Check me out at: http://laundrywillwait.blogspot.com/

~Jen

Farmhouse bed

Thanks for the plans Ana! We love our new bed.

Built from Plan(s)
Recommended Skill Level
Beginner

Comments

wjc129

Mon, 09/09/2013 - 11:16

Your bed looks like I am imagining mine will, minus possibly distressing it. I do have a question for you ... how did you attach the side rail to the footboard? I have gone through every brag post and only one of the posts had a photo of the connection to the footboard (they used brackets).

Tall Corner Media Console-Barn Door Twist

Submitted by dcraible on Wed, 09/02/2015 - 09:46

This project was modified from the original plan in that it is not as tall, the shelving was configured differently as well as the doors. I wanted a sophisticated yet rustic appeal to it. Thus, I made vertical long doors with a barn door design. 

Built from Plan(s)
Estimated Cost
$200.00
Estimated Time Investment
Week Long Project (20 Hours or More)
Finish Used
Rustoleum Driftwood Stain with a water based satin polyurethane. This project has 2 coats of stain and 3 coats of poly.
Recommended Skill Level
Intermediate

Comments