Community Brag Posts
Retirement Gift Man Crate
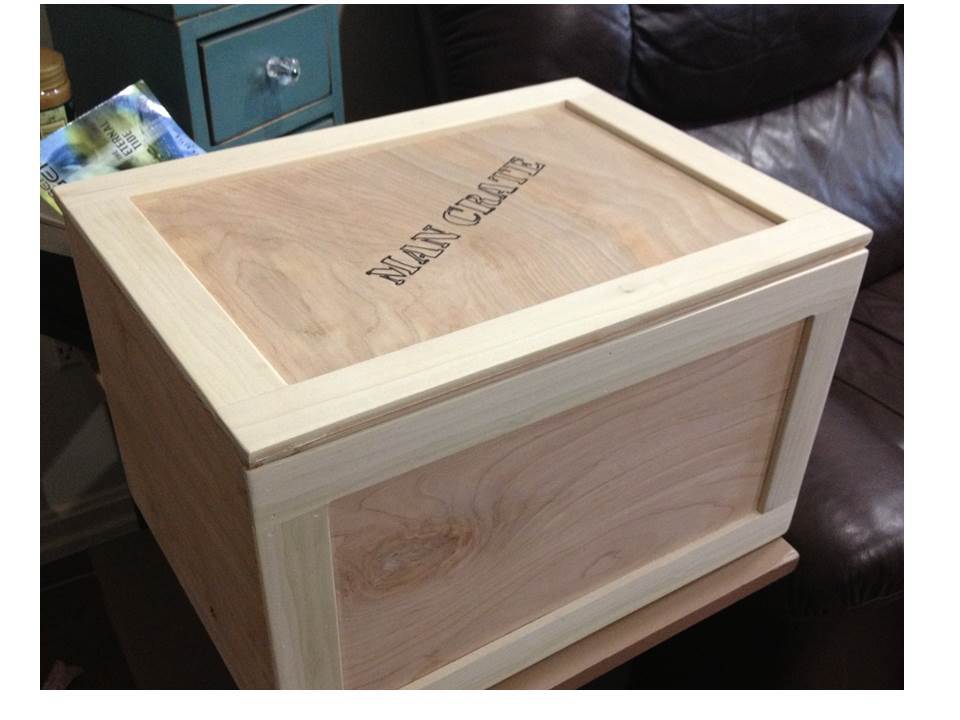
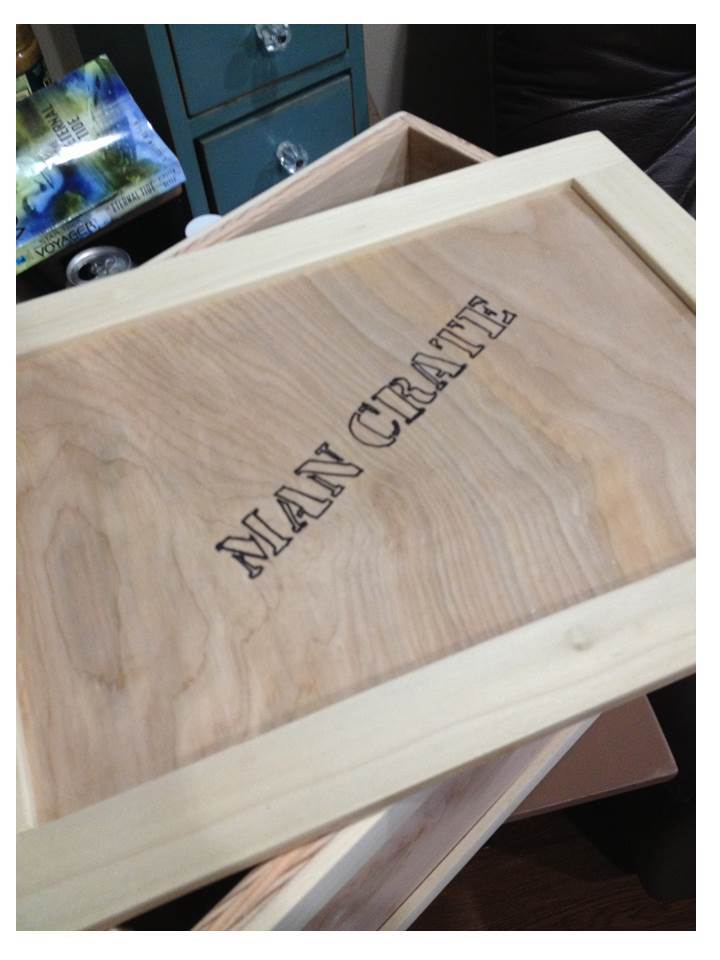
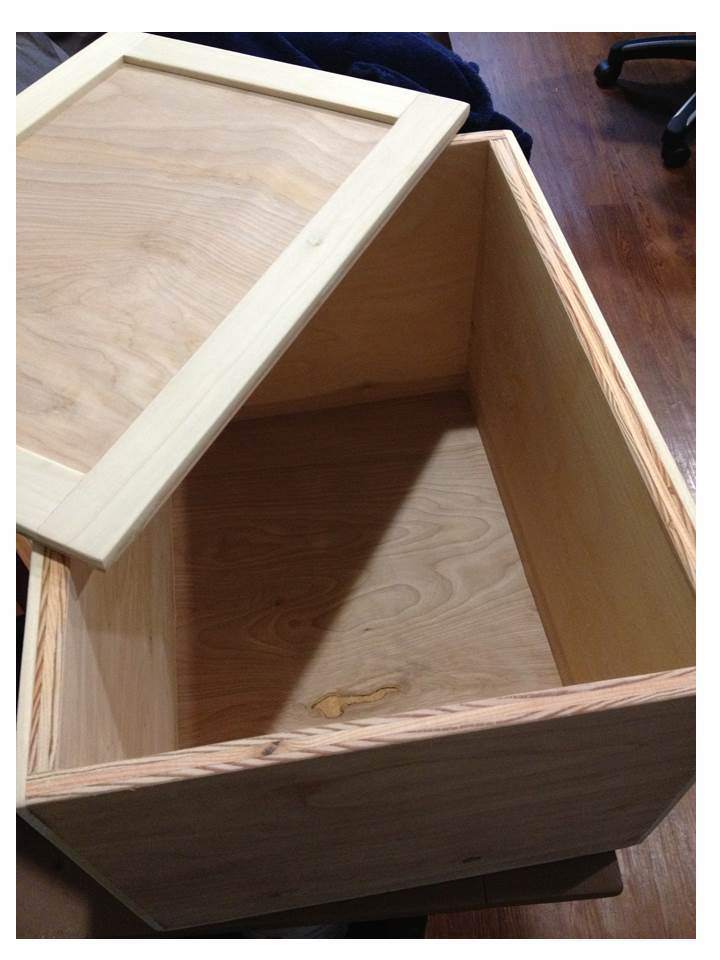
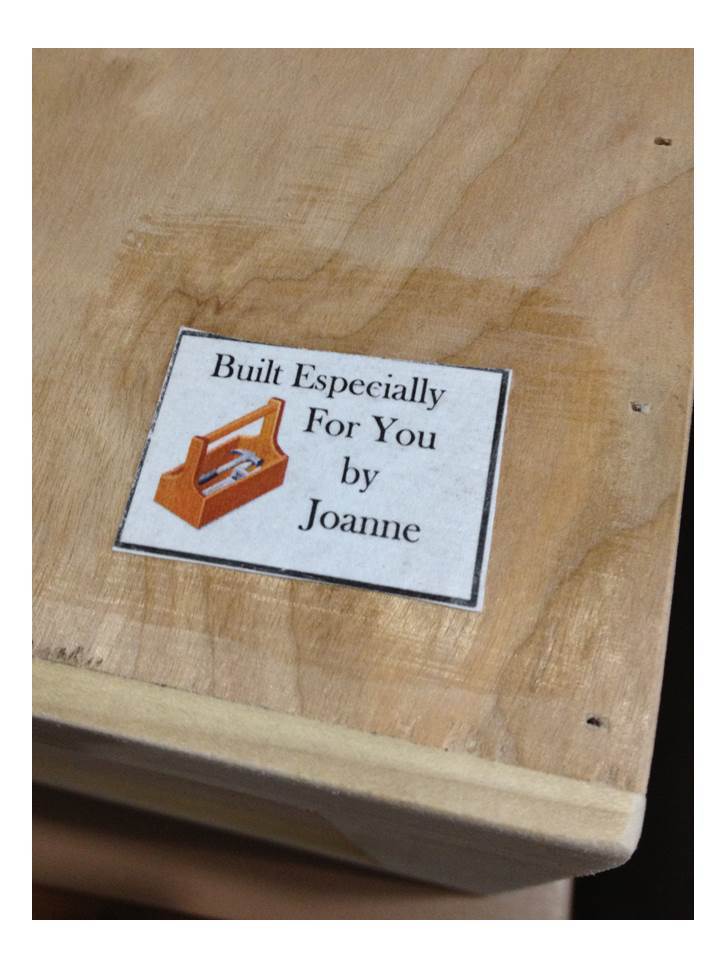
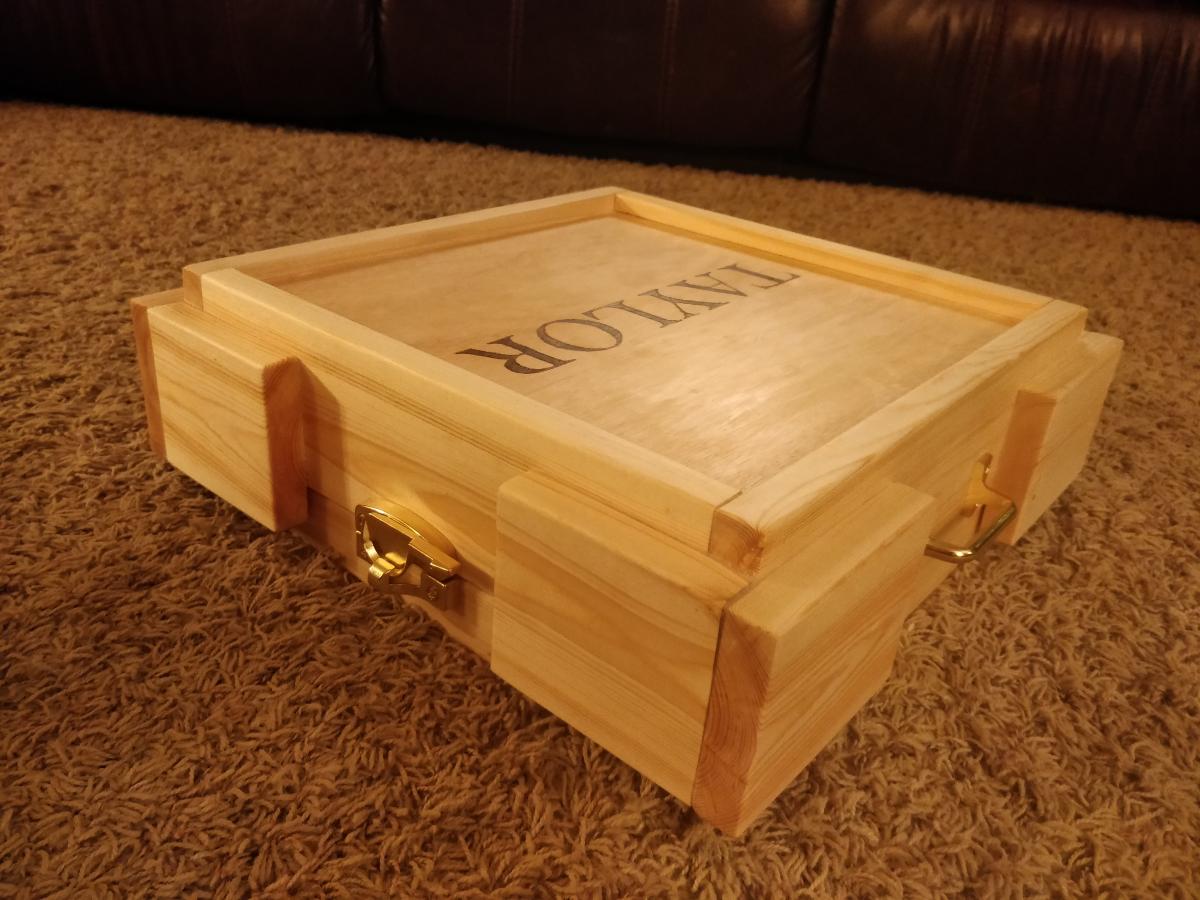
This man crate is a gift for a co worker who is retiring. We'll put all his keepsake gifts in here and he'll have to open it with a crowbar. :) The dimensions on this were adjusted to the size of 17" long, 12" wide, and 10 3/4" high (about the size of a case of copier paper). It is made with 1/2" birch plywood and poplar craft boards. I chose to use the hardwood plywood since I found out folks would be signing it, and it's much easier to write on this with a ballpoint pen than on regular plywood. Plus, less sanding for me to do ! ;)
To keep it from being so heavy when it's filled, I substituted 1/4" plywood for the top and bottom, and left the trim off of the ends. I arranged the pieces so the trim on the front & back covered the cut ends of the 1/2" plywood.
The lettering was traced on (it's "Stencil" font, in 105 pt size, printed from Powerpoint) using a ballpoint pen to dent the surface, then a black Sharpie pen to outline. Hubby thought it looked nice just with the letters in outline, and that's shown in the picture.
Also on this one, I made a little gift tag with some clip-art, and mod-podge'd it to the bottom.
Built from Plan(s)
Estimated Cost
$35 for hardwood plywood and poplar trim boards
Estimated Time Investment
An Hour or Two (0-2 Hours)
Finish Used
Unfinished - left it this way to make it easier for folks to sign the crate.
Recommended Skill Level
Starter Project
Comments

Tue, 11/19/2013 - 16:03
Man Crate was a hit!
The man crate was a big hit at the retirement party! I think we're starting a tradition ;) We had his wife stash the crowbar, and when it was time for him to open it, we asked, "does anyone have a crowbar?" - and then his wife said, "Here you go!" and pulls one out of her shoulder bag! It was a hoot! :)
tv stand and side tables (night tables)
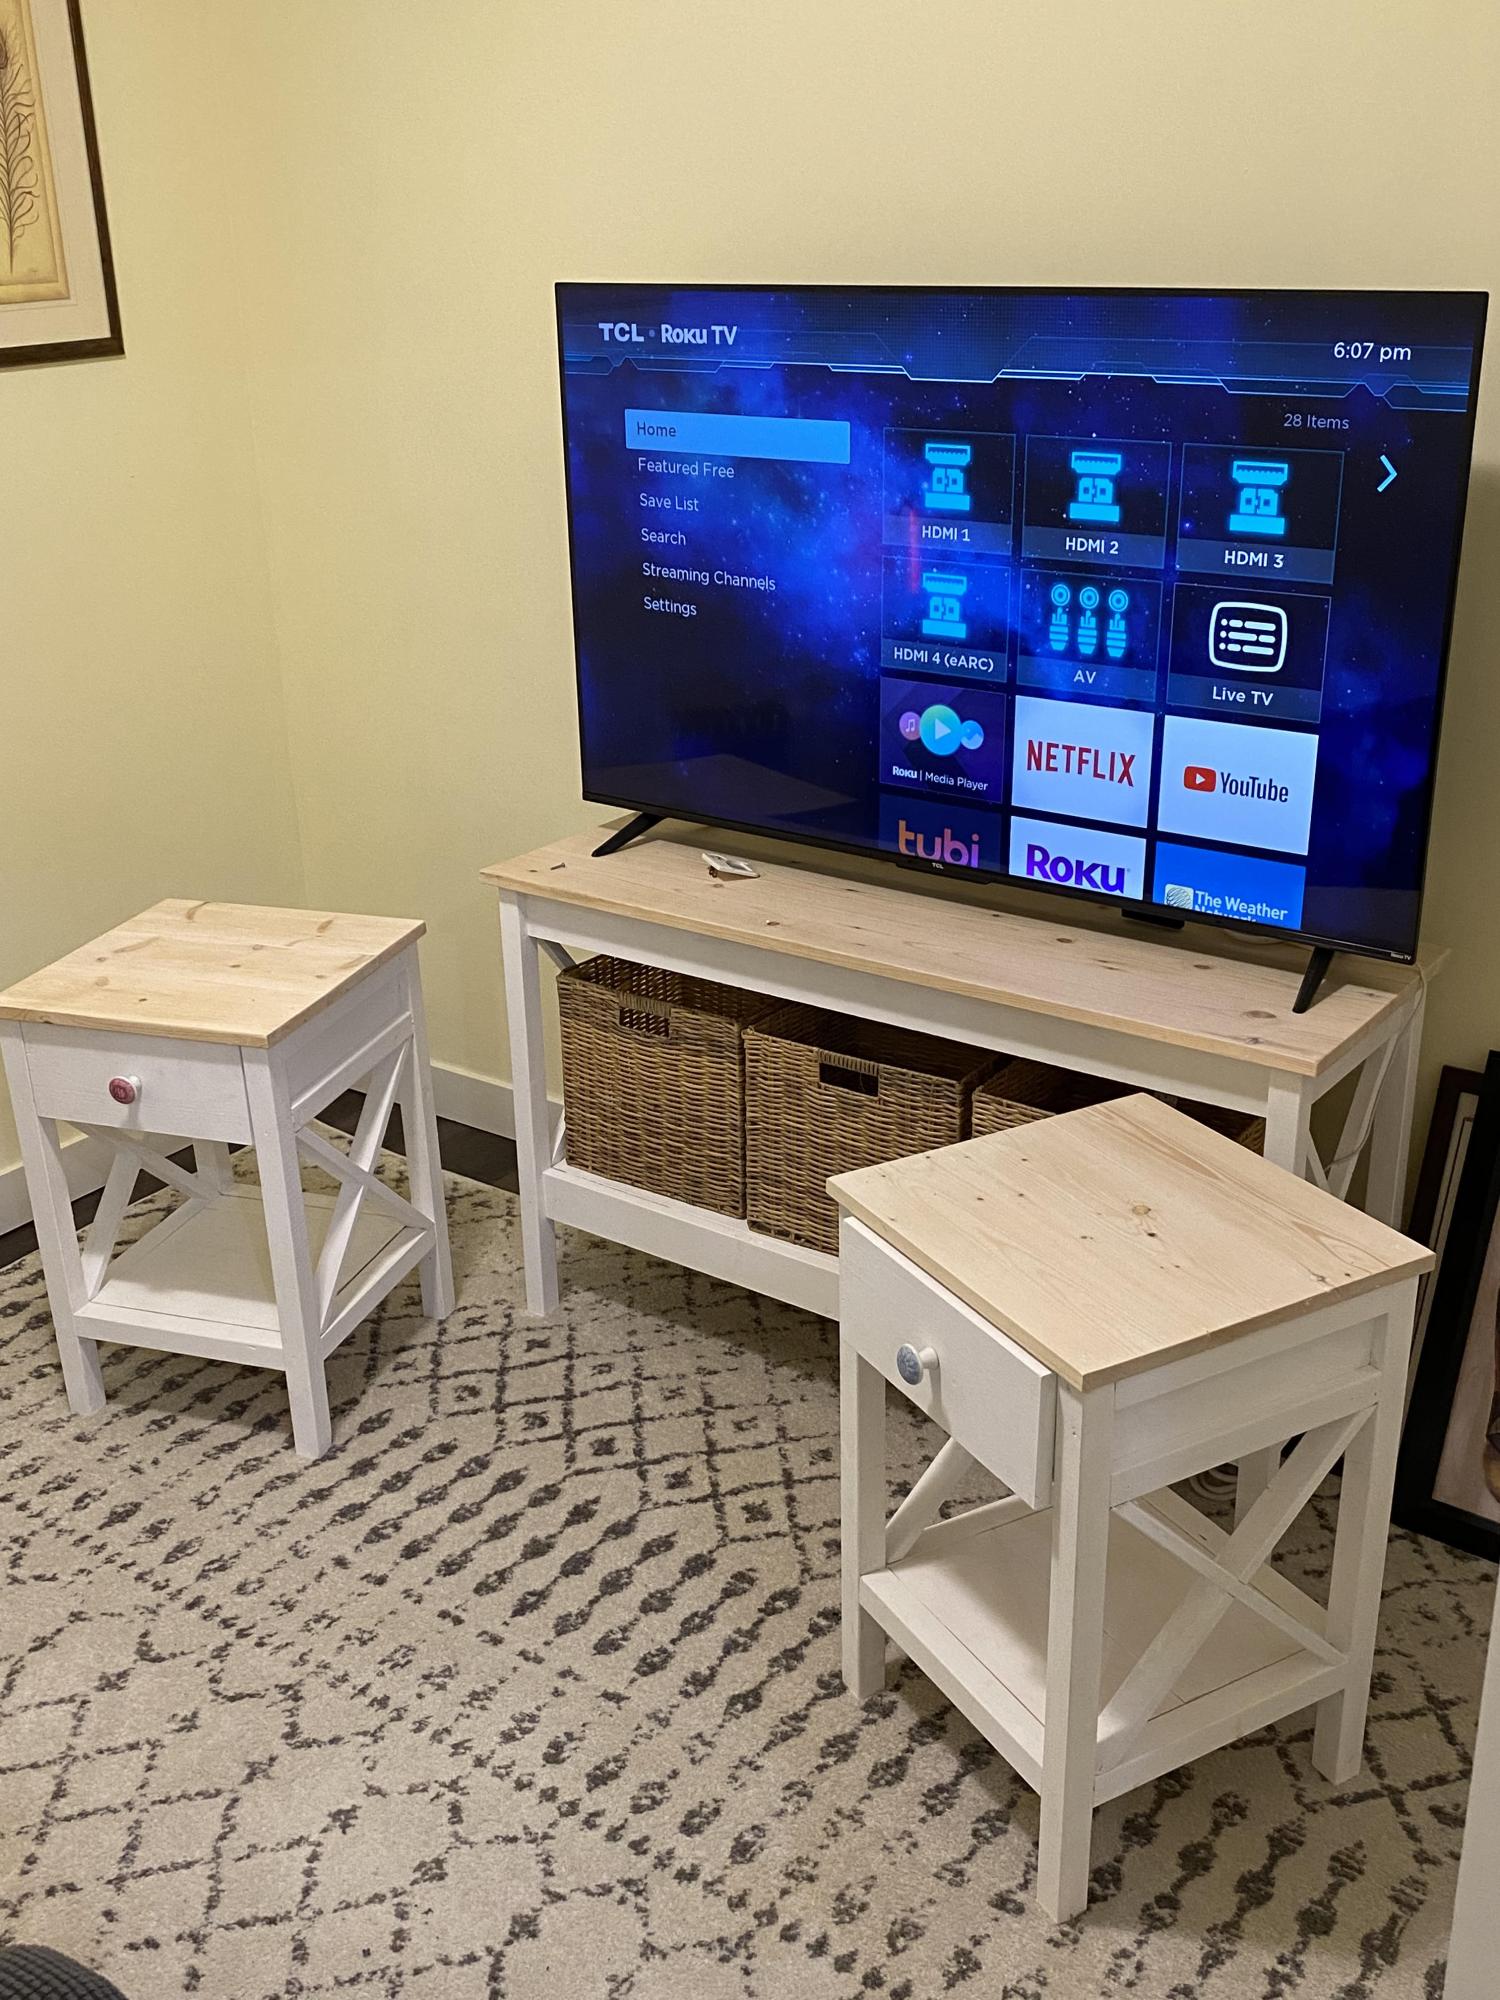
I needed some furniture for a summer tv room ( cooler downstairs) I was making. These sidetables and tv stand are loosely based off Ana's work.
Built from Plan(s)
Comments
Marlee's Kitchen "Just Like Grammie's"
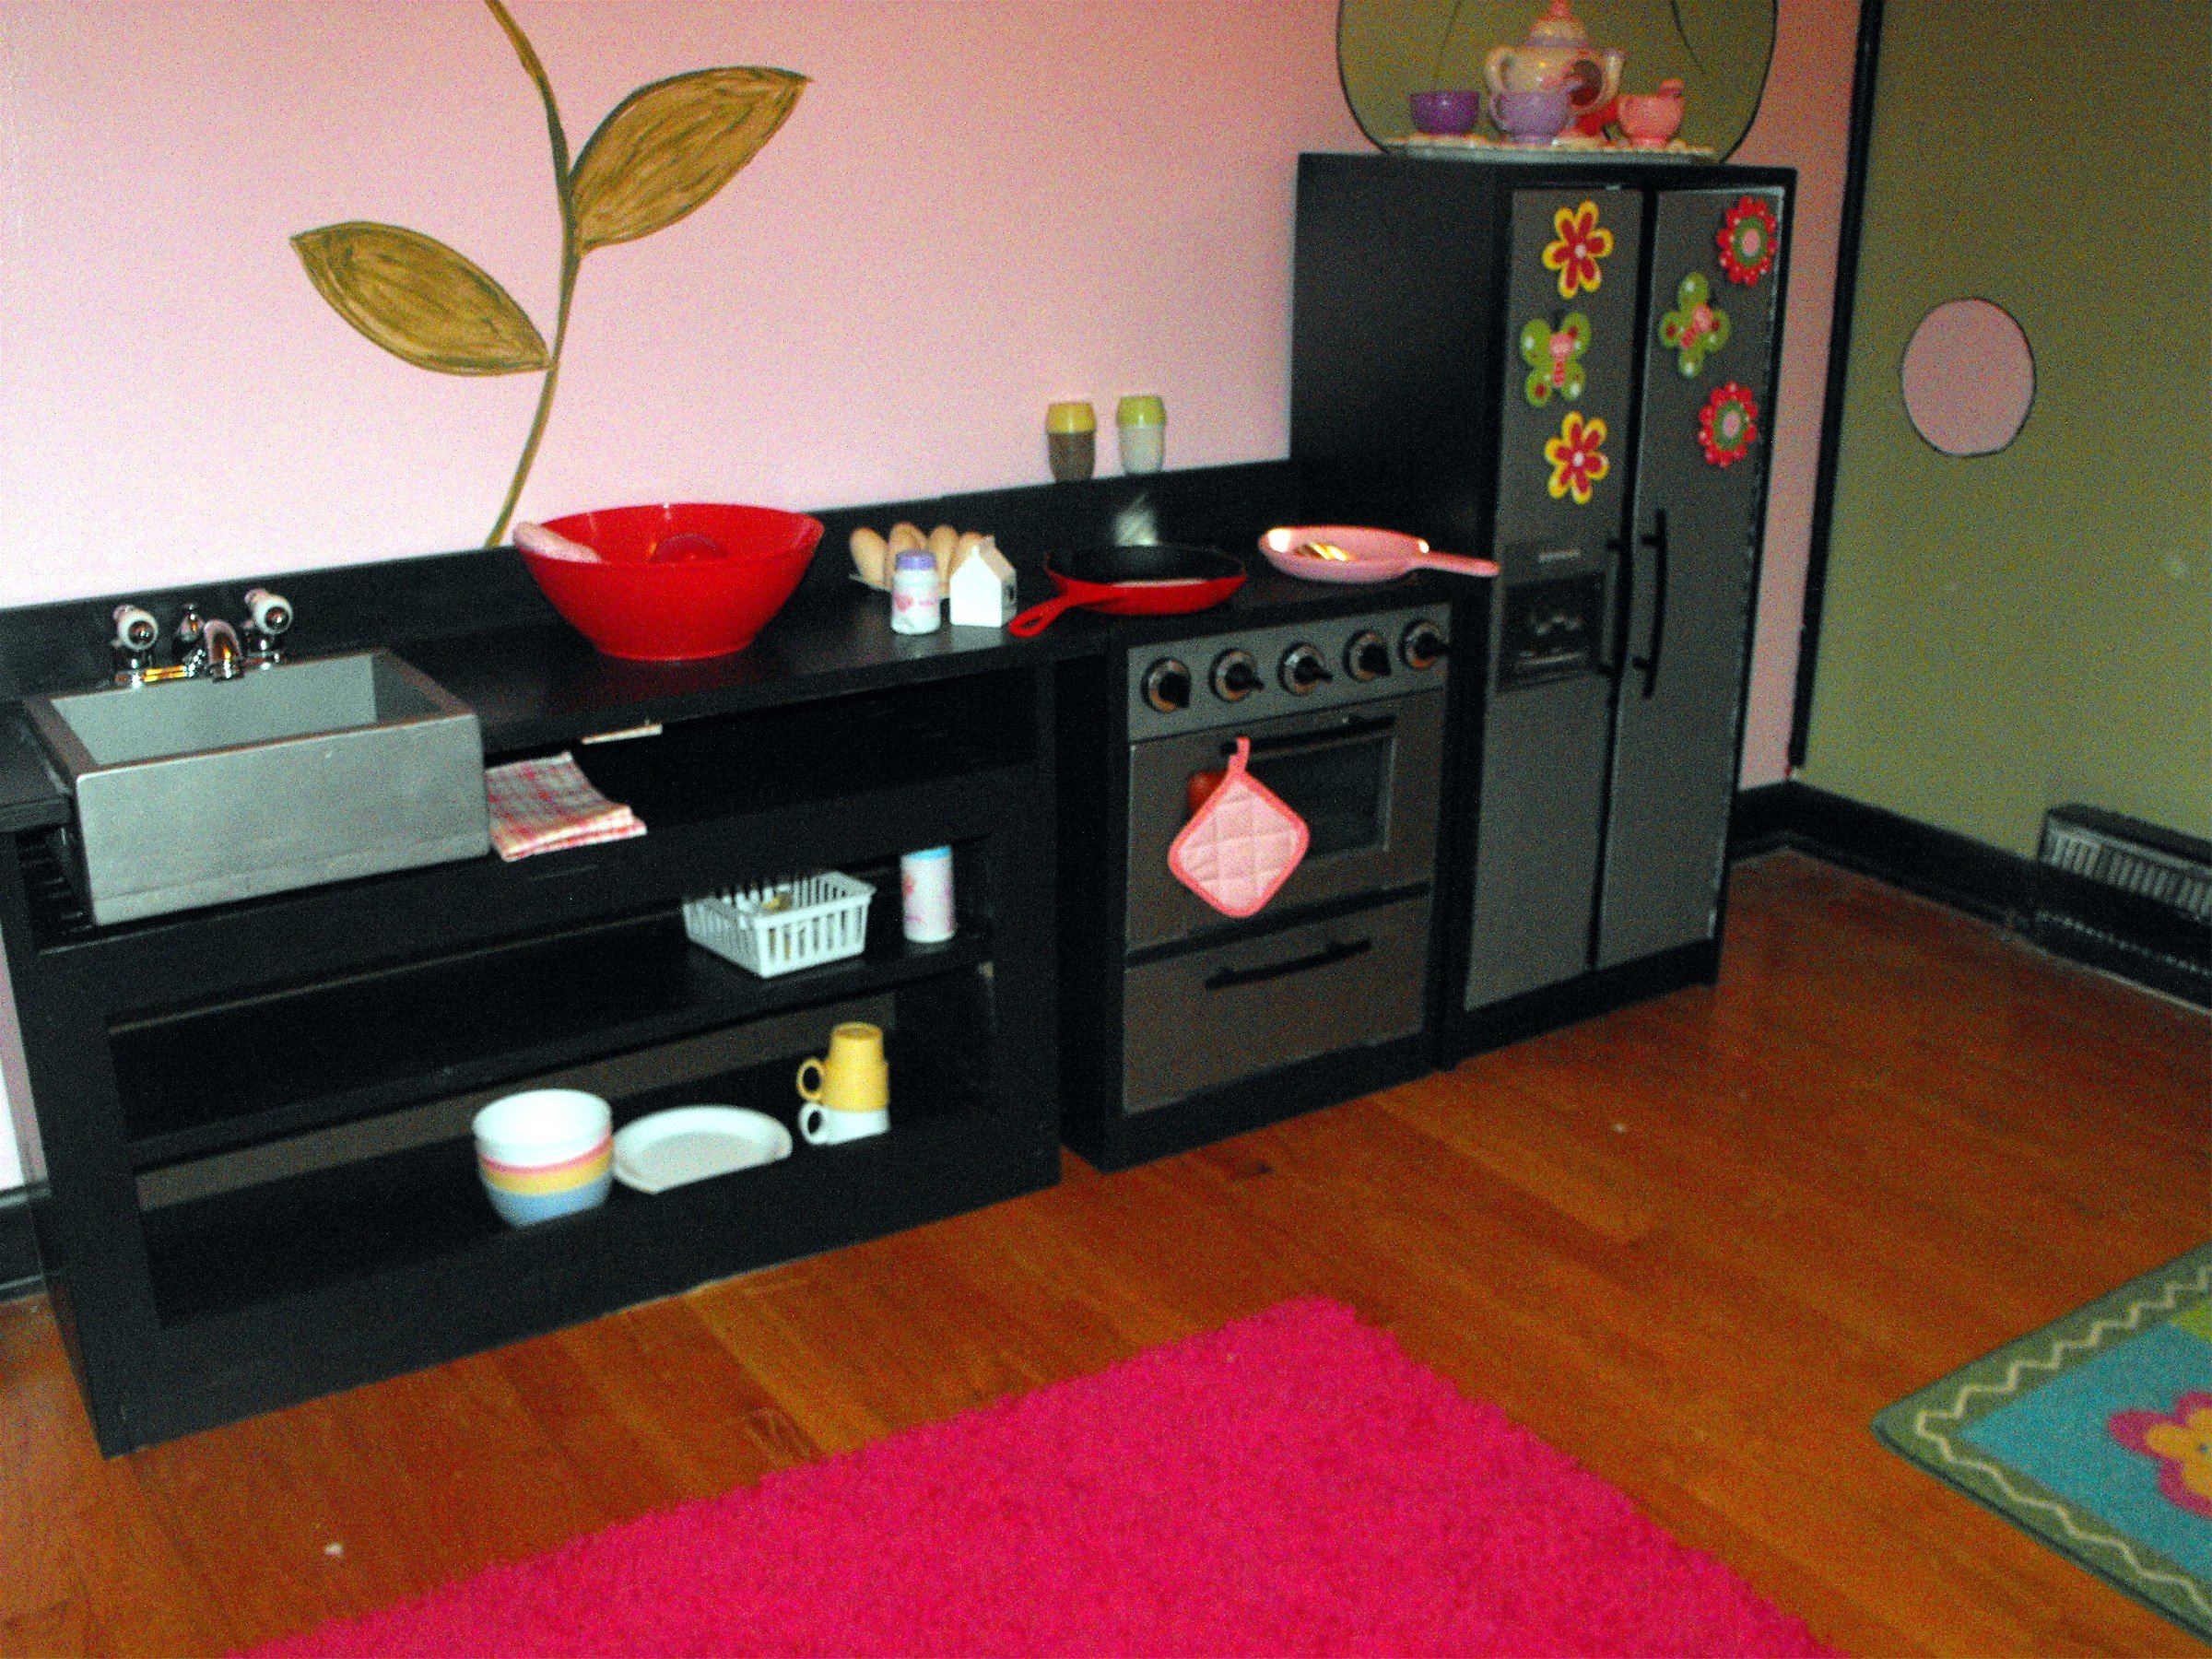
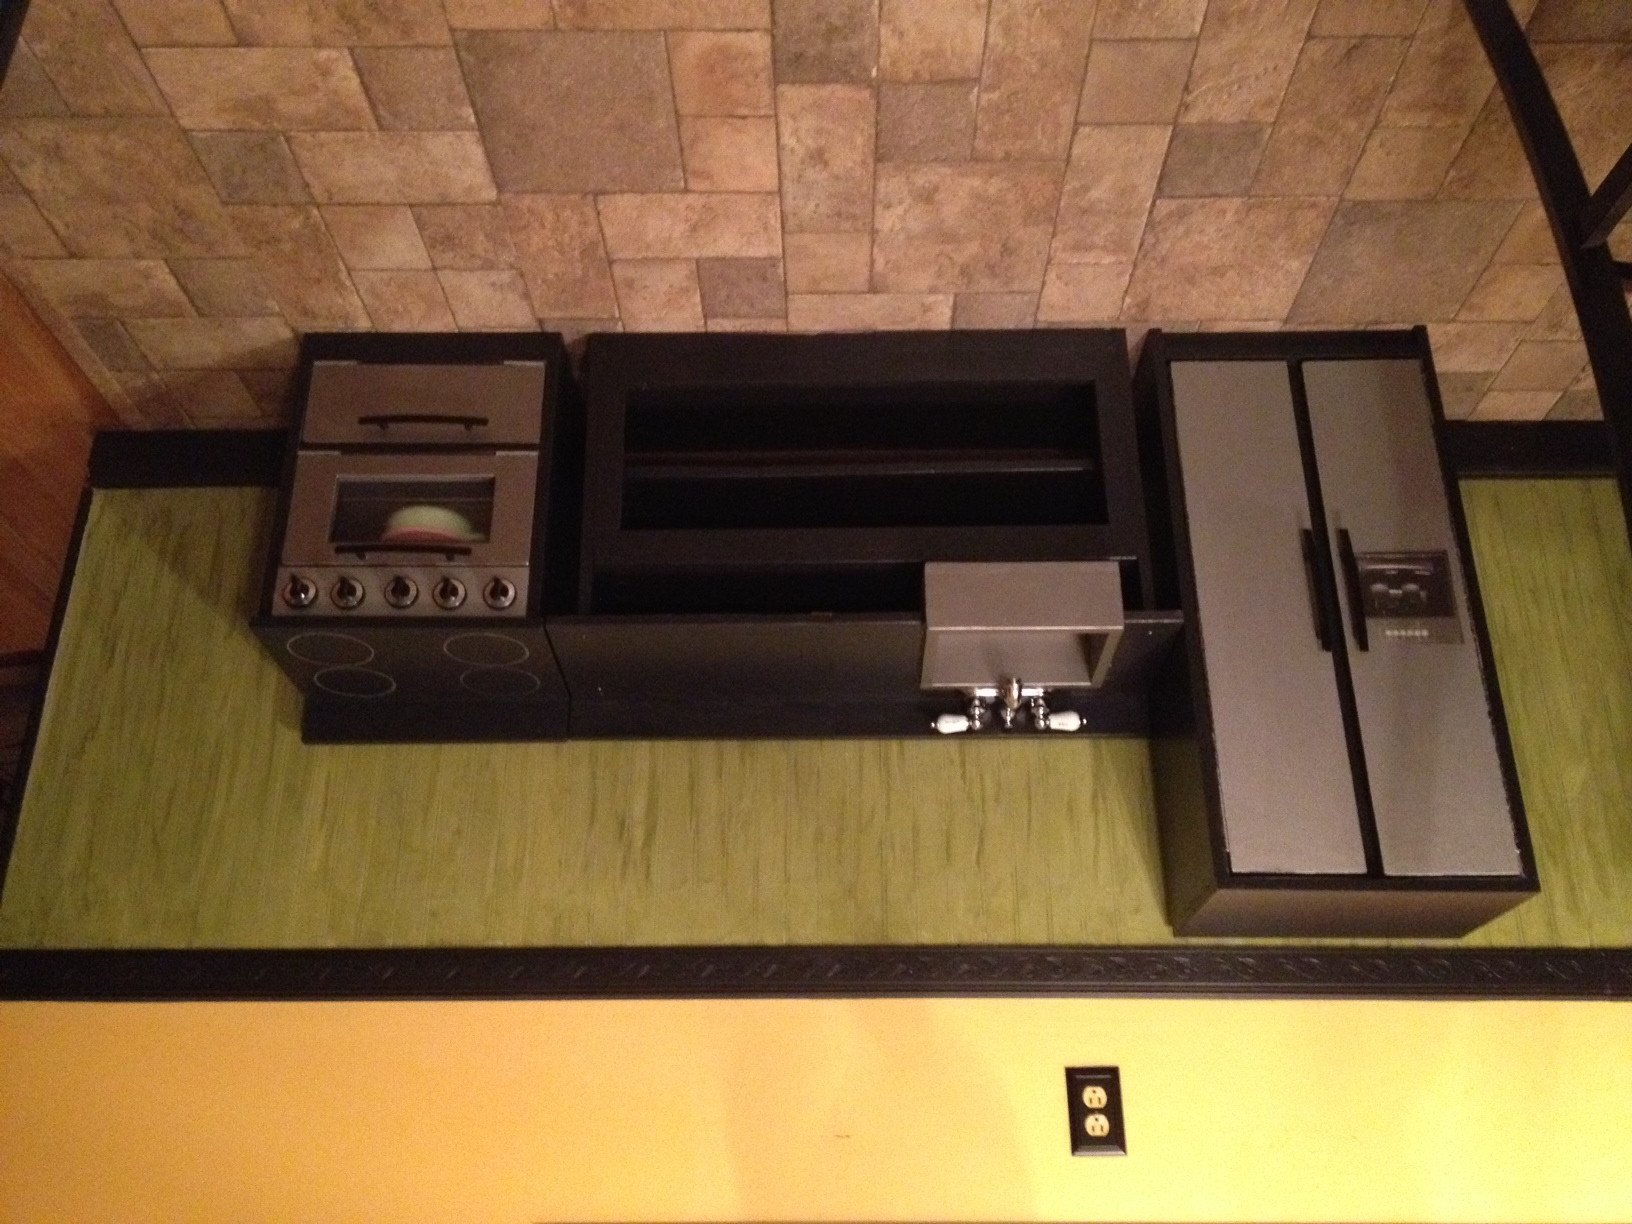
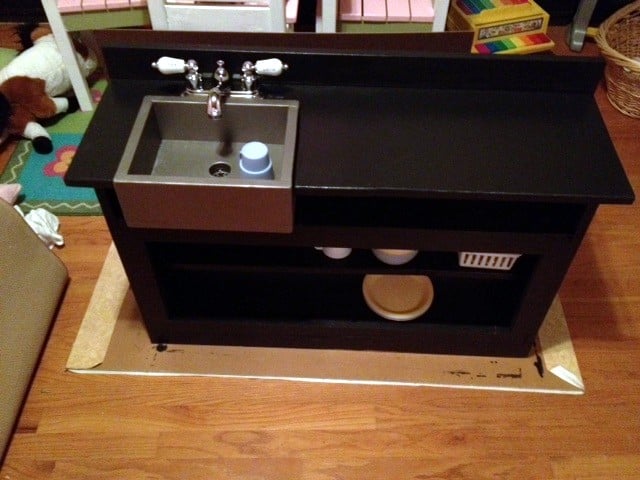
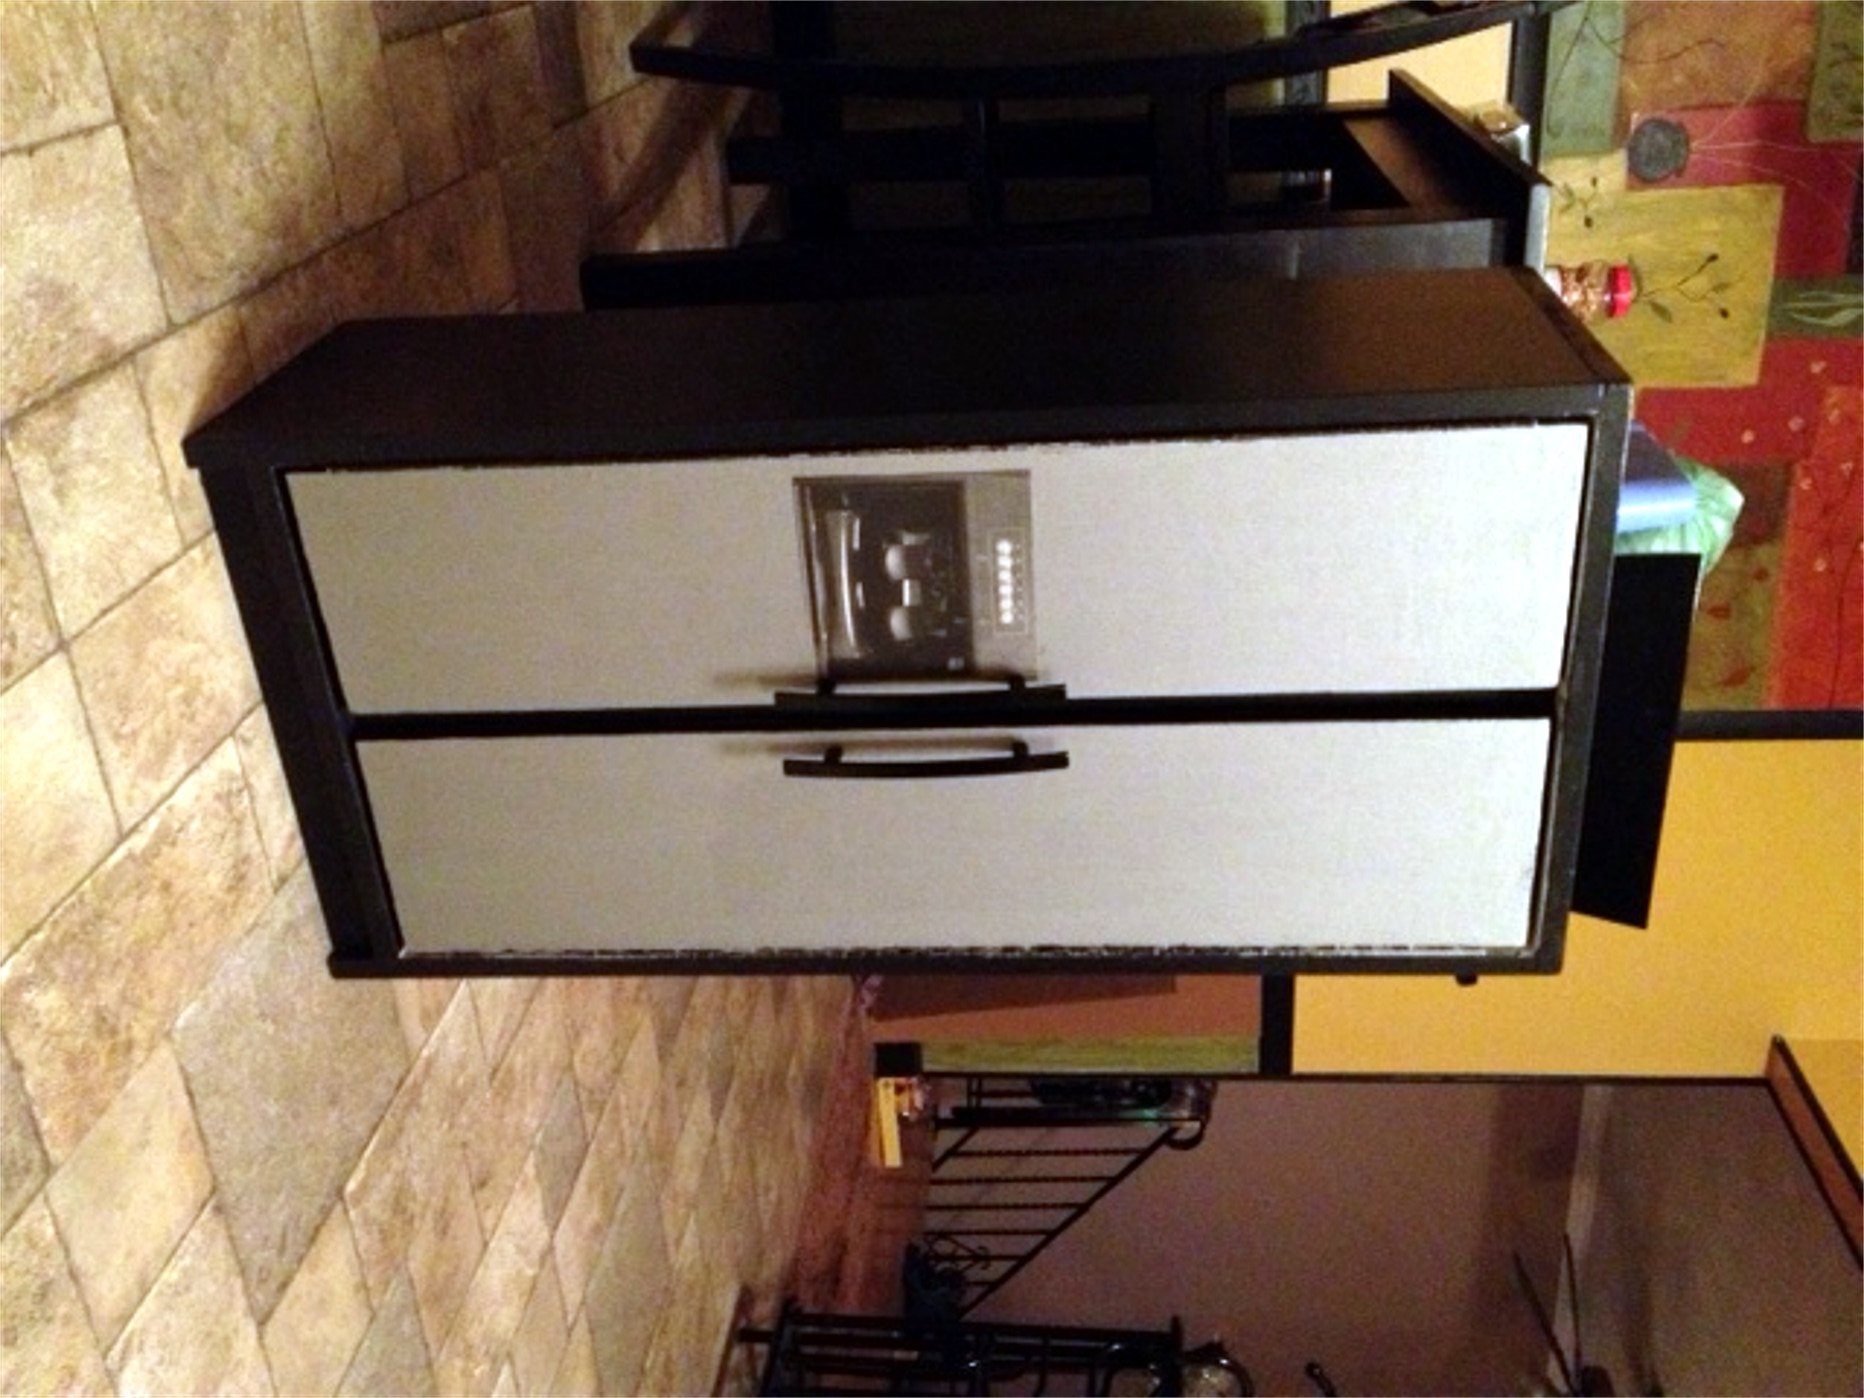
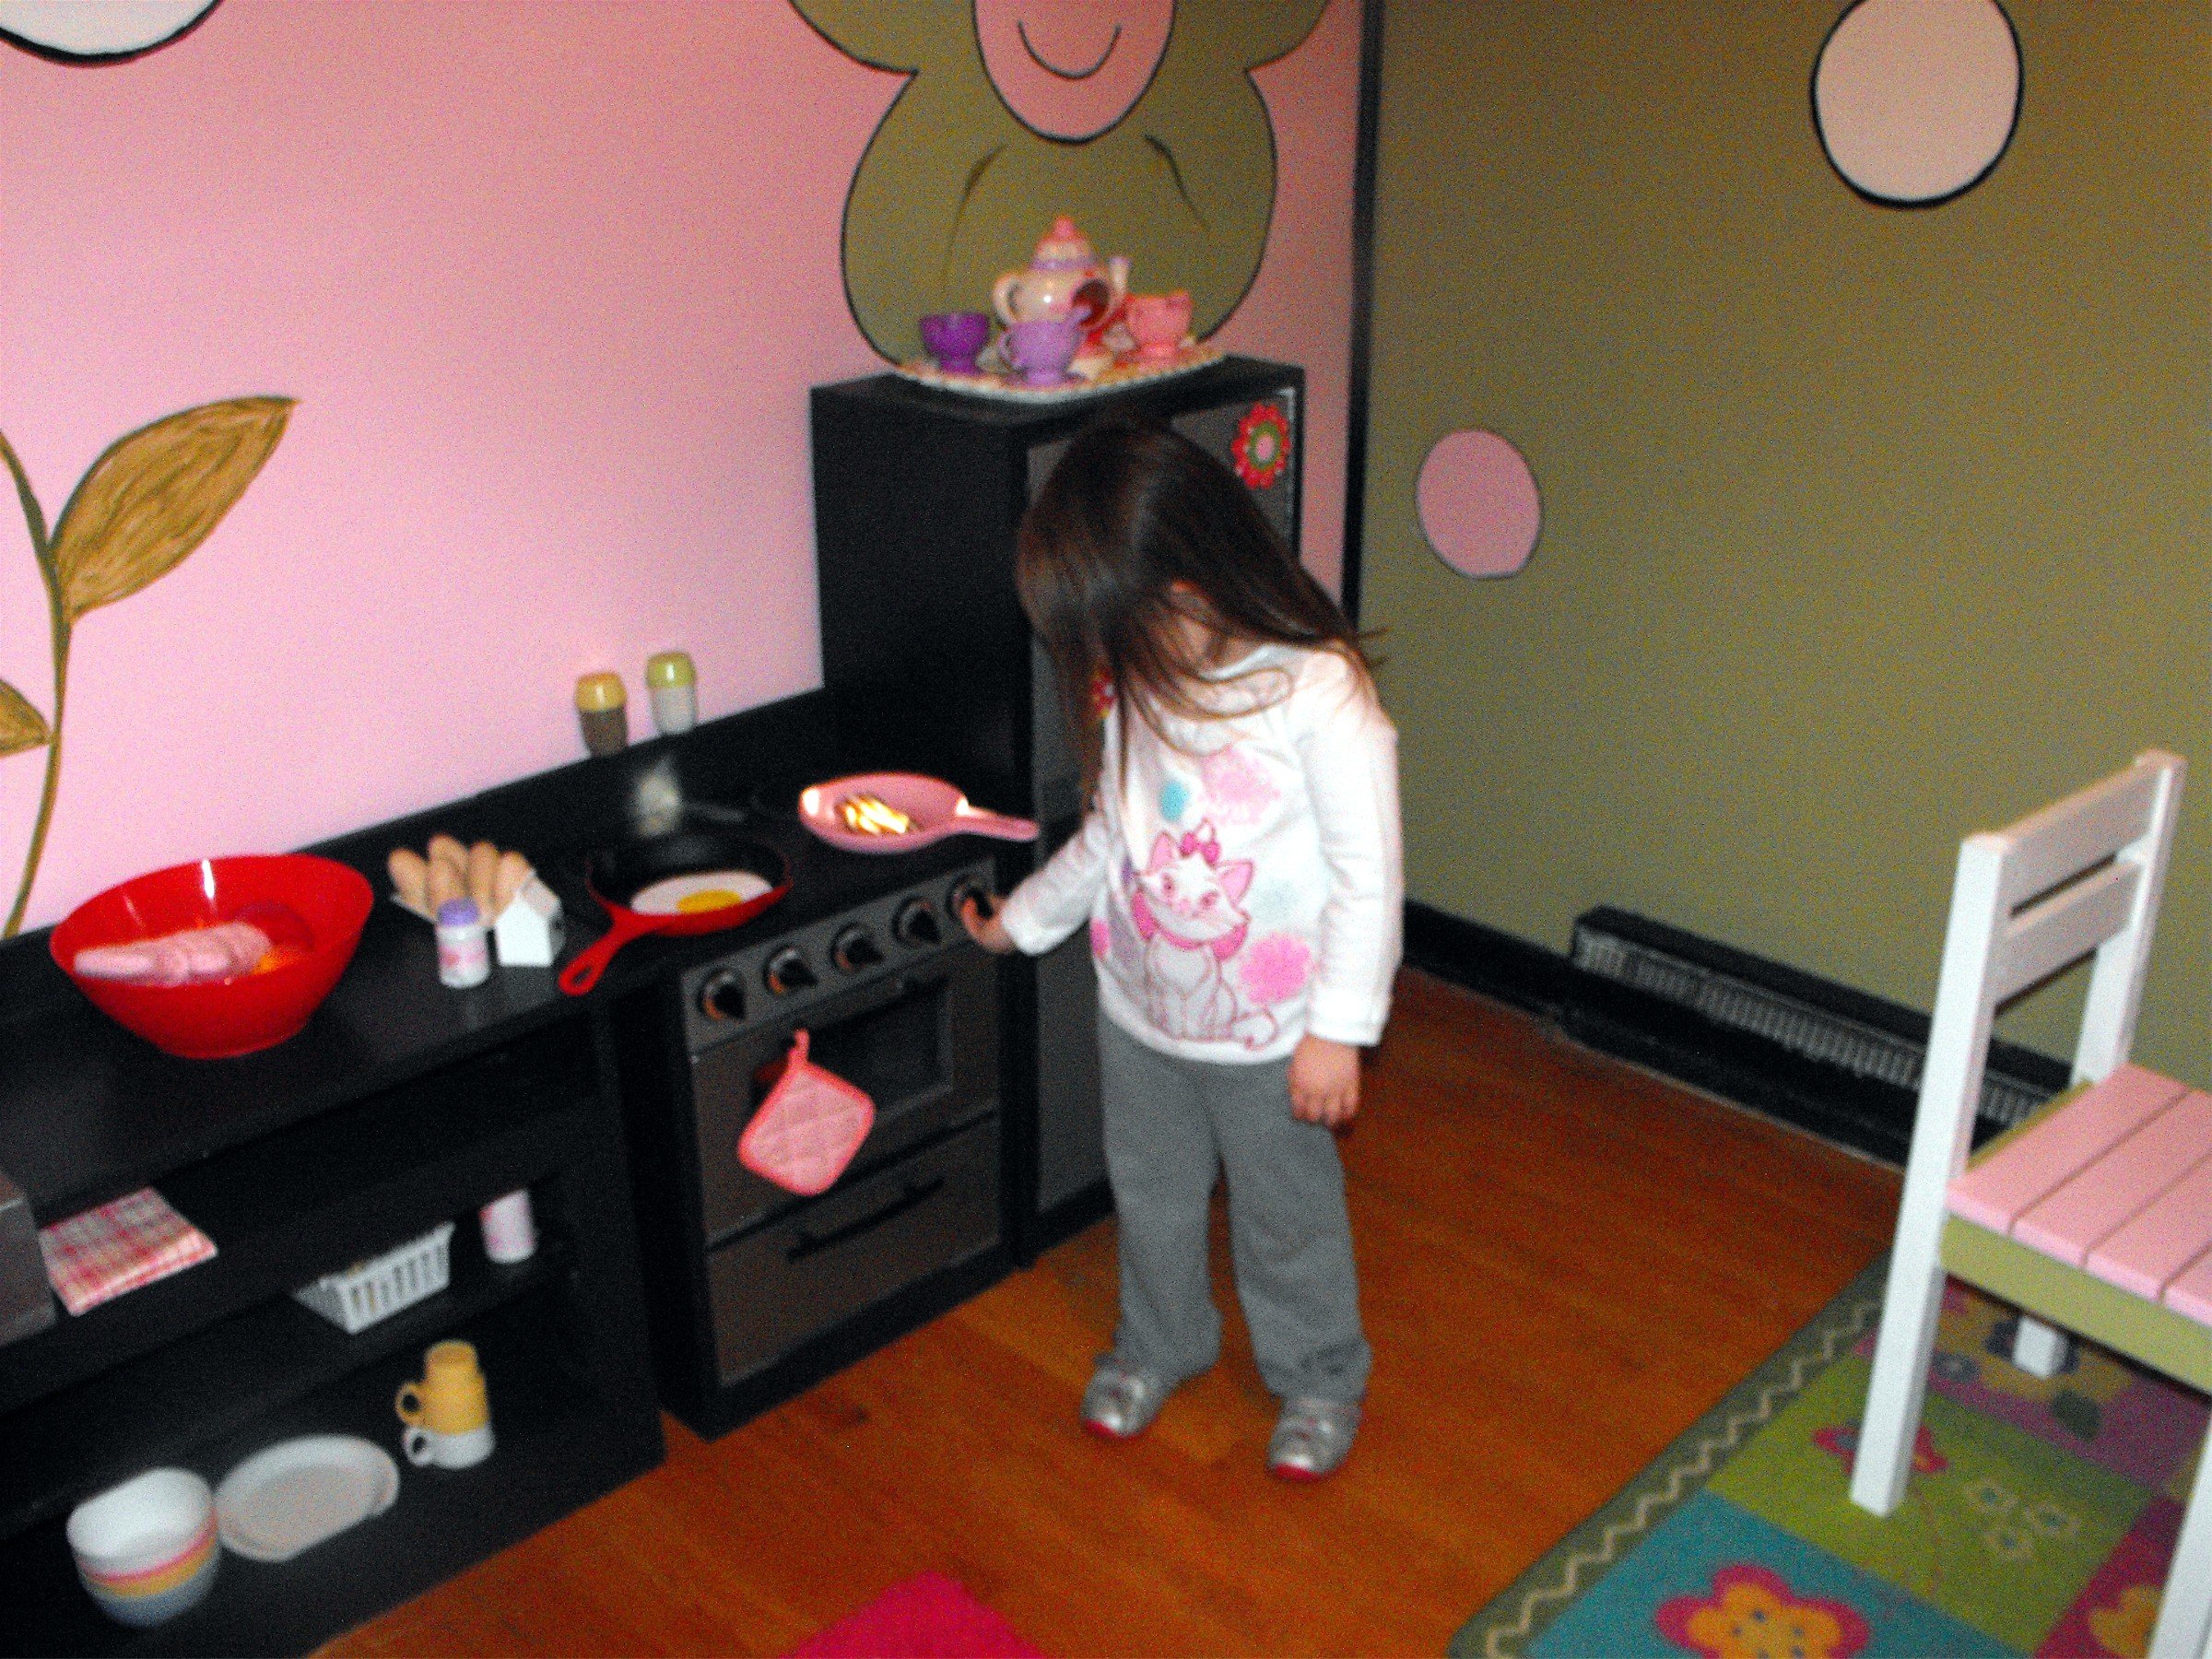
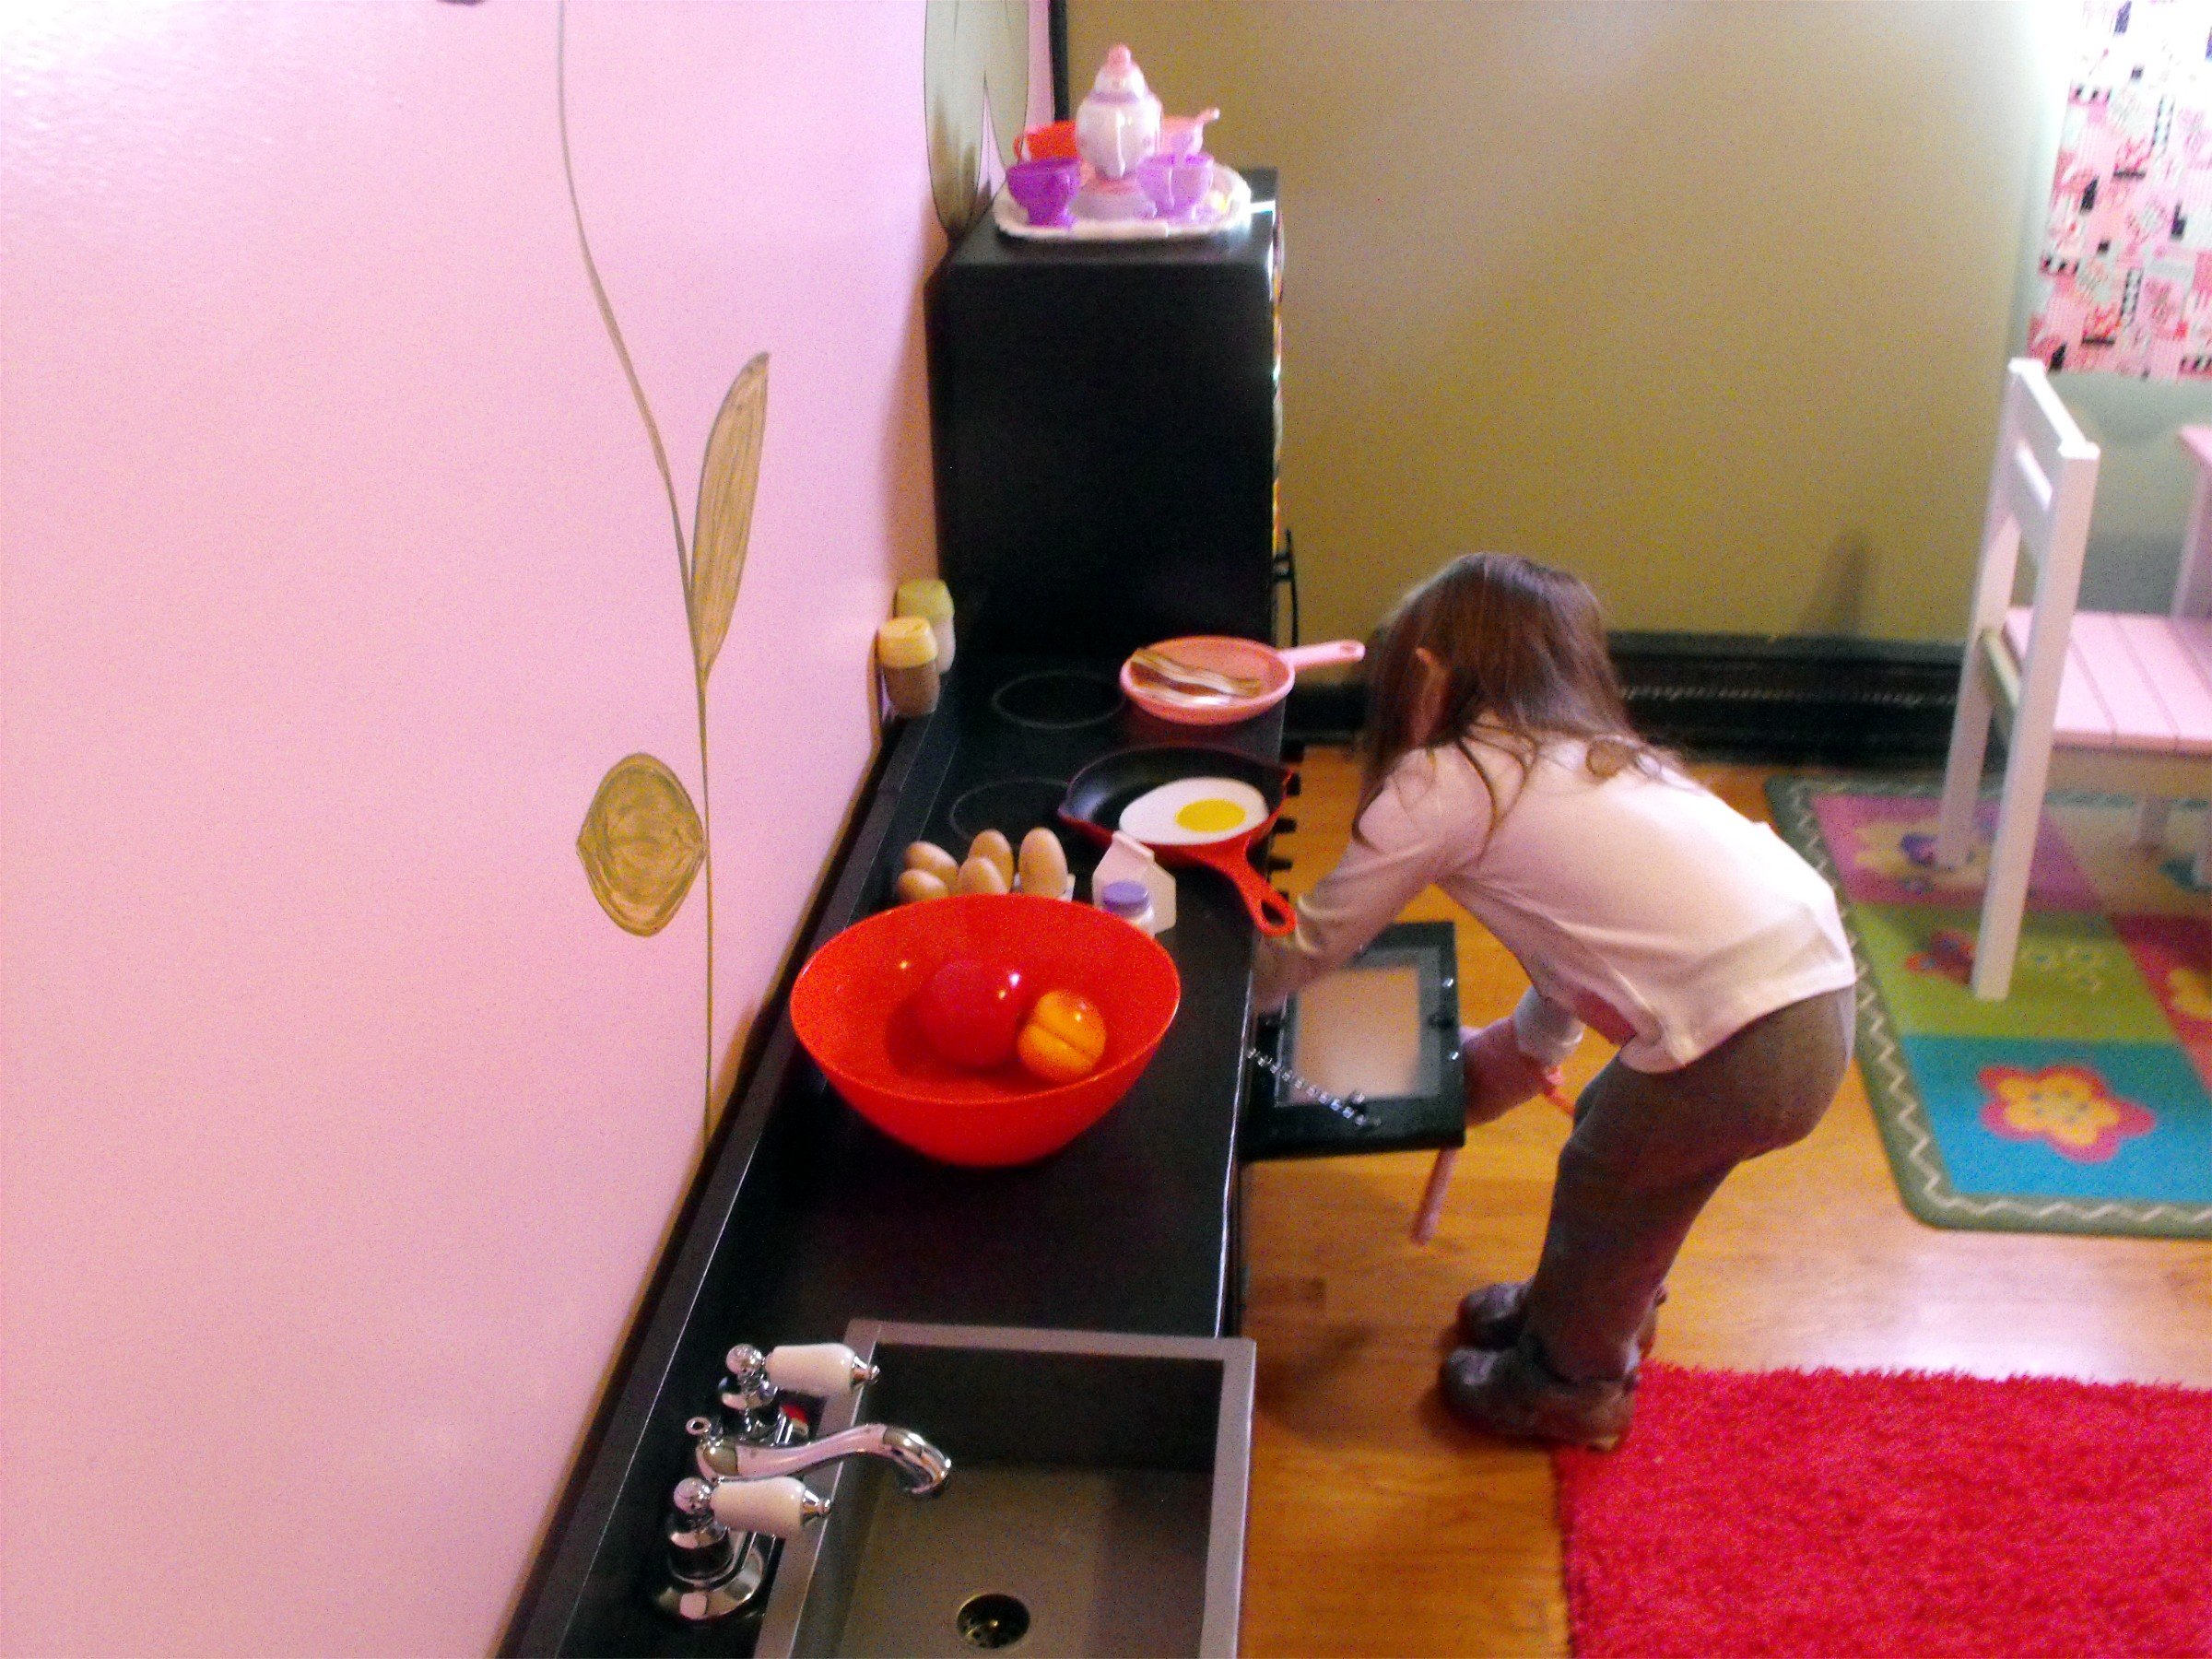
I started this project months ago... hoping to give this to Marlee for her 3rd birthday... that was September. Here it is... 99.99% complete... 3.5 months past the deadline... Just in time for Christmas. I used the plans for Grace's Kitchen pieces with some modifications. I extended the cabinet for the sink... gave her a farmer's sink... and extra counter space. What kitchen doesn't need additional counter space??? I left it open storage for now... I wanted to add doors... but ran out of time... ha ha... The oven I added the drop down door below the oven compartment for additional storage. I painted the burners on her cooktop.. just like Grammie's... I couldn't find the handles I wanted in black... I had to buy the stainless ones and prime and spray them black... that was pricey ... The fridge has 5+ coats of magnetic primer under the stainless steel paint. I got a pic of an icemaker/water dispenser from the web and Mod Podged it to the freezer door. I had just as much fun shopping for her supplies as I did making the kitchen. Most of the food products are from Melissa & Doug... and mostly all made of wood!! Too bad she's only here a couple nights a month.... maybe I might have to have my own friends over to play when she's not here!!! Thank you Ana... once again I owe it all to you!!!!
Built from Plan(s)
Estimated Cost
$150-$200
Finish Used
Rustoleum Magnetic Primer
Rustoleum Stainless Steel Paint
Sherwin Williams Caviar paint
Rustoleum Stainless Steel Paint
Sherwin Williams Caviar paint
Recommended Skill Level
Beginner
Comments

Mon, 01/02/2012 - 08:31
This is probably the best one
This is probably the best one I have seen! Honestly - the fridge is fantastic and that sink is insanely awesome! I am jealous now lol....I am sure she loves it and who says YOU aren't allowed to play with it while she is not there ;)
Mon, 01/02/2012 - 19:12
Thank you. That's very nice
Thank you. That's very nice of you to say, there are many beautiful sets on here. Yours is very nice too. I love the grill on your stove. That's a great addition.
Thu, 01/05/2012 - 18:31
Thank you
I think the extra space is going to work out well. My granddaughter is already using it and if she didn't have it, I suspect she'd make my play sandwich on the floor!! I would like to make another piece, for additional storage and maybe a microwave, but I'm running out of space in her room!!!
Mon, 02/06/2012 - 19:08
dimensions
Could you please tell me the dimensions of your sink & counter? Thanks,
Sun, 08/19/2012 - 10:30
Where did you find?
Where did you find that cute sink? Id love to make this for my daughter, you did a great job.
Sun, 08/19/2012 - 18:35
Thank you, I built the sink.
Thank you, I built the sink. Just made a box and painted it with stainless steel paint. I really winged it with the sink. The counter top is two boards that were scrap from the fridge joined with pocket holes. I splurged and bought the faucet.
Fri, 08/23/2013 - 09:22
I love your kitchen set at
I love your kitchen set at first i thought it was the real deal. the stainless on black looks amazing what paint did you use to get the stainless color? also what did you use for the stove knobs they look real Great job.
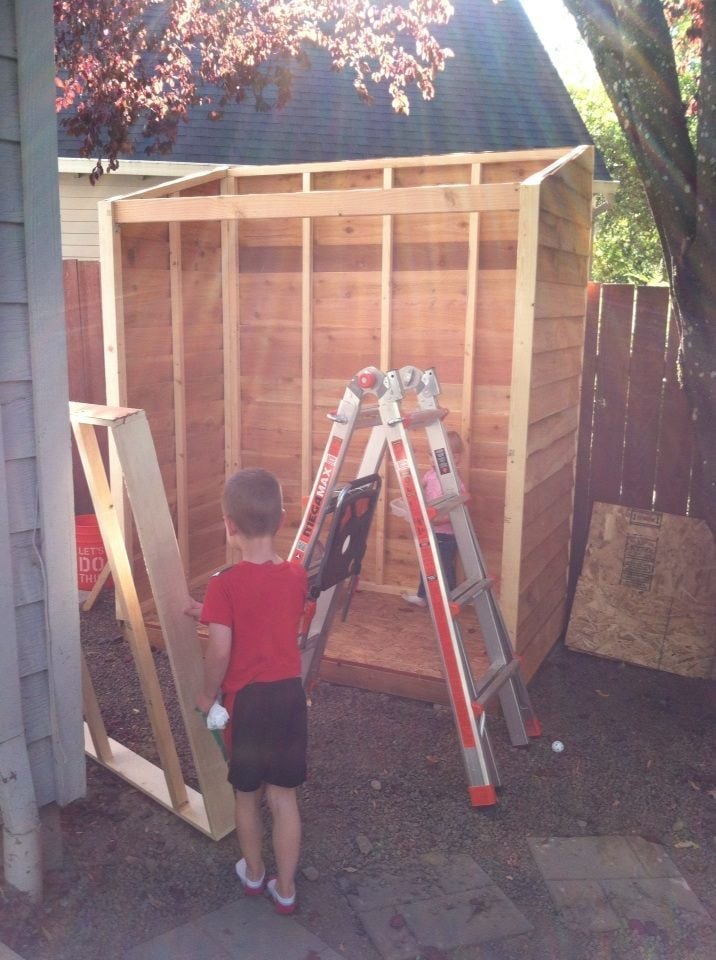
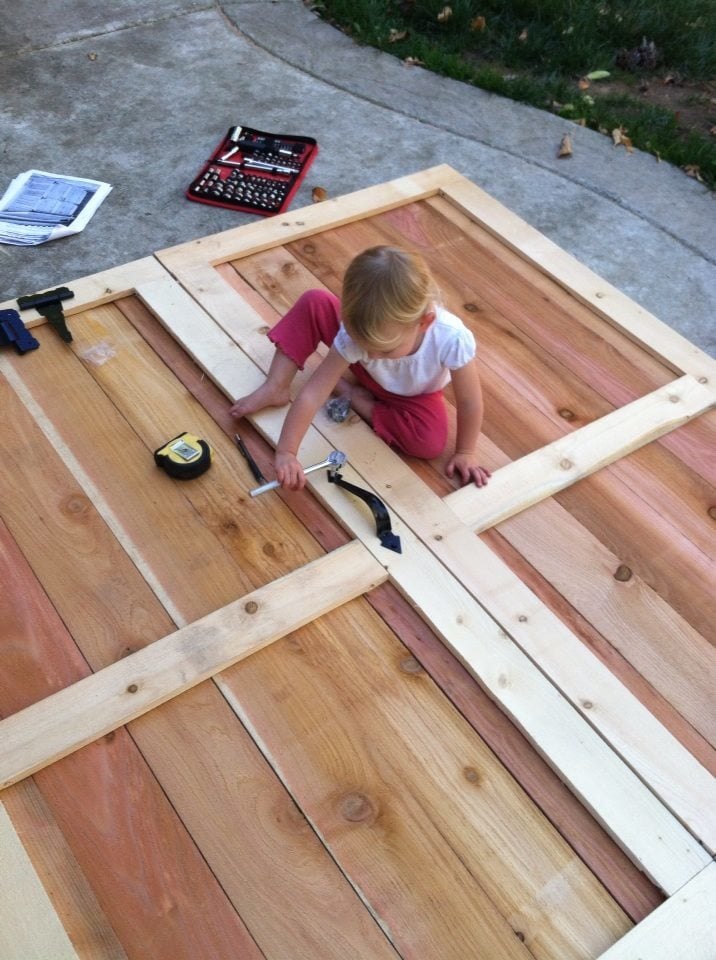
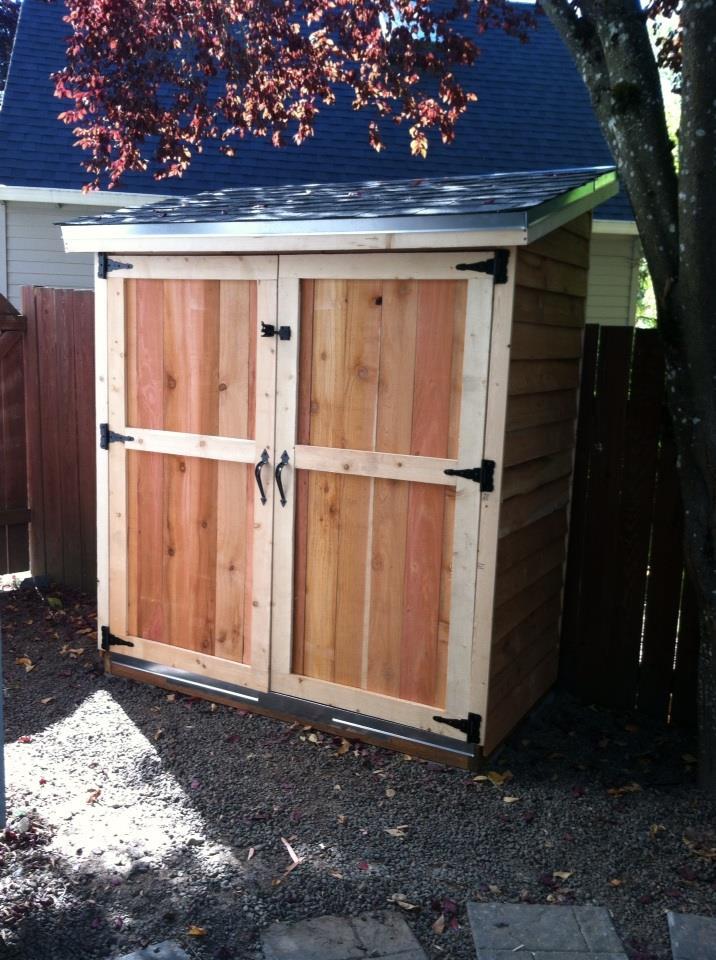
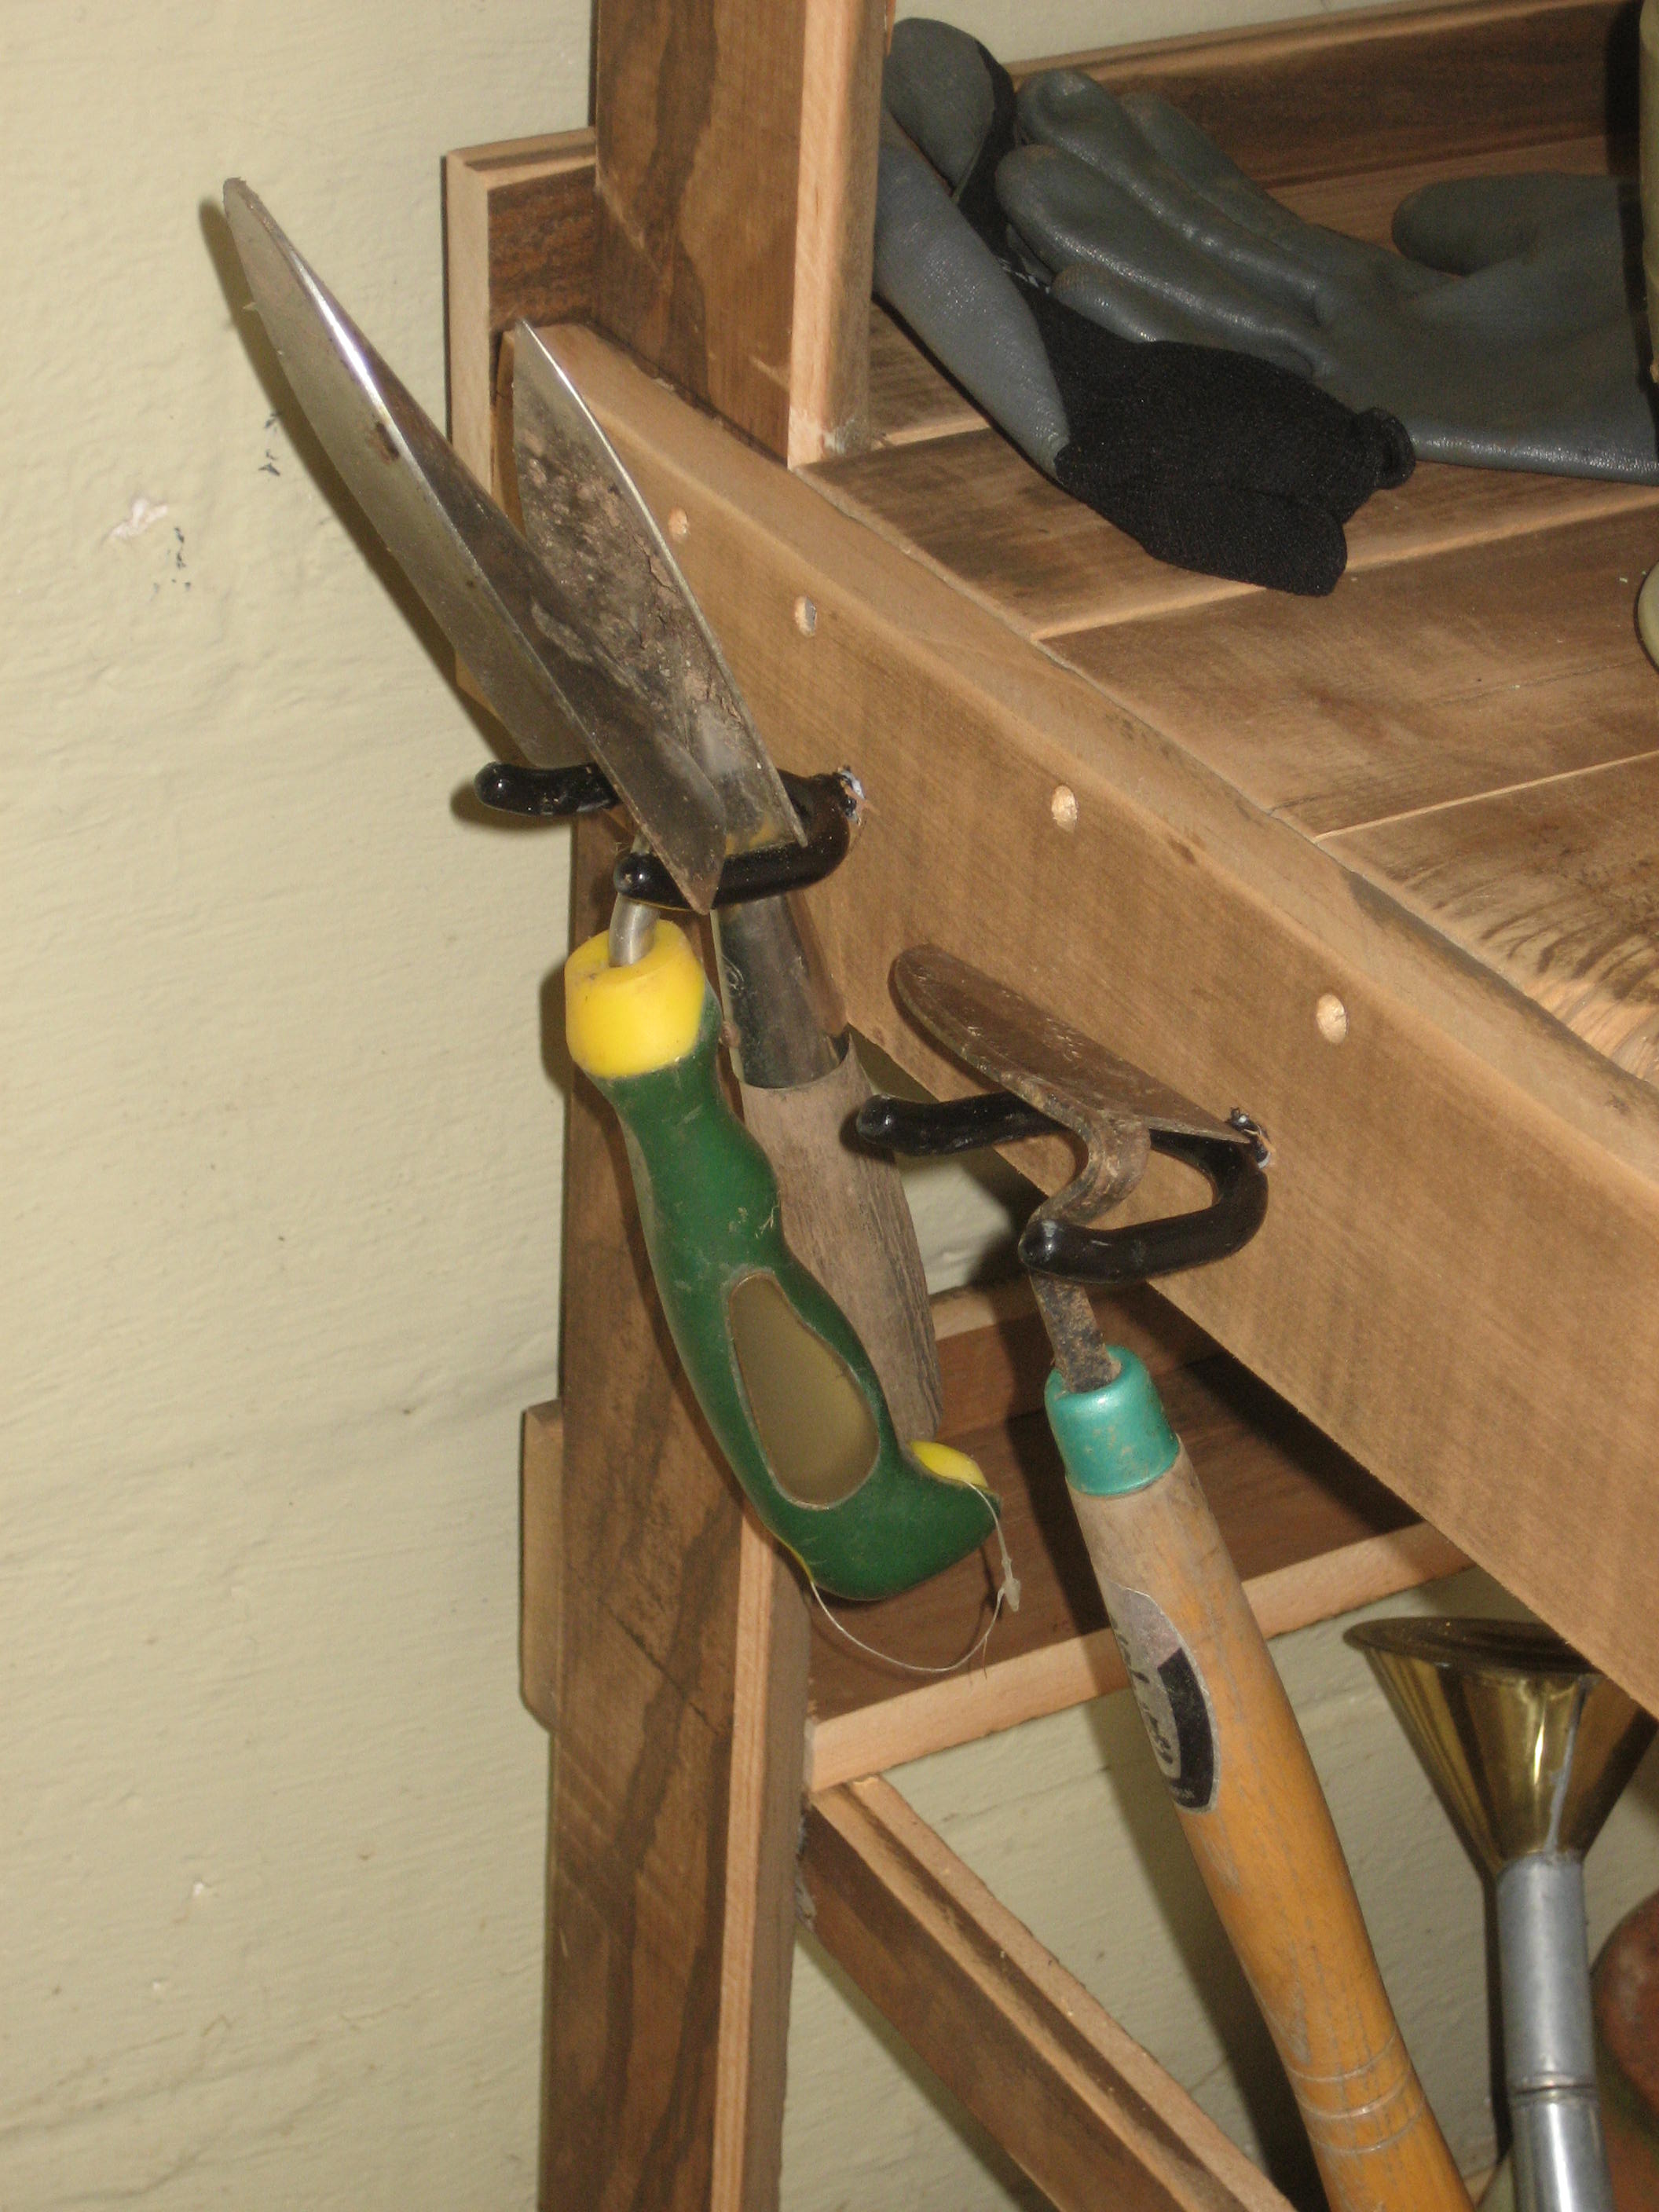
Storage Shed

The plans were great! I hadn't built anything this big before but just followed the instructions step by step. I did also built a base to put it on (pavers on sand then pressure treated 2x6 frame). It took quite a while but that's just mostly because I had "helpers" and had to work on it when I had a spare minute. I was pleasantly surprised by how much we were able to pack in there. We added electricity and made a few other modifications to a larger shed we had so my husband could use that as an office. I built this to store all the tools, yard equipment, etc that we moved out of there.
Built from Plan(s)
Estimated Cost
$400-$500 (I added a base and added flashing and roofing paper to the roof)
Estimated Time Investment
Week Long Project (20 Hours or More)
Recommended Skill Level
Beginner
Barn door
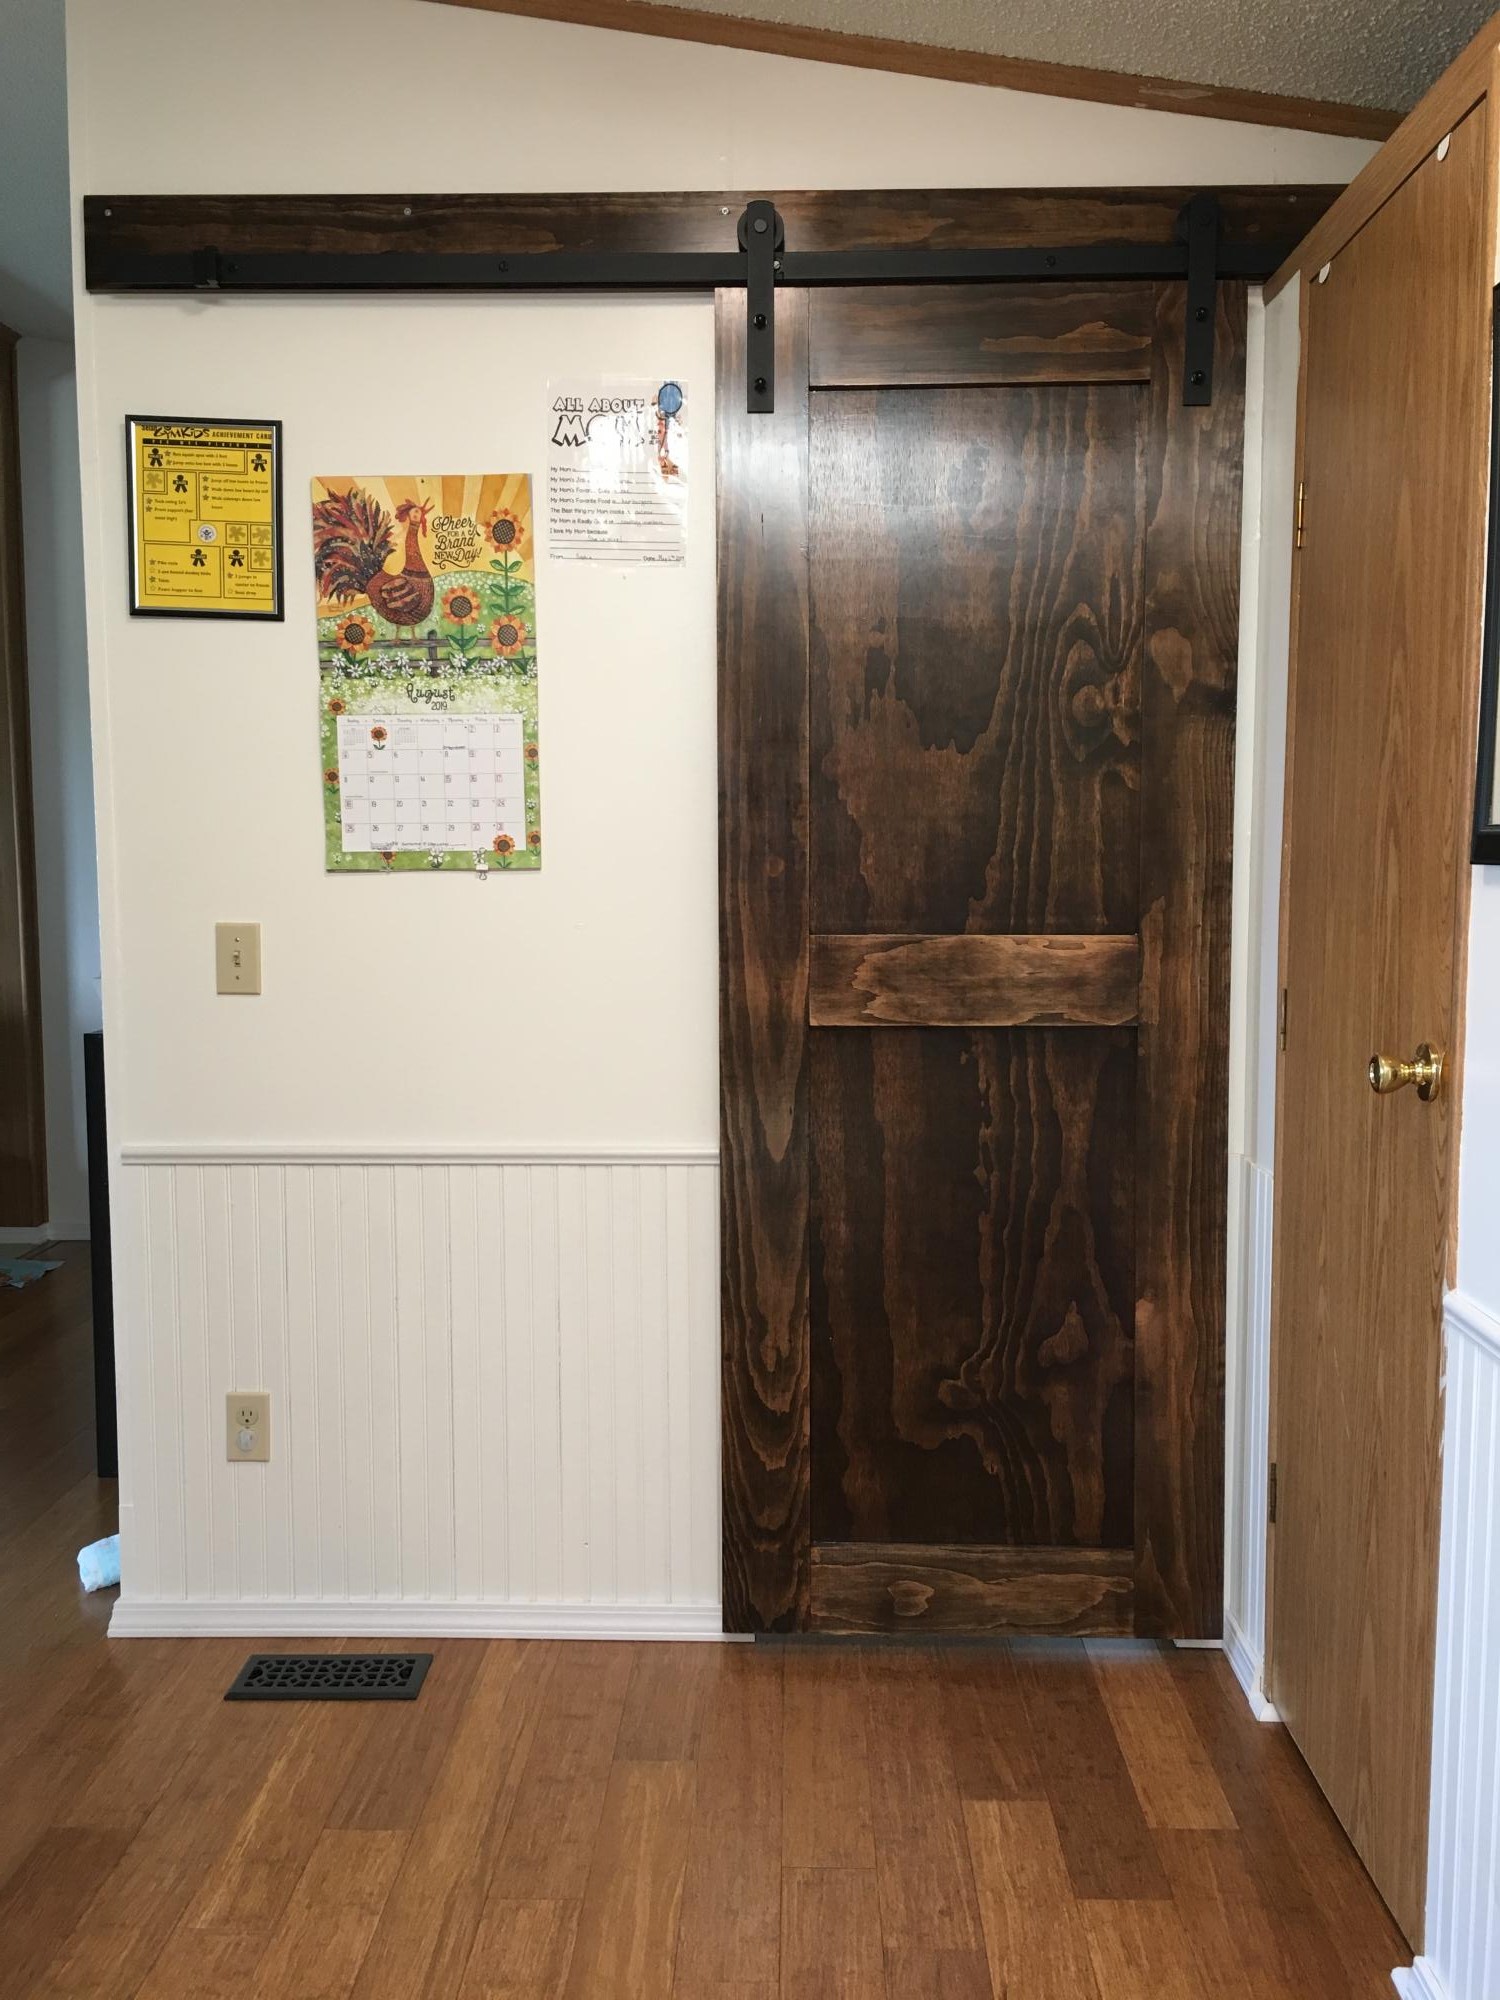
I used your plans for the painted barn doors using plywood but modified them and stained the door instead.
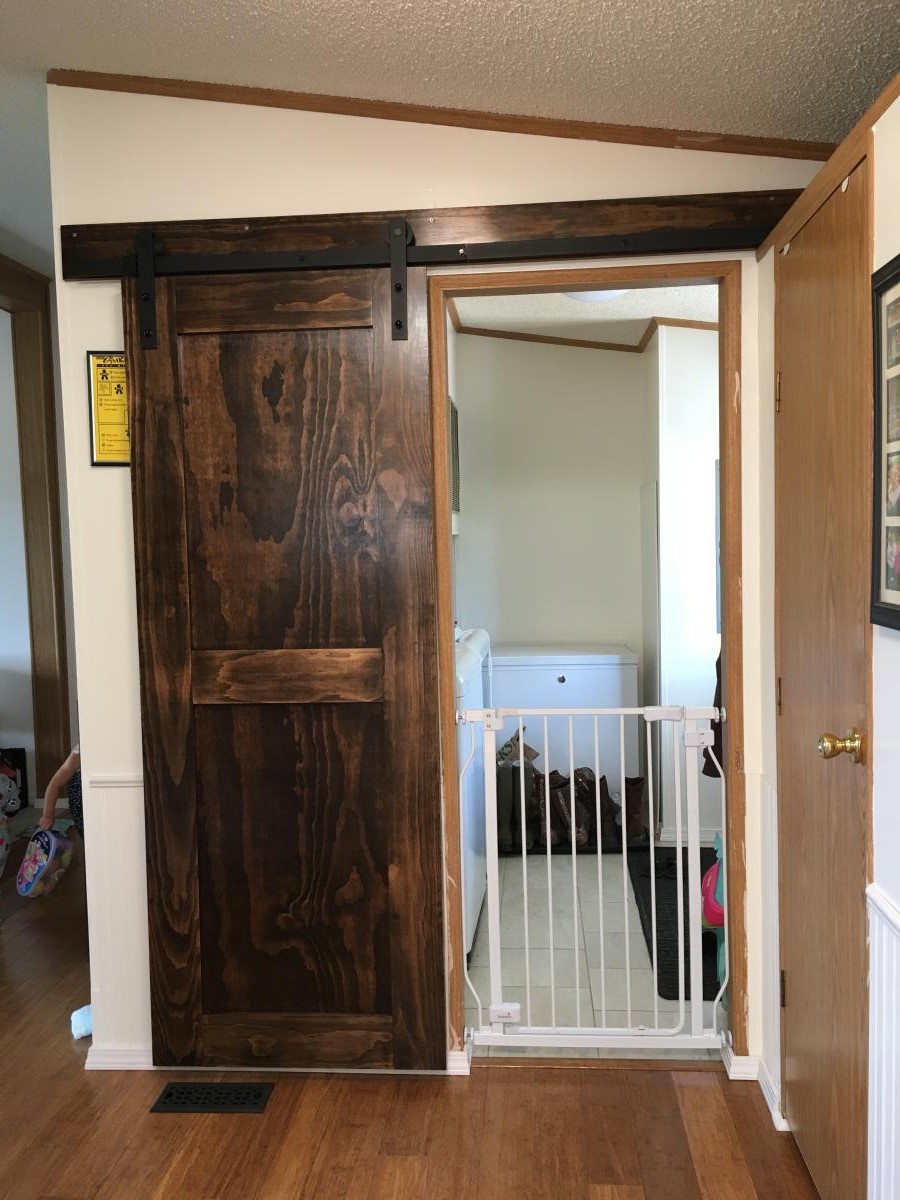
Built from Plan(s)
King Modern Bed

Made this with pallet 4x6 and 4x4 posts, and construction lumber.
Built from Plan(s)
Comments
Fri, 05/05/2023 - 11:44
WOW, what a bed!
It is masterfully done, I love your use of material! Thanks for sharing.
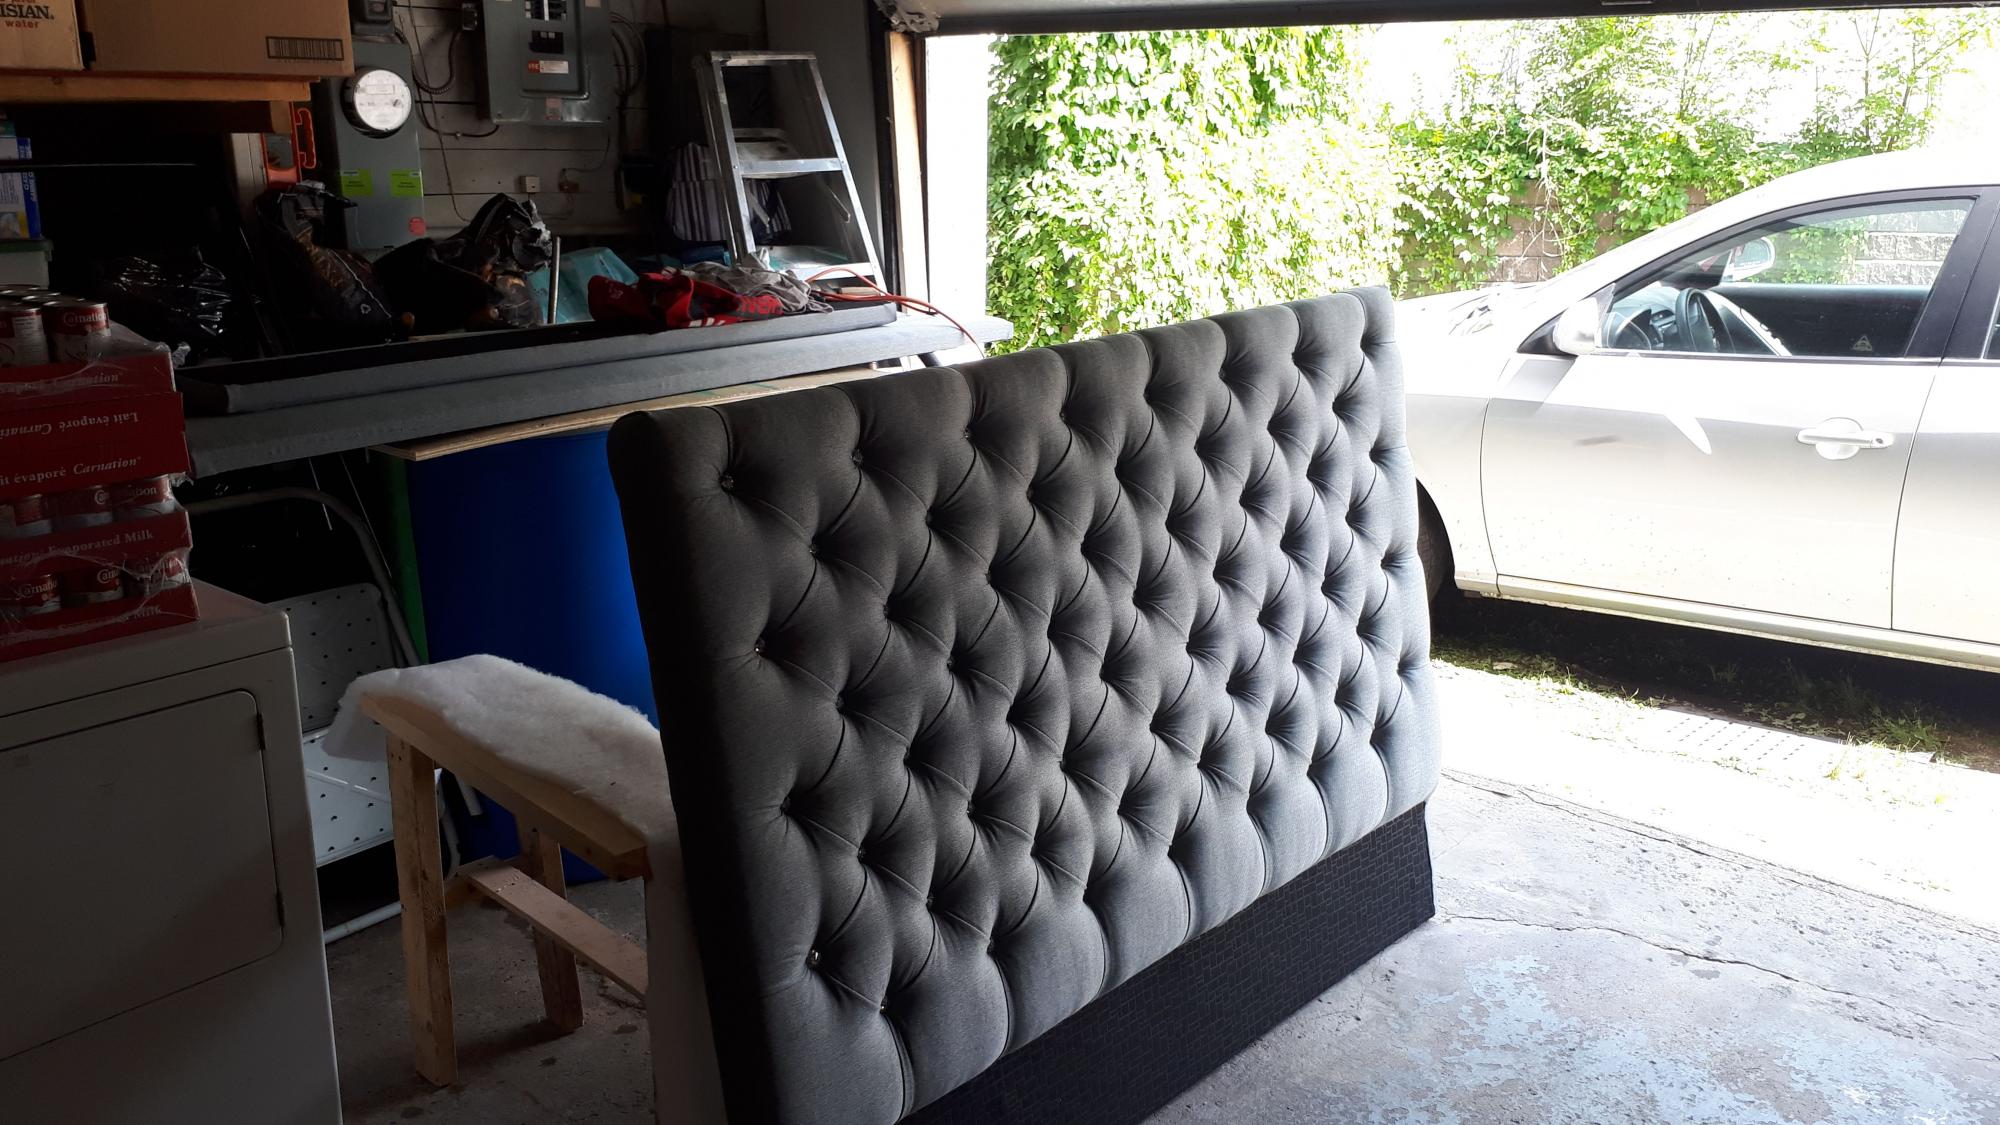
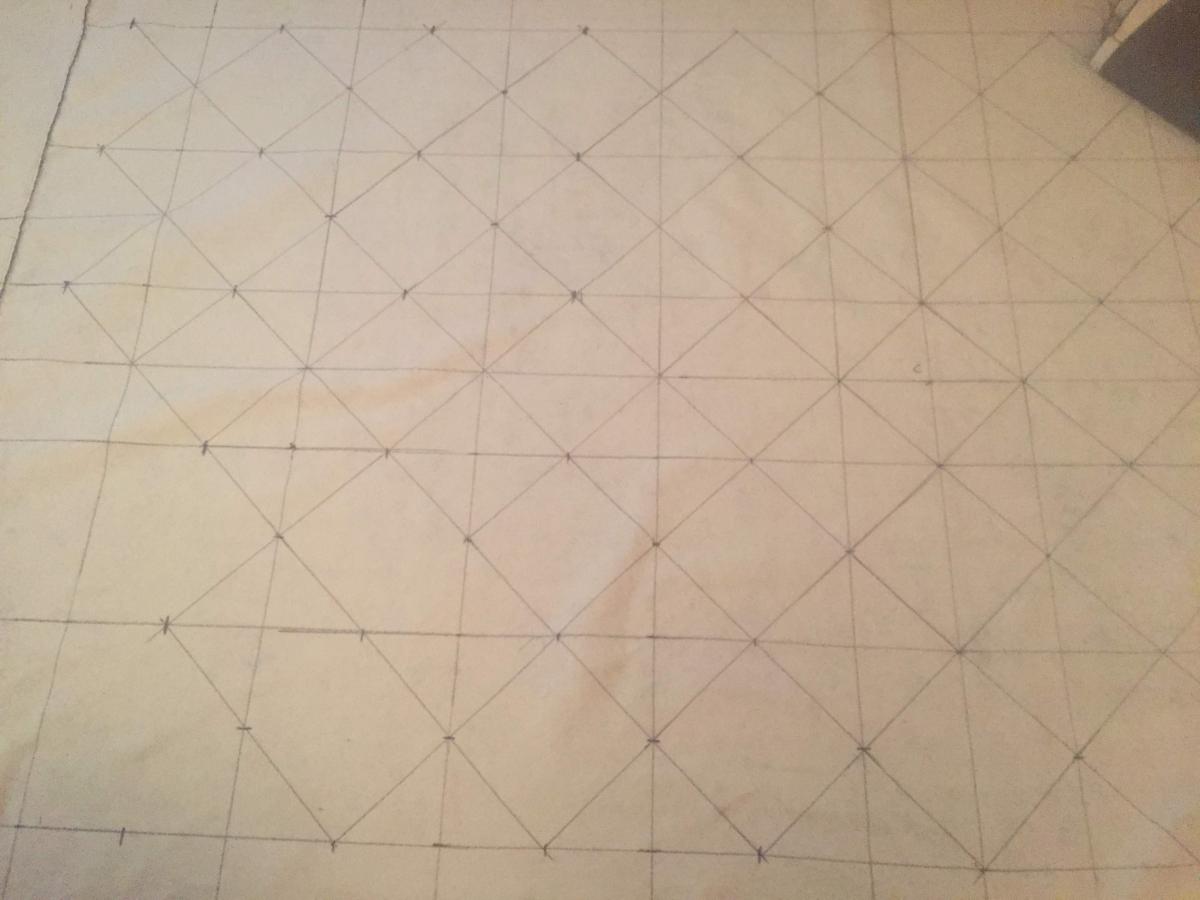
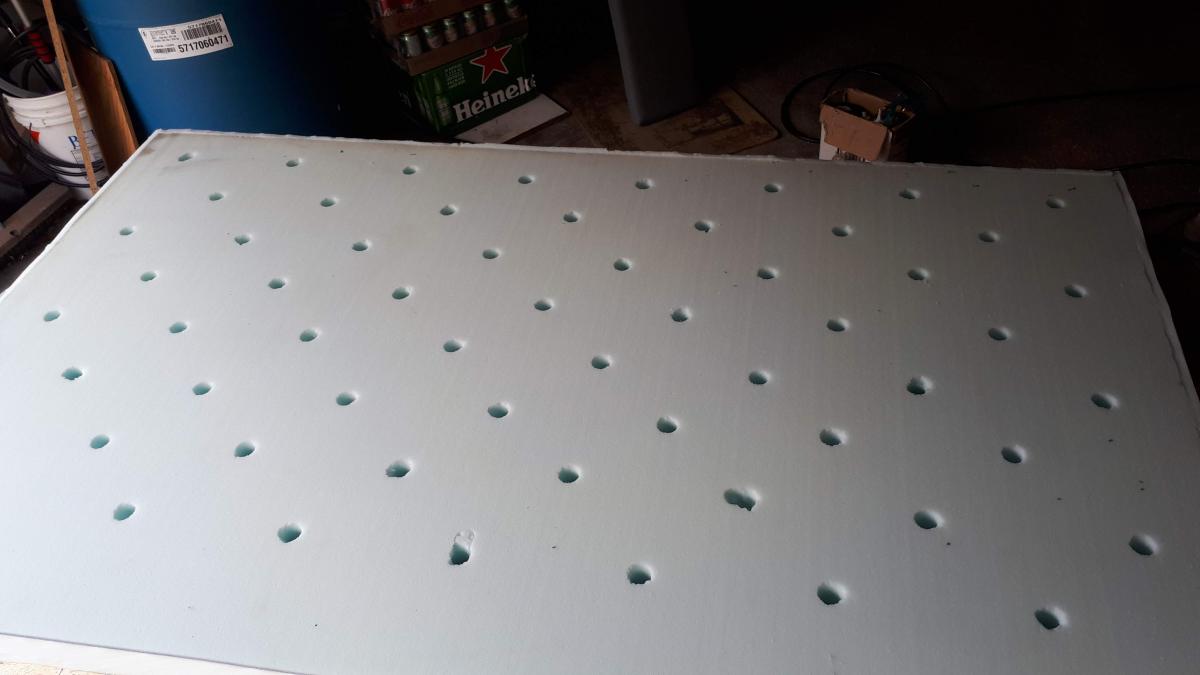
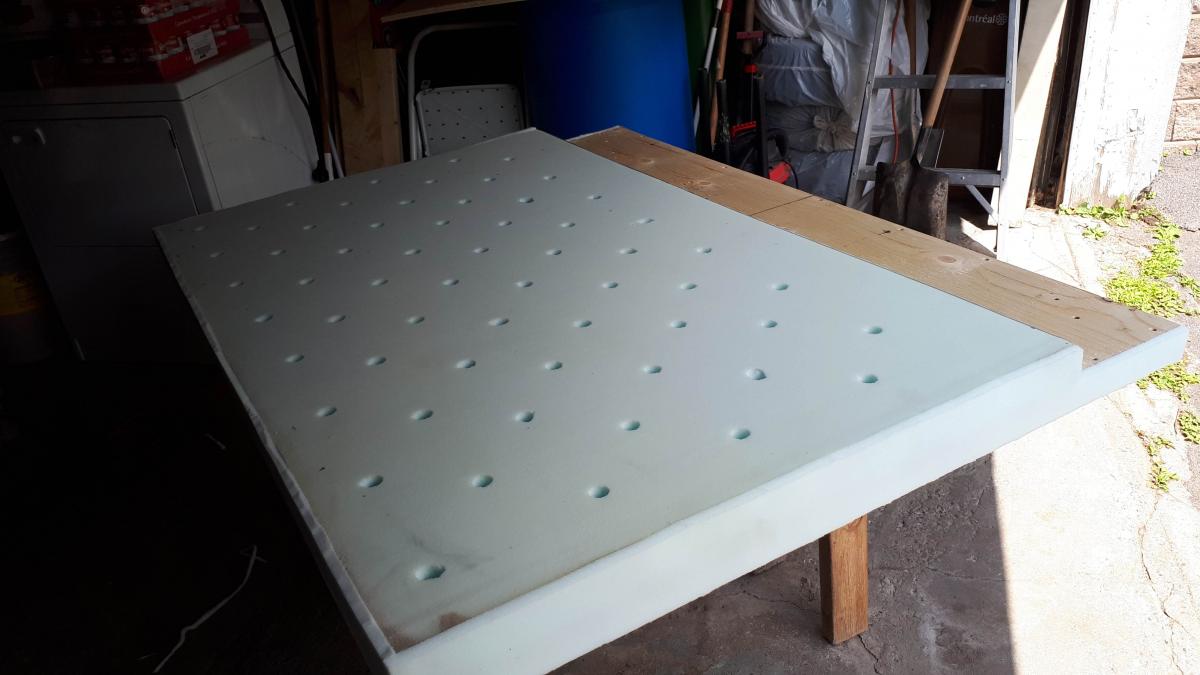
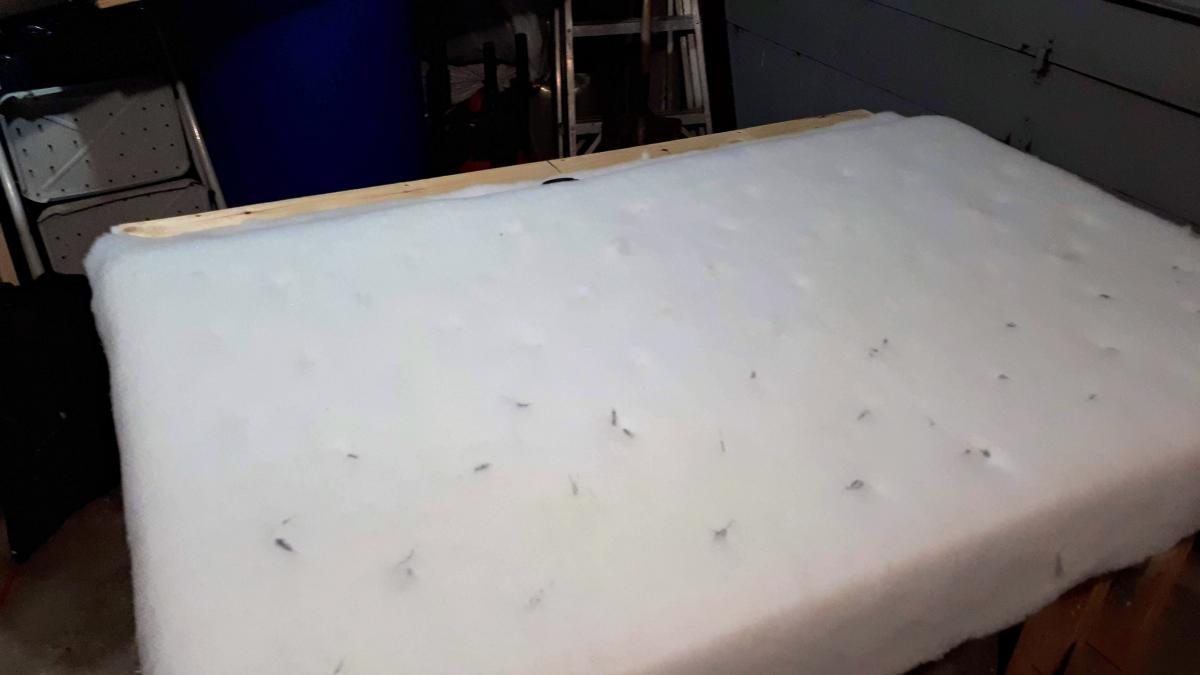
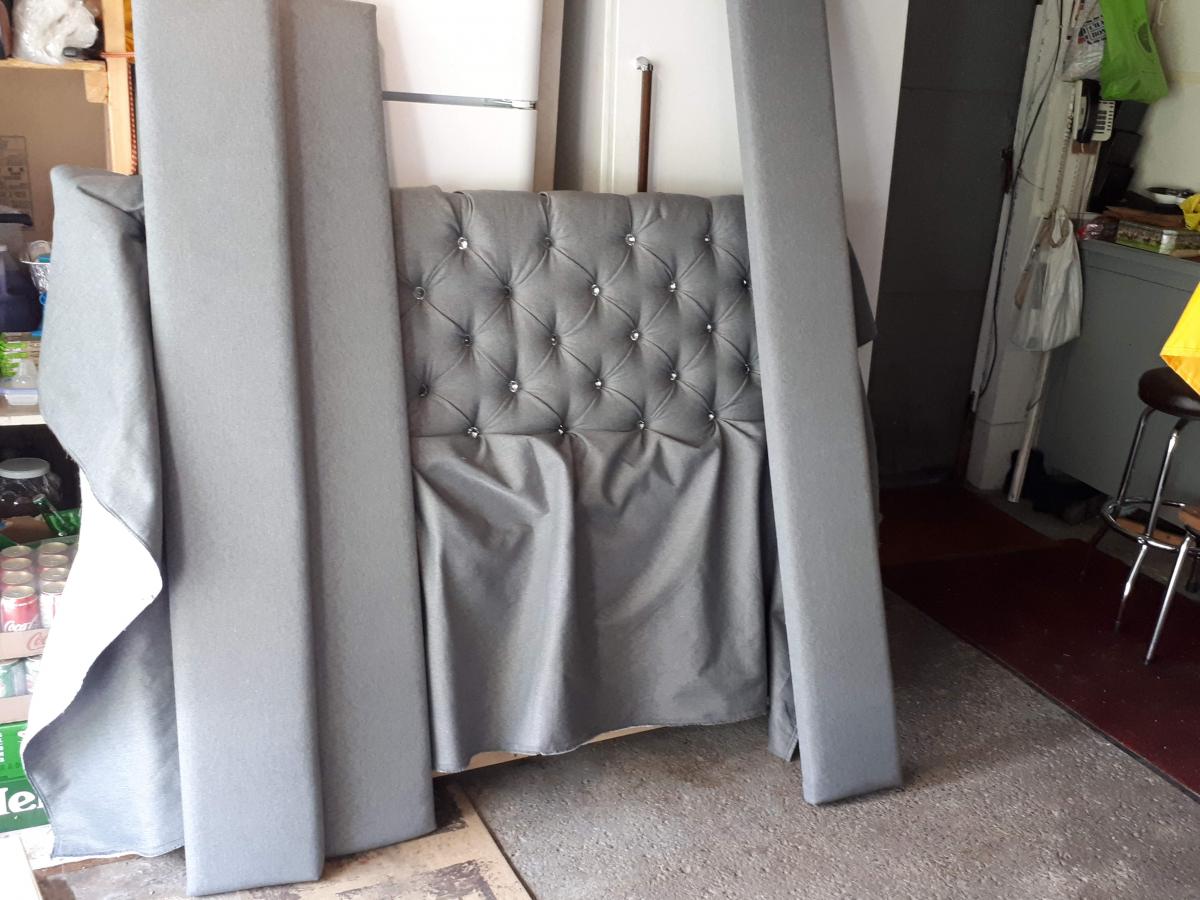
Squared2 Headboard
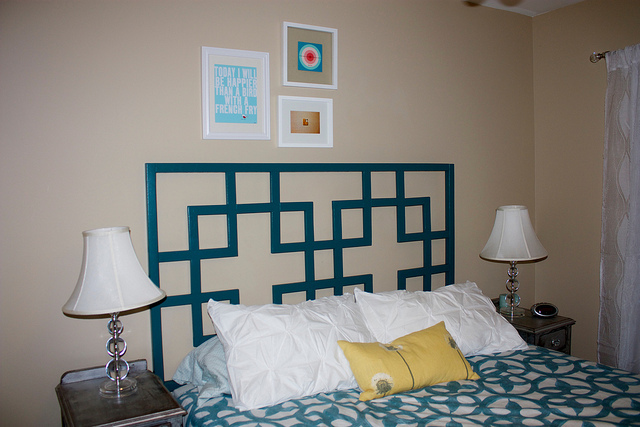
I build Anna's version of this popular store's headboard. I love it! Cost includes wood and paint. I would have used poplar for the entire bed but my hardware store only had 2x2s and 2x4s in white wood.
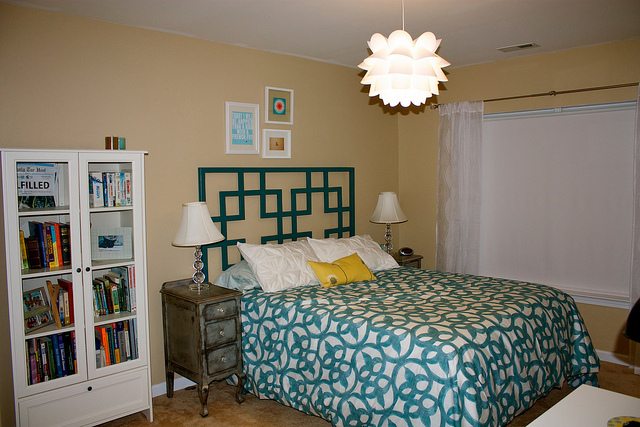
Estimated Cost
$75
Estimated Time Investment
Day Project (6-9 Hours)
Finish Used
The paint color is pond by eddie bauer color matched at benjamin moore. I used a HVLP paint sprayer to paint and a semi gloss paint thinned with a water based product (you can just use water and floetrol).
Recommended Skill Level
Beginner
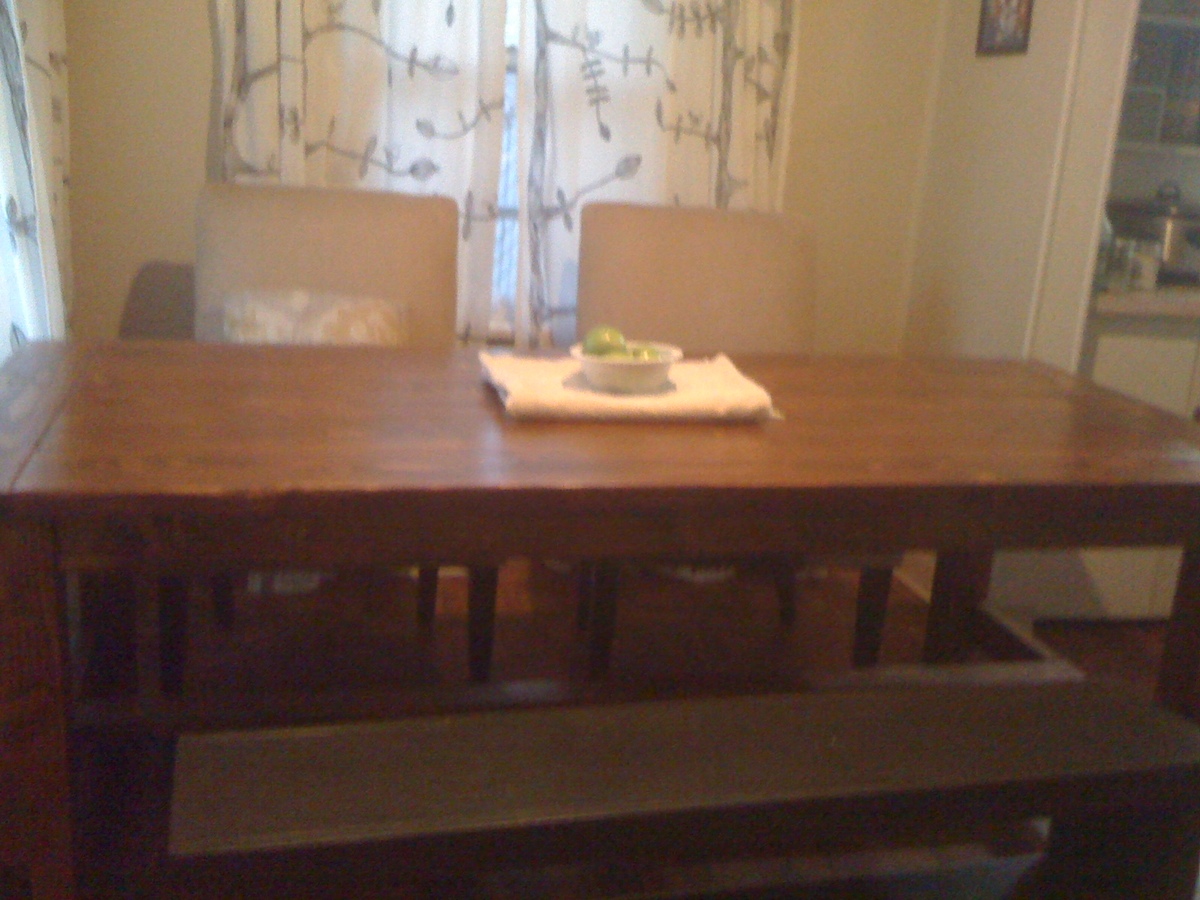
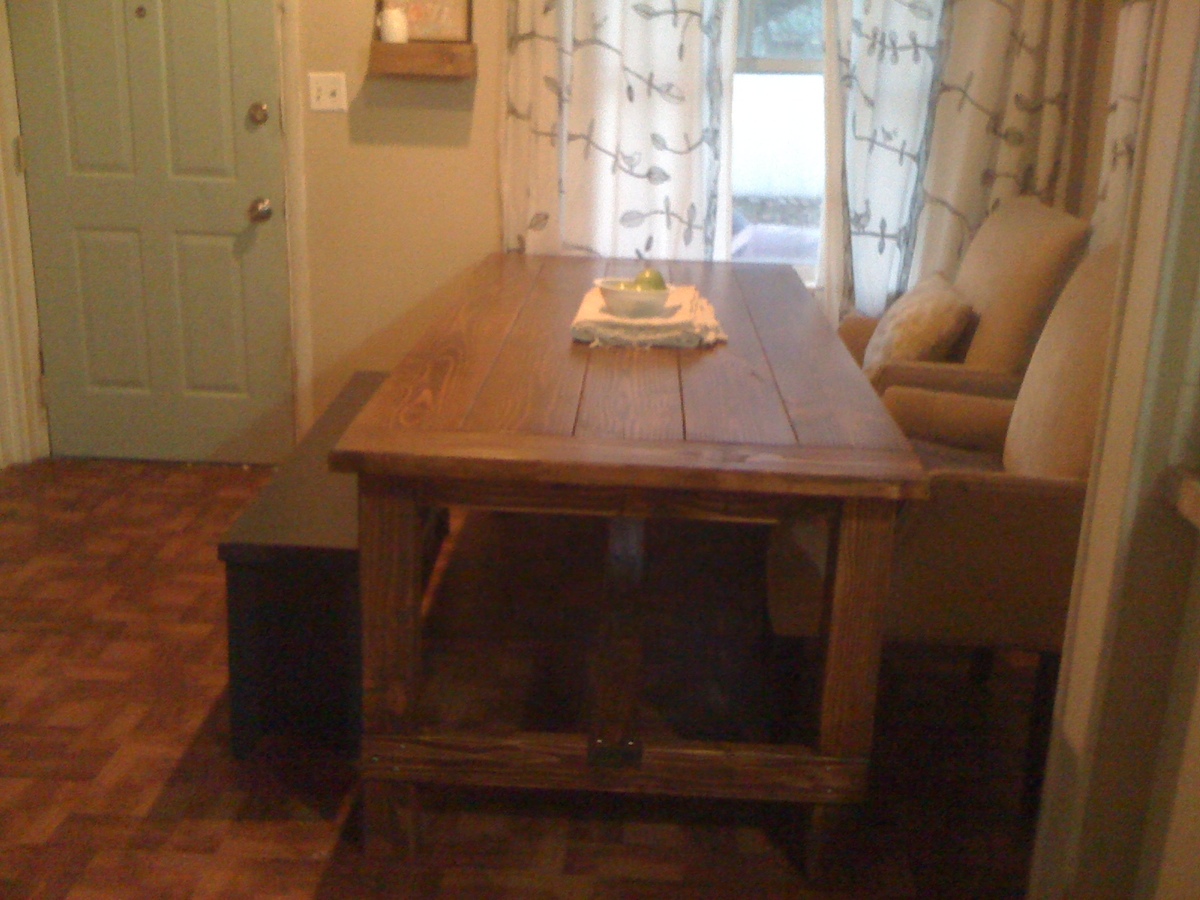
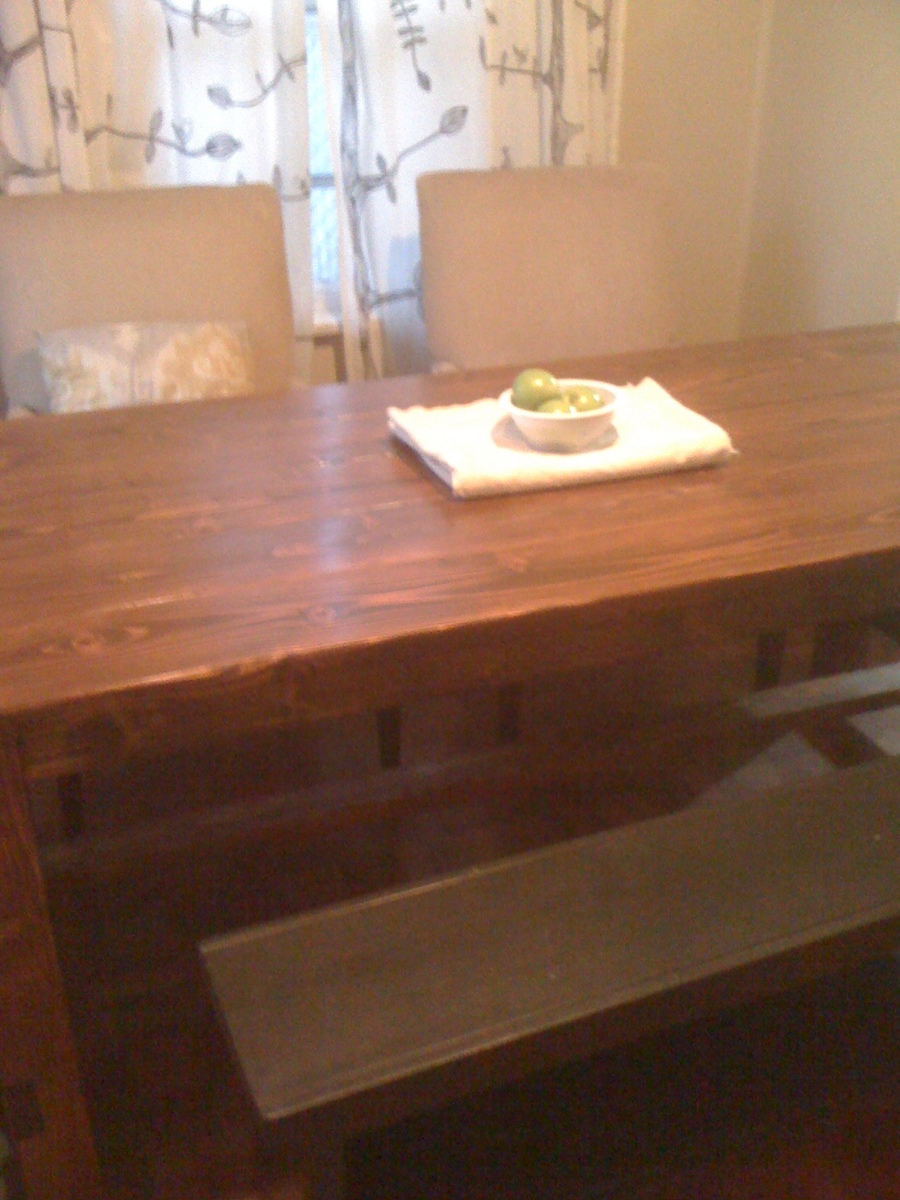
Farmhouse table American Walnut for Friends
We built this table for some friends and the build went great!
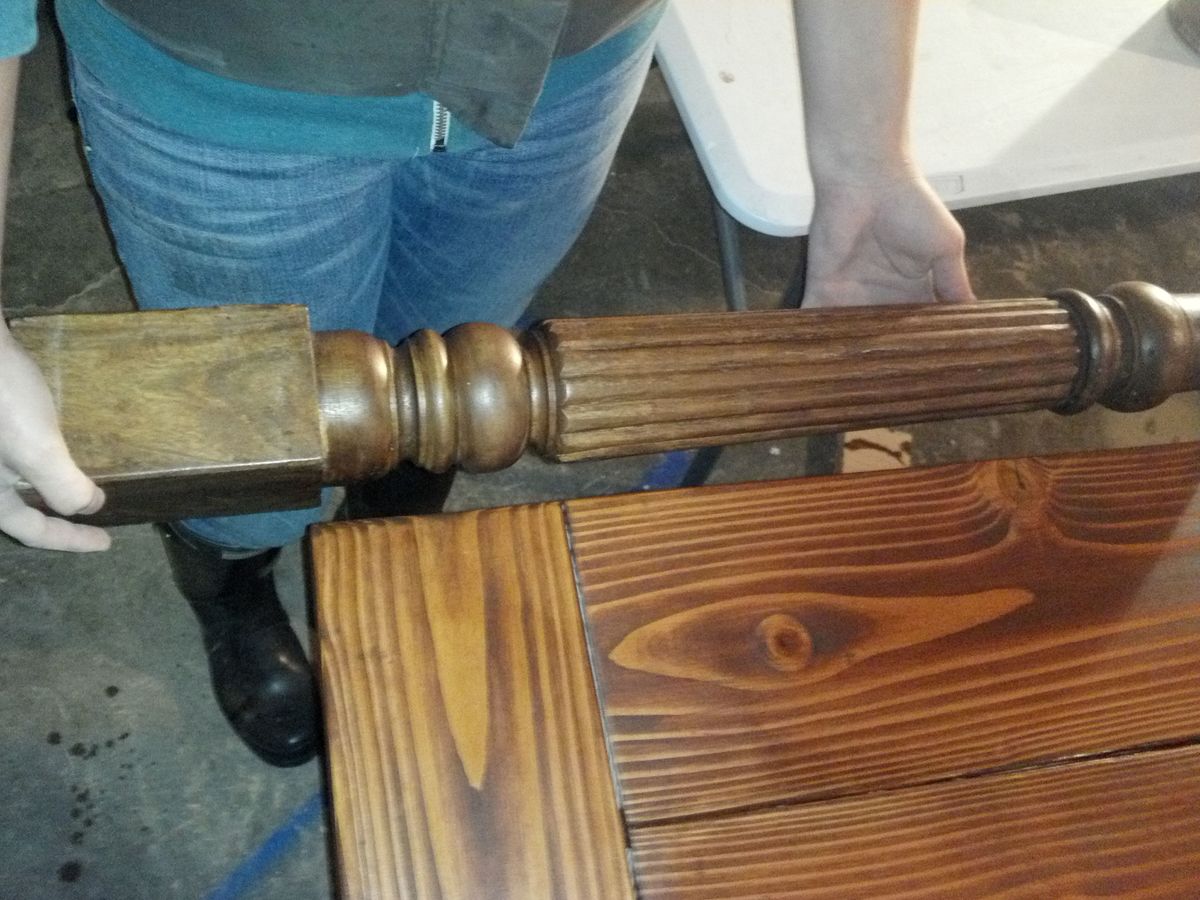
She brought over a table leg so that we could try to compliment their existing stain colors. I used "American Walnut" when maybe I should have used "Special walnut". It turned out a little reddish and I'm worried that she wont like it. I think it's beautiful but I'm so nervous!
What do you think about the finish?
Built from Plan(s)
Estimated Time Investment
Weekend Project (10-20 Hours)
Finish Used
American Walnut and Minwax poly in satin (3 coats)
Recommended Skill Level
Beginner
Comments

Fri, 11/22/2013 - 09:54
They'll love it
Don't worry, it came out beautiful and the finish looks fine! They will be happy and thankful for your efforts. Besides, the style these days isn't to be so "matchy matchy" anyway. Great job!
In reply to They'll love it by spiceylg
Fri, 11/22/2013 - 18:22
Thanks! They actually really
Thanks! They actually really loved it. I'm sooo relieved. Turns out her husband loves red wood stains. :) There is just something about hand built furniture. It is never perfect but it always has soul.
storage chest
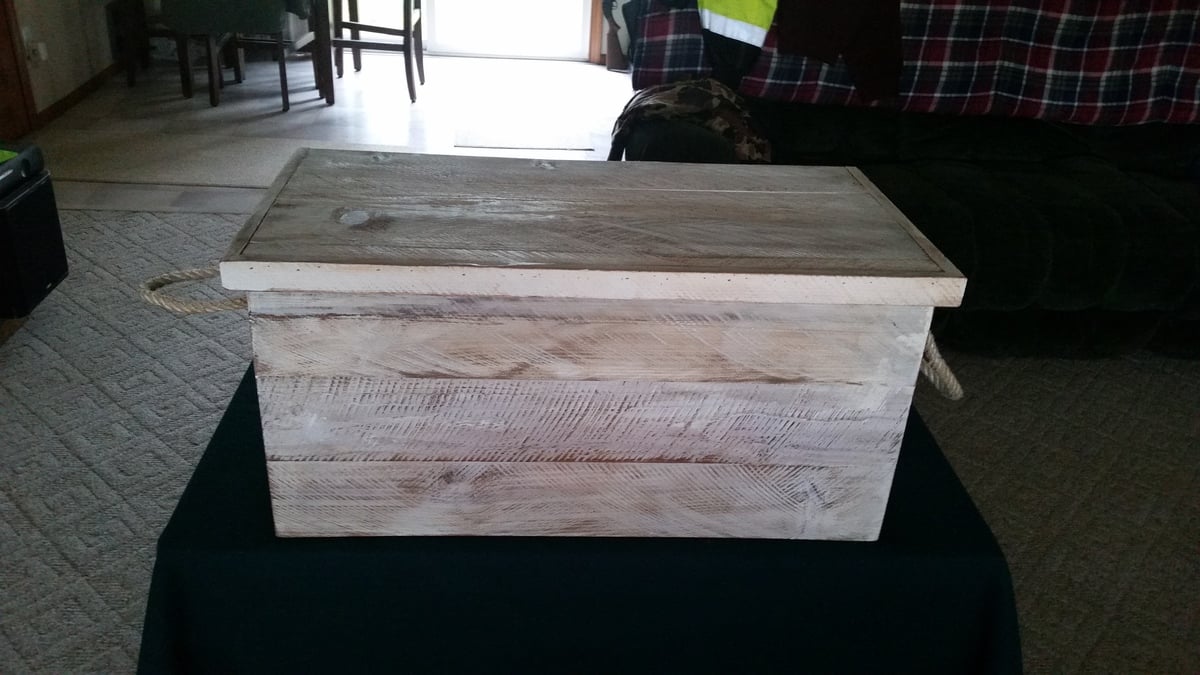
Started as a tool chest for garage and after reading a article on ana white about finishings thought I would give it a tfy
Built from Plan(s)
Estimated Cost
about $15.00
Estimated Time Investment
Afternoon Project (3-6 Hours)
Finish Used
white wash then aged with vinegar and steel wool. Sealed with poly
Recommended Skill Level
Beginner
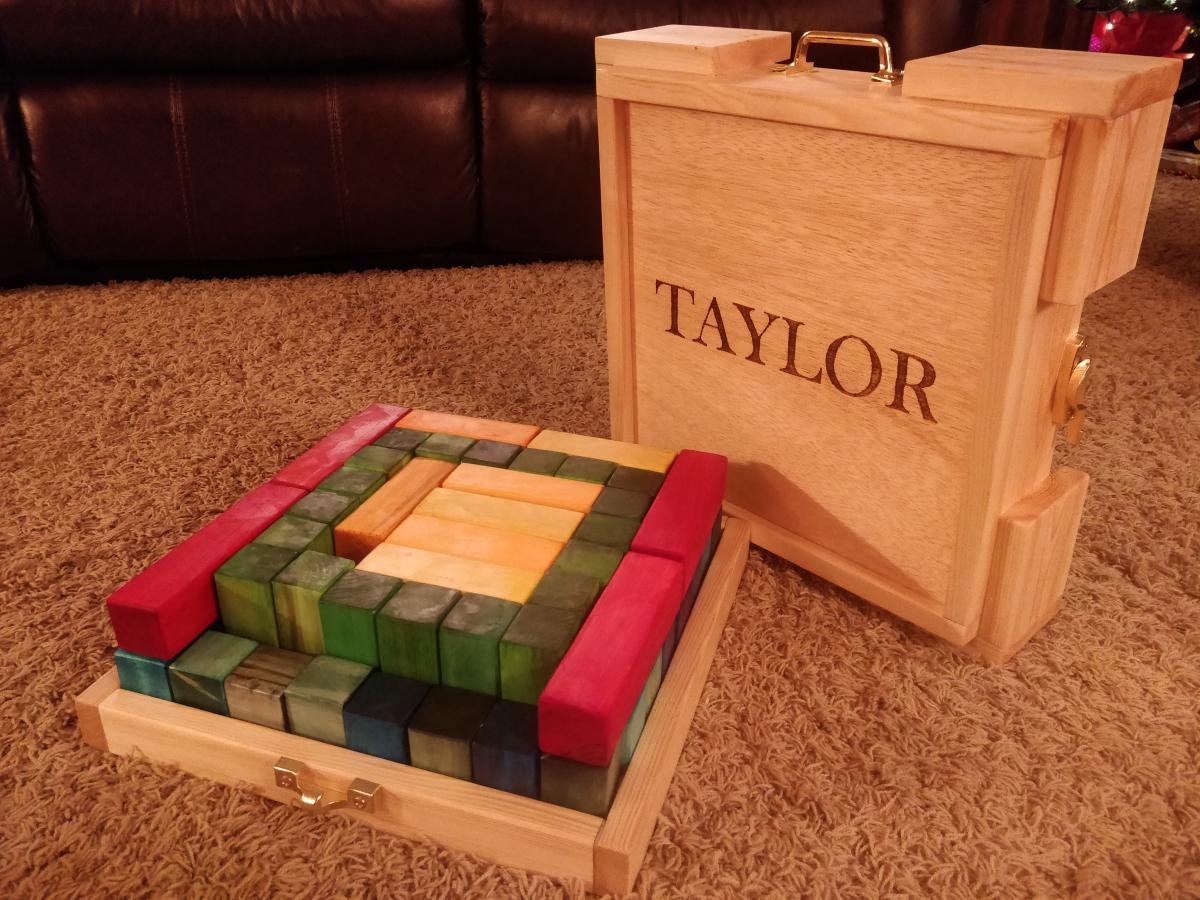
Wood Blocks in a Box
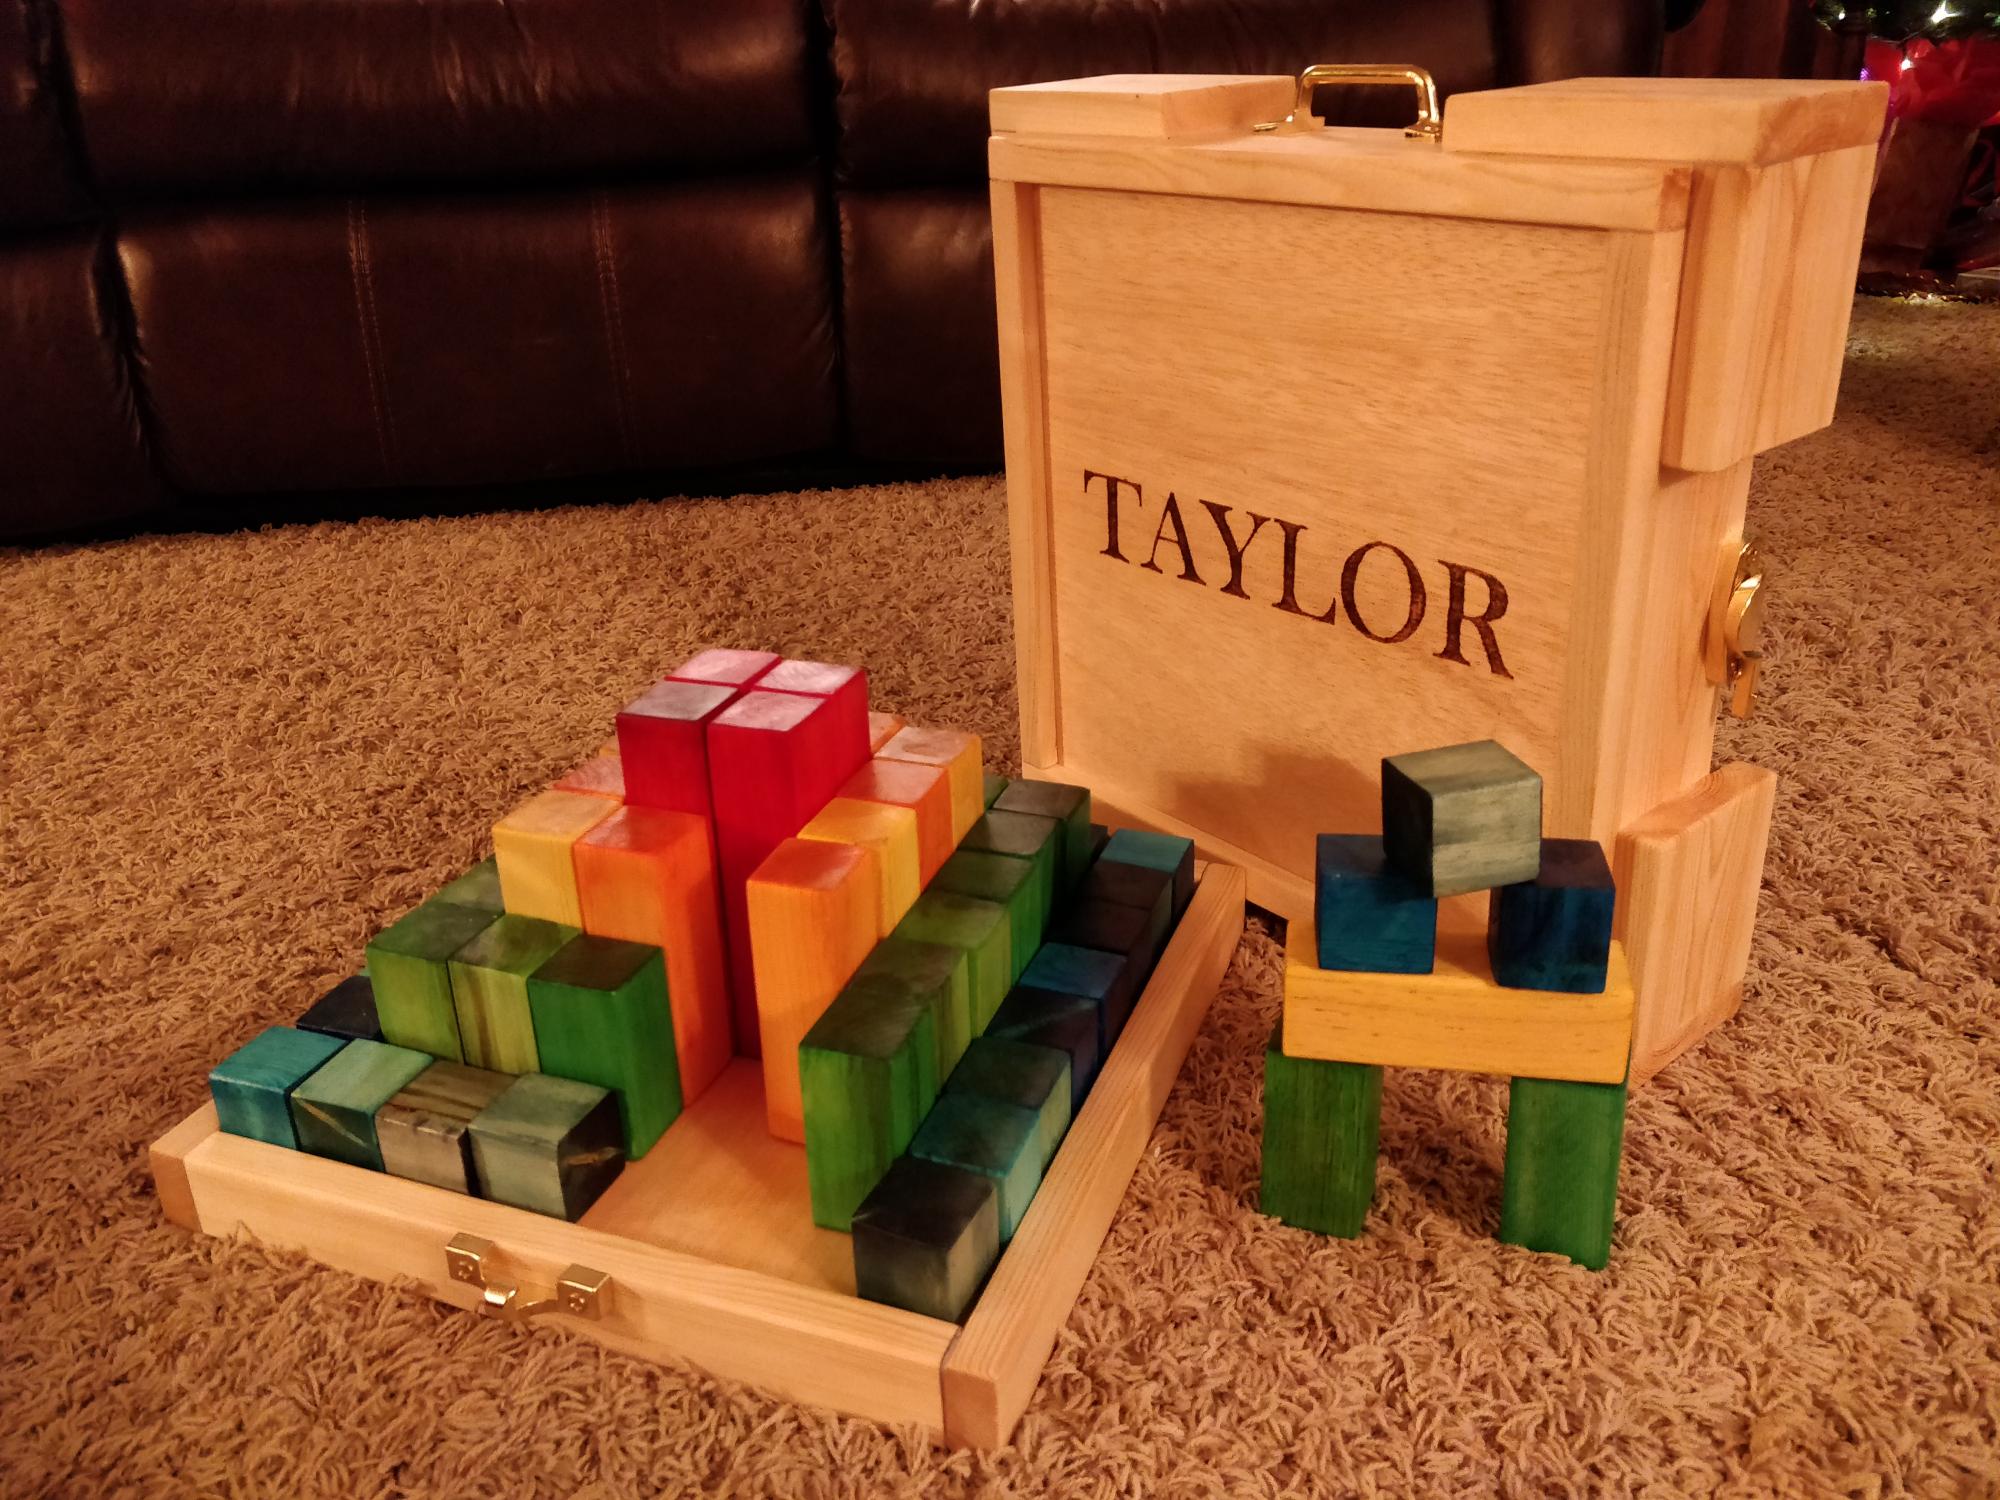
I modified the block dimensions so the smallest blocks are cubic. I also only made four levels of blocks so that the blocks could be stacked into two levels with just eight cubes' worth of empty space. This simplifies storage, and works with the lid I made out of 1x4s to complement the tray that's in Ana's plans. The tray and the lid fasten together with window sash hardware.
I spent forever on this project because it was my first and I was trying to make it perfect. Watching my little one play with it, I now appreciate how soft pine is and how fast kids distress it!
Built from Plan(s)
Estimated Cost
$30
Estimated Time Investment
Week Long Project (20 Hours or More)
Finish Used
I love the food dye colors, but three thick coats of beeswax and coconut oil (applied over several months) are NOT enough to make these colorfast. Luckily at eighteen months my little one is now more interested in building and less in tasting.
I experimented with woodburning on the lid, otherwise it and the tray just have beeswax and coconut oil on them.
I experimented with woodburning on the lid, otherwise it and the tray just have beeswax and coconut oil on them.
Recommended Skill Level
Beginner
Grandson Chair
Made some modifications. Love your plans Ana White. Thank you 😊.
Built from Plan(s)
Comments
Fri, 05/12/2023 - 10:48
Oh my goodness!
A work of art to be treasured, so cute! Thank you for sharing.:)
Craft/Sewing Table
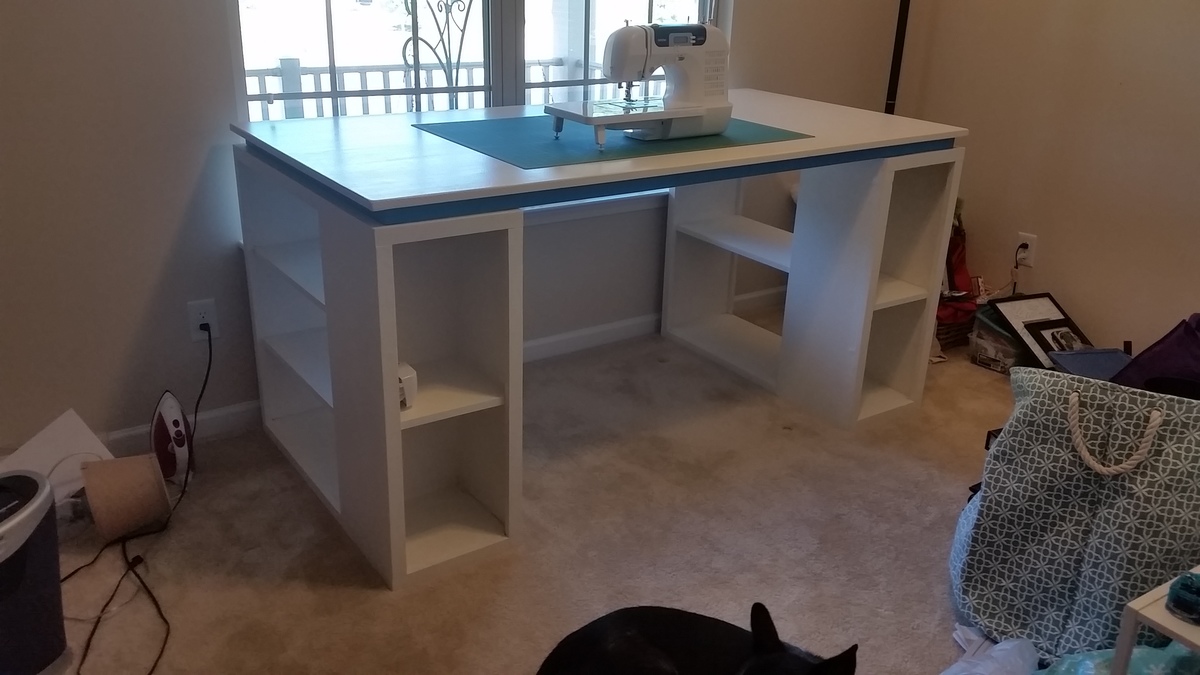
This is a craft table following the Modern Craft Table Plans. There were some adjustments to increase the size of the table to fit the entire width of the window. The final dimensions of the top turned out at 72" x 36" and fits my wifes cutting sheet perfectly on top with no overhang. The project did turn out a little taller than anticipated (built it as if it was a standing workbench or elevated) so that posed an issue with the foot pedal but overall, the wife approves. Future additions may be to add a drawer and attach a couple of adjustable lights, but on to other projects to improve her craft room.
Built from Plan(s)
Estimated Cost
Used MDF and saved some on the cost, overall, about $150. 2 Sheets of MDF a few 1x2's and 2x2's, plus primer and paint.
Estimated Time Investment
Weekend Project (10-20 Hours)
Finish Used
Sherwin Williams Paint, Kilz Primer, Minwax Poly on top
Recommended Skill Level
Beginner
Comments
Sun, 11/21/2021 - 13:10
Where are the plans ?
Looks great…. Where are the plans ? Is there a link I’m not seeing?
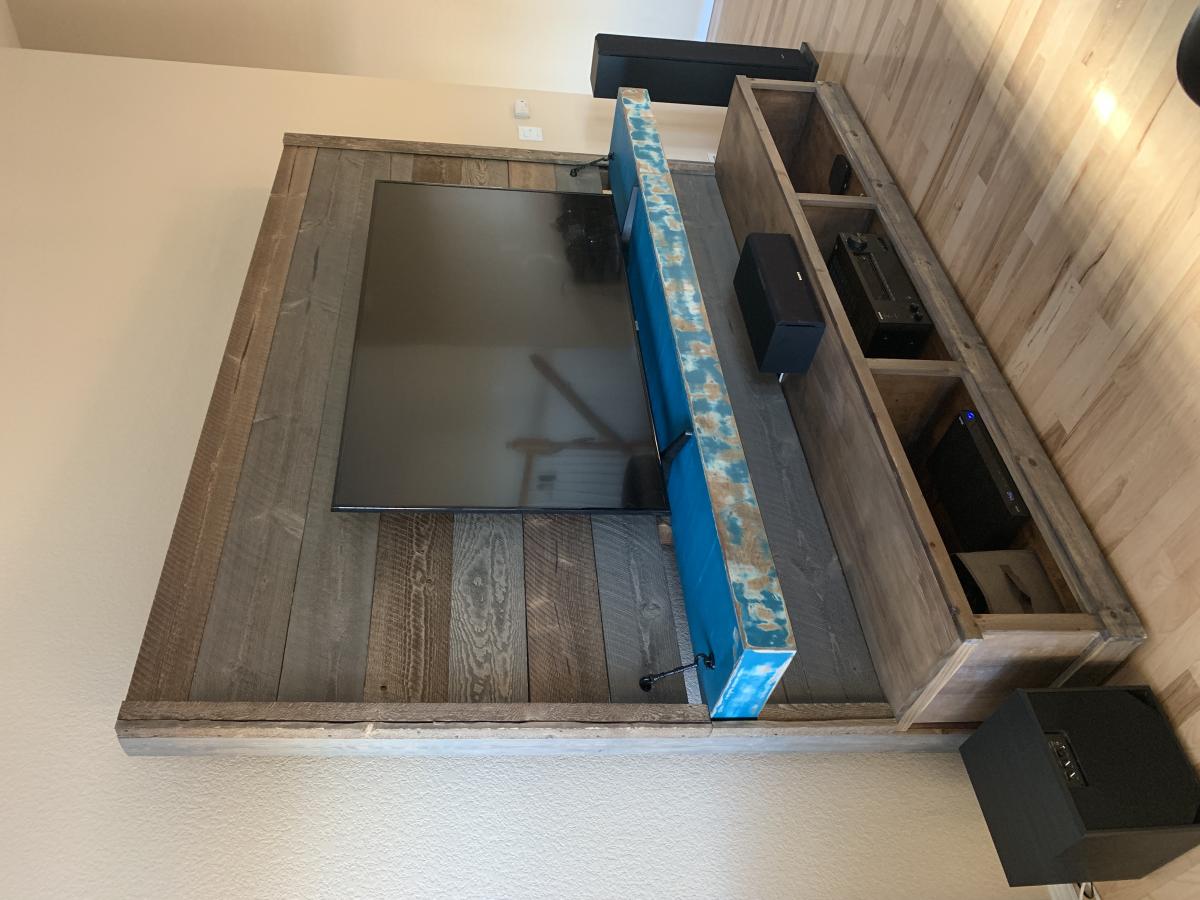
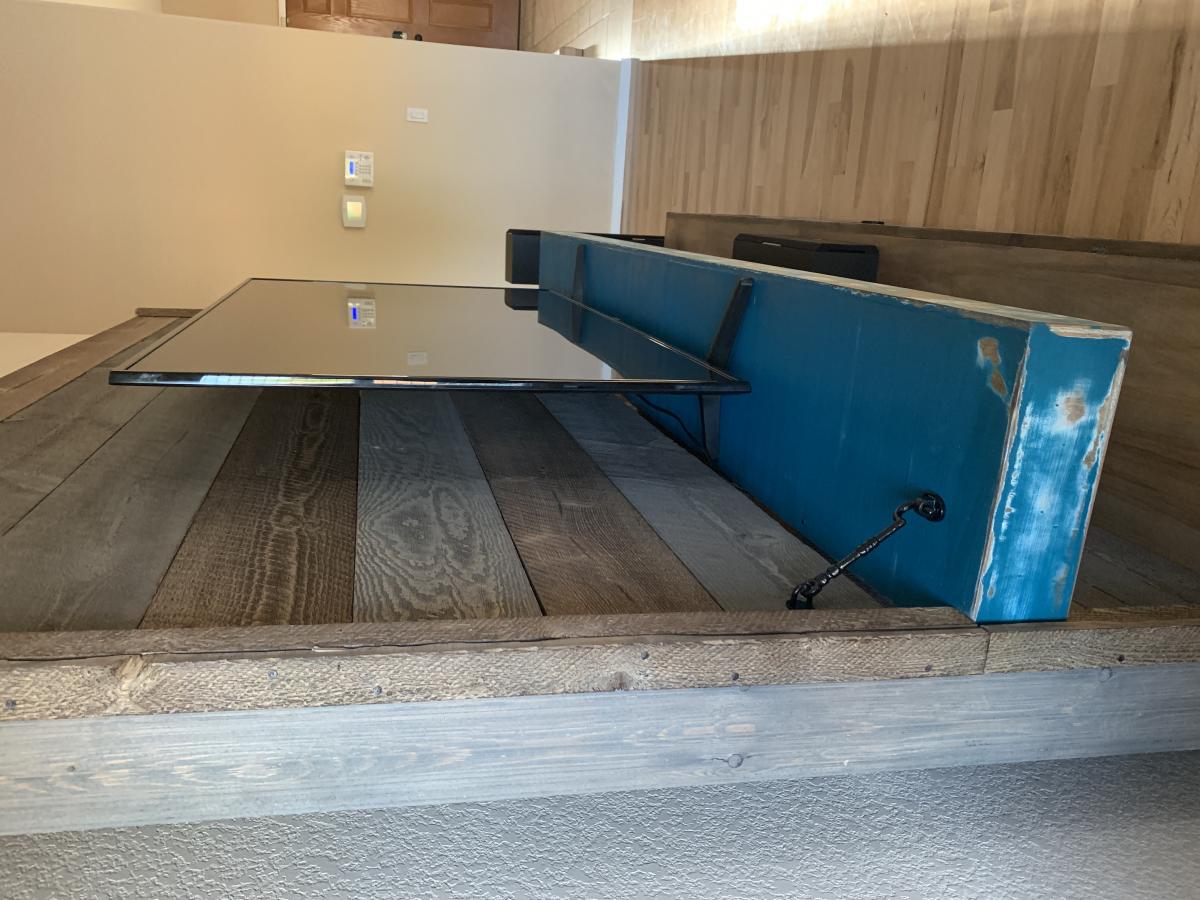
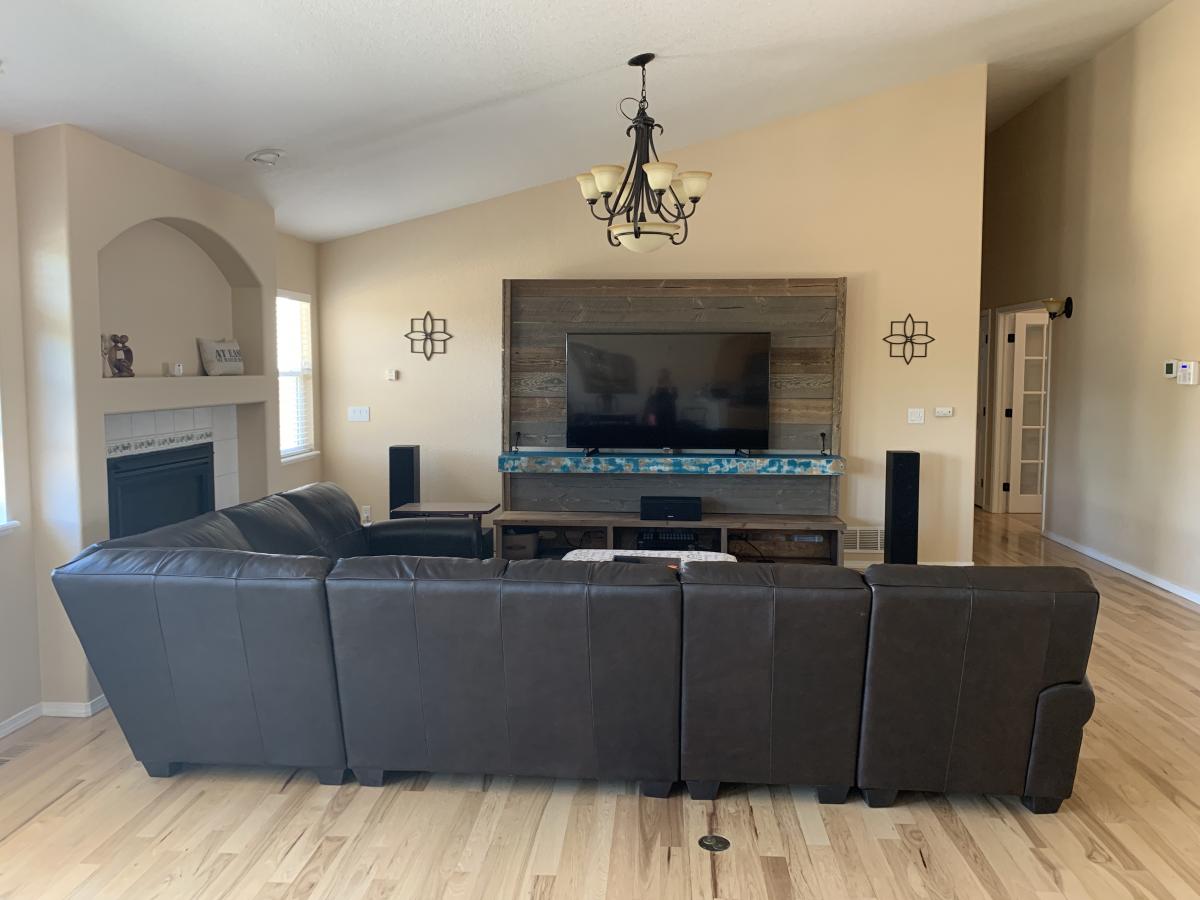
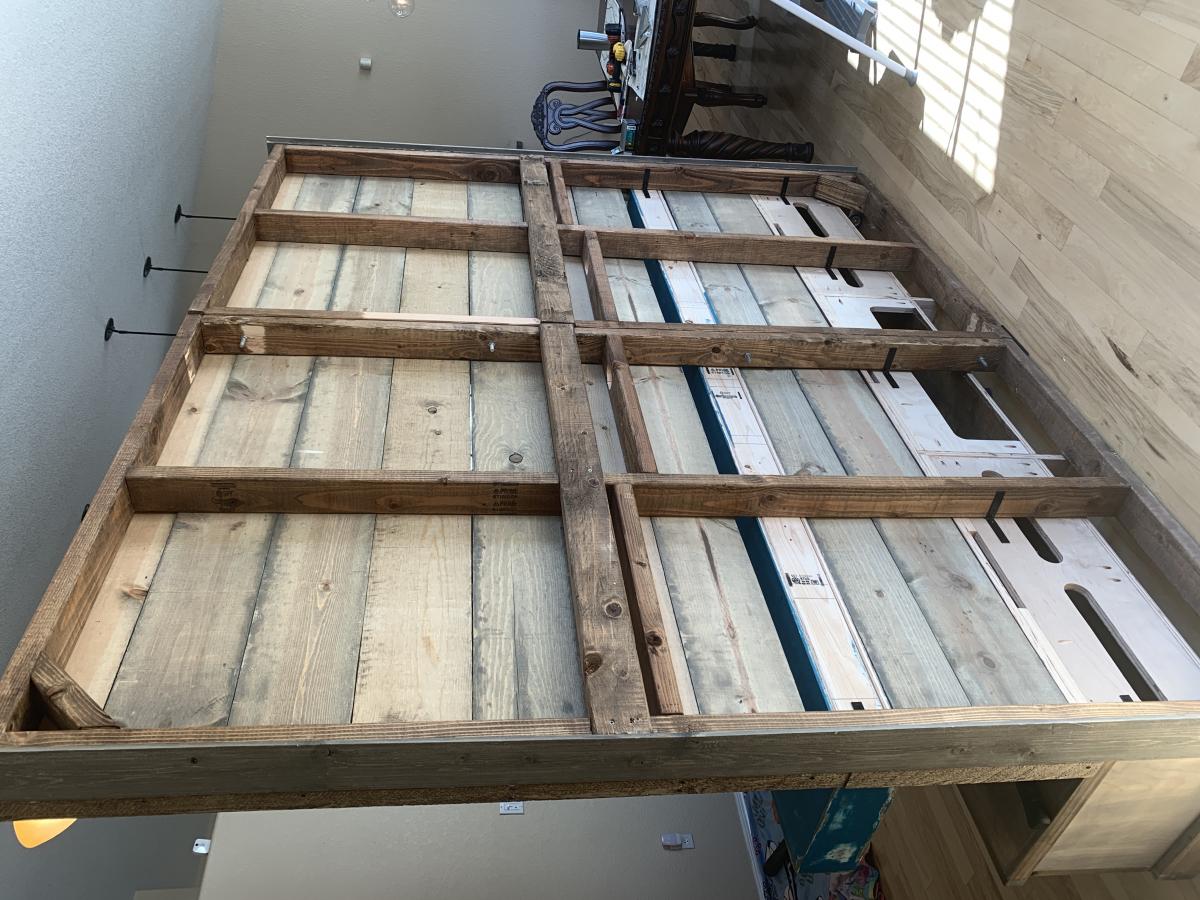
Entertainment Center
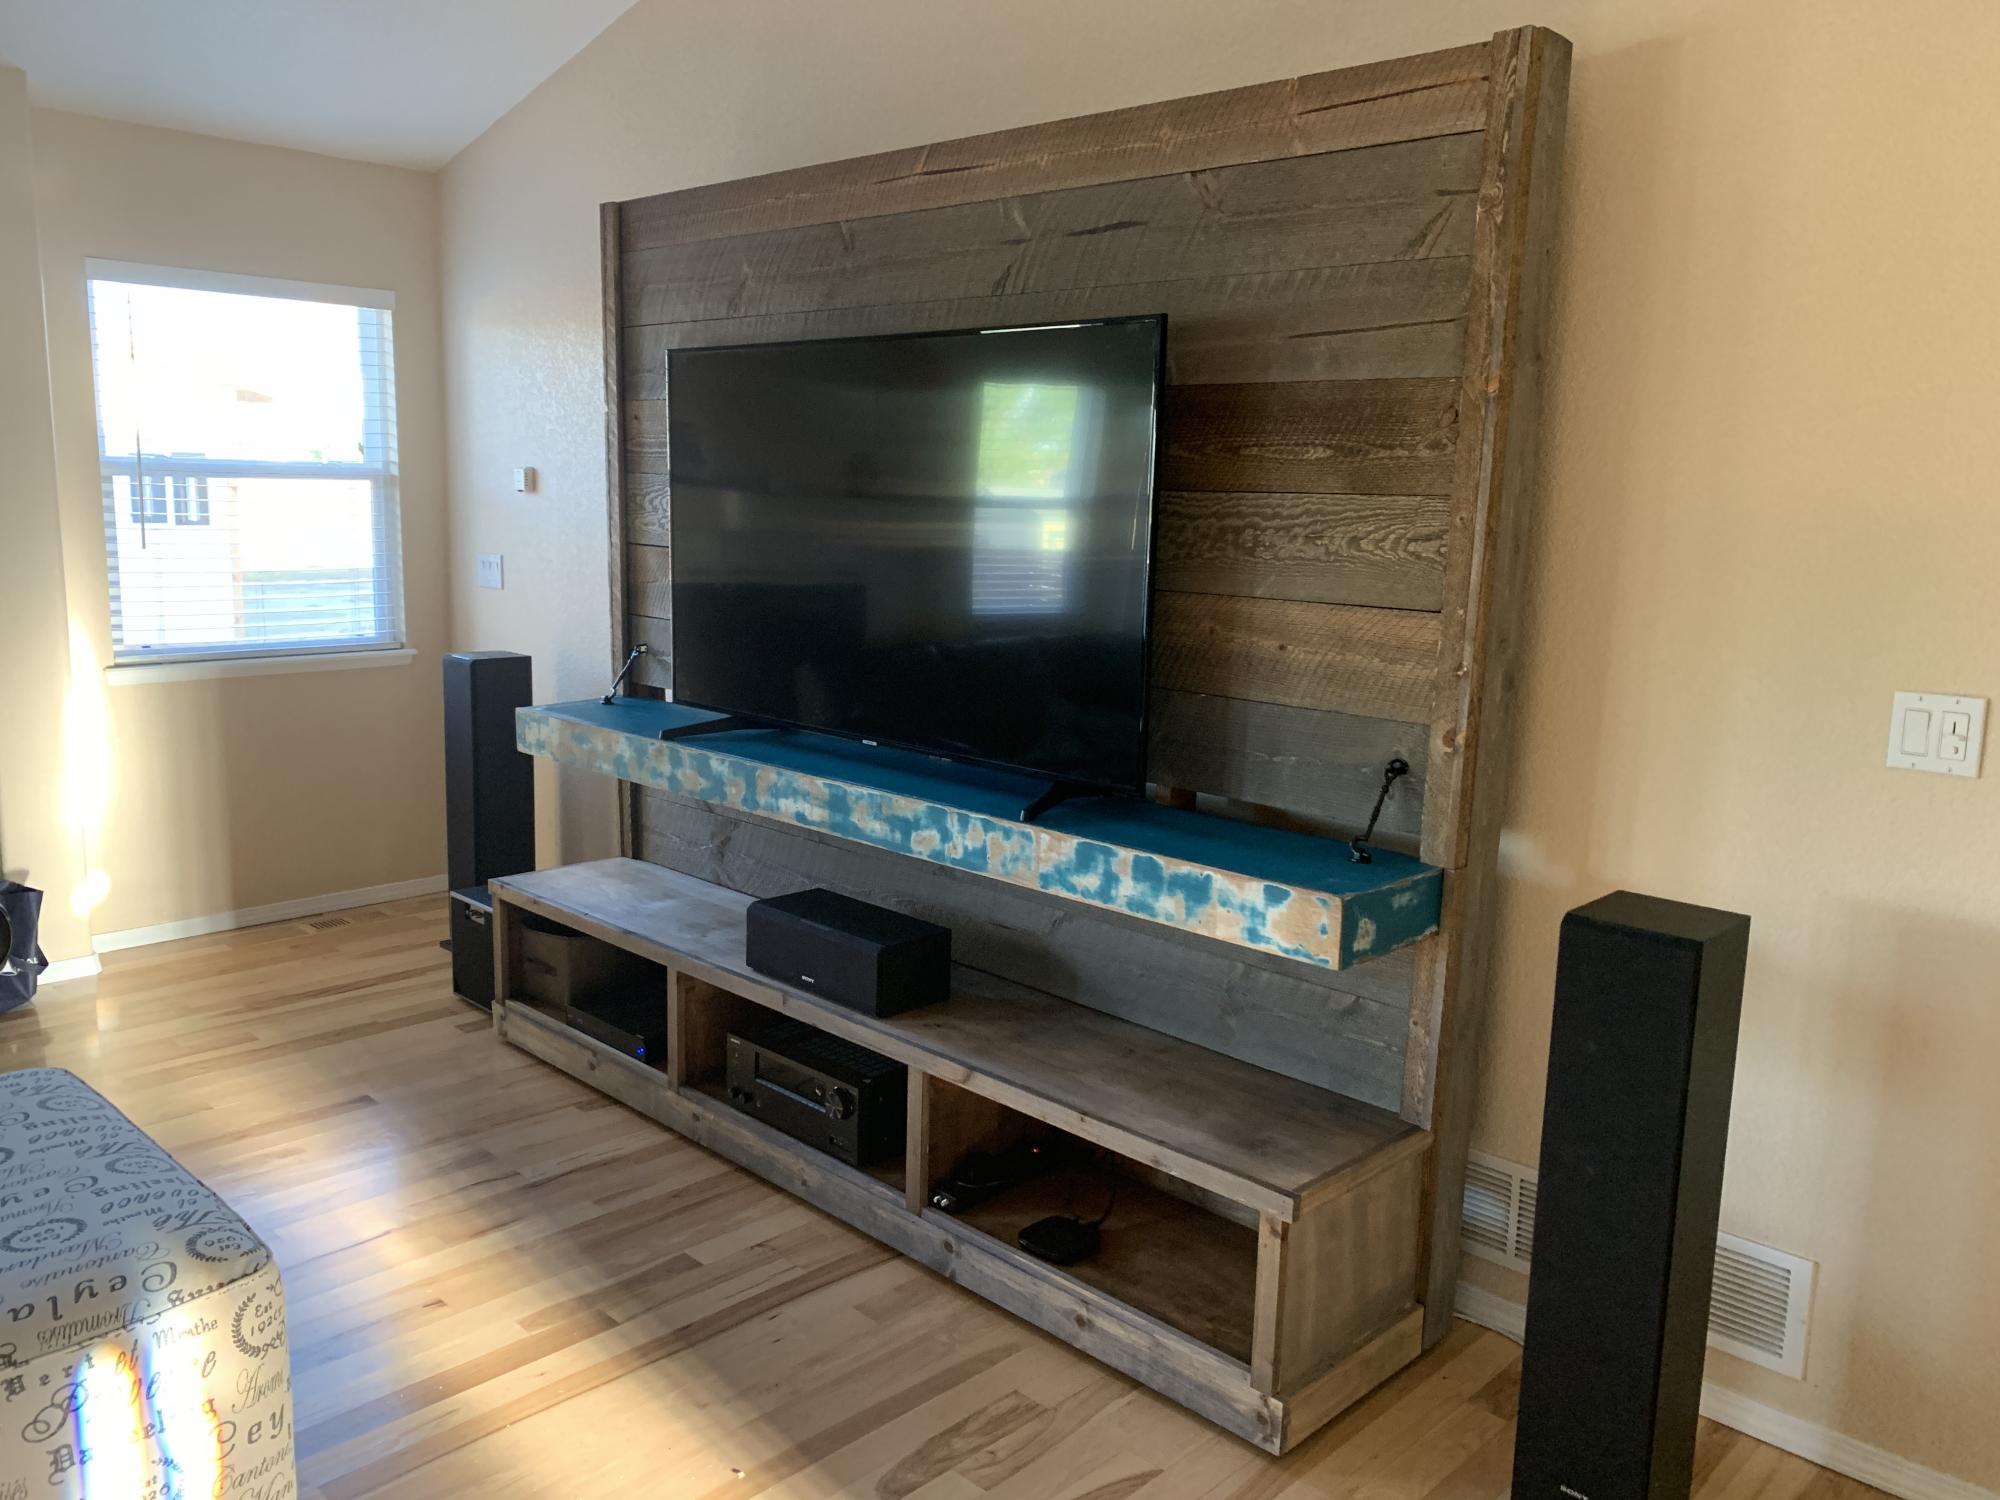
I started with the Triple Cubby Storage Base plan, built two 2x4 walls, and a floating shelf. The walls are 4x7 and were attached inside the house with hex bolts. The walls are attached to the cubby shelf with L brackets. The floating shelf is attached to the wall with 3.5 inch screws and a couple L brackets at the end. Barn wood covers the wall and is attached with brad nails and black sheet rock nails. There are six total 2" wheels under the cubby shelf. We put felt under the bottom part of the wall that touches the floor.

Built from Plan(s)
Estimated Cost
400
Estimated Time Investment
Week Long Project (20 Hours or More)
Finish Used
Varathane Weathered Wood Accelerator, Minwax Early American, Minwax Wipe on poly, Wax
Recommended Skill Level
Intermediate
Comments
One arm 2x4 outdoor sofa

This was so super easy. We are so in love with this. Thank you Ana for making DIY so much fun!
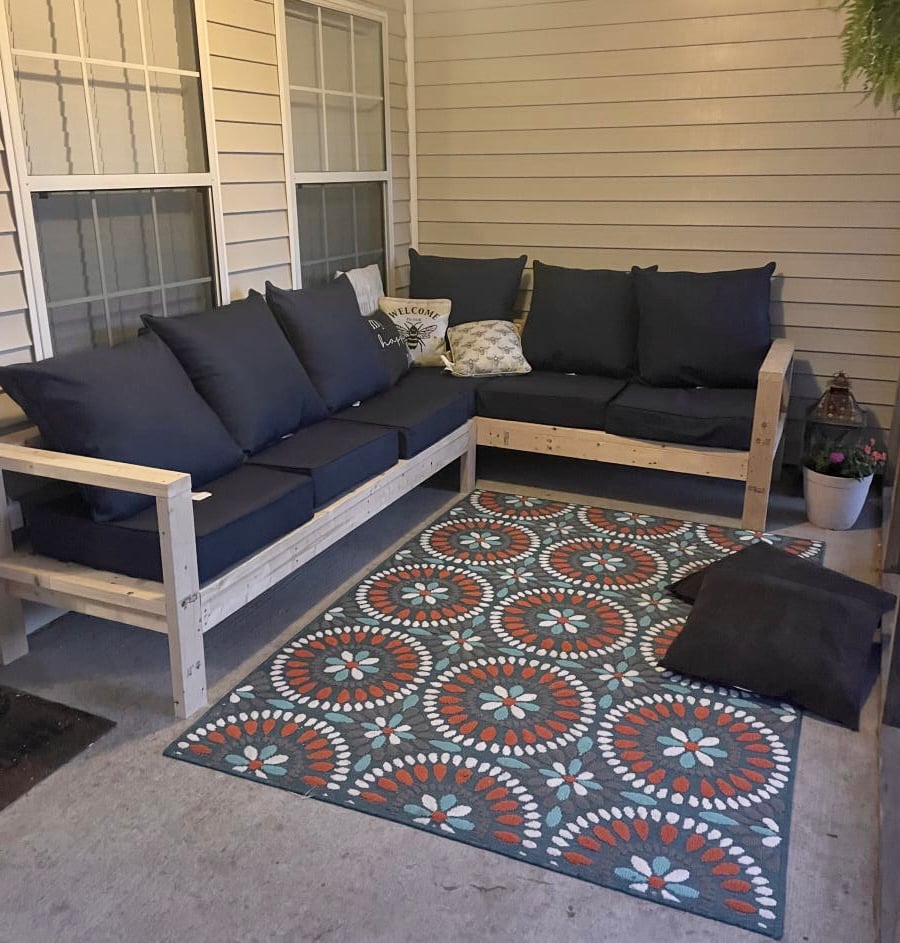
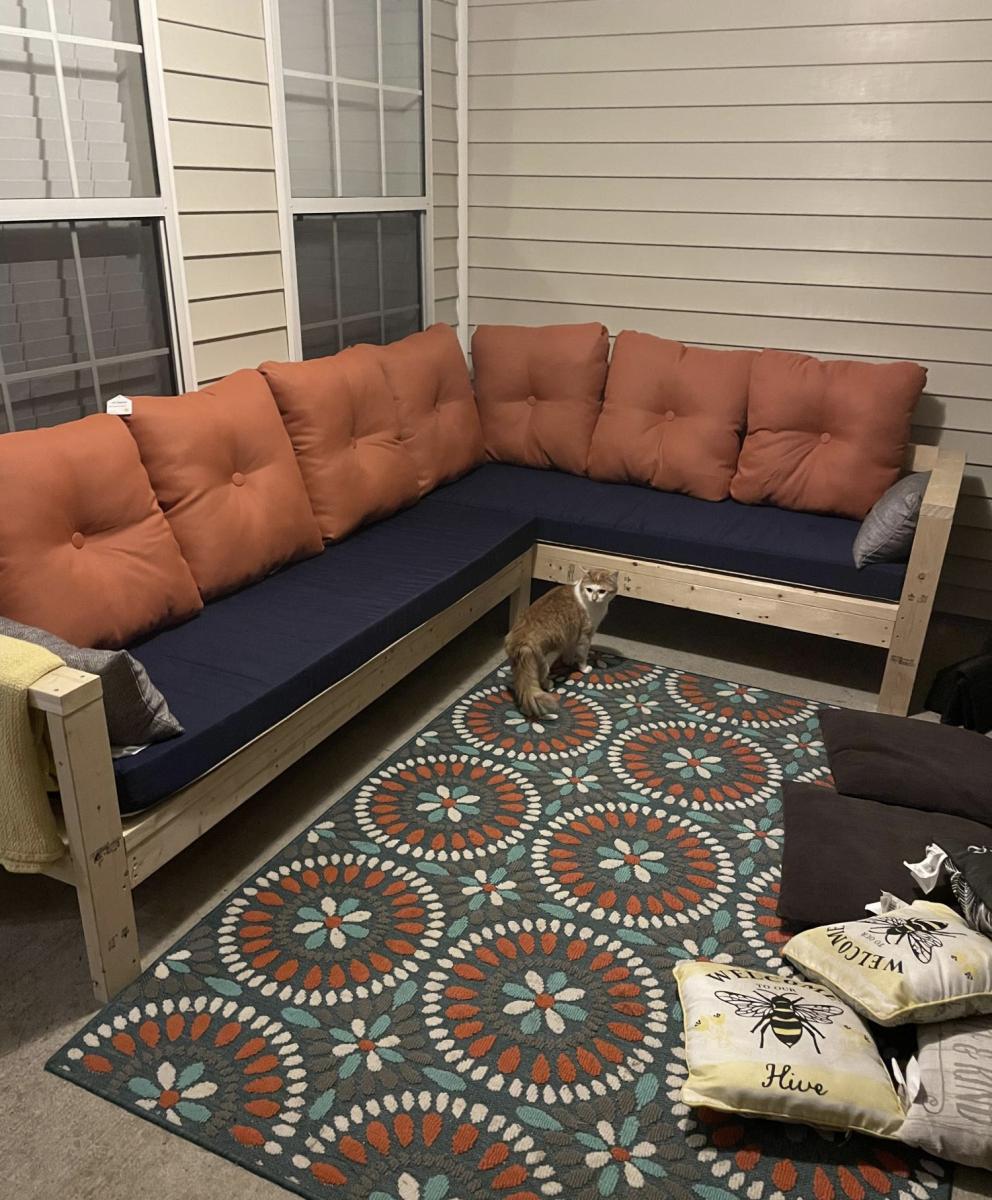
Built from Plan(s)
Comments
Thu, 05/18/2023 - 09:22
Excellent outdoor seating!
Way to go, so happy you enjoy it! Thanks for sharing.
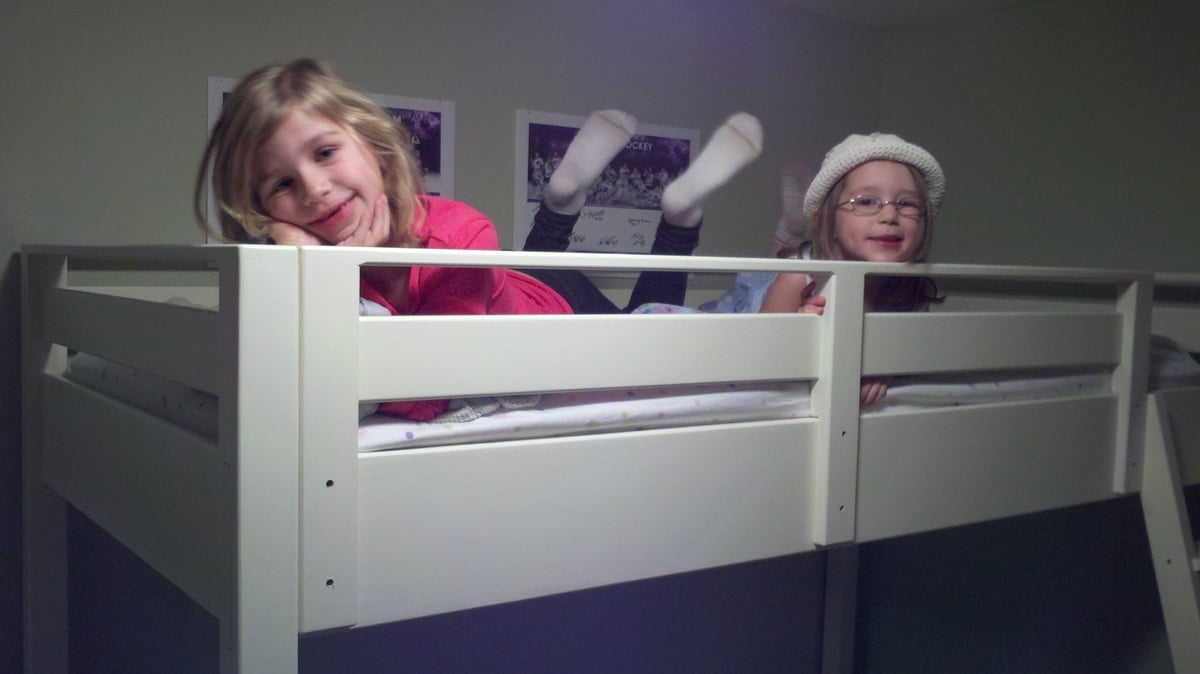
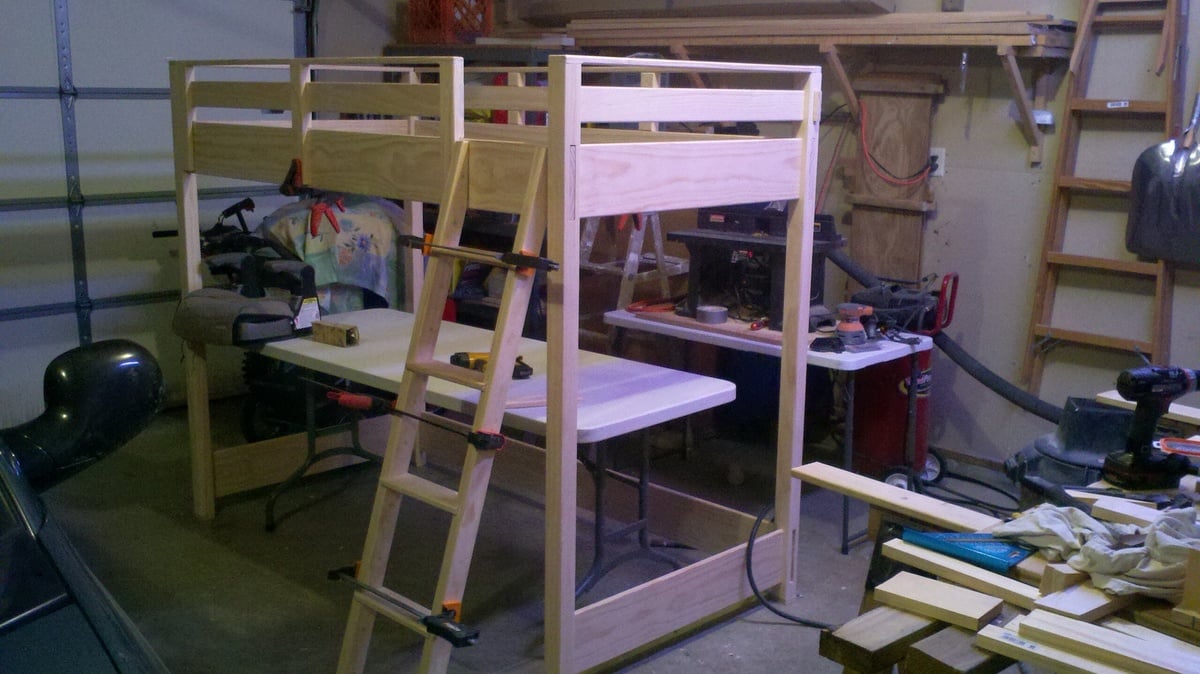
Ella's Loft Bed
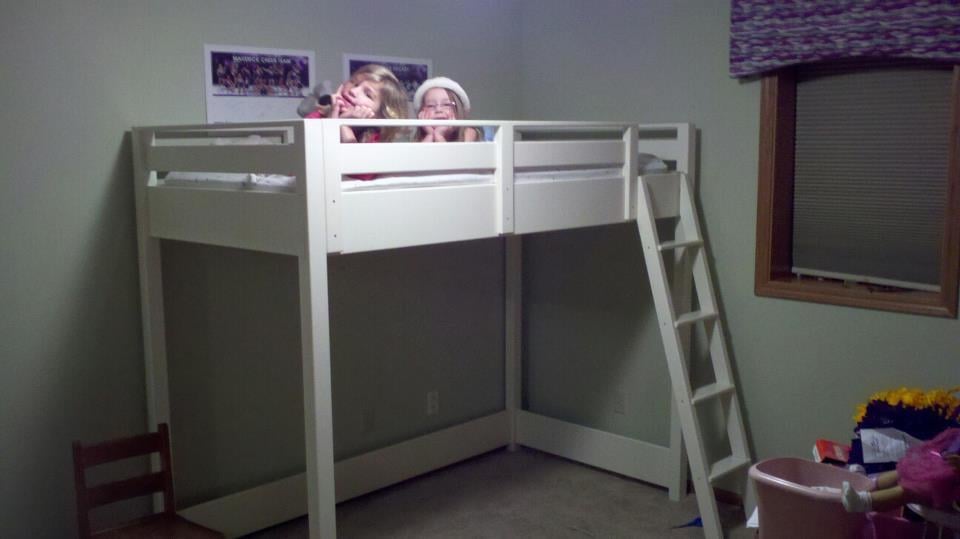
My daughter loves her new bed, thanks Ana!
The plans were well thought out and very easy to follow. I did make a few changes/modifications that others might want to consider.
I used select pine boards to cut down on the amount of sanding necessary prior to paining, however that boards have a fairly sharp edges. Because this is a kids bed and play area underneath I rounded off all the edges with a 1/4" round over bit in my router. I love how it turned out!
I also added two 1x3 supports to the long 1x2 top back rail. I did this for two reasons, first was the 1x2 seems a bit saggy and didn't seem like it would hold up too well to my 6 year old up there. Secondly, it match the front rail nicely. Speaking of the front rail, I also changed the vertical supports from 1x4s to 1x3s. The 1x3s match the 1x3 posts and look much better IMHO.
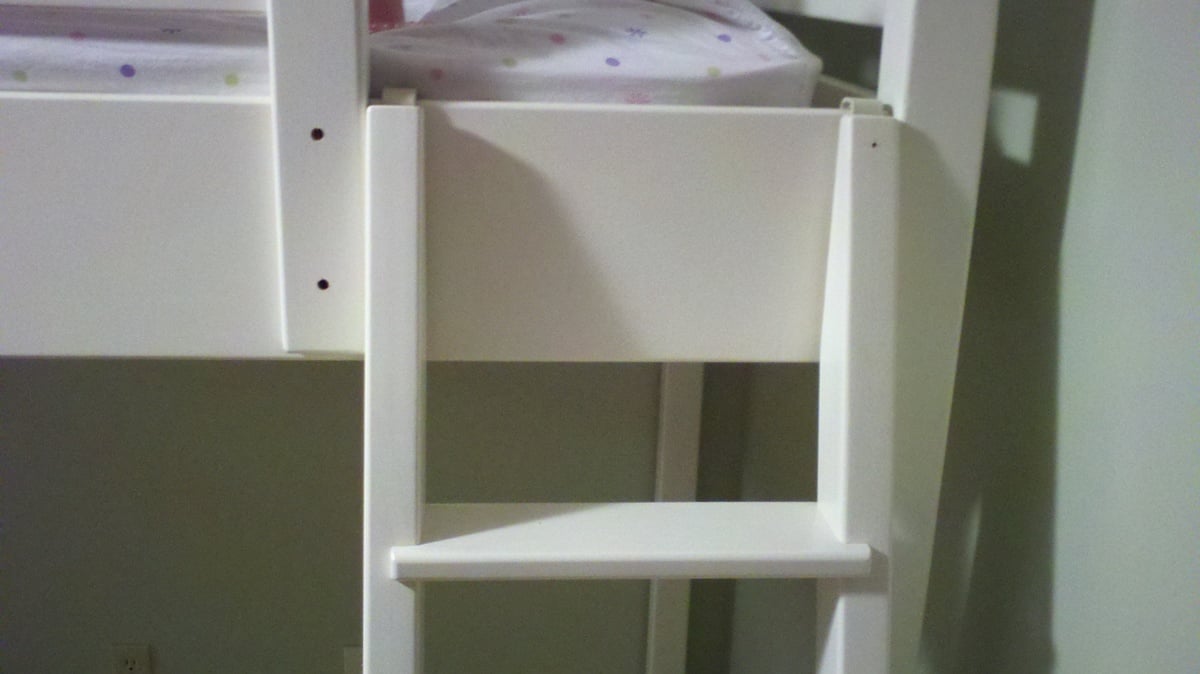
When I built the ladder I was struggling with the gaps left by the 1x3 stair treads when I placed them in the 1x3 sides. Finally I decided to use 1x4 treads, again rounded over with a 1/4" bit. These larger treads overhang the 1x3 sides by about 1/2-inch and look very nice.
Finally, instead of screwing the ladder to t 1x8 bed frame, I bent 5" corner brackets into a "J" shape and attached them upside down to the top of the ladder. The upside down "J's" hook over the top of the 1x8 bed rail and allows the ladder to be easily removable yet is still securely attached to the bed for use.
Built from Plan(s)
Estimated Cost
$300
Estimated Time Investment
Week Long Project (20 Hours or More)
Finish Used
I finished it with a coat of latex primer followed by a couple coats of an off-white latex paint.
Recommended Skill Level
Beginner
Comments
Mon, 01/23/2012 - 14:12
Ella's Loft Bed
Wow!!!! Saw a similar bed at a kid's furniture store for about $2,500 in NYC. Thank God I came across this site before plunking down that amount of cash.
Well Done!
Sun, 02/26/2012 - 21:47
Height Question
Is this bed as tall as the original design specified? For some reason it seems shorter to me. We have a ceiling fan in my childrens' rooms and average height ceilings. I am concerned with making something too tall.
Thanks.
Wed, 07/11/2012 - 07:59
Height Question
Mary - No, I had to shorten the bed by about 3 or 4 inches because our ceilings are lower than 8' in the basement. The only real challenge with changing the height of the loft is re-working the step spacing on the ladder.
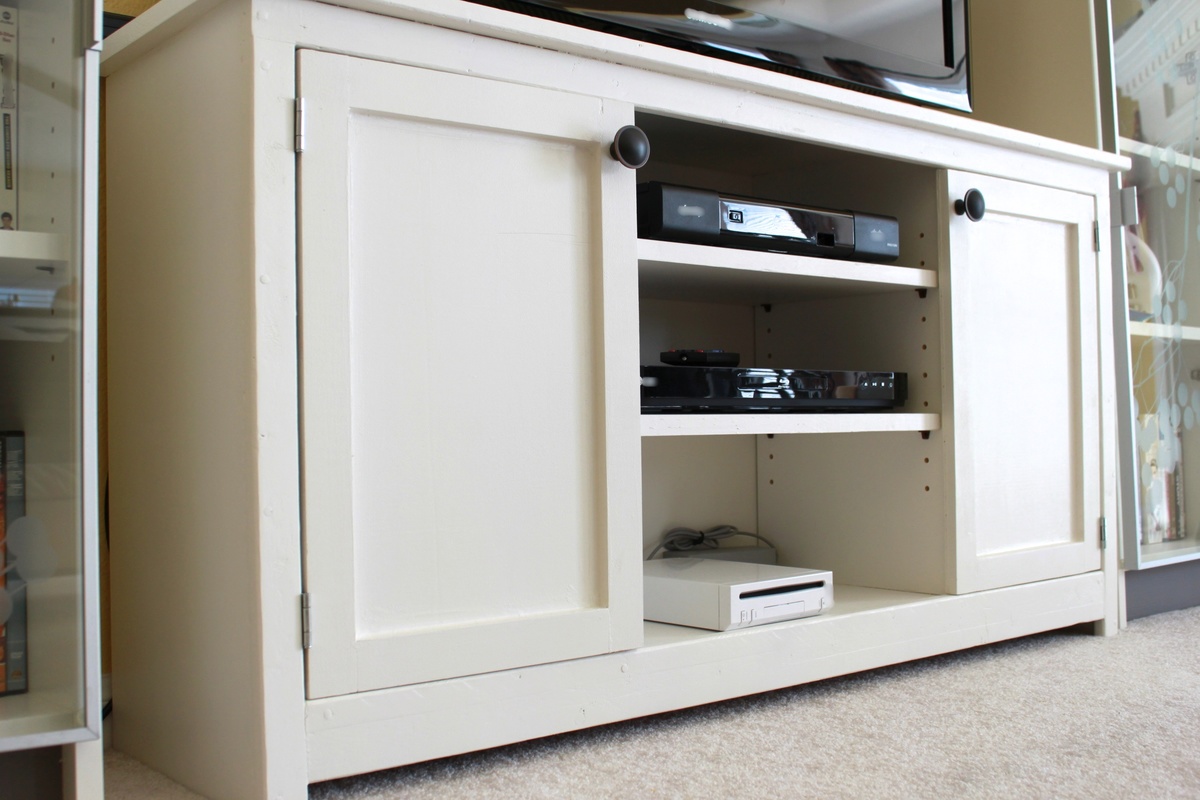
Media Console from The Handbuilt Home
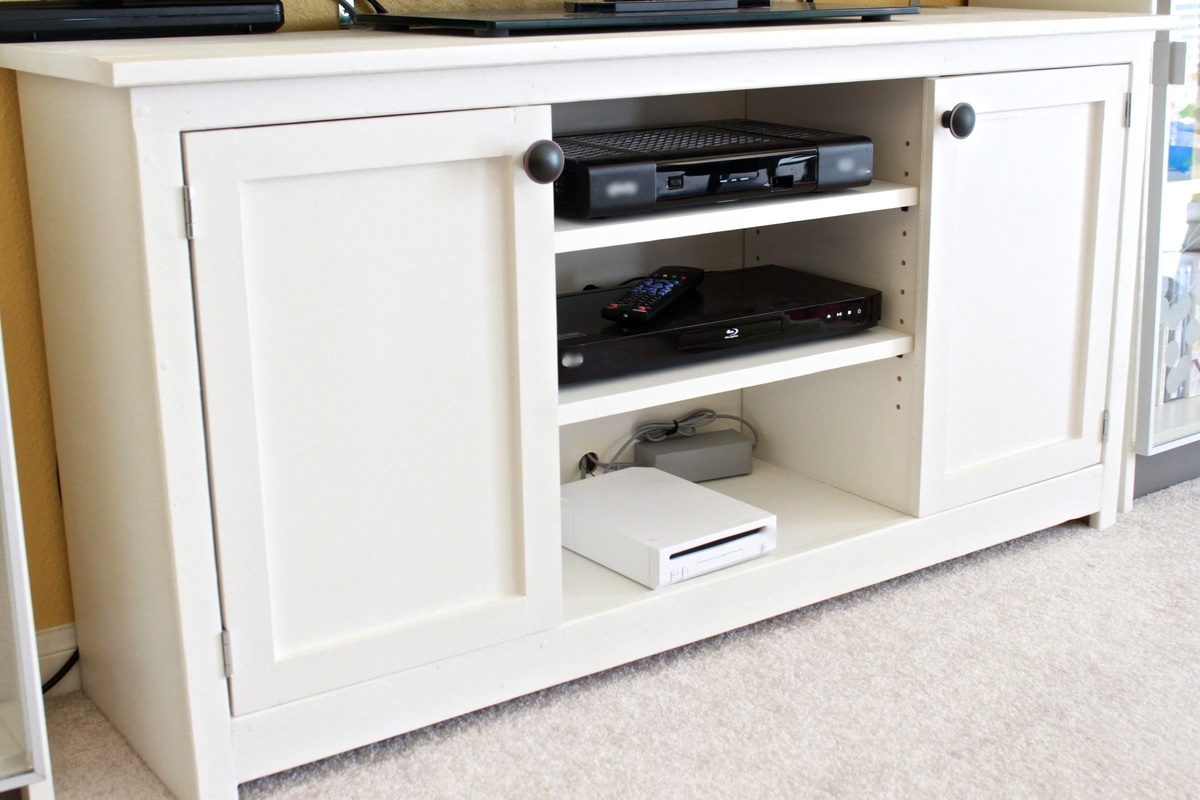
We built this media console because our old TV stand was pretty much a safety hazard for our soon-to-be mobile baby. We found a good plan in The Handbuilt Home and modified it to our dimensions with the help of Sketch Up. We couldn't be happier with the final product!
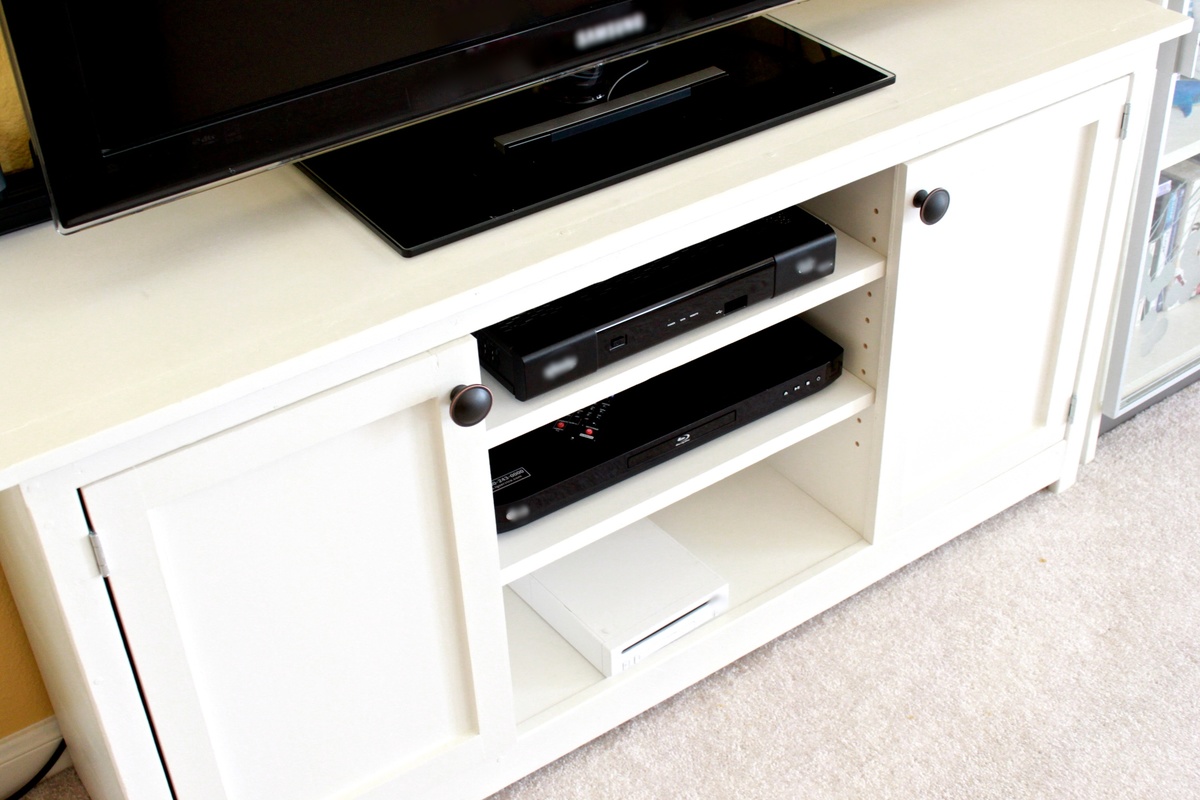

Built from Plan(s)
Estimated Time Investment
Weekend Project (10-20 Hours)
Finish Used
Primer & Behr's Swiss Coffee in Satin
Recommended Skill Level
Intermediate
Toy storage bins
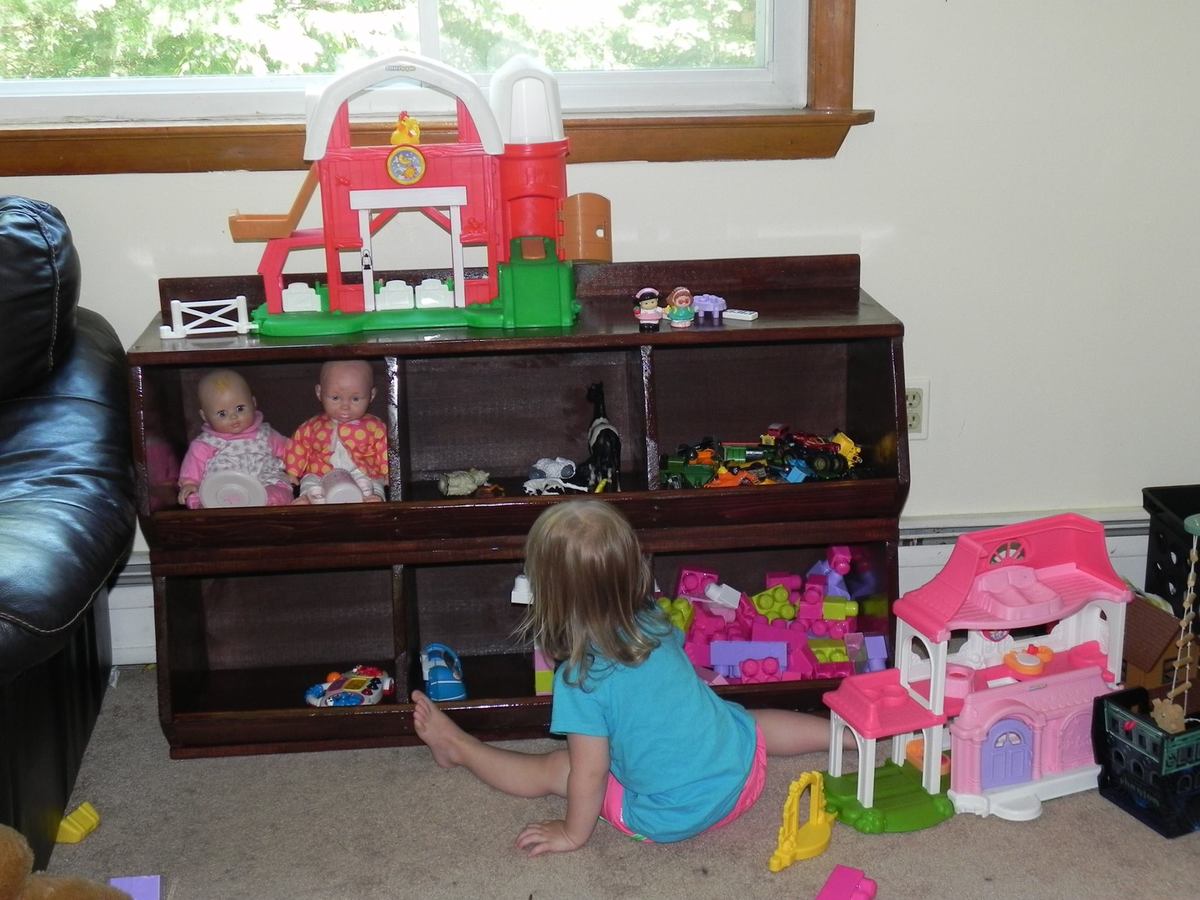
I made this for my 2 year old daughter. She absolutely loves it! I'm glad I only made two levels, because she uses the top to play with her toys. The open bins make it easy for her to find what she wants to play with and she even likes to put things away. I had extra shiplap boards, so I used them for the back. The back is a bit higher than the top, which helps keep toys from falling behind the bins. I secured it to the wall with furniture straps screwed into wall studs. The only tricky part of building this was figuring out the angle cuts. I built this about 6 months ago and it has held up very well. It is a very sturdy design!
Built from Plan(s)
Estimated Time Investment
Day Project (6-9 Hours)
Finish Used
I think I used English Chestnut by Minwax for the stain. I also did several layers of Minwax high-build polyurethane clear semi-gloss. I lightly sanded with fine grit in between coats. I also wiped it with mineral spirits in between coats. It came out very smooth and has withstood several water and chocolate milk spills!
Recommended Skill Level
Beginner
High back porch swing
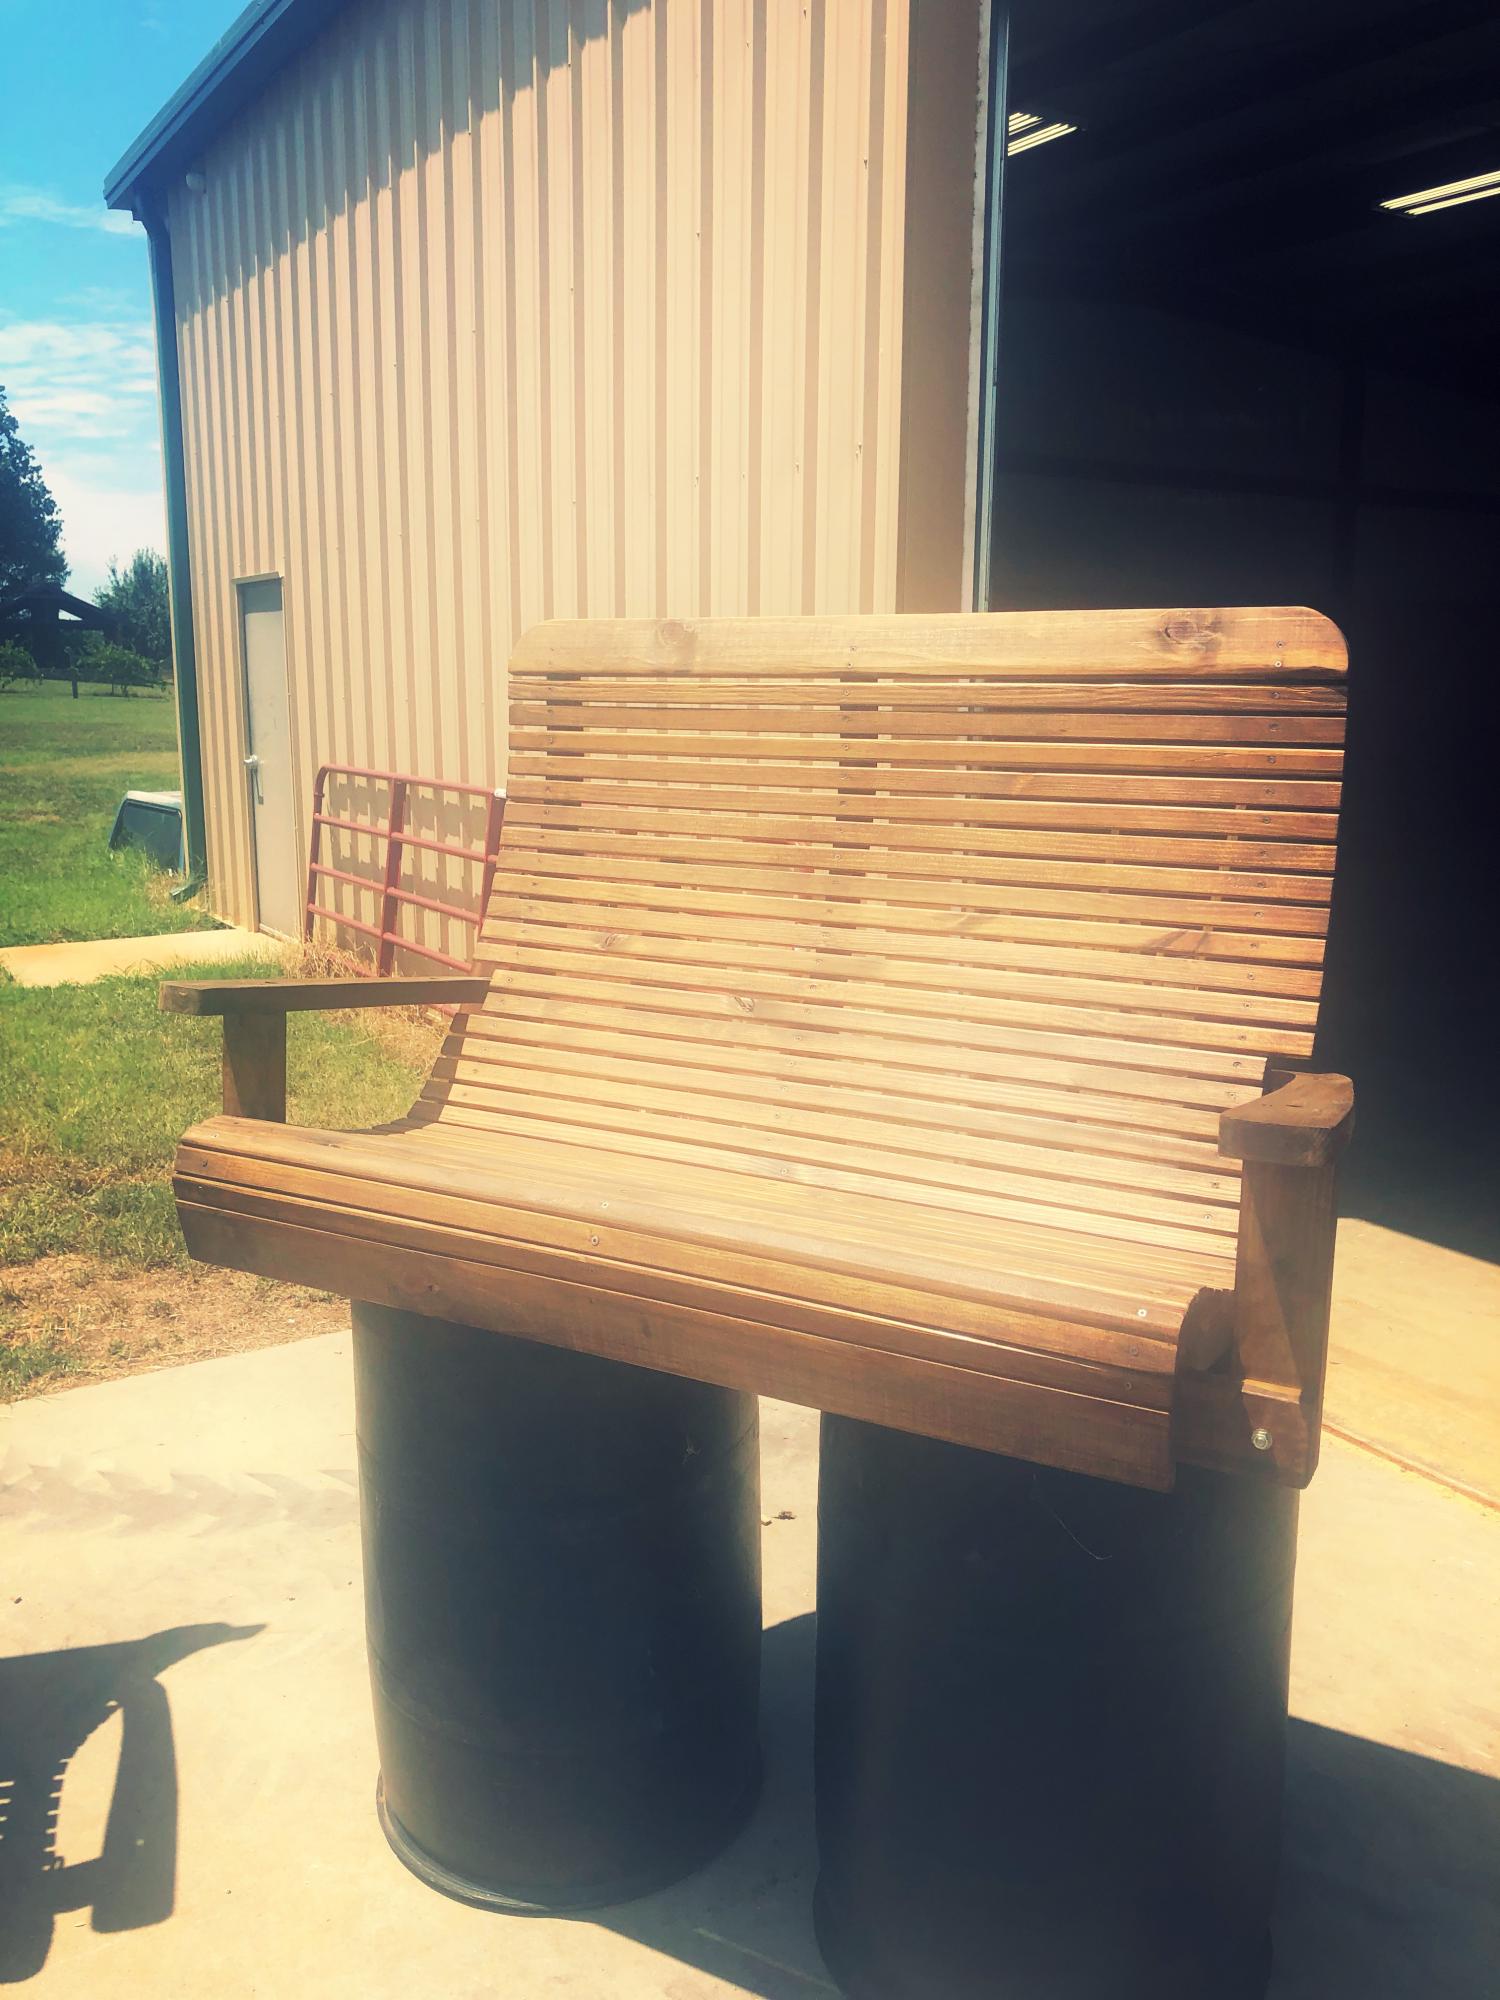
it was an old swing on the family farm. I saved it from the burn pile and remade it. Have made five so far. All hav even 5ft wide, but one was 7ft. Amazingly comfortable swing!
Estimated Cost
175
Estimated Time Investment
Weekend Project (10-20 Hours)
Finish Used
Provincial 211
Recommended Skill Level
Intermediate