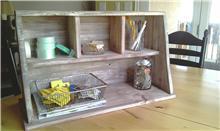
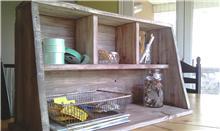
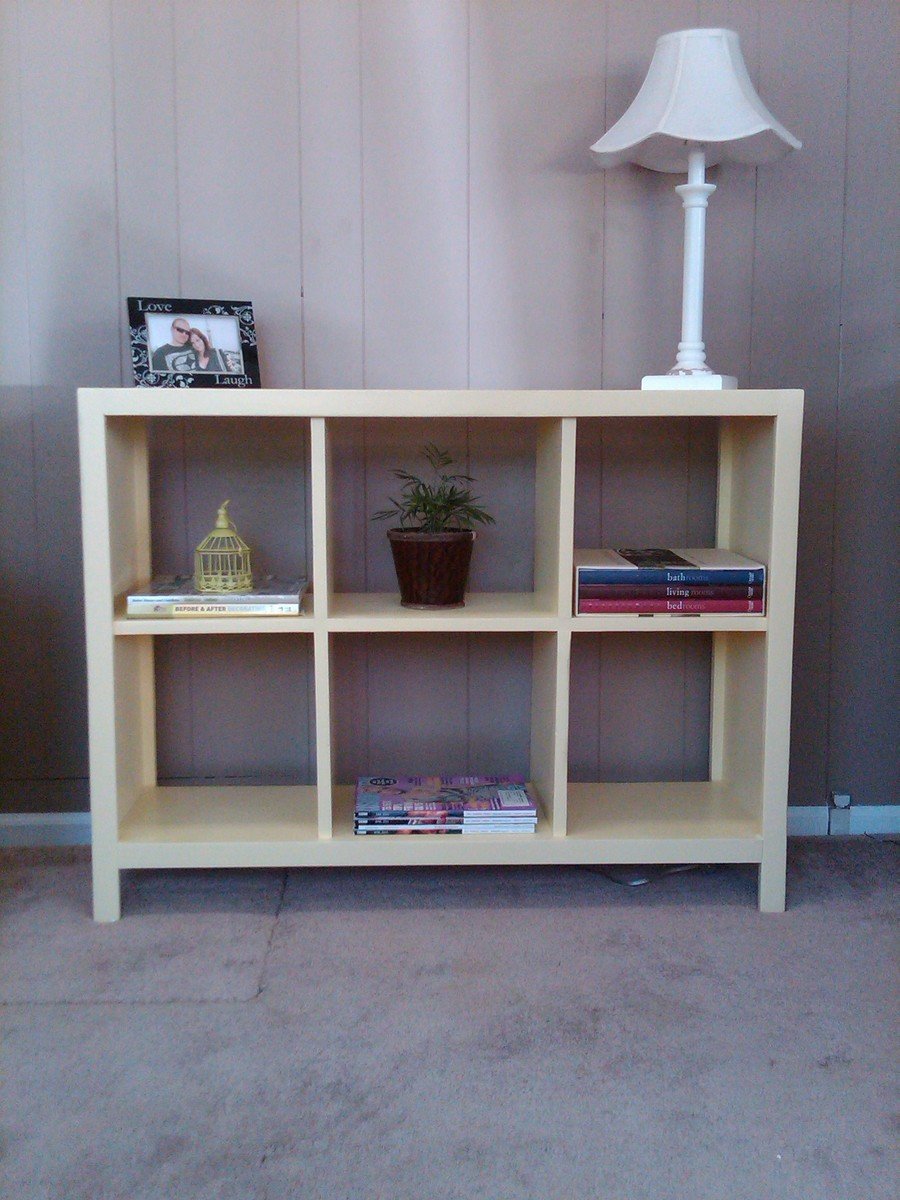
My new yellow cubby shelf
Totally lovin' my new cubby shelf. I painted it bright yellow, but I may paint it a more nuetral color after noticing it does not math anything haha! This is a super sturdy shelf...LOVE IT! Thanks ANA!
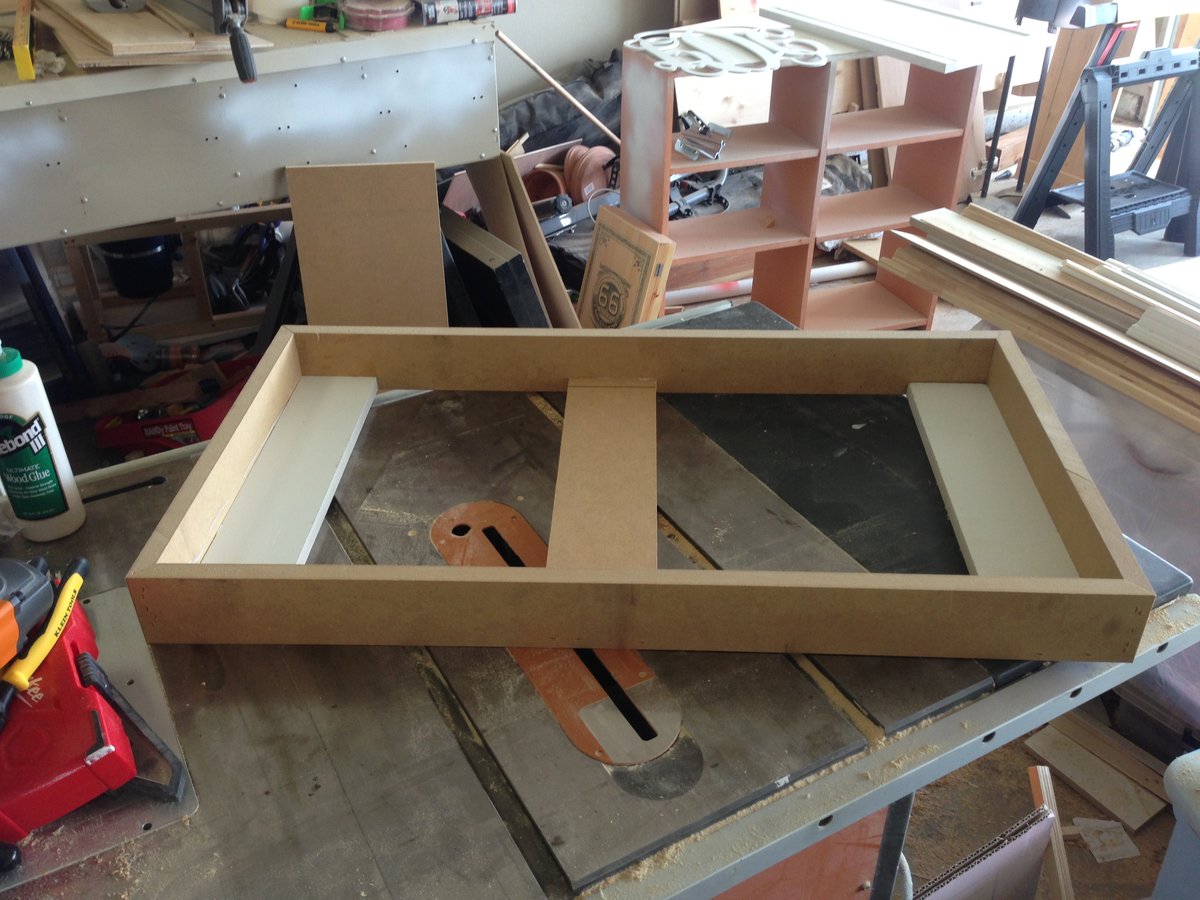
I built this using scrap 2x2s and 1x4s that I ripped down to the appropriate sizes. Also instead of using pocket holes I counter sunk the screws and filled with wood filler.
Upgraded the original to fit the style of our living room. Just a few dollars more in wood. Changed the frame setup as well.
Very busy so I only have time to do a little bit at a time so I have no real idea how long it really took to build. All I know is the finishing took the longest: 2 coats black painted lower with 2 coats stain on the (custom color) and 2 coats polyurethane on the top piece.
I used the Rustic Kitchen Island plans to build this. I made my own modifications making the draw and the shelves the entire width of the unit. I also used 1x2’s behind the X’s to give it more of a barn look.
Built this for my daughter as a wedding present the top is mahogany, benches and base are oak stained pine.
It was time for an office makeover(at home). Sitting on the floor makes for a strong back and works those core muscles, so it was time to change things up. About a year ago or so I modified Ana's Flip Top Storage Bench / Coffee Table for my husband to use as a desk, as he needed to sit on the floor due to a back injury. Now it was time for mine. I instead modified Ana's Scrap Lap Desk. and it was truly built of scraps, with the exception of the hinges(which is odd, because I always have hinges lying around!)
I made the desk larger, and adjusted the height to fit me. I also omitted the side boxes and instead added a shelf on the bottom. Construction was simple and straightforward. Primed with whatever primer I had around, and even painted with a can of oops paint. The edges were lightly distressed, and will naturally distress even more, I am sure.
I had a green bookcase already, and the orange bins with I got on clearance at blue some time ago, and suddenly my color scheme was set--in the 70s. But I like it, as I need more color in my life. The printer stand I cobbled together out of scraps as well--essentially a box. A few boxes covered in paper, a rug from old tshirts, and two light fixtures-one a polyhedron from milk jugs, and the other a flower pot from the bullseye store, and I am set. Oh, and I finally got around to making my corkboard from all of the wine corks I've collected throughout the years. Or some of them, anyway.
I built cedar raised beds out of cedar decking, 3 pieces 5/4" x 6" x 8', actual dimensions were 1" x 5.5" x 8', plus 1 - 2 x 4 cedar. I made 48" x 96" boxes. I cut 1 of the cedar deck pieces into 2 - 48" long pieces. For the corners, I cut the 2 x 4 into 8 - 5.5" long pieces. I then screwed 2 of the 2 x 4 pieces together to form a 4 x 4 block. I used these as the inside corner to screw the decking to. The total cost was $60 to build 2 cedar beds. The other option would have been to make them double height, by cutting the 2 x 4's 11 inches long. This is more expensive then the boxes Ana did, but I could not find cedar fence slats, they appeared to be Northern White Pine which would have deteriorated quickly. I obtained the lumber from Lowes.
I omitted some of what was called for in the original plans at ana-white.com. I wanted only a headboard. I then opted to go without the plywood backing when I found out that my local Home Depot's cutting area was not cutting due to the machines needing to be repaired. I added an extra piece of wood to the legs to accommodate attaching the bed frame. The finish is Varthane Red Oak and sealed with Minwax Polycrylic in Satin.
My mom is very happy to be getting these two headboards for her spare room. (The other one is still on my work table in the garage awaiting assembly and final finish!) Thanks for great plans to work from Ana!
I used my CNC machine do add custom details to this build , this thing is huge ! The hardware was a bit tricky to track down the parts but not hard to assemble at all.
A gift for my husband! Now I’m hoping he will get me the fireplace! Ha ha!
I love this step stool!! My daughter uses it EVERYDAY! This was the first thing I built and I think it turned out pretty good. I did a different design on the bottom sides to make it a little girly since I was painting it blue (girls can have blue stuff too!)
This fun patriotic caddy was created with some small modifications to the plans that inspired this project : Ana White's Soda Caddy . I added a space for napkins to my version.
Sun, 08/11/2013 - 19:20
I love how you modified the compartments fit the napkins!
We went with the mission style headboard and used 1x2 posts instead of a solid or upholstered backboard. We also converted the designs to accomodate our California king mattress.
The designs on the site are for a queen sized bed, which is 60"X80". The "H" frame of the headboard is 66" wide (two vertical 2x6's and a 54" horizontal piece). Our California king mattress is 72"x84". So that's 12 inches wider than a queen. As such, we simply adjusted everything up by 12". So, insead of a 66" wide H frame, we made it a 78" H frame and so on.
It took just one day to build. But we used an entire container of woodfiller to conceal the joins, nail/screw holes and knots, lol. Then we used 2 coats of primer and sanded between coats. Then used 3 coats of latex semi-gloss paint, sanding in between each coat. The wood filler, paint, sanding and drying time is what caused the project to be more than just a weekend thing.
Recent projects:
Treehouse for my 6-year old granddaughter
Desk for my 6-year old granddaughter
I wanted to build something fun and challenging for me. I was inspired to do more caddy things because of Anas fun plans for her Soda Caddy. I often try to design my own plans, (the old fashioned way, because skechup hates me!). I LOVE to look at pictures online, and just see if I can replicate it somewhat. So this Desk Caddy is what I came up with. I used all old wood that I had in the shed, and was begging to be made into something fun! I think this would be cute for so many different areas. Outside, you could organize your gardening items, seed packets, shovels and pots. It could be an awesome message center, mail area. Whatever!
If the dimensions are with the image, it's much easier for me to figure out, this one had dimensions, so I just went with my gut and I think it turned out ok. It sold in my booth, at our local antique mall in 2 days.
Without the Kreg Jig, I would not have had the confidence to build this, and sell it. I love the Kreg Jig!
Clearly I need to get a new camera, and need to take better pictures, SOON!
I used Ana's plans and only made one adjustment. I could not cut the 50 degree angles on my miter saw so I just borrowed the "V" design from one of her other plans. This table is really heavy and sturdy. A helper is necessary to flip the table top back and forth.
I used flat stone and a masonry circular blade for the base of the corner posts. I also used 2 x 4's for both layers of the top boards. It was a lot of fun to build.
This is my first Ana-White project (first furniture project, for that matter). I used the Farmhouse Bed as inspiration and modified the headboard / footboard to be a little taller. Other differences are that I used larger side railings (2x10) and left off the decorative tops of the headboard / footboard. Pocket holes hide all of the attachments, and I found some amaing bed rail hangers so the bed can easily be disassembled in case we move. It's super sturdy and my wife is happy (the most important part)!
We just moved into our newly built home, I love to cook, and realized really didn't have a good spot in the pantry for all the spices. This was my first project and in doing internet search for ideas came across Ana White's website, not only did I find the spice cabinet plan I was looking for, but a treasure trove of other projects and ideas. New to this so I have found Ana's site to be such a blessing. Yes, this made me a hero to my wife!
Built this over a relatively warm Saturday in January. Like most projects, the building wasn't bad but the finishing took forever :)
My wife liked the PB Larking High/Low table, but I didn't like the price. Took about 3 weeks of evenings and weekends.
Used 3/4" MDF Panels for sides, bottom, and top
used 3/4" select Pine for face frame
used 3/4" smooth plywood for drawer faces.
cut additional pine strips at 15/16" and then routed one edge for trim work around drawer face.
same process for right side door, but added 1 1/2" pine to trim along sides and bottom
Attached 2x4's to bottom of table and then covered with MDF panel for skirt.
Skirt is an 1/8" raised from floor to give space for carpet and not cause stress on skirt
used a jig saw on front of skirt for cutout
used decorative molding for under the table top lip, you'll need to figure out your overhang for whatever molding you use.
Used MDF for the changing pad holder. about 3 inches tall and then cut to dimensions of pad.
Topper on the right is just a miniature of the full table, from a contraction perspective.
My dimensions are slightly customized from the below.
Changing Table
Overall: 55" wide x 21" deep x 44" high
Dresser Cabinet: 15" wide x 19" deep x 23" high
Dresser Drawer (3): 31" wide x 18" deep x 7" high
Small Top Drawer (1): 11.5" wide x 15" deep x 5" high
Topper
Overall: 34" wide x 17.5" deep x 3" high
Topper drawer inside small cabinet: 16.5" wide x 11.5" deep x 5" high
Tue, 07/09/2013 - 20:15
if you have a plan or at least dimensions and material list for this project, i believe many people including myself would love to try this one. My wife is due in Oct and would love me to build this for out nursery.
Thanks and great job
Fri, 07/12/2013 - 14:40
Glad she likes it. I have a ton of pics, but only able to post a few here. I tried to add some more detail on my post as well. Basically I looked at the Pottery Barn Kids Larkin High/low Table. When to the store and took some pics, then sat down, drew it out and started building it. I wish I would have done the skirt out of a solid piece of wood instead of MDF, because I'm pretty sure it's gonna get banged around and not hold up as well.
Mon, 09/16/2013 - 15:57
OMG! Amazing! I've been looking at this changing table the last 2 months at pottery barn but so expensive.
Would you be kind enough and email me the plan? My husband said if I can get the plan for him he will make it for me!
Thank you! ❤
Mon, 01/20/2014 - 08:25
Awesome job!!! My wife is in love with this changing table and we just found out PBkids is discontinuing this line of furniture. She's due in August so this may be a good project for me between now and then. If you have plans or more pics I'd absolutely love it if you'd share them
Thanks
Mon, 01/20/2014 - 11:15
Let's see if this works for adding more pictures.
https://www.icloud.com/photostream/#A2G6XBubBLXVb
As for actual plans, I don't really have anything in picture format, other then my sketches and math, but I'll add that too.