Community Brag Posts

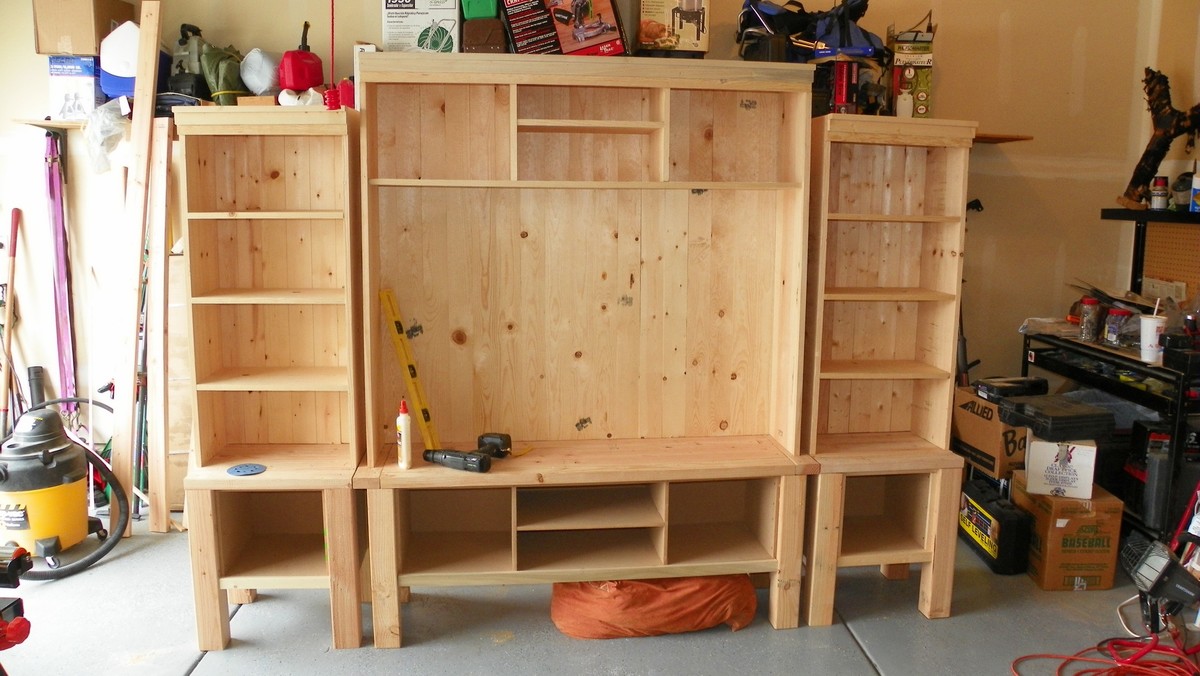
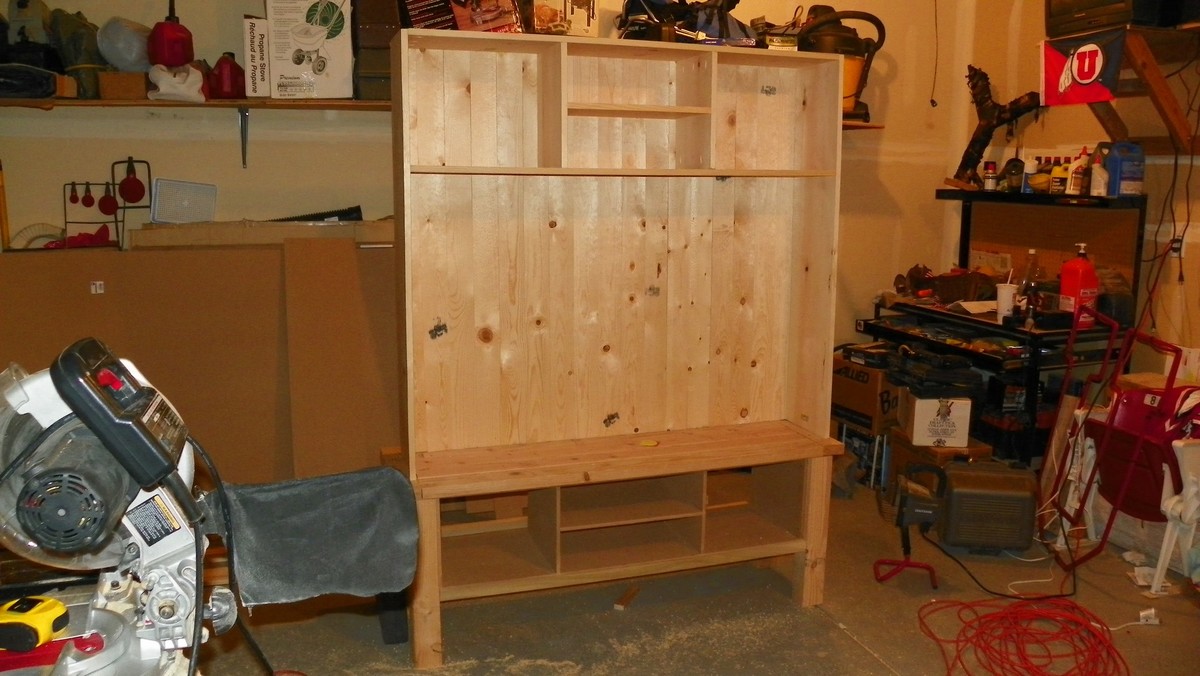
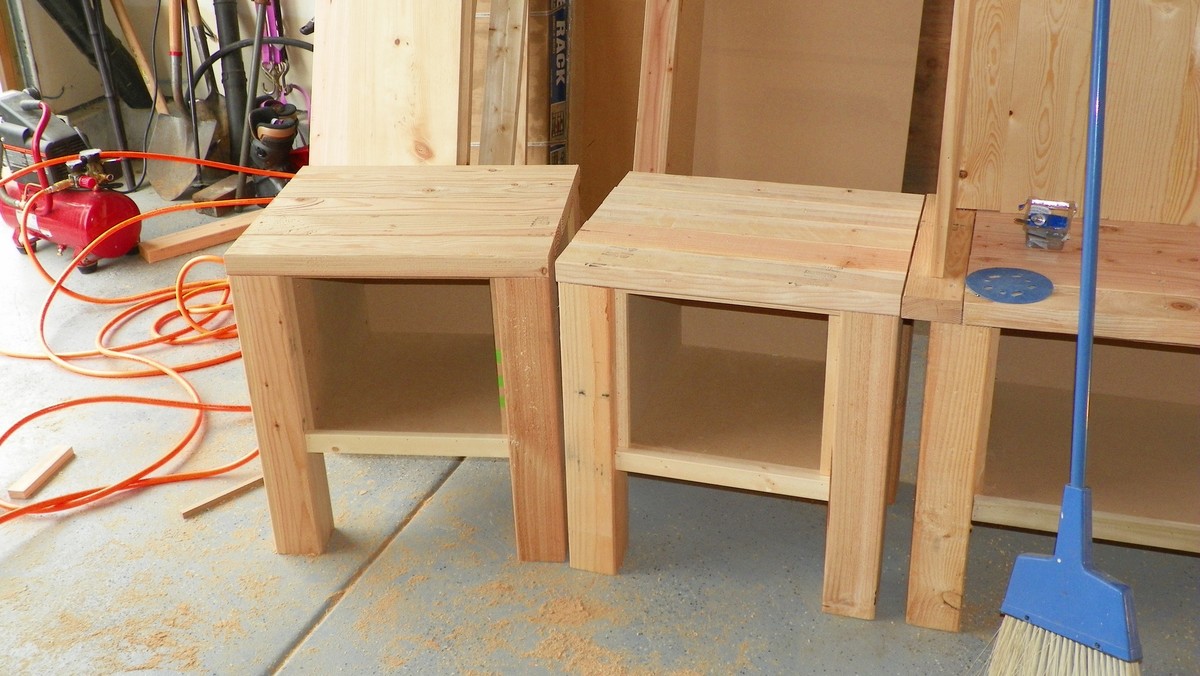
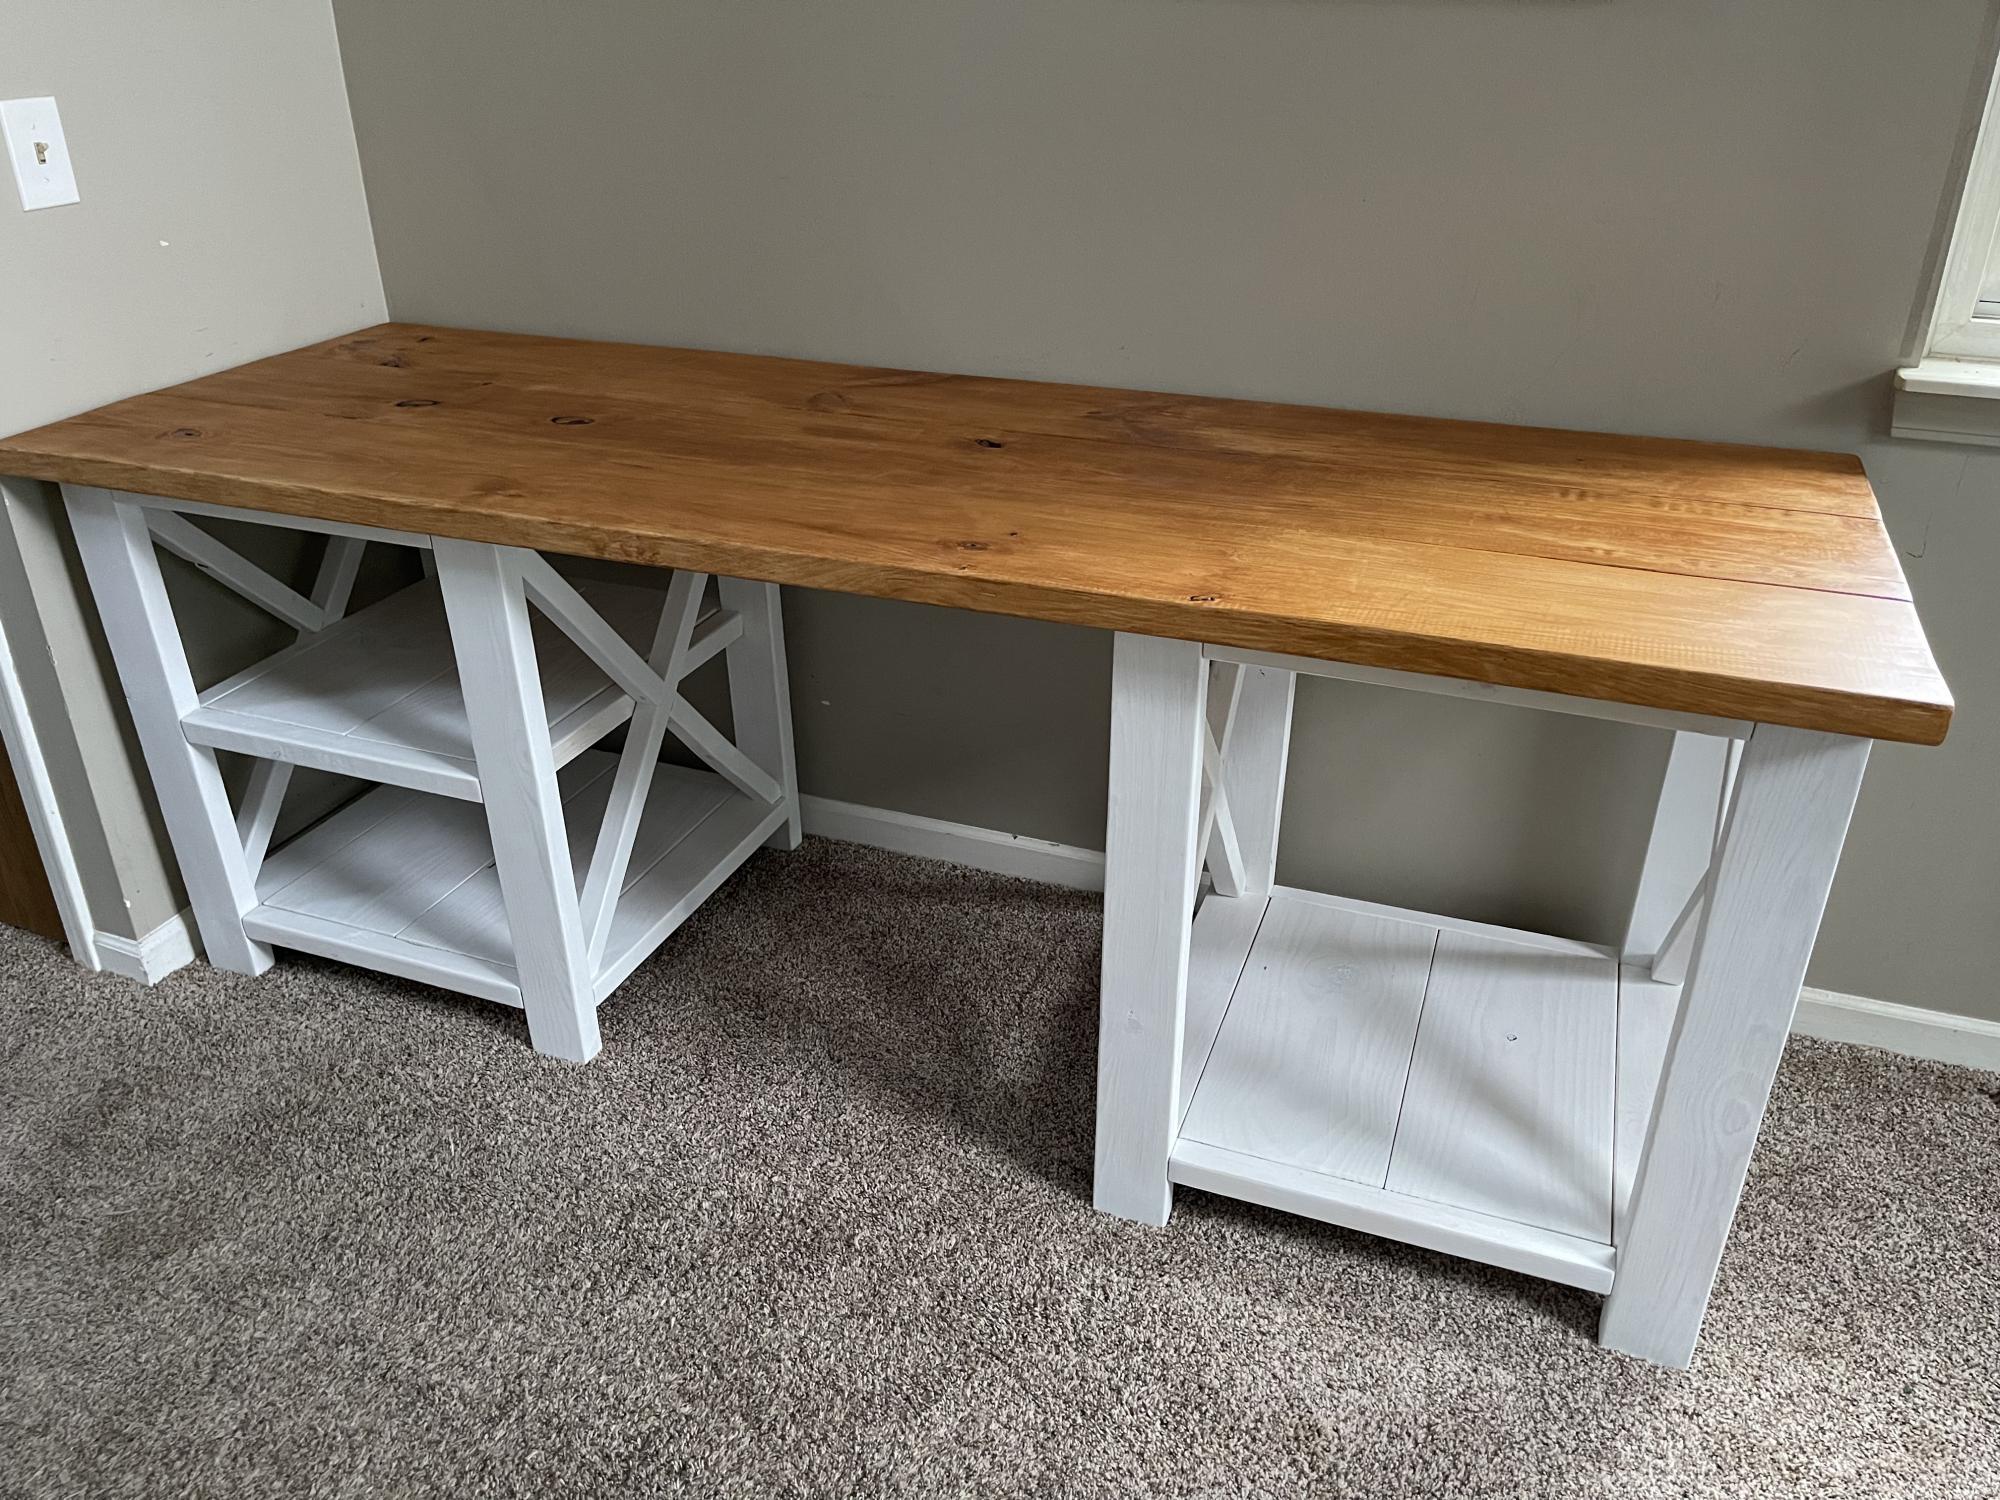
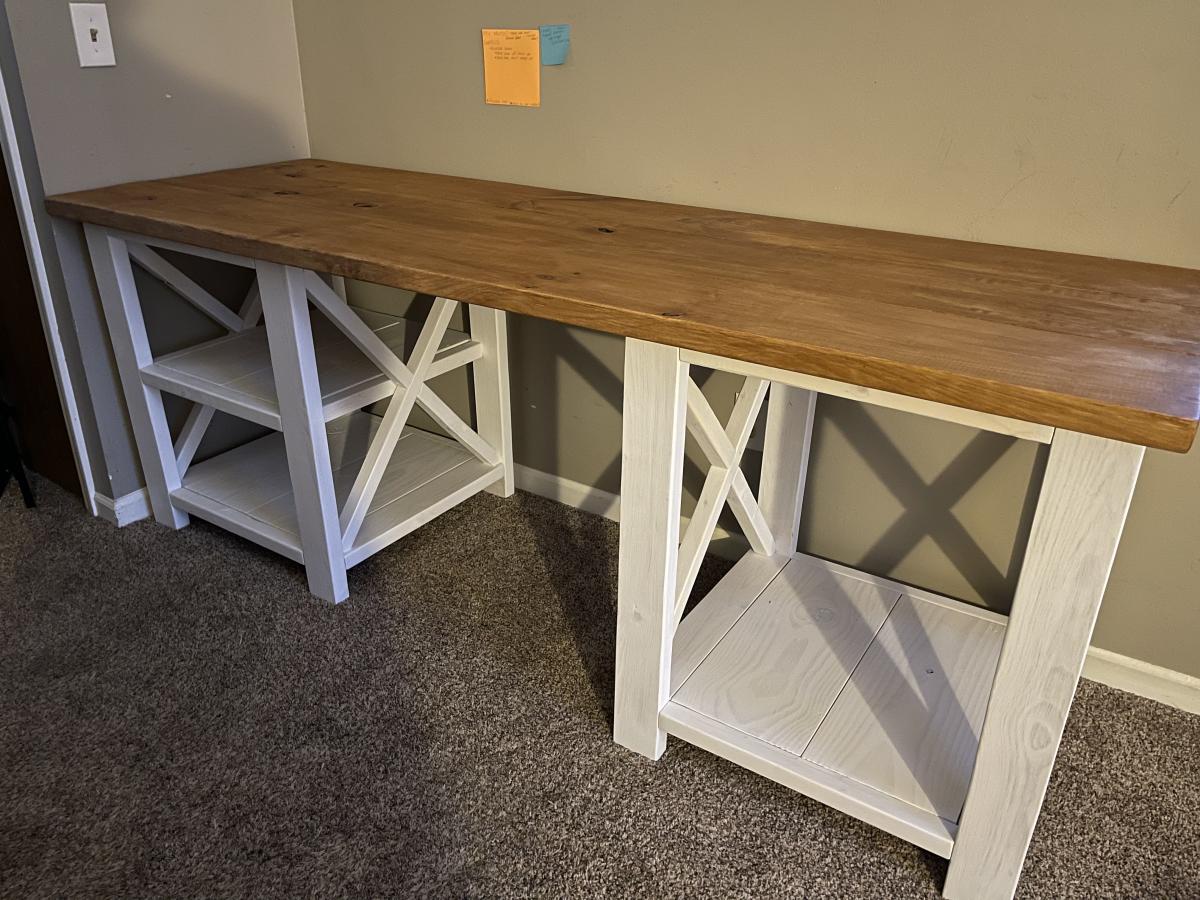
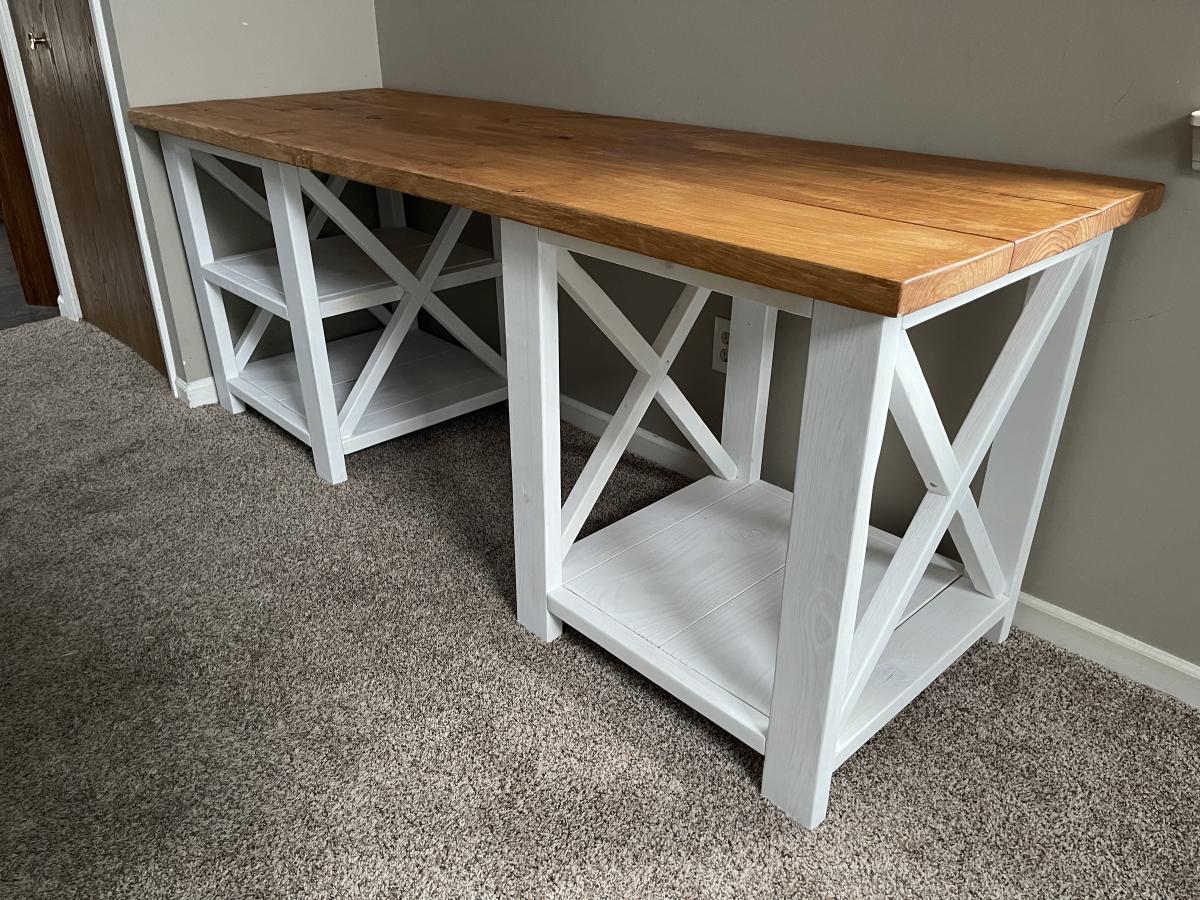
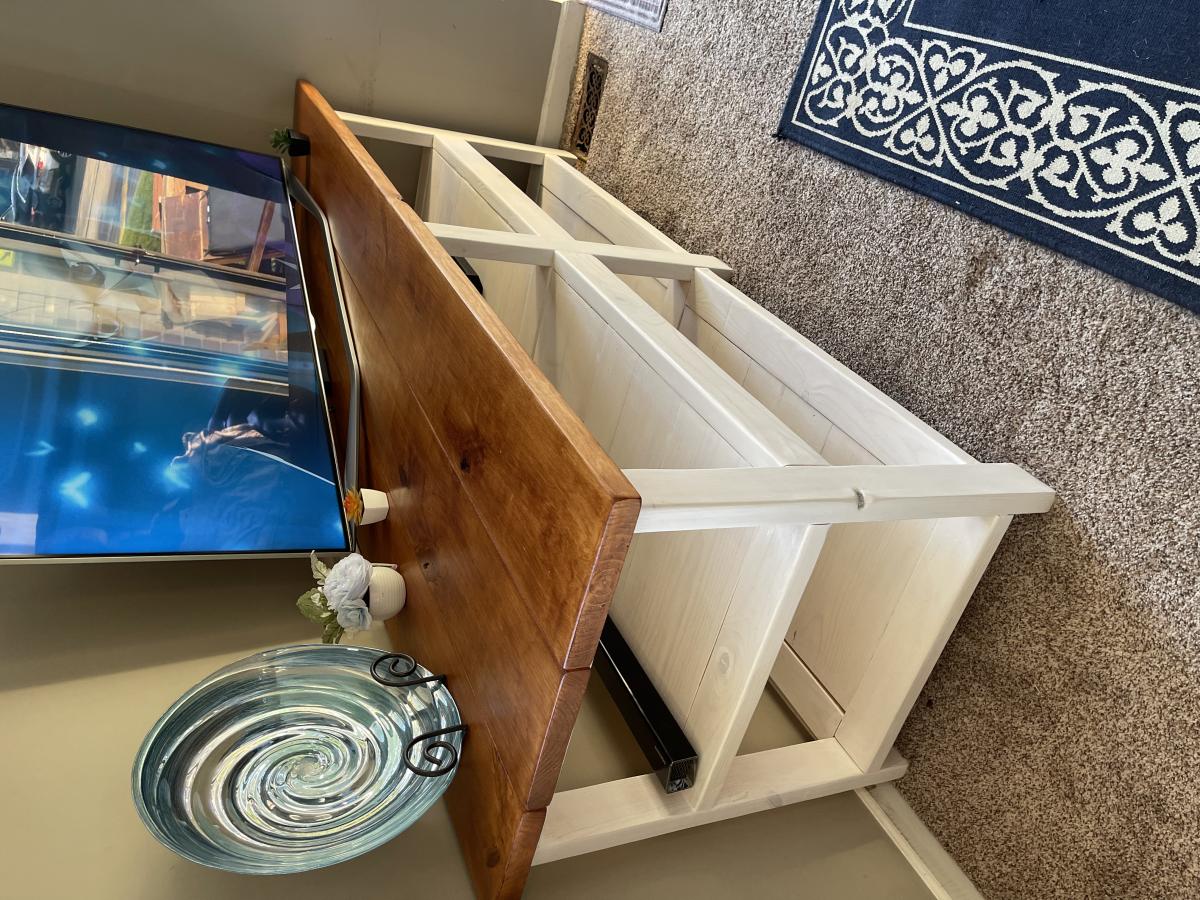
Open Face Cabinet Desk

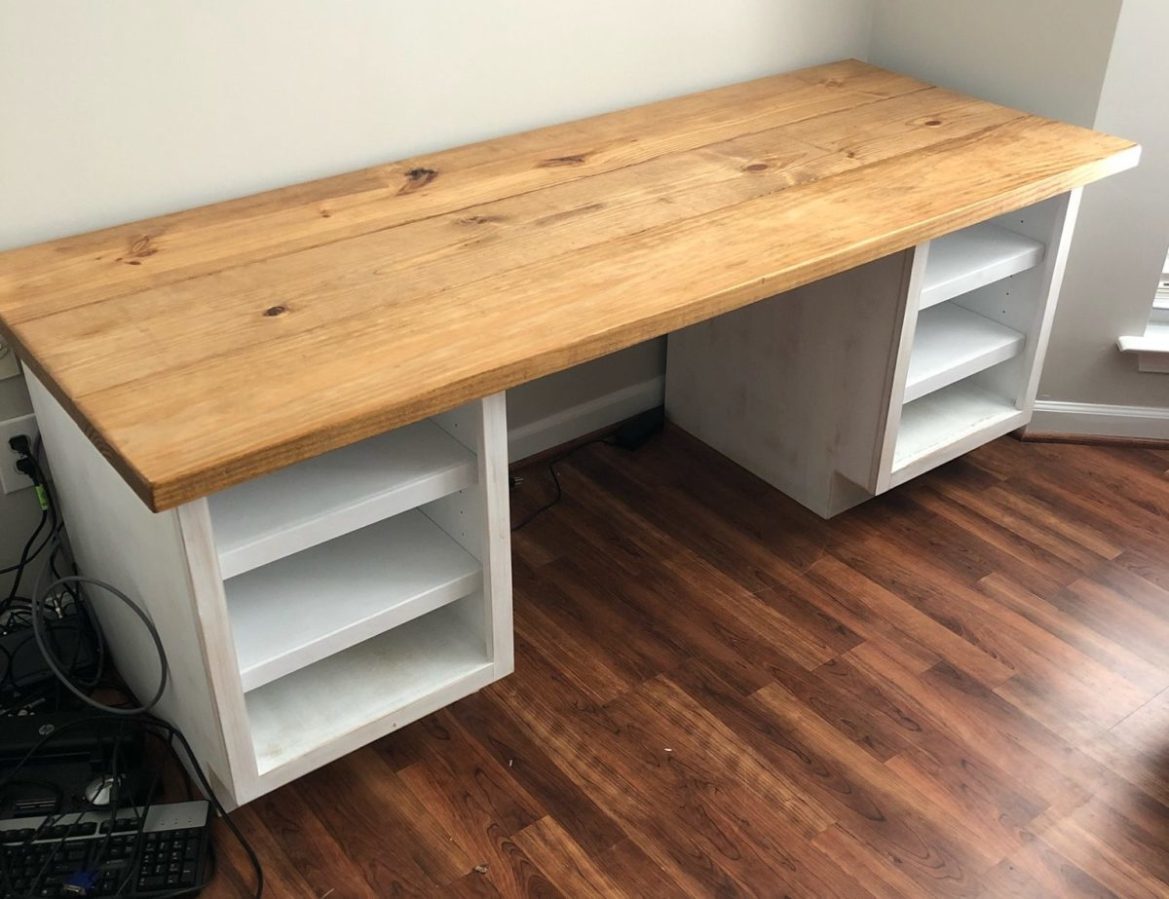
This is a project where we built the cabinets for our friends, and they added their own top to the desk.

These cabinets are each 18″ wide x 24″ deep x 26″ high, with the overall desk size being 72″ wide x 27″ deep x 27.5″ high.

These are constructed out of 3/4″ and 1/2″ plywood, with poplar face frames and shelf fronts.  The finish on the cabinets is a distressed white latex paint, finished with a few coats of clear Valspar Sealing Wax to give the cabinets a nice, soft feel.

You can see more pictures on our post on our site, or even get the plans if you want to build your own.


Estimated Cost
$150
Estimated Time Investment
Weekend Project (10-20 Hours)
Finish Used
White latex paint, clear sealing wax, and stain.
Recommended Skill Level
Intermediate

Coffee Mug Rack

Submitted by KSOlene01 on Sun, 04/24/2022 - 09:52

We had too many disorganized coffee mugs and needed a better storage solution. I took a couple of old cassette (remember those?) storage crates, did a chevron style back from old pallet wood, added shelves from the former dividers, and added a lot of clear coat. It functions well for us and was completely upcycled materials.

by Kevin

Tryde Media Console

Submitted by mfreeman37 on Mon, 06/27/2011 - 15:08

I built the Tryde Media Console with a few modifications. I had to increase the size to of the console to accommodate the 60" T.V. that it would be housing. You will also notice that I added a shelf in the top center of the console so that I could fit more components on the top. I also modified the console plans to create new plans for building two matching bookcases, one for either side of the console, giving it the "built-in" appearance. This turned out beautifully and we couldn't be happier with the plans that we downloaded from Ana-white.com! P.S. - The Kreg jig was a must for this project. All of the boards creating the back of the console are joined using pocket screws, pre-drilled with the kreg jig. After using this inexpensive tool for about ten minutes, I couldn't believe how long I had gone on without it!

Estimated Time Investment
Week Long Project (20 Hours or More)
Finish Used
Primed and Painted
Recommended Skill Level
Intermediate

Comments

Amberwms (not verified)

Wed, 10/24/2012 - 21:34

Can you please share your plans love this!!

Super Easy Bench (modified)

Submitted by spiceylg on Mon, 08/05/2013 - 16:44

We built this bench for the same women's shelter for whom we built the storage table and benches at their request. They wanted a place for the children to come in and remove their shoes. Since it was for children, we modified the height to be the same as the other small benches, 14". Leftover gray primer was used and they requested the same color scheme as the previous build. Therefore the leftover paint from the other project was used plus three coats of semi-gloss Polycrylic. I think the paint brand is Olympic. It was a joint effort between a friend, my husband and I. It was built in an evening, but I put a week long project because of the coats of primer, paint, and top coat with all of the drying time.

Estimated Time Investment
Week Long Project (20 Hours or More)
Recommended Skill Level
Beginner

Comments

yurra-bazain

Fri, 08/30/2013 - 09:06

This is great! I love that you are still building things for the shelter! Your bench looks well-built and I am sure it will last them a lifetime.

Storage Bed

Submitted by vkaylee on Sun, 04/15/2018 - 12:17

Built this for my teen daughter's room. I changed the legs to 2x6 in order to fit in a tighter space as she has a small room and we needed to spare as much of the space moving around the foot of her bed as possible. It saved a few inches total in length by not using 4x4 legs. I also changed the style of the headboard and footboard to a slat design. She loves it and even says she hopes to hold onto it for her kids to have someday. Makes my heart smile! This is just part of why I love to build. It's quality, sturdy furniture that will last for years to come. 

Estimated Cost
$180
Estimated Time Investment
Weekend Project (10-20 Hours)
Finish Used
White wash with poly coat
Recommended Skill Level
Advanced

Comments

rbgreene04

Wed, 04/18/2018 - 22:35

Nice job! I built the same bed and made some modifications myself. I like the whitewash finish. Hopefully that piece stays in the family for many years to come.

Modern Adirondack Chairs

Submitted by Anonymous (not verified) on Sun, 04/24/2022 - 12:05

I made these from your plans thanks for sharing your ideas with us.

by Jeff

Nightstand

Submitted by JennyG on Fri, 07/01/2011 - 14:24

This was my first project, an introduction to saws and drills, after my pug ate a bag of chocolate that was sitting next to my bed. The plan was picked because it said "simple" and had a drawer to safely store remotes. And chocolate.

Built from Plan(s)
Estimated Cost
$20-40
Estimated Time Investment
An Hour or Two (0-2 Hours)
Finish Used
stain
Recommended Skill Level
Beginner

Fancy X Farm Table and Benches

Submitted by Newfey on Wed, 08/07/2013 - 14:05

I made this table and benches for my daughter

Estimated Cost
$100.00
Estimated Time Investment
Weekend Project (10-20 Hours)
Finish Used
I finished the table and benches with a solution of extra fine Steel wool disolved in Apple Cider Vinegar and dark brown RIT Liquid Dye. Then gave it a number of coats of Polyurethane.
Recommended Skill Level
Intermediate

Clara's Table

Submitted by mtallent on Sat, 05/12/2018 - 07:13

Our daughter said she wanted a desk like Daddy. When I found these plans I was so excited! My husband doesn't know it yet but it was his practice for a large farmhouse table that I want for our dining room. The Clara's table plans were easy to follow, I can not remember the exact prices for our materials since we built this back in the fall (over 6 months ago). We will eventually make the chairs. I was pleased with the way it turned out with the stained top and the legs were painted a ballet pink. I believe the stain is Dark Walnut, it was something we had leftover from another project and the paint for the legs was leftover from painting her room. It has held up well the past 6 months, it has a few dings from markers and other toys but I love the character it adds to the table. We plan on making the chairs soon.

Built from Plan(s)
Estimated Cost
$30-$40
Estimated Time Investment
Afternoon Project (3-6 Hours)
Finish Used
Dark Walnut stain and clear coat polyurethane (2 coats stain, 2 clear coats) Ballet pink paint used for the legs. We did not have an old rag to apply the stain, we used a plastic grocery bag and it worked great!
Recommended Skill Level
Beginner

Comments

Reclaimed lumber Adirondack chair

Submitted by rkyount on Thu, 08/08/2013 - 13:23

For my brother's 35th birthday, I helped him build a fence and side deck on his house. Using the leftover lumber scraps and screws, I adapted the DIH Adirondack chair plans to build this for him. He wanted a big, sturdy chair with a wide arm rest that looks "rustic". I used 4x4 and 2x4 post scraps, deck boards, and fence pickets. I also widened the seat just a bit for comfort. This is definitely the perfect chair for him!

Estimated Time Investment
Afternoon Project (3-6 Hours)
Finish Used
Since it's all treated lumber, we'll just seal it whenever we do the deck with Thompson's Water Seal.
Recommended Skill Level
Beginner

Comments

rkyount

Fri, 08/09/2013 - 14:38

Thanks! I always enjoy building with your plans, and it was a bonus that I didn't have to buy anything to build this, since I used leftover materials.

Outdoor table in Norway

I found the plans for a farmhouse table here on Ana White`s and decided that this would be a great design an real outdoor table.The table seats 12 people and I also made four benches to go with it. The reason I made four benches is that it is easyer when someone needs to get up and leave the table. Under the feet I mounted small blocks of wood since the table will be standing directly on the ground. This way the rainwater will pass under the feet and if necessary these blocks are easy to change. The feet and the supports are made with 2X4" and the tabletop is made with 1,5X6" all in pressuretreated pine. Pressuretreated pine workes well outdoor in the nordic climate here in Norway and is cheap and widly awailable.

Greatings from Norway

Built from Plan(s)
Estimated Cost
250 usd including the benches.
Estimated Time Investment
Day Project (6-9 Hours)
Finish Used
None
Recommended Skill Level
Beginner

Full outdoor furniture set

Submitted by Bradnag on Fri, 06/22/2018 - 10:15

Built a new outdoor furniture set using the following plans:

Ryobi Outdoor Couch (linked to in the One Arm Outdoor Sectional plans)

Armless 2x4 Sectional

2x4 Outdoor Coffee Table


I also built the Tryde End Table with Shelf & 2 of the Modern Outdoor Chair from 2x4s and 2x6s, but they will be in a seperate brag post since I can only link 3 sets of plans per post.


I built the armless middle sectional piece exactly to plan, to fit 25x25 outdoor cushions. The bench is a little deep for sitting, but great for laying out. The 2 side pieces I shallowed to fit 19" cushions, since they are cheaper and easier to find and are more naturally sized for sitting. I also added a support board under the back rail, which is missing from the Outdoor Couch plans but is present in the Armless sectional plans and I wanted everything to match. I stained everything with Thompson's water sealing stain, since it was going to be exposed to the elements at all times (though this picture was taken before the staining was completely finished, hence the untouched lumber visible under some of the cushions).


Project took a 3-day weekend. Day 1: measuring and cutting. Day 2: assembly. Day 3: sanding and staining. 


Estimated Cost
$250 in materials, $300 in cushions
Estimated Time Investment
Weekend Project (10-20 Hours)
Finish Used
Thompson's Semi-Transparent Stain & Sealer, Honey Gold
Recommended Skill Level
Intermediate

Comments

Easy Build Wood Headboard

Submitted by Anneke on Fri, 07/08/2011 - 01:01

This was actually my first build. I had just about had it, went with all three kids, got the wood, and built it while my hubby was at work (24 hr. shifts at the fire station). And yes, that was after I finally Googled, "How to unlock a Dewalt Compound Miter Saw" after 30 minutes of unsuccessful prodding! :-) I'm super happy with how it came out (despite the poor flashy picture)! And it was great "practice" for doing my girl's farmhouse beds.

Estimated Cost
$80
Estimated Time Investment
Afternoon Project (3-6 Hours)
Finish Used
Minwax PolyShades Bombay Mahogany Satin - 2 coats with 3rd touch ups
Recommended Skill Level
Beginner

Comments

JamieRiehl (not verified)

Sun, 05/20/2012 - 22:18

I think it is beautiful! I love the stain! This was my first build also, I used old red barnwood, but a friend wants me to build her one, so I'm thinking about going with the same finish you used, absolutely gorgeous!

Classic Storage Wall

Since moving into our house almost 3 years ago, I have wanted a large piece to house the tv. The husband did not want glass, I wanted shelving on both ends and it had to hold a 60 inch tv (not pictured). To avoid paying thousands of dollars to a furniture store, I decided to build my own.

I used 1x2's, 1x3's, 4x8-3/4" plywood (sanded on one side) edge banding (super easy to use), nail gun and wood glue. I spent roughly a week building and staining, interrupted by 2 kids. The staining being the most tedious part. Cost was around $450 for all the pieces. I did attach the bridge piece by drilling holes through the bridge to the side hutches. I then installed nuts and bolts through the hole to attach it all together. Makes it easy to take apart when moved and I am not constantly drilling screws into the unit.

My husband is deployed so this was built solely by myself. My experience level is novice, this is only my 3rd piece of furniture, but I am hooked. The plans are easy to follow and use.

Estimated Time Investment
Week Long Project (20 Hours or More)
Finish Used
Minwax Wood Finish Dark Walnut
Recommended Skill Level
Intermediate

Comments

moonhopping

Mon, 08/12/2013 - 20:29

I have build a lot of small projects but nothing big I wanted to make this when I saw it. You inspired me to get started. You realy did a great job

Back to school 2015

I was just thinking "Where can I put their backpacks and folders this year so we don't lose/forget so many things this year?" Thanks Ana! Modified the plans to make use of my scrap pile. I ordered the vinyls off Etsy from, The Vinyl Things in Life, she custom made them to my dimensions and I love the pop of color! Sorry I can't get better pictures, our entry is tiny.

Estimated Cost
$20, for hooks and vinyl. Wood was from the scrap pile.
Estimated Time Investment
An Hour or Two (0-2 Hours)
Finish Used
Dark walnut stain. Topcoat Polywhey in satin.
Recommended Skill Level
Starter Project

Rustic X console table

Submitted by AUPatrick on Mon, 07/16/2018 - 09:30

My 14 year old son wanted a piece of furniture to put under his TV.  We made it 20 inches less in length but kept the other dimensions the same as the plans.  I made the cuts for him, but he did all of the work putting it together, sanding and staining.  He loves the outcome and it only took us about 6-8 hours over the course of two days.

Thanks for the plans!

Built from Plan(s)
Estimated Cost
$80-$100
Estimated Time Investment
Day Project (6-9 Hours)
Finish Used
Jacoby for the legs and Early American for the remainder
Recommended Skill Level
Beginner

Rustic X Desk and TV stand

Submitted by Neeley1925 on Sun, 05/08/2022 - 05:38

Modified the Rustic X Desk plan to include an additional shelf. Eventually the whole wall where this is now will have a matching tv stand, and dog kennel with barn doors will go in between them

Comments

Narrow end table

My kids (11 & 12) made these in about 3 days. We have to work during my 2 yr olds nap time so I would say 6-8 hrs total. We always have a lot of scrap wood lying around so this was a great way to use it up. Unfortunately, sometimes when using scrap wood, it is not always the exact measurements that you need but some plan reworking and measuring as you go can fix that. On this particular plan, the only thing we changed was the thickness of the top and a little fudging on the drawer box. We also used our router to round over some or the edges and we made our own drawer tracks along the bottom w/ scrap furring strips. Honestly, those studs you see in the picture, did most of the work and since their skill set usually involves a reference to the newest video game out, I would say this was defiantly a simple project! ;-)

Built from Plan(s)
Estimated Cost
$20 each If you had to buy all new wood
Estimated Time Investment
Afternoon Project (3-6 Hours)
Finish Used
Valspar paint in emerald and varathane brand stain in early American
Recommended Skill Level
Beginner

Comments

spiceylg

Wed, 08/14/2013 - 04:46

I love that your kids built these, what a sense of accomplishment! Tell them they did a great job!

Coffee Table

Submitted by melehes on Thu, 08/02/2018 - 12:38

Burned wood finish with stain and lots of coats of poly for protection and shine

Built from Plan(s)
Estimated Cost
$100
Estimated Time Investment
Weekend Project (10-20 Hours)
Recommended Skill Level
Beginner