Community Brag Posts

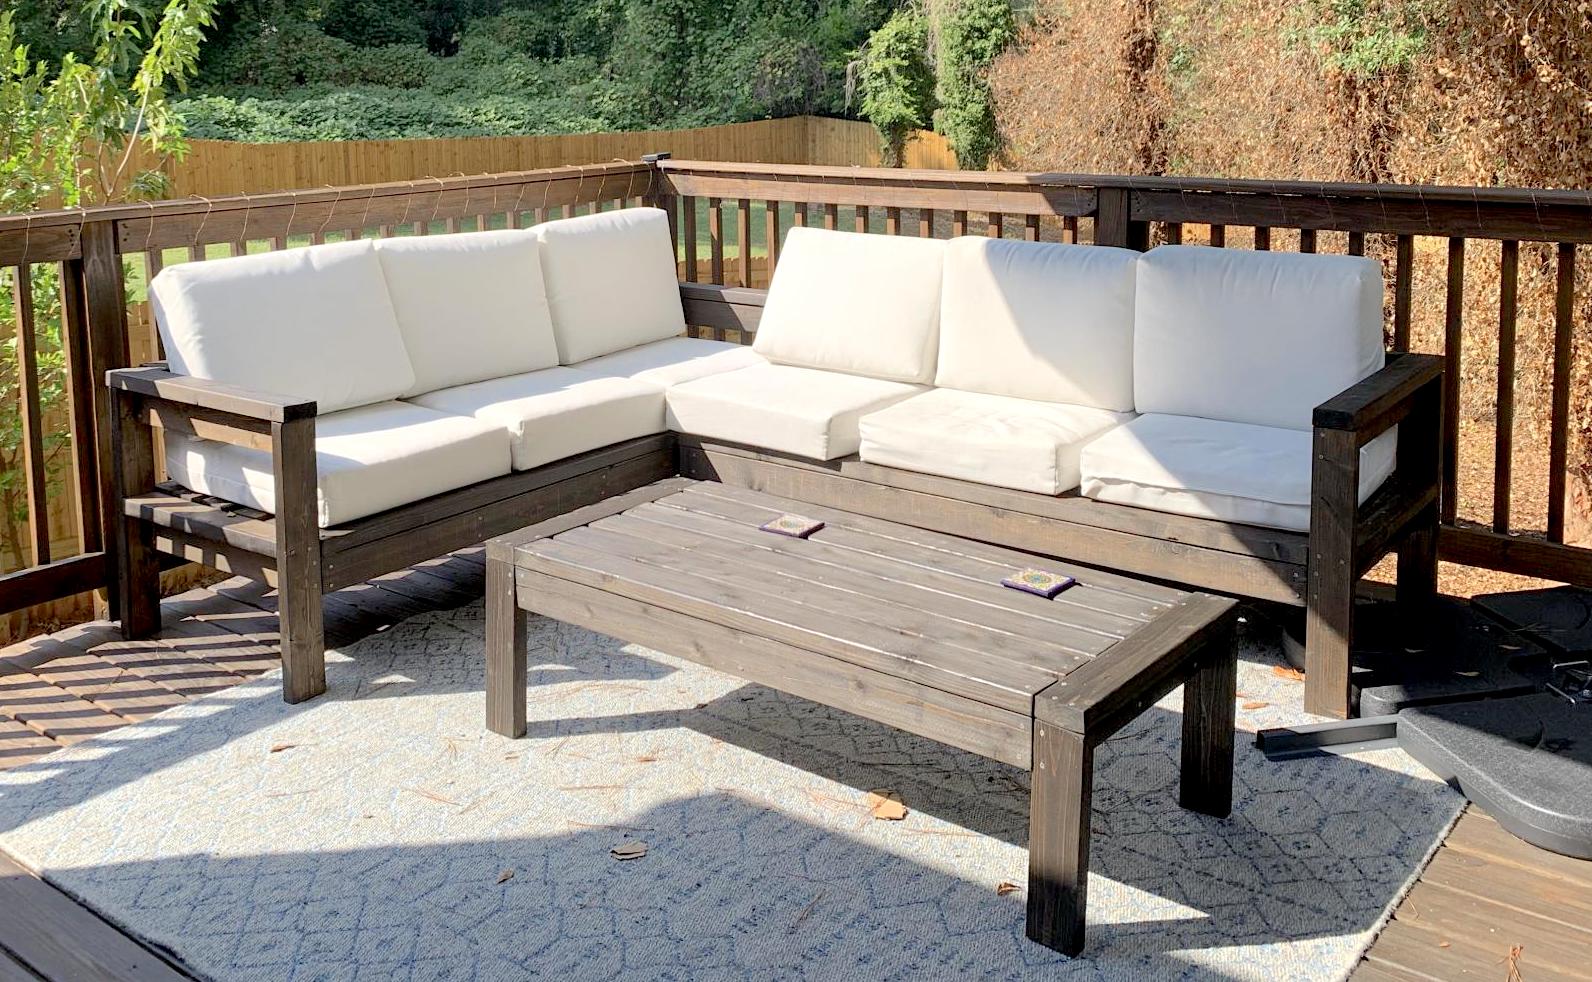
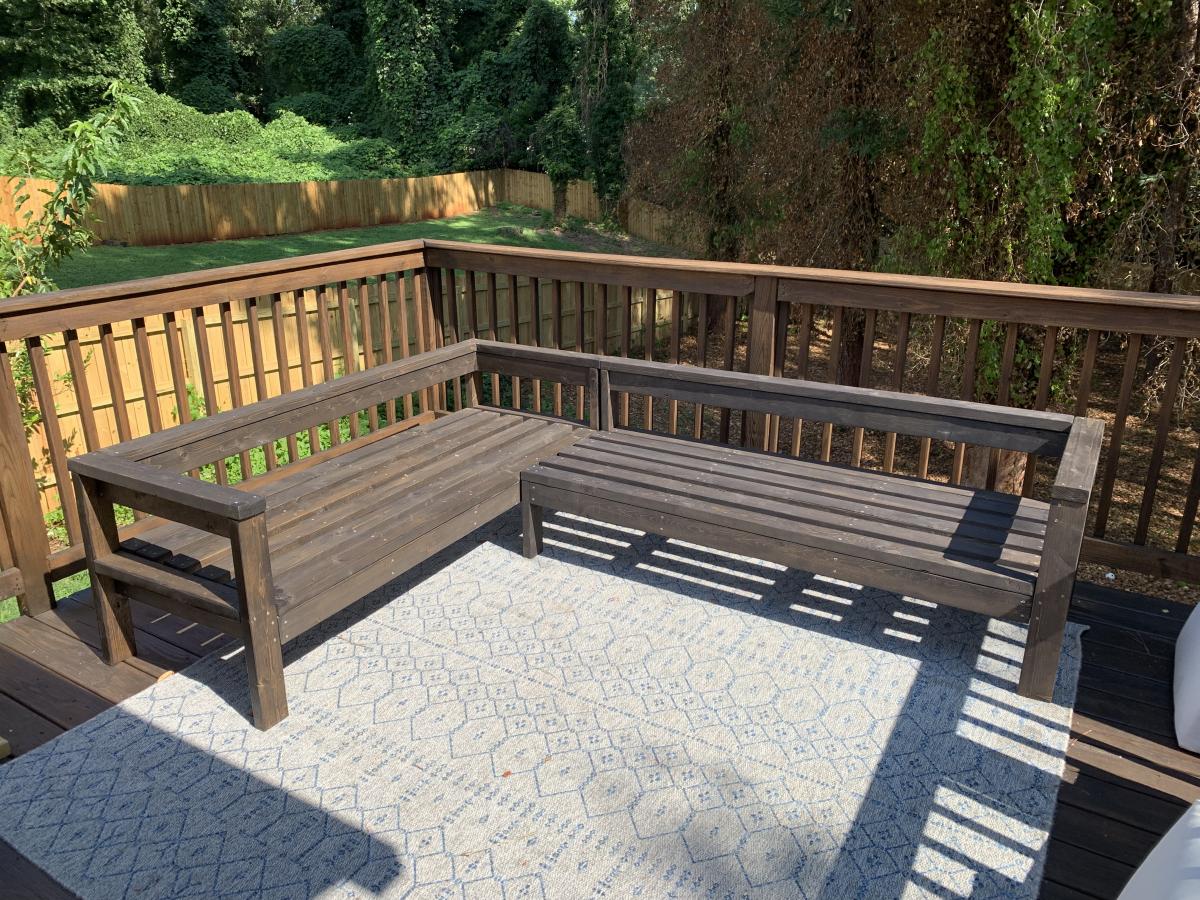
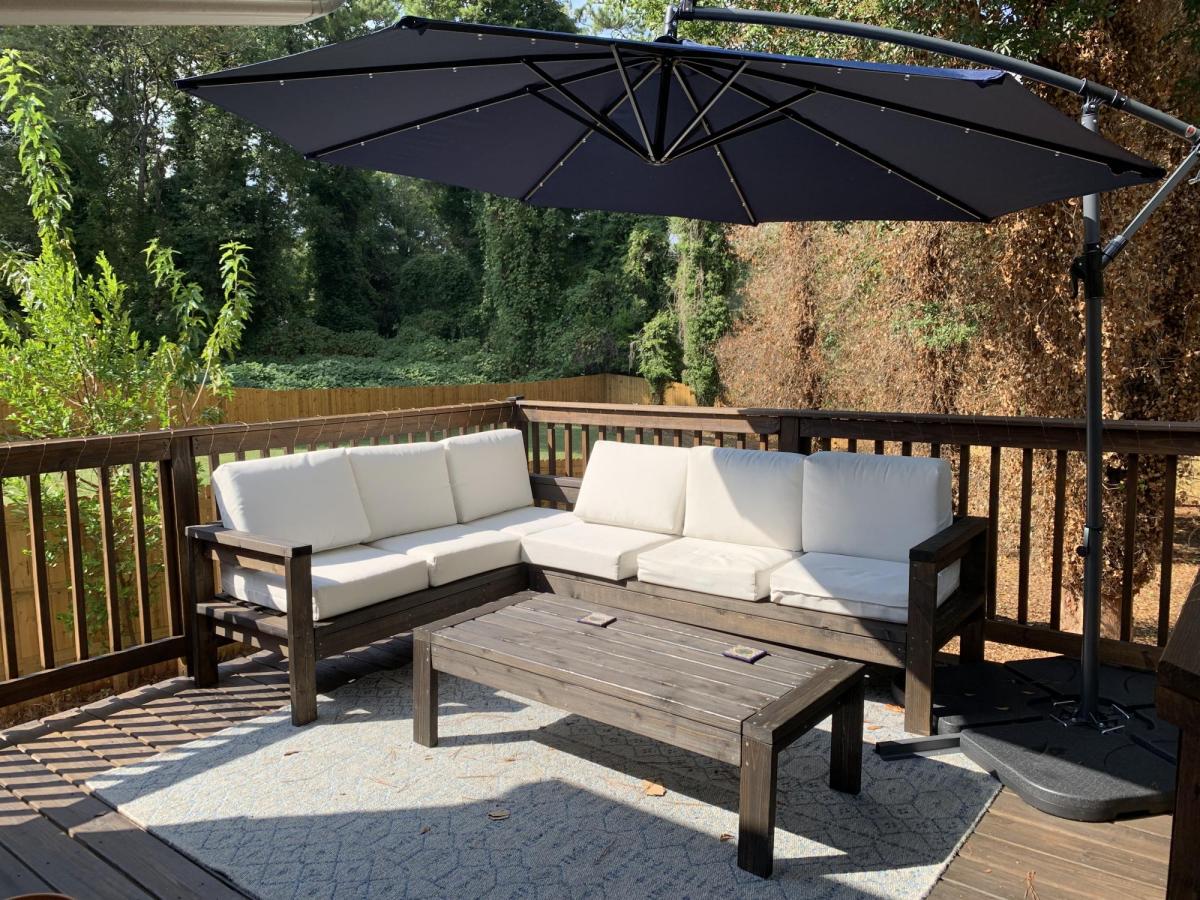
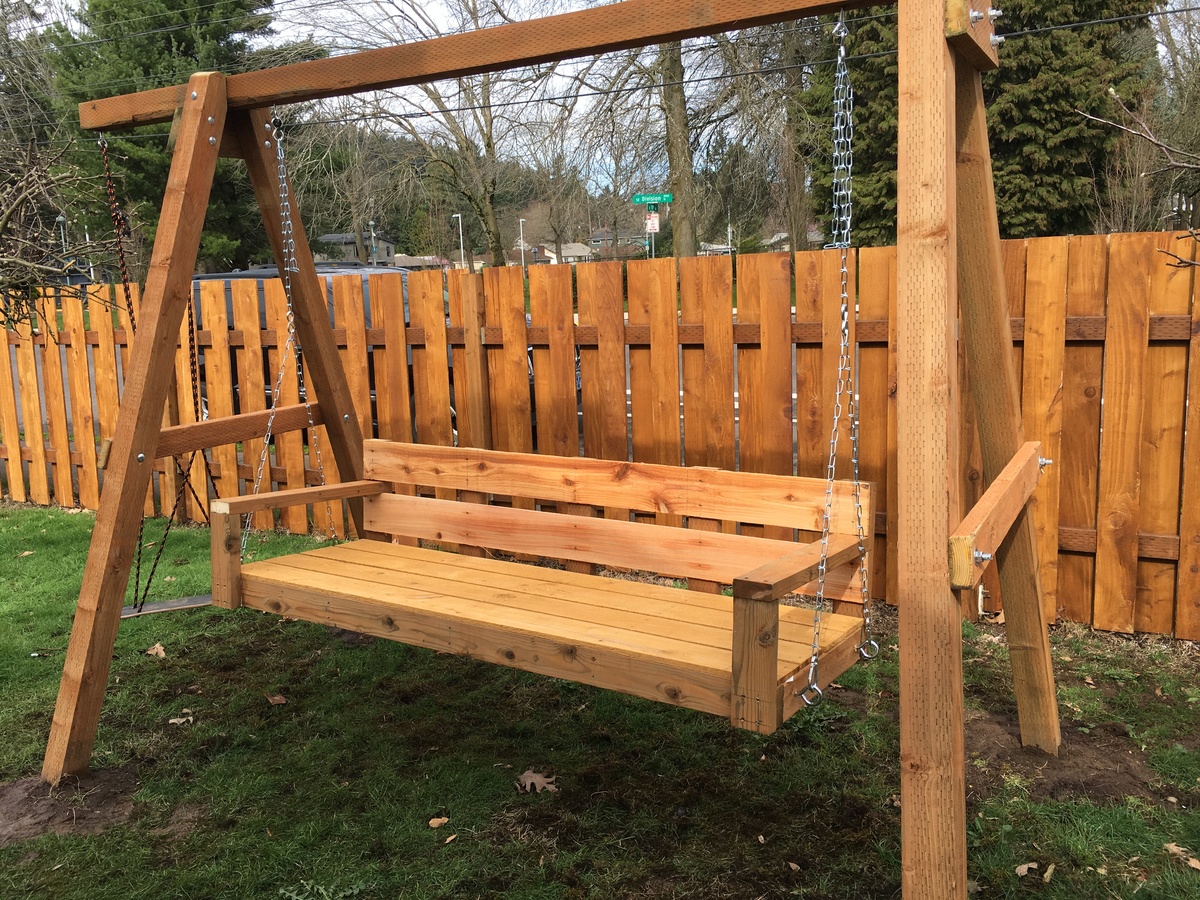
Modern Comfort Outdoor Sofa

Submitted by LinzFritz on Fri, 09/09/2011 - 18:45

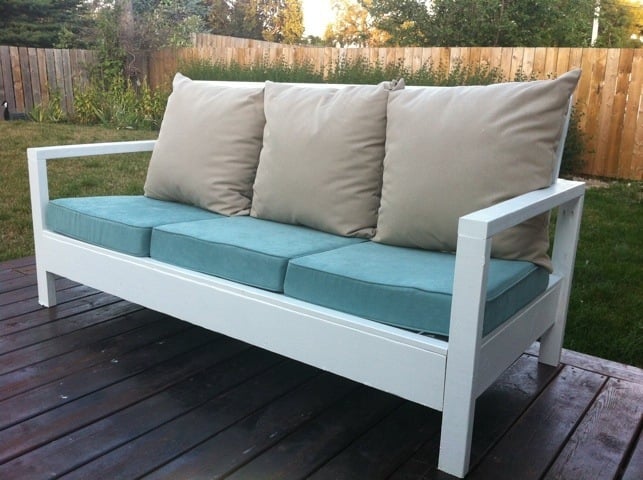
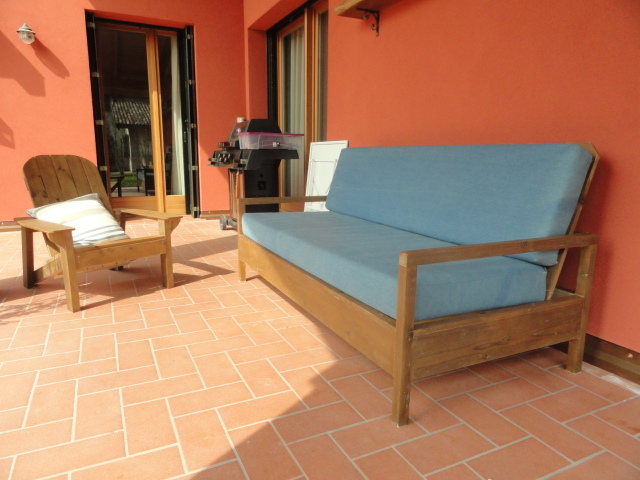
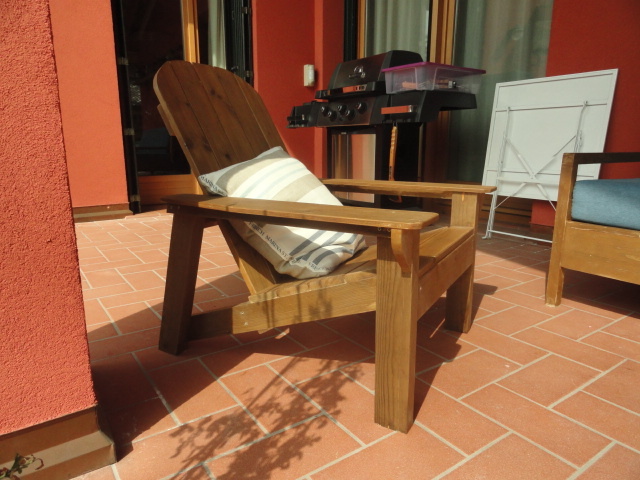
I built this sofa in one day, and painted it the next! I procrastinated all summer, and now that it's almost fall I decided to finally build it so that I could relax on the sofa in the back yard for the last month of nice weather here in Winnipeg. The plans were fantastic, the only problem I had was finding 24x24 cushions. The closest I could find were 22x22, so I adjusted the plans accordingly. It turned out well but I prefer it without the back cushions because that way there's more lounging room. Thank you so much for the plans!

Estimated Time Investment
Day Project (6-9 Hours)
Finish Used
Rustoleum glossy white outdoor paint
Recommended Skill Level
Beginner

Comments

SingleMomThriving

Mon, 09/12/2011 - 08:56

Good idea to look for the cushions first and adjust accordingly. I love the color you chose to... works very well with the white sofa and warm wood deck. I agree that it is more inviting without the back pillows... That way you can see the wonderful detail of the back

karisaija

Tue, 05/12/2020 - 11:30

Beautiful!
I am so confused. Multiple people who have built this mention Ana's being 24 x 24. I can not find any plans for 2 x 4 sofa or couch with 24 x 24" cushions. I have spent days searching the interwebs.....

Seasonal And Holiday

Full Size Bunk

Submitted by Anonymous (not verified) on Fri, 07/07/2023 - 11:30

Almost finished but I managed to alter the plans into a full over full! Just use 2×4 instead of 2×1 and use 2×6 for the legs.

Antonio

Built from Plan(s)

A-Frame Hen House

Submitted by Anonymous (not verified) on Mon, 04/22/2024 - 10:22

Great easy project to get the bigger chicks out of the garage to integrate with the older hens. Made some modifications because we have a lot of critters trying to kill the chickens/chicks.

Built from Plan(s)

Catio heaven

Submitted by bhoppy on Fri, 09/04/2020 - 15:43

Ana doesn’t have a plan for a catio but she does for a playhouse and a cedar shed made from 2x2’s. I sort of combined my knowledge from making her plans over the last 10 years and came up with this for my cats. It was fun to make!! My baby kitten is loving it. I used garden fencing and stapled it to the outside and pocket holes for the walls. I made each wall individually like the playhouse then connected them once in place.


Estimated Cost
$250
Estimated Time Investment
Week Long Project (20 Hours or More)
Finish Used
Cabot semi transparent outdoor deck and fence stain. ($9 oops section)
Recommended Skill Level
Intermediate

Comments

Wifey

Wed, 06/09/2021 - 12:36

Thank you for sharing! My daughter wants a cat for her birthday but it can't be inside due to our son's allergies. Roaming outside isn't really an option because we have coyotes. We are going to use one of these in combination with an underground electric fence.

Seasonal And Holiday

Red Hen Home's Farmhouse Storage Bed

I made the Farmhouse Storage bed for my son's room, which also has to double as the guest room. It has a planked headbord and footboard. I made the slats in removable sections under the mattress to access the storage between the drawer boxes. Also modified the drawers somewhat to use less wood (basically they don't have a double-thickness front). I also used 1/2" plywood to cut down on the weight of the drawers, and they seem to work great! I used iron-on veneer to cover up the raw edges of the plywood on the drawer boxes. More information and pictures on my blog! http://redhenhome.blogspot.com/2013/06/the-handbuilt-bedroom-pt-4-bed.h… http://redhenhome.blogspot.com/2013/07/the-handbuilt-bedroom-pt-6-drawe…

Estimated Cost
$250
Estimated Time Investment
Weekend Project (10-20 Hours)
Finish Used
Custom mix of Minwax Antique Walnut/Weathered Oak stain.
Recommended Skill Level
Intermediate

Comments

Modern Craft Table-Aqua

Submitted by beingbrook on Sun, 01/15/2012 - 15:16

Love the Modern Craft Table! It has lots of storage space and tons of workspace on top. We used pine for the shelves and plywood for the top and edged the top with pine.

There is a spot for two counter stools at the opposite ends of the table which is perfect to give kids their own spot to craft/color.

Built from Plan(s)
Estimated Cost
$150
Estimated Time Investment
Day Project (6-9 Hours)
Finish Used
Primed and Painted with Two coats of Behr's Woodwind Springs. Top has two coats of polycrylic.
Recommended Skill Level
Intermediate

Comments

Guest (not verified)

Sun, 01/15/2012 - 20:10

I love this table but I wonder how do you use it to sew with? or do you sew on this table?

beingbrook

Sun, 01/15/2012 - 20:24

I don't use this table to sew on. My craft room also has a sewing table that we built using the narrow farmhouse table plans. I use this to craft on and to cut fabric out.

Guest (not verified)

Mon, 01/16/2012 - 10:03

the whole room is beautifull. how many of the other pieces of furniture were built using Anna's plans?

Guest (not verified)

Mon, 01/16/2012 - 10:03

the whole room is beautifull. how many of the other pieces of furniture were built using Anna's plans?

mebohn

Mon, 01/16/2012 - 12:06

This table is fabulous and I'm really in love with the color! Thank you for sharing. So many new ideas for my room now!

mebohn

Mon, 01/16/2012 - 12:06

This table is fabulous and I'm really in love with the color! Thank you for sharing. So many new ideas for my room now!

Lis West

Mon, 01/16/2012 - 17:32

You won't believe this...but today I was shopping for the wood to make the Modular Craft Table, but I did not buy the wood because I was trying to tweek the plans to change the "cubbies" and size. So, I came back to this sight and here is this craft table that would be much better. I want to make it table height rather than counter height so I can sit down and sew at it. I also want to be able to drop the back 12 inches of the table if I do not need it and so it will fit better in my room, wheels on the bottom to pull it out easily so I can extend the 12 inch table when needed. I love what you have done!

Cindy from Indiana (not verified)

Tue, 01/17/2012 - 11:36

You did a fantastic job on this project! Love the way it looks and the color!

Great job!

Ricci (not verified)

Sat, 01/21/2012 - 07:00

I love this table, but I can't seem to find the directions to make it. Can you point me in the right direction to find it?

Joe (not verified)

Wed, 01/25/2012 - 17:24

Is there a reason you can't sew on this (from what I gathered from a previous comment)? I want to build something for my wife's craft room and love this, but she will need to sew as well. Help?

Brook @ BeingBrook (not verified)

Wed, 01/25/2012 - 17:32

Joe,

It would be hard to sew at this table because the table is counter height. You wouldn't be able to reach the foot peddle to run your sewing machine. You could alter the plans to fit a spot that could hold the peddle foot. I sew on a different table in my craft room and use this for cutting fabric and general crafts.

Brook

Guest (not verified)

Wed, 01/25/2012 - 19:26

at one time I had my sewing machine in a spot that was counter height. I used a wood box to put the foot peddle on. One of anna's steep stool plans or the bathroom platform for kids plan might be good to build with this. It was also nice when I was sewing small pieces that needed lots of ironing to stand and sew at the counter.

Guest (not verified)

Wed, 02/01/2012 - 14:25

I have a modern sewing machine (within last 5 years) and I routinely sew at counter height with no problem. I prefer it because it really helps my back. I cannot wait to make this!

Guest (not verified)

Fri, 02/24/2012 - 22:36

Joe,
I think it would work to mount the foot pedal on the inside of the shelf area. She would use her lower outer thigh to depress the pedal while seated.

Angela Preimesberger (not verified)

Tue, 05/08/2012 - 07:47

I love this table! I'm with Brook and don't sew on mine. Height issue is easily worked around - main issue is usually back support. Sewing at a huge workstation tends to leave you feeling unsupported and sitting on a stool (I have a nice wide comfy one from Target) leaves your back unsupported so you usually slouch (bad! bad!). I sew at my smaller desk in a good supporting chair and use my table for everything else. I use this table for a true work area including cutting. I have an Accuquilt Studio and that sucker is HUGE and heavy!

Michele Crane (not verified)

Mon, 11/12/2012 - 11:22

I just talked my fiance' into building this for me to use as a desk. I need a desk for my work from home position where I can store everything as well as have a large area to spread things out. I loved this the moment I saw it and talked him into building it for me. Can't wait to post the pictures when it is finished.

bbawol

Wed, 12/12/2012 - 16:47

I was wondering if you could tell me where you got the chair from? It looks like it pairs very well with this table and I would love to get one for my wife for her table I just finished.

nkliegel66

Thu, 02/28/2013 - 16:15

My husband made this FABULOUS Craft Table for me last weekend, it turned out PERFECT! Thank you so much for posting this with such detailed directions....

What do you have in your galvanized pails? What do the labels say?

Thank you!

DIY Wood Outdoor Chair with Deep Seat Cushion

Submitted by Anonymous (not verified) on Thu, 08/10/2023 - 12:27

Using just basic tools, I was able to build this super comfy outdoor chair for the fraction of the cost. With a couple of modifications, Ana White's design plan made for a perfect fit for the new deep seat cushions I had found on fb marketplace.
 

Seasonal And Holiday

Flip Top Console Table

Submitted by pixl8r on Fri, 09/07/2012 - 16:01

First project with my new (to me) wood shop. Really liked this plan and enjoyed putting it together! It came out great!

My cost was really low on this because I was able to use a lot of wood that I already had. The main cost was paint/stain and poly.

Estimated Cost
$45
Estimated Time Investment
Week Long Project (20 Hours or More)
Finish Used
Coffee Stained Antique White and Cherry for the Top.
Recommended Skill Level
Beginner

Comments

pixl8r

Tue, 09/11/2012 - 06:08

I chose the outdoor style "legs" for a rougher look. Thanks for your comment!
Thanks for the plan!

Eagle Project Workbench - Ultimate Roll Away Workbench with Miter Saw Stand

Submitted by nelsoncc on Mon, 10/18/2021 - 11:32

My son chose to make a workbench for his high school theater for his Eagle Scout project, and selected the Ultimate Roll Away Workbench with Miter Saw Stand as the basis for the project. The theater teacher wanted pegboard for tool storage, so we extended the rear legs on each workbench and notched the top to allow them to pass through. We built two frames from 1x3s to fit inside the rear legs, then put a pegboard inside each one.

To secure the extended legs, we added a riser shelf from 1x8s. We put a storage station for drills at one end of the riser shelf.

We also made all the cart shelves adjustable and added an adjustable shelf under the miter saw, and added lighting and power strips.

We left out the panels at the end of the workbench to allow access to the shelves there without having to remove the carts. Once we had constructed it, we added a brace at each end of the workbench to better support the outside front legs.

This plan was the perfect one for the theater, giving a stable work area for the miter saw and allowing for tool and materials storage. The carts can be rolled around to where a work surface is needed. This will come in handy for years of set construction in the theater. So proud of my son and all the leadership and hard work he put into this project!

Comments

Bench with A Frame Ends

Submitted by AndyH on Tue, 03/29/2016 - 17:54

Bench made with A frame ends. 5 feet long, 17 inches high and 14.5 inches wide.

Estimated Cost
$30
Estimated Time Investment
Afternoon Project (3-6 Hours)
Finish Used
Varathane Kona and three coats of satin protector.
Recommended Skill Level
Beginner

Mary's sewing table

Submitted by Anonymous (not verified) on Mon, 12/23/2019 - 20:52

Built using your sewing table as the base idea. Pine cabinet, drawers and drawer fronts. The top is Hickory, poplar and red oak. base top dimension is 30x30 and folds out to 30x90. Mary will get this as a surprise on Christmas day. Cabinet and to is Varathane 3x. Casters are from Woodcraft and drawer slides are Hickory Hardware.

Built from Plan(s)
Estimated Cost
250.00
Estimated Time Investment
Week Long Project (20 Hours or More)
Finish Used
Varathane 3x
Recommended Skill Level
Intermediate

Comments

Outdoor Sectional

Submitted by rachelmlee on Sun, 01/26/2020 - 20:23

This was my first real woodworking project and was so much fun! I use my deck much more now and am excited to build more!

Estimated Cost
$500 (with cushions)
Estimated Time Investment
Week Long Project (20 Hours or More)
Finish Used
Varathane Jacobean stain
Recommended Skill Level
Beginner

Playhouse big build

I went a little out of control on the week of the 4th of July - I set out to build a picnic table, 4 sling chairs, a deck and a playhouse - and I did!!!! I owe Ana a great debt of gratitude for these amazing plans and empowering me to do it! I built the picnic table and the sling chairs as I was waiting for primer and paint to dry on the frame, inside and outside of the house. For the shutters - I scrounged around the garage and found some leftover wainscoting, and put a leftover 1x2 on them. The door frame wasn't straight - so I added a piece of leftover trim from my daughters bed I built. My only next step is curtains for the windows. I even moved the full kitchen set I built the kids a few christmas's ago into their. They have only been playing with it for 2 days and I can't drag them out of it!!!

Estimated Cost
$500-$550
Estimated Time Investment
Week Long Project (20 Hours or More)
Finish Used
Primer and paint
Recommended Skill Level
Intermediate
Seasonal And Holiday

Farmhouse Console Table

Submitted by boneill on Thu, 07/09/2020 - 04:20

16.5” depth, 60” length , 30” height. White Satin frame , Early American Minwax Stained Top/3 coats poly satin clear coat .

Built from Plan(s)
Estimated Cost
$45.00
Estimated Time Investment
Day Project (6-9 Hours)
Finish Used
Minwax early American , Minwax poly quick dry satin . Satin white paint
Recommended Skill Level
Intermediate

Garage Shelves - Freestanding (Modified)

Submitted by Anonymous (not verified) on Tue, 09/15/2020 - 20:45

First project ever! I have been planning to build this for at least a year, and I finally did it! I had to modify the plan to fit my space, but it worked out well. They cut the wood for me at the store, so I did not make any cuts myself, just assembled all of the pieces together. I used all 2x4s, 8' and 10', cut down to my measurements. I did not finish the shelves since it is just for the garage, but I did sand rough board edges and some of the faces. I just used an palm sander and coarse sandpaper (80 grit). Please double check all measurements and lists because I forgot to add my shorter shelf supports to the list and had to go back to the store. I also forgot to add the width of the top shelf to those two shorter supports, so the shelf boards are resting on the top instead of nestled into the supports. It turned out not to be a functional problem, but a good lesson to learn. I also learned to make sure my driver battery is charged fully before starting - that took a large chunk out of my first day building and I had to finish the next day. My husband helped with some lifting and holding, but I mostly did this on my own in one weekend, so you CAN do it! Don't wait like I did - it is soooooooo useful and it looks great! All of my friends are really impressed and it feels so good to have made something like this! Thank you Ana!!

Estimated Cost
$180
Estimated Time Investment
Weekend Project (10-20 Hours)
Finish Used
N/A
Recommended Skill Level
Beginner

Comments

Second Project: table saw/ miter saw work bench

Submitted by jamesjill on Sat, 01/30/2021 - 20:34

Used part of the Ultimate Roll Away Workbench with Miter Saw Stand to just build one of the roll-away workbenches to work with my miter saw and table saw. I'm very happy with how it turned out.

Recommended Skill Level
Beginner

Comments

King Size Farmhouse Bed with Dog Stairs and Storage

Submitted by jkjackson on Sun, 05/30/2021 - 15:21

We have a frosty faced blind girl and an aging tri-pawed that we wanted to be able to continue snuggling with us so we adapted the Farmhouse Bed with Storage to make it a king size. We made the drawer boxes deeper which allowed us to get rid of our dresser to create more space in our room. And we added a flight of stairs for the pups.

Estimated Time Investment
Weekend Project (10-20 Hours)
Finish Used
General Finishes White Wash with Arm R Seal Oil Based Satin Finish top coat. (If you want the white wash to be more white and less amber, use water based.)
Recommended Skill Level
Intermediate

Comments

Patio cooler/Grill cart!

Submitted by Anonymous (not verified) on Thu, 06/22/2017 - 14:06

Great project! I'm new to wood working and have been looking for simple but challenging builds. Needless to say this fit the bill... This grill cart was a great starter build and ultimately became a Father's Day gift!  My Pops loved it! 

I did add a couple of custom pieces: a foldable table top extension and towel bar... things Dad will undoubtedly need as he's an outdoorsman who loves to BBQ!

Thanks for the idea/design plans! 

Estimated Cost
$150
Estimated Time Investment
Weekend Project (10-20 Hours)
Finish Used
Semi-gloss spar urethane (3 coats)
Recommended Skill Level
Beginner

Comments

Patio Swing

Submitted by Anonymous (not verified) on Thu, 03/10/2016 - 11:41

Quick build for the garden swing.

Built from Plan(s)
Estimated Time Investment
Afternoon Project (3-6 Hours)
Finish Used
Unfinished, we are still waiting for some sun in Portland.
Recommended Skill Level
Beginner

adirondack chair of Ana

Submitted by pattyitaly on Sun, 04/13/2014 - 03:28

Hi
I am still working on my portico furnitures..but as we have changed the colour of our Home, I have decided to change the colour of sofa ( terrible decision) and than to build the adirondack chair for Home depot of Ana to be part of the ensemble.
Thanks Ana. I love it.
I used the same project just changing two small things ( a small support under the arms and making the arms more similar to the original adirondack chair. I used the oxydizing solution to paint and it is a great stuff!
ciao patty
p.s. I already posted the sofa is always Ana's project.

Estimated Time Investment
Weekend Project (10-20 Hours)
Finish Used
oxydizing solution
Recommended Skill Level
Starter Project