Community Brag Posts

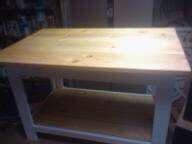
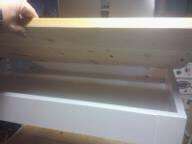
Flip Top Coffee Table

Submitted by angiemicn on Wed, 11/23/2011 - 01:11

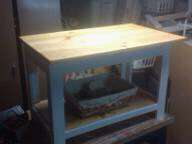
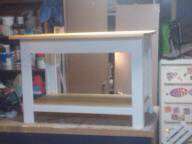
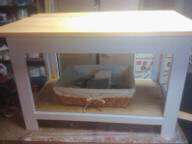
Needed a sturdy coffee table and this plan was perfect. Doubles as a bench, extra storage in the hidden cubby underneath the flip top, holds football fiesta platters, beers, and when the parties not in full swing, I'm using as a sewing table as well. Love it. Used my Kreg jig for entire assembly so super sturdy and easy too. Modifications: 1x6 Pine boards, jigged together. love the look of pine and after assembly, meticulously sanded so feels like one piece of wood. Used the hidden hinges. Bottom shelf I made out of leftover 1x4's, to match the top. width is 36 inches. Had to fit in a tiny living room. Did add support to the bottom shelf, 2 1x2's under the 1x4's....my dog has already crawled onto the shelf.

Estimated Cost
free used leftover scraps
Estimated Time Investment
Weekend Project (10-20 Hours)
Finish Used
Varathane Natural finish for top and shelf.
Kilz white primer 2 coats, and Behr Ultra White for legs and apron.
Recommended Skill Level
Intermediate

Comments

angiemicn

Sun, 02/05/2012 - 02:36

thank you so much! Glad you liked it, I love the contrast too!
Since it's essentially a holder for hubby's beer and snacks this kind of top can take a lot of abuse and still look great

Victoria Marie (not verified)

Tue, 02/21/2012 - 18:57

I love the look of this augmented plan. The 1x6 boards looks super sleek.

Can I ask you a question? I'm building this bench as my very first building project, and so far it is quite wobbly. I attached the shelves with one pocket hole in each corner through the shelf piece. You mentioned that yours is super sturdy. How did you attach the shelves?

Thanks! - Victoria

angiemicn

Wed, 02/22/2012 - 22:57

Victoria,
I made each side as a frame, looked like 2 rectangles and 2 squares. Those were both kregged together...then I put those frames, front, back and 2 sides together kregging those together. The shelves are all kregged in too. I don't know if that helps or not. I've used mine for extra seating.
good luck, angie

Rustic X end table

I love this site. We needed new furniture in are house and didn't want to spend a bunch of money. Finding the Rustic x plans was a life saver.

Built from Plan(s)
Estimated Cost
$80
Estimated Time Investment
Weekend Project (10-20 Hours)
Finish Used
White paint and kona stain.
Recommended Skill Level
Beginner

Tweeked

Submitted by Anonymous (not verified) on Wed, 01/13/2016 - 17:51

Few tweeks such as router work, finish, and forged corner braces.  

Recommended Skill Level
Intermediate

Adirondack chair

Submitted by Davis_Reed on Fri, 05/24/2019 - 07:10

These are the adirondack chairs and I took the basic model and added a wine glass holder and also a bottle/snack bag holder.

Estimated Time Investment
Weekend Project (10-20 Hours)
Finish Used
Benjamin Moore wood primer and then Benjamin Moore oil based paint.
Recommended Skill Level
Beginner

Comments

Mantle

Submitted by Anonymous (not verified) on Fri, 03/17/2023 - 14:14

The second one was before. It was the very first project I ever did all by myself. It only took me a couple of months to get the nerve to go to the store and buy everything. Then I cut and did everything on my own. 😬 I am so stinkin proud of myself.

Comments

Perfect!

Submitted by lbadger on Thu, 12/01/2011 - 06:59

I went round and round trying to figure out what type of shelving to install in our kitchen to go above a cabinet below that will be topped with a rough live edge pine slab (not yet completed). I stumbled across your industrial chic shelves post, found an old board laying around the yard and whalla! As always, thanks for this amazing site!!

Estimated Cost
n/a
Estimated Time Investment
An Hour or Two (0-2 Hours)
Finish Used
Cleaned up a bit, sanded down a bit and top coated with poly
Recommended Skill Level
Beginner

Comments

Young Mrs. (not verified)

Thu, 12/22/2011 - 12:44

Hi! Love how your shelves turned out. I was just wondering how much weight these shelves would hold. Looking at yours with plates on them, it seems like they hold quite a lot!

Did you use larger L-brackets or the same size that Ana used?

Thanks for posting your shelves!

Industrial Bookshelves

Submitted by Jodiah on Thu, 10/31/2013 - 14:20

It took a long time to compile all if the parts for these shelves. I searched the Internet for affordable cast iron castors. I ordered all of the black plumbing fixtures from a local hardware store. I bought 2, 16 foot 2x12's and cut them up, sanded them and stained them.

Estimated Cost
$250./ shelf
Estimated Time Investment
Weekend Project (10-20 Hours)
Finish Used
Min wax Early American stain, min wax Polycrylic protective finish.
Recommended Skill Level
Intermediate

Comments

Bunkbed

Submitted by Miles35 on Sun, 01/17/2016 - 12:17

I built this for my grandkids. It took me several weekends to complete to this point. I made a few changes from the original and still have the drawers to complete but overall its about finished.

Built from Plan(s)
Estimated Time Investment
Week Long Project (20 Hours or More)
Finish Used
Water based paint
Recommended Skill Level
Intermediate

Comments

CarrieLJP

Mon, 01/22/2018 - 10:41

I love how bright and vibrant you made this! It looks absolutely beautiful! I'm working on a bunk bed for my two young daughters now and I liked seeing how you tweaked the plans a bit- I'm doing something similar. Thanks for sharing!

3 Seat And Loveseat 2X4 Outdoor Couches

Submitted by jerryo on Mon, 06/03/2019 - 19:39

Used Redwood and Kona colored stain. This is my first wood project and Ana really inspired me in being able to complete this. Thank You Ana all the way from California! The Love Seat was easy to modify from the original 3 seat plan.

Estimated Time Investment
Weekend Project (10-20 Hours)
Finish Used
Rustoleum Kona
Recommended Skill Level
Beginner

Comments

jerryo

Thu, 06/06/2019 - 11:40

hard to believe, we found them on the Big Lots website...$40 a set back and cushion. We looked everywhere for an affordable option. These look great and are really comfortable..!thanks for the compliment : )

Jerry

Farmhouse Coffee Table

This was my first project and while I prepared to build it I had to endure some real negative forces coming from people who knew my building skills. But I was heart set on doing this and proving people wrong.

As you can see from the pictures I made some adjustments to the table as I did not want a square table rather a rectangle to fit perfectly in front of my sectional, LOL.

I could not believe how well it came out and how easy it was to build. Thank you Ana for this site as I know I would never have taken on this project without finding this site. Furniture building is something I always wanted to do and have as a hobby. I will NEVER purchase another piece of furniture from a store again!

I have included a few pics to show the progress.

Estimated Time Investment
An Hour or Two (0-2 Hours)
Finish Used
Initially stained using Ebony minwax then painted over with Pottery Barn Blue (Van Courtland Blue). Then scuffed with sandpaper to give some distressing.
Recommended Skill Level
Beginner

Comments

King Size Headboard

I am so happy about how this headboard turned out. It is exactly what I have always wanted. I am so excited that it is sooooo much cheaper than buying the one from Pottery Barn. I would never have been able to afford that one. This one only cost me about $50 for the wood, and then I was able to make an end table and a picture frame from the leftover scraps!

Estimated Cost
$50
Estimated Time Investment
Day Project (6-9 Hours)
Finish Used
Minwax prestain, minwax red mahogany stain (2 coats), minwax polyeurethane (2 coats).
Recommended Skill Level
Beginner

Desktop Organizer

Built this in an afternoon with scraps left from other projects! Using it at at work on my desk. Added 1/4" plywood to base to close up drawer space. Felt strips on bottom of drawer makes the drawer slide out very nicely. 

Estimated Cost
Wood scrap project. Bought drawer pull for $2 and a paint sample from Lowe's.
Estimated Time Investment
Afternoon Project (3-6 Hours)
Finish Used
Valspar paint sample in "Prickly Pear" shade. Furniture wax over paint.
Recommended Skill Level
Beginner

Large Rustic X Bench

Submitted by RHgaijin2 on Thu, 06/13/2019 - 09:16

I made this bench to go along with the matching table.  I also made a video of me making on youtube:  https://youtu.be/B-5KKcPxM24

Estimated Cost
The base was made from reclaimed wood.
The seat was made from 2x6's purchased from Lowes.
Approximately $20
Estimated Time Investment
Weekend Project (10-20 Hours)
Finish Used
Polystain for seat
primer and paint for legs
Recommended Skill Level
Intermediate

Sweet Pea Bunk

Submitted by Anonymous (not verified) on Mon, 03/27/2023 - 10:54

This was fun project! Changed up a couple of things, but am very proud of myself. I can't wait to see what my Grandkids think :)

Built from Plan(s)

Comments

Easiest Chalkboard Shelf from Scraps

Submitted by jlamorey on Wed, 12/14/2011 - 10:19

I loved this when I saw it posted the other day, it really doesn't take long to make and adds character to our kitchen! I added a dowel that i sanded a little on one side to the long end of the 1x4 so that the chalk won't slide off, just something that I can see happening here.

Estimated Cost
$6 - can of chalkboard paint and hooks
Estimated Time Investment
An Hour or Two (0-2 Hours)
Finish Used
primed and then spray chalkboard paint. I sanded the corners and edges a bit.
Recommended Skill Level
Starter Project

Clothesline frame

Submitted by Brad Wills on Tue, 11/05/2013 - 19:53

I had a empty space that needed something and this was an expensive fun way to fill it.

Estimated Cost
15.00
Estimated Time Investment
Afternoon Project (3-6 Hours)
Finish Used
Varathane weathered gray and ash stains. Behr oyster satin paint with 3 coats of varathane poly.
Recommended Skill Level
Beginner

Comments

Reclaimed TV console

Submitted by Anonymous (not verified) on Thu, 01/21/2016 - 10:24

Built this TV console from reclaimed pallet wood. Added some tiny hairpin legs for more of an industrial look.

Estimated Cost
$150.00
Estimated Time Investment
Weekend Project (10-20 Hours)
Finish Used
Hand rubbed clear wax
Recommended Skill Level
Advanced

Kamado table

Submitted by lmarco191 on Sun, 05/16/2021 - 14:47

The table assembly was Inspired by farm table and workbench plans. It was built from construction grade untreated 4x4 and 2x6 and assembled using Kreg pocket screws and glue. Finish is semi-transparent wood stain. Rather heavy, the table have locking wheels to help move it. The lower shelf is used to store accessories.

The small kamado is just the right size for two people. I added a large ceramic tile under the firebox plus a small inlay next to the grill. That was the top of a small patio table. A few hooks were added as a final touch.

We built it last year; it gets a lot of use as a grill, smoker, bread and pizza oven.

We are very satisfied with the outcome. Many thanks for the plans and inspiration.

Built from Plan(s)
Estimated Time Investment
Week Long Project (20 Hours or More)
Finish Used
Semi transparent wood stain
Recommended Skill Level
Intermediate

Comments

Jacob1234

Mon, 08/02/2021 - 23:34

Your grill is very beautiful, but I prefer cooking in the kitchen, I will explain why, I recently read a lot of Kitchenotic.com here, what connects me and the kitchen most of all is the answers to my any questions, no matter how stupid they are and the answers were always correct

Farmhouse potting bench

Submitted by Anonymous (not verified) on Thu, 04/06/2023 - 23:12

Had so much fun building this project for my moms birthday present.

Built from Plan(s)

Comments

Kids' Playhouse (under stairs)

Submitted by kdins31 on Sun, 12/18/2011 - 09:22

Had the perfect space for a little playhouse under the stairs in the basement and it's been our plan for 4 years to do something. Finally, we did something. Wanted depth so I added the roof and portico. Also added cedar shingles that I picked up for $7 at HD. Inside I had extra laminate flooring so I put that down and added beadboard, chair rail and crown molding. There's also a small transom window above the small kitchen area. The kids love the barnhouse doors with old fashioned doorbell, mailslot and window. The bookshelf under the stairs was the final touch. I didn't use any plans from this awesome site but did, as always, get a bunch of tips and inspiration!

Pin for Later!

Kids' Playhouse (under stairs)

Estimated Time Investment
Week Long Project (20 Hours or More)
Finish Used
Dark walnut stain on cedar shingles.
Recommended Skill Level
Intermediate

Comments

Cindy from Indiana (not verified)

Sun, 12/18/2011 - 19:00

Wow! That is awesome!

You really did a great job on that! So imaginative, too. WTG!

Guest (not verified)

Sun, 12/18/2011 - 19:58

That is so stinkin' adorable! Fantastic job. I love everything about it. Your kids (and grandkids) will remember the playhouse under that stairs forever!

spiceylg

Mon, 12/19/2011 - 06:54

Wow, this is too cool! They are going to love love love this! Can't wait to see the kitchen reveal!

bhoppy

Mon, 12/19/2011 - 08:43

LOVE LOVE LOVE this!!!! It looks amazing! Makes me want to buy a new house with stairs. LOL

birdsandsoap

Sat, 12/31/2011 - 18:26

You did an amazing job on this. I'm planning a bunkbed with a similar facade. I love how cozy it looks without having to make an actual pitched roof. The shingles are such a nice touch that I may have to copy you! And it's wired for lights; you've really outdone yourself.

Guest (not verified)

Mon, 02/27/2012 - 21:14

I love this playroom you created. We are currently in the process of building a playroom under the stairs for our girls. Where did you find the door...it is exactly what I am looking for! What a wonderful job you did!!!

kdins31

Mon, 03/19/2012 - 14:26

Thanks to all of you for the nice comments! Re: the door, I just cut a plain 18x80 door slab ($21 from orange) and trimmed it out. I still need to put the window grille over the open space, and was hoping to find a cool 'speak easy' grille that fits the space.

Thanks again!

megan_m

Fri, 04/27/2012 - 09:07

this is such an amazing little space! great work!

MicheleInAlabama (not verified)

Thu, 05/03/2012 - 23:38

This has to be one of the most adorable things I've ever seen! What an awesome idea......how cool is that for the kids??! Love the lighting and the laminate (or is it hardwood) flooring inside. Even the stove is gorgeous! Such fond memories will be made there and remembered forever. Kudos!!

Amanda Rhoads (not verified)

Wed, 12/05/2012 - 15:34

Oh my goodness this is such an inspiration! However, as a beginning tool user, I don't think I could get my finishes so nice. How much experience had you had at this kind of stuff before? Was the area closed in before this project or did you do that too? I've got an open stairway into our basement and would be starting from scratch with ceiling, walls, etc. and have no experience hanging drywall or anything. I think it would take me a year. Great job, and thanks for sharing!

maggieasselin

Sat, 06/21/2014 - 12:51

Hi there!

I was just wondering how you made the door for your play house? We're basically stuck at this level in ours right now... ;) Thanks for any tips!!!