Community Brag Posts
Barnwood Electric Fireplace Surround
Gorgeous Barnwood Fireplace Surround by Scott Snyder
Built from Plan(s)
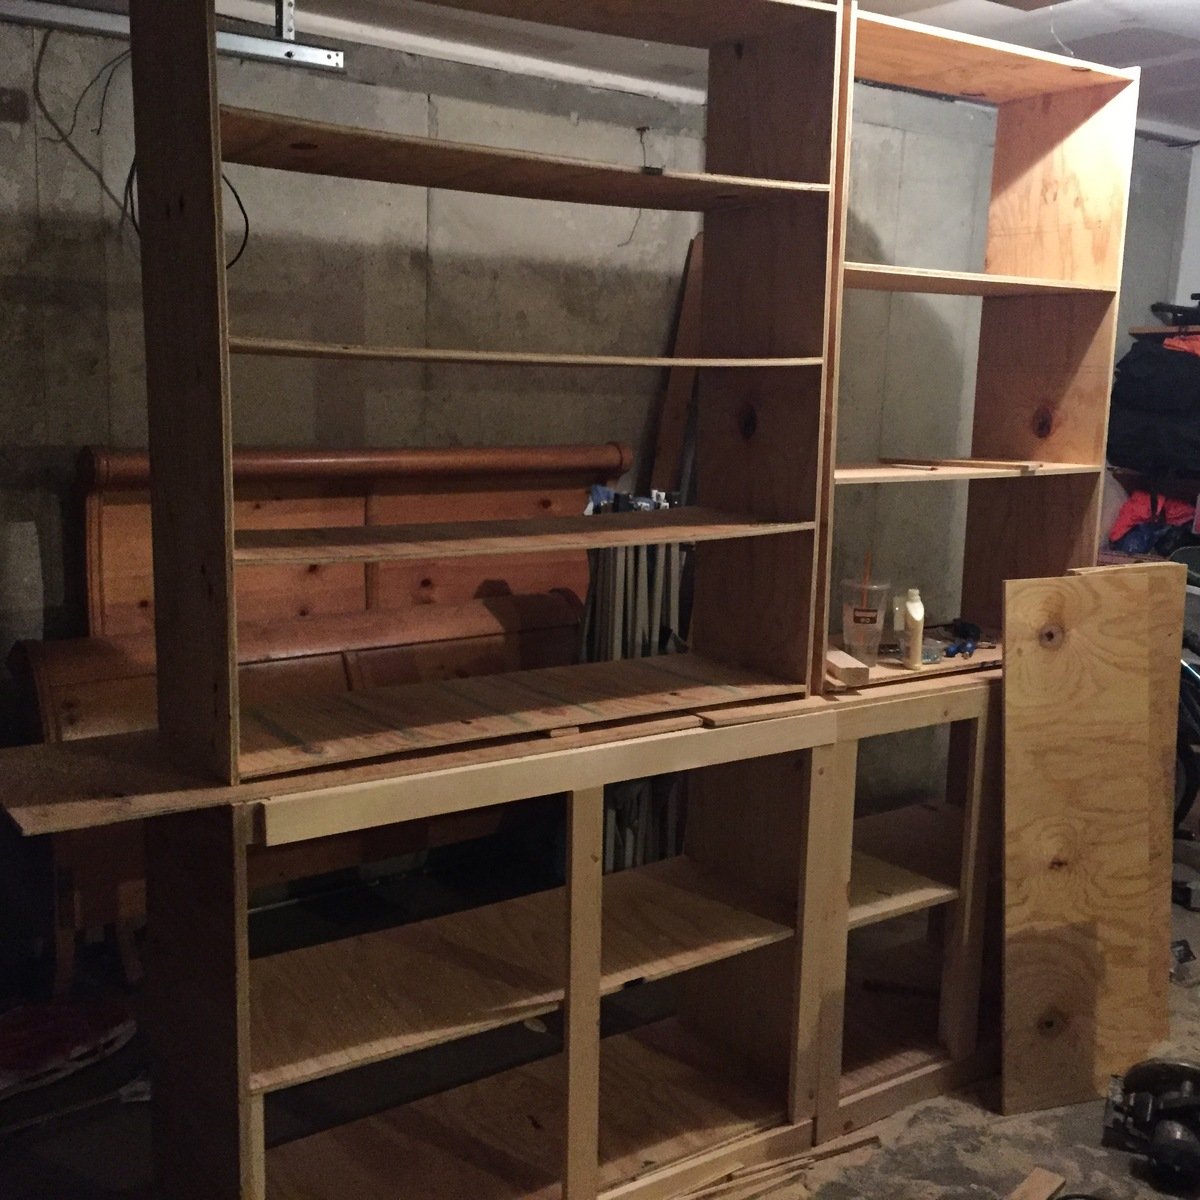
My Tryde Media Console Hutch
This was the second part of my Tryde media center build. You can read about the console build here.
This part of the project was very quick to put together, I spent a lot of time reading the brag board and looking at pictures of what others produced. I really appreciate when people upload high res pictures of their builds so you can really look at the details - I've tried to do the same on my blog post about this project in case you needed further information (see link below).
I made the plan as per Ana's original, with some modifications. These were:
- added a back kickboard at the base for stability
- added trim around the back and sides at the base to stop it toppling over
- added felt to the feet to avoid scratching my console underneath (worked so hard on that one!)
- added 'L' shaped brackets to join the two pieces together, for added stability (check my previous post for more details on this)
- changed the orientation of the beadboard on the back to be vertical and not horizontal (I just preferred it this way)
- after seeing Perchik's build of the Tryde media center I shamelessly copied his idea to extend out the trim around the top. It looks much better wrapped around than jutting out the front, a little less severe I think
I hope you would give this project a go, as a hutch it is very simple to put together for a beginner and quite satisfying. To get more information about my build please read my blog post where I go in to a lot more detail (and leave a comment too, I'd love to know what you think!)
Happy building!
Built from Plan(s)
Estimated Cost
Approx $100AUD (not incl hardware, paint)
Estimated Time Investment
Weekend Project (10-20 Hours)
Finish Used
Taubman's Endure interior paint (satin) in 'Milk Paint'
Custom 'glaze' (see blog posting for details)
Cabot's wood putty in 'Radiata Pine'
Custom 'glaze' (see blog posting for details)
Cabot's wood putty in 'Radiata Pine'
Recommended Skill Level
Starter Project
Comments

Tue, 10/25/2011 - 08:34
WOW!
Annie this looks great!
I'm glad you found inspiration in my design. I think I'll go back and upload a side picture and the sketchup model I worked from so that other people can see the details of how I did the trim. I think yours turned out wonderful!
I don't like painted furniture in my home but I really like the look of your furniture. The antiqued white goes well with the stained console top and the faux drawers.
Great job!!
Tue, 10/25/2011 - 15:37
Aww cheers Perchik... You're
Aww cheers Perchik... You're right, the natural beauty of wood is lovely, but I have so many different shades of wood in my living room from collecting 2nd hand furniture and old college furniture over the years that nothing seems to match :) Plus I do like this modern trend of stained top and painted legs, it looks quite fresh. The hard part with this stuff is deciding which project to do next - so many to choose from :)
Tue, 10/25/2011 - 15:38
Oh also I think if you have
Oh also I think if you have that sketchup stuff to hand I would definitely upload it, I zoomed in quite a lot on your photos and others photos of completed builds to understand details that are sometimes difficult to visualise on the plans.
Daughter's Vanity
Made this with an oversized removable center top. Wanted this to double as a vanity and art table, so I made this with a 20" deep center top. By being removable (set into slots) the two end pieces can later be used as separate storage shelves or night stands, as these are made from solid alder wood.
Built from Plan(s)
Estimated Cost
$125
Estimated Time Investment
Weekend Project (10-20 Hours)
Finish Used
Paint
Recommended Skill Level
Intermediate
Comments
Desk X Build
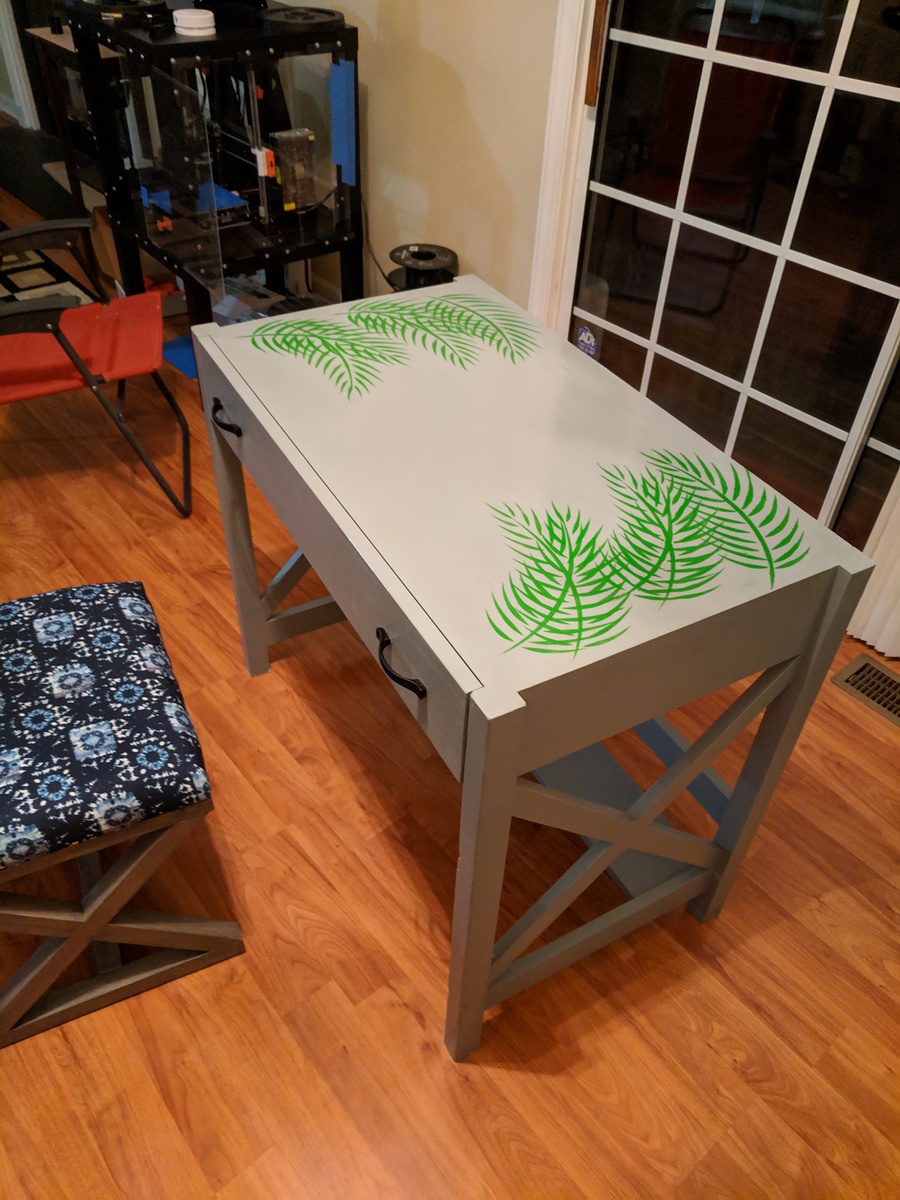
Full timelapse and thoughts in the imgur album.
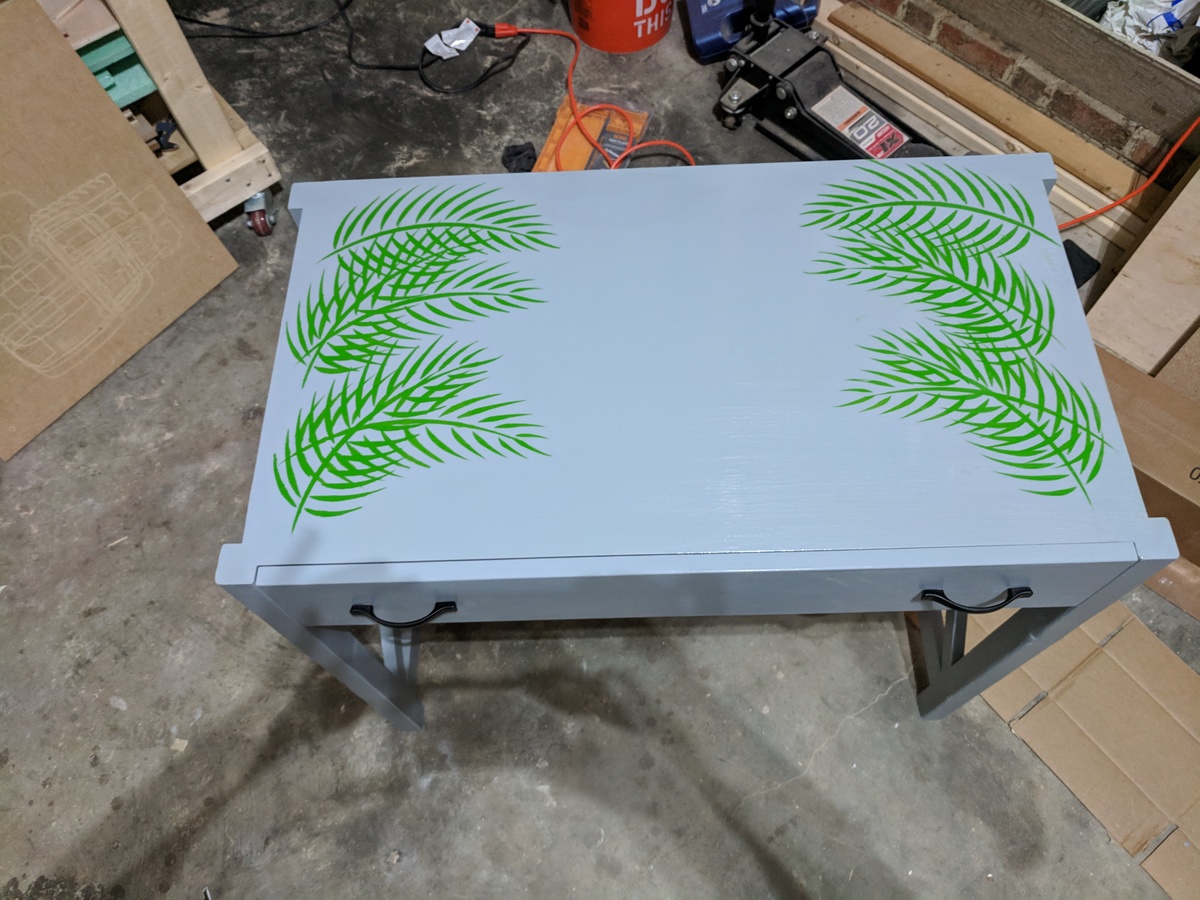

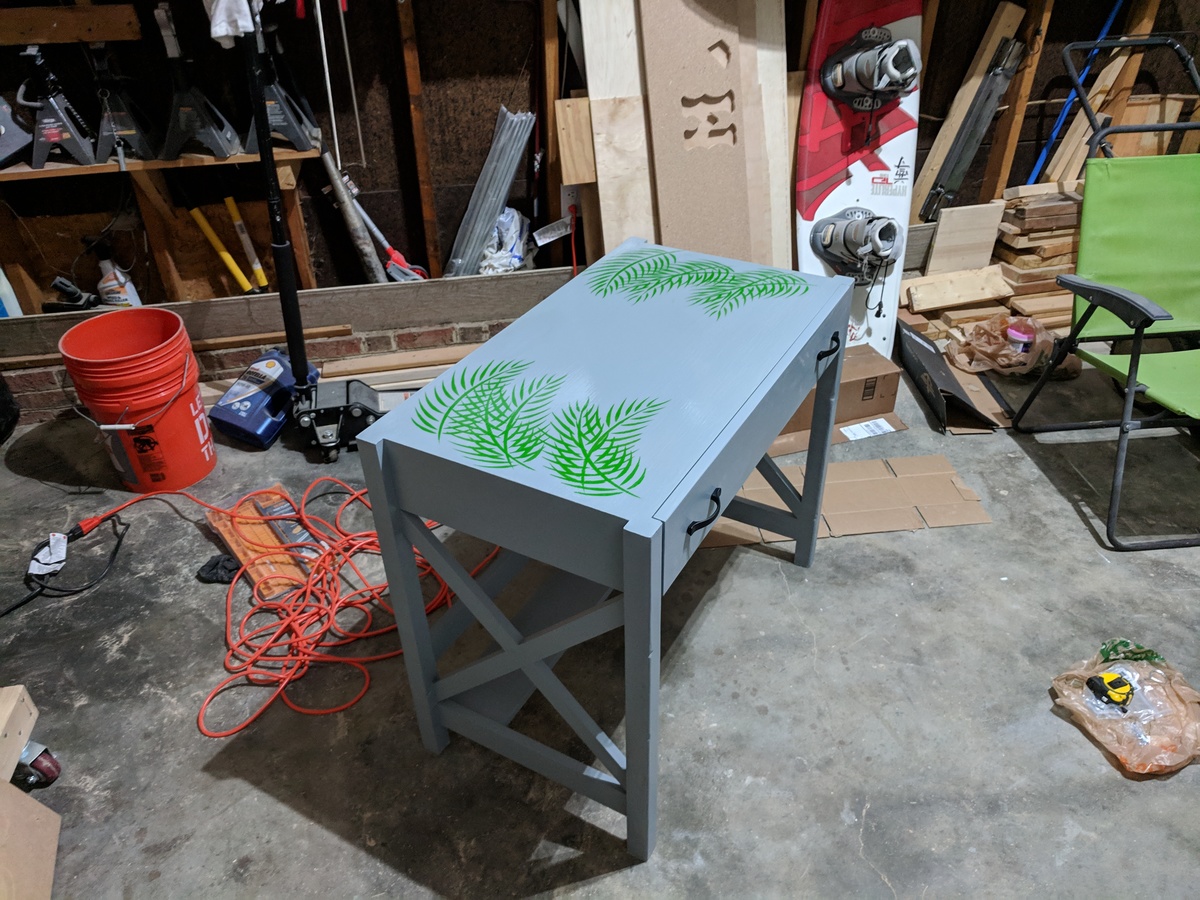
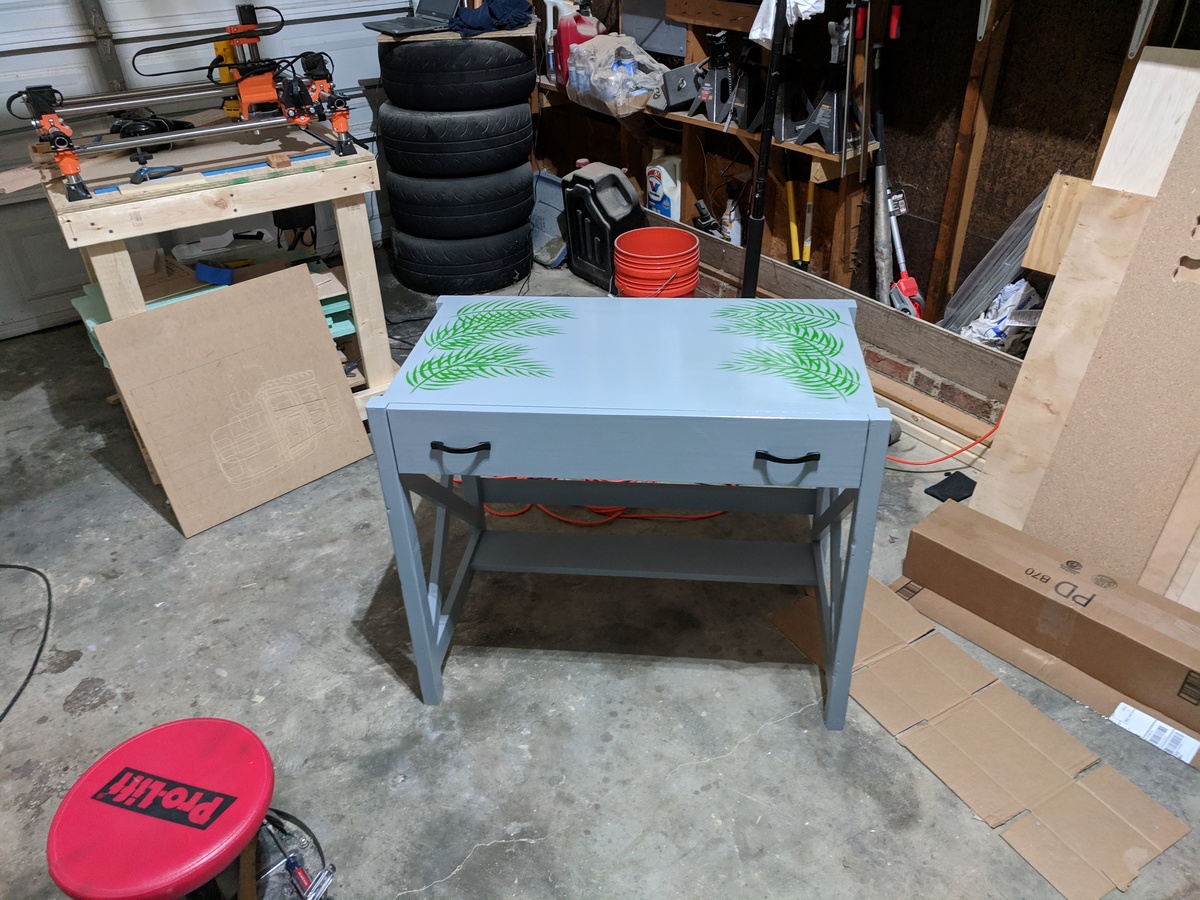
Built from Plan(s)
Estimated Cost
$120
Estimated Time Investment
Weekend Project (10-20 Hours)
Finish Used
Behr: Moonquake grey and Luck of the Irish green. Polyurethane on the top and drawer face.
Recommended Skill Level
Beginner
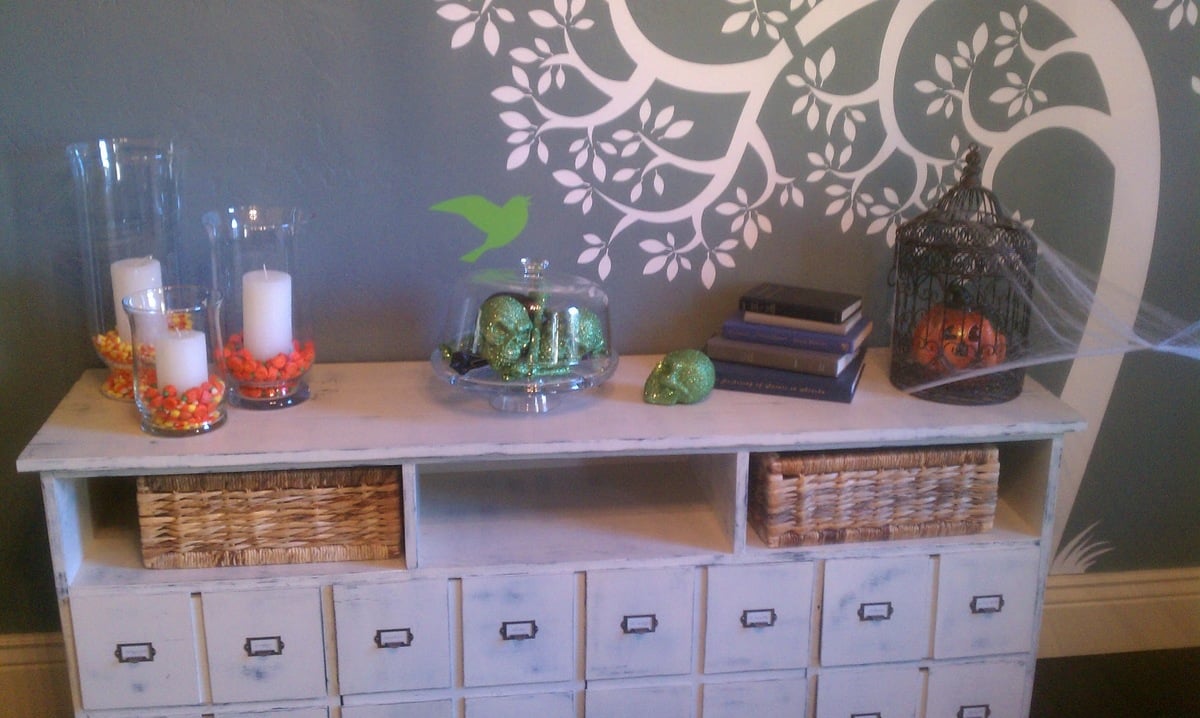
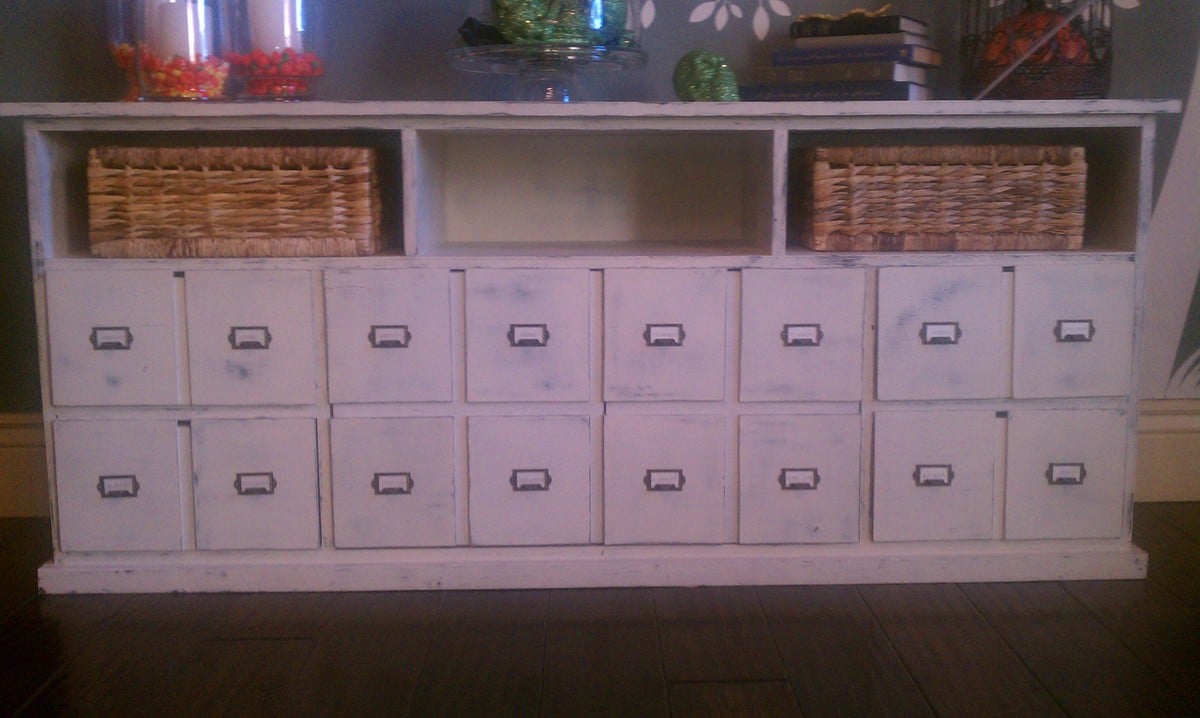
Apothecary Cabinet
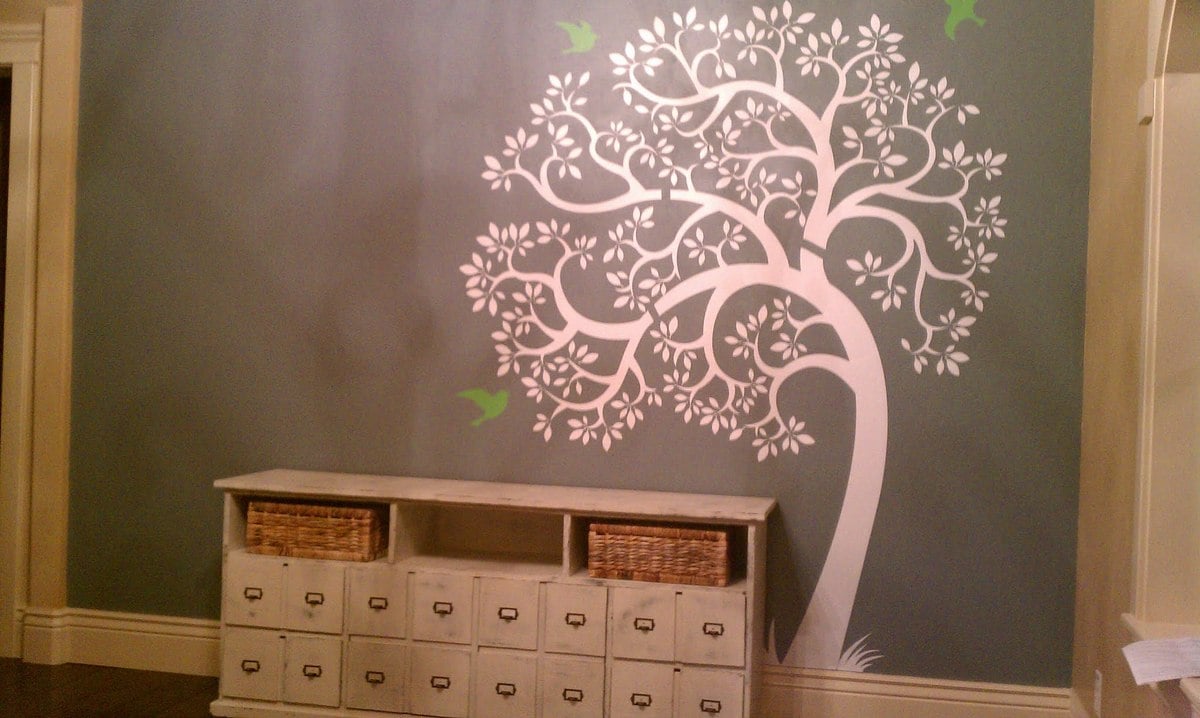
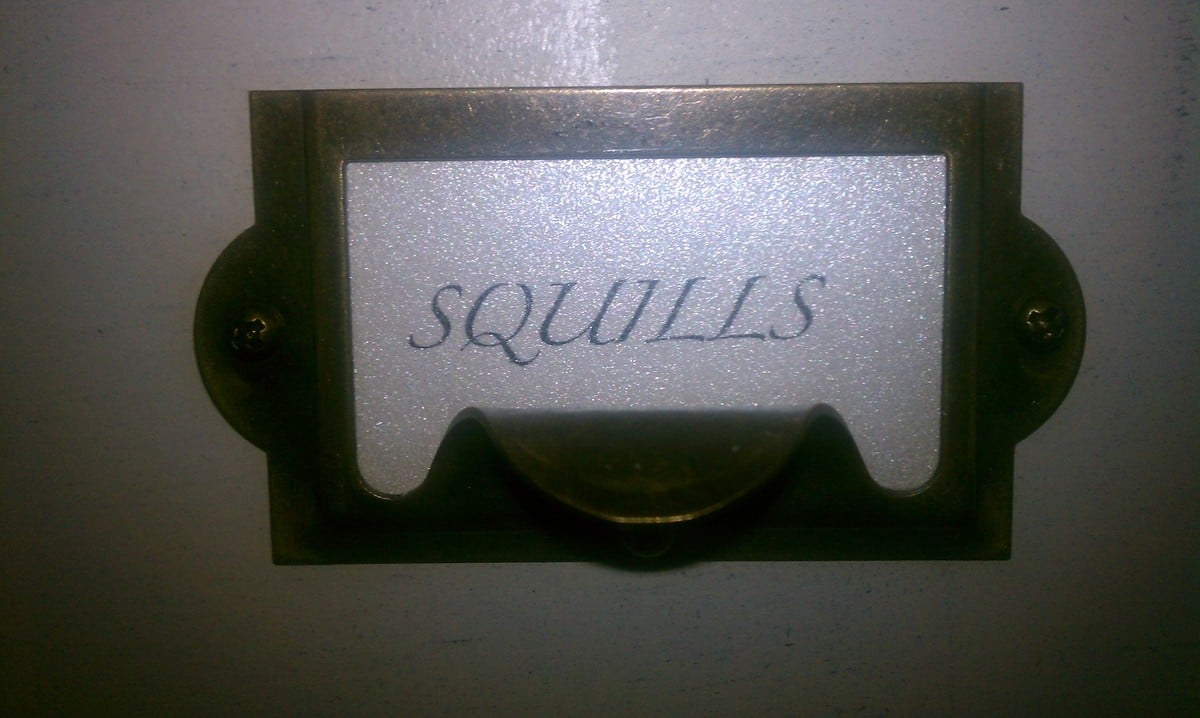
I painted the entire cabinet a dark blue, then painted over it again with an antique white. After it was completely dried I sanded it all down to give it a distressed look. I used antique label holders for the drawer pulls.
Built from Plan(s)
Estimated Cost
$350.00
Estimated Time Investment
Week Long Project (20 Hours or More)
Finish Used
I use this cabinet in my piano room to store all my music.
Recommended Skill Level
Intermediate
Comments
Sun, 10/30/2011 - 19:53
Love these things! You did a
Love these things! You did a great job - especially like the pulls!
Sat, 11/12/2011 - 02:55
It's funny cause I have been
It's funny cause I have been thinking about doing the same set up with the apothecary console under a wall painted tree. I have to ask how you made the tree - is it stickons or stencil (if so please tell me where you got them) or is it hand painted. It's absolutely beautiful!!!!!!!!!!!!!
Tue, 11/15/2011 - 08:39
Its a vinyl wall decal. I
Its a vinyl wall decal. I bought it on etsy. I love it.
Tue, 11/15/2011 - 08:40
Its a vinyl wall decal. I
Its a vinyl wall decal. I bought it on etsy. I love it.
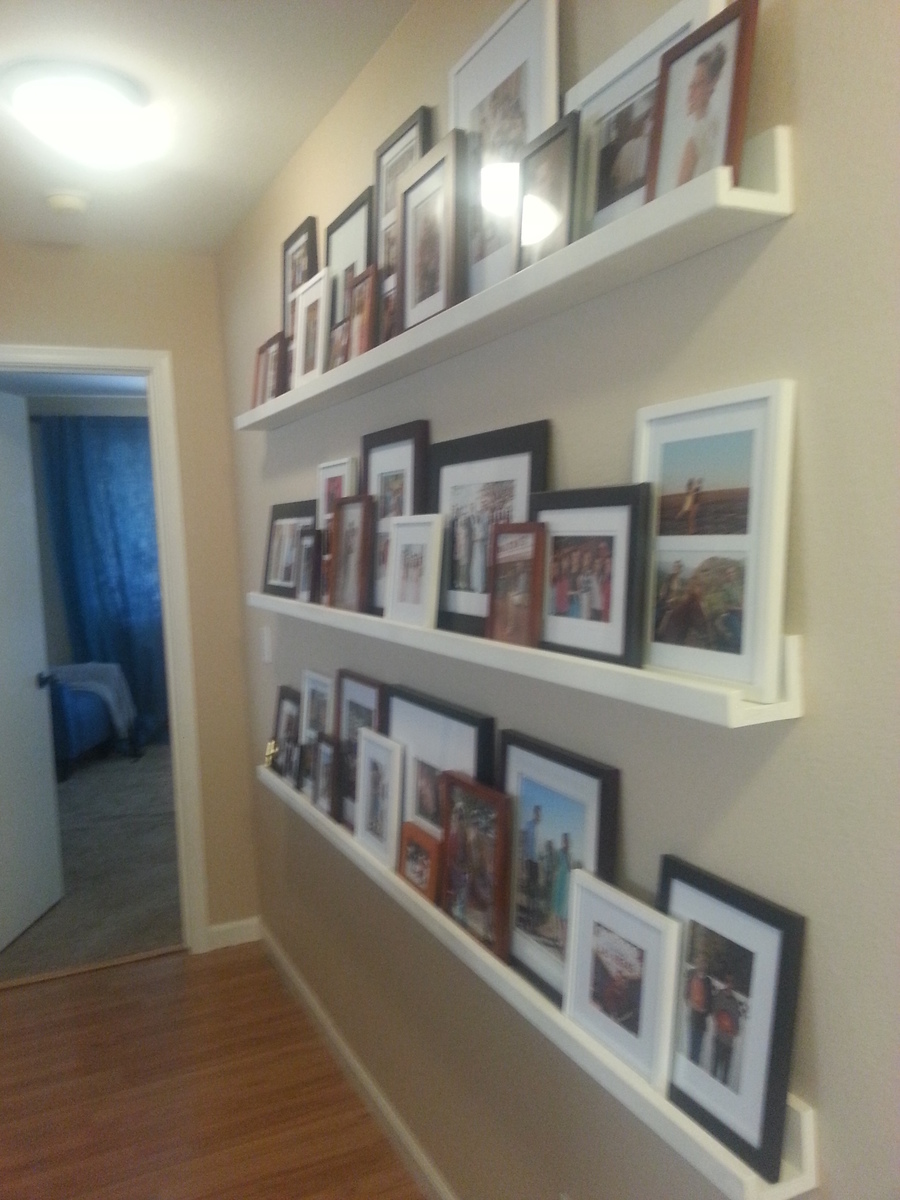
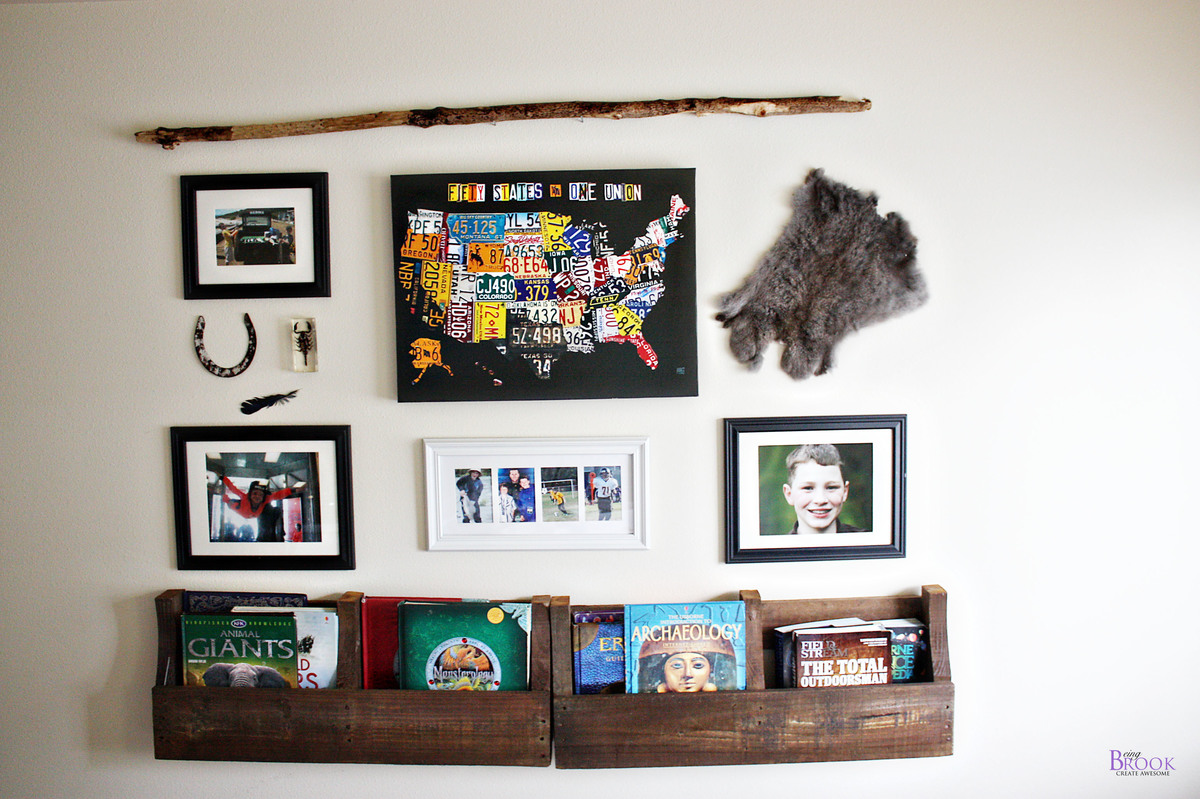
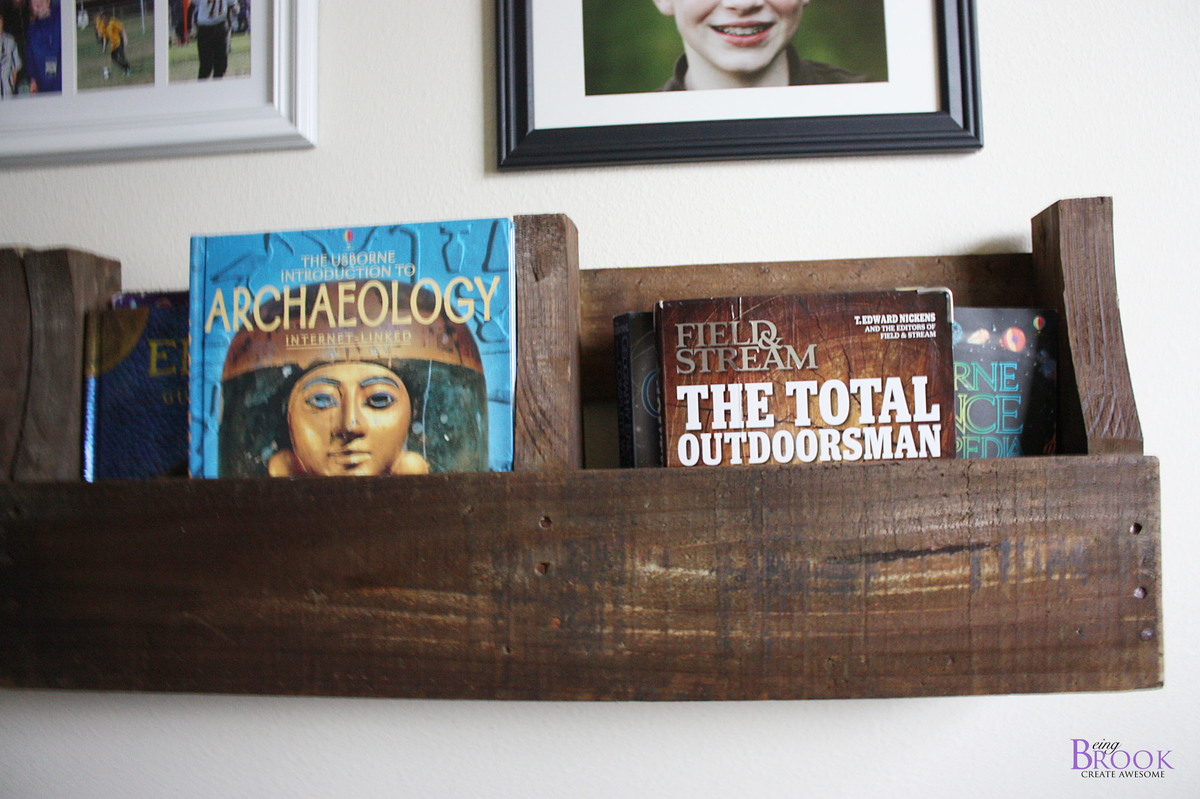
Photo Gallery Made Easy!
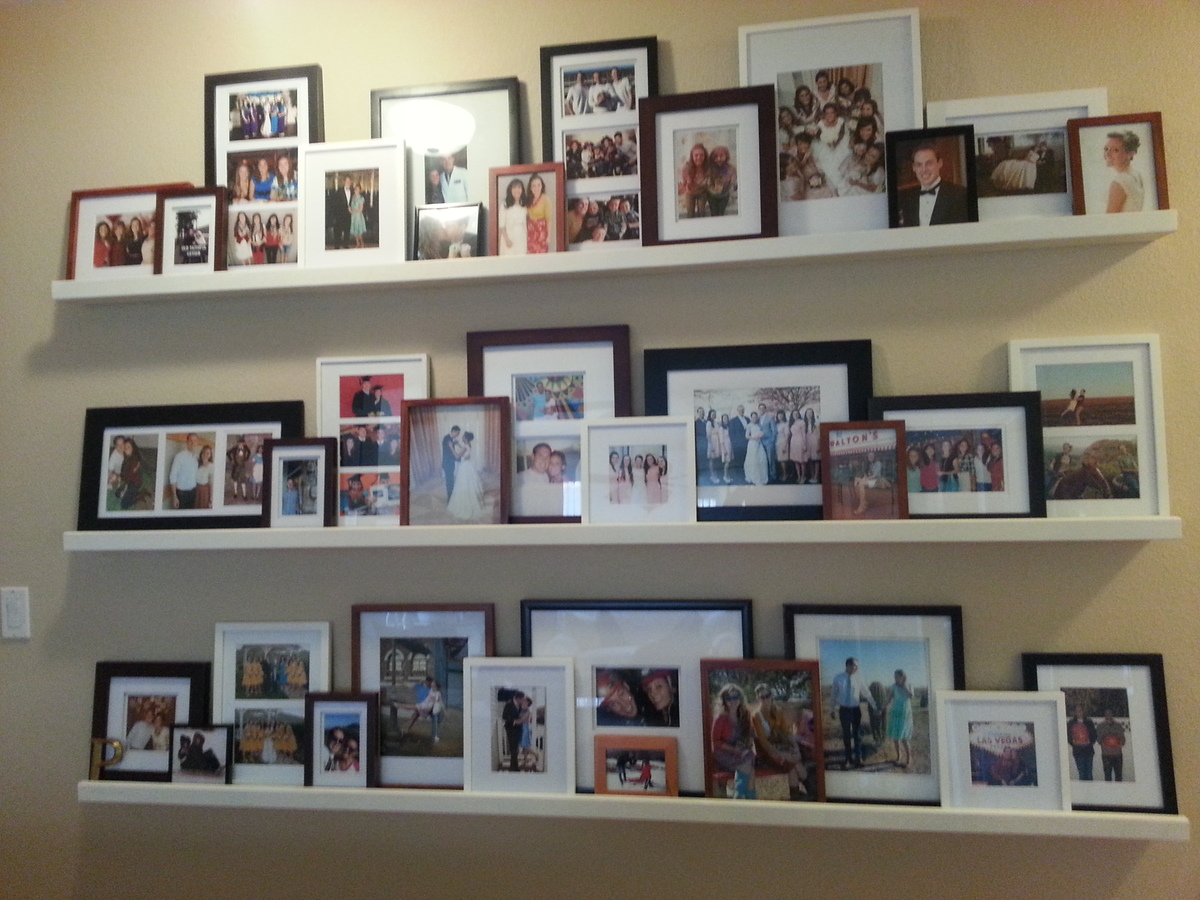
I love my new photo ledges. I had a huge space on my wall and these ledges are perfect. The ledges were so easy to make. I got a kreg jig for my birthday (I never thought I would ask for a tool for a birthday present) and I have gotten so much use out of it. I saw similar ledges at pottery barn for 10 times the cost of this DIY project. I saved so much with these ledges. The kreg jig has already paid for itself. The ledges make it super easy to switch out photos and I love being able to display so many fun photos. Everyone who sees these ledges loves them!! This was my first project. Thanks Ana for the great plans!
Estimated Cost
$50
Estimated Time Investment
Afternoon Project (3-6 Hours)
Finish Used
White gloss spray praint
Recommended Skill Level
Starter Project
Comments

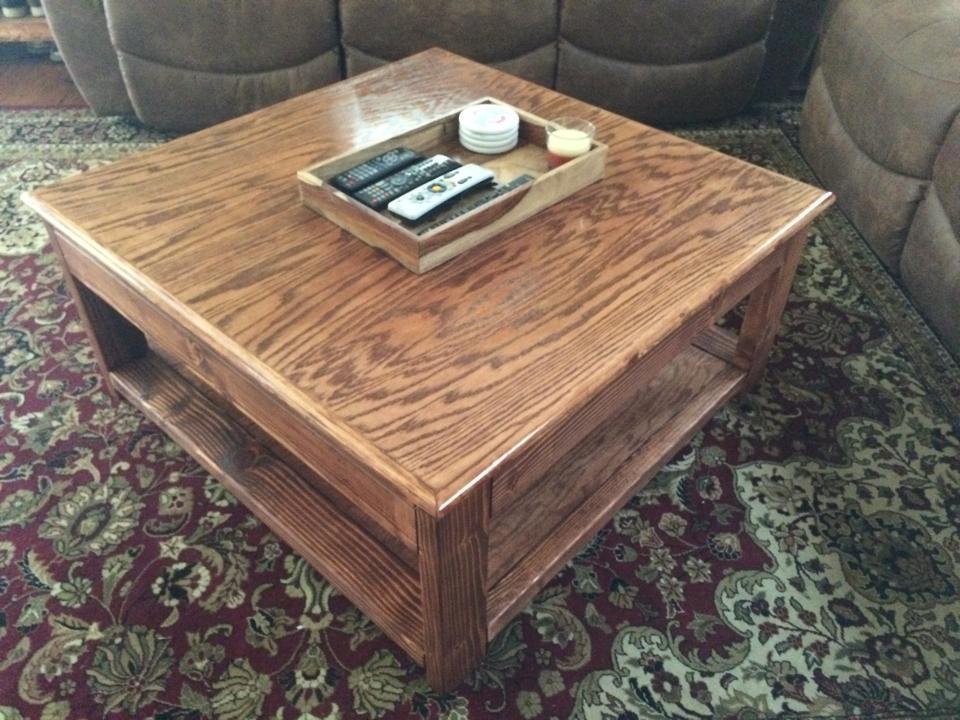
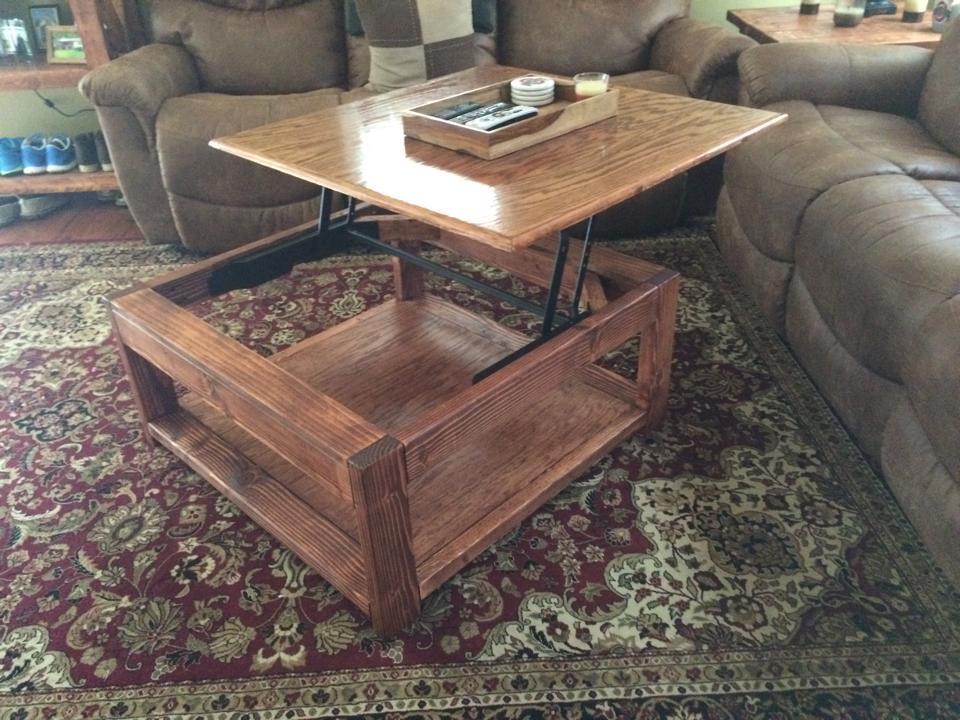
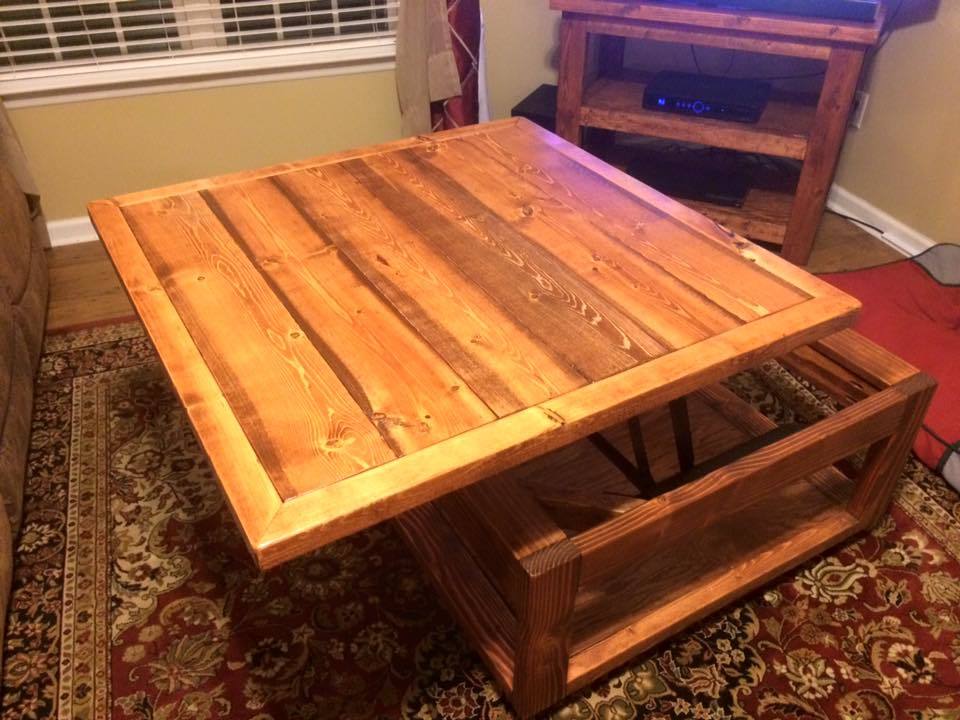
Lift Top Coffee Table

I used the rustic x coffee table for my inspiration for this project. I found the mechanism for the lift top table on the web and was able to work it into my design. I used oak plywood for the top instead of the 2x6's and trimmed out the rough edge, however, I have thought about redoing the top with the 2x6's to match my tv stand and end table. I am still really happy with the way it turned out though. After posting this I decided to upgrade the top as I had described and I am way happier with the look of it!!
Built from Plan(s)
Estimated Cost
$150
Estimated Time Investment
Weekend Project (10-20 Hours)
Finish Used
Rustoleum American walnut
Recommended Skill Level
Intermediate
Comments
Tue, 01/19/2016 - 13:19
Totally Sweet!
Great job with this project, it looks amazing. Thanks for sharing!

Wed, 04/13/2016 - 10:43
Lift Top Coffee Table
Where did you find the mechanism for the lift top table on the web & how much was it I would like to try this project.
Bench and mirror
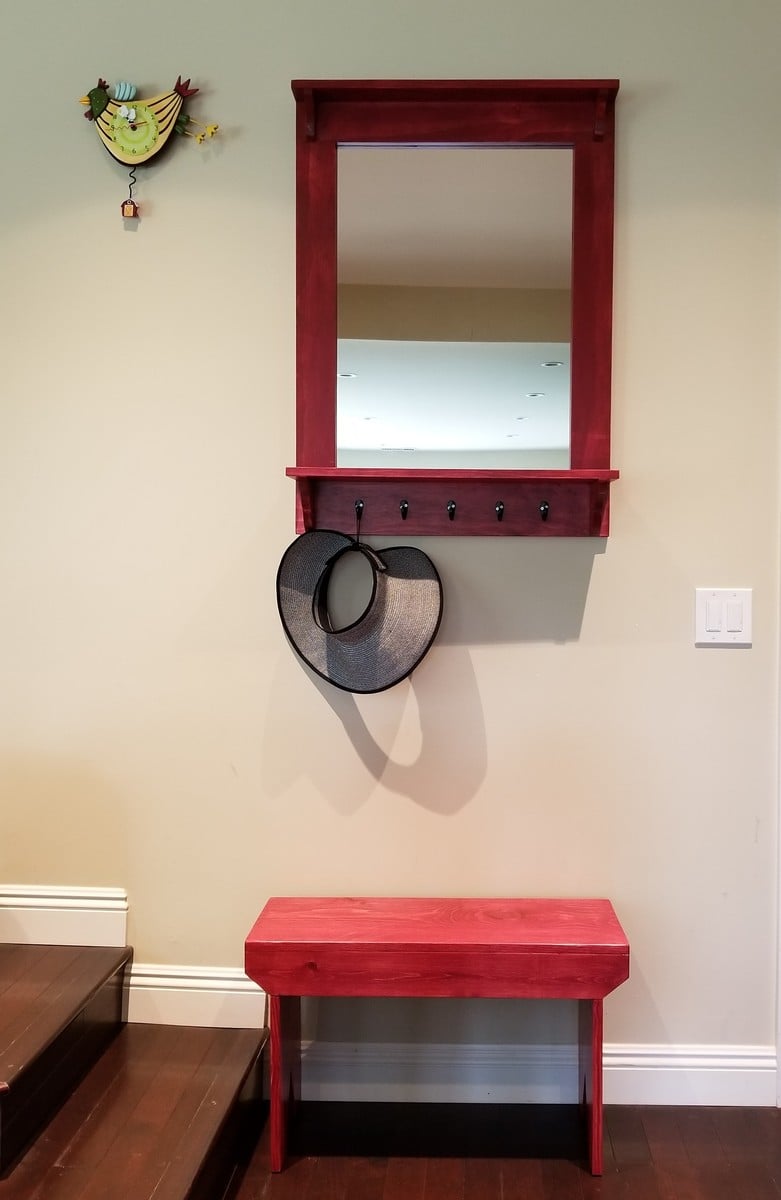
This is the 5-board bench and project #2 mirror from Ana's "The Handbuilt Home" book. The bench was shortened to fit the space that I wanted it for.
Estimated Cost
$50
Estimated Time Investment
Afternoon Project (3-6 Hours)
Finish Used
Barn red stain and matte polyurethane
Recommended Skill Level
Beginner
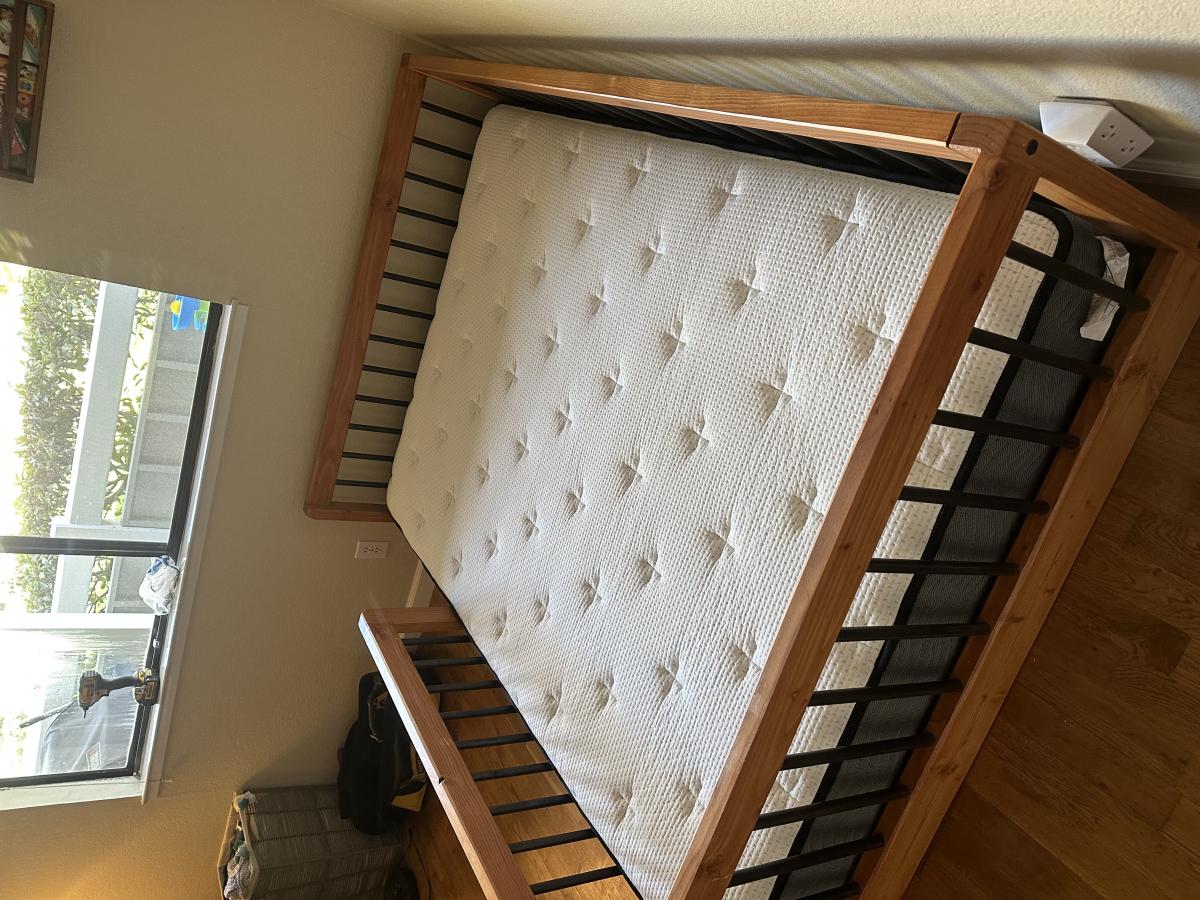
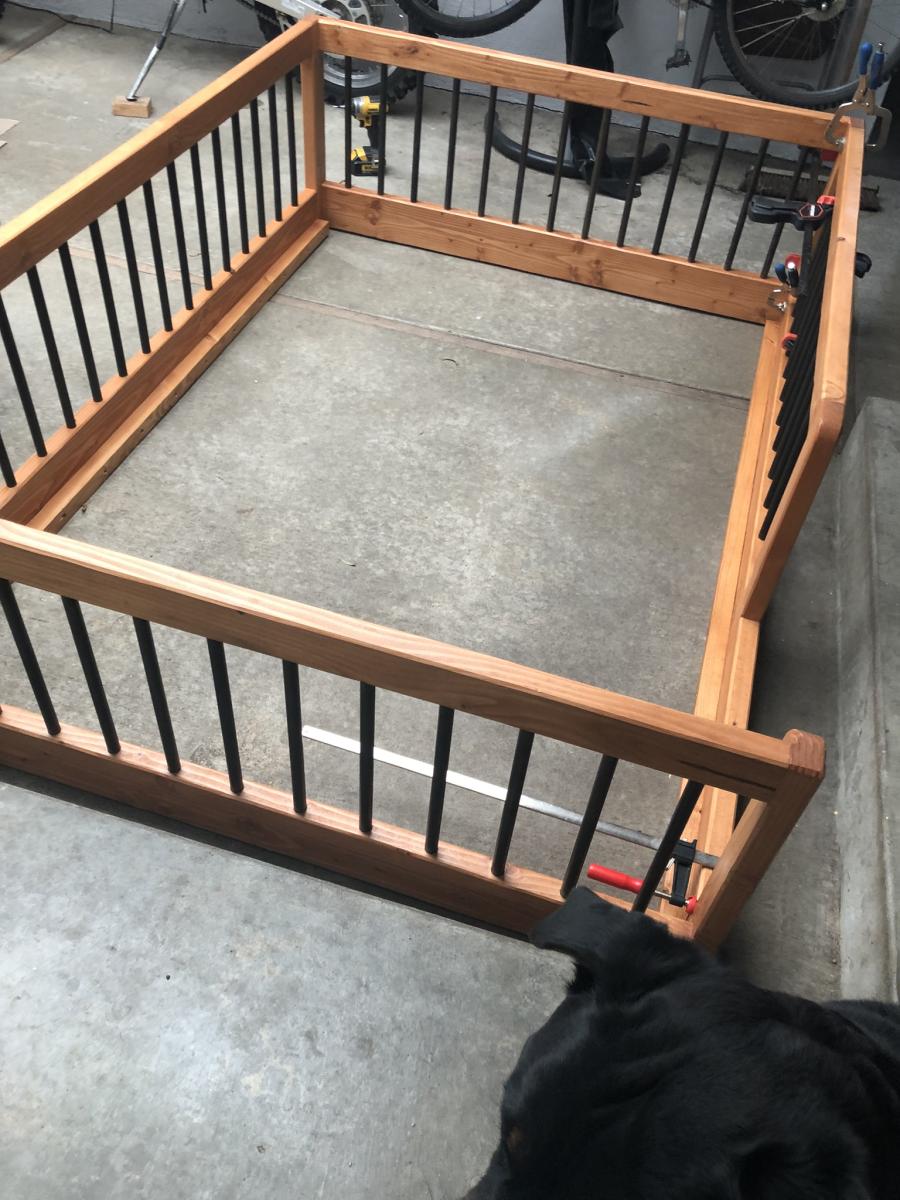
Montessori bed
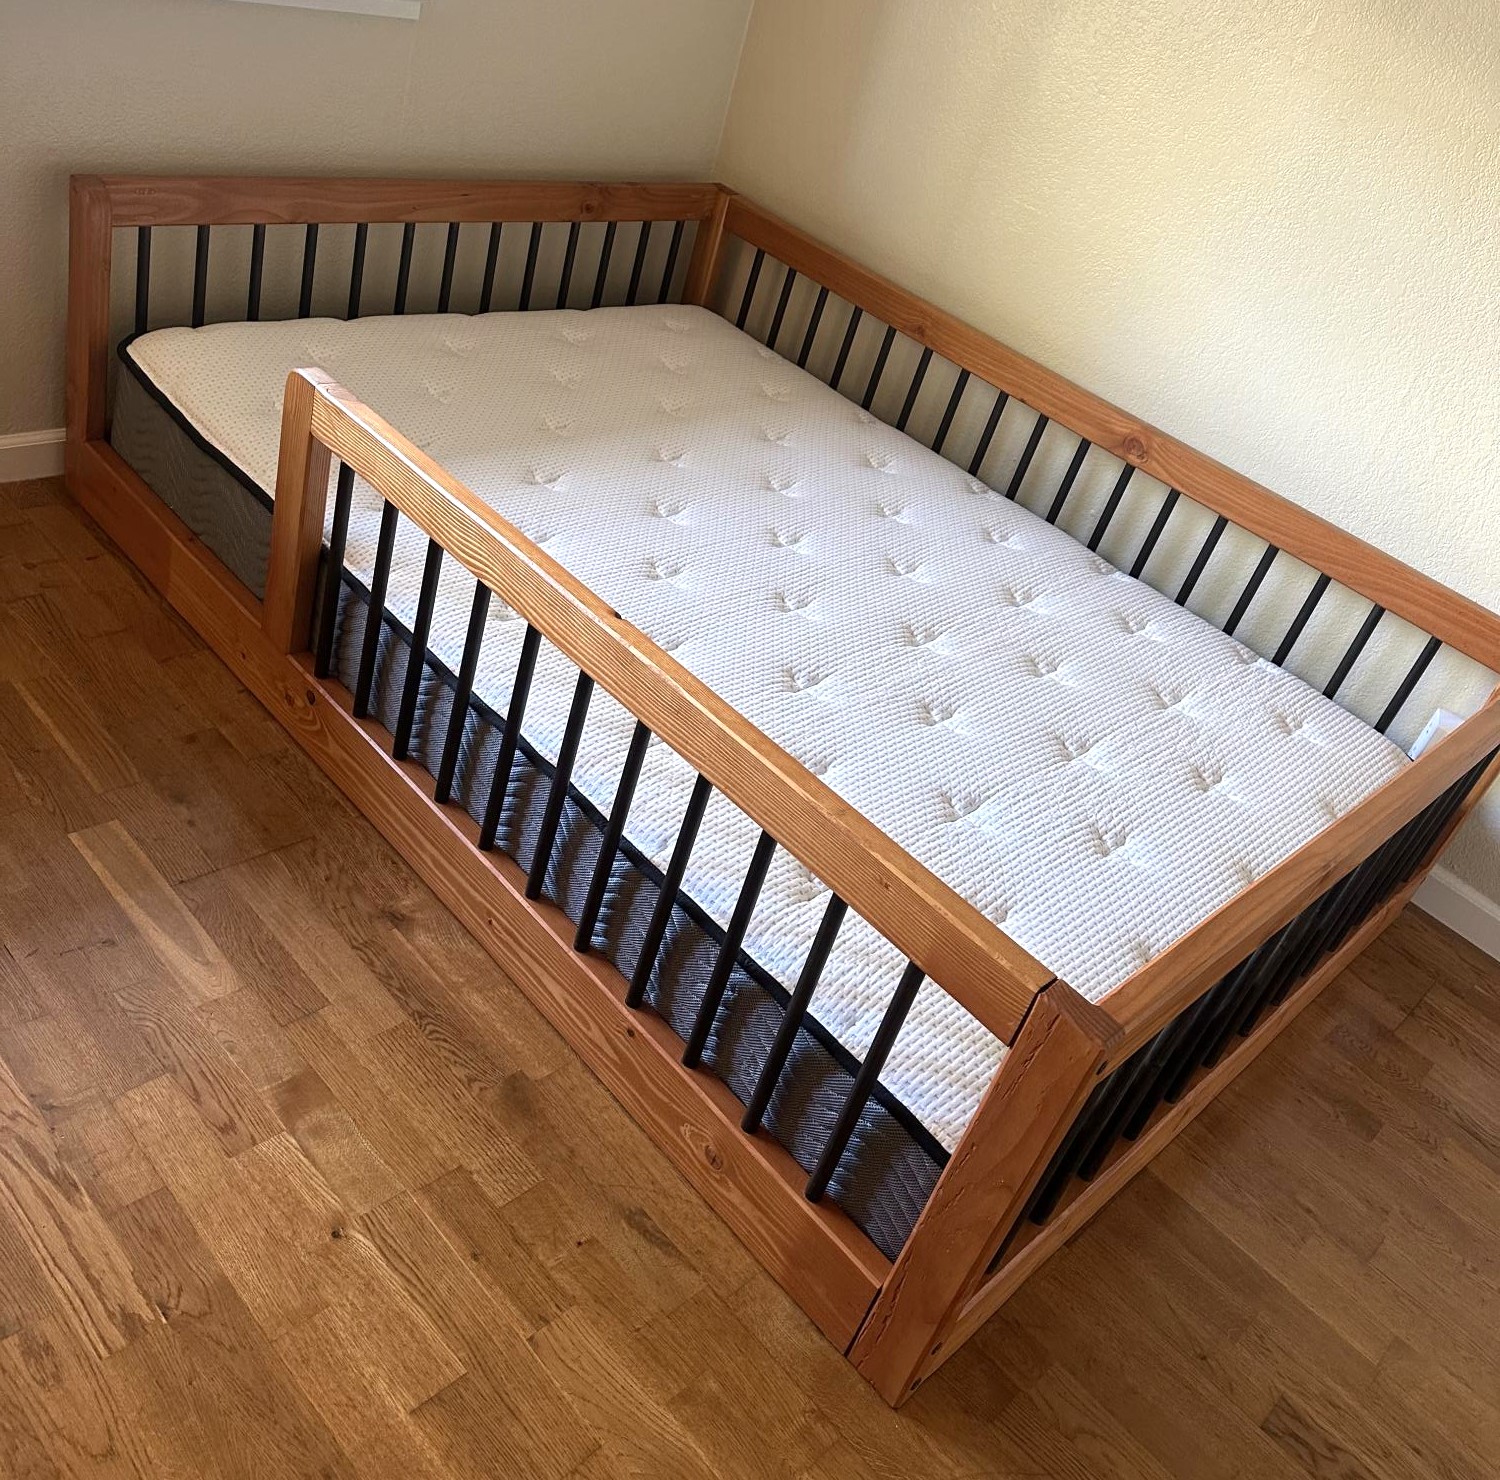
A Montessori (full size) bed made for my grandson Jack’s 1st Birthday.
Comments
entry shoe bench and coat rack
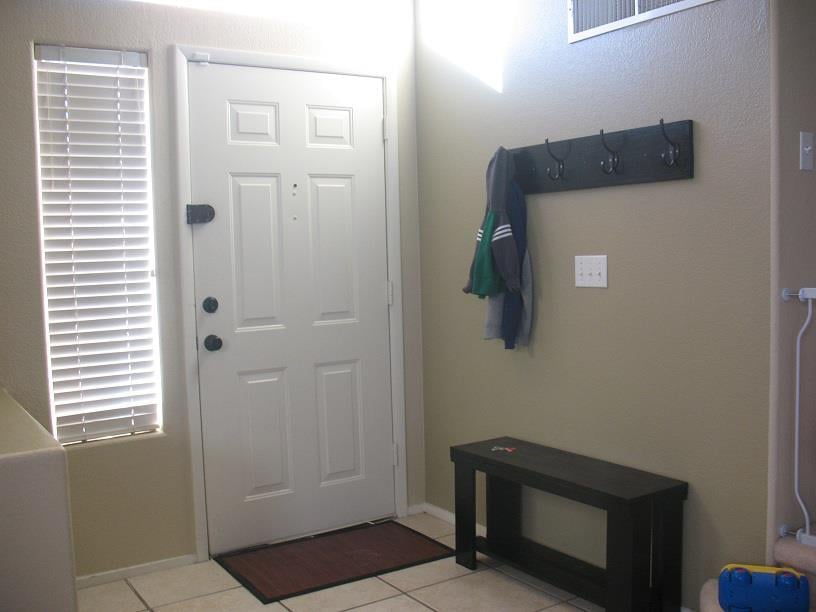
This is a great place to put on shoes and hang up your coat. My husband loves it. You can place your shoes on the shelf under the bench.
Built from Plan(s)
Estimated Time Investment
Weekend Project (10-20 Hours)
Recommended Skill Level
Beginner
Forward facing bookshelf
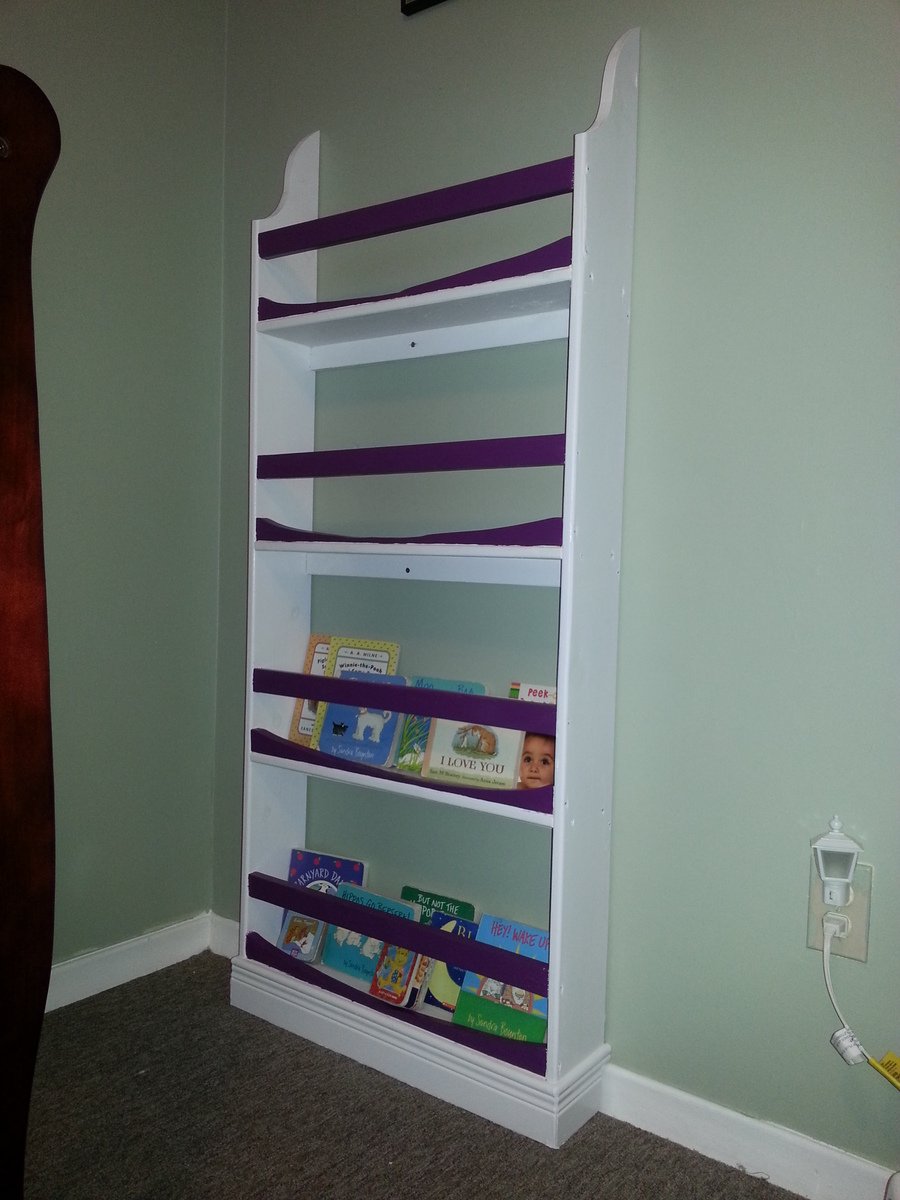
This was my first build and I think it turned out pretty nice. I had been considering a new bookshelf for my daughter's room for some time because the one we had was large and clunky. This takes up significantly less floor space which makes her room seem so much larger.
The hardest part of this I found was cutting the arches out of the 1x2s. I noticed a lot of other people omitted that part, but I thought it was a neat way to add some interest so I really wanted to keep it. Unfortunately, they aren't exactly symmetrical and the cuts were very jagged. But I knew I was going for a dark paint in those spots so with a little bit of sanding you can barely tell.
Speaking of paint, I didn't realize how much even a small quart was going to cost me, and I bought two colours! But it was definitely worth it I think. The white with plum purple accents is really sharp, and my daughter loves it. In fact, I'm already planning on building a complete bedroom set for her in the same colour scheme. Hopefully it works out.
Thanks for taking a look! :)
Built from Plan(s)
Estimated Cost
$50
Estimated Time Investment
Weekend Project (10-20 Hours)
Finish Used
Behr White and Grape Jubilee
Recommended Skill Level
Starter Project
Comments


Sat, 04/19/2014 - 06:19
Love the accent
Love the accent colour!!
I've been trying to figure out how to throw in a pop colour, this is it! Thanks!
Love my new built ins!
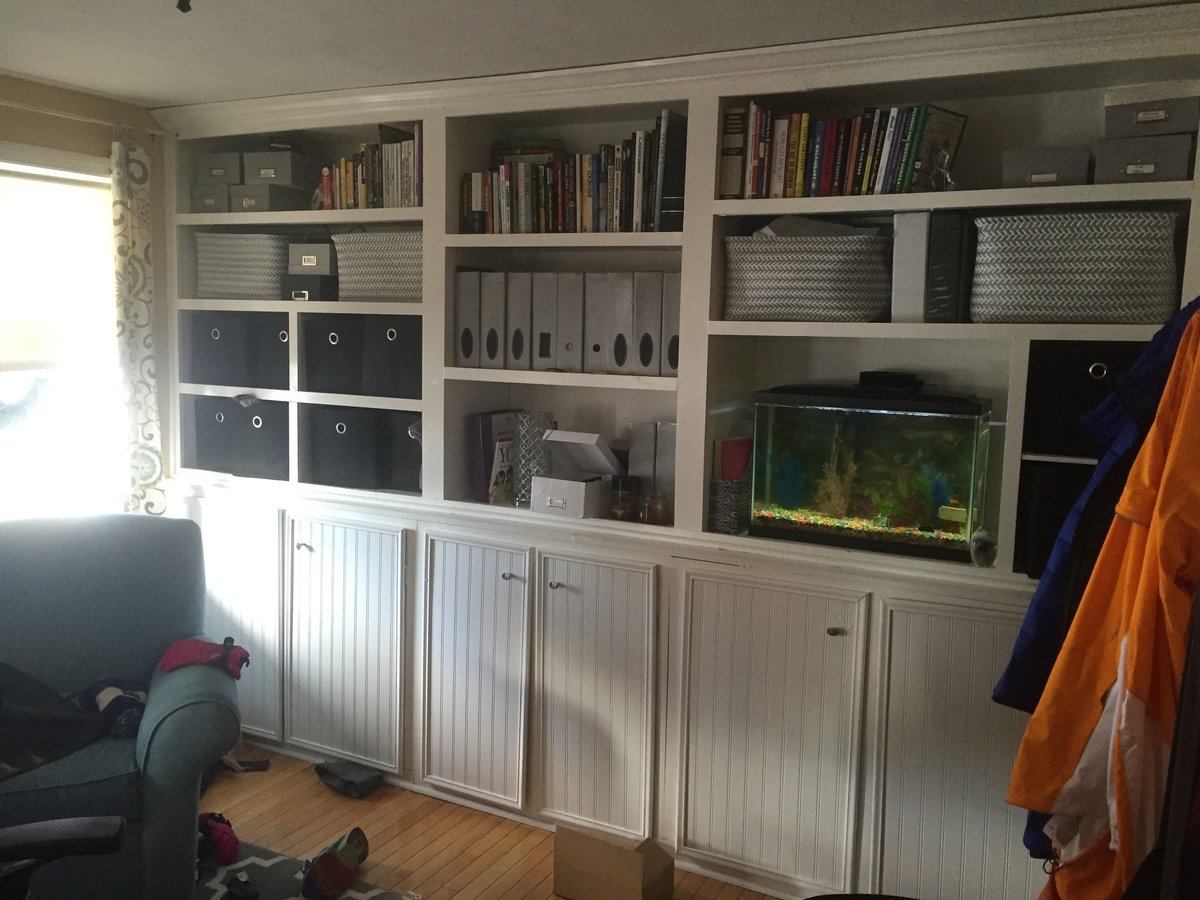
built ins for my office-based on basic bookcase plans, and pieces from rustic bookcase plans. I got a kreg pocket hole jig for this one- best money ever spent!!! My husband didn't think I could do it but I did! ❤️❤️❤️
Built from Plan(s)
Estimated Cost
$500
Estimated Time Investment
Week Long Project (20 Hours or More)
Recommended Skill Level
Intermediate
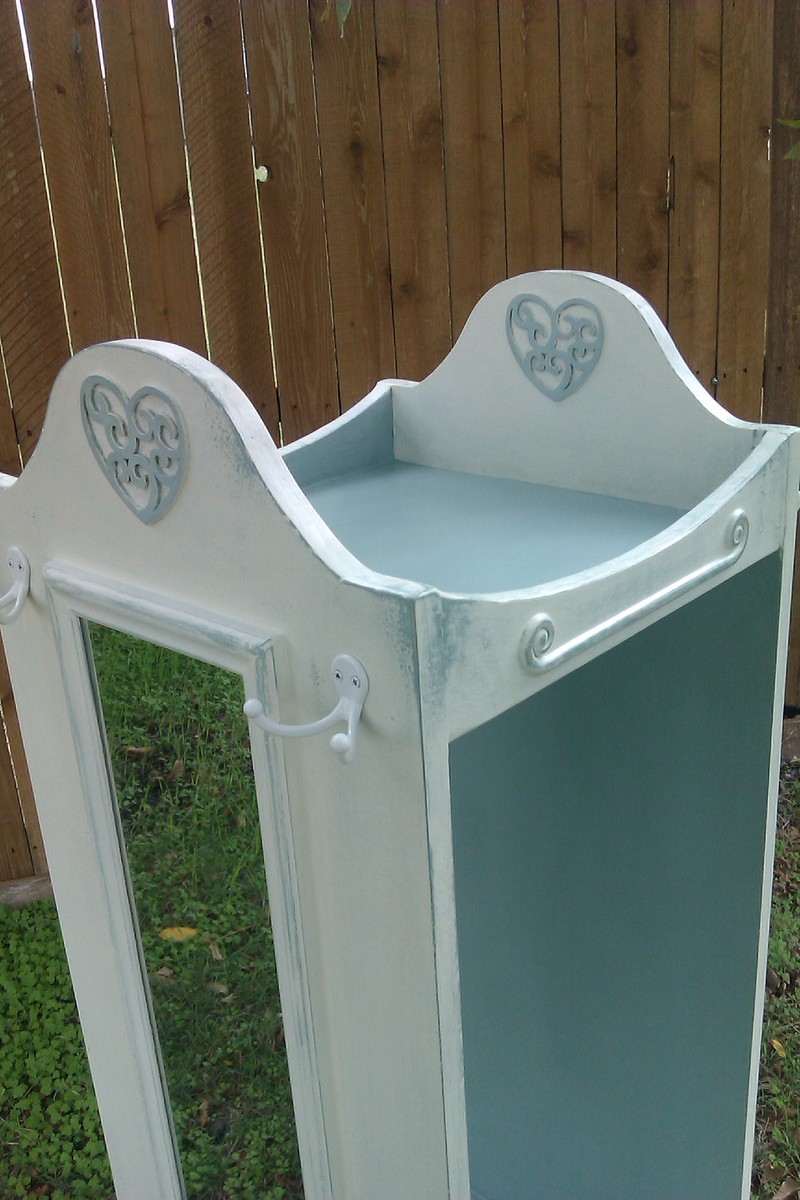
Dress Up Tower for my four year old Granddaughter
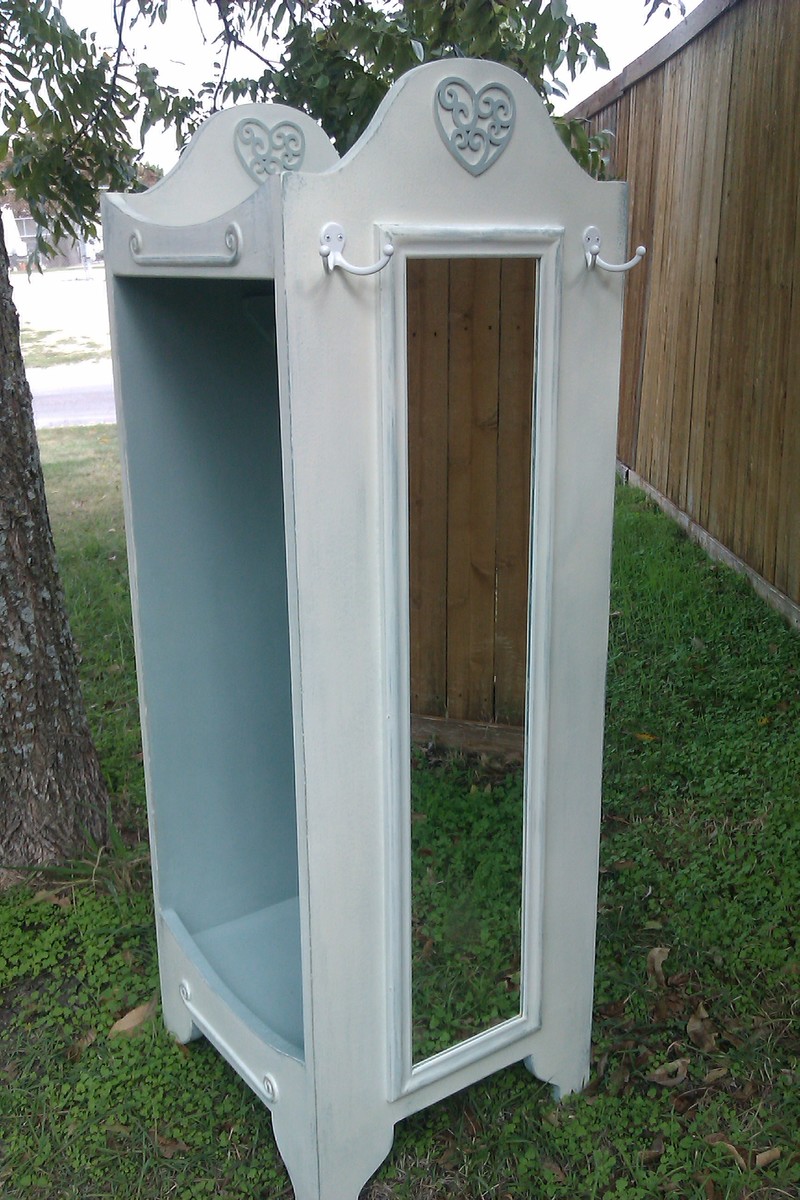
I'm a furniture builder now! This is actually the fourth project built from Ana's plans, but the first one complete and gifted. I bought my materials in the morning, and had it together by late afternoon. Now choosing colors, trim and do-dads to embellish was a whole nuther thing. I opted for chalk paint with a wax finish, and distressed her. She has mirrors on both sides as well as two, double hooks for hats, belts and jewelry.
My grand daughter is one pleased princess. Me too! I'm proud of myself.
Thanks Ana for the terrific instructions, encouragement and education you provide.
Built from Plan(s)
Estimated Cost
$75
Estimated Time Investment
Weekend Project (10-20 Hours)
Finish Used
After a wood putty and a light sanding, I mixed Annie Sloan Chalk Paints to get the beautiful blue. It's one part Duck Egg Blue to one part Old White. No primer is needed with this brand, but I did apply two coats of paint. When dry, I used one coat of Old White to the outward facing walls, leaving the inside and top blue. A light sanding at corners and where natural wear might occur took off enough white so blue could show thru. I applied 2 coats of Annie's Soft Clear Wax to seal and waterproof the finish. I'm pleased with the finish.
Recommended Skill Level
Beginner
Comments

Fri, 11/11/2011 - 09:19
Great Details
Great Project! I really loved the heart embellishment on the inside of the top...it makes it even more interesting to look at from many angles.
Question: does the waxed chalk paint finish feel that it may wear away with use? I am considering this finish but have never felt it in person.
In reply to Great Details by cathryn j (not verified)
Sat, 11/12/2011 - 19:20
hearts and wax
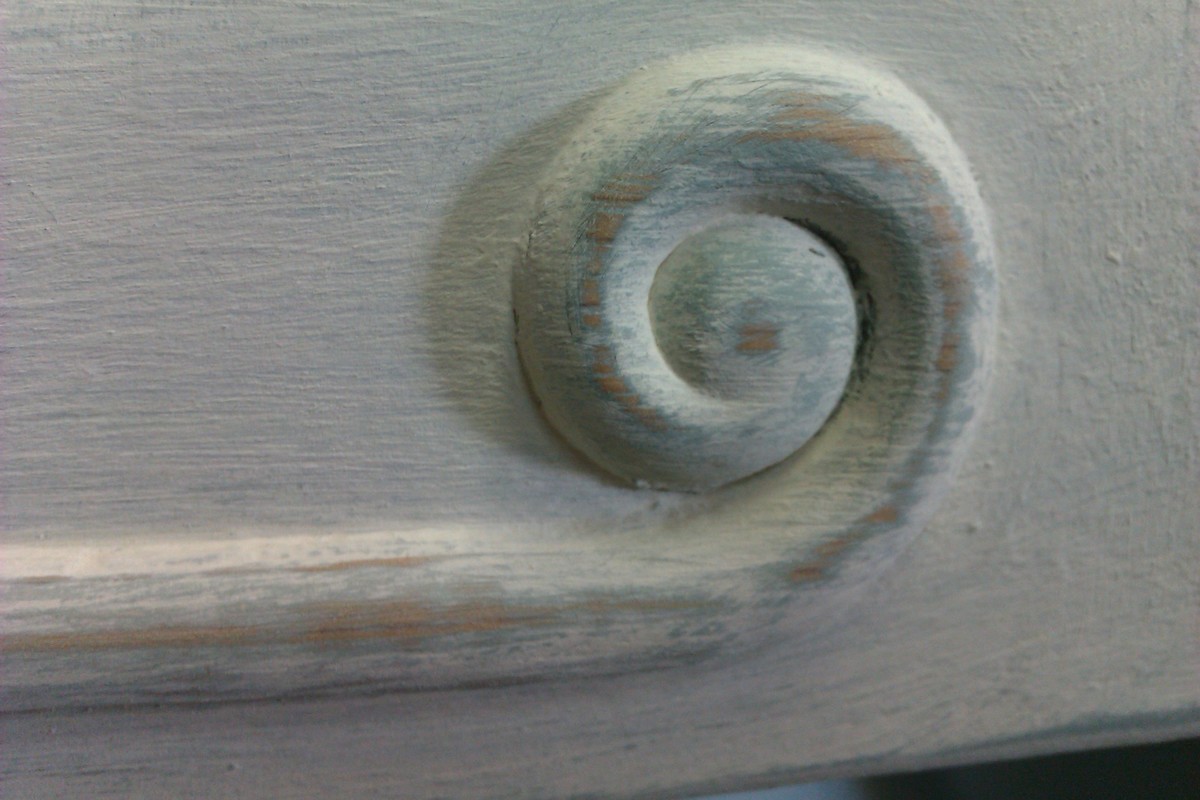
I love the hearts too! Found them in a clearance bin at a local hobby supply store for .29 cents each. The price thrilled miserly me.
Regarding the wax, it feels very smooth and satiny. I'm new to the chalk paint and wax technique, myself, but I did research before using it. From what I gather, wax, in general, will eventually wear away and have to be redone. When the piece looses it's luster a soft rag should buff the sheen back. When you can't buff up a sheen, then it's time to rewax. It should last years. Ask me again in 5 years. :-)
Oh, I should add, the close up of the curly embellishment was taken before I waxed.
I came across a lot of conflicting info regarding the soft wax. Nothing bad, just different techniques, and it seemed the more I read, the more questions I had. Finally just dove in and found my way. I like, like the method!
Did I answer your question? And then some!
In reply to Great job! by margjack
Sat, 11/12/2011 - 19:49
Thank you!
She's a foo-foo girl, so yes, she was excited. Even more so when she was able to stand in front of her own full length mirror and see how stunning she was in the princess outfit her Aunt gave her. So cute!
Sun, 11/13/2011 - 19:48
It's gorgeous!
You did a beautiful job, and I love the finish! I built the same piece, but only gave it an antique white painted finish. I may have to try some of your techniques on my next build.
Where did you find mirrors to fit? I can't find them short enough...
Tue, 11/15/2011 - 16:20
I found them @ Lowe's
I'd planned to use mirror tiles, but while at the Lowe's buying trim and mastif, I came across 2 to a pack beveled mirrors for $19. They were the perfect size! Now that's luck.
Wed, 11/23/2011 - 18:43
Thanks, Ana
Thank you, Ana, for this awesome site! I'm building Christmas gifts now. :-)
Sat, 12/31/2011 - 04:05
j'adore , je vais en faire
j'adore , je vais en faire une mais j'ai du mal avec les cotes de chez vous.... Happy new year Isabelle
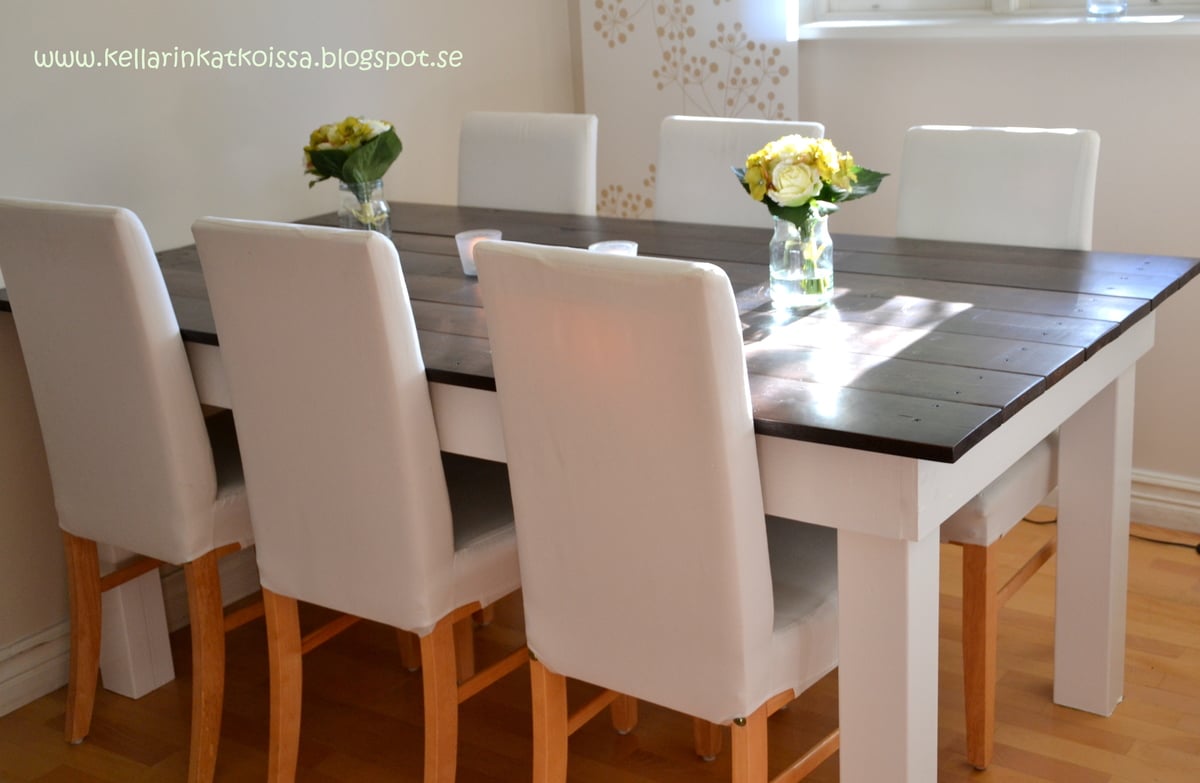
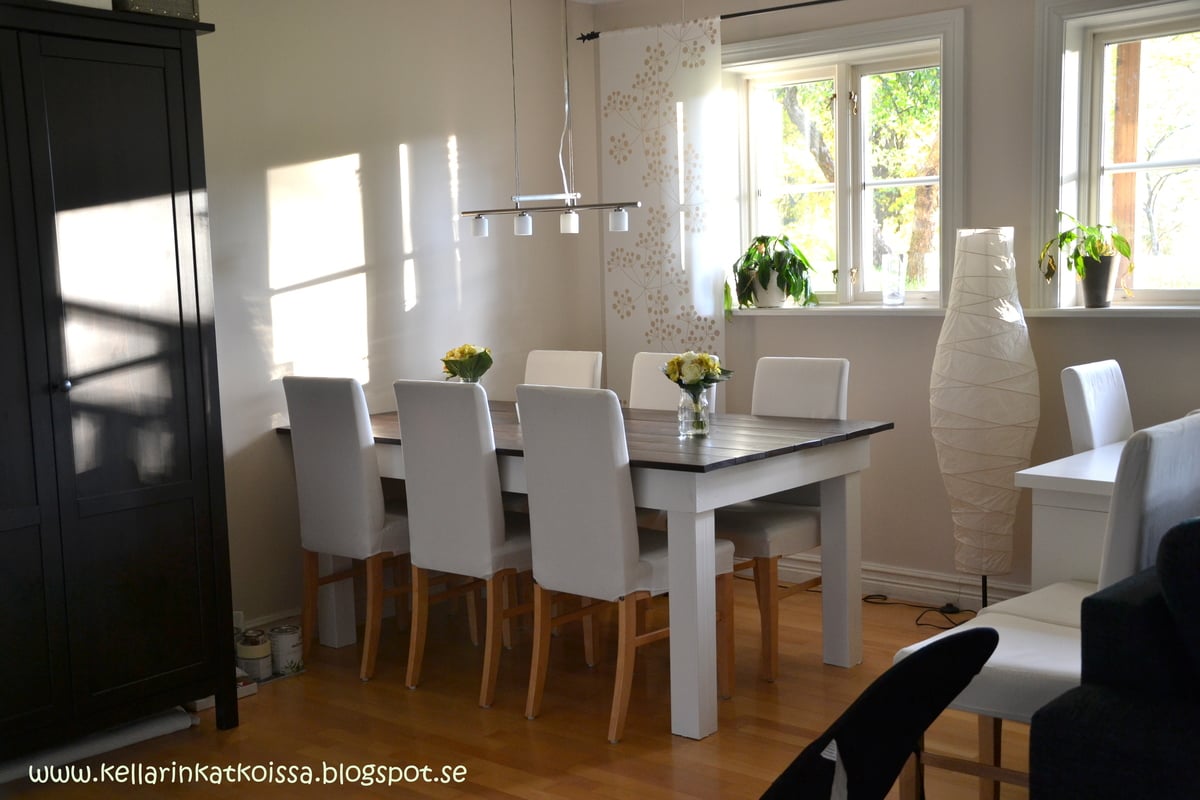
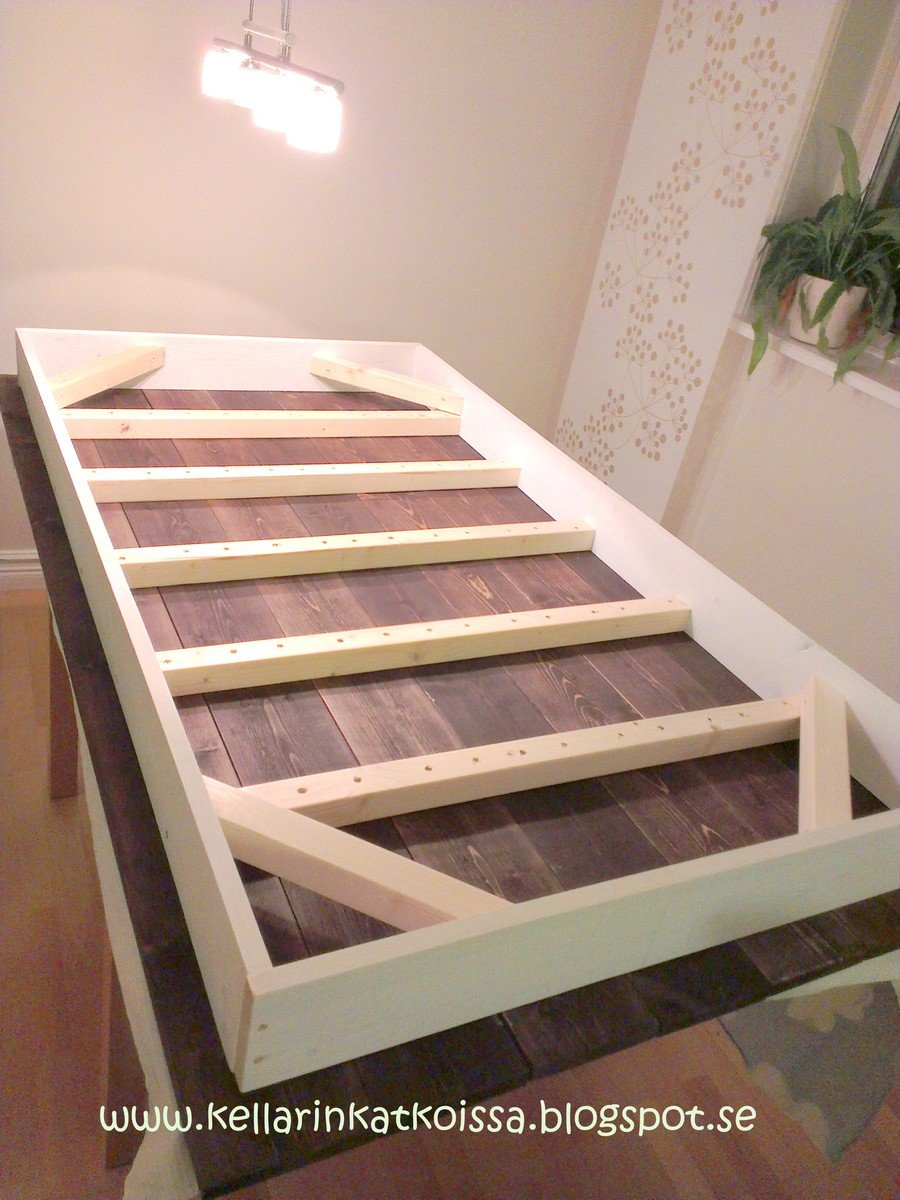
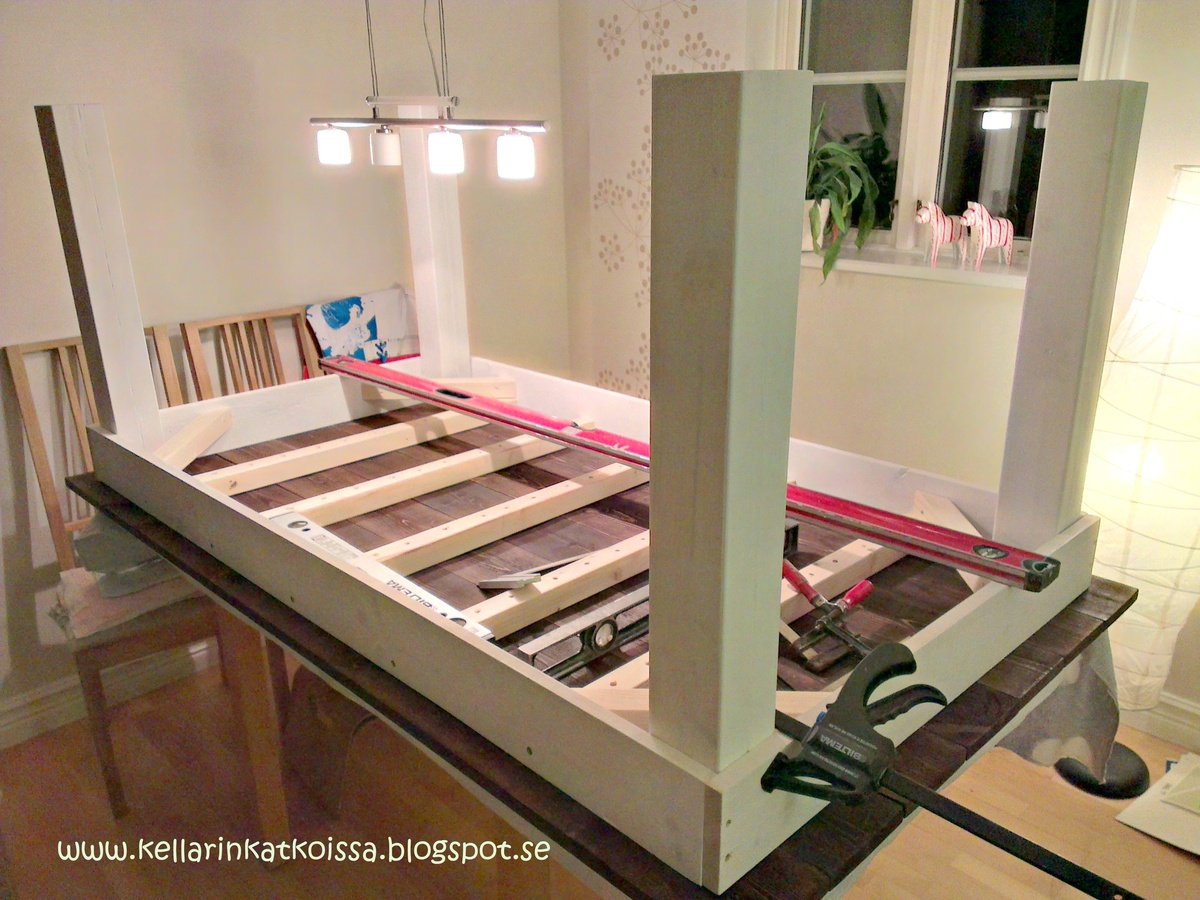
dining table
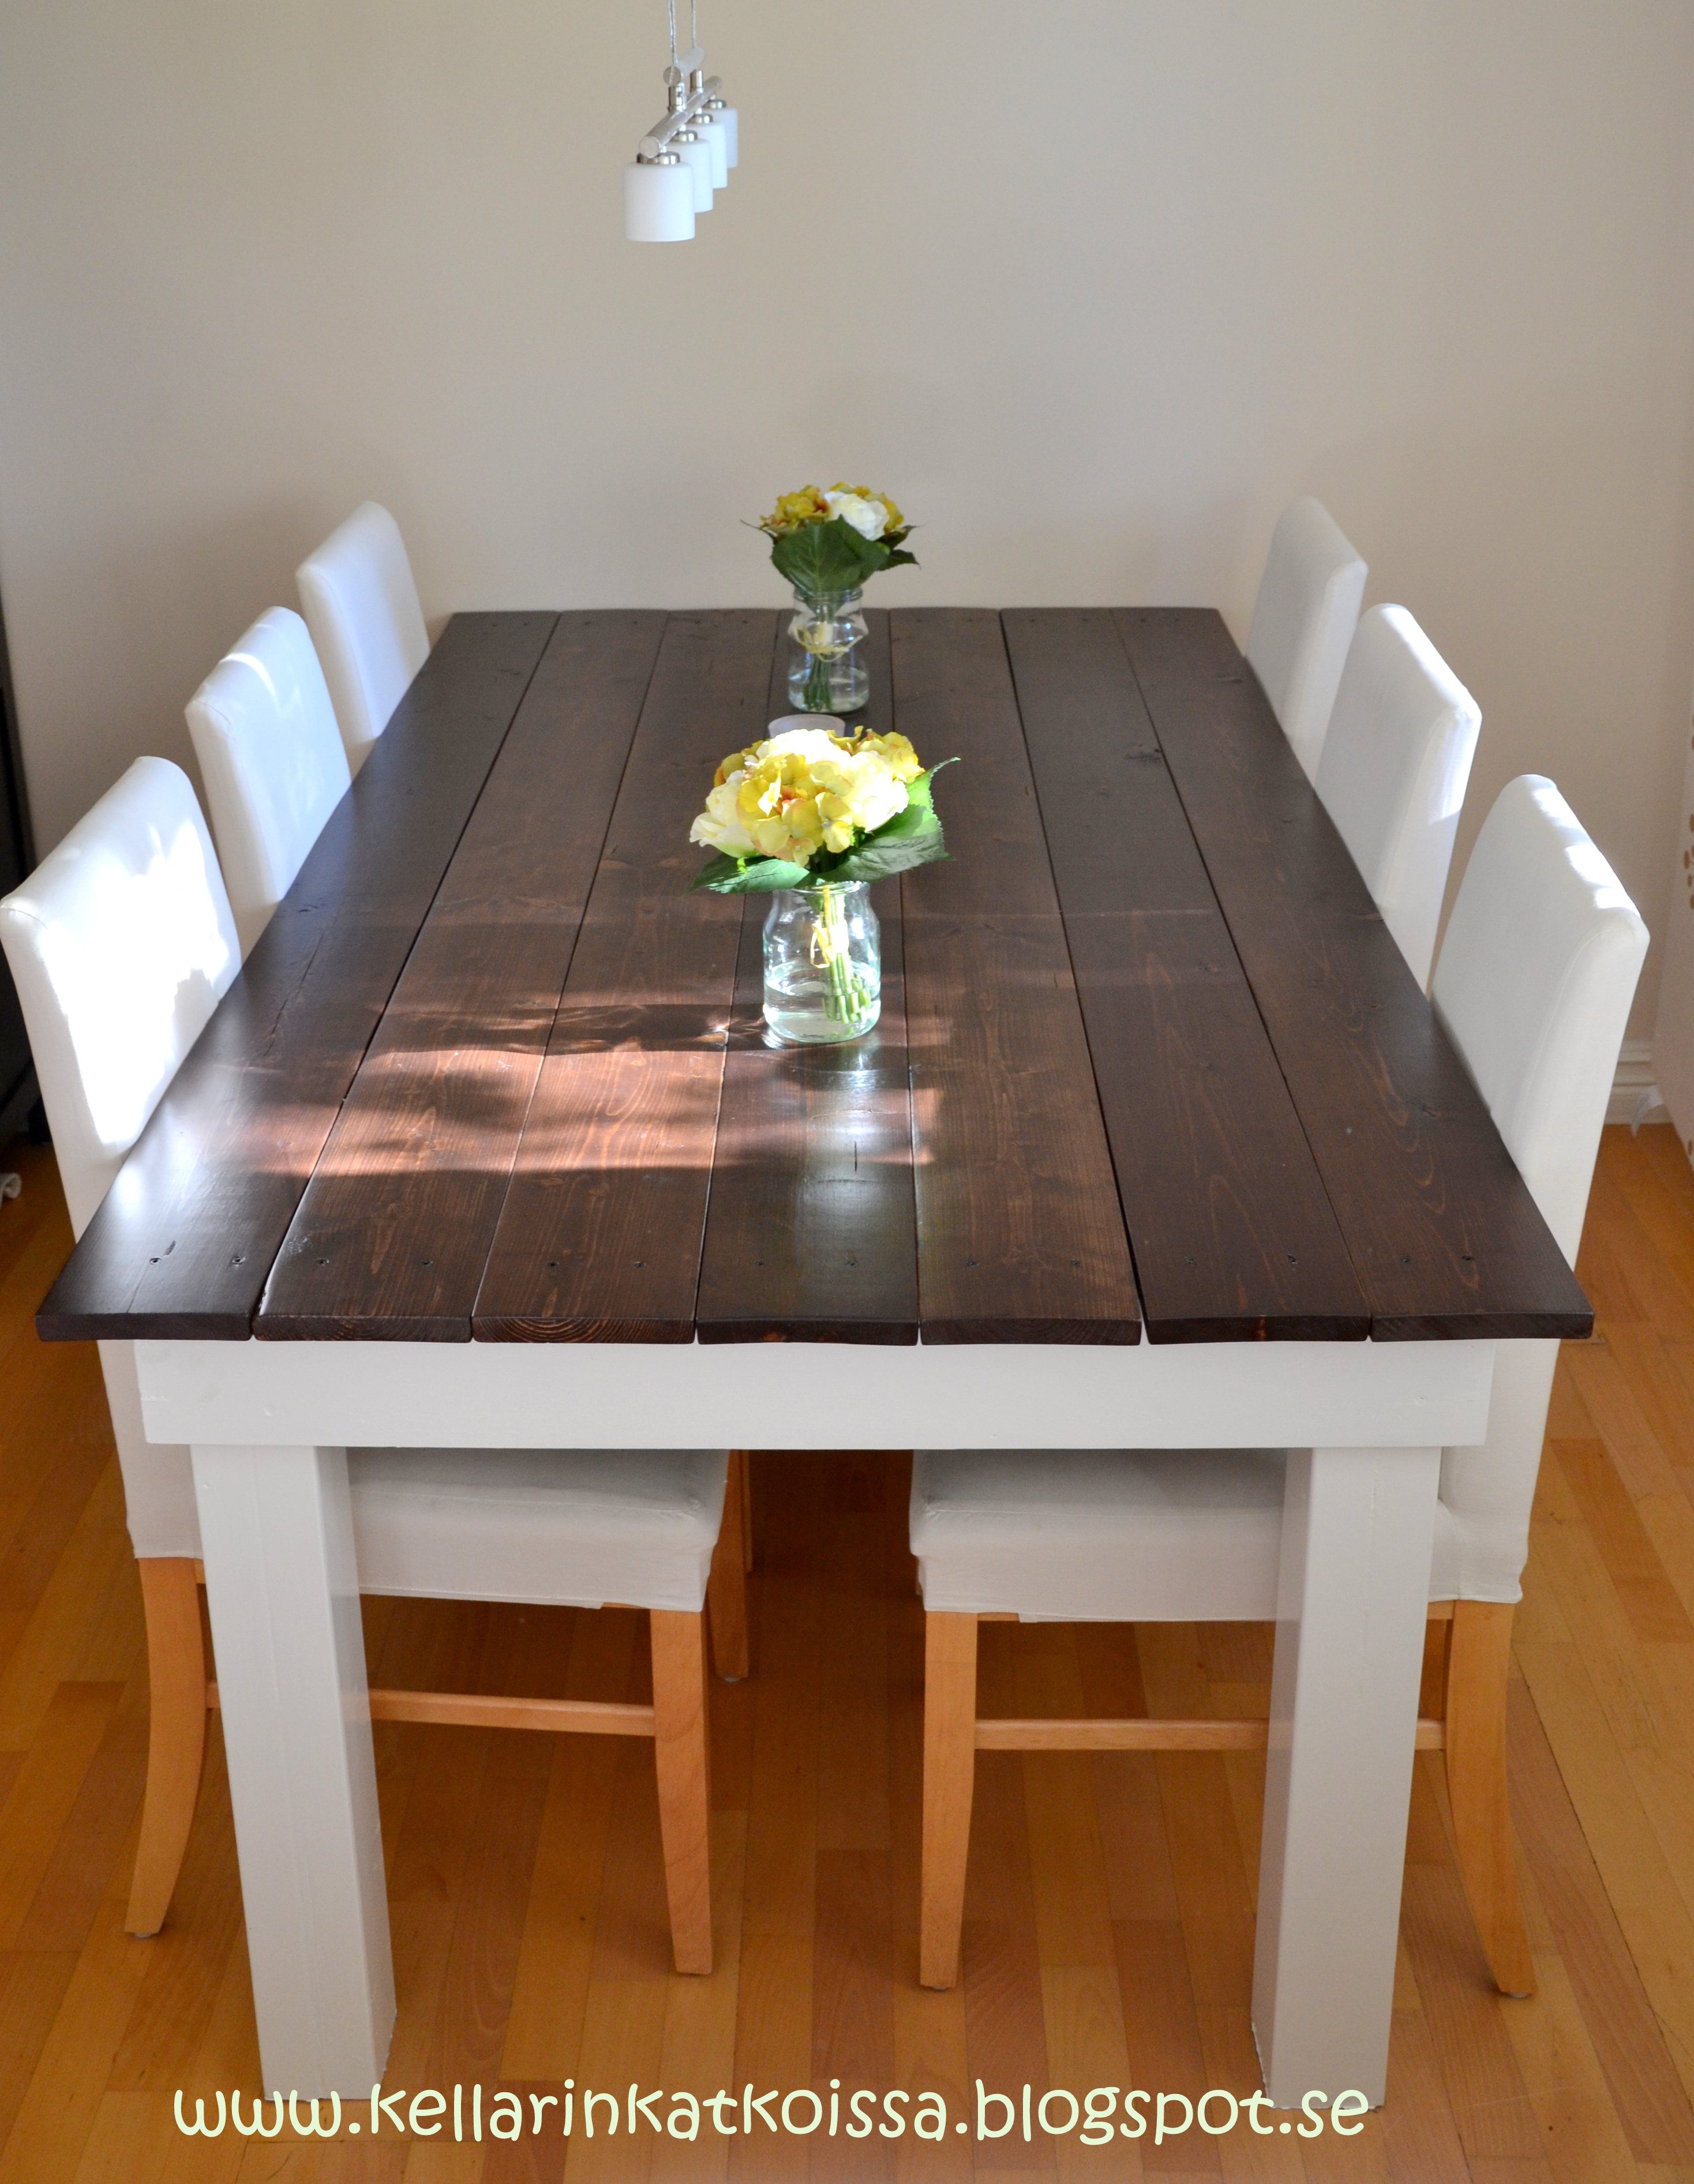
We got idea from here, but we had to make our own plan for table to make it fit in to our home.. and we just love it :)
more in my blog http://kellarinkatkoissa.blogspot.se/2013/10/tee-se-itse.html
Built from Plan(s)
Estimated Time Investment
Week Long Project (20 Hours or More)
Finish Used
teak and hard wax oil
Recommended Skill Level
Beginner
Comments
Sat, 06/20/2015 - 11:18
about how long did you make
about how long did you make your table so that you could fit 3 chairs on each side?
you table is stunning
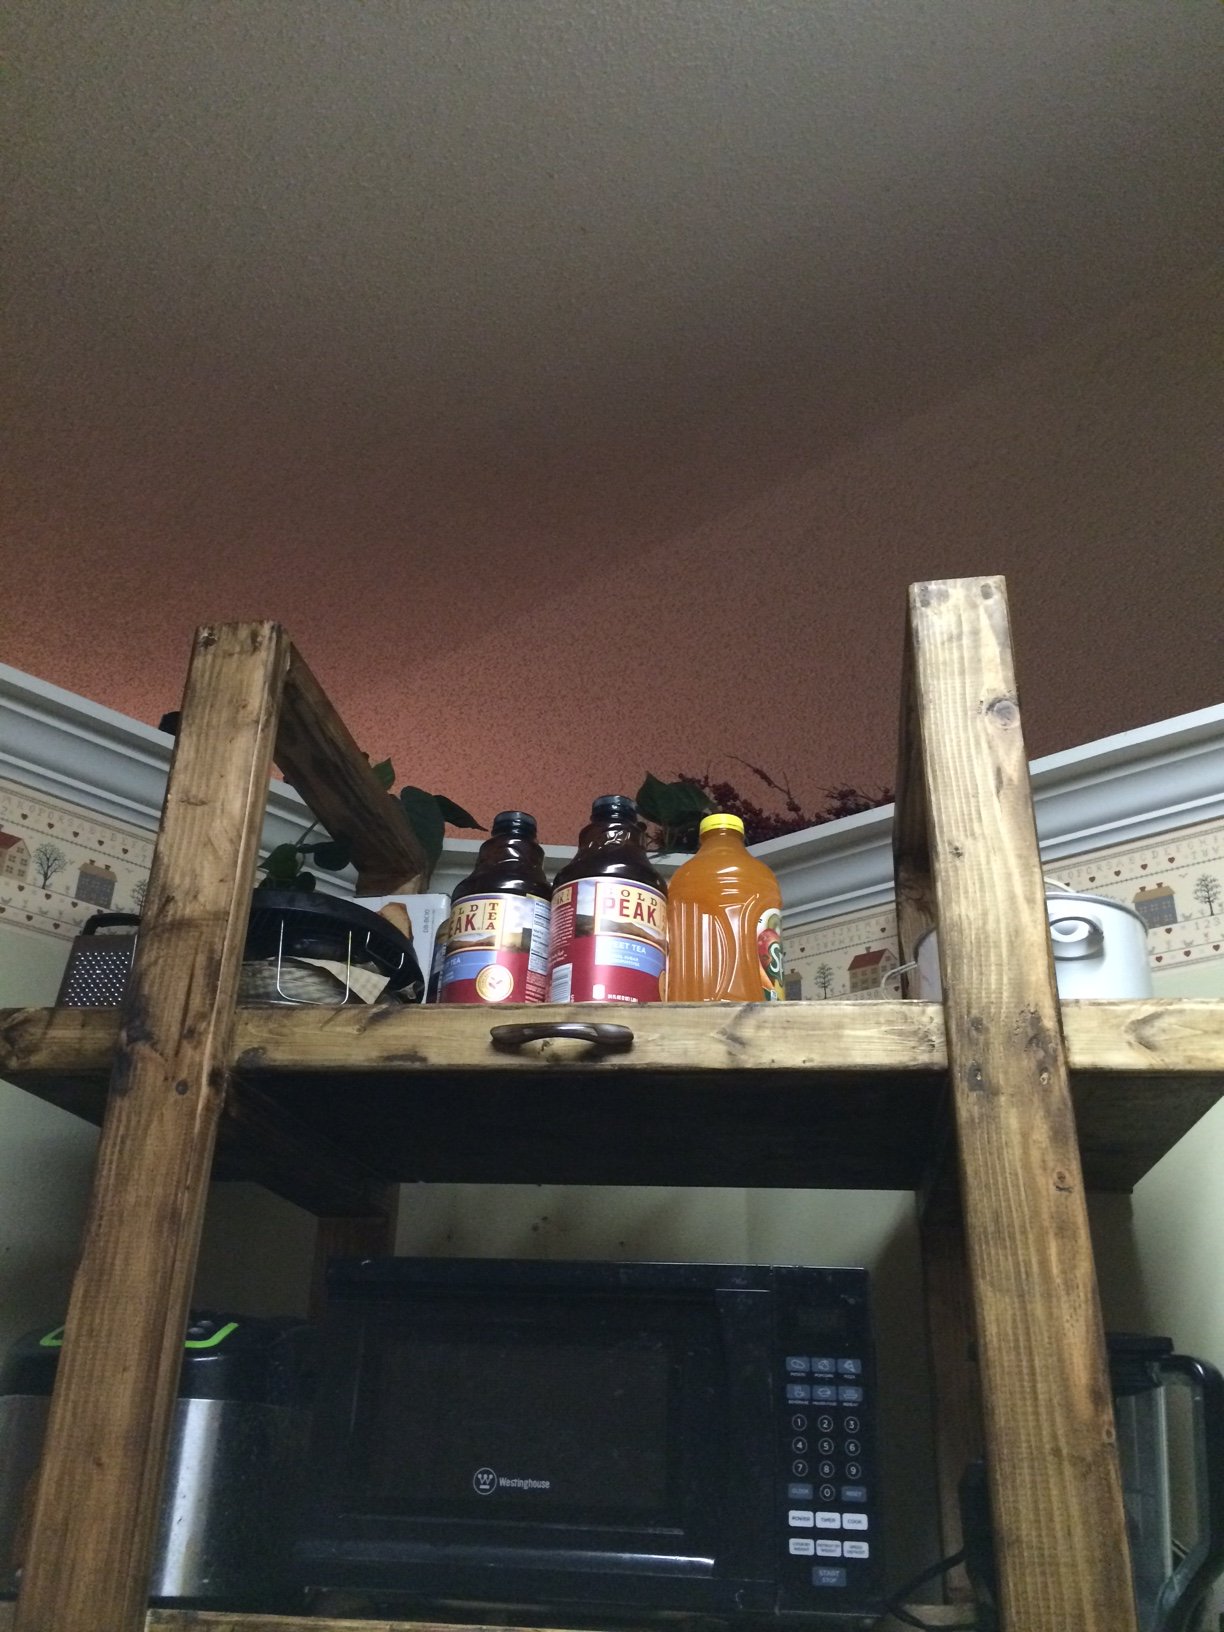
Home Depot DIH Workshop Rolling Storage Cart
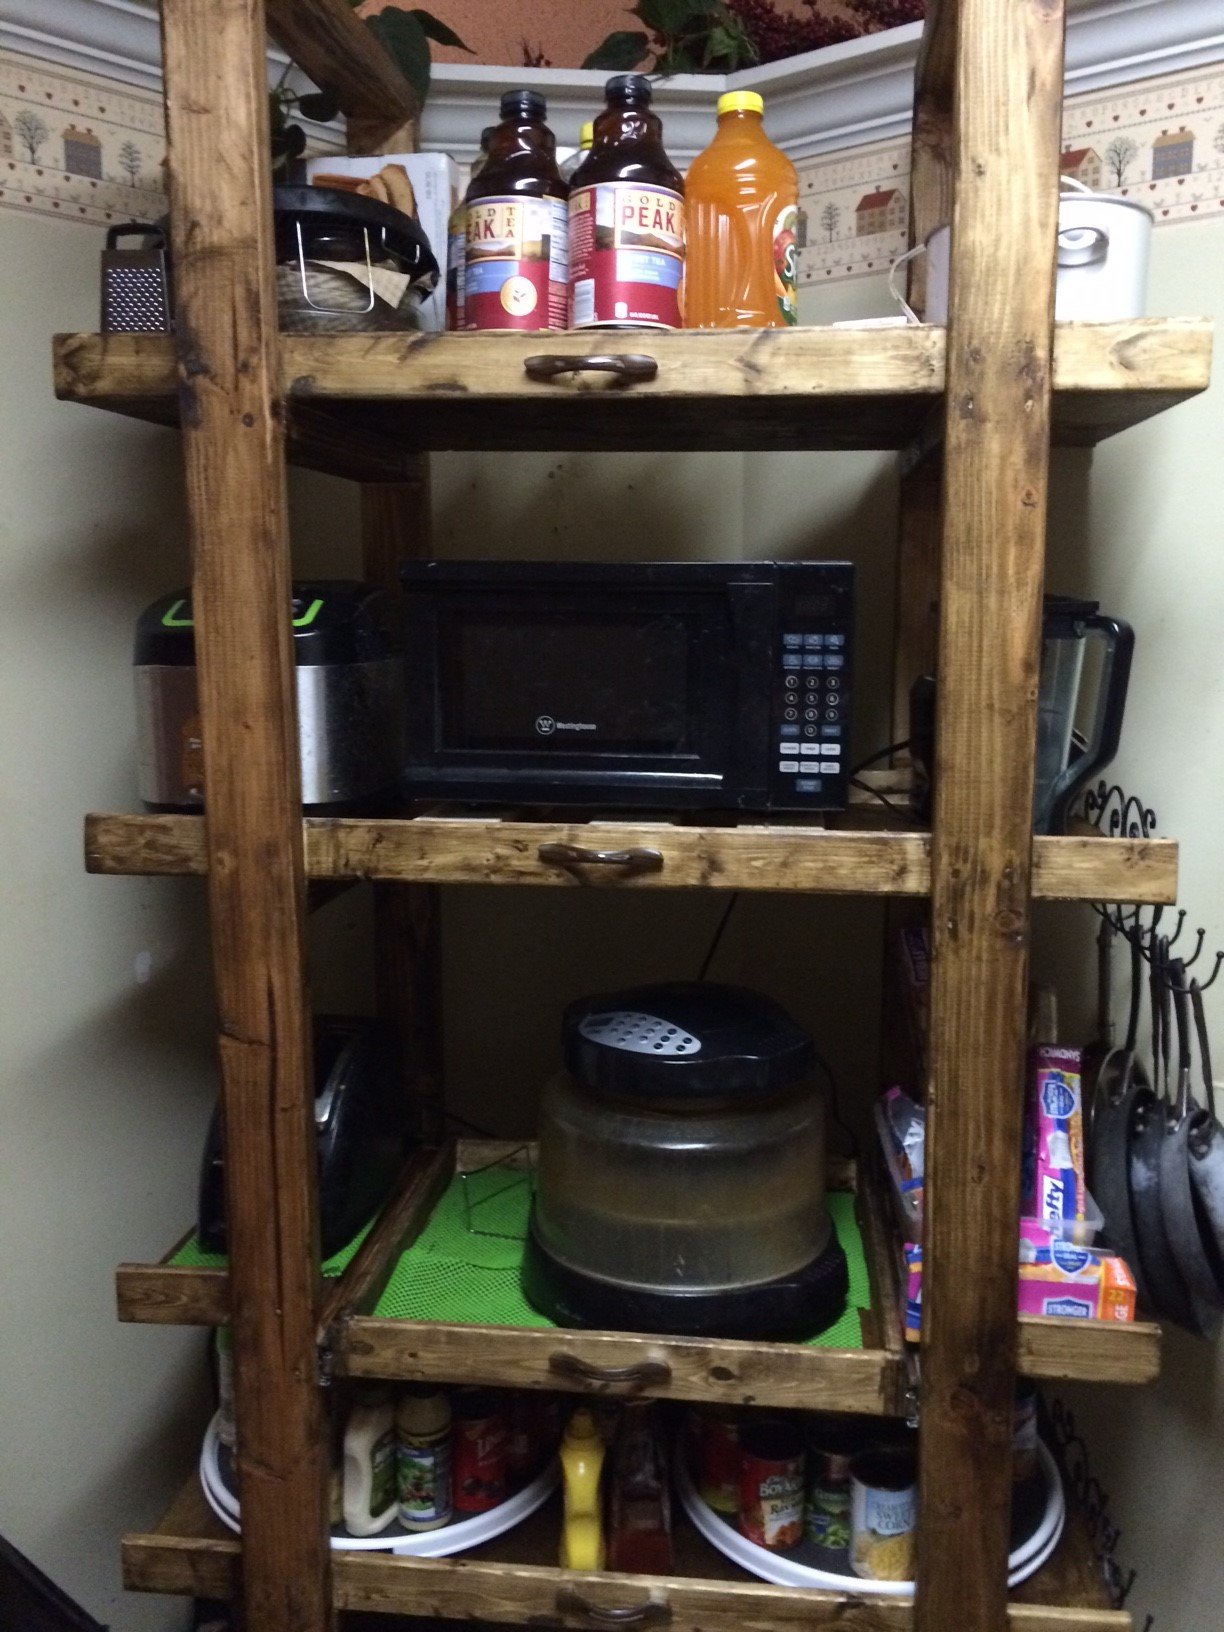
I needed more storage in my small kitchen so I modified this cart to 42 x 20 x 96. One shelf has a sliding drawer. I am very new to all of this so I mistakenly overlooked accounting for the side ends of the shelves in my calculations. I left them off, but may go back and insert 1 x 2 to complete them. Not sure yet.
Built from Plan(s)
Estimated Cost
$80
Estimated Time Investment
Day Project (6-9 Hours)
Recommended Skill Level
Beginner
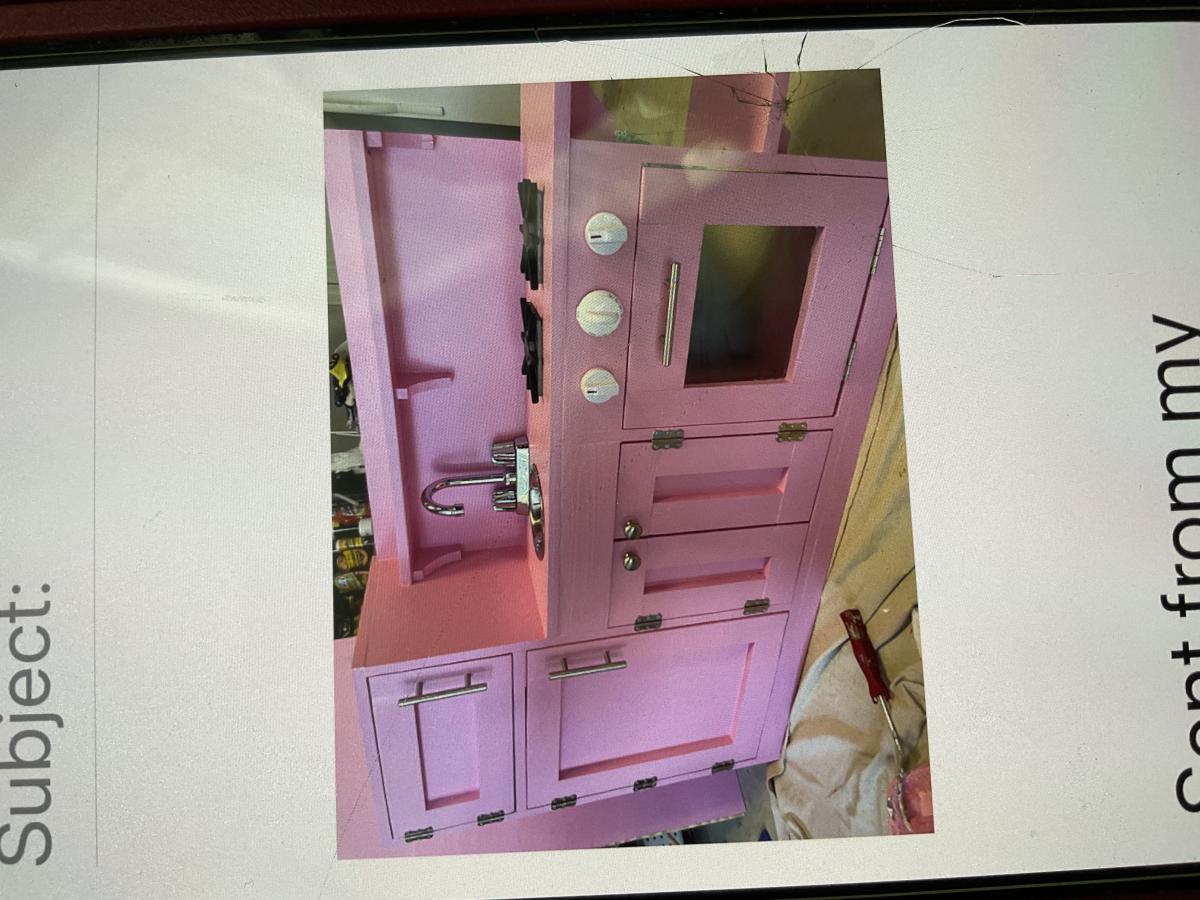
Toddler Kitchen
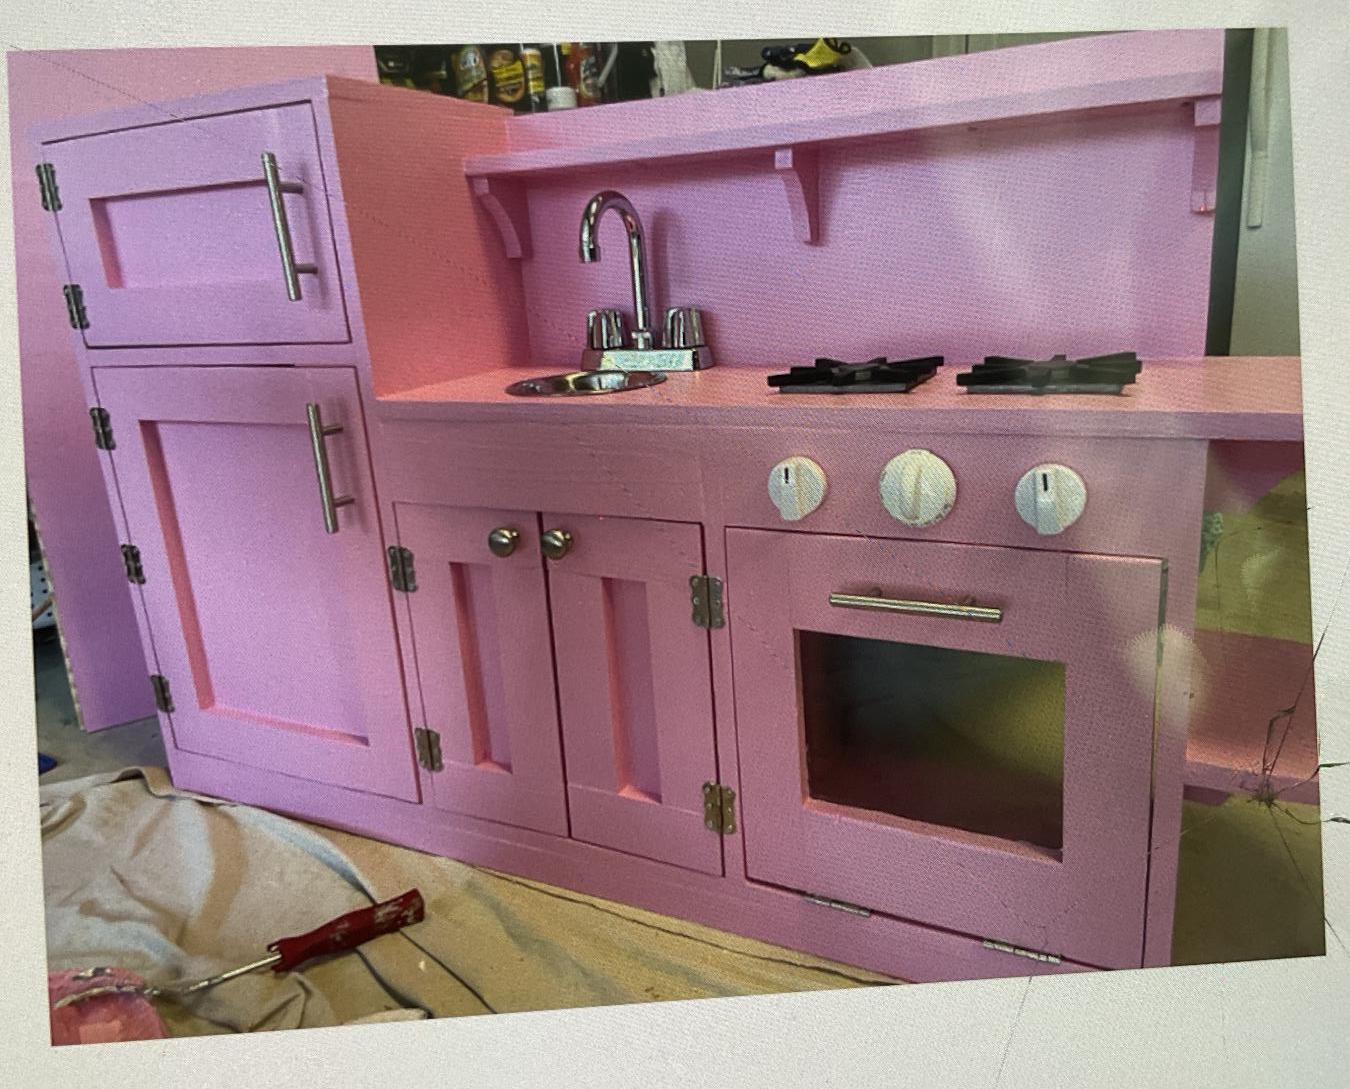
Granddaughter wanted a Pink kitchen for Christmas, so what does Meemaw do ?? She goes to your website and does her research. I completed this kitchen in probably less than 2 weeks.
She abstained loved it, and no one in the family could believe Meemaw built this…
Many thanks..
Built from Plan(s)
Comments
Fri, 03/10/2023 - 13:27
Love the pink!
This is adorable, you are an amazing Meemaw, thank you for sharing!
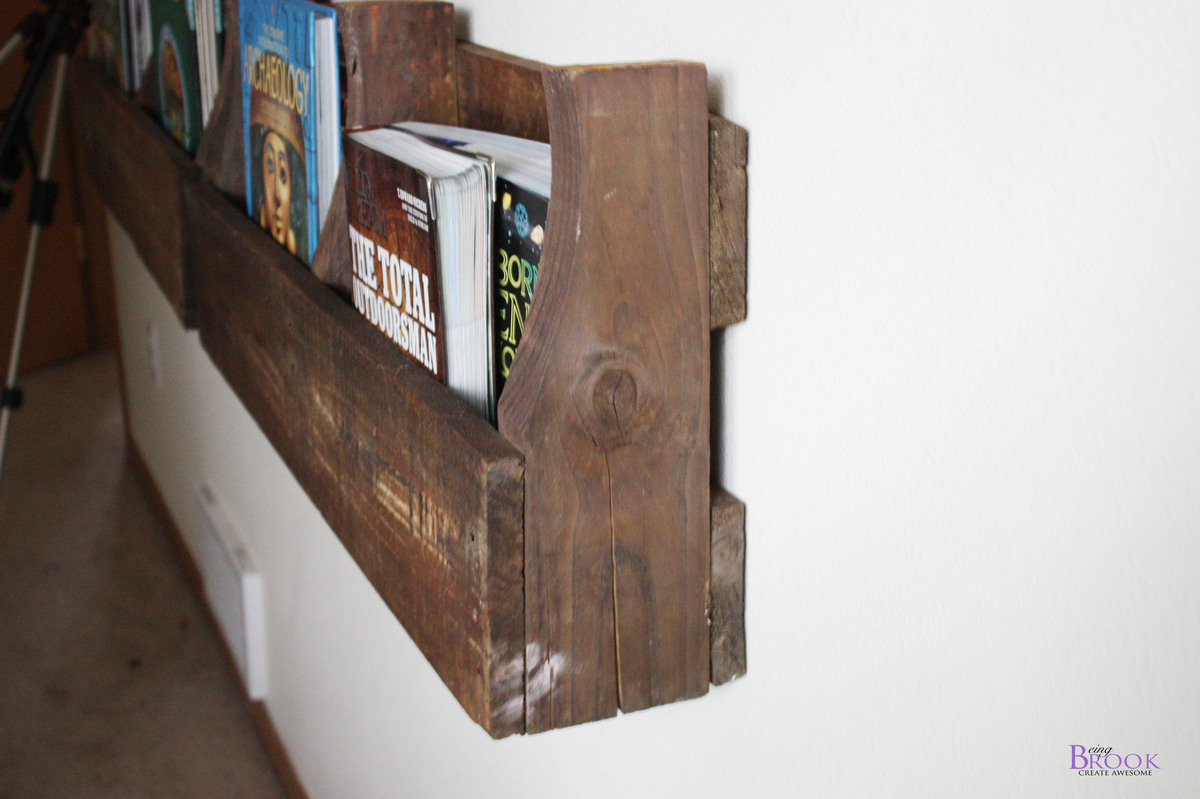
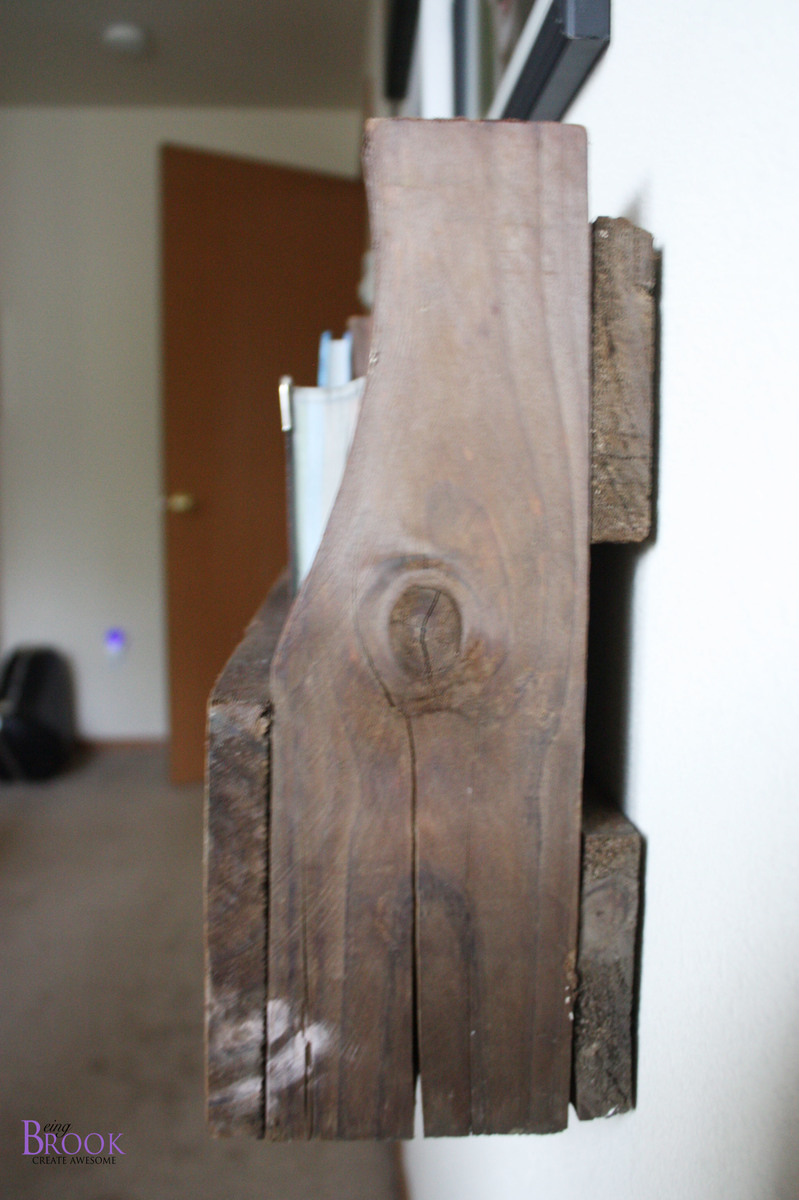
Pallet Shelf
We are going for a rustic look in our teen sons bedroom. He has some large books that will not fit onto his bookshelf so a pallet wall shelf seemed like a perfect solution.
This project literally took five minutes. If you don't have a sawsall it would probably take around 30 but still pretty quick.
Built from Plan(s)
Estimated Cost
Less than $5
Estimated Time Investment
An Hour or Two (0-2 Hours)
Finish Used
Our pallet didn't come with tons of character so I did a vinegar and steel wood treatment to it to help age the wood.
Recommended Skill Level
Starter Project
rustic x sofa table
I love this site. We needed new furniture in are house and didn't want to spend a bunch of money. Finding the Rustic x plans was a life saver.
Built from Plan(s)
Estimated Cost
$100
Estimated Time Investment
Weekend Project (10-20 Hours)
Finish Used
White paint and kona stain.
Recommended Skill Level
Beginner
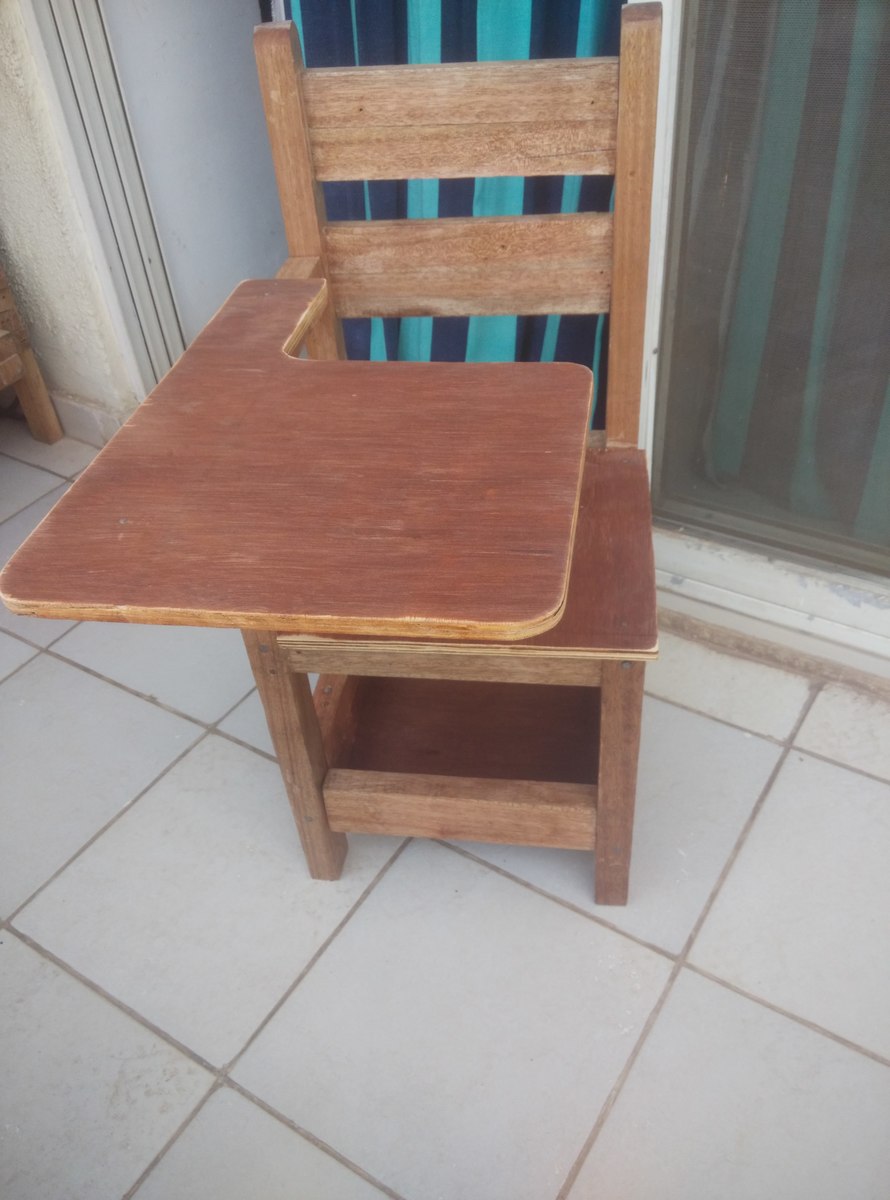
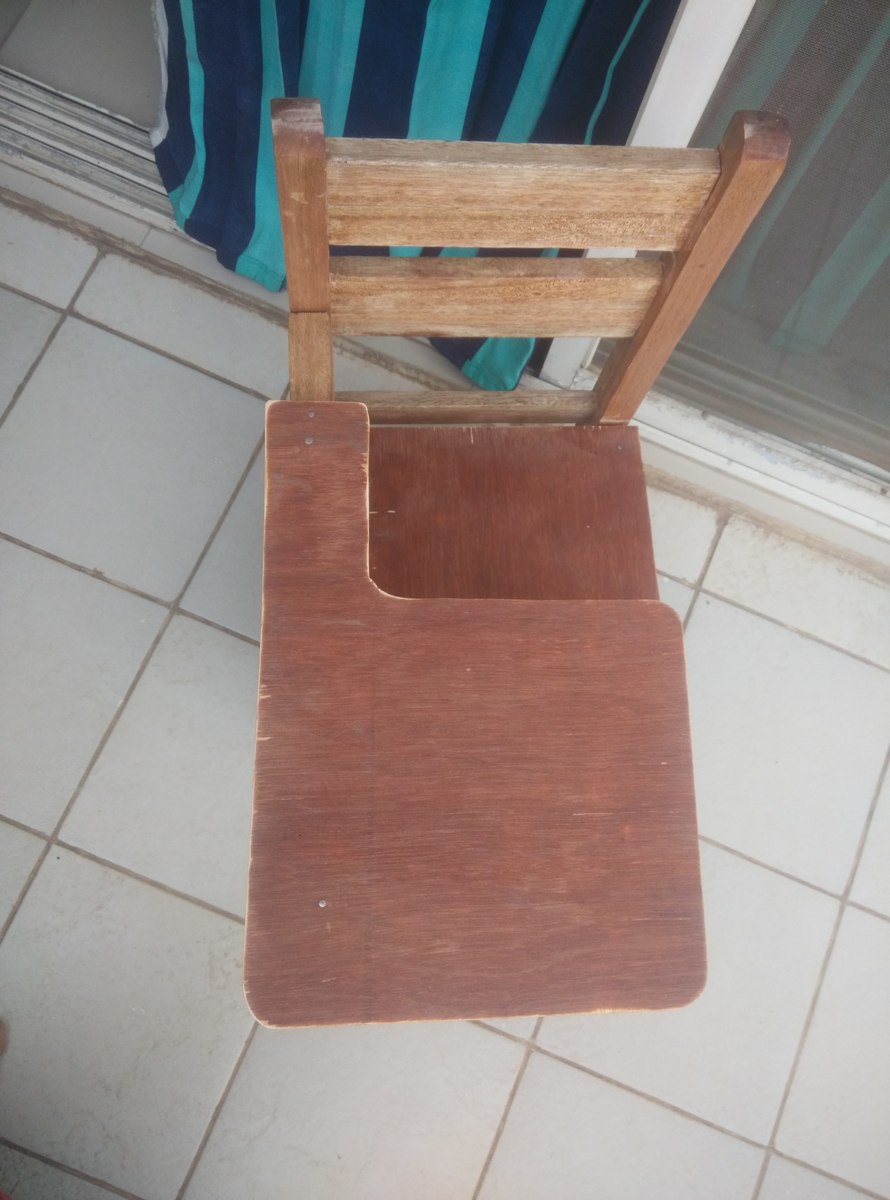
My First Fully Finished Project ! YAY Thanks Ana
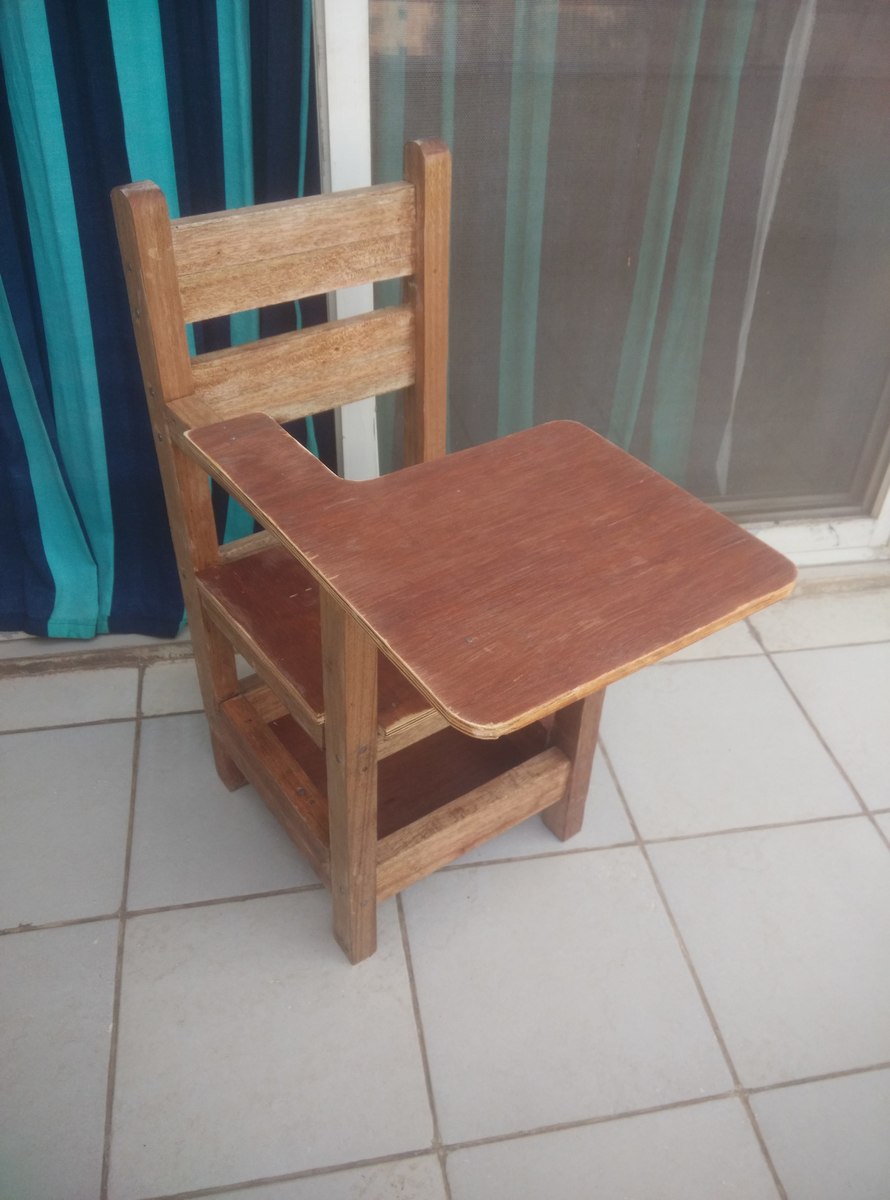
I am very excited to post this project .
I used the Schoolhouse Chair with Writing Pad Desk Plan exactly and did not stain the wood. Just gave it a coat of PU and there it is .
Its not a perfect project (since I used a Jigsaw ... Yes I did as no other tools were available :() but carefully cut them straight using guide.
As a first-timer I am happy with the result... sort of... But Thanks for inspiring Ana & Jaime !!!
Built from Plan(s)
Estimated Time Investment
Weekend Project (10-20 Hours)
Finish Used
One PU coat and sanding ..
Recommended Skill Level
Starter Project
Farmhouse Entryway console
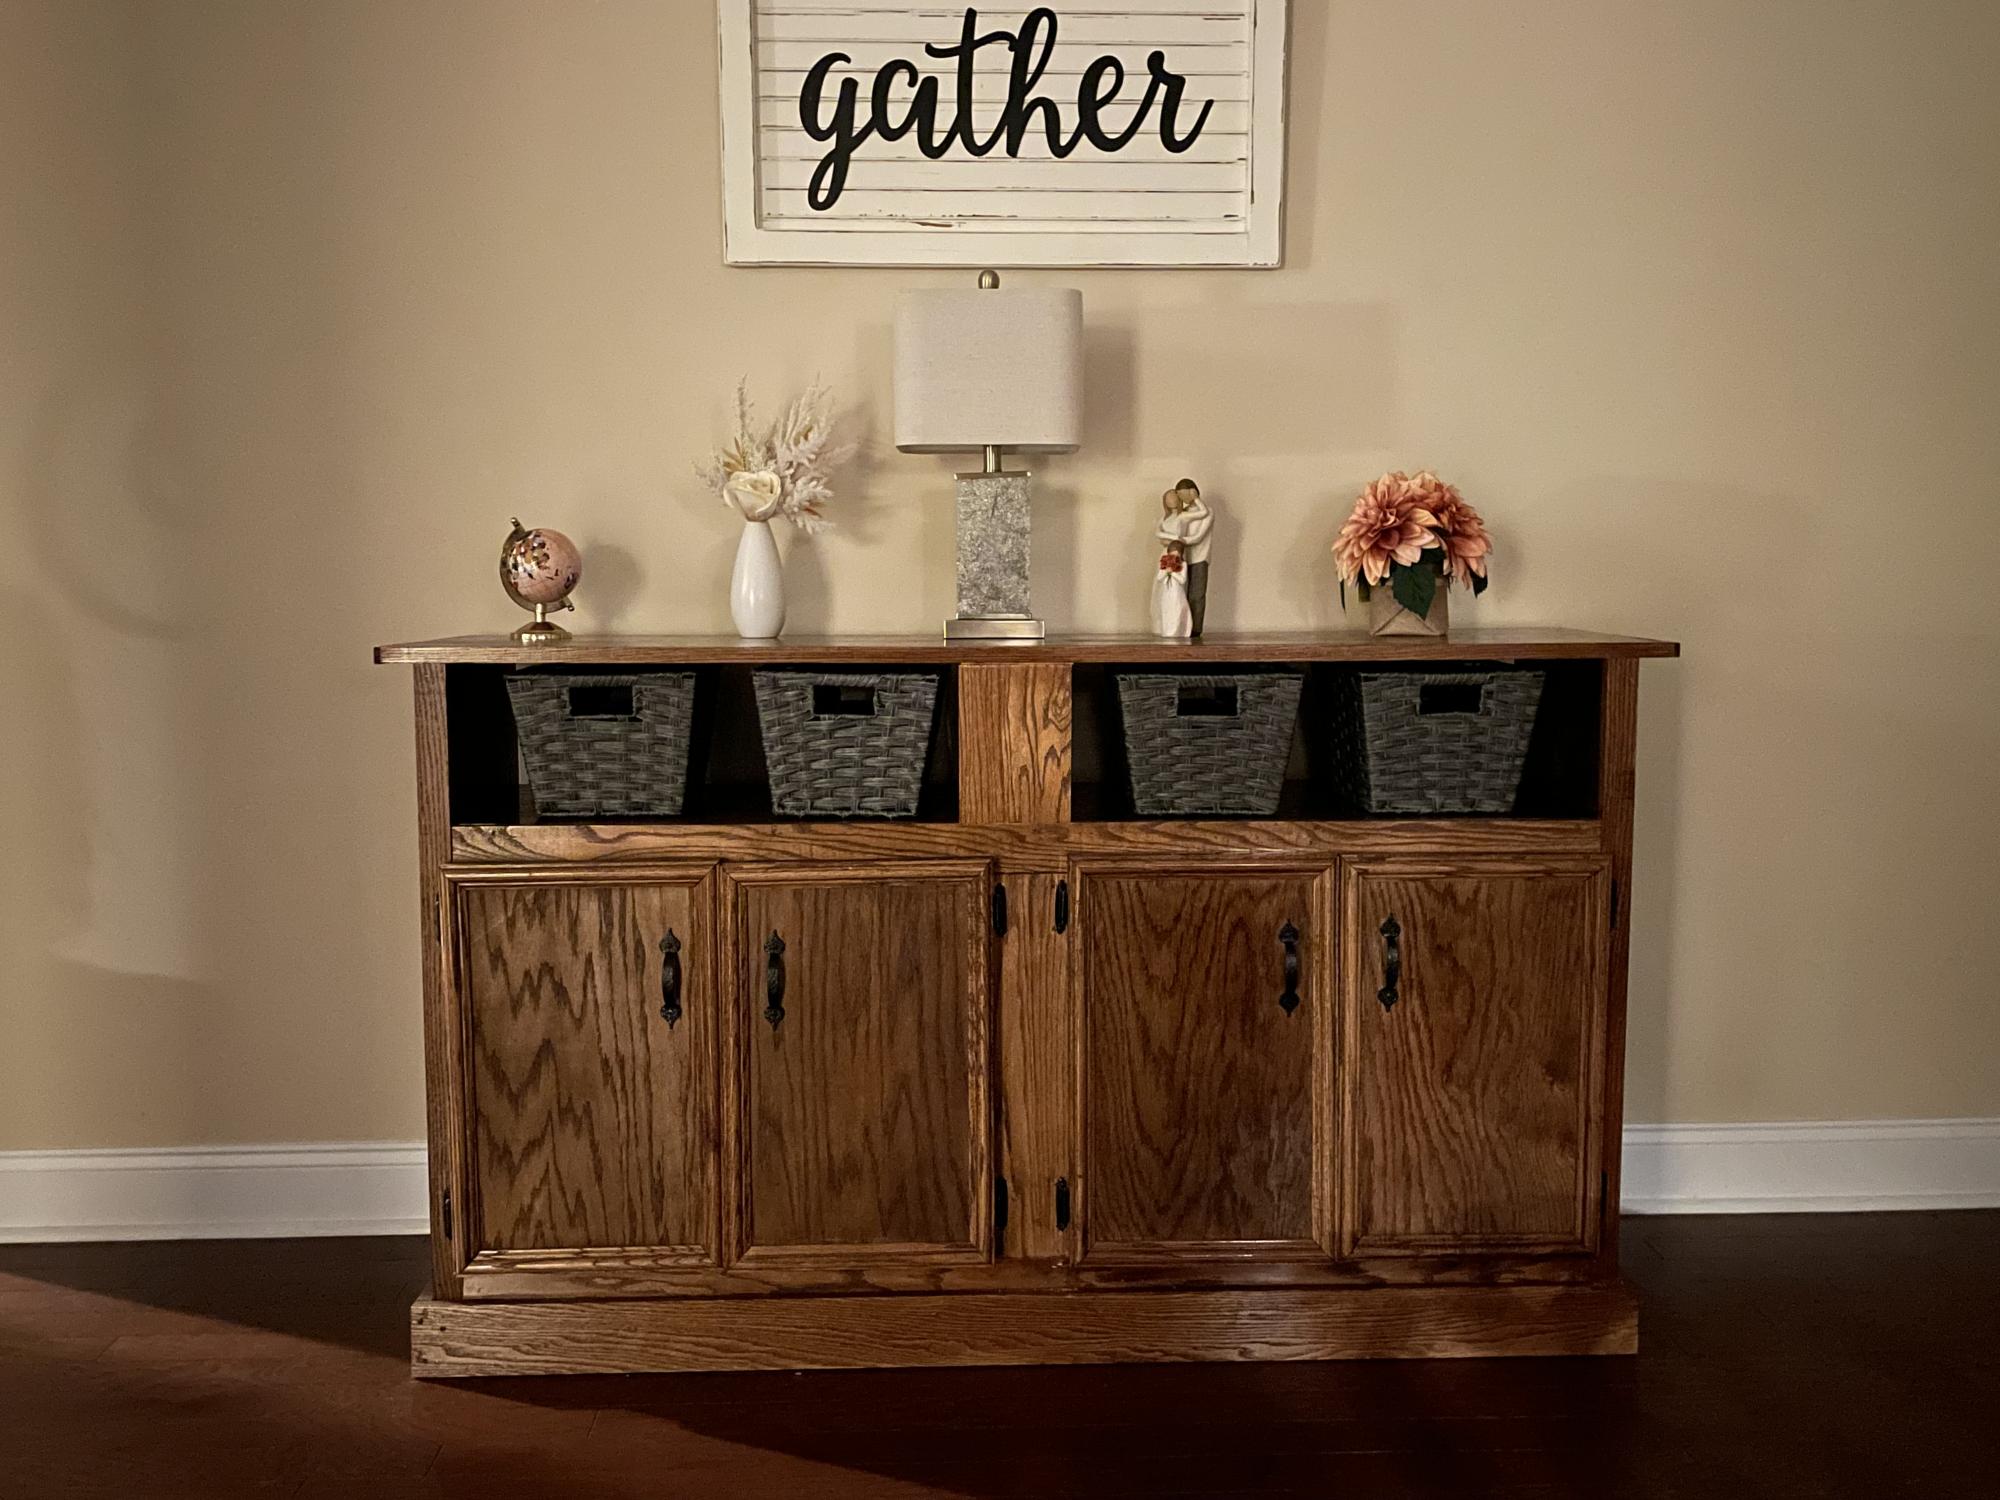
I saw these plans several months ago and finally got the time I wanted to make it. I chose oak because it’s the best and prettiest stained. I love the way it turned out!
Built from Plan(s)
Comments
Fri, 03/17/2023 - 19:49
Stunning oak console!
Absolutely beautiful, love the finish! Thank you for sharing.
Comments
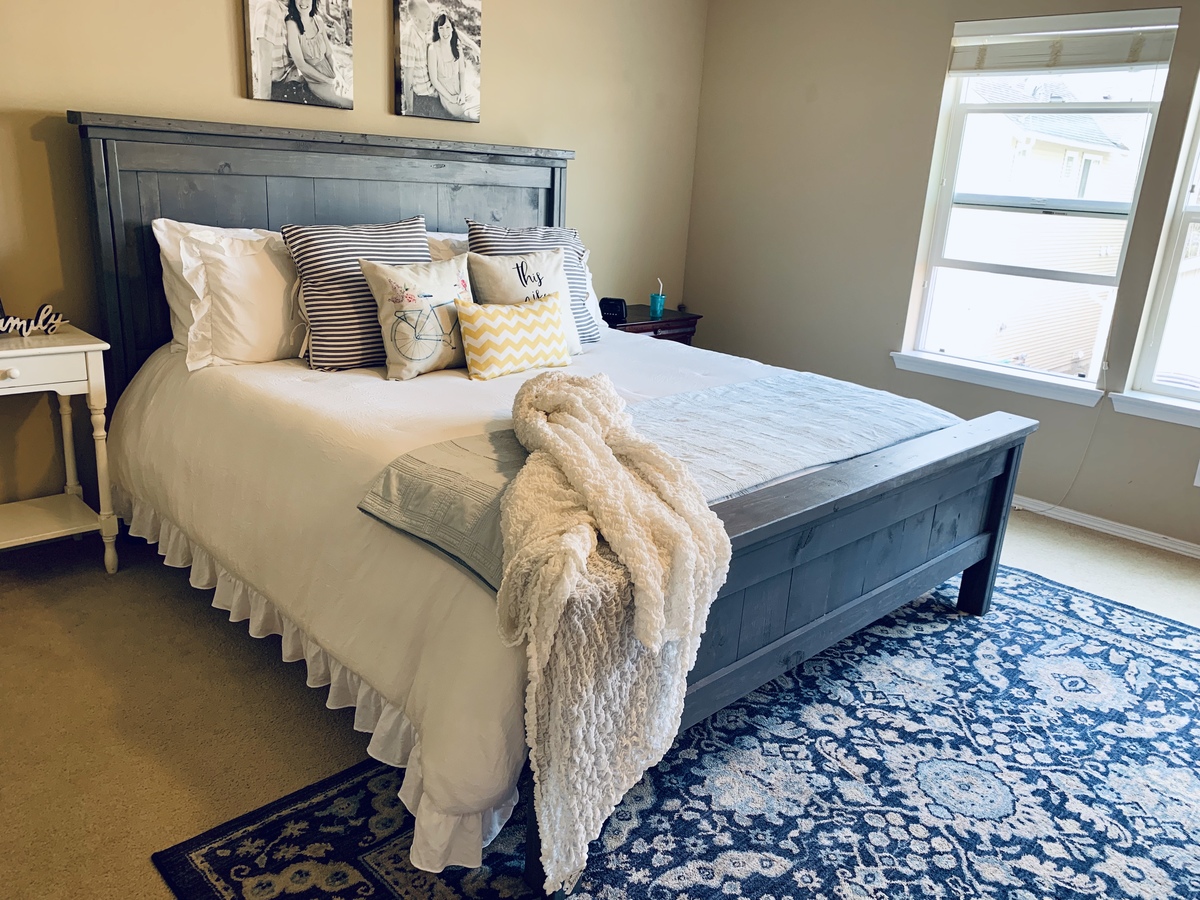
Pamela23
Mon, 05/13/2019 - 15:53
farmhouse bed
This is gorgeous, can you share what you had to go back for? Also, what is the finish?