Community Brag Posts

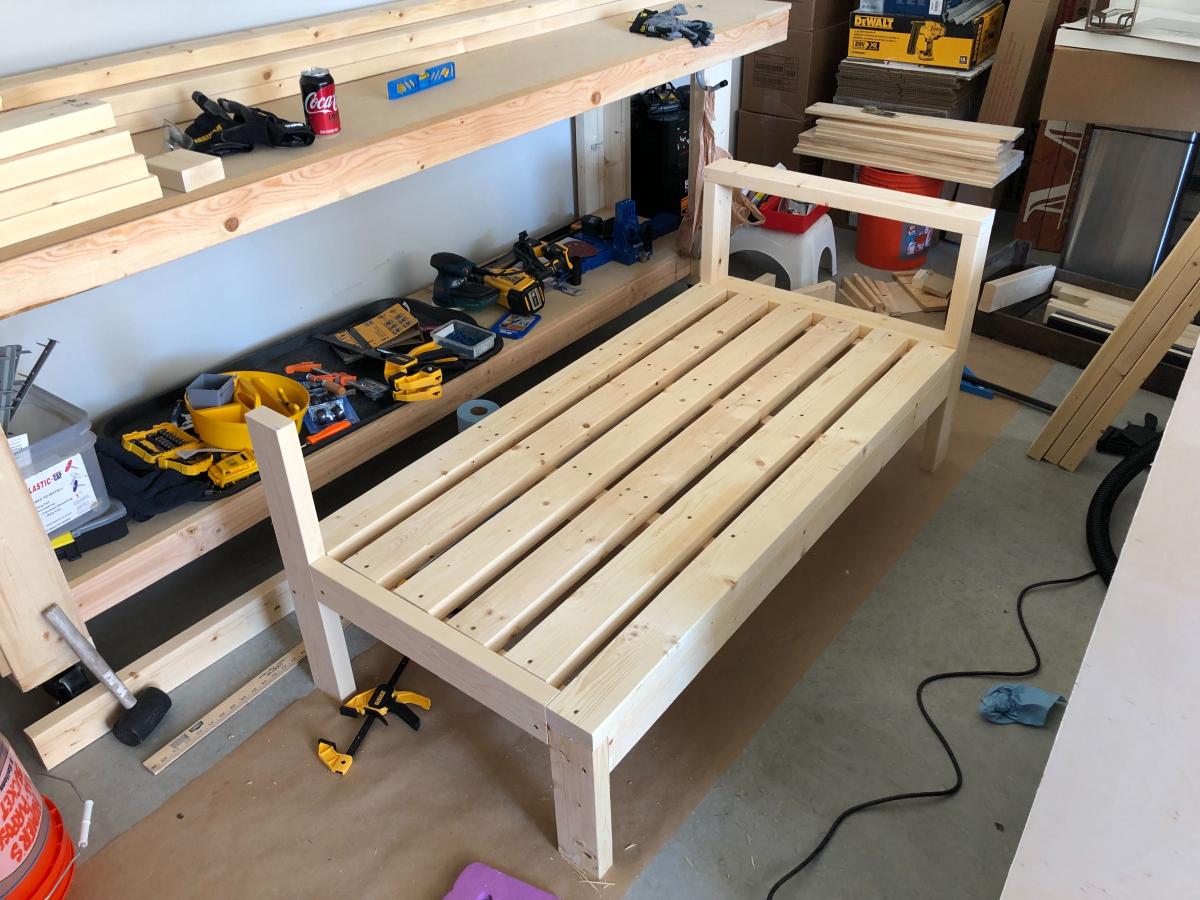
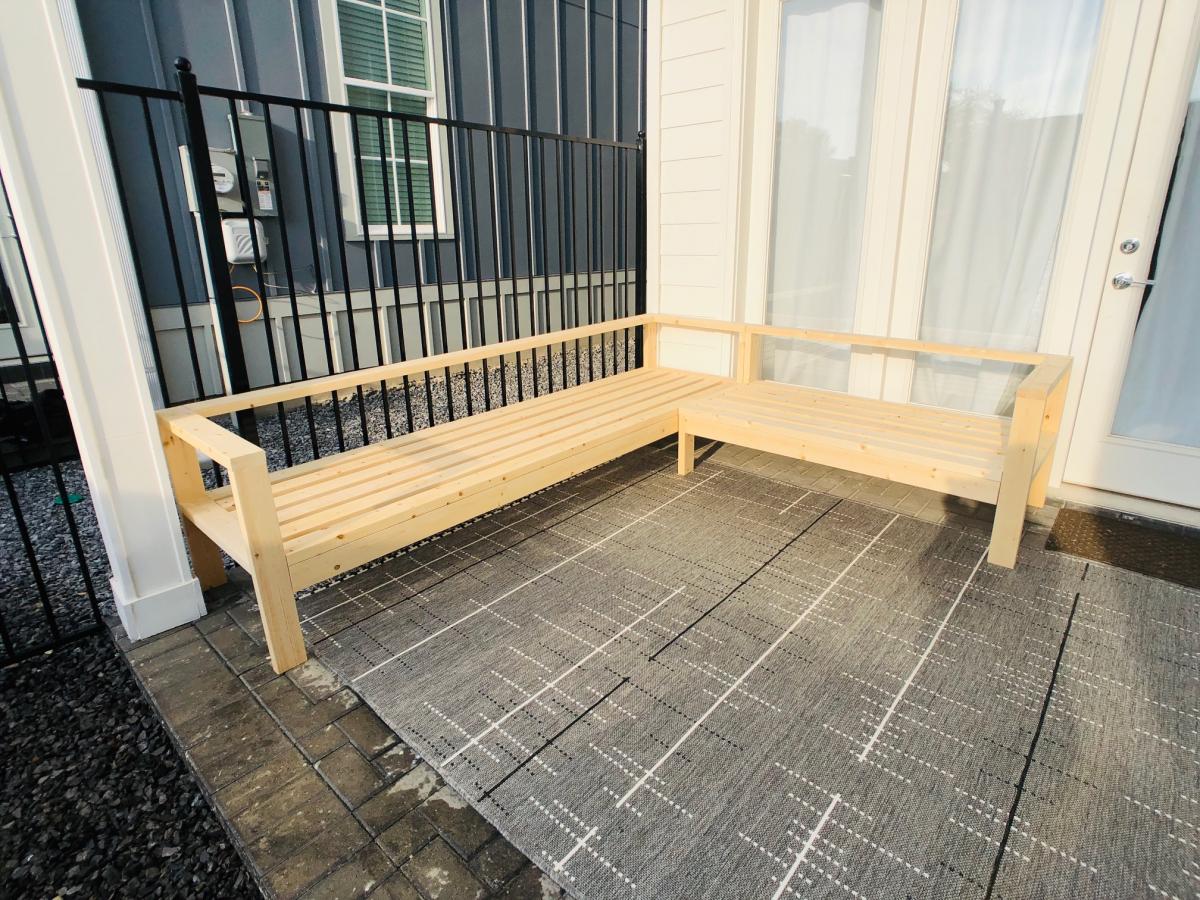
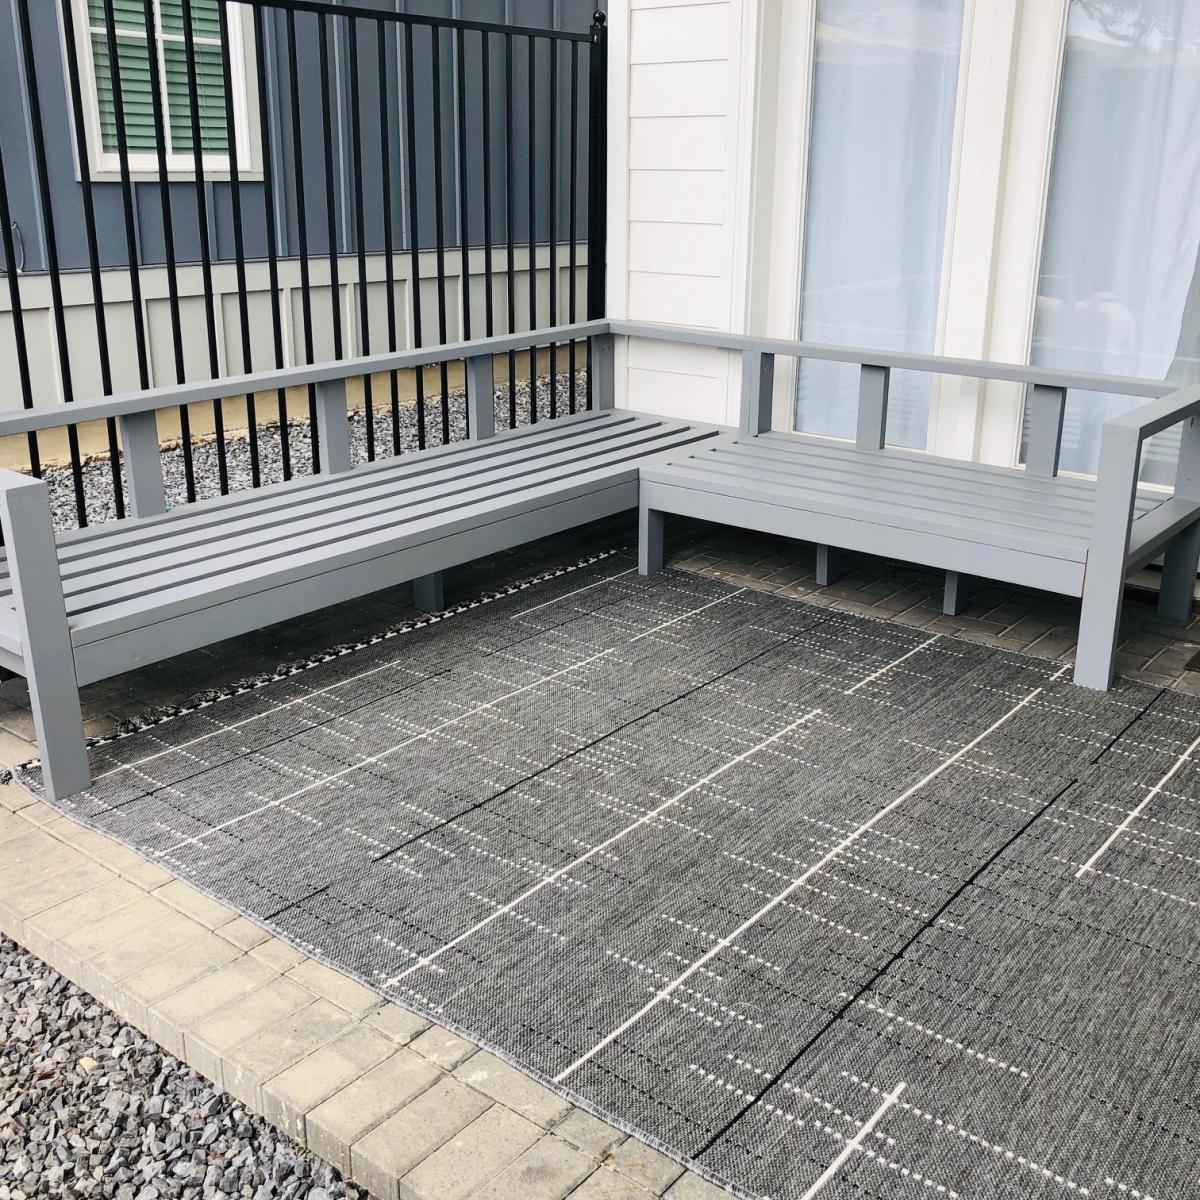
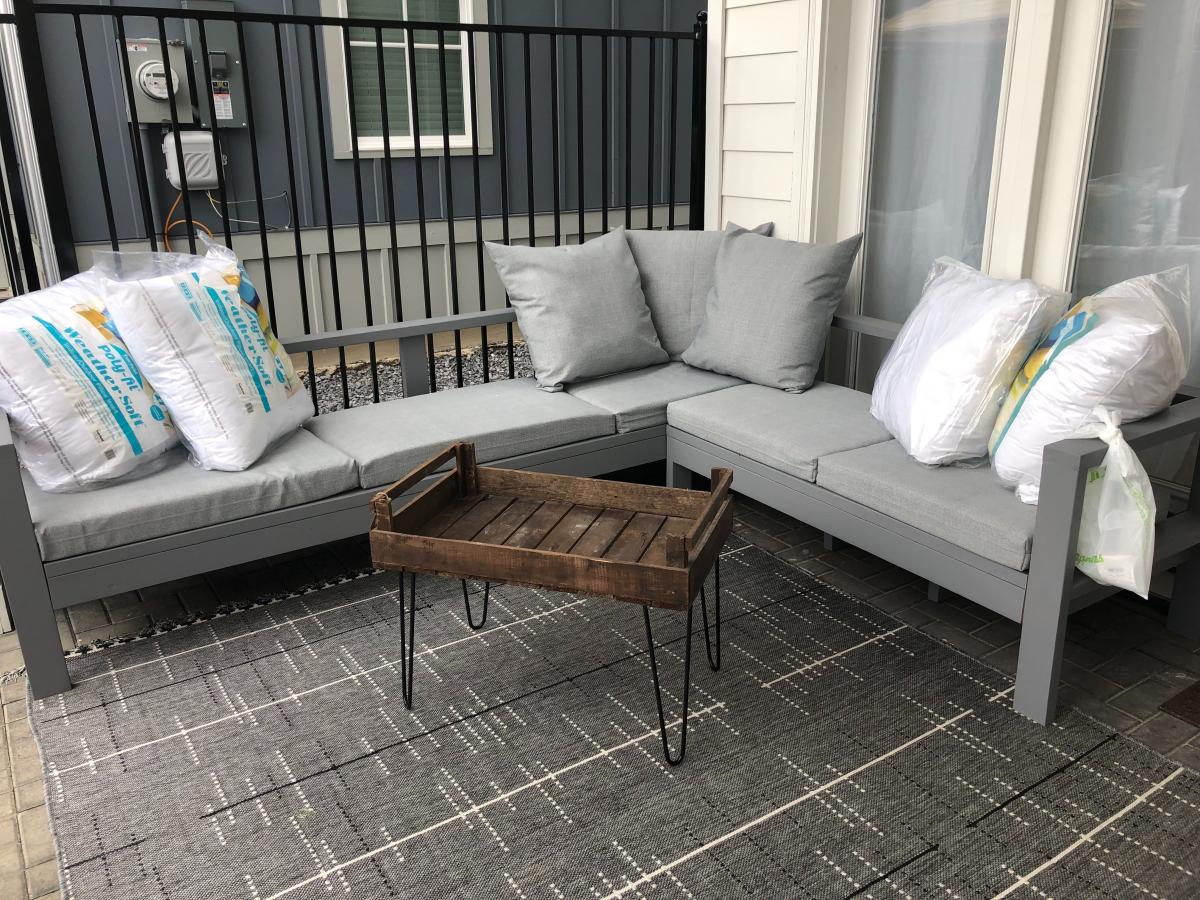
Outdoor sectional, my 2nd diy project
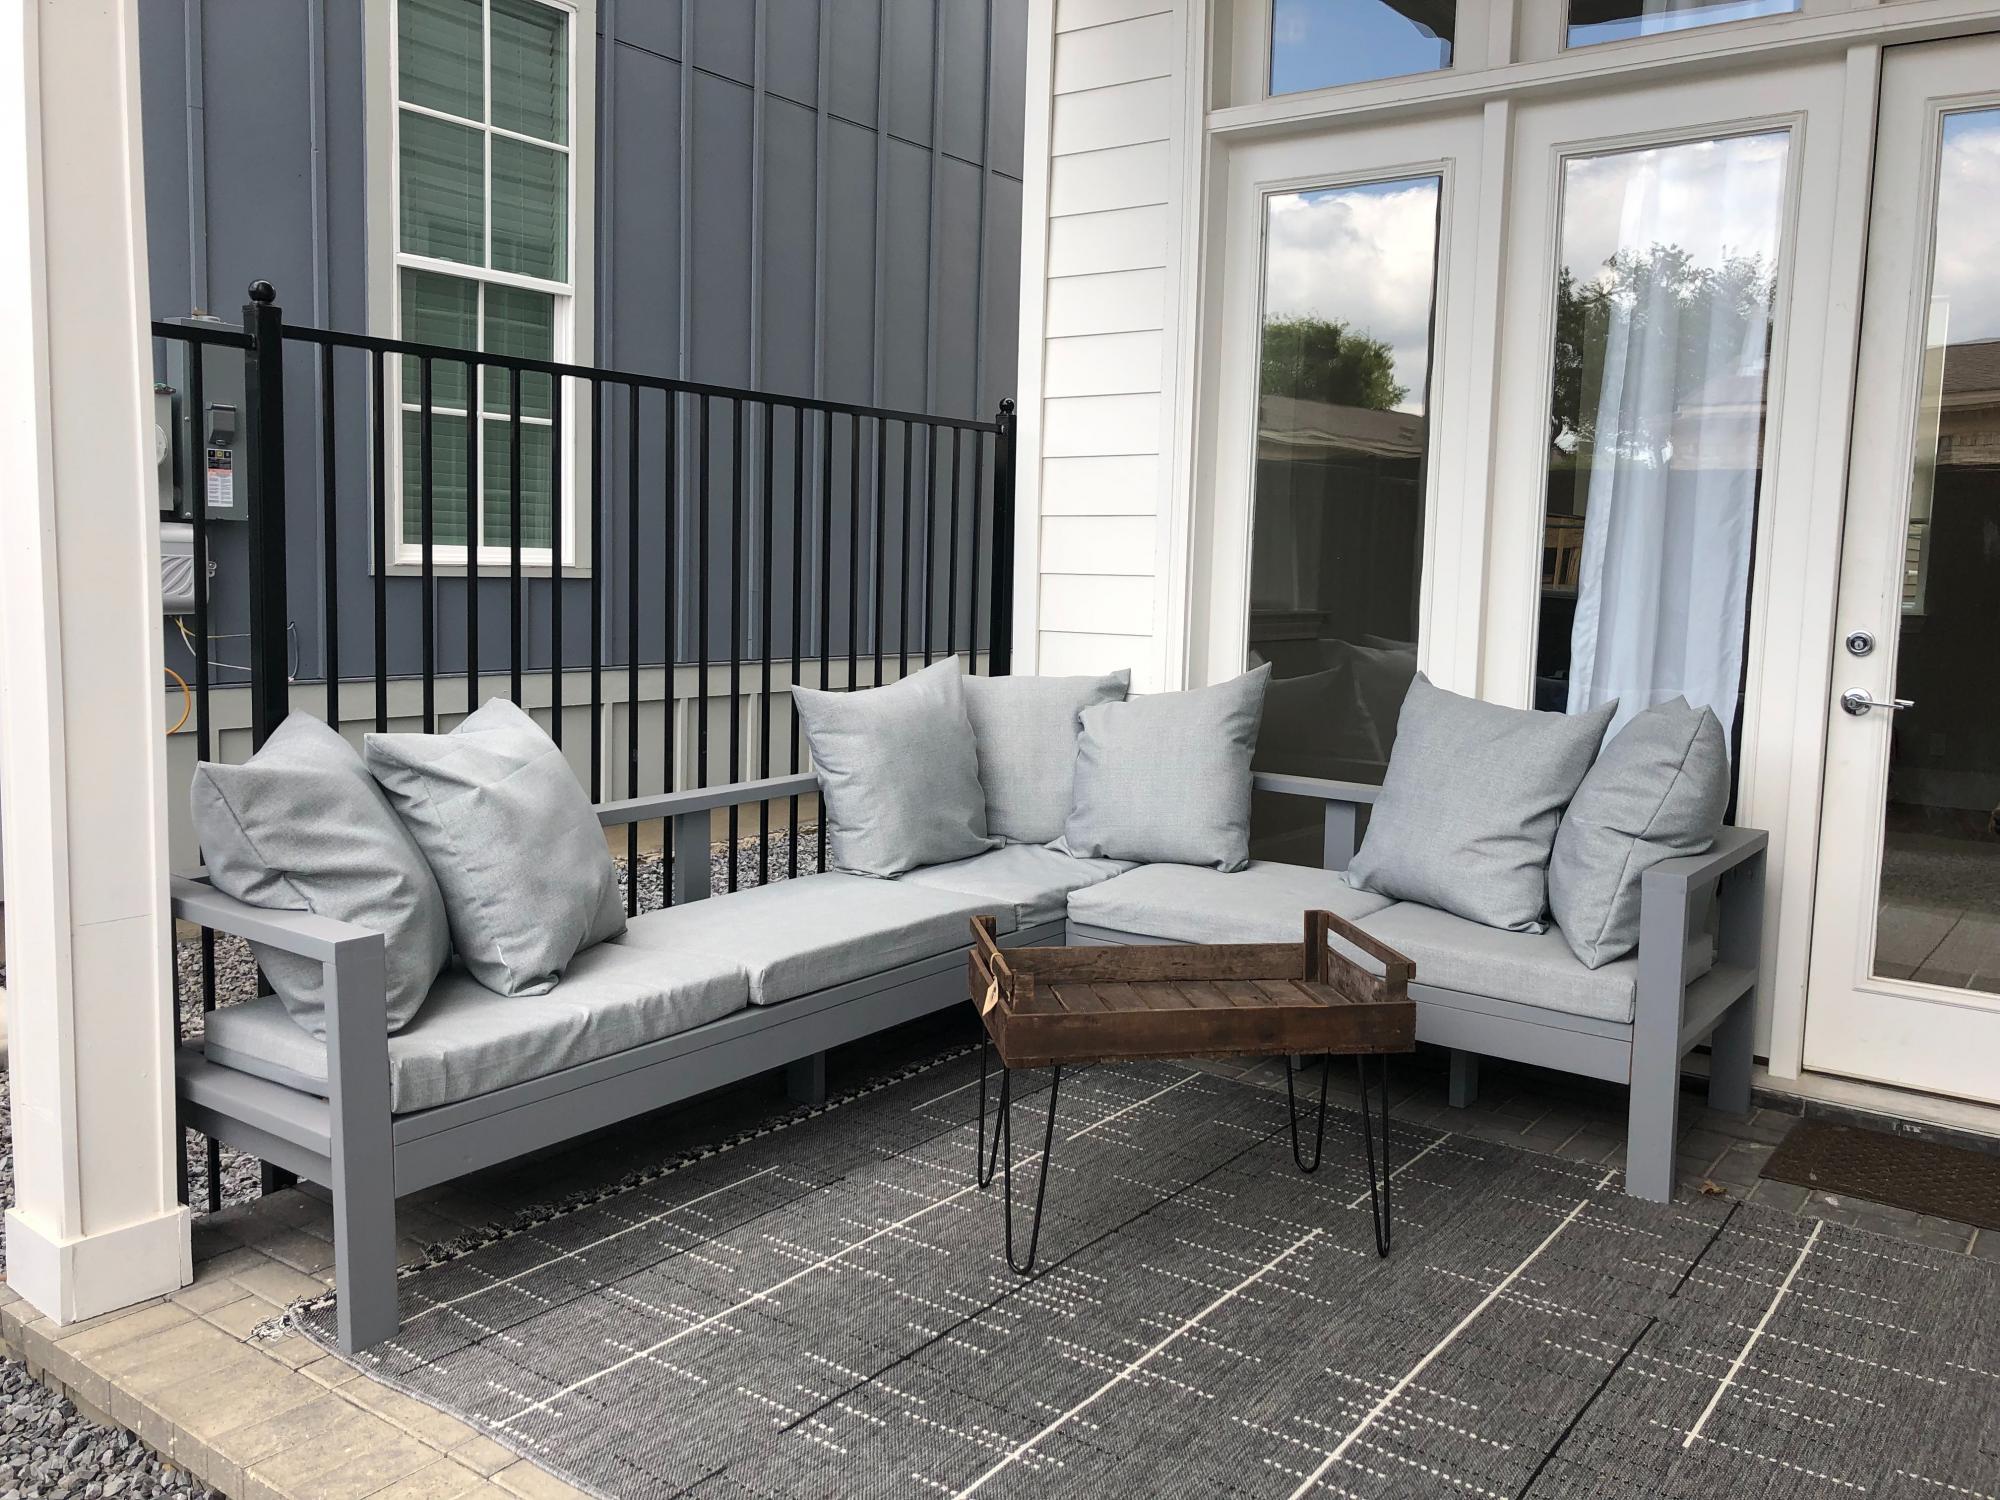
- I pretty much followed the instructions for each plan. I customized the length to fit my space.
- There was some bowing on the back rest so I added some vertical supports.
- Because the sectional is quite long I added some legs in the middle.
- I stained the sectional twice and had to sand off the stain twice before I decided to paint it. I highly recommend that you test your stain on a cut off piece and pick what you're doing before putting it on your furniture. If I had done this it would have saved me a lot of hours and sanding.
- I had planned to buy Target cushions for my sectional but I forgot to build the sofa with the cushions I wanted to purchase in mind. I ended up having to make my own in order to get a good fit.
- I have a tiny patio area and this design really worked amazing to give me a lot of seating and still make it feel spacious.
- You can definitely build and paint this sectional in a day.

Built from Plan(s)
Estimated Cost
$300 for outdoor cushion foam and outdoor fabric.
$150-$200 for wood and supplies
$150-$200 for wood and supplies
Estimated Time Investment
Day Project (6-9 Hours)
Finish Used
The paint is outdoor matte paint from Home Depot and it worked marvelously, very streak free.
Recommended Skill Level
Starter Project
Comments

Wed, 07/03/2019 - 19:47
So modern and crisp and…
So modern and crisp and clean! Love it! Thanks so much for sharing a photo!
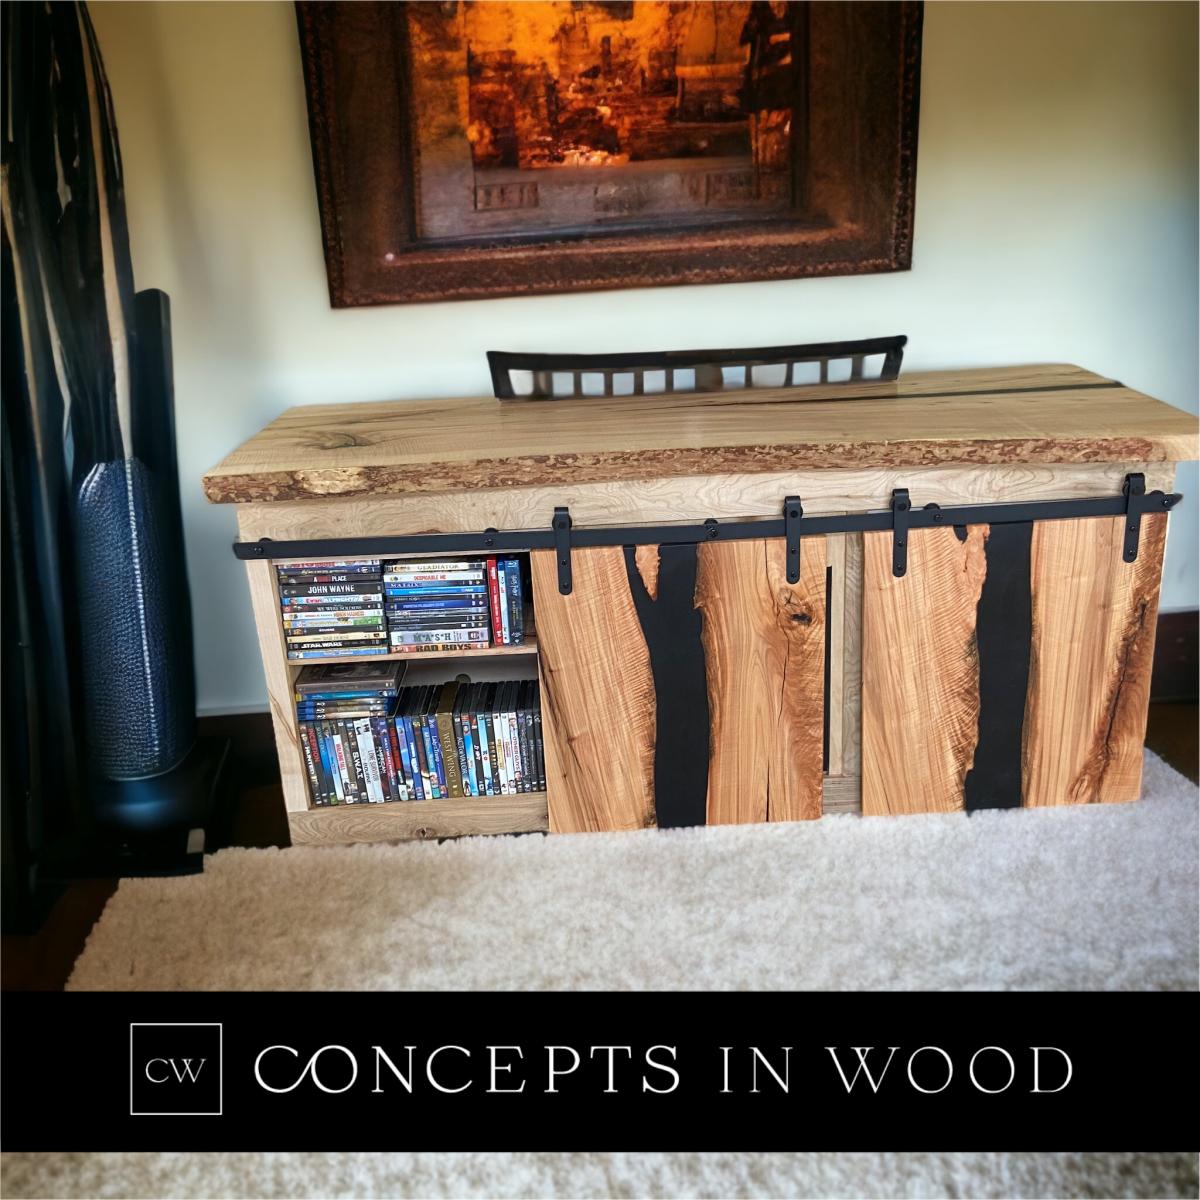
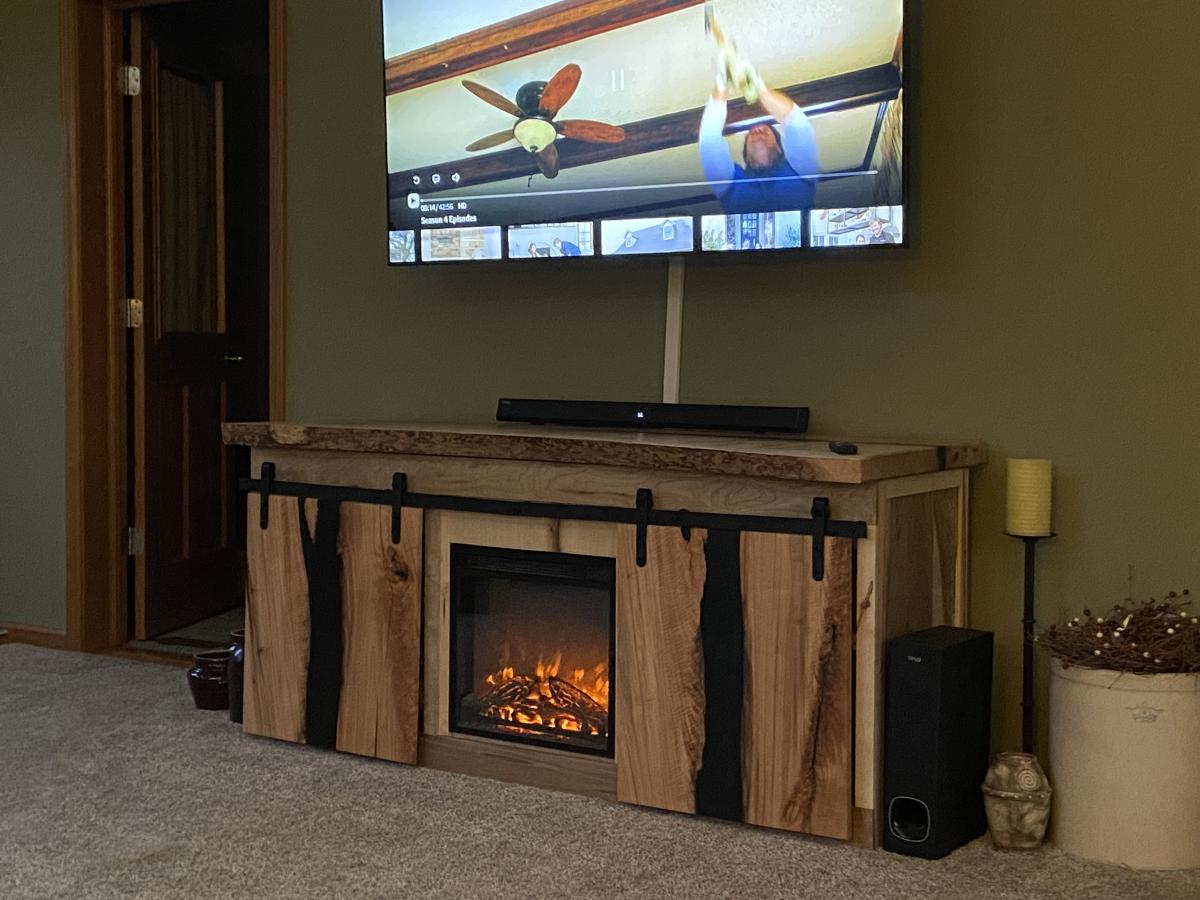
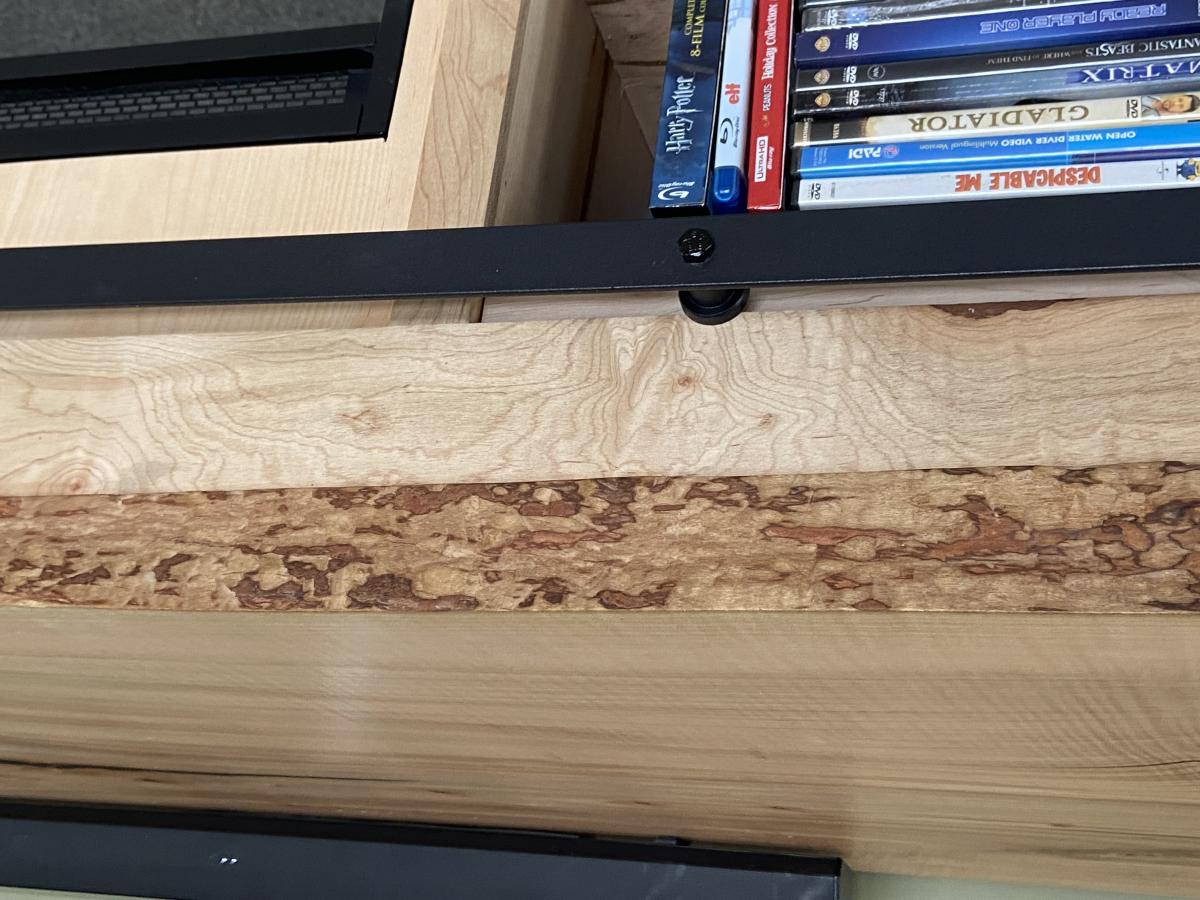
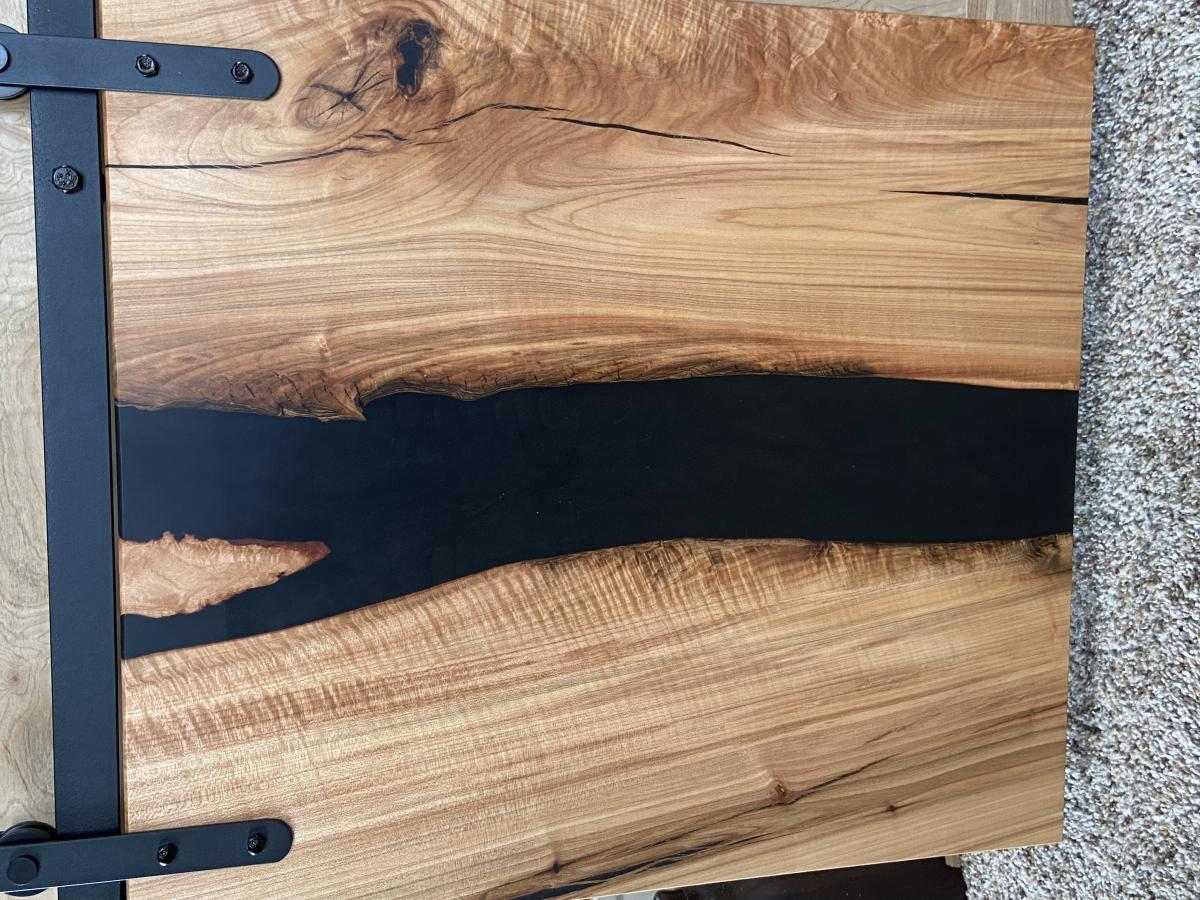
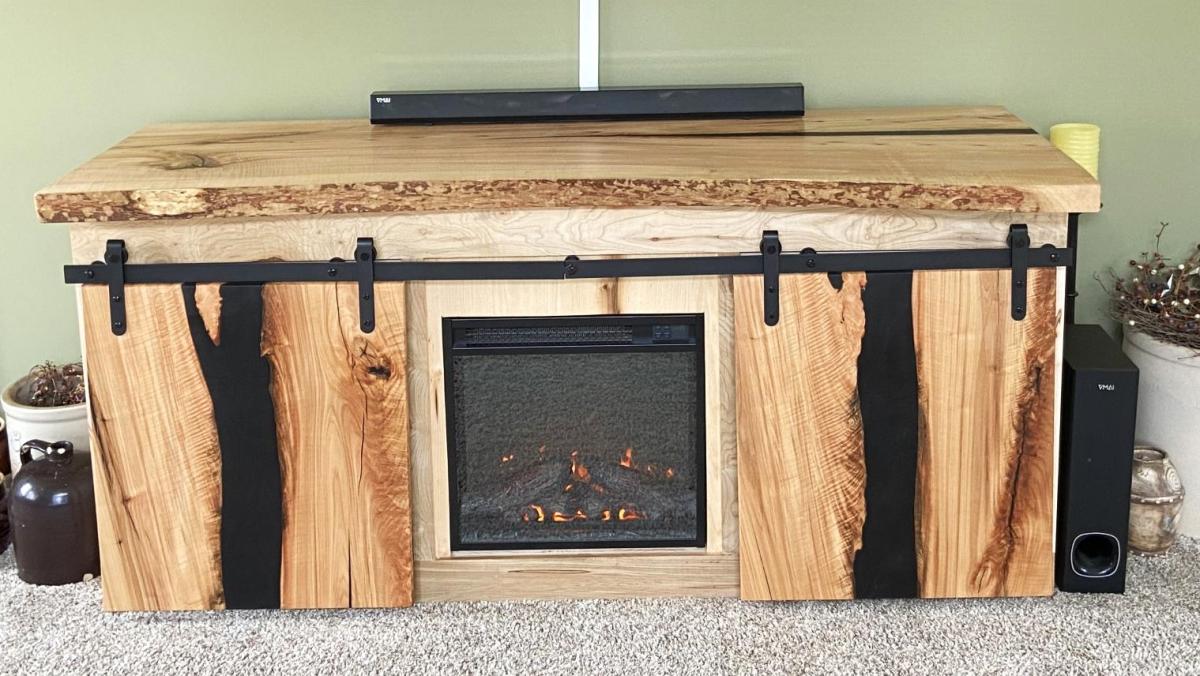
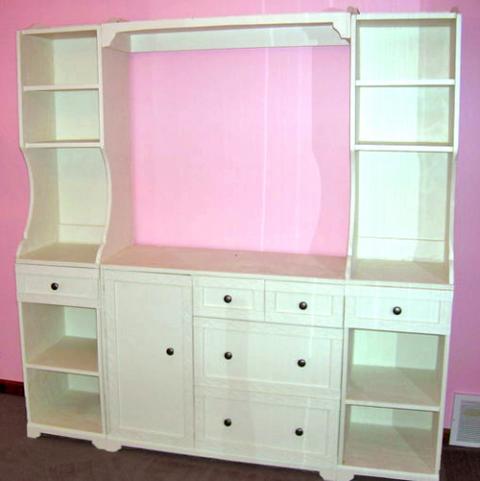
Entertainment Console
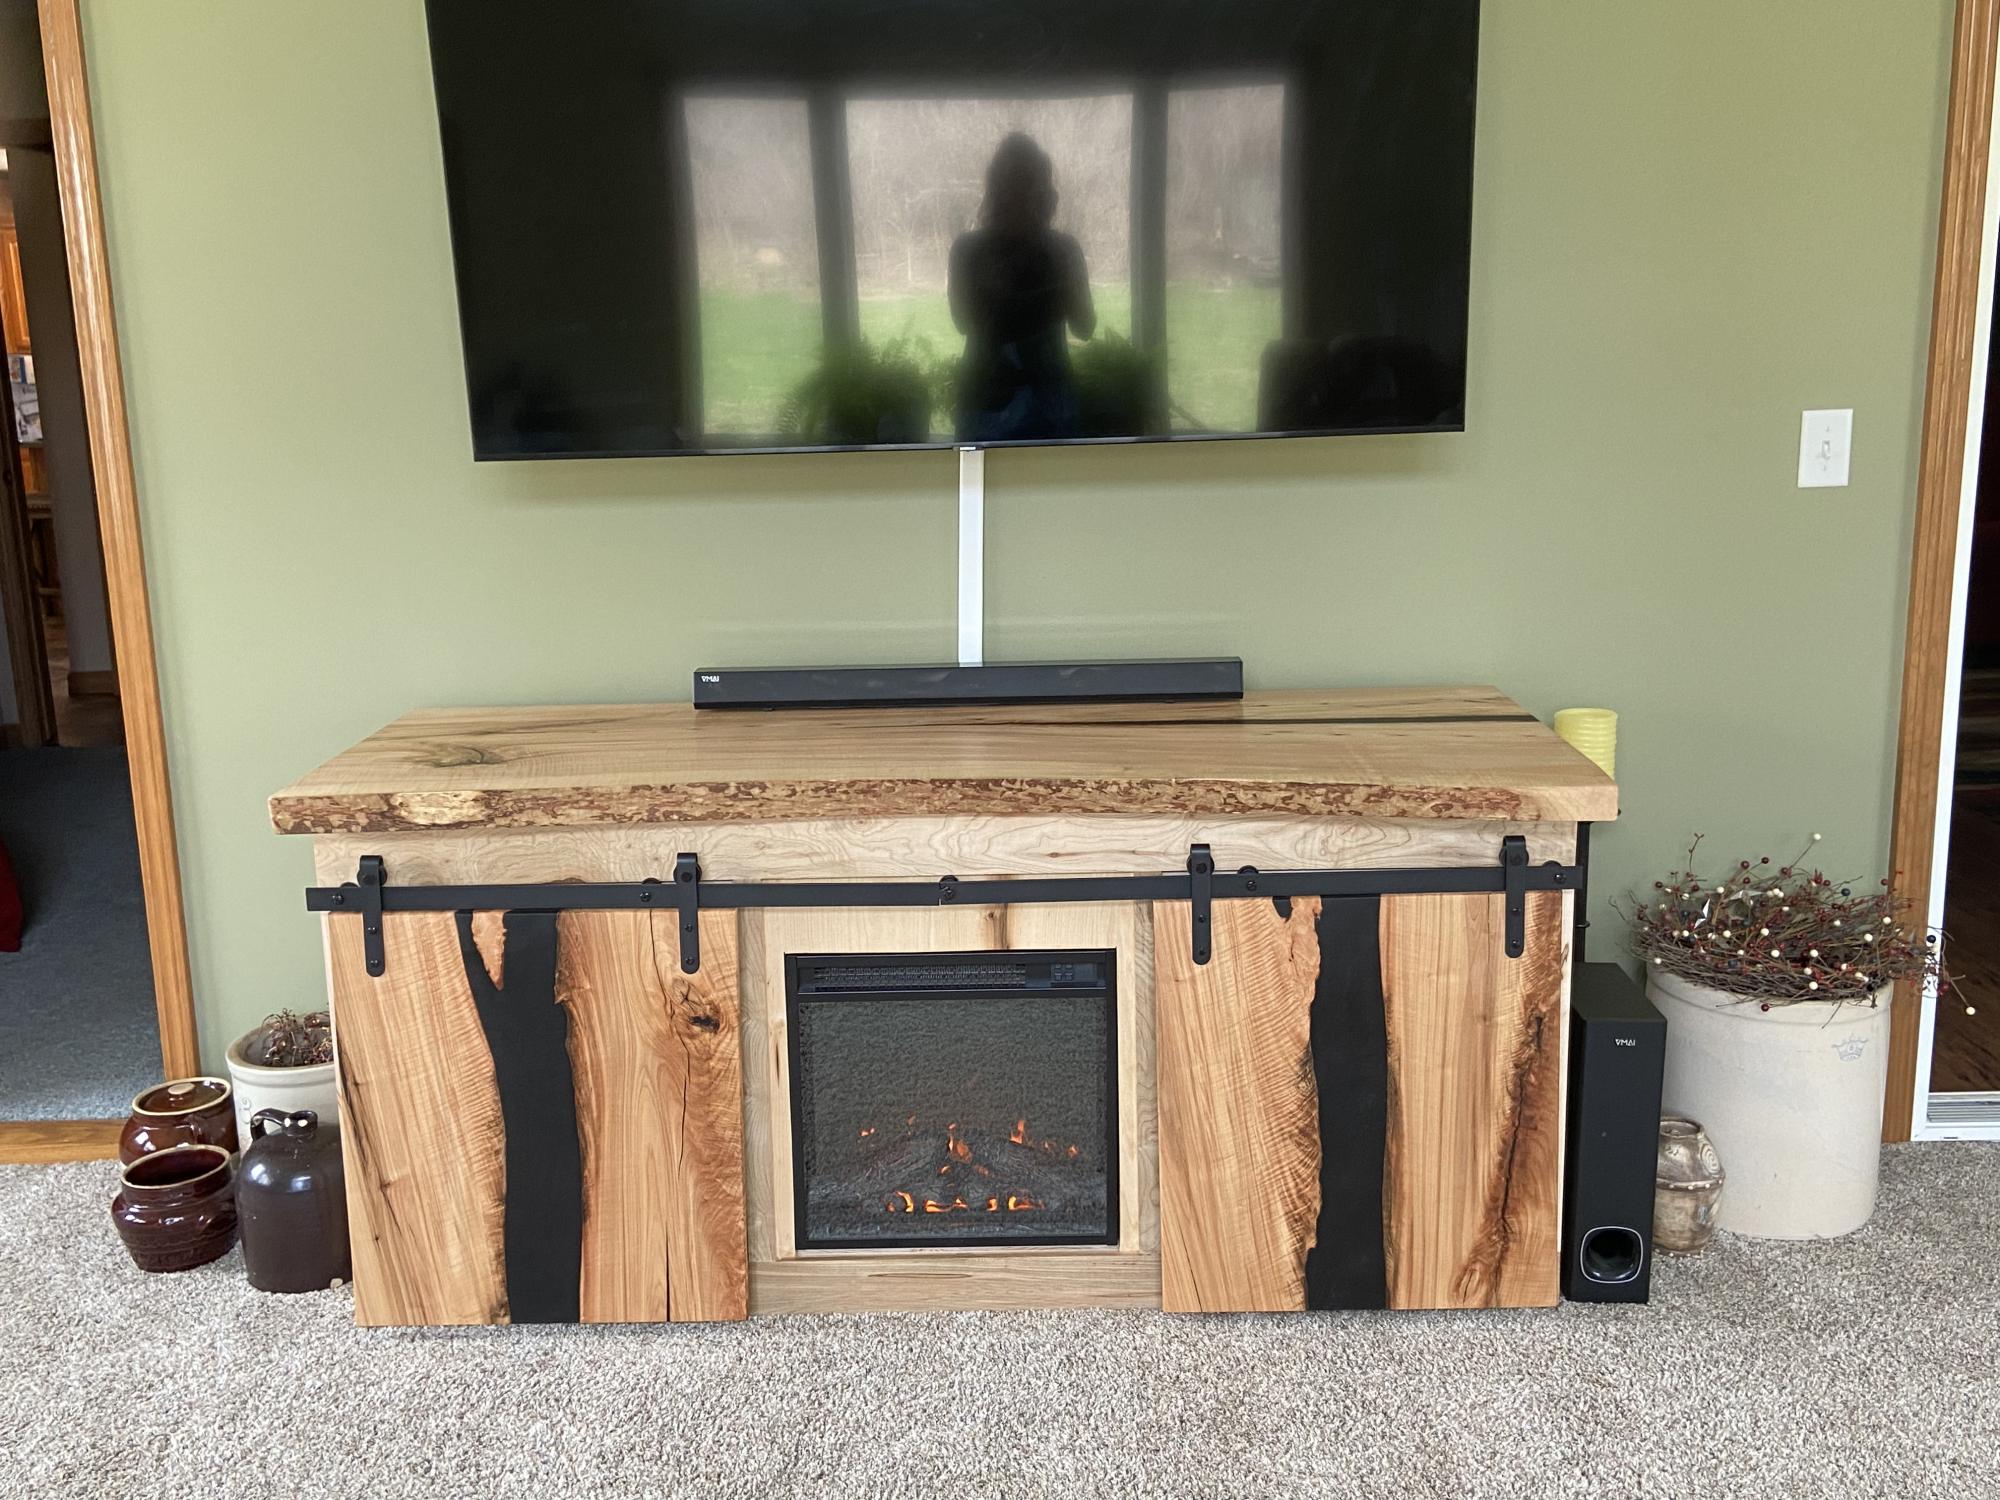
We needed a new entertainment console for the living room but didn’t want to spend $$$for something everyone else has. I found plans on your site and tweaked them to fit our needs.
This is 70”x31”x24” live edge Maple top and doors have a black epoxy filling the voids. The shelving, sides and trim are ambrosia maple. The fireplace insert has a heat/no heat option. I trimmed it the back with 1/4” maple plywood with ventilation for the fireplace. The top and doors maple is from a tree we cut, slabbed and dried. I finished it with Odies Woods Wax.
All-in-all, $550 in materials. The best part, my husband loves it!
Built from Plan(s)
Comments
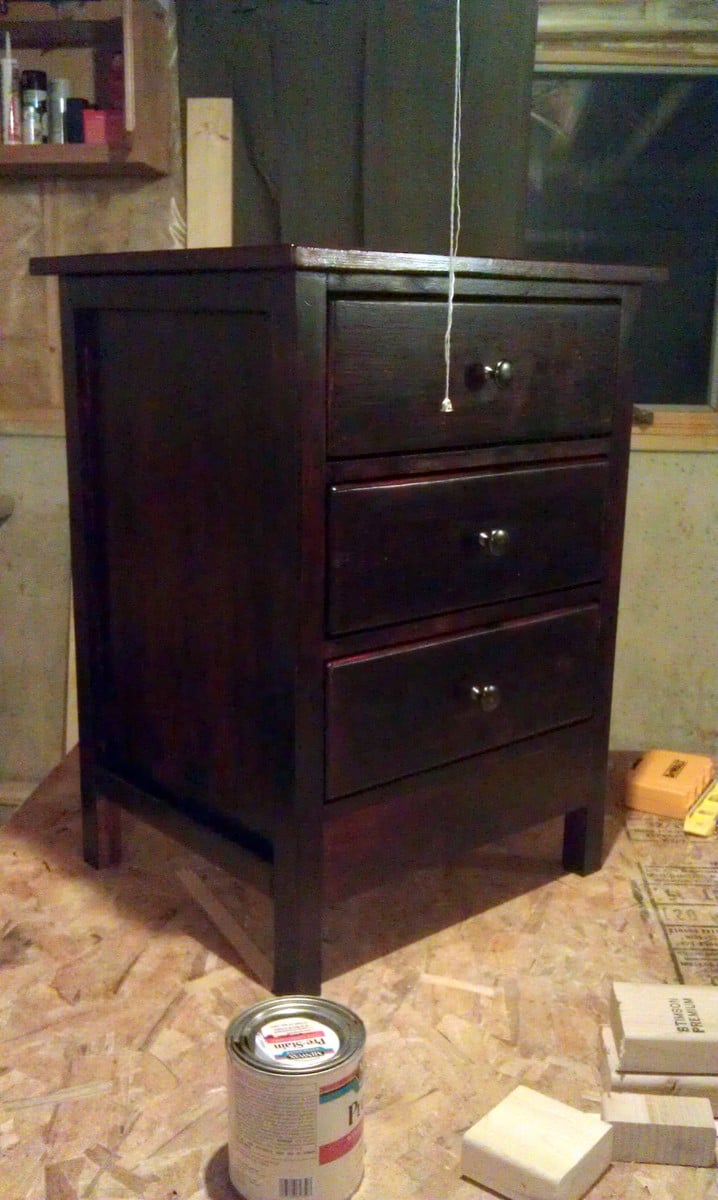
Nightstand

Another project my husband worked diligently on! It took him forever because he's a perfectionist, but he finally got one done. He used a piece of 3/4" plywood framed with mitered wood instead of the planks for the top. Now, on to the other one.

Built from Plan(s)
Estimated Cost
20.00 each
Estimated Time Investment
Week Long Project (20 Hours or More)
Finish Used
Minwax Poly Shades Bombay Mahogany
Recommended Skill Level
Beginner
Comments


Mon, 12/19/2011 - 16:37
Yes, and it matches our
Yes, and it matches our headboard (that he also made) perfectly! I'm excited to eventually have a matching set!
Wed, 01/22/2014 - 07:51
I love the way the top is
I love the way the top is done.......... I made a bed and stained it with the same stain as you used. I'm hoping my nightstand turns out like yours.
Distressed chalk paint
Distressed chalk paint
Built from Plan(s)
Estimated Cost
275
Estimated Time Investment
Week Long Project (20 Hours or More)
Recommended Skill Level
Beginner
Comments
Toy storage
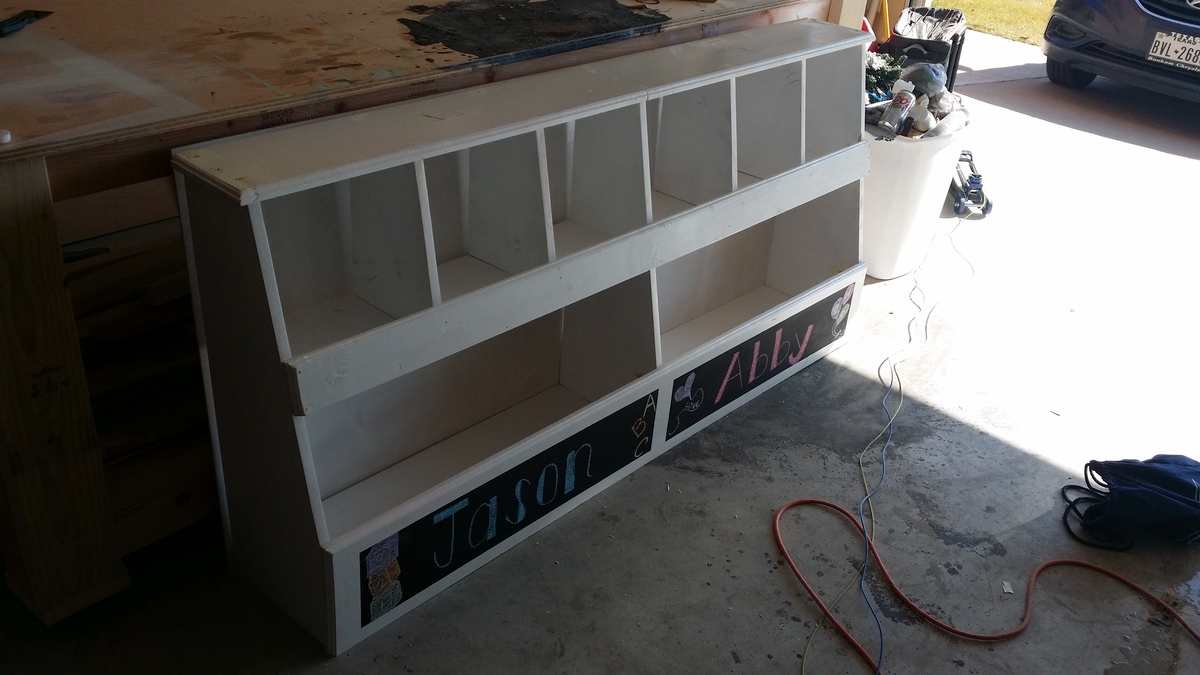
Doubled the size of Ana's toy storage to accommodate my niece and nephew.
Built from Plan(s)
Estimated Cost
135
Estimated Time Investment
Weekend Project (10-20 Hours)
Recommended Skill Level
Beginner
Comments
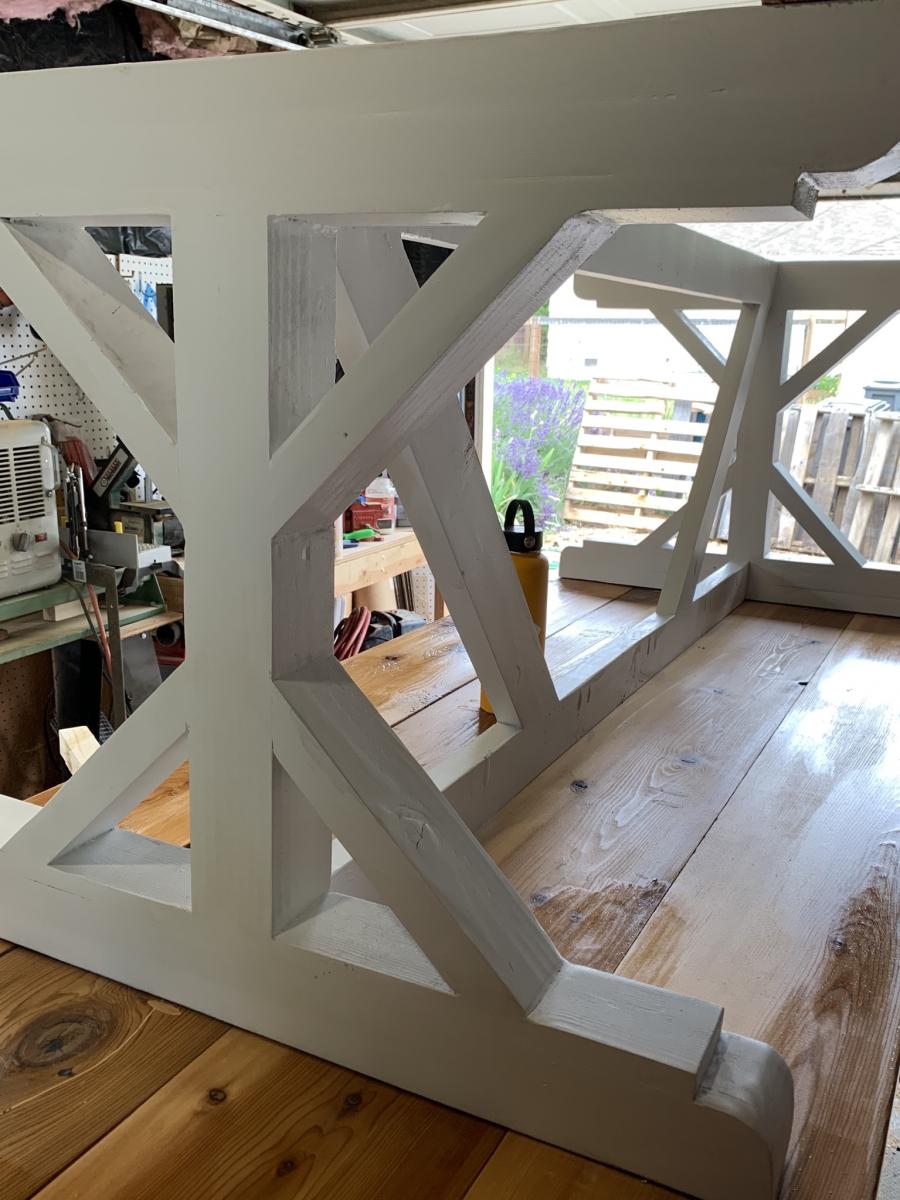
Fancy X Farmhouse Table
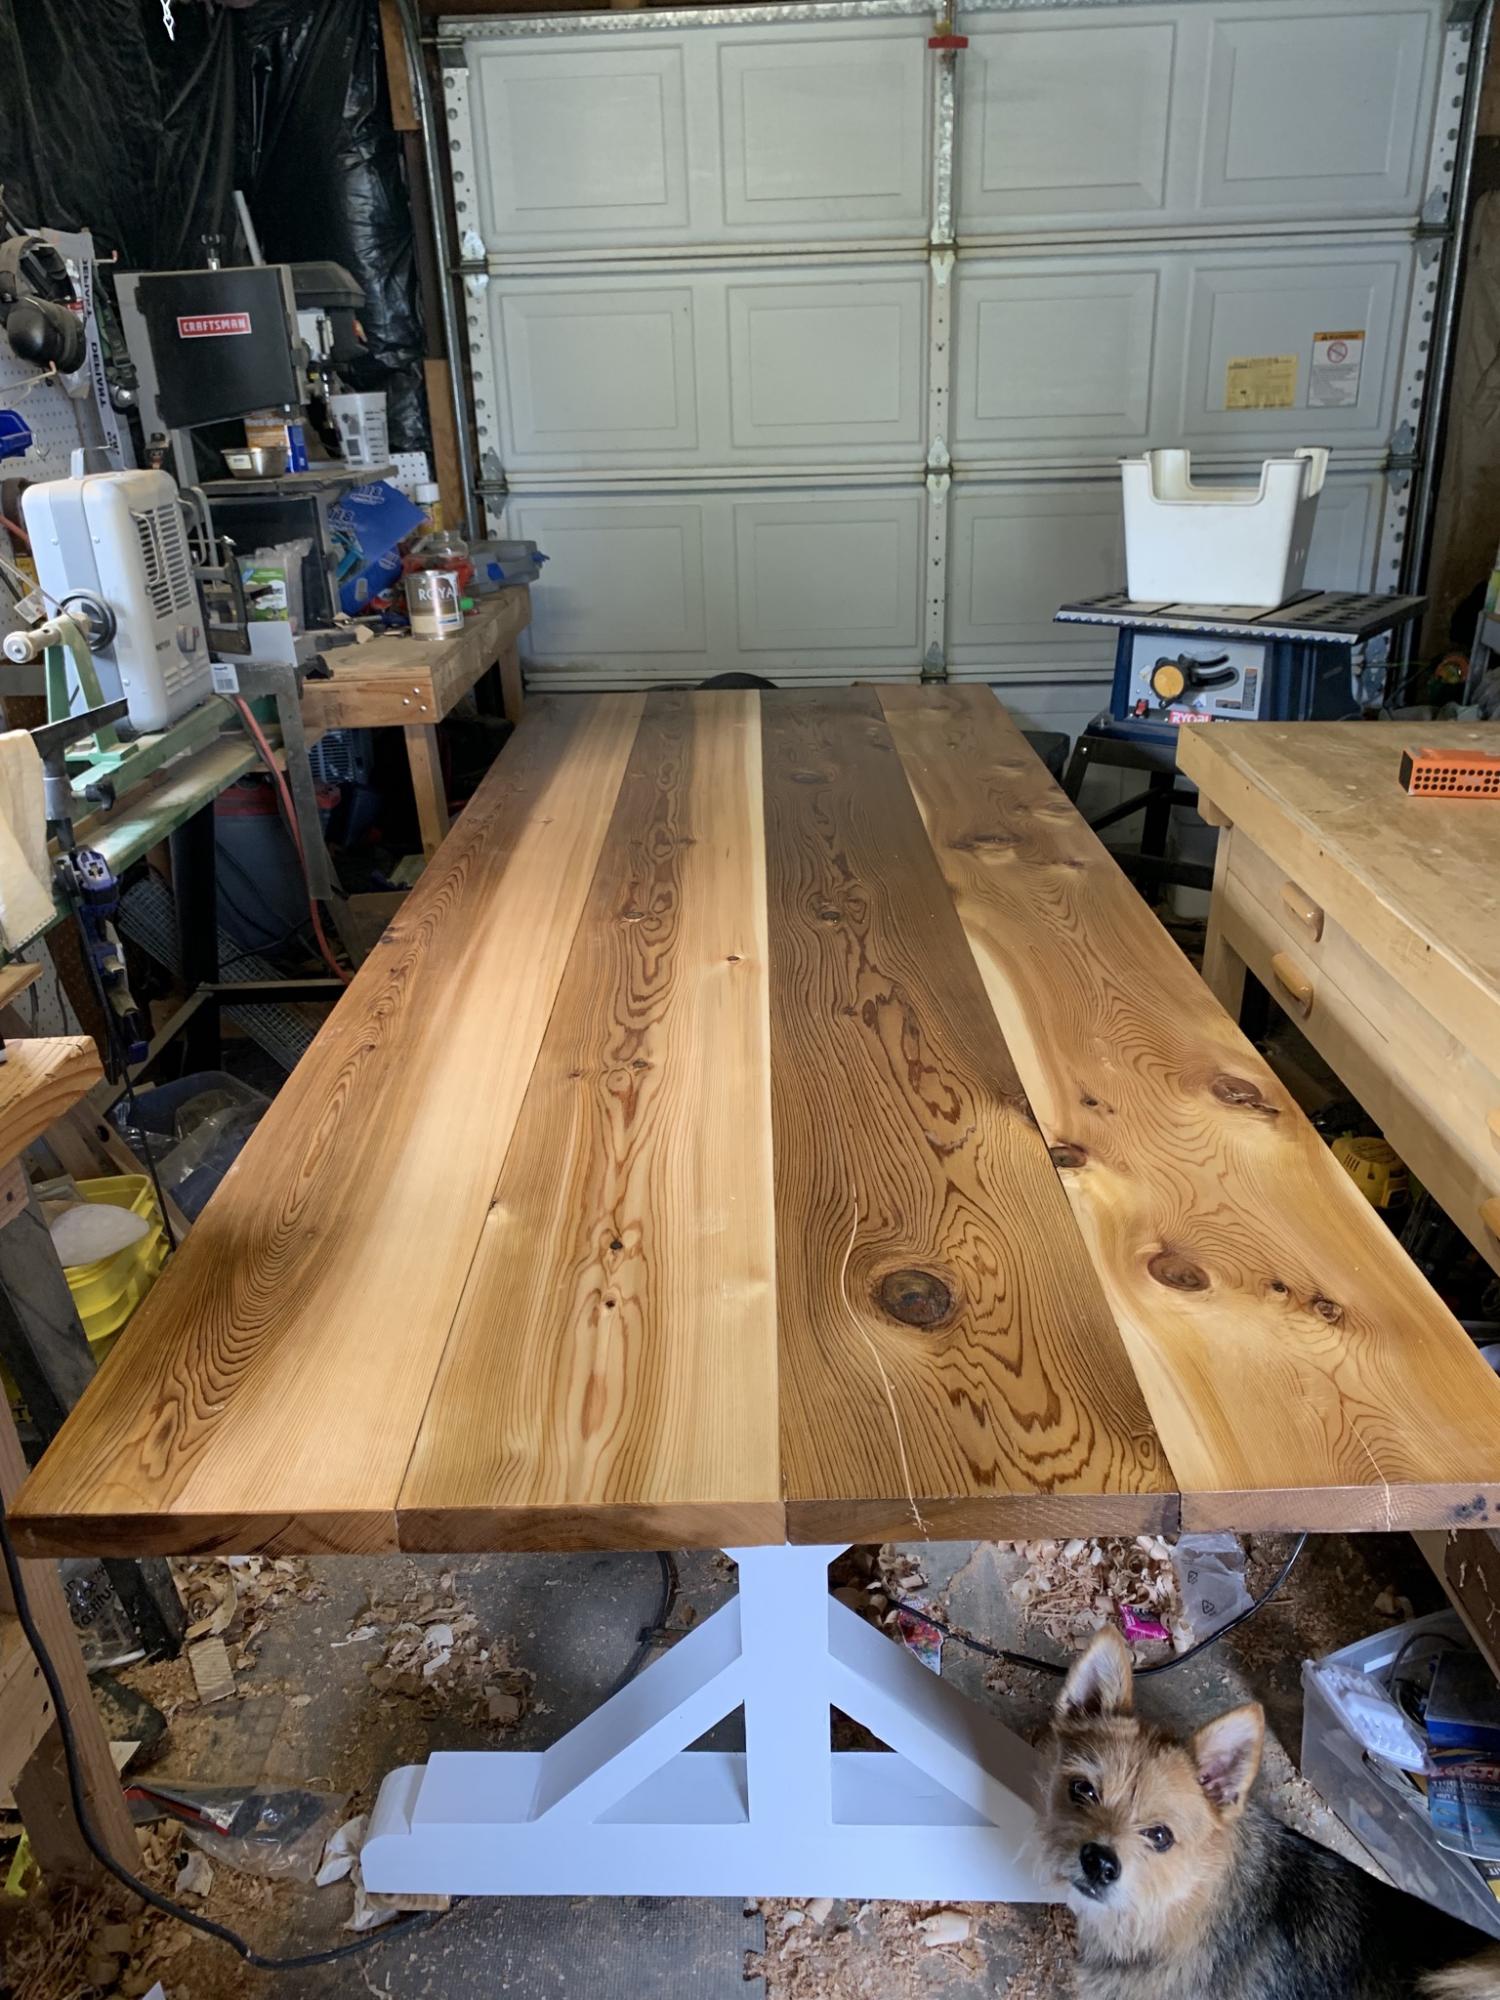
Table top is tight knot cedar, sealed with ship n shore, 7 coats spar urethane.
Base is fir, sealed and painted in latex outdoor paint:
Estimated Cost
225 (cedar was 150).
Estimated Time Investment
Week Long Project (20 Hours or More)
Finish Used
Spar Urethane
Recommended Skill Level
Intermediate
Comments
Kitchen Table

I couldn't find an exact plan for the kitchen table I wanted, so I used a combination of the farmhouse table and pub table to create the perfect table for my space. I liked the look of the 4x4 legs, but my local lumber store did not have a good selection of 4x4 boards. So I used a 1x4 and 1x3 kreg jigged together in an L shape to get the look of the 4x4 legs. The overall table dimensions ended up 44" square by 31" tall.
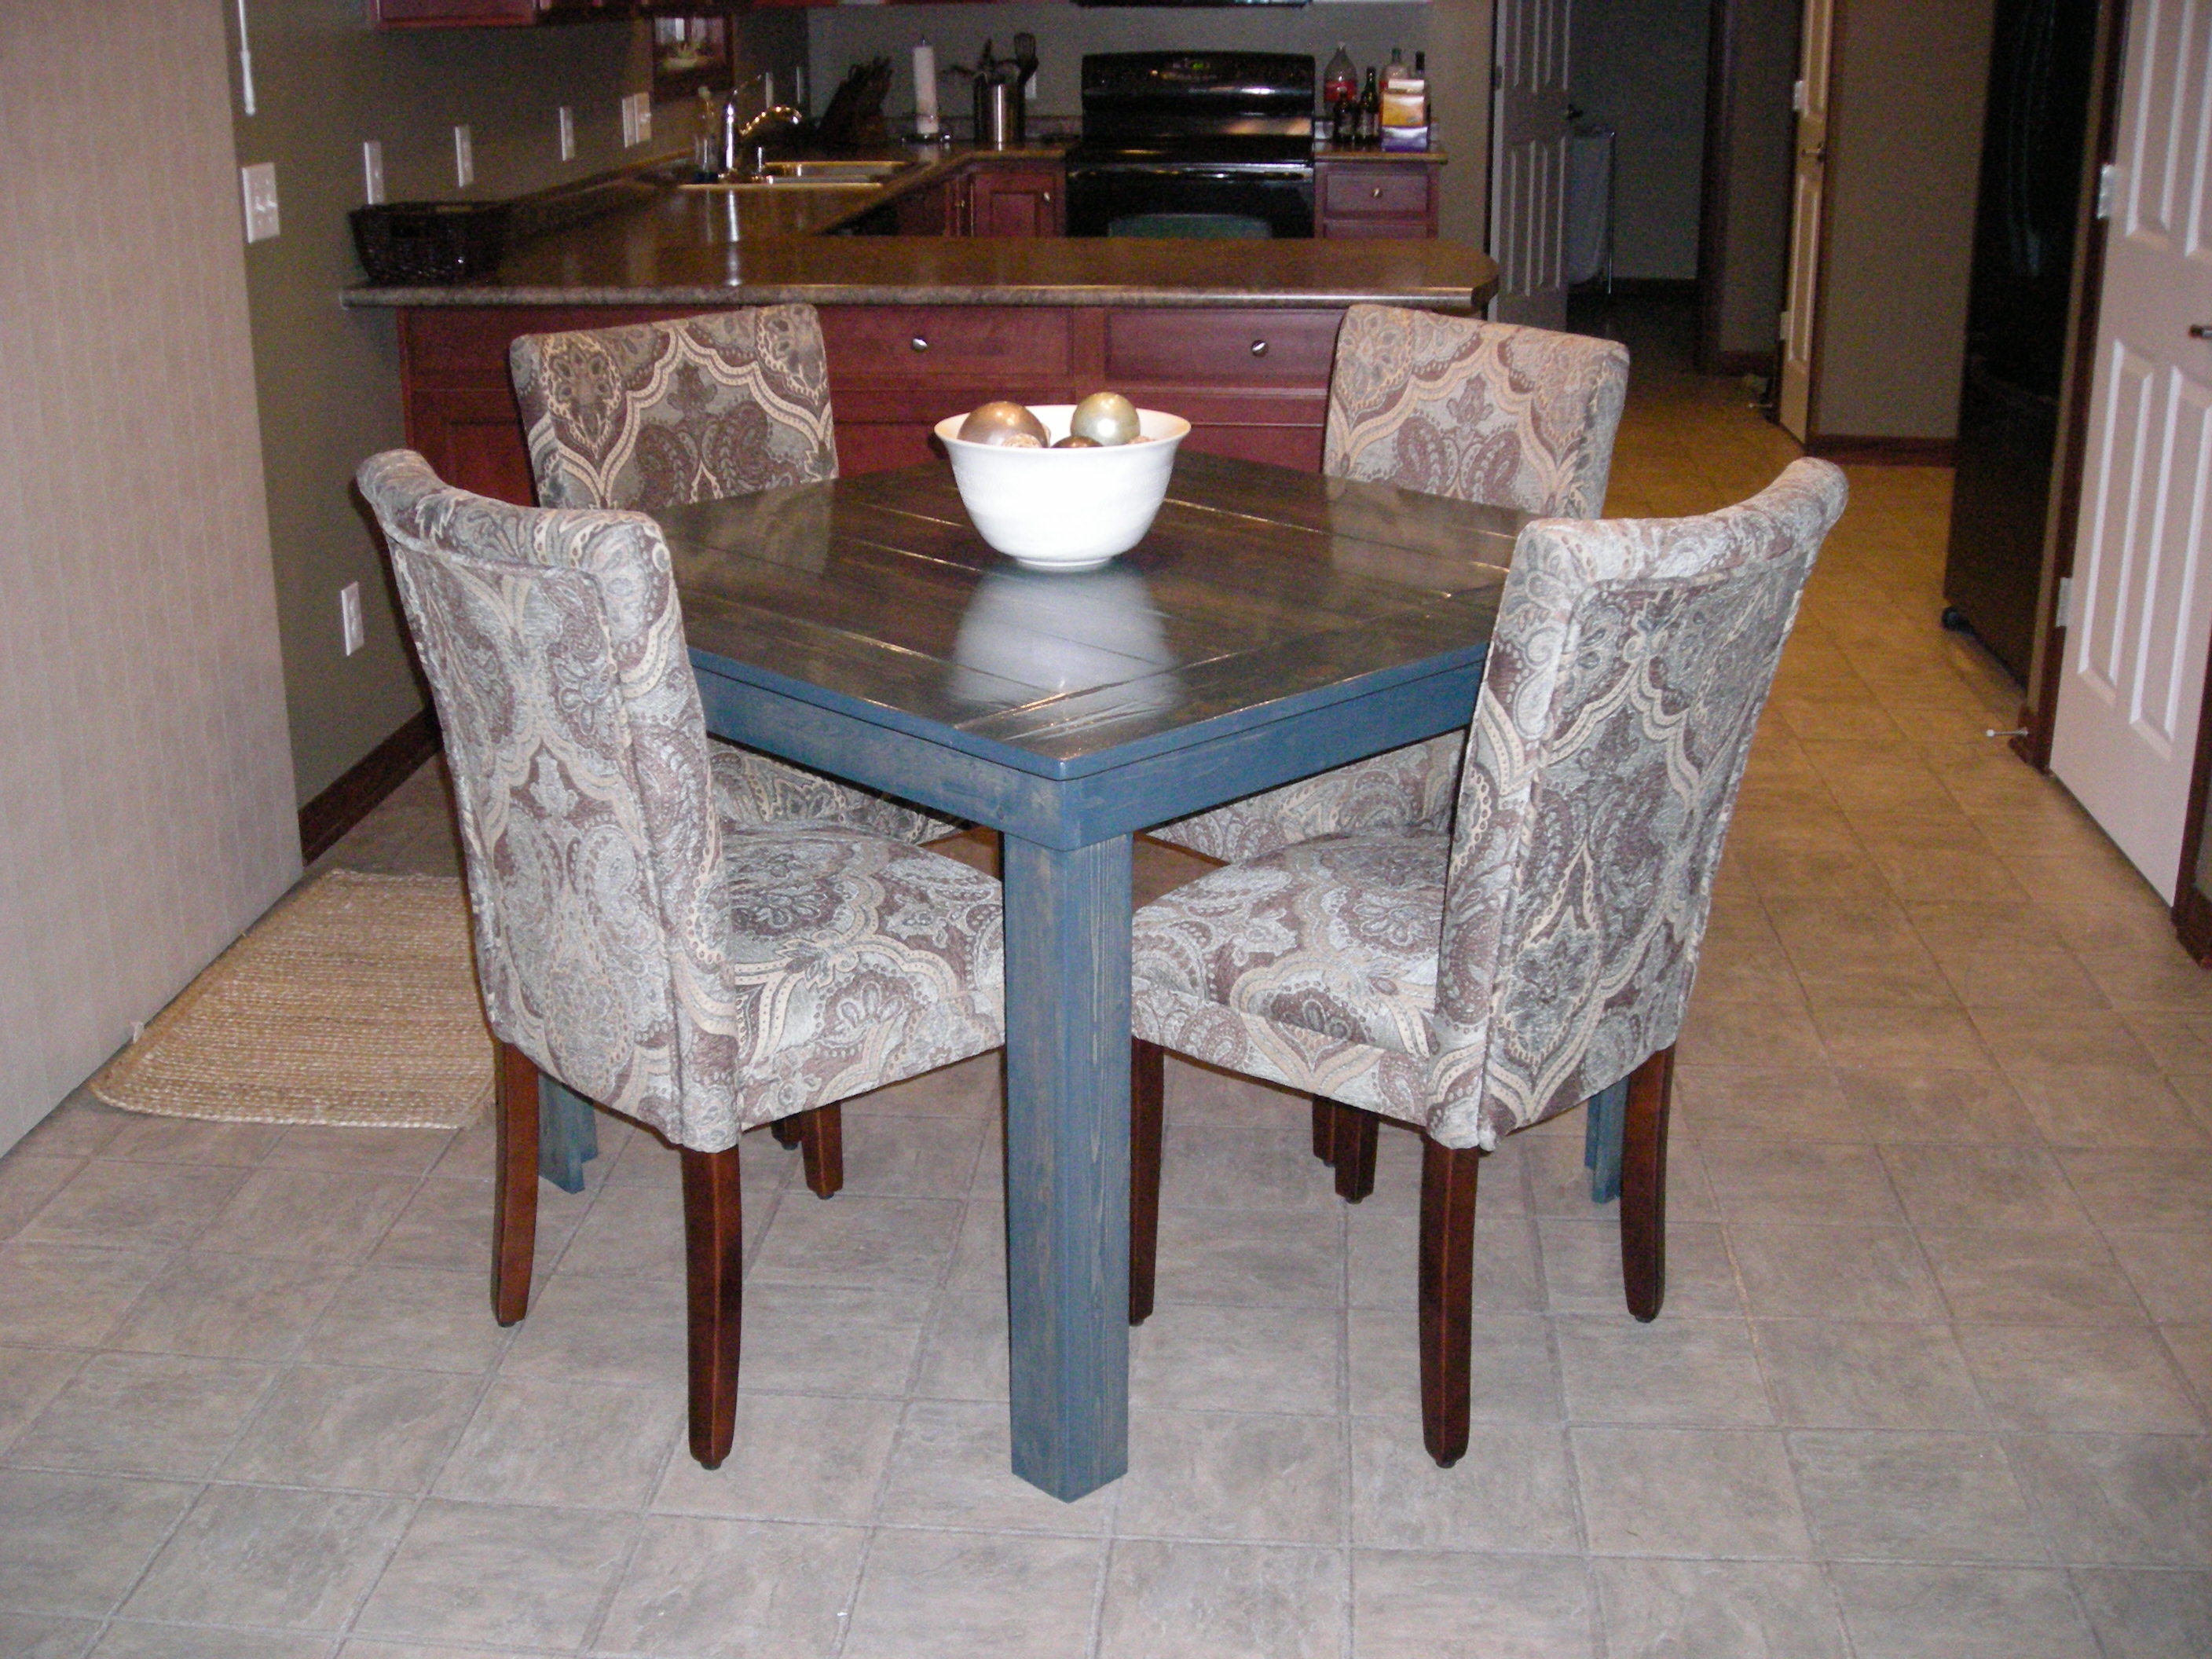


Built from Plan(s)
Estimated Cost
$100
Estimated Time Investment
Weekend Project (10-20 Hours)
Finish Used
Well, I asked for charcoal gray minwax stain. However, it turned out VERY blue, so I believe the paint machine must have made a mistake. I havent decided if I like the color, perhaps it will grow on me, if not, I'll be sanding it down and restaining it this spring. I used minwax satin polyurethane over the stain.
Recommended Skill Level
Intermediate
Comments
Mon, 04/16/2012 - 18:48
Great make, will you help
Great make, will you help with the dimensions and size of boards you used? What did use use for the top and aprons? 2x6? Any info would help. This would be a perfect fit for my place
Sun, 10/27/2013 - 01:02
Drilling holes
Is it necesery to drill holes on angle and what does it help (picture 3, under the table) ? Thank you
Sun, 07/13/2014 - 05:43
Beautiful job!
Love the way the color of the table turned out and the size boards you used on top. Where did you find the matching chairs? This is the exact color scheme of my dining room remodel. Thanks!
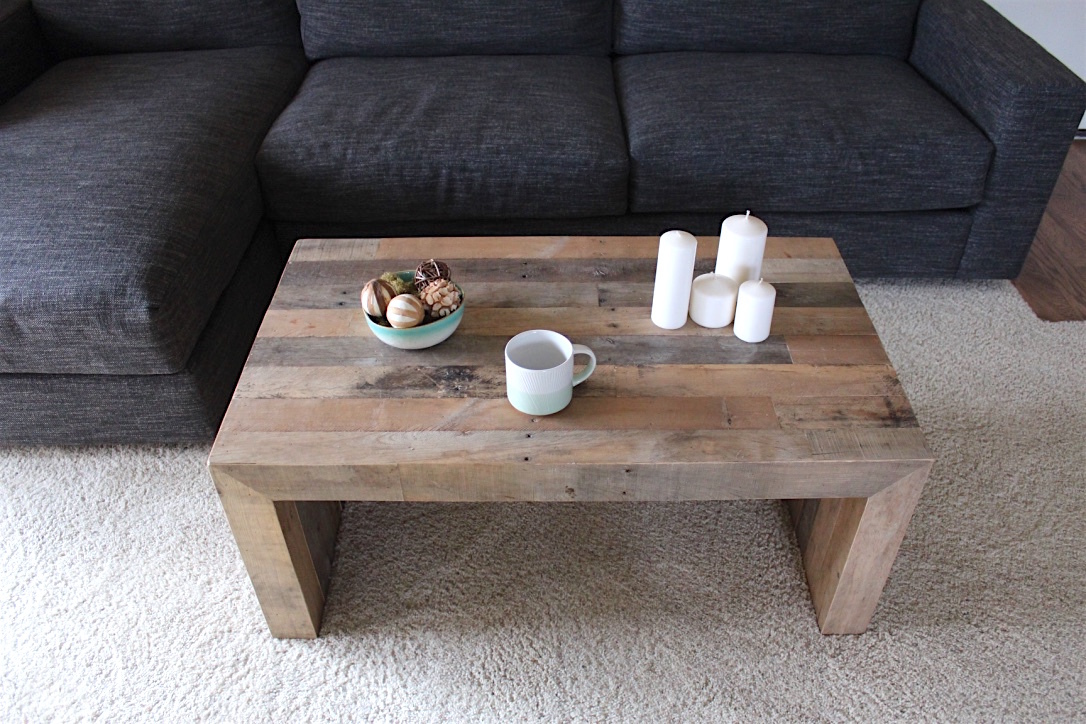
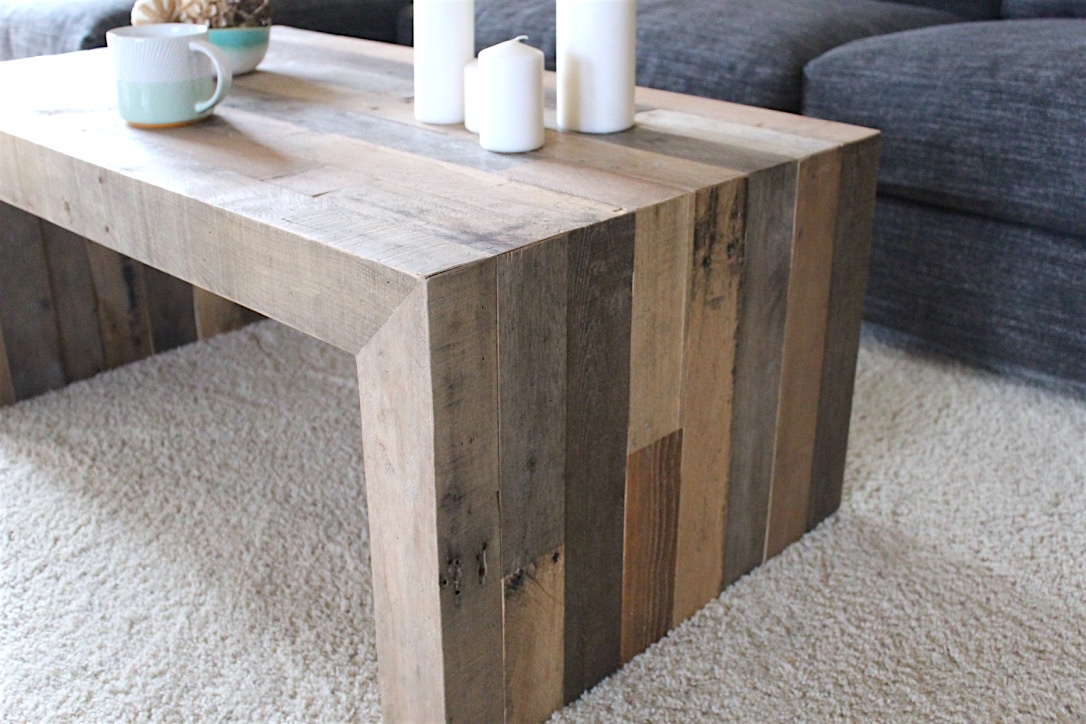
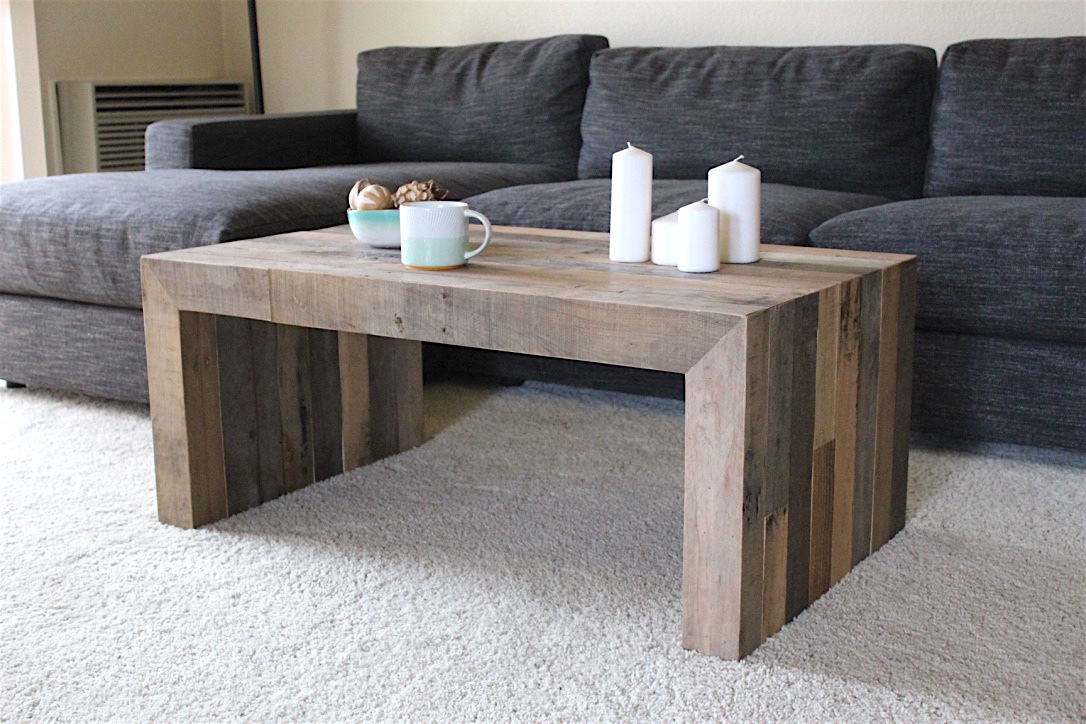
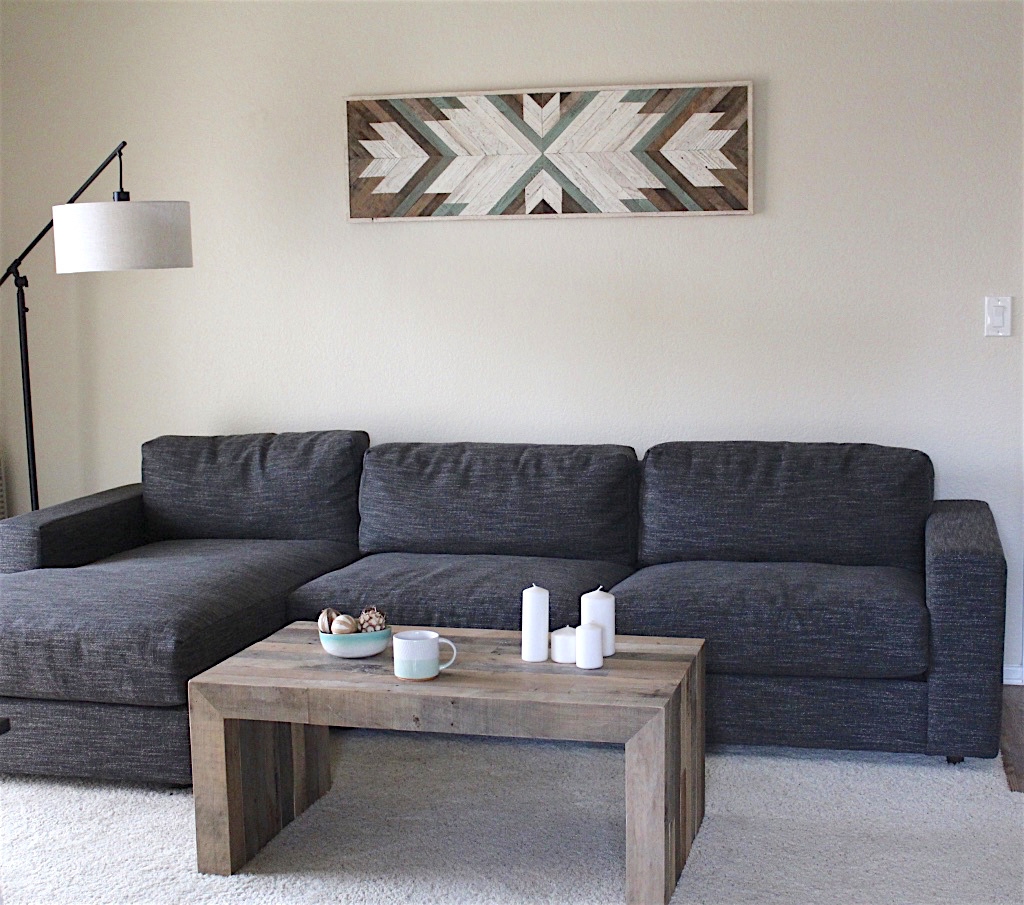
Coffee Table
I tweaked the console plans to work best for my space, and to work with the reclaimed barn threshing floor boards that I used for the top.
I love how it turned out and it works wonderfully in my space.
Built from Plan(s)
Estimated Cost
60
Estimated Time Investment
Weekend Project (10-20 Hours)
Finish Used
I painted the bottom with a melamine paint.
The top was stained with a walnut gel stain, and finished with a wipe on poly.
The top was stained with a walnut gel stain, and finished with a wipe on poly.
Recommended Skill Level
Beginner
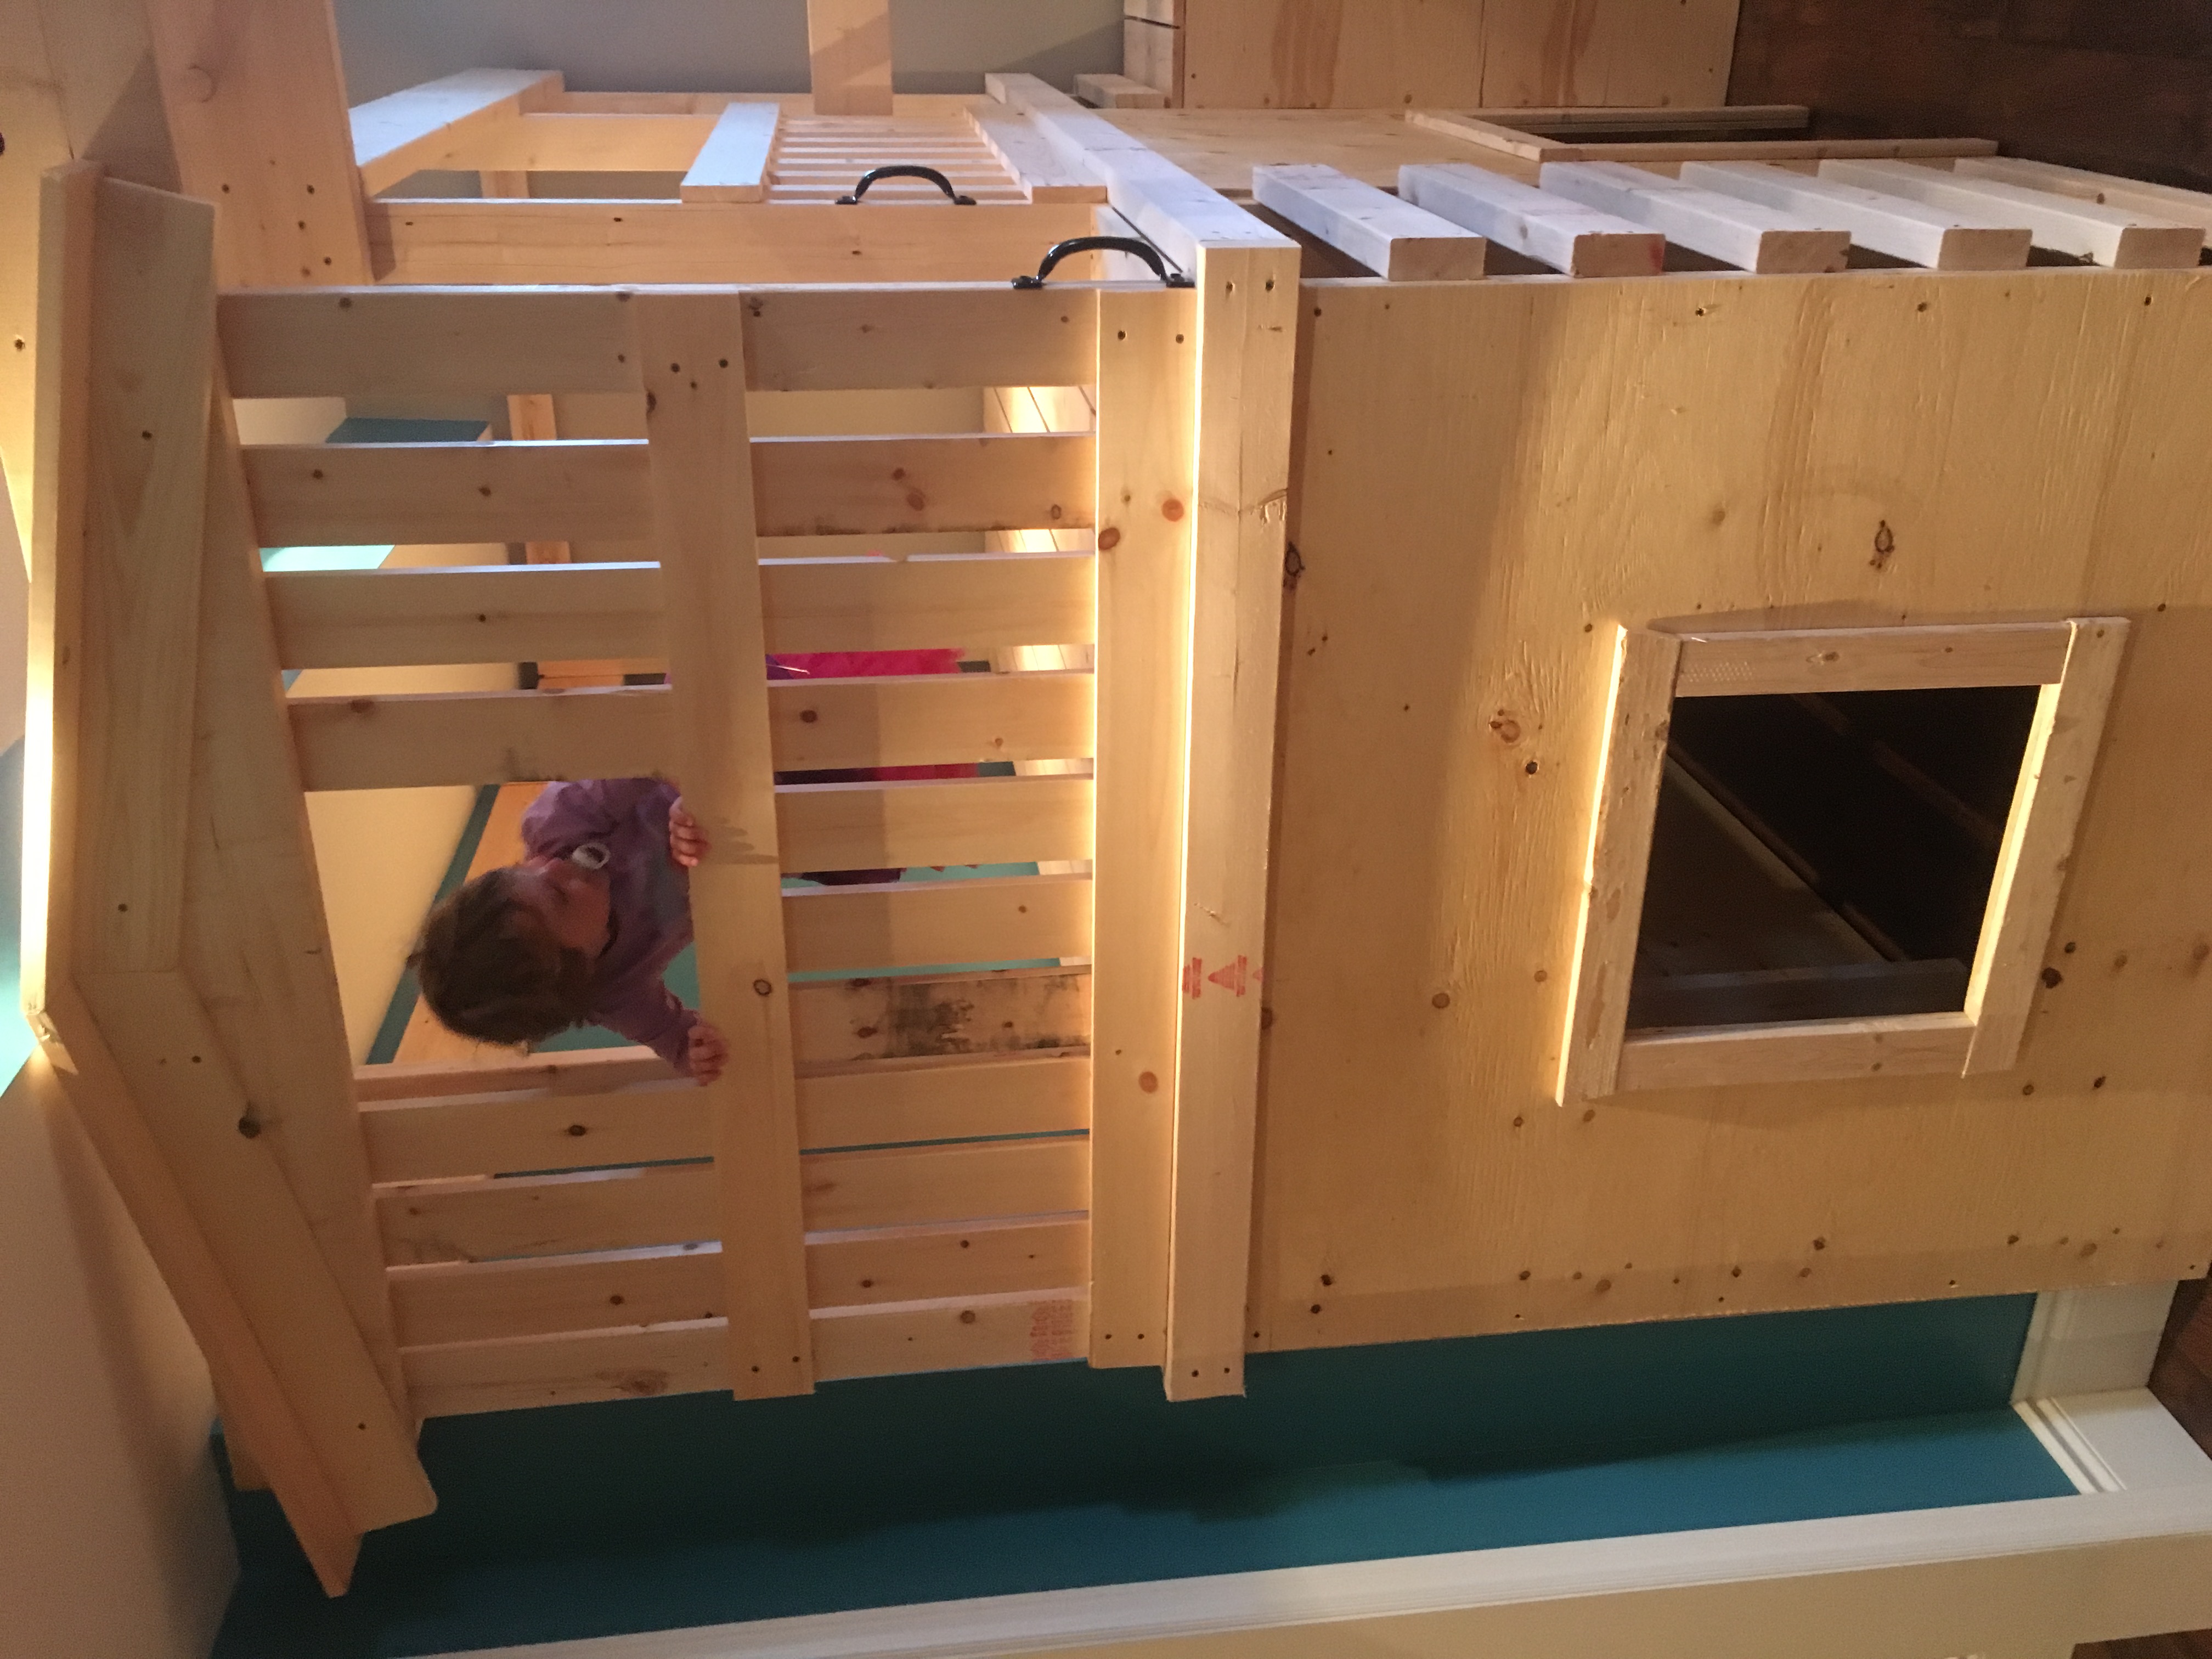
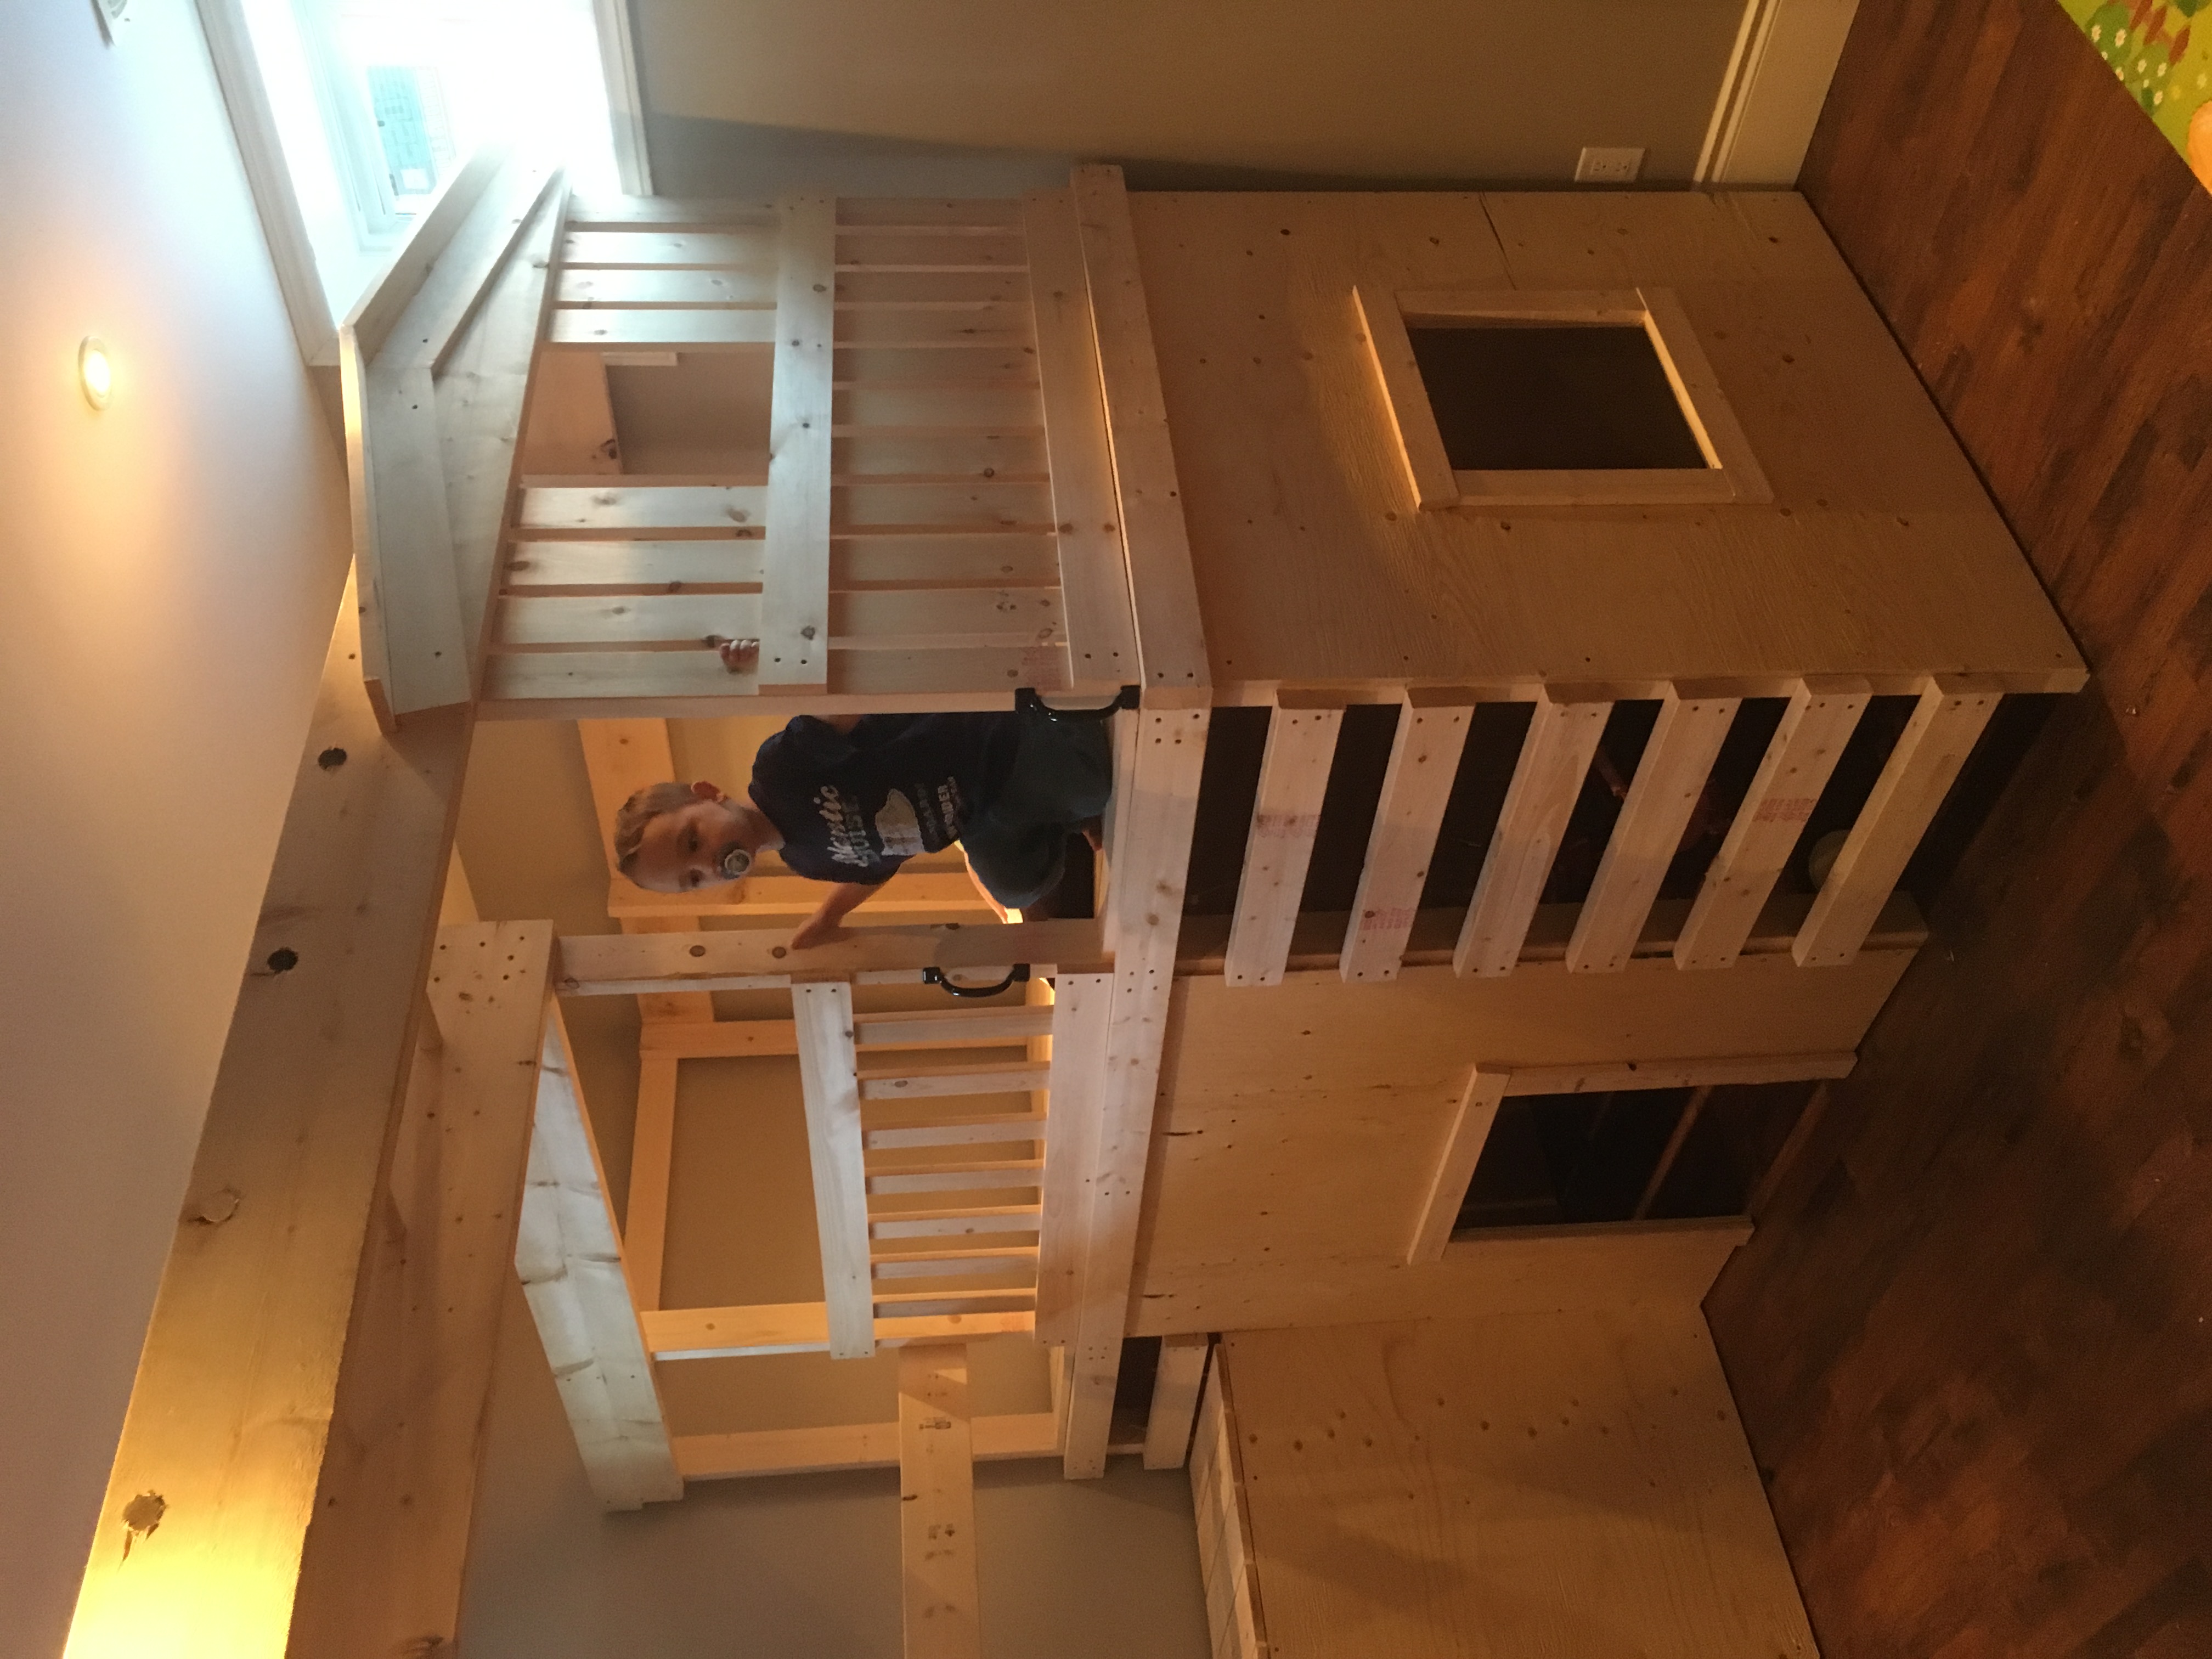
The BEST 3rd Birthday Present Ever!
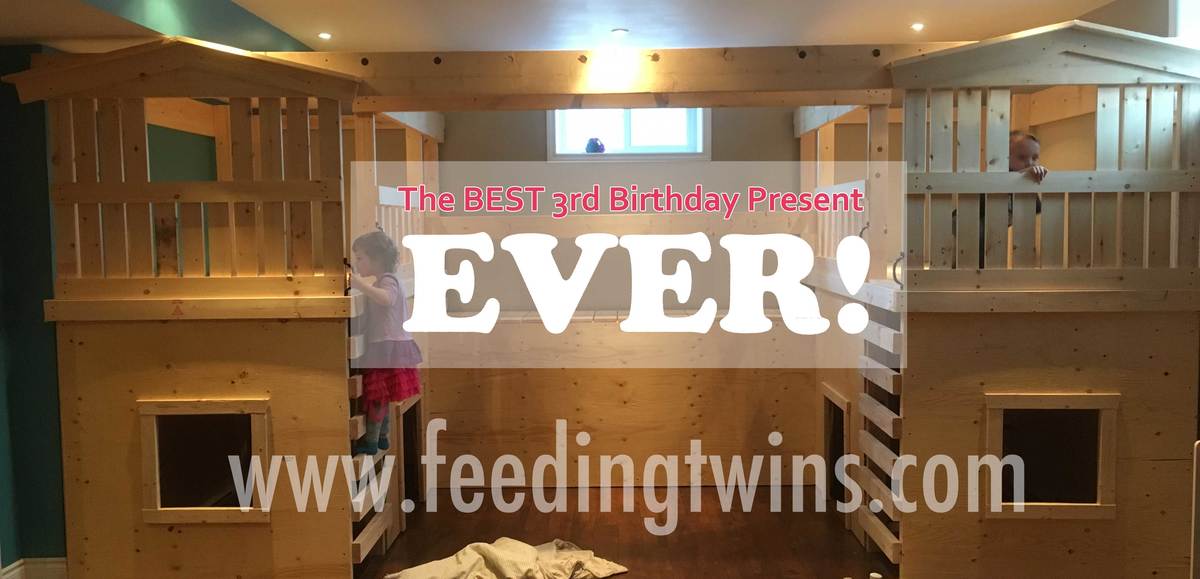
Hi Ana! Thank-you for the detailed instructions on how to build the indoor playground! We had our contractor build this for our twins' 3rd birthday present. The kids absolutely LOVE the playground and use it every day. I'm planning to paint it, reinforce and install a rock climbing wall up to the bridge, and install some easels in the bottoms of the playhouses. You can see more pictures of the kids playing and the construction here: http://feedingtwins.com/body/the-best-3rd-birthday-present/ Thanks again! Julie
Built from Plan(s)
Estimated Time Investment
Weekend Project (10-20 Hours)
Recommended Skill Level
Intermediate
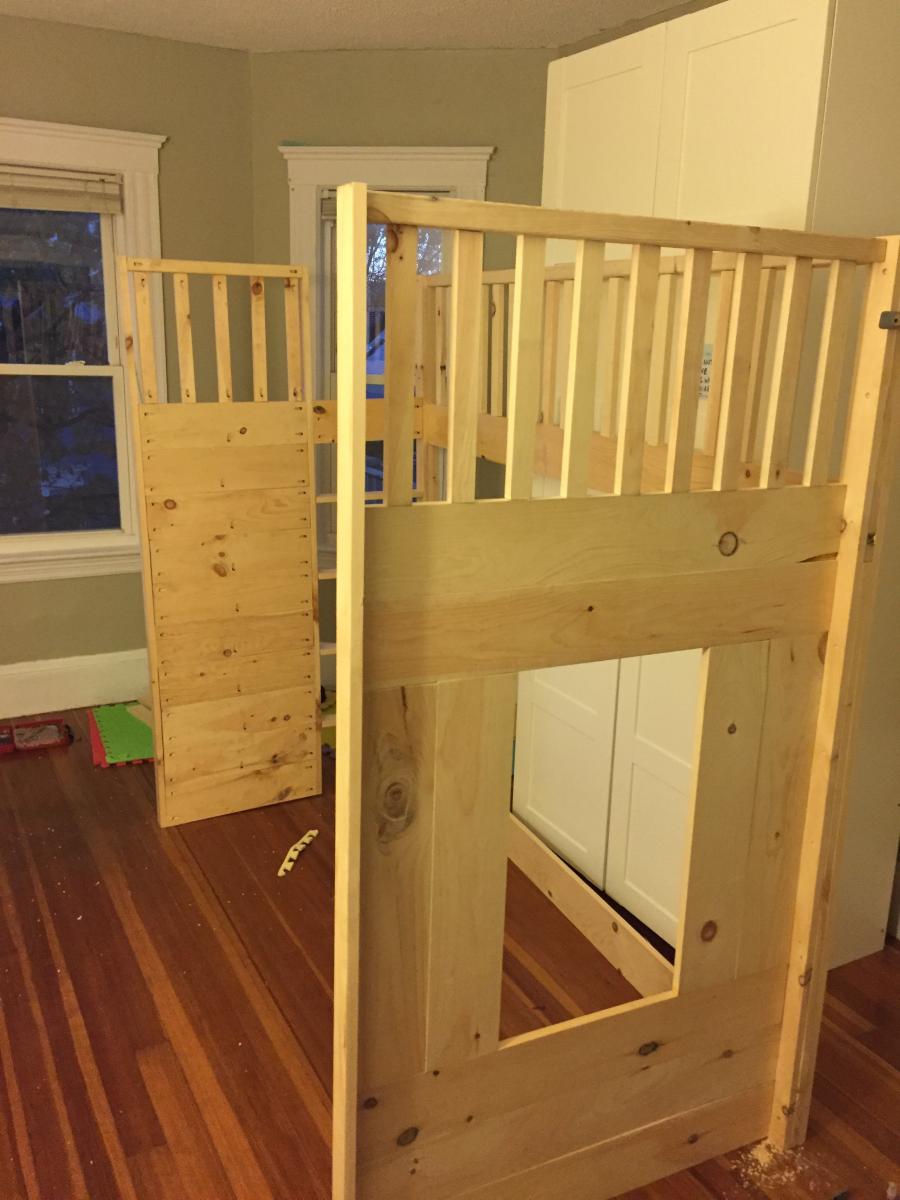
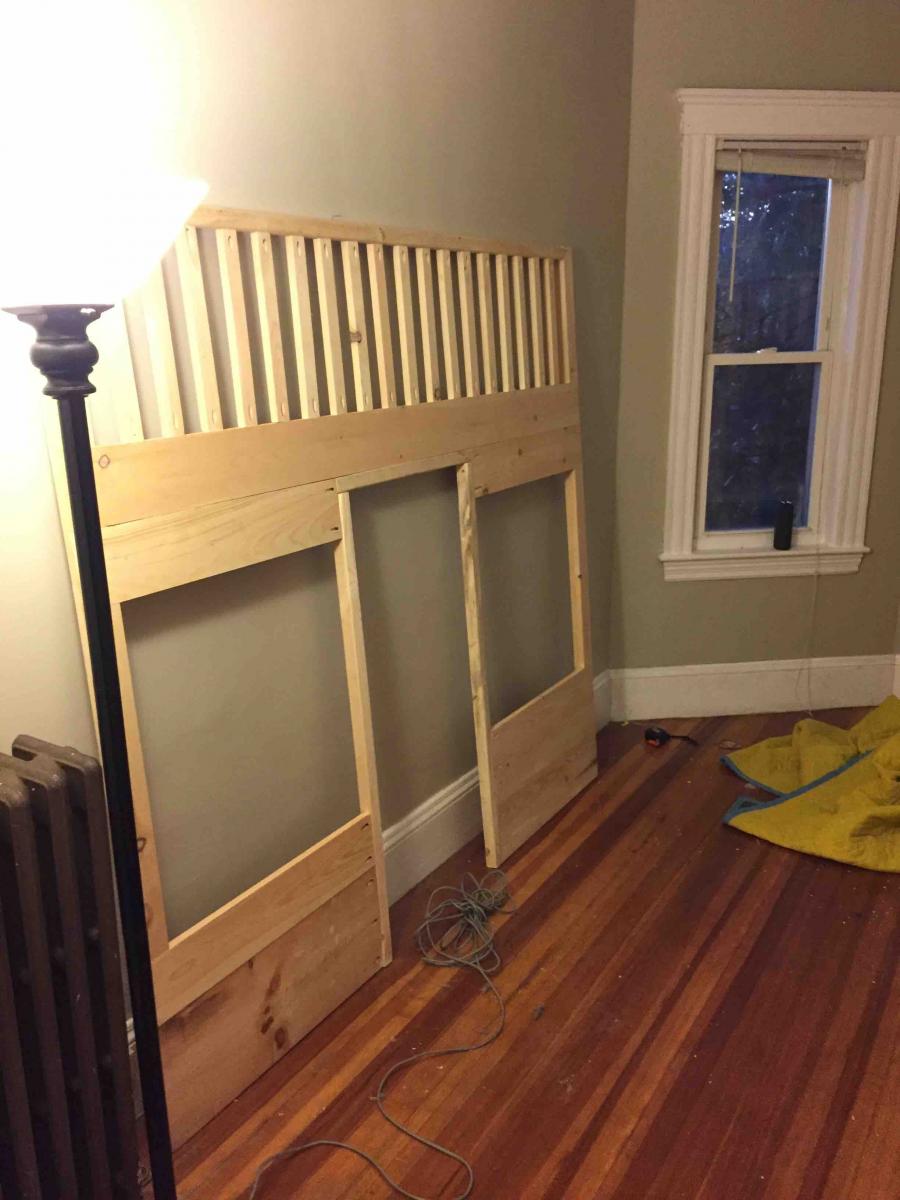
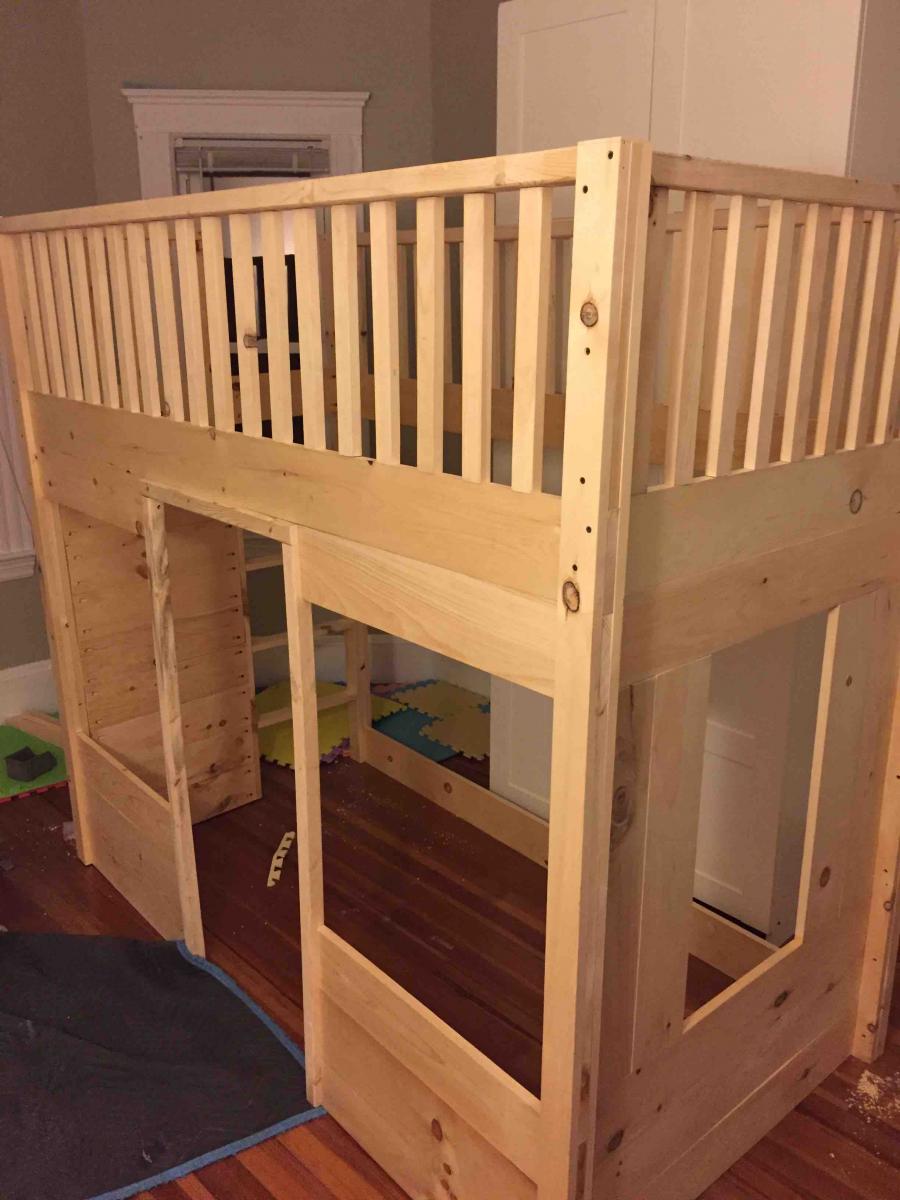
Little Cottage Loft Bed
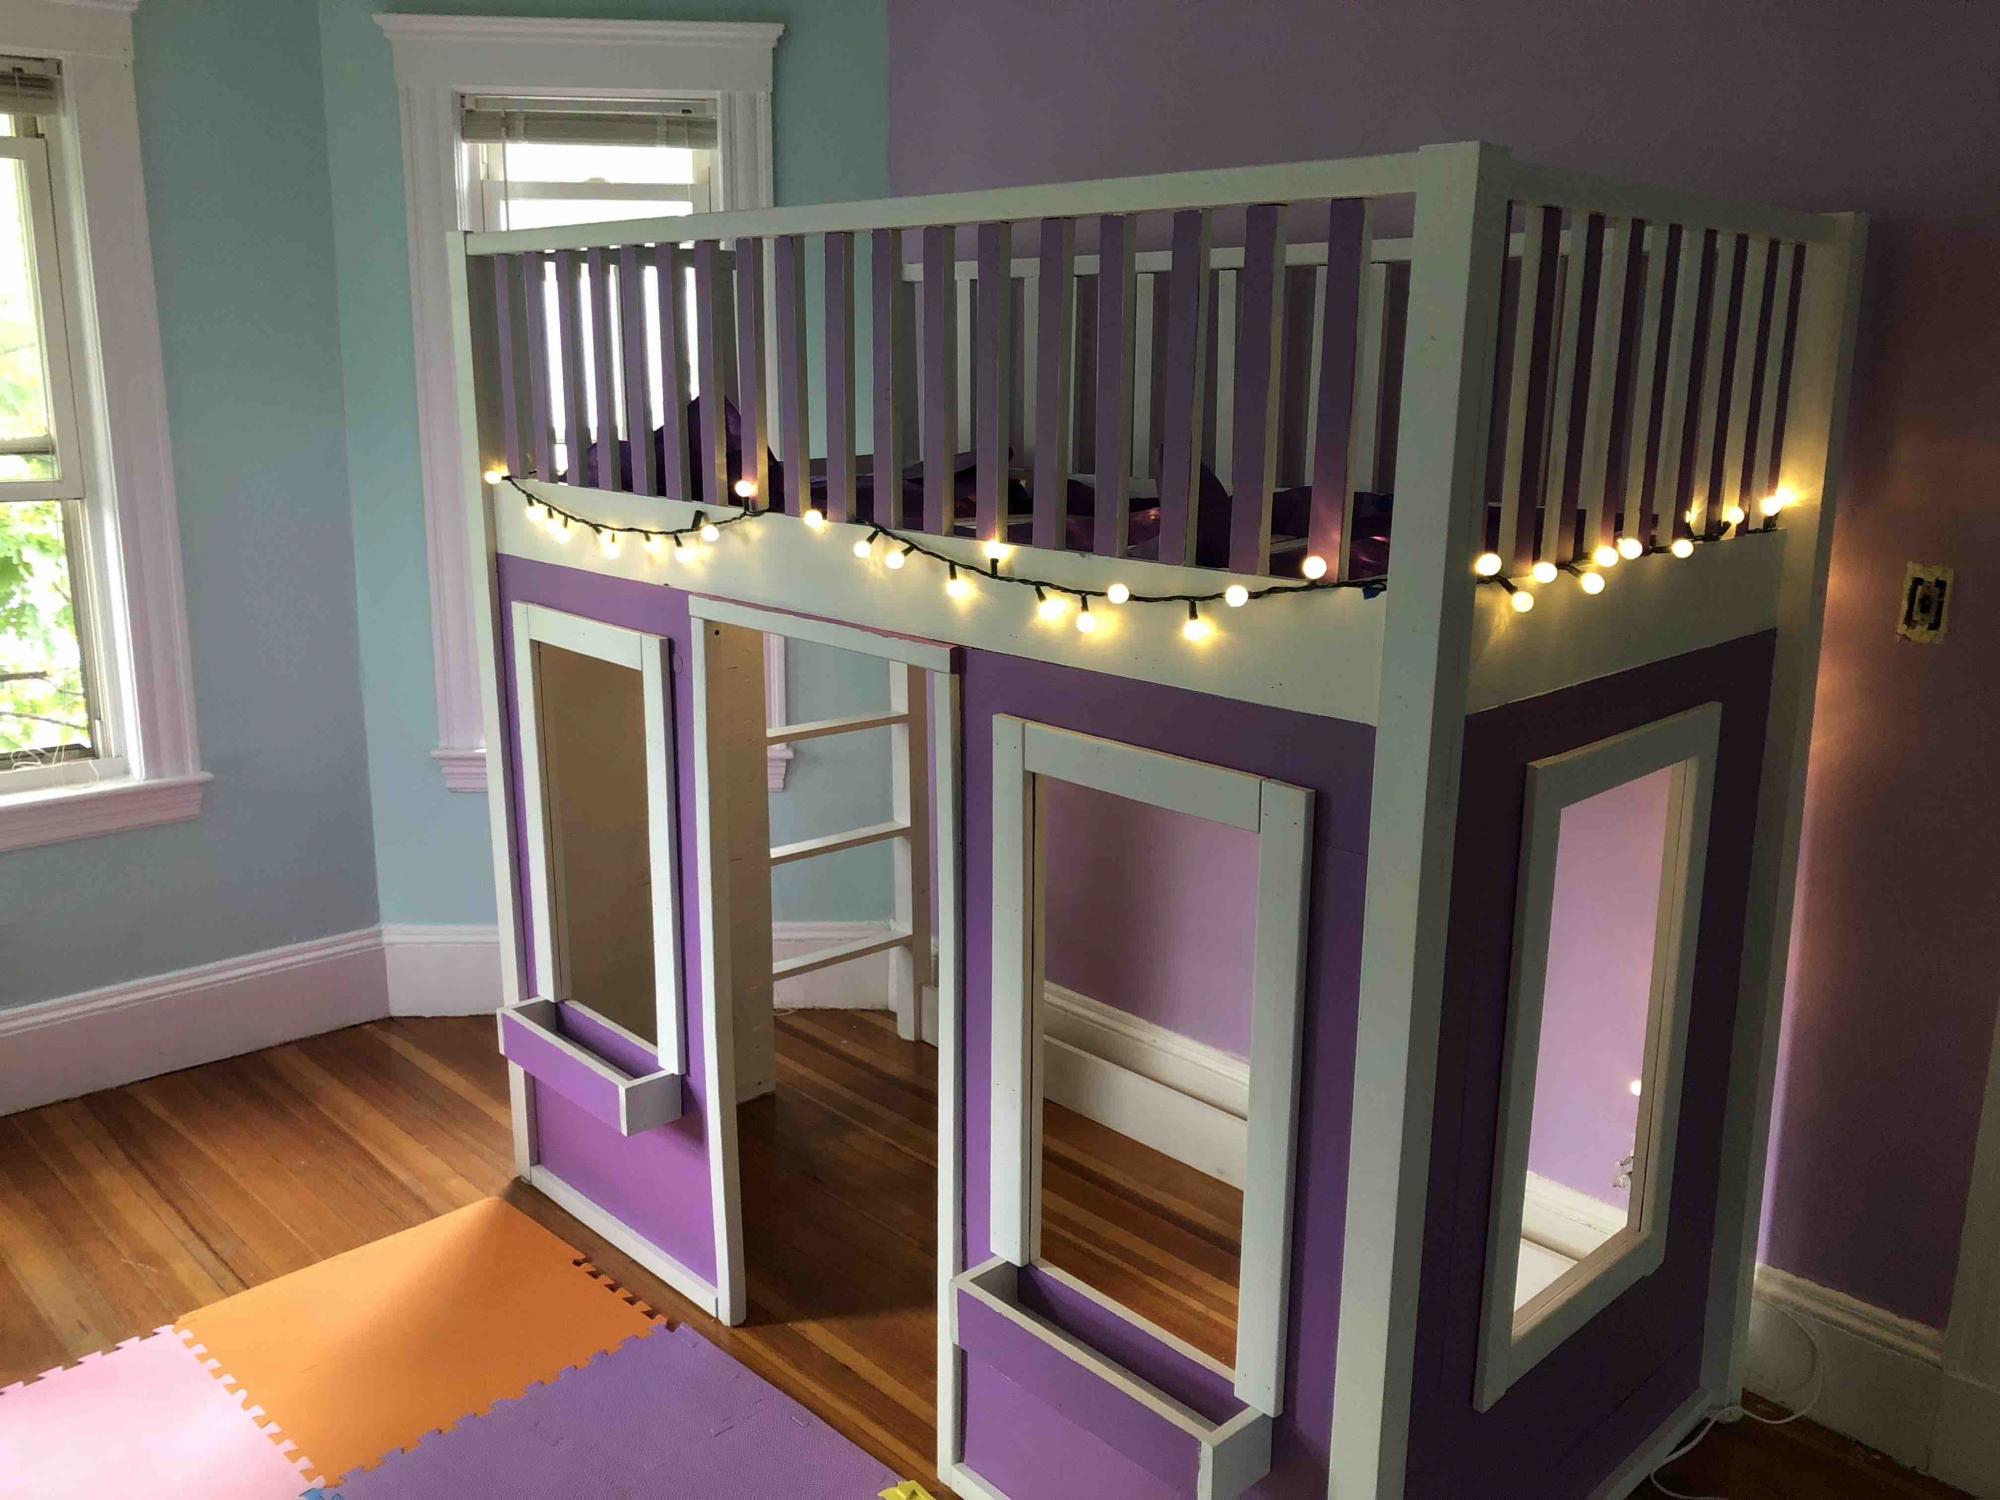
My daughter absolutely loves this bed, and everyone who comes over can't help but to compliment it. I was able to build it in 4 pieces in the basement then carry them up to our apartment and put them all together. It was not an easy build especially since I kept making little mistakes and had to go back and fix them. For example I did not use wood glue at first for the bars so after I screwed them all into place i relaxed they wobbled and twisted so I had to unscrew all of them, add glue and screw them all back in. But overall the instructions were pretty simple to follow and I am very happy with the way it came out.
Built from Plan(s)
Estimated Cost
$300
Estimated Time Investment
Week Long Project (20 Hours or More)
Finish Used
Chalkboard paint
Recommended Skill Level
Intermediate
Comments
Wed, 07/17/2019 - 10:15
Love this bed! The color is…
Love this bed! The color is great! Thank you for submitting your brag posts, we appreciate it!
Simple and fast
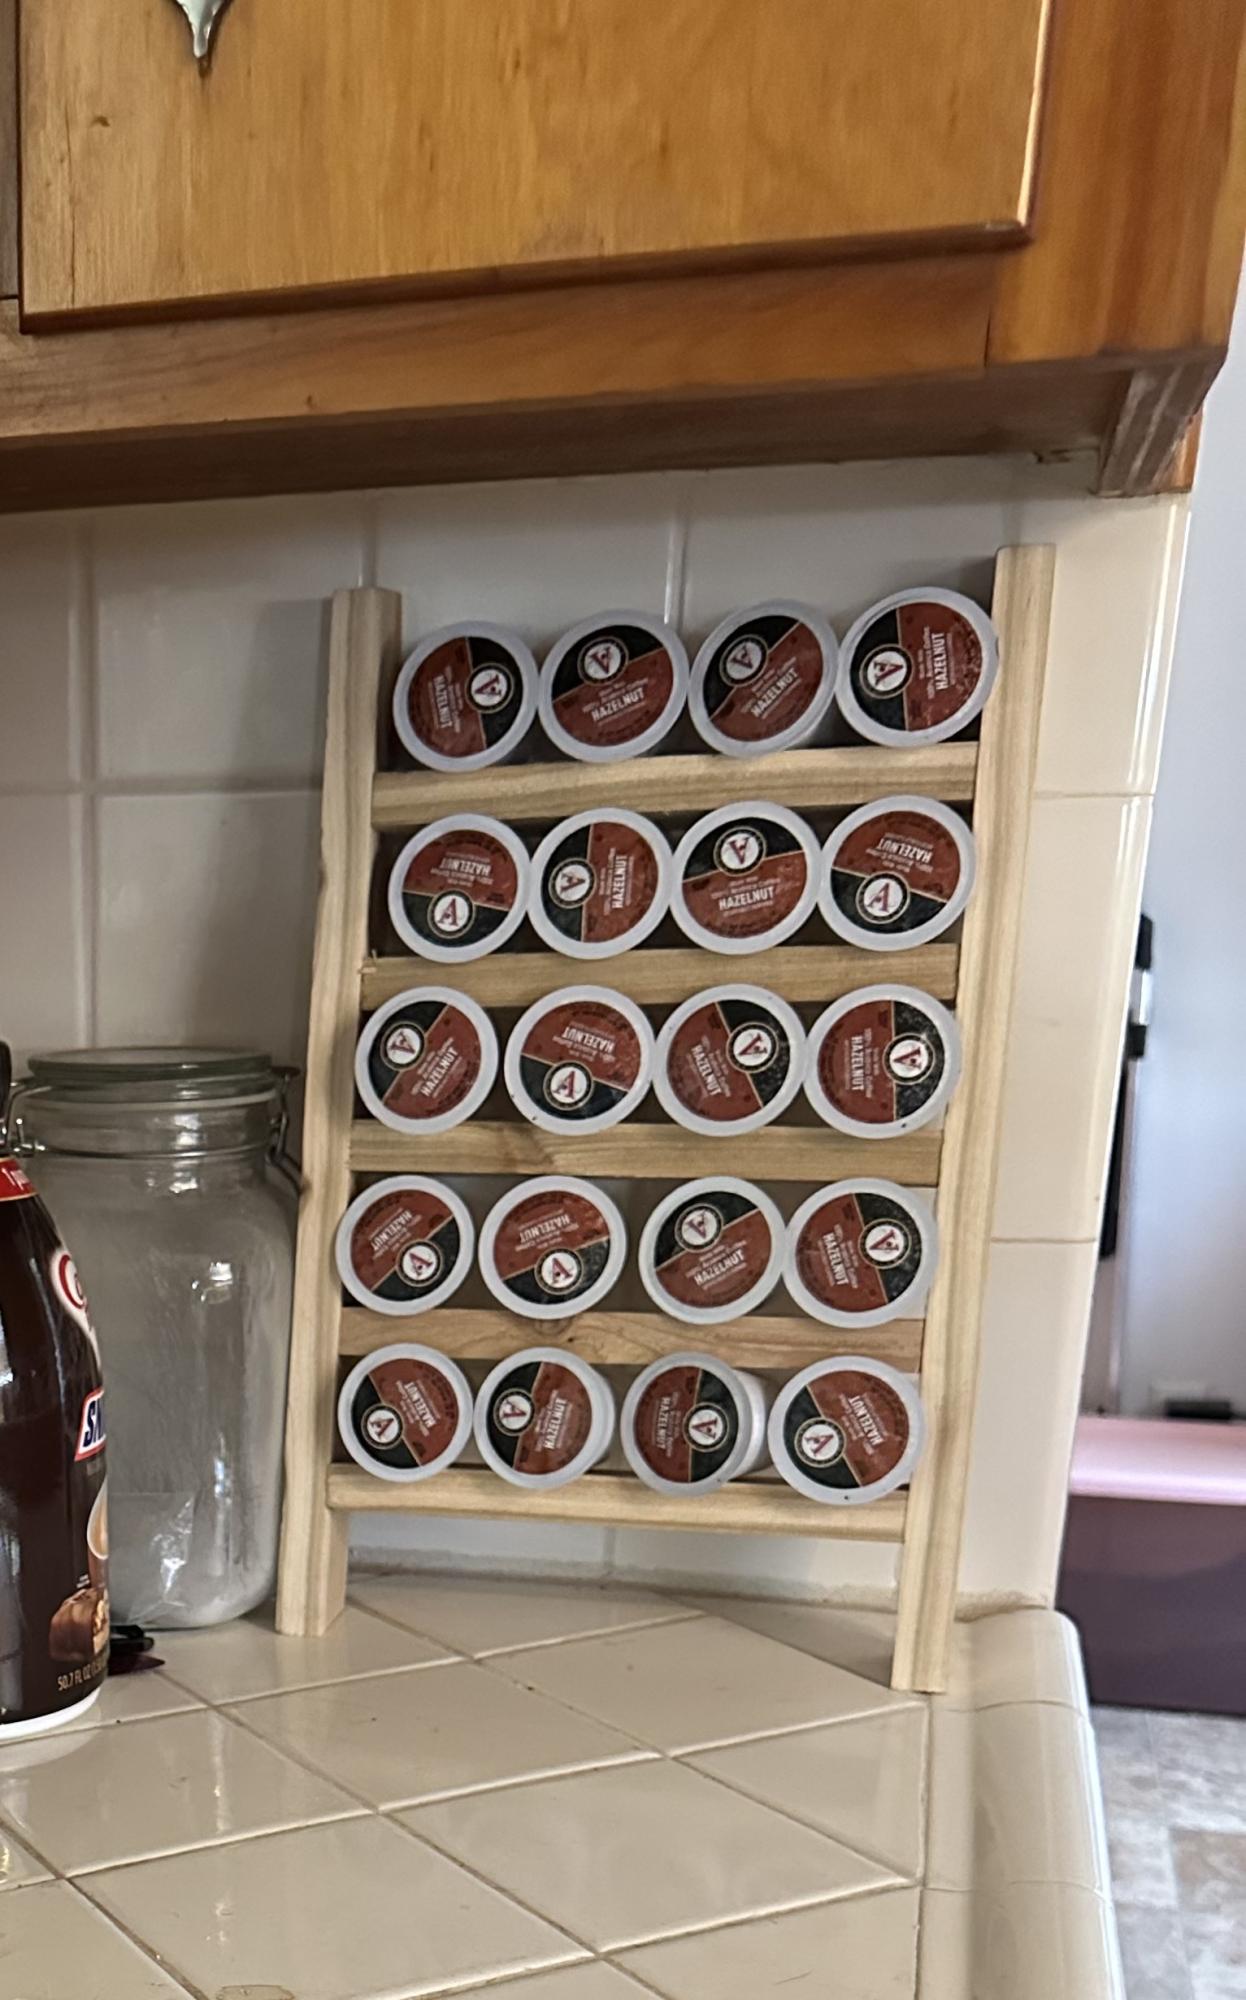
Took me maybe 30 minutes to put this together. Used 1-5/8 spacing, every other row is a little tight, but they work.
Built from Plan(s)
Comments
Claras Table and $4 stackable chairs sized for 18" Dolls.

I decided to make the Clara table and the $4 stackable chairs for my daughters for Christmas. They were not for them though but rather for their American Girl dolls. I had to modify the plans to work for standard 18" dolls.
The Table:
It is a little taller than it should be but it allows the doll to fit under the table/apron while sitting in an appropriately sized chair (5" seat).
I also changed the length from 18" to 15 1/2" so the cuts could be made from a 4ft board.
3 - 1 x 6 @ 15 1/2" (Top) (1 @ 4ft)
4 - 2 x 2 @ 10" (Legs) (1 @ 4ft)
2 - 1 x 3 @ 10 1/2" (End Apron) (1 @ 4ft)
2 - 1 x 3 @ 9" (Side Aprons)
The apron is 1 1/2 inches. a 1x2 would probably work for the aprons too. You could then shorten the table legs by about an inch.
The Chairs:
The over all dimensions are now 12" H (back), 5 1/2" H (seat) X 6" W X 6 1/2" D
Cut List:
2 - 1×2 @ 4 1/4" (Side Aprons)
2 - 1×2 @ 5" (Side Supports)
3 - 1×2 @ 4 1/2" (Front Legs and Front Apron)
7 - 1×2 @ 6" (4 Seat Slats, 2 Back Slats and Back Apron)
2 - 1×2 @ 12" (Back Legs)

Built from Plan(s)
Estimated Time Investment
Week Long Project (20 Hours or More)
Finish Used
White paint. I used some Valspar paint on the table and one chair then decided it would take too long to get all the cracks and crevices. On the other three chairs, I used Krylon Spray paint. I put two coats of the spray paint on the first chair for better coverage.
Recommended Skill Level
Beginner
Comments
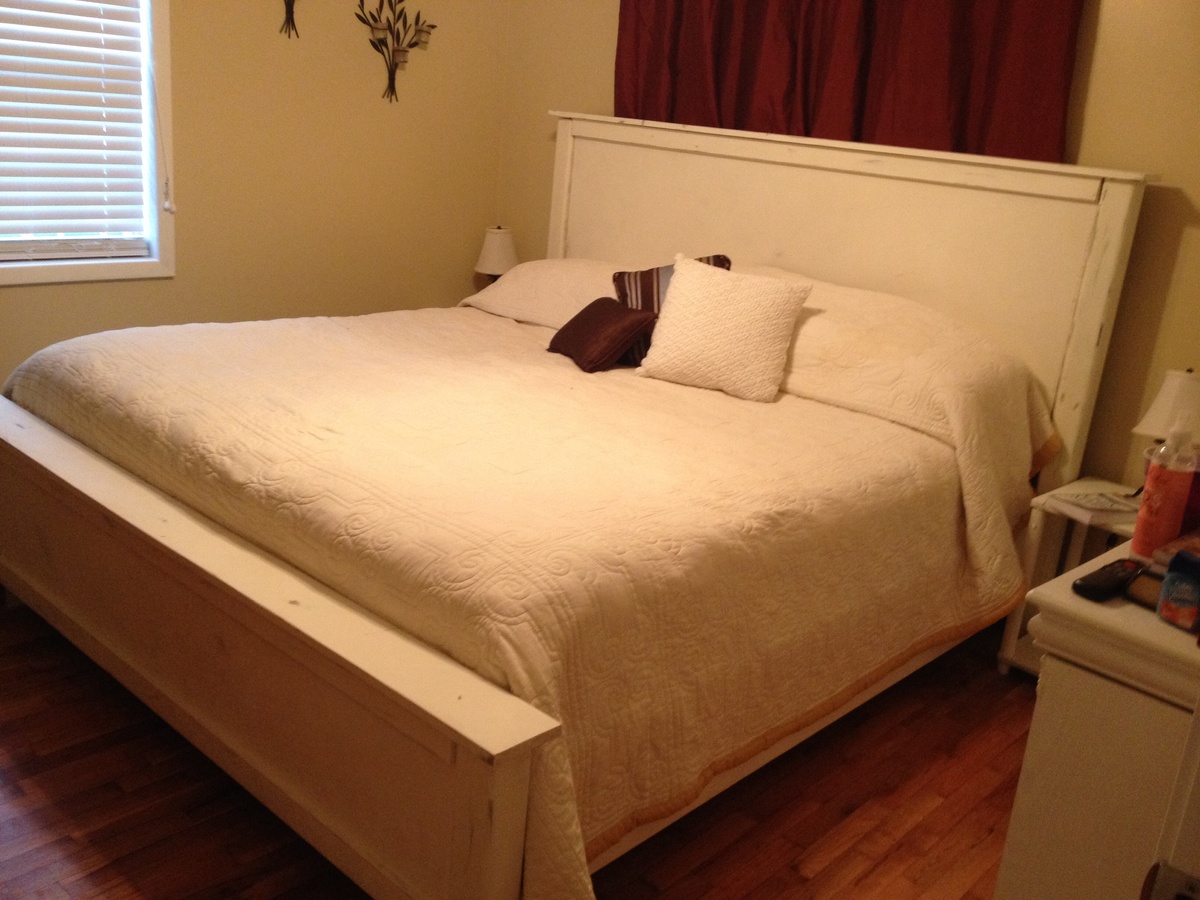
Storage Bench
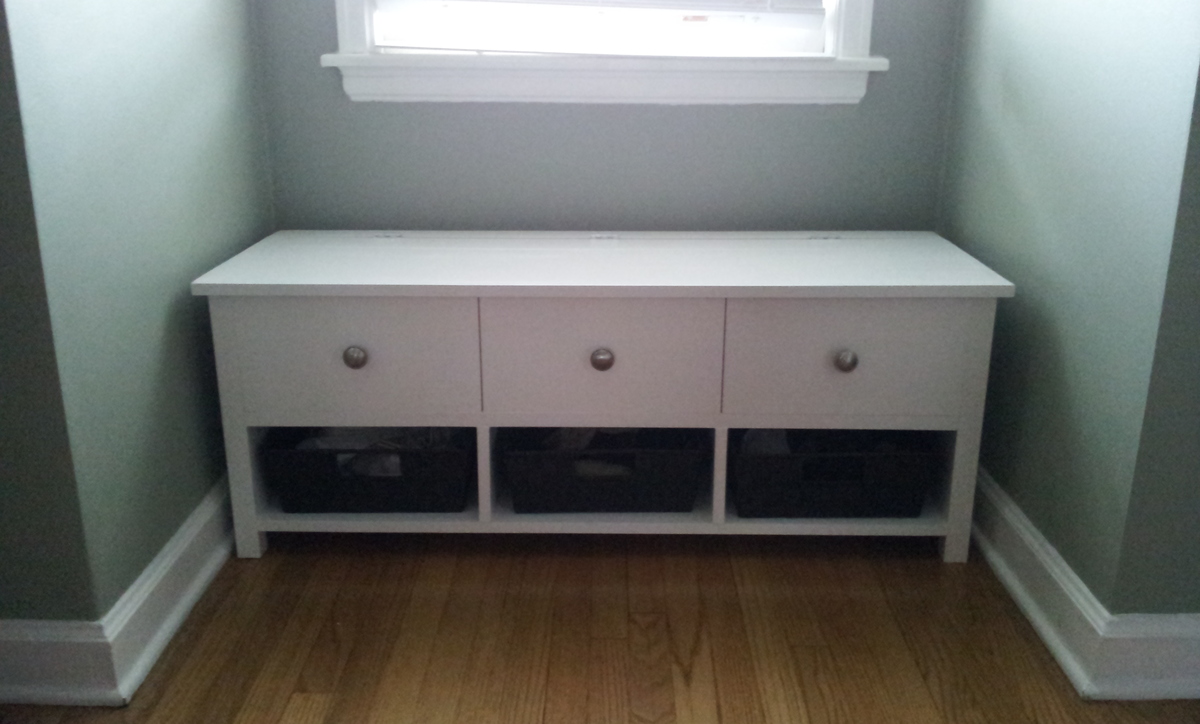
I followed the plans and everything went really well. Th bench was built to match a Farmhouse Bed and nightstand that I built. I added fake drawers and knobs to make it match the nightstand. The top of the bench is made from boards screwed together rather than plywood, to add a little character.
Estimated Time Investment
Afternoon Project (3-6 Hours)
Finish Used
White paint with a clear acrylic on top.
Recommended Skill Level
Intermediate
Comments
Salad bar with handles
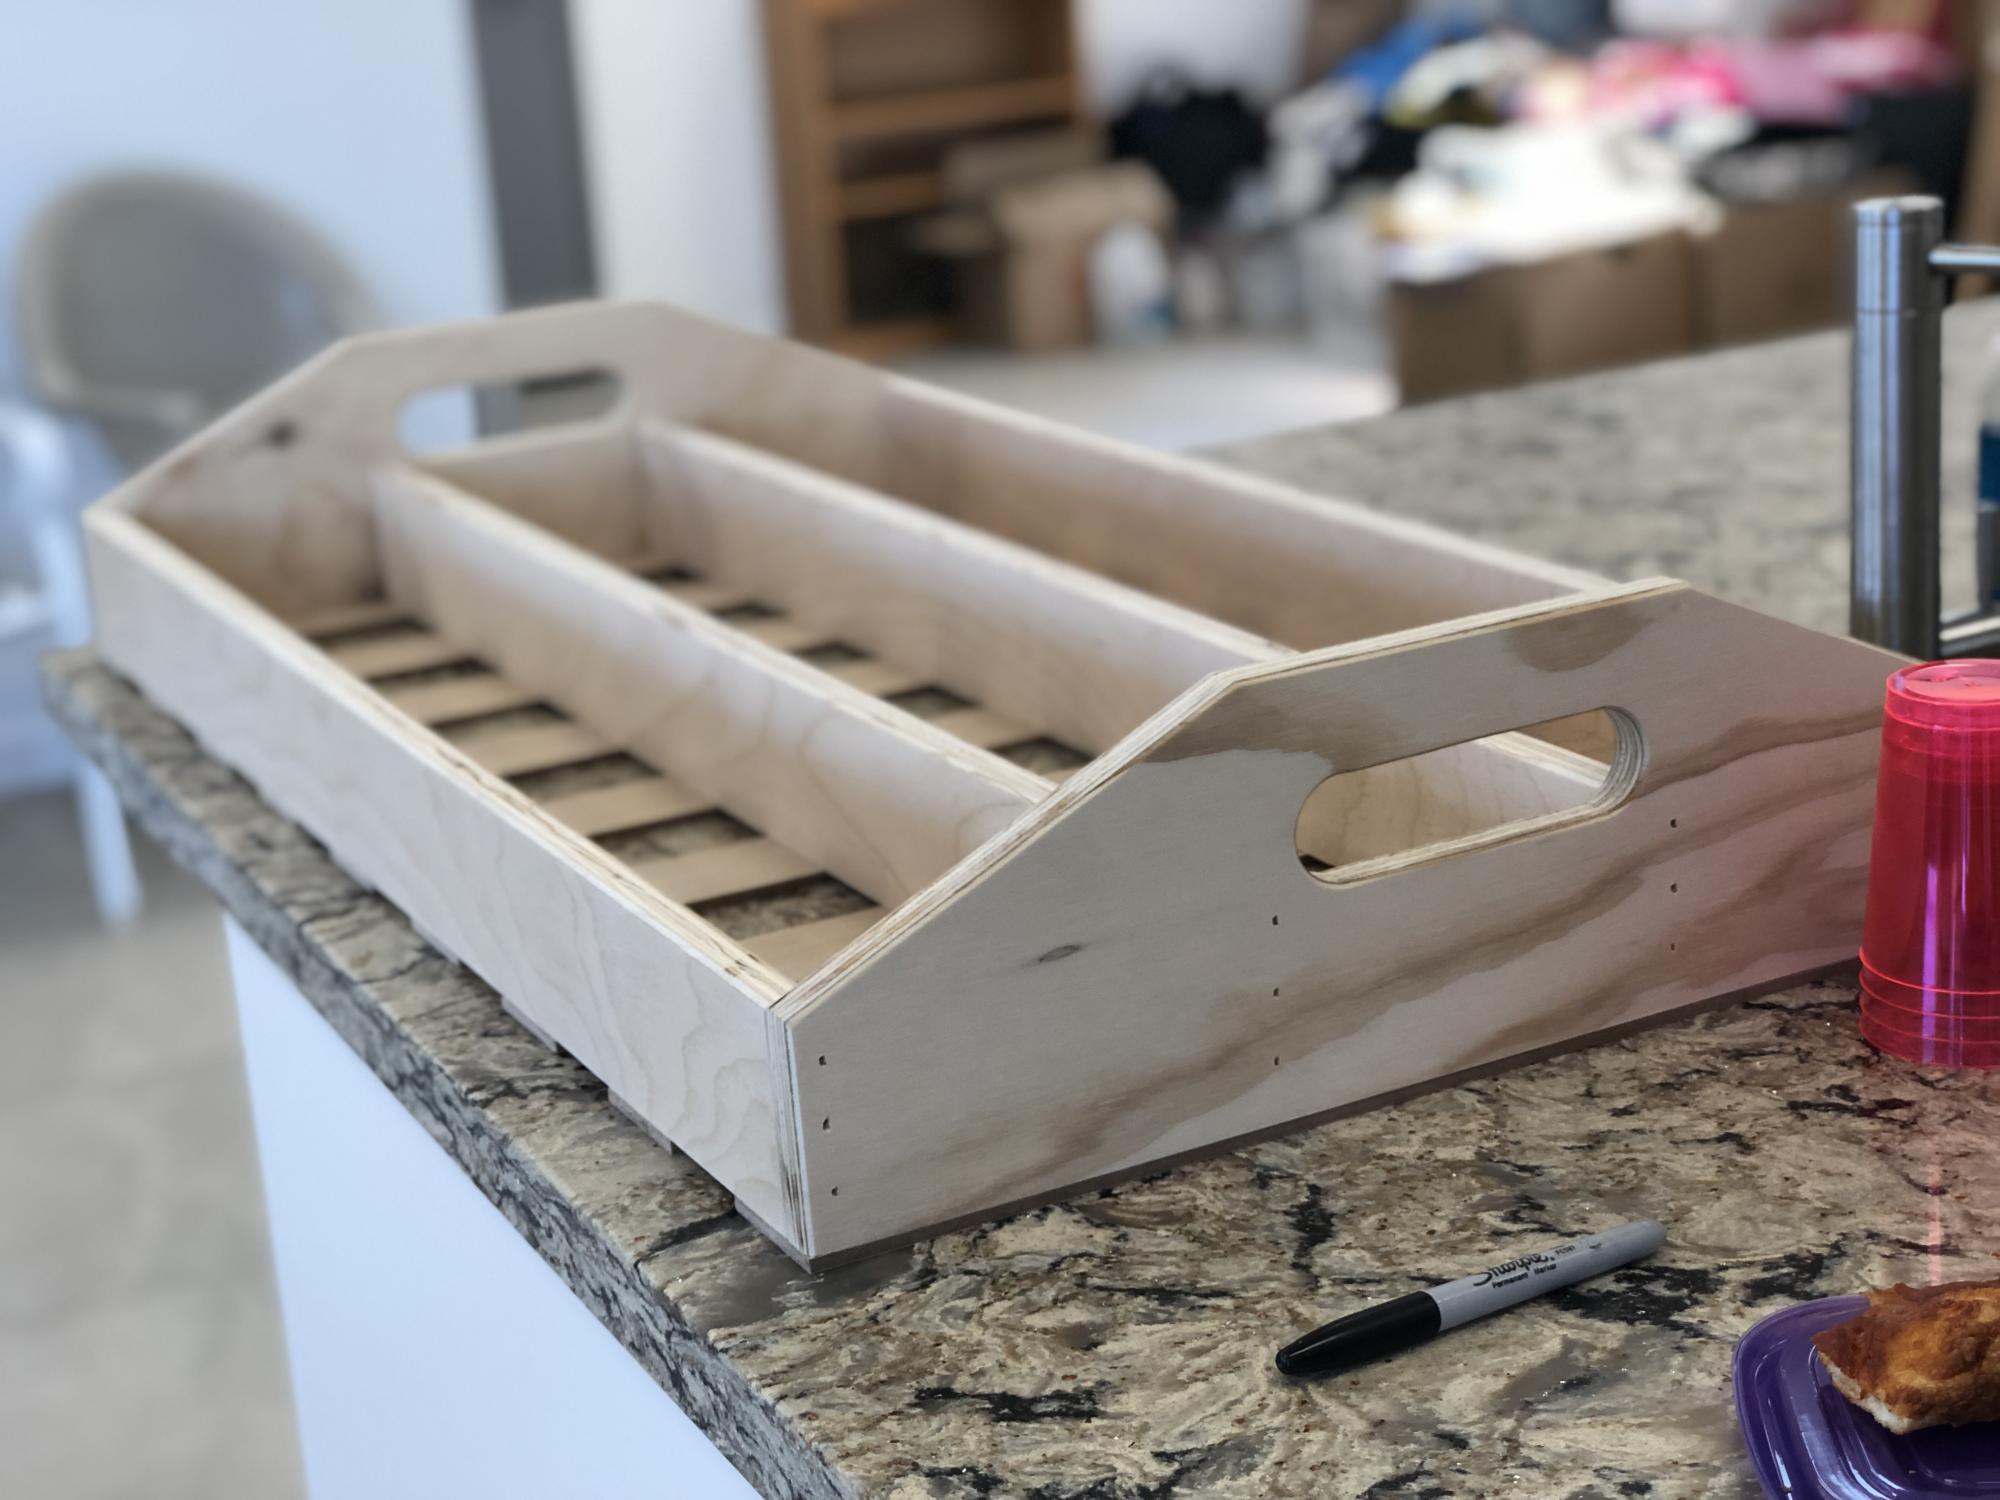
My husband made this with a few tweaks: taller dividers to be even with the sides, smoothing of edges, and handles! It was perfect for our salad bar and pizza party!
Estimated Cost
$0 (used scrap plywood)
Estimated Time Investment
Afternoon Project (3-6 Hours)
Finish Used
none, but we plan to use butcher block oil/sealer
Recommended Skill Level
Beginner
Comments
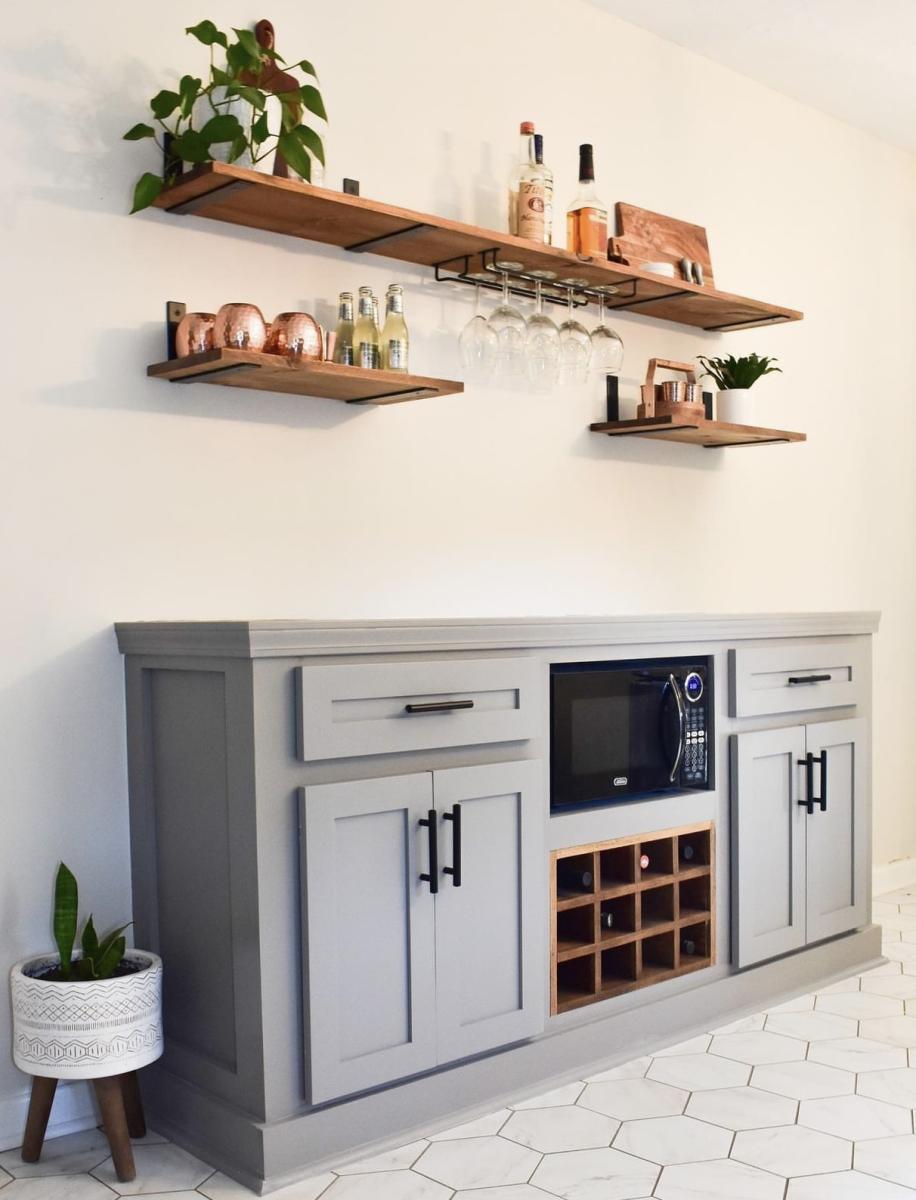
Sideboard Cabinet with Microwave and Wine Storage
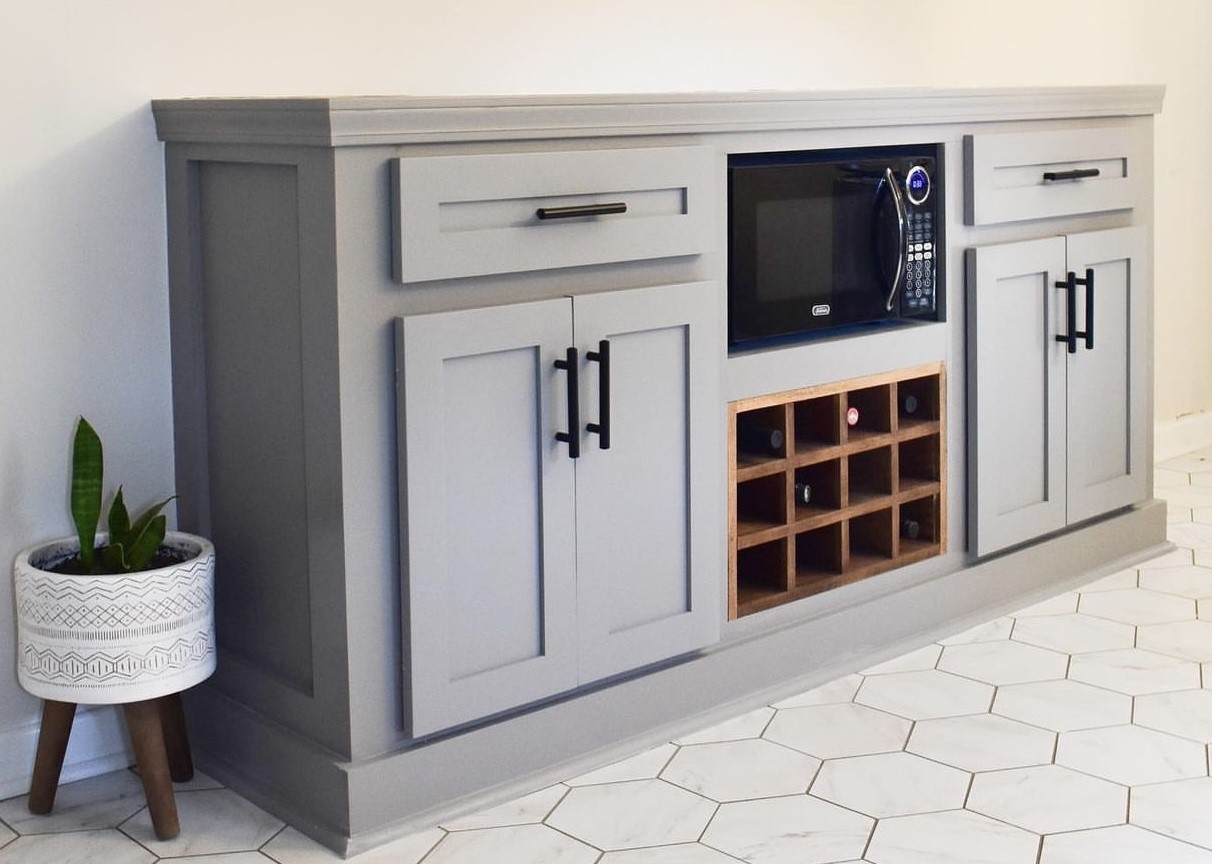
"I took a dead spot in our kitchen and designed it into a functional space that also added value to our home!
I built the frame using the sideboard plans by Ana White & Shanty2Chic. From there I designed it to fit our needs perfectly."
Built from Plan(s)
one more farmhouse doll bed
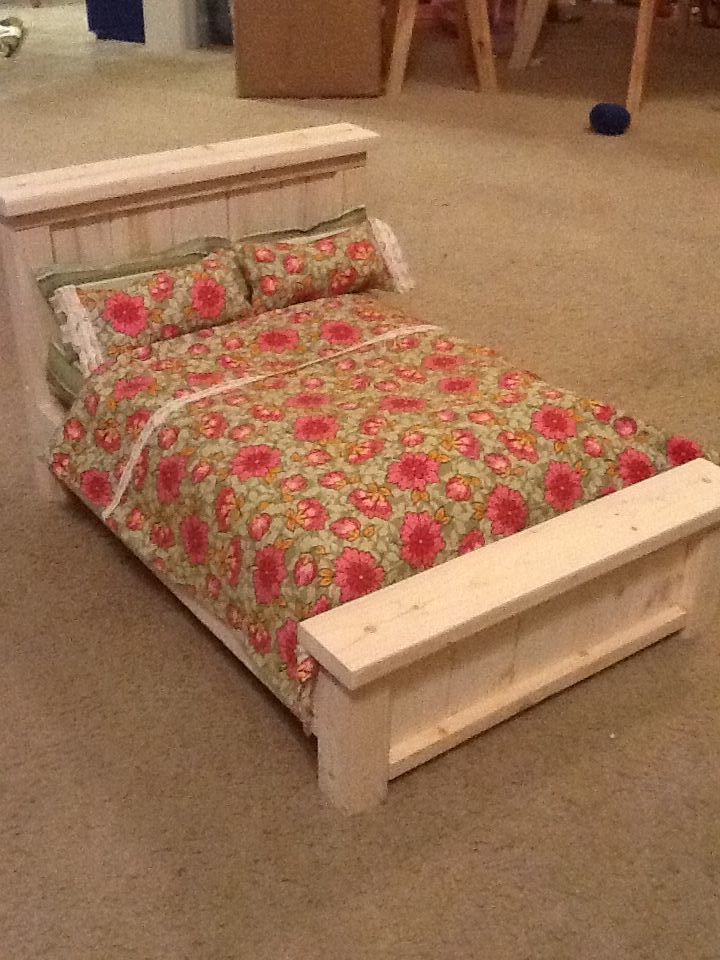
A cooperative project. Hubby made the bed and I did the bedding.
Estimated Cost
$10
Estimated Time Investment
Afternoon Project (3-6 Hours)
Finish Used
going to paint it white
Recommended Skill Level
Beginner
Comments
Rustic End Table
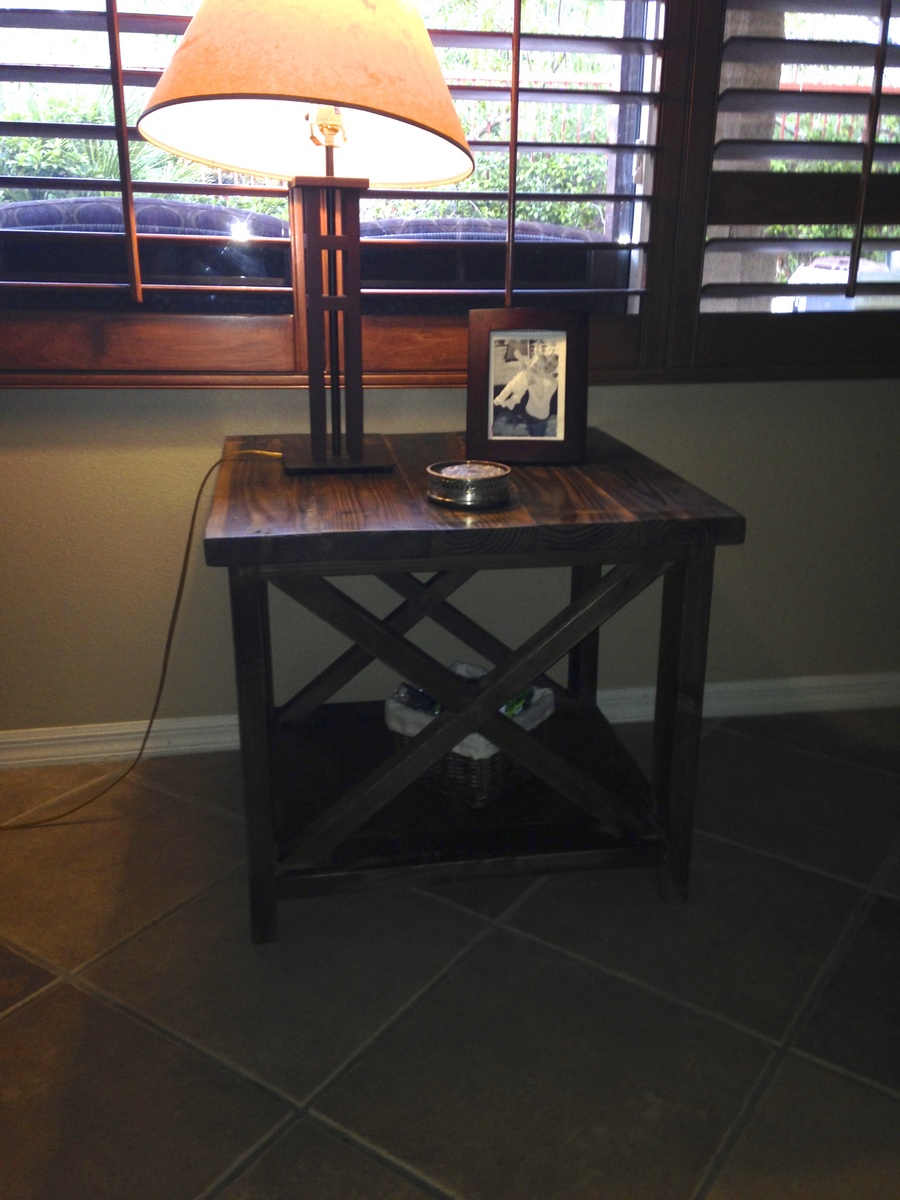
Fun quick project!
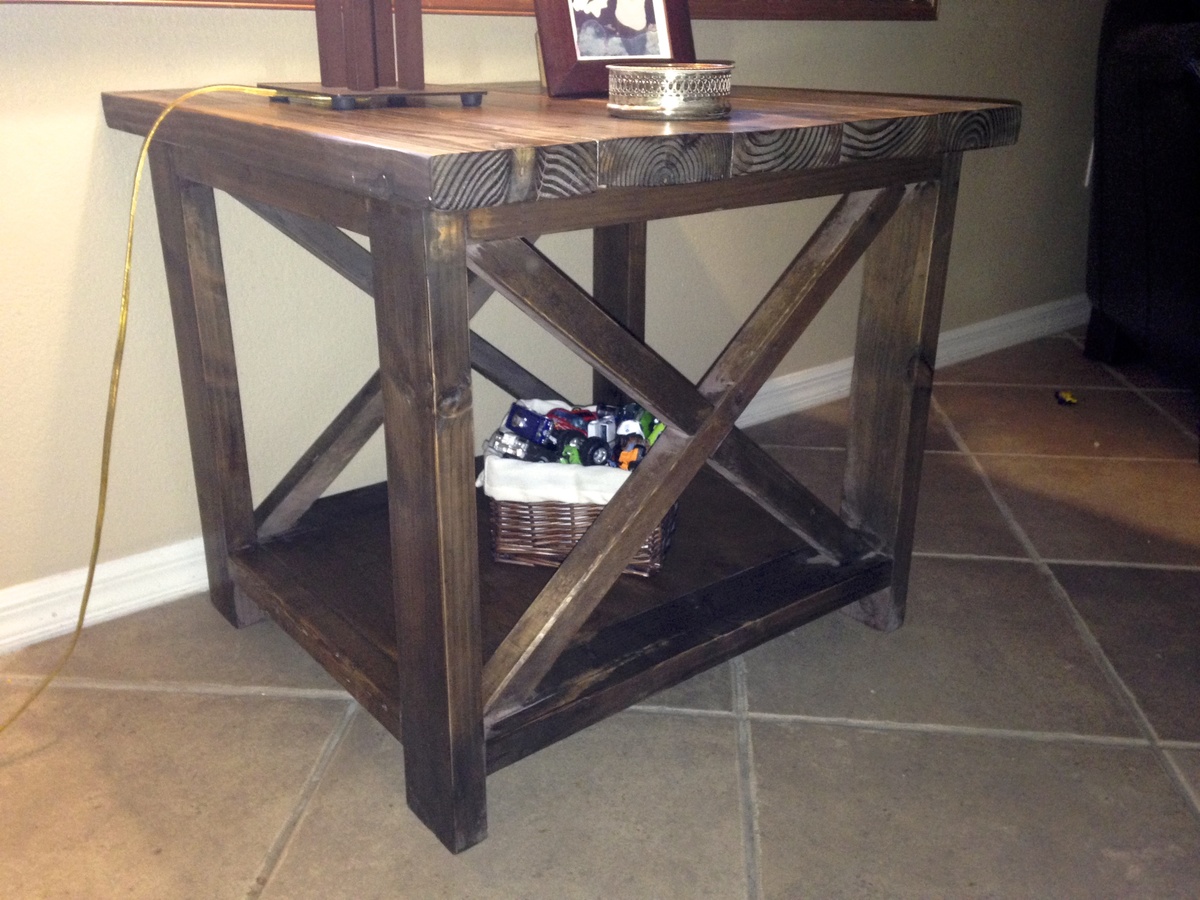
Built from Plan(s)
Estimated Time Investment
Day Project (6-9 Hours)
Finish Used
Steel wool and Vinegar mix, then a dark brown Briwax
Recommended Skill Level
Beginner
Pottery Barn Inspired Dresser
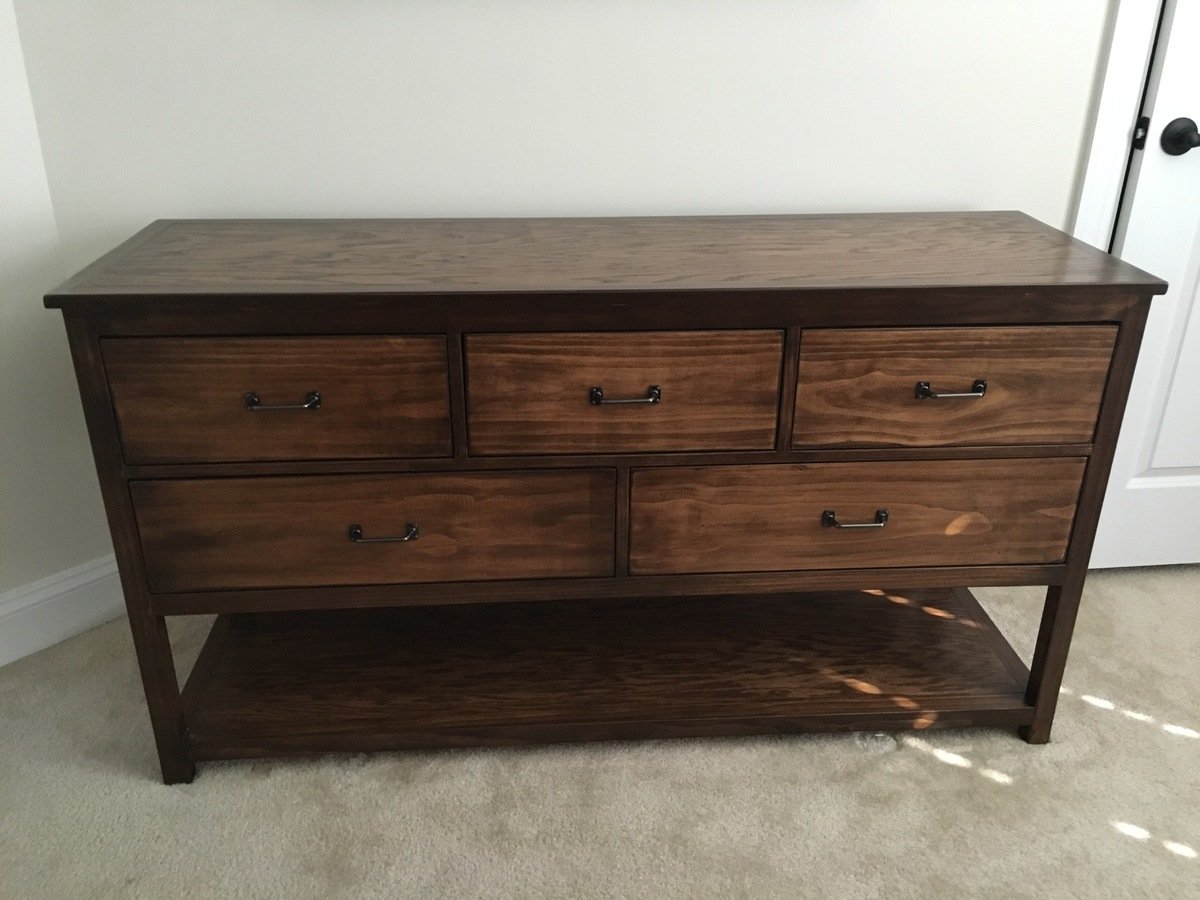
My husband built the dresser for our three-year-old son. He built and stained the dresser over the course of a week.
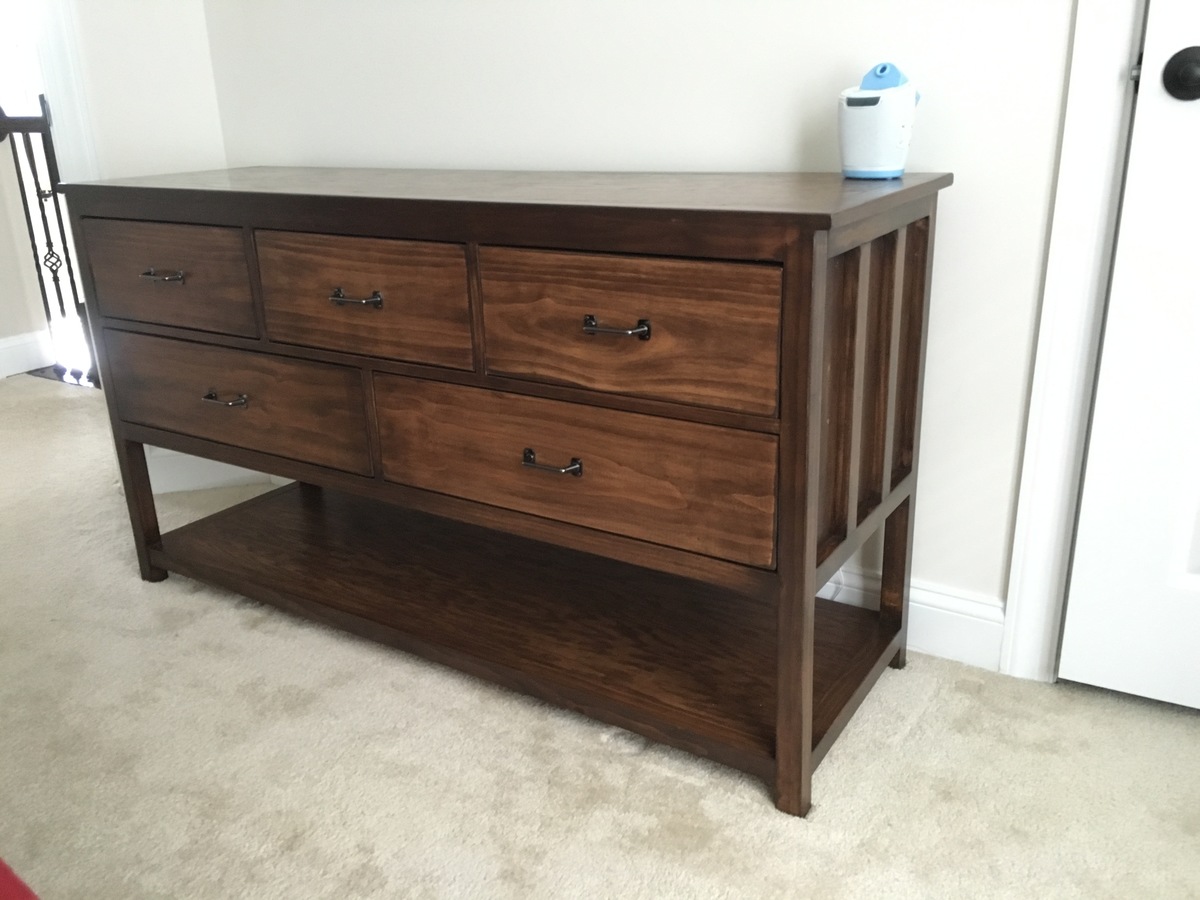
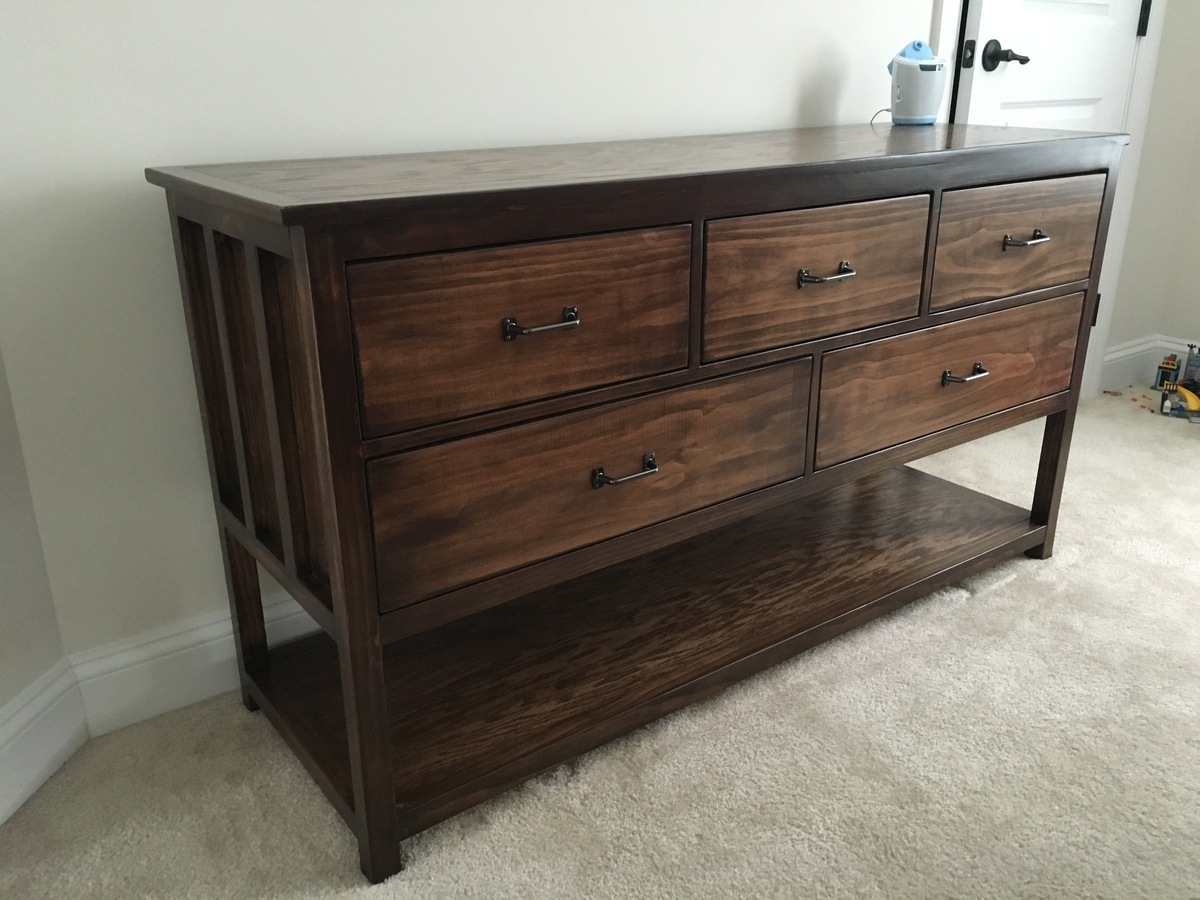
Built from Plan(s)
Estimated Cost
$300 including slides and pulls. We used select pine which increased the cost.
Estimated Time Investment
Week Long Project (20 Hours or More)
Finish Used
Dark Walnut Stain. The drawers took more coats to match the frame and still ended up slightly lighter than the rest of the dresser.
Recommended Skill Level
Intermediate
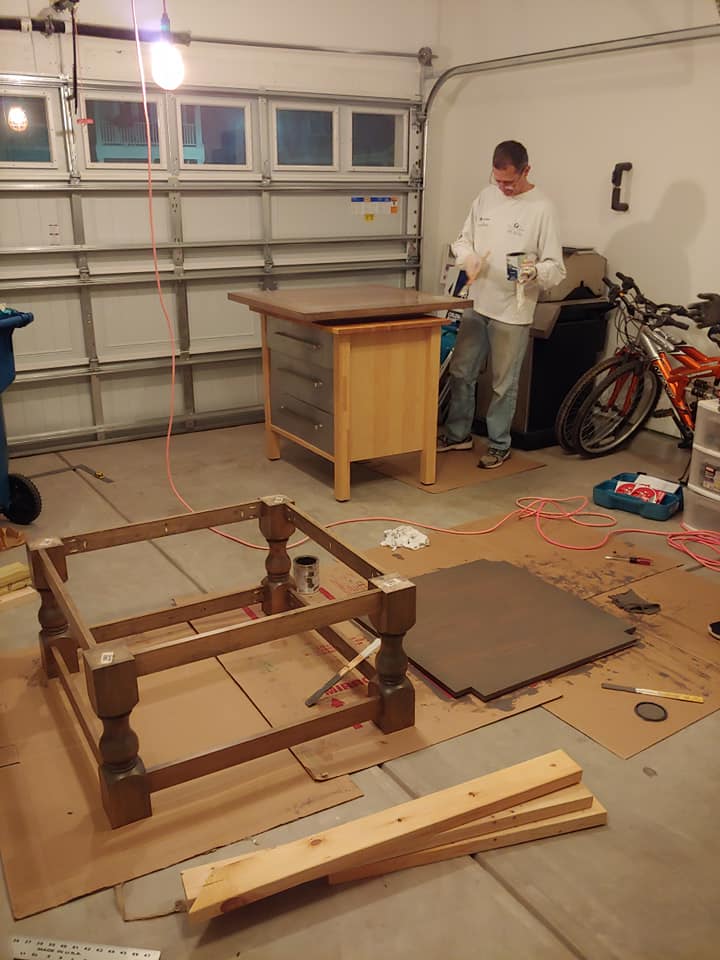
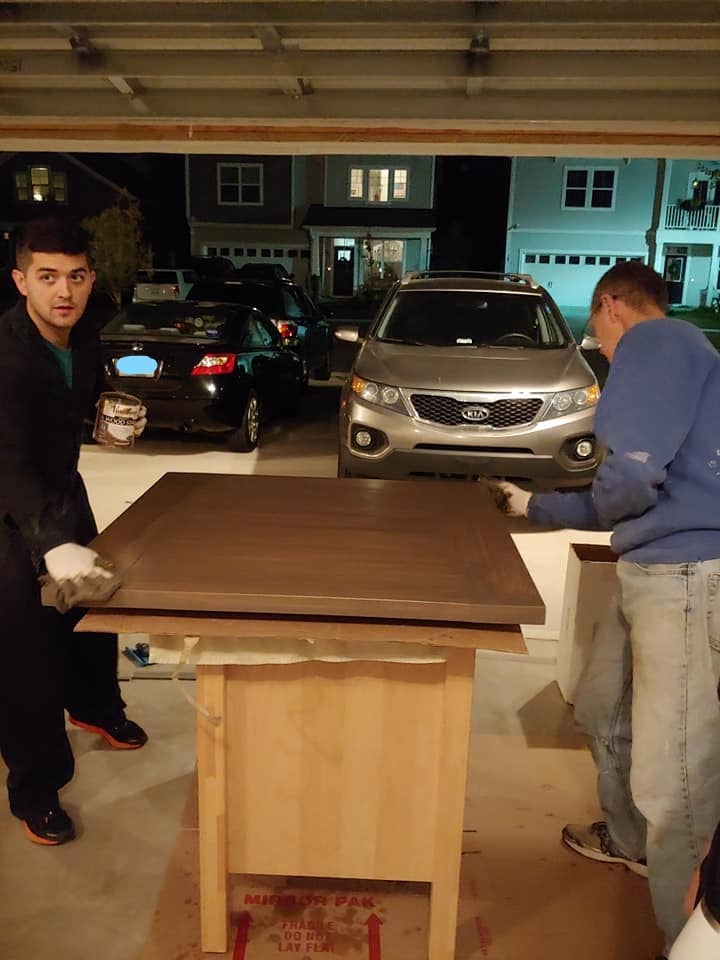
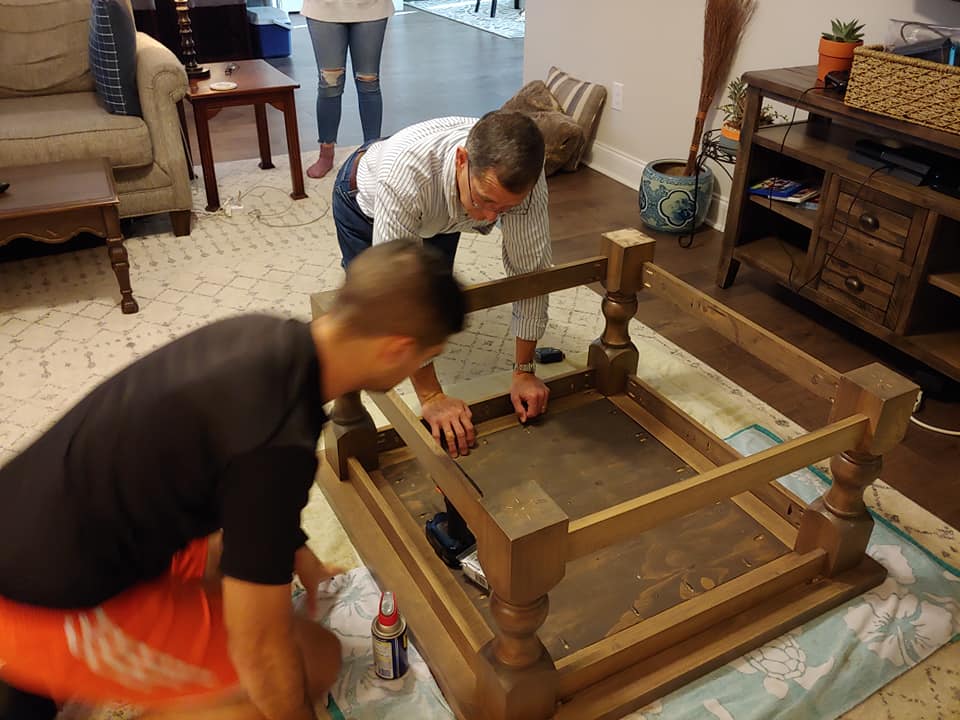
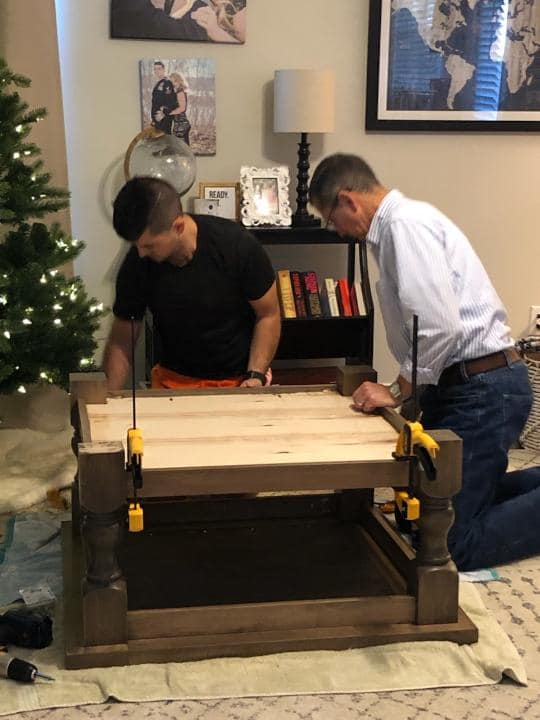
Corona Coffee Table - Square
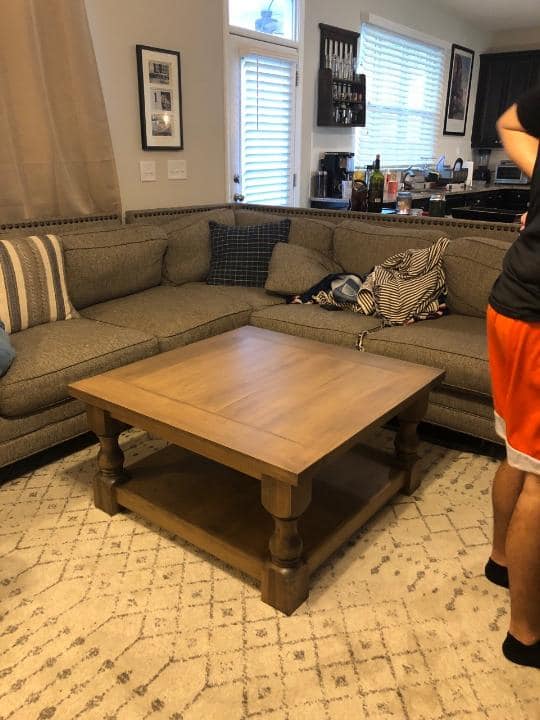
Built this table out of solid Maple, which made it much more expensive to build, but such a beautiful piece of furniture. I bought the legs from Osborne Wood. One thing I did to cut down on cost was to use 1" X 6" wood for the 5 center table-top boards instead of the 2" X 6" called for in the plans. Underneath those, I put a piece of 3/4" plywood to increase the thickness to match the (4) 2" X 6" outer edges. This is not visible unless you climb under the table to look at it from underneath but I think it actually helped to create a flat (almost seamless) table top. Thank you for the plans! I put a lot of work into this piece and I think it will remain in my family for generations!

Built from Plan(s)
Estimated Cost
$700.00 (
Estimated Time Investment
Weekend Project (10-20 Hours)
Finish Used
-3 coats of Varathane Stain (the color is Briarsmoke)
-2 coats of Varathane Polyurethane (Matte Finish)
-2 coats of Varathane Polyurethane (Matte Finish)
Recommended Skill Level
Intermediate
Comments
Lila Archer
Sun, 01/24/2016 - 18:27
love it
Pretty awesome looking coffee table!!!