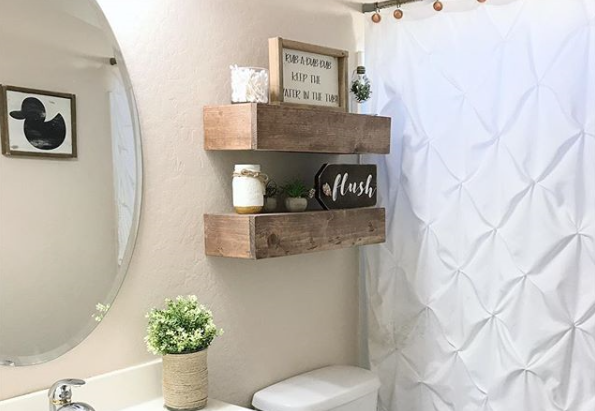
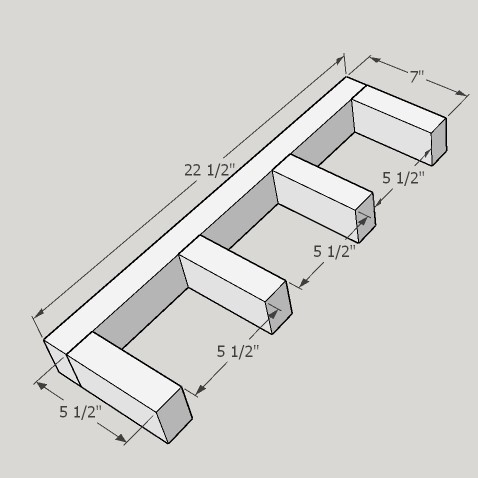
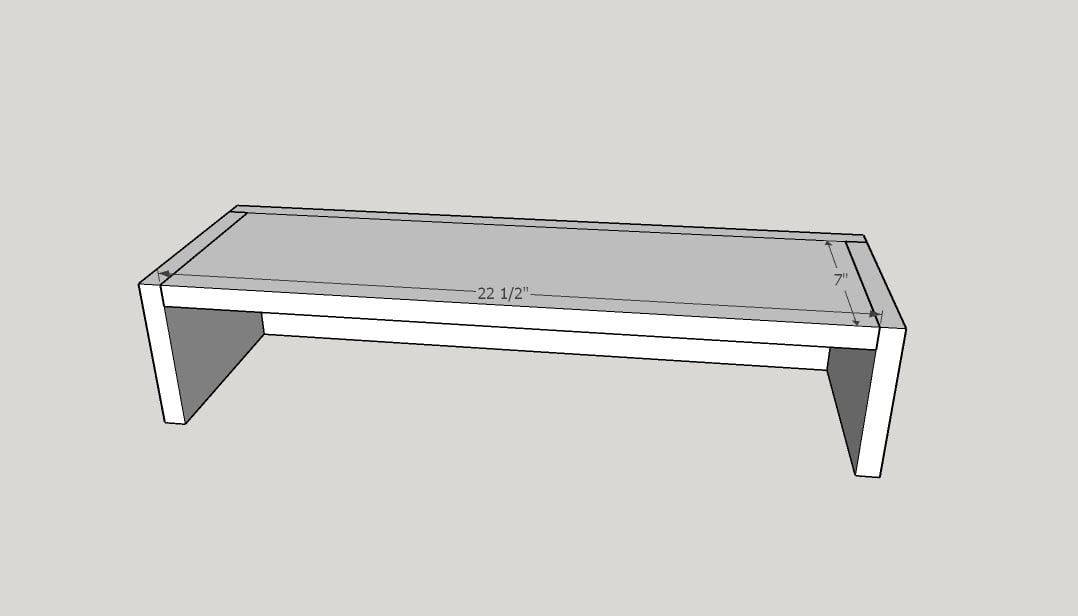
Chunky Floating Shelves
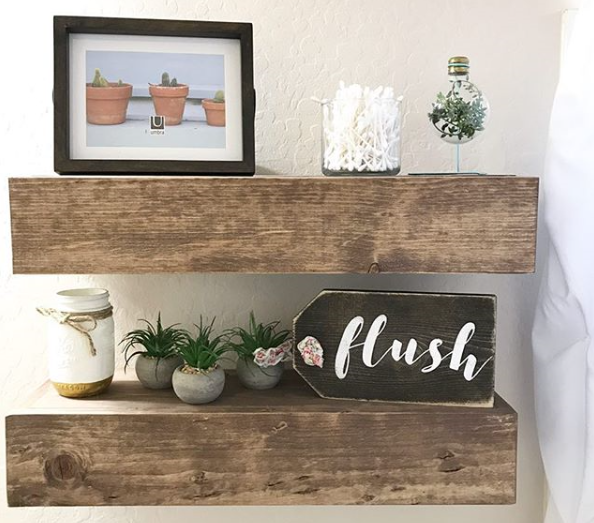
I built these floating shelves to put in my kiddo's bathroom. They come together easily and add a ton of charm to his bathroom! These are a great beginner project.
We wanted a new bed - but couldn’t find exactly what we wanted. Then I came across your plans & my husband just ran with it. I’ve gotten tons of compliments too.
My husband and I took the Narrow Farmhouse Table and modified it for a school table for our children. We used two old doors we had left over from remodeling our 1925 craftsman home. One door is the top, and the rest is lumber culled from the other door. A fun, free, one-day project.
Sat, 07/16/2011 - 08:17
Did you put a glass top on this to make a flat surface? I was thinking that the recess in the center would make a good place for displaying artwork, etc. under glass.
In reply to Did you put a glass top on by Pam the Goatherd
Sat, 07/16/2011 - 13:24
Yes, the kids will be using the table for school, so we needed a flat surface. The inset from the door will have all kinds of fun things placed in it throughout the year!
My husband tackled the Fancy Farmhouse Table and finished it in 1 weekend and it looks amazing! I could not be more thrilled with the outcome.
This was a pretty easy build! I changed the plans a little bit by adding ventalation holes and the way the cubbies conntect. I wanted to be able to easily take apart the bed if I need to so I built a track system that the middle support sits on and locks in place.
I made this for a friend who has two little ones that are less than two years old. Although I enjoy the ease and convenience of the Kreg jig, I wanted to try something more difficult for this. So for the sides I used mortise and tenon joinery for the ladder rungs and top arches. The only screw I used we to place the hinges and attach the feet. I also didn’t like the gap in the platform that would have been caused by my 1x8 actually only being 7.5 in wide, so I made my own platform by joining the edges of two pieces of wood (one was 11 inches and the other was 6 inches wide). After clamping and lettting the glue dry, I trimmed up the platform to size. Due to the modifications the project took well over 20 hours, but was a fun challenge.
I built the two piece sectional + table and adjusted the sizing so the lengths of the sectionals pieces are the same.
Turned out amazing. So much fun building this and I can’t wait for my next project!
I already made the stack-able chairs for my daughter, but she was using an end table for an art table and her chairs would not fit under it. I took the old legs and frame off of the table and built the clara table frame. I kept the original table top. I then spray painted the legs black and for the top I used chalkboard spray paint which I found at Michaels. She now has a fun table that can be used for art projects and she can draw right on it. The before photo below shows the original table. I took the spindle legs, painted them different colors, and I will be using them for a bench to go with a new dining table I am building.
I modified the plan by using a hardwood plywood 4X8 sheet cut down to a 72" by 28" size. I put hardwood trim around the edges for a smooth appearance. I stained the top with a Minwax poly shield oak finish and painted the base using a glossy enamel paint "Inkwell" from Sherwin Williams. The seamless top makes for a better writing surface.
This was my first build and I haven't stopped since!! Thank you Ana White for your inspiration, building plans and encouragement!!!
This was a super fun build for me! I have been wanting to do it for a long time, but was a little intimidated with the hardware. I bypassed the expensive kits you see online and built my own from aluminum flat bar, carriage bolts, and sliding door pulleys. I am very pleased with the overall project and wish I would have done it sooner! Shortened down to 6', and I opted to make 3 "openings, with the middle being the same as the outers, doubled, to insure the doors matched up.
Wed, 10/10/2018 - 11:11
This looks awesome! Your DIY barn door hardware turned out really well! Thanks for sharing a photo!
In reply to This looks awesome! Your DIY by Ana White
Thu, 10/11/2018 - 10:41
Thanks Ana! I appreciate that! Thank you for all you do on your site, I absolutley love it.
This was our first build project! We spent the most amount of time picking the color than we did on the actual assembly. We extended the back 2 legs 36 inches to accommodate the window frame and shelf.
Mon, 07/25/2011 - 09:02
This is beautiful! I have a garage full of these windows and I have been trying to figure out things to do with them before my husband decides to throw them out.
This project was so fun! I made it to blend in with a tree house I built (adapted from Ana White plans). The top of the stool was the best part. Full details on my blog.
Thu, 08/22/2013 - 13:34
This is super cute and so creative! I looked at the tree house on your blog, just made me say Wow!!!!
This was my first real project from start to finish. We bought rough lumber from The Home Depot. Between having a toddler, tweenager and a life it took about a month of sporadic work but it was a great bonding project for my husband and I. Guess the overachiever in me should have seen that one coming, I wanted have the full experience of jointing our own wood. I learned a lot and had a lot of fun working with the table saw, miter saw, jointer, and kreg jig, all of which my husband already owned. I did not use any glue on this project simply because I wanted to avoid the mess. The best part about this project was the easy measurements..I'm not too good with the confusion. It made it so much easier when cutting, specifically the 45degree angles.
I'm a student at a local votech. Built this for a neighbor.
I used the Farmhouse Bed Plans and a picture posted on the FB page to get the look I wanted. We have a split king adjustable bed and needed the bed to allow the mattresses to adjust up and down at the headboard and footboard. The actual opening for the bed is 82X82. I used birch plywood for the main panel on the headboard and footboard and trimmed it with 1X4's, 1X2's, cove & chair rail trim. The headers are 2X4's and 2X6's. I tapered the untreated 4X4 posts which I found at our local store. For the sides I used 2X12's and raised them to allow extra room under the bed for storage. I used lots of wood filler, sanded for a whole day, applied wood conditioner and used a gel stain. I made the mistake of not wiping off the first coat of stain because it looked so good. After I applied the second coat it was too dark and showed brush marks. When it isn't so humid outside, I plan to sand it down and re-stain. I'll also apply a protective top coat at that point. I did purchase bed rail brackets online and they provide a nice tight fit.
Mon, 08/01/2011 - 07:37
This is amazing! This is exactly the look I want when I make my King Bed. I love the geometric look with the trim on the headboard and footboard but the traditional look that the trim around the top gives. It makes the bed a little more modern versus rustic. I Love It!
I made this for my 6 year old who just started the first grade. The only modification I made to the plans was to make a couple cutouts in the hutch for cords. I also added cork which comes in a 24 by 48 inch roll.. I ordered all the hardware from the same place that Jaime from That's my Letter suggested in her build post. This was my first drawer and it was intimidating but it was fairly easy and cute as it can be:-) The plans were very easy to follow! I got the idea for the peg board organizer from the Shanty 2 Chic website. It's just 1x4 frame around the pegboard. The chair was a craigslist find I painted and made a cushion for with some foam and cute fabric. I'm really happy with how it turned out and look forward to the day when my daughter will actually use it. LOL
Mon, 08/26/2013 - 07:39
Absolutely adorable! I love all your finishing details as well.
I went with inset doors with chicken wire instead of the sliding barn doors, and I added an additional shelf.
Thanks for these plans! Worked perfectly. One day build.
Once I saw the plans posted I knew my daughter would love it and she does!! Every time she goes to bed she has to put her babies in bed too. This was a simple build but very rewarding. THanks Ana!!
Built 2 of these for a customer. Stained with Rust-Oleum Dark Walnut and finished with Rust-Oleum Satin Ployuerethane.