Community Brag Posts

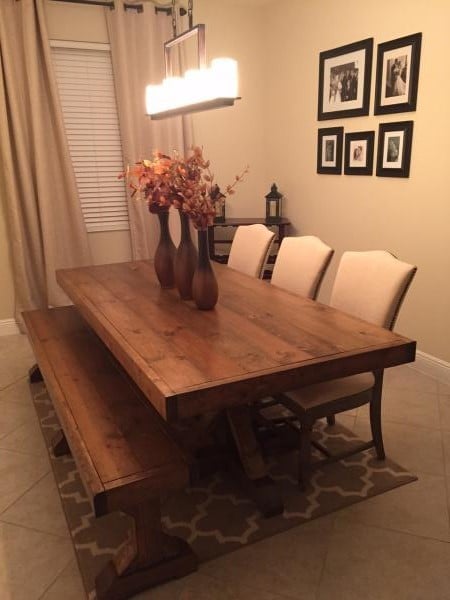
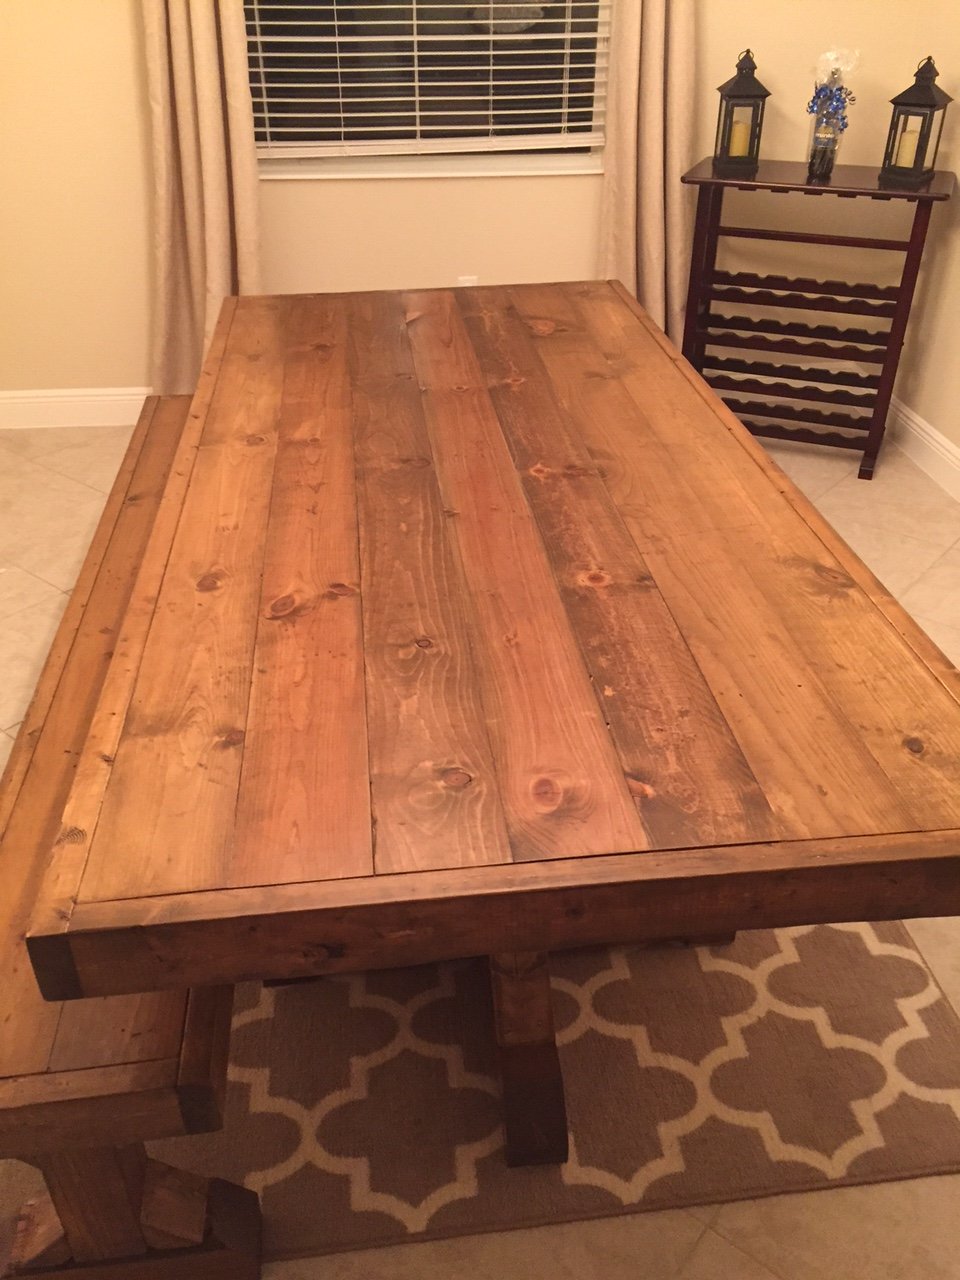
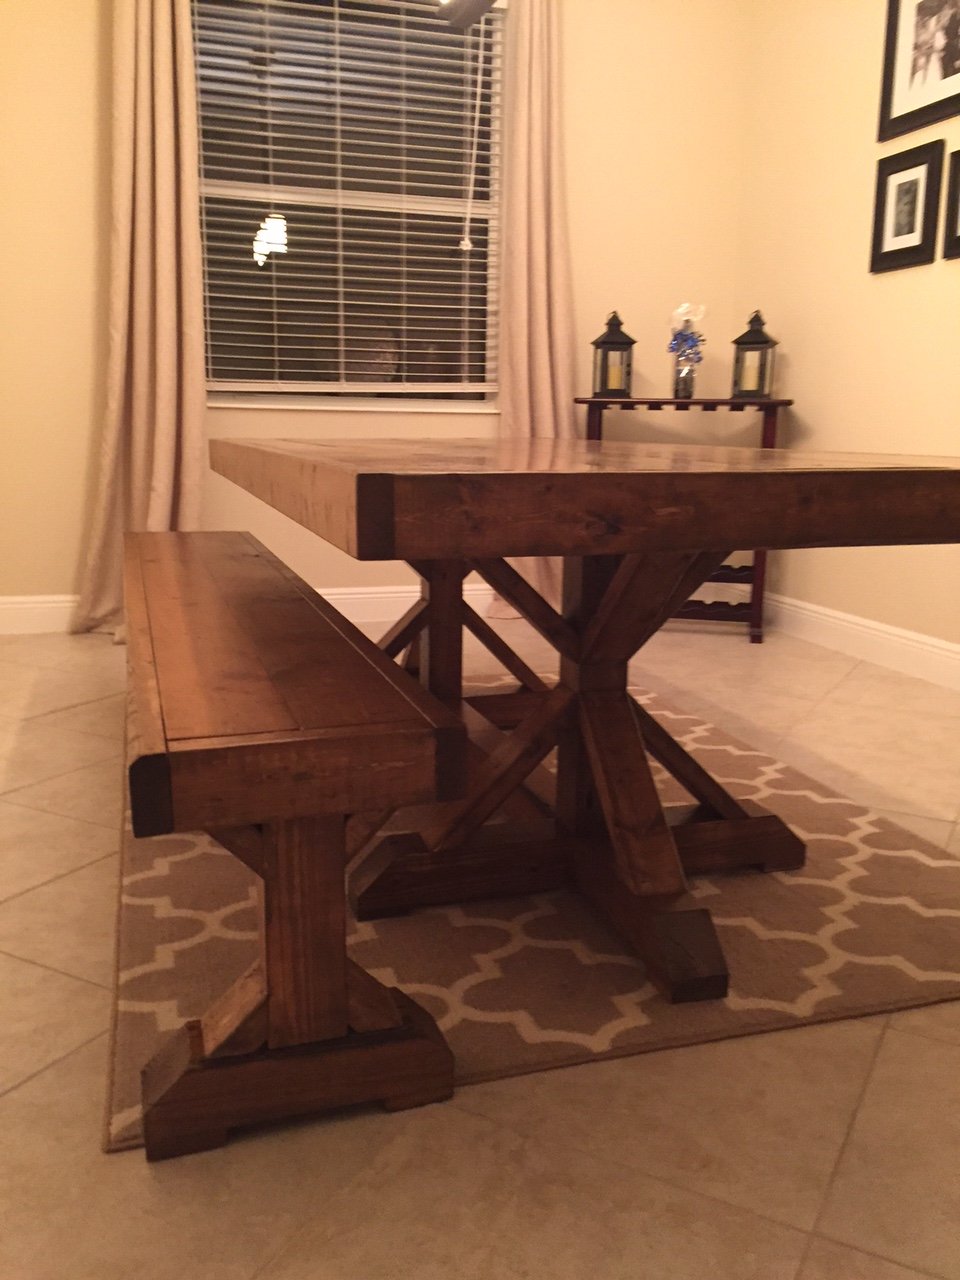
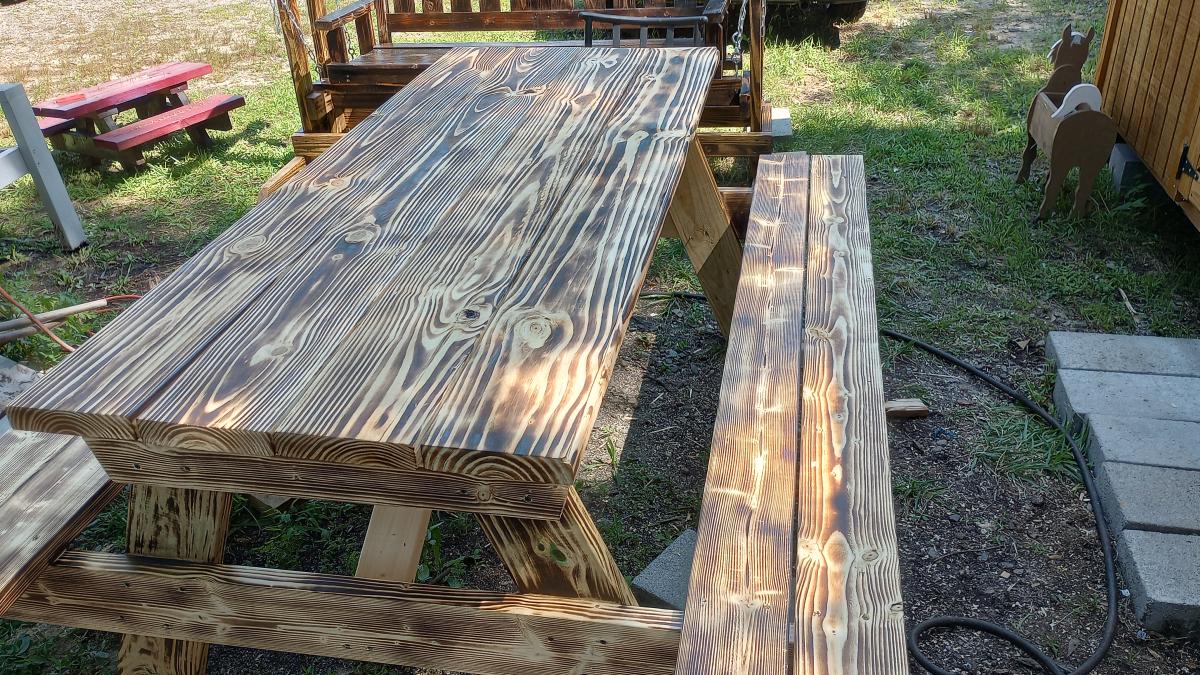
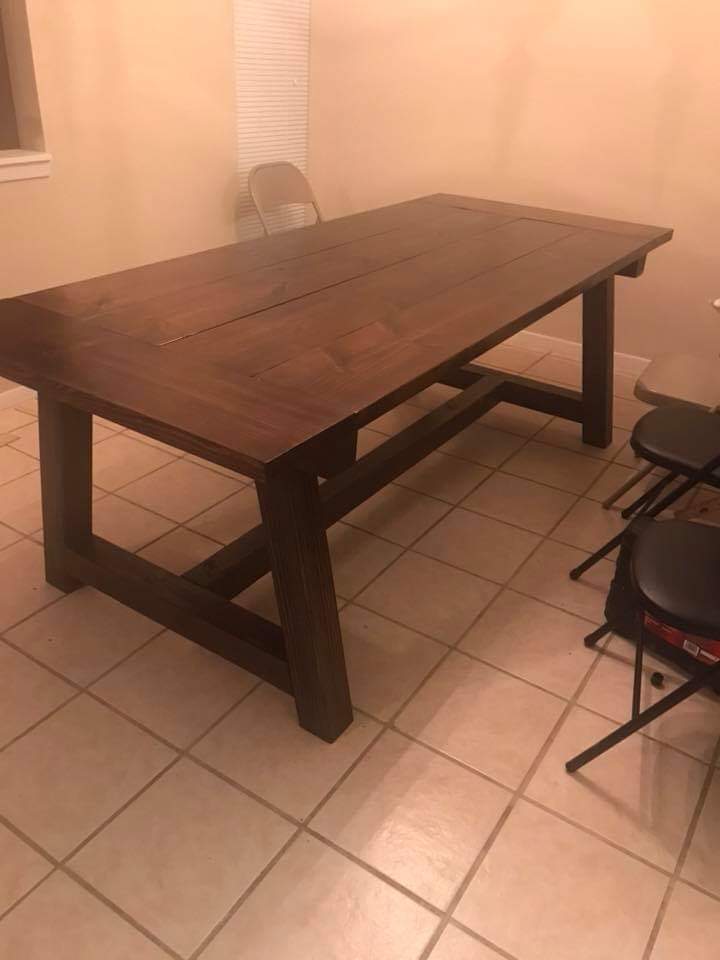
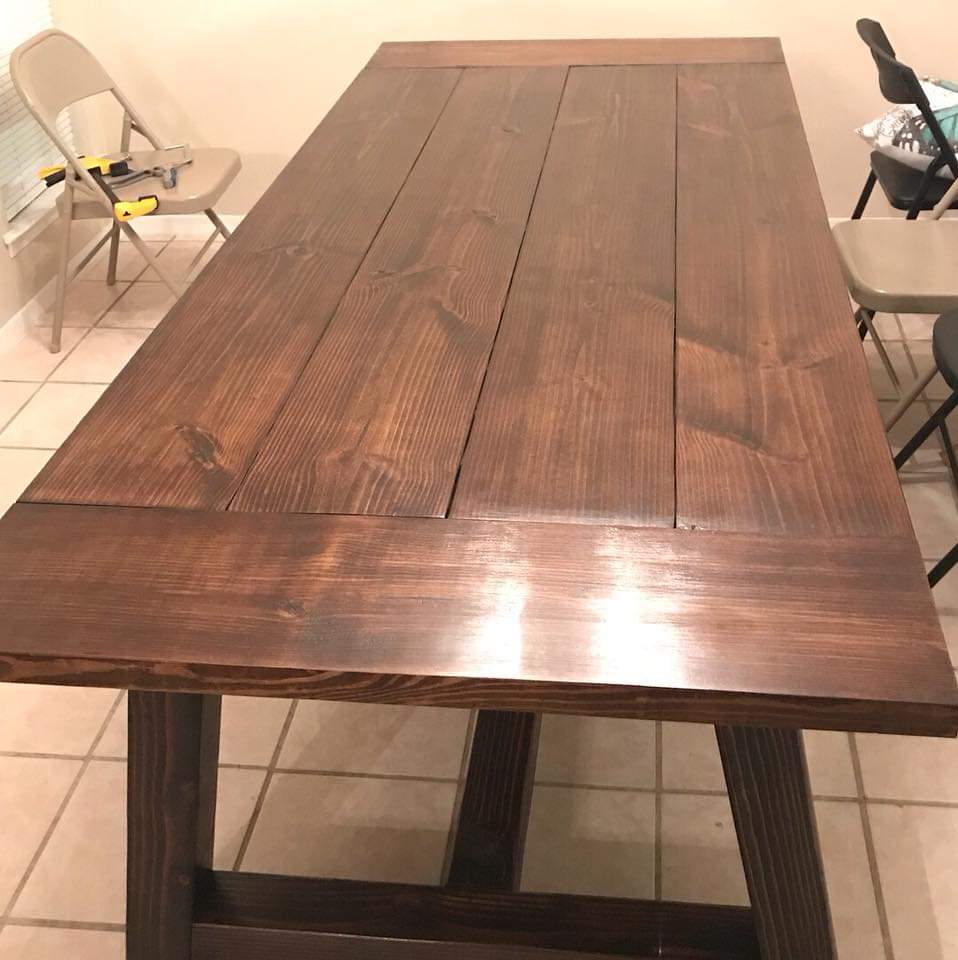
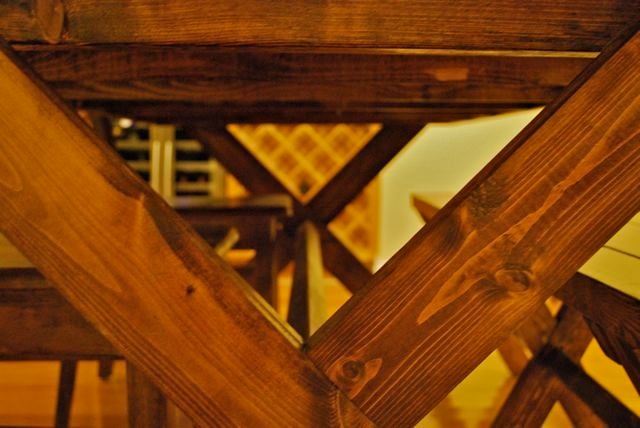
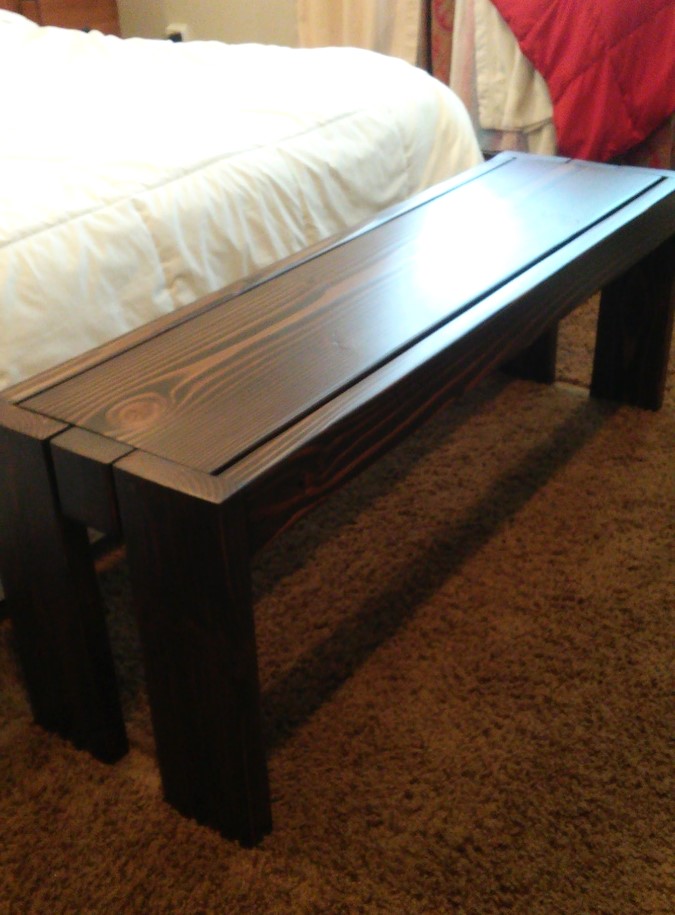
American Made Woodworks Trestle Table

Submitted by Anonymous (not verified) on Sat, 10/05/2019 - 16:46

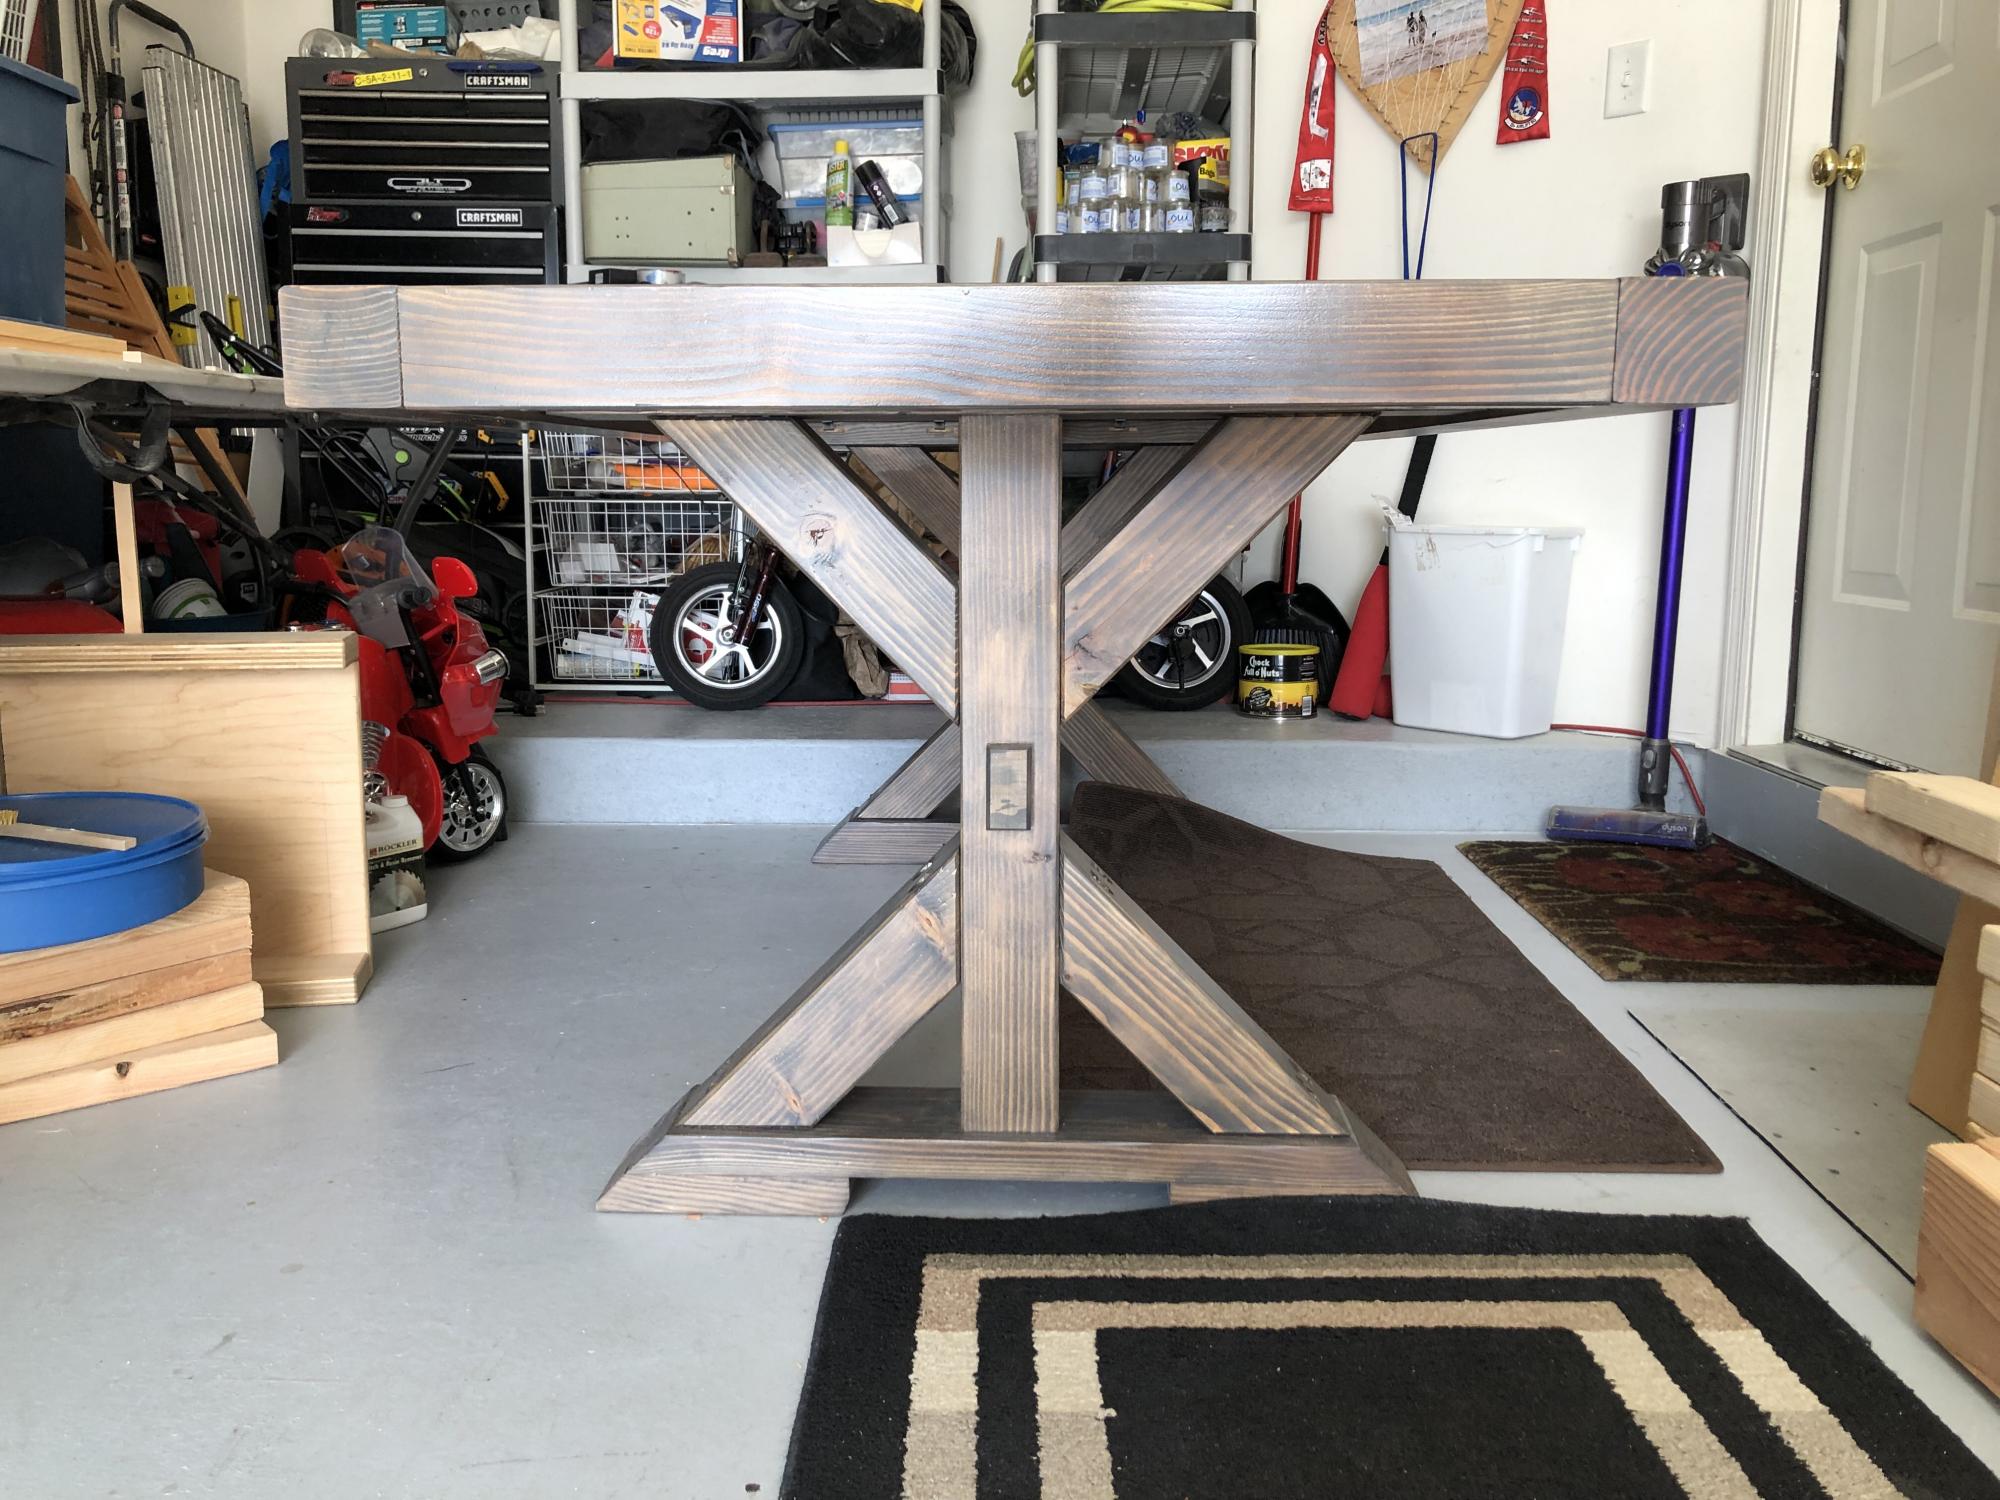
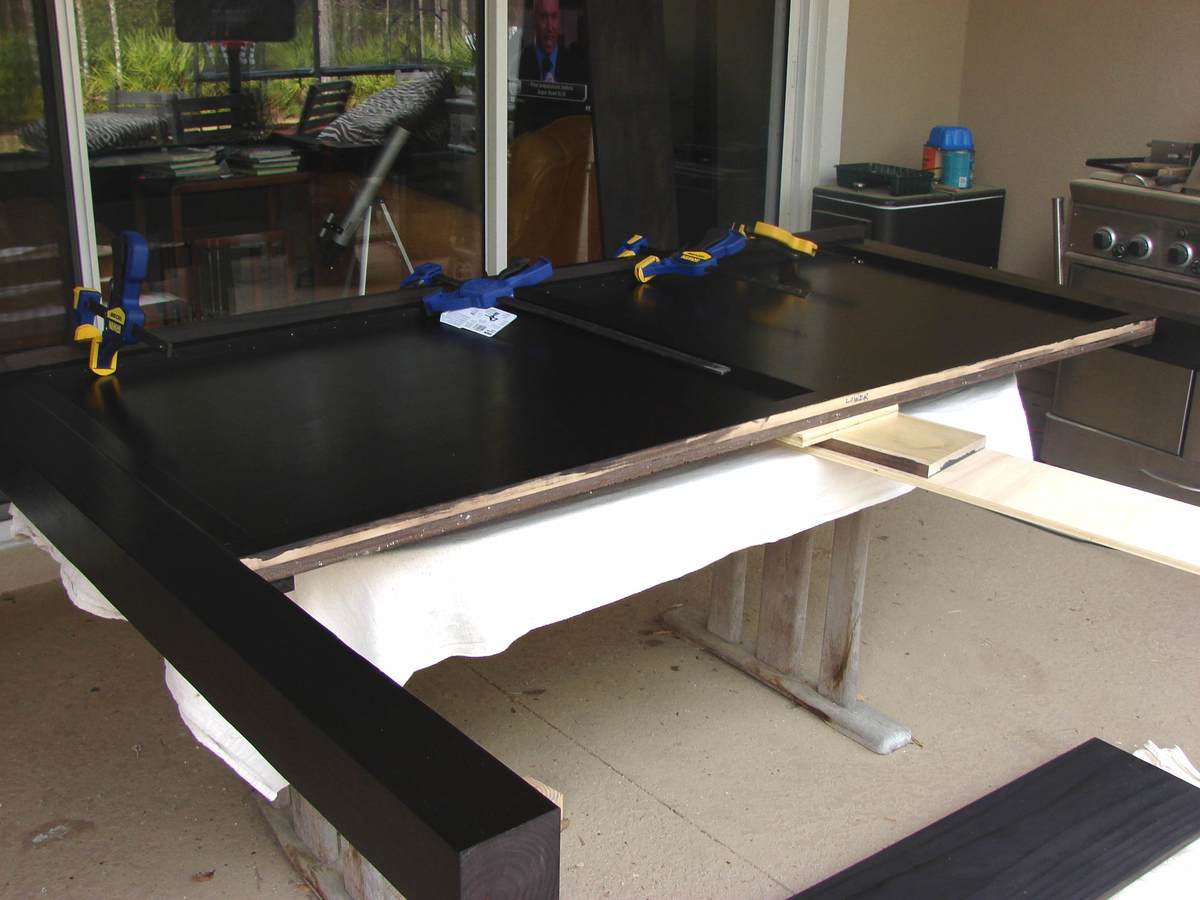
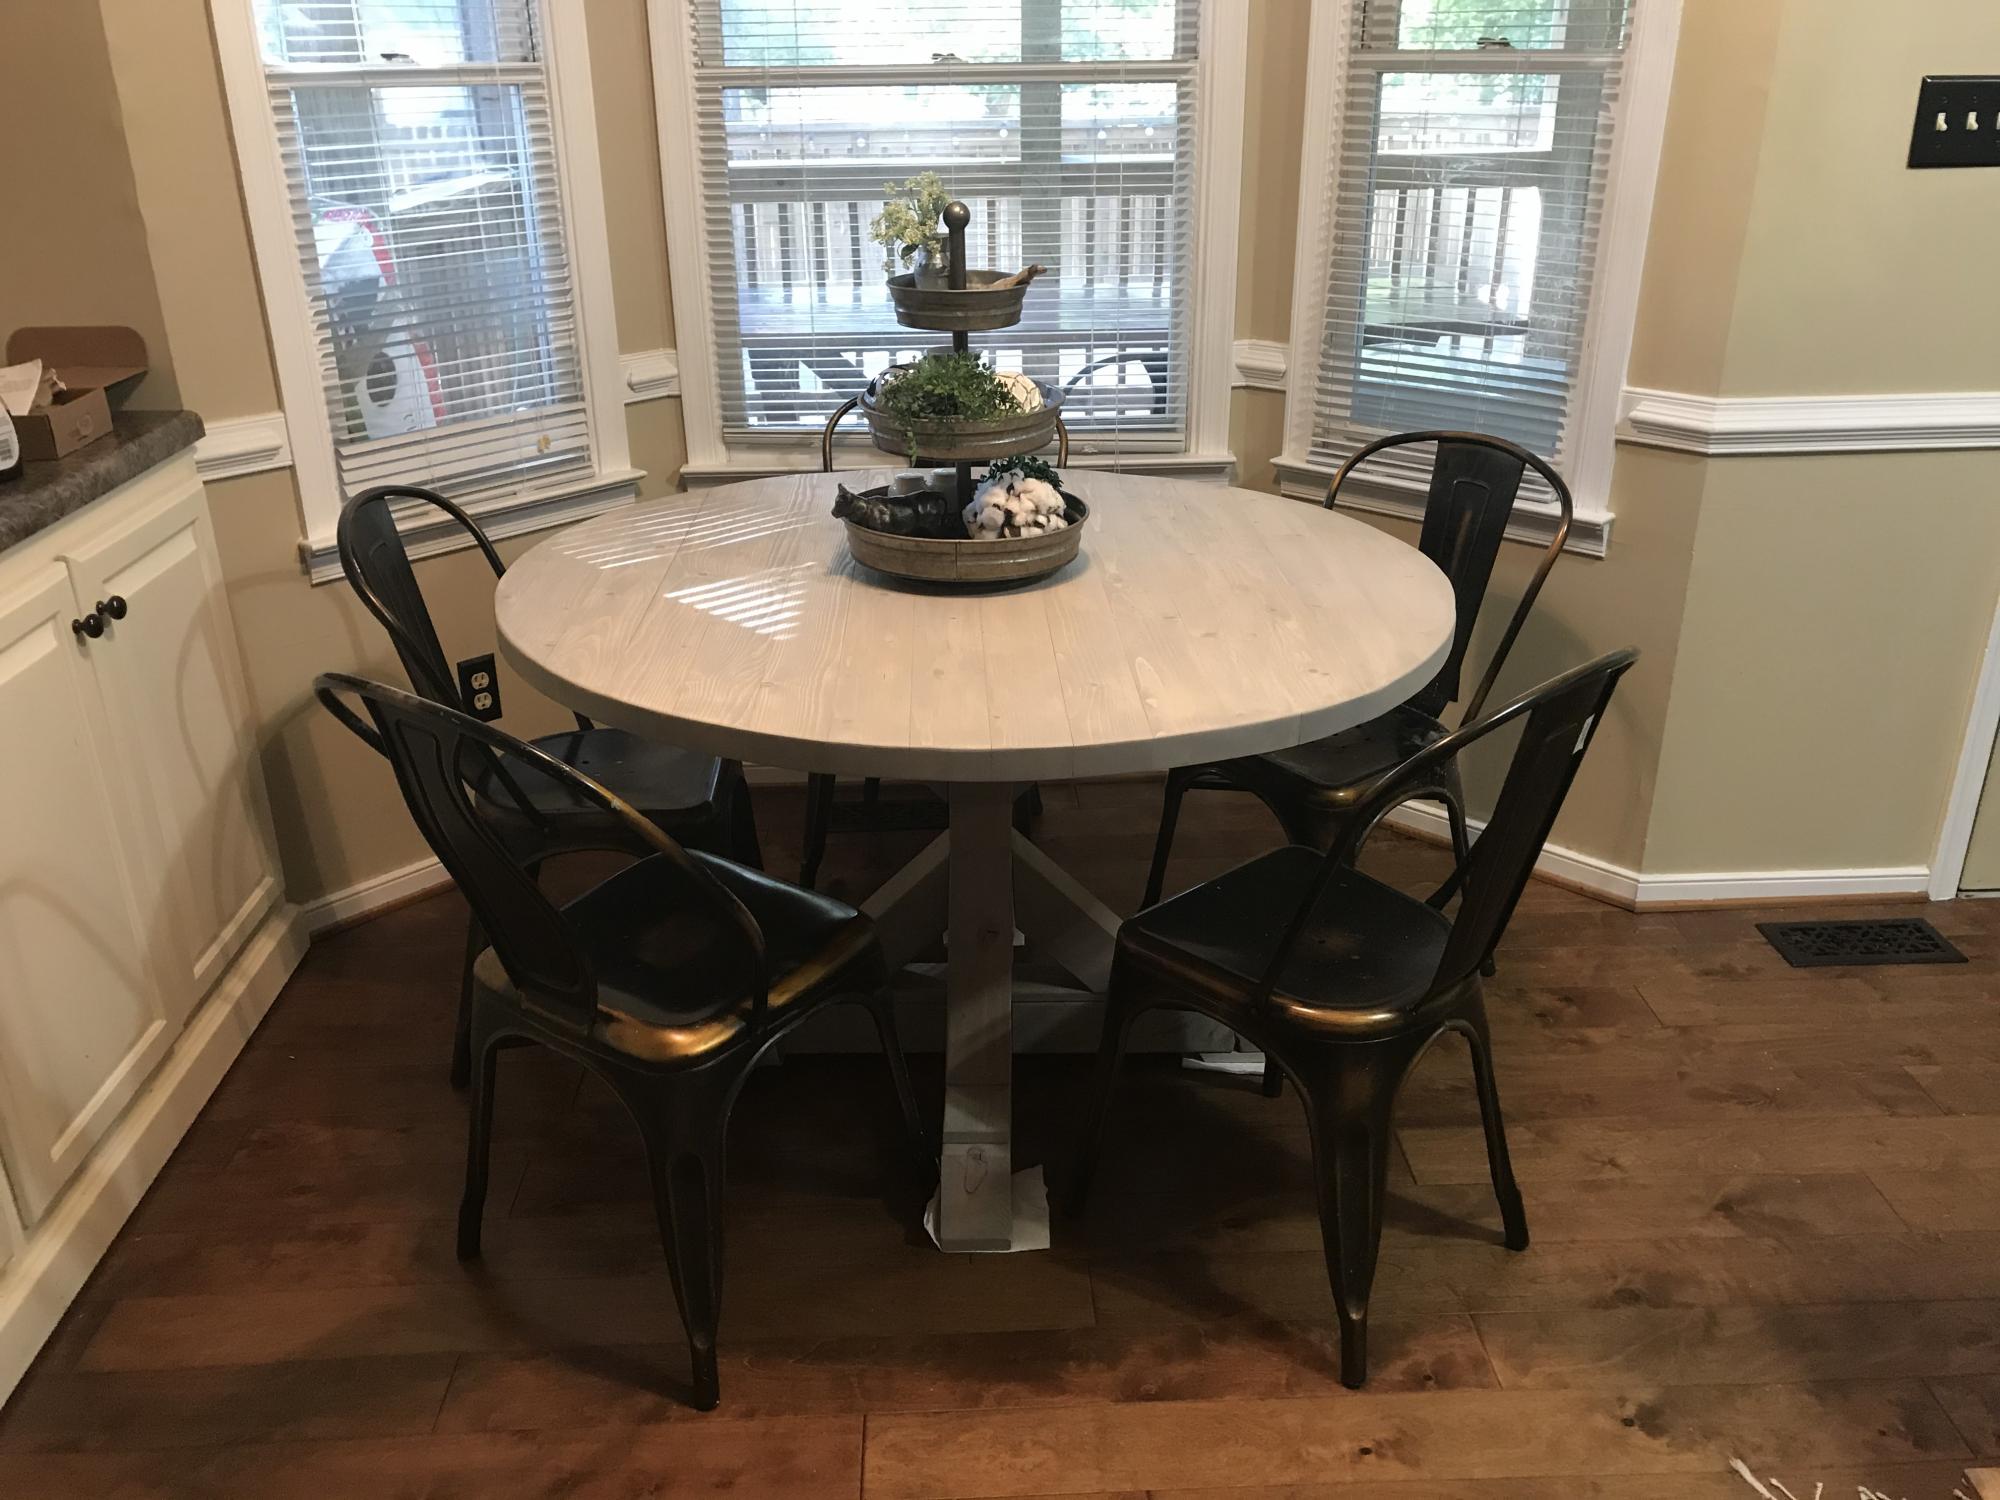
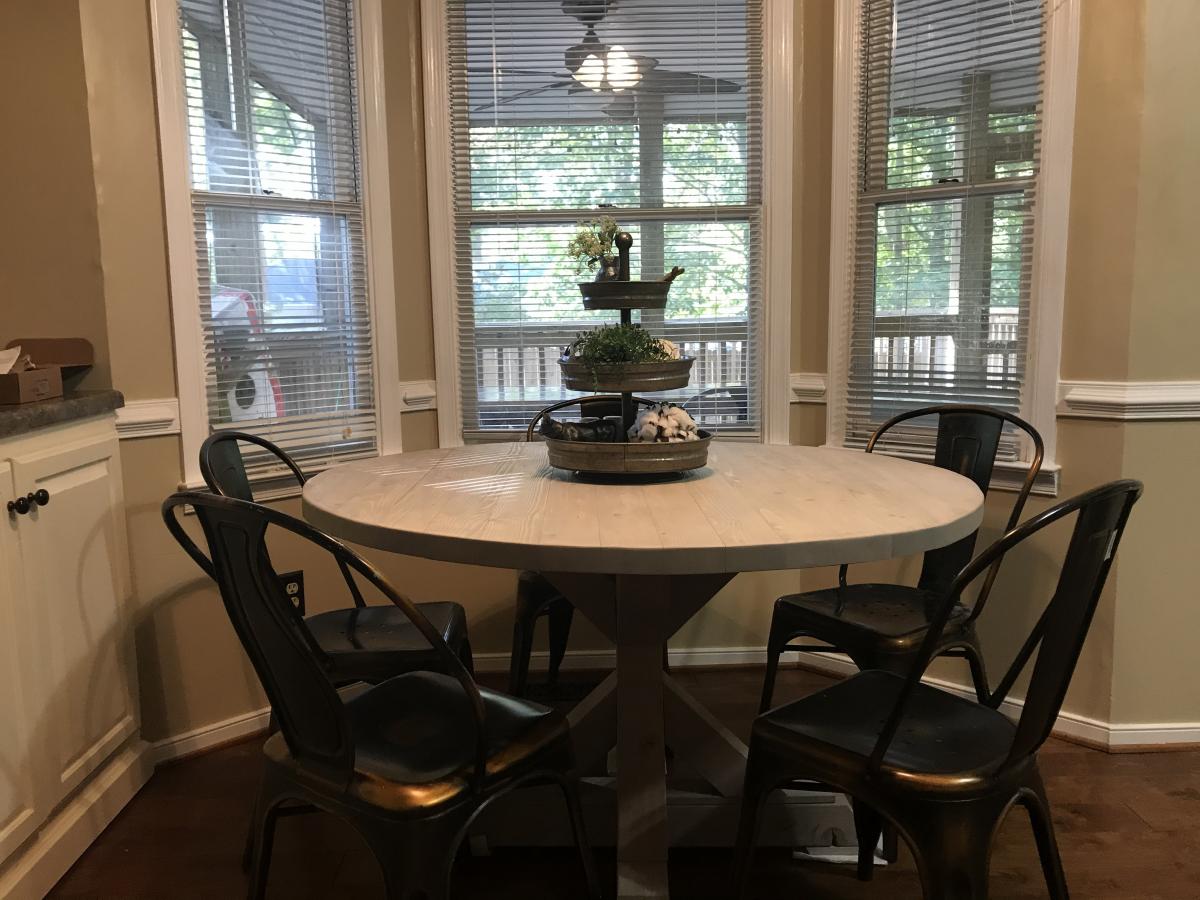
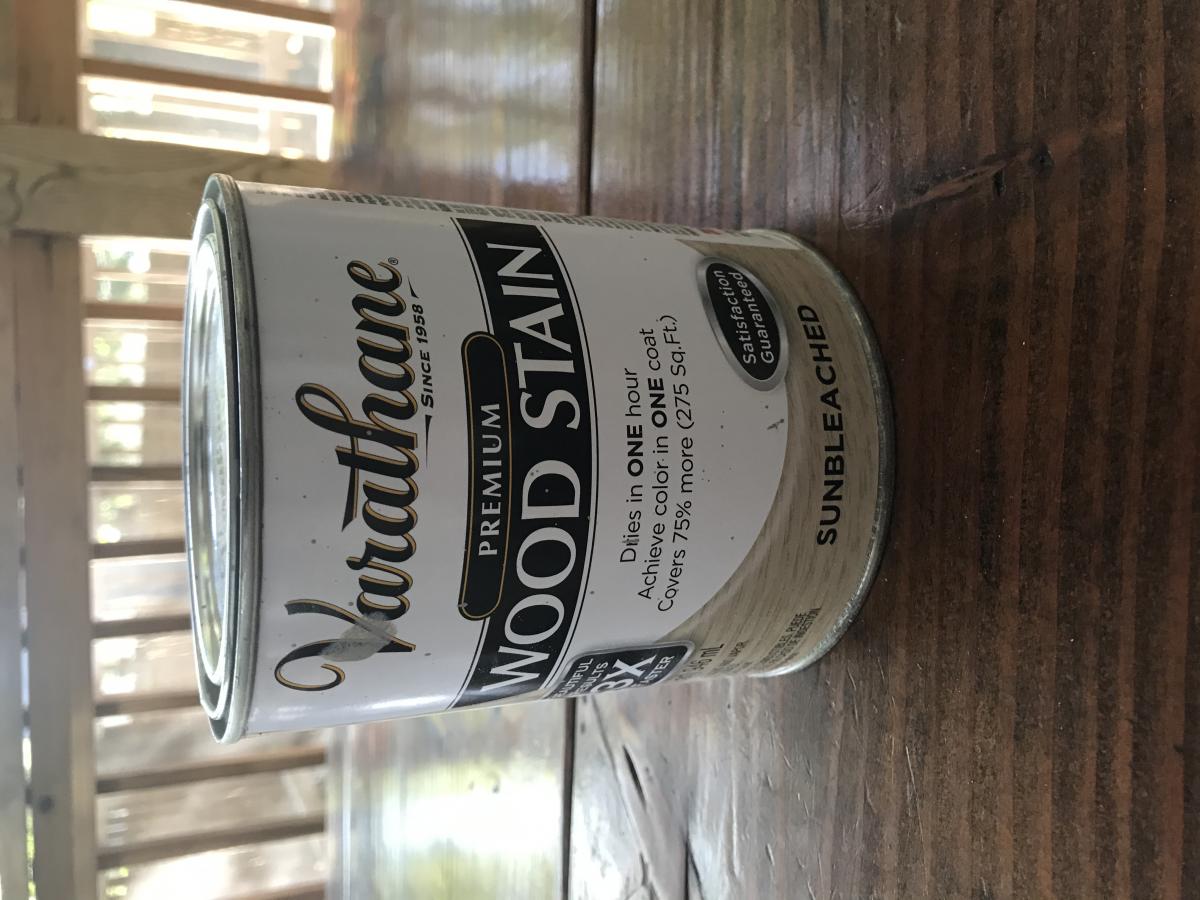
This amazing trestle table seats 8 people with the “not pictured” matching bench. The table legs are jointed with mortise and tenon and the ends of the table top are lose slot jointed to the 4”x4”s to prevent unwanted warping if there is any. The table top is secured to the apron frame by table top fasteners to allow for wood movement and easy disassemble for transport. All wood planed to required thickness and sanded to 220 grit. Then finished off with an 80/20 mixture of “carbon grey stain and Ebony stain”. 3 coats of oil based satin polyurethane to top it off.

Estimated Cost
$140
Estimated Time Investment
Week Long Project (20 Hours or More)
Finish Used
Oil based polyurethane(satin)
Recommended Skill Level
Intermediate

Adirondack Chairs

Submitted by Anonymous (not verified) on Sat, 06/24/2023 - 09:23

I made a pair of Adirondack chairs for my nephew and his fiancé. I use the old Home Depot plans (not sure if they're still online). I used treated 2x4's and cedar 1x4's.

Comments

Five Dollar Ledges for Doll Display

Submitted by angiemicn on Wed, 02/08/2012 - 02:32

These shelves are great because you can make them any size you want! As you can see, these were made to hold my daughter's monster high collection, took advantage of dead space between the wall and the window. I put these together with my Kreg Jig so they're very sturdy. I couldn't buy shelves as nice as these, TWO OF THEM! for under 10 dollars. If you're thinking of building these, stop thinking, start doing, they're well worth your time and effort.

Built from Plan(s)
Estimated Cost
5.00, used leftover stain and poly, screws left over from other projects
Estimated Time Investment
Day Project (6-9 Hours)
Finish Used
Sanded smooth, stained with 3 coats, light sanding in between each coat, of China Red Minwaxs, with 25% Black Onyx mixed in. Top coat is Polyurethane x2 coats. My daughter's favorite color
Recommended Skill Level
Beginner

Toy box

Submitted by adk_native on Wed, 12/18/2013 - 17:39

I have been wanting a good size toy box for my son and after finding this project here, I decided to build one for him for Christmas. Eli is going to be so excited!
This is a pocket hole version.

Built from Plan(s)
Estimated Cost
$75
Finish Used
Cavalry blue satin paint from Lowe's. Basic white in semi gloss letters
Recommended Skill Level
Beginner

Comments

HD

Mon, 12/23/2013 - 10:07

Thanks...I couldn't place the brand.

By the way...Eli will probably love the toybox. I made one last year for my daughter, and stuck her name on it using wood cutout letters. I added a lid, so I don't have to look at her ever growing collection of stuffies...

I made mine with a "MasterCraft" saw, a budget brand similar to Craftsman in terms of price and quality...
HD

Restoration Hardware Inspired Table

Submitted by cjddesigns on Mon, 02/29/2016 - 07:00

My wife wanted a farmhouse, rustic, restoration hardware type table but I wasn't about to spend the crazy money on one.  So I told her let me see if I can build one she would like and she loves it.  

Built from Plan(s)
Estimated Cost
$150
Estimated Time Investment
Weekend Project (10-20 Hours)
Finish Used
3 step process
Recommended Skill Level
Beginner

King Size Fancy Farmhouse bed

Submitted by Anonymous (not verified) on Tue, 10/08/2019 - 04:04

My hubby and I never really wanted a king size bed until we had grand babies and the bed just wasn’t big enough. I found the Ana White Fancy Farmhouse bed plans, ask if he thought he could make it....he did not disappoint!!! I love our new bed and it’s ready for Honey and Pepe’s first sleepover.

Built from Plan(s)
Estimated Cost
$300
Estimated Time Investment
Weekend Project (10-20 Hours)
Finish Used
Painted
Recommended Skill Level
Intermediate

Outdoor Furniture Builds

Submitted by Anonymous (not verified) on Wed, 06/28/2023 - 07:22

Hi Ana, after building your essential chairs I decided to build my grandson a small one I burned it with a torch and then clear coated it and it turned out so sweet. I also built a picnic table and added a different crossmember to it for strength. I also built a glider swing that I used from an old pattern from many years ago. Still without going to your site and watching you build on YouTube I would not have attempted any of this. I love all of the things that you build and you have inspired me so much. Thank you for all you do and keep those wonderful plans coming! My next project is going to be that little workshop that you build in panels and put together that you made for your friend. I'm going to make one and turn it into a lawn mower shed.

Darlene Sudderth the Twiddlebug woodshop

Arts and Crafts Table for My Daughter

Submitted by jpiller on Sat, 02/11/2012 - 07:32

This project was my first from Ana White's plans and my first wood working project on my own. I spent quite a bit of time w/ my dad as a young boy helping him w/ woodworking projects and have been looking forward to doing one on my own.

My daughter is a crazy artist of four years old and she makes more art in a month than we know what to do with. Along with that comes piles of crayons, markers, paper, and so on all over her room, so this table was for her to try and keep organized.

The only real modification from Ana's original plans was that I used plywood for the cover instead of a clear piece of plastic b/c I figured the wood would hold up better under a four year old's abuse.

Built from Plan(s)
Estimated Cost
40
Estimated Time Investment
Day Project (6-9 Hours)
Finish Used
Regular wall paint - same used to paint my daughter's room.
Recommended Skill Level
Starter Project

Comments

jpiller

Sat, 08/02/2014 - 09:46

Yes, i actually had to put two pieces glued together in order to get the correct height to fill it in. It's a little heavy, but my daughter really loves the table and it doesn't seem to be too much of a problem.

Mantle

We wanted to have a mantel for hanging the Christmas stockings this year and this fit perfectly! We modified the plans a bit by substituting 1x6's for the sides and a 1x12 on the top in order to gain a little more shelf space and to accommodate the LED fire logs. We added a piece of plywood painted black to mask the color of the wall and to give the "flames" a surface to reflect off of. We are debating giving a more realistic appearance by covering with mortar and brick tiles rubbed with charcoal. Thanks for the plan and for making these holidays special as the kids now believe Santa has a chimney to come down!

Estimated Cost
$80
Estimated Time Investment
Day Project (6-9 Hours)
Finish Used
Minwax botanical green stain with cottage white paint wash
Recommended Skill Level
Beginner

4x4 Truss Beam Table

Submitted by WolffA on Fri, 10/11/2019 - 08:15

Used Kreg Jig HD screws and pocket holes with glue. Stained in Dark Walnut. 

Built from Plan(s)
Estimated Cost
250
Estimated Time Investment
Weekend Project (10-20 Hours)
Finish Used
Dark Walnut Stain
Recommended Skill Level
Intermediate

Our first project

Submitted by Delilah on Tue, 02/14/2012 - 18:53

I was looking for plans to build a table like this and found Ana's site.

Estimated Cost
100
Estimated Time Investment
Weekend Project (10-20 Hours)
Finish Used
Minwax Early American and Satin Poly
Recommended Skill Level
Starter Project

Comments

Delilah

Fri, 02/17/2012 - 19:26

I would make the bench first if I could do it again--good practice. You can't fit a lot of people around it but it is good for a small space.

anandereson (not verified)

Mon, 04/30/2012 - 04:55

How did you fasten the tabletop to the base? Did you screw it from under and attach along every cross beam? Or screw from the top and fill the holes with putty? All the way across or just on the ends...this step in the directions is very vague...

Shanty Open Shelf Console

Submitted by carongirls on Tue, 12/24/2013 - 07:55

I had been eyeing this for awhile but, doors scare me. This is my daughters Christmas gift. It was a fairly easy quick build.
I am pleased with it.

Built from Plan(s)
Estimated Time Investment
Day Project (6-9 Hours)
Finish Used
Rustoleum Dark Walnut
Recommended Skill Level
Beginner

Comments

Val Manchuk

Tue, 12/24/2013 - 22:24

Doors scare me too, but seeing what a great job you've done encourages me to give it a try. Looks beautiful. I like how the hardware ties in with your choice of stain. Nice work!

Val @ artsybuildinglady.blogspot.ca

carongirls

Wed, 12/25/2013 - 10:21

The measurements for each door is a bit different because I wasn't careful with the trim. I used shims on all sides of the door to keep it straight and spaced to attach the hinges. Big plus is they open and close :-)

Bench

Submitted by Anonymous (not verified) on Sat, 03/05/2016 - 10:35

This is a first time project that my husband and 11 yr old on made. 

Estimated Time Investment
Weekend Project (10-20 Hours)
Finish Used
Entryway or bedroom.
Recommended Skill Level
Starter Project

bird Feeder

Submitted by Anonymous (not verified) on Mon, 10/14/2019 - 02:52

Bird feeder aksed by my mother. I used rest of IPE wood used for a deck. The thickness is a little big! 22mm but its strong and 30years waranty :) I changed a little bit the dimensions to convert in mm.

Estimated Cost
0
Estimated Time Investment
An Hour or Two (0-2 Hours)
Finish Used
not necessary this wood very smooth
Recommended Skill Level
Starter Project

DIY Famhouse Table

Submitted by Anonymous (not verified) on Wed, 07/05/2023 - 08:24

I used the farmhouse table plans, with a few modifications. I made two benches to go along with it. This was my first big wood project and I'm pretty proud of it. My daughter bought her first home and needed a table custom sized to her space so this was perfect. I love all of Ana's plans, so easy to follow.

Farmhouse bed king modified

Submitted by susanr on Tue, 02/21/2012 - 06:40

This is a modification of the Farmhouse bed with a panel headboard and footboard rather than individual boards. It currently fits around the mattress/boxspring/metal frame. When we buy a new mattress, we will then add the joists, etc.

The headboard and footboard are both 72" wide. We had the guys at blue do a rip cut at 72" which ensures that both pieces are exactly the same measurement (for square.) Then, they turned the plywood a quarter turn and cut at 15" for the footboard. This left a 33" high headboard. It is 3 inches larger than the original plan, but it doesn't require a second cut and you don't see it anyway. The trim is just a 1x3 with a 1" overhang. (I might make it just a 3/4" if doing it again.)

The side boards are 1x12 cut at 80 1/4", but you may want to add a little if your comforter is really thick or if your mattress is much longer than ours at 79 1/2". We used non-mortised (no cutting into the wood) bed rail hardware from Woodcraft, so we could easily take it apart. These were placed 1 1/8" in from the inside edge of the 4x4 post. They were placed on the very edge of the side rail so it would butt up against the post. The 1 1/8" gives us plenty of room to shove the bedding down inside the side rail.

We glued and nailed 1x2s from the back for the trim on each piece.

Estimated Cost
about $190, but you could save $17 by not spilling an entire can of dye/stain on yourself when you foolishly open your completely full pressurized sprayer
Estimated Time Investment
Weekend Project (10-20 Hours)
Finish Used
General Finishes dye stain in Dark Brown; polycrylic - 3 coats; prefinished all the wood before assembling.
Recommended Skill Level
Beginner

Comments

Kate (not verified)

Wed, 02/22/2012 - 05:18

Looks beautiful! We are currently making this bed with the exact samce change to use panels instead of boards and then one board down the middle, except we made our footboard and headboard higher.

susanr

Wed, 02/22/2012 - 07:32

I would love to have the footboard higher, but my husband is 6'4" with large feet, and he asked that I make sure that he could sleep on his stomach with his feet dangling down without touching the footboard! We actually measured it. Make sure you post yours when it is done.

C.Lang

Wed, 02/22/2012 - 20:40

This is a beautiful bed. It is actually pretty much the exact bed i want to build for me and my wife.

sandrabees

Sun, 04/29/2012 - 16:47

I am wanting a king... love the farmhouse plan and I think that hardware is the way ij want to go. Is that where you can slip the side rails in and out of the headboard and foot board?

Modern Park Bench

Submitted by TaylorMade on Tue, 03/08/2016 - 18:42

HI Ana! Just wanted to tell you thank you for sharing all your knowledge. I really got inspired reading your book and looking through your website. I was quite intimidated but I finally completed my first build. It feels amazing and I am so grateful for your help! XO Sarah Taylor

Built from Plan(s)
Recommended Skill Level
Intermediate

Comments

TCossins1

Submitted by Anonymous (not verified) on Sat, 10/19/2019 - 07:52

I used the 4x4 X Base Pedestal Dining Table with Planked Wood Top plans for the base but I decided to go with a round tabletop because it fits better in our kitchen. The tabletop is 16 2x4’s attached together using pocket holes and wood glue.

Estimated Cost
$150.00
Estimated Time Investment
Weekend Project (10-20 Hours)
Finish Used
Varathane “sun bleached” brushed on with a cheap paintbrush and wiped off with a towel after about 1-2 minutes after application.
Recommended Skill Level
Intermediate
Back