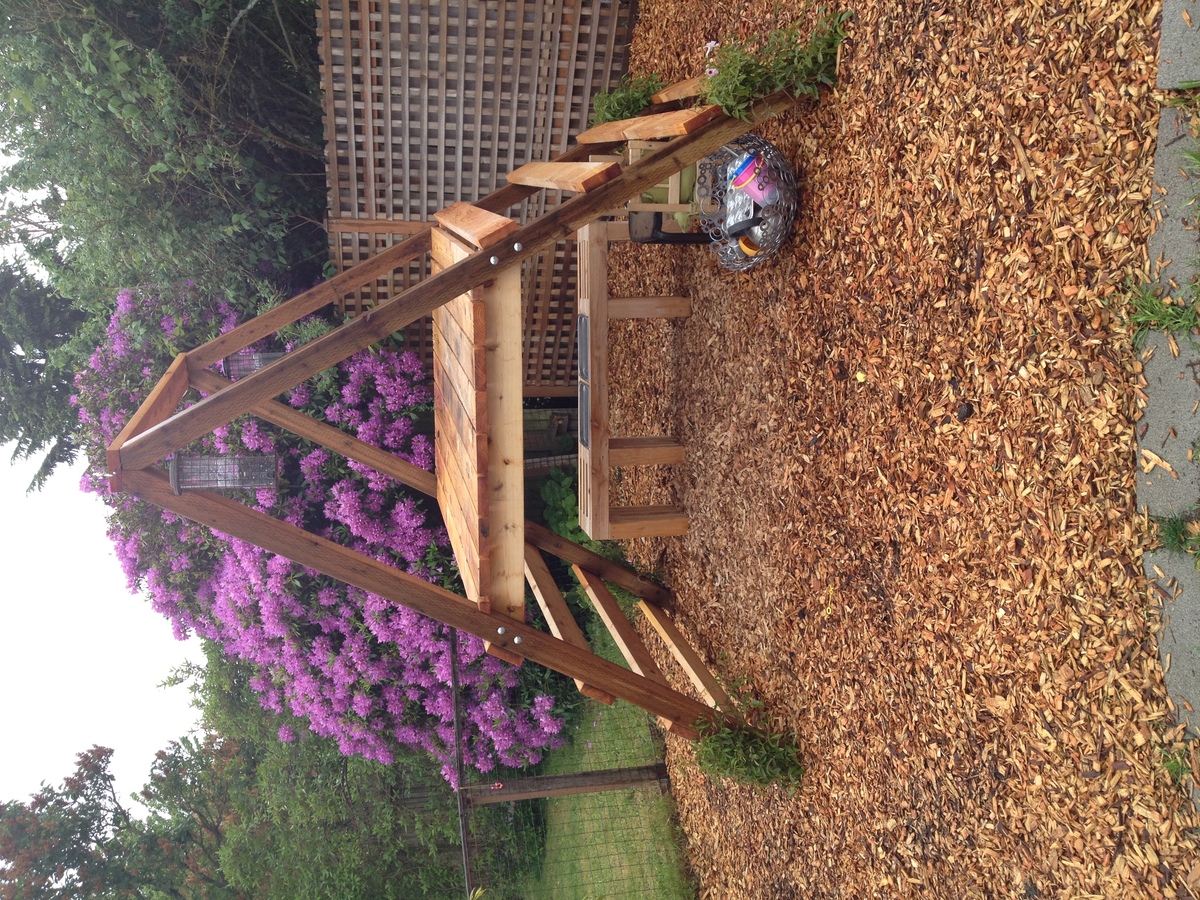
Outdoor DIY Play Set
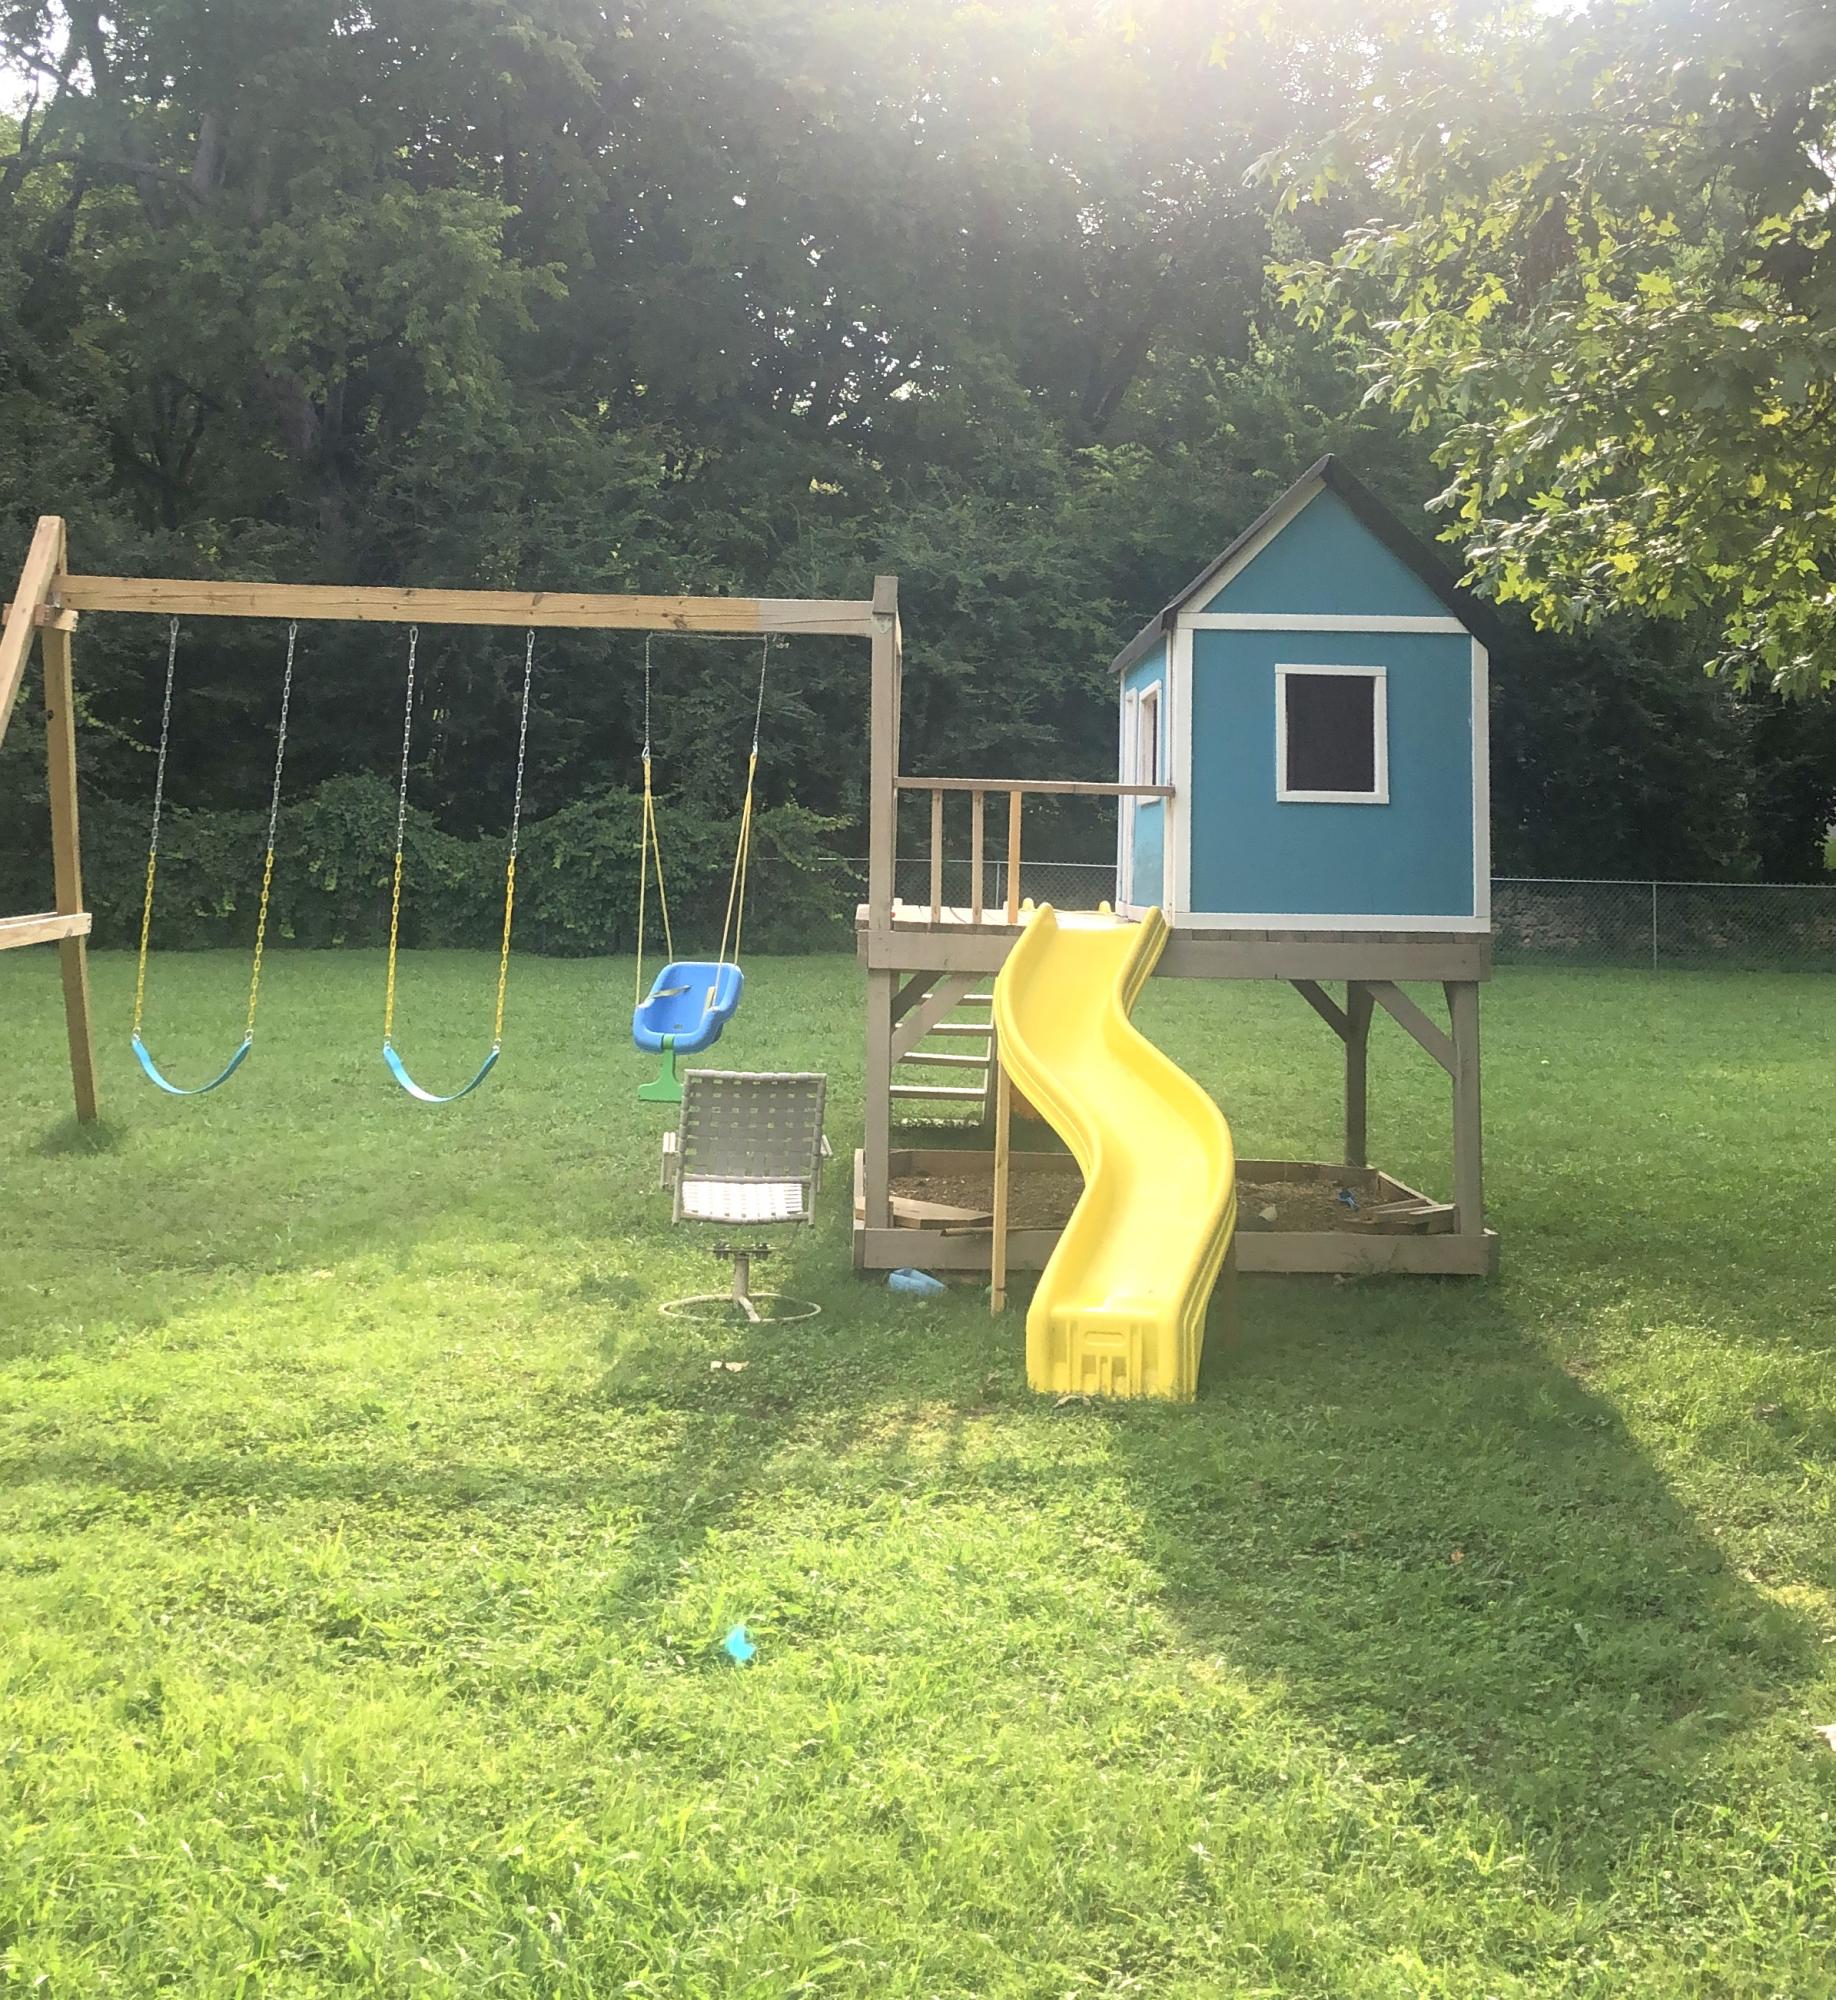
The one toy that we could not live without! Started this as a 2020 covid project and play on it everyday.
The one toy that we could not live without! Started this as a 2020 covid project and play on it everyday.

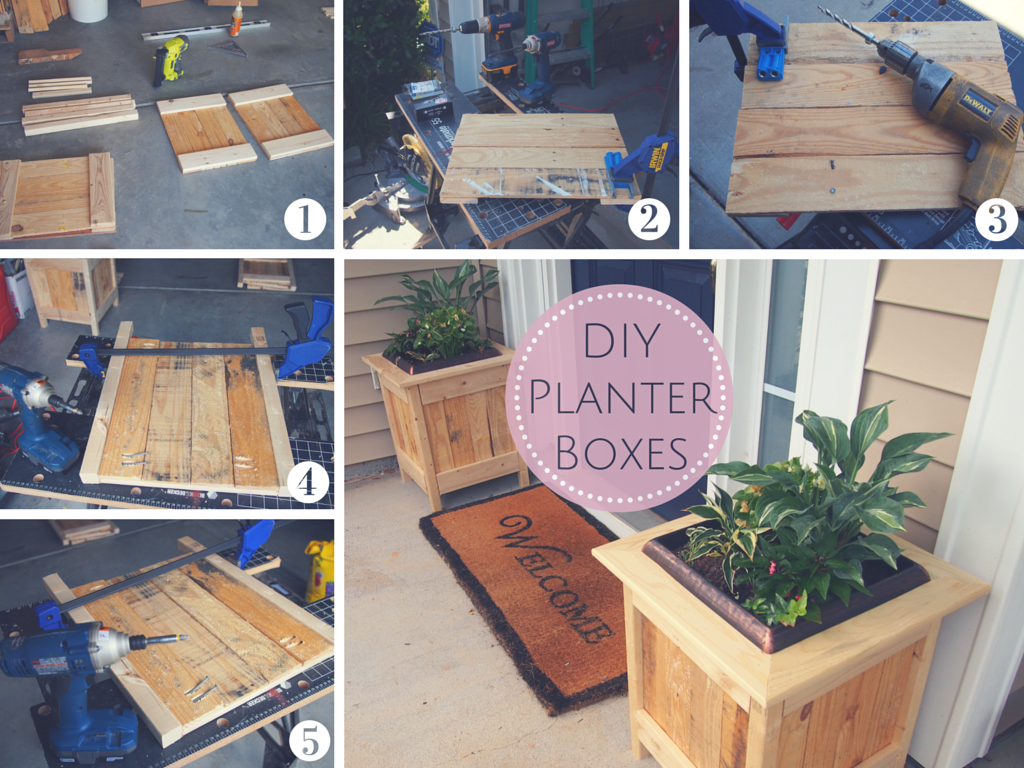
We picked up a couple 14.9" square plastic garden planters from Home Depot and ended up creating some wood planter boxes from pallet wood for them to sit in.
I didn't add up the cost of these boxes, because we had most of the wood and only needed a few pieces, but I'd say they were definitely less than $10 a box.
We altered our dimensions to fit our HD planters so they would slip in for a snug fit and made the legs flush with the top of our sides. We build a simple frame for the top, which allowed the lip of our HD planters to sit firmly on top.
Something I didn't do, but wish I did: fill in the cracks with wood filler. There were a couple places that really could have used it, but I was in a rush and decided to skip it. They turned out great, but could have been even better had I taken an extra 30 minutes. On an off weekend, we are going to use wood filler in the seams, sand them down, and do a second coat of white paint.
Can't wait to plant these with some mums for Fall! :)

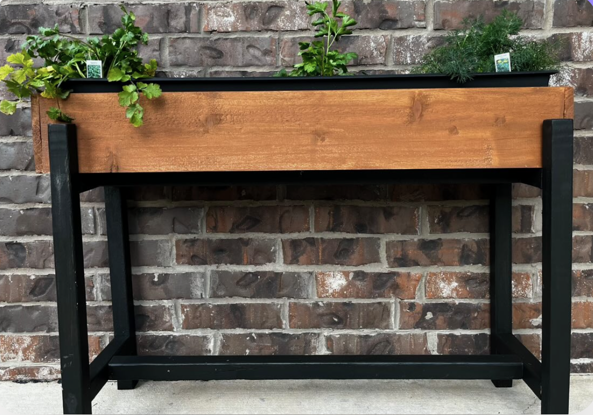
"Here's a pic of the planter I made! I modified it to fit a 36" planter. I LOVE it. Thanks!!"
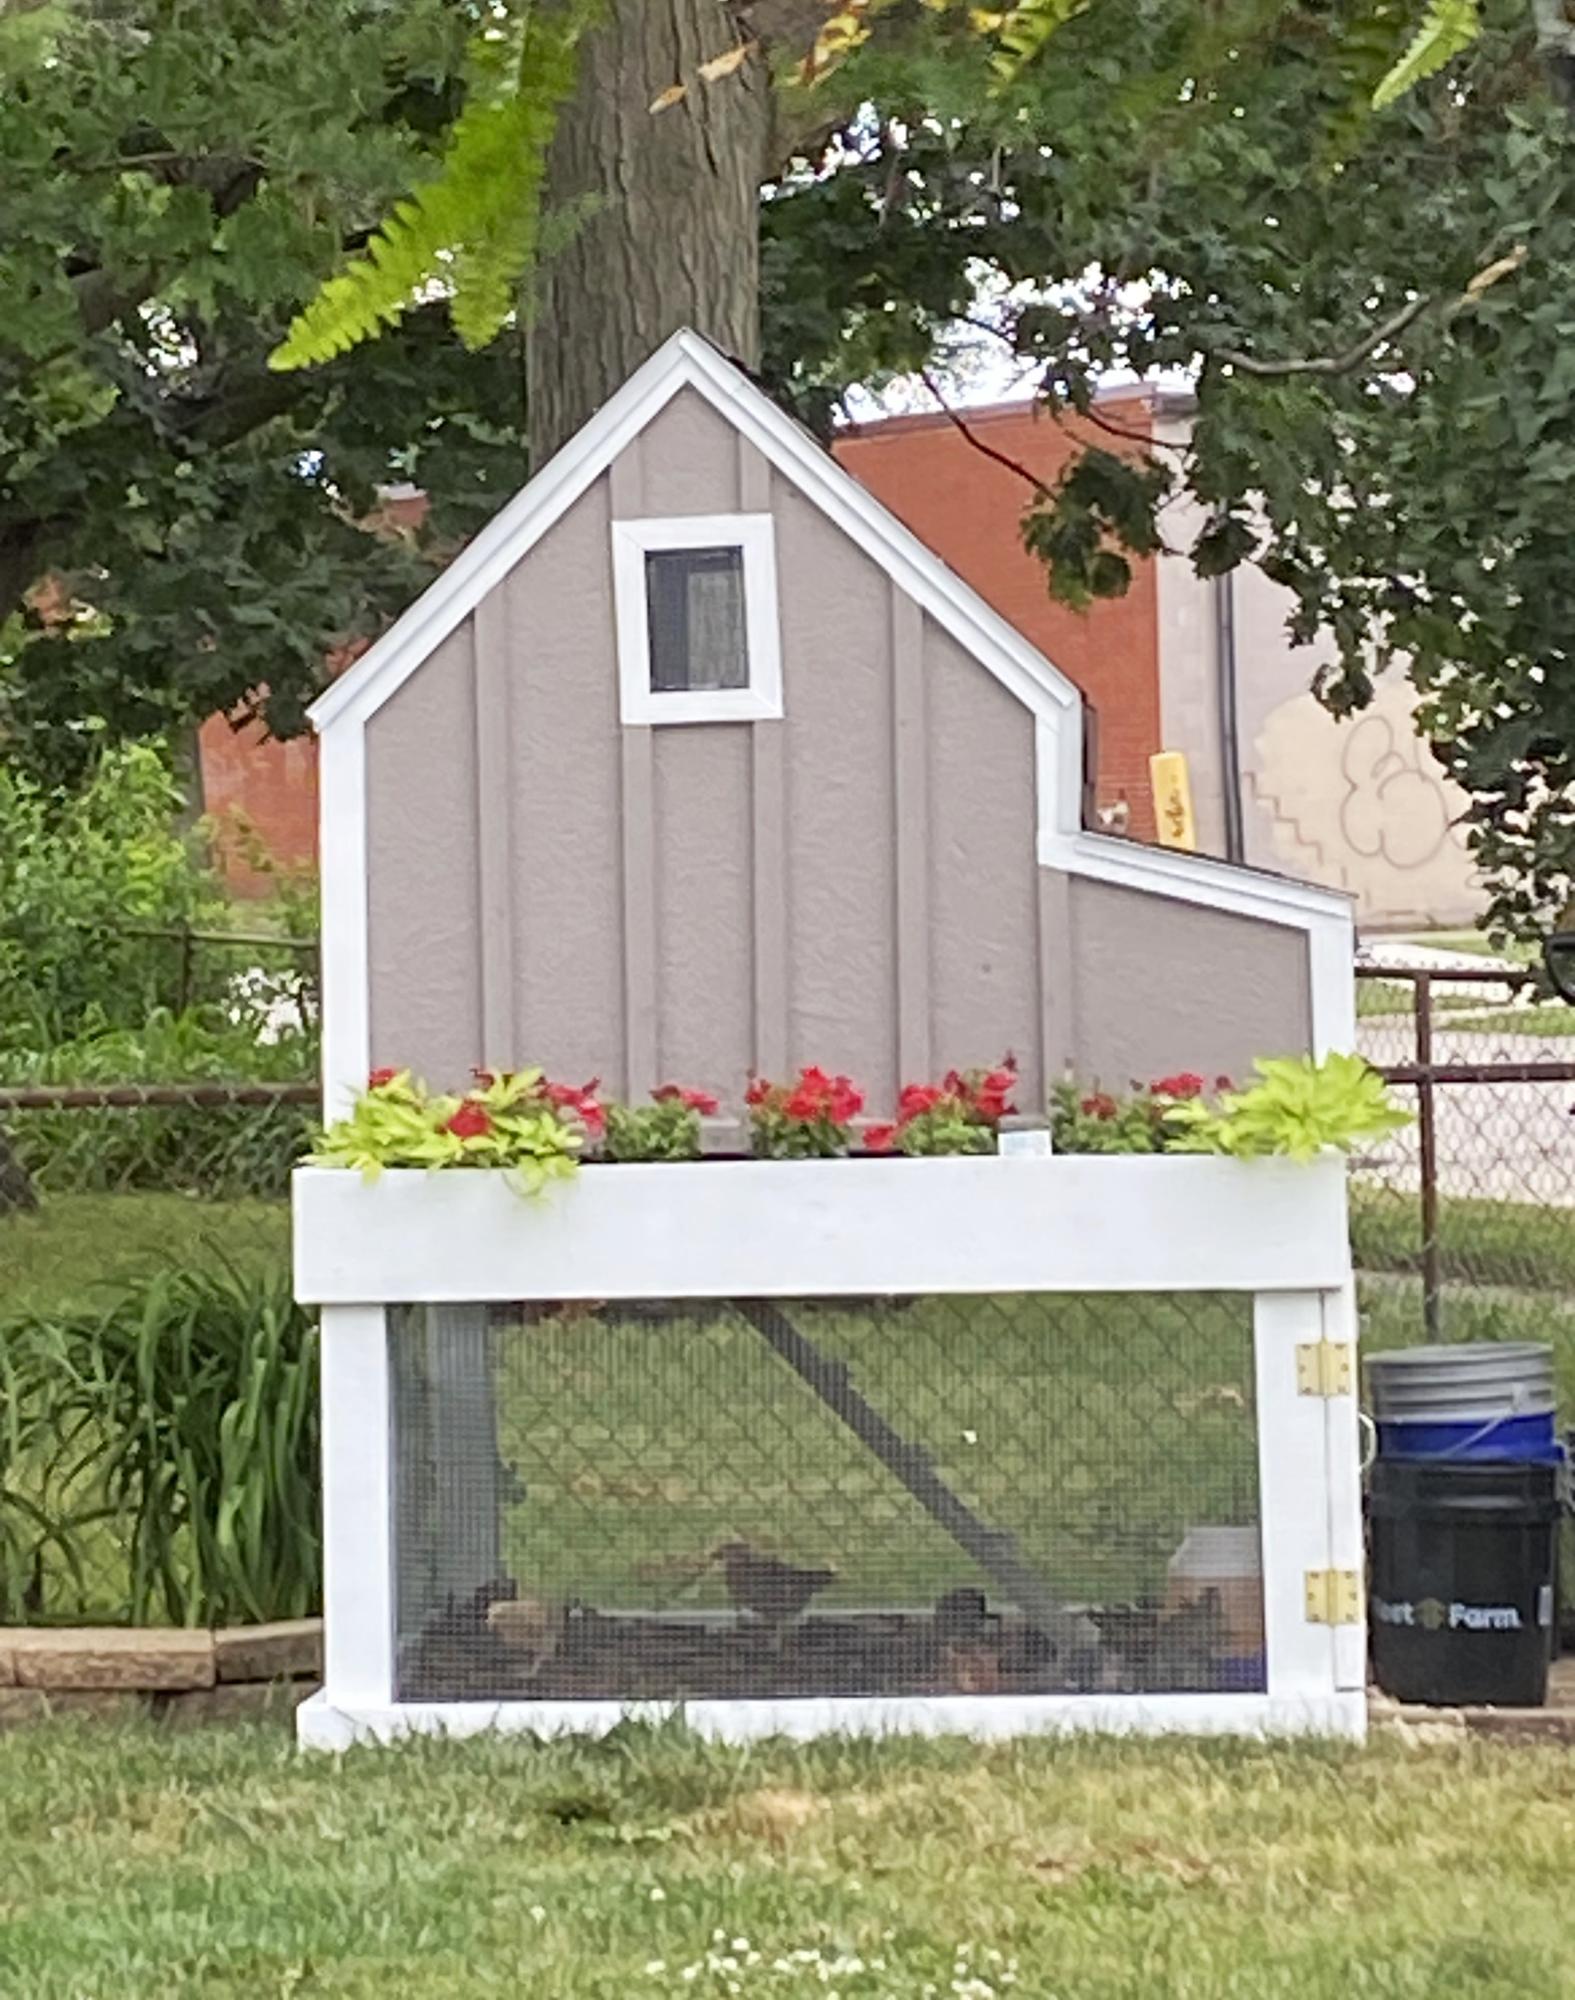
As a first time chicken farmer, I have four chickens now fully grown. It was 29 degrees in Iowa this morning, wondering if I should wrap the lower portion of the coop on three sides with visqueen, and should the roost windows be covered? I have straw bales to roost on and add where needed . I don’t plan to heat the coop . Any help will be appreciated.
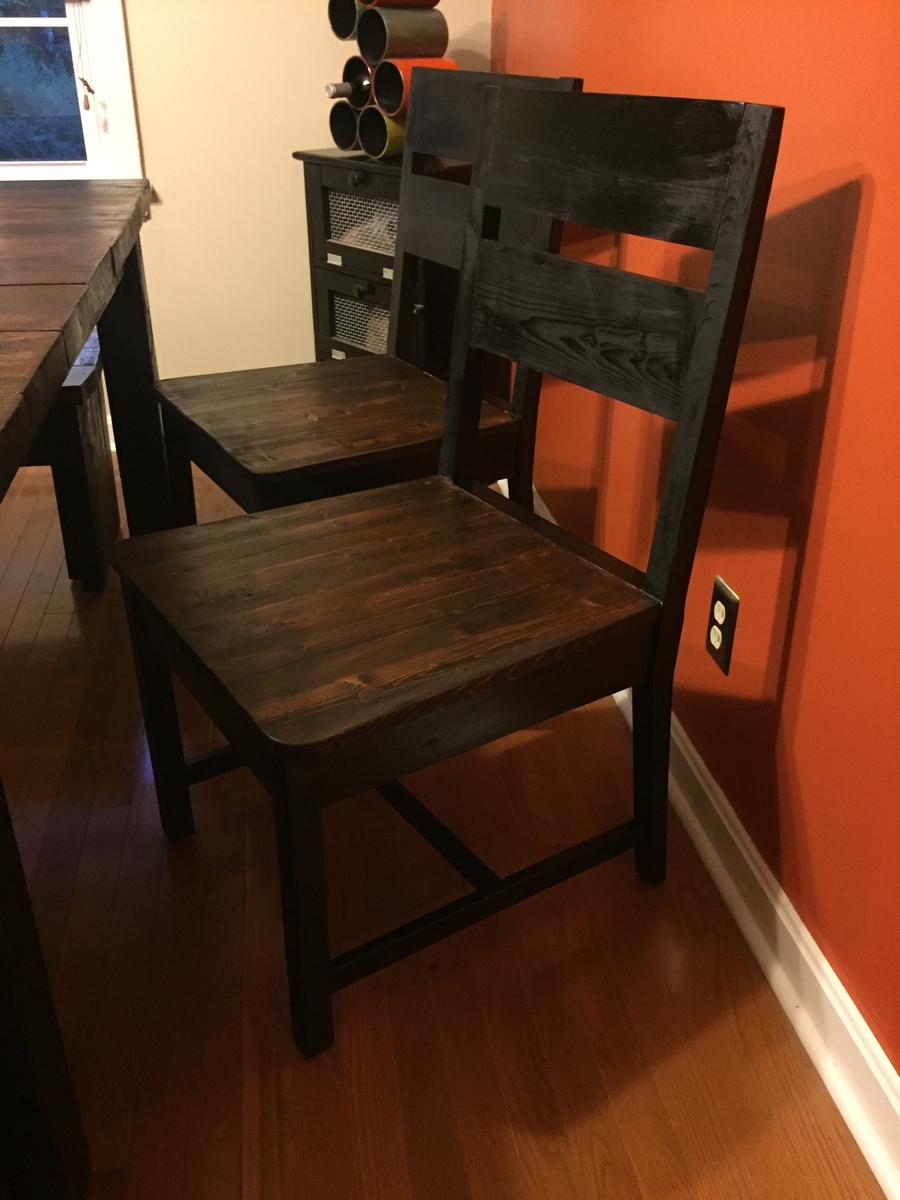
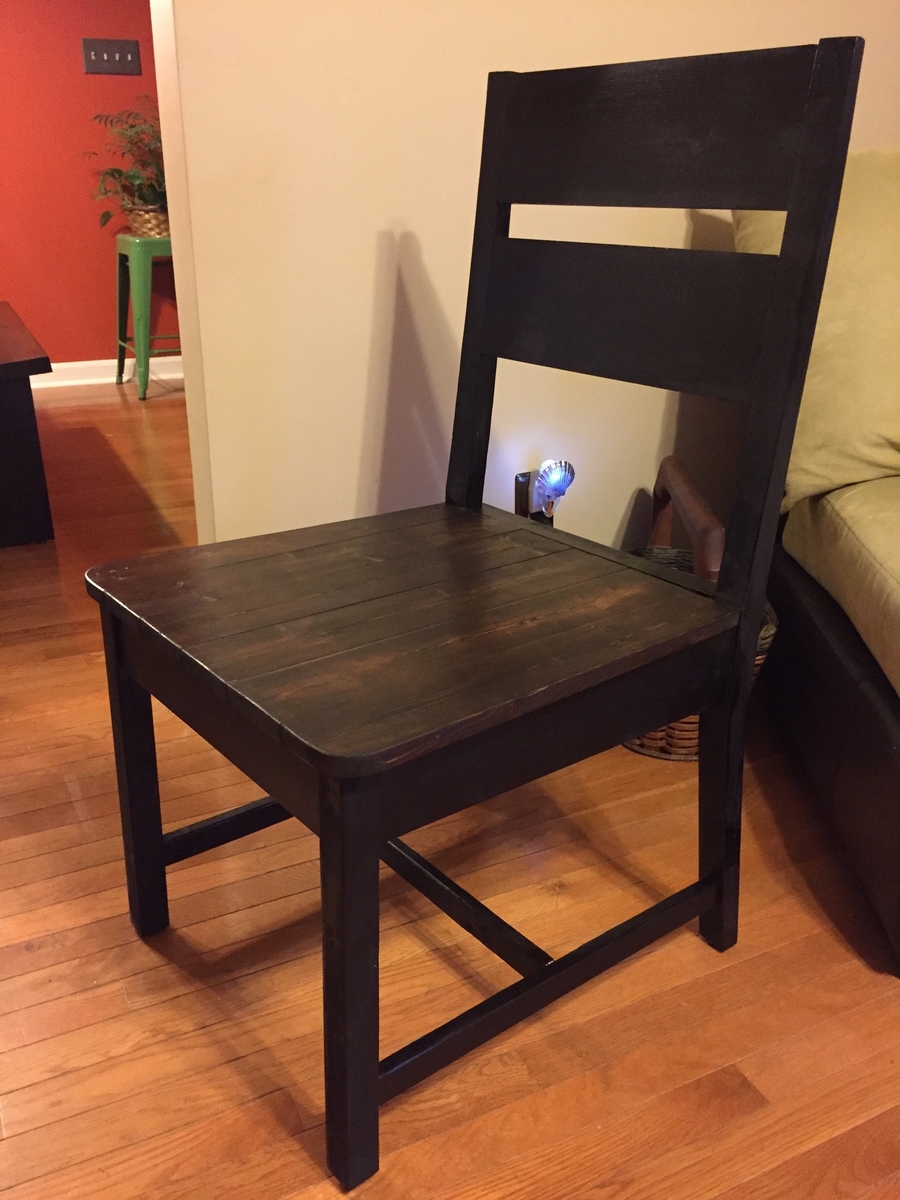
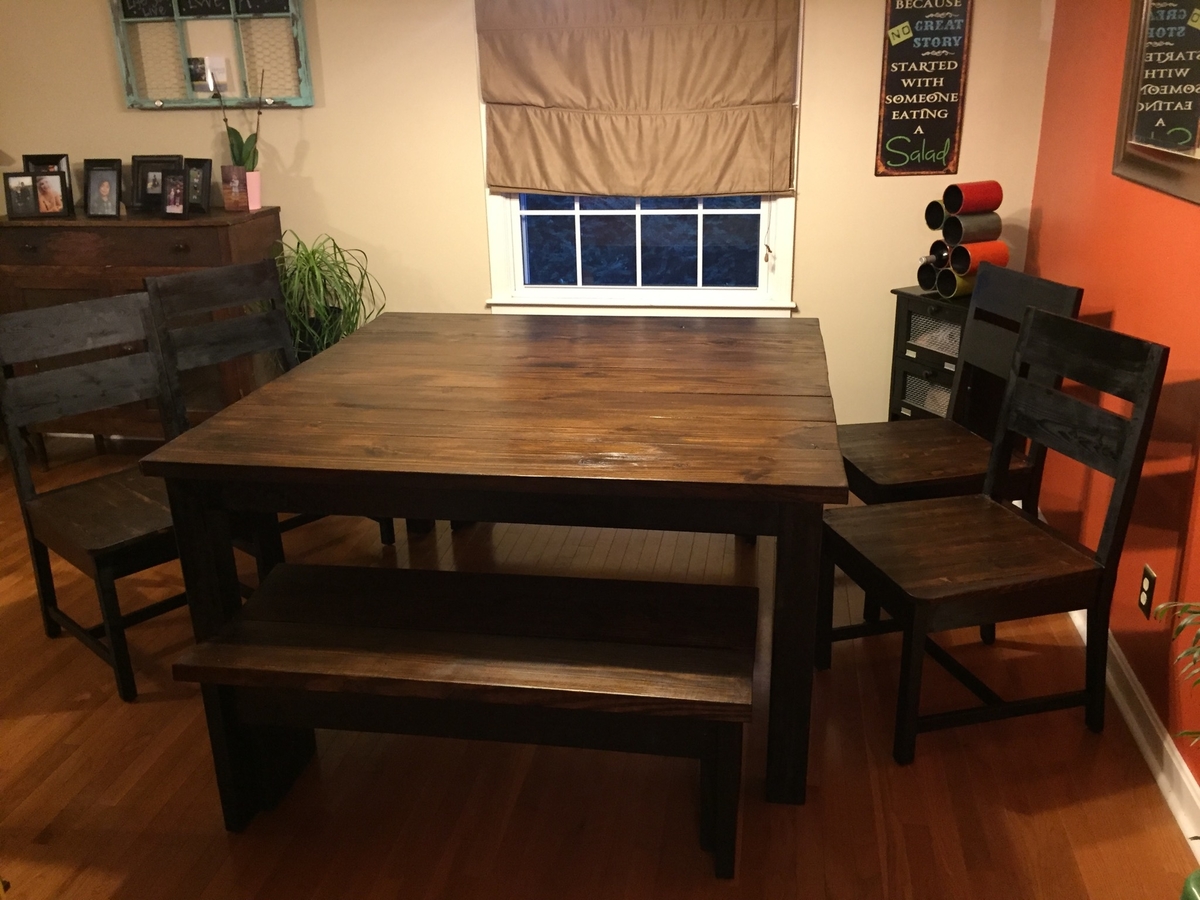
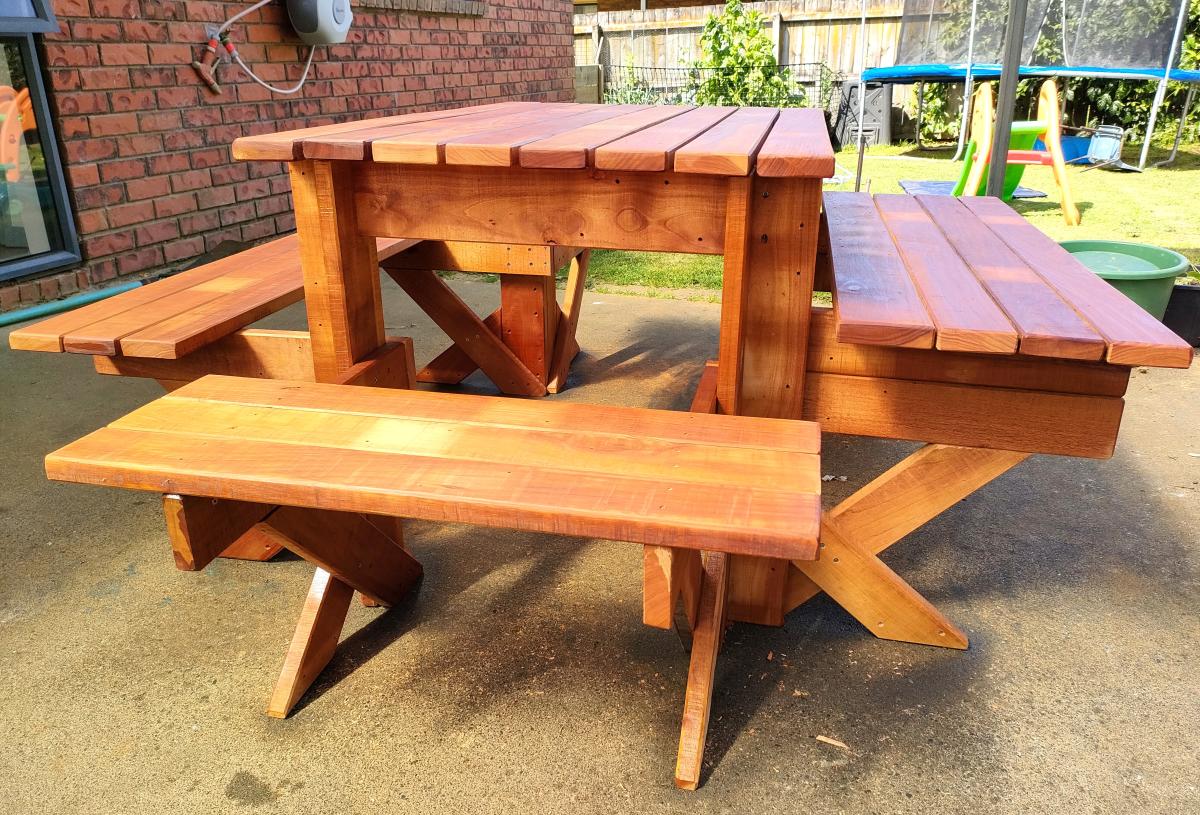
This was my first attempt at making furniture...but it turned out GREAT! My fiance was about to buy a VERY similar dining room set for $1300 before I stopped her and insisted that I could build it myself, finish it to match our kitchen/dining room, and save a TON of money!

Basically I took Ana's plan and tweaked it to create a diy sofa, a love seat, and a corner piece to make a sectional. All 3 pieces have the same basic design and function (they all have a storage compartment), although the corner piece, because of its placement and the thickness of the seating cushions, doesn't open unless the couch is opened first. We purchased custom cut, 6" thick foam cushions for the seats (we bought the XL-38 foam from https://www.buyfoam.com/, but if we had to do it again, we'd go with the XL-28 as the 38 is VERY firm). We also used upholstery fabric instead of a paint drop-cloth to cover the couches. The foam and upholstery fabric upped the overall cost significantly. Other changes from Ana's plan, I used 15/32" OSB because the 1/4" plywood just felt too flimsy (I'm a large guy). I also added I bolts to the underside of the seat before the foam and upholstery so I could add a stress relief rope to prevent the kids from opening the top and dropping it and ripping out the hinges. I used piano hinges as they seemed to me to provide the most support. Finally, I ended up using 1x2s for the base trim since I couldn't find any 2x2s that were straight and finish-ready, then I added router detailing to provide some visual interest. I used 3" pieces of 4x6 for the feet and added matching router detail. Additionally, I used T-Nuts and bolts to make the feet and base trim completely removable.


Mon, 08/17/2020 - 07:46
It is superb blog and i really appreciate your blog. It is because i always like the informative blogs. You did a great job and thanks for sharing.I am impressed by your post. It contains very informative data and i gain a lot information from it. It is very useful for me. Thanks for sharing and keep on sharing that type of posts.The Mobile App Developer Dubai provides good service you visit here site https://www.mistersaad.com/
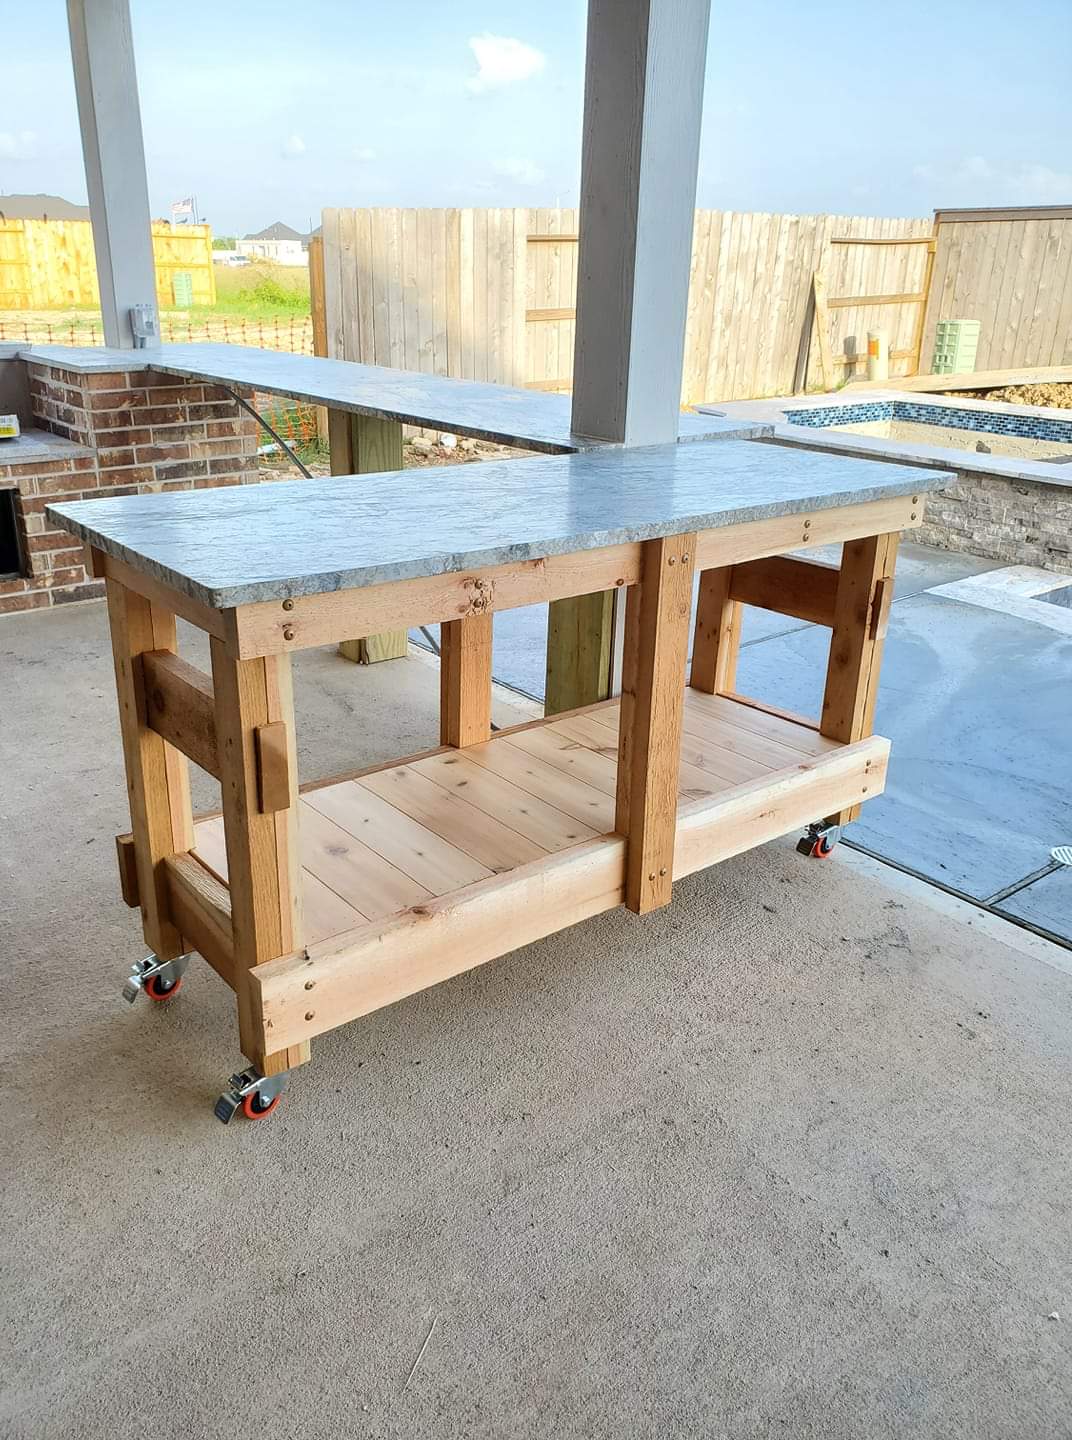
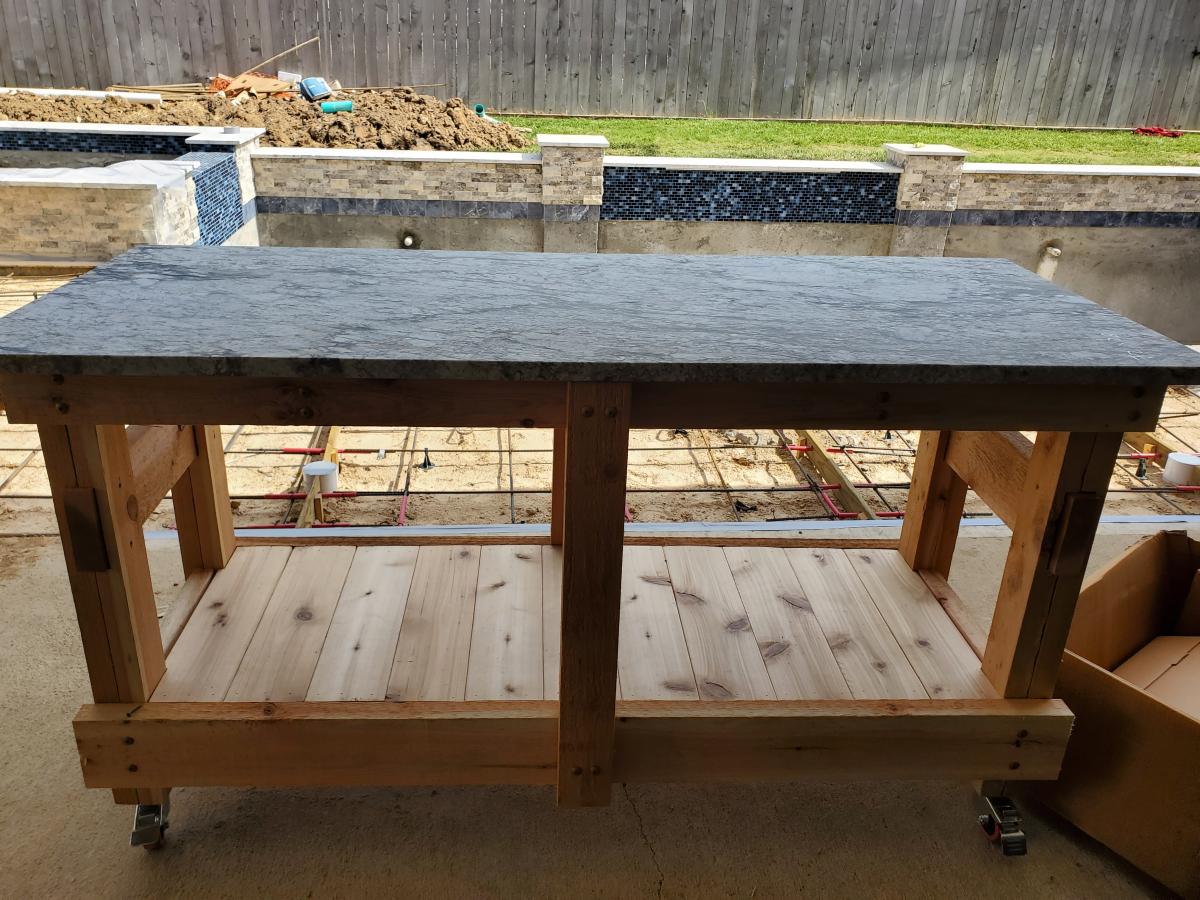
We had some leftover granite from an outdoor kitchen build and wanted to maximize the use of it. We loved the look of a rustic table from Pottery Barn and set out to find something that was asking the same aesthetic. I came across the Jilly and Mia workbench console and thought it would work great with some minor modifications. I shortened the overall length and height, went with some heavy duty casters to support the weight of the granite, and reinforced the cross beams that would support the 3/4" plywood sheet and granite. I went with cedar for this build since it was outdoors and I'll finish it with a clear sealant.
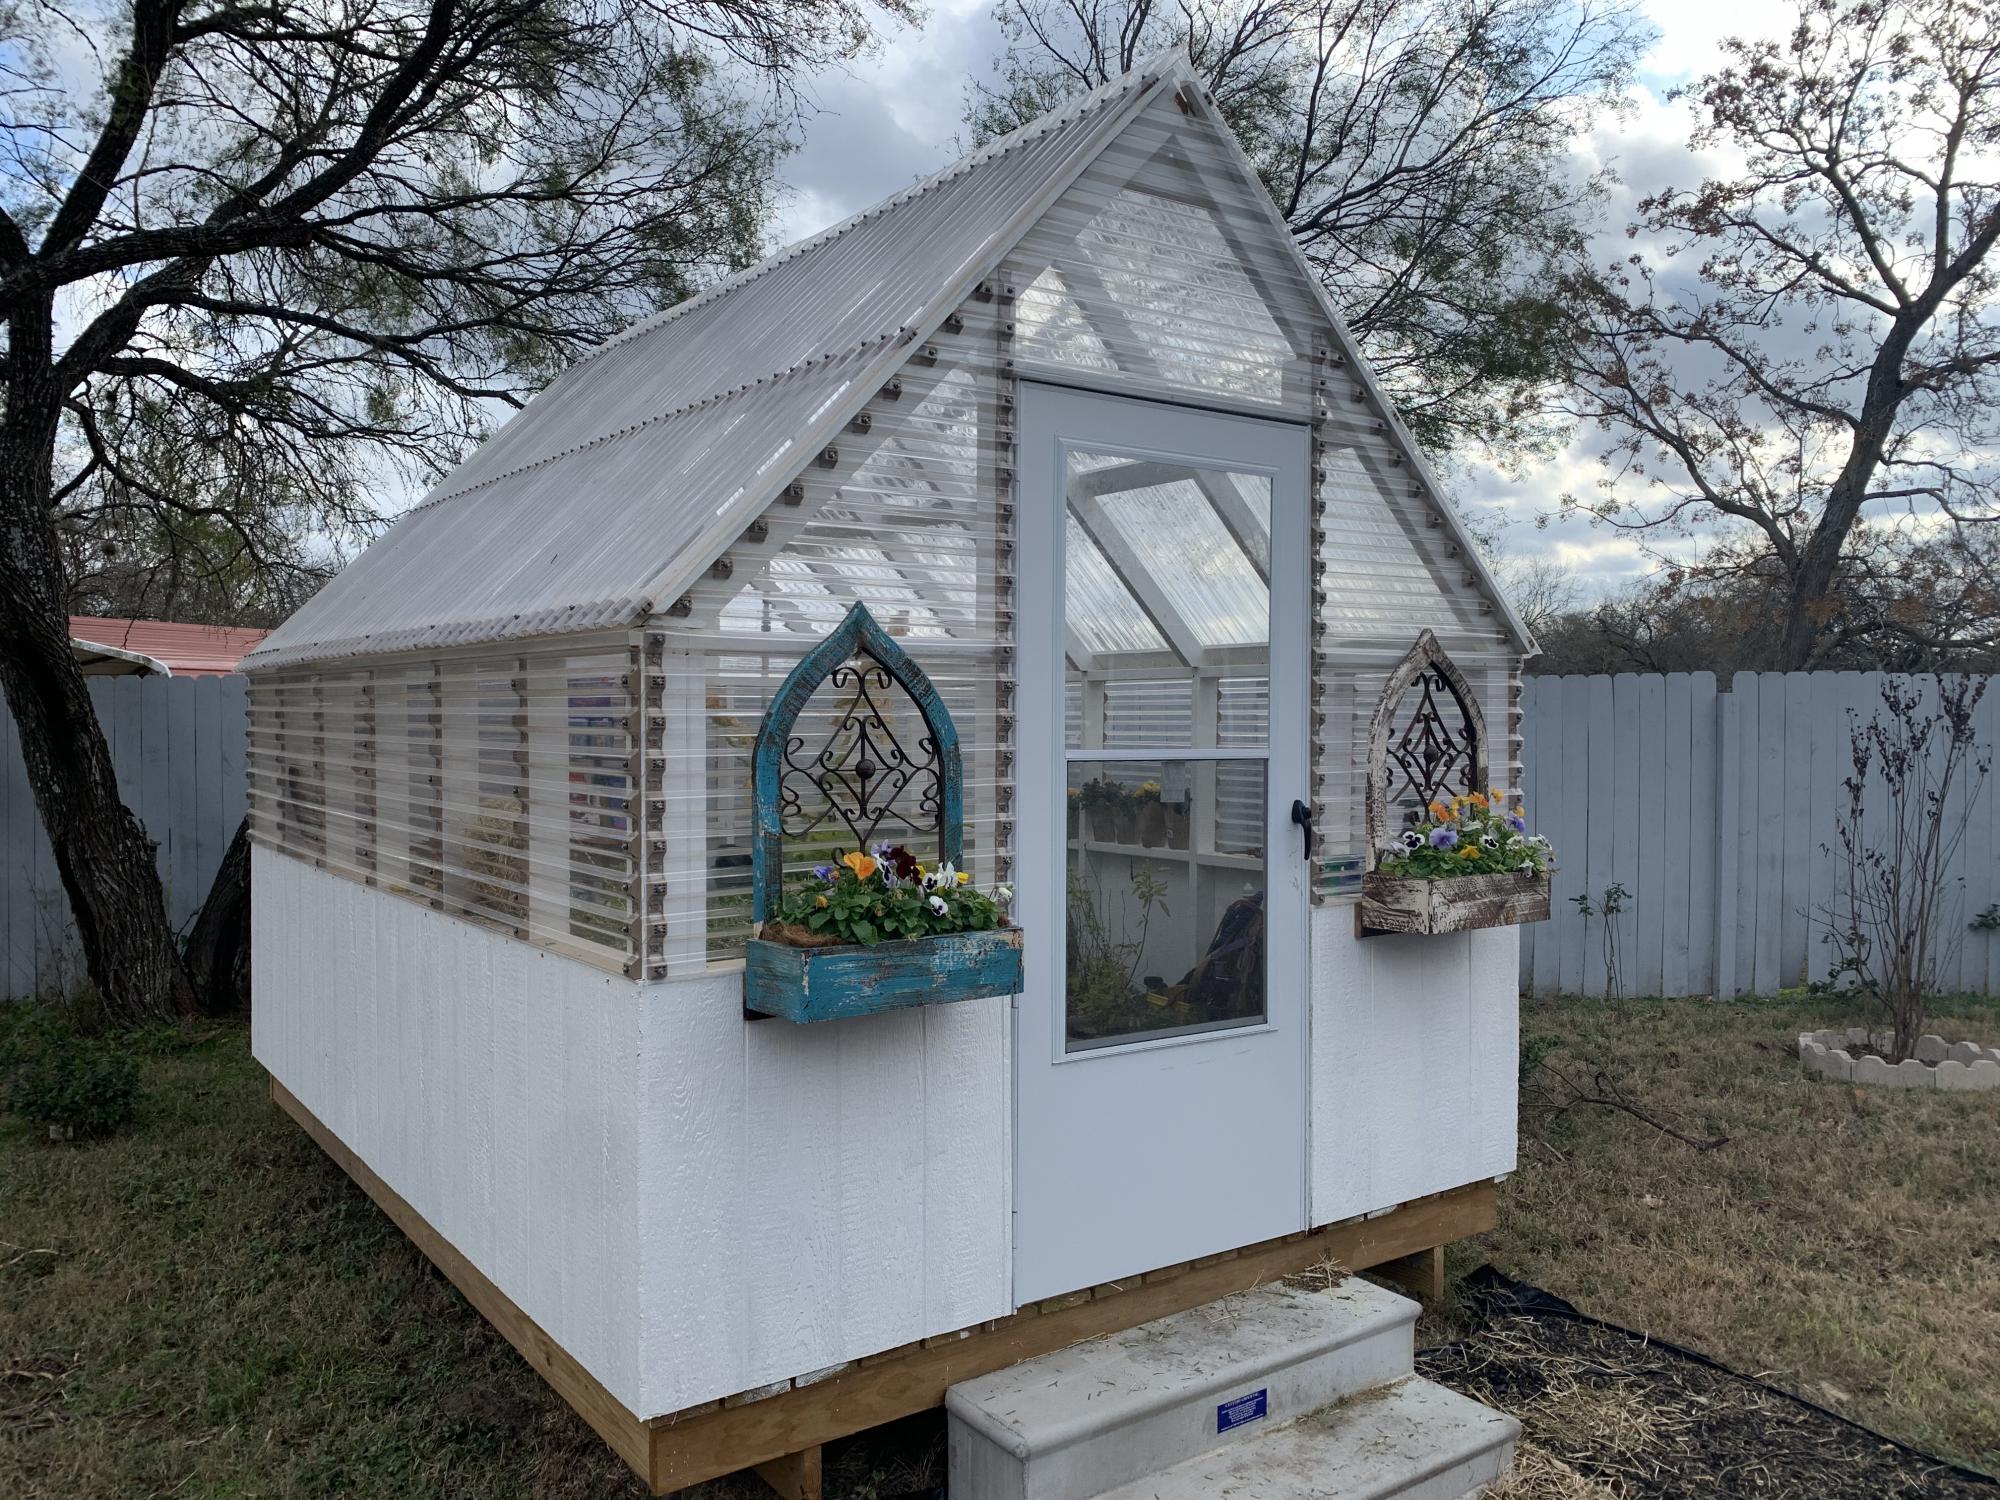
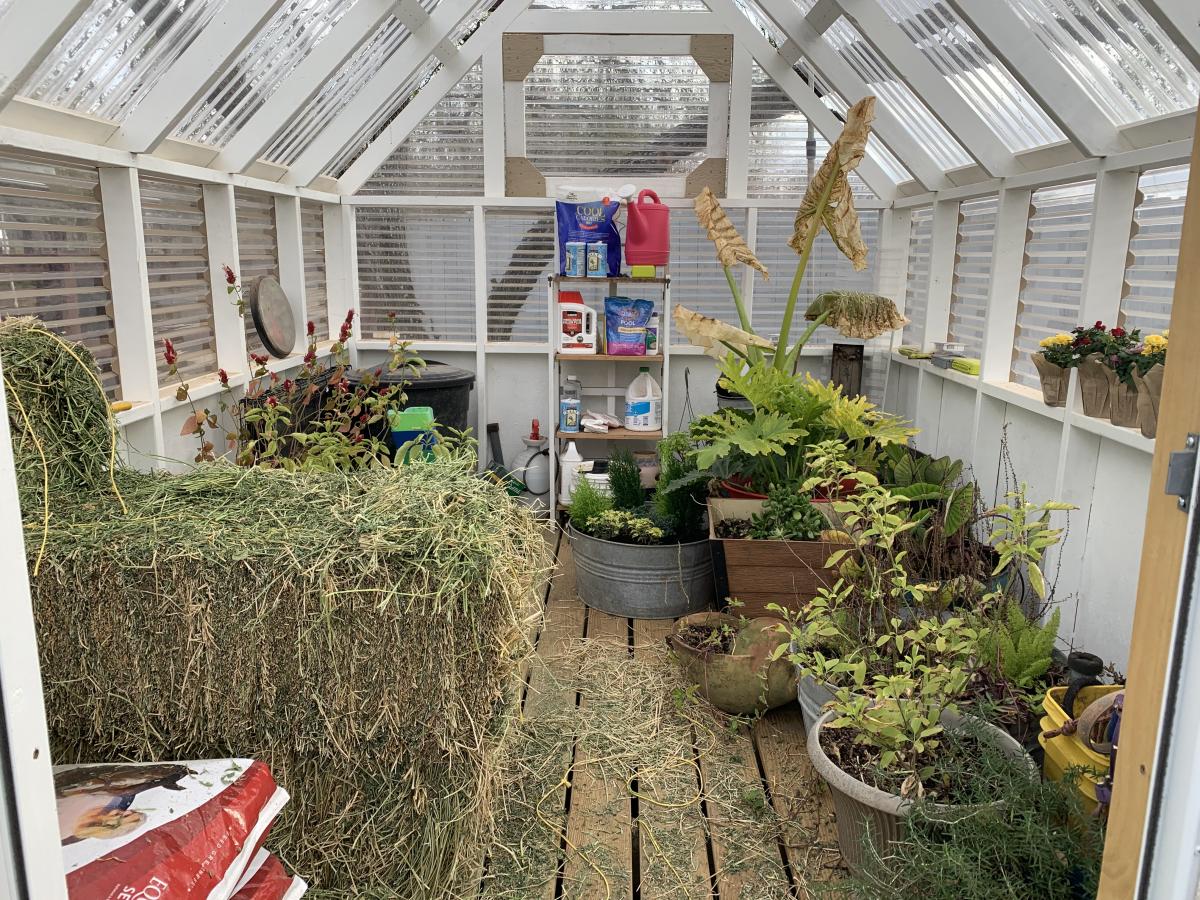
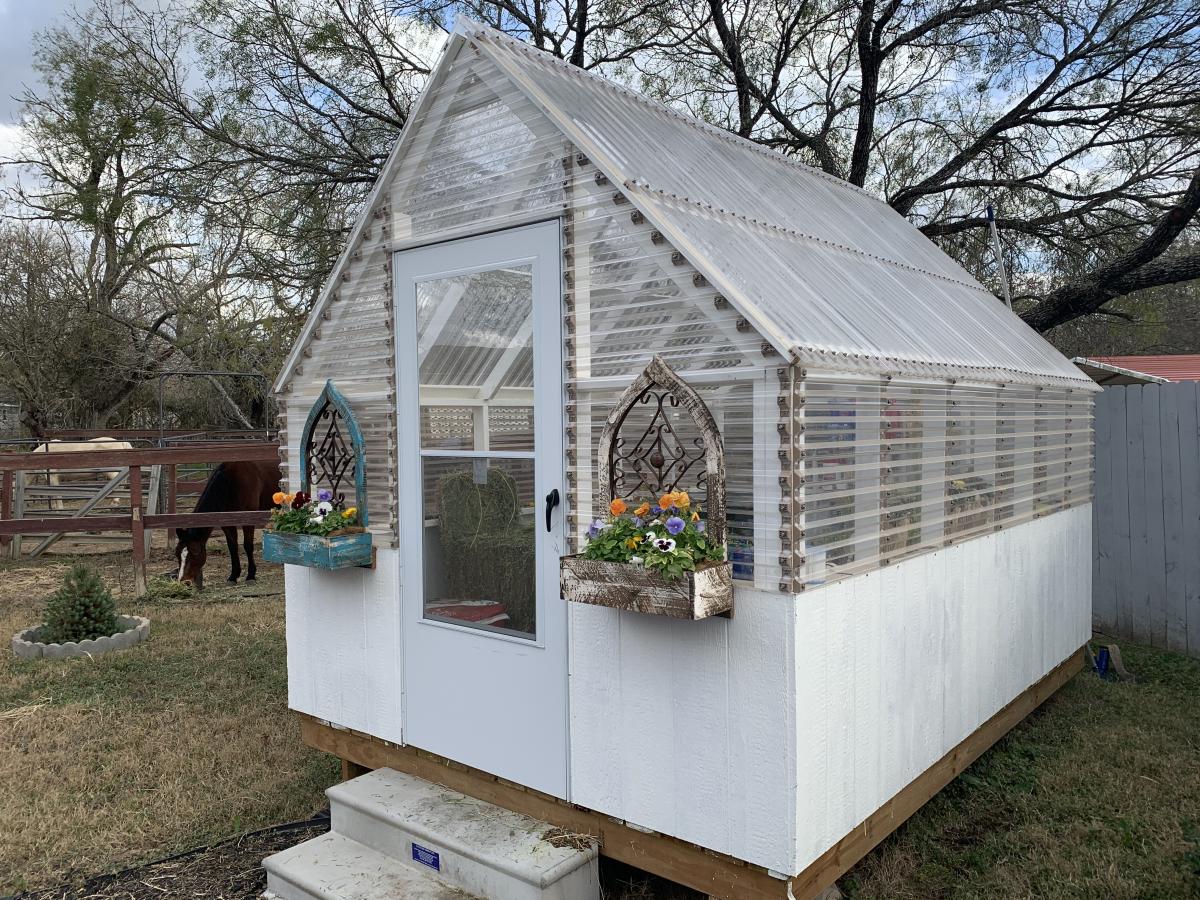
I was planning on building a greenhouse some time next year but I just happen to see this by chance and fell in love with it. I've always built from my own designs but when I saw this I decided to purchase the plans. I couldn't be more happy with it. Right now its doubling as a feed room. I wanted a solid foundation so I build a floating deck to mount the walls on. The deck added quite a bit to the total price.
Wed, 12/23/2020 - 09:52
Love that you're able to double it as a feed room, great job on this build!
Fun build. Plans were easy to follow!
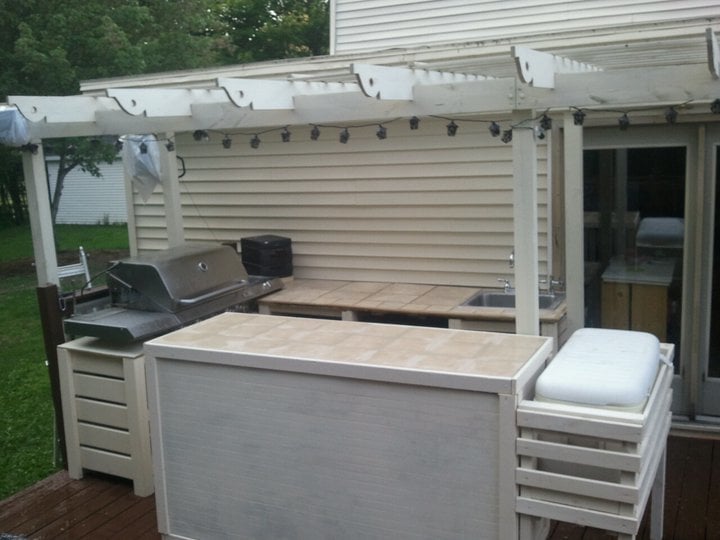
This is the new outdoor kitchen I had been working on - finally finished! It was inspired from the kitchen island plans - I like the slats, and thought they would work well outdoors for air flow and water drainage. I worked around the existing grill, and it is all modular, so it can be moved if necessary (such as painting or treating the deck). It includes cupboards underneath the bar, dorm fridge and sink with storage under the countertop. The cooler stand raises the cooler up to 'user' level (no more bending!). Because I'm an avid recycler - most of the products used were recycled items. All told (not including the already purchased grill) - this kitchen cost me a total of approximately $95.00 (I had a lot of the materials already). This project took me approximately 5 weeks working on it part-time after hours. I built one cabinet at a time, then the countertops.
Wed, 07/06/2011 - 10:12
I would love to see more pictures of of your bbq kitchen. This is just what we need. Thank you for sharing.

Wed, 07/06/2011 - 17:29
This looks really awesome Colleen! I was thinking about putting a sink like that on my deck. What kind of finish did you use for the countertops? Would you please post more pictures of it? Great job!
Thu, 07/07/2011 - 04:42
Thanks Kmatt & Viola...I'll try and get some more pictures up asap. For the bar top and countertop I used tile, and treated the grout lines many times with a waterproofer. Both tile and grout were purchased at our local ReStore - a total of 20 cents a piece for the tile, grout was $3. Not bad for a countertop!
Thu, 07/14/2011 - 16:57
What kind of top did you put under the tile? Plywood, cement board?
Wed, 07/20/2011 - 11:48
Wow, this is really amazing! This is just what we need for our new deck - something modular and not too expensive to build. Do you have any more pics? I'd love to see what the area in front of the grill looks like. Very, very nice work.
Mon, 03/05/2012 - 10:54
Hi, I was wondering if you have the plans for the kitchen around the bbq grill, i would love to make this for my husband for his birthday.
Mon, 04/09/2012 - 18:38
Hi, this is great. Is there anyway you can post pics of the front of the bar where the sink is and especially the bbq, I want to build around my existing bbq grill but dont know how. thank you so much.
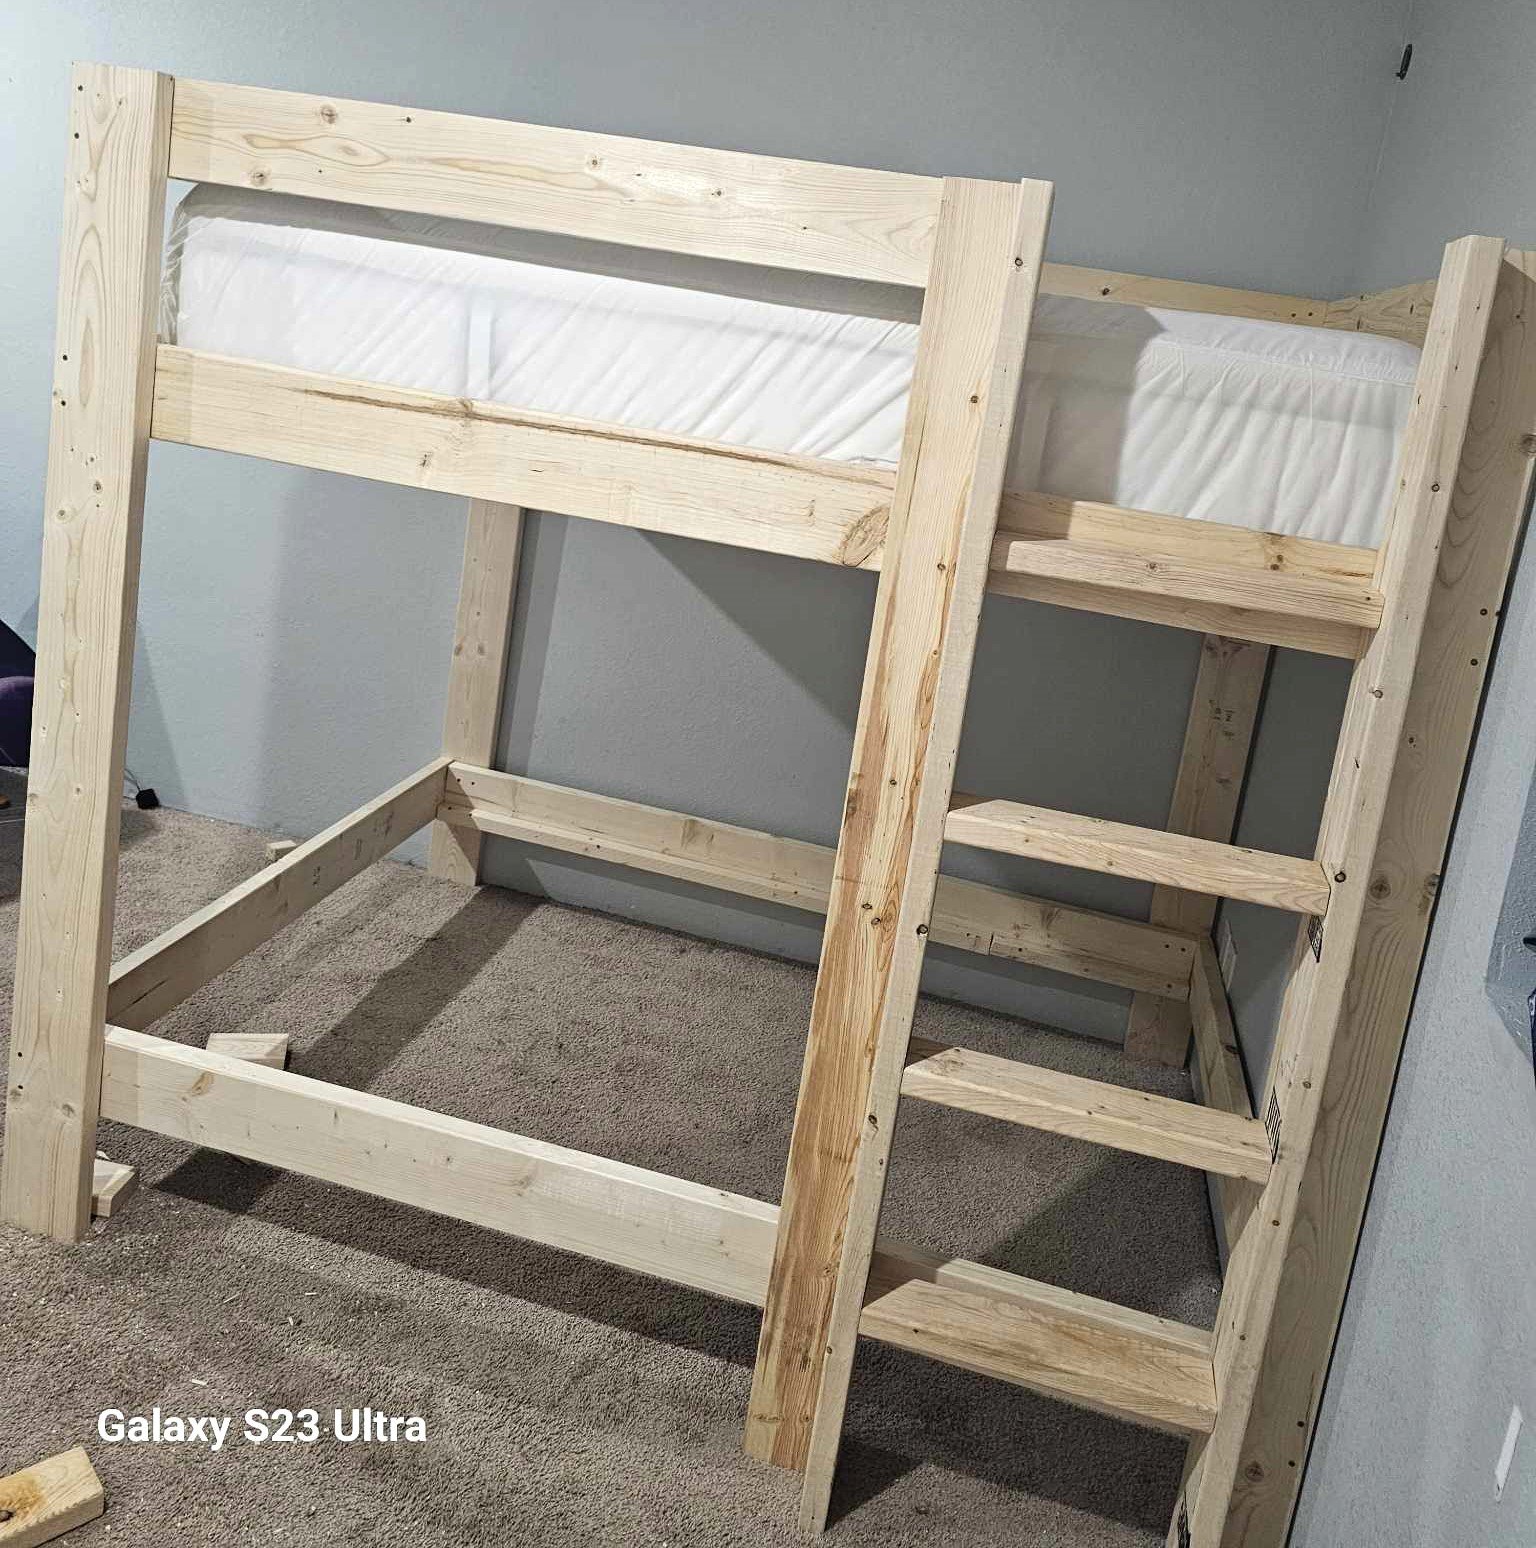
Almost finished but I managed to alter the plans into a full over full! Just use 2×4 instead of 2×1 and use 2×6 for the legs.
Antonio
Kids stuff usually sells pretty good for us. Considering in our area, to buy kid size chairs are about $25 we looked for another option. This stackable chair fit the bill perfectly and was so inexpensive and easy to build!! Made the back part solid so I could paint on it and added some moulding on the side. Going to get my grandson who is being homeschooled, busy building some more as part of his wood shop class.
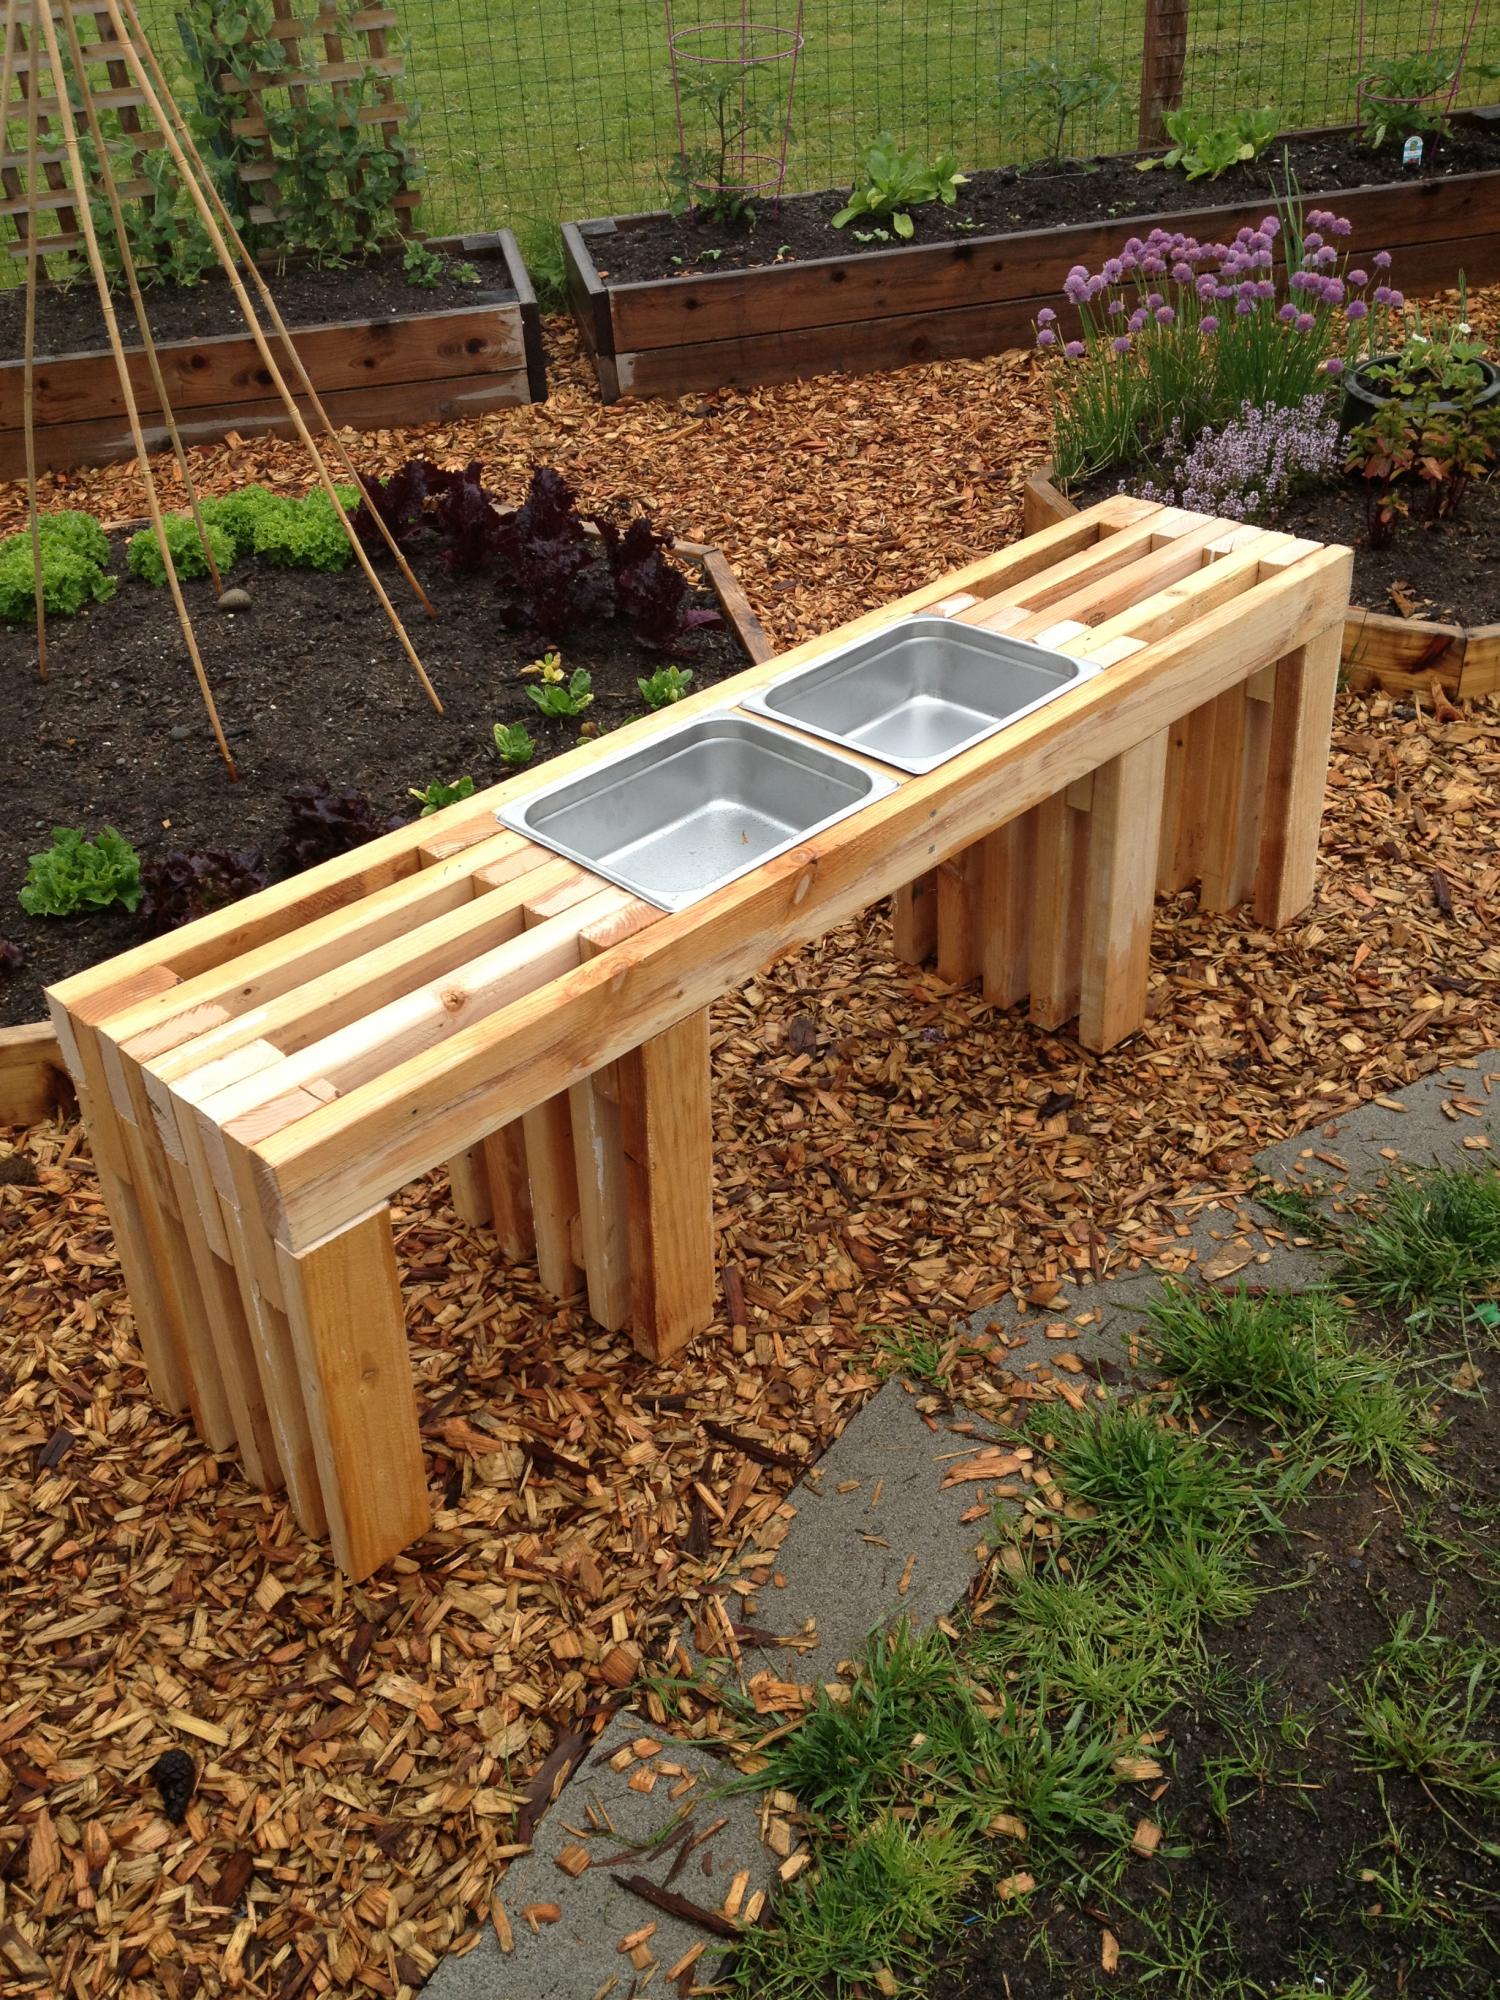
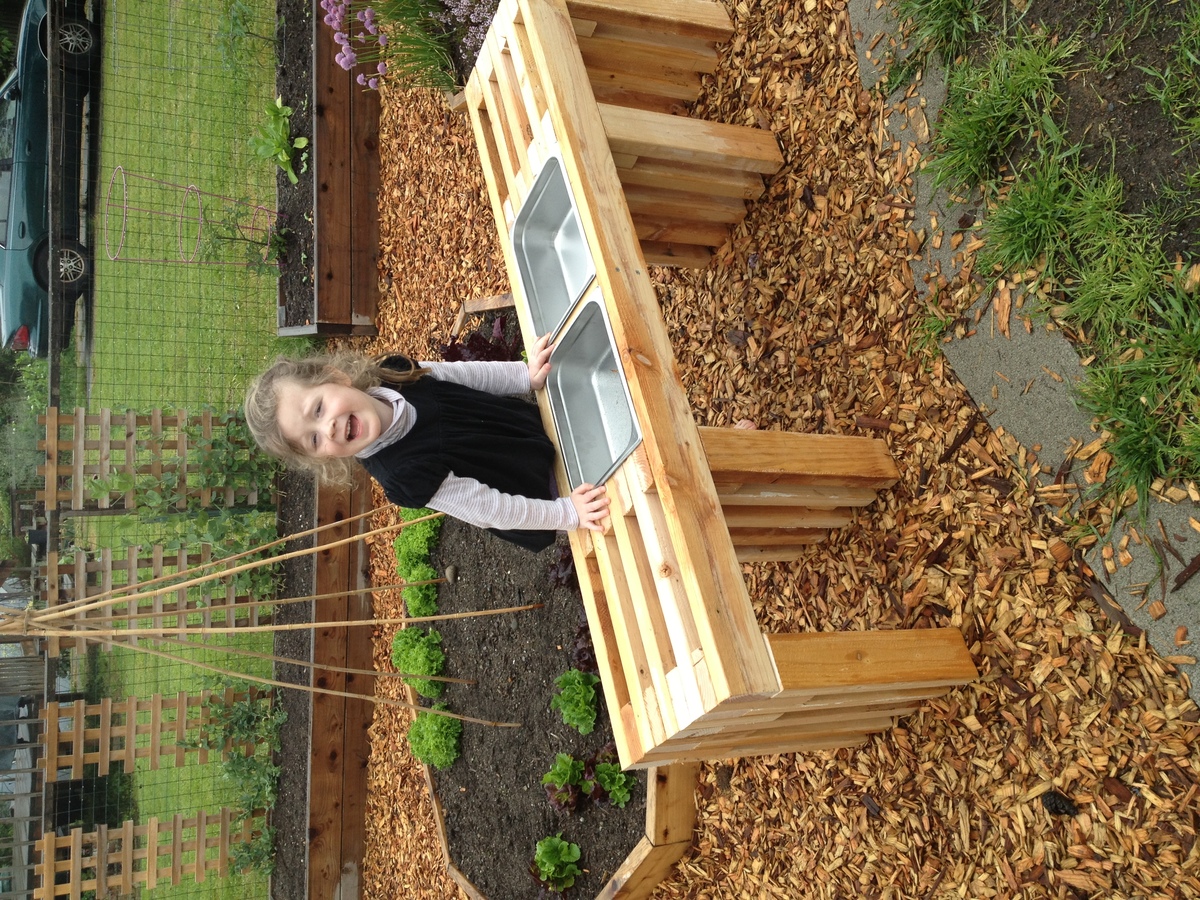
I've been looking for a simple design for a consol table that I could easily modify to fit in my kids' club house. This one fit the bill perfectly! I also happen to have a pile of 2x4s left over from a closet demo, so I wanted to use those up. I basically built 2 of the consol tables, letting the 2 outer-most horizontal beams extend across and 25.5 inch space and connect the two consols. Then I put in a middle beam and that created the perfect space to set some catering pans in it. Also, I only had 2x4s so I used those for all the pieces, making the gaps a little wider than the original design. And lastly, because I didn't quite have enough wood, I shortened the vertical beams. If you look at the picture, all of this will make more sense! Thanks for the inspiration and direction! ps - I have no idea how to rotate the photos. Sorry!

I modified this chair with 2x4's as the base and 2x2 for decoration on arms, this is prior to sanding and finishing

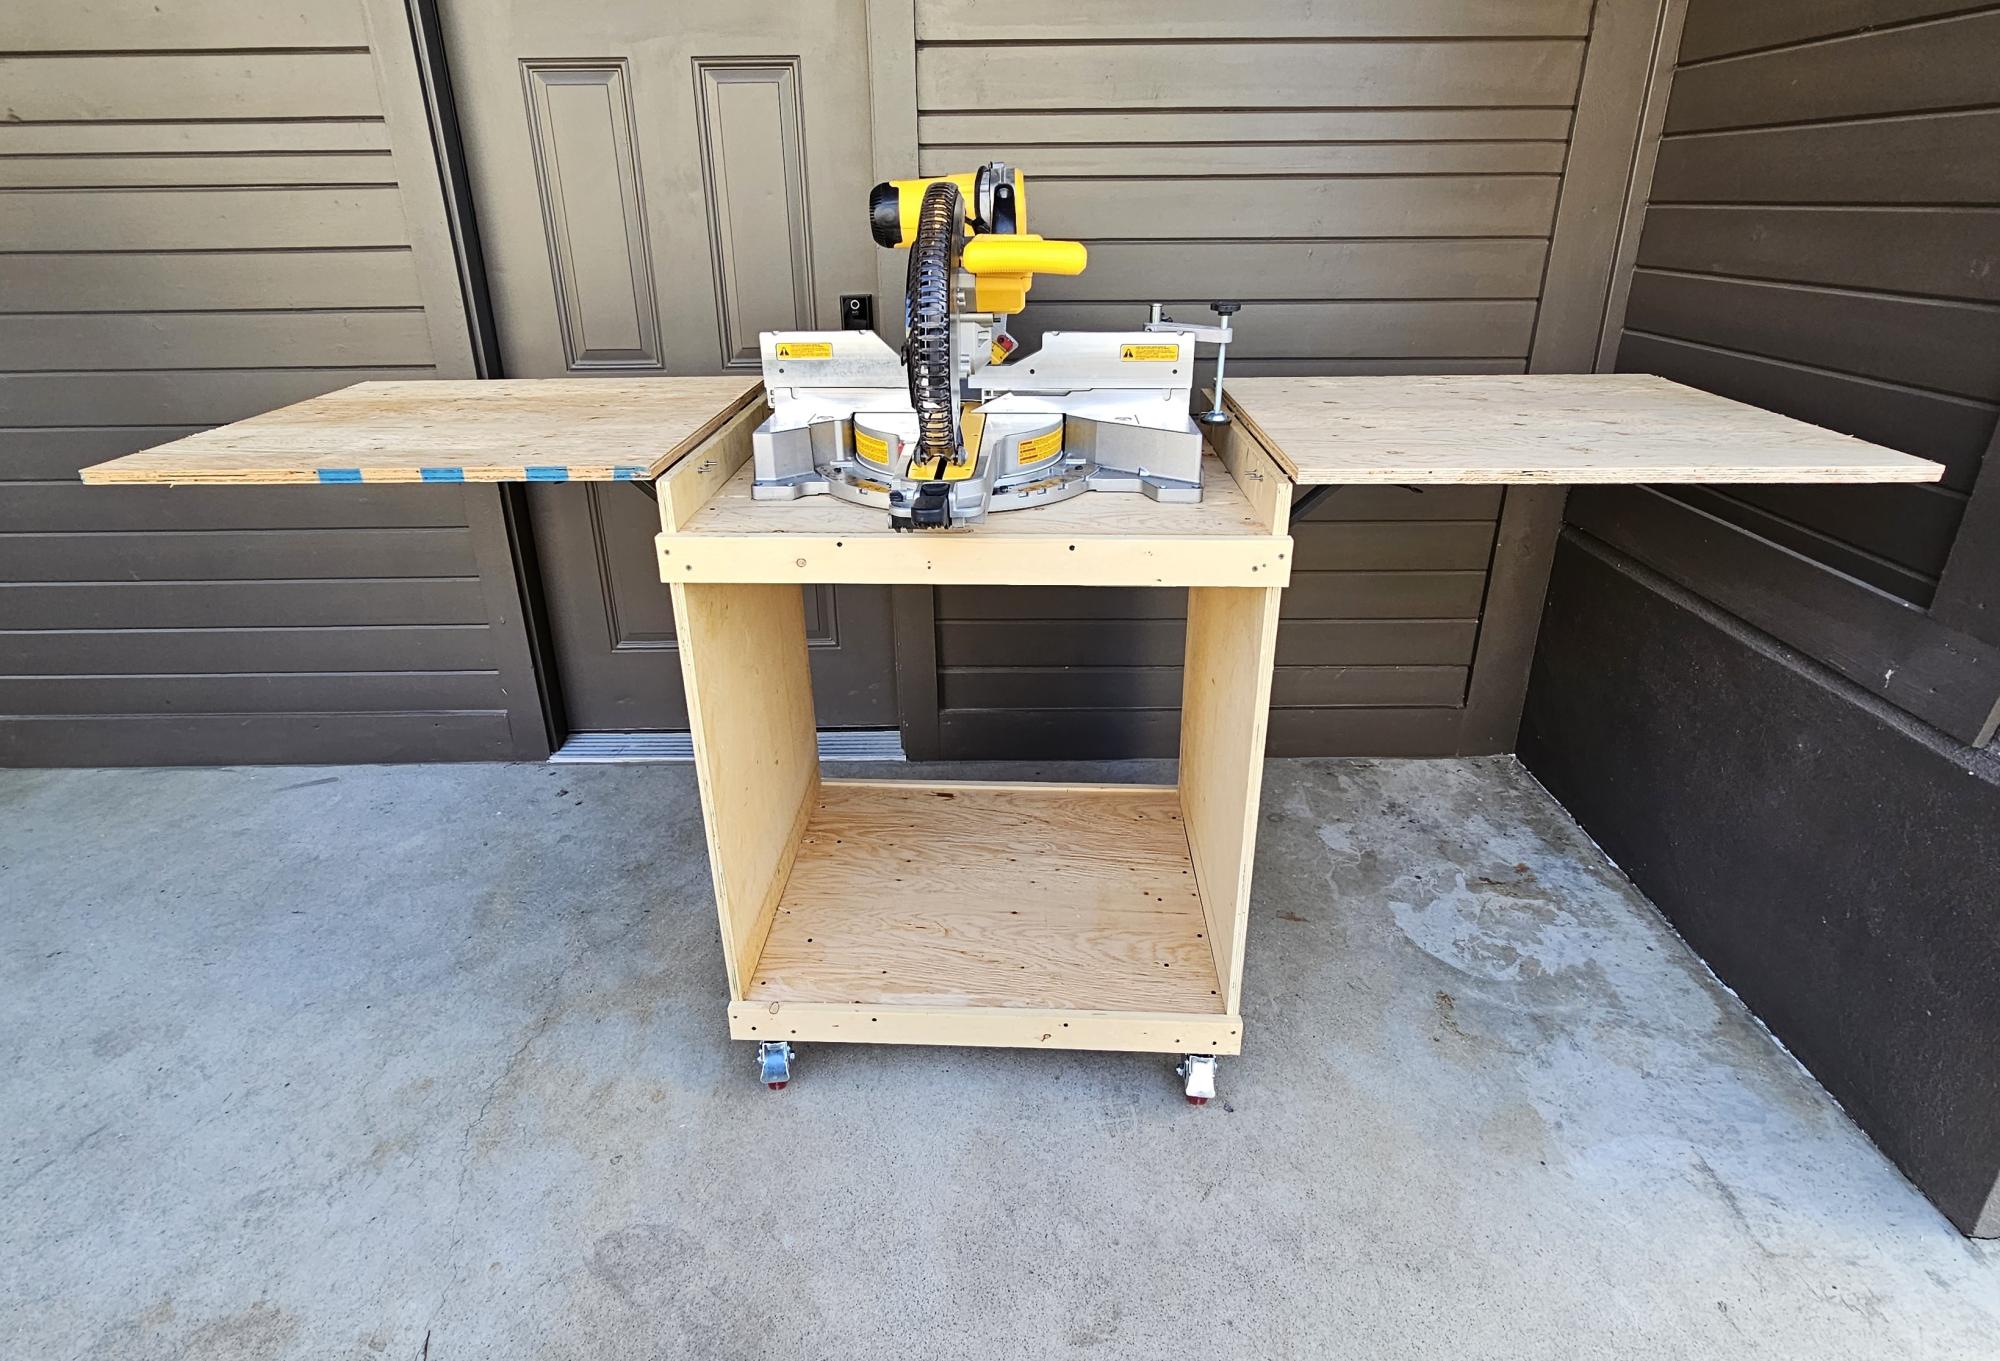
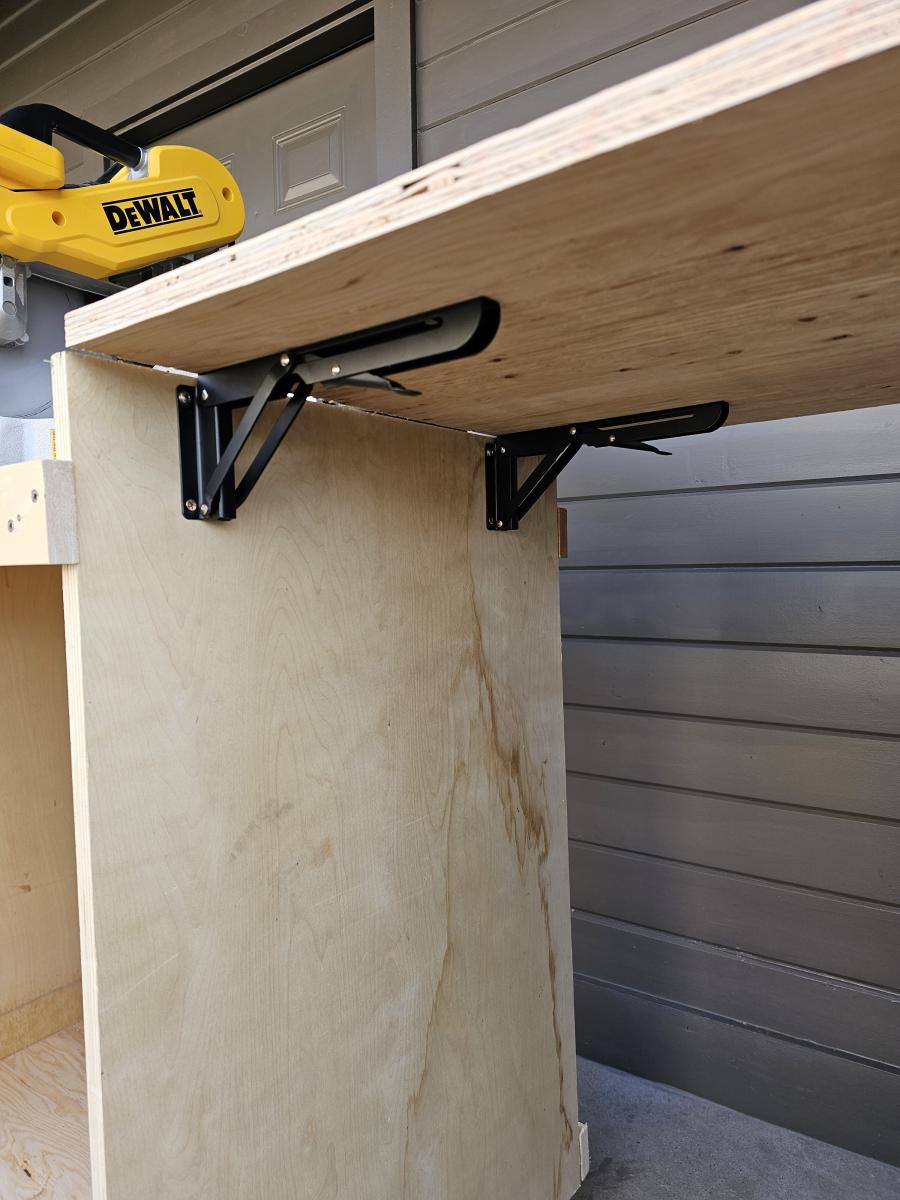
I pretty much followed the plans exactly as provided. The folding brackets I used are supposed to be heavy duty and able to handle up to 100 lbs. per pair of brackets. We'll see how they do. If needed, I might add the 2x2 or 2x4 braces I've seen many others do on here. It's nice to finally have my mitre saw off of my workbench.
These are the brackets and wheels I used.
https://www.amazon.ca/gp/product/B08PVFJ87Y/ref=ppx_yo_dt_b_asin_title_…
https://www.amazon.ca/gp/product/B093FQVV8P/ref=ppx_yo_dt_b_asin_title_…


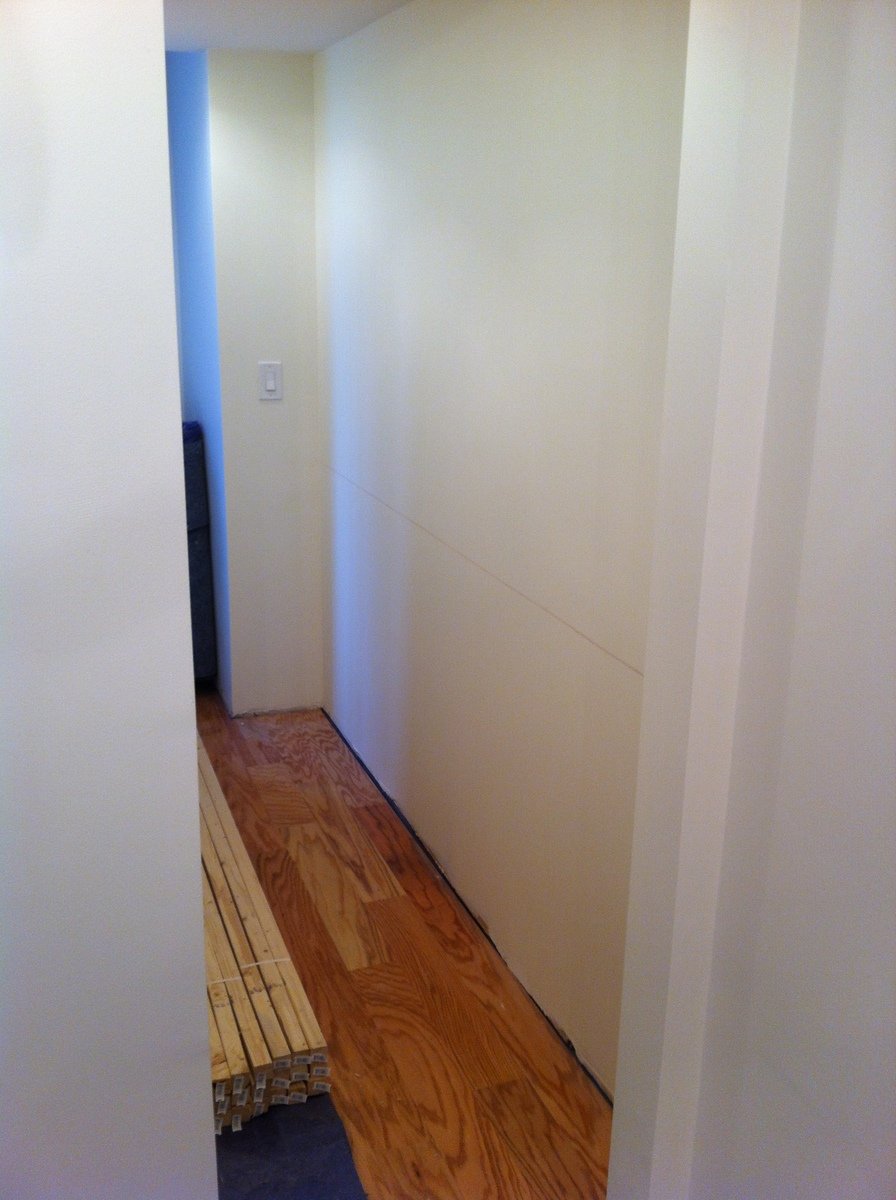
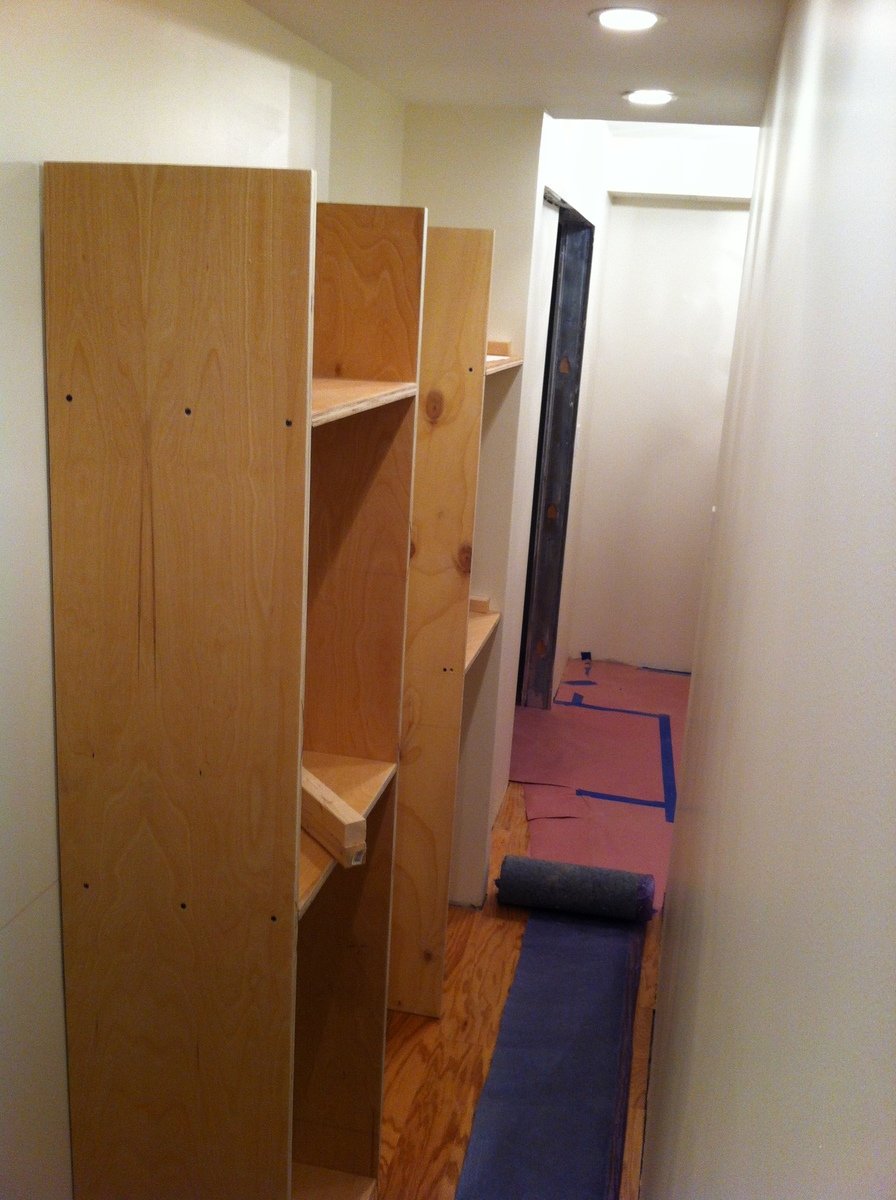
Followed plans with slight modifications:
1. Made shelves deeper but narrower
2. Used 3/4" Birch Plywood for all
3. Built no base just mounted to floor & wall
4. No drawers just shelving
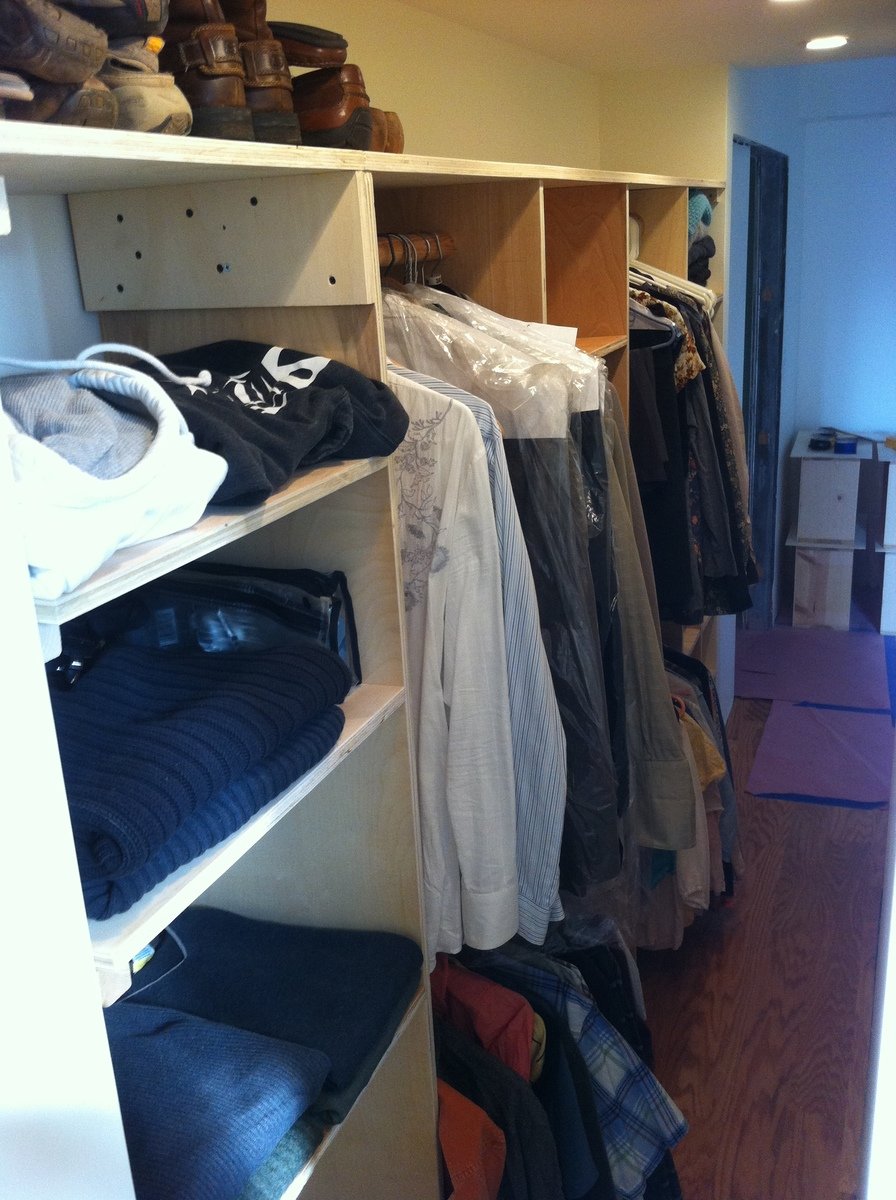
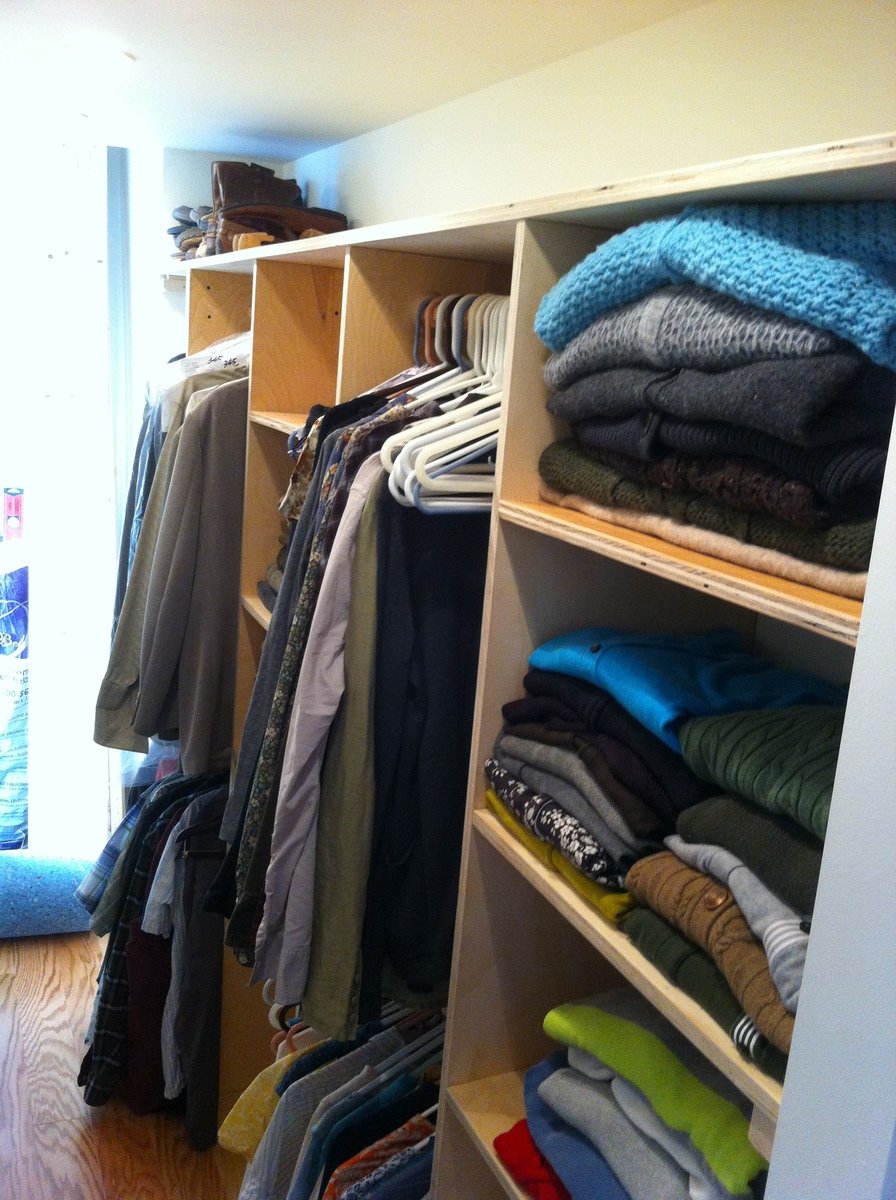
Sat, 01/19/2013 - 04:43
It's nice to see the closet system with actual stuff in it, so you can see how much it really holds. Good job!
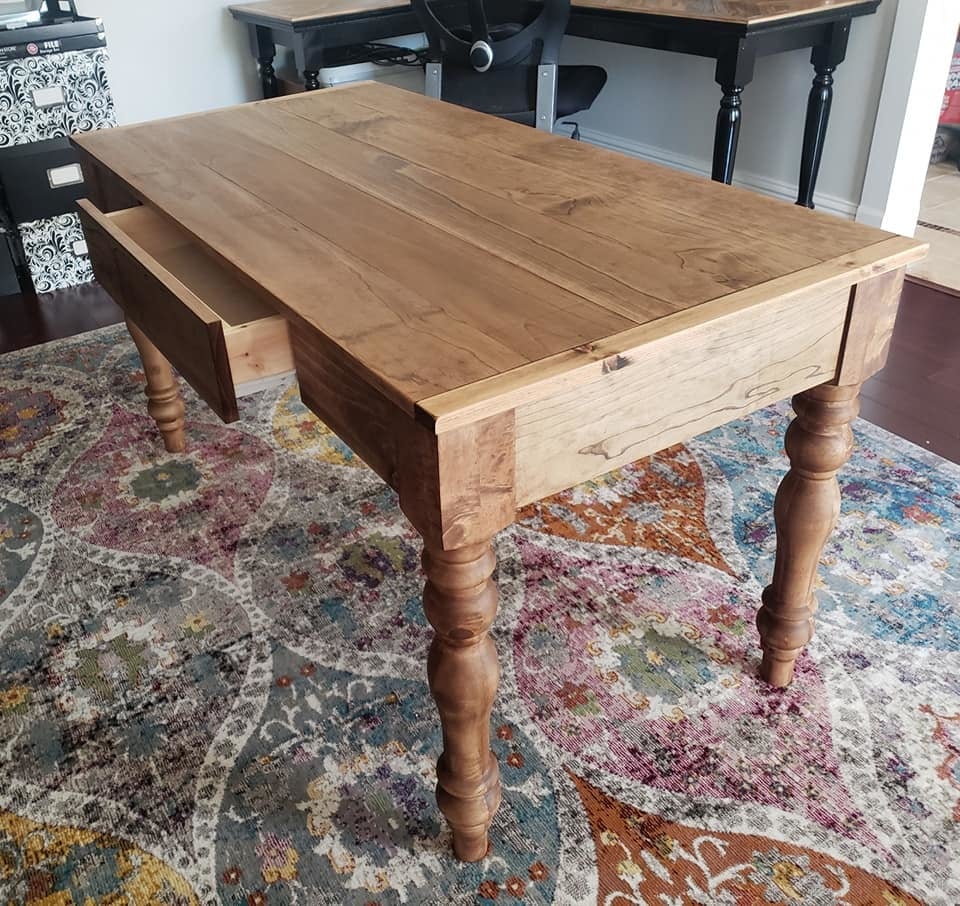
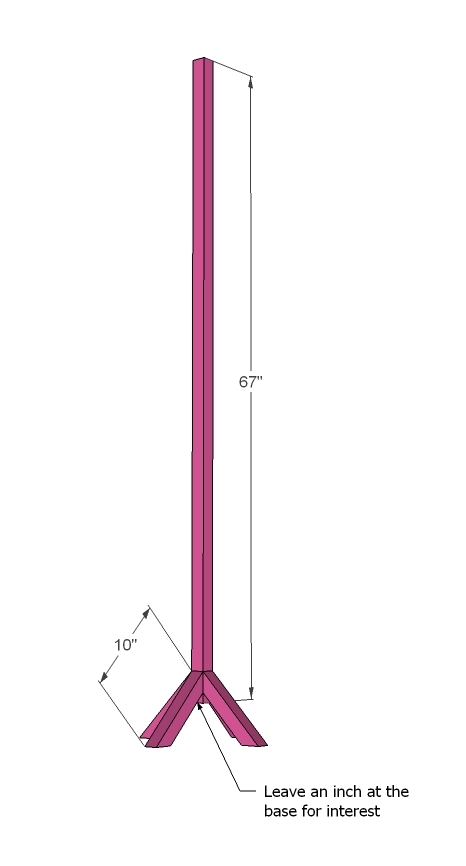
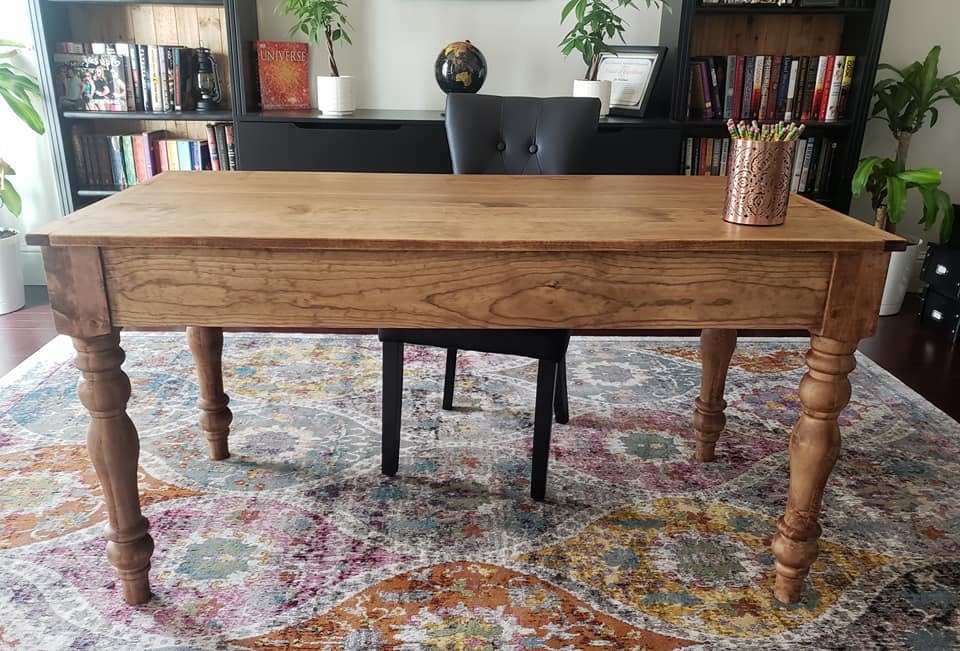
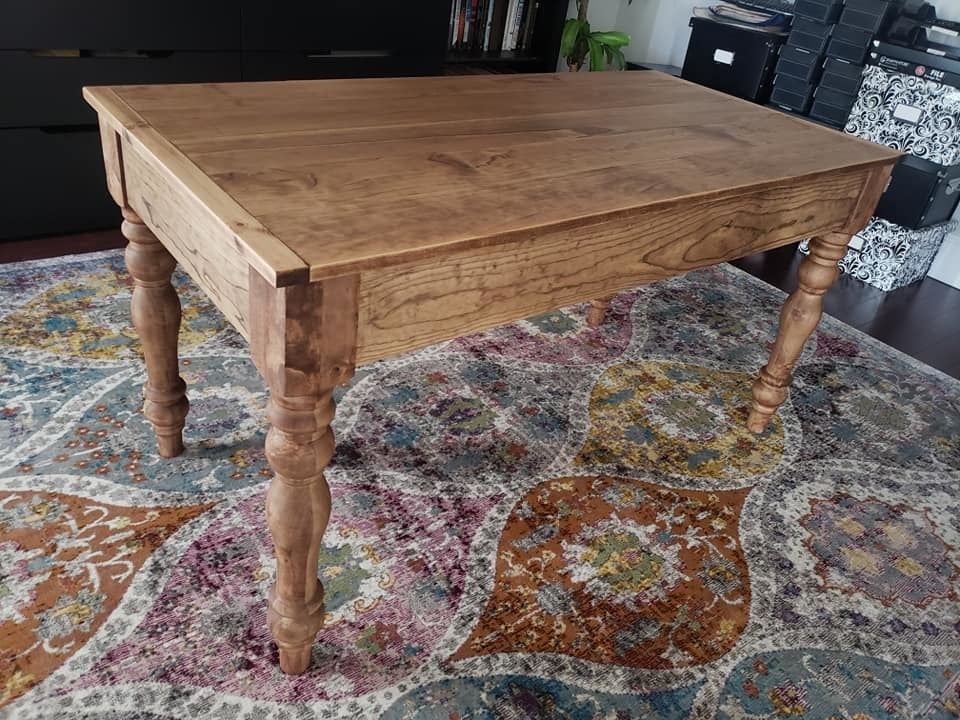
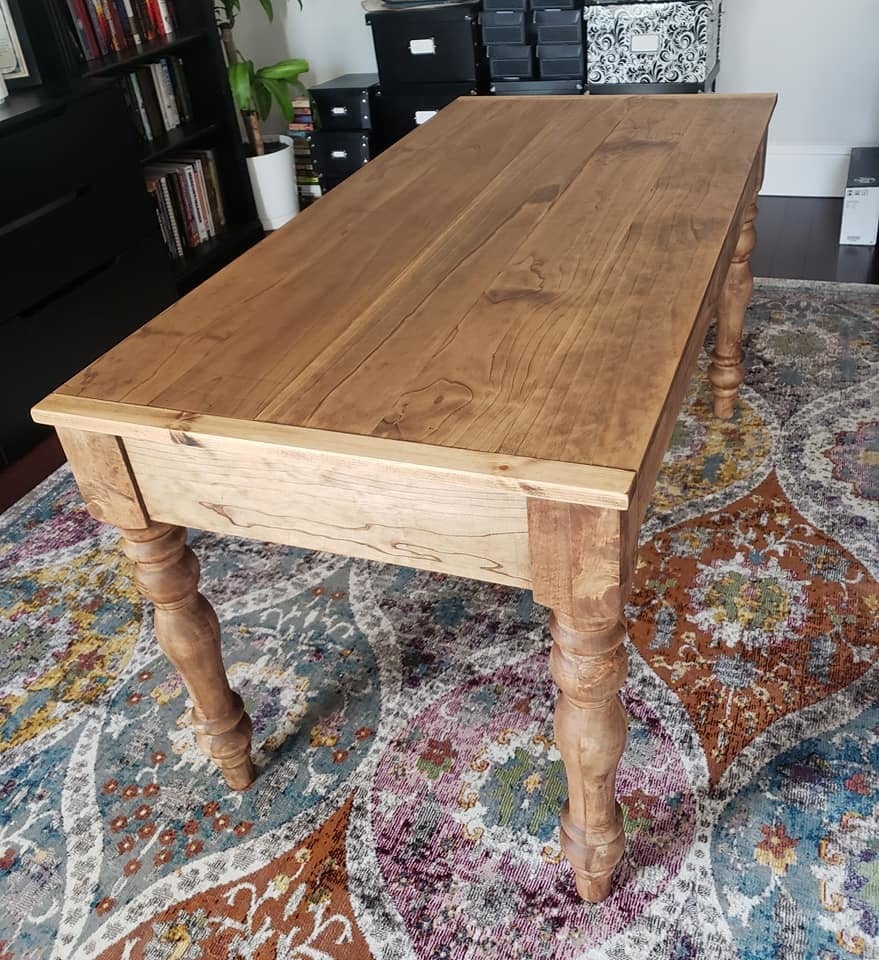
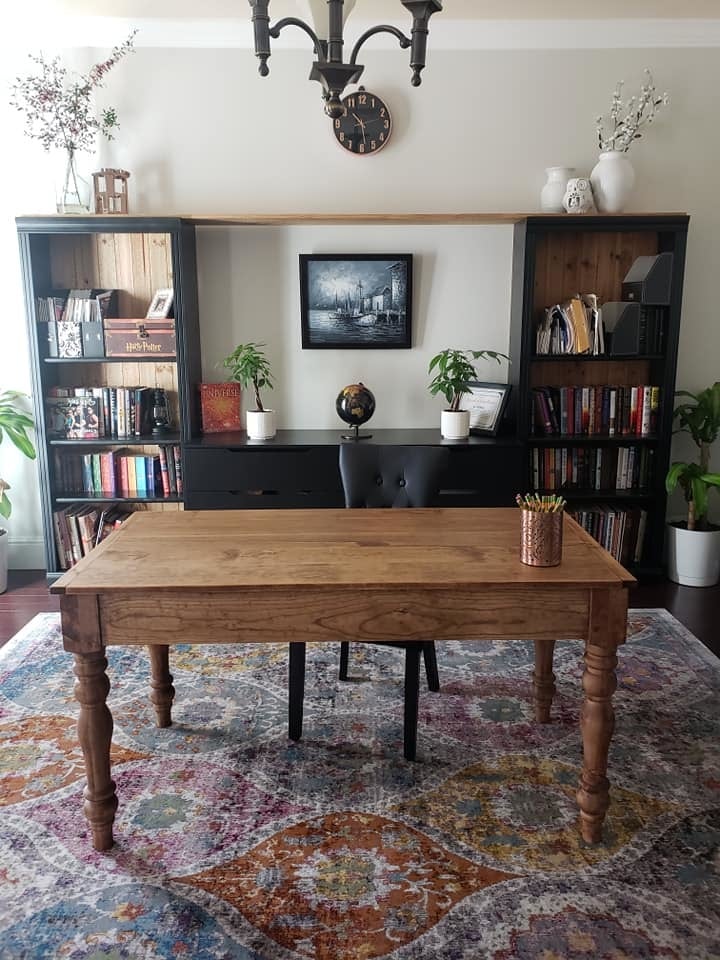
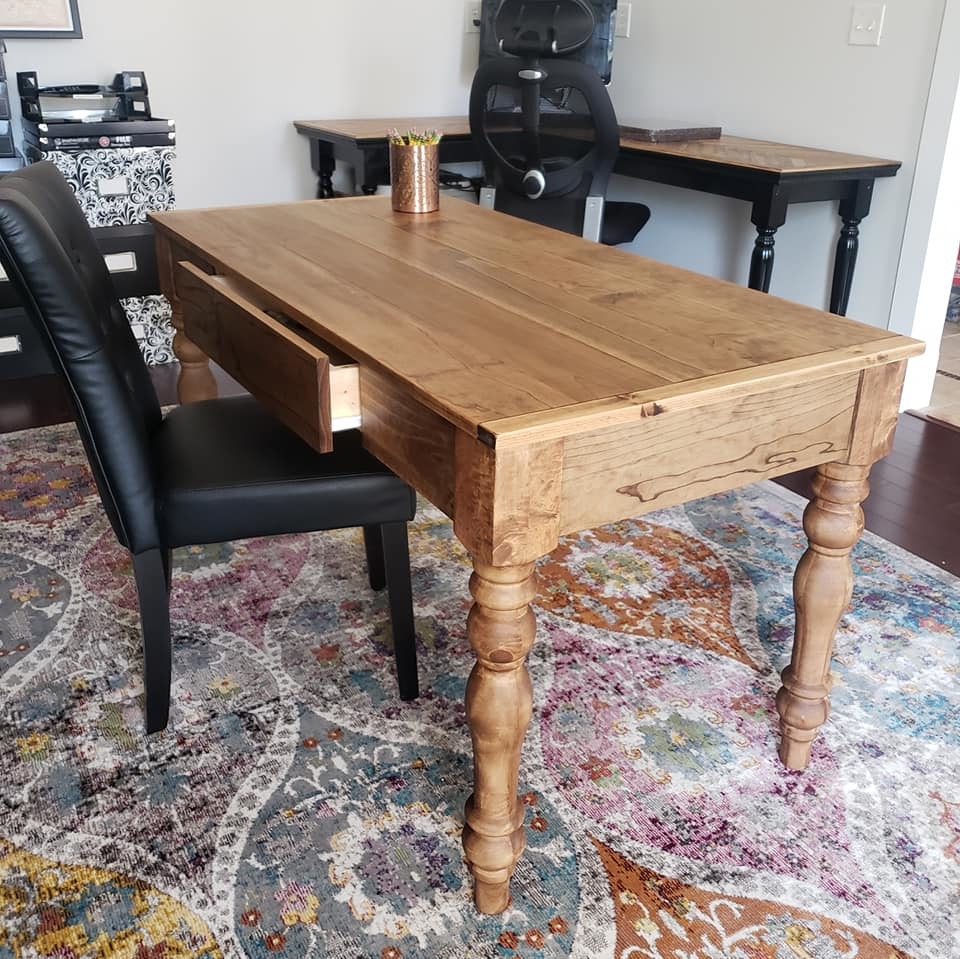
I modified the Small Old English Style Farmhouse Dining Table plan to build a writing desk. I used five 1x6 boards for the top for a width of 27.5 inches. I made my desk 56 inches in length. I put the drawer on the long side like a pencil drawer. I did use the legs that Ana recommended in the plan. I love how it turned out. I used dark walnut danish oil and dark wax for the finish.
Sat, 08/31/2019 - 05:18
Beautiful! What are the brands of oil and wax that you used?
Fri, 10/04/2019 - 21:46
Thank you! I used Watco Danish oil and I used Minwax dark wax. I've tried alot of different wax brands and I always come back to Minwax. It dries the hardest in my opinion.
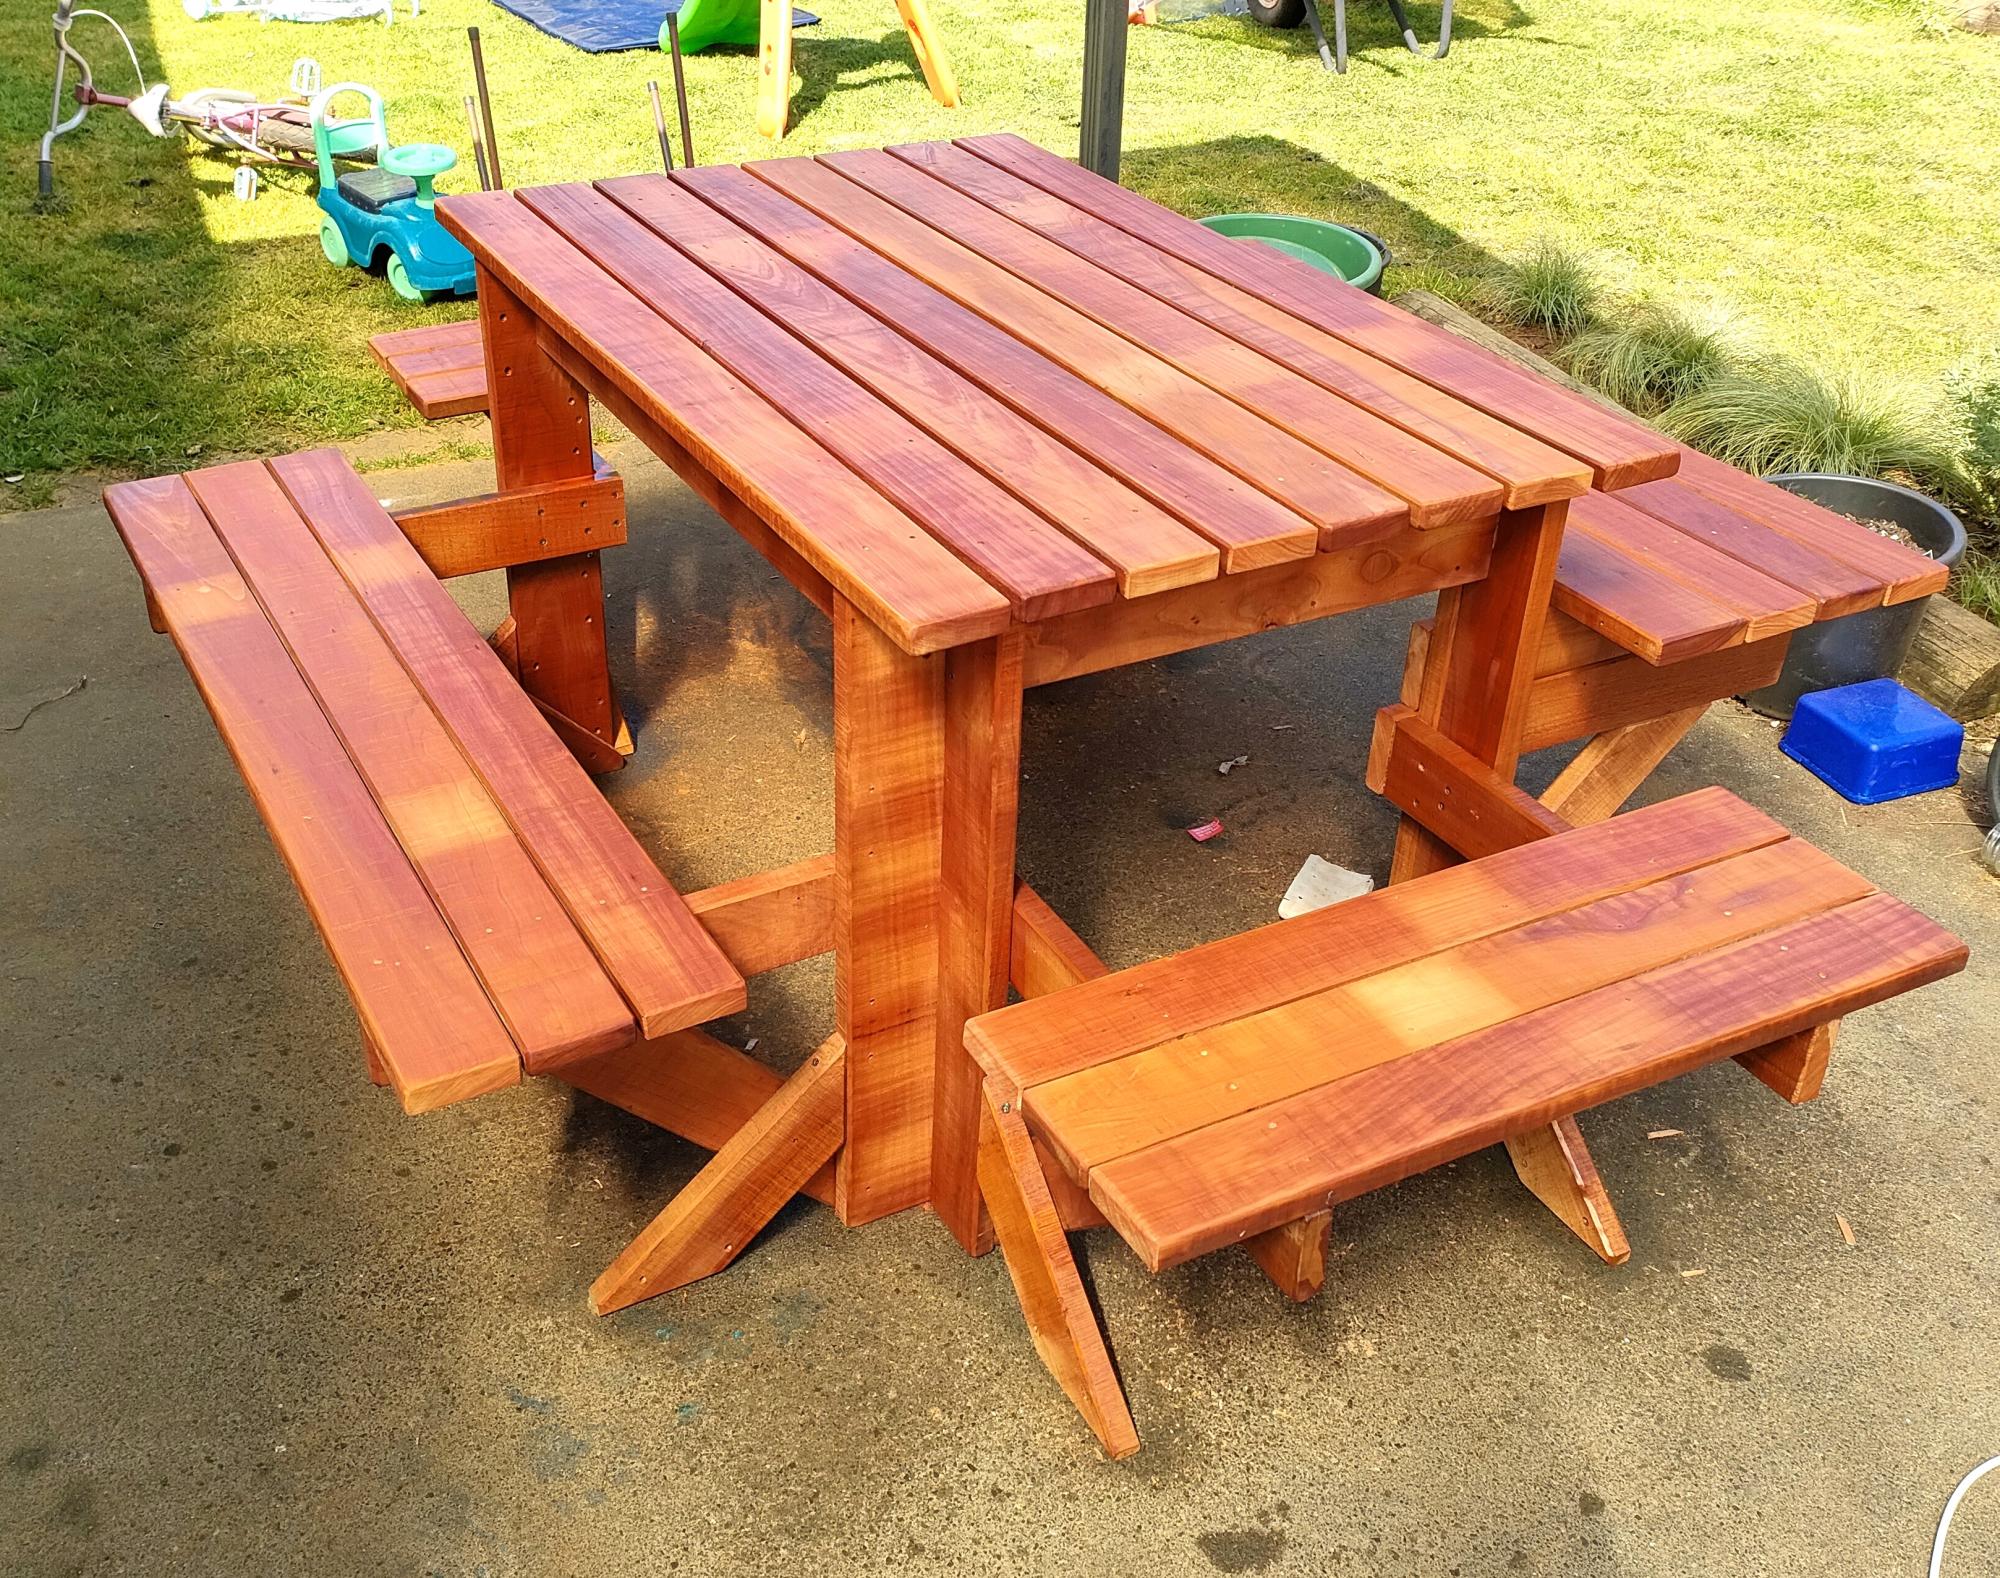
6 seater Recycled Fijian Kauri with extra leg supports, one side higher & closer for kids.
Marty
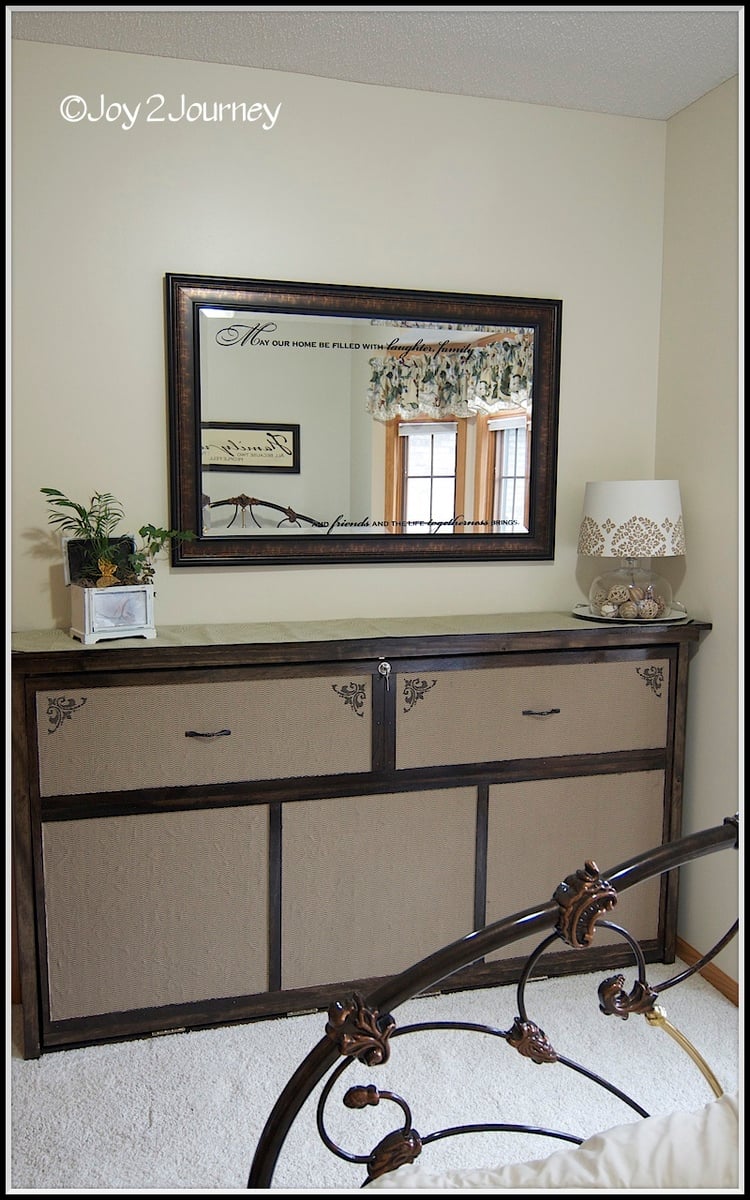
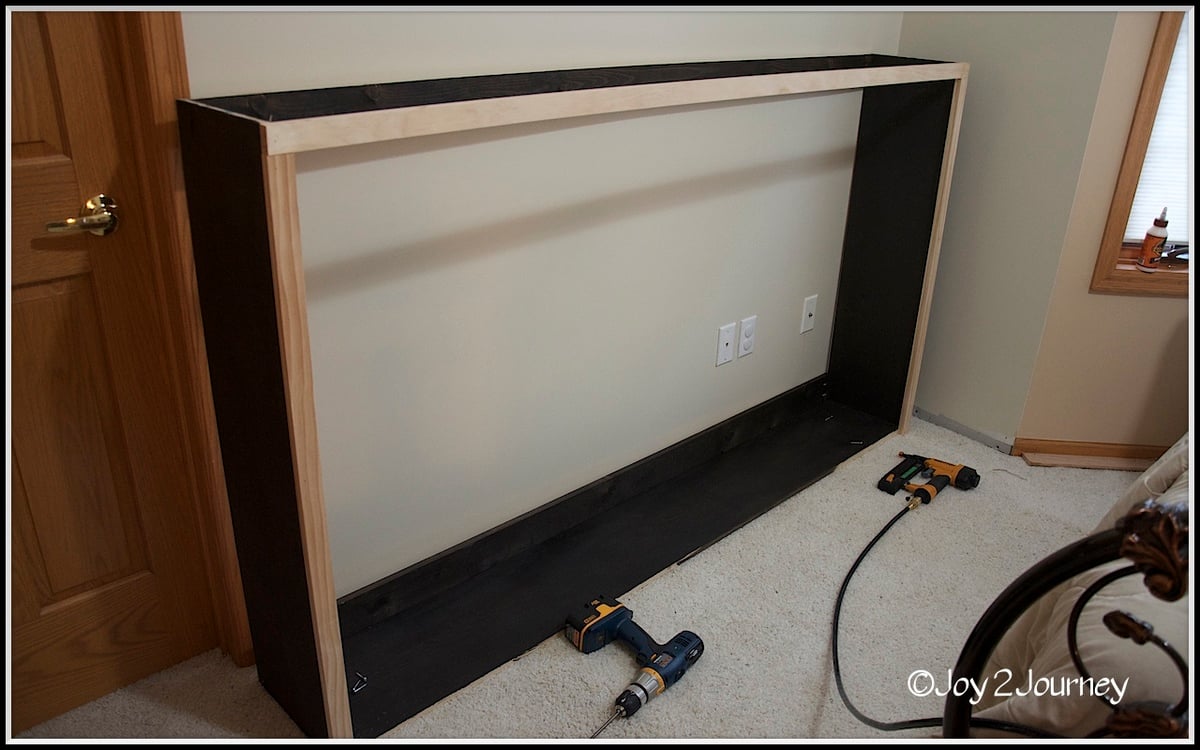
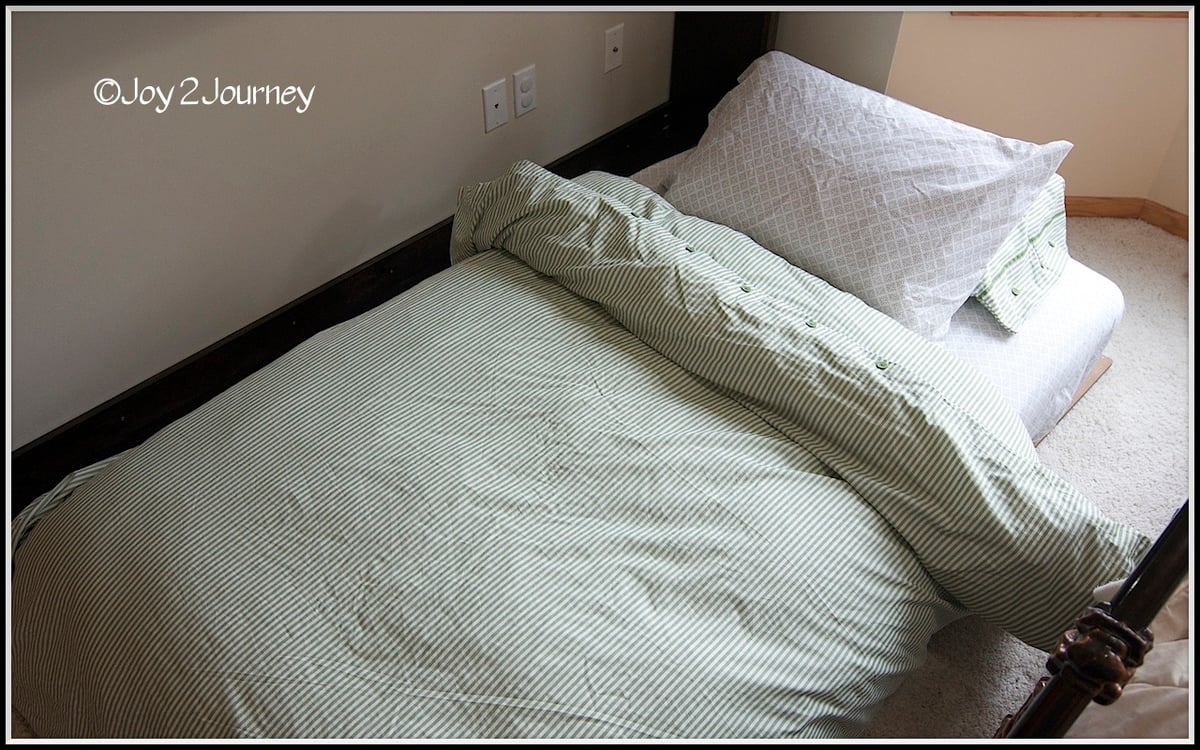
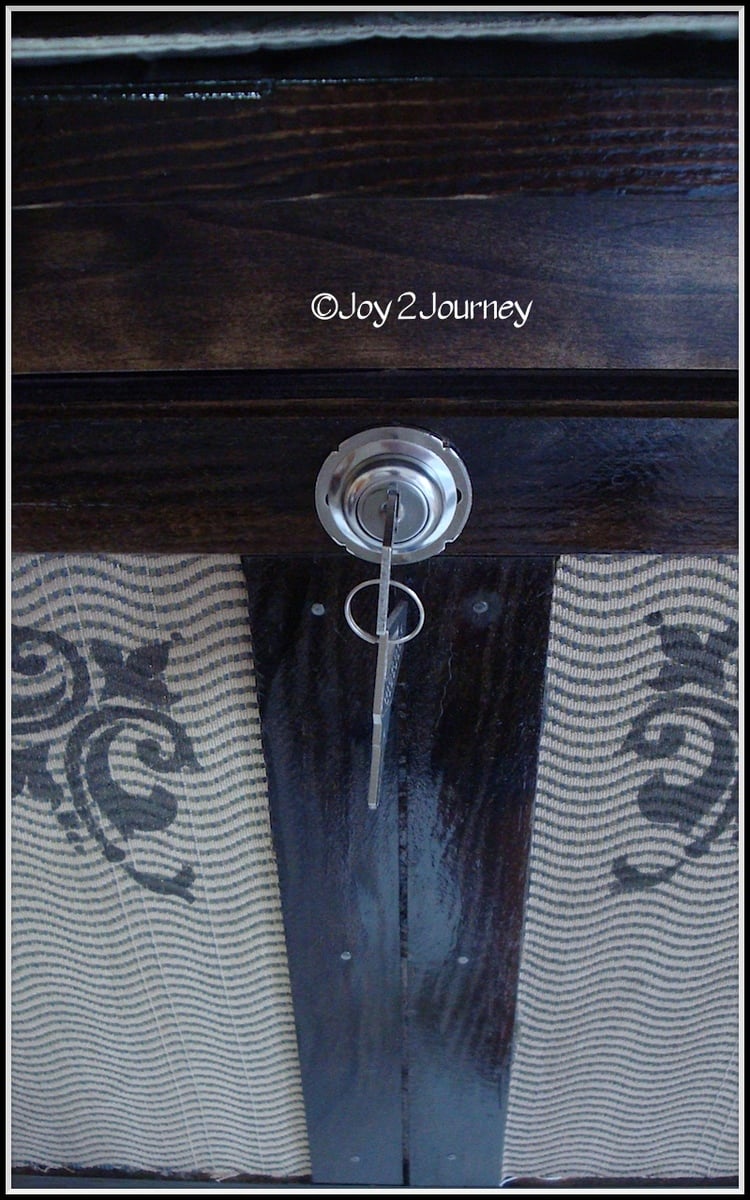
I used the Murphy Bed Plan that Ana had on her website. I modified it so that it would look more like a dresser and would fit into the space that I have. It is perfect and I have used it myself just to see if it was comfy. It was!!! :)
This project took me longer to do as I had a creativity issue that you can read about here .. http://joy2journey.blogspot.com/2012/04/m-is-for-murphy-bed-its-finishe…


Sun, 04/15/2012 - 11:37
What an amazing job! Really looks just like a dresser. The lock closure is a great idea for keeping it securely closed. Beautiful finish, and the fabric and stencils are so creative!
In reply to Amazing job! by JoanneS
Sun, 04/15/2012 - 11:54
I was afraid little hands would pull it open ... hence the idea of a lock. Now I just have to spray paint it to have it blend in :)
bj
Fri, 12/14/2012 - 03:36
Things derived in this material will surely have some impact on the process of making of a classical overview. You should bookmark this page and http://allfreepapers.blogspot.com for the future. The question about it is a very important for the contemporary society. They have become proclaimed national standards recently.
Wed, 02/13/2013 - 11:42
Just curious did you buy the jig called for? If not what did you use instead? Camille
Wed, 01/08/2014 - 12:28
You did a fabulous job on your murphy bed. Good to know it can be made horizontally too. Thanks for the inspiration! =]
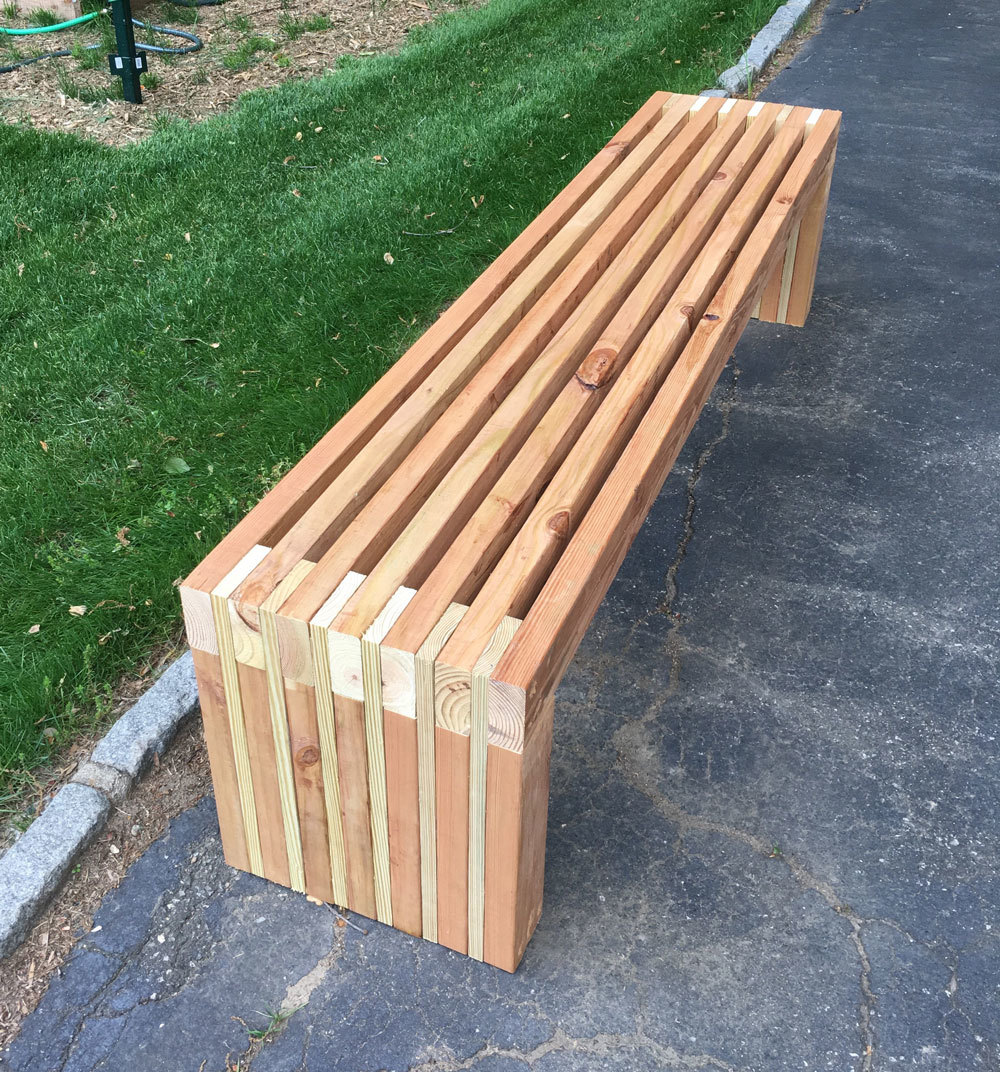
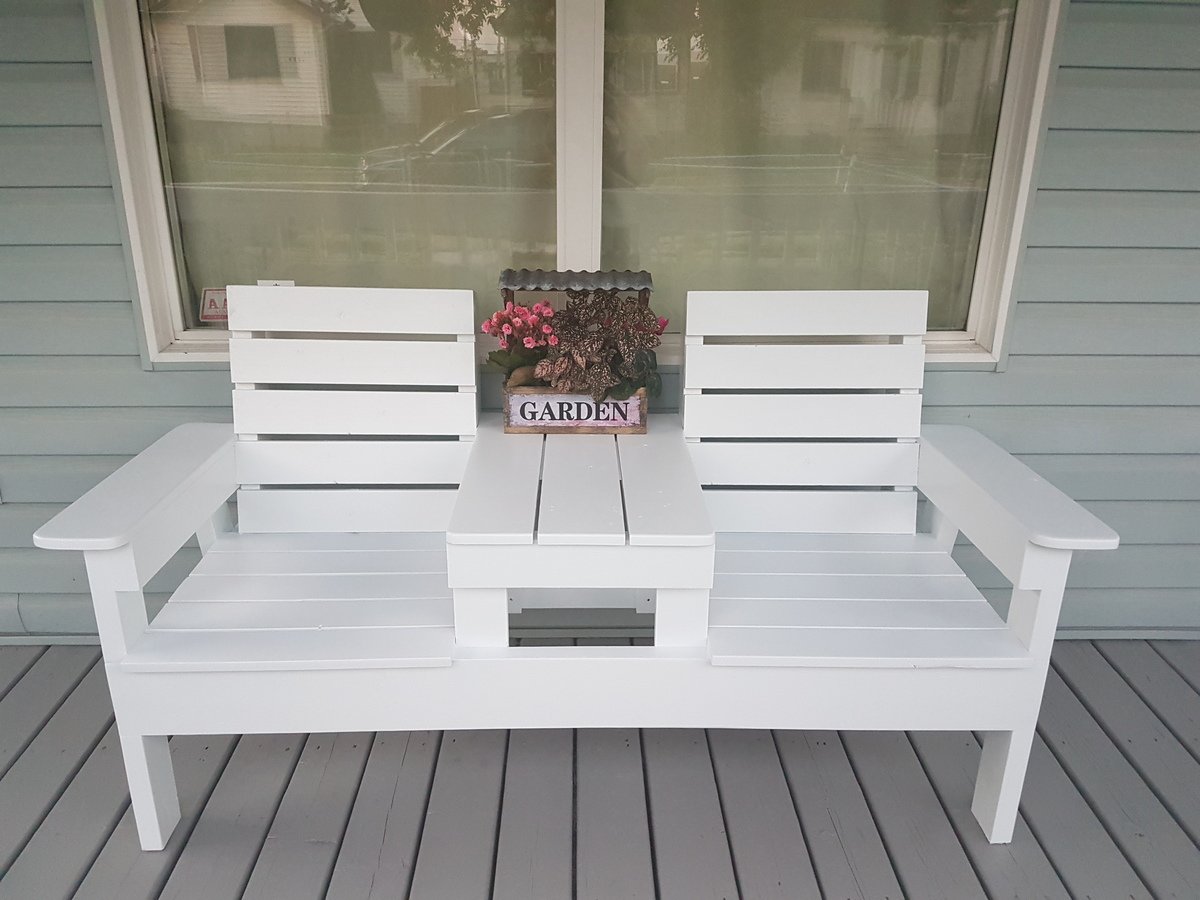
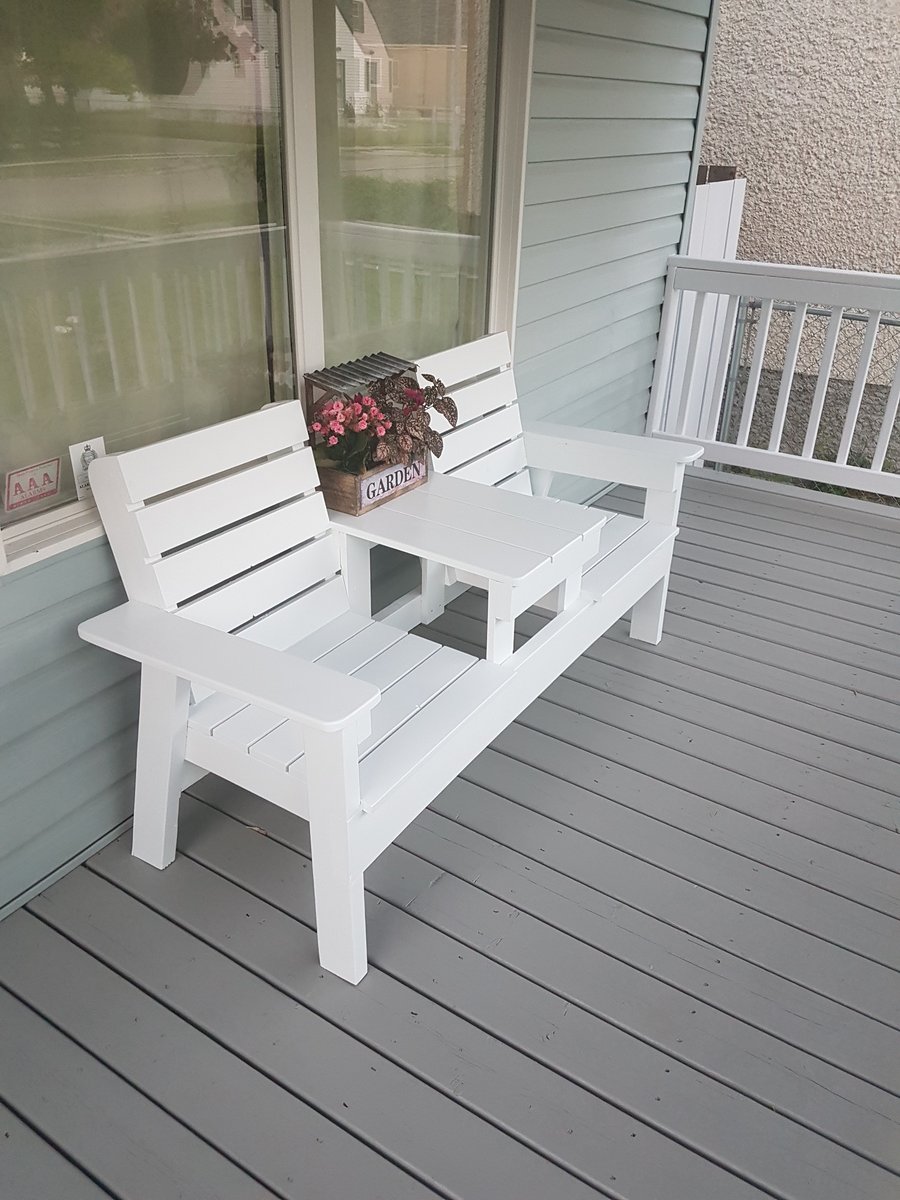
Great bench
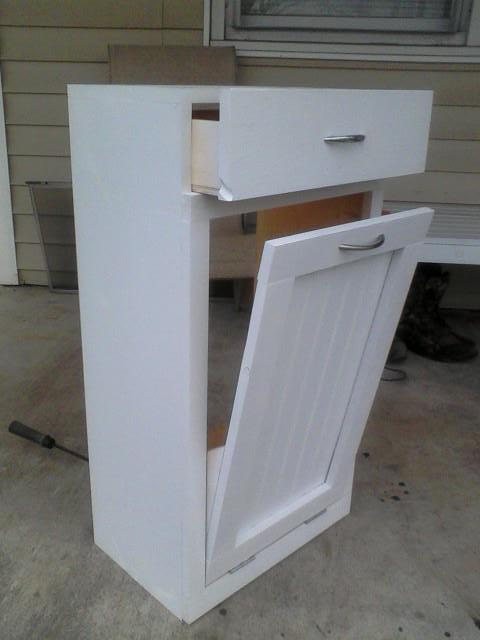
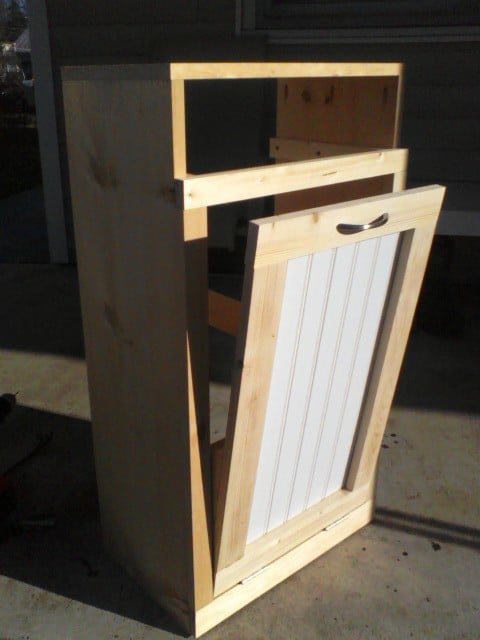
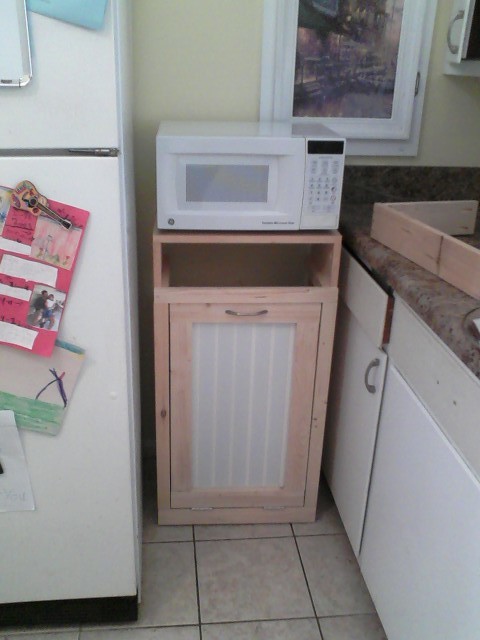
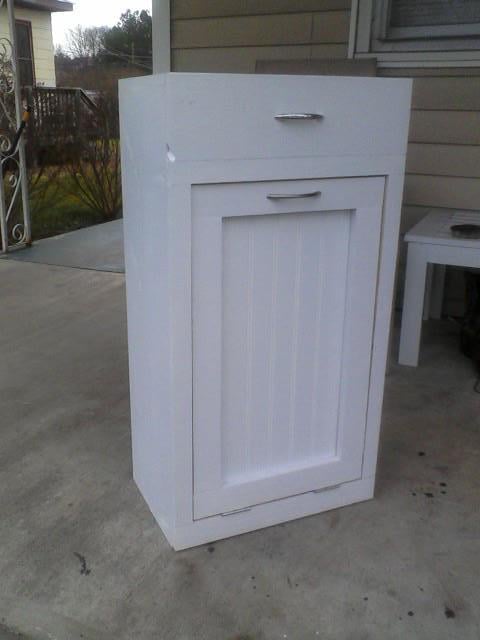
Our large lap dog finally discovered he could easily get whatever he wanted out of the trash, so I built the tilt out bin to help keep him out of trouble. lol. I made it cabinet height so we could move the microwave off the counter, and added a drawer to the extra space to keep garbage bags and such in.