Outdoor U-Shape Sectional

Outdoor Sectional

Outdoor Sectional
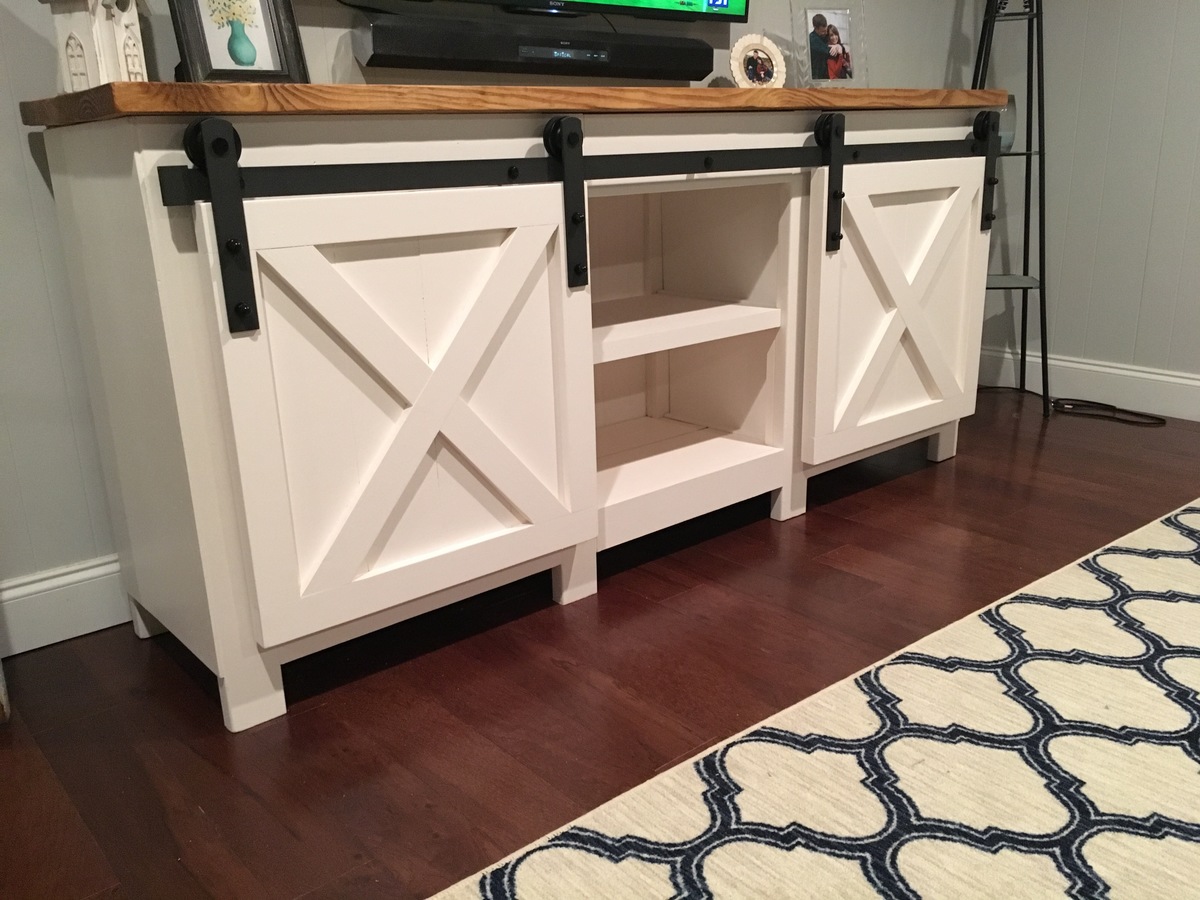
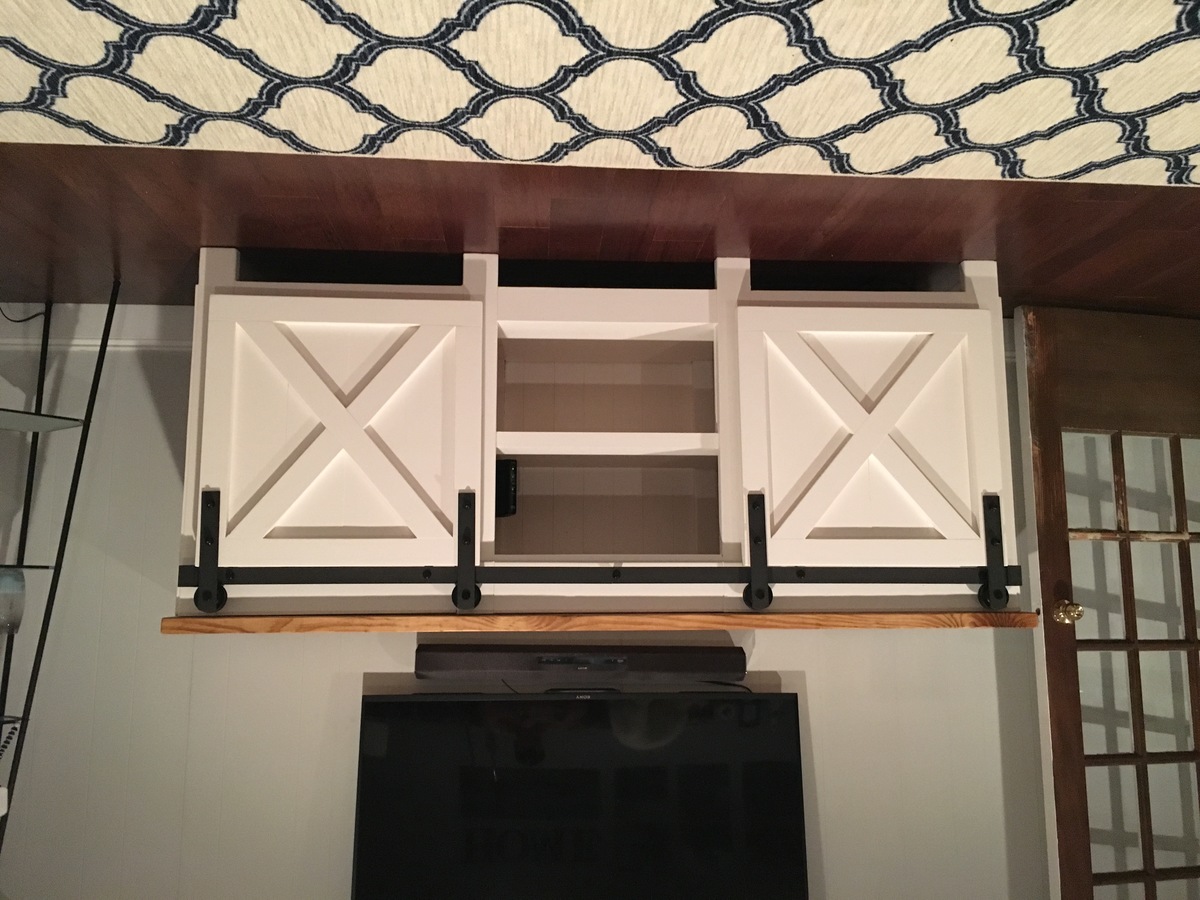
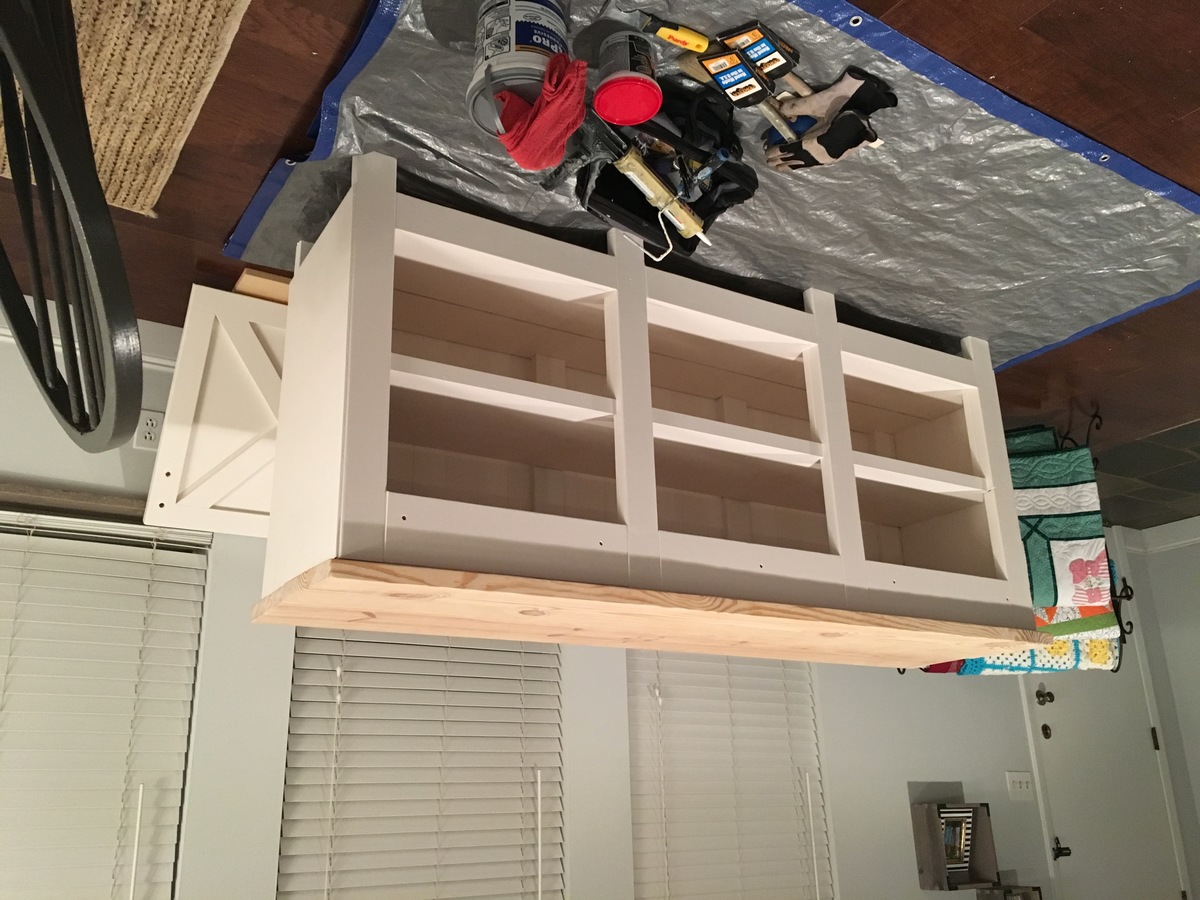
Changed the Grandy design just a little to bring it up off the floor and add legs to it. I notched 2x4 to line up with the 1x4 face pieces. Then I found barndoor hardware on Amazon for $47 a set. Needed two sets for this console since I wanted two doors. Only needed the one rail piece though.
Tue, 06/21/2016 - 14:50
This is my build. I guess I wasn't signed in when I posted this on the board. If you have any questions about it then I'll be glad to answer any. Let me know.

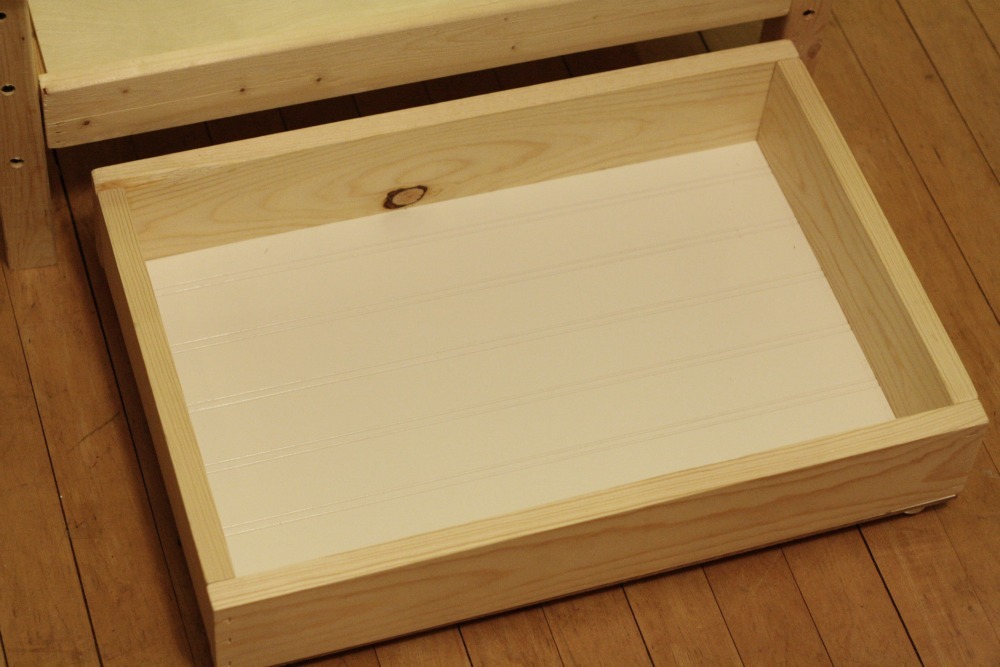
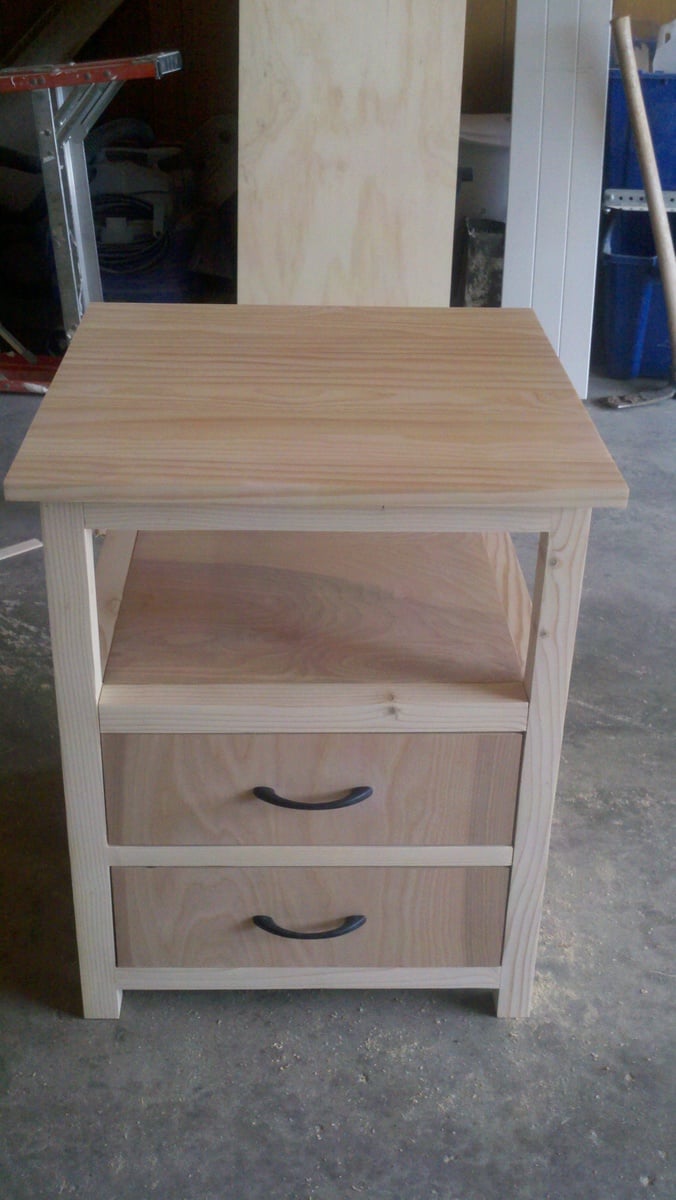
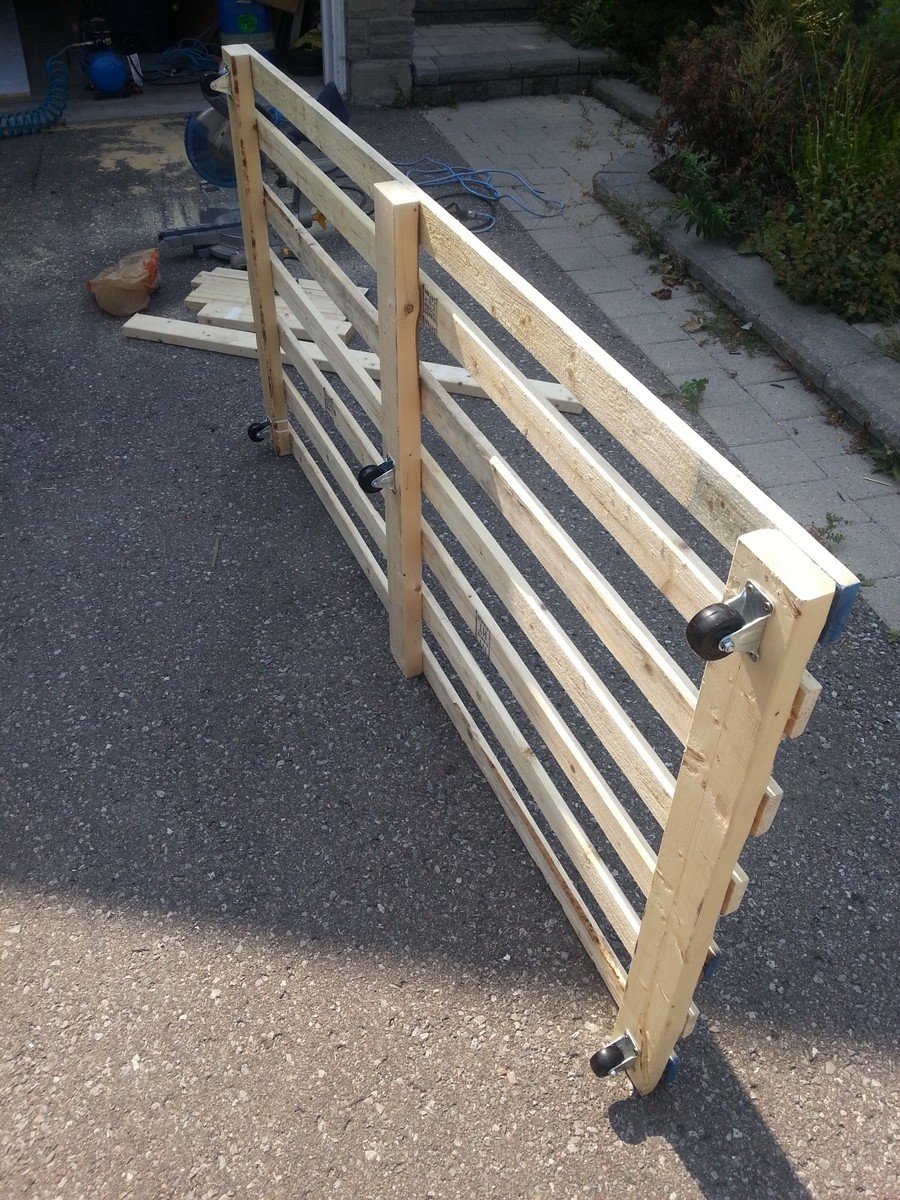
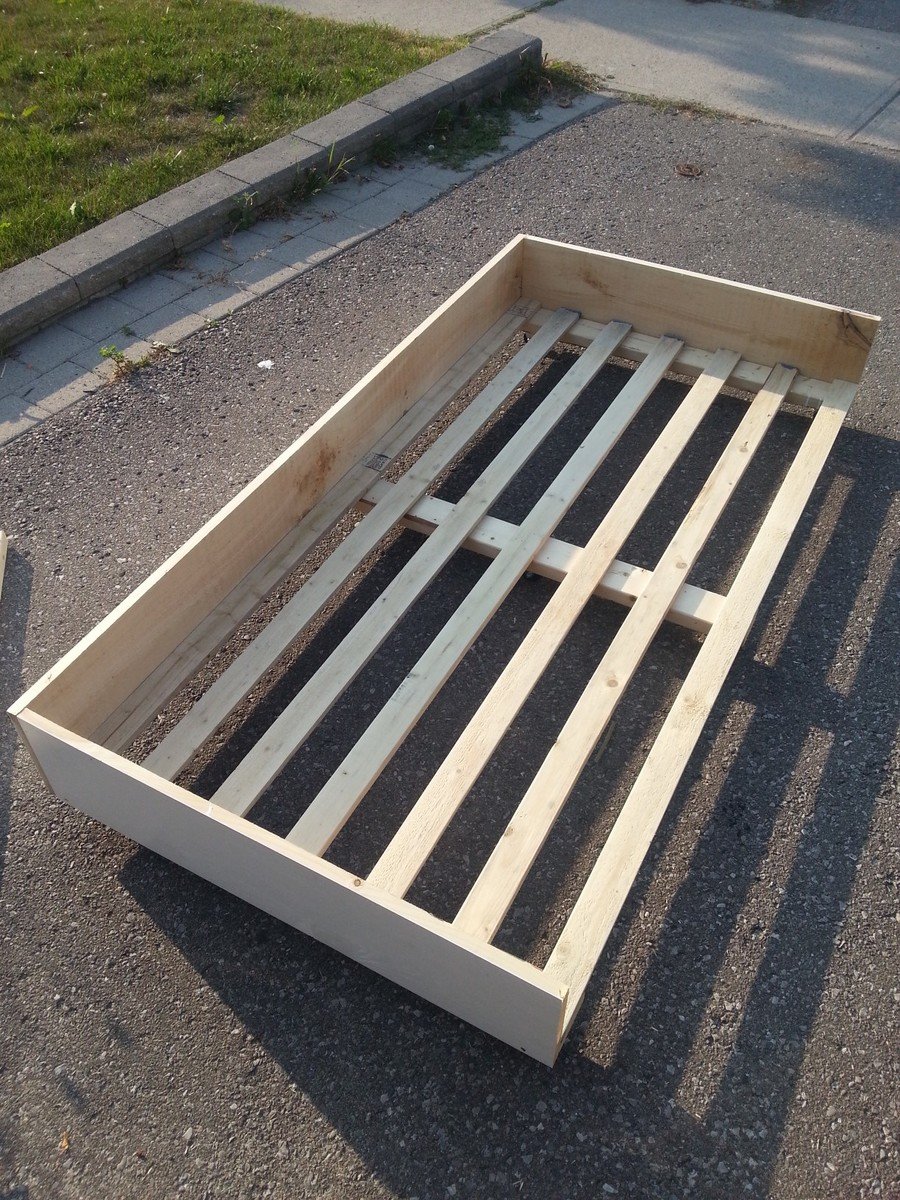
I built this for my daughter after Christmas sinse she had the living room covered in toys. The dimensions are 37" x 18" x 20"
Tue, 01/09/2018 - 05:51
HI Anna,
Can you provide more pictures or instructions on how you assembled this toy box? i want to make one just like it!
Thanks!
Wed, 03/10/2021 - 16:31
Looking at the wall panels they look like the long edge of each panel has a small bevel cut on it. This gives each panel edge a more pronounced or well-defined edge? Is this true? Was it done with a router?
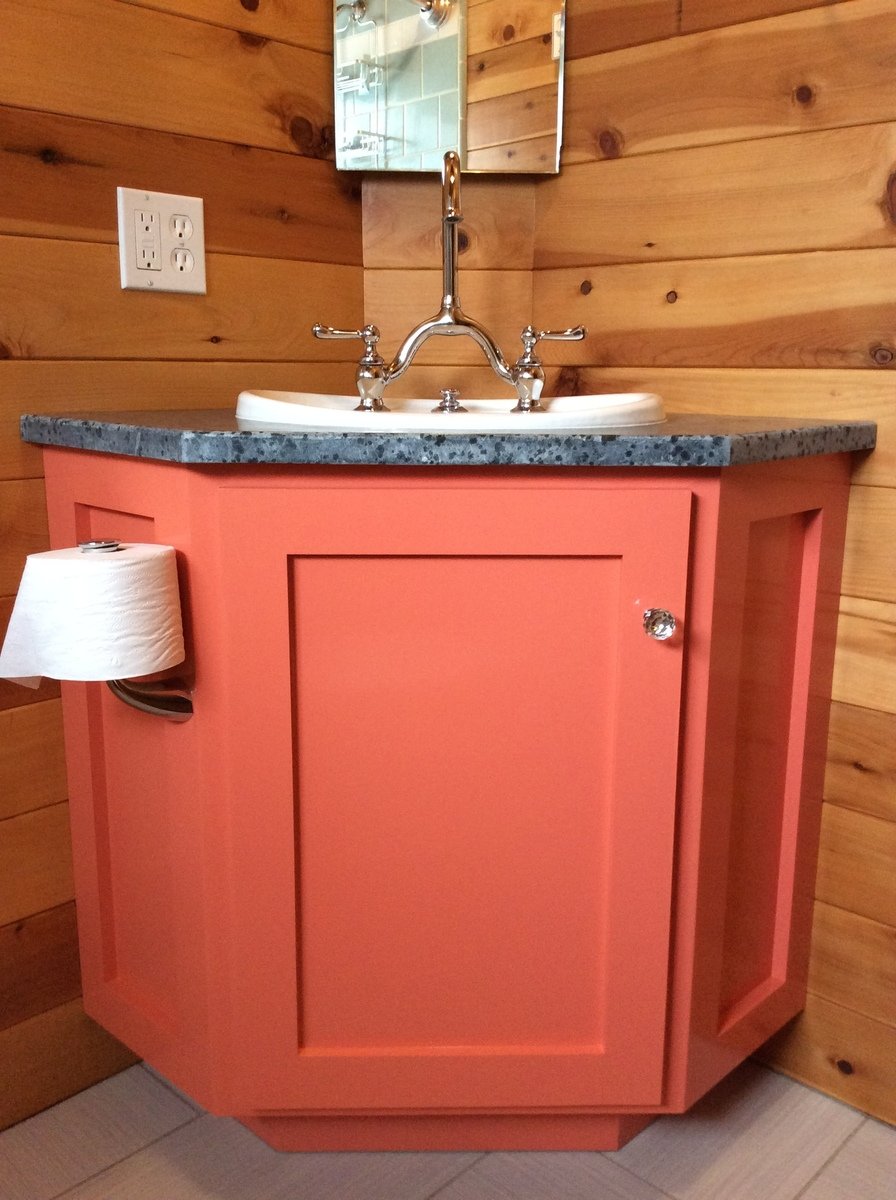
This project started because a corner bathroom vanity that fit my space requirements and budget did not exist. A plan specific to what I exactly needed also did not exist. After combing through what plans I found online, the Wall Kitchen Corner Cabinet best matched what I wanted. I modified it with the Momplex Sink Base Kitchen Cabinet in order to turn it into a sink base.
But, there was a problem. I hadn't actually built anything before. In order to get at least one project under my belt, I built the Vintage Step Stool. It turned out great, so I figured I was ready to go! Strangely enough, after spending about $100 and several weekends picking away at this project, it was done! It looked great, even. Then, I moved the vanity into the bathroom and realized that, while it may have looked great, it wasn't very square. Lesson learned was that this is a two person project. It is too difficult to keep things square and screw at the same time when there is only one person.
At this point, everyone was tired of having to use the kitchen sink to brush their teeth and wash their hands, so we needed to get this project done. $100 later, we had more material. Since I had figured out what needed to be done with the first vanity, let's call it our prototype, the second vanity went together REALLY quickly.
Within a few hours, it was pieced together. Since it was going to be painted, we used Bondo to cover up our imperfections. Yes, of course there were imperfections. While much better than the prototype, it still was only my third woodworking project. Sanding, caulking, and priming took another hour or so. A few coats of the finish paint went on, followed by a couple more coats of a clear sealer, and it was done.
We moved it into place, screwed it to the wall, put the soapstone countertop on along with the sink and faucet, and it truly was complete. Sink is Kohler, faucet came from our local Habitat for Humanity store and I'm not sure what brand it is, and the soapstone came from soapstones.com. If we had oiled the soapstone with mineral oil, it would be a very dark gray.


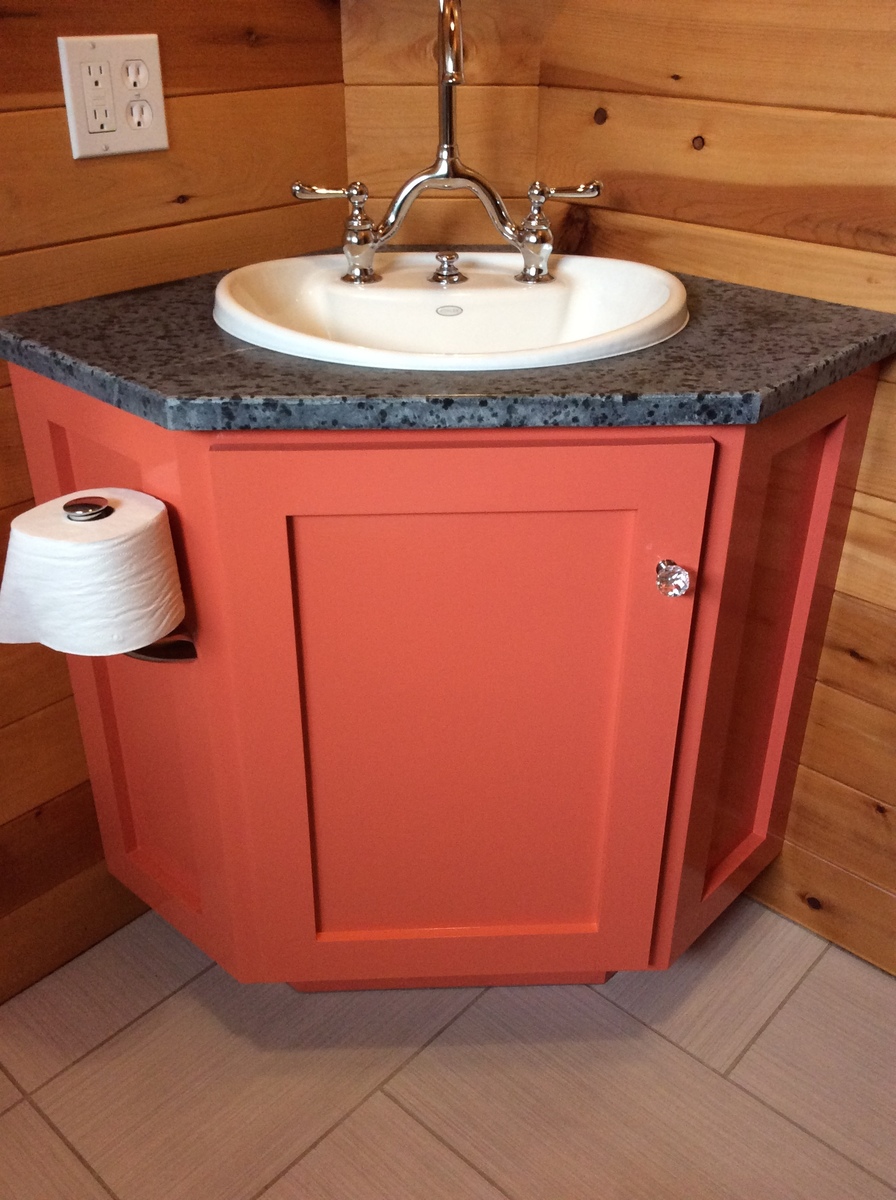
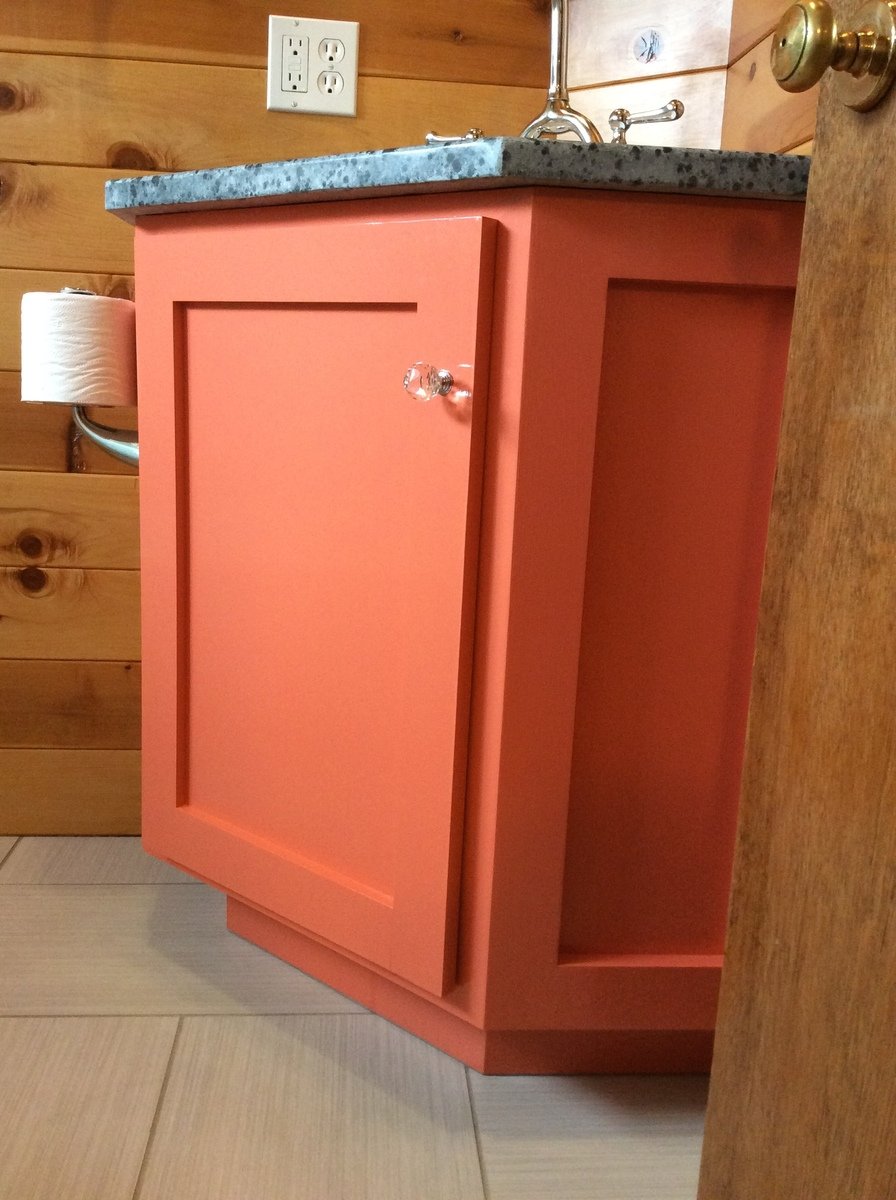
We used ana's plan but modified the top
Thu, 05/30/2019 - 13:00
This is EXACTLY what I'm looking for but I can't find the plans that were used to build it. Do you happen to still have the link for them?
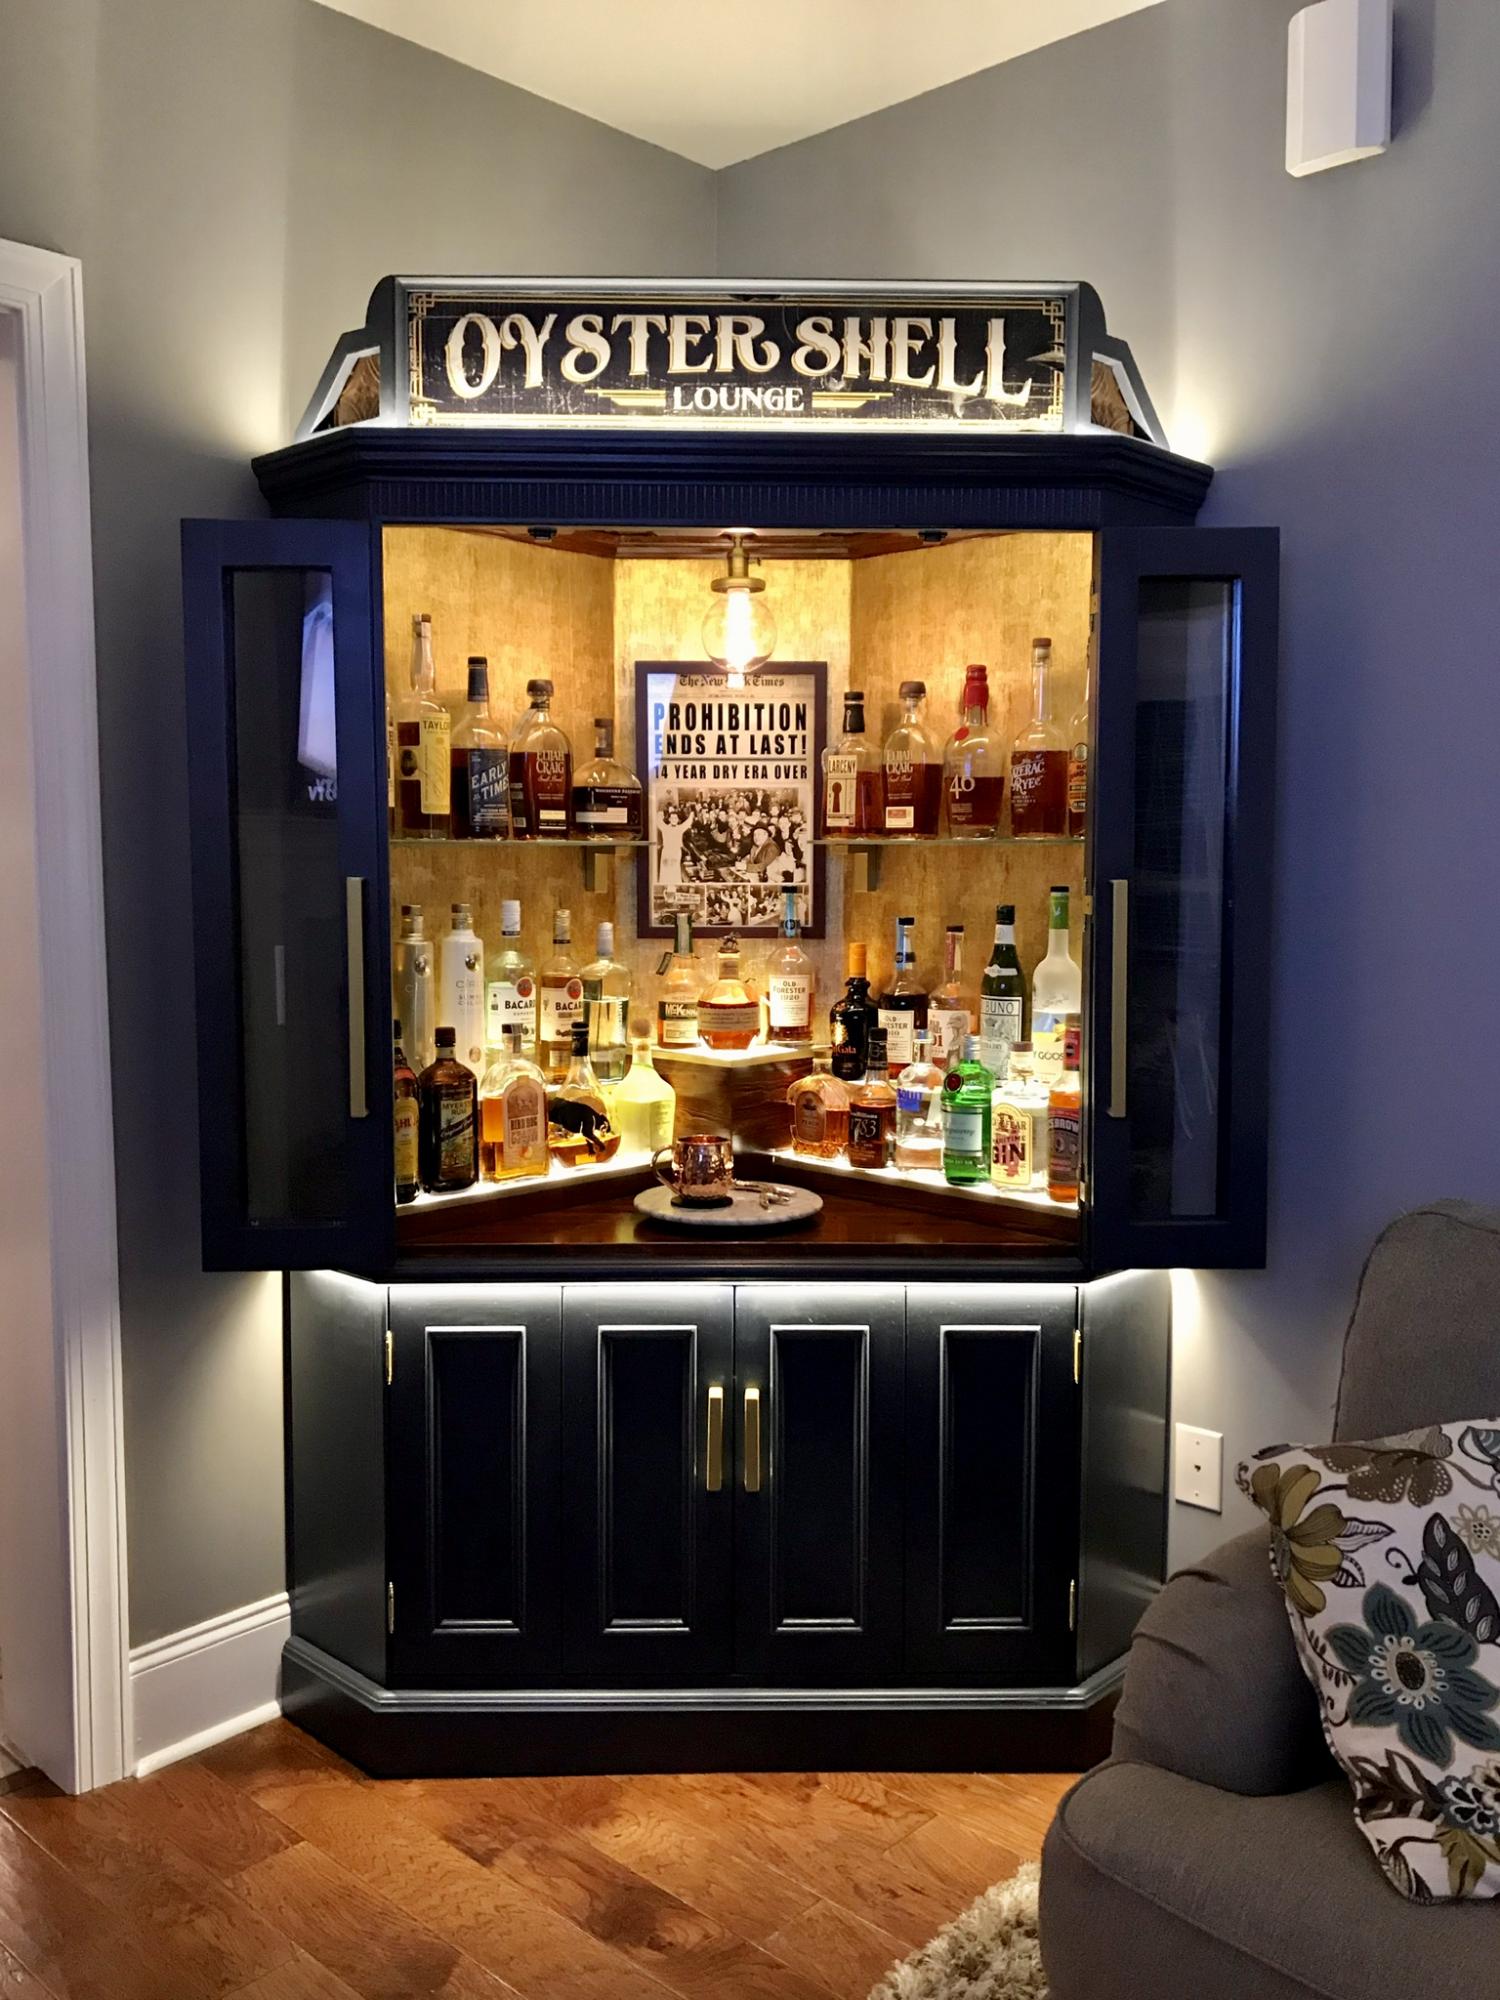
I bought this tv corner cabinet for $40. I spent many hours turning into my perfect bar cabinet. I built a custom lighted liquor display. I have posted photos of the transformation.
Thu, 03/18/2021 - 00:07
Wow that beautiful do you have directions on what you did?
Tue, 07/06/2021 - 19:04
So this is not your project? Because there isn't much information or a before and after picture. This gave me an idea for our home.
Sun, 08/15/2021 - 18:34
Yes, this is my project. What would you like to know?
Wed, 12/29/2021 - 06:41
This looks beautiful and authentic at the same time. Love how it gives me a theatre vibe! cabinet makers mornington
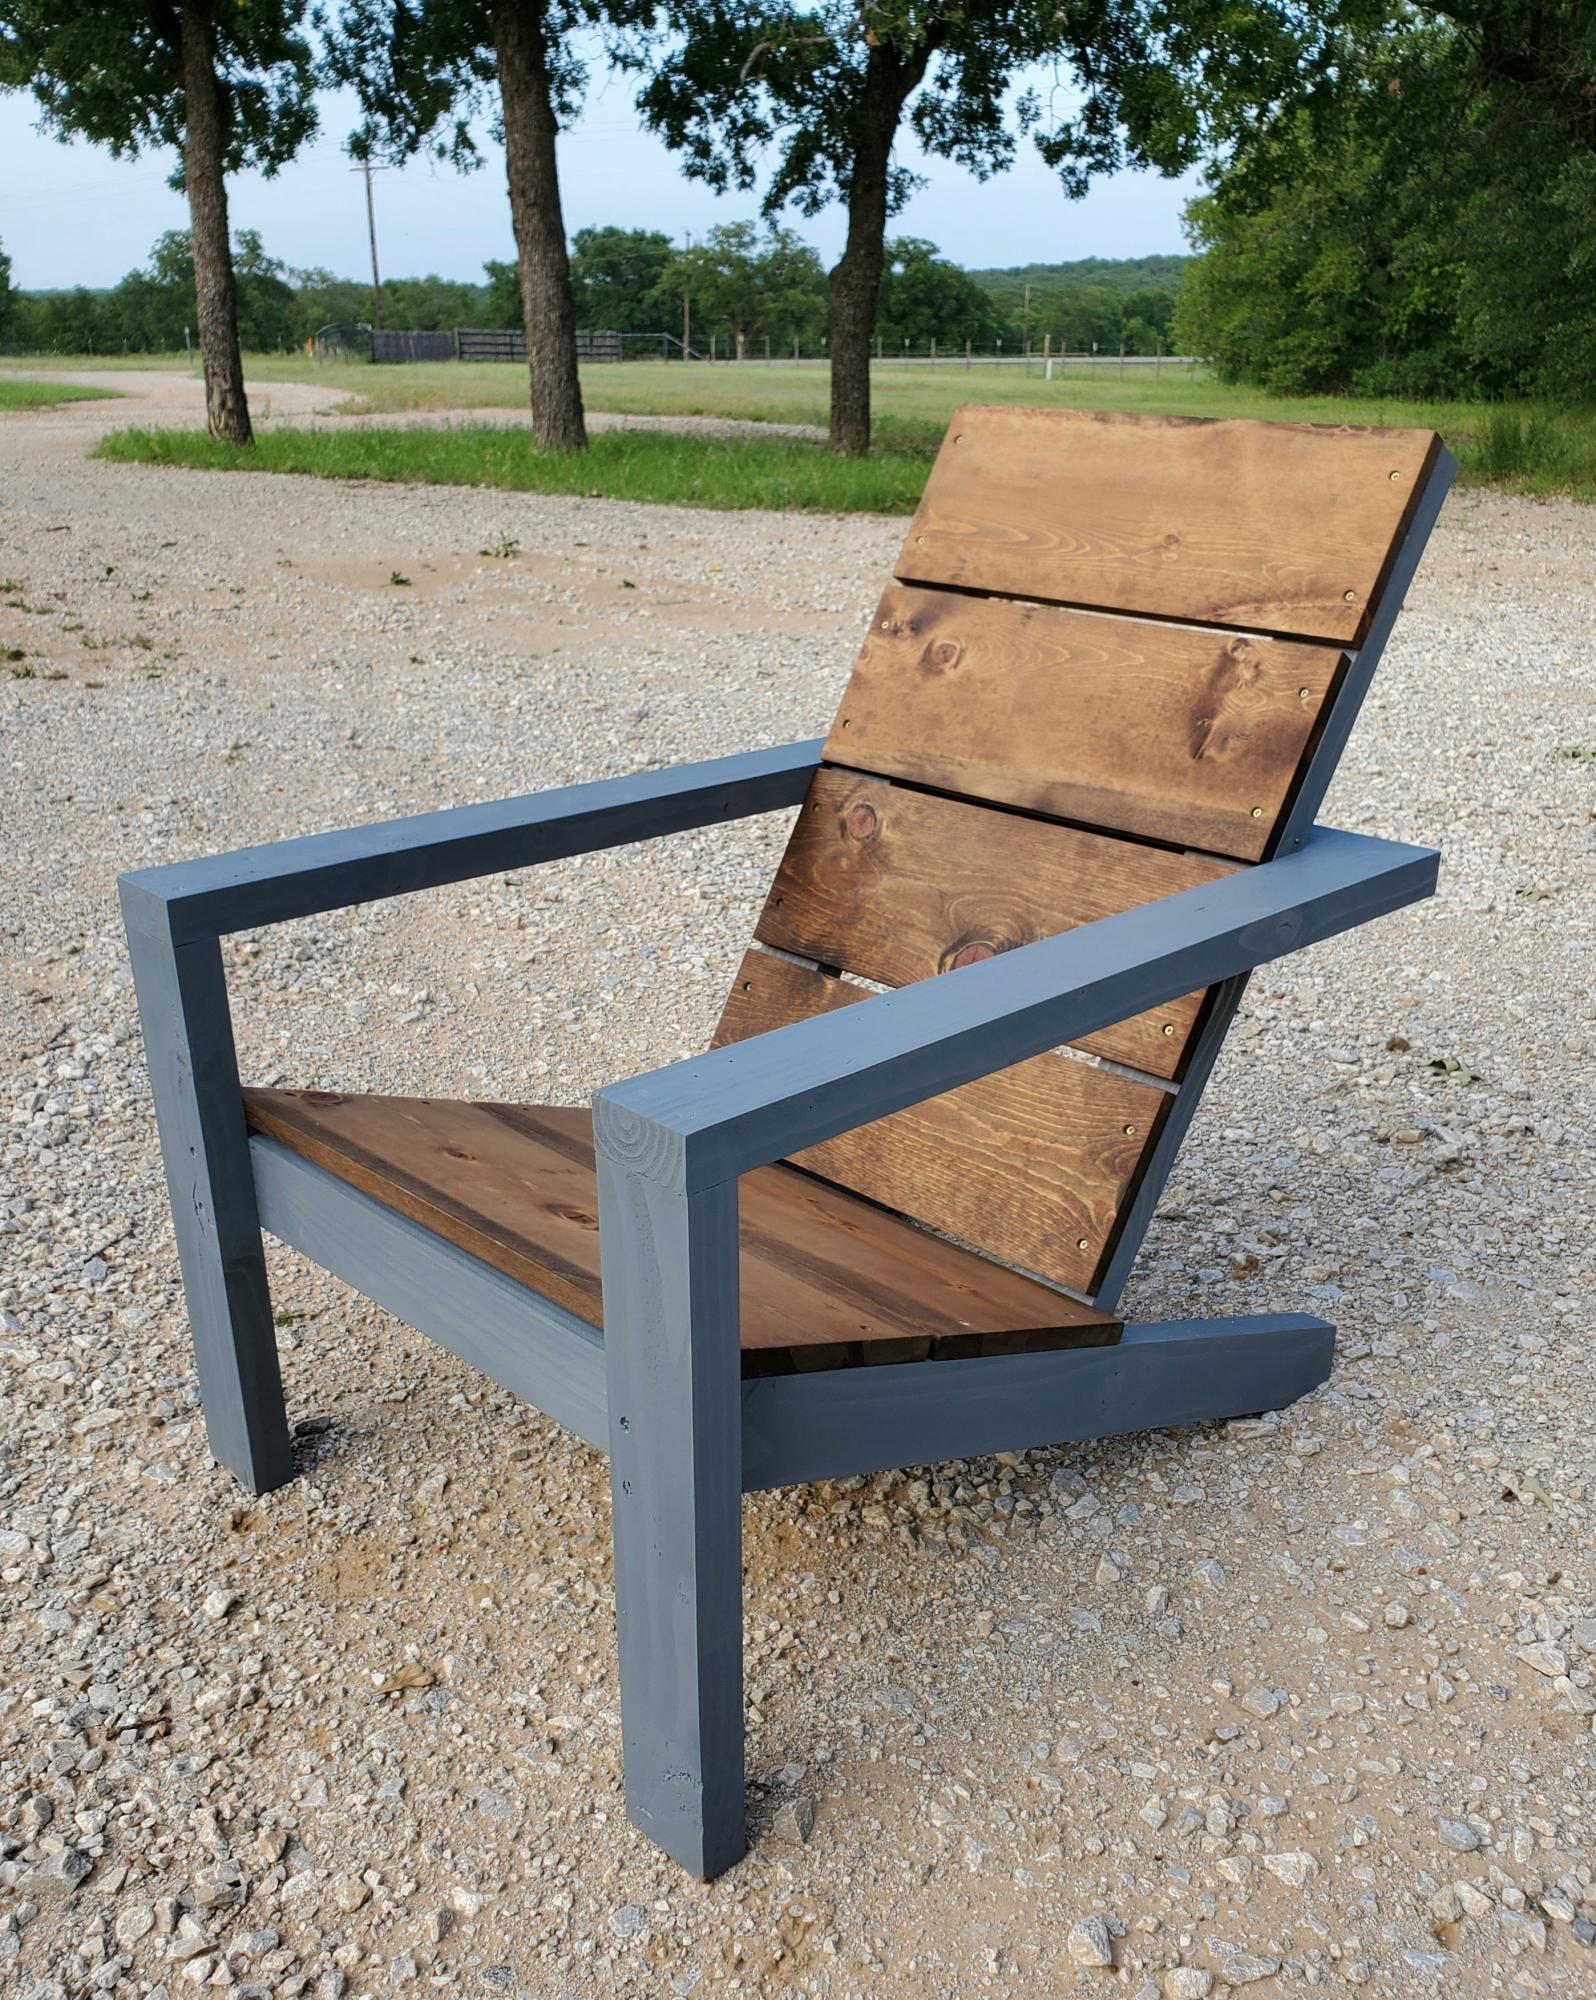
Like this chair! Changed the 3 1x10's on the back to 4 1x8's ripped down to 6 ¹⁵/¹⁶
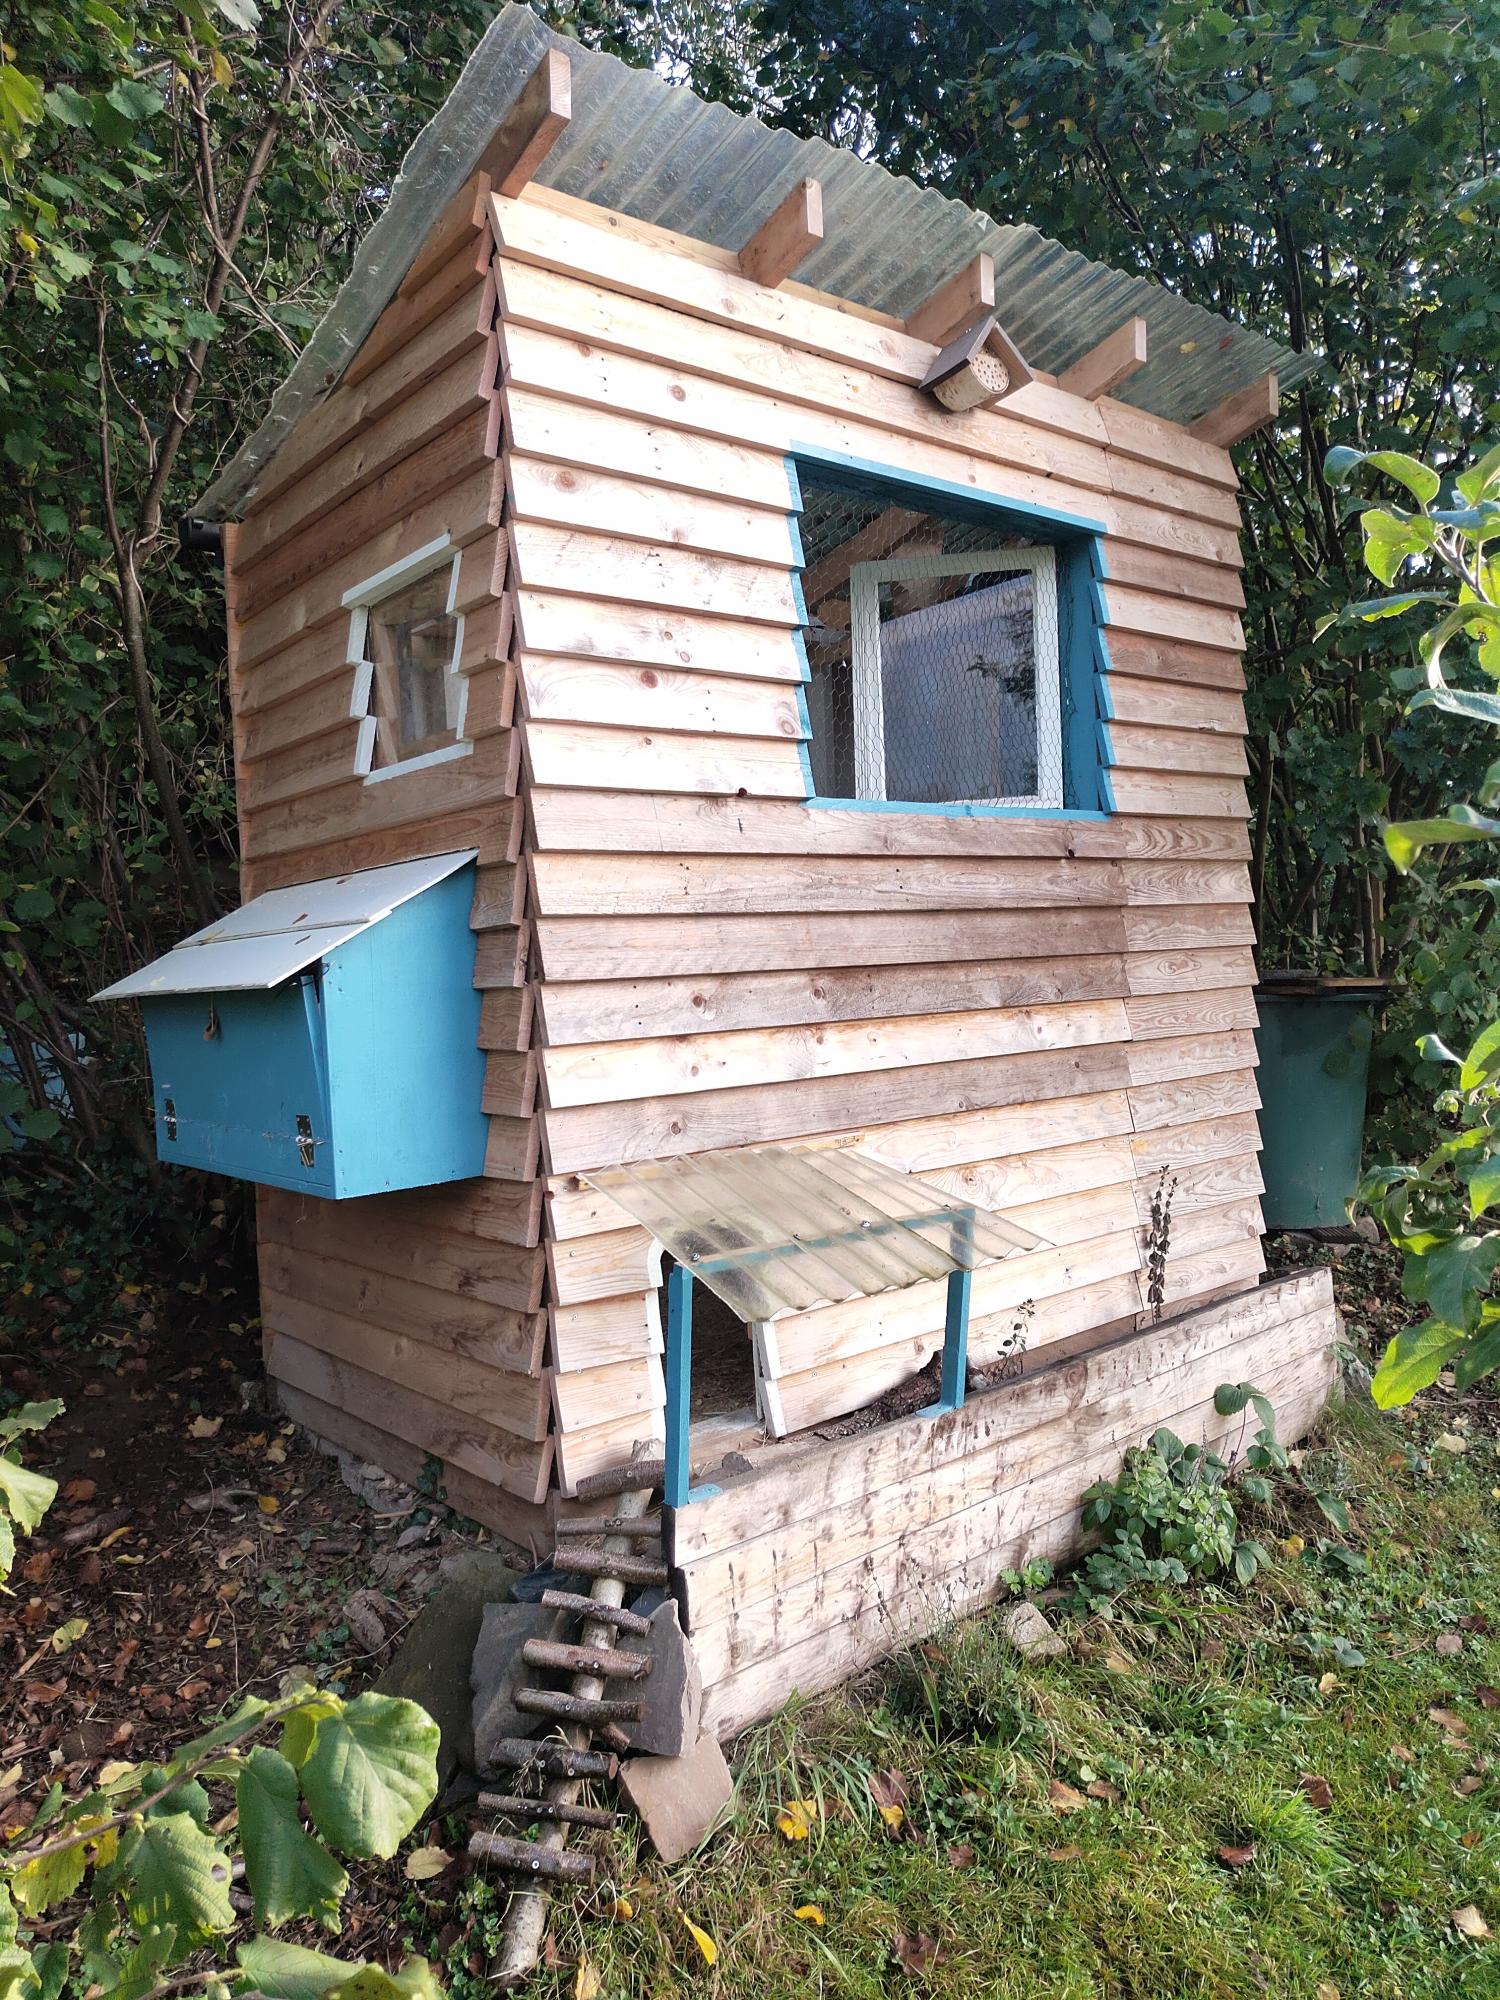
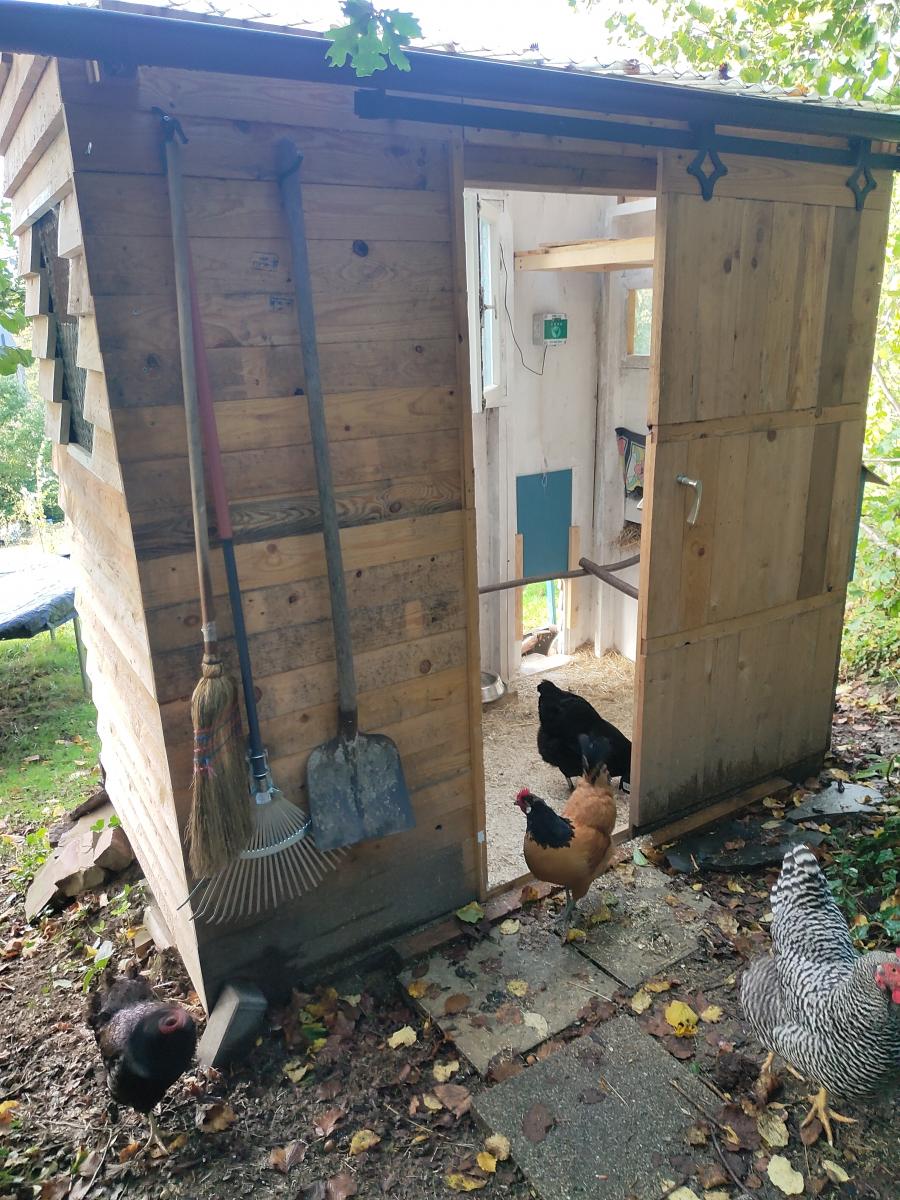
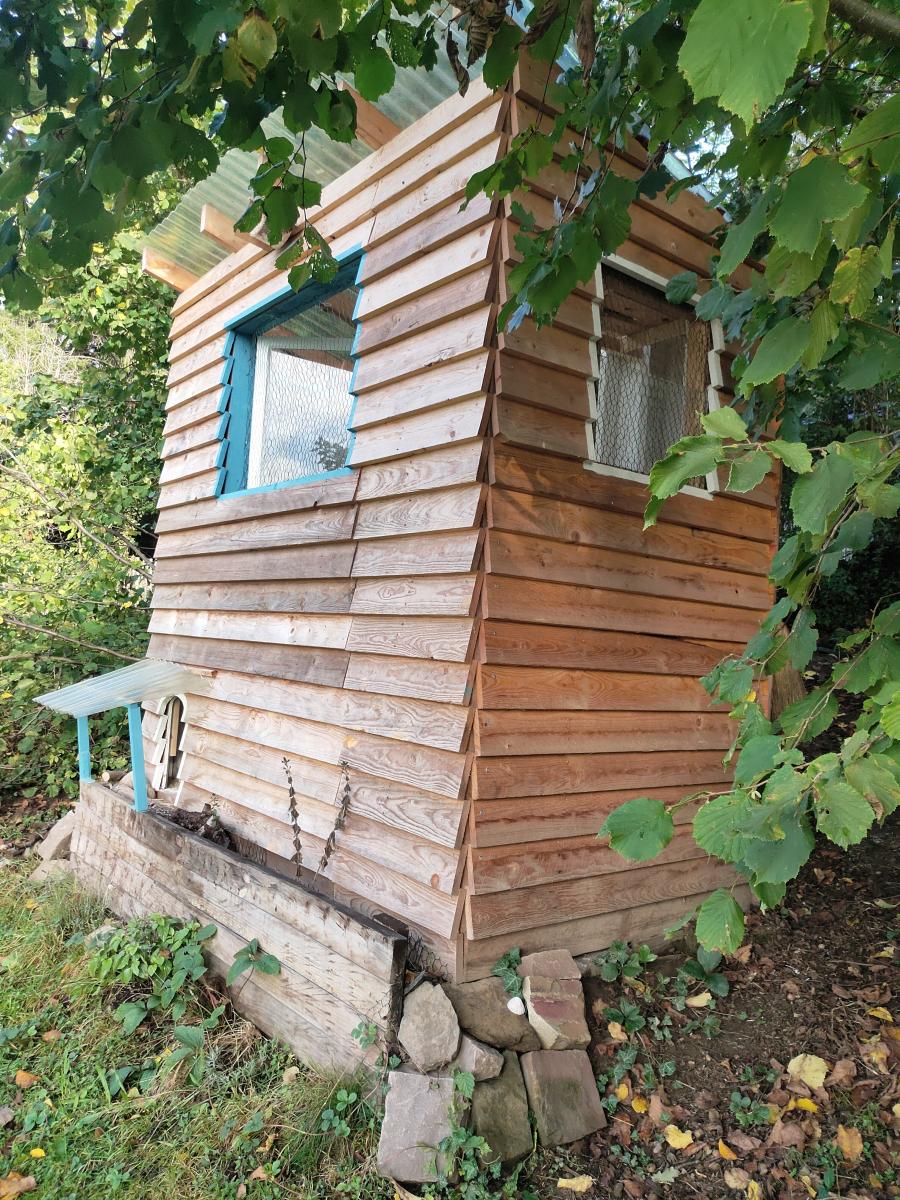
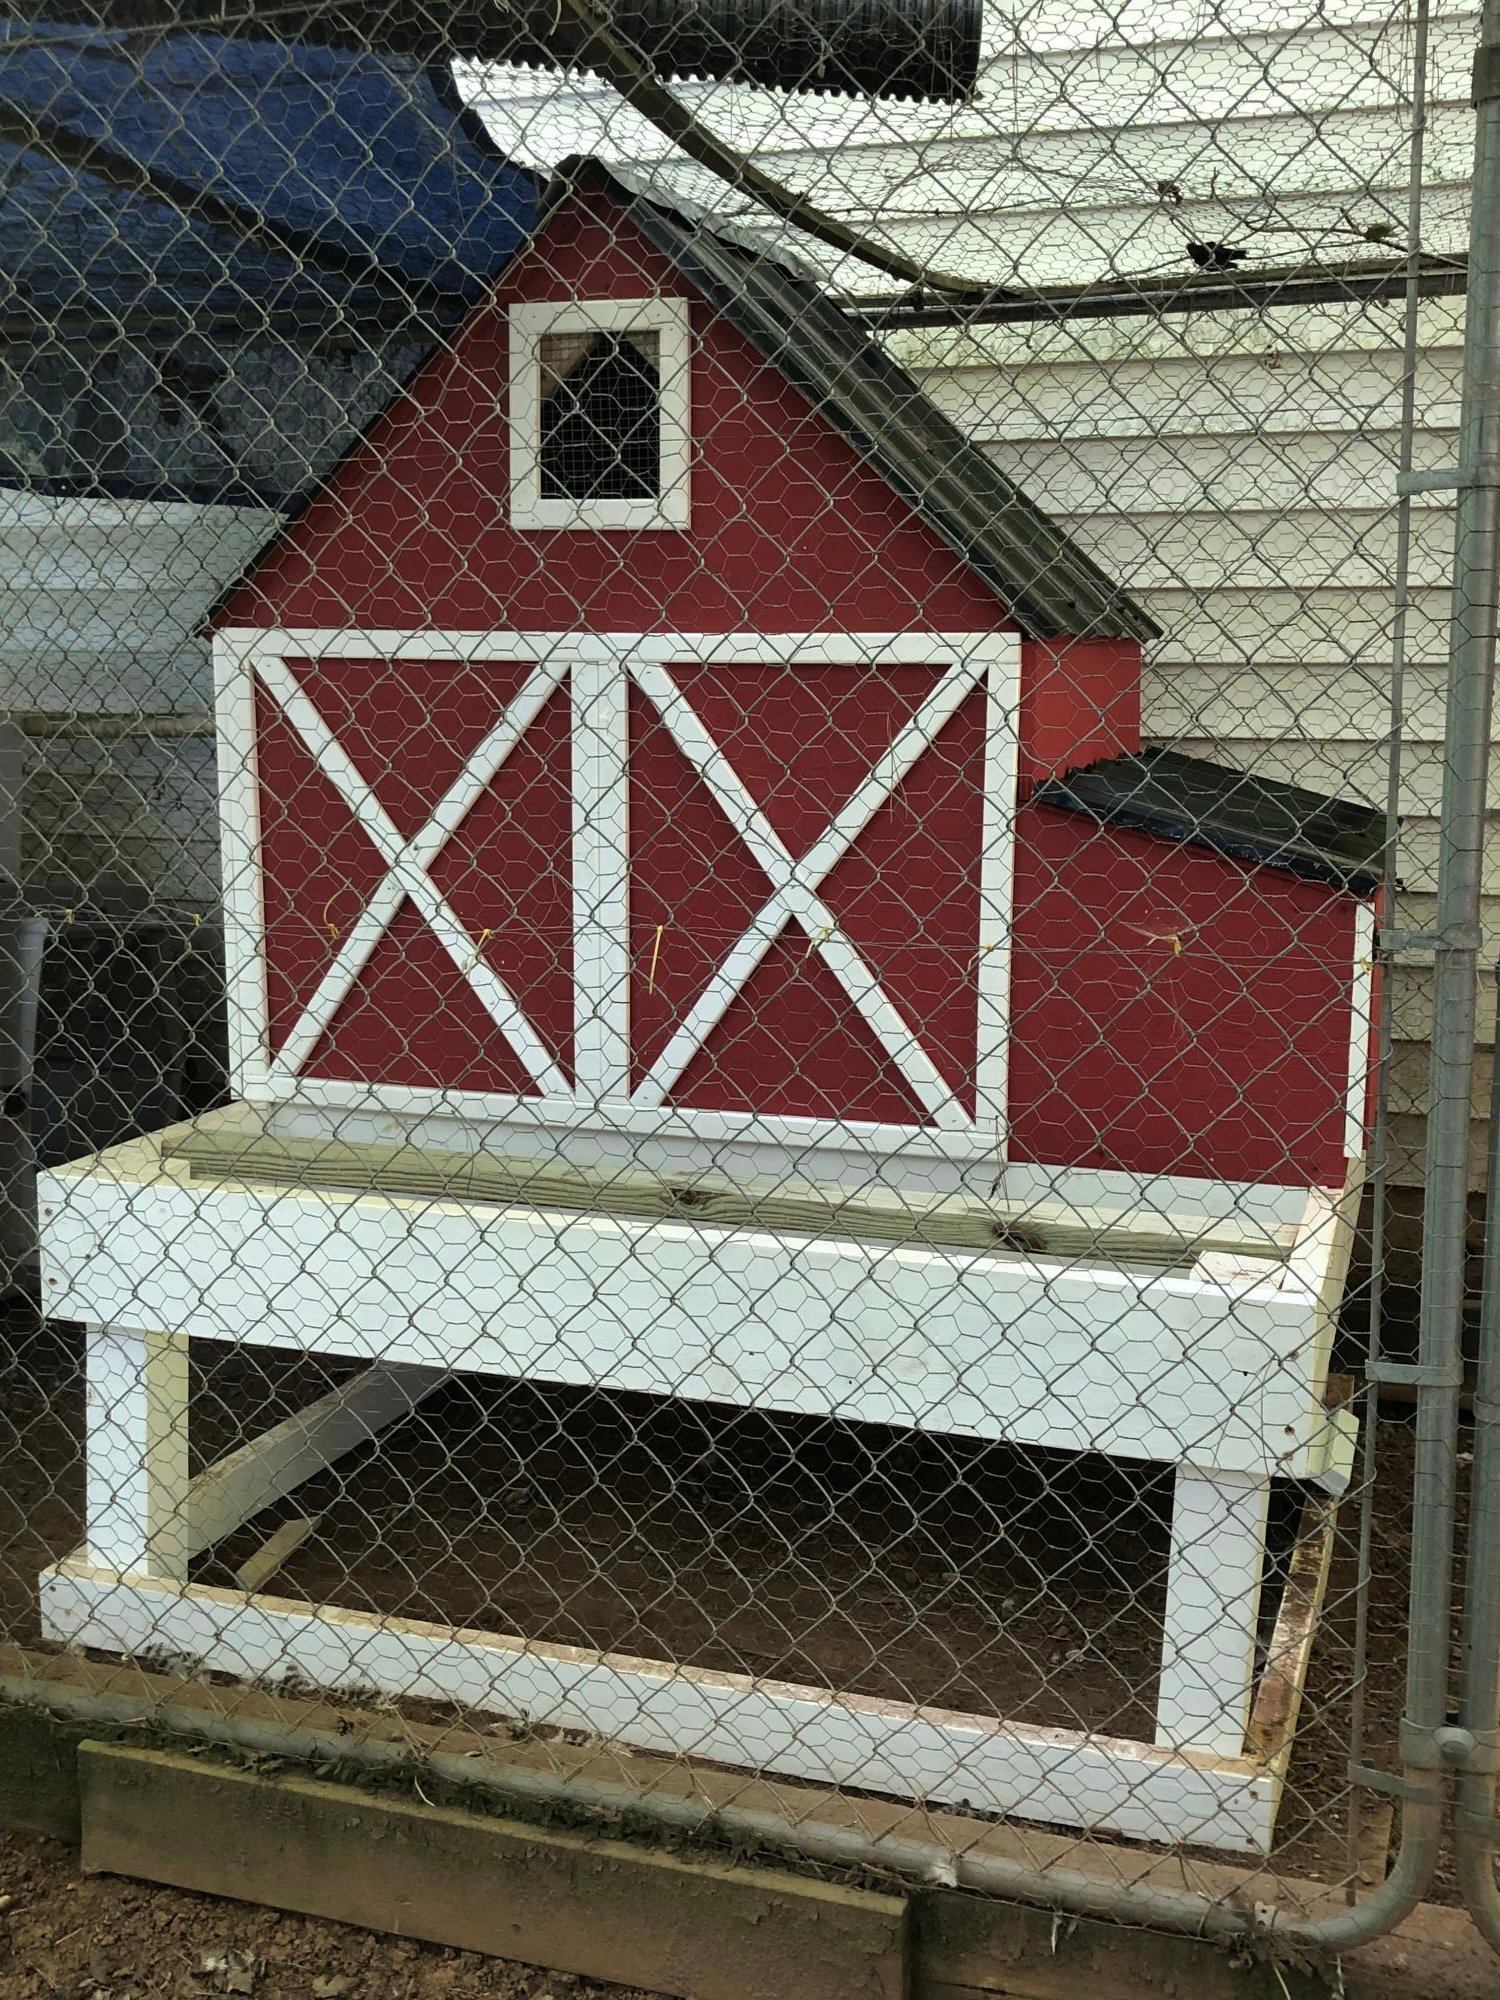
I had started this project last year in September and finished it finally 2020 in March because I get my chicken then.
I did modify the chicken coop a little bit due to the material I got.
The instructions and most of all the cutting list I like best!
Antje
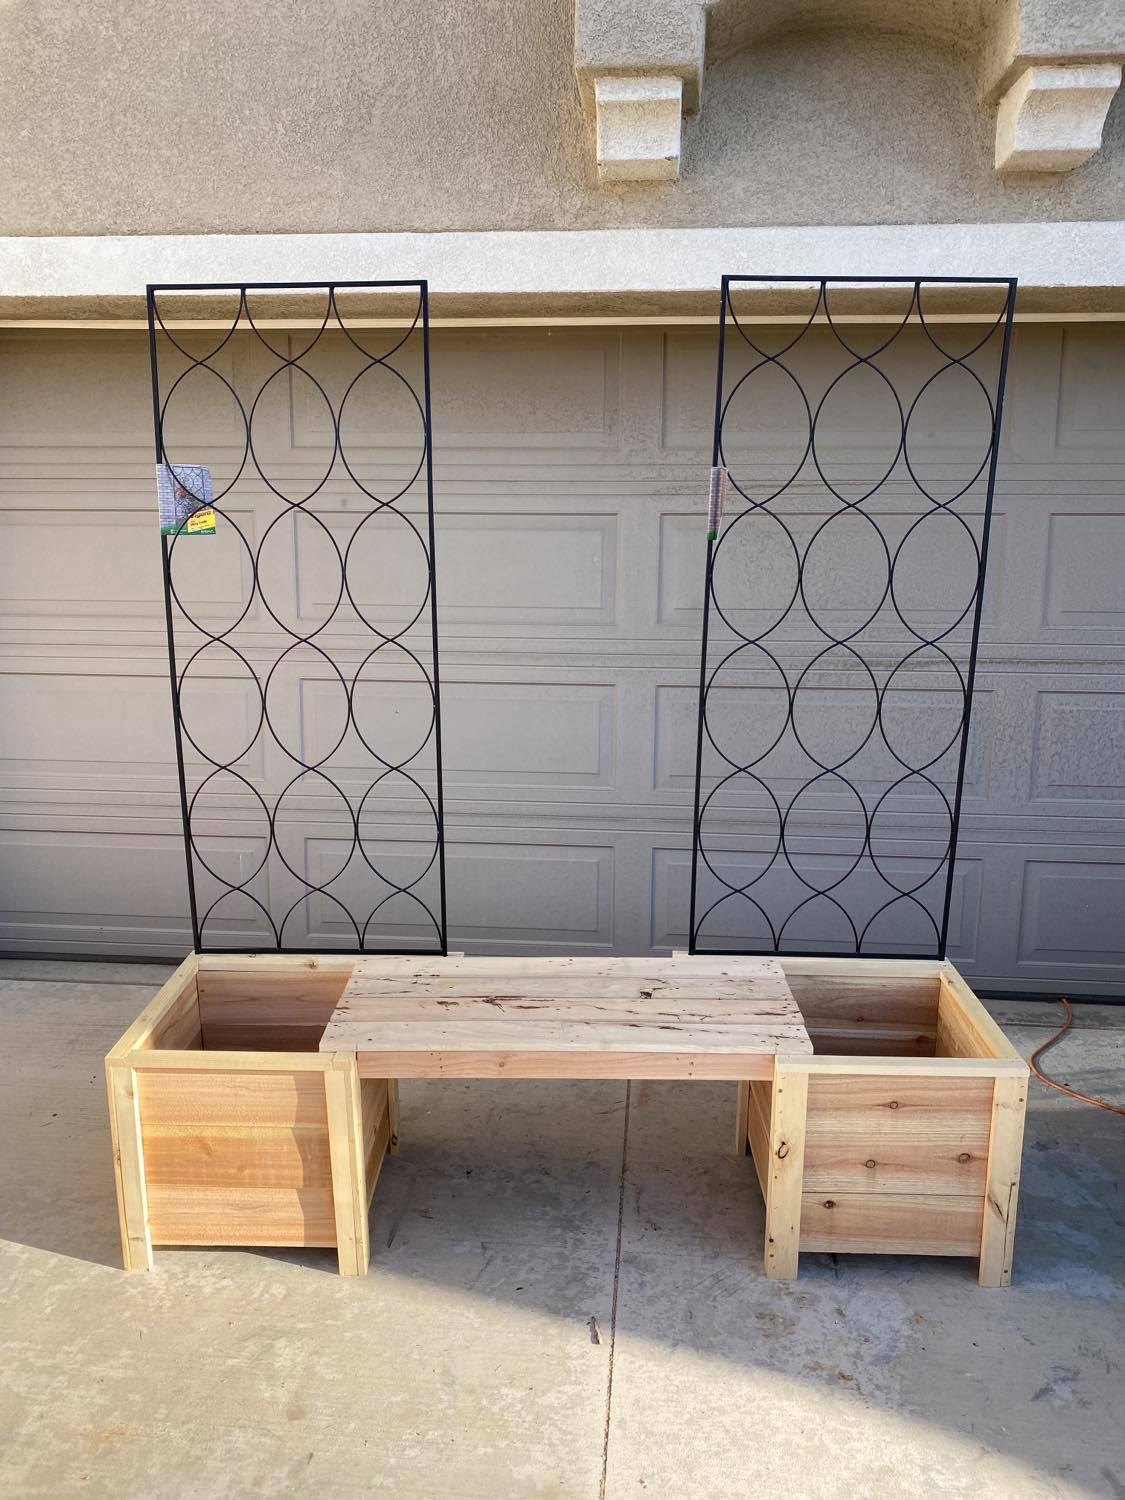
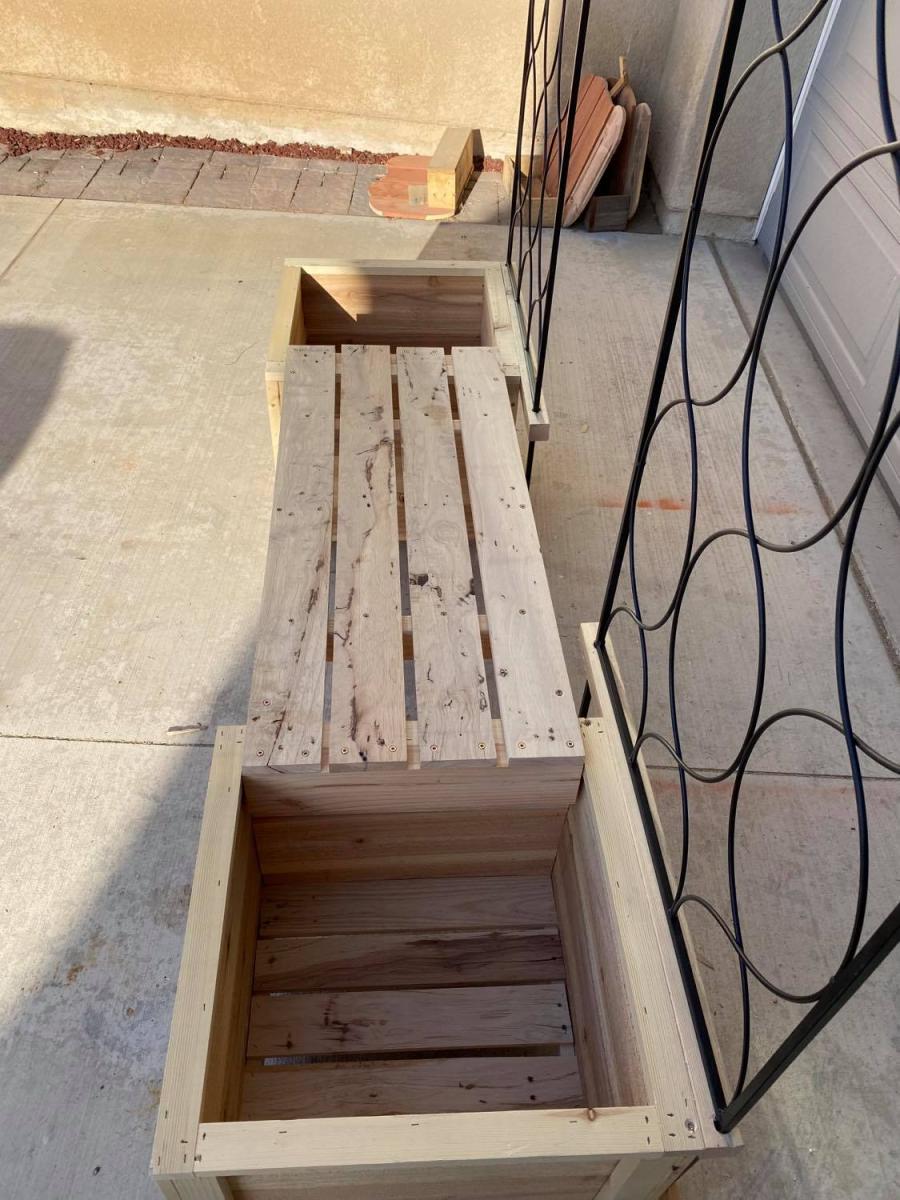
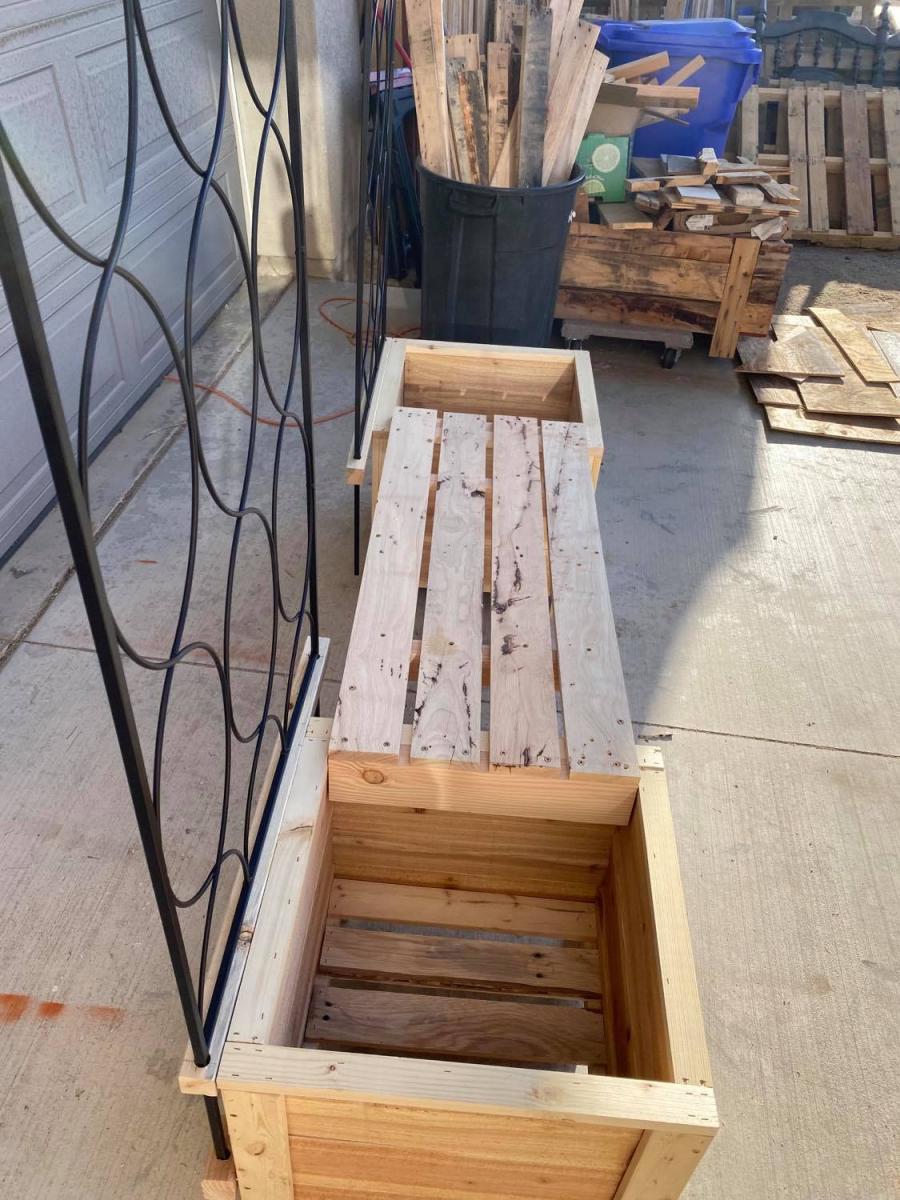
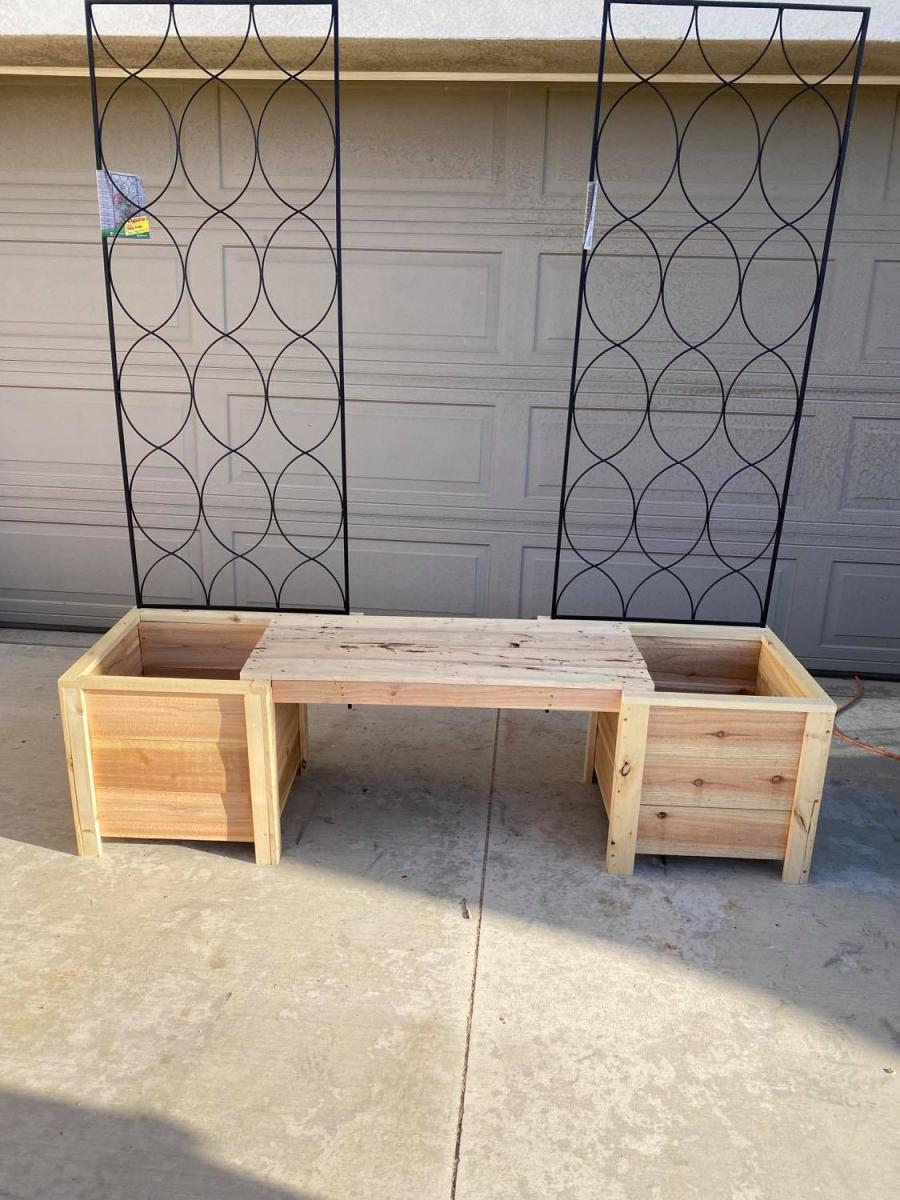
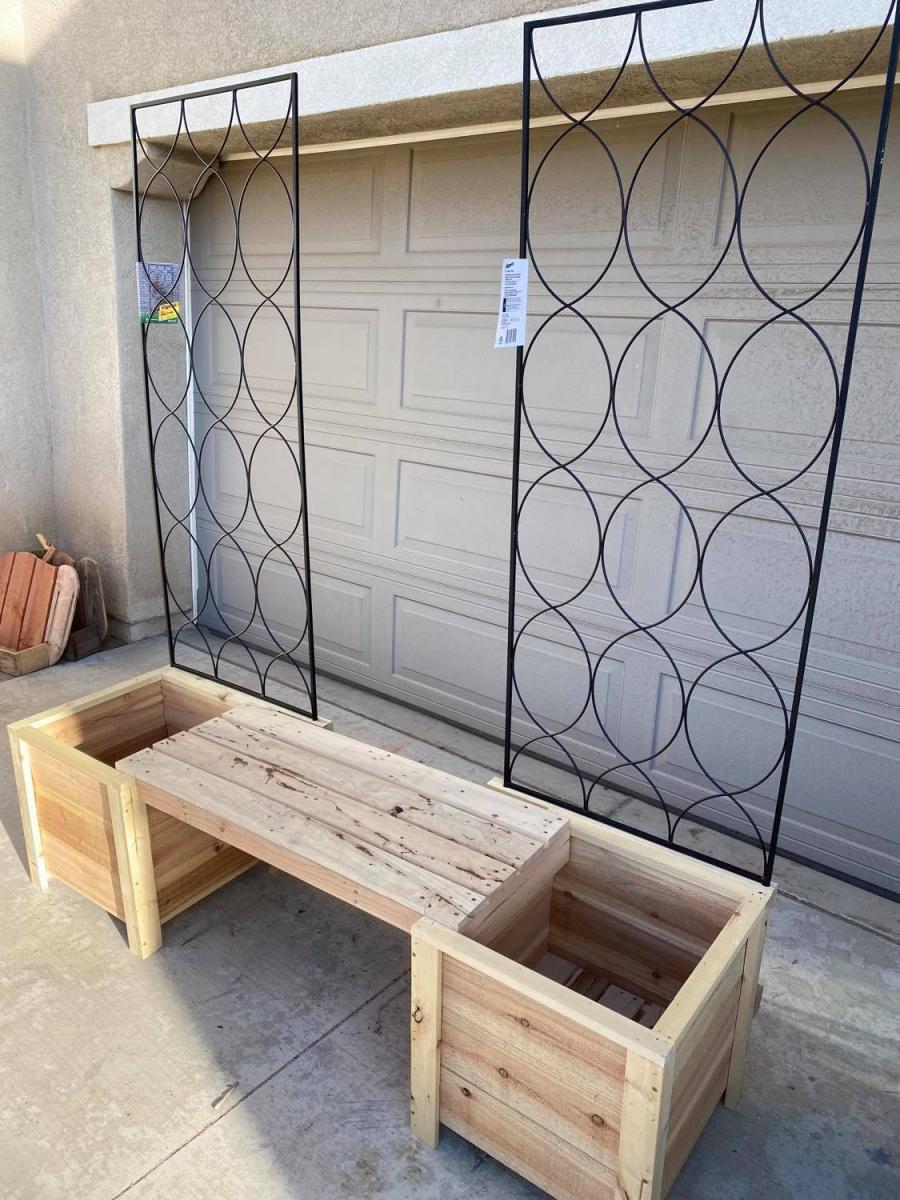
I used Ana's planter box plans and I designed and built the bench out of pallet wood, and purchased the power coated trellis's and custom fit then to the planters.

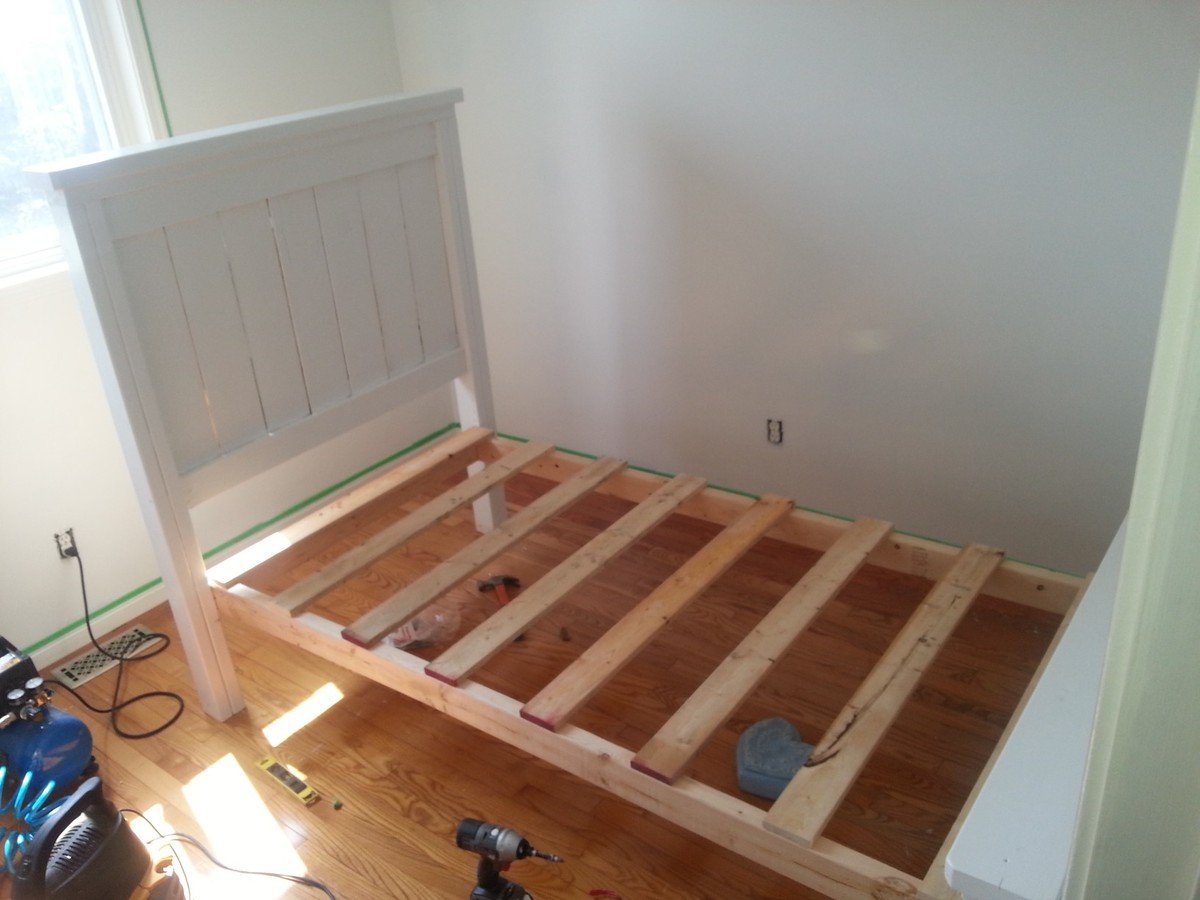
Took the farmhouse plan and added a Trundle. Was initially going to build two farmhouse beds for my two girls, but thought adding the Trundle would free up some much needed floor space. The girls love it!

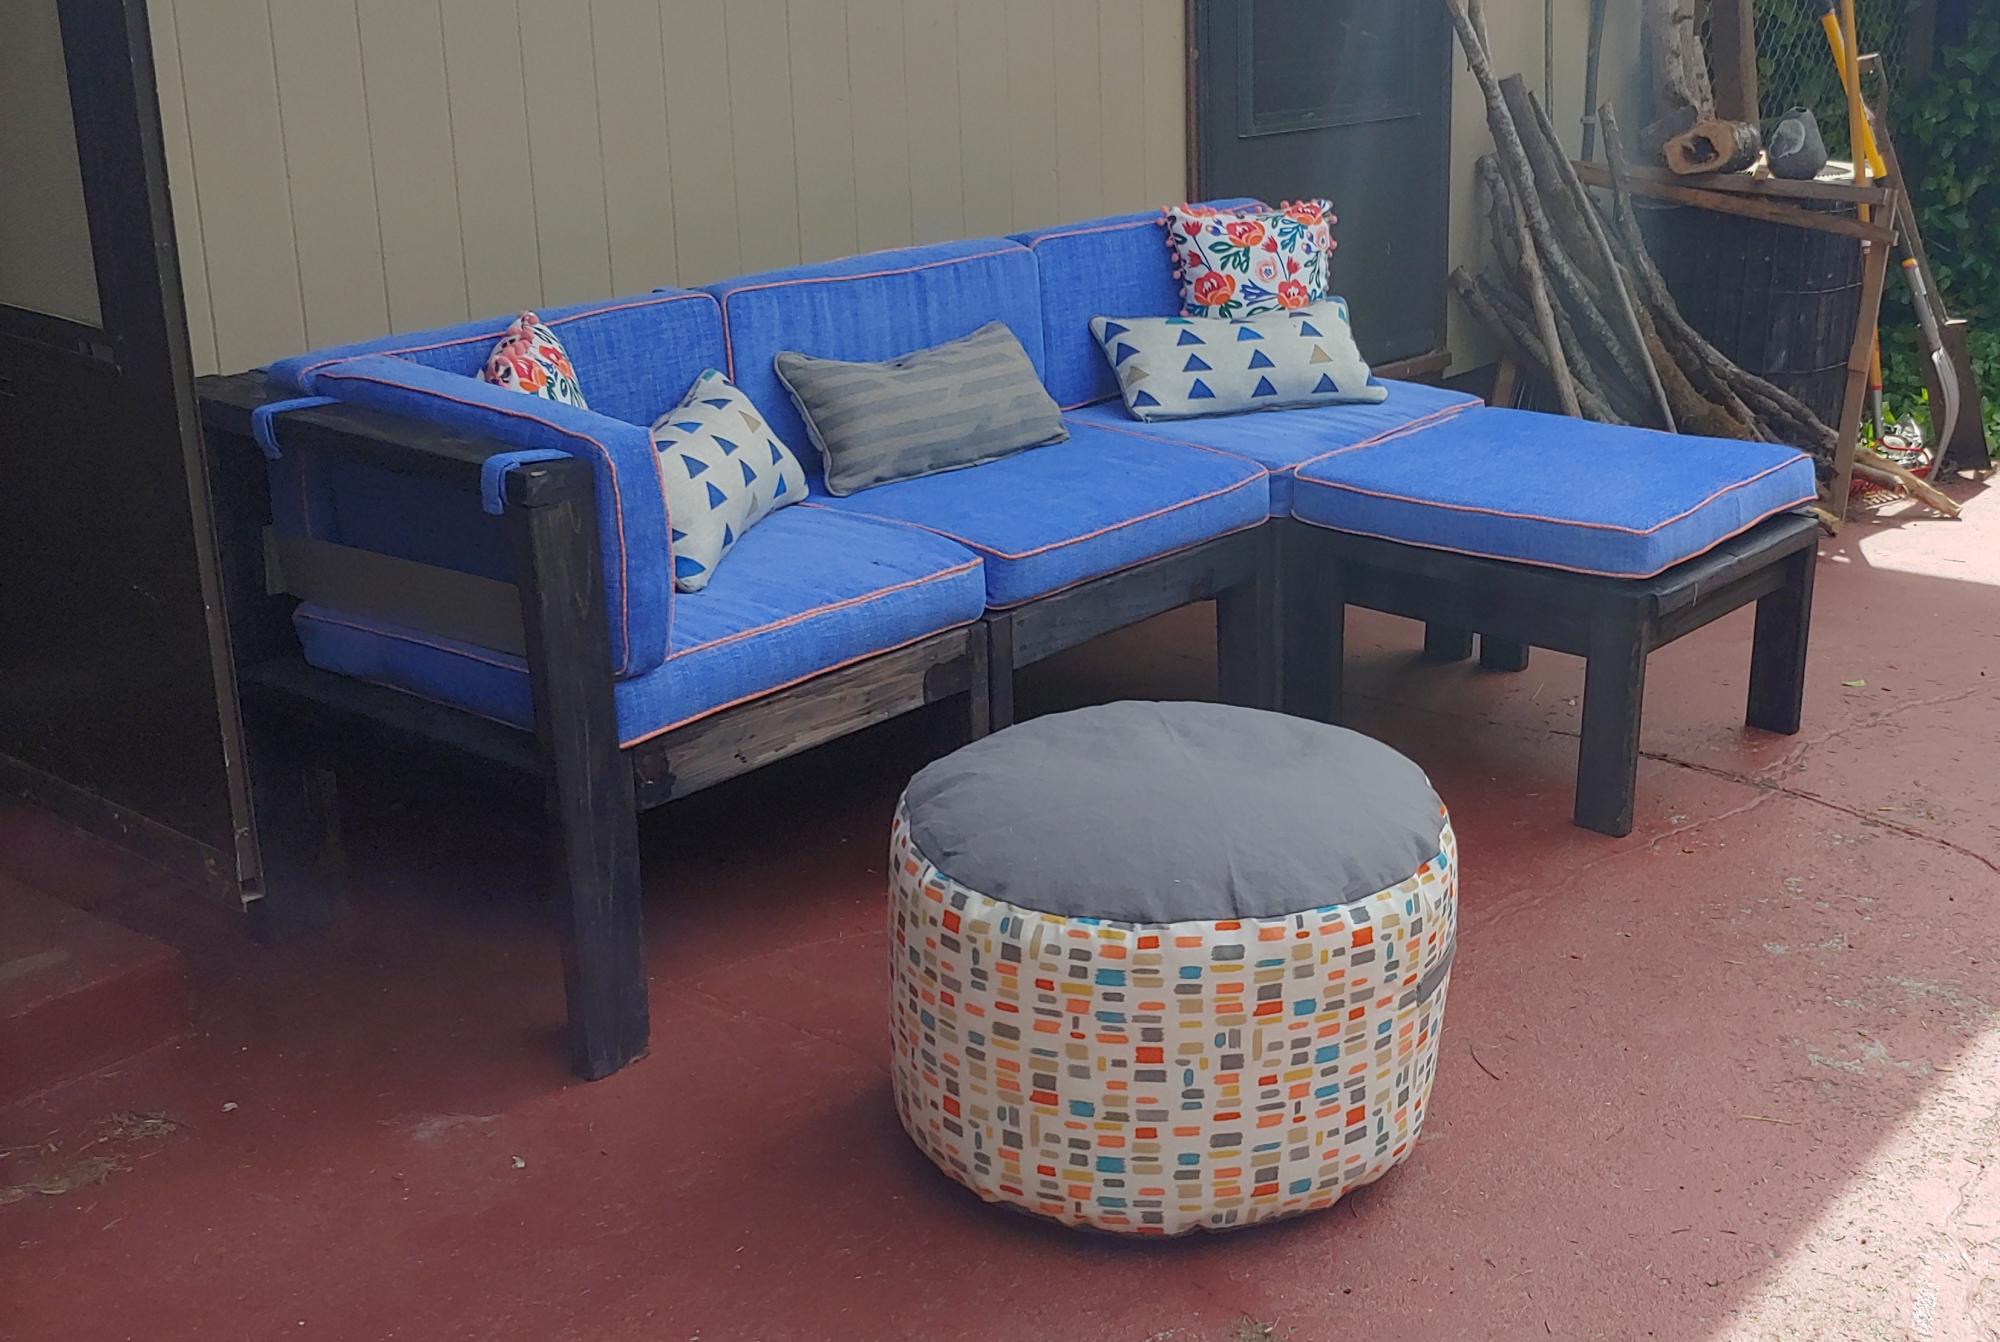
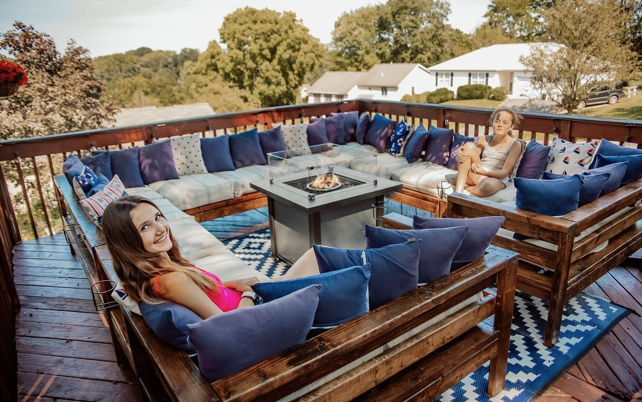
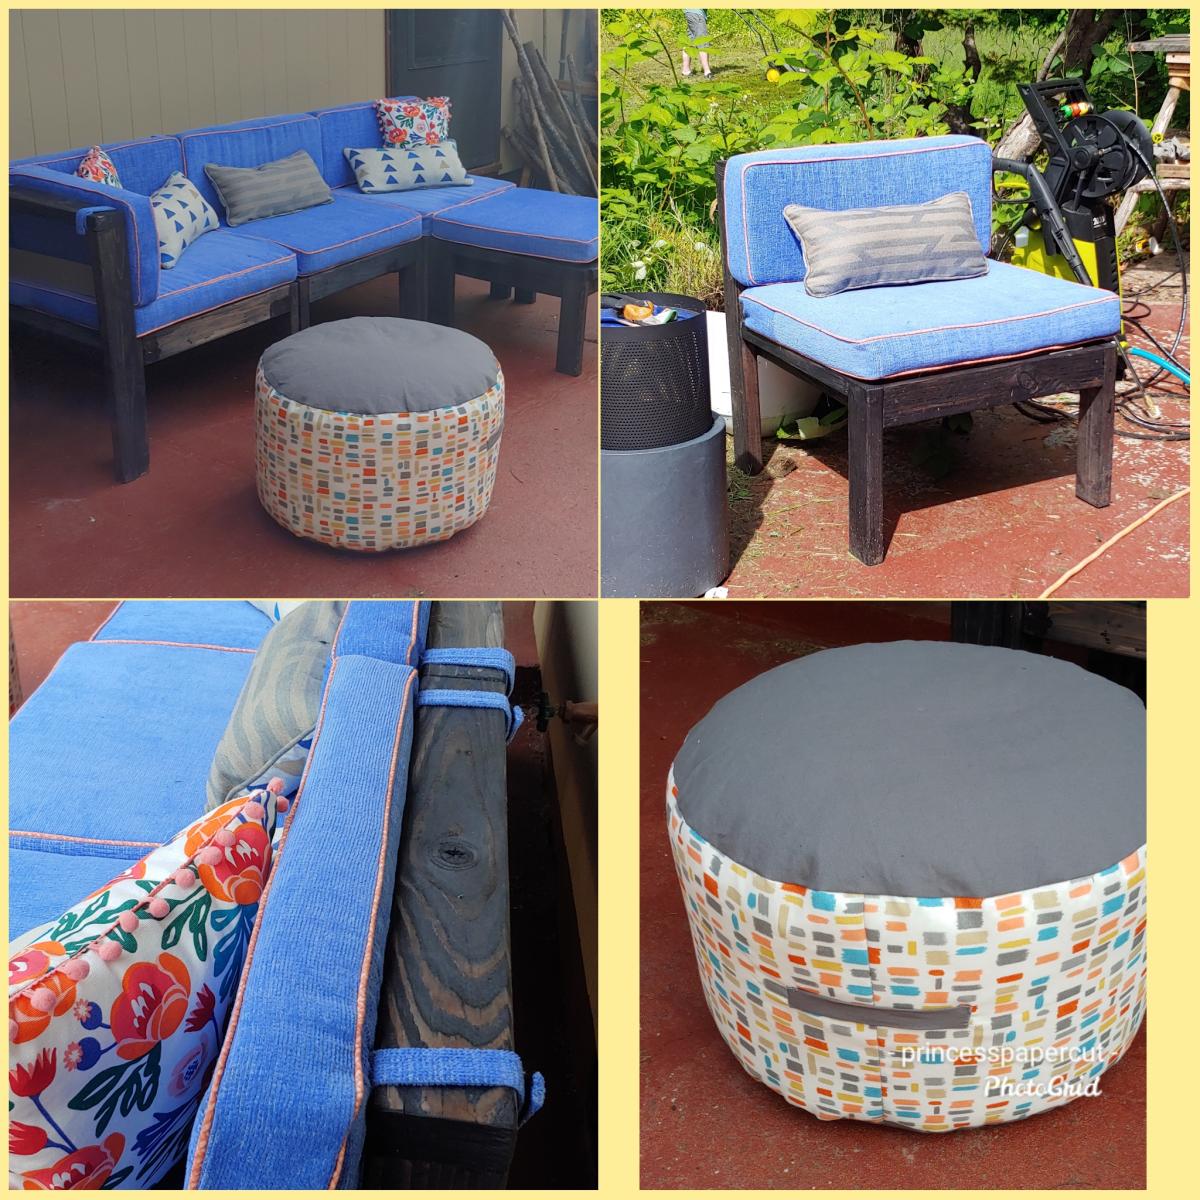
Building this project and sewing the cushions was like a love letter to my family. I made them a year ago while on a high dose of Prednisone for my asthma and chronic pain (so helpful!). I finally felt capable of doing something that would bring our family together outside. A year later it continues to serve us well.
The instructions for the sectional were very well done. Super friendly and made me want to keep going! I used black analin dye to stain the wood. Swoon!
For making the cushions:
- I relied heavily on Sailrite's resourceful web site & tutorials for their thorough and detailed instructions on making cushions, cutting foam and sewing piping.
- Home Depot has the best pricing on foam.
- Used the brand 'Cushion Qwik' Silk Film (Amazon) to wrap the foam so they can withstand PNW rain.
Fri, 05/27/2022 - 12:25
Thank you so much for sharing, that is a great description of building, "a love letter to my family"!
This was an Ana White plan. My first outside project. Late husband left me with lots of tools so decided I’d teach myself woodworking. Thanks Ana White for the super easy plans. I tweaked them a little especially the outside look. I put a single fold down door for the pullout tray. Put a hinged ladder for easy clean out attached to clean out tray.
Mon, 06/05/2023 - 07:49
Thank you for sharing, I'm sorry for your loss and happy you were able to pick up your late husbands tools and build.

I used the basic framing plan for the project, but extended roof overhangs, added engineered siding / trim and cedar shake roofing. I put 2x4 bracing on for the platform.


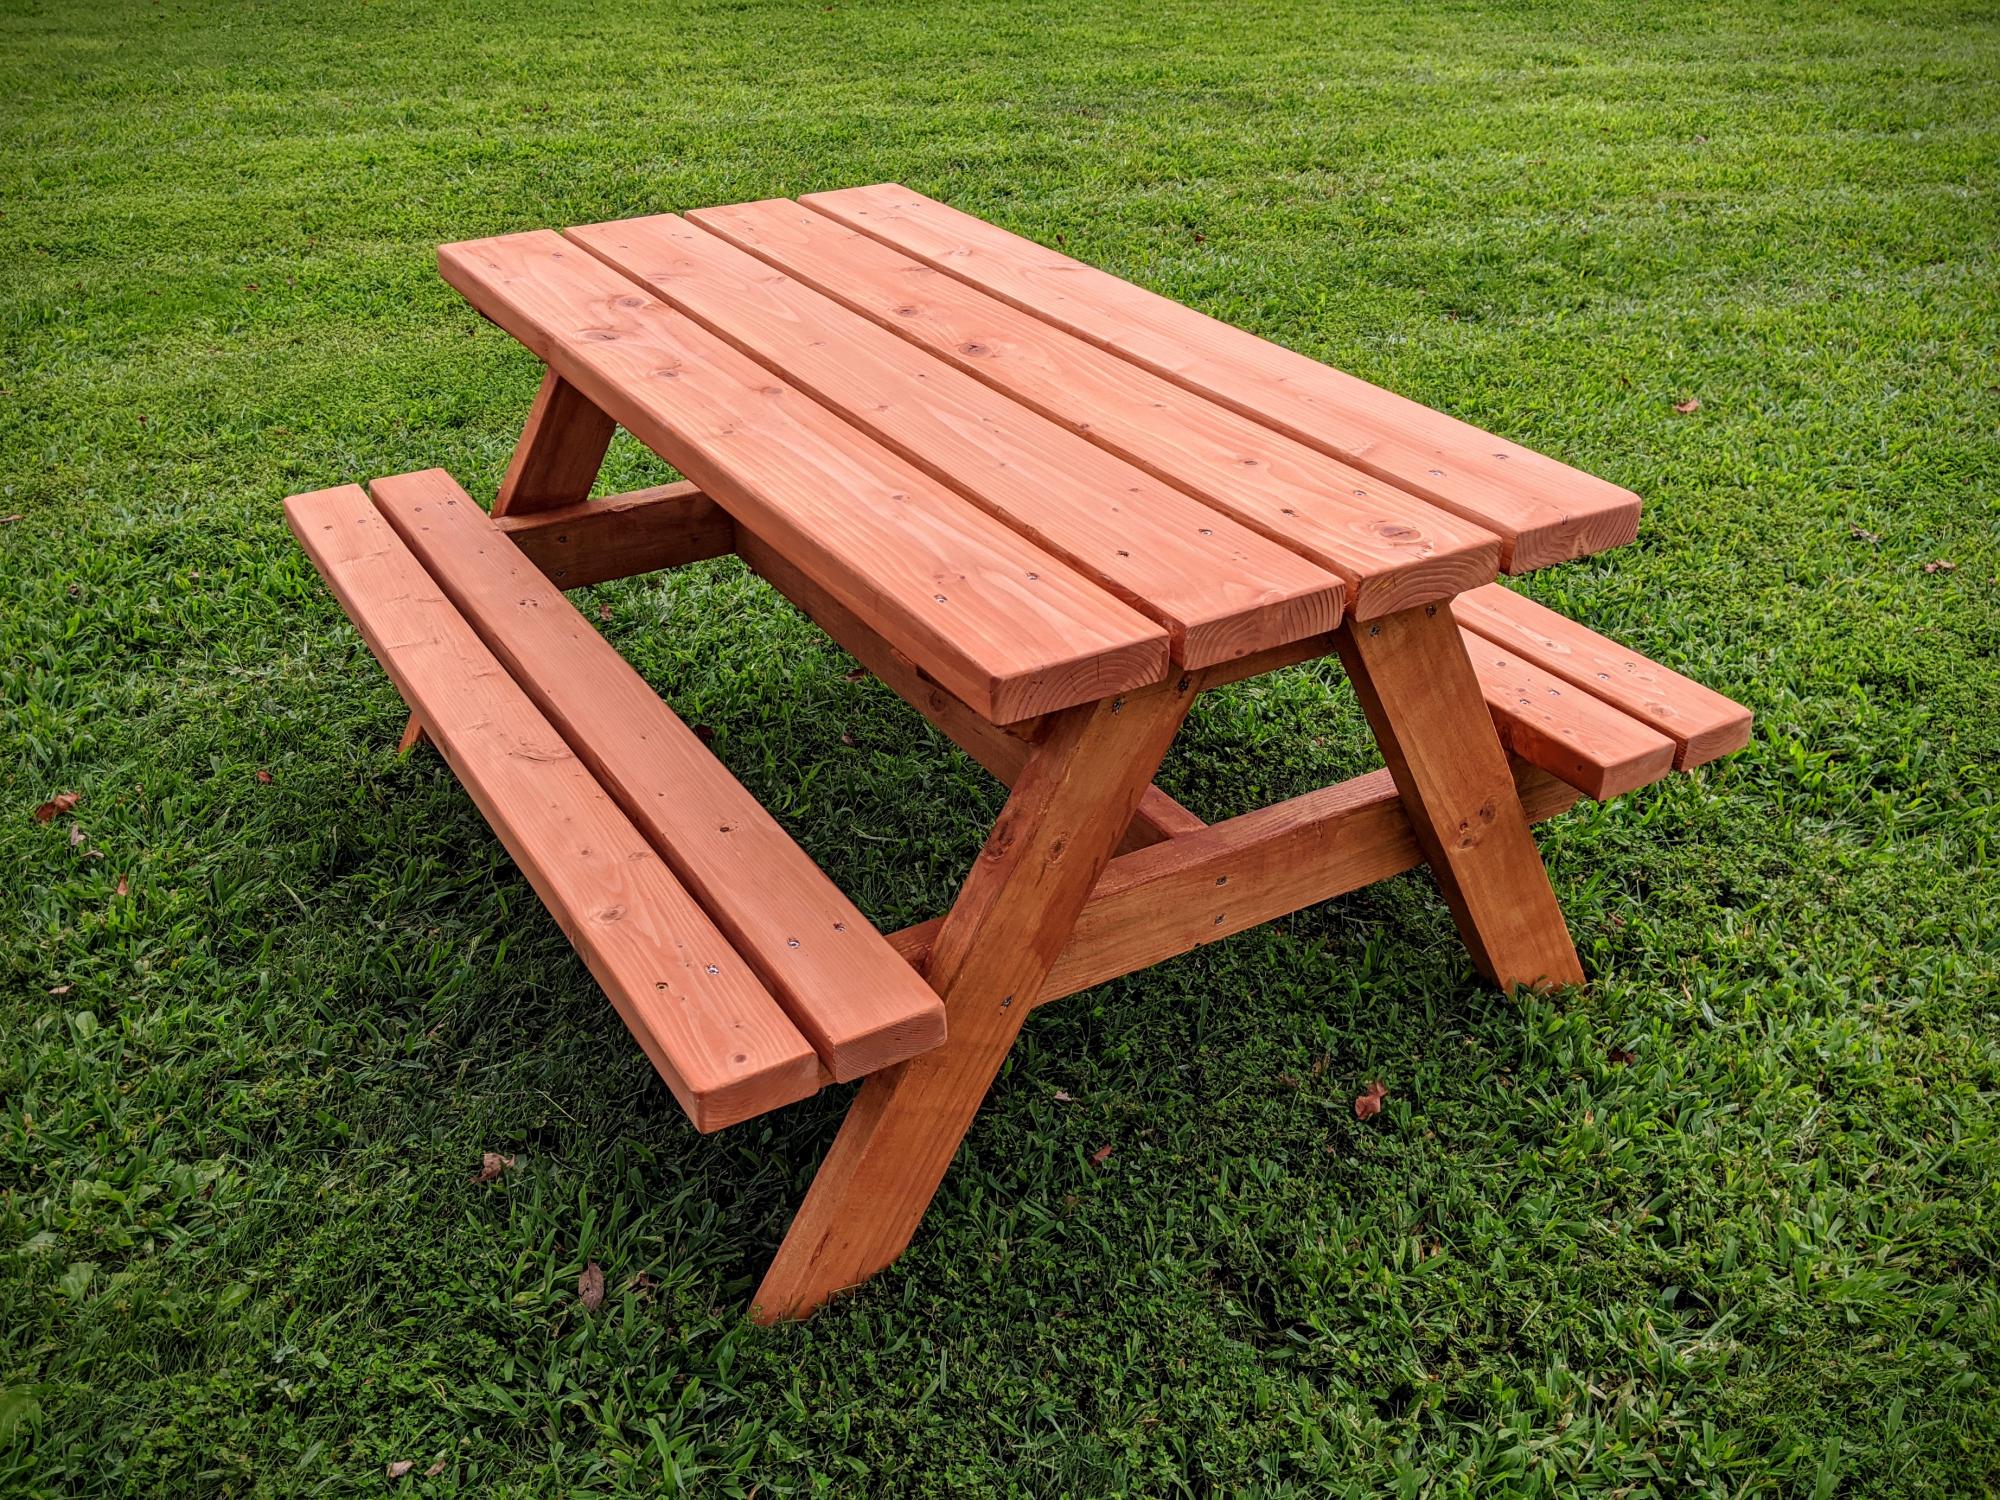
Built using Ana Whites plans for a Bigger Kids Picnic Table. Used pressure treated 2x4 for frame (legs and supports), 2x4 and 2x6 pine (fir) for table top and bench. Finished with Cabot's semi-transparent redwood stain and sealer.
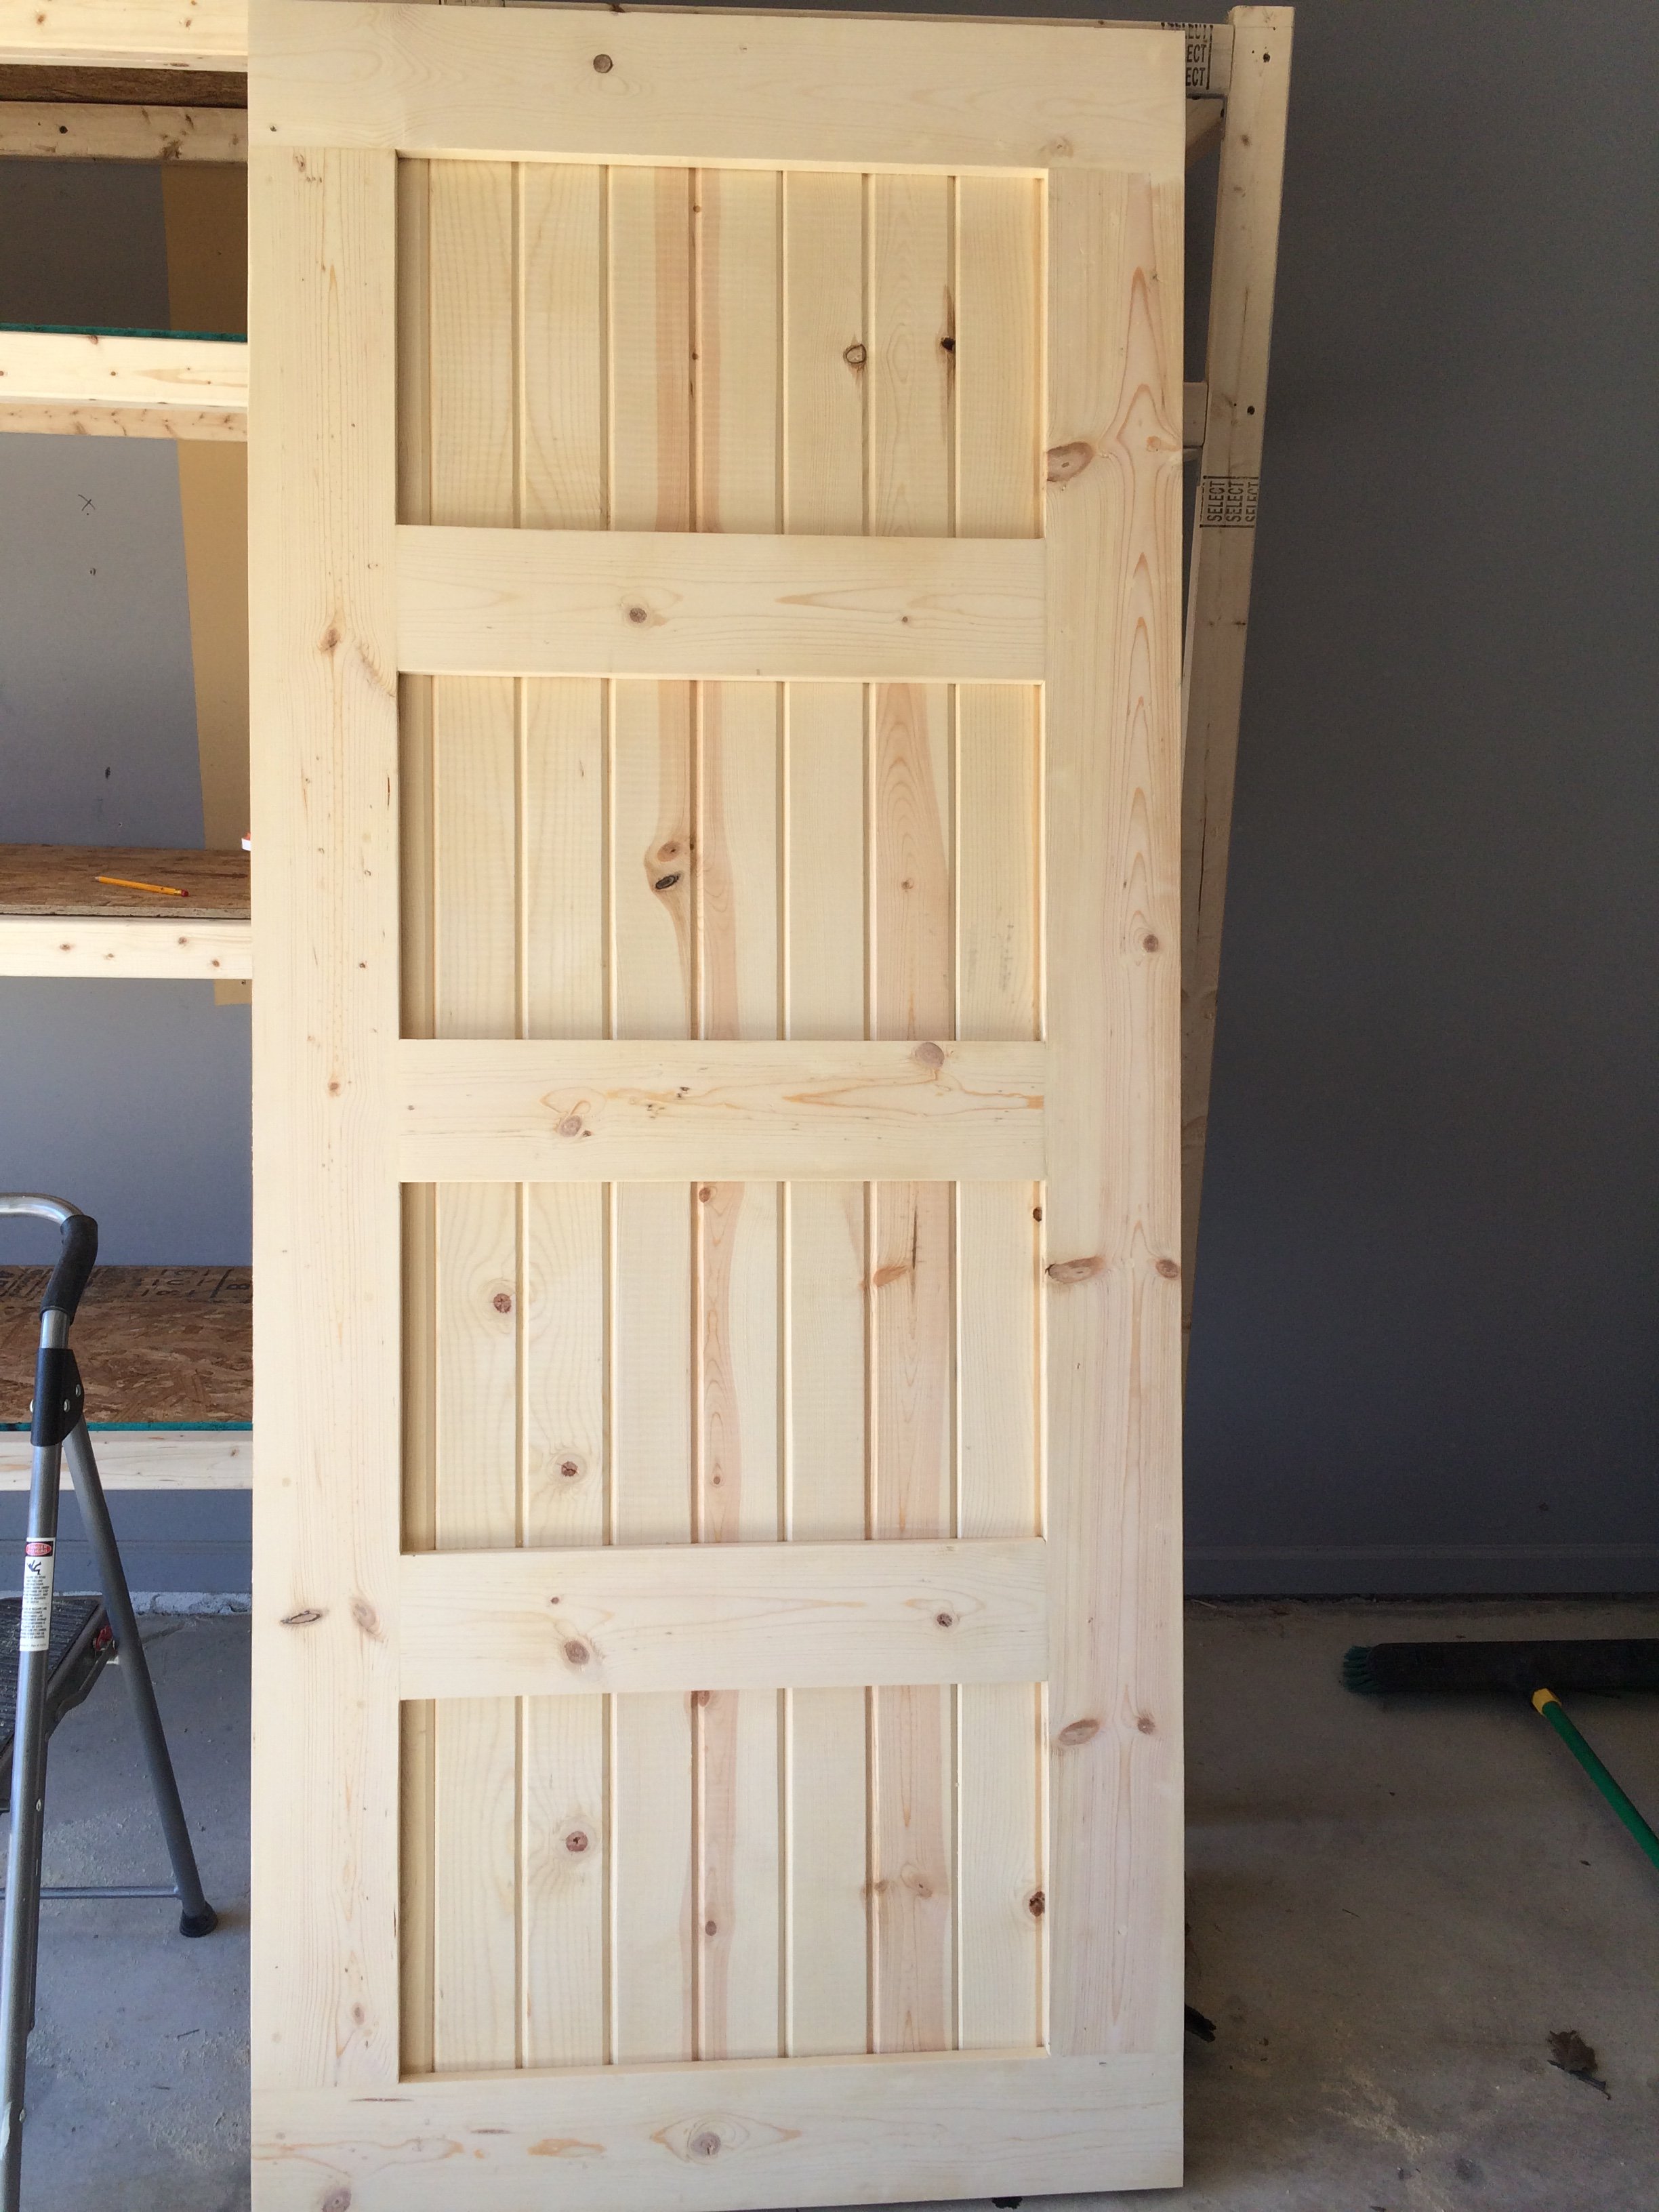
Created this door with pine wood tongue and groove lumber and pine wood planks. Purchase barn door hardware / track from Jet.com and door handles from Hobby Lobby.
This replaced my Master bath door and I think came out pretty good. Thank you for the ideas!!! Jeff M. Brownstown, Mi


This was born out of the need for more counter space in our galley kitchen. We don't have the space to add an island. Especially around the holidays, it would be great to have extra space for making cookies, serving big meals, etc. I used Ana's Small Kitchen Island Prep Cart plans for inspiration. I adapted the dimensions to fit at the end of our counters when not in use and added a drop leaf to give us almost 4 additional feet of butcher block counter top when we need it. I used scrap lumber that I had for the cabinet and had an extra drawer handle that matches our kitchen cabinets but bought the butcher block, locking casters, drawer slide and hardware for the legs. Also, the weight of the butcher block makes it want to tip when it's away from the cabinet with the drop leaf down so I added a lead counter weight inside the drawer.


Tue, 04/27/2021 - 18:09
I am so interested in doing this, but would like more details on how the drop leaf was constructed. Would it be possible to get more information?

In reply to I am so interested in doing… by haartd
Sat, 07/24/2021 - 16:59
Sure! I used a 4 foot butcher block and cut it down. The horizontal part is 13 1/2" and the drop leaf part is 32 1/8" attached with a piano hinge. The legs need to be cut and hinged to fit when folded up. This one is made so that the drop leaf fits right under the overhang of the kitchen countertop that it is next to so it's snug against the cabinet and not an issue but, if you want it to be freestanding, the weight of the butcher block will pull it over if you don't weight the cabinet down with something as well. I got a 5 pound lead bar from Amazon in case we need to use it somewhere else. I hope that helps! Let me know if you have any other questions.
My wife is always annoyed with me. I make something for our home, and a few months later I decide I dont like it and want something better! I sold our 5th bed set months ago (Farmhouse Bed made through Ana White) and have been sleeping on the floor for the last few months.. Figured it was time to create something I wouldnt sell! Took some plan ideas from the Farmhouse King Bed Plans and came up with something a little more extravagent.
Hopefully I dont sell this one.
In reply to Whoa! by Ana White Admin
Wed, 01/14/2015 - 18:49
Thank you very much!

Wed, 01/14/2015 - 21:37
Awesome!!! This is so cool!! Thanks for posting!
In reply to Awesome!!! This is so cool!! by Ana White
Thu, 01/15/2015 - 05:03
Thanks Ana!
Thu, 01/15/2015 - 03:34
Very nice, would love the plans for it as it is awesome! :0) I need a new bed as well upgrading from queen to a king. :0)
Thu, 01/15/2015 - 05:06
Thanks thewoodbuilder, its super easy and you could probably figure it out just by looking at it. =)
I extended the legs 2" past top of footboard, and 4" past top of headboard with caps on top. And layed 1x4 vertically over top of the 1x6 planks, and horizontally across the top of both foot and head board.
Cheers!
Justin
In reply to Stain technique by tbednarick
Fri, 01/23/2015 - 13:50
Lol, actually its one that Ana wrote a small tutorial on! im not sure where her Finish tutorials are on this new site but im sure you can find it somewhere.
Fri, 01/23/2015 - 15:05
I found the tutorial at http://ana-white.com/2013/05/vintage-graybrown-stain-pine. Thanks for mentioning it.
In reply to Thanks! by tbednarick
Sat, 01/24/2015 - 13:06
great! be sure to mix that weathered oak well!

Wed, 01/21/2015 - 20:47
This bed is gorgeous!!!! If you don't mind I have a couple of questions... For your stain combo of Weathered Oak and Special Walnut do you layer the weathered oak, wipe it off then apply special walnut? Or do you mix the two stains? Your footboard looks taller than the plan calls for , did you make it higher , if so by how much? And what dimensions are your footboard posts? This seriously is an amazing build. Great job!
In reply to Awesome! by tracygator
Fri, 01/23/2015 - 14:04
Thank you! I don't mind at all. =)
The stains I do seperataely. I start with weathered oak and let sit for 15min, wipe off. Than do special walnut right after for 15min than wipe off. I repeat this until I like my color. From the farmhouse plans I really only took the planking idea and how to attach planking section to legs. The foot board is higher by 11" while the headboard posts are higher by 10".
The posts are reclaimed fir 6x6's. Thank again very much tracygator! Its a super easy design! if you have any other questions just let me know. =)
Cheers,
Justin
Sun, 03/01/2015 - 08:13
Okay.......how much do ya want for the bed? ........
Ha! Seriously, it's beautiful and a source of inspiration,
Sat, 05/23/2015 - 20:13
Do you have any other pictures of the side rails? I'm curious how you did them? Specifically, how did you mount them to the head and footboard?
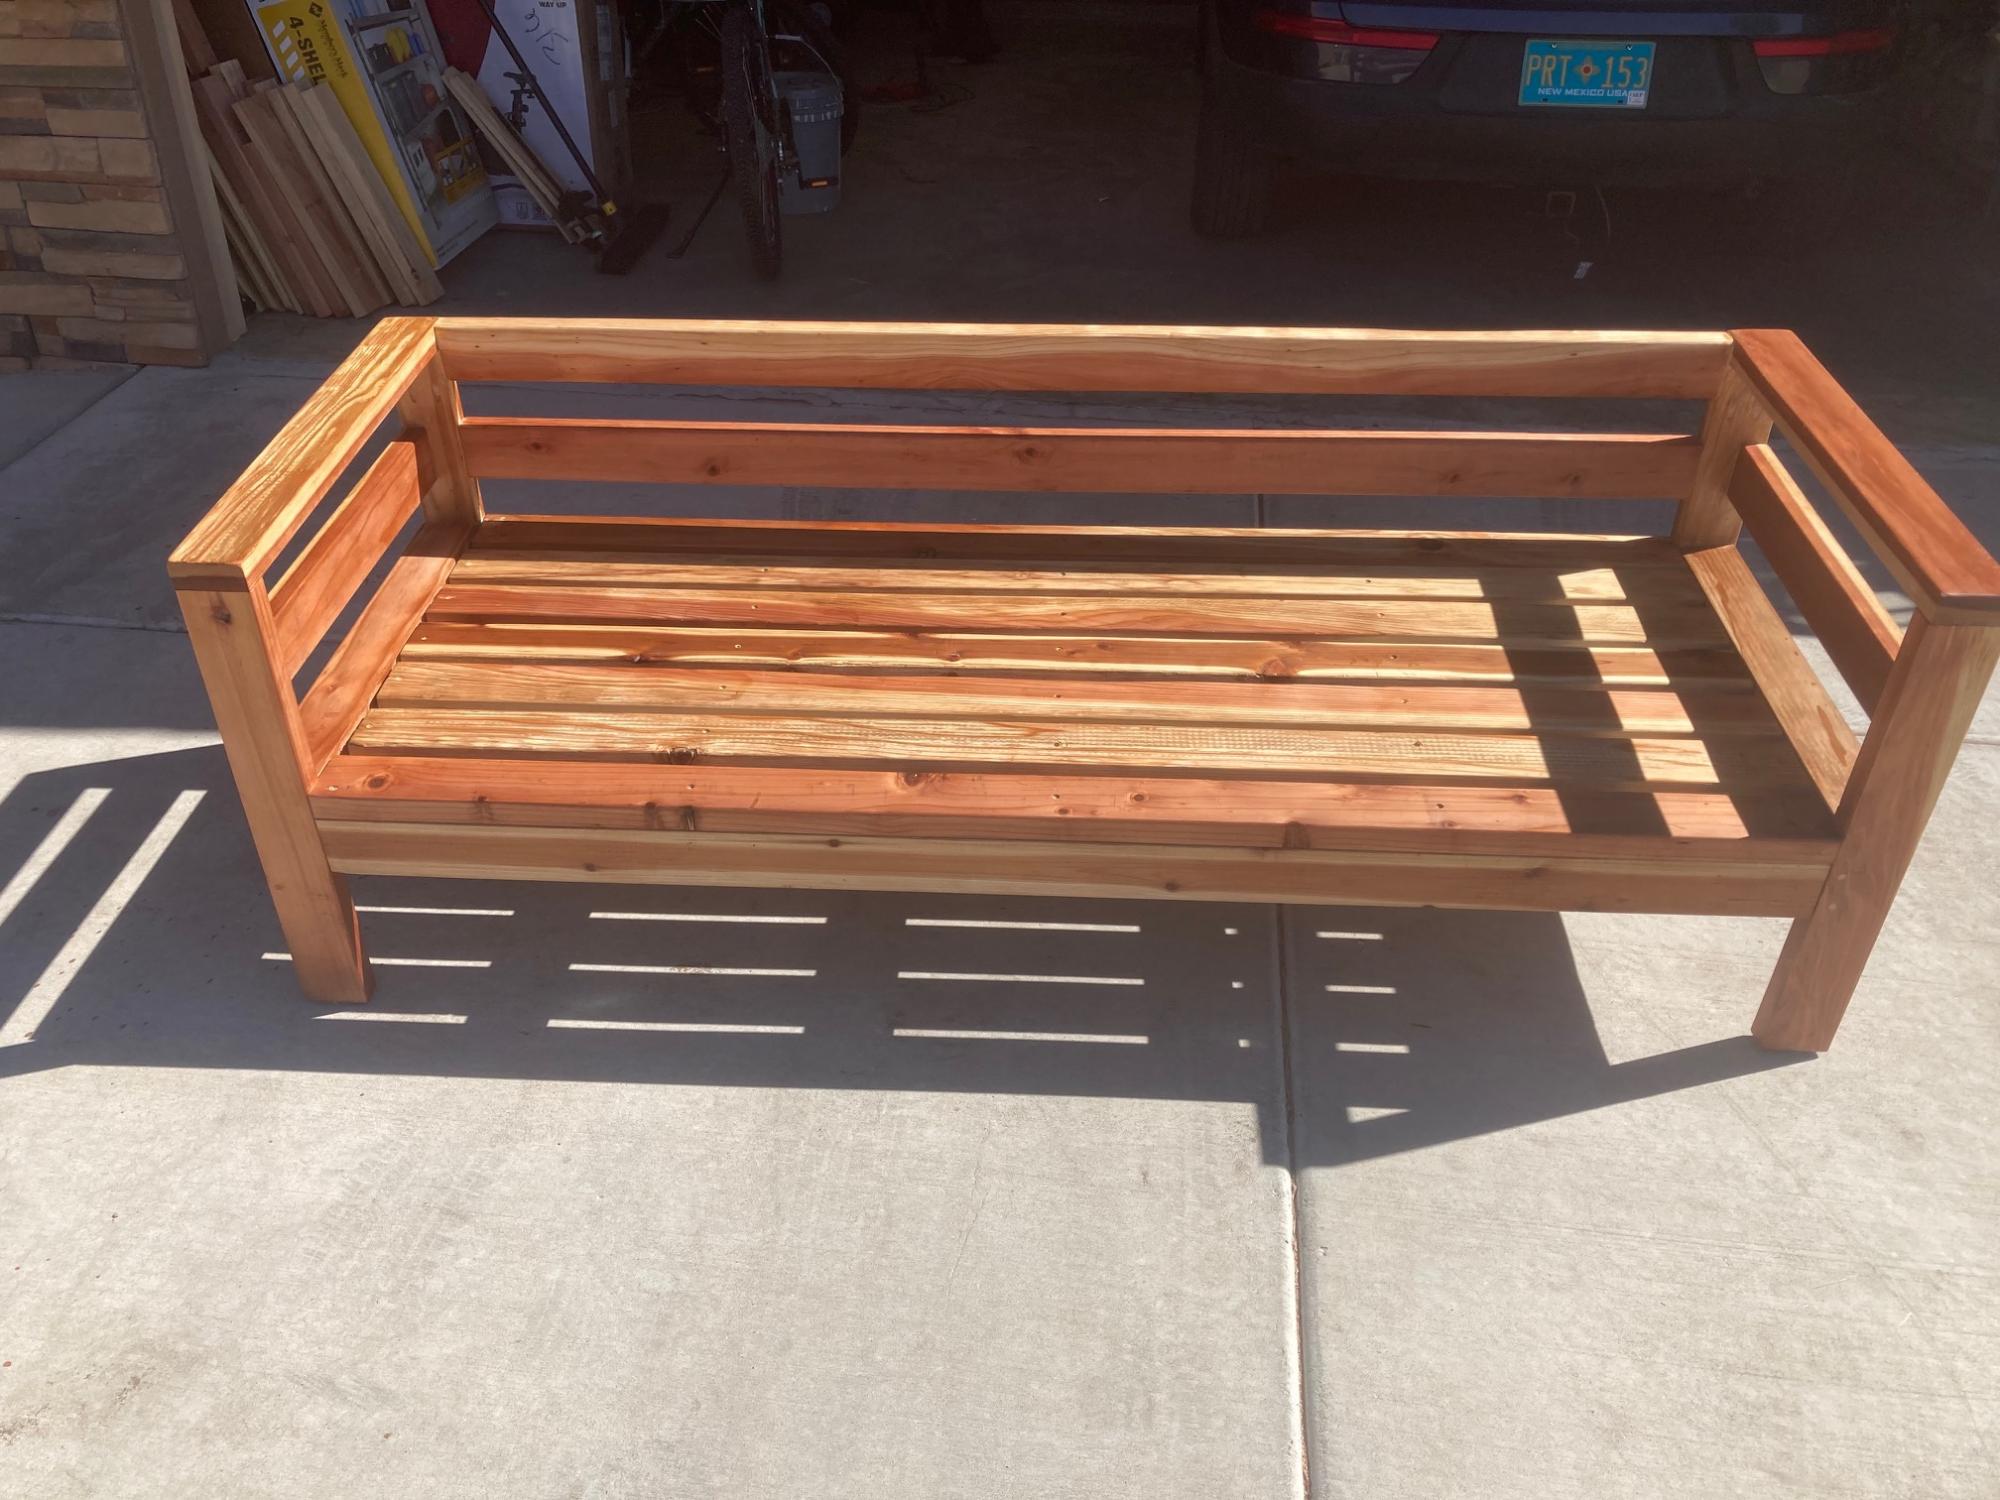
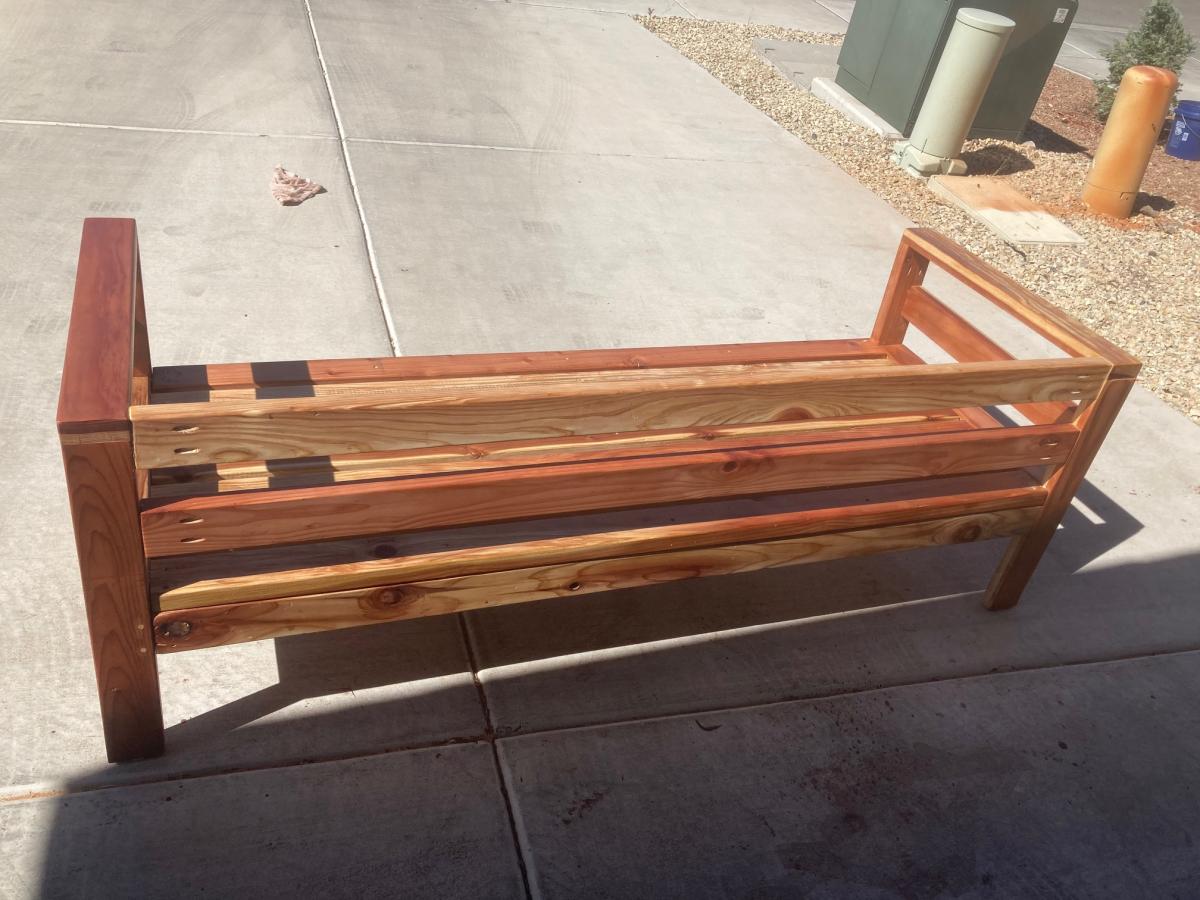
I love Ana White's 2x4 sofa project. I chose a couple of upgrades: bought redwood 2x4's and a pocket-hole jig to reduce visibility of screw holes and, of course, installed the additional side and back rails. I finished with Tung oil and then read the directions on the can afterwards: 'This product is intended for interior projects only!' Oh well.
We ordered these cushions: https://www.walmart.com/ip/Arden-Selections-Plush-BlowFill-Sapphire-Blu…
which were rather expensive but I read too many negative reviews from customers who bought and used cheap cushions.
This was the perfect project for a retiree with too much time on his hands and some basic building skills.
Thank you for this!
Michael Smith
Thu, 04/22/2021 - 09:34
Wonderful job, it looks fantastic! Can't wait for you to get your cushions and enjoy!
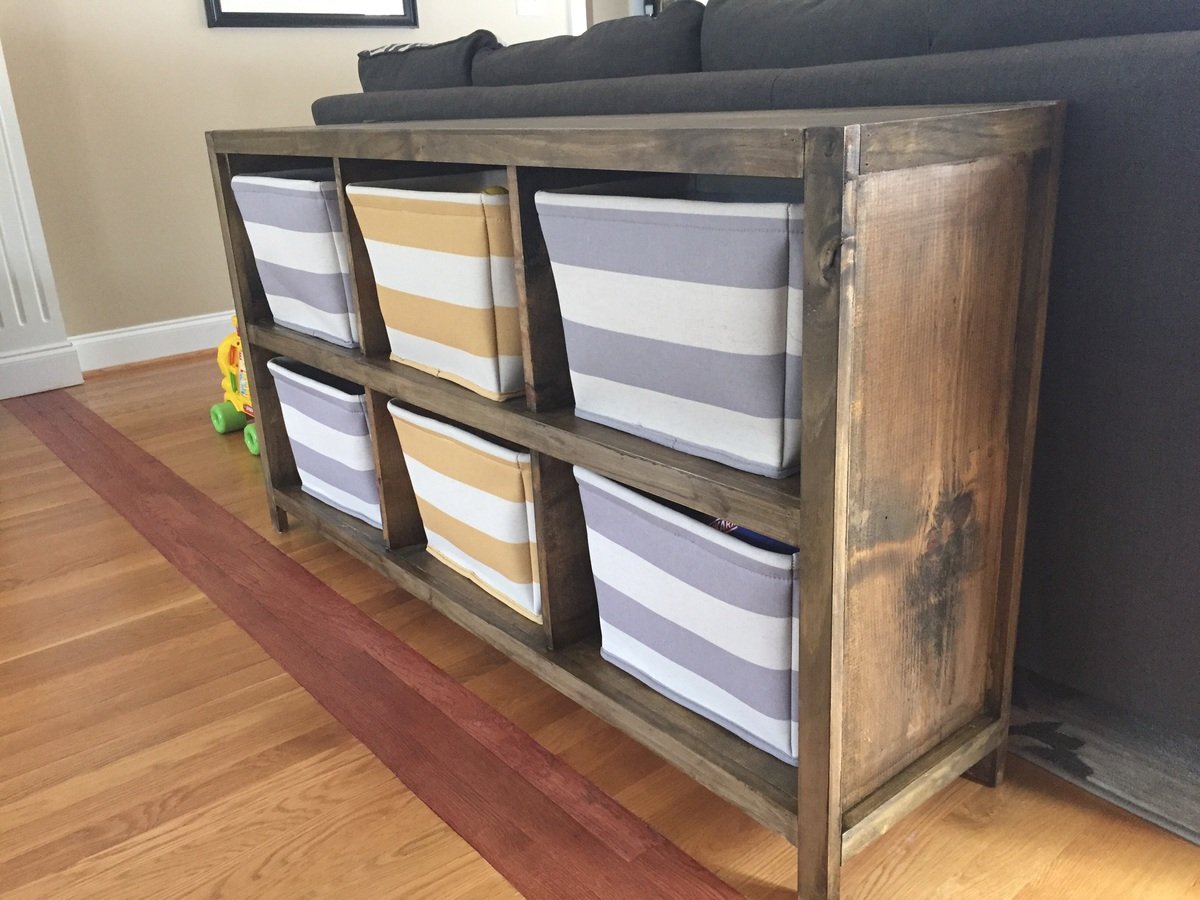
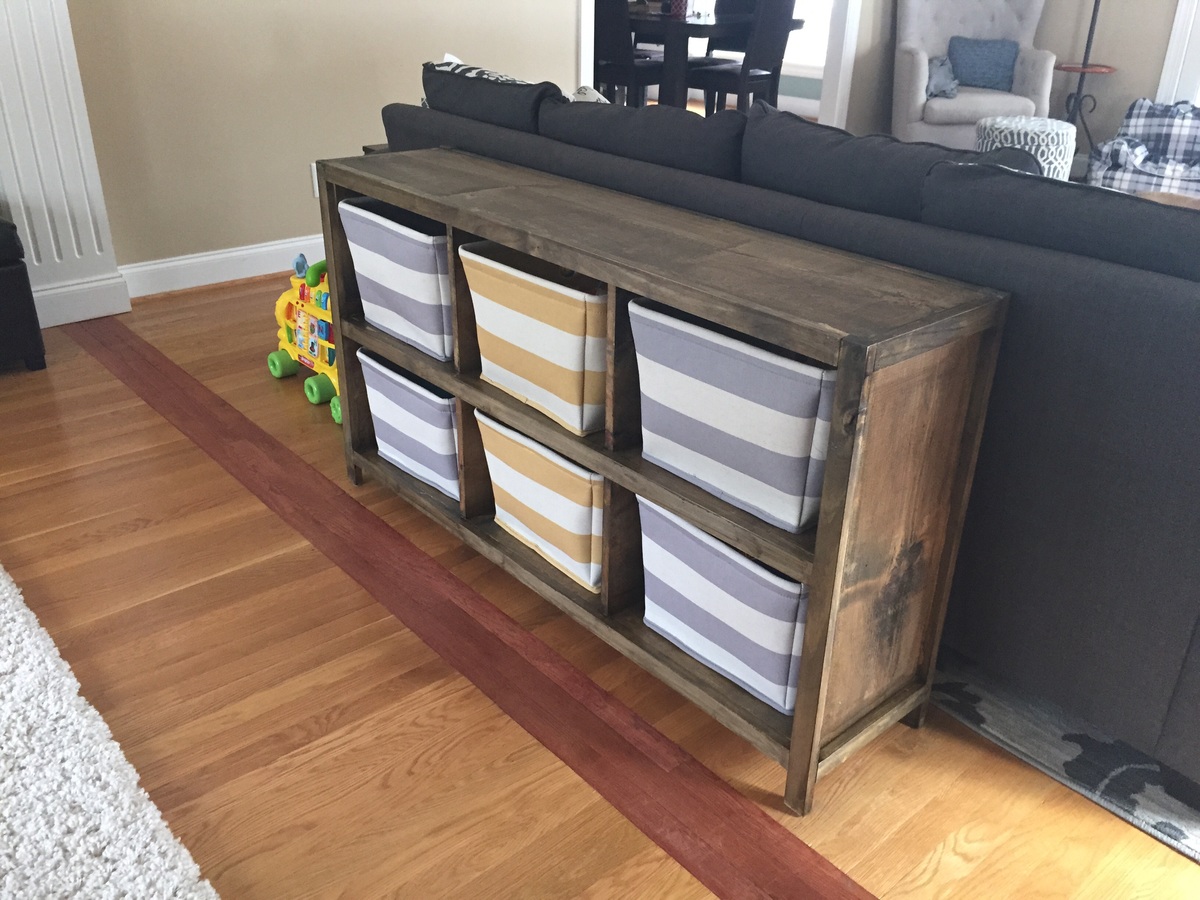
My wife and I wanted a nice way to hide more of our son's toys in the living room that didn't look tacky. We actually bought the cubby bins before even deciding what to make. (From target of course.) I made the bookcase out of wood shelving that already looked kind of beat up when I bought it knowing that the wood stain wood bring some character to it.
I only changed the plans slightly by making the legs flush with the inside so I could trim the ends and customizing the size of the cubby openings to fit the bins. (Mine aren't actually cubes.)
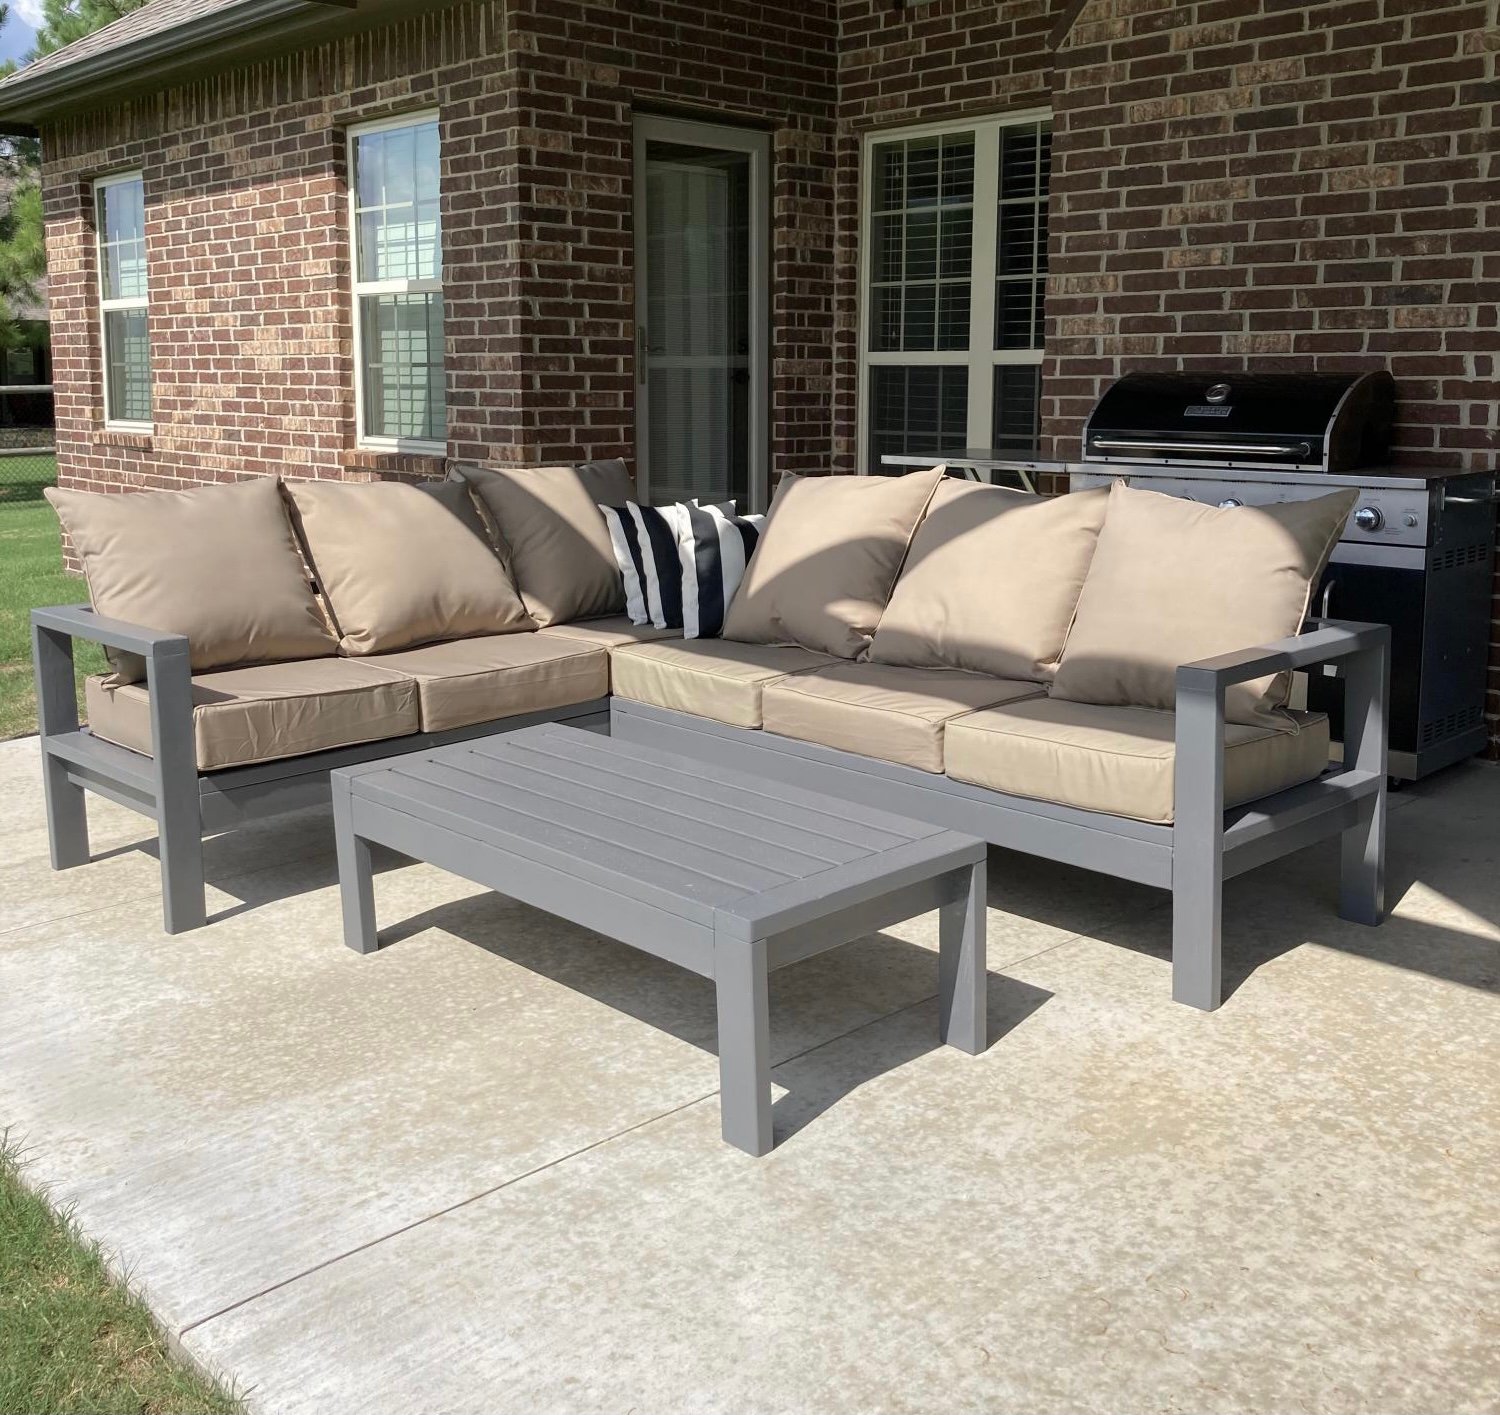
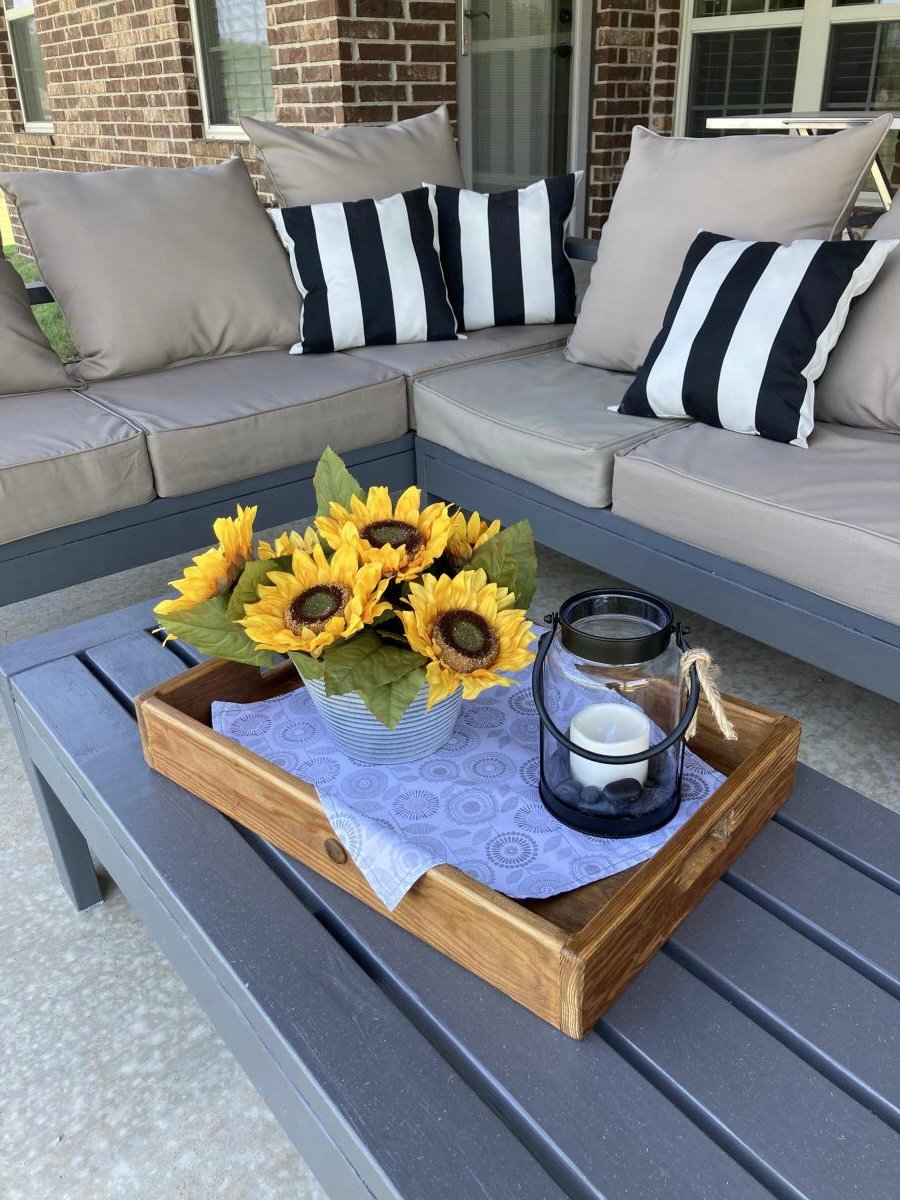
I wanted sturdy seating for my patio. Ana White had the perfect plans for my L shaped seating and coffee table. It was simple to put together and we love it!

Submitted on FB
DIY small shed for trash and recycling.