Community Brag Posts

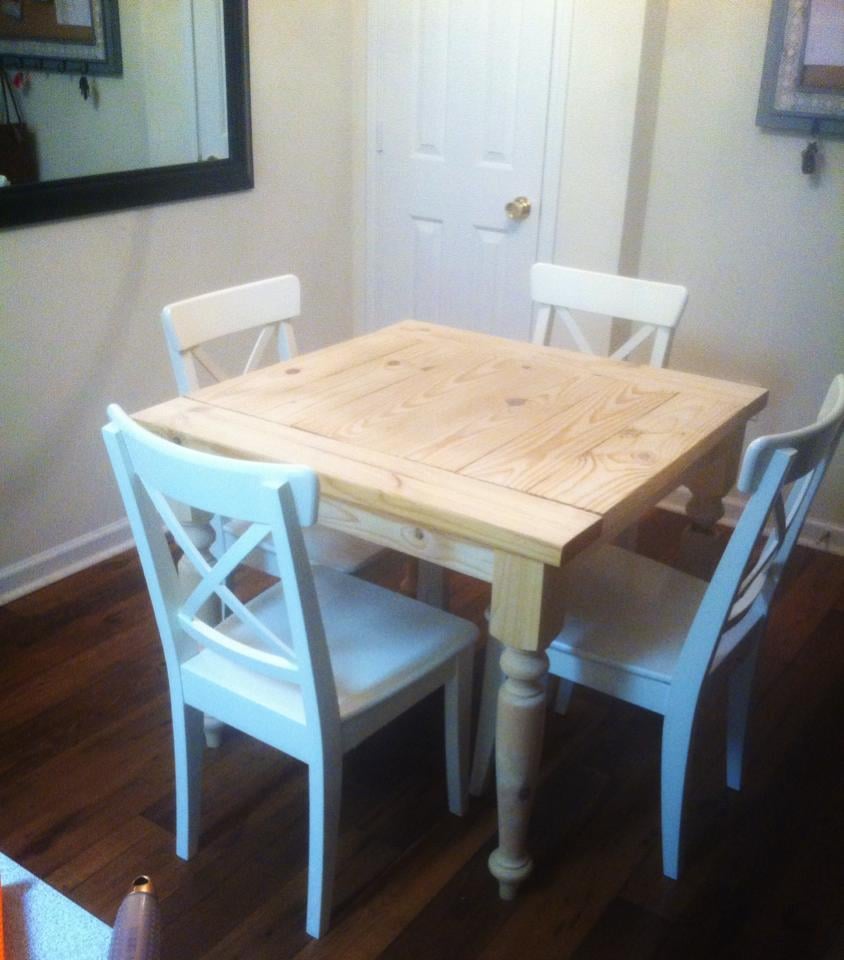
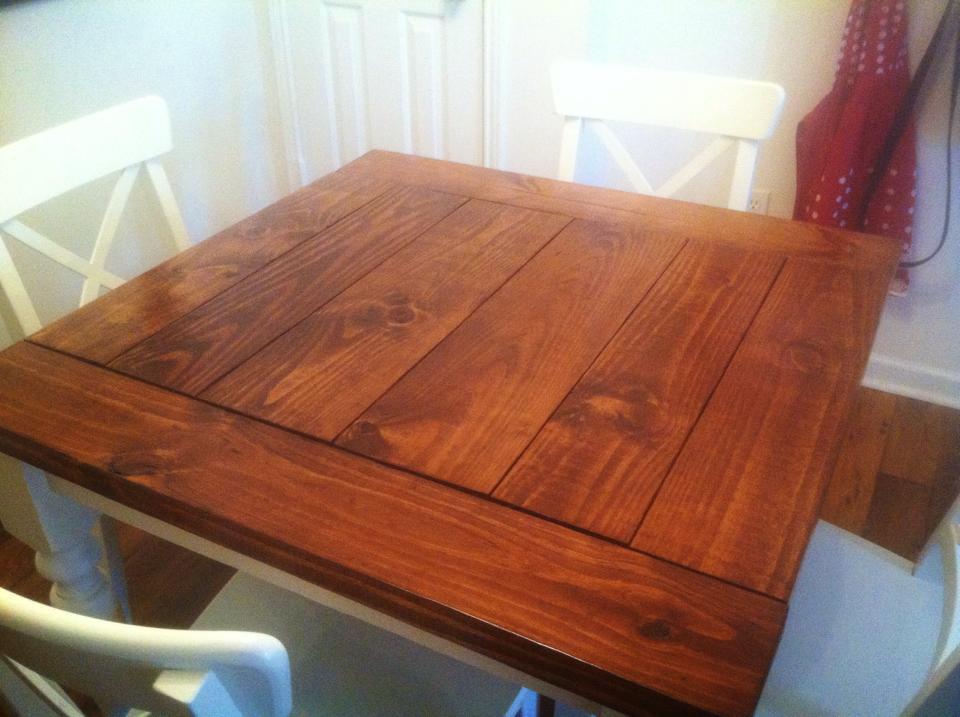
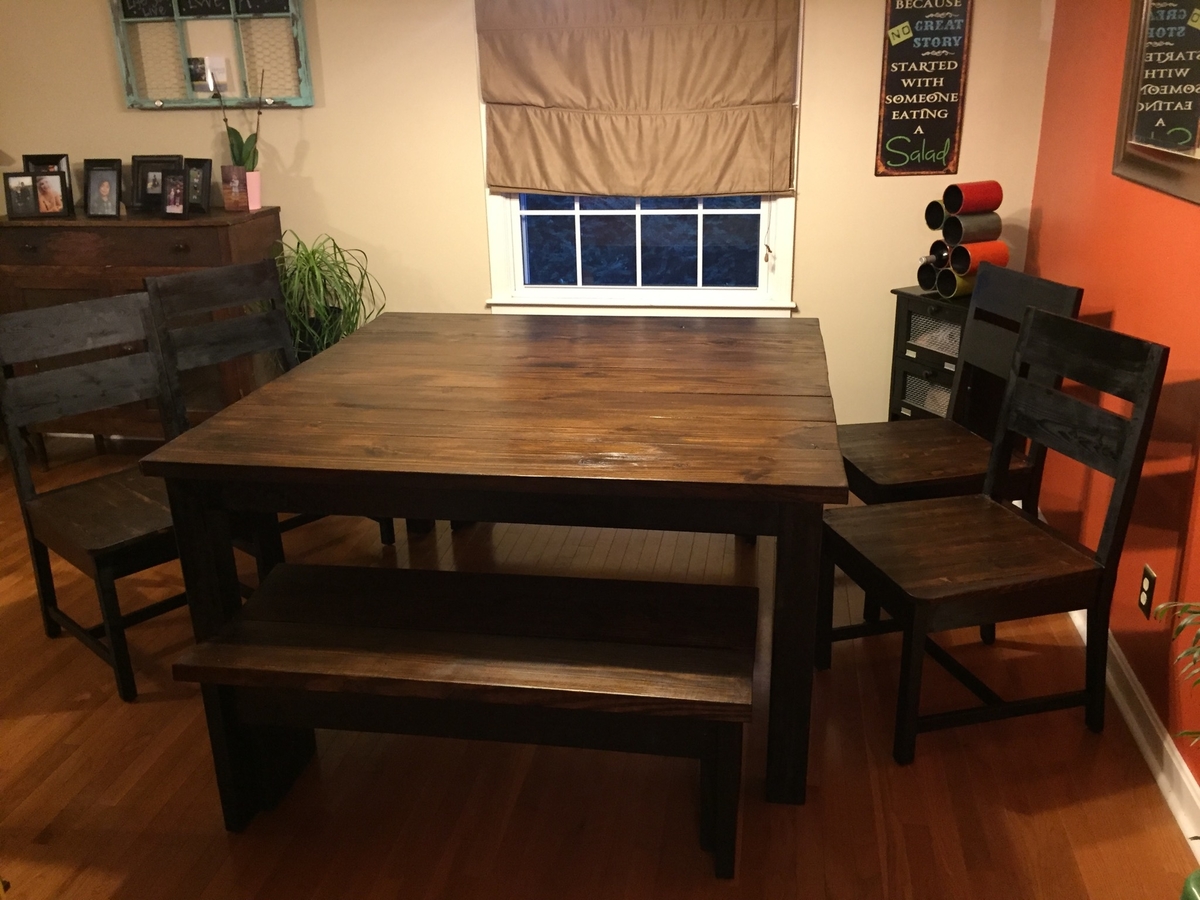
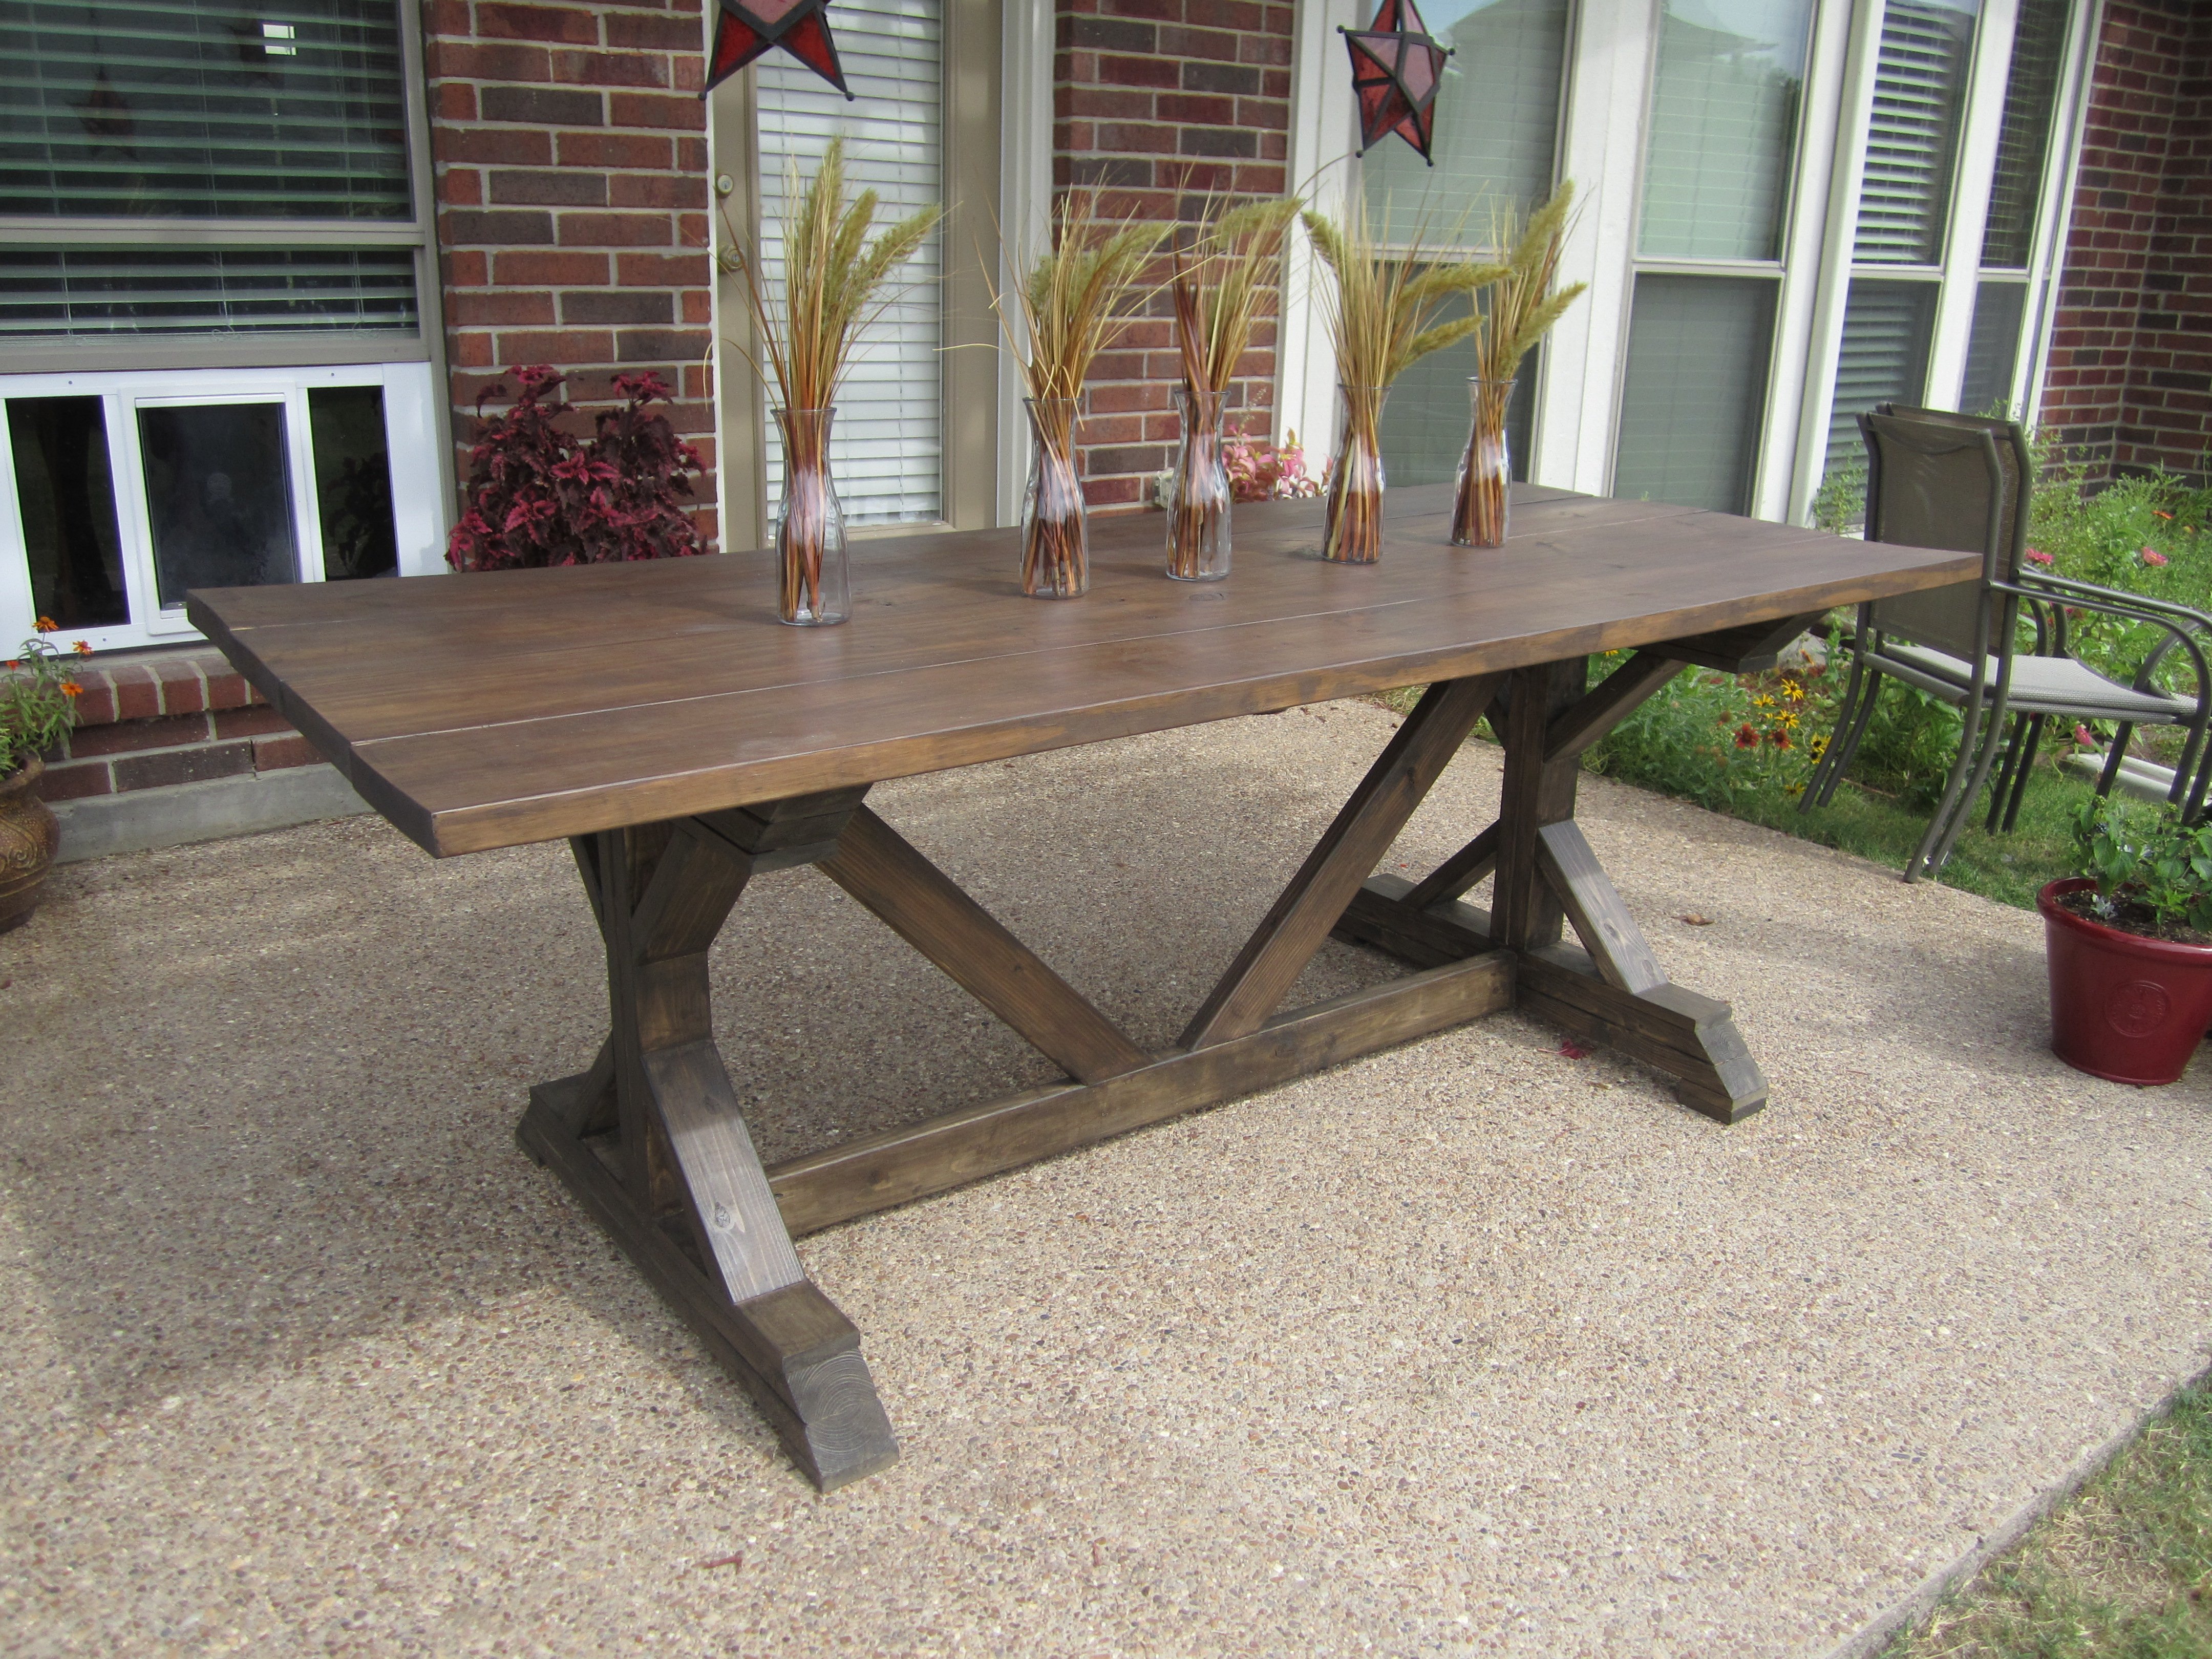
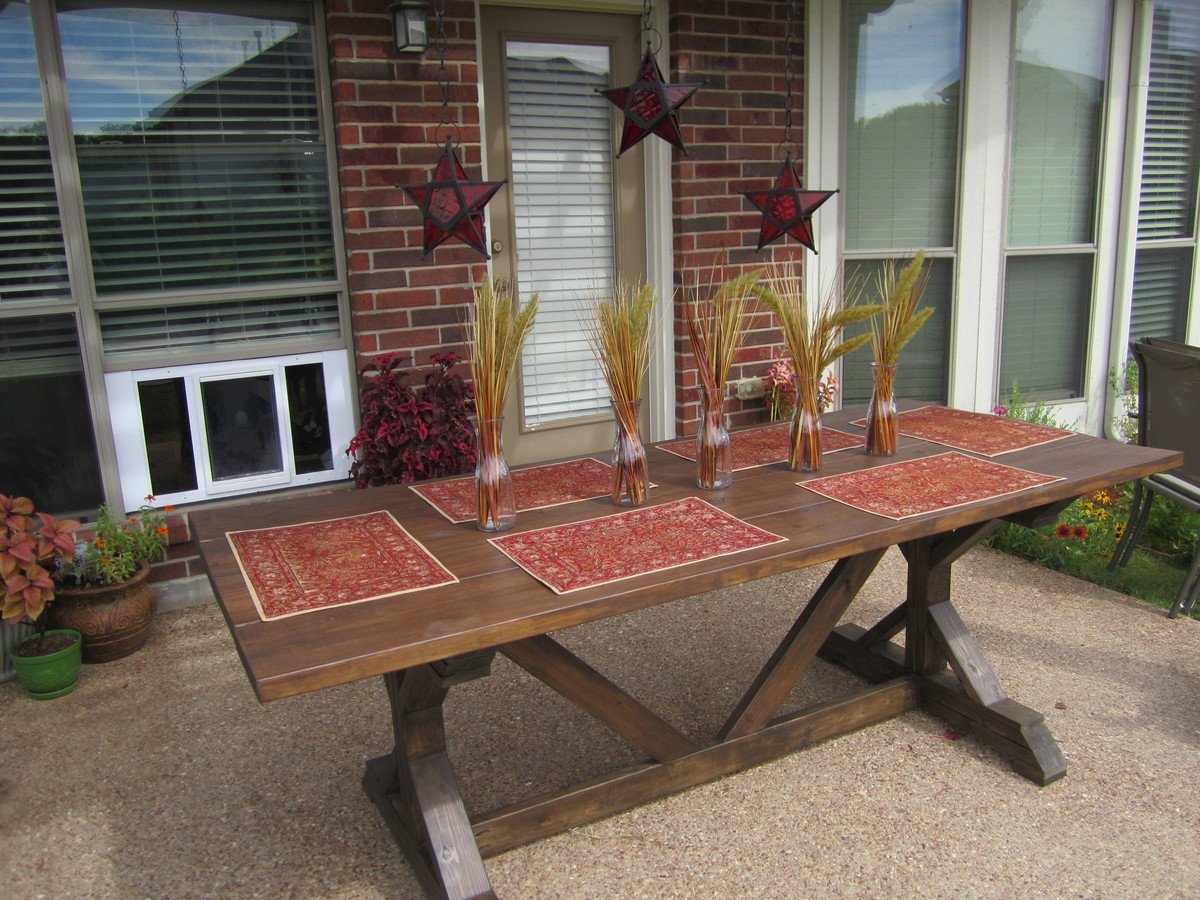
Square Turned Leg Farmhouse Kitchen Table

I had to do a 3ftx3ft square table since our eating area in the apartment isn't big enough for a dining table, but I really like how it turned out :) I also added breadboard ends because I can't stand how the cut ends look. I got the legs from osborne wood

Built from Plan(s)
Estimated Cost
$160
Estimated Time Investment
Weekend Project (10-20 Hours)
Finish Used
Minwax English Chestnut, Antique Beige Paint, and Helmsman Clearcoat
Recommended Skill Level
Beginner

Comments

First bird house

Submitted by Snoot357 on Fri, 07/15/2016 - 17:14

First bird house..! 

Built from Plan(s)
Estimated Cost
$3.00 for six foot board.
Estimated Time Investment
An Hour or Two (0-2 Hours)
Finish Used
Boiled linseed oil, on the outside only.
Recommended Skill Level
Beginner

Dining room set (with Classic Chairs made Simple)

Submitted by Anonymous (not verified) on Mon, 07/18/2016 - 10:16

This was my first attempt at making furniture...but it turned out GREAT!  My fiance was about to buy a VERY similar dining room set for $1300 before I stopped her and insisted that I could build it myself, finish it to match our kitchen/dining room, and save a TON of money!

Built from Plan(s)
Estimated Cost
$350 total
Estimated Time Investment
Week Long Project (20 Hours or More)
Finish Used
Minwax Expresso Stain plus 2 coats of Minwax Polycrylic on table top and seats
Minwax Classic Black Polyshades on frame
Recommended Skill Level
Beginner

Comments

Storage Daybed with Trundle Drawers + Storage Headboard and Hutch

I combined Ana's plans for Daybed with Storage Trundle Drawers and a Storage Headboard with a Small Hutch.

This is my 3rd daybed with storage drawers. It's such an easy build and gives so much extra space. The entire project took about 40 hours. I used Minwax stain in Classic Grey and three coats of polyurethane. For the drawers, I used 1.5" casters. I drilled a hole through the back of the headboard to feed cords through. Then I put the whole thing in the back of my truck and drove 500 miles for the final assembly. :)  In the provided photos, some of the pieces are flush because I hadn't permanently attached them. 

Estimated Cost
$450
Estimated Time Investment
Week Long Project (20 Hours or More)
Finish Used
Minwax Classic Grey
Recommended Skill Level
Intermediate

Fancy X Farmhouse Table

Submitted by shannonls on Thu, 09/13/2012 - 14:11

First build ever and we're thrilled with how it turned out. Definitely took us longer than the 4 hours other users have cited, but not bad for total newbies! Thanks for the plans, we love it.

Built from Plan(s)
Estimated Time Investment
Weekend Project (10-20 Hours)
Finish Used
Behr Semi-Transparent Weatherproofing Wood Stain - Coffee
Recommended Skill Level
Beginner

Comments

Tilt Out Trash Bin

This was my first project using an Ana White plan....Modified it a bit...quite happy with how it came out...it was very low cost to make and a lot of fun.

Estimated Time Investment
Weekend Project (10-20 Hours)
Finish Used
Varathane Stain....Spring Oak
Recommended Skill Level
Beginner

Firewood Shed

When I decided to build a woodshed I was freaked out because I've never done anything even remotely like this.  I struggle with precision and patience, which made this project seem overwhelming as I knew I had to do a lot of prep work to properly level the ground, measure the wood, learn how to operate a saw, calculate angles to cut, etc...  I did a lot of research online and found this simple blueprint a great starting point.   I made some adjustments since i needed a much bigger shed, it's 11.5' x 7' x 7'.  Also, I already had the wood resting on pallets so I just build this shed around the wood with no built in floor.  Overall, I'm thrilled with how it turned out!

Built from Plan(s)
Estimated Cost
$500
Estimated Time Investment
Weekend Project (10-20 Hours)
Recommended Skill Level
Beginner

Comments

Basement Play Gym

Submitted by Anonymous (not verified) on Fri, 01/08/2021 - 05:51

With Christmas approaching and the realization that my three young boys had way too much “stuff”, I enrolled the help of my dad to build this amazing basement play area. When I found Ana’s plans for the play gym with monkey bars, I knew we were in business. I modified the design to fit our space and we were off. Such a fun build and my boys absolutely love spending time down there. Thanks so much for your continued inspiration and the confidence you give us mamas to build with the big boys, Ana!!

Estimated Cost
$1000
Estimated Time Investment
Week Long Project (20 Hours or More)
Recommended Skill Level
Intermediate

Comments

16" Cedar Patio Planter

Submitted by prelude on Fri, 03/05/2021 - 04:33

I created these 16" cedar patio planters using Ana's plans. I bought four 6' cedar pickets from Lowe's for $1.98 each or under $8 for the lot. I used the extra picket to cut our my 1x2s and 1x3s so the whole construction is made of cedar including the pieces to hold a potted plant. I used Behr's clear and cedar finish to complete the job in under 1 hour. Thanks Ana for the motivation.

Estimated Cost
$8
Estimated Time Investment
An Hour or Two (0-2 Hours)
Finish Used
Behr's clear and cedar exterior finish
Recommended Skill Level
Intermediate

Comments

Backyard Bliss!

Submitted by kdins31 on Mon, 01/12/2015 - 09:26

I built this outdoor play area for my kids this past summer.  The area under that portion of the deck was always messy and muddy and so I wanted to make use of it.  I built the deck and anchored it with lag bolts to the deck supports.  On the one side I used rubber mulch and on the other there is play sand.  I dug holes in various locations and filled with gravel to allow for drainage under the sand and mulch.  For the awning I used plain cedar shingles.  I added a shower that is just regular 1/2" metal pipe with a hose adaptor.  The shower wall and fence are just old pallets that I had for a while, cut to size, which was pretty much random but they came out great.  I added a misting system under the awning that works great, the kids love the cool mist on the hot days. Overall, a heavy job ripping up the grass, moving the wood, gravel, stones, sand and mulch, but a fun deck build and even better experience doing this with my kids by my side!  

Estimated Time Investment
Week Long Project (20 Hours or More)
Recommended Skill Level
Intermediate

Comments

Einman10

Tue, 12/29/2015 - 17:10

I'm extremely interested in the plans for the bathroom vanity with the step stool that pulls out for kids to be able to reach the sink.  Is there a way I can get those plans?

Fancy X Desk

My first big project. It turned out great! There are a couple of issues with the plans but nothing a little common sense couldn't resolve. Also, for any beginners out there, make sure when you're going through your cut list, start with the larger pieces first then work your way down to the smaller cuts. You'll end up having to take another trip to the hardware store if you cut the smaller pieces first. Great plans Ana White! I built this as a Christmas gift for my girlfriend. She was blown away! She absolutely loves it!

~Justin~

Built from Plan(s)
Estimated Cost
Wood cost: $45.95
I did end up spending a lot more on stain, polyurethane, hardware, sandpaper.. The list goes on. But most of these items are things I can reuse for future projects.
Estimated Time Investment
Weekend Project (10-20 Hours)
Finish Used
Black Cherry Stain and then a clear polyurethane.
Recommended Skill Level
Beginner

Comments

Adirondack chair

Submitted by Gsmit96 on Sun, 05/19/2013 - 18:38

The only thing I did different to the plan was add 4.5 inches to the back slats so I could round the edges and 3 inches to the right arm rest so I could cut out a track to rest a wine glass. One thing I highly recommend is to create a stencil of the stringer. I did and now I have it for the next one so the next chair will be consistent. Thanks Ana white, this site is very therapeutic for me. Already built 3 projects in the last month.

Estimated Time Investment
Afternoon Project (3-6 Hours)
Finish Used
Haven't painted yet, will paint white soon
Recommended Skill Level
Beginner

Comments

sorese

Thu, 06/06/2013 - 06:38

The mods on this make me now want to build a set of these, the wine glass holder is genius! love the rounded front and back, so much better than original plans, thanks for inspiration!

Simple Plant Stand

Submitted by mtairymd on Fri, 05/01/2015 - 12:32

Build Instructions:

http://www.instructables.com/id/Garden-Plant-Stand/

The plant stand allows you to grow edibles in a compact vertical space. We use the planter to grow herbs and edibles on the deck close at hand to the kitchen and the grill. In the containers we have mint, pineapple sage, marjoram, oregano and two other types of sage. The plants that like the most sun are placed on top. The lower levels of the plant stand are used for more shade tolerant plants; however, they still get plenty of light. For growing the plants, self-watering planters were chosen. Other planting options are a rain gutter system, individual pots, wood boxes, etc. The stand can be easily constructed from excess lumber or pallets

Estimated Cost
$20
Estimated Time Investment
Afternoon Project (3-6 Hours)
Finish Used
Paint
Recommended Skill Level
Starter Project

Comments

Twin captain bed

Submitted by meckylang on Sun, 05/17/2015 - 09:02

This bed was built custom for the girl who ordered it. She wanted both a bookcase headboard on the long side and a traditional headboard. The bookcase headboard could not block the window and needed to have access to the outlet behind the bed. The bed was designed to match a dresser that had already been purchased. The drawers below give additional storage.

Estimated Cost
$550
Estimated Time Investment
Week Long Project (20 Hours or More)
Finish Used
Primed and painted with 2 coats of flat latex paint.
Recommended Skill Level
Advanced

Comments

kevin2117

Mon, 02/13/2017 - 10:23

Hi there - you don't happen to have plans you can share for this bed, do you?

Thanks! ~ Kevin

Dog Bed

Submitted by daddydrew on Fri, 07/19/2013 - 12:48

I did this project today with some old scrap that has been sitting around and taking up way to much space! Shotzie got a new bed out of the deal and she is pretty happy about it. I am available to do builds for people who like what they see and dont want to pay retail price for this stuff. check out my profile.

http://ana-white.com/users/daddydrew

Estimated Time Investment
An Hour or Two (0-2 Hours)
Finish Used
Minwax Grey oil based stain
Recommended Skill Level
Starter Project

Comments

JoanneS

Fri, 07/19/2013 - 15:19

What a great way to use your scrap wood! Love the color and the design. Looks super!

Garden/Storage Shed

Submitted by Smokeydog on Mon, 08/03/2015 - 06:48

Building a storage shed was quite a jump for me but because of the confidence and experience I gained from Ana's  site I decided to give it a shot.  I acquired the plans online. It has 8 foot high walls and 3 feet of "attic space".  The shed is 8'x12'.  I used cement board lap siding.  It took about seven weeks to finish working a few hours here and there.  I really like it.  Even has a little window flower box.

Estimated Cost
2100.00
Estimated Time Investment
Week Long Project (20 Hours or More)
Finish Used
Benjamin Moore Paint
Recommended Skill Level
Intermediate

Comments

New Outdoor Kitchen!

Submitted by ColleenM on Wed, 07/06/2011 - 06:48

This is the new outdoor kitchen I had been working on - finally finished! It was inspired from the kitchen island plans - I like the slats, and thought they would work well outdoors for air flow and water drainage. I worked around the existing grill, and it is all modular, so it can be moved if necessary (such as painting or treating the deck). It includes cupboards underneath the bar, dorm fridge and sink with storage under the countertop. The cooler stand raises the cooler up to 'user' level (no more bending!). Because I'm an avid recycler - most of the products used were recycled items. All told (not including the already purchased grill) - this kitchen cost me a total of approximately $95.00 (I had a lot of the materials already). This project took me approximately 5 weeks working on it part-time after hours. I built one cabinet at a time, then the countertops.

Built from Plan(s)
Estimated Cost
$95.00
Estimated Time Investment
Week Long Project (20 Hours or More)
Finish Used
I used the same paint I used on the house - an exterior Behr latex stain.
Recommended Skill Level
Intermediate

Comments

kmatt55

Wed, 07/06/2011 - 17:29

This looks really awesome Colleen! I was thinking about putting a sink like that on my deck. What kind of finish did you use for the countertops? Would you please post more pictures of it? Great job!

ColleenM

Thu, 07/07/2011 - 04:42

Thanks Kmatt & Viola...I'll try and get some more pictures up asap. For the bar top and countertop I used tile, and treated the grout lines many times with a waterproofer. Both tile and grout were purchased at our local ReStore - a total of 20 cents a piece for the tile, grout was $3. Not bad for a countertop!

mamafiona

Wed, 07/20/2011 - 11:48

Wow, this is really amazing! This is just what we need for our new deck - something modular and not too expensive to build. Do you have any more pics? I'd love to see what the area in front of the grill looks like. Very, very nice work.

Guest (not verified)

Mon, 03/05/2012 - 10:54

Hi, I was wondering if you have the plans for the kitchen around the bbq grill, i would love to make this for my husband for his birthday.

Guest (not verified)

Mon, 04/09/2012 - 18:38

Hi, this is great. Is there anyway you can post pics of the front of the bar where the sink is and especially the bbq, I want to build around my existing bbq grill but dont know how. thank you so much.

Wall Jewelry Cabinet

Submitted by Anonymous (not verified) on Sun, 02/07/2016 - 22:15

I built this for Girlfriend this Christmas. It was fun to surprise her. I put some jewelry in it, wrapped it, and put it under the tree. I think it turned out really nice. I installed a recessed bead-board back and 1/8" glass in the door. All black hardware and a two tone finish.  She loves it but she filled it up real quick. I guess I could have built it bigger! wink

Built from Plan(s)
Estimated Cost
$70-$90 including lumber, paint, stain, glass, and hardware
Estimated Time Investment
Weekend Project (10-20 Hours)
Finish Used
Swiss Chalk Paint and Minwax pre-stain conditioner, Dark Walnut stain and Satin Polyurethane
Recommended Skill Level
Intermediate

Closet Organizer

Submitted by kristen on Sun, 02/05/2012 - 10:26

I needed a closet organizer for my daughter's room that could grow and change with her age. Right now it needed to have lots of shelves at her height to hold the massive amount of stuff an 8 year old can accumulate.

Once she transitions out of the toys, I plan on moving the shelves all to one side or the other for shoes, and adding another rod. Another possibility is shoes in the door organizer and 4 sections of hanging clothes...regardless, the end result has options that will grow with her!

I was able to keep the cost of this down because I used all scrap plywood to make the drawers. I did splurge in S4S pine lumber rather than trying to make rougher cuts nice.

On the left door is Ana's Behind Closet Door Storage plan as well :)

Estimated Time Investment
Week Long Project (20 Hours or More)
Finish Used
Kilz No VOC primer, Olympic No VOC paint in semi-gloss (white off-the-shelf tint)
Recommended Skill Level
Intermediate

Comments

Guest (not verified)

Sun, 02/05/2012 - 11:17

I love the idea of the stuffed animals on the door! Those things multiply so fast and get in the way of making the bed - great closet!

Cindy from Indiana (not verified)

Sun, 02/05/2012 - 18:58

Right now DD's room is a blank canvas. One of the first projects (after getting her window in) is to figure out the closet. I think this will be my inspiration!

Looks great!

kristen

Sun, 02/05/2012 - 19:25

Thank you! I am loving how organized her whole room is because of the closet being in good shape. And everything has a spot now, so it's easy for her to get it back where it needs to go!

Oh, those stuffed animals. I mentioned to her the idea of paring her collection down and she was horrified at the idea!

In reply to by kristen

claydowling

Mon, 02/06/2012 - 06:40

A shocking notion. I think there's a box in our storage area with my wife's stuffed animals somewhere. Keep in mind, my wife isn't a 20-something who just moved out of her parents' house. We have a grand-daughter. Stuffed animals are forever. In fact I think one of my nephews still has my teddy bear.

kristen

Mon, 02/06/2012 - 09:04

...at the bottom of the basket where her stuffed animals used to live, were two of mine from when I was little, lol!

But you bring up a good point about forever. I think I need to put a ban on any new ones joining her stuffed animal family from here on out. Pretty soon I'm going to need to add another closet to her room just for those!

Guest (not verified)

Thu, 02/23/2012 - 17:32

How did you build and incorporate the drawers?

In reply to by Guest (not verified)

kristen

Sat, 06/30/2012 - 20:46

claydowling

Thu, 02/23/2012 - 19:12

The easiest way to do a quick drawer, if you don't know how to do dovetails (and that's a simple skill totally worth learning), is to drill holes through the sides and into the front, and pin it with hardwood dowels. Use a domestic hardwood, you'll be a better dowel and a dimension that matches drills you own. The cheaper white imported dowels don't match any drill diameters that I can find.

hoffer5353

Thu, 06/28/2012 - 13:18

I am wanting to add shelves and drawers on a closet and am afraid it will be too big for the space. How wide is your closet?

In reply to by hoffer5353

kristen

Sat, 06/30/2012 - 20:53

Here is the post with the plan mock-up with dimensions:

http://pinktoesandpowertools.com/2012/01/24/how-to-build-a-closet-organ…

It says 65.5" wide on there, and I don't believe I made any changes, so that should be accurate. I think you could get away with having an approximately 46" wide closet. You could have the drawers in the middle and then 12" wide shelves on either side that would fit sweaters, jeans, shoes. If you made them adjustable like mine, then you could really maximize the space in there. Just make sure you give yourself plenty of room in front of the shelves if there is wall there--you want to be able to easily take things in and out.

Good luck!

mrs.T.La Forme

Mon, 02/04/2013 - 17:49

i just want to say I`m jealous i wish my closet looked like this. cant wait until I`m skilled enough to try it .

kristen

Tue, 02/05/2013 - 15:08

I'm looking forward to doing this to my closet too!! It's a good project to take on once you want to try out drawers for the first time--since it's behind doors, it doesn't have to be perfect. Good luck!