Community Brag Posts

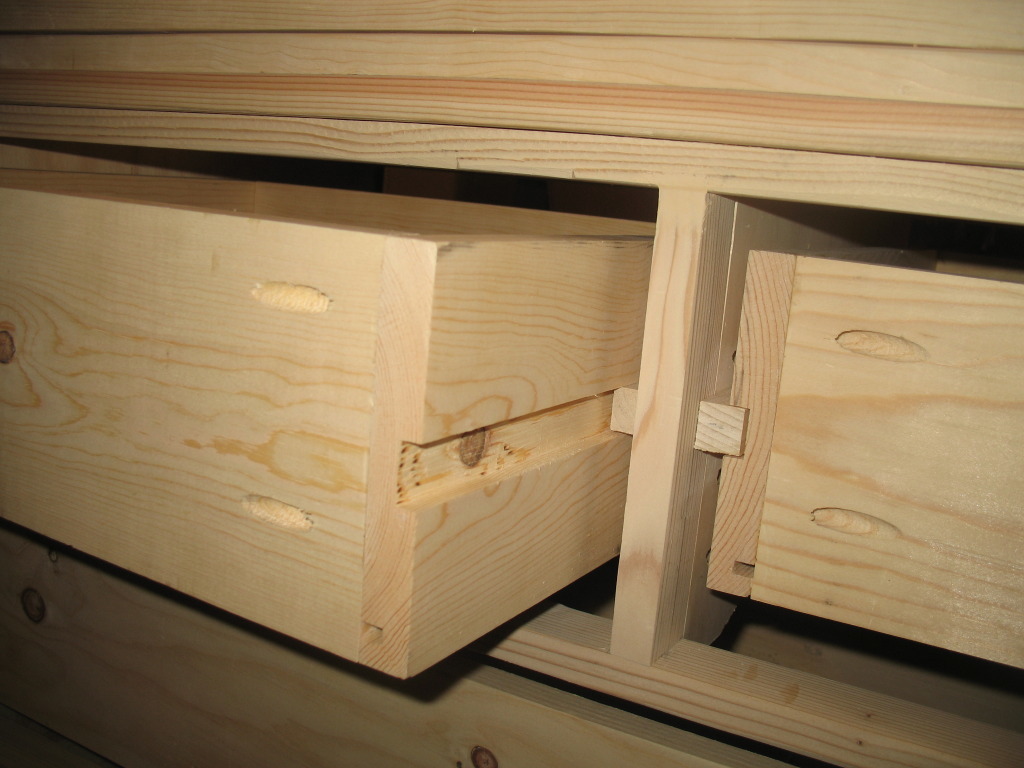
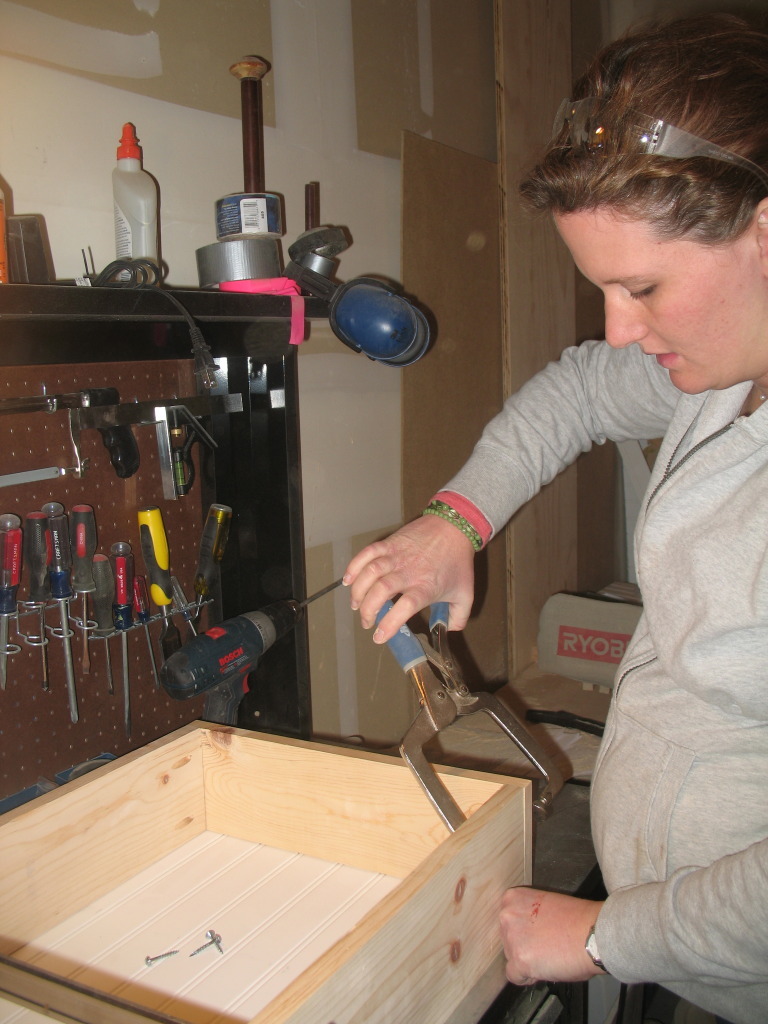
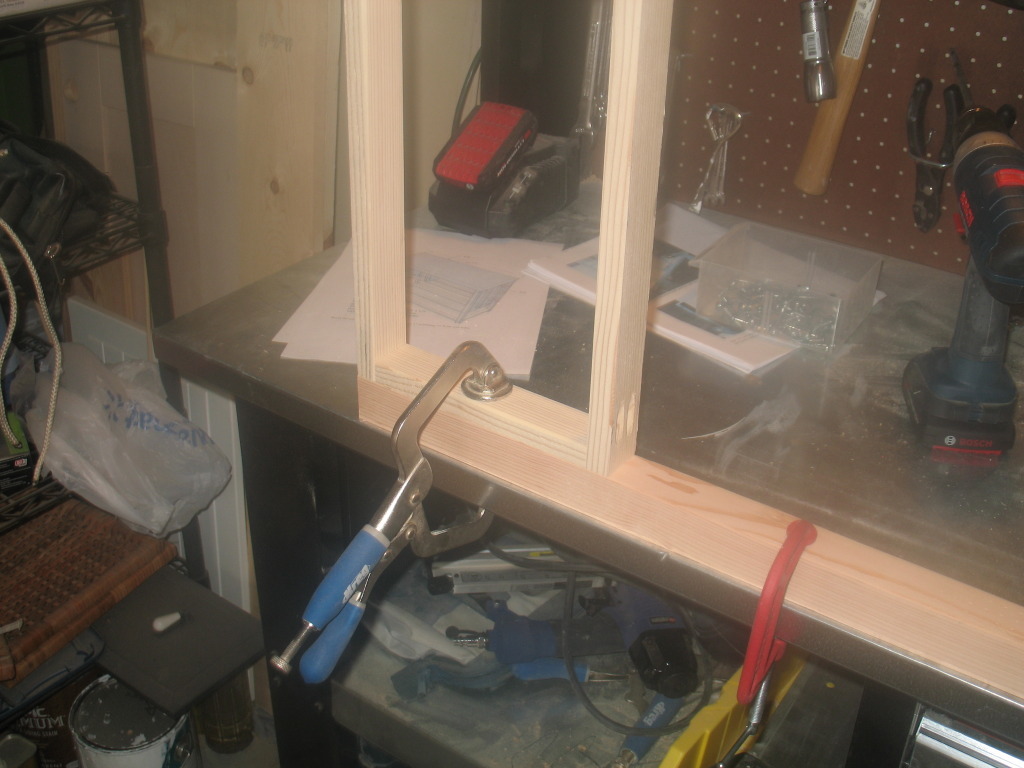
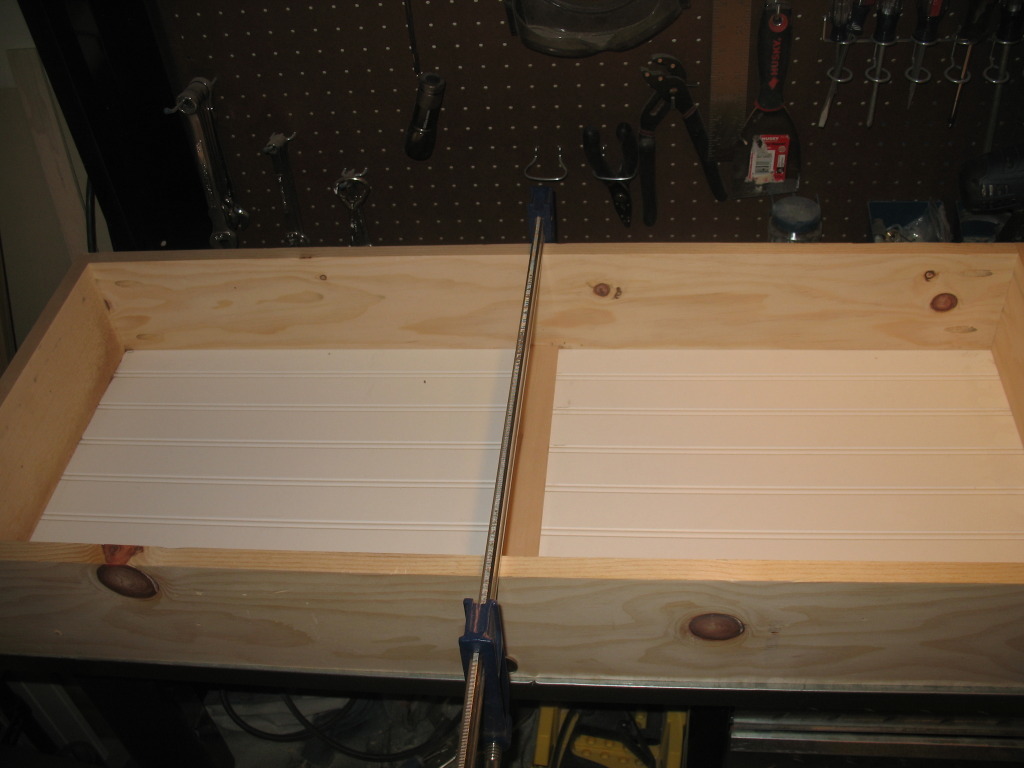
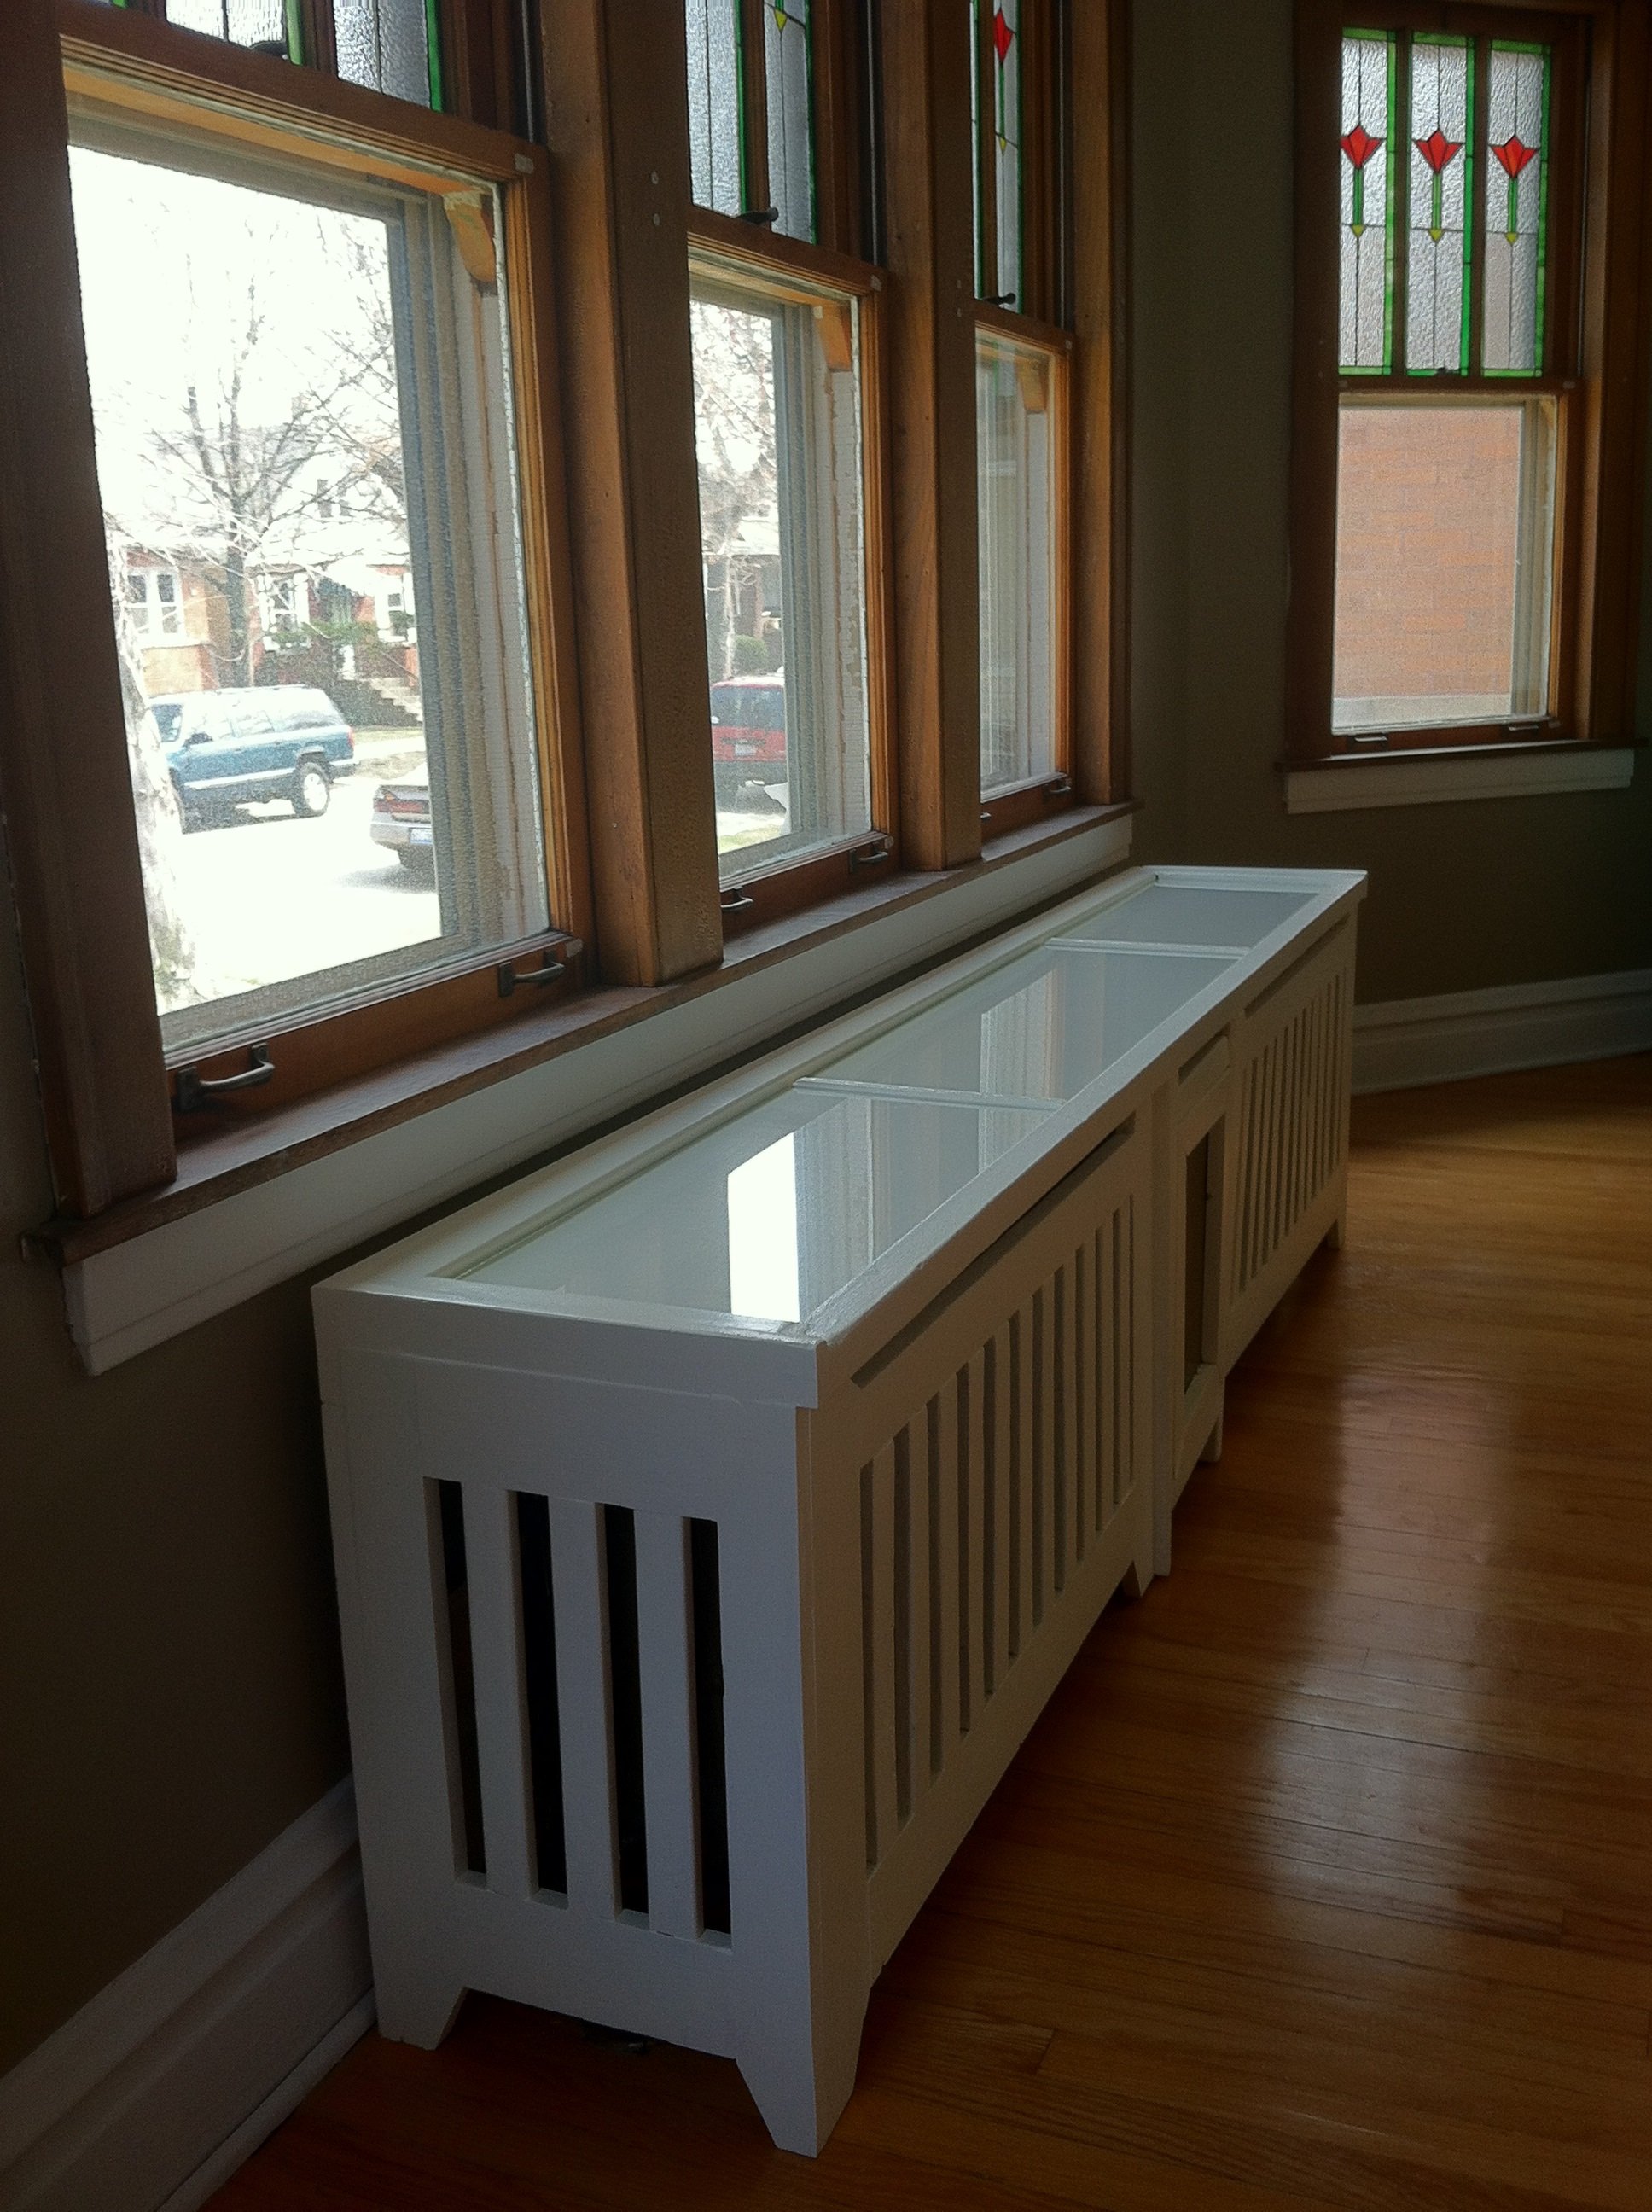
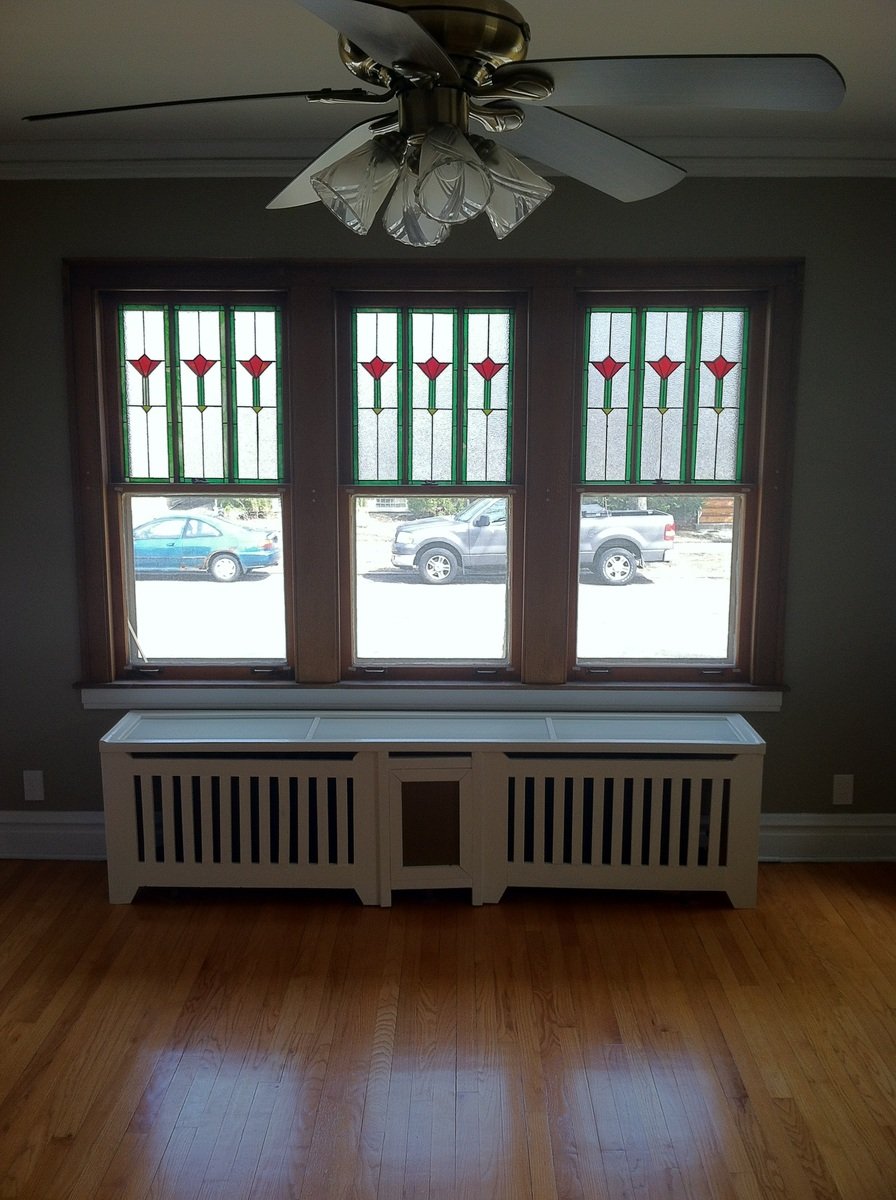
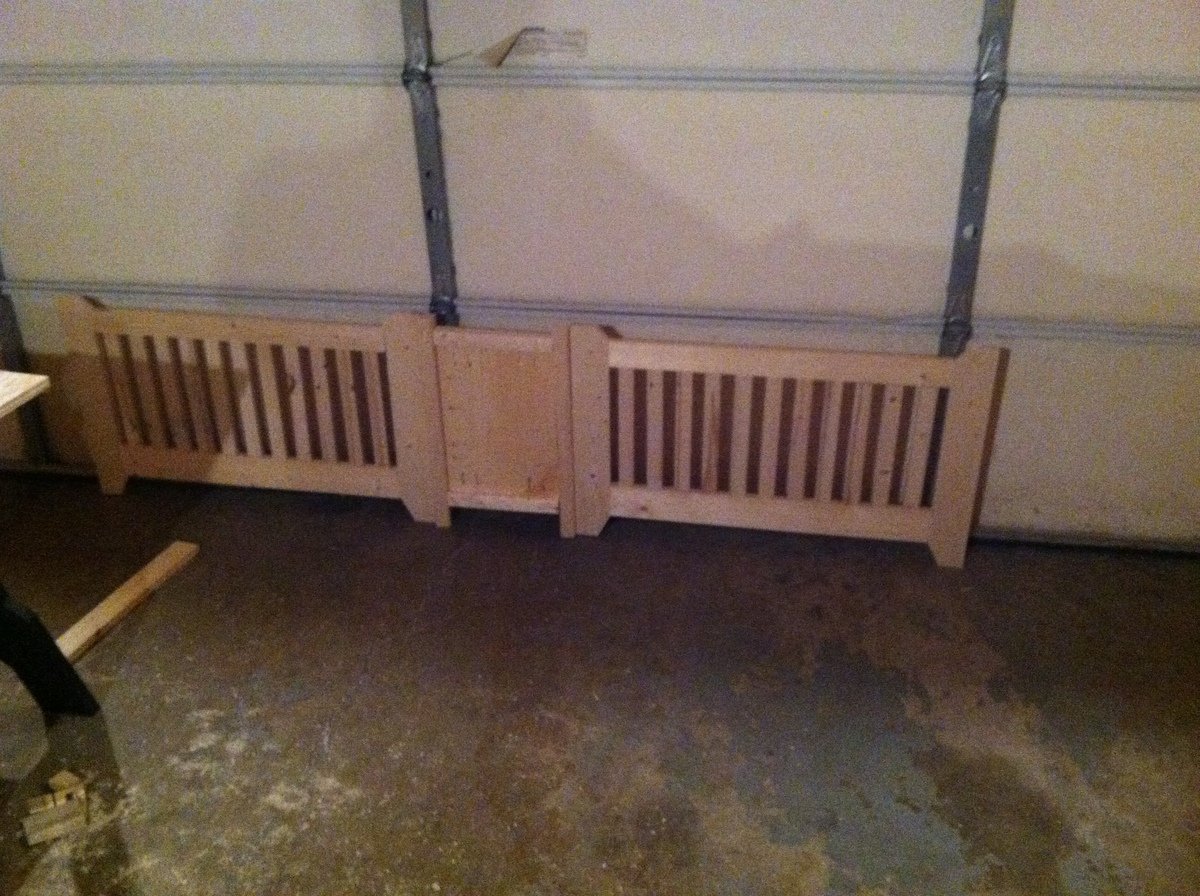
Double Bin Trash and Recycling Bin

Submitted by Anonymous (not verified) on Tue, 02/02/2016 - 12:54

Modified the design a bit to be lift up lids instead of tilt out.
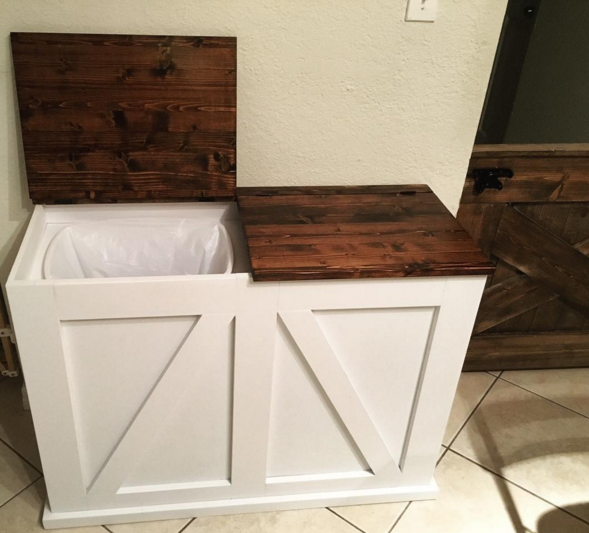
Estimated Cost
125
Estimated Time Investment
Weekend Project (10-20 Hours)
Finish Used
White Painted Base, Dark Walnut stained top
Recommended Skill Level
Intermediate

Comments

Matt712

Sat, 03/07/2020 - 02:29

I’d be grateful for details, plans, measurements for this project. This is an amazing build, nicely done.With green top looks fantastic and complements the white very well.

smbanks75

Thu, 01/11/2024 - 20:31

To everyone asking for the plans, it's a modified tilt out. It states right there under the pics that it was modified and the original plans are there in red, under "Built from plans"

Hanging Plant Stand

Submitted by Anonymous (not verified) on Sat, 07/08/2023 - 09:51

I made this for a friend. The hardest part of the build was finding the correct font.

Allyn

L-Shape Outdoor Bench

Submitted by ShannonG on Mon, 07/24/2023 - 13:21

Modified to make an L shaped bench . Absolutely love it! Thank you!

Built from Plan(s)

Comments

Small Dresser (cabin collection) turned changing table

Saw this on Ana's site just in time to make it for a changing table for baby number 4. This was our most difficult plan to take on so far, but it turned out to be pretty straight forward. The details on the plan were a great help - using the spacers to make the drawer openings perfectly spaced, and attaching the drawer fronts on after attaching the rails were great tips. We also used dowel drawer slides for the top 2 drawers, which we really ended up liking.

Estimated Cost
165
Estimated Time Investment
Week Long Project (20 Hours or More)
Finish Used
white spray paint - Krylon primer, rustoleum paint in semi-gloss, krylon clear coat in satin.
Recommended Skill Level
Intermediate

Comments

Kathy B. (not verified)

Sat, 03/17/2012 - 01:15

Did you just use a router for the channels in the top drawers? If yes, what bit? If no, how did you do them?

Beautiful work! Your baby is very lucky! :)

claydowling

Sat, 03/17/2012 - 03:04

Those grooves are probably made with a dado stack on a table saw, but your could easily do it with a router and a guide. Table saw is easier though.

If you don't own a dado set already, don't buy the cheapest one you can find. I made that mistake, and wasn't overly happy with the results of the cut. When I bought a better dado blade set, I was a lot happier with the quality of my cuts.

That turns out to be generally true: I'm always more happy with the result of a better blade. I also needed to tune up my saw to make sure the blade was properly aligned with the guide slots, and that my fence was parallel to the blade. If you don't do that then the best blade in the world won't help. Also, buy full-kerf blades, not the thin kerf blades they sell at the home improvement store. The full kerf blades wobble less and give you cleaner cuts.

In reply to by rob (not verified)

brookifer86

Sat, 03/17/2012 - 06:33

This is a community, there's no need to be rude. Sometimes the authors don't know there are comments, and it's nice to hear more than one solution to a problem. So let's please just appreciate the contribution from all the members, yes?

Guest (not verified)

Sat, 03/17/2012 - 14:56

Brookifer86,

I can appreciate where you are coming from, and I appreciate your kind suggestions.

I can also identify with Rob's comment directed at Clay. Which I did not find rude.

Clay tends to comment on nearly almost every post on Ana's site with a dismissive and know-it-all attitude, giving outdated advice and rude corrections. It has gotten pretty old. Obviously I am not the only one who sees this.

Remember, one person's authoritarian advice on how to do things isn't the only way or even the best way to approach a project. It is simply their experience and their own personal way of doing things.

birdsandsoap

Sun, 03/18/2012 - 12:16

I'm grateful for all the help on this blog! When it comes to woodworking, there always seems to be more than one way to do things, and I want to hear EVERYBODY'S ideas; it makes me a more knowledgeable woodworker and helps me overcome planning obstacles I would otherwise not get passed.
Clay, I've read many of you posts and appreciate the wisdom you share. And to the complainers: sometimes our thoughts are not always conveyed on Internet discussions. Some personalities can come across as abrasive/arrogant unbeknownst to the author simply because of their writing style. I've seen it time and again on blogs and forums. I know what I want to say, but it doesn't always come across *quite right* when I'm typing it out.
Either way, I want to hear more about these drawer glides! Clay, you posted a great link on the original plan that suggest always using hardwood for drawer glides or at least a hard/softwood combo. Makes sense, any other want to chime in?

rob (not verified)

Sun, 03/18/2012 - 12:39

Just because I asked him to let Mollie answer the question doesn't mean I was calling him rude. I just think it's common courtesy to let someone who is asked a question to speak first. I definitely appreciate Clay's wisdom and I agree that there are many ways to do something.

What if it were in person though? What if someone kept asking you a question but someone standing off to the side kept answering it before you? Sure they answer correctly every time and give credible insight but after getting cut off over and over, don't you think it might get annoying?

Don't you think the teacher gets a little piffed when that one kid in the back raises his hand and belts out the answer every time and doesn't let any of the other kids answer the question? Sorry for the rant...

anyway the issue isn't about good or bad insight. The issue is just manners. I'm sorry if that comes off brash, but let the person who actually built it answer first.

birdsandsoap

Sun, 03/18/2012 - 13:18

Lucky for us, we're not in person and we can just "scroll down," lol. I remember recently, one of the blogs I regularly read posted about just this. Her article was spot-on and amusing at the same time...partly because she describes these notorious commenters, and because I know I've been guilty of "thread dumping " myself. There are personalities that clash online and in the real world too. It's worth a glance for a little perspective-and a laugh. http://www.homestoriesatoz.com/2012/02/how-deal-negative-comments.html

claydowling

Sun, 03/18/2012 - 16:30

I seem to have stepped on some toes, and for that I'm sorry. I'll certainly take your points in mind in the future. I'm afraid that's distracted from the main point: this is a really amazing piece of furniture. Molly, your house must be pretty amazing if you're building furniture like this. I'll bet your children grow up to be pretty amazing if they've got a mom who builds their furniture.

bhoppy

Mon, 03/19/2012 - 12:44

Beautiful changing table! I have only been building a little over a year and I always appreciate the advice on this site. Thanks for sharing so much Clay:-)

Mollie (not verified)

Sun, 07/29/2012 - 21:13

I just saw there were comments here on my brag post. So, Clay, thanks for answering for me.

We used our table saw - although we don't have a fancy blade. We should probably get one. My husband just ran it through the table saw several times to get it the exact right width. The blade was lowered so that it would only cut 1/4 inch into the wood. And the slides were hardwood - square dowels you get get at a home improvement store.

little stuf

Wed, 08/08/2012 - 08:08

I love the plans for this piece, to begin with. Great job on your build. I LOVE this in white! Especially for a baby room or a little girl's room. Thank you so much for sharing your pics and ideas!

Green Granny (not verified)

Mon, 01/21/2013 - 20:45

Fantastic job on this piece! I think this would be perfect in an adult's bedroom also, with the bottom shelf for a blanket or quilt. I would love to make this.

DoryEllen

Sun, 03/31/2013 - 16:01

Hi,
I was wanting to do the same thing...make this for using as a changing table. What are the dimensions of your dresser? Did you change the size of the drawers (did you use something different than a 1x8)? At what measurement did you place the lower shelf relative to the ground and how much space is there between the top of that lower shelf and the bottom of the 1x2 that frames the bottom drawer?

Any help / details that you can give would be so appreciated!

Thanks!

Corner Headboard Storage for Twin Beds

Submitted by Anonymous (not verified) on Sun, 05/08/2016 - 18:27

Corner unit for kids bedroom. Added fabric boxes from ikea. The fit perfectly 

Estimated Cost
$200.00. All the materials are from the Home Depot
Estimated Time Investment
Day Project (6-9 Hours)
Finish Used
Behr. Polar bear white
Recommended Skill Level
Beginner

DIY Bar Cabinet

Submitted by Anonymous (not verified) on Mon, 02/24/2020 - 16:27

I bought this tv corner cabinet for $40. I spent many hours turning into my perfect bar cabinet. I built a custom lighted liquor display. I have posted photos of the transformation.

Estimated Cost
$1000
Estimated Time Investment
Week Long Project (20 Hours or More)
Finish Used
Benjamin Moore- hale navy
Recommended Skill Level
Intermediate

Comments

frendlygrl

Tue, 07/06/2021 - 19:04

So this is not your project? Because there isn't much information or a before and after picture. This gave me an idea for our home.

Toy room shelving

Submitted by Ybrown118 on Mon, 05/02/2016 - 15:14

Super easy project. My space is smaller so I modified to 6ft instead of the 8ft used in the plana. I plan to make the white board crates to finish the project. 

Built from Plan(s)
Estimated Cost
$31
Estimated Time Investment
An Hour or Two (0-2 Hours)
Recommended Skill Level
Beginner

Radiator Covers

Submitted by pde00311 on Mon, 02/24/2014 - 22:15

We loved the radiant air in our new early 20th century house, but as our daughter learned to crawl, we needed to prevent her little fingers from touching the two radiators that were still uncovered. After I finished my first few builds, I custom designed these radiator covers with 1x2s, 1x3s 2x2s and 1x12s. Needless to say, I got a ton of use out of my Kreg Jig. On the middle panel of the larger cover, I used a bit of decorative metal that they sell at the Big Box stores (of course, it would have been easier to use more of it, but I am a bit paranoid about little fingers touching a metal cover). For a final touch, I covered the top of the larger cover with decorative glass. For the smaller cover, I matched the distressed pink throughout the rest of my daughter's nursery.

Estimated Cost
200
Estimated Time Investment
Weekend Project (10-20 Hours)
Finish Used
Behr camembert paint (for the larger living room) and Behr Kashmir pink paint with distressed w/Martha Stewart vintage gold specialty finish (for the nursery)
Recommended Skill Level
Intermediate

Play Deck/Fort

Submitted by seeca13 on Sun, 06/01/2014 - 10:06

I wanted to build a structure for the kids to play in, but not include a playhouse. I used the playhouse deck design and made it slightly smaller (6 feet by 8 feet). The "roof" is removable to provide shade when it's sunny. It's just PVC and a tarp - pretty simple, but it does the job. I used treated posts and untreated lumber for the rest of it. I painted everything in my garage before assembling it. Once all of the wood at been painted, but came together pretty quickly!

Estimated Cost
$300 (including screws and paint)
Estimated Time Investment
Weekend Project (10-20 Hours)
Finish Used
Thompsons deck stain
Recommended Skill Level
Intermediate

Modern Park Bench - Son & Daughter In-law Christmas Gift

Submitted by mballway on Fri, 12/25/2020 - 14:13

A first for me in many years, over 40+. Not really since basic wood shop projects in Middle School. Anyway, my son (and daughter in-law, but she doesn't know) had asked for a backyard patio bench for Christmas this year (2020) so what could go wrong. Anyway, the plans are straight forward in this design. He saw the picture of a stained version on YouTube and said that would be perfect. The project took me three late afternoons/evenings as my day job took priority. After making all the cuts and beginning assembly I could really see this coming together nicely once the four legs were attached. Between wood fill and sanding I asked what finish they preferred and was told he would finish that part. So I sanded the exterior on it and glad for having him finish the coatings as I was just finished it that point on Christmas Eve Day. The red bow is also first for me.

Built from Plan(s)
Estimated Cost
< $100.00
Estimated Time Investment
Afternoon Project (3-6 Hours)
Recommended Skill Level
Intermediate

Storage Leg Desk

Submitted by Anonymous (not verified) on Thu, 04/13/2017 - 09:56

I made this for a friend!  She has cubbies on all four corners.

Built from Plan(s)
Recommended Skill Level
Intermediate

Teeter Totter

This is one of the cheapest projects for my kids I have ever completed!! And the most rewarding. I think everyone of my neighbors has been on the teeter totter...including adults :) My kids just love it and I am thinking of making a few for my nephews for Christmas. I was able to find all the wood I needed in my scrap pile. I had the PVC pipe and bolt already also so all I had to make a trip to the store for was the foam for the seats. My son helped me build this in an hour. I liked the unfinished look so I just sprayed it with a little Thompson Water Seal. Thank you Ana White!!

Built from Plan(s)
Estimated Cost
$0 Lumber (scrap wood) $5 Foam padding
Estimated Time Investment
An Hour or Two (0-2 Hours)
Finish Used
Thompson Water Seal
Recommended Skill Level
Starter Project

Comments

Seasonal And Holiday

Kids Cabin Bed with Barn Doors

Submitted by Anonymous (not verified) on Sun, 02/16/2020 - 21:21

Hand made kids fort bed

Estimated Time Investment
Day Project (6-9 Hours)
Recommended Skill Level
Intermediate

Comments

Beginner Farm House Table w/ pocket holes

Submitted by Anonymous (not verified) on Wed, 09/02/2020 - 19:28

Love this! The farm house table and bench (1st photo) were my first 2 wood project ever. They came out great so I decided to make a coffee table using modified dimensions (2nd photo) and used poplar for the table top instead of pine. Poplar took to the stain I used really well. The farm table is Danish Oil, Light Walnut and the coffee table is in Danish Oil Dark walnut. I used wipe on Poly to finish both tables and I used matte black wood screws for an accent on the base of the coffee table. Everything else was assembled with a compact circular saw and pocket holes w/ a Kreg Jig. Thanks for the plans!

Estimated Cost
$200
Estimated Time Investment
Weekend Project (10-20 Hours)
Finish Used
-Danish Oil Light Walnut - 2 coats (dining table)
-Danish Oil Dark Walnut - 1 coat (coffee table)
-Wipe on Poly, Gloss - 2 coats (both)
-Sanded all wood w/ orbital sander prior to assembling (I find it easier to get all the splinters, scratches, and stamp marks out if I do it before assembling)
Recommended Skill Level
Beginner

Comments

Craftsman playhouse!

Love how this turned out!! Thank you thank you Ana!! Plans were great, I think we got it done for just about $250! 

Thanks again!

Built from Plan(s)
Estimated Cost
$250
Estimated Time Investment
Weekend Project (10-20 Hours)
Recommended Skill Level
Intermediate

Comments

Queen Murphy Bed

Submitted by Jenga on Sun, 12/06/2015 - 12:59

Not too bad of a project but had to a good bit of guess work so I could changed the plans for a queen size bed and flip in on its side.

Estimated Cost
$200 if you already have the bed
Estimated Time Investment
Week Long Project (20 Hours or More)
Finish Used
White Paint and laminate flooring left over from the floor.
Recommended Skill Level
Beginner

Comments

Arilie

Sun, 05/29/2016 - 18:50

Good evening!

I am new at wood working, and would be very interrested in knowing the different measurements you changed to get from a twin to queen murphy bed. If it is posted on this page, I tried but couldn't find it. Thank you for your help. Have a good day.

Marie-Julie

Treehouse/Playhouse

Submitted by Bigbill99 on Sun, 01/10/2016 - 00:07

Thank you! You've helped me look like a true carpenter who knows what he's doing! My whole family is impressed with my woodwork lately, and now I'm addicted. I've done your seesaw, bar table and stools plus the treehouse in 2 weeks. Thank you for sharing your plans!

Estimated Cost
$500.00
Estimated Time Investment
Week Long Project (20 Hours or More)
Finish Used
Spar urethane
Recommended Skill Level
Beginner