Community Brag Posts

Storage Bed with Drawers and Rustic Planked Headboard with Lights

Submitted by jjmaldon on Sat, 02/08/2020 - 10:22

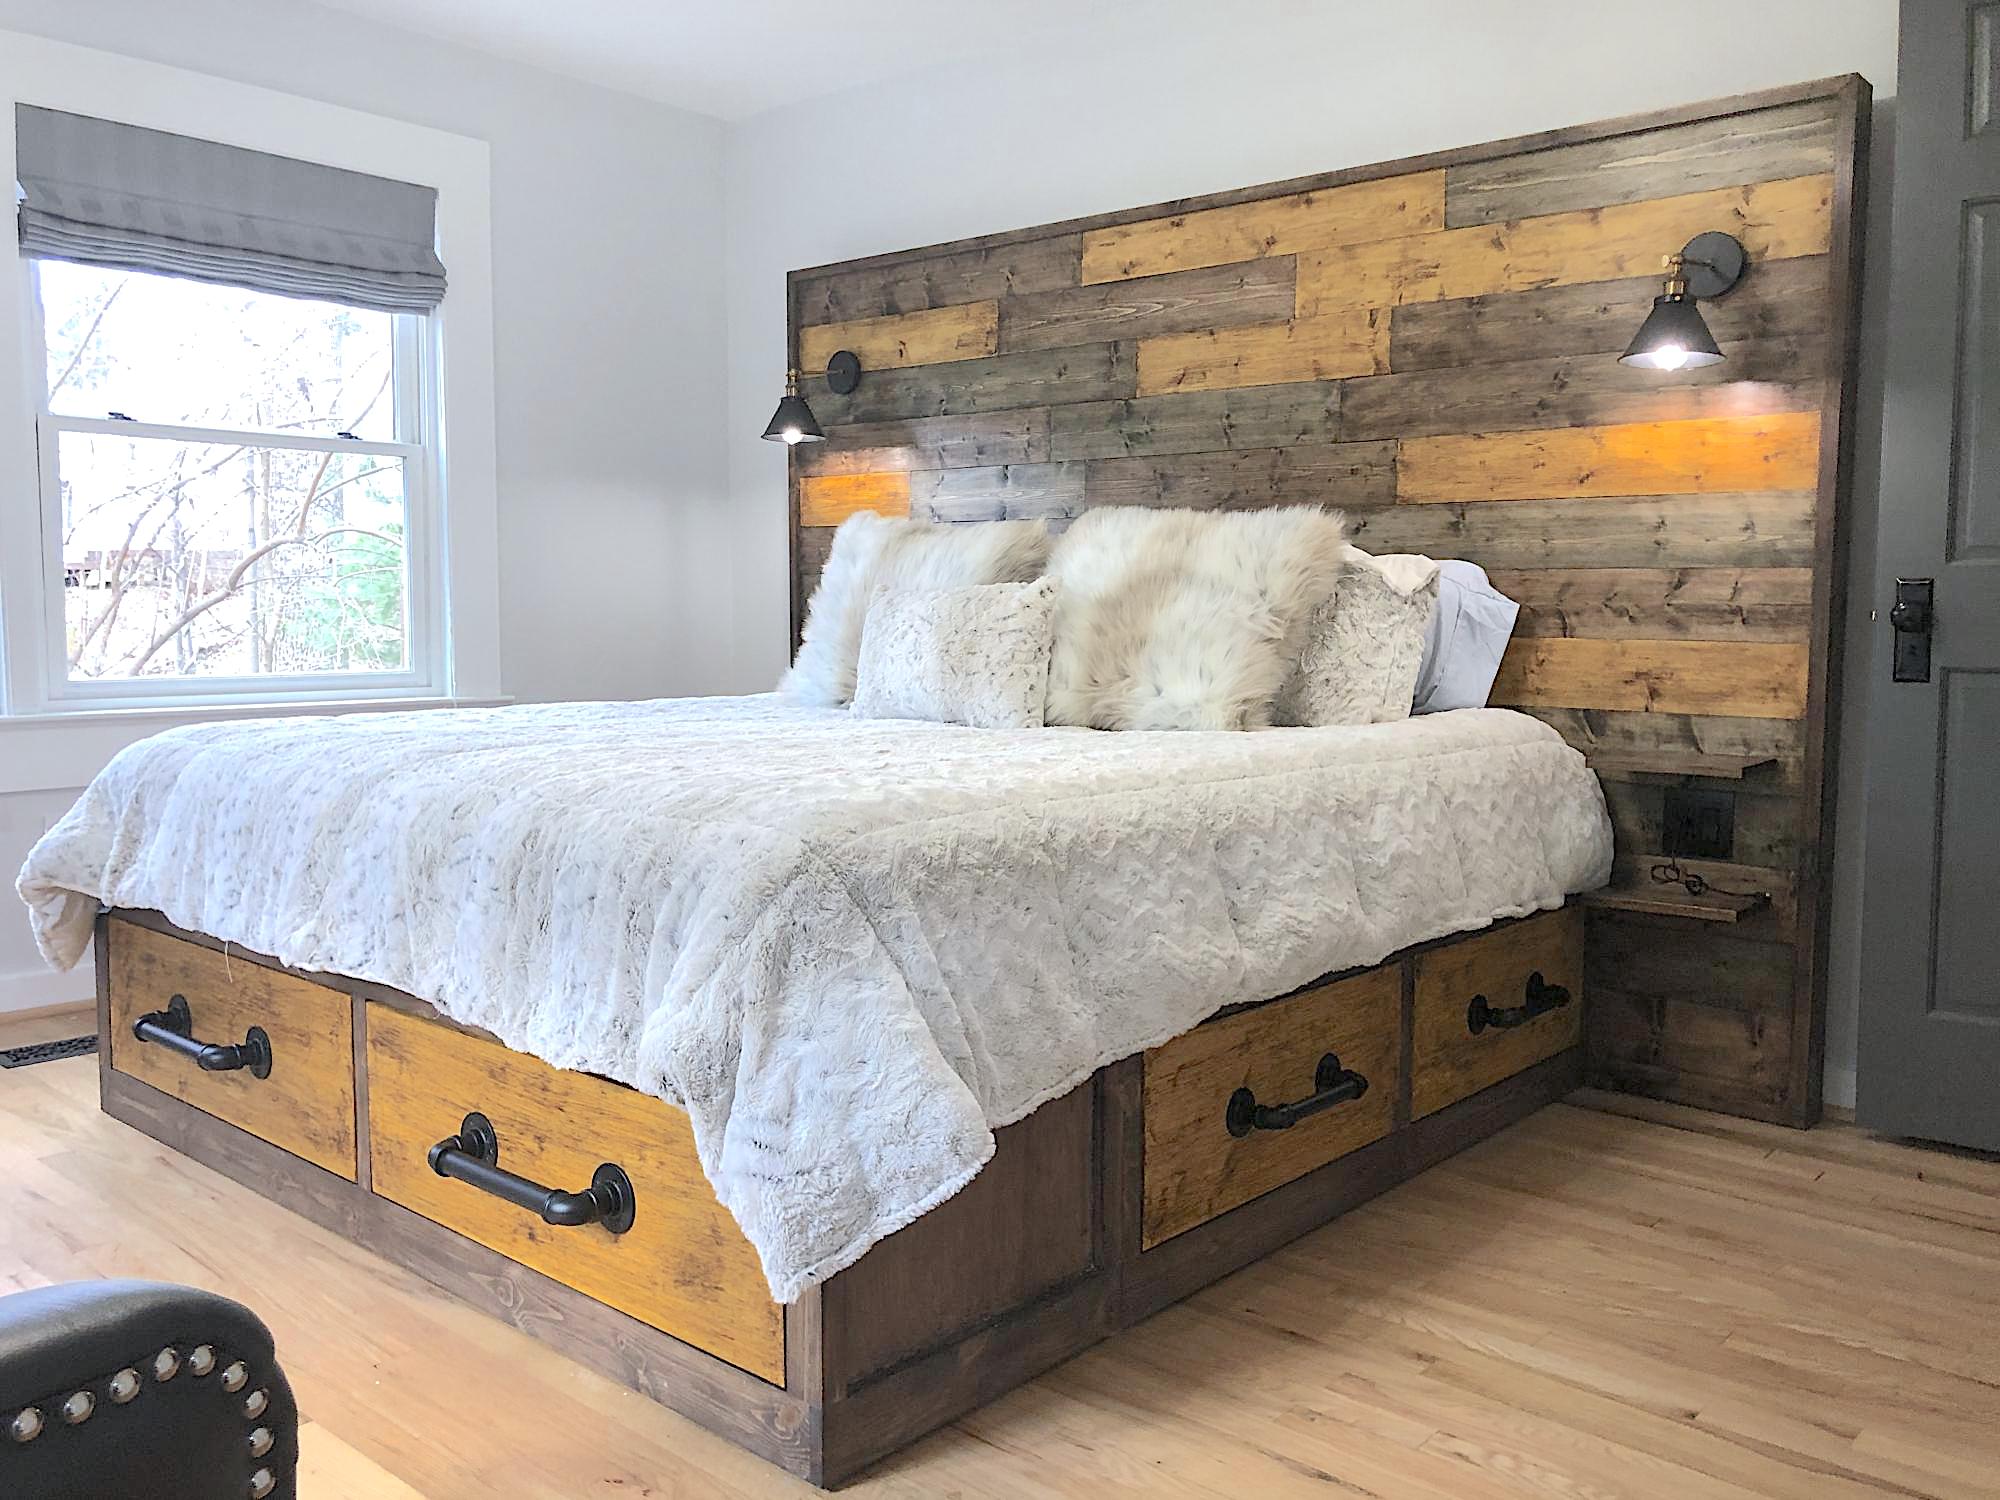
Base is classic storage king and the headboard was custom made to fit the size of the room. Enjoyed this project and the extra storage the drawers are providing. Thanks for the sharing the design plan; worked perfectly. 

Built from Plan(s)

Comments

Storage Bench

Loved using the plans, had to modify them to work around my baskets and a pipe sticking out of my wall. I'd say this is somewhere between beginner and intermediate, as I had to use the pocket screw for some added support when attaching the sides. I primed then used two coats of white "door and trim" paint. So far it has held up to the baskets being slid back and forth, if I had to do it again, I would add a poly coat for durability, at least on the bottom of the cubbies. Cushions and pillow from HomeGoods. Would have been nice to design the bench to fit more standard cushion sizes, but oh well!

Built from Plan(s)
Estimated Cost
$50
Estimated Time Investment
Afternoon Project (3-6 Hours)
Finish Used
white primer, two coats of white "door and trim" paint, applied with small foam roller and angled brush
Recommended Skill Level
Beginner

Storage sofa on steroids!

Submitted by Imadeit on Wed, 07/20/2016 - 12:59

First furniture project, first Kreg jig use.

Heavily adapted storage sofa plans.  Used existing day bed mattresses.  Made all wood surfaces finished with nice cladding, and all fabric portions removable and washable.

Added arms, and a back ledge.  Ledge is hinged to allow access to wall behind so I can get to the outlets.

Lots of work, but it is AWESOME.  Thanks for the inspiration Ana!

Built from Plan(s)
Estimated Cost
$700 including the fabric
Estimated Time Investment
Week Long Project (20 Hours or More)
Finish Used
Dark gray latex paint, and gel stain for the shelf.
Recommended Skill Level
Intermediate

Comments

WackyPup

Sun, 01/22/2017 - 13:37

This is almost exactly what I want to do! I have a dog who loves to rub on furniture and I don't want upholstery. Why did you make the back thicker? Is it just for added shelf space along the back? Thanks for posting the pictures. Very inspiring!

Imadeit

Mon, 02/20/2017 - 07:18

Sorry for the delay in seeing your question.  I haven't signed on to this site for a while.  You are correct thinking that I wanted to have shelf space along the back.  The sectional is the entire width of the wall and I knew that I would not be able to have end tables.  I wanted a way to have a lamp and a place to put drinks, etc.  As it turns out the arms of the sectional are great for holding my beverage.  The shelf holds my lamp and some baskets with general stuff like the remotes inside.  Thank you for the compliment.

sahorn01

Wed, 01/18/2023 - 09:28

Hi! I know this is a very old post but I would love try to make something similar to what you did in your storage sofa modifications - especially the wider frame and armrests. Any chance you wrote down your plans or have more pictures of your build? I also would love to understand how you made your upholstery/fabric removable. Did you follow any plan for making the cushions? Thanks in advance!

Octagon Table

Really enjoyed making this one. The plan was great but i ran into a few difficulties. The 2x2 trim was the hardest. I settled on 22.5* miter because my saw has a positive stop there and i thought it might be the angle that i needed. Careful as the plan doesn't have much room to experiment unless you want to buy an extra 2x2. If your selection of 2x2 is anything like mine, that could be a huge endeavor. Hard to find a straight board in texas.

Estimated Cost
120
Estimated Time Investment
Week Long Project (20 Hours or More)
Finish Used
Minwax PreStain Conditioner
Rustoleum Kona
Rustoleum Ultimate Polyurethane in Semi-Gloss x 3 coats. Sanded by hand with 320 in between coats and wetsanded with 600 grit after the final coat and it really came out smooth.
Recommended Skill Level
Intermediate

Comments

cmjohnson

Mon, 08/17/2015 - 08:05

hey! im currently working on this table & am running into the same trouble with the 2x2 trim. did the 22.5 miter cut work out for you for the trim pieces or was there a different angle that you ended up needing to use? thank you!

Rustic X Kitchen Island with 4x4 Legs

Submitted by Rich2727 on Fri, 06/20/2014 - 10:52

In order to make this island a little beafier I used 4x4 wood for the X as well as the the top and bottom braces. Top is made up of glued up 1x3 maple wood. It looked really good raw, but decided to stain it to give a more uniform look. I bought the rustic handles and the bottle opener on Amazon.com. I used lag bolts and washers for the finishing accents...similar to the pottery barn island. Painted them with Rustoleum oil bronzed paint and then dabbed it with a paper towel to give it a rougher finish to it and then sprayed the casters as well. This was a fun project and are getting a lot of use out of it. Thanks goes to Anna for the plans and inspiration for this island. Rich

Built from Plan(s)
Estimated Cost
$300
Estimated Time Investment
Week Long Project (20 Hours or More)
Recommended Skill Level
Intermediate

Comments

Mriddle

Fri, 06/20/2014 - 11:44

i keep debating if i should do this, you did a great job. i like the 4x4 sides.

Susan Hubbard

Sun, 06/22/2014 - 08:25

Rich, I love the changes you made with the 4x4's. You made a gorgeous piece of furniture! Can you share with me where/how you attached the drawer/shelf sides? I'd like to follow how you made this, but can't tell from the pictures. On the original they look inset from the 2x4's, but your space is taken up by 4x4's. Would you mind sharing??? Thanks!

Rich2727

Mon, 06/23/2014 - 16:36

So, I ripped the 4x4 cross pieces down by 1/2" so that the side panels would rest inside the rectangle and flush with the 4x4 frame and up against the X.

Did that make sense?

Susan Hubbard

Mon, 06/23/2014 - 18:28

That's what I thought, but I wanted to make sure. I'm going to make one similar to yours :)

Susan Hubbard

Mon, 06/23/2014 - 18:28

That's what I thought, but I wanted to make sure. I'm going to make one similar to yours :)

2x4 Modern Adirondack

Submitted by blondewolf on Thu, 01/14/2021 - 06:51

This is my second chair I’ve built. The first was proof of concept. This chair (and the subsequent 7 that will follow) are for the rental cabin in the Red River Gorge. Loving this chair! I have no idea why pic is turned sideways, it’s not that way on my phone.

Estimated Time Investment
Afternoon Project (3-6 Hours)
Finish Used
Aged bourbon and blue with a poly to protect it.
Recommended Skill Level
Beginner

Comments

Faux Fireplace

Submitted by Hayley842 on Sun, 12/21/2014 - 19:29

We used pine boards for the carcass, a solid aspen panel 15" deep from lowes that we had lowes cut to fit. The doors are select pine simply because there were no suitable 1x12 boards. Hinges were from Home Depot- the lowes ones didn't come with a template. We tiled the inside with 7 boxes of "aspect" stainless steel self stick tiles from Home Depot.  We drilled a hole in thr back piece (which is MDF, also cut to fit from lowes) to accommodate a cord, and I carved the hole through the tiles with a utility knife. It wasn't ideal, but it's hidden by my lights.  No crown molding, and no trim because 1. We couldn't decide on any and 2. We like it this way for now. We had lowes cut every single board for this so we only had to screw and glue. The hinges were a challenge since we are newbs, but we figured it out in the end. In the future we are going to be more careful to check for square. The plan doesn't include shelves, which we have yet to install and we aren't entirely sure how we will. If you had the Kreg shelf hole driller rig thing that would be ideal..

Crucial detail: we shortened this project by slicing inches off the center section in the plan. Maybe took 5" off total. 

Estimated Cost
$110 for wood alone. We had screws, stain, poly, brushes, glue, etc.
$70 for the tiles. Don't bother with home depot's tile trim- it won't fit, and it's not really suited for this application.
Estimated Time Investment
Weekend Project (10-20 Hours)
Finish Used
minwax special walnut and polycrylic
Recommended Skill Level
Intermediate
Seasonal And Holiday

Outdoor Toys Contained

Submitted by lmflerlage on Mon, 02/22/2021 - 12:32

I love this dual outdoor seating plus toy storage bench. I lengthened the plans so I needed to add some additional support for the lid. I also decided to go with a rope pull which is easier for the kiddos to utilize.

Estimated Cost
$40
Estimated Time Investment
Day Project (6-9 Hours)
Finish Used
Cedar finish
Recommended Skill Level
Beginner

Comments

Teen Loft Bed

Submitted by KailuaGirl on Fri, 03/15/2013 - 12:59

Aloha!
I was inspired by what I saw on Ana's website. My daughter was obsessed with the PB Teen version of the loft bed, so I tweaked the plans here to make it more like the $2500 bed from the catalog!!!!! Yikes and don't even get me started on what the shipping to Hawaii would be....It was well worth the effort! My daughter loves her new loft bed...Now if I can just figure out a way to get the dog to love the high bed!!!
Cheers, Tina

Built from Plan(s)
Estimated Cost
$250 because I added a glass top to the desk
Estimated Time Investment
Weekend Project (10-20 Hours)
Finish Used
white glossy paint
Recommended Skill Level
Beginner

Comments

DawnL

Sat, 06/22/2013 - 02:57

Aloha Tina!

You did a great job! I was wondering, how high is the bed, room and clearance? We also live in Hawaii and my daughter's room is small. Any feedback on what modifications you made would be greatly appreciated! Mahalo!

KailuaGirl

Tue, 06/25/2013 - 13:35

Hi Dawn,
Yes, my daughter's room has low clearance, so I tweaked the loft bed height.
I determined what top clearance I could maximize that would allow my daughter to sit up in bed comfortably, but it will be tight as she grows. She's 5 feet now...
Then I tweaked the desk area height as well to maximize without too much of a struggle to get into the area.. I hope this reply is helpful..
Floor to ceiling height is 96 inches. desk area has clearance of 56 inches and from the top of the mattress to ceiling has a clearance of 28 inches.
Aloha, Tina

hansje01

Tue, 12/17/2013 - 16:06

Im having a problem finding the plans for the teen loft bed shown above. any direction would be appreciated! Thanks!

KailuaGirl

Tue, 12/17/2013 - 16:59

HI! There are no plans for this loft bed.. I used the plans on this site and just literally DIY'ed to fit my needs.. Sorry I know this doesn't help you much…
If you have a specific question, maybe I could help…
Aloha, Tina

Backyard oasis

Submitted by Anonymous (not verified) on Tue, 04/25/2017 - 21:12

Awesome plans, incredibly simple to follow. I'm so happy to have found you and your plans on Pinterest, this is a piece we will enjoy for many years! 

Thank you!

Estimated Cost
$400 including everything from lumber, stain and cushions.
Estimated Time Investment
Weekend Project (10-20 Hours)
Finish Used
Same as our fence, a thick cedar stain with a 20 year warranty. (Fingers crossed!)
Recommended Skill Level
Beginner

2x4 Casual Desk Tweaked

My new fav stain. Minwax Expresso Polyshades in satin.
Followed the 2x4 desk design but had so many scrap pieces of 2x4 (from other projects) , ended up changing the direction of the table top.
Finished with Minwax gray and even though it looks blue , I like it...
Going to make some benches to match , weather pèrmitting :)
Didn't take long to build , just a couple of hours - staining was the killer. Needed 3 coats to get that rich dark even look.

Built from Plan(s)
Estimated Cost
$40
Estimated Time Investment
Weekend Project (10-20 Hours)
Finish Used
Minwax products
Recommended Skill Level
Beginner

Comments

Farmhouse table and bench - white base with stained top

Submitted by Anonymous (not verified) on Mon, 05/15/2017 - 19:36

We went off the Farmhouse table and bench design but had to customize the length of the table and bench so that it fit in our kitchen space. The table was our first ever project and we made a few mistakes but learned from them and built the bench and are hoping to move up to the Farmhouse bed and then the fullstorage bed. 

Estimated Time Investment
Afternoon Project (3-6 Hours)
Finish Used
Used everlasting in chalk paint for bottom and top then brushed blue over the top let dry then stained the top with minwax dark walnut and wiped off. Applied a few layers until desired look. Dry brushed more blue and white in between stain layers then used polycrylic semi gloss finish
Recommended Skill Level
Starter Project

Farmhouse Table Squared

Submitted by sraper2 on Sun, 04/07/2013 - 20:53

I used your plans for the table but changed the table dimensions to fit my space. My table is square and measures 58"x58". I also changed the chairs to have a straight back and then the top is is cut at a 6 degree angle. I love them so much!!!

Estimated Time Investment
Week Long Project (20 Hours or More)
Recommended Skill Level
Intermediate

Four station desk (PB inspired)

Submitted by monty742 on Sun, 03/15/2015 - 08:58

I really liked the PB mega desk, but I didn't want to spend $1600 on it.  After seeing someone's post here (a couple years ago...) asking for plans on that desk, I decided to do it myself.  I took these two plans and made 4 base units.  They are 18" square at the top and 34" tall.  I used 2 IKEA table tops connected underneath for the top, to make a total height of 36" - counter stool height.  I constructed them a little differently than the plans, but no matter how you make them, the idea is the same.  The plan is to take them apart and make 2 desks once everyone is too old and cool to do homework/artwork together.

Estimated Cost
$500
Estimated Time Investment
Week Long Project (20 Hours or More)
Finish Used
Kitchen and Bath finish paint (2 coats) - it's a little shinier than eggshell (I only used it because I had 2 or 3 gallons extra at home :) then 2 coats acrylic top coat matte finish.
Recommended Skill Level
Intermediate

Comments

monty742

Sat, 08/15/2015 - 04:33

Just seeing your comment...sorry for the delay!  I got the stools and the light fixture at a Ballard Backroom (outlet) store near me.  3 of the stools ended up being about $40 each with the sale they had at the time, and the 4th was $60? - bought at a later time than the first 3.

AlisaH

Wed, 11/04/2015 - 07:40

How did you connect the table tops from the bottom so that the tables were secure together? I'm curious what's the best way to do this. Since two of the four seats will be where the seam is, I want to make sure I secure it properly so it's not wobbly. Thanks so much.


monty742

Sat, 01/09/2016 - 05:06

I'm just seeing these latest comments for the first time, so you may have long finished this project already!  The tops were surprisingly sturdy but I did reinforce them.  I placed the tops on the floor upside down and screwed some metal brackets (about 12" long each) across the joint in four places.  I just screwed them in through holes already in the brackets.  This wasn't the most stable because those tops are particle board and don't hold screws very well...  But since it was already pretty sturdy, I figured it would do.  It has been fine, even with standing on the top (kids who get up there and me hanging the light fixture above).

Once the tops were joined, I placed the bases so there was about a 1" overhang on the top.  To hold the top in place, I used small pieces of wood screwed to the underside of the top at the inside corner to act as a placement stop.  The top is pretty big and heavy even though they are IKEA tops, so they don't have a tendency to move or slide at all anyway.  I'm going to try to figure out how to post another picture of the braces and corner stops...we'll see if I can do it!  Let me know if you have any more questions...again, sorry I didn't see this in a more timely manner!

Pmprdwife

Sat, 01/02/2016 - 05:55

Is the photo above the Pottery Barn version or your product result?  I'm trying to figure out the dimensions for the drawer and shelf configurations.  Thanks!  BTW, I'm totally addicted to your style and personality...my husband loves the productivity inspiration I've received. :-)


monty742

Sat, 01/09/2016 - 10:17

Hi!

I'm glad you like the desk!  The one in the picture is the one I built, not the pottery barn one!  My dimensions were a good bit different than the PB desk - square bases instead of rectangular and counter stool height instead of desk/table height.  So, I have no idea if I have my plans for this anymore, so I went and measured it again for you!  

So each base is 18" x 18" square and 34" high so that with the 2" top the total height is 36".


Each base was made of oak plywood that made with 3 sides, a top and a bottom.  All edges were rabbit joints (3/8" deep in thickness of boards and probably 3/8" wide - not 100% on width of rabbits).  It's kind of a pain to do rabbit joints if you don't have a dado blade for your table saw, so you could use pocket hole screws instead.  I glued and nailed these joints with a finish nailer, I believe.  

I figured a diagram with measurements would be easier than trying to write descriptions...so I'm adding another pic with the dimensions outlined.  Drawing is NOT to scale, so sorry about that!  I really need to learn to use SketchUp.  Let me know if you have any questions!  

Monty742

monty742

Sat, 01/09/2016 - 07:57

Hi!

I'm glad you like the desk!  The one in the picture is the one I built, not the pottery barn one!  My dimensions were a good bit different than the PB desk - square bases instead of rectangular and counter stool height instead of desk/table height.  So, I have no idea if I have my plans for this anymore, so I went and measured it again for you!  

So each base is 18" x 18" square and 34" high so that with the 2" top the total height is 36".


Each base was made of oak plywood that made with 3 sides, a top and a bottom.  All edges were rabbit joints (3/8" deep in thickness of boards and probably 3/8" wide - not 100% on width of rabbits).  It's kind of a pain to do rabbit joints if you don't have a dado blade for your table saw, so you could use pocket hole screws instead.  I glued and nailed these joints with a finish nailer, I believe.  

I figured a diagram with measurements would be easier than trying to write descriptions...so I'm adding another pic with the dimensions outlined.  Drawing is NOT to scale, so sorry about that!  I really need to learn to use SketchUp.  Let me know if you have any questions!  

monty742

Thu, 07/28/2016 - 14:13

No you can't buy them from Ikea.  I bought the table tops from Ikea, but I built the bases.  The dimensions for the bases are in one of the additional pictures with the post if you want to see them!

treverandamber

Mon, 10/10/2016 - 07:41

What are the total dimensions of the table top? Thinking of building something like this, but want to make sure it will fit in my space.

Simgre81

Thu, 12/28/2017 - 07:00

Are these just slide in drawers, or did you use some sort of hardware to have them slide in and out?

I painted mine!

Submitted by Anonymous (not verified) on Sun, 06/18/2017 - 13:57

I modified the back with a larger piece of wood because my cushions kept falling through. Then I painted it white to go better with my cushions. Only took about 4 hours to make and then a couple to paint. Good luck!

Estimated Time Investment
Day Project (6-9 Hours)
Recommended Skill Level
Beginner

Farmhouse Bed With Stenciled Headboard

Submitted by idearoom on Fri, 03/18/2011 - 23:43

Loved Ana's Farmhouse Bed so we downsized it and made it into a twin size for our daughter.  Took out the boards in the middle and painted a stenciled pattern instead.

Estimated Cost
$120
Estimated Time Investment
Weekend Project (10-20 Hours)
Finish Used
White paint
blue paint is Mythic Paint in Smooth Waves
Recommended Skill Level
Intermediate

Tool Caddy

Submitted by docbromo on Thu, 01/20/2022 - 15:21

I repurpose furniture as a hobby and I got tired of having my tools hanging on a wall on the other side of the garage so I bult this rolling tool caddy. It is made out of 3/4" plywood, a couple of 2x4's and some heavy-duty casters. I built one about 3 years ago and realized that there were some things I wanted to do differently so I sold it and bult this one. My wife gave me a subscription to SketchUp and I had fun drawing it up and tweaking it. I left an over hang of 3" on both sides so I could store my clamps. I also attached an electrical cord reel on the right side and reversed the ends so the male end can plug into the wall and I can roll the unit across the room allowing me to be able to charge my batteries. The back side has a 44 drawer storage organizer and also a few shelves for additional tools like a router and a multi-tool. I'm not nearly the craftsman many of you are and I'm sure you could do a much better job. I didn't build it to look pretty but to be functional and it works for me.

Comments

Jayp413

Fri, 01/21/2022 - 09:16

I really like this idea. I have my tools hung up neat all around the garage, but I keep walking back and forth for tools and batteries. It would be great to roll this over to a project and have everything you need right there. Nice work. I will modify one for my needs.

BigMacQue

Fri, 01/21/2022 - 10:06

there are some very thoughtful features on this, notably the wings at the top and the bottom for clamps and extra tools and the different shelf heights. Well done! I'm going to build one just like it and a power strip for battery storage.

Shoe Dresser with Extras!

Submitted by Anonymous (not verified) on Sun, 04/24/2022 - 11:30

We added a bit to your shoe dresser plan. We ended up building into the wall since it had the perfect little indent and put a baby cabinet in the middle so we had access to the outlet. 

by Angela

Built from Plan(s)

Grill table with stainless steel top

Submitted by krochelle on Tue, 08/20/2013 - 08:00

I made this table to go next to an outdoor grill to be used as a food prep area or just a surface for holding ingredients (instead of using the deck railing!). The top is stainless steel which fits tightly over 2 3/4" pieces of plywood laminated together. The bar/handle in front is made out of galvanized pipe. All wood was treated.

Legs - 4x4 posts
Bottom shelf - 1x6's
Sides - 1x4's
Top - 2 pieces of 3/4" plywood laminated together with a stainless steel top (custom fit) over top
Towel bar - galvanized pipe (cut and threaded to size at Lowe's), floor flanges and 90 degree elbows

Estimated Cost
$120
Estimated Time Investment
Day Project (6-9 Hours)
Finish Used
I used Kona stain but since it was over treated wood the stain did not take as dark as it should have. I will have to restain this piece after it has completely dried out.
Recommended Skill Level
Intermediate

Comments

spiceylg

Tue, 08/20/2013 - 09:07

Love this. Where did you get the stainless steel top? Did you have to special order to fit?

In reply to by spiceylg

krochelle

Thu, 05/15/2014 - 10:33

Sorry about the late reply! Yes, I just gave my dimensions to a local steel supplier and they made the top. I think I have about $40 into the stainless. They didn't weld the corners but I've never had an issue with them.

krochelle

Thu, 05/15/2014 - 10:46

No...I didn't have any plans when I built it but it's a very simple concept. I chose to use all treated wood since I knew it would be sitting outside unprotected. However, my 4x4 posts weren't square so this caused a lot of problems and everything was built to fit. I believe I just used 4x4's, 1X6s (for the bottom shelf) and 1x4s for the sides (top and bottom). For the top, I just laminated 2 pieces of 3/4" plywood together to bulk it up and then had the stainless top built to fit. It fit perfectly so I didn't glue it to the plywood. This makes it easy to remove and clean, if necessary. For the galvanized pipe (towel bar), I bought it at Lowe's and had them cut/thread it to fit my dimensions.