Community Brag Posts

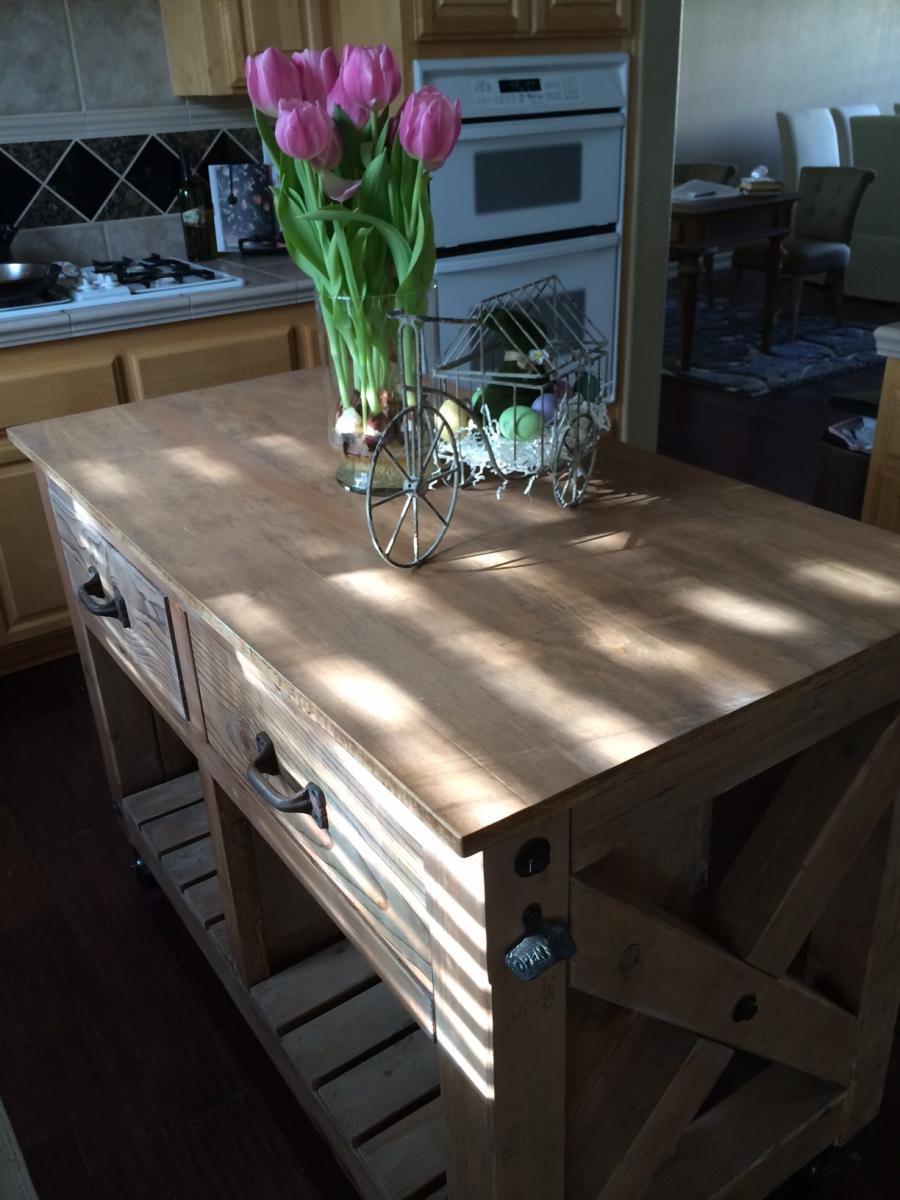
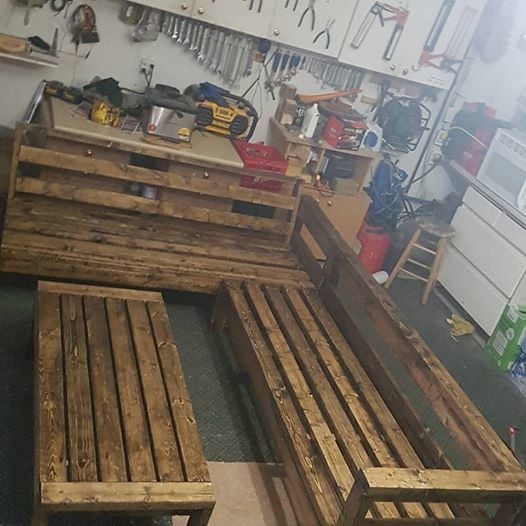
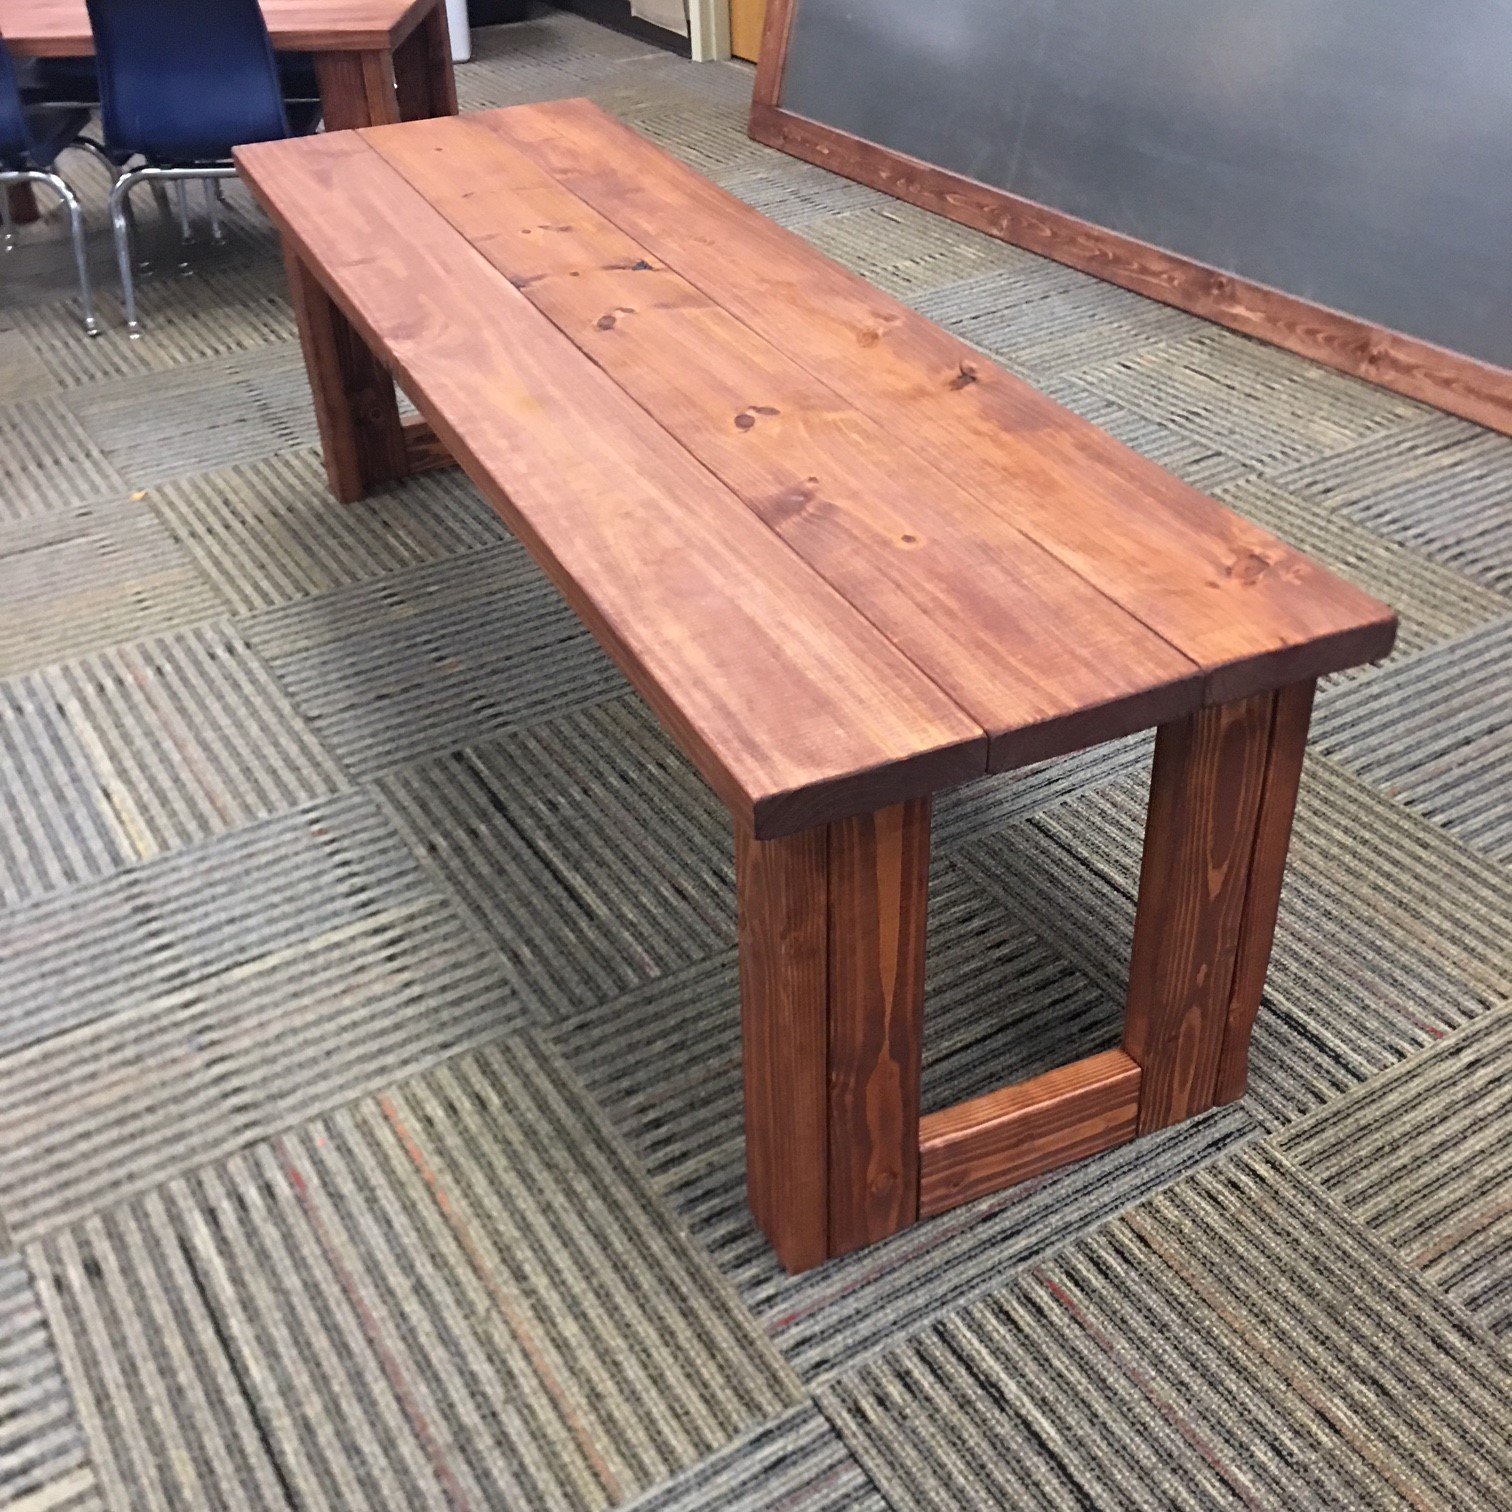
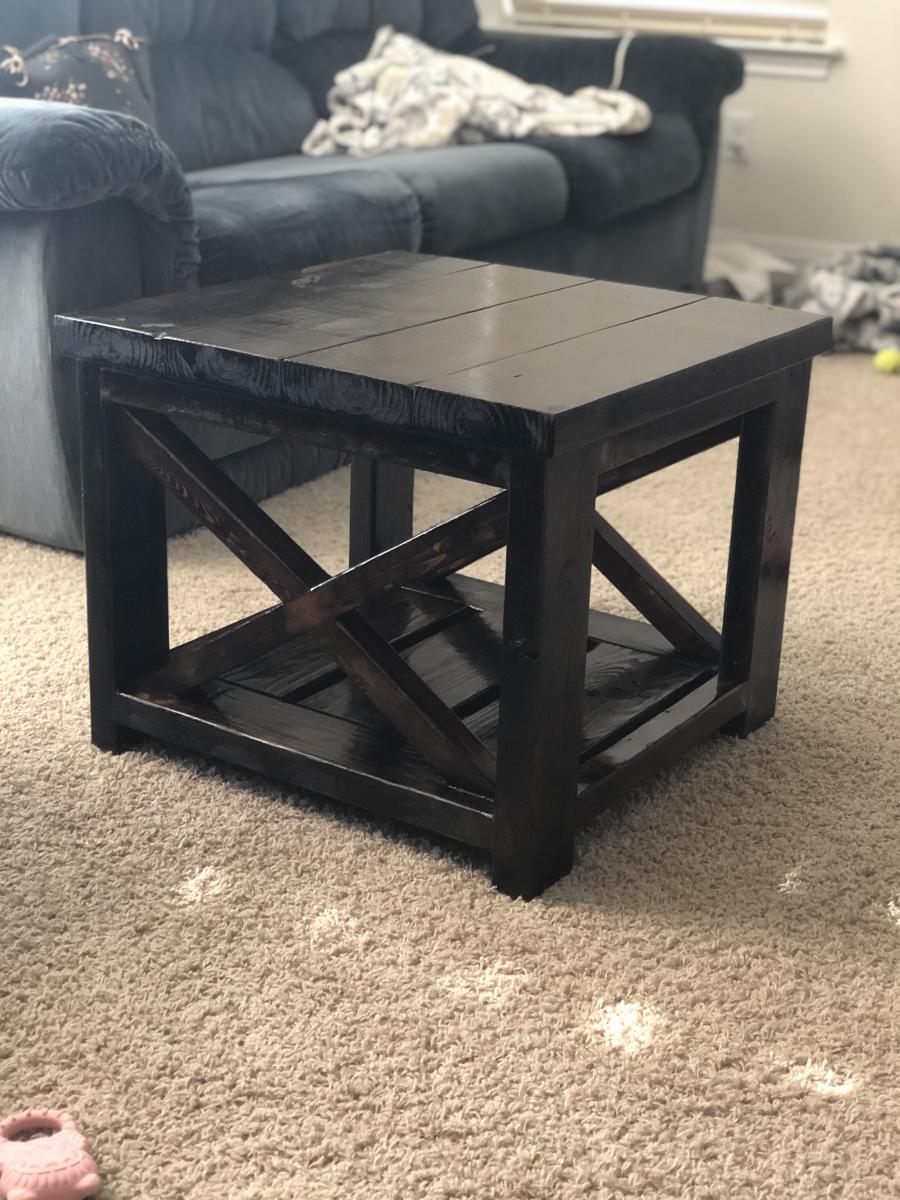
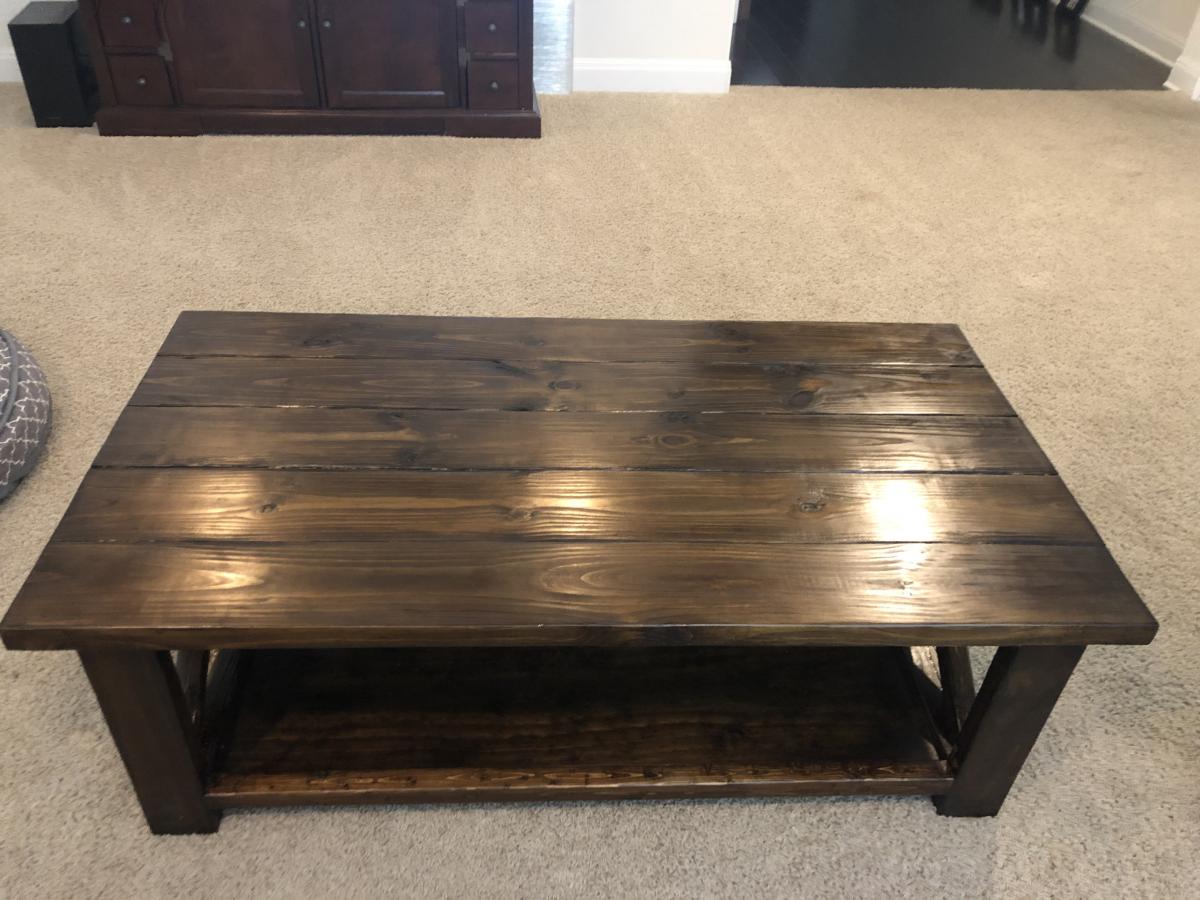
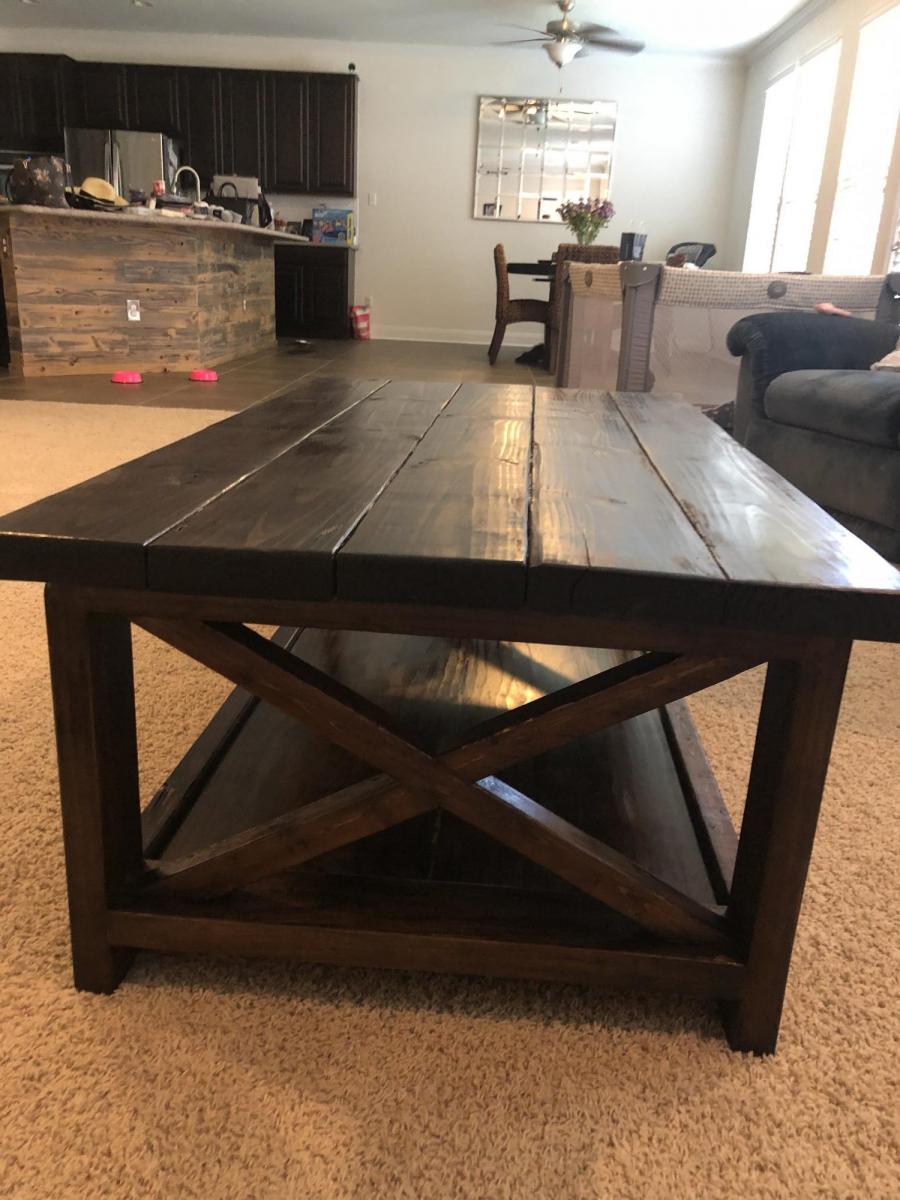
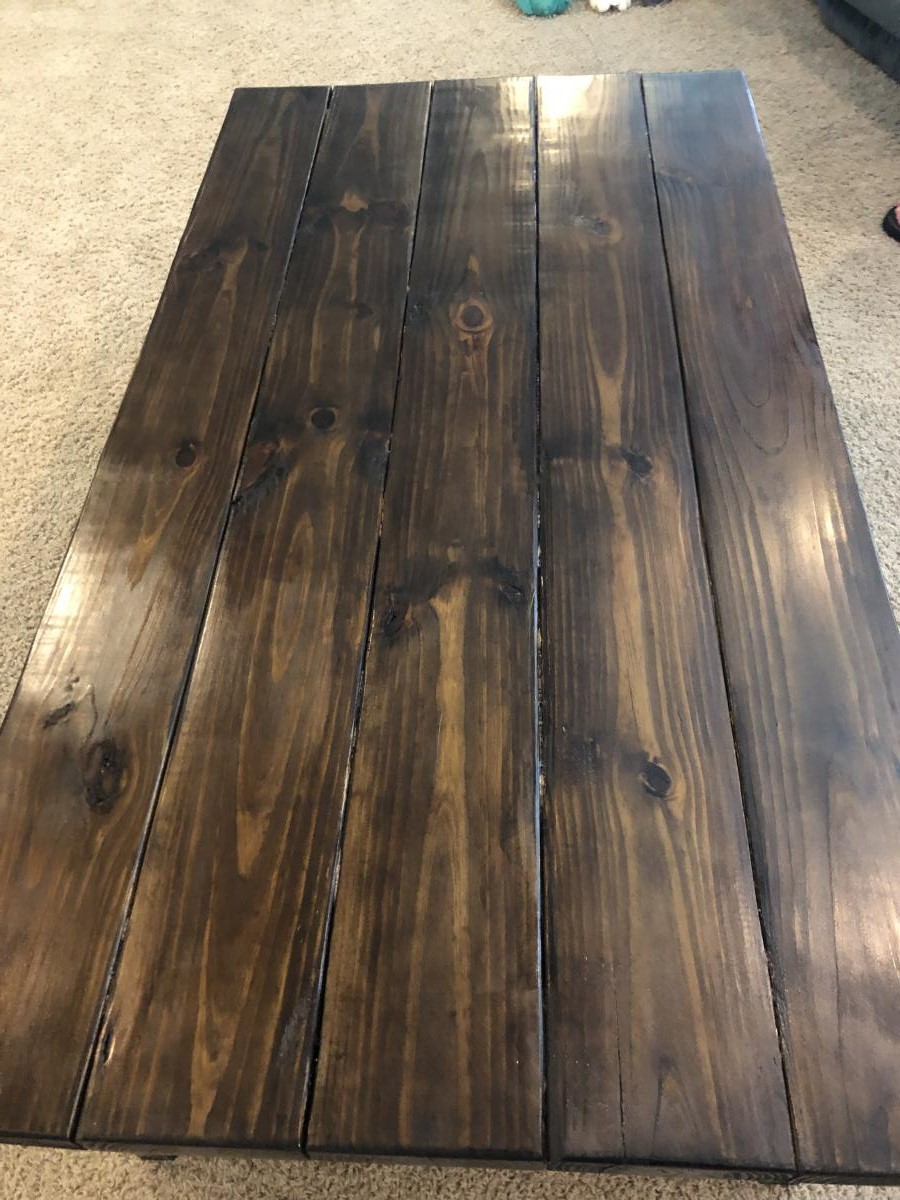
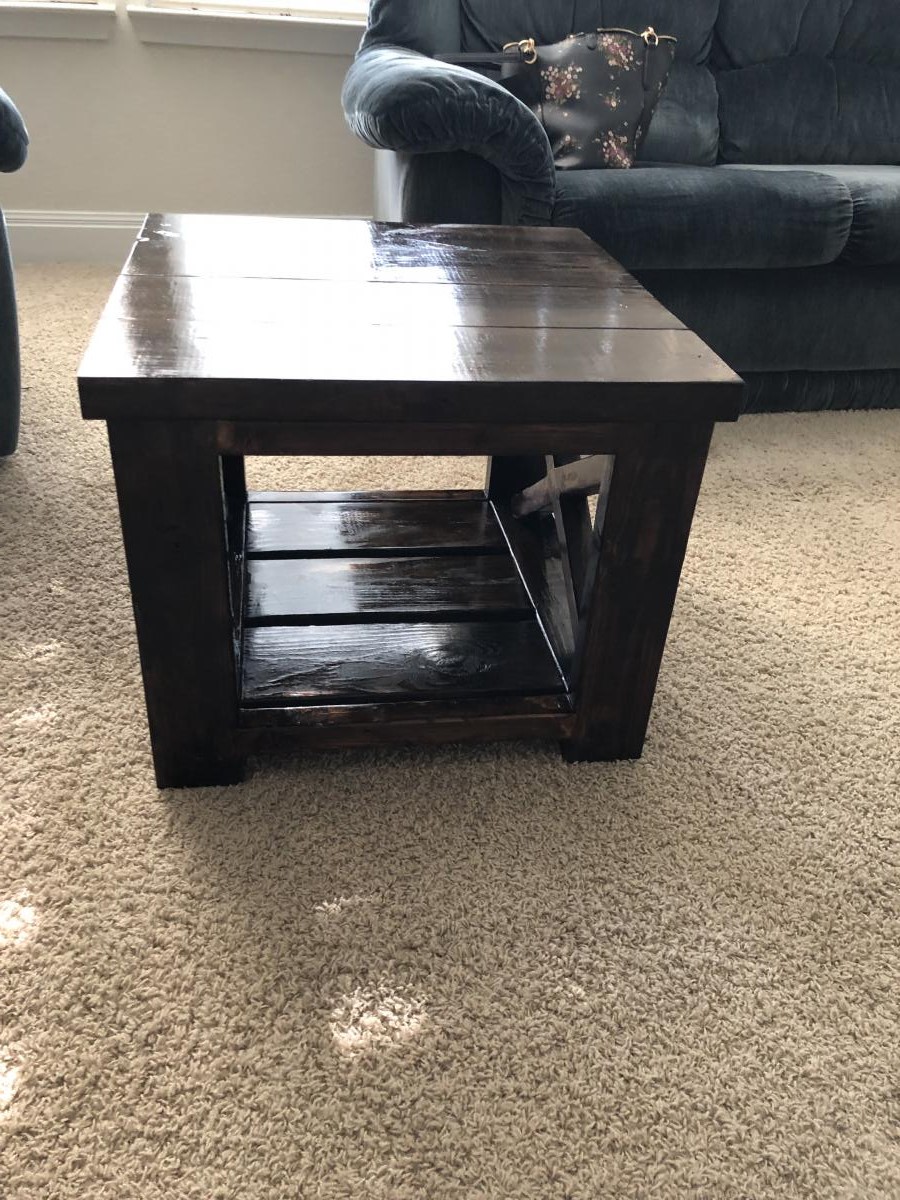
Rustic X Kitchen Island with 4x4 Legs

Submitted by Rich2727 on Fri, 06/20/2014 - 10:52

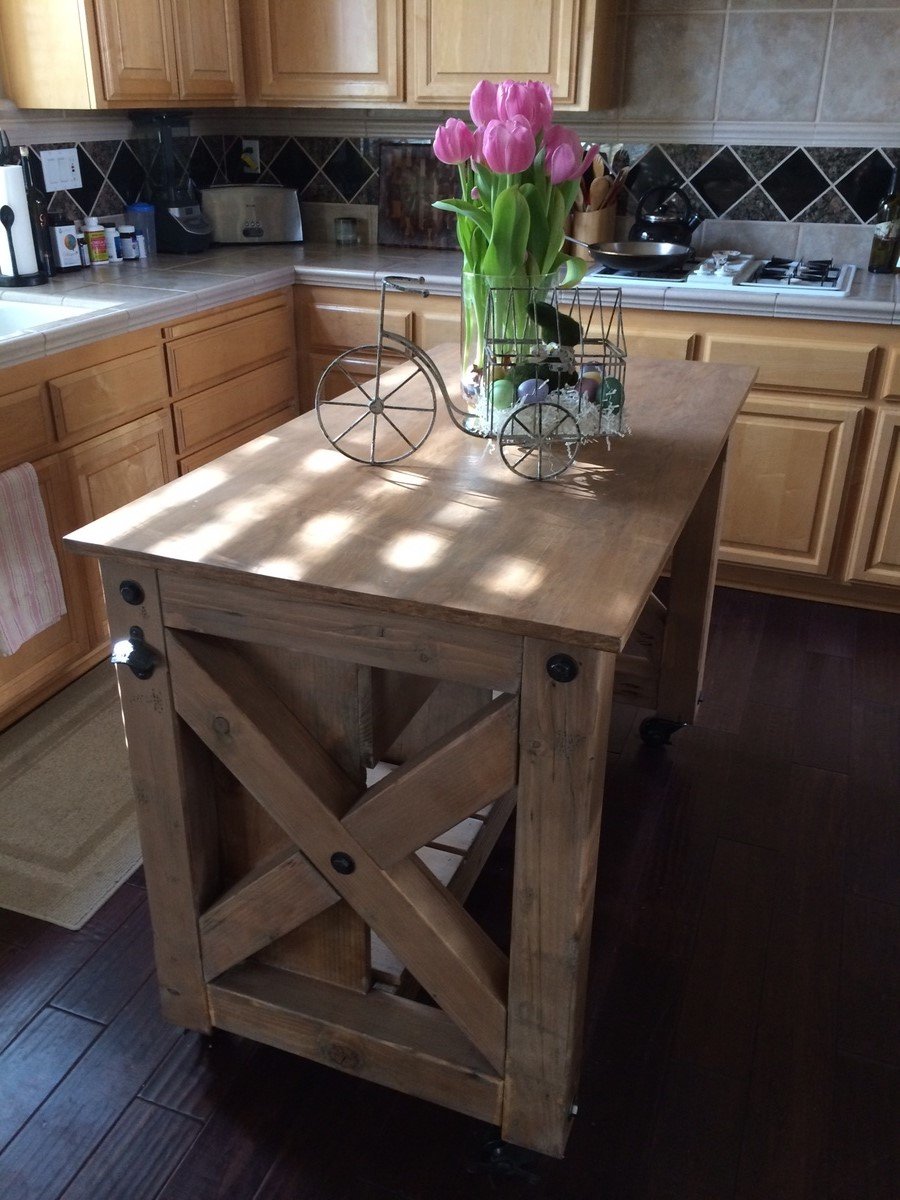
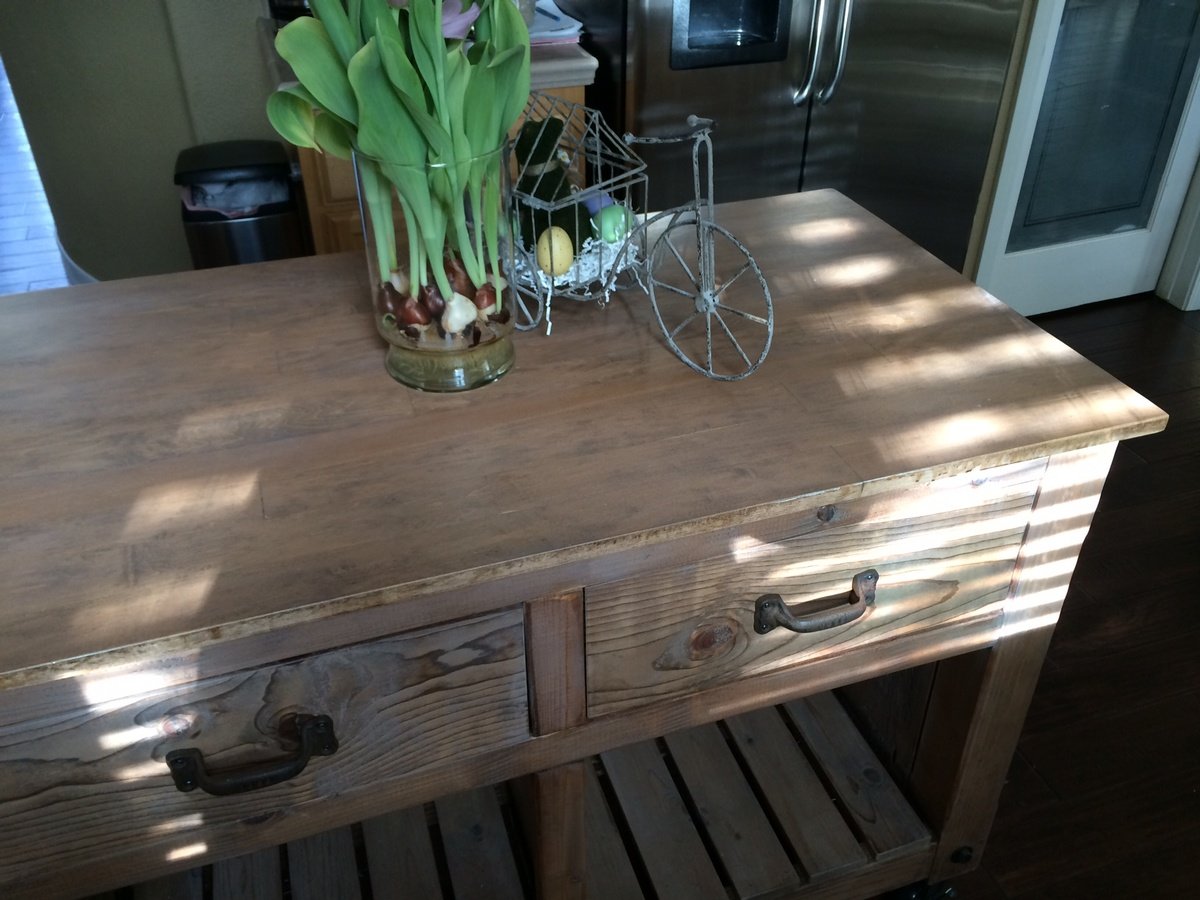
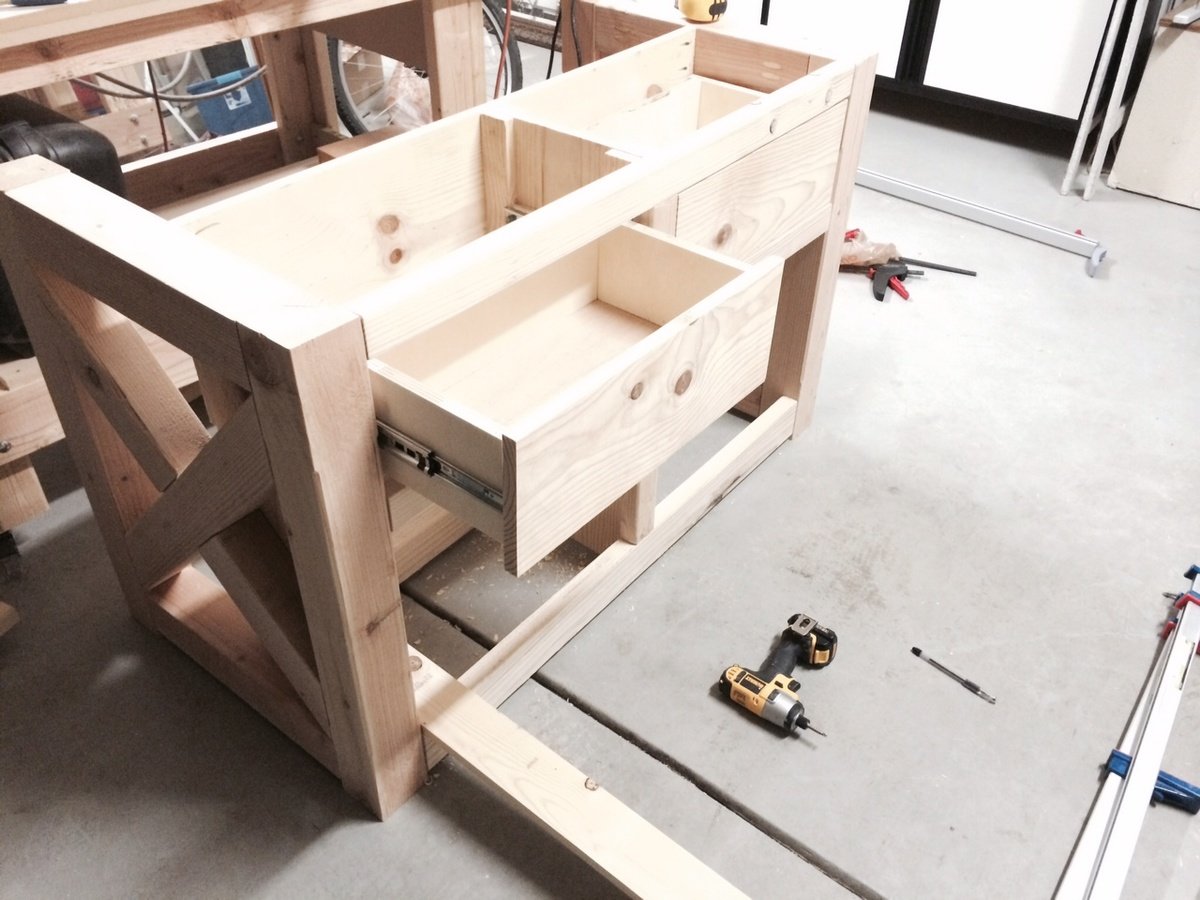
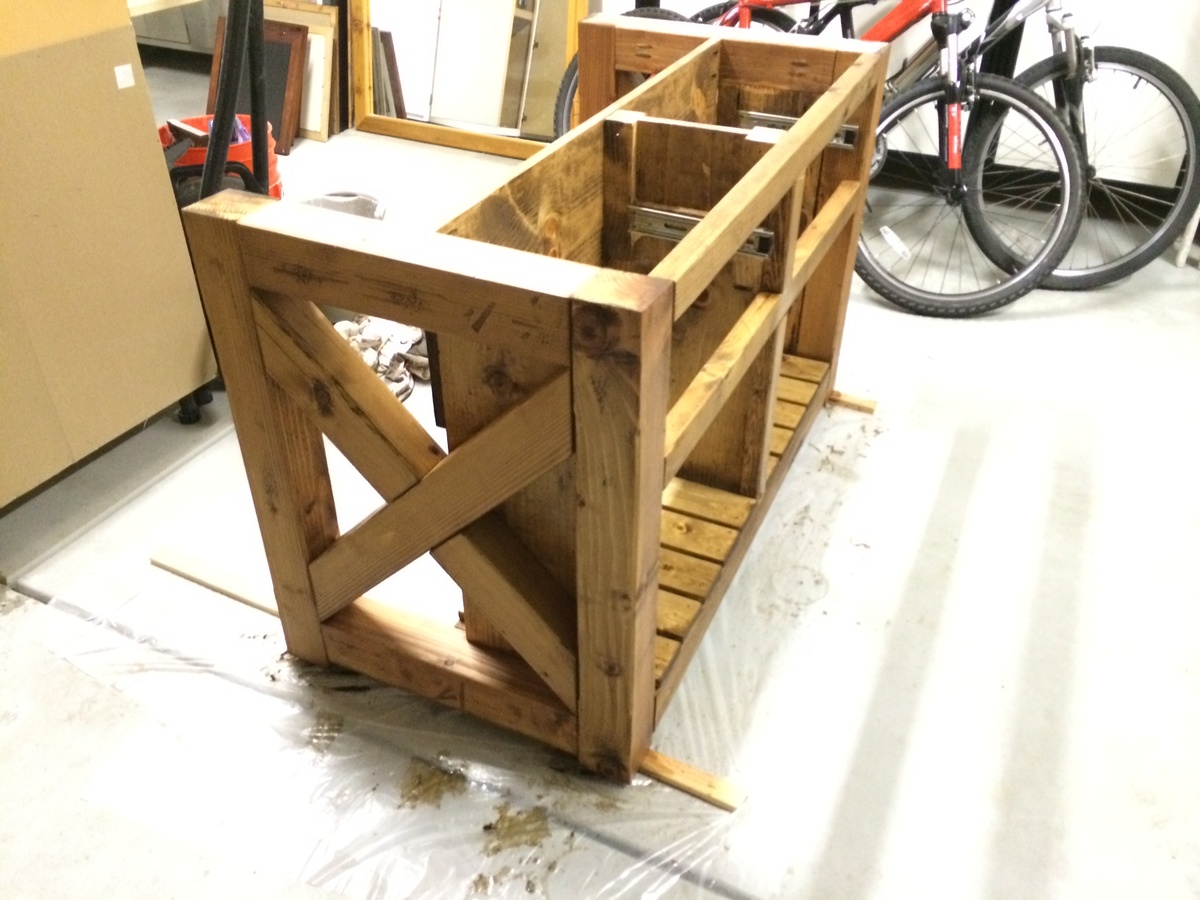
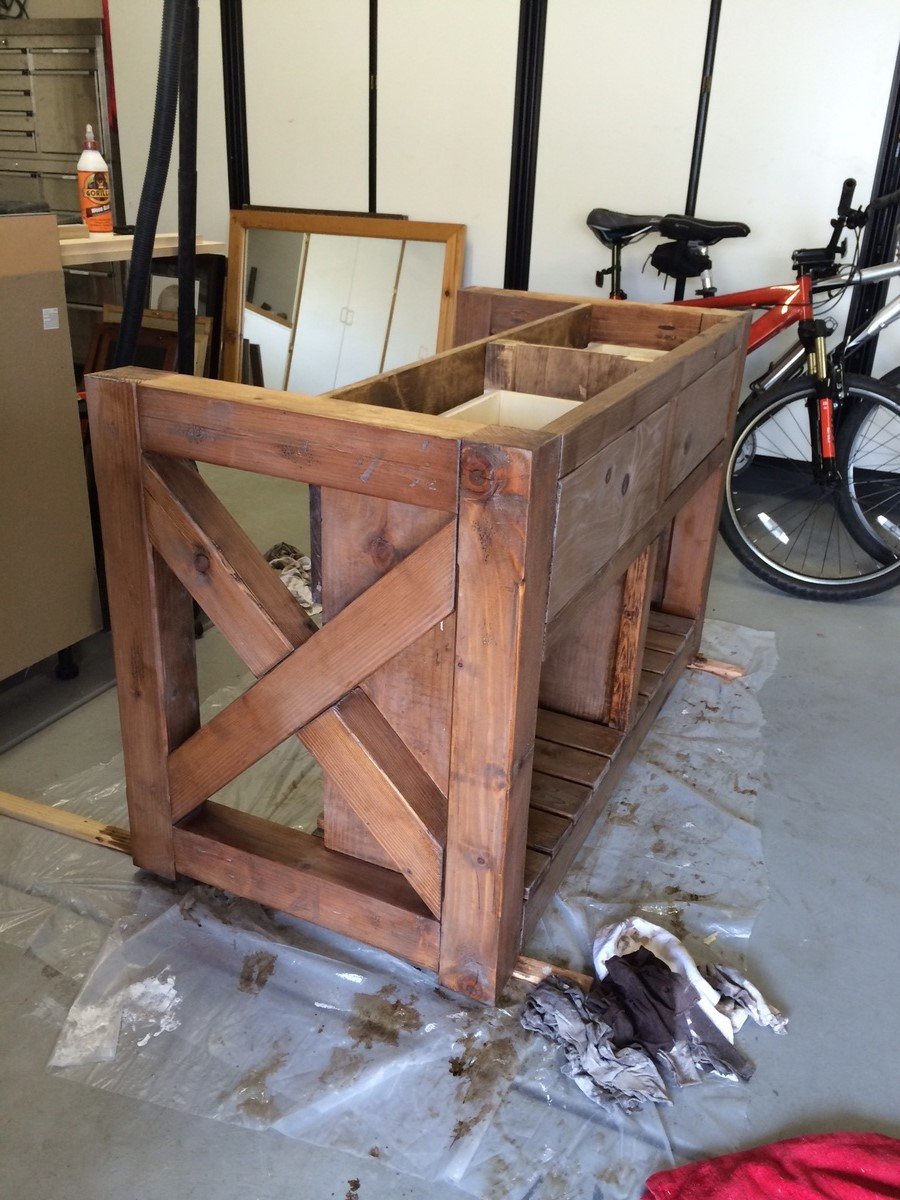
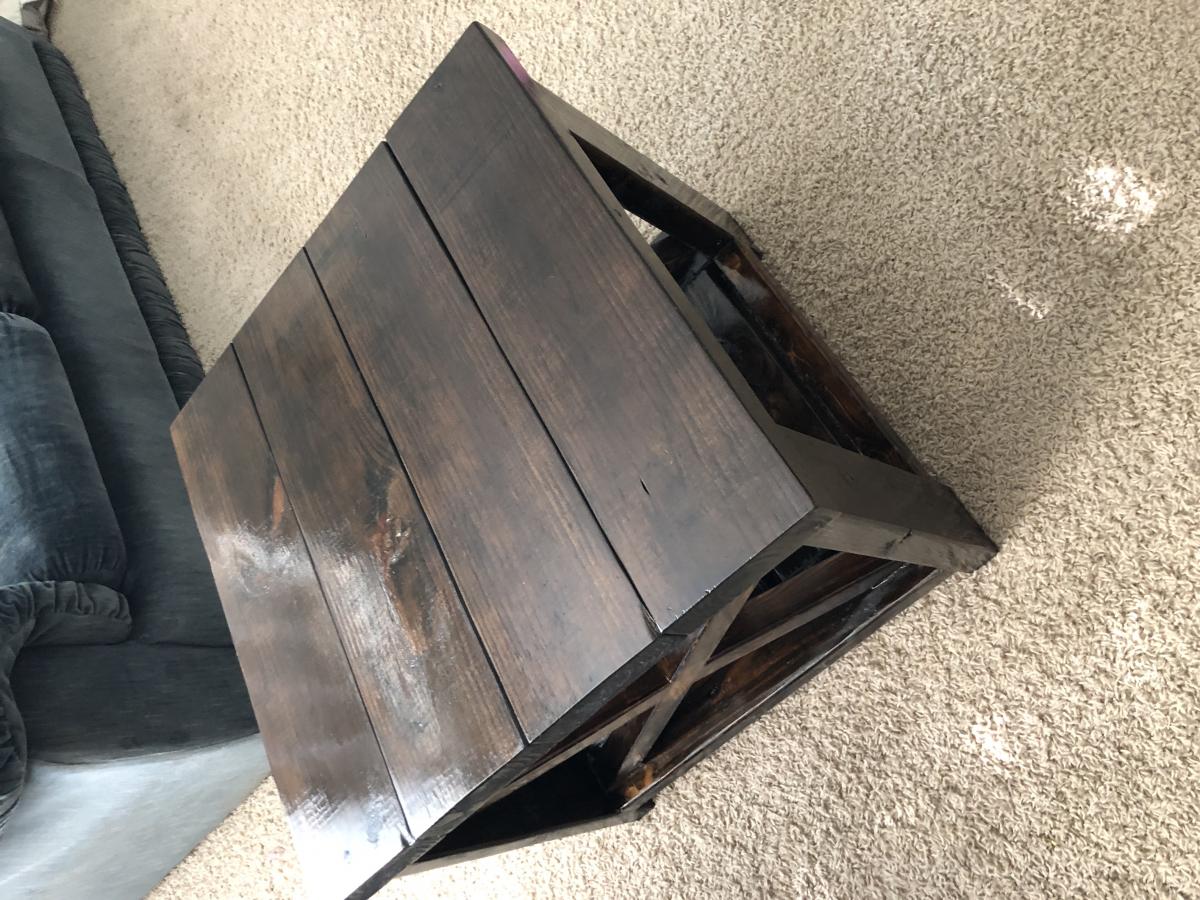
In order to make this island a little beafier I used 4x4 wood for the X as well as the the top and bottom braces. Top is made up of glued up 1x3 maple wood. It looked really good raw, but decided to stain it to give a more uniform look. I bought the rustic handles and the bottle opener on Amazon.com. I used lag bolts and washers for the finishing accents...similar to the pottery barn island. Painted them with Rustoleum oil bronzed paint and then dabbed it with a paper towel to give it a rougher finish to it and then sprayed the casters as well. This was a fun project and are getting a lot of use out of it. Thanks goes to Anna for the plans and inspiration for this island. Rich

Built from Plan(s)
Estimated Cost
$300
Estimated Time Investment
Week Long Project (20 Hours or More)
Recommended Skill Level
Intermediate

Comments

Mriddle

Fri, 06/20/2014 - 11:44

i keep debating if i should do this, you did a great job. i like the 4x4 sides.

Susan Hubbard

Sun, 06/22/2014 - 08:25

Rich, I love the changes you made with the 4x4's. You made a gorgeous piece of furniture! Can you share with me where/how you attached the drawer/shelf sides? I'd like to follow how you made this, but can't tell from the pictures. On the original they look inset from the 2x4's, but your space is taken up by 4x4's. Would you mind sharing??? Thanks!

Rich2727

Mon, 06/23/2014 - 16:36

So, I ripped the 4x4 cross pieces down by 1/2" so that the side panels would rest inside the rectangle and flush with the 4x4 frame and up against the X.

Did that make sense?

Susan Hubbard

Mon, 06/23/2014 - 18:28

That's what I thought, but I wanted to make sure. I'm going to make one similar to yours :)

Susan Hubbard

Mon, 06/23/2014 - 18:28

That's what I thought, but I wanted to make sure. I'm going to make one similar to yours :)

Pallirondack Laundry Basket Dresser

I showed my wife the Laundry Dresser featured on Ana White's website and she asked if I could make one for her, but not quite so tall. I also turned the orientation to fit our laundry room space. I used primarily oak from recycled pallets to build the Laundry Basket Dresser. She wanted a work space on top, so folded laundry, empty baskets, etc. all have a temporary resting place depending on the day. From start to finish, it took me about 6 hours. She plans to stain the piece at some point, but its already in use, so I'm not 100% sure that will ever happen until we move or something. ;-) Great idea and laundry room organization!

Estimated Cost
Half a box of screws
Estimated Time Investment
Afternoon Project (3-6 Hours)
Recommended Skill Level
Intermediate

Comments

Kathy in Pittsburgh (not verified)

Mon, 09/10/2012 - 10:22

I love the open sides, plus it makes it much more feasible to build with scraps repurposed wood, which I love. Thanks for the inspriation

payne.kj

Mon, 04/08/2013 - 08:48

Hi, do you have any kind of plans for how you did this or atleast dimensions? I think this one fits more of what my wife needs, but I'm pretty new to making anything.

nicholas_ftm

Sun, 06/14/2015 - 20:16

Soooo I made this according to the measurements and no laundry basket I find fit. Kind of dissapointed in the fact that this cool thing I just built doesn't have any baskets that will fit it. Any advice on finding a basket that fits?

jkread

Fri, 07/10/2015 - 20:56

I think the idea is to build it to fit the baskets you have or buy some and build around them.

2x4 Modern Adirondack

Submitted by blondewolf on Thu, 01/14/2021 - 06:51

This is my second chair I’ve built. The first was proof of concept. This chair (and the subsequent 7 that will follow) are for the rental cabin in the Red River Gorge. Loving this chair! I have no idea why pic is turned sideways, it’s not that way on my phone.

Estimated Time Investment
Afternoon Project (3-6 Hours)
Finish Used
Aged bourbon and blue with a poly to protect it.
Recommended Skill Level
Beginner

Comments

Faux Fireplace

Submitted by Hayley842 on Sun, 12/21/2014 - 19:29

We used pine boards for the carcass, a solid aspen panel 15" deep from lowes that we had lowes cut to fit. The doors are select pine simply because there were no suitable 1x12 boards. Hinges were from Home Depot- the lowes ones didn't come with a template. We tiled the inside with 7 boxes of "aspect" stainless steel self stick tiles from Home Depot.  We drilled a hole in thr back piece (which is MDF, also cut to fit from lowes) to accommodate a cord, and I carved the hole through the tiles with a utility knife. It wasn't ideal, but it's hidden by my lights.  No crown molding, and no trim because 1. We couldn't decide on any and 2. We like it this way for now. We had lowes cut every single board for this so we only had to screw and glue. The hinges were a challenge since we are newbs, but we figured it out in the end. In the future we are going to be more careful to check for square. The plan doesn't include shelves, which we have yet to install and we aren't entirely sure how we will. If you had the Kreg shelf hole driller rig thing that would be ideal..

Crucial detail: we shortened this project by slicing inches off the center section in the plan. Maybe took 5" off total. 

Estimated Cost
$110 for wood alone. We had screws, stain, poly, brushes, glue, etc.
$70 for the tiles. Don't bother with home depot's tile trim- it won't fit, and it's not really suited for this application.
Estimated Time Investment
Weekend Project (10-20 Hours)
Finish Used
minwax special walnut and polycrylic
Recommended Skill Level
Intermediate
Seasonal And Holiday

Tack Box

Submitted by Evandgc on Tue, 12/30/2014 - 16:21

I made this box for my wifes christmas present. She has been riding horses for sometime and is planning on doing some shows. I built this box from Mimi's storage bench design, made it bigger, added a deeper box top and created the rest from looking at pictures online. Its all made of pine plywood and pine boards to keep it light. I added 4 castors to the bottom to make it easily moveable and hid them with the moulding around the bottom. Still has to be sanded and stained before it hits the barn. Its 39W X 24D X 29H. I used a piano hinge and routered the back to set the hing in. Added cove moulding around the bottom and to all the boxes around the front and side. Used a lot of pocket holes and finsh nails. Took me longer than it could have, because I planned everything as I went.  I will add more pictures when its finsihed. I would rate it intermediate to advanced depending on your skills with certain tools. 

Built from Plan(s)
Estimated Cost
Will all the hardware, wood materials, screws etc, I think it cost me around $250-$300
Estimated Time Investment
Week Long Project (20 Hours or More)
Finish Used
not finished yet
Recommended Skill Level
Intermediate

Comments

Cabin Sectional

Submitted by Anonymous (not verified) on Sun, 04/23/2017 - 07:40

Spent my time home from work building this for the cabin this summer. will be using coushions from ikea that are water and uv resistant as well as double sealed with removable covers for washing. 

Estimated Cost
120 dollars
Estimated Time Investment
Week Long Project (20 Hours or More)
Finish Used
dark walnut and an oil based varnish
Recommended Skill Level
Beginner

Kitty Outhouse

My first Ana White project. Built Ana’s awesome small cedar shed as an outhouse for our many cats. The have access to it from inside the house. Great way to keep litter boxes and the mess out of the house. It is stand alone, and attached to the house, in front of a bedroom window. There are two ‘entrances’ as well as two, one-way, escape hatches, if a cat in the outhouse is interrupted by another cat (I.e. a male cat comes in and the female feels trapped) they can exit to the outside (one way so no critters can come inside!). Ana has easy to build plans, great site! I plan on making the square table just posted today for my newly refurbished deck. Keep in mind, my estimated costs and time reflect a LOT of additional features on the inside. The shed itself, very easy, simple, inexpensive. Very little waste with Ana’s projects as well.

Built from Plan(s)
Estimated Cost
$500
Estimated Time Investment
Week Long Project (20 Hours or More)
Finish Used
No finish, at least not yet.
Recommended Skill Level
Intermediate

Comments

Mantel Moulding Headboard

Submitted by Jon Moore on Sun, 04/07/2013 - 20:16

While browsing I ran across Ana's Mantel Molding Headboard (Pottery Barn Addison knockoff) and had to have one!

I stuck to her plans except that I used 3/4" boards instead of the 2x4's, made it wider (81") for a King size bed, used some different molding elements and gave it a professional looking finish with my airless paint sprayer. Most people who see it cannot believe it is not store bought.

This of course kicked off a whole remodeling effort including two additional DIY projects that came out great. Looking in the photos they are the boxed shells above the bed and the grass-cloth framed mirror. The bedroom is now one of our favorite rooms in the house!

Built from Plan(s)
Estimated Time Investment
Weekend Project (10-20 Hours)
Finish Used
Behr Clear Moon
Recommended Skill Level
Intermediate

10 Dollar Ledges (Mom and Daughter Project!)

My 13 year old daughter and I built these ledges together. We changed the plan just slightly to make two 36" ledges for her bedroom. She was able to do a lot of it, which was very cool. They are very "rustic" and she loves them. I am really shocked at how sturdy they are! Perfect for displaying some of her trophies that I was previously too afraid to let her put up in her room.

Thanks so much to Ana for giving us the courage to build things of our own!

Built from Plan(s)
Estimated Cost
Under $10
Estimated Time Investment
An Hour or Two (0-2 Hours)
Finish Used
We (meaning I) sanded them pretty well, and we (meaning she) brushed on a coat of water-based primer and 2 coats of Behr semi-gloss bright white latex paint.
Recommended Skill Level
Starter Project

Turning the Loft Bed into a Bunk Bed

Submitted by mommabutts on Thu, 04/14/2011 - 10:20

We adapted the loft bed plans so we could put our sons' current twin bed underneath it to make "bunk" beds for our boys.  It turned out perfectly!  The loft is very sturdy, even with 2 adults and a child on the top bed.

We made it taller and longer, and added an additional row of 1x8s to increase stability.

Built from Plan(s)
Estimated Time Investment
Day Project (6-9 Hours)
Finish Used
Minwax Polyshades
Recommended Skill Level
Intermediate

Pet Stairs

Submitted by alli2410 on Tue, 03/13/2018 - 06:26

I needed sturdy stairs for my 2 60lb dogs.  My bed is 33 inches from floor to top of mattress.  So, this is my very first project completed by myself!  Custom size pet stairs 24inx24inx24

Estimated Cost
$40-50
Estimated Time Investment
Afternoon Project (3-6 Hours)
Finish Used
Minwax polyshades Espresso gloss (3 coats)
Recommended Skill Level
Starter Project

Comments

Pretty Wood Boxes!

Submitted by cassiet717 on Fri, 08/02/2013 - 18:42

My brother and his fiancee just bought their first house, and these sweet little boxes were the perfect housewarming gift! I used the recommended cedar picket, and found some old reins at a flea market for the handles. Piece of cake to build, super inexpensive, but absolutely adorable!

Estimated Cost
$3 per box (including handles)
Estimated Time Investment
An Hour or Two (0-2 Hours)
Finish Used
Minwax Pre-Stain Wood Conditioner, Minwax Stain in Walnut
Recommended Skill Level
Starter Project

Wife's Kindergarten Classroom

Been a while since I had time to actually build anything worth posting about! My wife wanted some items for her Kindergarten classroom this year, so built several items, most inspired by the Farmhouse family.

Estimated Time Investment
Day Project (6-9 Hours)
Recommended Skill Level
Beginner

Comments

jennyboo

Sat, 06/12/2021 - 11:23

I am moving from 15 and half years of third grade to a first year of first grade. I NEED tables for my kids. I plan on building my own. I am building mine as a "2 seater." Would you please share the dimensions of these student tables? I love the teacher desk too. I built something similar for my home.

Toddler Room

My daughter's room has no closet and is pretty small, and I just couldn't find any furniture I liked around here. But I found tons on Ana-white.com! So, her entire room (except one old bookshelf) is now ana-white originals.... the cubbies hide her clothes and toys; the dress-up center functions as her hanging closet; she colors on the easel (originally made for her brother, but he never used it...); and the doll bed serves as a resting place for several different dolls (sometimes all at once). I think I will build her the dollhouse bookshelf to replace the older bookshelf, and once she's ready for a real bed (as opposed to the mattress on the floor), I'll be building that too! The chalkboard easel was one of my first builds, and I have to say, it still remains one of the most challenging (my screws kept splitting, I had a hard time fitting things together, esp. without another pair of hands....), but watching my daughter scribble all over it nearly every day makes it worth every minute! Building the dress-up center and cubbies took almost no time at all - but it took me over a month to get them finished (sanded, painted and poly'd). Thanks again Ana for the great plans and all your hard work!

Estimated Time Investment
Week Long Project (20 Hours or More)
Finish Used
The lavender color is oops paint; the white on the cubbies is Benjamin Moore that we used as trim for other rooms in the house.
Recommended Skill Level
Beginner

Farmhouse Dog Bed

Submitted by StacieM on Mon, 08/15/2011 - 10:26

So I finally finished the dog bed I've been working on for over a month now (I've been trying to avoid the 100+ Texas heat but it just wouldn't go away!) It was based on dmanar33's farmhouse dog bed (linked below) and I just made it larger for our greyhound, Daisy. It's far from perfect but it's been another good learning project for me while practicing before I start our desperately needed King bed.

The bed was made using 2x8 for the internal structure (with one 2x4 center "slat"), 1x6 and 1x8 boards for the surround, with 1x2 as trim and 3/4" plywood for the cushion base. It is rather heavy but can easily be moved with two people. This was my first project using my finish nailer ($16 at Harbor Freight) and it was worth every penny! I can't believe I never picked one up before.

For the cushion I tried to find a cheap, thin 3" futon mattress on Craigslist to cut up (as I've done before), but after 2 days of looking online I ended up settling for a $12 full size foam mattress topper from wally world. I folded it in half and wrapped with some thick batting I had laying around so the cushion ended up ~2" thick. And for the cover I used Ana's doll mattress tutorial with some wally world Chino Cotton curtains for $16 as fabric (thick, durable, cotton and cheaper than anything I could find at the fabric store) and it worked out great! I left one end open to put a zipper into once I pick one up, so right now it is like a large pillow case, but it works just fine.

I'm very happy with the total project and I love that Daisy (~75lbs) won't be breaking it anytime soon. She has plenty of room to stretch out and it looks much nicer than the old lumpy "giant pillow" style dog bed on the floor we had before.

Estimated Cost
~$30 for the wood and ~$30 for the cushion
Estimated Time Investment
Day Project (6-9 Hours)
Finish Used
One coat Sherwin Williams bright white flat (leftover ceiling paint) and one coat Rustoleum gloss white spray paint.
Recommended Skill Level
Beginner

Comments

kelli224

Mon, 08/15/2011 - 10:47

This is so fantastic!! But what I love even more...is that sweet greyhound! We are a greyhound family as well and I think our Breezy girl needs one of these.

juliead18733

Sat, 11/12/2011 - 08:35

You did an amazing job on this and thanks so much for giving detailed info about what you used! I've been toying with the idea of making a bed like this for my Pit Bull but I've been hesitant without knowing what materials would make it structurally sound for a large dog to lay on. Thanks for showing me how to give my big dog some of the pampering that the little dogs get all the time!

tnlscott

Wed, 01/11/2012 - 07:55

I saw the original blog about this bed, but it was quite smaller. I have a great dane that I want to make this bed for, so it's good to see how it looks bigger! I have a baby mattress that I'm going to use, so it'll be pretty big!! Awesome job!!

Rustic X Coffee and End Tables

Really enjoyed building these tables. The plans are great and easy to follow! I aged the wood before staining it, then finished them with 3 coats of poly! Best thing is my wife loves her new “Pottery Barn” like tables!

Estimated Cost
$250 for coffee table and 2 end tables
Estimated Time Investment
Weekend Project (10-20 Hours)
Recommended Skill Level
Beginner

Step Stool for Niece

Submitted by Anonymous (not verified) on Sat, 04/15/2023 - 11:58

My niece is turning 6 soon and I built this step stool for her birthday. I used the design for the Simple Step Stool but angled the legs in more because I thought it looked better. To help personalize it, I carved my niece’s name into the front using a v-groove carving tool. I hope this will be a gift she holds onto for many years to come.

Comments