Community Brag Posts

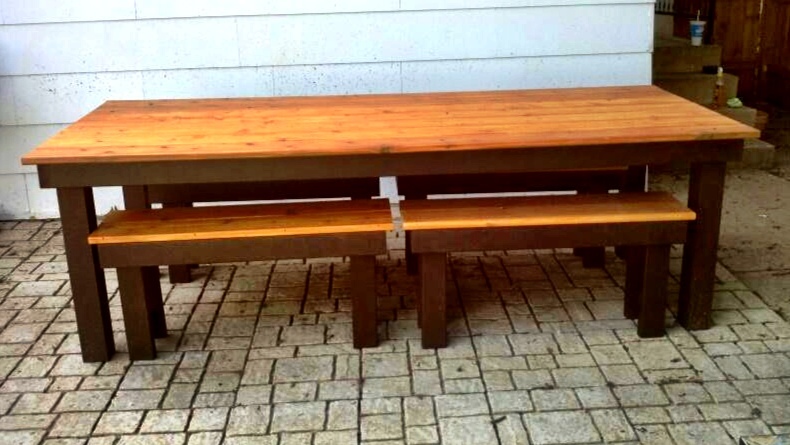
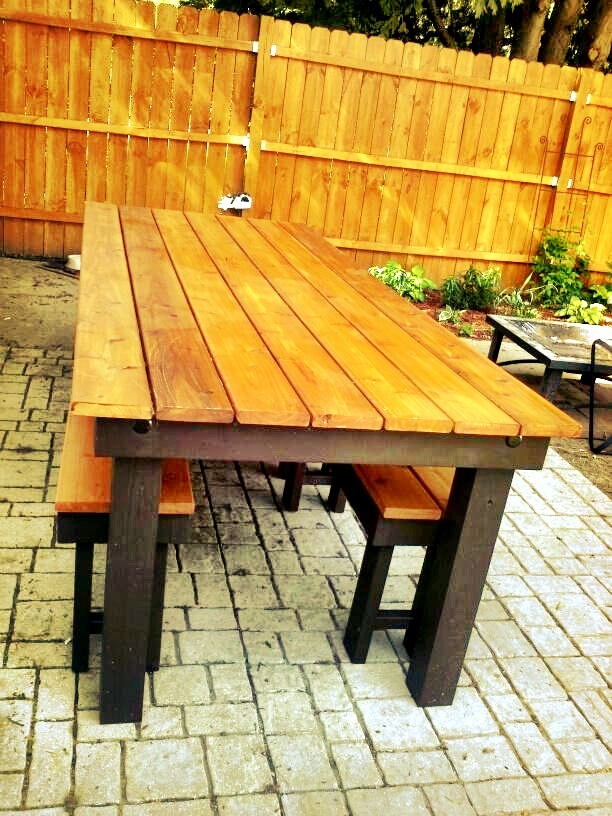
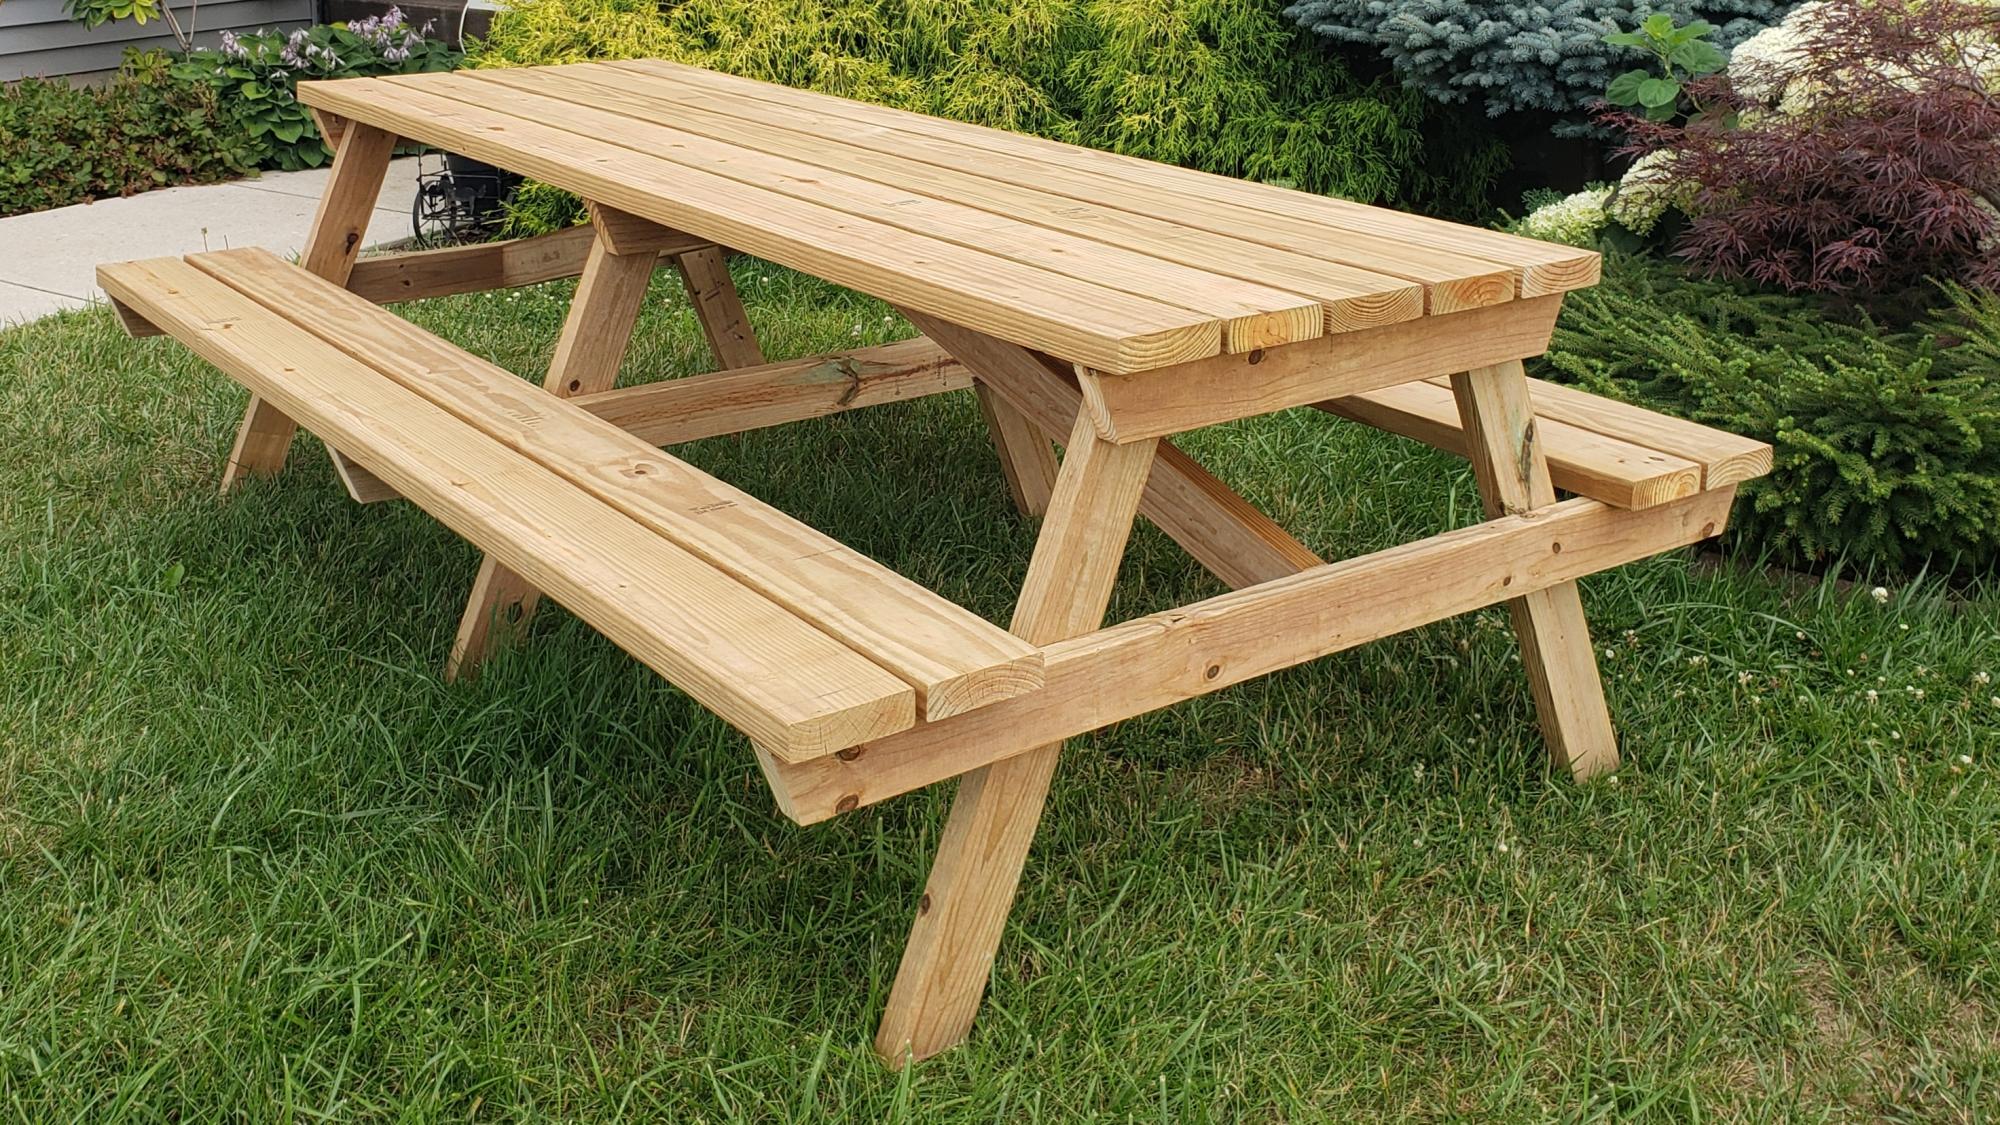
Modified rustic table and benches

Submitted by dkarinen on Sun, 06/16/2013 - 21:09

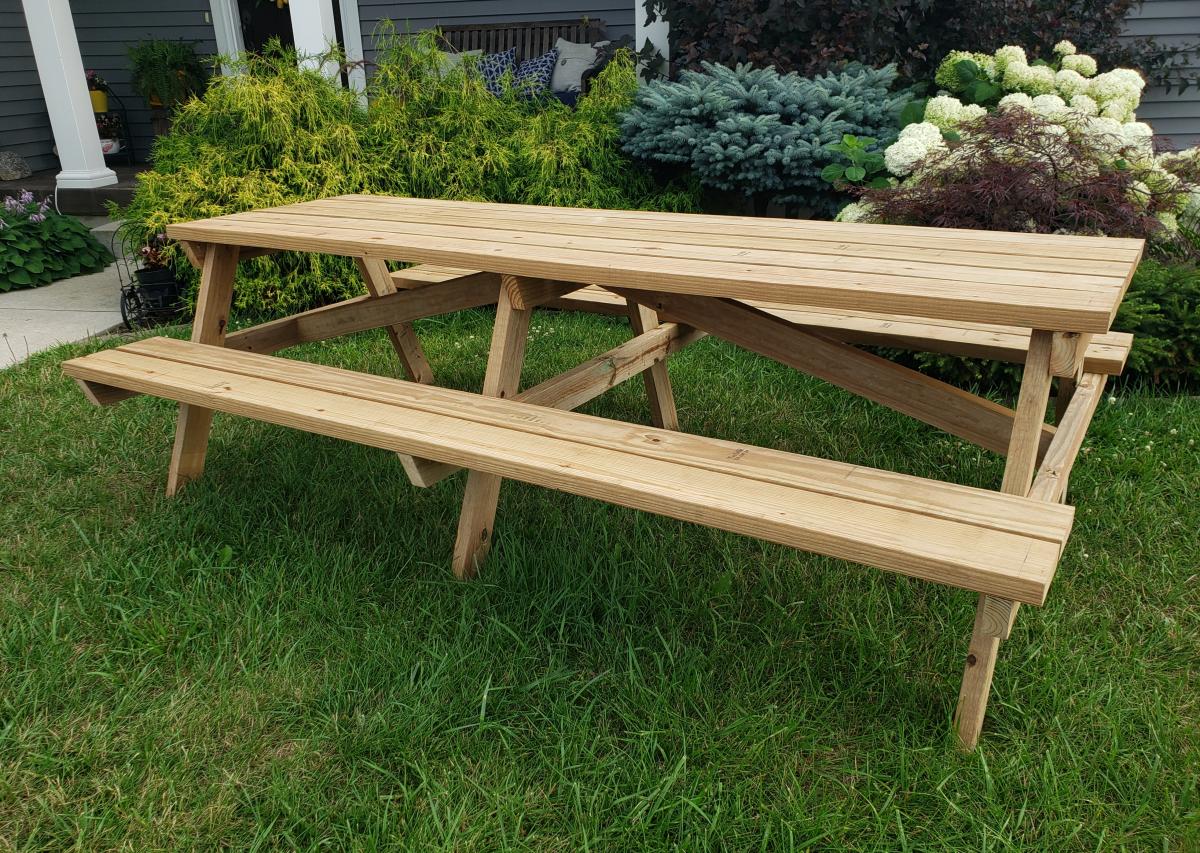
We built this table for my brother and new wife's wedding present. We modified it to use as an outdoor dining set. Instead of using the 1x10 for the tabletop we used 2x6's and for the legs we used 4x4's. We attached the top boards with a Camo fastening system we used last year on our deck (works great to conceal the screws). I stained the frame in Behr Cordovan Brown and the top boards in Behr Cedar Naturaltone. It was our first attempt at building a table and I think it turned out great, only problem was giving it away!

Built from Plan(s)
Estimated Cost
$300
Estimated Time Investment
Week Long Project (20 Hours or More)
Finish Used
Behr cordovan brown stain and Behr natural cedartone
Recommended Skill Level
Beginner

Comments

storchinsky

Mon, 06/17/2013 - 10:57

Very nice! I'd been considering this plan for my outdoor table, but my husband liked the modern farm table better. Same idea--I am leaving gaps to allow the water to drain. Love the two-tone finish! It's amazing what you can do with plain old 2 x 6s!

Rustic reception desk

Submitted by Markb25 on Tue, 02/08/2022 - 13:21

A friend is opening a new tattoo parlor up and wanted a rustic looking reception desk making up.

Using reclaimed wood wasn't an option so we opted for 25mm t&g boards and randomly cut 1/4 way through it to give the appearance of individual boards. The main carcas is made with 2x4's clad with Baltic birch ply to give it a cleaner appearance from behind and, to give additional surface area to attach the boards to.

To finish inised a combination of forced aging with a solution of WWV, iron sulphate and black tea + coffee, varying degrees of Charing, the walnut and oak stains were by V33 and the whites and greys by French chic.

Comments

Fireplace with recessed TV mount

Submitted by medicscott on Thu, 02/16/2023 - 07:46

This is a very custom fireplace that I built for my wife as a 40th wedding anniversary gift. It is built around a Samsung 55” Frame TV and a Vivo motorized mount. The motorized mount allows the TV to be lowered to a better viewing height than the standard above mantle position which is usually too high for comfortable viewing.

In order to maintain the flush mount effect with the TV in art mode, I recessed the mount into the fireplace. That required building a “back” frame for the TV mount then the outer frame for the surround. I covered the outer frame with ½” OSB then ship lap. The mantle and hearth is made from Poplar with walnut stain and Polyurethane satin top coat. The hearth opens for storage.

This was sourced from several different plan sets with a lot of customization and input from the Technical Support Staff at Vizo-US.

Comments

Ana White

Thu, 02/16/2023 - 09:46

Happy Anniversary!
This is a beautiful, well thought out project.
I was hoping someone would do the recessed mount, and you nailed it! It's so much better with the tv flush like yours.
Also love the motorized mount.
Thank you very much for sharing photos.
Ana

One arm 2x4 outdoor sofa

Submitted by Anonymous (not verified) on Thu, 05/18/2023 - 08:10

This was so super easy. We are so in love with this. Thank you Ana for making DIY so much fun!

Comments

compartment depot bookshelf

Submitted by boutzak on Sun, 12/15/2013 - 15:01

This is my first serious project that I dedicated to my wife so she can arrange her many books and personal things. I used the undercover jig from wolfcraft (same as kreg jig).

Built from Plan(s)
Estimated Time Investment
Week Long Project (20 Hours or More)
Finish Used
white satin paint
Recommended Skill Level
Intermediate

Shoe Rack Bench

This was my very first woodworking project. I definitely made some mistakes but nothing major, and I learned! This was really fun and straightforward. I’m very happy with the results. Plus it’s a very solid piece. It took me awhile because of the dry times for the stain and finish. Everything else was pretty quick, though. 
When staining, I just covered one side at a time and quickly wiped it away to get a more rustic look.

Built from Plan(s)
Estimated Cost
$35
Estimated Time Investment
Week Long Project (20 Hours or More)
Finish Used
Minwax Wood Finish - Penetrating Stain - Ebony 2718 - Apply and wipe away within a minute for the rustic look
Minwax Fast-Drying Polyurethane- Clear Satin - 2 coats
Recommended Skill Level
Beginner

Garden bed with folding screens

Submitted by Kate_14 on Wed, 05/27/2020 - 09:39

I added folding screens to my garden bed to prevent my dog to go in it. It can also discourage hares, cats and other animals. The folding screens make it easy to work in your garden.

Estimated Time Investment
Day Project (6-9 Hours)
Finish Used
None
Recommended Skill Level
Beginner

Princess canopy bed

Submitted by GemmaJ on Fri, 06/27/2014 - 17:55

My first ever furniture making attempt . My 5 year old daughter Delilah really wanted a princess canopy bed and we found the perfect one on this site , thank

Built from Plan(s)
Estimated Cost
$70
Estimated Time Investment
Weekend Project (10-20 Hours)
Finish Used
Paint
Recommended Skill Level
Beginner

Comments

audreyandmicah

Sun, 06/28/2015 - 23:32

The bed turned out great! I just finished the same one for our daughter. I'm having a horrible time finding a fabric canopy. Do you remember where you found yours?

8 Foot Picnic Table

Submitted by milleall on Wed, 07/22/2020 - 12:07

My teenage son and his father took over the bulk of the building duties this time. We chose to use treated lumber as untreated lumber with finish applied doesn't do well in Michigan weather in my experience. We made it more beautiful by using the treated lumber in cedartone. We used pocket holes to attach the top and seats to the supports to make for a smooth appearance. This is one large and heavy table! The plans were accurate and the build was fairly simple, but having many hands made working with the large piece easier.

Built from Plan(s)
Estimated Cost
$150
Estimated Time Investment
Afternoon Project (3-6 Hours)
Finish Used
None
Recommended Skill Level
Intermediate

Comments

Seasonal And Holiday

Dartboard Cabinet

I had a big empty wall in my den/man cave, so I decided to build a dartboard cabinet instead of just hanging a dartboard on the wall. No plans for this, I just made it up as I went. Measured twice, sketched it out and cut as I went.

I use pine 1x4's for the frame and back. 1x3's for the accessory box, 1x2's for the door frame, and poplar strips for the doors and door braces. The darts are held by 6" long 2x2's with holes drilled.

Wood screws, finish nails, and small brads were used to hold everything together.

The chalkboards are simple MDF's cut and sprayed with chalkboard paint. Overlay hinges are used for the doors, and the dartbord is held on with screws from the back so it can be replaced when needed.

The Alabama A is hand-painted.

Estimated Time Investment
Day Project (6-9 Hours)
Finish Used
Minwax Classic Gray with light coats of spray glosscoat.
Recommended Skill Level
Beginner

Outdoor side table

Keeping budget with wood projects, made side table for outdoor fire pit area.

Estimated Cost
$25
Estimated Time Investment
An Hour or Two (0-2 Hours)
Finish Used
Legs and braces=rosewood stain
Top=honey pine
Recommended Skill Level
Starter Project

A-Frame Chicken Coop - Easy to Clean

Submitted by Anonymous (not verified) on Mon, 04/24/2017 - 14:25

Thanks for the free plans. I did have to make modifications for the doors. i hid the hinges to give it a clean look. i used cedar for the trim and Plywood Siding Panel T1-11 4 IN OC (Common: 19/32 in. x 4 ft. x 8 ft.; Actual: 0.563 in. x 48 in. x 96 in.) for the doors.  i used a metal flashing for the roof so it will vent.

Built from Plan(s)
Estimated Cost
$250
Estimated Time Investment
Week Long Project (20 Hours or More)
Finish Used
BEHR Transparent waterproofing finish (Cedar Natural Tone) NO 501
Recommended Skill Level
Intermediate
Seasonal And Holiday

Works great for a Great Dane!

Submitted by Anonymous (not verified) on Wed, 06/28/2017 - 12:52

This was a really fun project! We increased the leg height to 16" to work better for our Great Dane. Also, there's a typo in the "to buy" list. It says you should buy 1X2 @30.5" but they really mean a 1X3 since they refer to a 1X3 the rest of the time. It still works with a 1X2, but we used 3 pocket drilled holes instead of the 5 they suggested. 

Estimated Cost
$50
Estimated Time Investment
Afternoon Project (3-6 Hours)
Recommended Skill Level
Beginner

Cat Tree/Condo

Submitted by Joni on Sat, 05/11/2013 - 07:22

I always wanted a cabin-type cat tree where my cats could crawl in and feel safe, but still have a great view of the birds out of a window. I tried to draw my vision on paper, but that had a hideous result. Learning Google SketchUp (at least the basics) was an absolute necessity. I could never have built this without drawing it in 3D first, and seeing how the boards would connect, etc.

For the scratch pad, I built a frame out of 2x4s on top of plywood, covered it with carpet, and dropped the standard size scratch pad in place. This is the cat's favorite feature. I put barn doors on the window with tiny hinges so that I can close for added privacy. The tree sits against a window so that the back side is totally open. I made cozy zippered cushions for the platforms (that can be taken off and washed). I covered the carpeted areas with spare carpeting.

Estimated Cost
Approx. $30 for can of paint, varnish and a 4x4 (all other was scrap material)
Estimated Time Investment
Weekend Project (10-20 Hours)
Finish Used
Combination of Minwax Water-based stains: 6 parts Colonial Pine: 1 part American Walnut, followed 3-4 coats Minwax Polycrylic
Recommended Skill Level
Intermediate

Comments

bhoppy

Fri, 07/12/2013 - 09:36

Would you mind sharing your dimensions for this? It is absolutely beautiful!

Jodi W

Sun, 08/25/2013 - 08:10

Do you have the plans somewhere? I really want to build this (even got the okay from the hubby!) but I don't think I could do it without some serious guidelines...

Joni

Fri, 08/30/2013 - 15:55

First, sorry for the late notice; I just happened to look and saw the comments/questions.

I don't have plans...all I have is a google sketchup diagram that I created as a guideline for my construction (which is included in the photos), which is not to scale. Actual measurements are:

* Base (green carpeted base): 33.5" x 19"
* 4x4 legs: 35" tall
* 'Mezzanine' scratch pad level: 22" x 17.5"
* Mid-level base: 18" x 32"
* Enclosed cabin: 18.25" x 22.5" x 17" high
* Highest point: 56"

This has turned out to be a fantastic hit with the cats. They use all 5 levels, but the scratch pad and cabin are their favorite spots. If you need anything else or additional pics, please contact me.

Jodi W

Fri, 08/30/2013 - 18:15

Thanks for the dimensions, Joni! I'm trying to learn SketchUp so I can draw up my own plans, also. If I can't figure it out, I'll hand it off to my 12 year old, who is a pro at it (go figure). I know my cats will love it if I can manage to get it built!

Joni

Thu, 10/31/2013 - 14:30

Bhoppy -- I looked at your cat tree on facebook. It's awesome! The sturdiness of it shocked me too. And I was initially worried that my cats might knock it down!!

The worst part of building it was getting that lower scratch pad level on straight with the 3 posts. I'd never want to do that again!
Thanks for sharing, Joni

gregmasciola

Fri, 01/02/2015 - 01:18

Funny, almost every time I'm looking for ideas or inspiration when I want to build something, I end up back on this site. I was searching for pictures of cat trees and this was the only one that made me say "Holy crap, that's EXACTLY what I want!" My cat will love it!

M0710NM4N

Mon, 04/27/2020 - 20:41

Not sure if anyone is still around to see this, but I fell in love with this tree the second I saw it. Wondering if anyone created a detailed plan and might have it handy or possibly a detailed sketchup and wouldn't mind sharing the save file?

In the event nobody has either... I'm planning on having someone else build this for me as I don't have the tools nor skill to do it myself. I have a few questions:

1. The tree base/platform, what's a good recommended thickness?
2. The platform for the scratchpad... is there any certain reason it's so much thicker compared to the other platforms?

Thanks.

whiteroses9

Sun, 09/12/2021 - 11:51

Reverse engineering this project, using just 2x4s. None of the photos show the undersides. How are the plywood pillow bases attached for the top and bottom of the cabin? and the base of the top viewing platform?

4x4 Truss beam table and bench

Submitted by Anonymous (not verified) on Mon, 10/04/2021 - 13:42

The plans were very easy to follow for non avid woodworkers. We decided to upholster the seat on the bench.

Built from Plan(s)

Comments

Greenhouse

Submitted by Anonymous (not verified) on Sun, 01/02/2022 - 12:30

Built the greenhouse from Ana Whites plan
She did the plan really well..

Built from Plan(s)

Comments

Recycle/garbage center

Submitted by YeenYus on Wed, 07/24/2013 - 08:50

We just moved in to a newly built house, so it was important for everything to have a place. I don't like the garbage can to be under the sink, and my wife doesn't like the can just out on the floor...too many missed hook shots with the coffee filters I guess! This cabinet solves many kitchen problems all at once. An attractive cabinet that hides garbage and recycle, yet is easy to get in and out of. The railroad spike handles are something we sell on Etsy, as well as knobs and shelves. The shop name is YeenYus.

Estimated Time Investment
Weekend Project (10-20 Hours)
Finish Used
Stain, paint
Recommended Skill Level
Intermediate

Comments

Ecspronk

Wed, 07/24/2013 - 20:44

I was wondering if you had a price estimate on how much the supplies cost you along with some measurements. I am looking to build a double one like this. More details would be awesome. Thank you

In reply to by Ecspronk

YeenYus

Wed, 07/24/2013 - 21:15

Yeah, I kind of built this on the run with nothing but the space it had to fit into. But it is 34" wide 32" deep and 24" high. I needed it to fit under the window and used the Home Depot garbage bins as the starting point.

I build a lot of stuff...and this was a tough one. The frame is 2x4's with pine facing and bead board. 4 hinges, stain and paint...less than $100.

I'd love to work with you on this if you want. The hard part was engineering the bins falling forward equally and not binding up. The back of the bin actually hits the counter top perfectly now. But you can see that I had to put an extra 1" under the top for it to hit something.

It' gonna take some work but this thing looks and works so smoothly. You can do it...I can help!

momaimp

Thu, 05/08/2014 - 06:07

Would you be able to post a sketch of this project? I assume there are three boxes - the main cabinet and the two tilt-out boxes, but I would appreciate seeing a breakdown of the parts. Thanks!

momaimp

Thu, 05/08/2014 - 06:07

Would you be able to post a sketch of this project? I assume there are three boxes - the main cabinet and the two tilt-out boxes, but I would appreciate seeing a breakdown of the parts. Thanks!

Jsanderson

Wed, 09/23/2015 - 06:32

Is there a way I can get plans for this? I tried to sign up on site but can't locate

American Girl Dollhouse with Crawlspace

Submitted by Anonymous (not verified) on Wed, 12/28/2022 - 13:20

We had a lot of fun building this. We made the bottom floor 1/2 the size so she can use it as a storage (aka crawlspace). I also followed another posts idea of using 4 inch tongue and groove pattern board (beadboard) for the roof.

Comments

Lean-To Shed

Submitted by Anonymous (not verified) on Fri, 03/24/2023 - 13:17

I’m a first year teacher of construction class at Waterloo High School in Illinois. We recently used your Small Cedar shed instructions with some modifications for a class project. It’s a bear getting cedar right now, so we used T1-11 for the outside and 2x4 for the frame.

Built from Plan(s)

Comments

Easy to Build Workbench

Submitted by Anonymous (not verified) on Thu, 08/17/2023 - 13:40

Easy to build workbench. I added an extra 2 1/2 inches (width) to the top plywood cut. This gave me a 1 1/4" lip to the front and back sides. I wanted to be able to clamp on all sides of the bench. Also added casters since I wanted to use this as an outdoor table for entertaining if needed and to simply have mobility with the bench. So far I love it!