Community Brag Posts

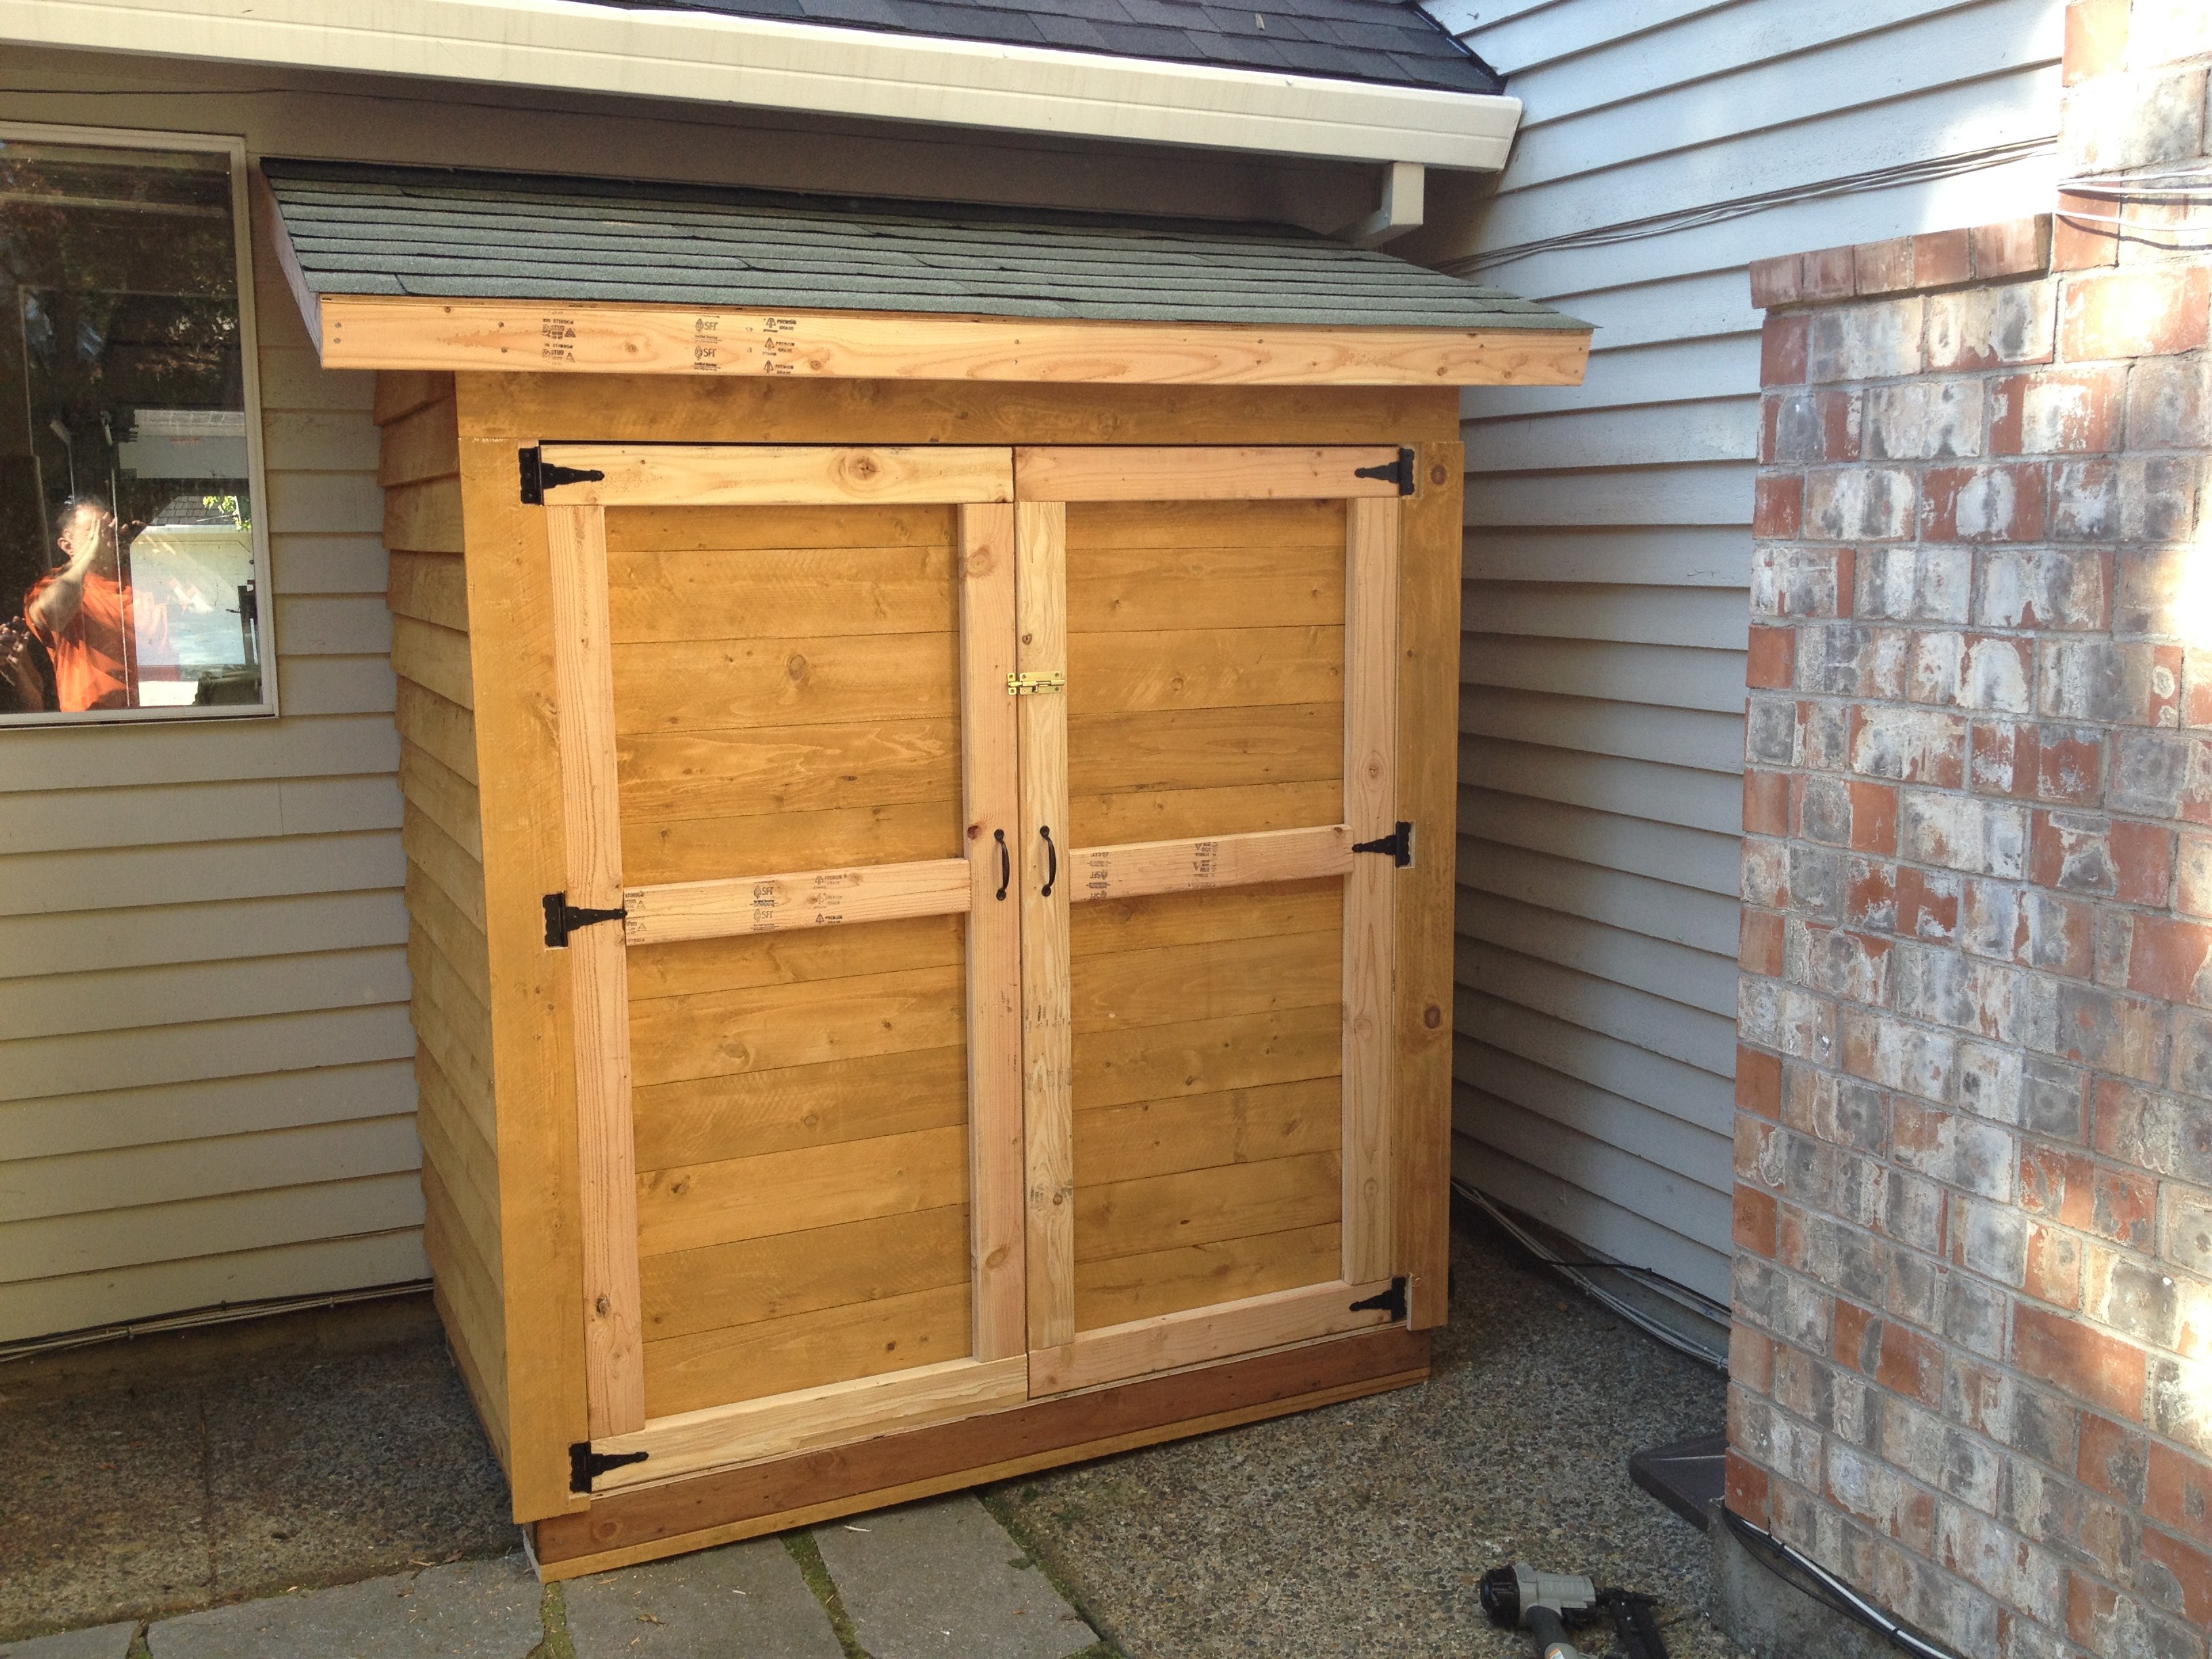
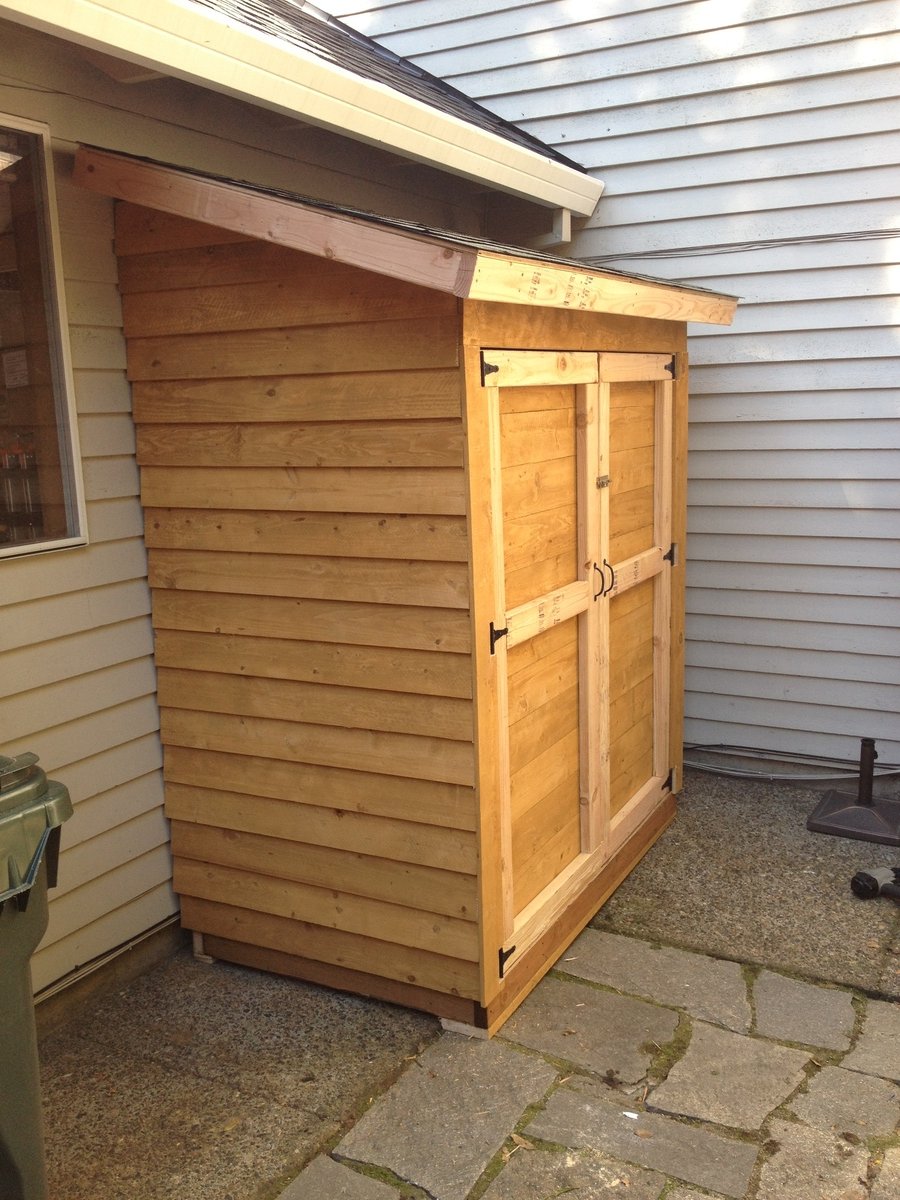
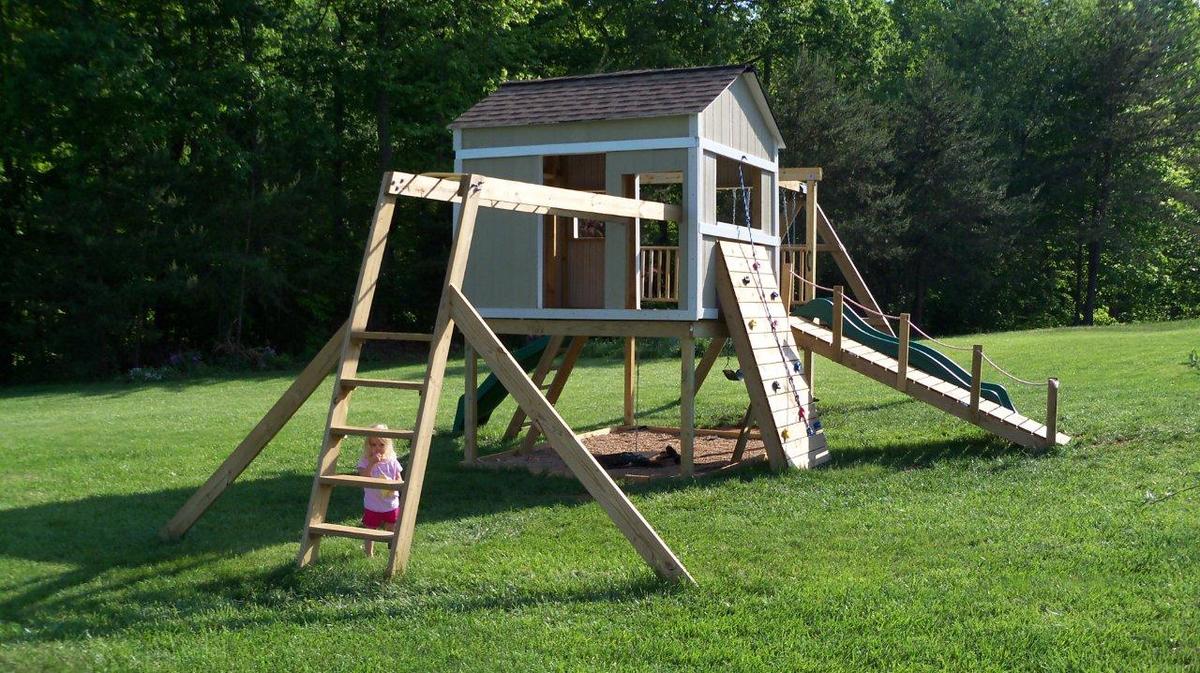
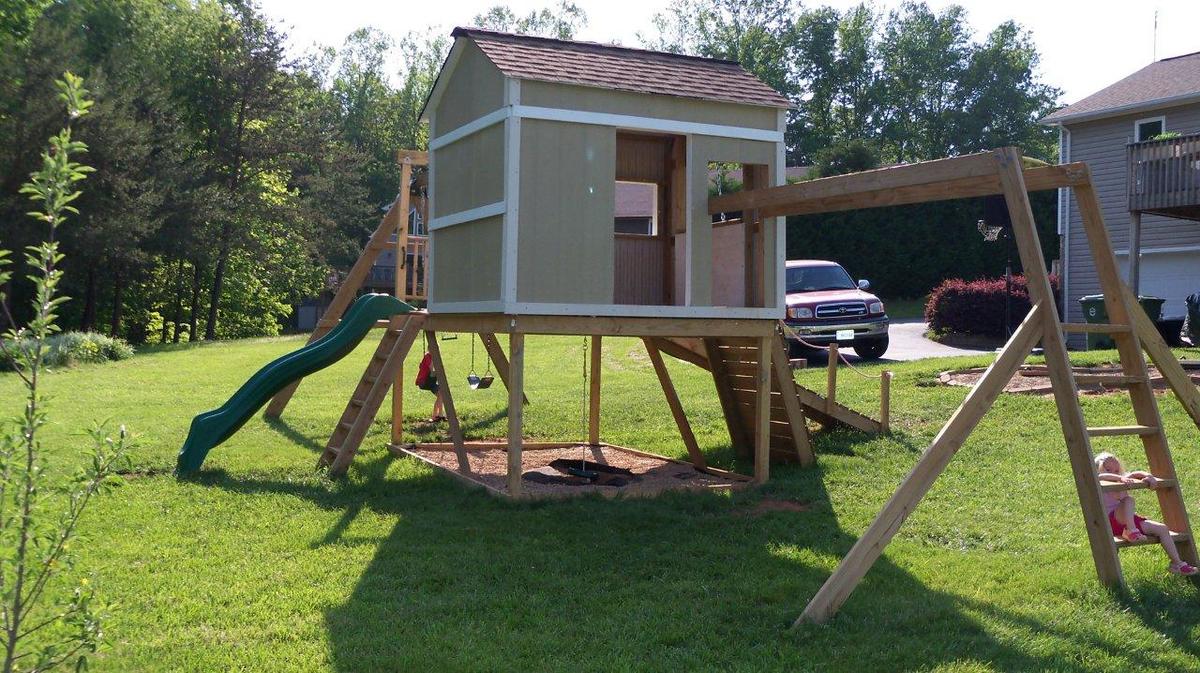
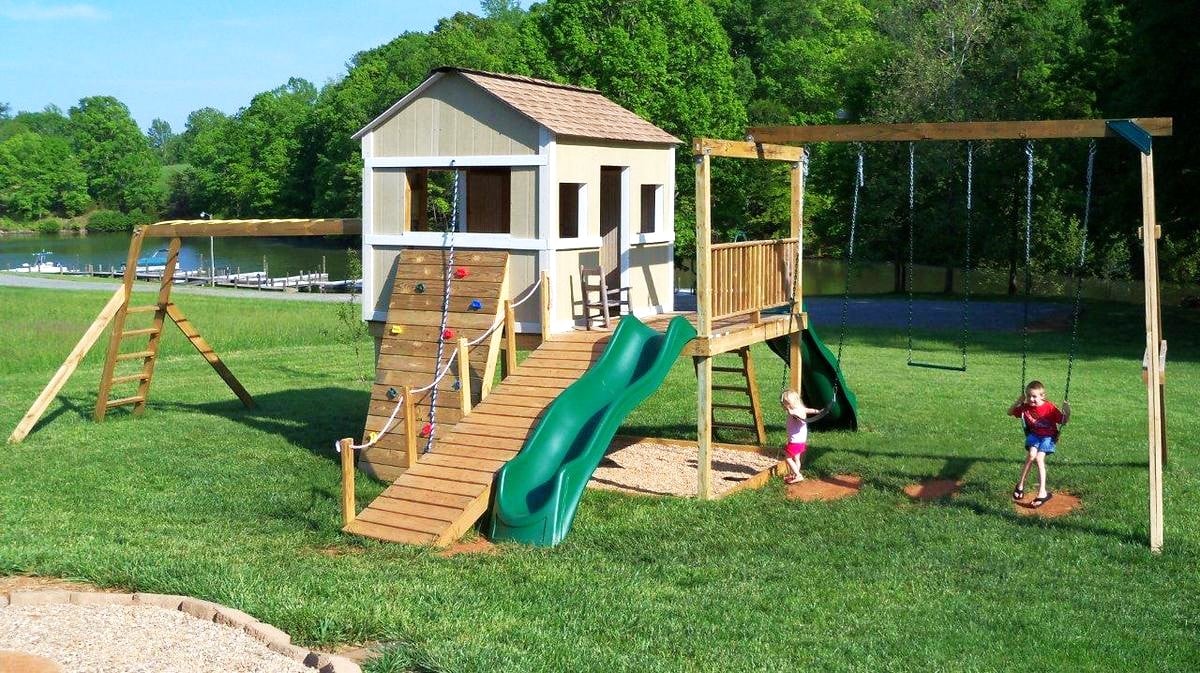
Clubhouse based on Ana's Plan

Submitted by MattSl on Tue, 05/03/2011 - 09:18

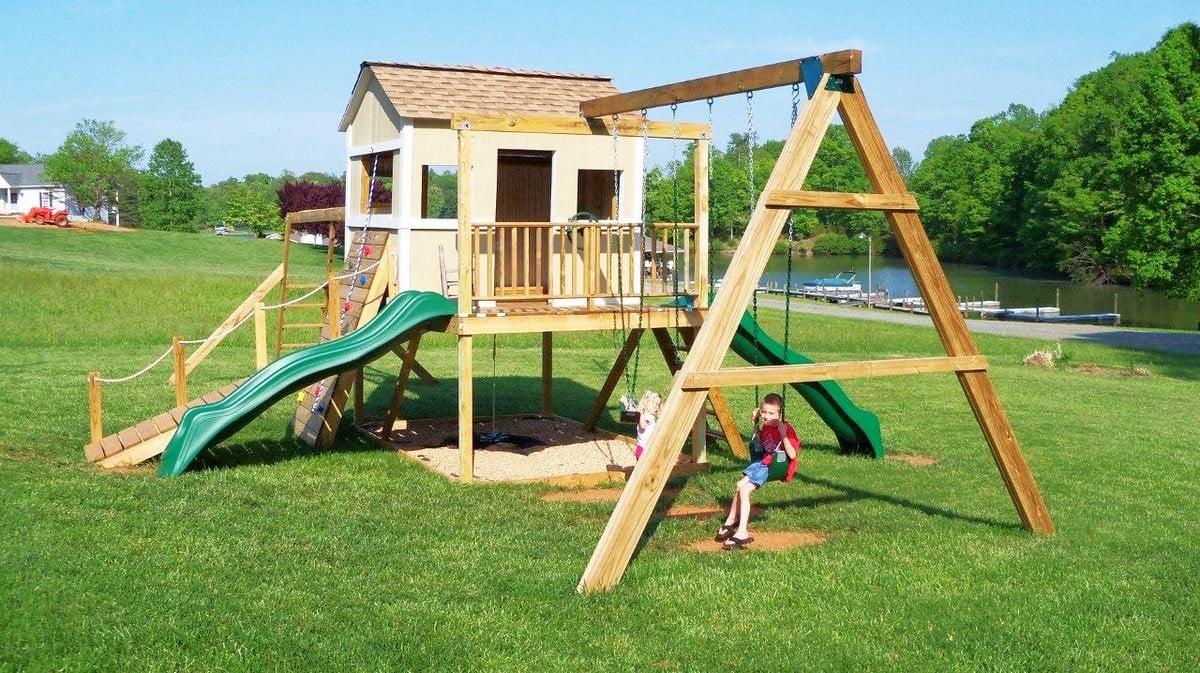
I used Ana's plan as a base.

I changed it from 8x8 to 8x12, made the 4x4x8's to 4x4x10' for a higher main platform and swing platform, and added a 12' long monkey bar set to the other side. Also, an 8' climbing wall and a plank walkway to accompany the two slides.

For the clubhouse, I used Hardiplank 4x8 sheets for the siding and an EZ-Framer kit for the structure itself.

The slides I purchased from Lowes, monkey bars from Amazon, and the swing frame braces from Amazon as well. The swing kits I got from ebay.

Estimated Cost
1500
Estimated Time Investment
Week Long Project (20 Hours or More)
Recommended Skill Level
Intermediate
Seasonal And Holiday

Cedar Boxes

Submitted by drowland on Sat, 07/09/2011 - 07:18

We built these before we saw these plans, but they are pretty much the same... We added the chicken wire to keep the rabbits (and our dog) out of the garden. We added the owl to keep the birds out. We've gotten a ton of tomatoes, onions, and bell peppers so far. Next year, we'll add a few more beds. We also added the verticle garden to take up less space, but its not deep enough. We'll make the next one deeper.

Estimated Cost
$30
Estimated Time Investment
An Hour or Two (0-2 Hours)
Finish Used
none
Recommended Skill Level
Starter Project

Comments

KatieO (not verified)

Sat, 07/09/2011 - 20:11

Wow! LOVE IT! I love the taller posts so you can incorporate the chicken wire! I SOOOO needed to do something like that this year. Also, the vertical garden boxes are BRILLIANT! LOVE IT!

drowland

Thu, 11/17/2011 - 07:59

We ended up getting a ton of tomoatoes and green peppers from the garden boxes. We've actually built a couple more. We'll probably double again before next spring. We're looking at adding more veggies.

We now have ton of stuff planted for the fall...

Guest (not verified)

Tue, 03/13/2012 - 10:46

How did you build the upright planter boxes? Do you mind explaining the building process/design? I really want to plant this in my yard!

colton's mom (not verified)

Tue, 04/03/2012 - 06:19

i love the vertical boxes. I am just trying my hand at the world with a green thumb and could use as much advice as possible about how to make as well as to line the boxes or not to line them. All advice appreciated!

berman (not verified)

Fri, 11/23/2012 - 21:53

Hi, my name is berman. I found you pin from my pinterest and your box garden is so great. I am a newbie in this field and so interested to build garden in my house. If i can ask you some question, could you please to answer that?

cheers,
berman

Seasonal And Holiday

dress up station

Ive made a couple of these dress up stations now, for presents for my daughters friends. I plan to make her one next!
Plenty of room for storing all their fancy dress items :)

Built from Plan(s)
Estimated Time Investment
Weekend Project (10-20 Hours)
Finish Used
wallpaper and paint, rubber lace lining for the shelves, wooden ball feet, decals, mirror, name, hooks
Recommended Skill Level
Intermediate

Small Cedar Fence Picket Storage Shed

Submitted by Pembat on Sun, 10/06/2013 - 20:37

Built this in a weekend, took about 1.5 days. I ended us using 2x4's instead of 2x2's, I think it resulted in a much stronger frame. I also built a base for it to sit on. I got pre-stained cedar fence boards, and overlapped them 1" instead of a 1/2". Pretty easy project, I ended up siding the back on the ground, installing it, and then adding the side walls without the siding (just the framing), and then sided them in place. The doors work perfectly. I took my total inside dimension between walls, made sure the opening was square, and then divided that by two to get the width of each door. I then took another 1/4" off that, so each door had an additional 1/8" gap, it worked perfectly. When I set the doors, I put them on a piece of roofing closed as I screwed in the hinges, and then opened them and removed the roofing. I opted to run the door siding horizontal to use up a bunch of waste wood. I'm happy with the outcome. I also found some 6" self starting lag bolts and lagged through the back of the shed into studs (through the siding) into the garage behind it.

Estimated Time Investment
Weekend Project (10-20 Hours)
Recommended Skill Level
Intermediate

Murphy bed

Submitted by bpcooper14 on Wed, 05/08/2019 - 06:09

So I've always wanted to build a Murphy bed.  And by always I mean since I first came across plans here that made it look so simple.  It ended up taking me a while to do because my job has me working 6 days a week so I was only able to work on it for short chunks of time.

I ended up utilizing a few different plans and mashed them together to build a full size murphy bed.  The shelves are the support legs when the bed is down.  The "hinge" mechanism are heavy duty 360 degree seat swivels.

All-in-all it turned out WAY better than I expected with only some minor issues throughout the construction process.  

Next up is a twin xl Murphy bed with a murphy desk attachment that will serve as a craft  table when up.

Estimated Cost
3 - 4x8 sheets of 3/4" plywood ($25 each)
3 - 1x2x8 to wrap the frame ($2-3 each)
1 pack Door Hinge pins to serve as the pins to hold the bed upright ($3-5)
1 pint stain
1 pint shellac
2 - Heavy Duty 360 degree seat swivels ($20)
Screws/nails/etc.

All told, this project probably cost around $200
Estimated Time Investment
Week Long Project (20 Hours or More)
Recommended Skill Level
Intermediate

Comments

Conversation Set

Submitted by Anonymous (not verified) on Sun, 03/19/2023 - 18:31

My husband built this conversation set during covid. Since then he has built so much stuff for our yard. More pics to follow.

Comments

Rocking horse

Submitted by jerfer on Wed, 01/18/2012 - 19:16

I made this for my daughter based on one her uncle made for her when she was little.

Estimated Time Investment
Day Project (6-9 Hours)
Finish Used
mini-wax Bombay mahogany
Recommended Skill Level
Beginner

Comments

hammertime

Thu, 01/19/2012 - 09:00

What a lovely heirloom gift you've created. So much more meaningful (and much more beautiful) than the plastic toys we see these days.

moldah

Thu, 01/19/2012 - 15:32

This is wonderful! I have been thinking of trying to search for plans for a rocking horse to build for a few family members. Looking at this picture, I really like it!

jerfer

Sat, 01/21/2012 - 19:19

I can give you the rough dimensions if you want. I used yellow pine. It is basically a 2x8x8 and a 2x4x8. The head, seat and rocker rails come from the 2x8. The 2x4 pieces hold it all together in the crossbeams. There is also a 1.25 inch dowel holding the two rocker rails together below the crossbeams. A piece of the same dowel is used for the handles.

Adirondack Chairs with Foot Rest

Submitted by Anonymous (not verified) on Sun, 07/30/2023 - 14:45

Great set of outdoor chairs with foot rest!


RG Design & Build

Comments

Corner TV stand

Submitted by TBarn on Tue, 01/21/2014 - 12:41

After a promise to get a new carpet and TV stand as an anniversary gift, I began a search for a corner stand that would fit a 50" flat screen and hid all of those ugly wires. Craig's List had nothing and the retail options were either cheaply made, ugly or crazy expensive. I stumbled upon Ann's page, and since my son has a wood shop in the basement, I figured why not try to build something. I used the original plan, but borrowed ideas from other brag posts to create a 36" tall model with overlay doors that we think looks great. Next project: bar stools for the kitchen island.

Built from Plan(s)
Estimated Cost
$200
Estimated Time Investment
Weekend Project (10-20 Hours)
Finish Used
Zinder Primer and Gidden (America's Finest) Semi Gloss
Recommended Skill Level
Intermediate

Modified L Shaped Desk

This was my first woodworking project in a couple years. I modified the size to make it about 60" on each side. Now that  I am working from home now due to COVID-19 for the foreseeable future this has been perfect to use in order to have two monitors and enough room on the sides for other work. 

Estimated Cost
70
Recommended Skill Level
Beginner

Comments

Cedar Patio Table w Hidden Coolers

Submitted by Goldy272 on Tue, 04/22/2014 - 08:04

We needed a new patio table for our deck and I loved this design. I made it out of cedar which worked beautifully and made a few small tweaks:

- Needed it longer and wider so added two more 2x4's to the middle and added 2x6 end caps (as another poster had done).
- I did not add the holes to the cooler covers for uniformity, they slide in and out very easily.
- I used 4x4's as the legs and constructed the table skirting around it. This is a very sturdy design.

Built some benches for seating and they worked out great.

Overall I loved this build and it was fairly simple. Stained with Penofin deck stain (red label) and a spar varnish for protection.

Hope you like it!

Estimated Cost
$320
Estimated Time Investment
Weekend Project (10-20 Hours)
Finish Used
Stained with Penofin deck stain (red label) and a spar varnish for protection.
Recommended Skill Level
Beginner

Comments

Goldy272

Thu, 04/24/2014 - 07:43

Thank you! Local lumber yard that had great stuff. I will say though that I had to get some additional pieces from Home Depot and their cedar is fairly nice too. Beware though, they don't have true 1x cedar (at least here in St. Louis) it's more like 1/2 inch think.

coleyld10

Tue, 07/08/2014 - 20:00

Really well done with the two-tone stain. What particular colors of Penofin did you use? I'm working on a similar build and would like to use your color combination.

jmilkeris

Mon, 05/04/2015 - 10:06

Do you happen to have your lumber list? I'm not the greatest with add ons, LOL! If you happen to have a step by step that's even better.
Thanks,
Jennifer

Modern Sectional Sofa

Submitted by reinkense on Fri, 05/30/2014 - 17:22

I looked all around my town for a sofa that meet my needs. I wanted something with tall legs, modern lines and fit my living room. I did not have $3,000 to buy one online so I said to myself why not???


Estimated Cost
$400
Estimated Time Investment
Week Long Project (20 Hours or More)
Recommended Skill Level
Intermediate

Comments

reinkense

Sat, 05/31/2014 - 15:58

Thank you! I am really proud of it. I was thinking of putting together some plans.

Samigdal

Fri, 12/25/2015 - 17:48

Are there step-by-step instructions for building this posted anywhere?

walthoca

Fri, 01/06/2017 - 11:06

I am so impressed. We recently spent a small fortune on a sectional, but yours looks equally beautiful. You are incredibly talented! 

Sliding "barn" door from reclaimed pallet wood

I saw many different sliding door projects online, so I did my own spin on one. I was able to get several old pallets for free (pine and oak). I went to Lowes and bought a few 2x3s which I used as the frame, and the track hardware which was only $13! Most doors I see are mounted from the wall, but since I have 7' ceilings downstairs I mounted mine from the ceiling. This project only took about 4 hours total and cost about $40 when you figure in costs for screws, stain, etc. The most difficult part was taking apart the pallets. Using a reciprocating saw with a 12'' demolition blade is the best way to take them apart. Thanks for the idea Ana.

Estimated Cost
$40
Estimated Time Investment
Afternoon Project (3-6 Hours)
Finish Used
Minwax Dark Walnut
Recommended Skill Level
Beginner

Comments

BREATHESMILEBE

Mon, 05/13/2013 - 20:00

Hi!!
This looks so awesome! I came across this and was hoping to repeat it. You mention that you found the door hanging hardware at Lowes for $13. I can't seem to find it. Do you happen to remember the name of it? I'm entering "hanging door hardware" into Lowes and Home Depot and can't seem to find any hanging door hardware at all. I'd appreciate the help. Thanks!
Tina

Gate-Leg Sewing Table

My husband and I built this table as our first project. We followed all of the dimensions from Ana's "Small Sewing Table" project here: http://ana-white.com/2010/10/plans/sewing-table-small-spaces?page=1 The only thing we changed was the size of the table top and the legs. We were worried about putting my heavy sewing machine on top of the leaf called for in the plan, so we created gate legs to support the leaves. Since the legs were going to be folded up in between the base and each leaf, we extended the center portion of the table top to accommodate the change. After it was assembled and stained, I decided that I didn't like the solid color, so I stenciled on a pattern with white latex enamel paint (what I had on hand) and continued to paint the base. After lightly scuffing it up with the sander, I layered 3 coats of poly on top. It has held up well, even after many large quilt projects! I just LOVE my sewing table!

Built from Plan(s)
Estimated Cost
$120
Estimated Time Investment
Weekend Project (10-20 Hours)
Finish Used
Golden Oak Minwax Stain
Polycrilic
Valspa Latex Enamel in Satin White
Recommended Skill Level
Beginner

Comments

TinyHouser

Fri, 08/05/2016 - 13:41

Hi there. Could you please tell me what the brackets are you used with the gateleg? Do you remember where you got them? Thank you!!!

Project Complete!

Here is my patio sectional made of 2x4s. Used my Kreg Jig for the first time to complete this project. I used pocket holes in as many places as possible, then finished it with two coats of leftover fence stain and two coats of semi-gloss outdoor Varathane spar urethane for a nice sheen. I modified the dimensions to fit the cushions that my wife purchased before I began the project. I made the back substantially taller to support the cushions and left the arms off of both ends of the sectional so people could sit facing sideways too. I left the corner of the sectional without a cushion so people would have a place to set drinks.

Estimated Time Investment
Afternoon Project (3-6 Hours)
Finish Used
Two coats of Behr transperent weatherproofing all in one wood finish stain in "chocolate" (leftover from our fence) and two coats clear semi-gloss outdoor varathane spar urethane.
Recommended Skill Level
Beginner
Seasonal And Holiday

Book Ledges

These ledges are incredibly versatile and will easily grow with any child.  Books for the younger ones and then a gallery wall for when they grow.  They are so easy to build that literally, a child can do it, as you can see.  This was her first build that she completed by herself.  After the boards were cut of course.  Thanks Ana, this is a great plan and it was an AWESOME  day for the girls!

Built from Plan(s)
Estimated Cost
$25
Estimated Time Investment
An Hour or Two (0-2 Hours)
Finish Used
sanded and painted white.
Recommended Skill Level
Starter Project

Double Inset Bookshelf Doors

Submitted by dholubar on Wed, 08/21/2013 - 07:08

You made this project look so simple that I just had to try it. However, to suit my needs I had to make a few alterations to the plans. I had a set of bi-fold doors that were in need of replacement and I thought inset bookshelf doors would be the perfect way to replace them. This project was easy enough for me to do it myself and I am really new to the DIY game but I did have some help. I really love the way they turned out. You can read all about my my adventure at http://heresalittletmi.blogspot.com/2013/08/bookshelf-doors.html

Built from Plan(s)
Estimated Cost
$120.00
Recommended Skill Level
Beginner

Guest Room Farmhouse Bed with planked wall

Submitted by The Allens on Sat, 11/02/2013 - 15:05

We loved the first farmhouse bed we built so much, that we decided to build another one for our guest bed. We loved the red paint, and weren't too sure how to accent it, so we went with a planked feature wall. Just need to build some night stands and hang some pictures and our guest room should be complete!

Built from Plan(s)
Estimated Cost
$150
Estimated Time Investment
Weekend Project (10-20 Hours)
Finish Used
We primed and then painted 3 coats of red paint, I think California Poppy BEHR paint. Then I used a glaze, that I tinted with black paint, brushed it on and then wiped off with a damp rag. Finished it off with Minwax Polyurathene semi gloss clear coat.
Recommended Skill Level
Starter Project

Comments

JoanneS

Sat, 11/02/2013 - 18:16

Awesome project! Love the bed and red finish, and the plank wall is brilliant! Love it!

The Allens

Sun, 11/03/2013 - 19:22

We didn't have any old distressed wood, so we bought pine tongue and groove from the hardware store and stained them ourselves. Then we just used a nail gun to attach them to the studs on the wall. It was surprisingly easy to do, just a bit time consuming. And nerve wrecking, we figured it would look either really good, or just awful! W are very pleased with how it turned out!

Back Yard

Submitted by Anonymous (not verified) on Mon, 05/15/2023 - 08:32

This is my homemade backyard inspired by plans from Ana. Used Ana's previous post to build all pieces. Stained in Mission Oak and bought pillows from Lowe's. Succulents from a local nursery.

Coffee Table
2 piece lounge
2 chairs
Ice chest
Planter Box

Comments

Bunk Bed

Submitted by hoffer5353 on Wed, 02/08/2012 - 14:04

I am very happy to have completed the up portion of the bunk bed. The full size down was done quite sometime ago and I became sidetracked on other projects.
This is a sturdy bed and a favorite in my home. One day I even found my husband napping (hiding) on the top bunk.
The part that I like the best is when we graduate from bunk beds we still have two beds to use.
I also completed the ladder and it works, but I cut it just alittle shorter than the plan called for. Lets just put another on my to do list.

Estimated Cost
100-200
Estimated Time Investment
Week Long Project (20 Hours or More)
Finish Used
minwax, red oak stain. Minwax Poly
Recommended Skill Level
Beginner

Comments

hoffer5353

Sat, 02/11/2012 - 14:37

It was surprisingly more easy that I expected. It helped me stay motivated to finish both beds.

Back