Community Brag Posts

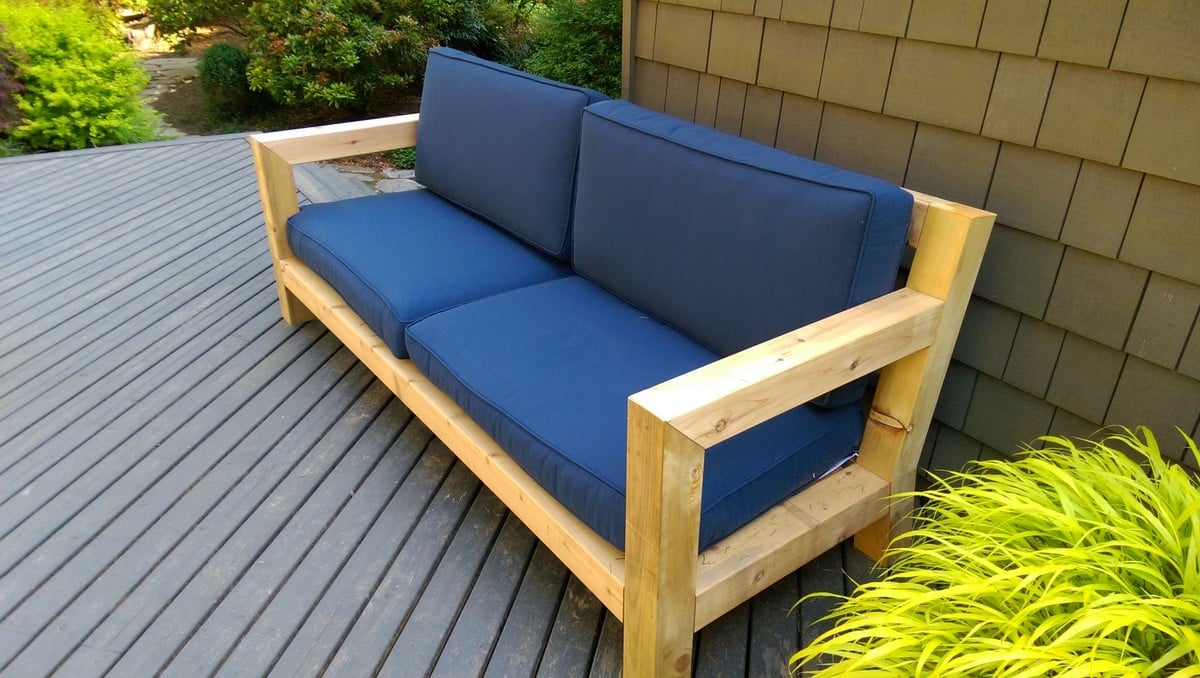
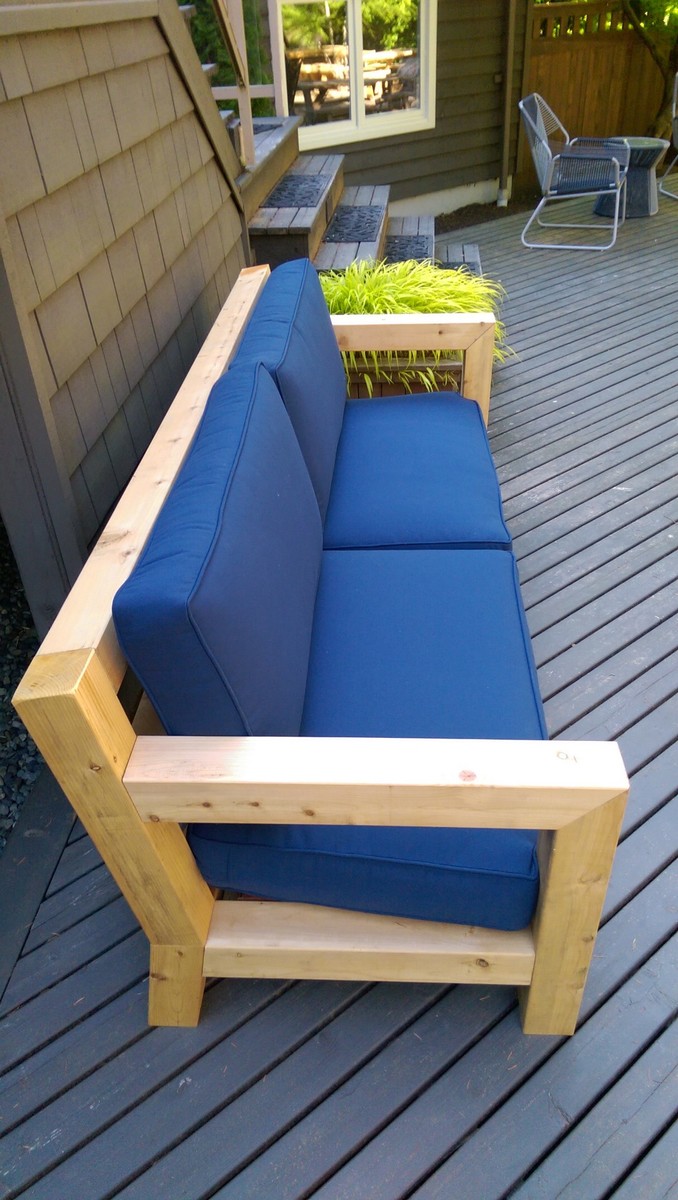
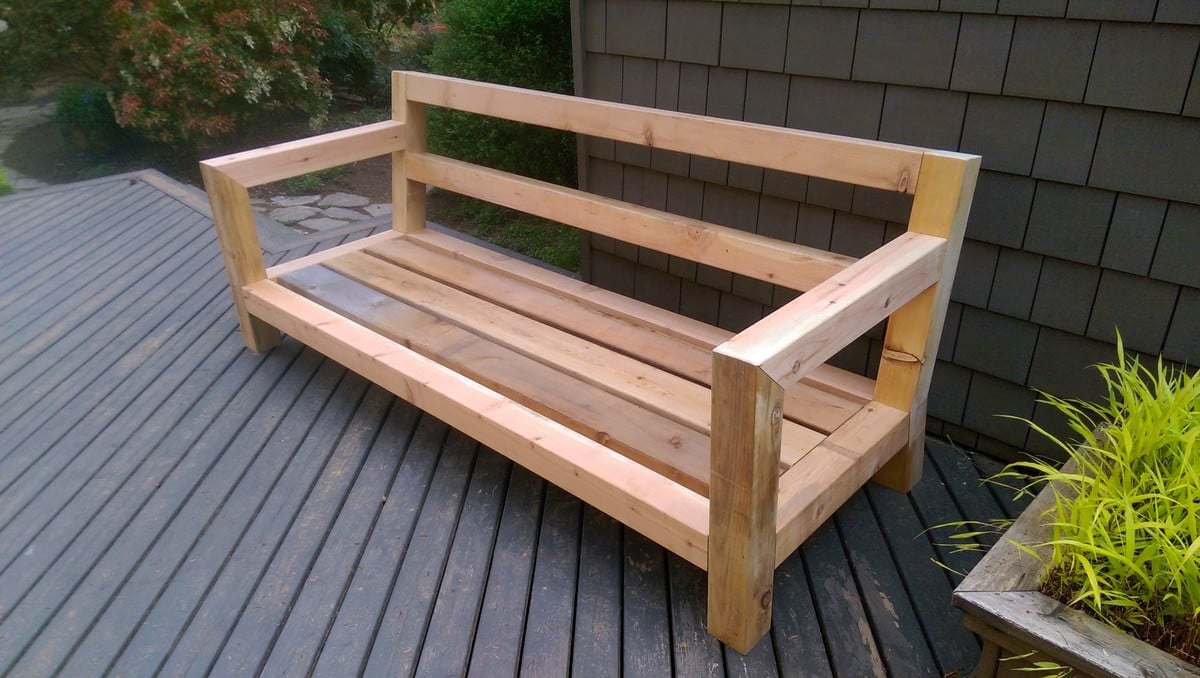
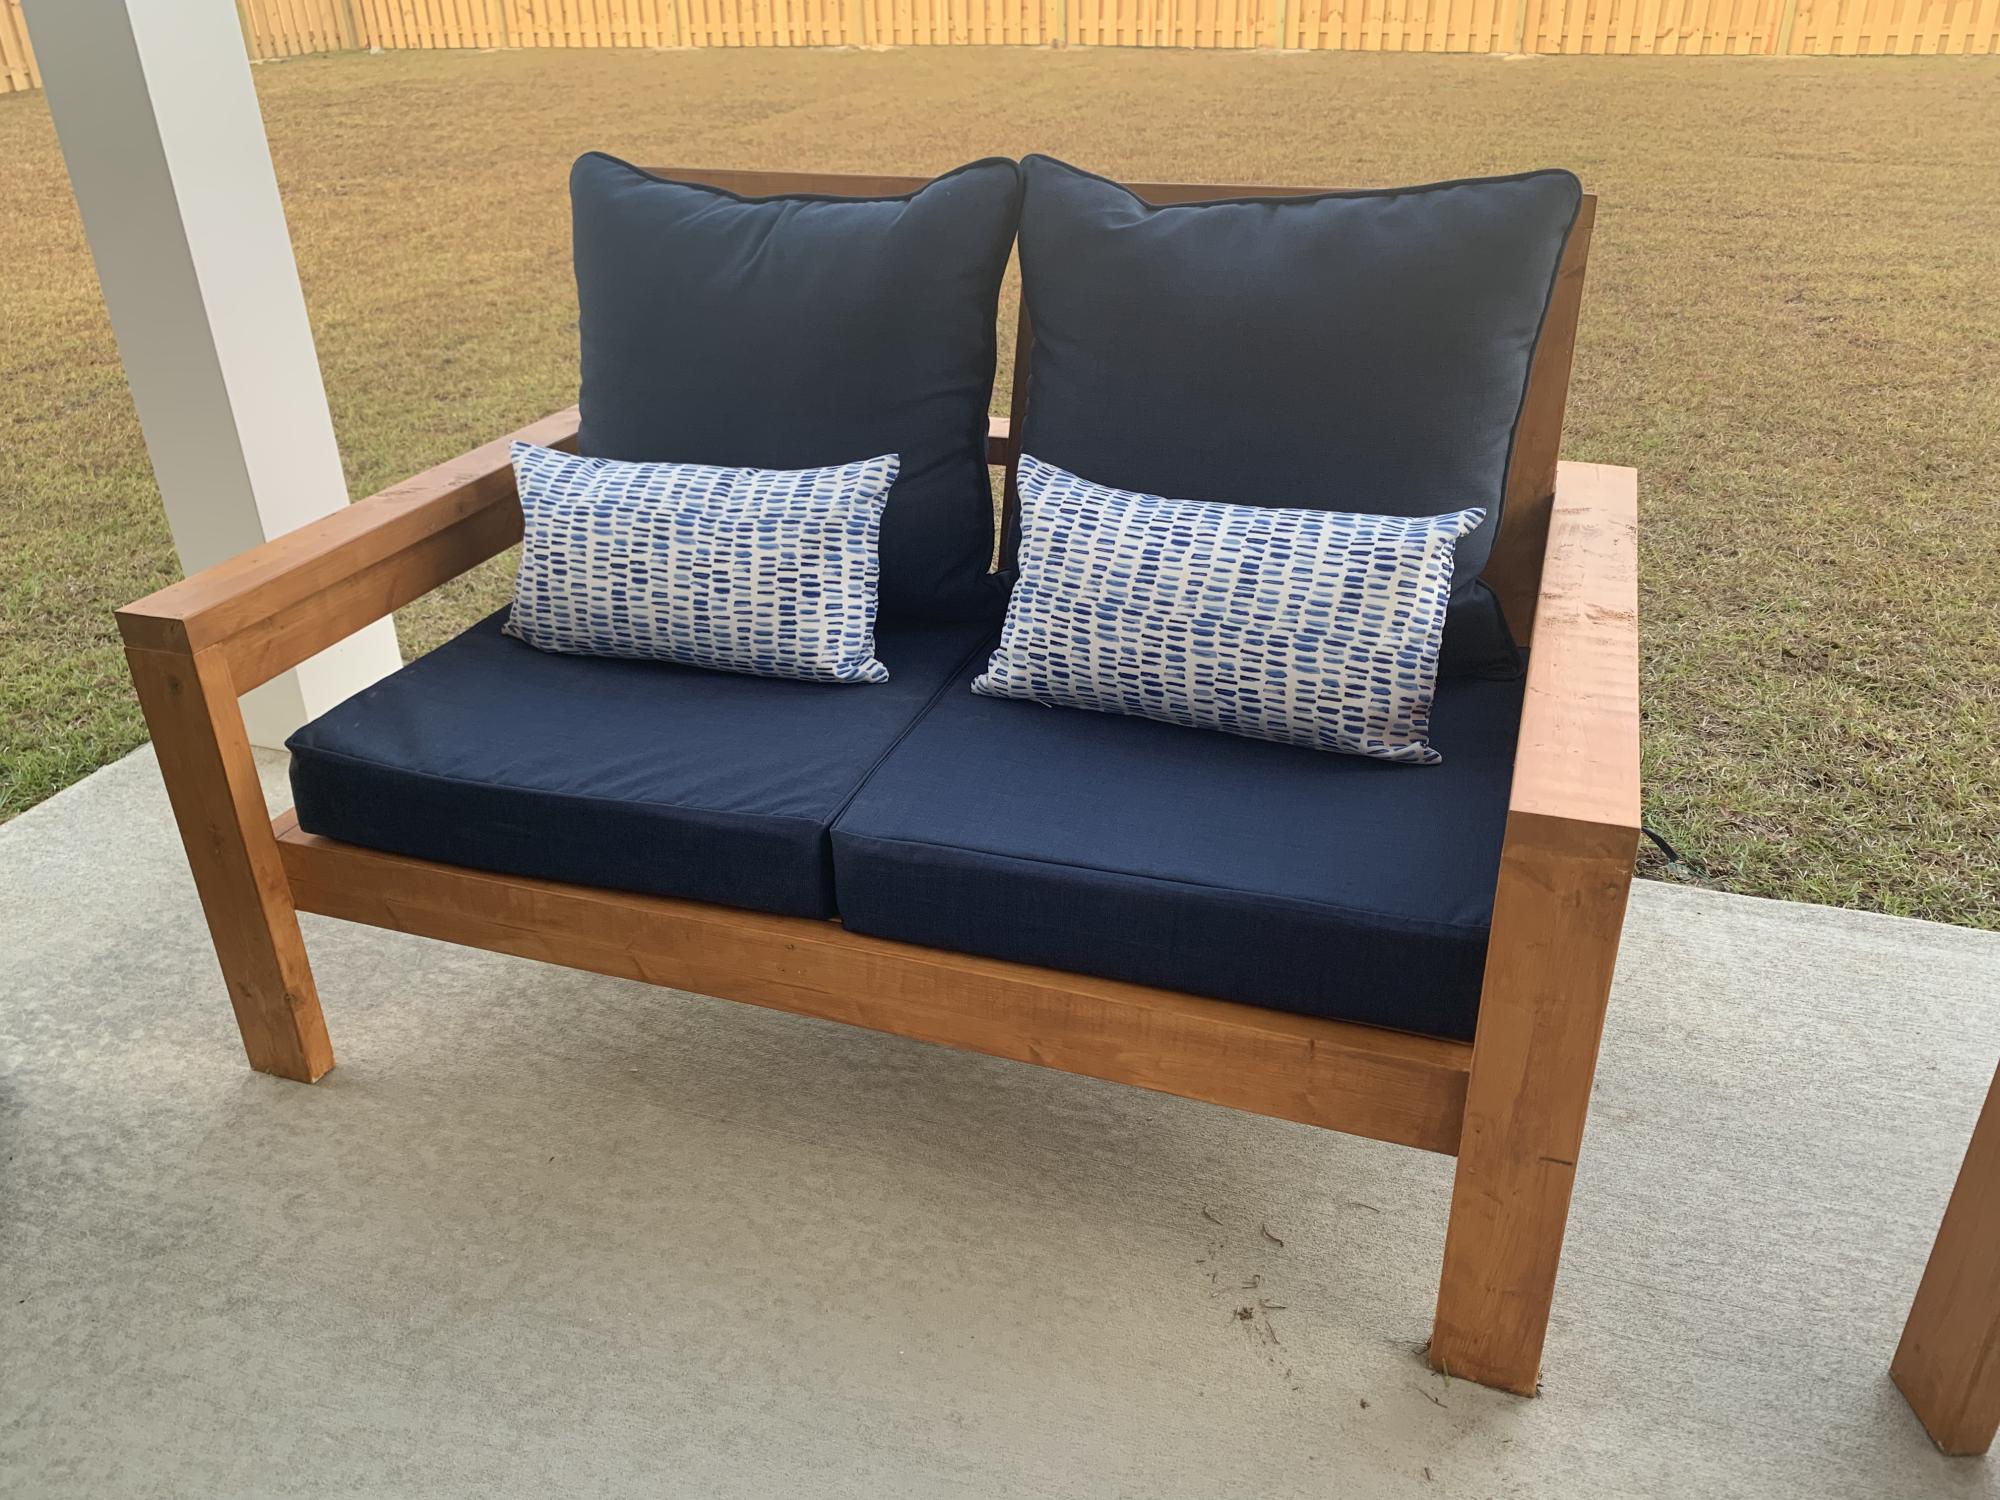
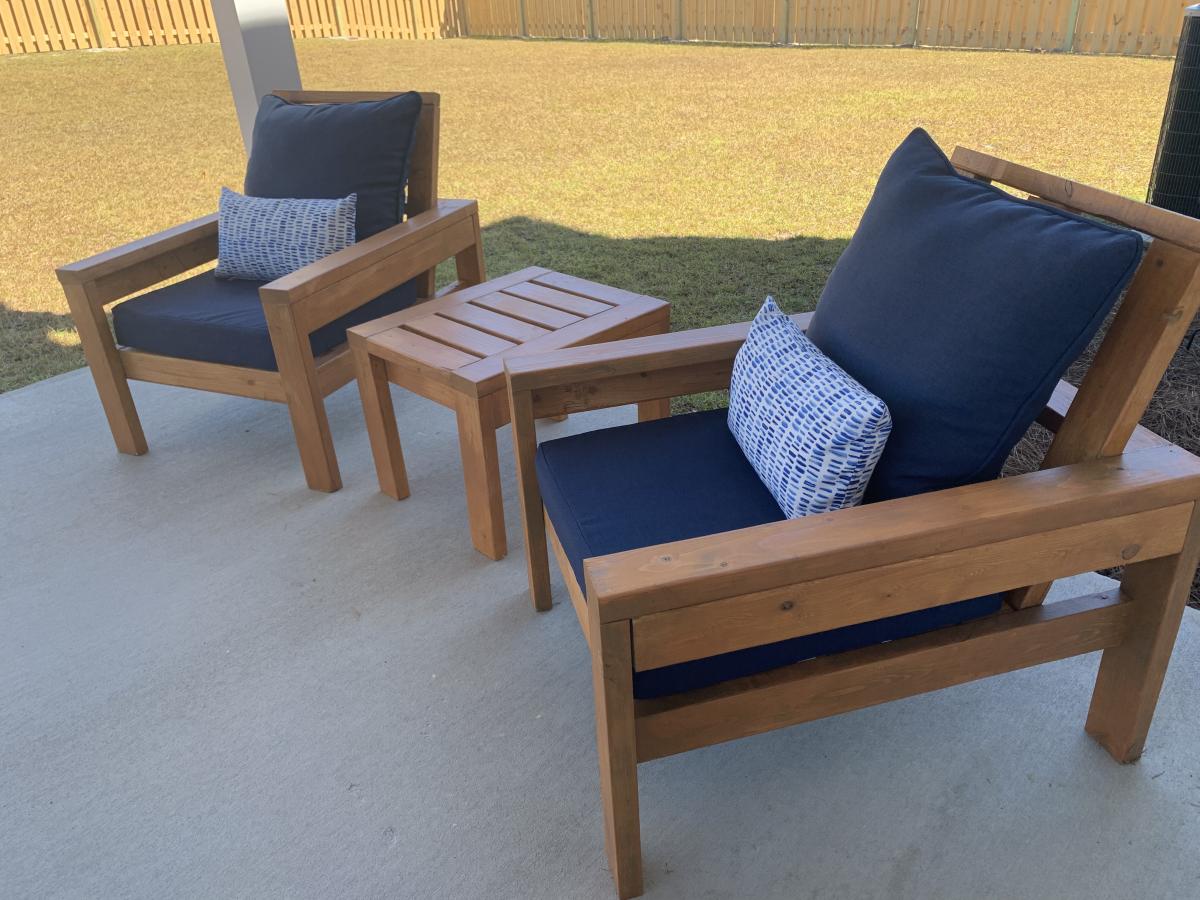
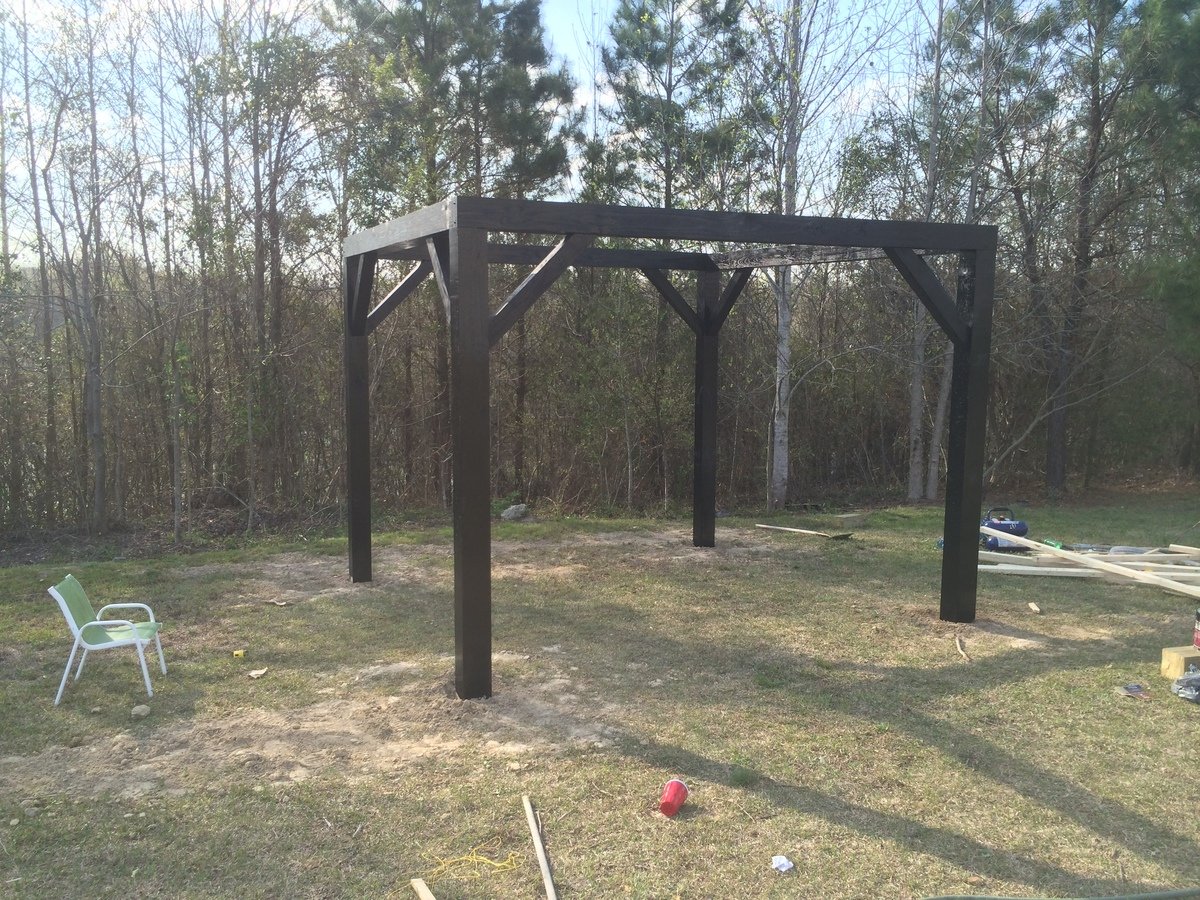
Modern Rustic Outdoor Sofa Inspired by RH Merida

Submitted by susanshamp on Sun, 04/01/2018 - 14:19

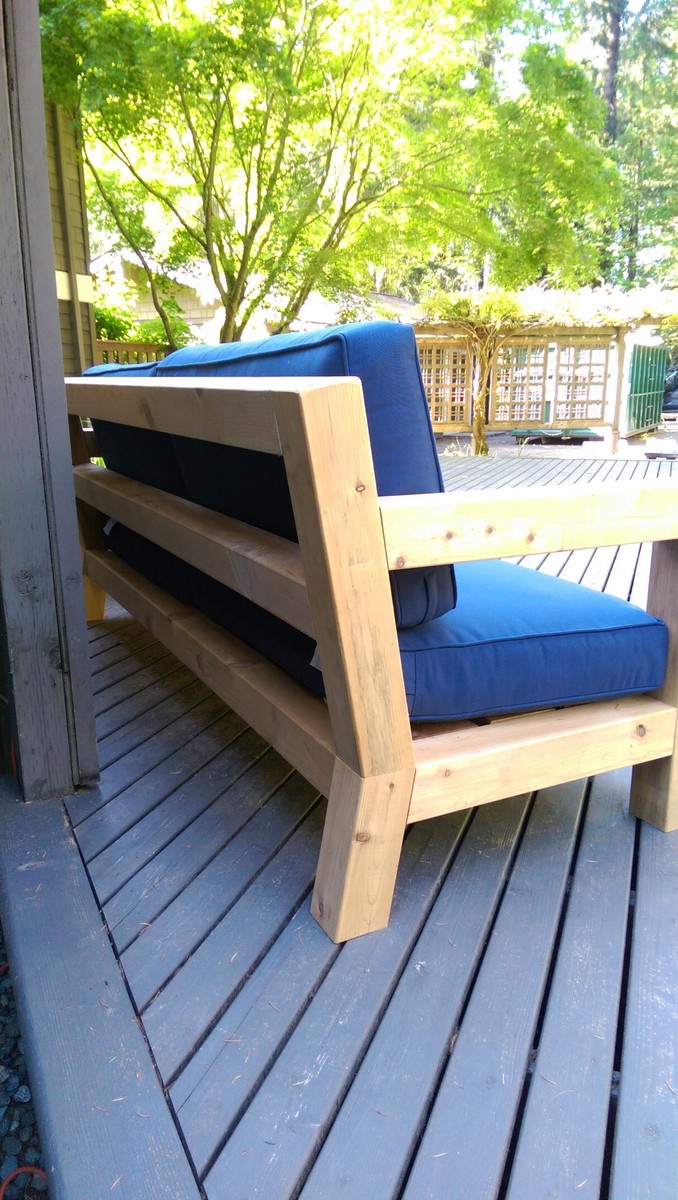
I was in love with the RH Merida set because of its clean lines and modern style. Also, the plan seemed simple enough that I could re-create it without a pattern. The only thing that I did not like about it is the lack of arms. I really like to have a place to put my arm or my beverage :) - so I added arms to the design.

Estimated Cost
$150
Estimated Time Investment
Day Project (6-9 Hours)
Finish Used
Natural
Recommended Skill Level
Intermediate

Comments

bogle

Wed, 05/20/2020 - 10:45

This is Awesome. I'm halfway in the middle as i thought I could complete without plans. Do you have any plans could share. Please....

Modern Patio Chairs/Love Sear

Submitted by Anonymous (not verified) on Sun, 09/25/2022 - 15:57

Super easy and fun project! We altered the original plans to build a loveseat and had zero issues. We did add some extra support below.
I did not find 25”x25” cushions within our price range so I settled for 25”x22.5” and they work but ultimately 25x25 works best.

Low Loft Bed for Toddler

Submitted by Anonymous (not verified) on Sat, 11/12/2022 - 17:08

I built this low loft bed following Ana’s plan as soon as I found out that I was pregnant with baby #2. We needed a “big boy” bed for our 3 year old, and I couldn’t find a loft bed on the market that was priced reasonably or looked sturdy. This the biggest challenge I have taken on to date, and I was certainly sore after building. I don’t have a workbench, so I worked on the floor of my garage and used a couple of saw horses that my dad had next door. I am so proud of this and can’t wait to build more after baby boy comes!

Comments

IKEA Hack 6" Tray Cabinet

Submitted by Matty3481 on Thu, 01/07/2016 - 16:30

I'm happy to share with everyone my IKEA hack 6" tray cabinet.

I found a 24" cabinet box in IKEA's As-Is section and took it home for half price ($23)!  I would have preferred plywood, but my table saw is a little small and cutting large sheets of plywood is a little scary.  When I deconstructed the cabinet, it sustained some damage (as its particleboard), so if you try this at home, be careful!  I ended up changing the depth to 22" in order to cut off the damaged piece, but that shouldnt be noticeable with average trays and cutting boards.  

I used Ana's 6" tray cabinet plan and modified the dimensions a little for my planned space.  It still needs the back, face frame and door (which will be a replacement drawer front from the cabinet manufacturer).  I plan on building the face frame at the time the cabinets are installed, since this will go in between the 36" corner easy-reach and the 36" sink base.  Once its done, I'll post updated pics!

Estimated Cost
$30 (cabinet and an aluminum straight edge tool to help me cut straight lines with my Dremel).
Estimated Time Investment
Afternoon Project (3-6 Hours)
Finish Used
Face frame will be painted to match factory cabinets
Recommended Skill Level
Intermediate

Reclaimed TV console

Submitted by Anonymous (not verified) on Thu, 01/21/2016 - 10:24

Built this TV console from reclaimed pallet wood. Added some tiny hairpin legs for more of an industrial look.

Estimated Cost
$150.00
Estimated Time Investment
Weekend Project (10-20 Hours)
Finish Used
Hand rubbed clear wax
Recommended Skill Level
Advanced

Kids' Playhouse (under stairs)

Submitted by kdins31 on Sun, 12/18/2011 - 09:22

Had the perfect space for a little playhouse under the stairs in the basement and it's been our plan for 4 years to do something. Finally, we did something. Wanted depth so I added the roof and portico. Also added cedar shingles that I picked up for $7 at HD. Inside I had extra laminate flooring so I put that down and added beadboard, chair rail and crown molding. There's also a small transom window above the small kitchen area. The kids love the barnhouse doors with old fashioned doorbell, mailslot and window. The bookshelf under the stairs was the final touch. I didn't use any plans from this awesome site but did, as always, get a bunch of tips and inspiration!

Pin for Later!

Kids' Playhouse (under stairs)

Estimated Time Investment
Week Long Project (20 Hours or More)
Finish Used
Dark walnut stain on cedar shingles.
Recommended Skill Level
Intermediate

Comments

Cindy from Indiana (not verified)

Sun, 12/18/2011 - 19:00

Wow! That is awesome!

You really did a great job on that! So imaginative, too. WTG!

Guest (not verified)

Sun, 12/18/2011 - 19:58

That is so stinkin' adorable! Fantastic job. I love everything about it. Your kids (and grandkids) will remember the playhouse under that stairs forever!

spiceylg

Mon, 12/19/2011 - 06:54

Wow, this is too cool! They are going to love love love this! Can't wait to see the kitchen reveal!

bhoppy

Mon, 12/19/2011 - 08:43

LOVE LOVE LOVE this!!!! It looks amazing! Makes me want to buy a new house with stairs. LOL

birdsandsoap

Sat, 12/31/2011 - 18:26

You did an amazing job on this. I'm planning a bunkbed with a similar facade. I love how cozy it looks without having to make an actual pitched roof. The shingles are such a nice touch that I may have to copy you! And it's wired for lights; you've really outdone yourself.

Guest (not verified)

Mon, 02/27/2012 - 21:14

I love this playroom you created. We are currently in the process of building a playroom under the stairs for our girls. Where did you find the door...it is exactly what I am looking for! What a wonderful job you did!!!

kdins31

Mon, 03/19/2012 - 14:26

Thanks to all of you for the nice comments! Re: the door, I just cut a plain 18x80 door slab ($21 from orange) and trimmed it out. I still need to put the window grille over the open space, and was hoping to find a cool 'speak easy' grille that fits the space.

Thanks again!

megan_m

Fri, 04/27/2012 - 09:07

this is such an amazing little space! great work!

MicheleInAlabama (not verified)

Thu, 05/03/2012 - 23:38

This has to be one of the most adorable things I've ever seen! What an awesome idea......how cool is that for the kids??! Love the lighting and the laminate (or is it hardwood) flooring inside. Even the stove is gorgeous! Such fond memories will be made there and remembered forever. Kudos!!

Amanda Rhoads (not verified)

Wed, 12/05/2012 - 15:34

Oh my goodness this is such an inspiration! However, as a beginning tool user, I don't think I could get my finishes so nice. How much experience had you had at this kind of stuff before? Was the area closed in before this project or did you do that too? I've got an open stairway into our basement and would be starting from scratch with ceiling, walls, etc. and have no experience hanging drywall or anything. I think it would take me a year. Great job, and thanks for sharing!

maggieasselin

Sat, 06/21/2014 - 12:51

Hi there!

I was just wondering how you made the door for your play house? We're basically stuck at this level in ours right now... ;) Thanks for any tips!!!

Play Vanity

Submitted by hoffer5353 on Tue, 11/26/2013 - 11:52

I wanted to surprise someone special with just the right gift on her 5th birthday. The size was just perfect for her and the space that was available.
At the last minute I decided to add drawers to contain all those girly things and am glad that I did. To finish it off I added pretty crystal knobs to really glam it up.
I also built the play table stool to complete the set.

Built from Plan(s)
Estimated Cost
$35-50
Estimated Time Investment
Day Project (6-9 Hours)
Finish Used
Minwax Red Oak, semi-gloss poly, White semi-gloss paint.
Recommended Skill Level
Beginner

Comments

spiceylg

Tue, 11/26/2013 - 12:48

So precious! Wish I had this type of set up when I was a teenager, let alone when I was five! LOL! Lucky girl!

Fire Pit Swings

My wife saw something like this on Pinterest and desperately wanted one. The one she saw was hexagonal in shape. We didn't need as many swings so we went with just a plain square shape. We used 6x6s for the legs and posts across the top and used 4x4s for the angled support pieces. We built the swings using the plan from this website. All the materials can be picked up at the blue and orange stores. However when it came to the springs for the swings, the blue store was 1/3 of the price of HD. The legs are 12' long and buried 4' under the ground and cemented in for strength. Luckily I am retired military and was able to rent an auger for 1/2 the price of HD or the blue store. You could do it by hand but it saved us hours and lots of back pain. We found our dimensions for the size we wanted and spray painted dots on the ground where the posts were going to go. We dug the holes and stuffed the 6x6s in them. Using a post level we made sure they were plum. We braced them and added the quickrete and left them to setup over night. The next day we had to make sure all the tops were level with each other. This is where having some knowledge of physics paid off. I took clear tubing and screwed it above the height that I wanted on one post and then screwed the other end to another post. Fill it with water until the water level on the first post is where I wanted it (8 feet high) and it will automatically fill it level on the other end. There is a picture of this above. Water will always level itself out. I had to do this because my yard is at a slight down hill grade. We marked it and cut the tops off to make it level. After attaching the 6x6s on the top with 8" lag bolts it was time to paint. After painting was done we built 3 swings from Ana's plans. We shortened them by 6" to give room to walk between the legs and the swings. All in all it was a great project that only took two dedicated weekends. My wife still has to paint the swings though.

Built from Plan(s)
Estimated Cost
$600ish
Estimated Time Investment
Week Long Project (20 Hours or More)
Finish Used
We used an oil base Black Barn Paint from the blue store.
Recommended Skill Level
Intermediate

Comments

jkread

Wed, 05/27/2015 - 22:38

It sounds and looks like the top 6x6s are mitered and sit on top of the end of the vertical posts. I'd say at least one lag bolt each way to hold the mitered corner together and then at least one in each piece down into the vertical to hold it in place.

carewarner

Mon, 04/27/2020 - 10:24

WOW, LOVE!!! This is simply gorgeous! What a warm and welcoming addition to your yard. And thanks for sharing your method of finding level for your posts on your sloped yard. I absolutely love it!

Seasonal And Holiday

2x4 sectional outdoor sofa

Submitted by Anonymous (not verified) on Tue, 05/12/2020 - 08:10

My first Ana White project. My friend Shelley and I are RN's, and she got me hooked on woodworking. I started with cushions from Lowes ( in the sizes that you recommended)to see if I loved the sectional for a few years. I loved it so much I decided to have custom Sunbrella fabric ones made. Even though the custom ones were more expensive, it has been worth it. They go perfect with my California Mission style home. Now I want to add the armless one and make it a U-shape. I did add a piece at the bottom back of each sofa to hold the cushions in. The seat cushions would slide out the back when sitting on the sofa. I made the coffee table to match. Our family loves it!

Estimated Cost
building materials for sofa $250. Custom Sunbrella Fabric cushiosn $2000
Estimated Time Investment
Weekend Project (10-20 Hours)
Finish Used
Stained with Carrington Minwax and sealed with spray Shellac
Recommended Skill Level
Beginner

Comments

Modified Camp Loft Bed *Full Size*

Submitted by Anonymous (not verified) on Sun, 11/29/2020 - 16:36

Our 10 year old daughter has a small room so we decided a loft bed would be ideal, as it would open up some needed floor space. However, spending $1000 on a loft bed from a store was inconceivable, so we were THRILLED to find this camp loft bed plan on Ana White!

My husband modified the plans to accommodate a full-size mattress, added two inches of height to the underside, and removed the stairs.

Cost of wood was just under $300 as prices are high in our area at the moment. Still far less than any store would offer a bed of this size and configuration, so still a win!

The build took two full weekends. He had to be able to disassemble the piece in the garage in order to take it upstairs to reassemble in her room.

It was painted white with Kilz Interior Sealer and Stain locker. It was a HIT and now our son wants one too! :) Great project that affords her SO much more floor space for her books and eventually a chair underneath.

Estimated Cost
$300
Estimated Time Investment
Weekend Project (10-20 Hours)
Finish Used
Kilz Interior Sealant and Stain Blocker
Recommended Skill Level
Intermediate

Comments

tfbucfan

Mon, 07/11/2022 - 23:47

How did you do the slats? I am trying to make an oversized loft bed and nervous about the supports for under the mattress

Square Picnic Table

Submitted by Anonymous (not verified) on Mon, 10/04/2021 - 15:01

This is a bit larger than Ana’s plan. I added additional support to the table top and added a braced opening for the umbrella. I also went for a more rounded finish by rounding all the corners of the table and benches with my jigsaw and then sanding to create smooth curves.

Built from Plan(s)

Comments

Simple Nightstands

I absolutely love the way these turned out! I drew up an example in Sketch-up using Ana's plans for the Simple Nightstand as a starting point. 

The top is made from 5 boards, 19 inches in length, joined together underneath with a kreg jig. I made two of these, identical. Each nightstand took exactly 50 kreg screws, not intentional, it just worked out that way. I used a brad nailer to attach the trim along the bottom shelf (which I could have avoided with a a little more planning in the beginning), also to attach the side panels that you see on the sides and back, and to assemble the majority of the drawer, using kreg screws to attach the front.
I'm in love with the drawer pulls, a metal twig shape bought at blue! I'm debating whether or not I want to paint them with some brown paint and distress them a little bit, but not sure if it would just end up looking hokey since they are obviously not real twigs.
It took me several hours to build these, mostly because I had to kind of work out a few details as I went, but I'm confident I could do it quicker if I had to do it again. The finishing is what takes the longest!
Built from Plan(s)
Estimated Cost
$110 includes enough Select Pine, kreg jig screws, and drawer pulls to make two nightstands
Estimated Time Investment
Day Project (6-9 Hours)
Finish Used
Two coats of Cabot stain, Pecan color. Three coats of satin polyurethane, with a light sanding between each coat.
Recommended Skill Level
Intermediate

Modified Beginner Farm Table and Bench

Submitted by Anonymous (not verified) on Tue, 06/28/2022 - 12:09

Altered the Beginner Farm Table plans to use 2x8s for the top and 4x4s for the legs. I used pocket holes for the table. I followed the bench plans almost exactly, adjusting slightly for the 2x8 tops. I am a beginner and I did it myself! The table and bench are beautiful and sturdy! Thanks Ana!

Comments

Coffee Bar with Built-In Beer Fridge and Wine Storage

Submitted by Chuck1979 on Mon, 07/08/2019 - 10:39

We made a beverage station for the corner of the kitchen!

Estimated Cost
$250
Estimated Time Investment
Day Project (6-9 Hours)
Finish Used
Semi-gloss white paint and Dark Walnut stain
Recommended Skill Level
Intermediate

Comments

gunnare57

Fri, 07/31/2020 - 09:43

Hello! Was looking to see if this is something you would be interested in building for us? We are in love with this project but don't have the tools or means to do it ourself..

Can talk about pricing / size etc.
Thanks!

Kitchen Storage Shelf

Thanks to you we were able to build my mom a shelf for her kitchen with a combination of two of your plans! My mom loved the top of the “Farmhouse Potting Bench” but also wanted shelves like the “Rustic X Console Table”. We combined the two and adjusted measurements to fit our wall space. We didn’t do a complete X on the side because we wanted it with one slant, but loved how it turned out over all! 

Kayla

Sandbox with benches

Submitted by h.abbott on Tue, 04/10/2012 - 05:43

I knew I needed a sandbox for my toddler, and saw the original on pinterest. I was so happy when I came here looking for designs and saw that someone had created a plan for this. I think I'm more excited about it than my little guy is.

The plan was easy to follow, and it went together quickly. Thank you very much for these plans

Built from Plan(s)
Estimated Cost
$50
Estimated Time Investment
Afternoon Project (3-6 Hours)
Finish Used
Exterior paint in light blue.
Recommended Skill Level
Starter Project

Comments

hippyengineer (not verified)

Tue, 10/16/2012 - 19:32

You rock Ana! Your plans are some of the best quick builds with lots of features. I built this sand box in two hours and my son is having the best time. This is a Texas winter replacement for the beach and the backyard pool.

edkeogh

Mon, 05/23/2016 - 19:44

So I just started making this box and it's truly an awesome design but I couldn't get 1x8 lumber instead I got 2x8... For the box base, will this make an difference in the mechanics of the seat and back opening..and the overall size of the box is 1.5" longer at 49" instead of the 47" the plans detail.. I was hoping that it won't but I think it might interfere with the 2x4 support the seat back..

I right in the middle of this project so I need to get on with it as it's nice tomorrow..

THANK YOU
ED