Small Outdoor Shed

Submitted on FB
DIY small shed for trash and recycling.
Built from Plan(s)
Recommended Skill Level
Intermediate
Submitted on FB
DIY small shed for trash and recycling.

I made this coop twice as wide like Ana suggested since I have 4 chickens and wanted to make sure there was some extra wiggle room in case “chicken math” got the best of us. I made a nesting box to mount on the outside. I also used plywood for the sides like Ana did in the video. I installed a Run Chicken automatic door that opens at sunrise and closes at sunset. I added some hasps and clasps to make sure all my doors would close tightly. I put hardware cloth across the top before installing the roof panels. I stapled and buried hardware cloth around the perimeter for predator protection. I also spray painted the hardware cloth flat black so that it would be easier for us to see inside the coop. I stained the rest of the wood with Varathane Semi-Transparent stain, color “Carbon Gray.” I also added some roosts and cedar shingle siding for some extra protection during our New England winters at to match our house. Working 2-4 hours a day, off and on, with a bum shoulder and weak hands, this took me about a week! Thanks for the great plan, Ana!


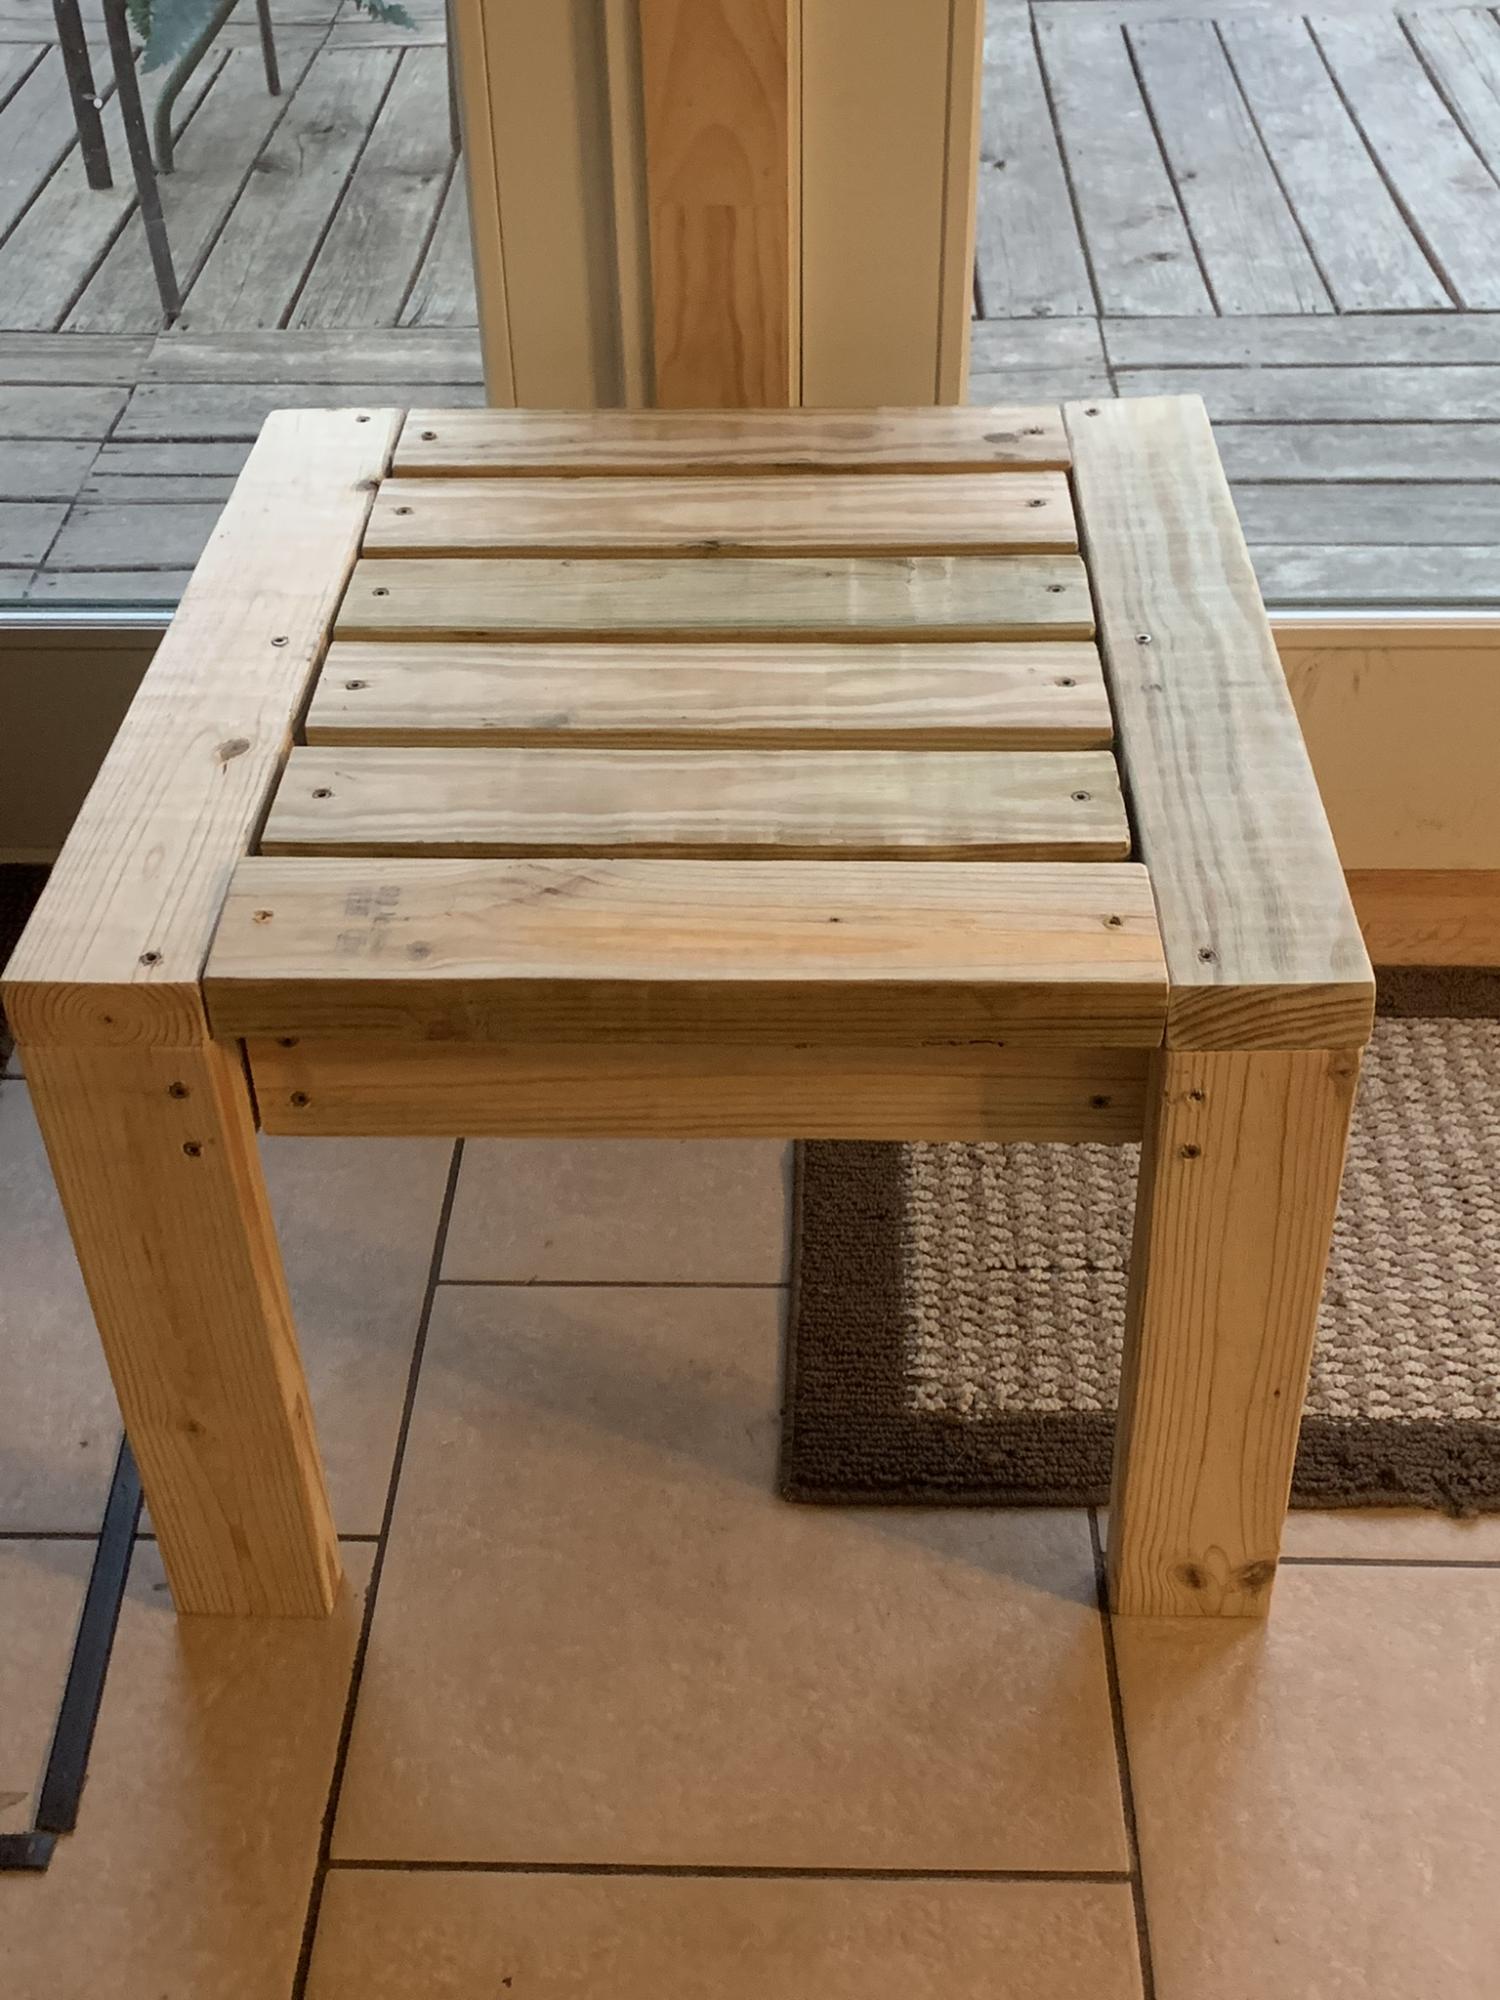
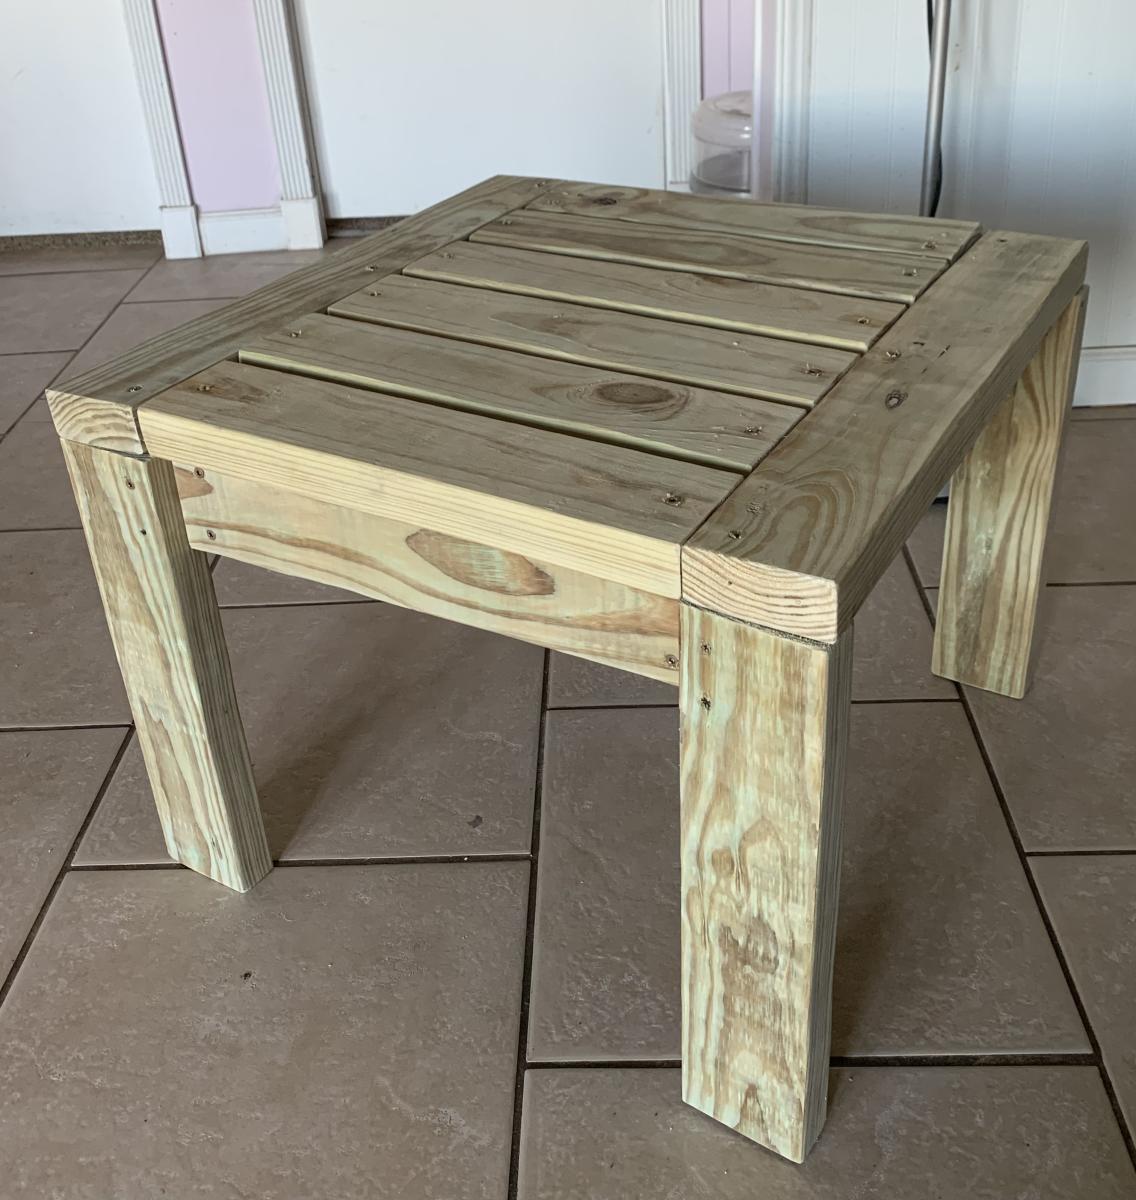
My kids needed a step stool and I had some scrap wood (2x10) left over from a previous project
Thu, 08/18/2016 - 20:12
Thank you! The dimensions are the same as the Ana White "Simple 1x10 Single Step Stool" except I used 2x10's instead of 1x10's like the plans called for. I also used some scrap pallet wood to make a design on the top of the stool.
- Stool height: 7 1/2" for legs, 1 1/2" for top, and 1/2" for scrap pallet wood; which gives a total height of 9"
- Stool width: 9 1/4" x 16"
- 5 degree angle cuts were made on the legs
Wed, 04/17/2024 - 09:21
Are the rails a 2x10 cut in half.? Or is it pallet wood?
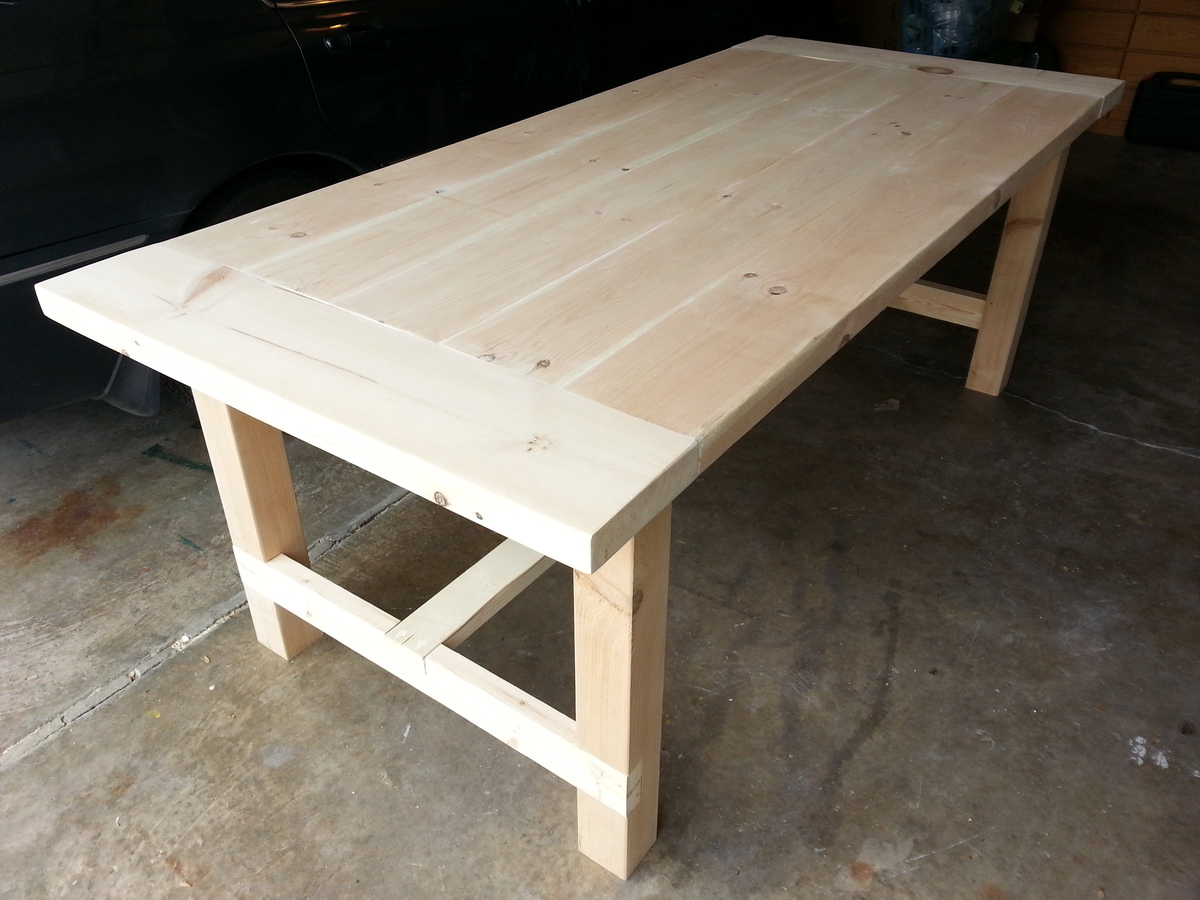
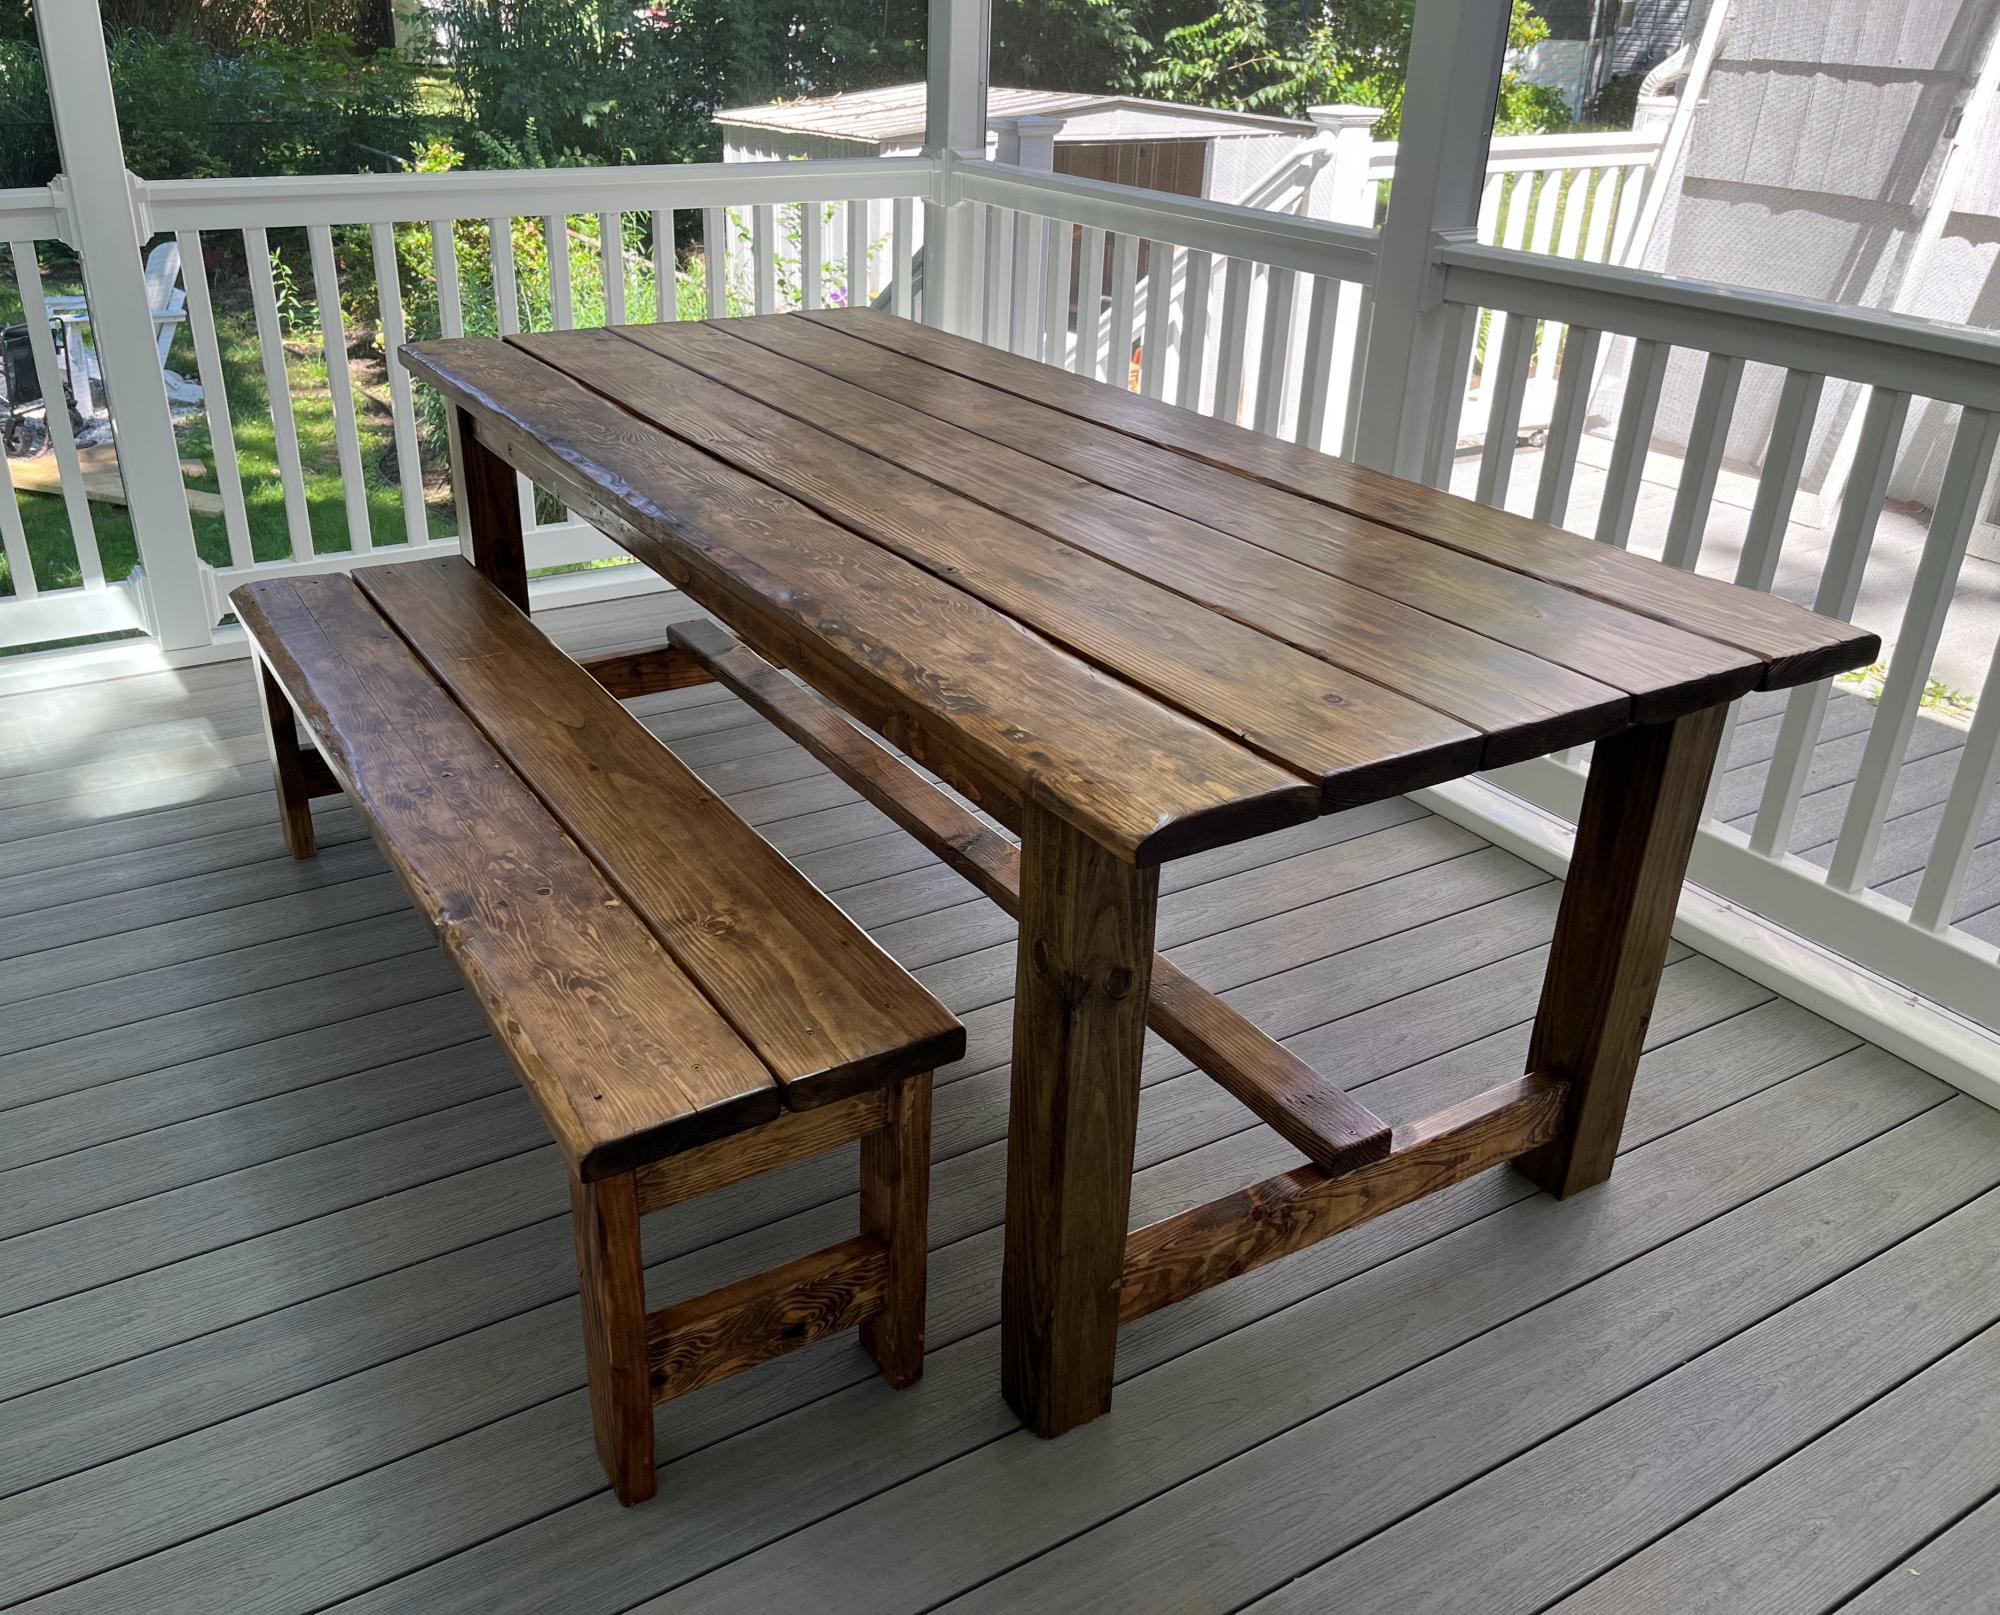
Farmhouse dining room table built for my mom. Unstained.
Table top is 2" White Pine Boards, legs are cedar, and everything else is whitewood studs. Left the leg assemblies and stretcher board unattached for the two hour transport to Charlotte. Attached them with screws and some glue upon arrival. Loved the plan and finished in two days!
They were simple to make and the plan was easy to follow. The only modification I made was adding the 1x3 topper in place of the longer legs sticking out of the top.


Fri, 07/19/2013 - 06:36
Adding these to my to-do list for spring (yes, I plan ahead). I'm thinking of elevating and elongating them to fit around a bay window.
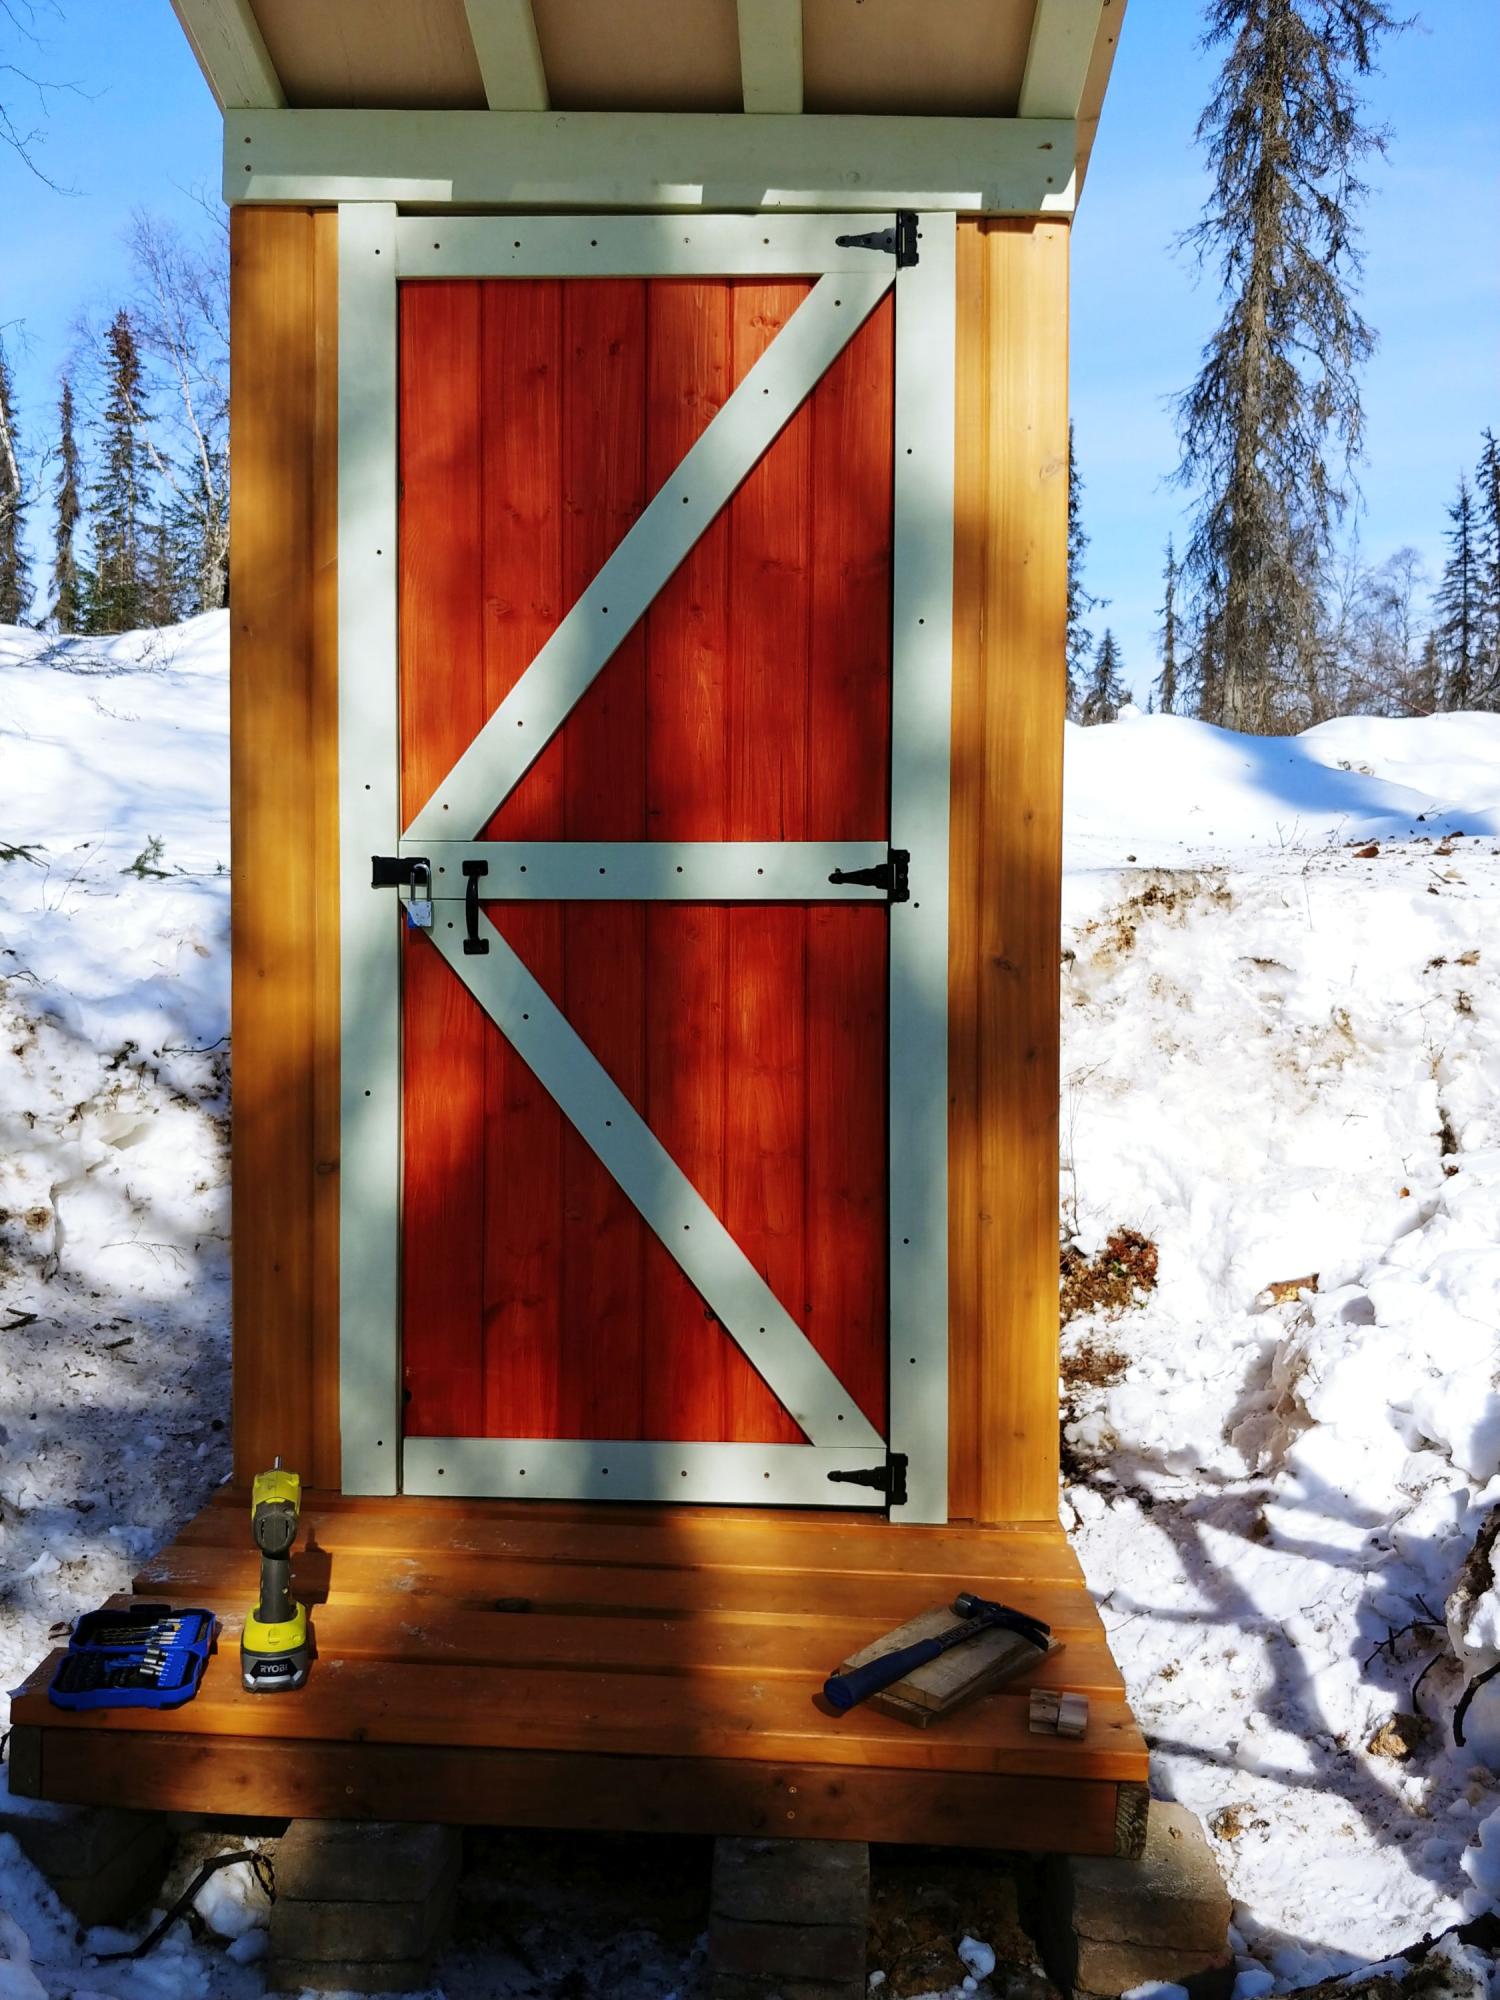
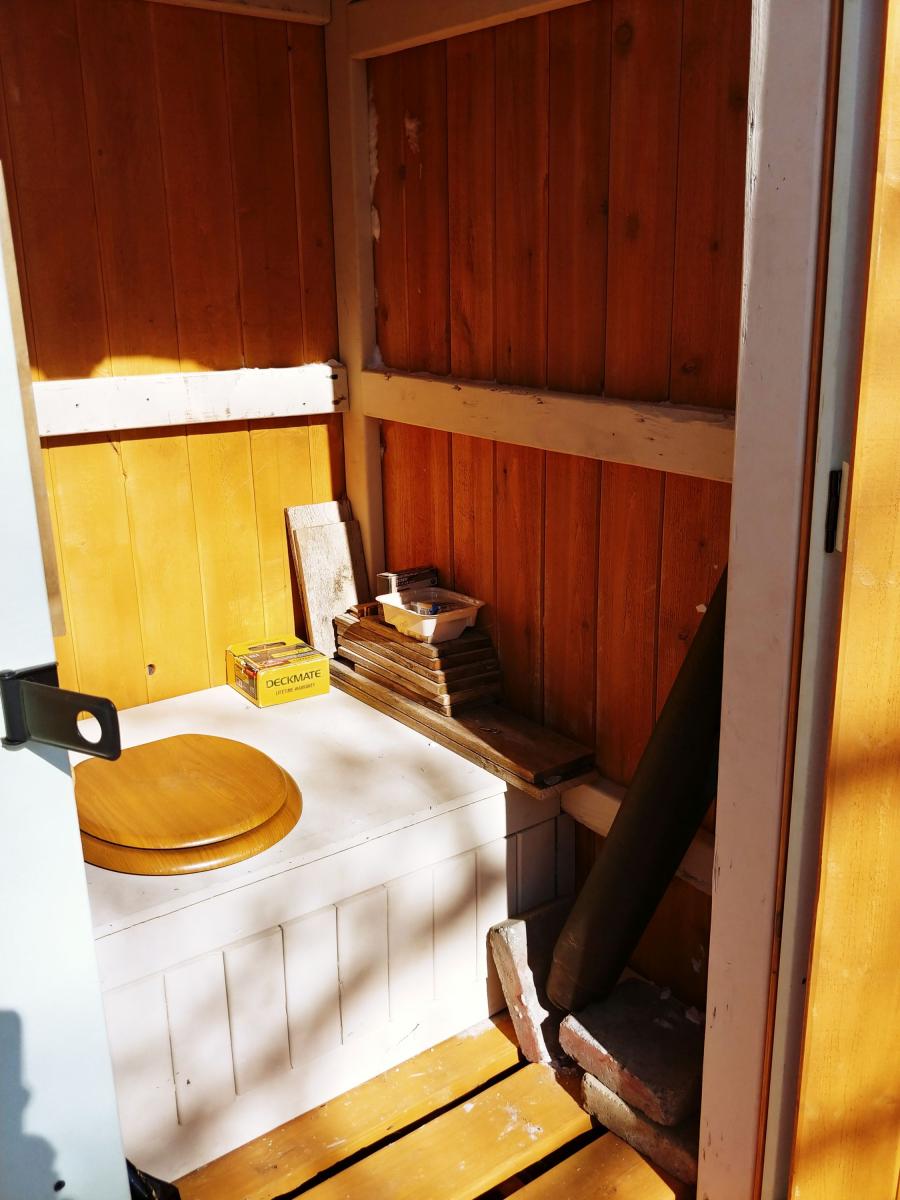
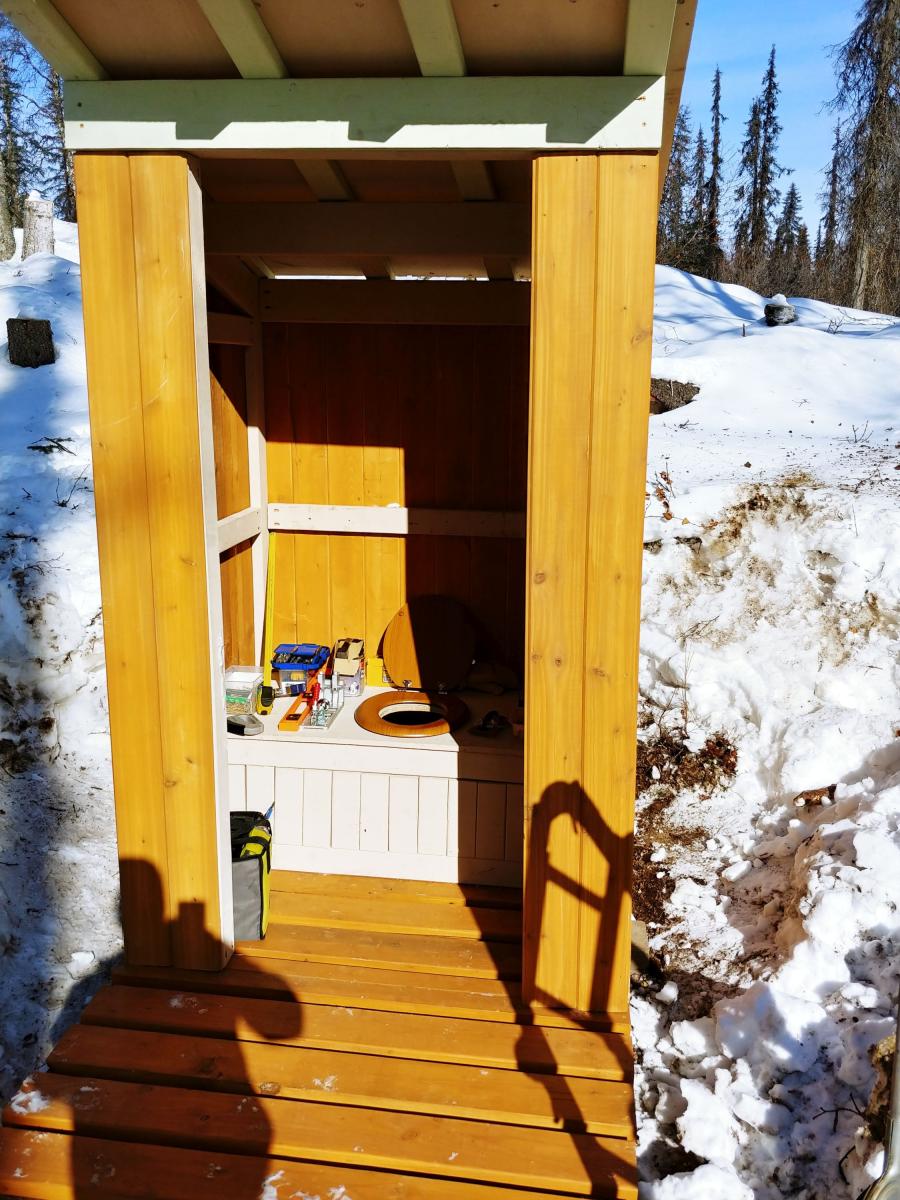
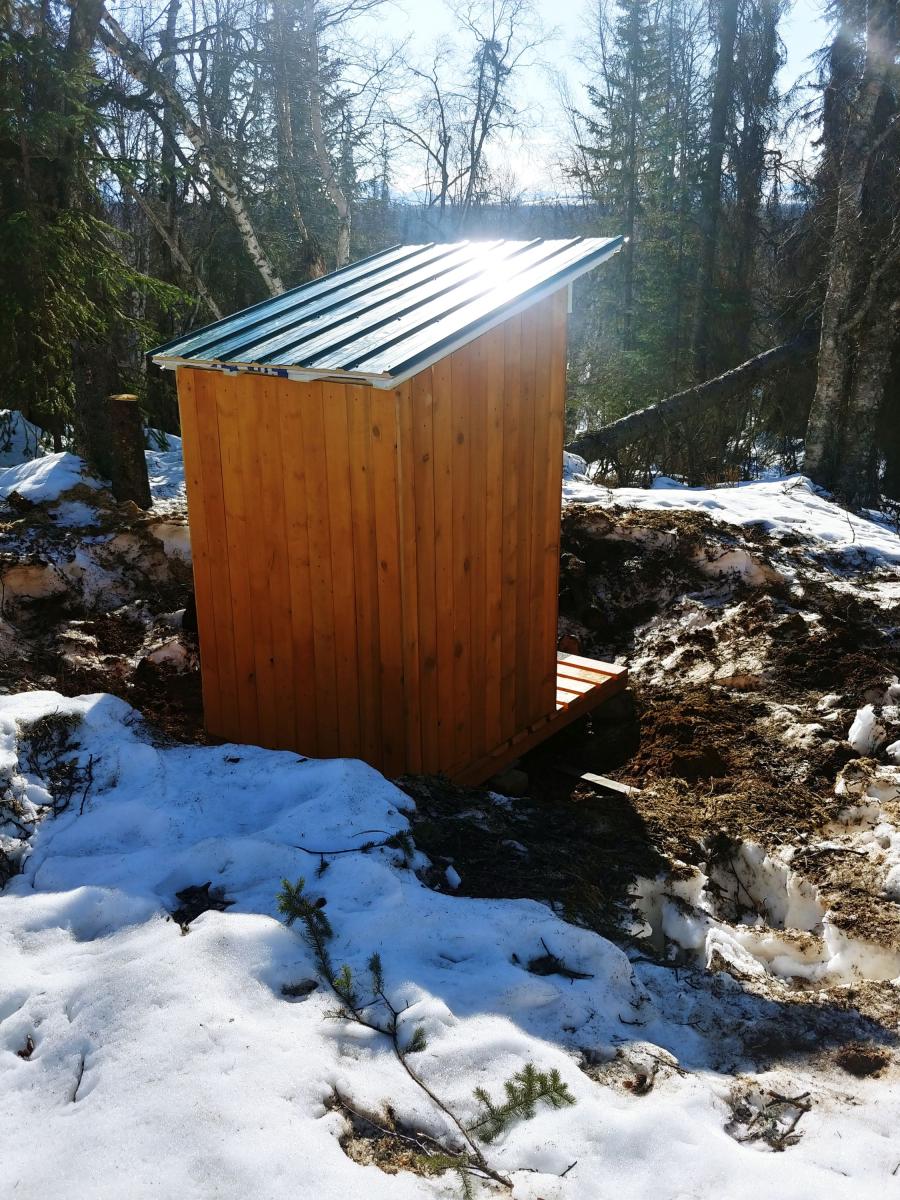
Hi Ana and Family,
I mostly followed your plans for my remote Alaska property outhouse build, with slight modifications. Our property is 7 miles from any road (and 2.5 hr drive from Anchorage) and I typically go there in the winter via snowmobile (December-April). I built this on my back deck in Anchorage and then took it apart and transported it in sections (back wall, 2x sidewalls, floor parts, door, roof parts, seat parts). It took me 5 trips to get it all up to my property from the truck at the trailhead via snowmobile!
The hardest part was digging the hole under 5 ft of snow! I cut several dead spruce trees in the area I planned to situate the outhouse and started a big fire (really big). We kept that going until we had melted out about a 15ft wide area down to bare soil. The next morning, while the ground was still warm from the previous evening's fire, we dug the hole (only about 3.5x3.5ft). Then I cribbed in the hole with old cedar fence slats to help prevent the inevitable ground cave-in that we often see with soil melt and rains in Alaska. Then, I pieced the outhouse together, with the frame sitting on small pavers.
I used a combo of T&G pine and cedar for the walls. I used metal for the roof. As I built this in January and February over several weekends (in Alaska), it was very cold and I would take the pieces inside and paint/stain them. As such, this basically took me all winter from start to finish. It doesn't take that long if you build it on site in warm weather. Once transported to the cabin site, it took parts of 3 weekends to get it in place and useable, including site prep. I've still got a little touch-up work to do (e.g., window for light in winter and bird block to keep the spring and summer nesters out). I put some anti-slip tape on the frame so that I don't slip on the frame base.
There is some waste wood if you follow the plans directly (especially 2x6), but I am using that to build a small firewood cover at home. This was not an inexpensive outhouse even without pandemic prices (I could have chosen a less expensive siding), but I wanted a nice outhouse and I'm very pleased with the outcome, so it was money well spent. Great plans! Thanks.
Tue, 06/07/2022 - 15:29
Snow always makes everything more challenging! Thank you for sharing, this looks great:)
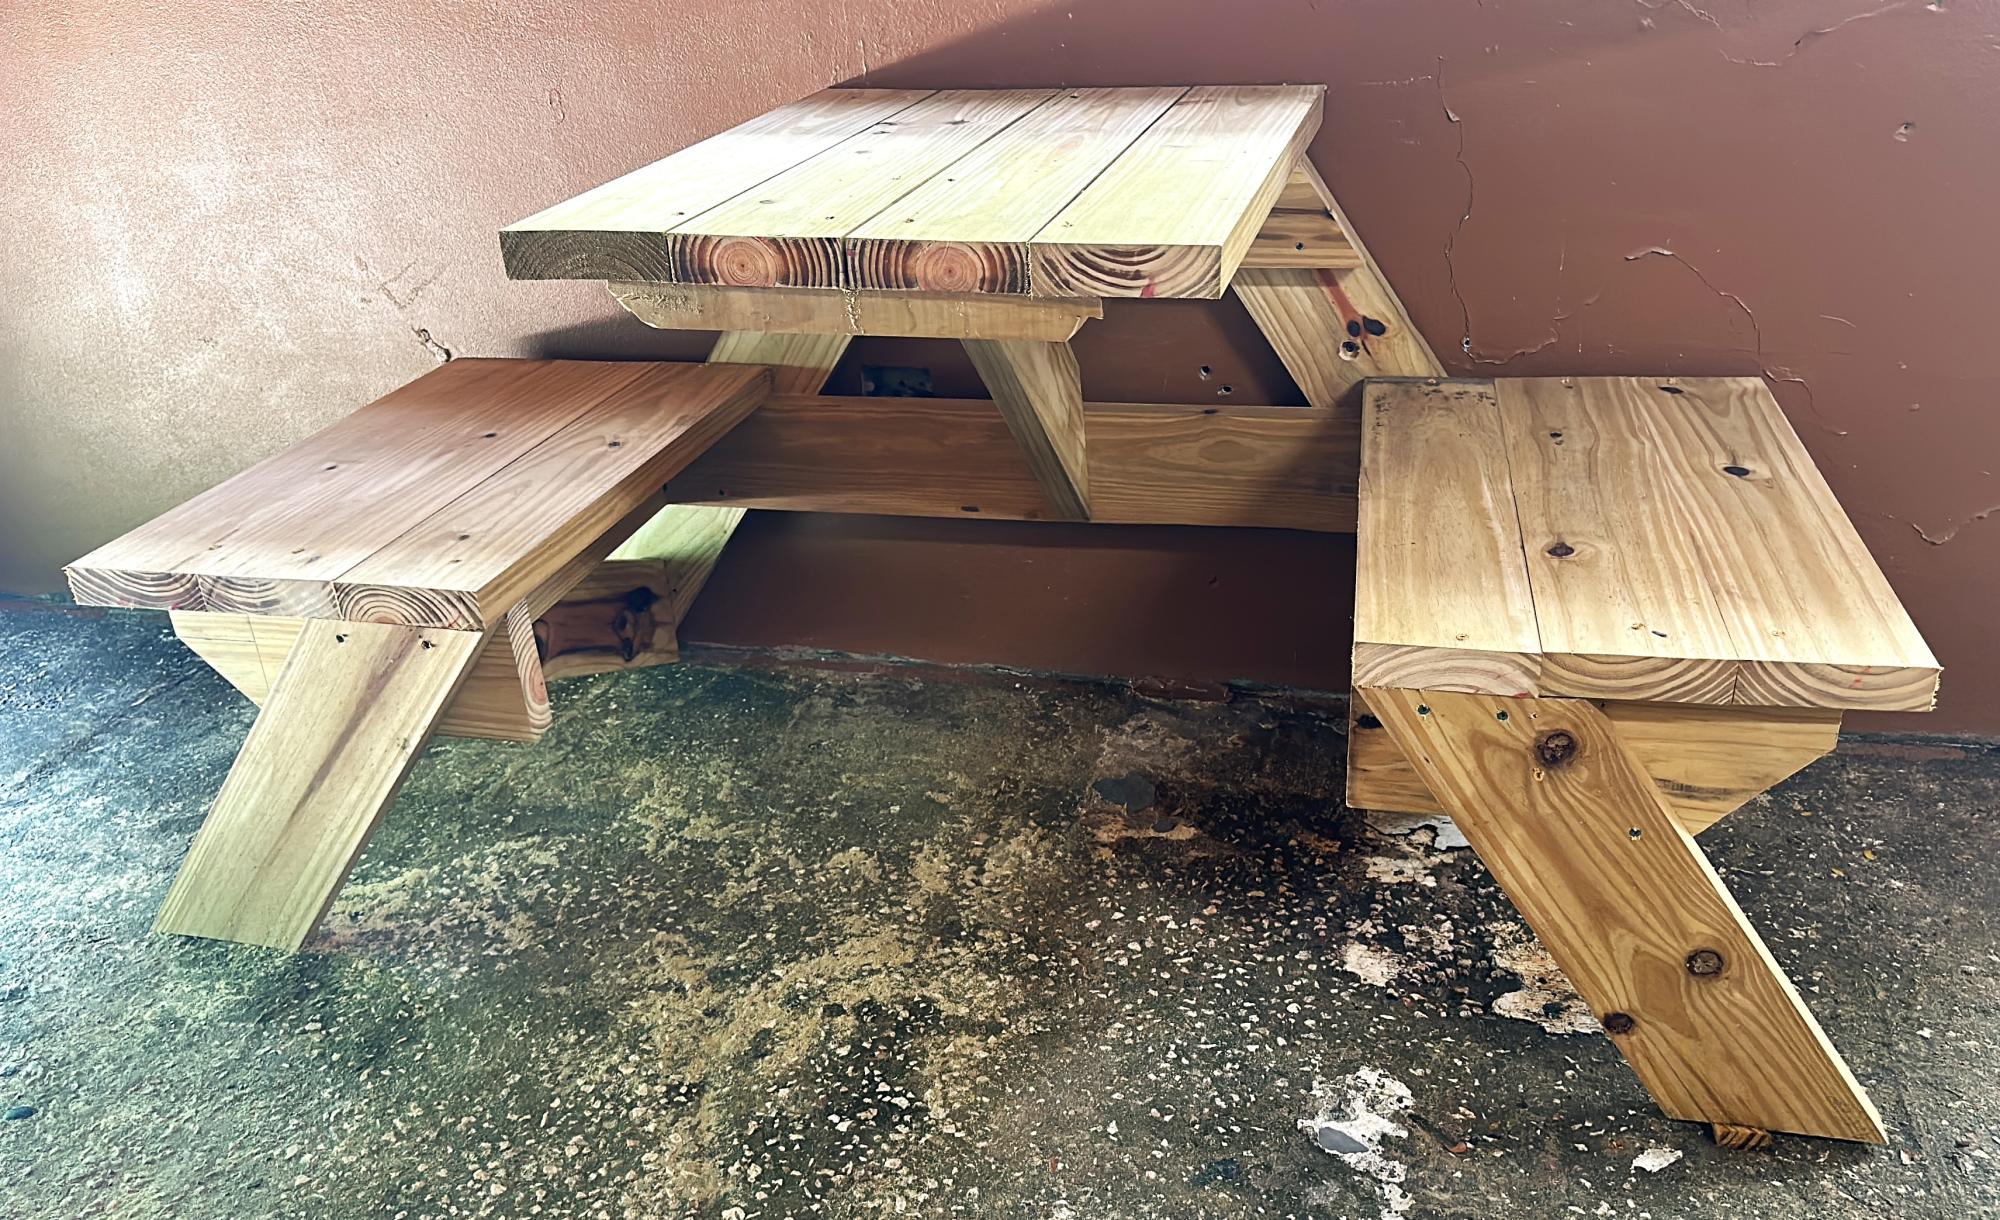
Altered the Beginner Farm Table plans to use 2x8s for the top and 4x4s for the legs. I used pocket holes for the table. I followed the bench plans almost exactly, adjusting slightly for the 2x8 tops. I am a beginner and I did it myself! The table and bench are beautiful and sturdy! Thanks Ana!
I made these two Ana White outdoor end tables for my patio. Next up will be the matching coffee table
Sun, 01/29/2023 - 16:04
Thanks for sharing, they will be a nice outdoor additon!
Made 2 of these for my coffee shop in Puerto Rico. Easy instructions. Thank you!
Javiel Cardona
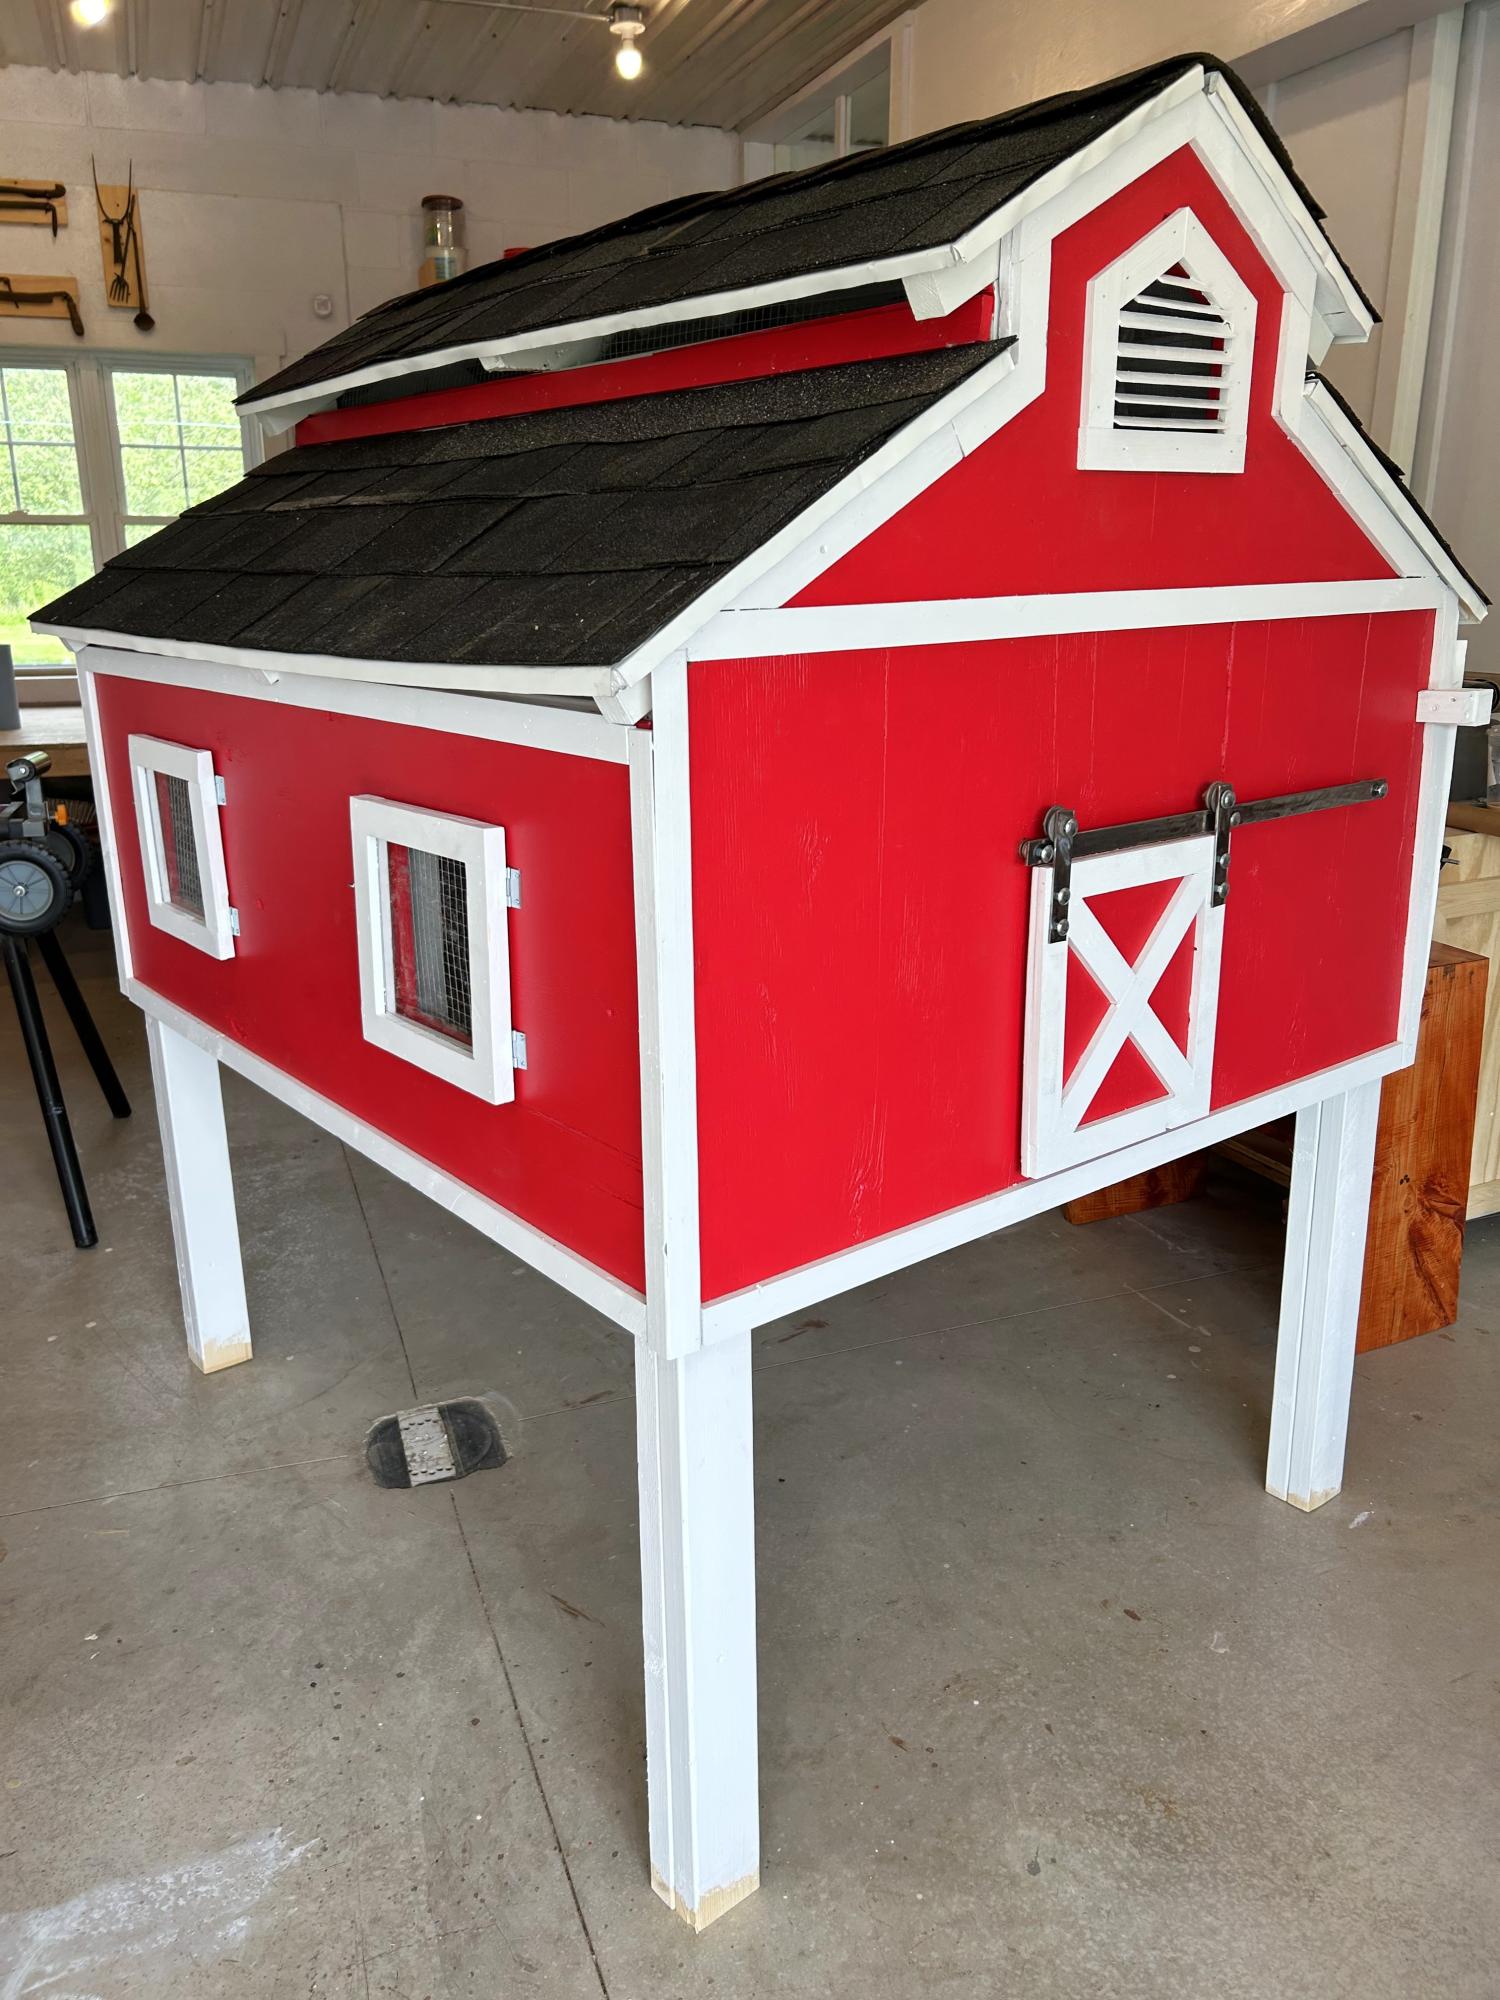
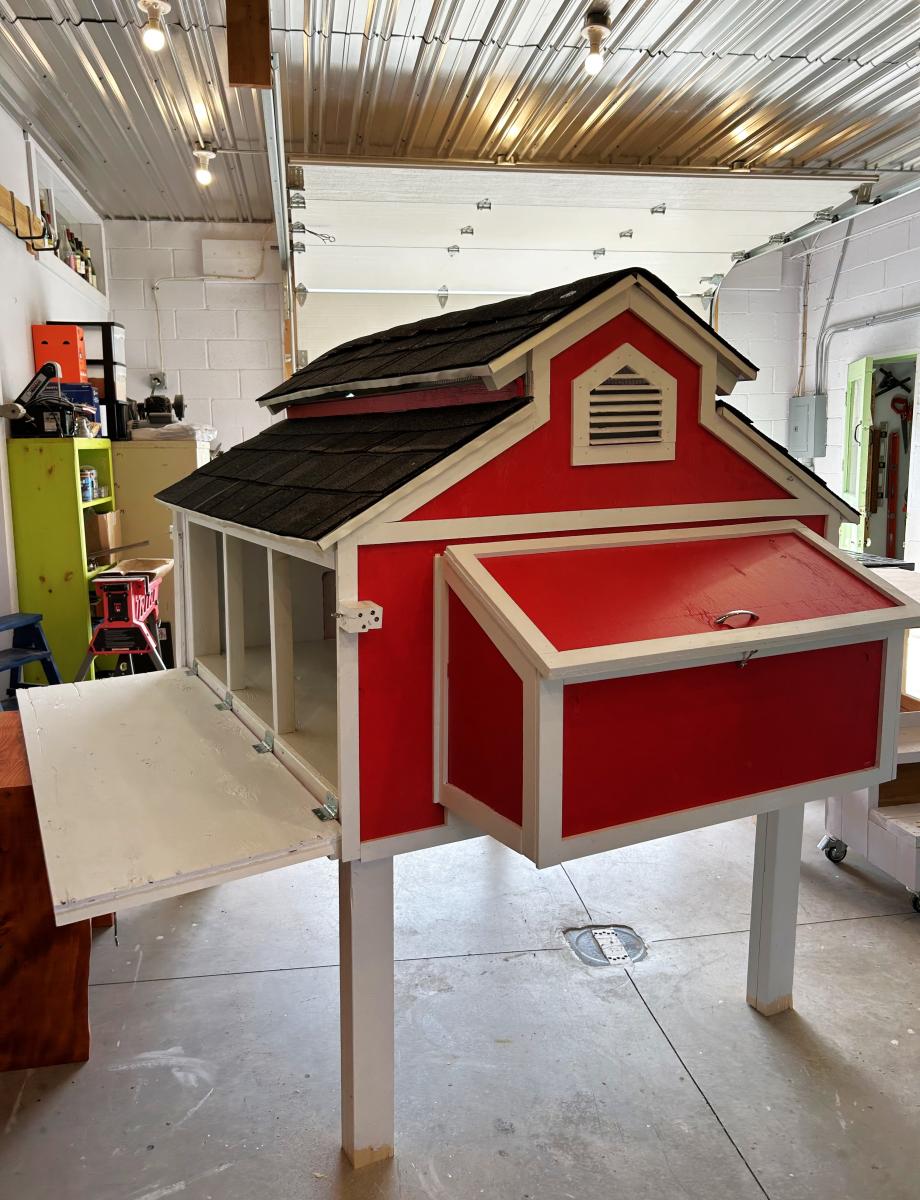
Chicken coop I made to look like a little red barn complete with a working barn door. We have seven girls and they love their lovely barn home.
Sue Laidacker
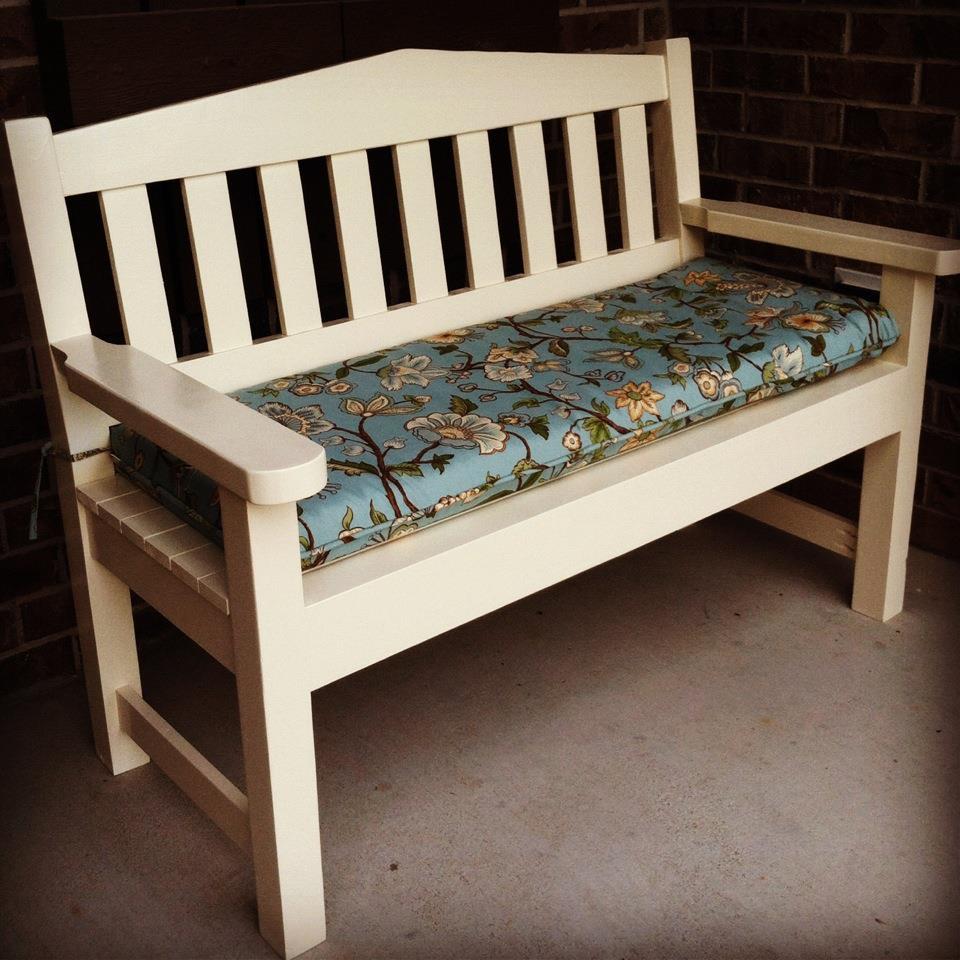
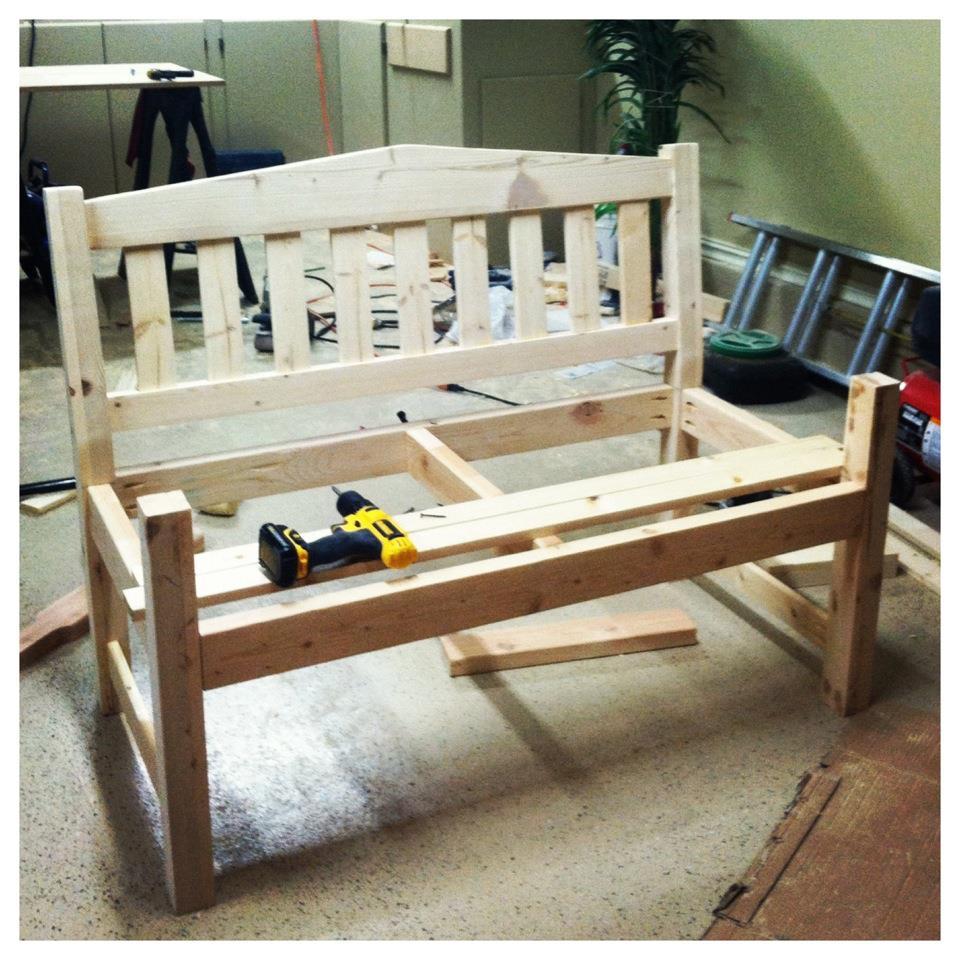
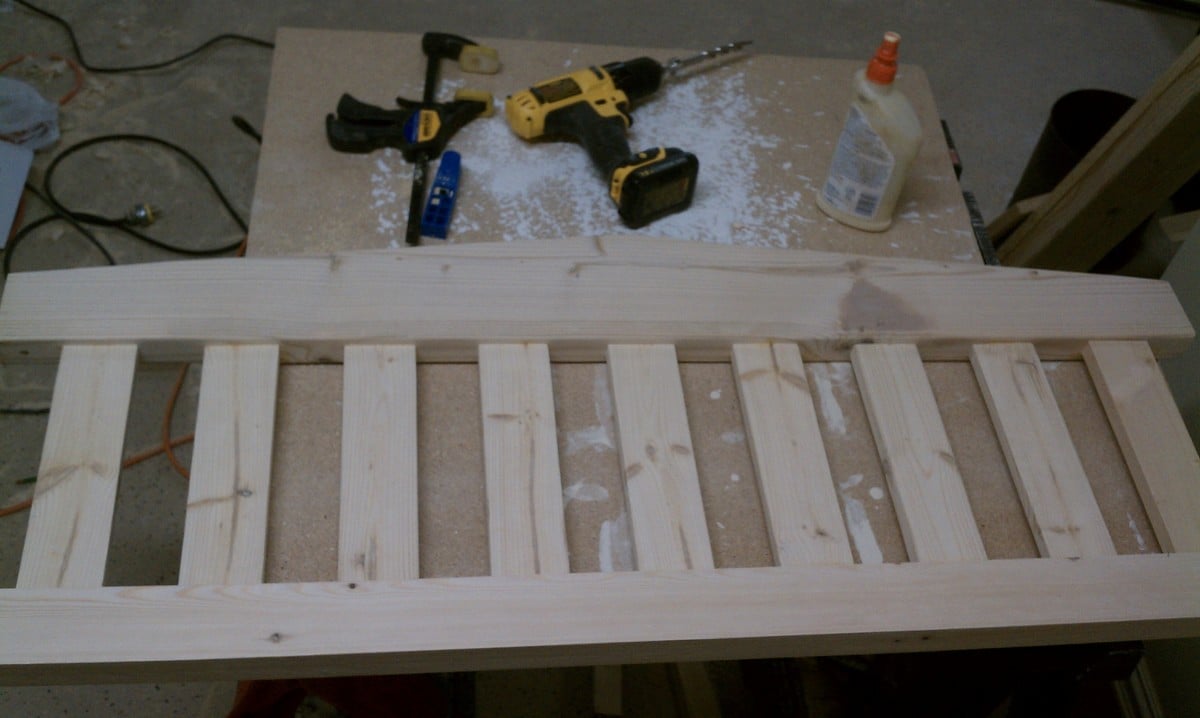
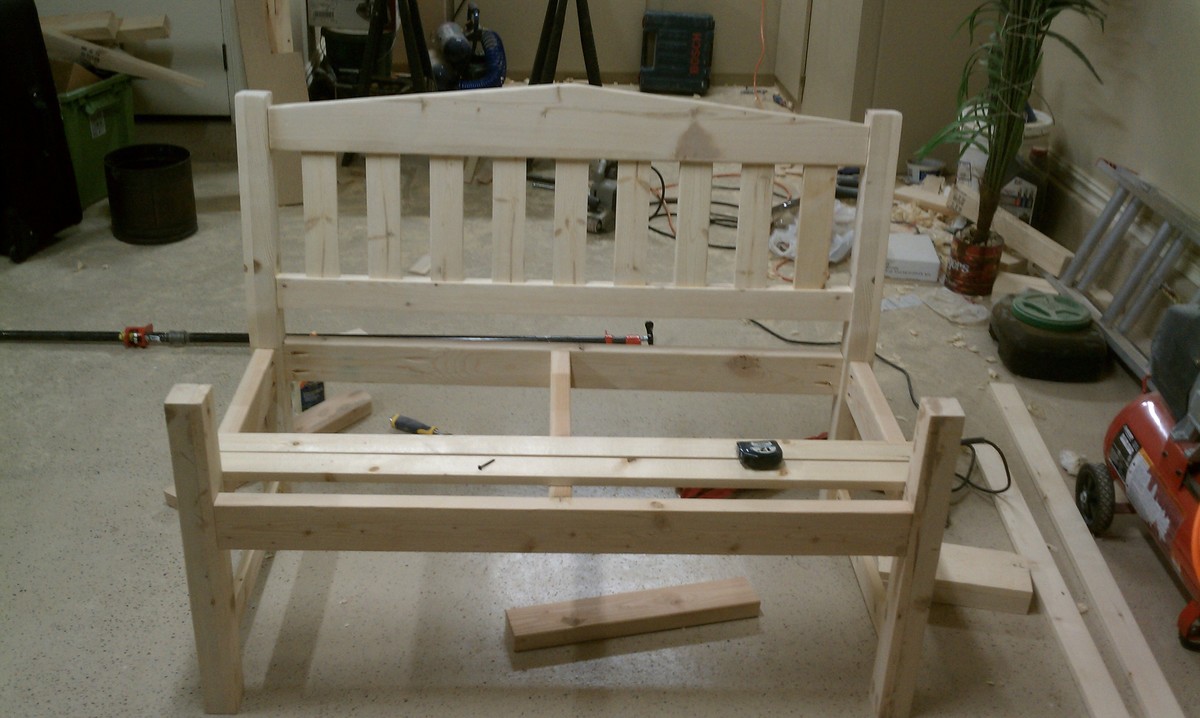
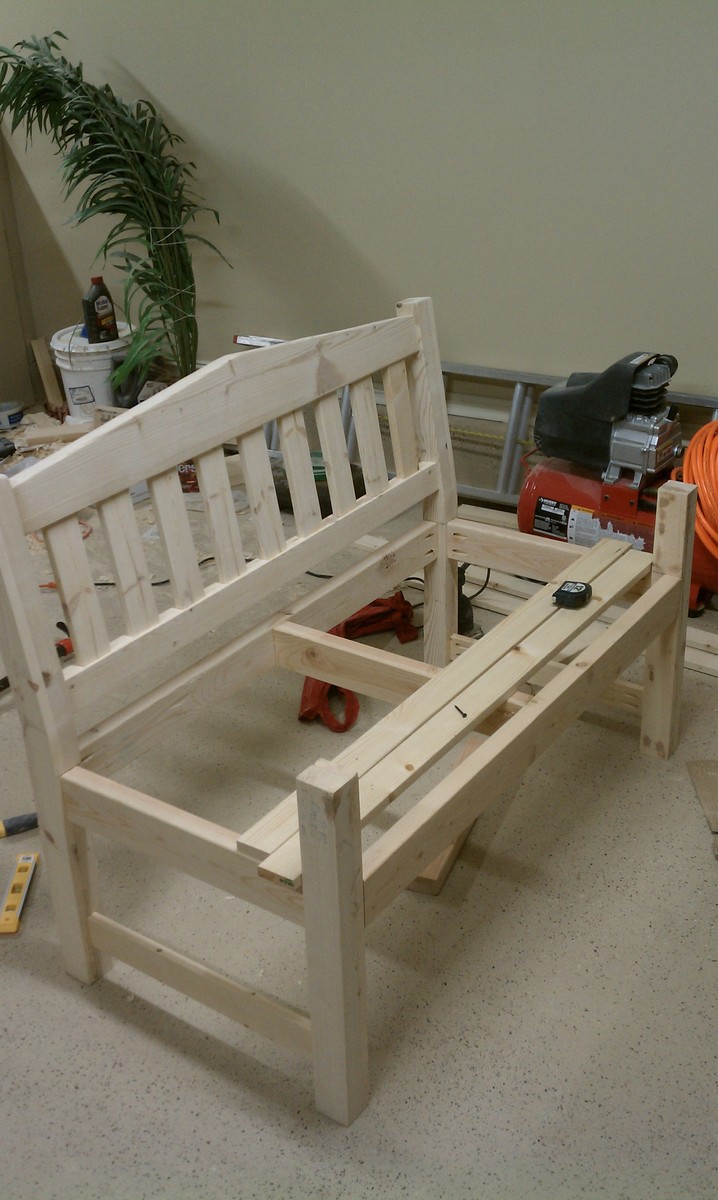
I built this for my wife for an anniversary present. She had wanted a garden bench for some time but the ones that she wanted were between $500-$700 which is ridiculous for this type of bench. So, I did a search on here for garden benches but there weren't really any plans for them and the few brag plans were not really the type of bench I was looking for. I printed off a few pictures of benches that I liked and got to work. The front and back legs a 2x6 and a 1x6 glued together and then cut to be straight. I wanted something thicker then just a plain old 2x6. If I had to do this again though, I would have just glued 3 1X6's together. The reason being, is that 1x6's usually do not have a rounded edge and a 2X6 does. So needless to say when you glue them together you have a nice little gap on either side. Without a table saw to take this off, its pretty difficult to get a straight cut. But I ended up getting it right after sweating for a few hours in the garage. The bench stands 36 inches high, 48inches wide and about 18 inches deep. The seat height is right at 18in also.
In the unfinished pictures I actually had the depth being 24 inches. After sitting on it though it was just way to deep. So I pulled it apart, made the adjustments and its now much more comfortable to sit in.
If anyone has any questions or wants more details feel free to drop me a line!
Thanks!

Fri, 06/19/2015 - 13:32
Yes I think thats what they came out to be. yes the cross pieces are 2x4 and the slats are 1x4's

In reply to back legs by smz1919
Fri, 06/19/2015 - 13:34
I glued a 2x6 and a 1x6 together to get the thickness. Now that i have a table saw and a jointer this entire process would have been much easier but after getting it to look like one solid piece i just outlined the slant i wanted and cut it using a jig saw.
Fri, 06/19/2015 - 20:17
So the back slats are just glued in place right? I wonder if it would be easier to use a biscuit joiner or not
Sun, 10/23/2016 - 17:46
Wed, 05/26/2021 - 08:32
Hi Nathan
Love the look of the bench. Would you have a list of material requirements. I intend to make a bench like this and would like to know the measurements of the top back spar (the shaped one).
Here in the Uk our timber yards do not always supply the same cuts as the US so I need to have some idea of the pieces I need
Many thanks
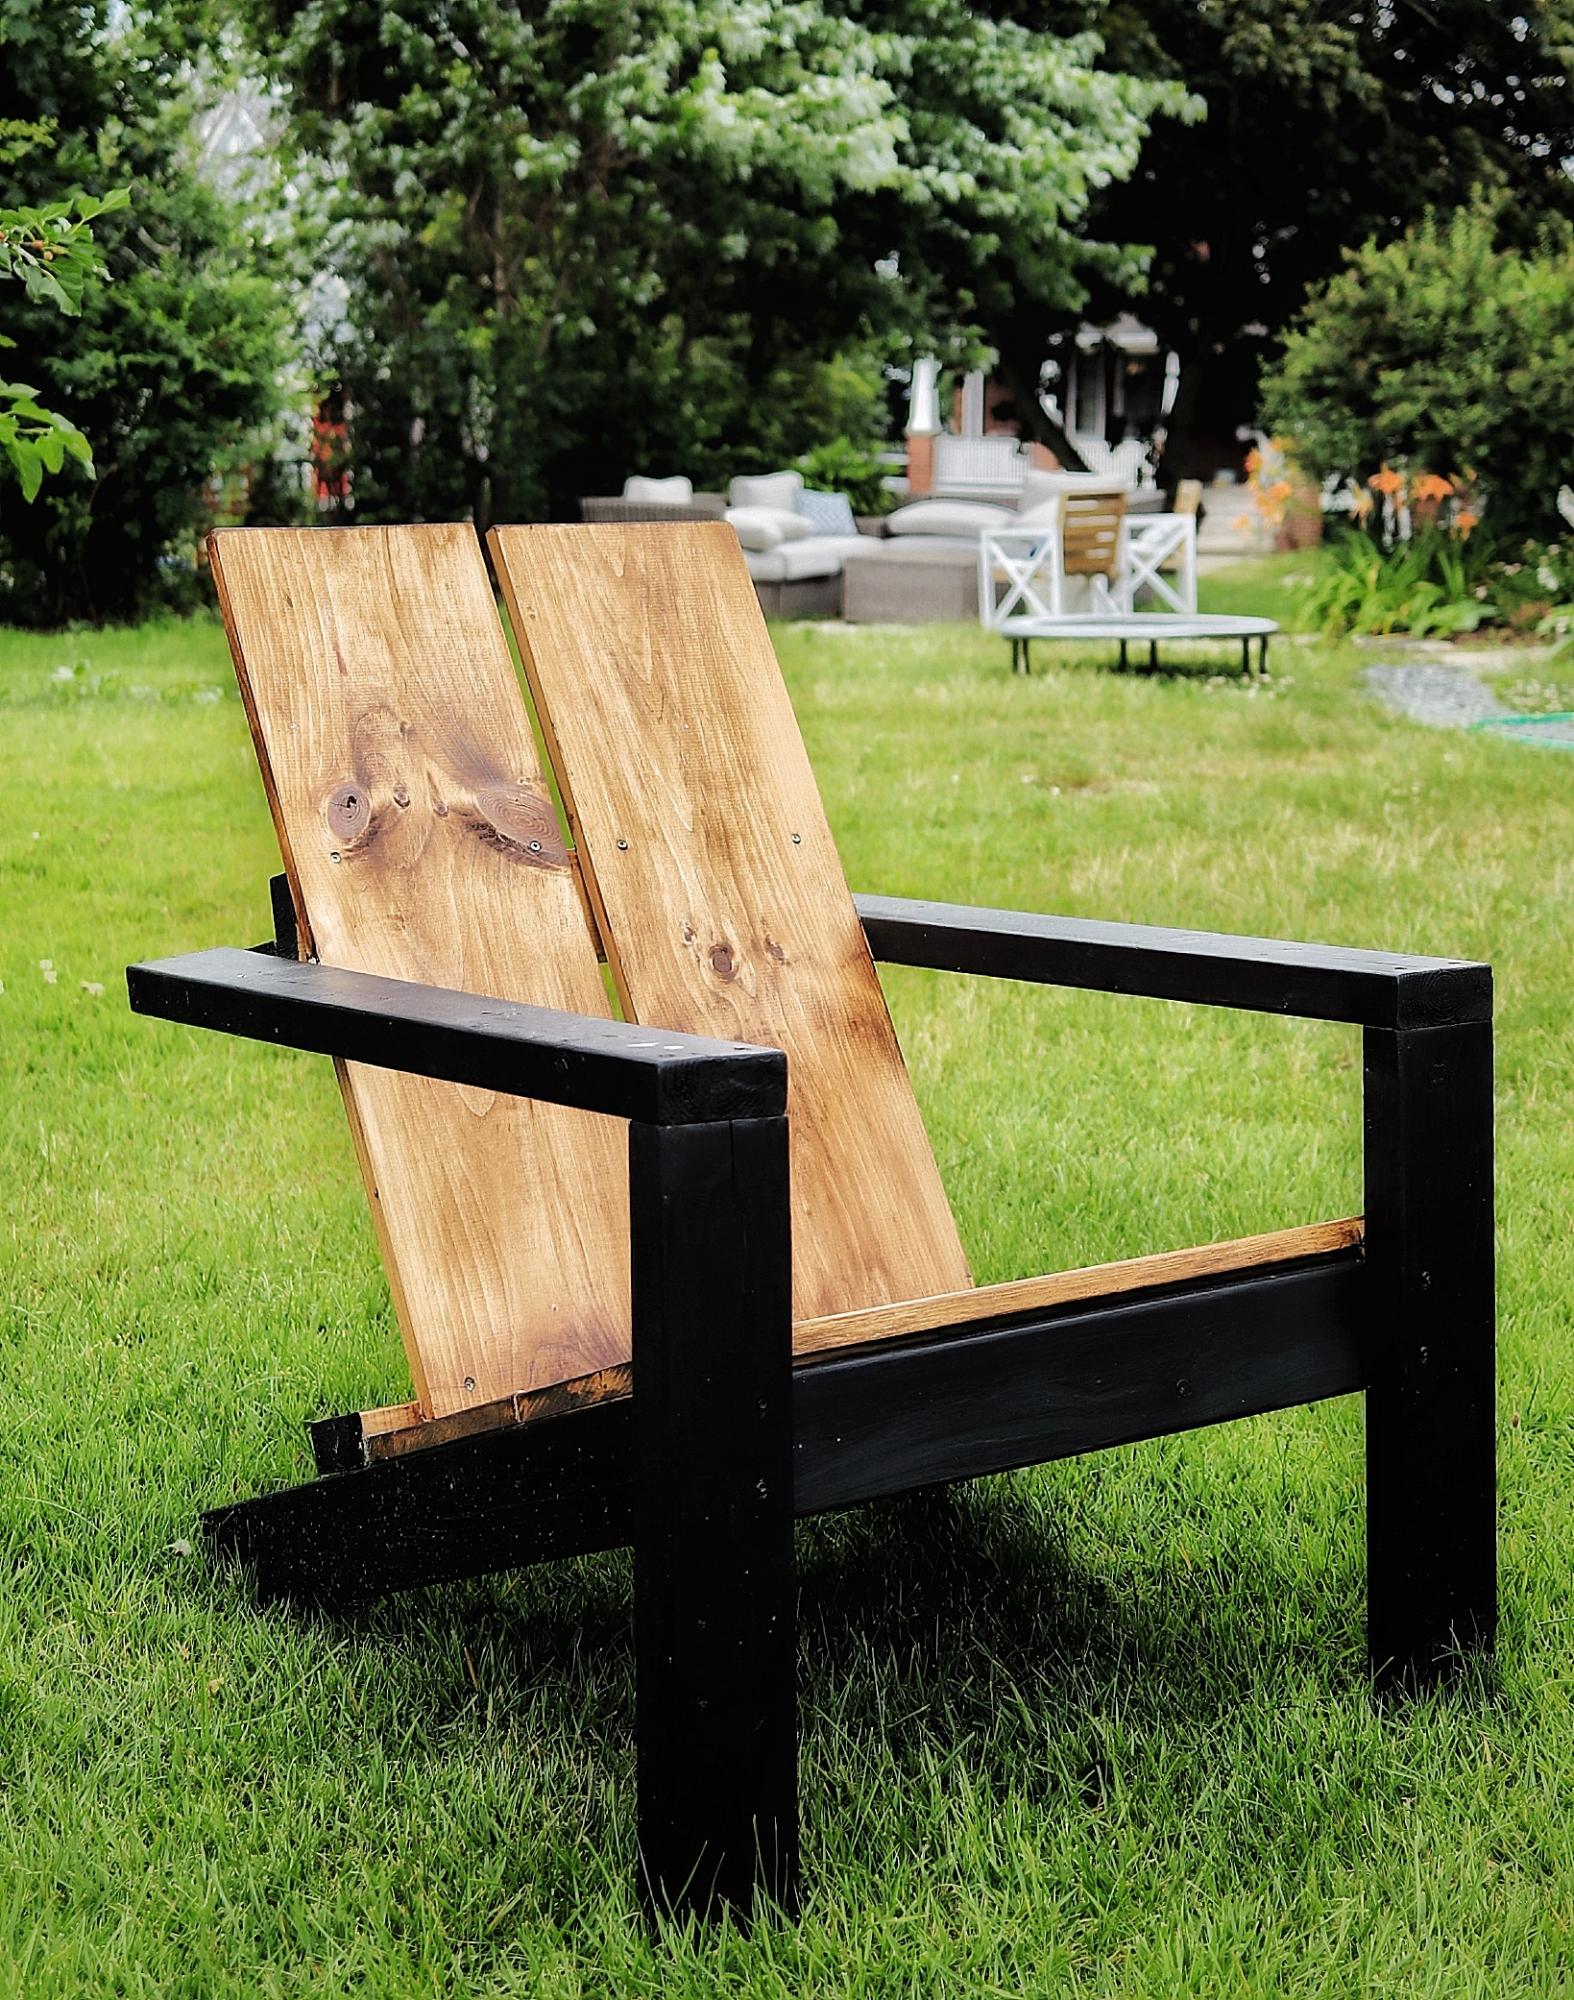
I was so excited to find the plans for these awesome chairs, I’ve built 7 this season already—the modification happened as an accident, but I loved the result !

Thu, 03/04/2021 - 10:59
This is absolutely gorgeous! I love the modification!
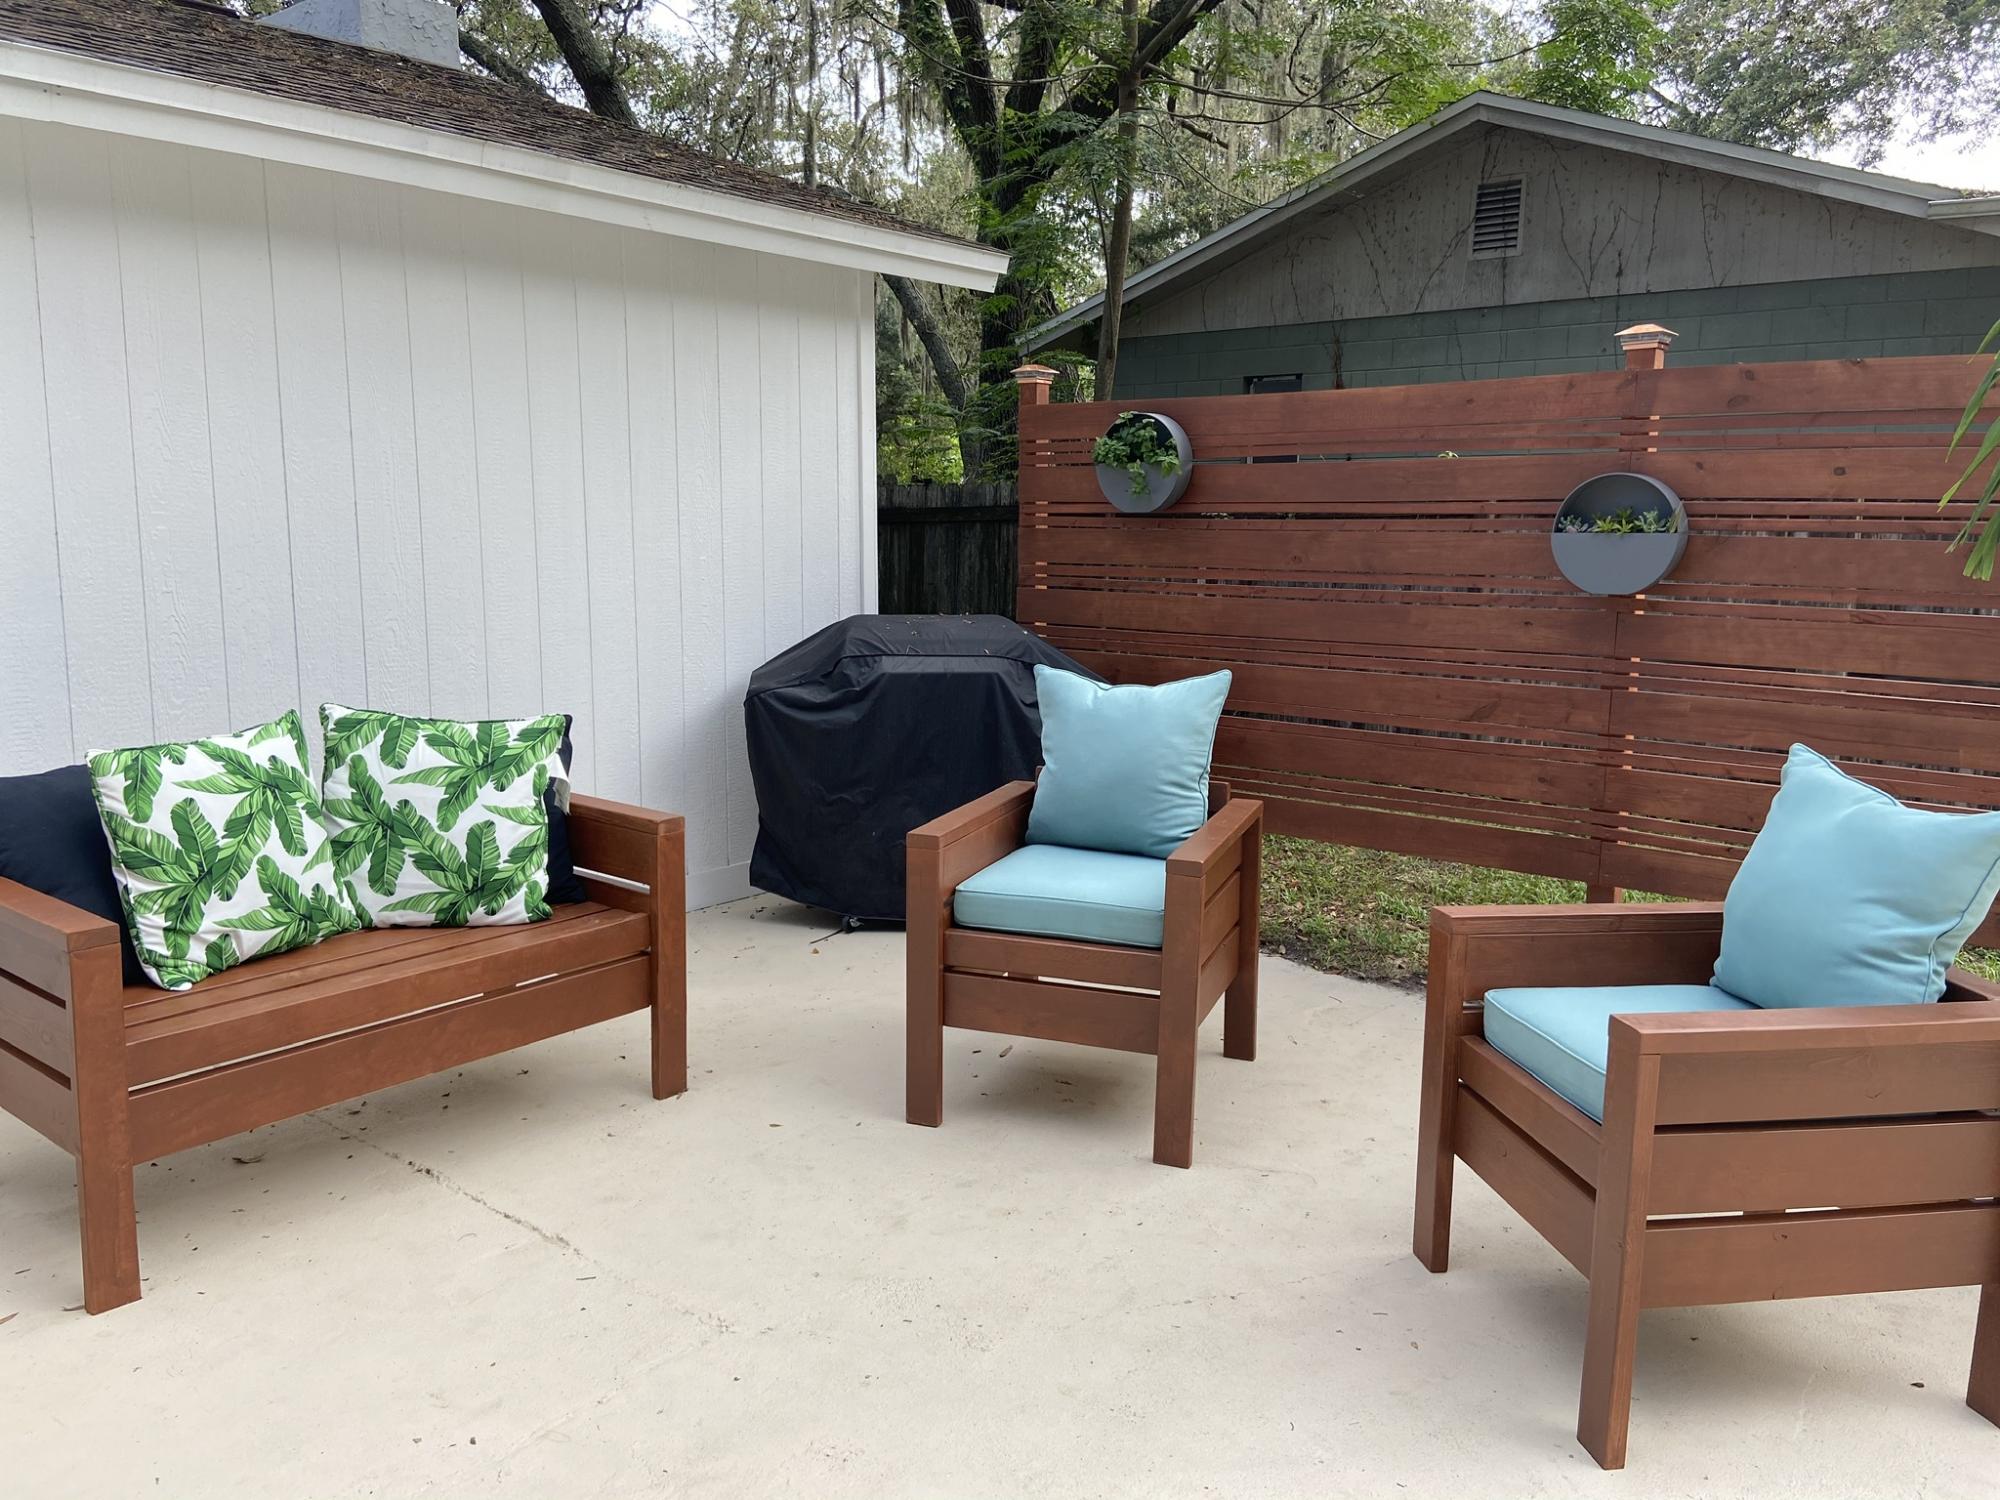
I was so excited to build this outdoor patio set! My husband and I looked high and low to find an affordable,“tall and sturdy people” outdoor patio set. The sturdy pieces we found were in the $600-$1000s... and I’m sorry.... we’re not paying that. Especially, since most of those sets were not built to hold up in the Florida rain and humidity. So my husband suggested... “ just build it!” I modified the leg length to 28 1/4”, since I have tall family. The cushions were found at Pier1 for a steal since they’re going out of business, so the chairs were modified to fit the cushion size 22”x 22”.
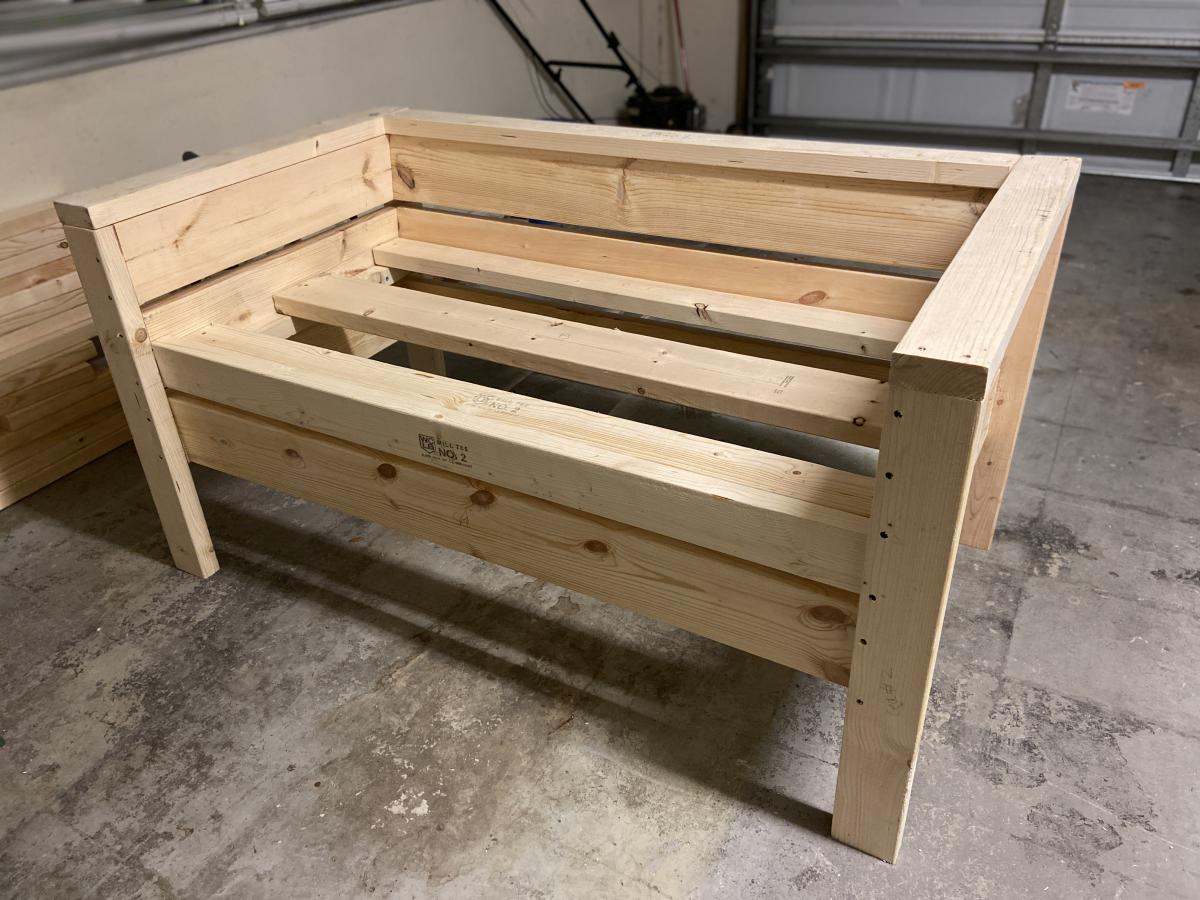
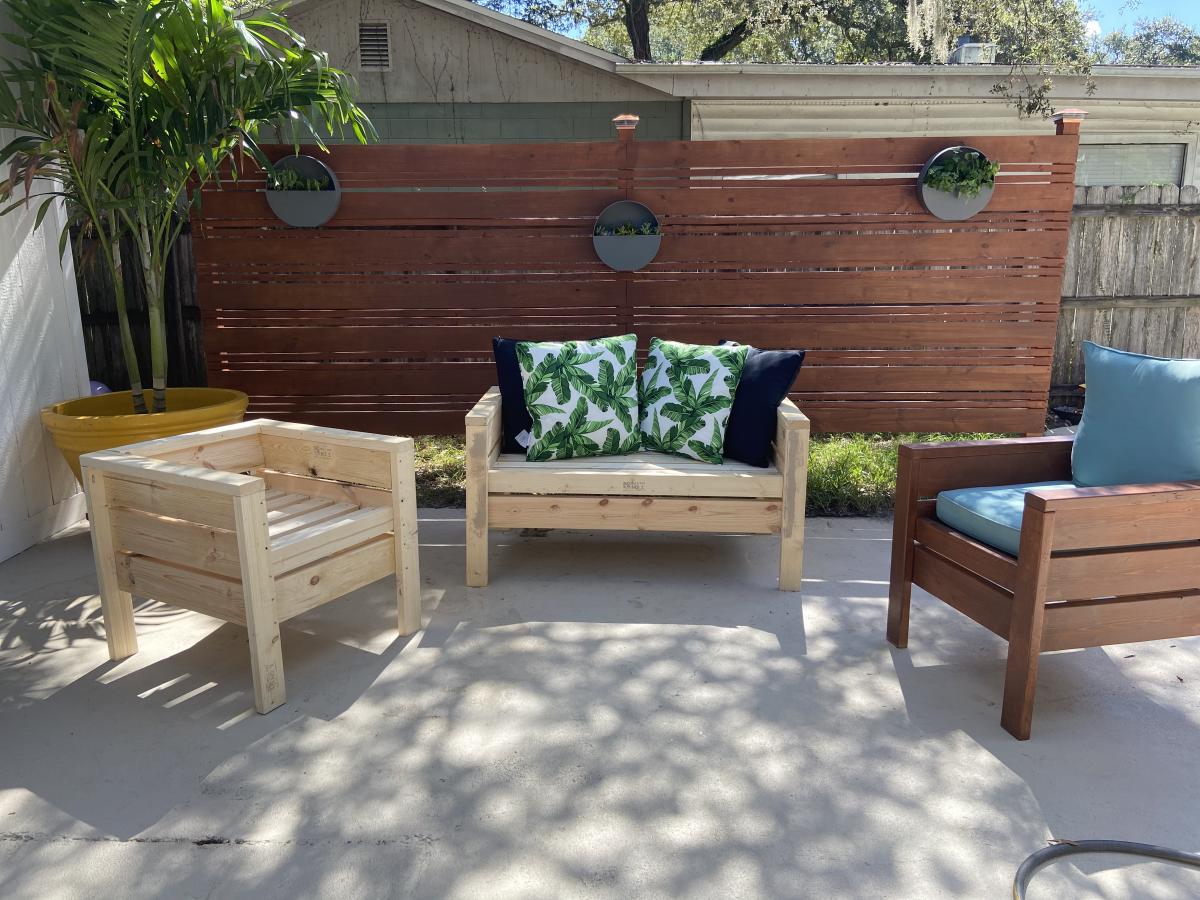
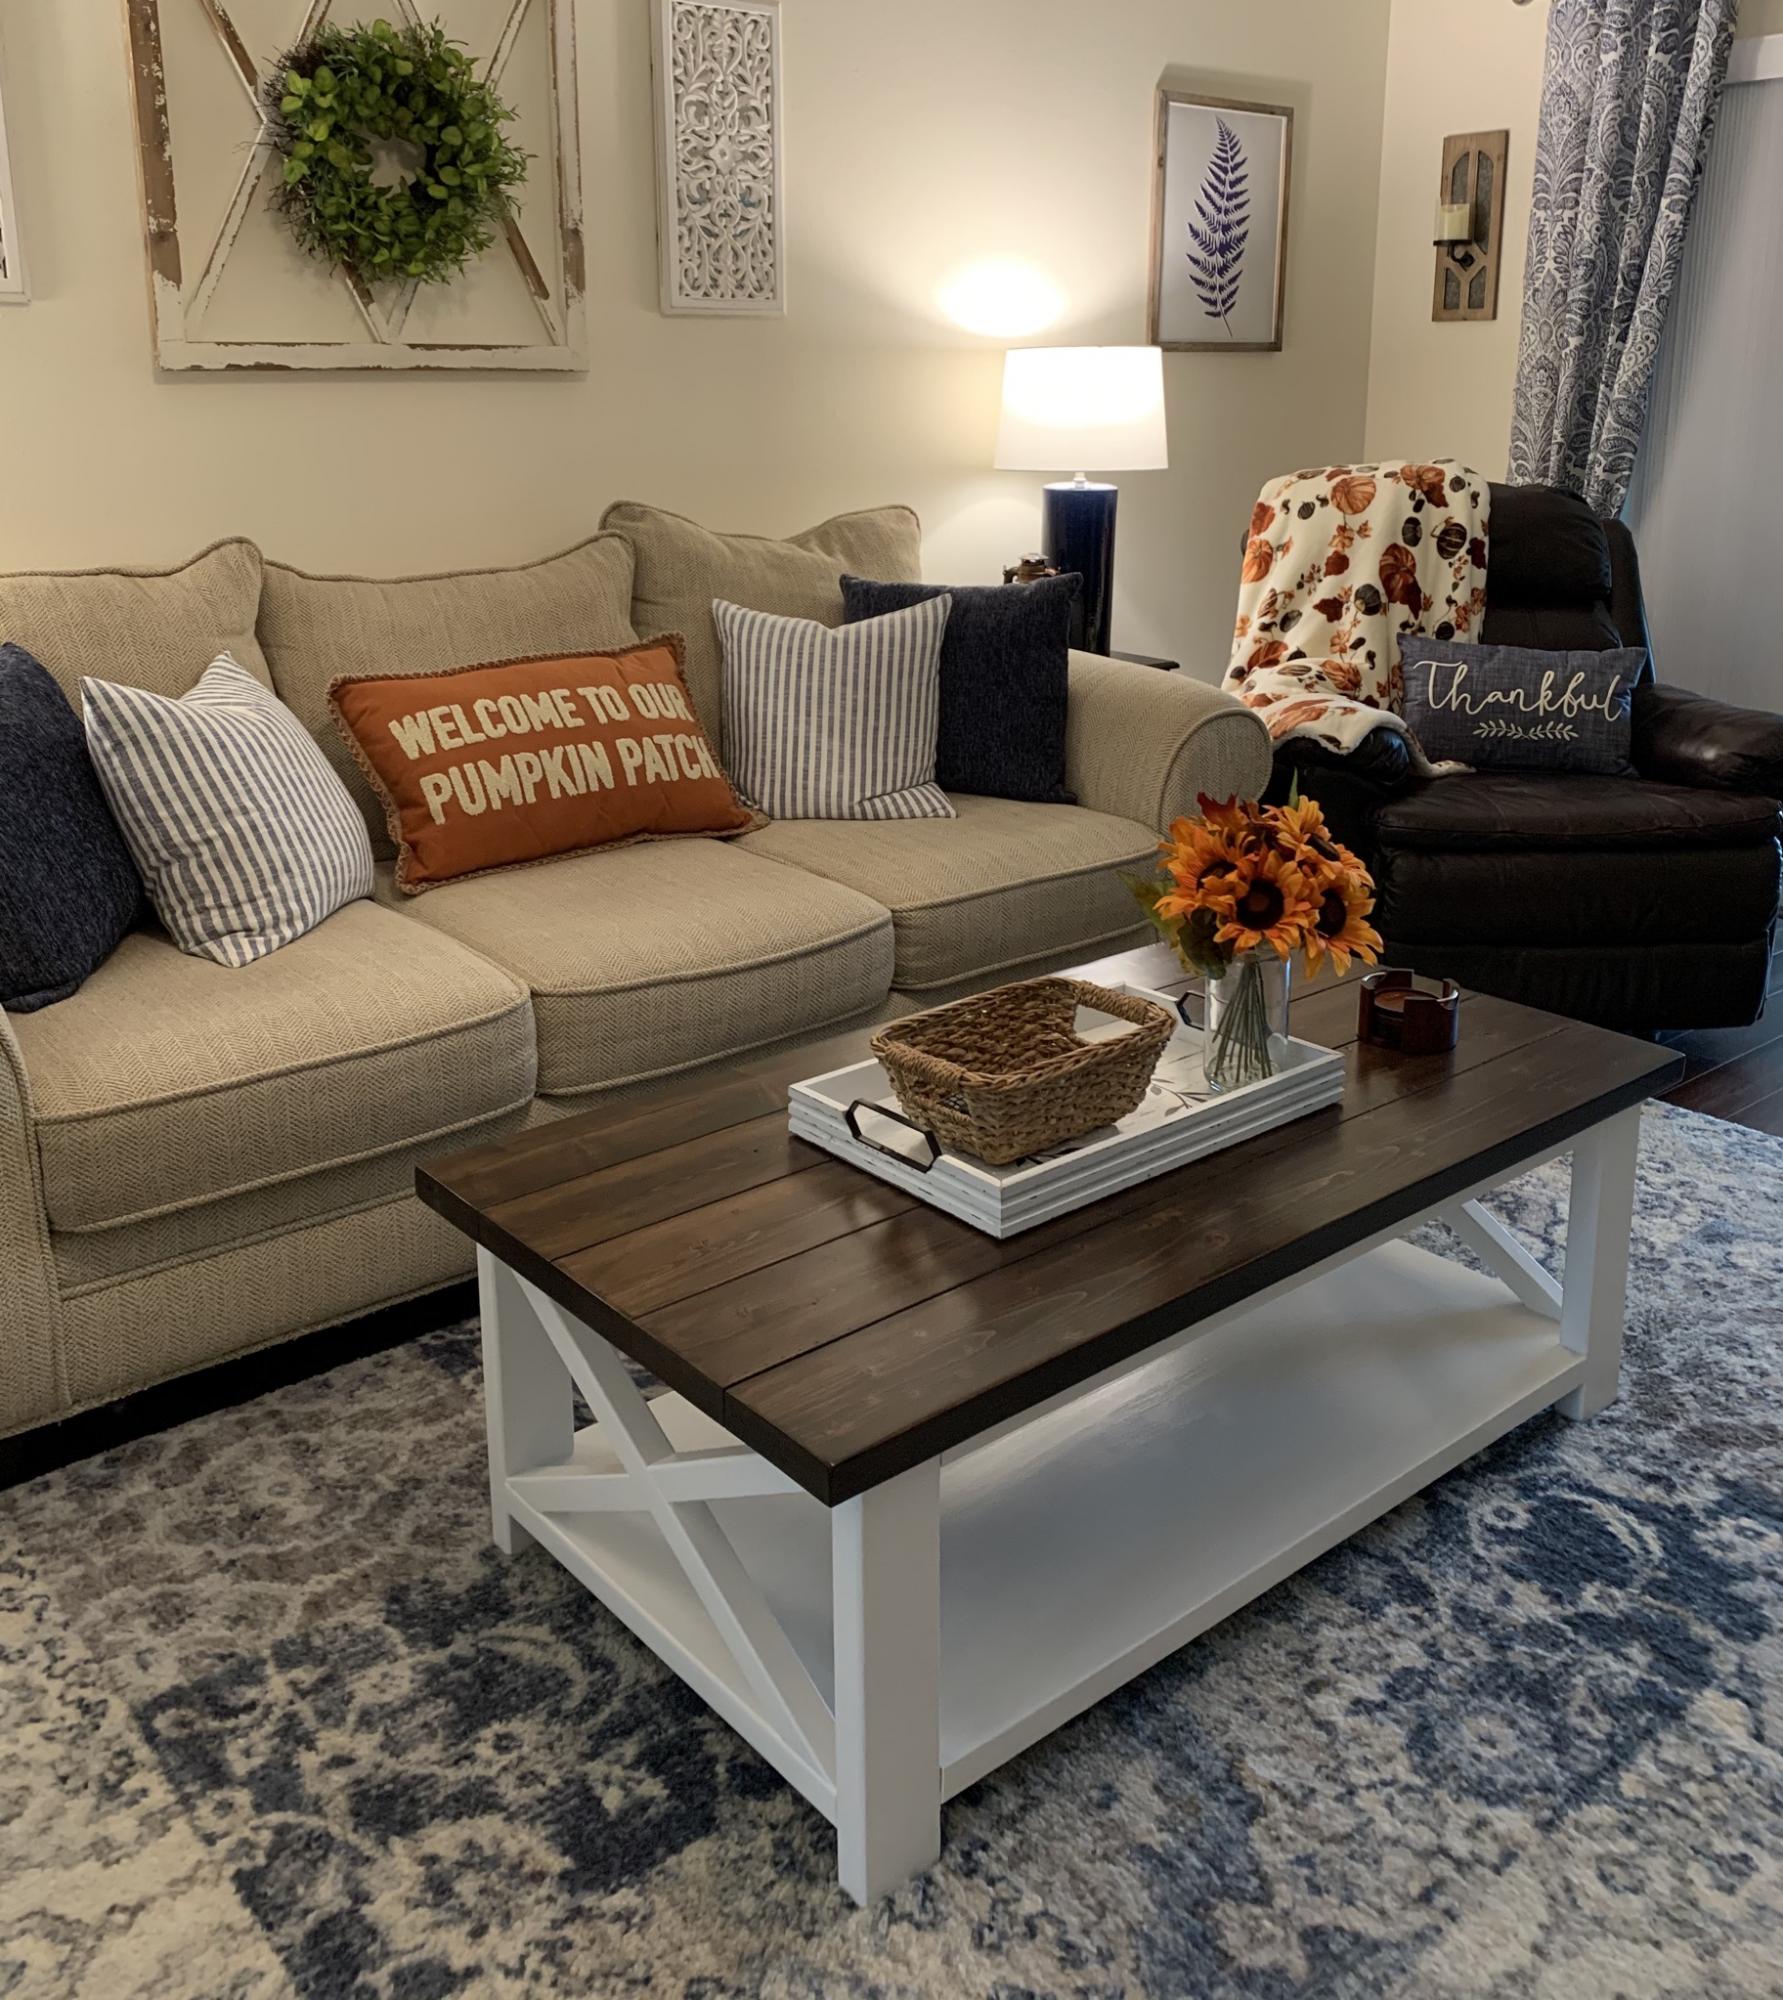
This was the very first project that my husband and I have ever built and it came out exactly as planned. We followed the instructions exactly as written and I’m in love with this table.
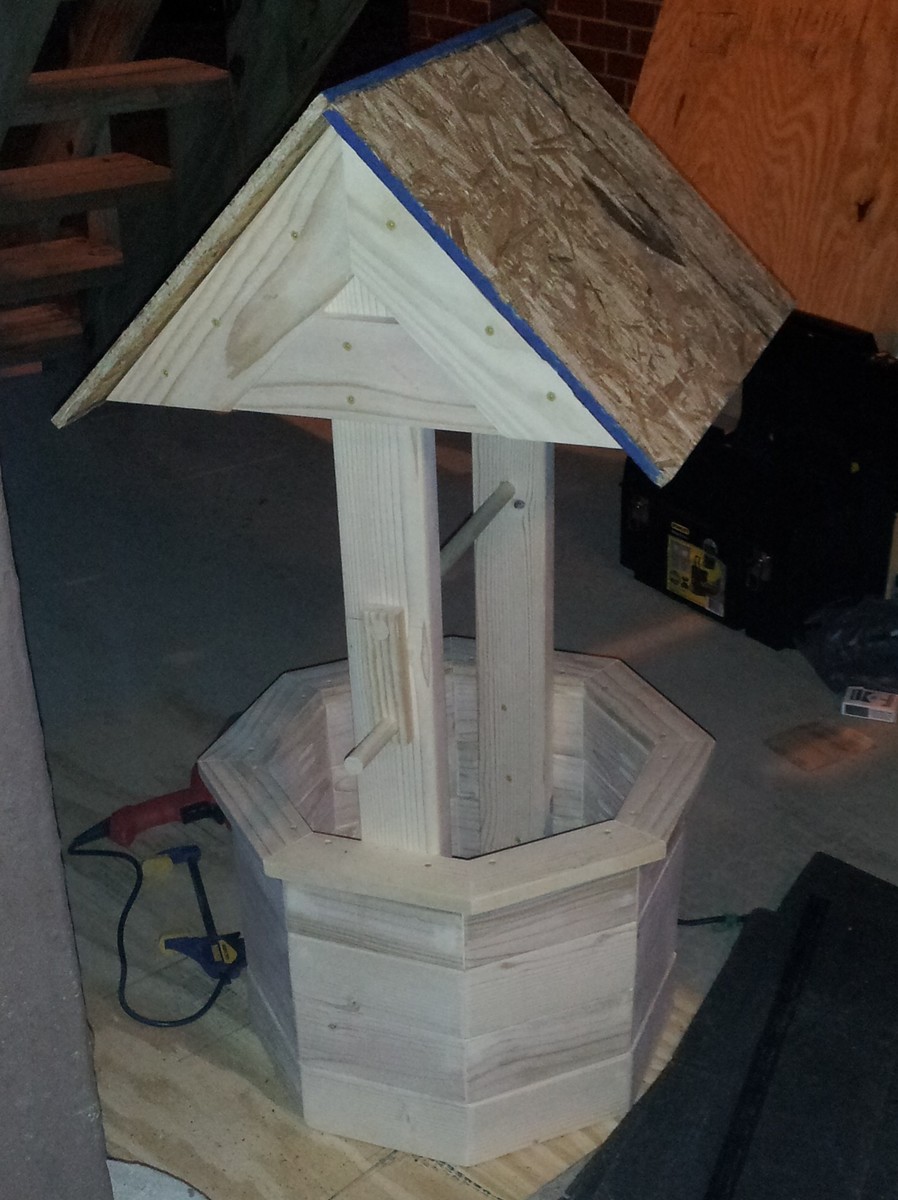
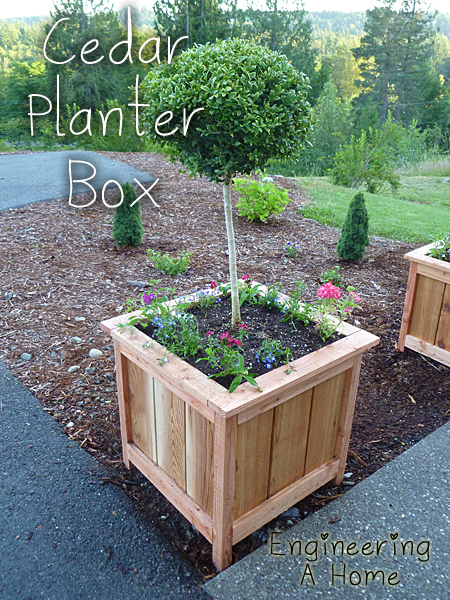
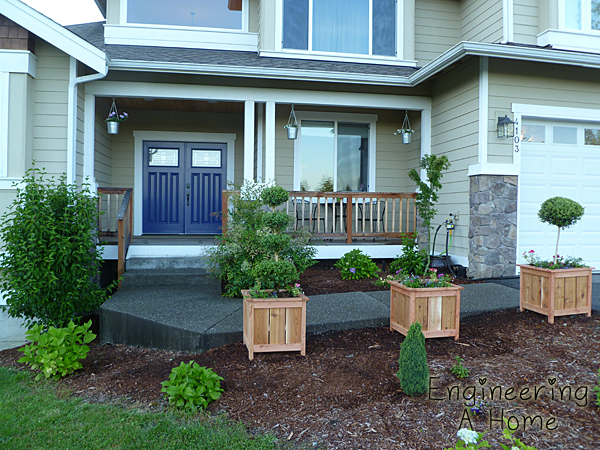
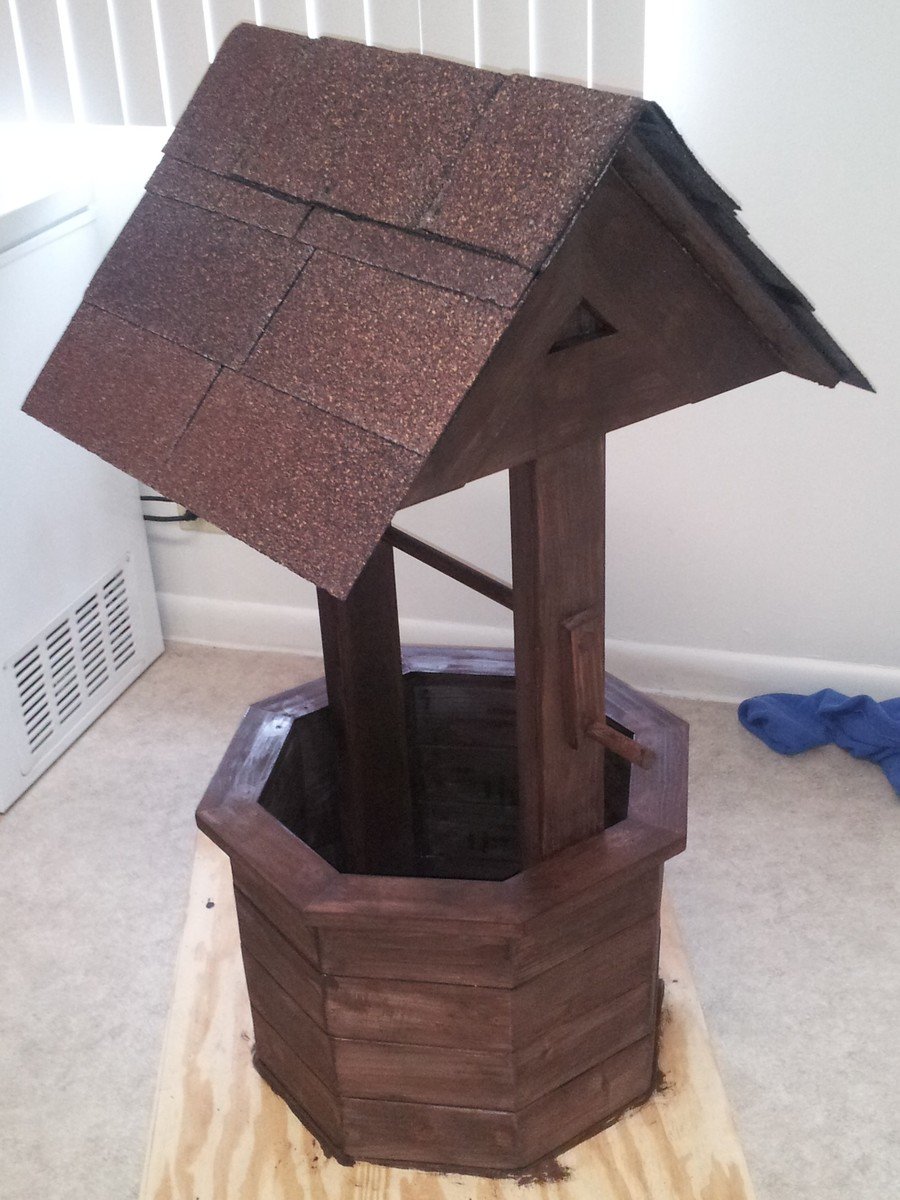
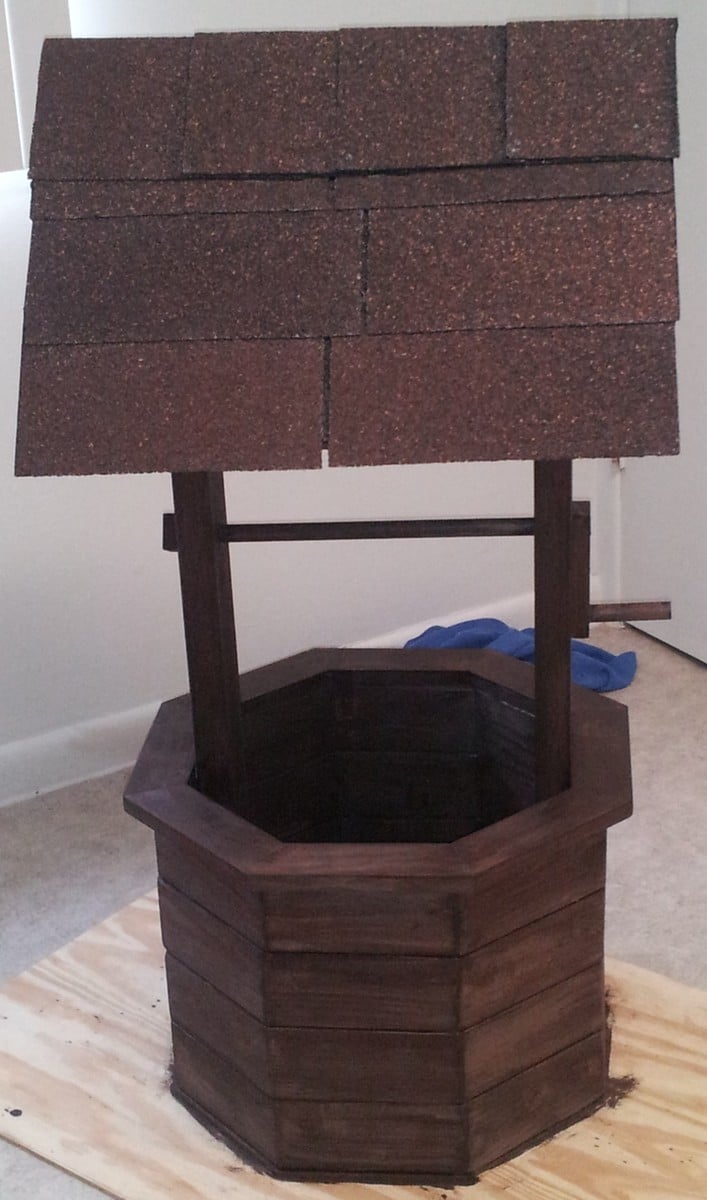
This is a wishing well I made for my sister for her wedding. It will be used during the wedding for people to drop "wish you well" cards into and afterward she can use it as a planter in her yard.
I followed ideas from multiple plans here on Ana-White.com, but I didn't follow any specific plan. Mostly I followed tips and instructions for cutting angles, drilling pocket holes and some finishing tips. This is the first "big" project I've done and I"m quite proud of it.
With everything, it measures 44.5 inches high. The well measures 21 inches across and 15 inches high. The roof measures 22.75 inches by 23.75 inches.
I hope y'all like it. I worked hard on this! :)
Thank you, Ana and everyone who contributes to this site. It's been so much fun and I've got lots of ideas for more stuff. If I was any good at all at Google Sketchup I'd put up the plans but I'm not. If anyone could help me with that, that would great. :)
Have a great day!
Mon, 07/21/2014 - 20:04
Anyway you can please tell me the angle for the boards ont the walls. I reallly like your well, and would like to build this for my wife but im not sure on what angles to use thank you

In reply to wishing well by bellows86
Sun, 07/10/2016 - 17:10
The 8 sided wishing well is going to be 22.5 degrees all the way around. hopes this helps
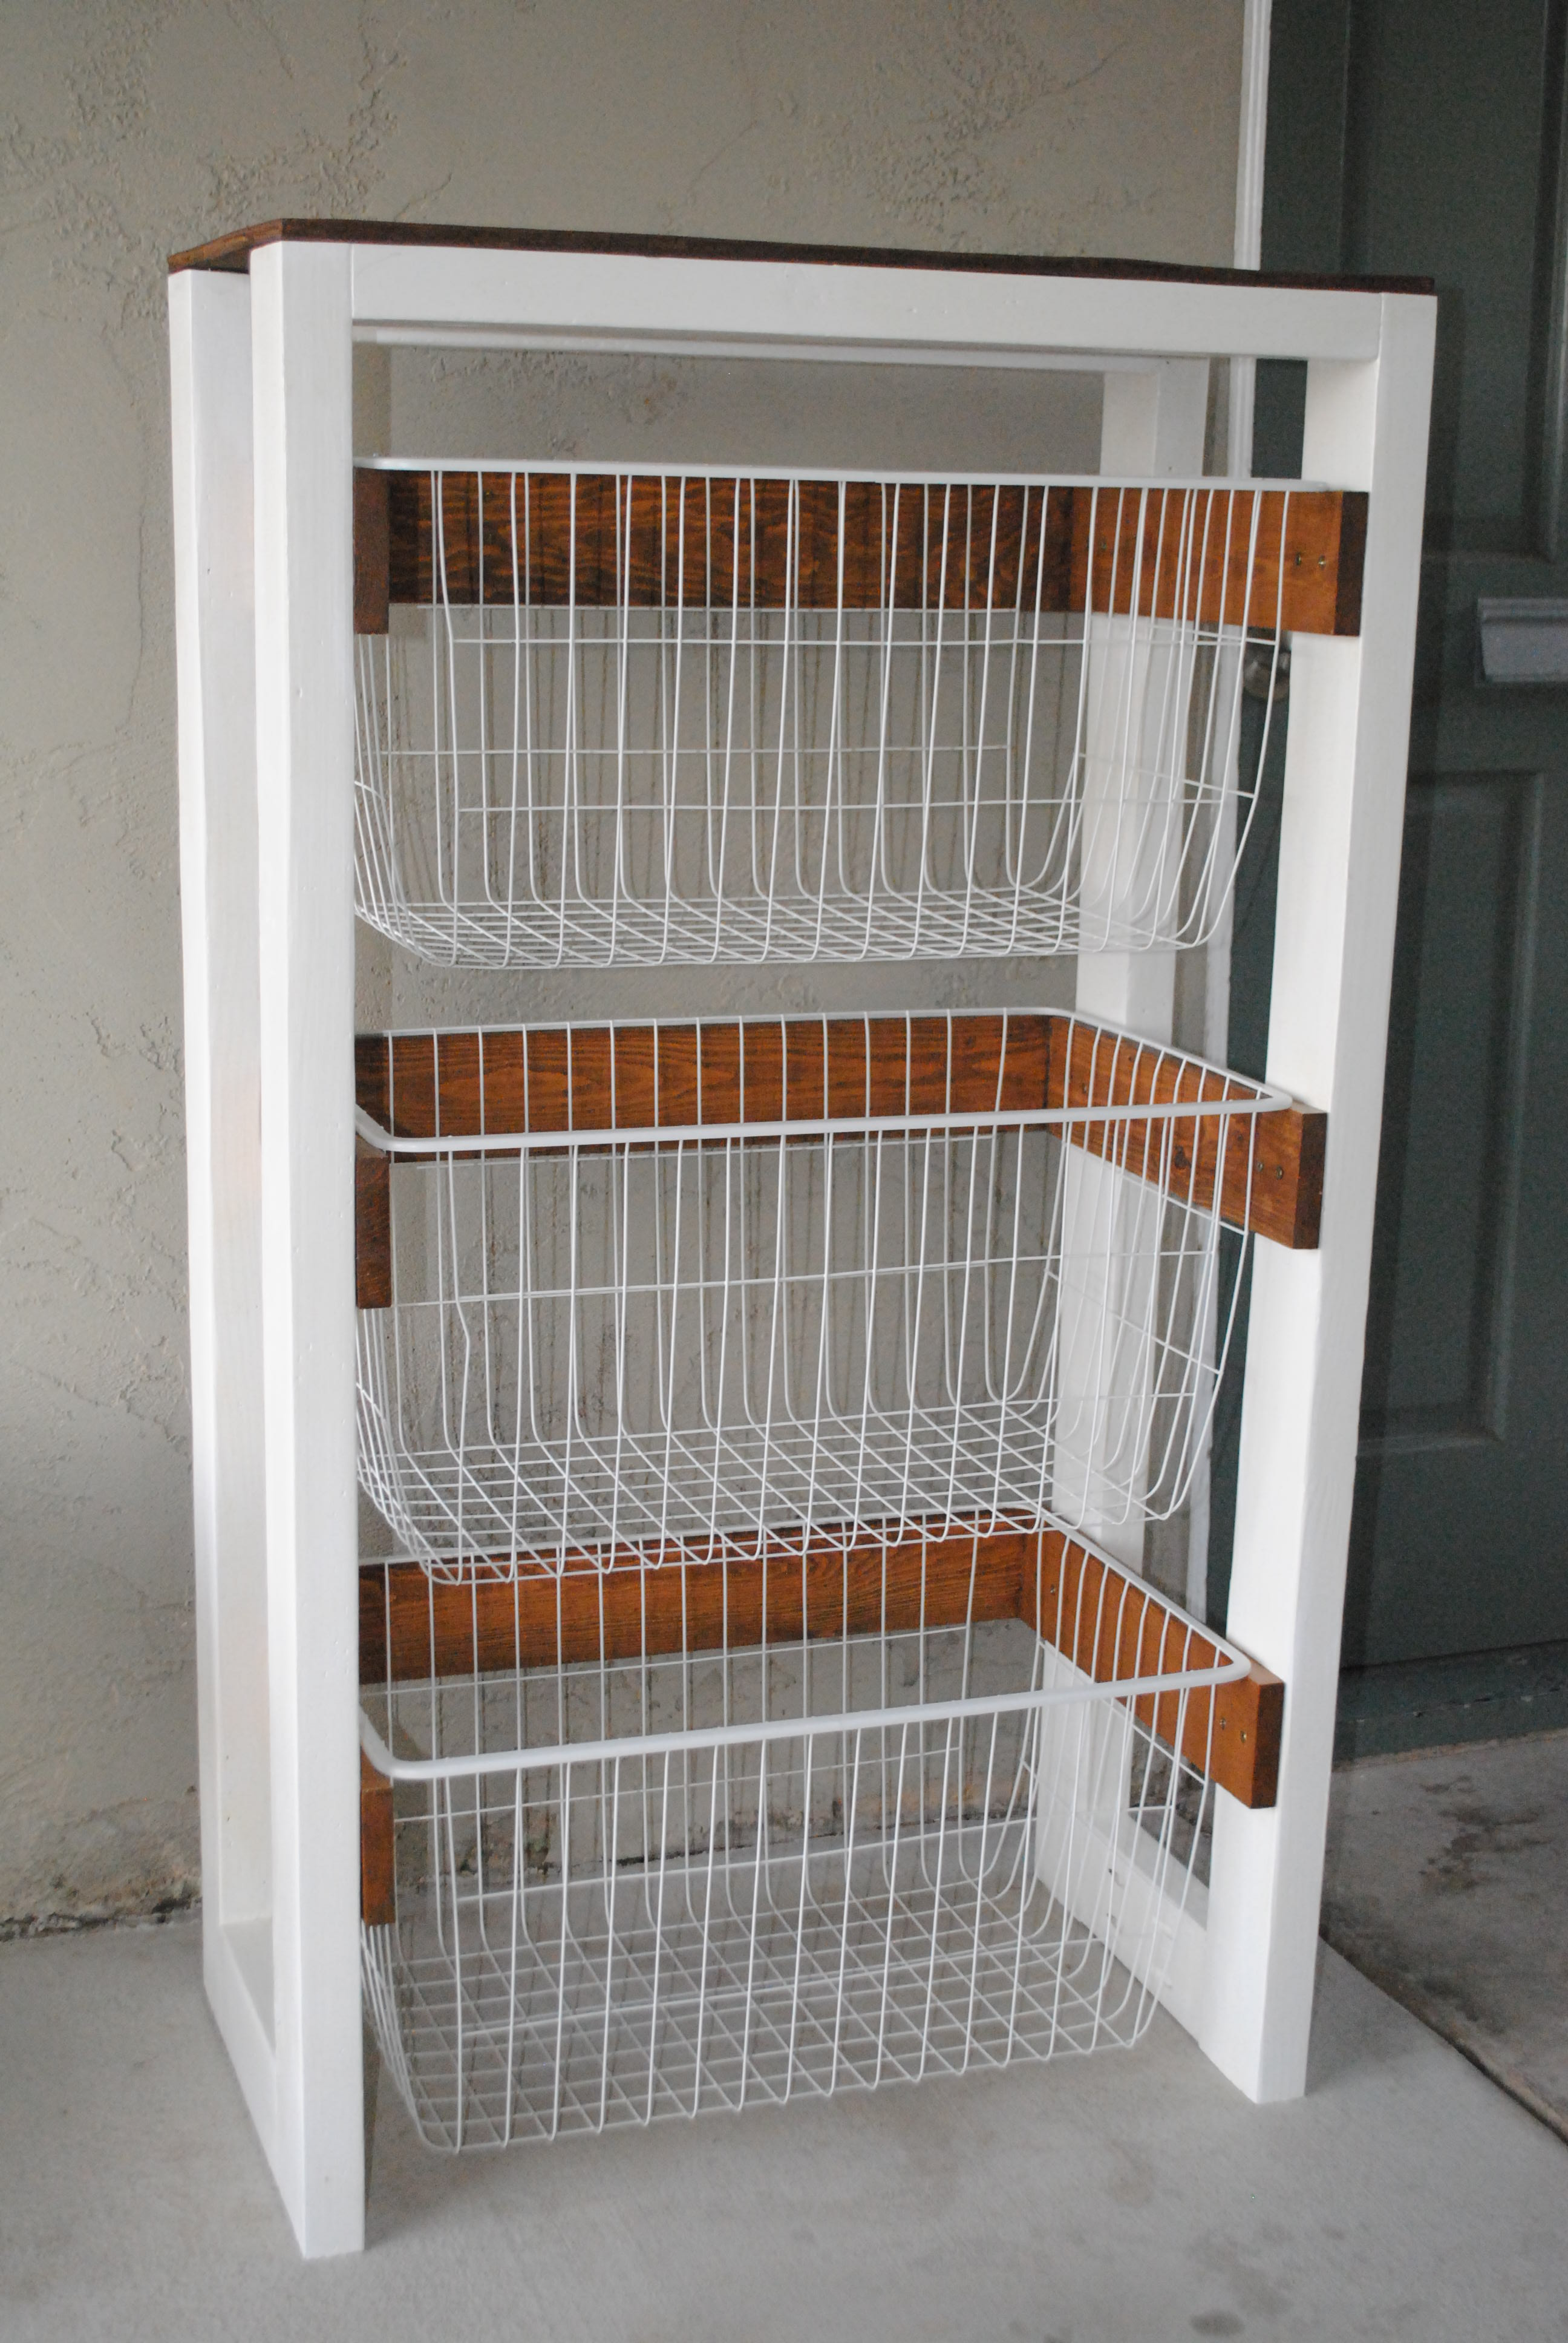
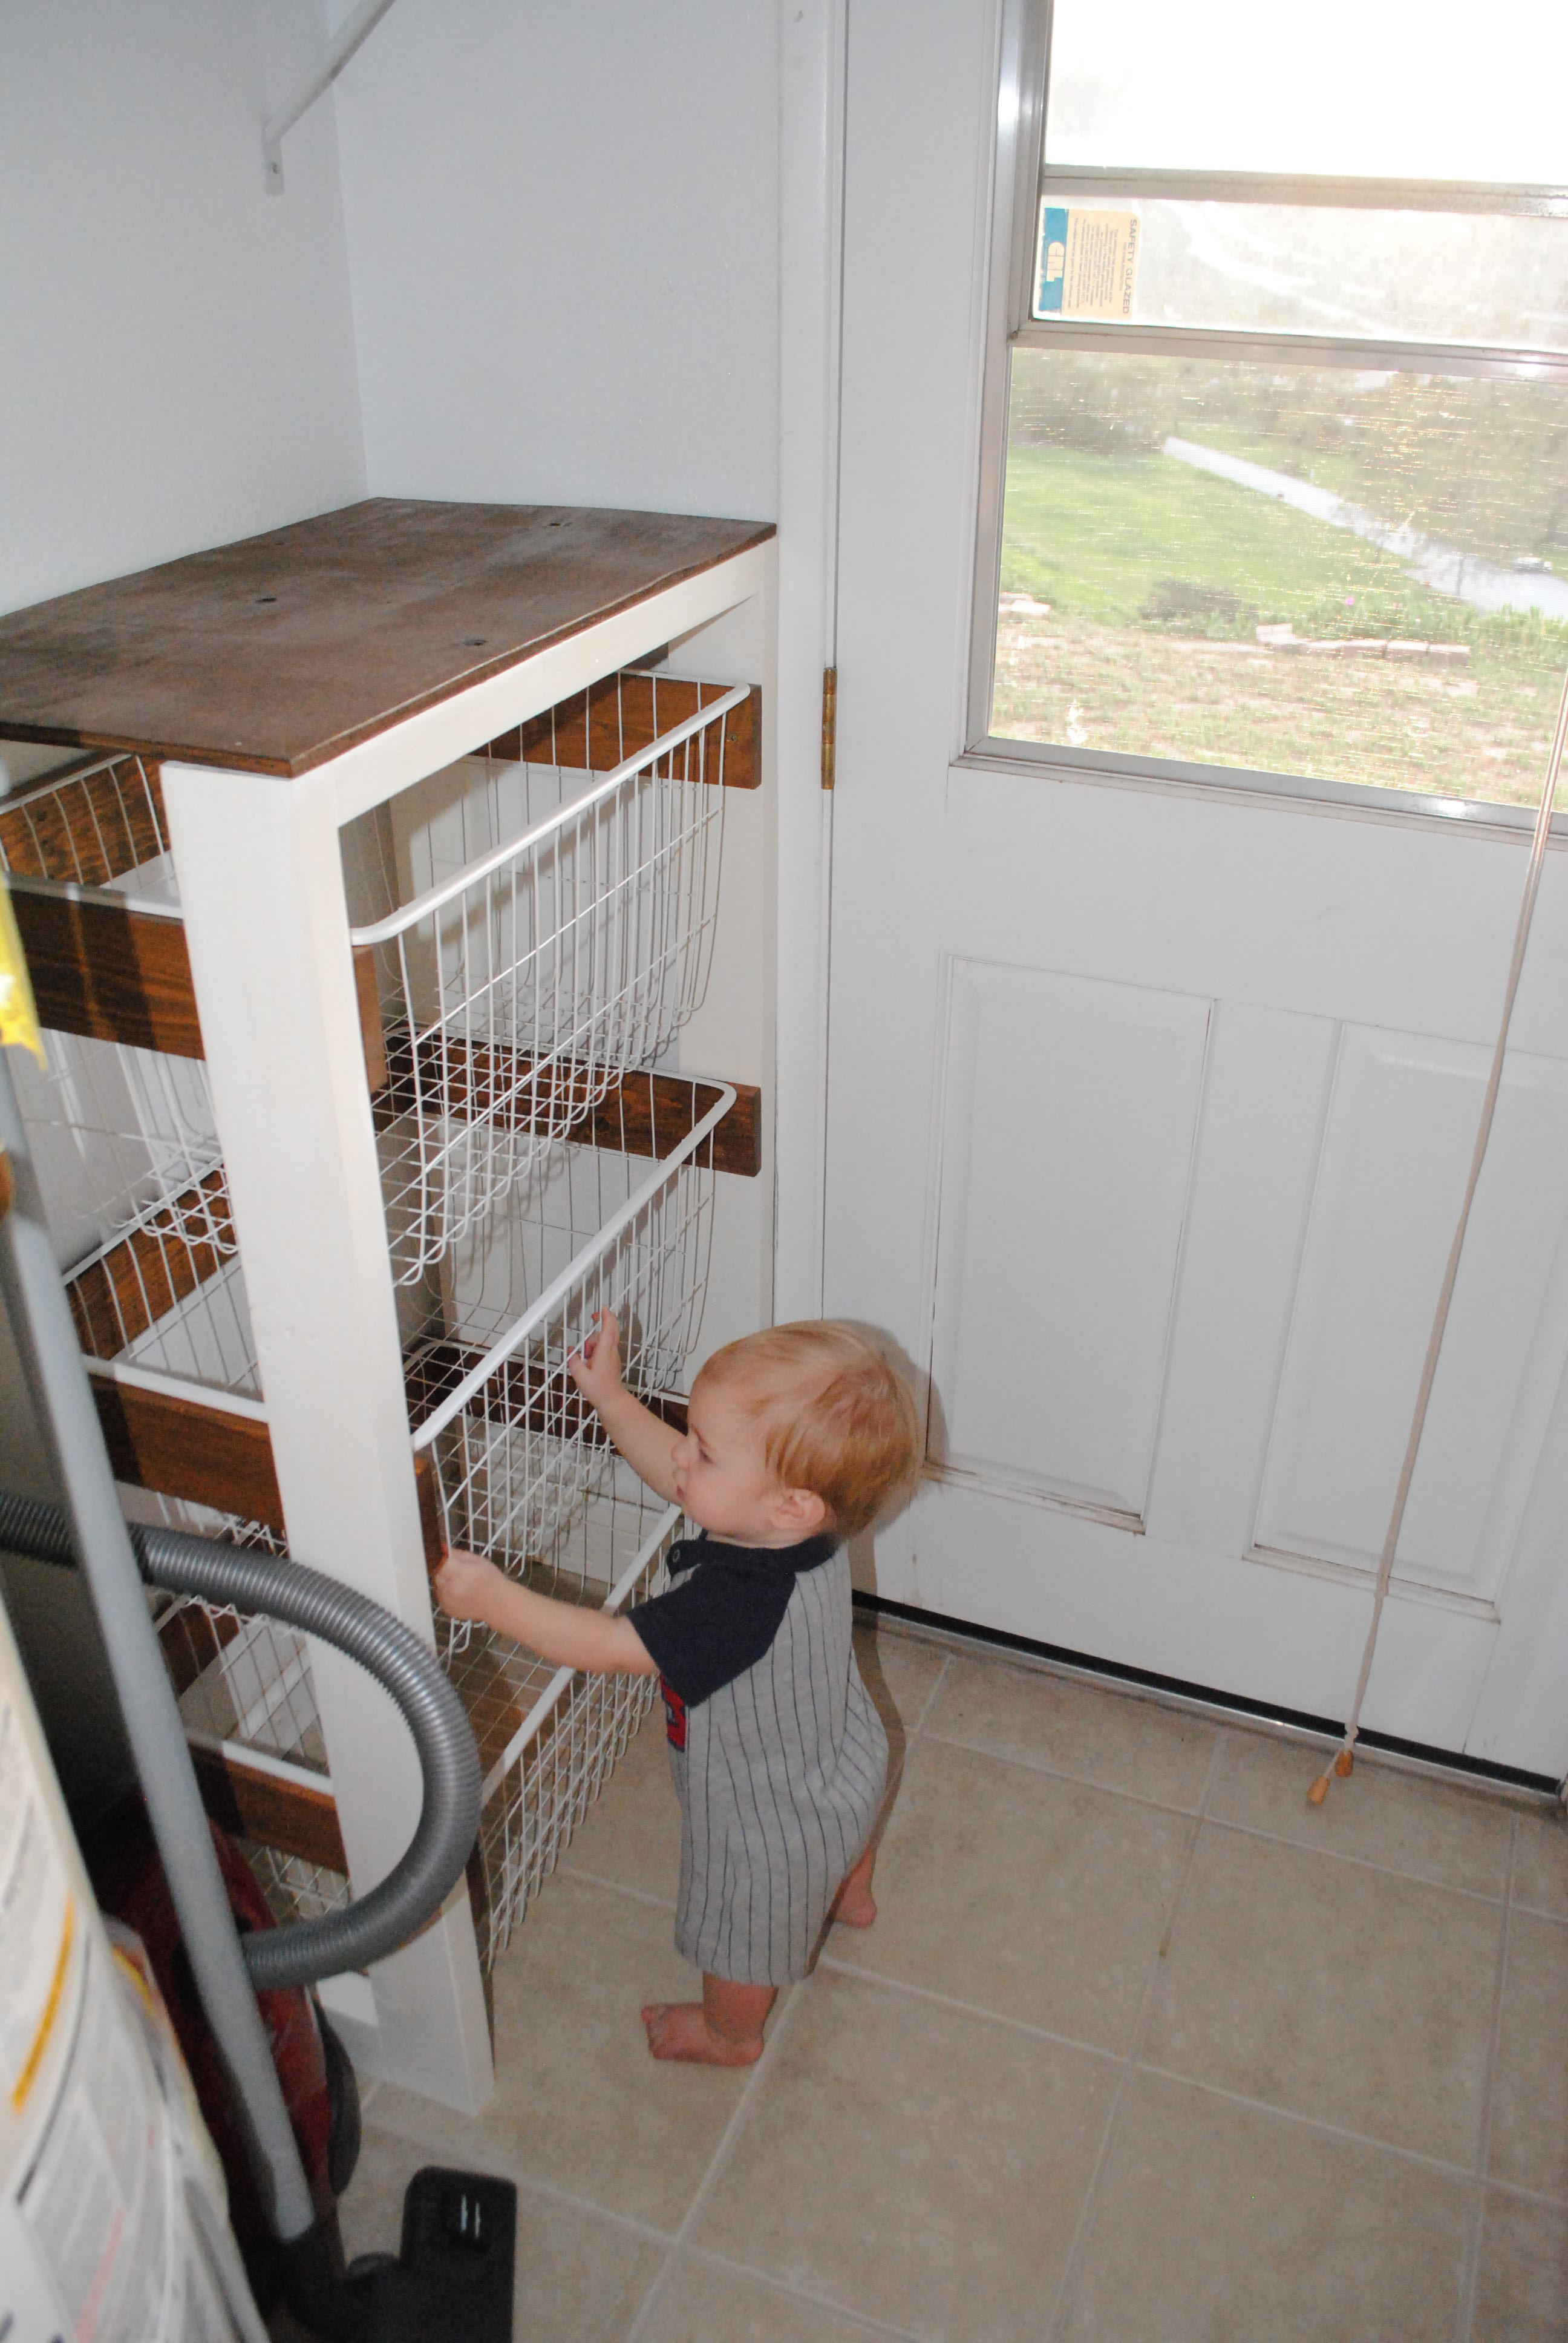
I built this project totally from pallet wood and leftover 2x4's. I already had the paint and stain from other projects, so the only cost was for the baskets, which were $6 a piece at Ikea. This project turned out even better than I expected and I couldn't be happier.
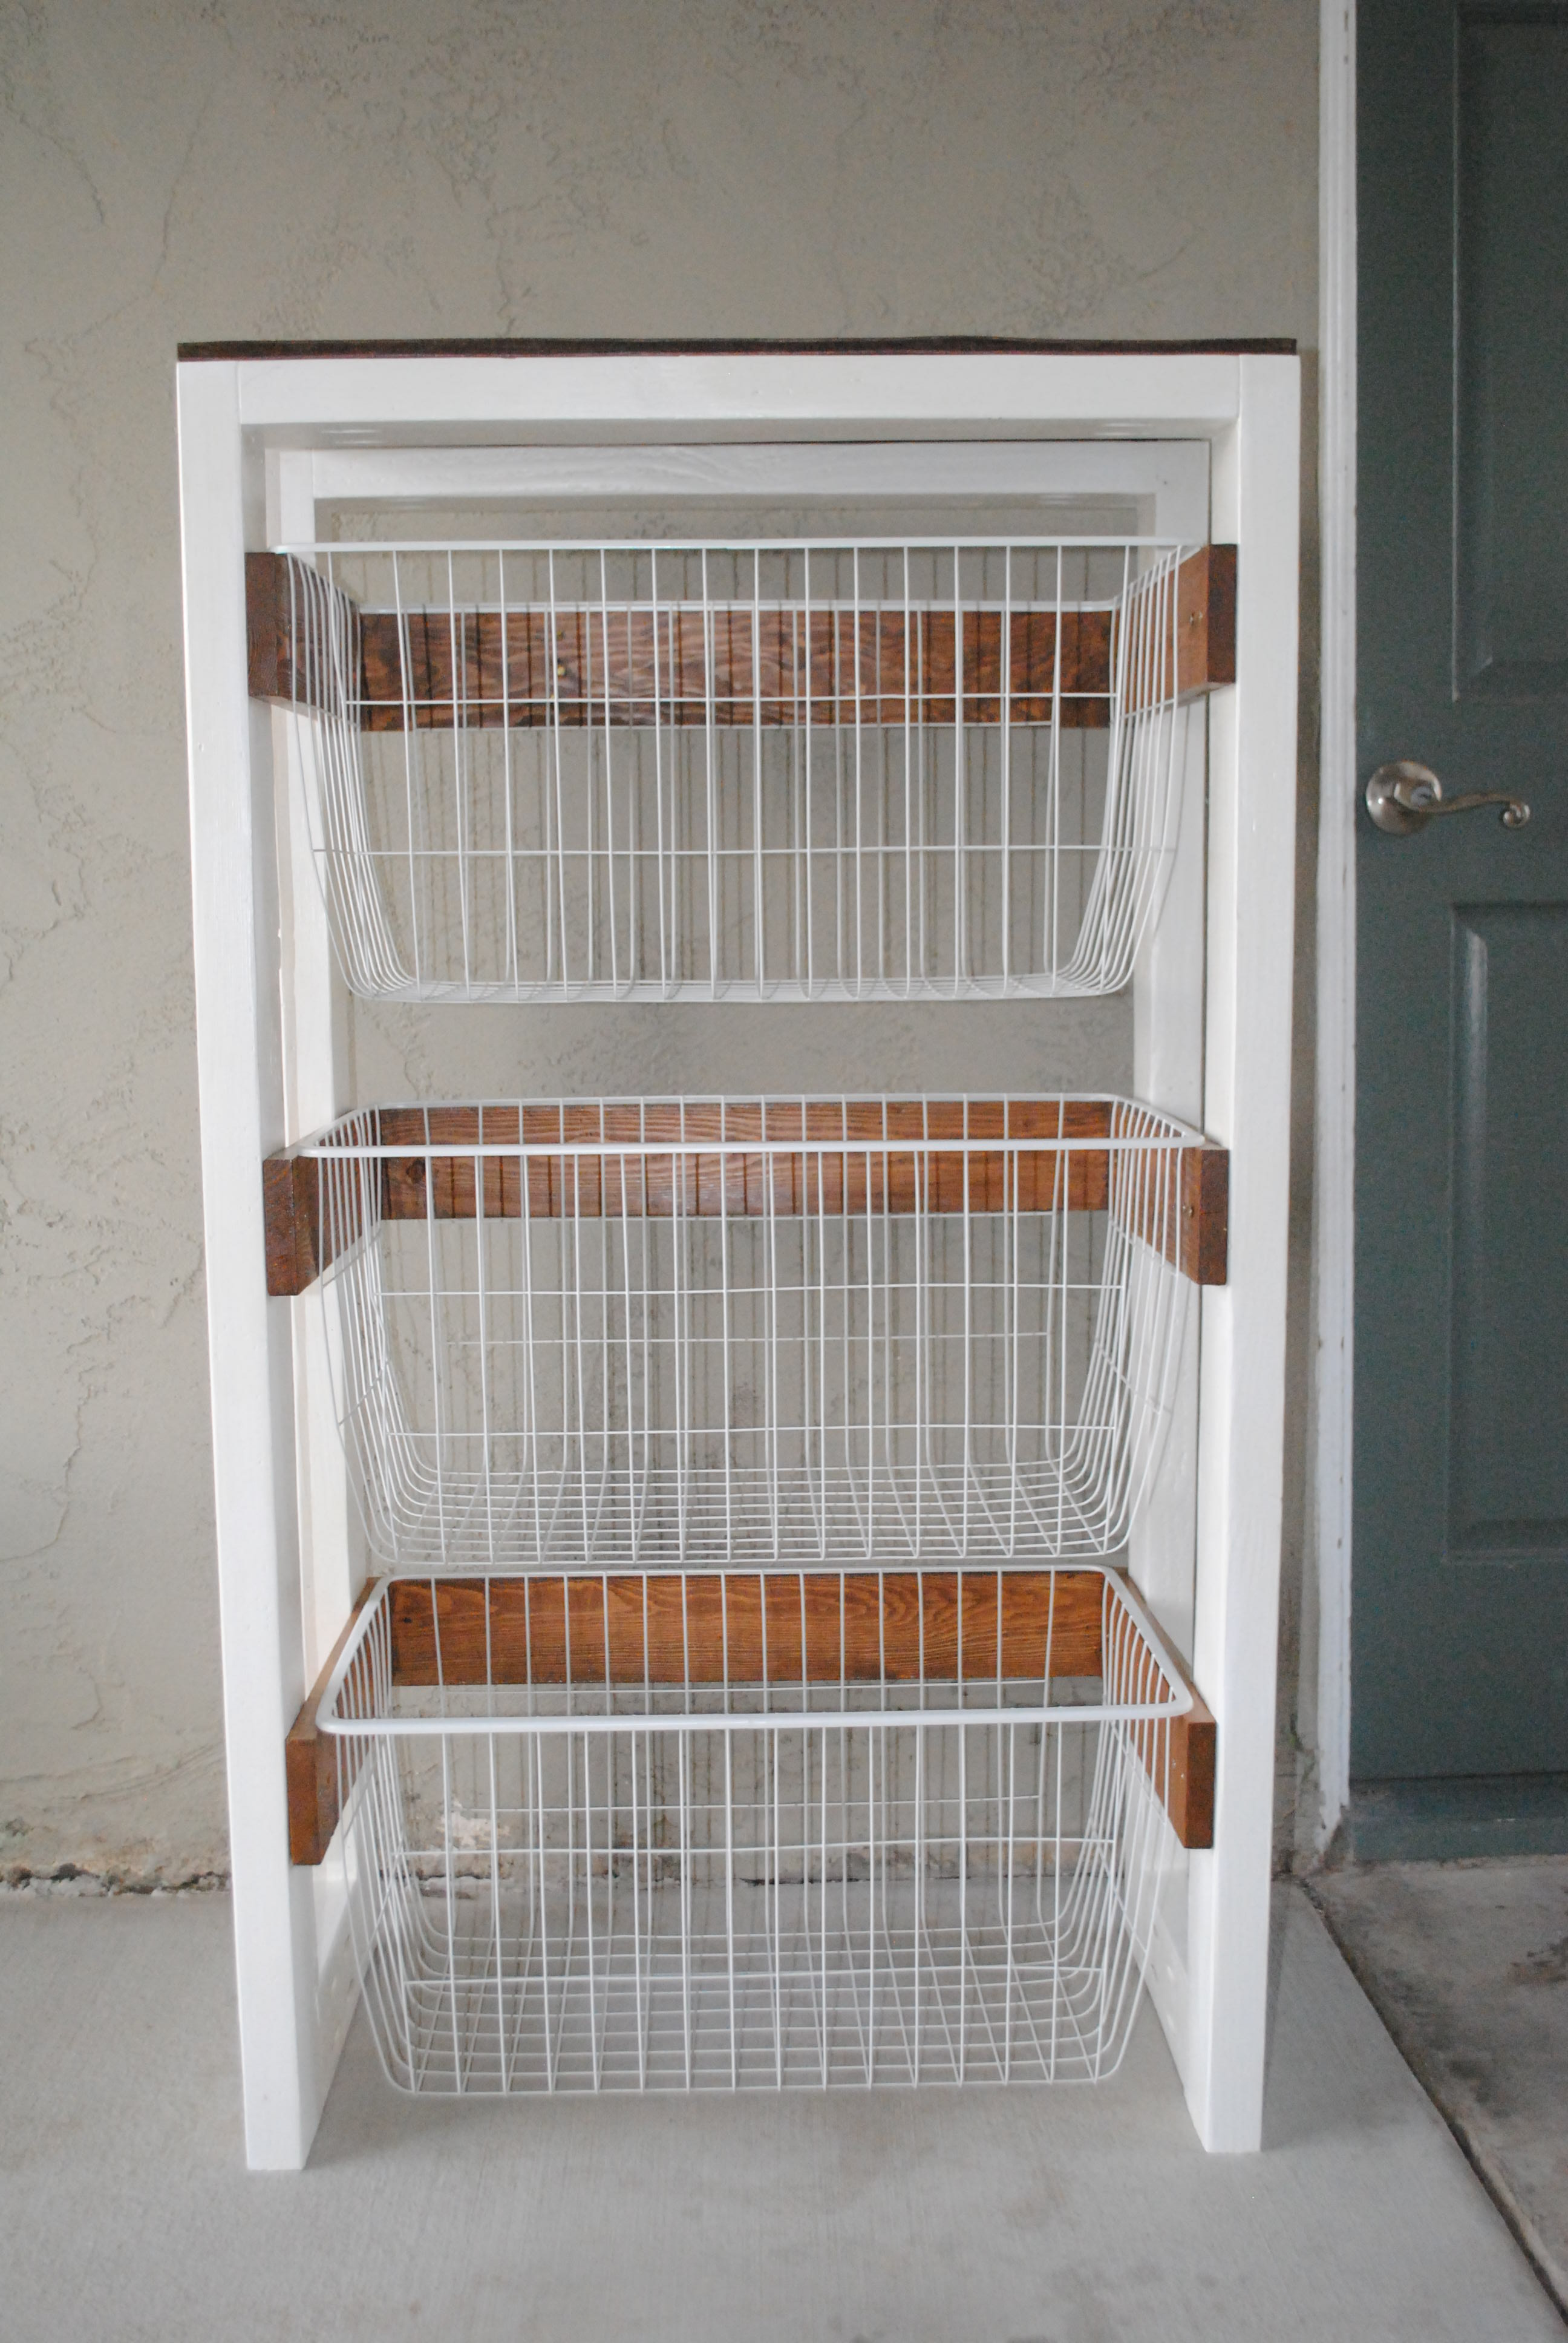
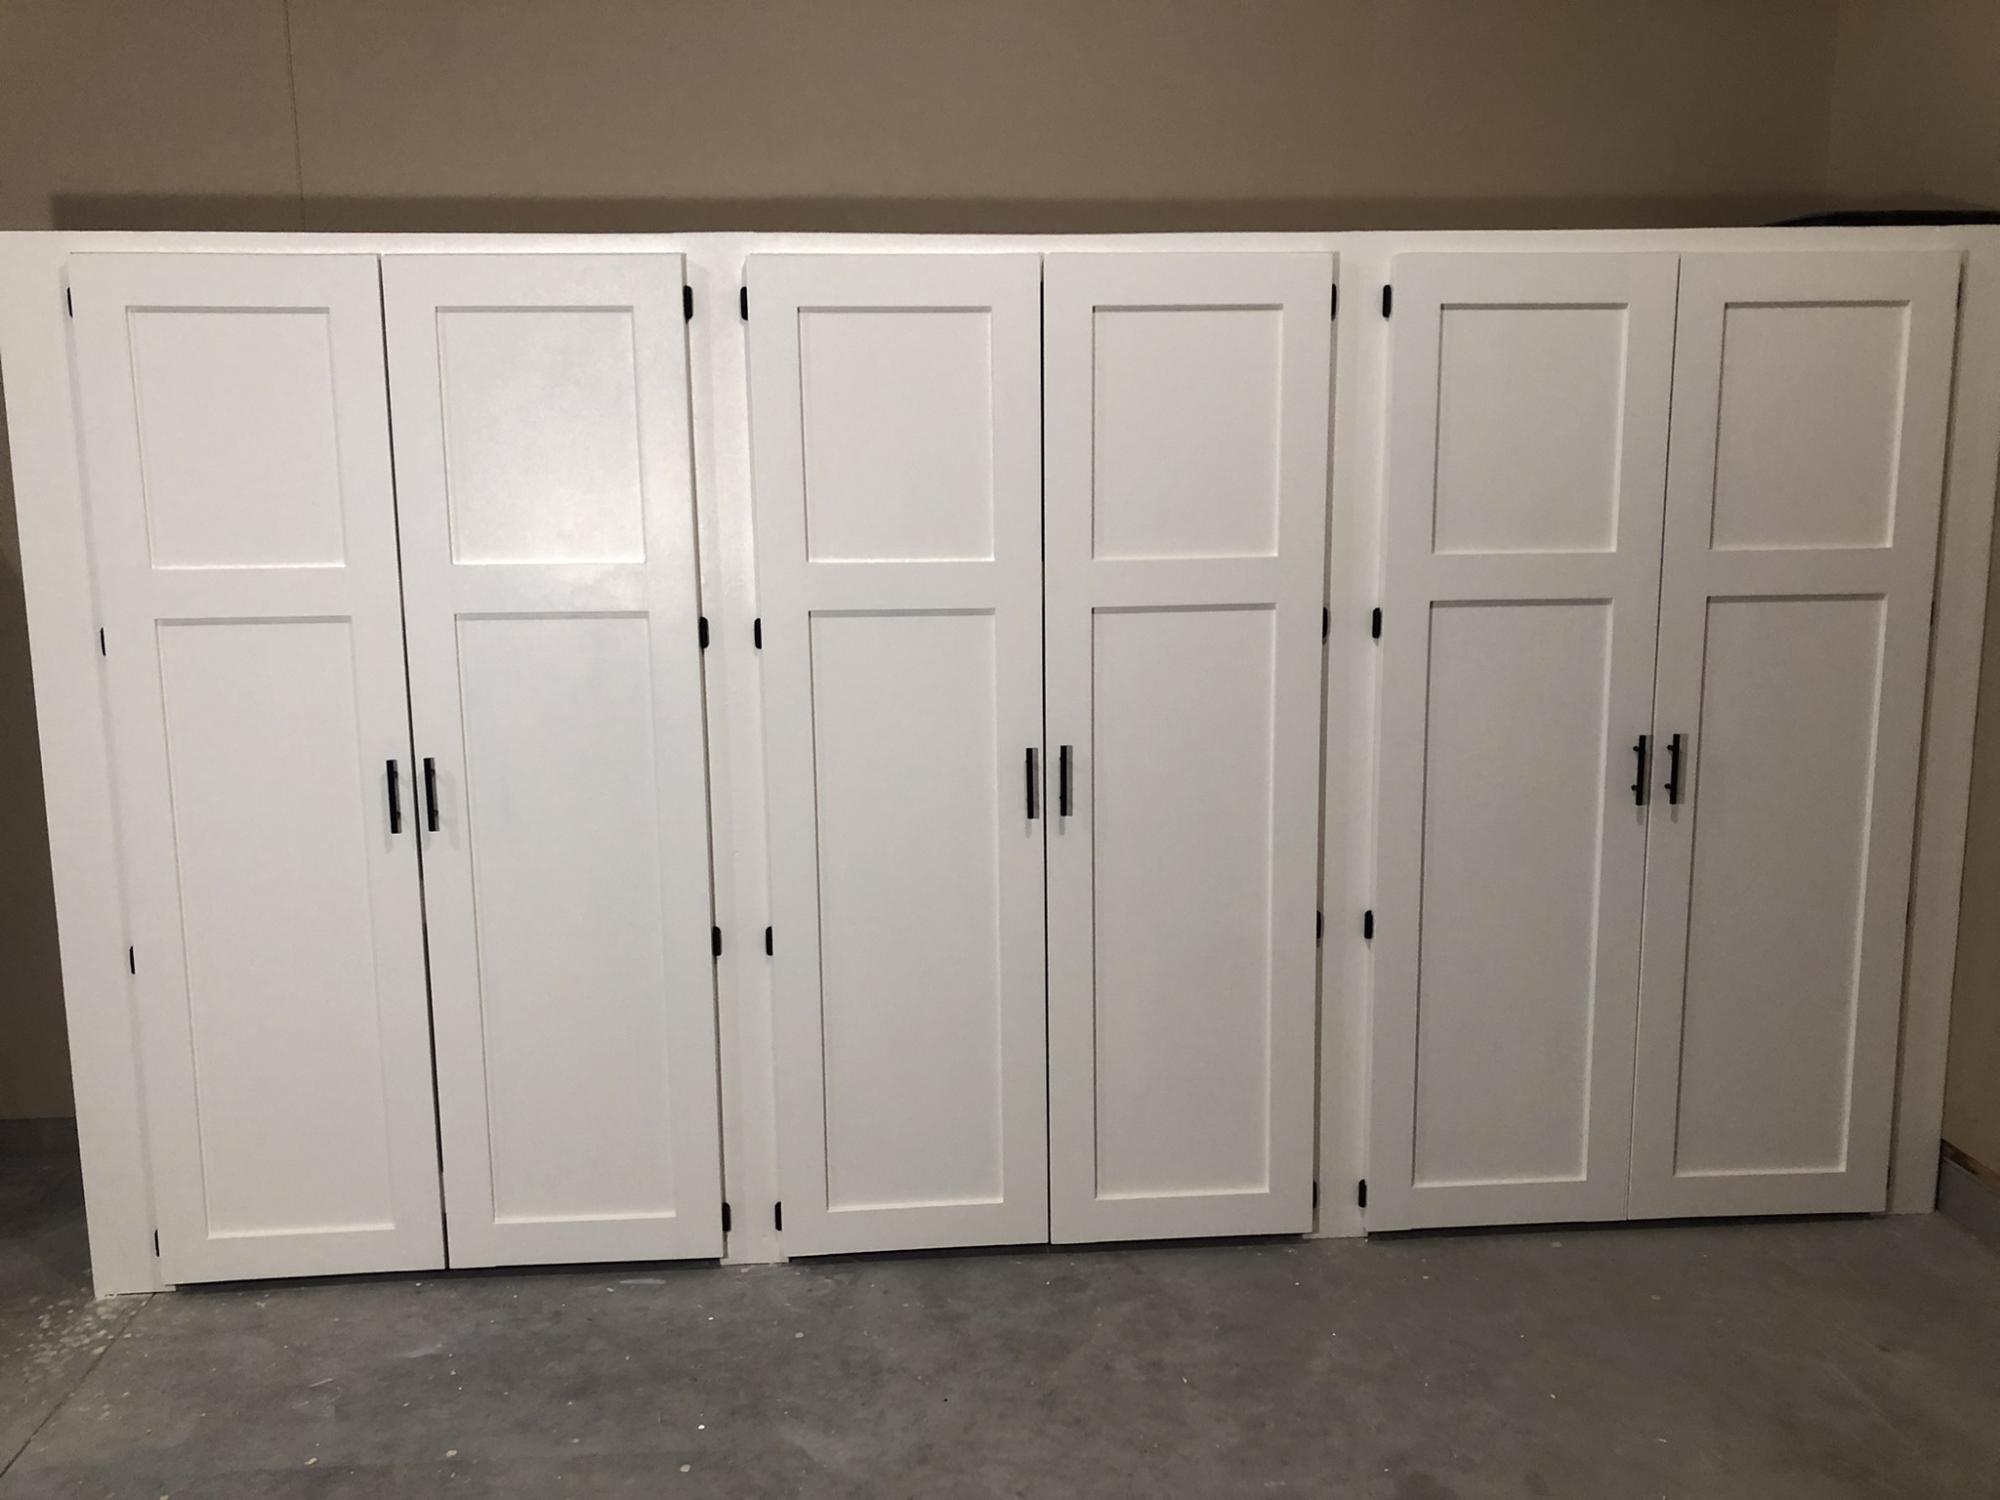
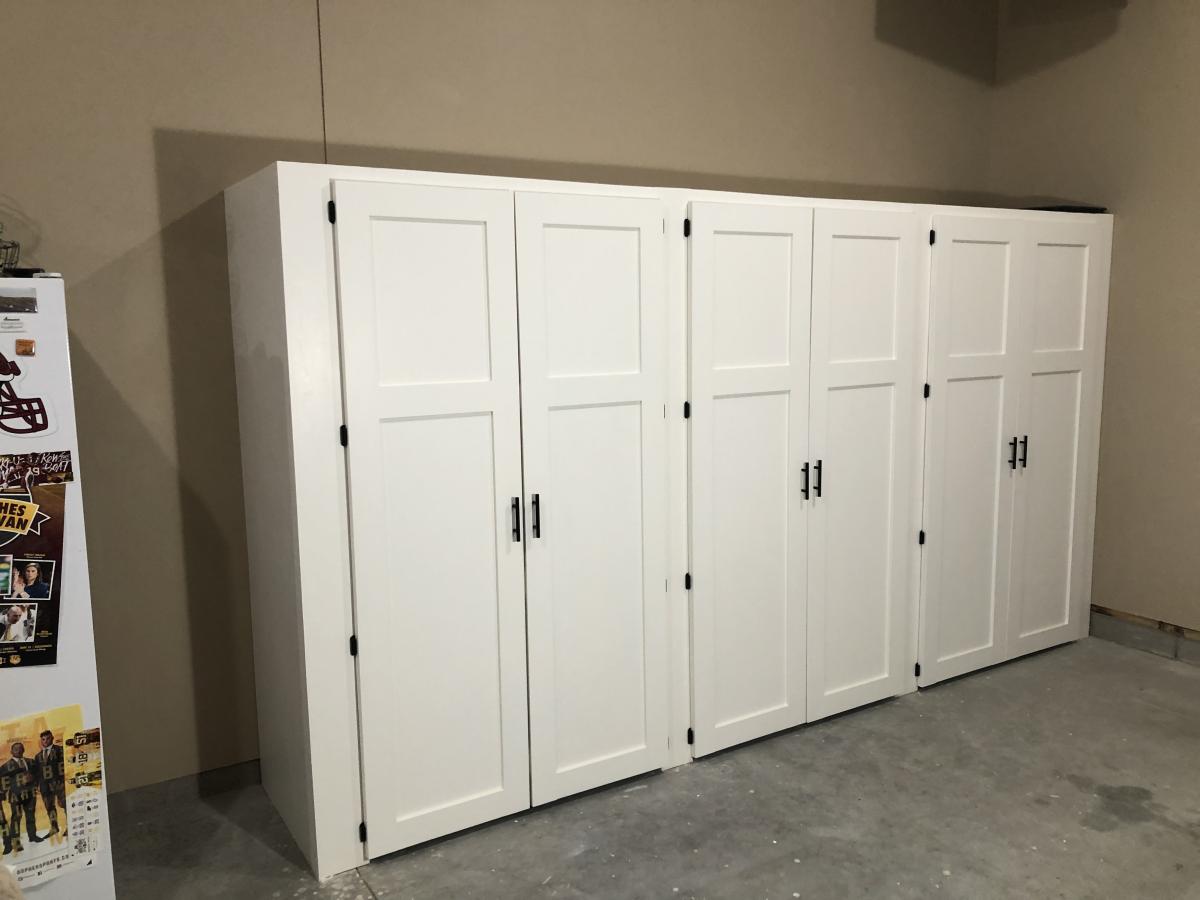
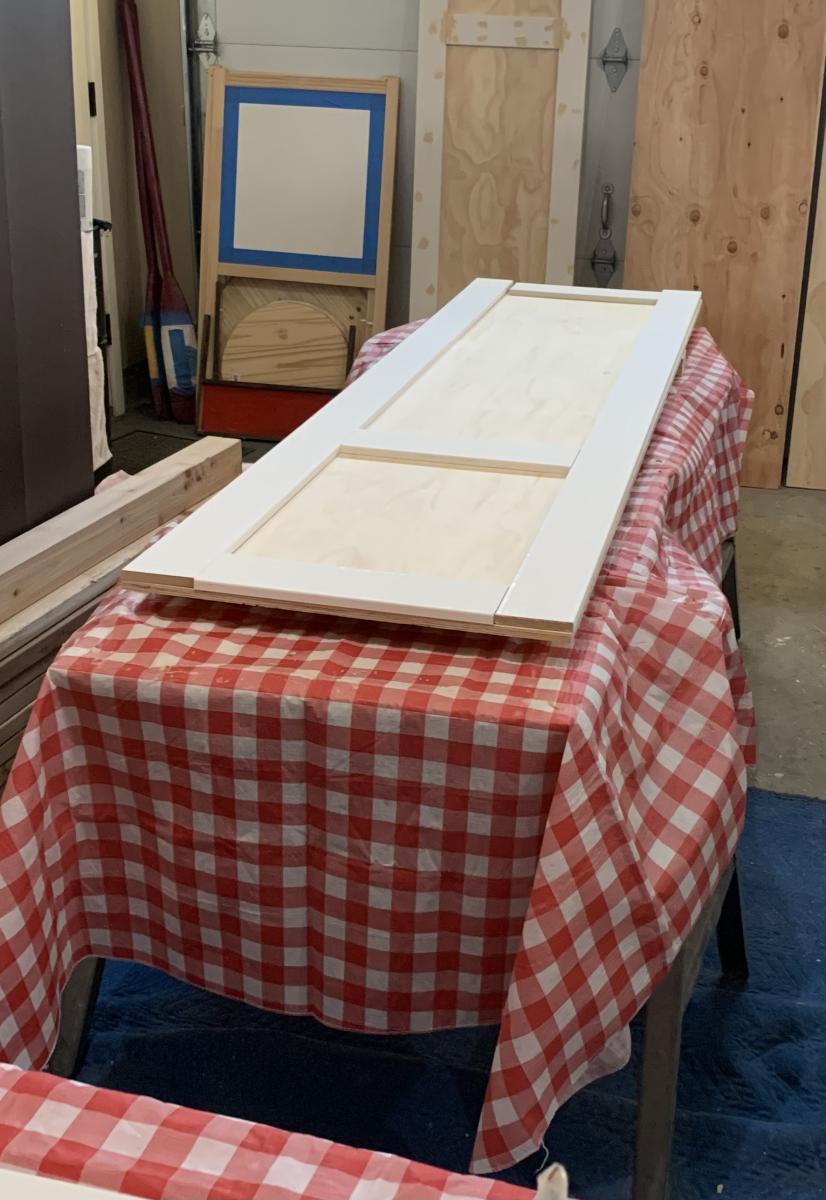
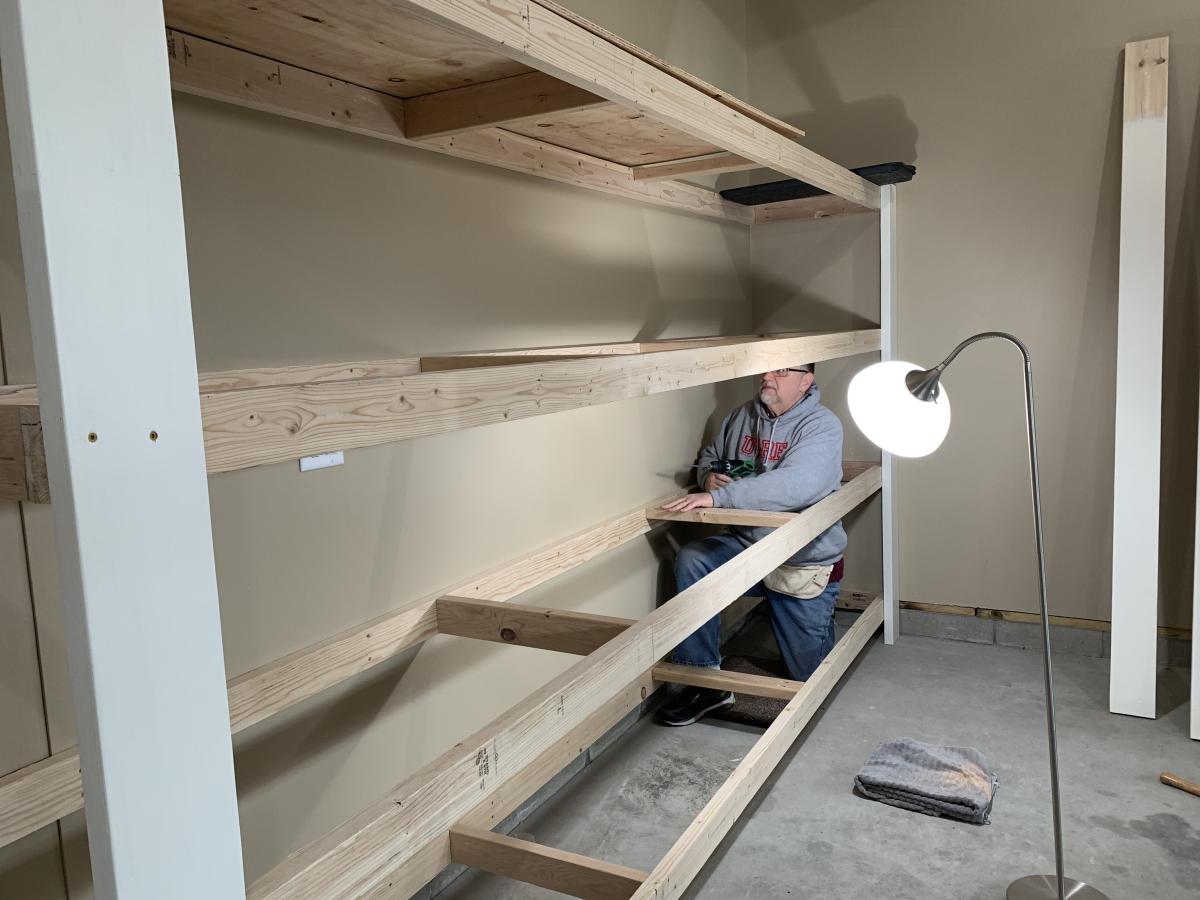
Thank you so much for the two videos we watched of you and your husband explaining and demonstrating how to build garage shelves. We used your plans as a guide. We chose to add shaker style doors to create cabinet shelves. We absolutely love them. We are not handy as you can see we had a living room lamp for a work light and a lifetime table as a work bench. Thank you!
The Paulsons


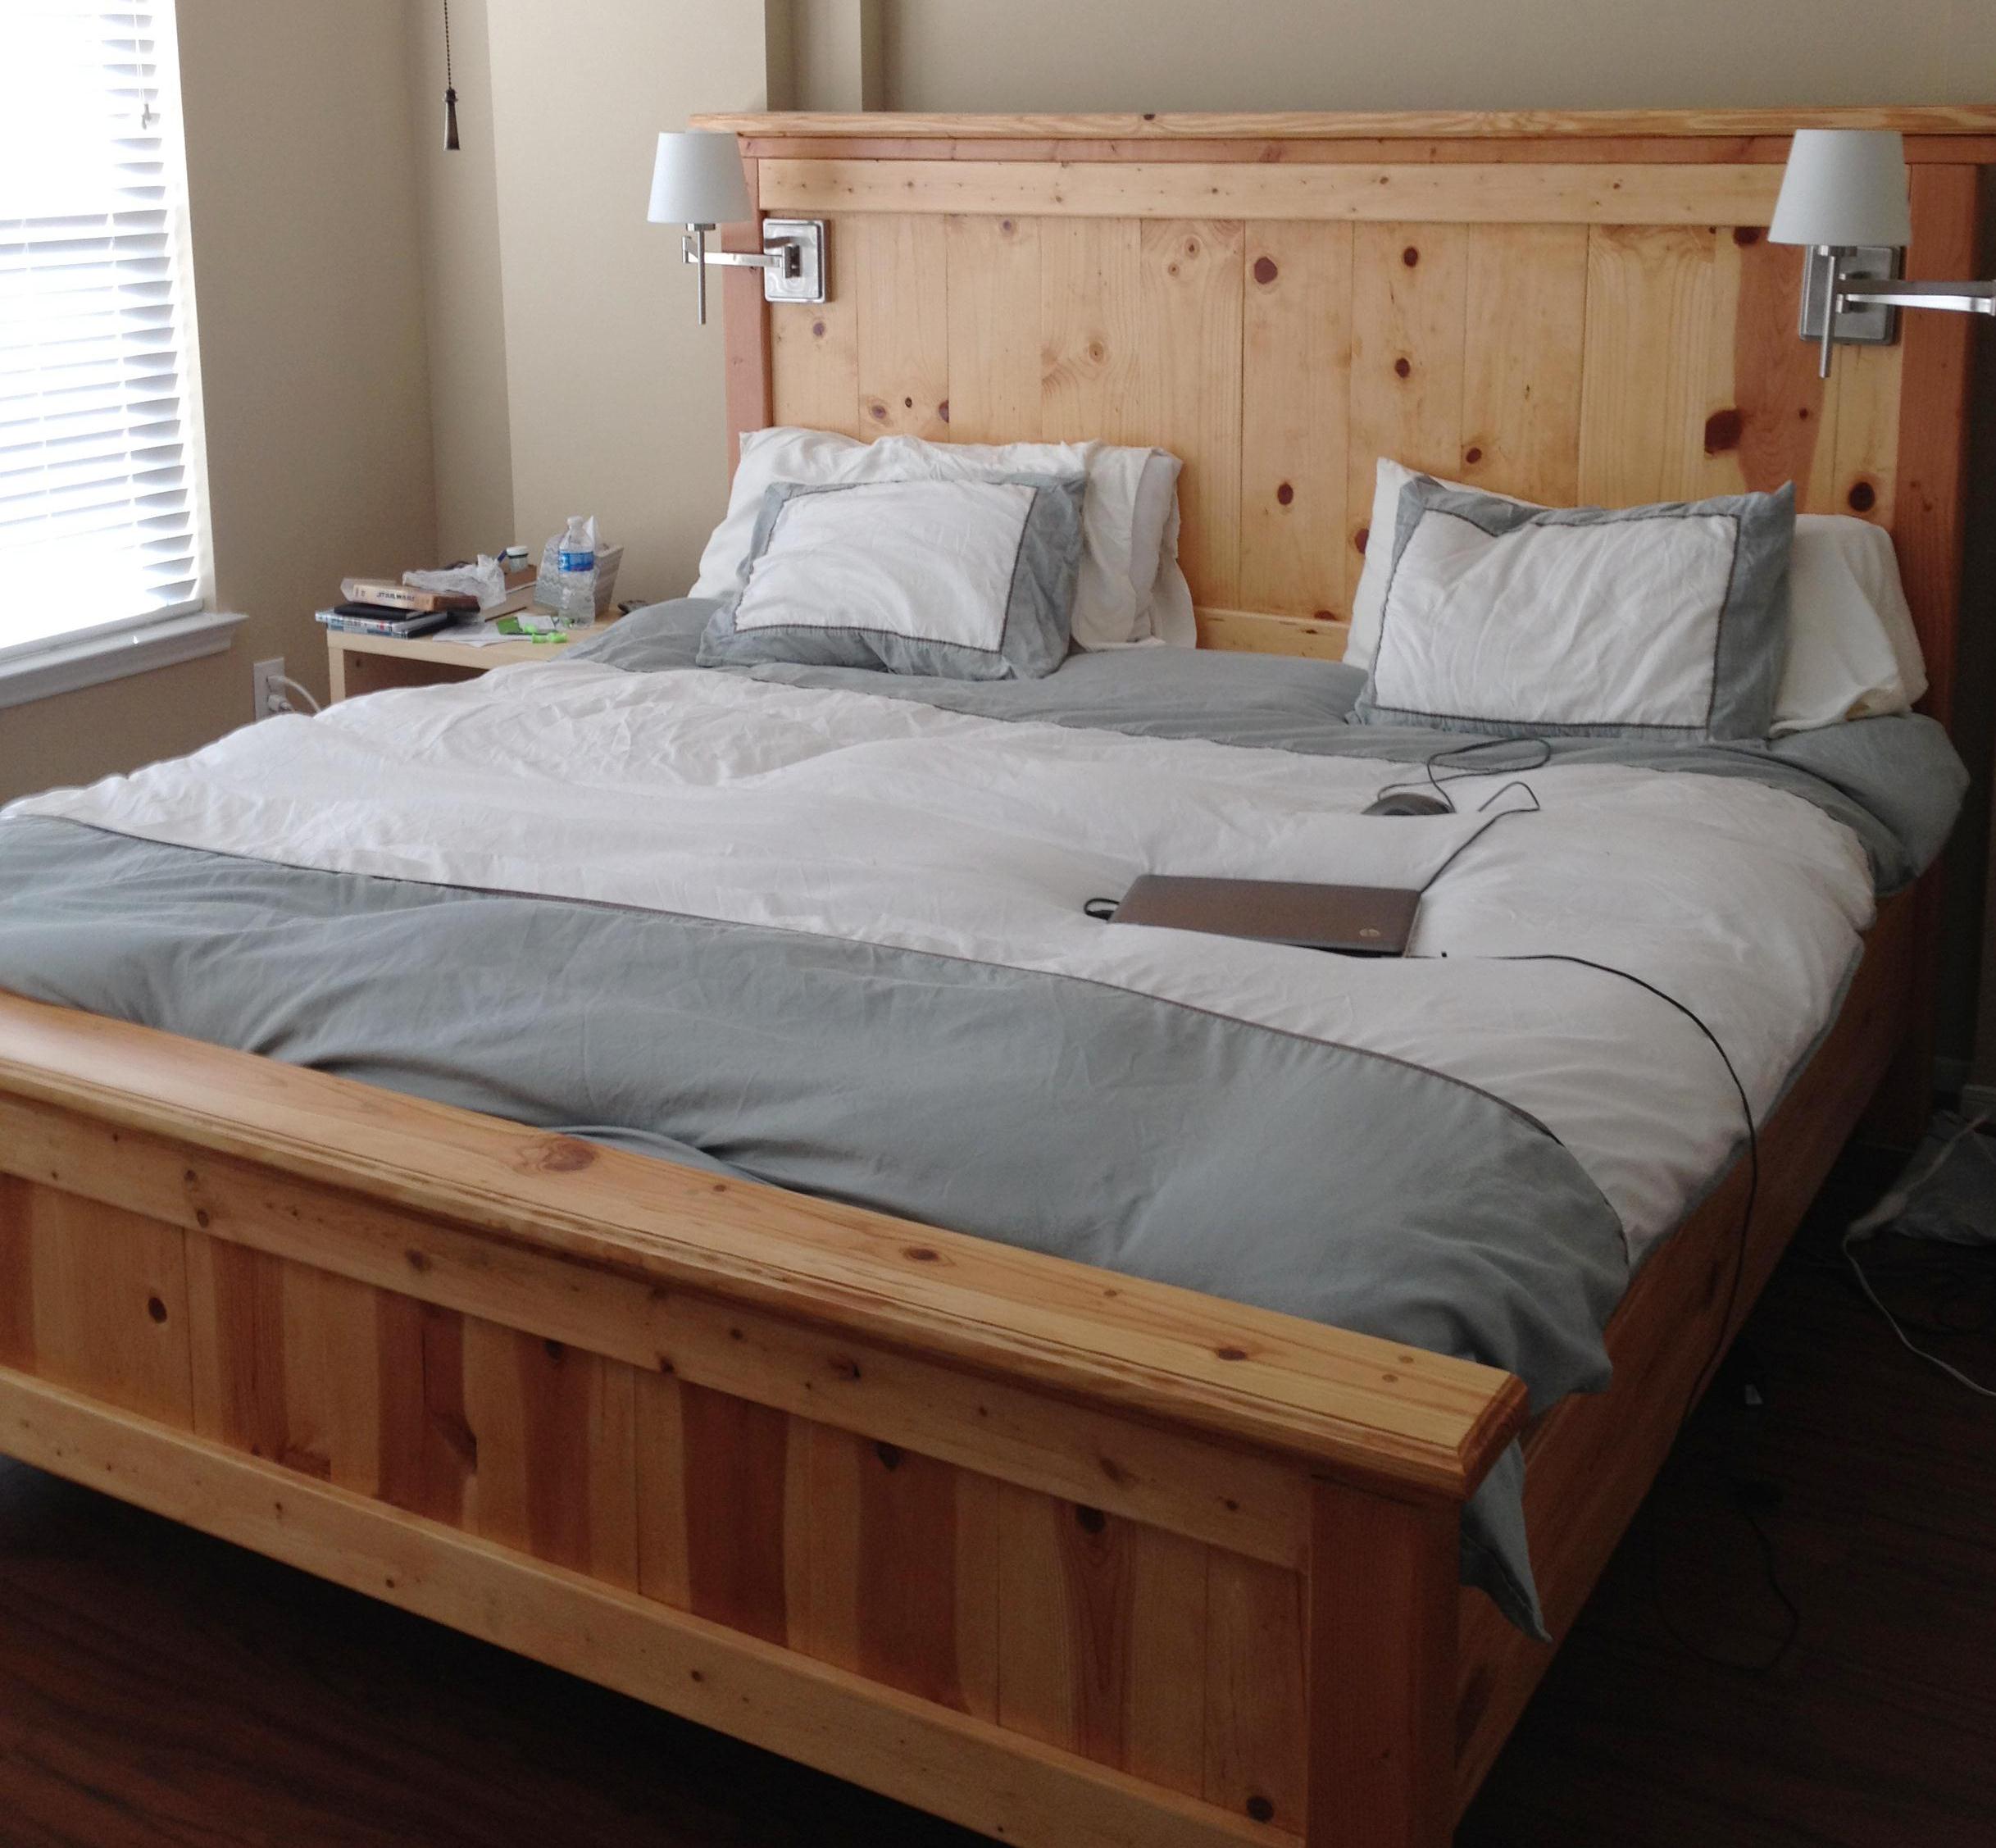
This was the plan that started my addiction! We had just gotten new mattresses, and we needed a new bed frame. All of the furniture stores have dark stains, and we wanted something natural and bright. I was searching one night found your site, and that was it. A few changes, increased the height of the headboard and footboard, wanted a slight overhang on the top of each as well. Also added an additional 2x4 between the legs of the headboard for support.
Wed, 01/11/2012 - 17:15
That looks great! The natural finish looks really great with your bedding. I love the higher headboard - we're planning to do the same with the farmhouse bed I'm planning so that my husband will be able to sit up in bed without hitting the back.
Did you end up using the boxspring, or is the mattress just in slats? I couldn't tell from your picture.
Wed, 01/11/2012 - 18:23
Hi, thanks for the positive response :) The mattress and box spring both are on here. In fact, I kept the bed itself on the original metal frame below, and added the side rails to hide it. Purchased the hardware for the side rails from Rockler
Fri, 01/13/2012 - 08:42
All I can say is wow. Definitely showing this to my wife today. We had plans to do something like this but yours is up up and away! Excellent job!
Fri, 01/13/2012 - 15:48
I'm glad you like the lights. I go back and forth on them. I hated that I had to drill holes into the wood to run the cord, as it does not give us the option to remove later on. Also, if you go with the lights, you might want to put some double sided tape on the back. Thanks!
Tue, 04/03/2012 - 09:41
My husband just forwarded me a link of your bed.
It is SO SO beautiful!!! Love the reading light. Where did you get that by the way?
The bed is so pretty. Love the natural wood look and the knots.
We too have mostly dark wood stain in the house and love this light color look. Did you stain it or coat it with something?
Sat, 04/28/2012 - 15:26
Hi Moldah,
Very impressive and great addition with the lights. Can you tell me how tall your final headboard and footboard are? Thanks.
Sat, 06/16/2012 - 04:46
LOVE IT! I love doing things like this and I am inspired by seeing your pictures!! I am especially impressed with the Star Wars case noted on your endtable LOL Right there I know you have great taste in films, too!!! I am going to do this project! Great job!
Wed, 09/04/2013 - 17:10
Wow, this is so beautiful! Great Job! We are very amateur builders and I had a couple questions. Do you have a blog with more details? How did you achieve the routered edges? And also, do you mind sharing the cost of the project? Thanks!
Sun, 11/03/2013 - 08:44
By how many inches did you increase the height of the headboard and footboard? I am thinking about doing the same when I build this bed and was hoping for some guidance.
Sun, 12/18/2016 - 06:00
We don't have boxsprings. How would you modify this plan for that?

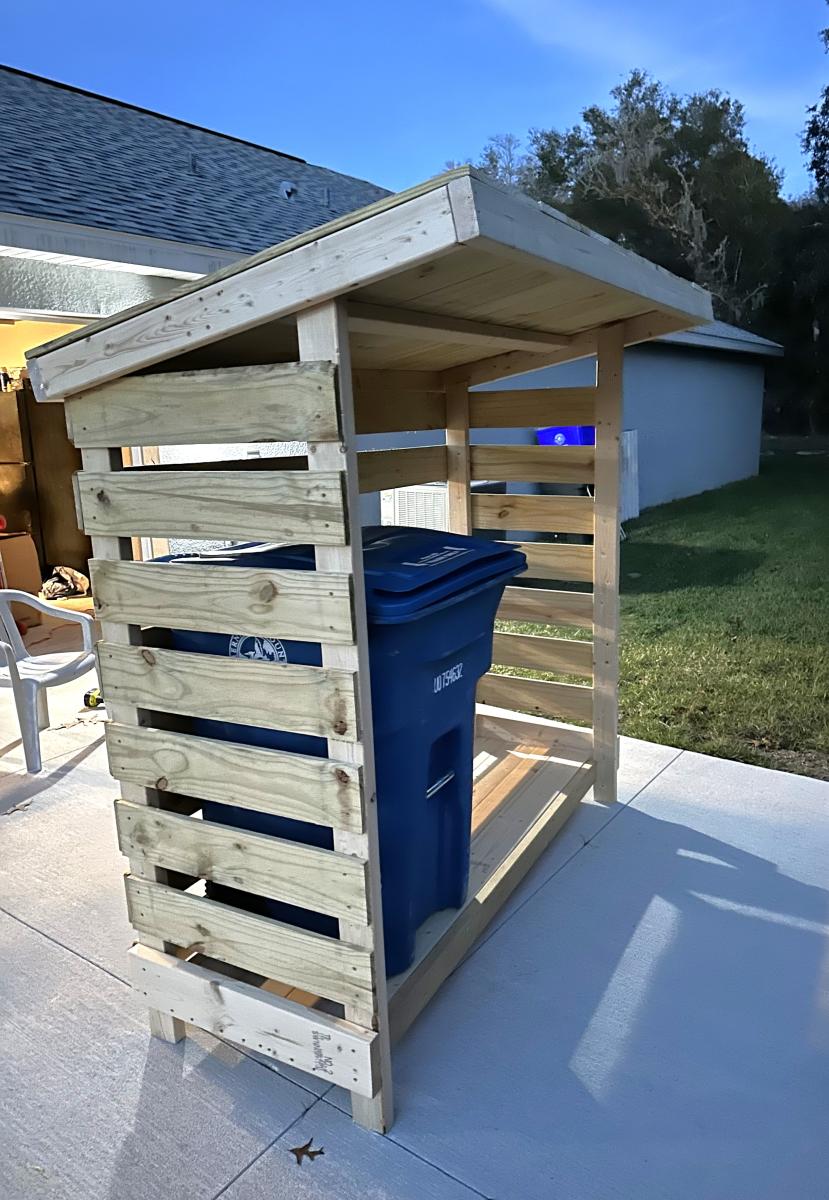
Chose the small firewood shed project as a "template" if you will .. built this to house our garbage cans and eventually put a gate on it to "help deter" the Florida black bears (we do multiple things to keep them at bay) but this will also just be a nicer looking way to keep the cans outside.
I modified the floor since the firewood shed had a floor that was suitable for, well, firewood but not so much for rolling garbage cans. Had to leave the one slat off the back for the depth of the can which I didn't completely account for in the beginning. Overall, still need to paint it and water seal it but happy with how it turned out.
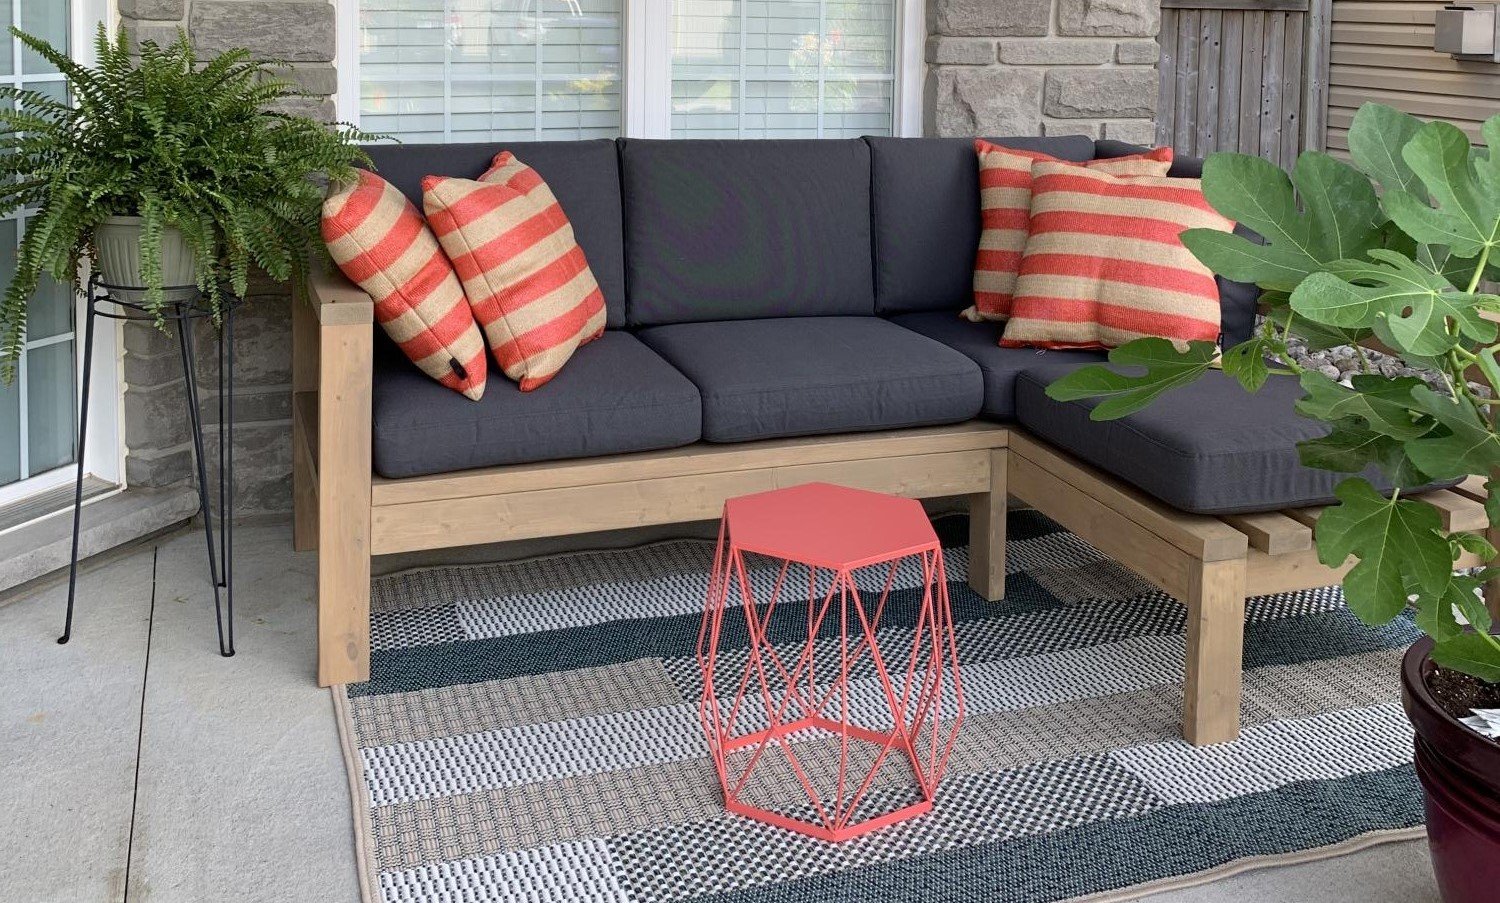
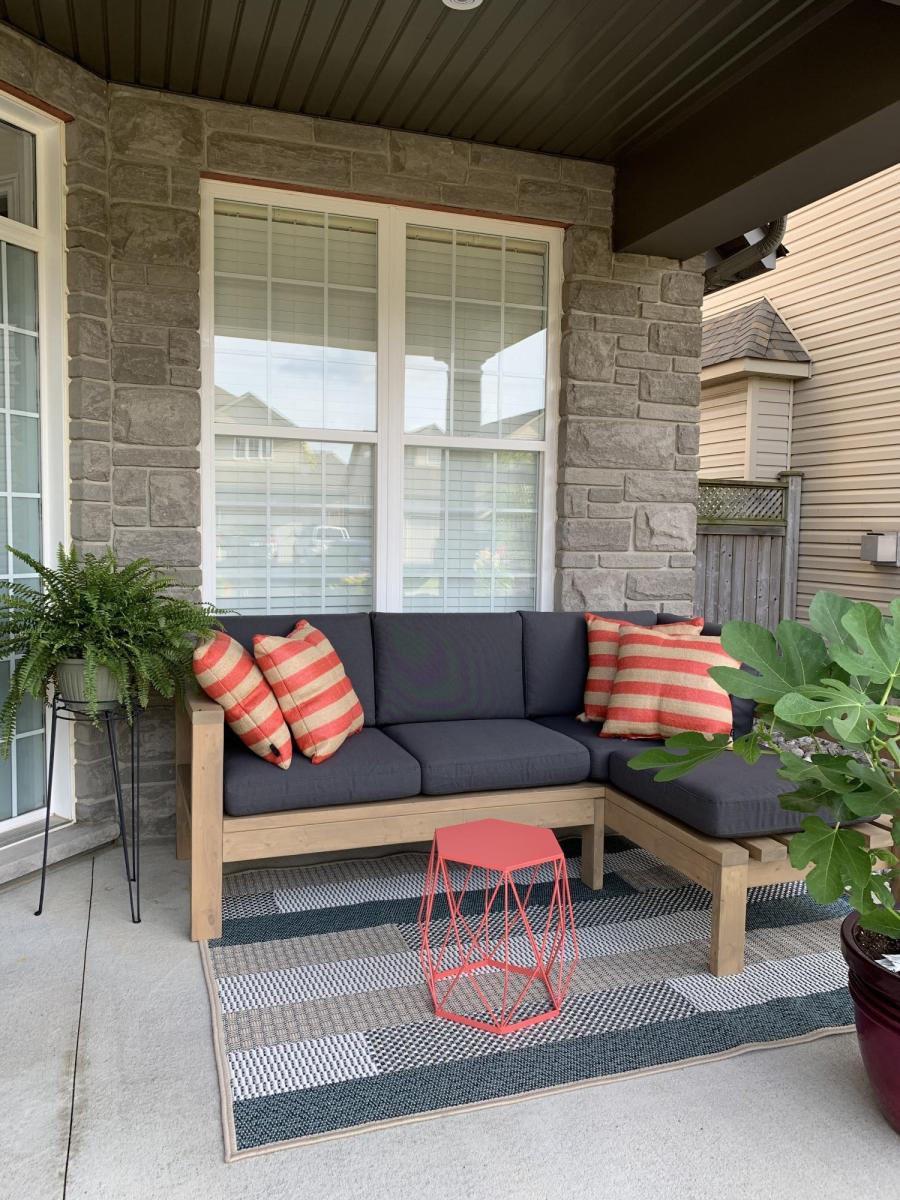
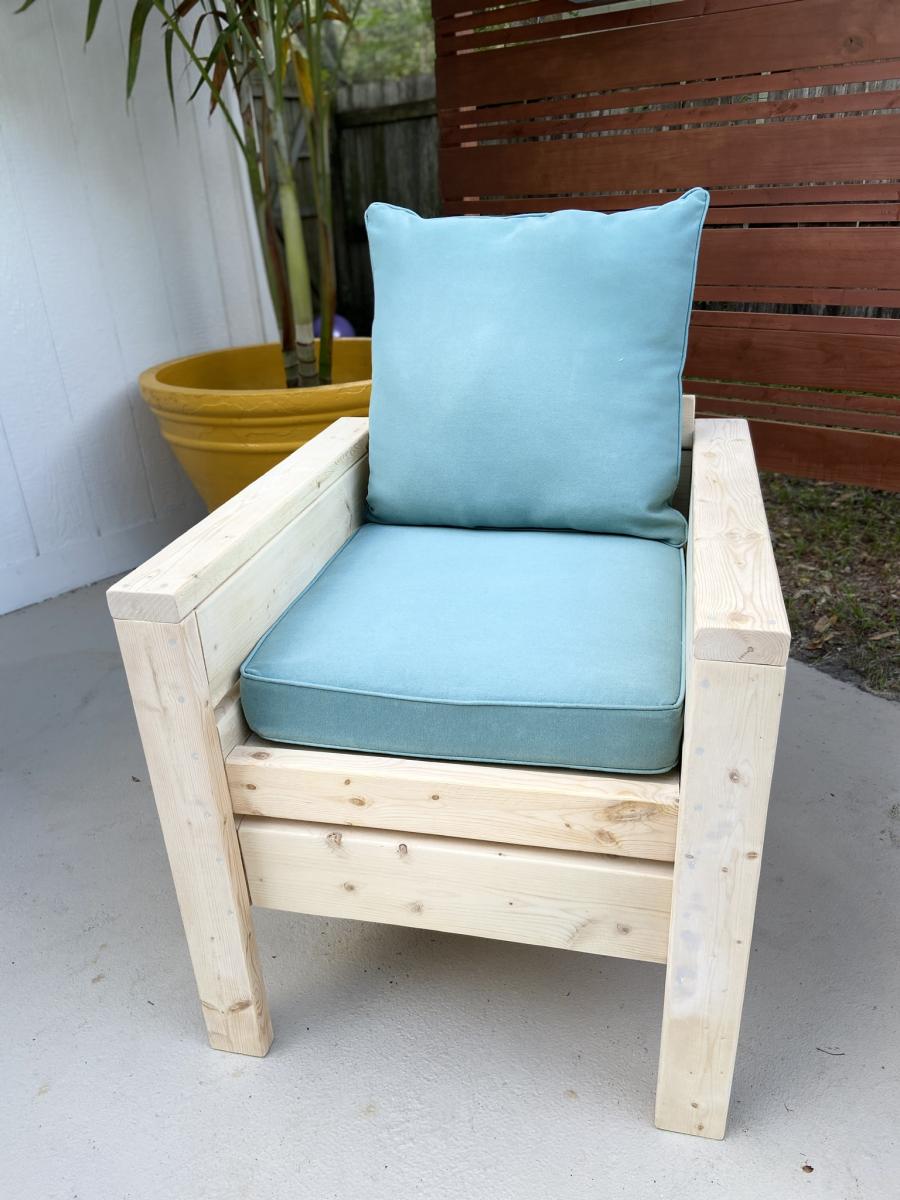
This project was quite easy and did not require many tools. The plan allowed me to adjust the measurements easily so it could fit in that space. I used regular 2x4’s and treated the wood with Mountain Ash colour in a semi-transparent stain from Sherwin Williams, I just love the colour! I build 2 - 2 seaters exactly the same. The one side has no arm, as I wanted it to look like a lounge chair. I love to sit in the corner and stretch my legs 😊. I bought the cushion covers from IKEA, and got good quality foam.