Community Brag Posts
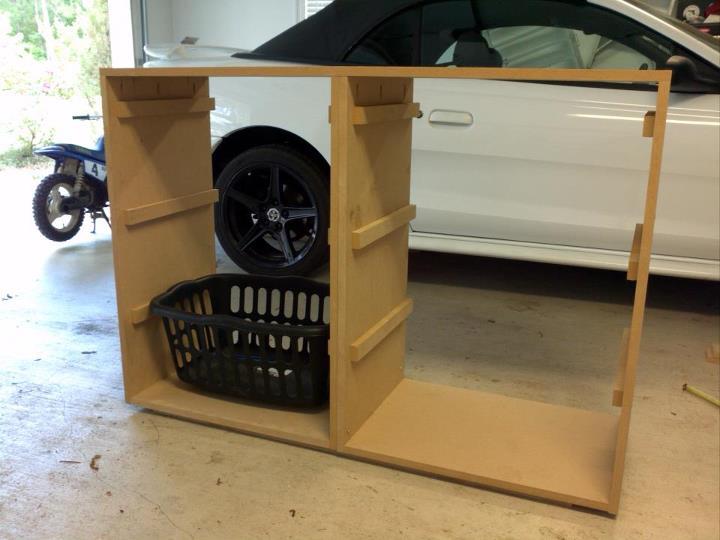
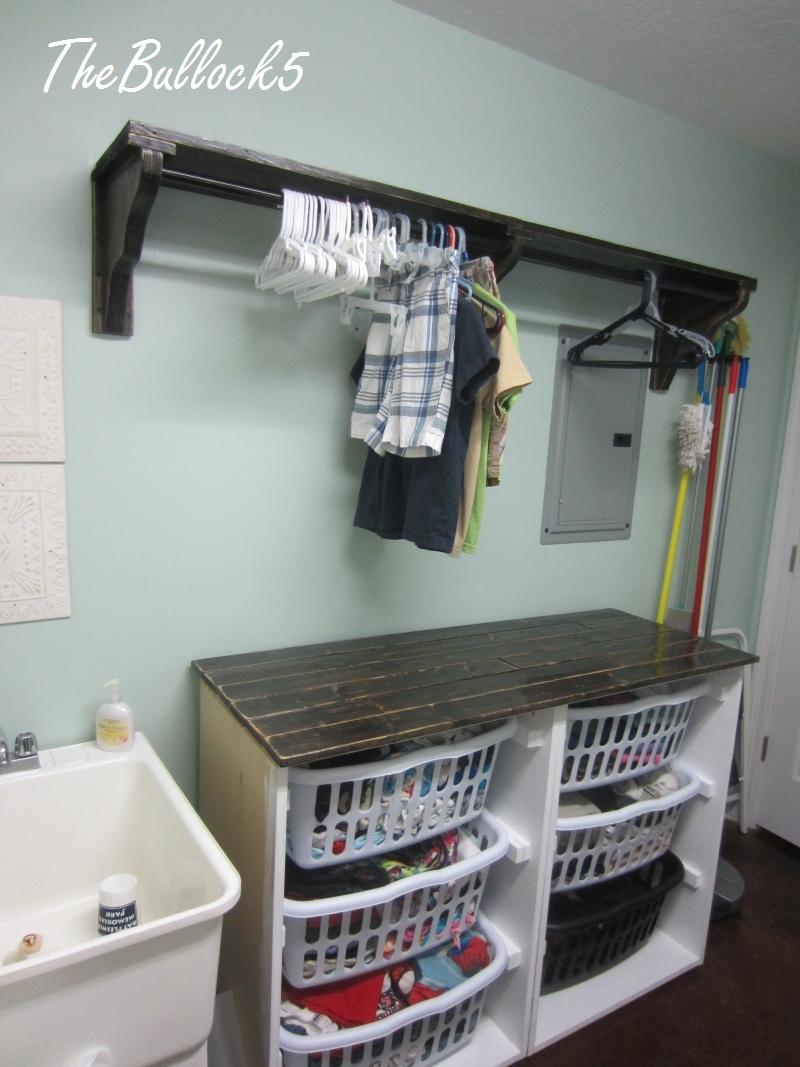
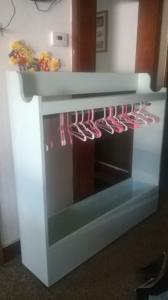
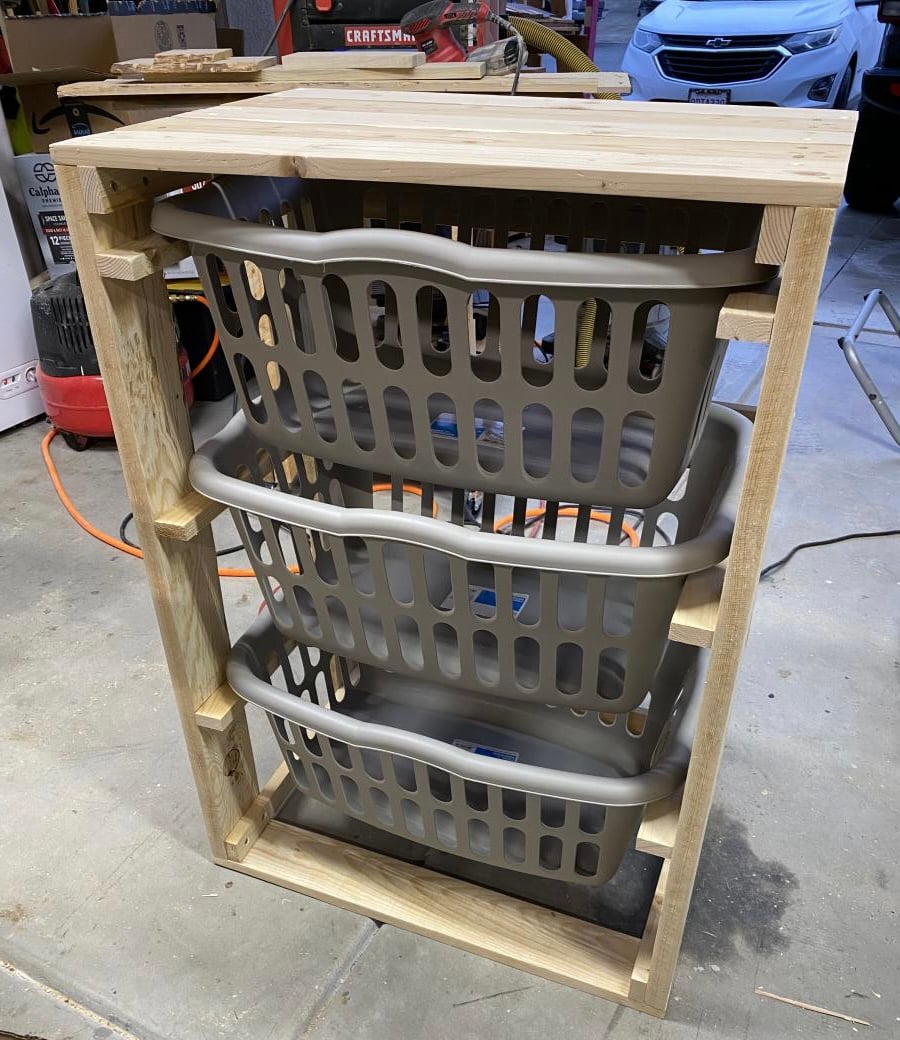
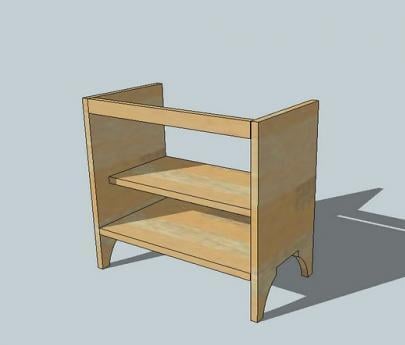
Laundry Dresser foling area and hanging shelf

more details on my blog. I built 2 of the laundry dressers. adjusted the placement of my baskets due to restrictions in the overall height of my unit (I have a ironing board cabinet built into 1 wall that I still wanted to be able to open and use :) I used MDF, but it was a bear to work with and next time I would spend the extra $$ on birch. i painte the bottom in a semi gloss. and plan to add the doors (which will have a beadboard backing) they will be painted white with a dark walnut glaze. The top and shelf /brackets are all done in a distressed finish with ebony and mahogany stain mixed then 2 coats of poly very sturdy even filled!


Built from Plan(s)
Estimated Cost
$140
Estimated Time Investment
Weekend Project (10-20 Hours)
Finish Used
white semi gloss paint, (will be glazing with dark walnut as well),
Recommended Skill Level
Beginner
Comments

Fri, 06/26/2015 - 00:00
Love the look of this
I have been wanting to make the laundry basket dresser but am holding off because we are moving. What color did you us on the walls, I love it.
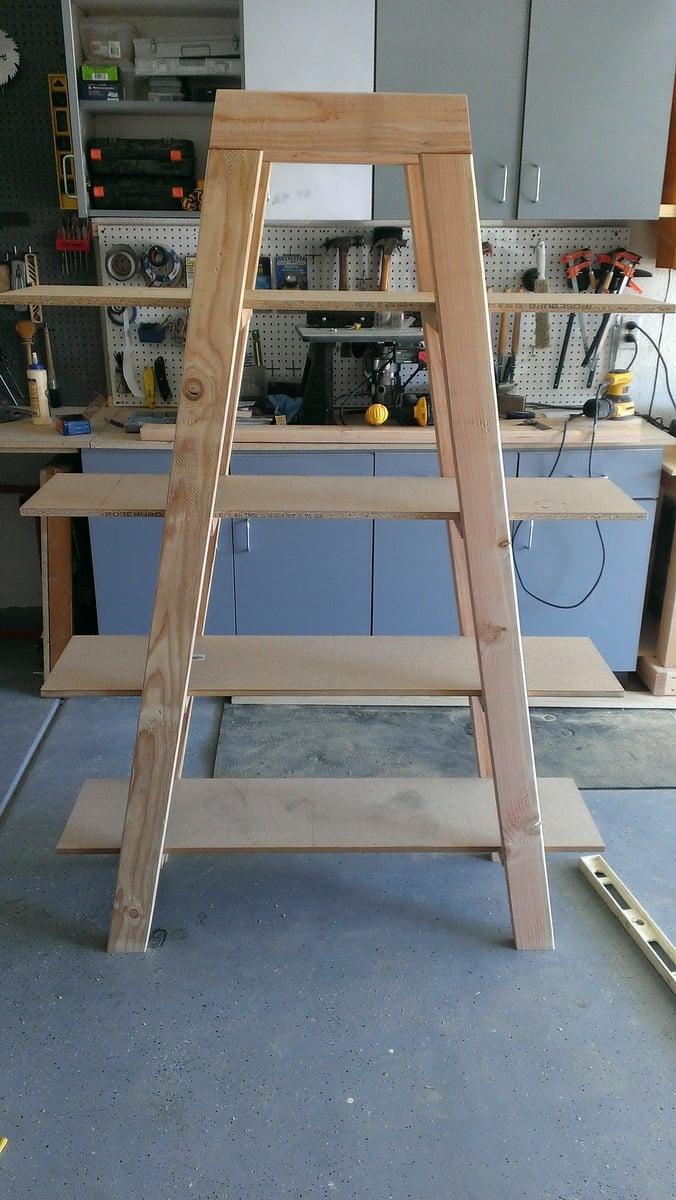
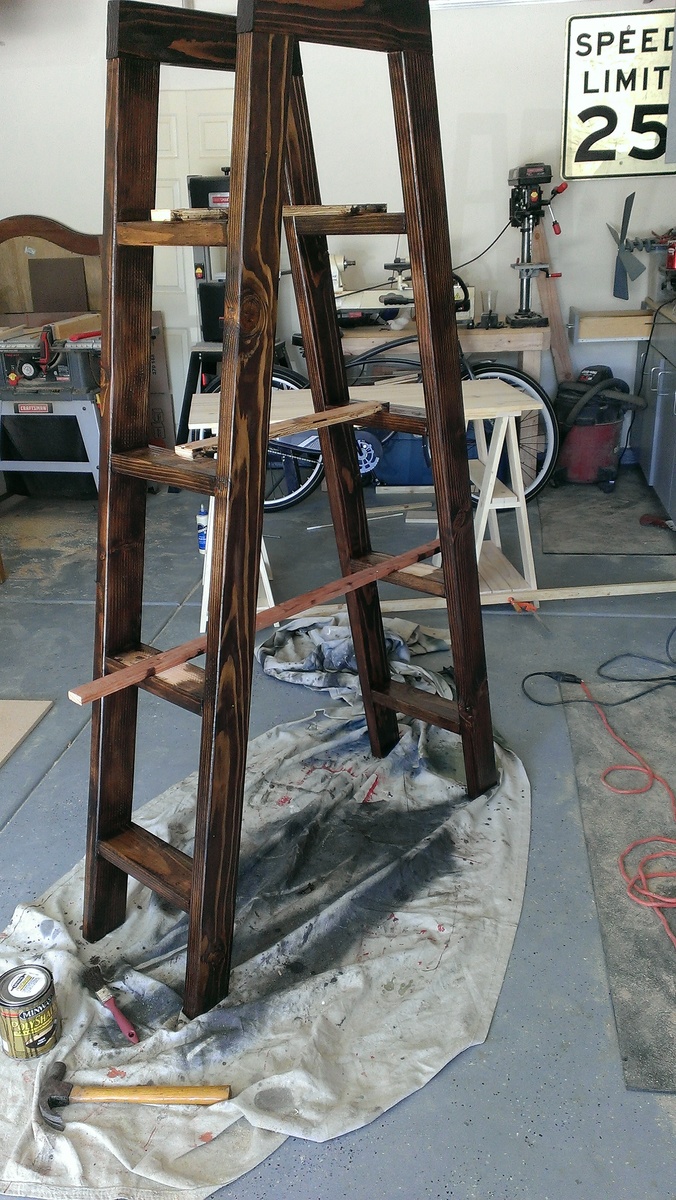
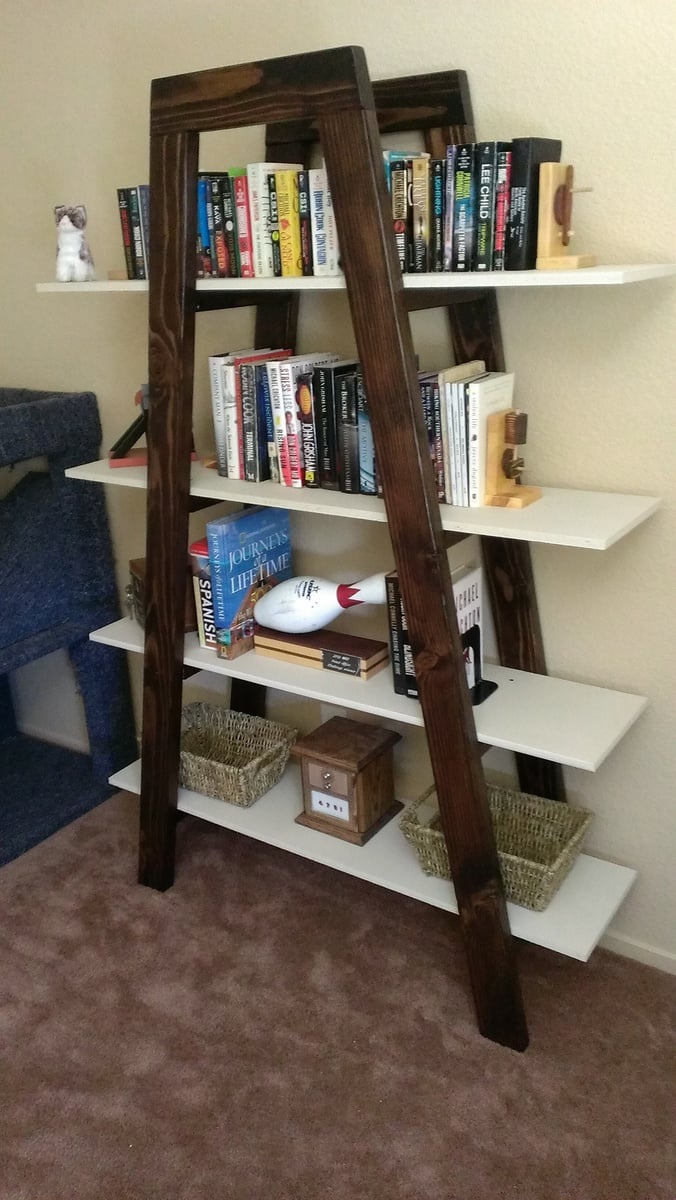
truss shelf/bookcase
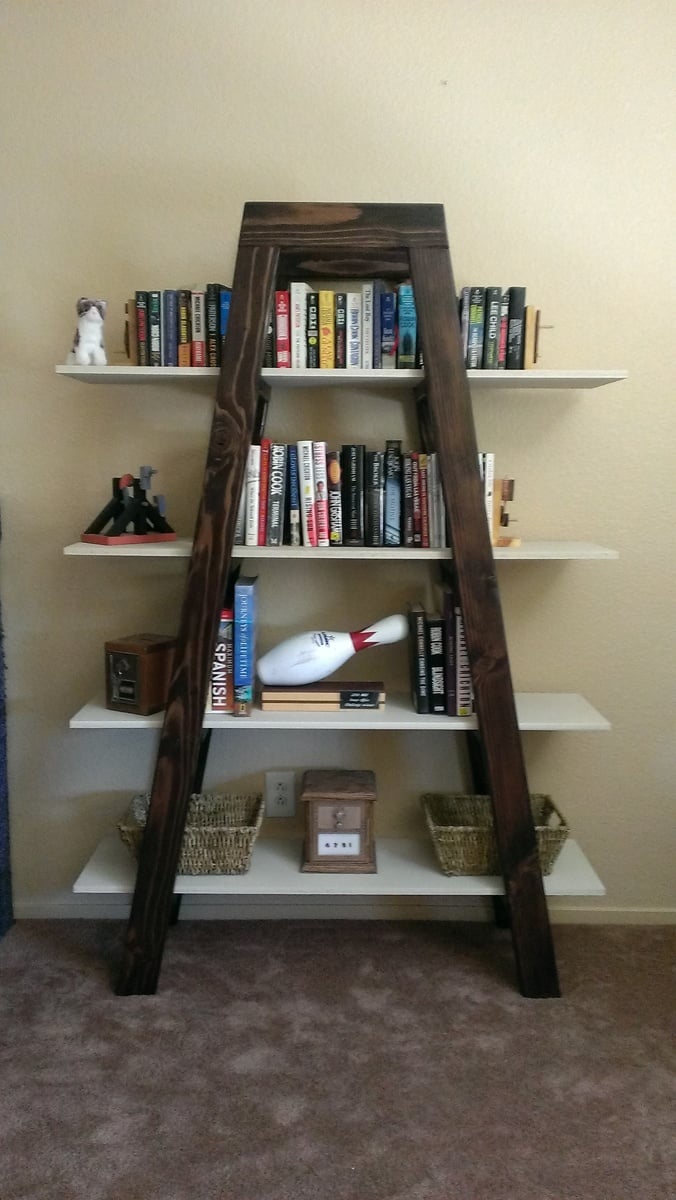
This was a pretty simple project as long as you make accurate cuts. Making accurately angled cut allows for tight joint also love the pocket screws. I did add a top brace for stability, seemed a little unstable without them. I pocket screwed them on from the backside, so they can't be seen from front. Than went with a two tone paint/stain.
Built from Plan(s)
Estimated Time Investment
Weekend Project (10-20 Hours)
Recommended Skill Level
Beginner
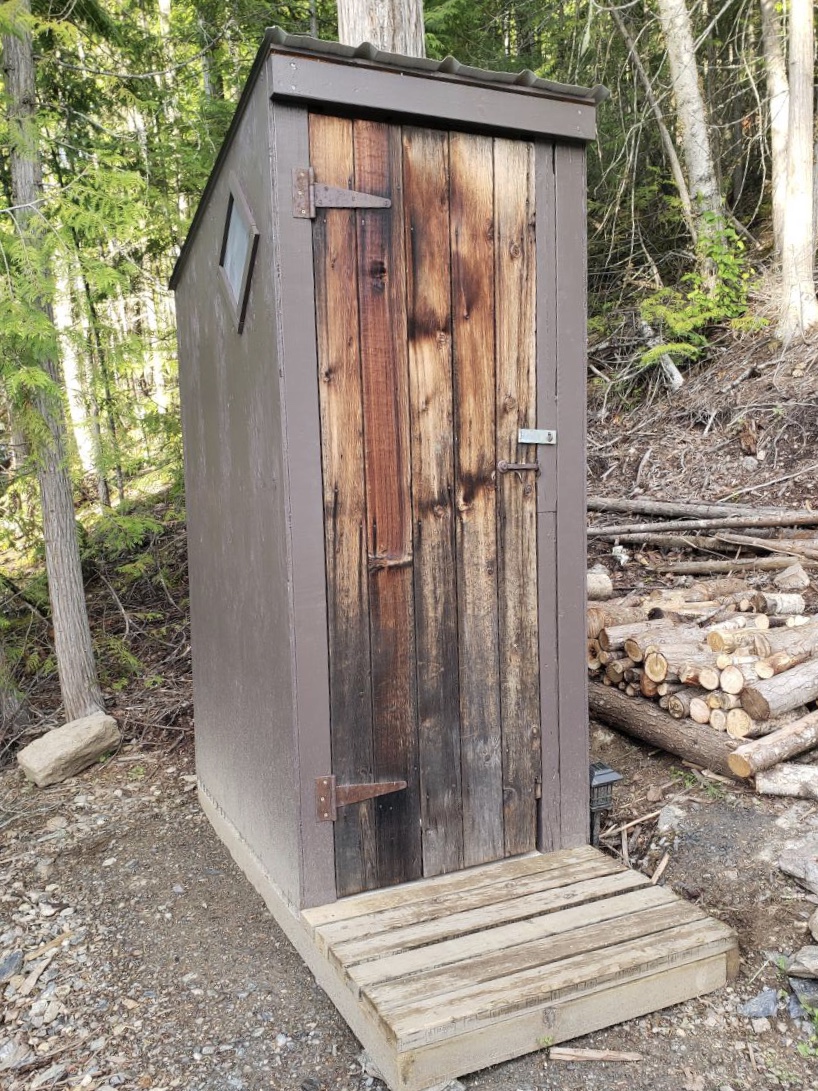
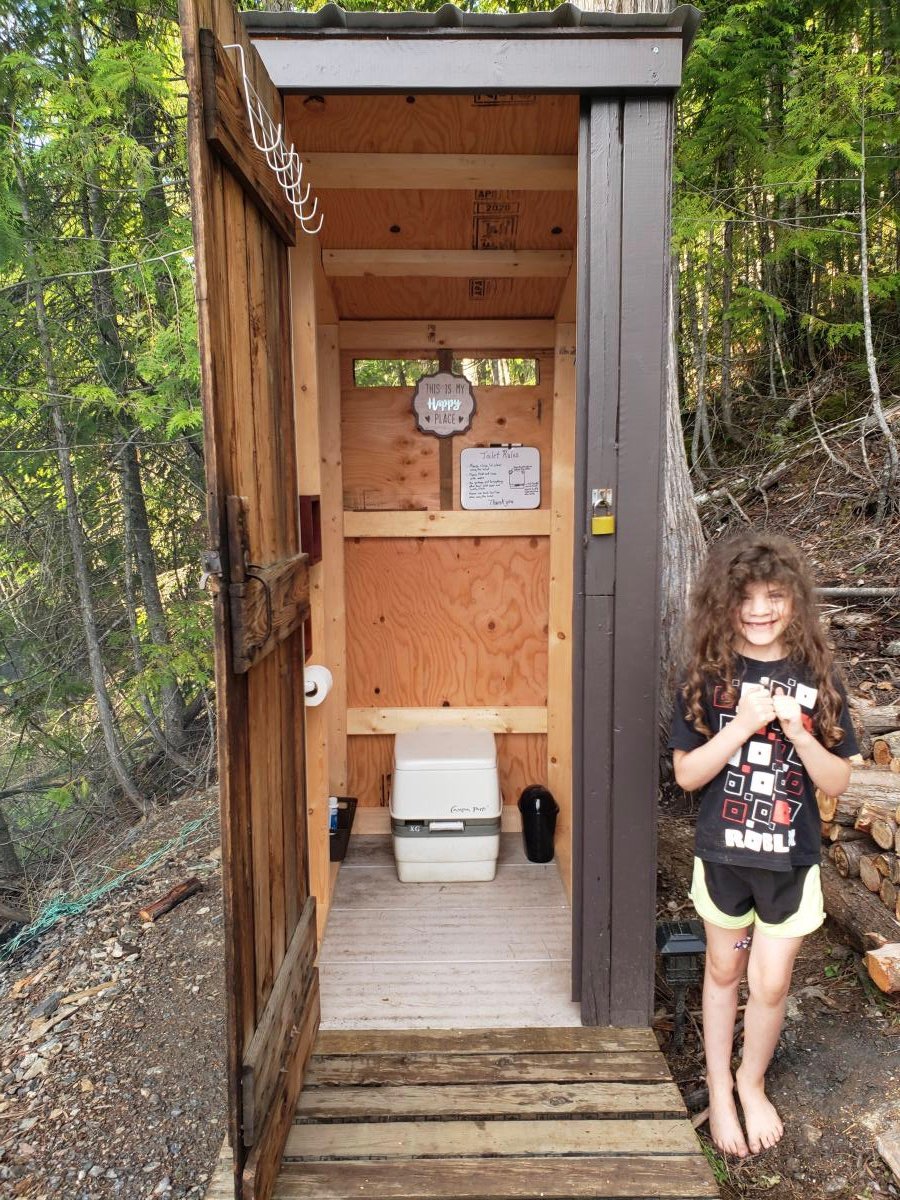
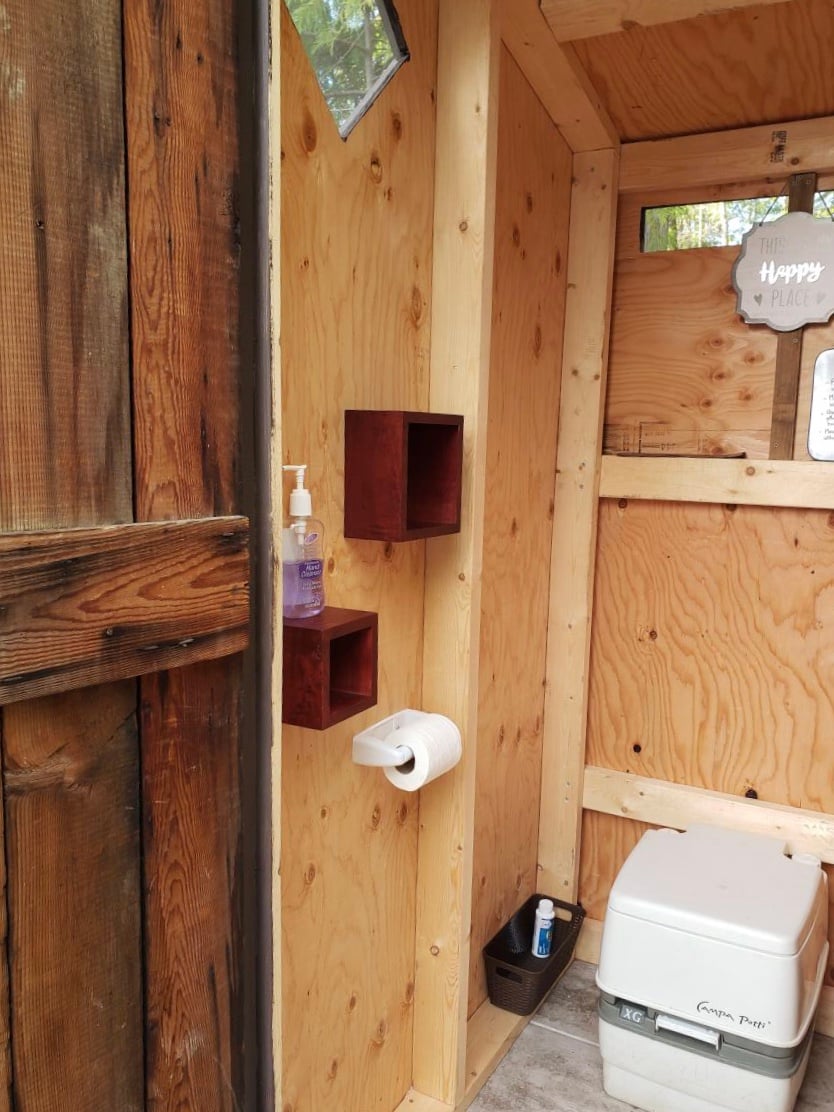
Simple Outhouse
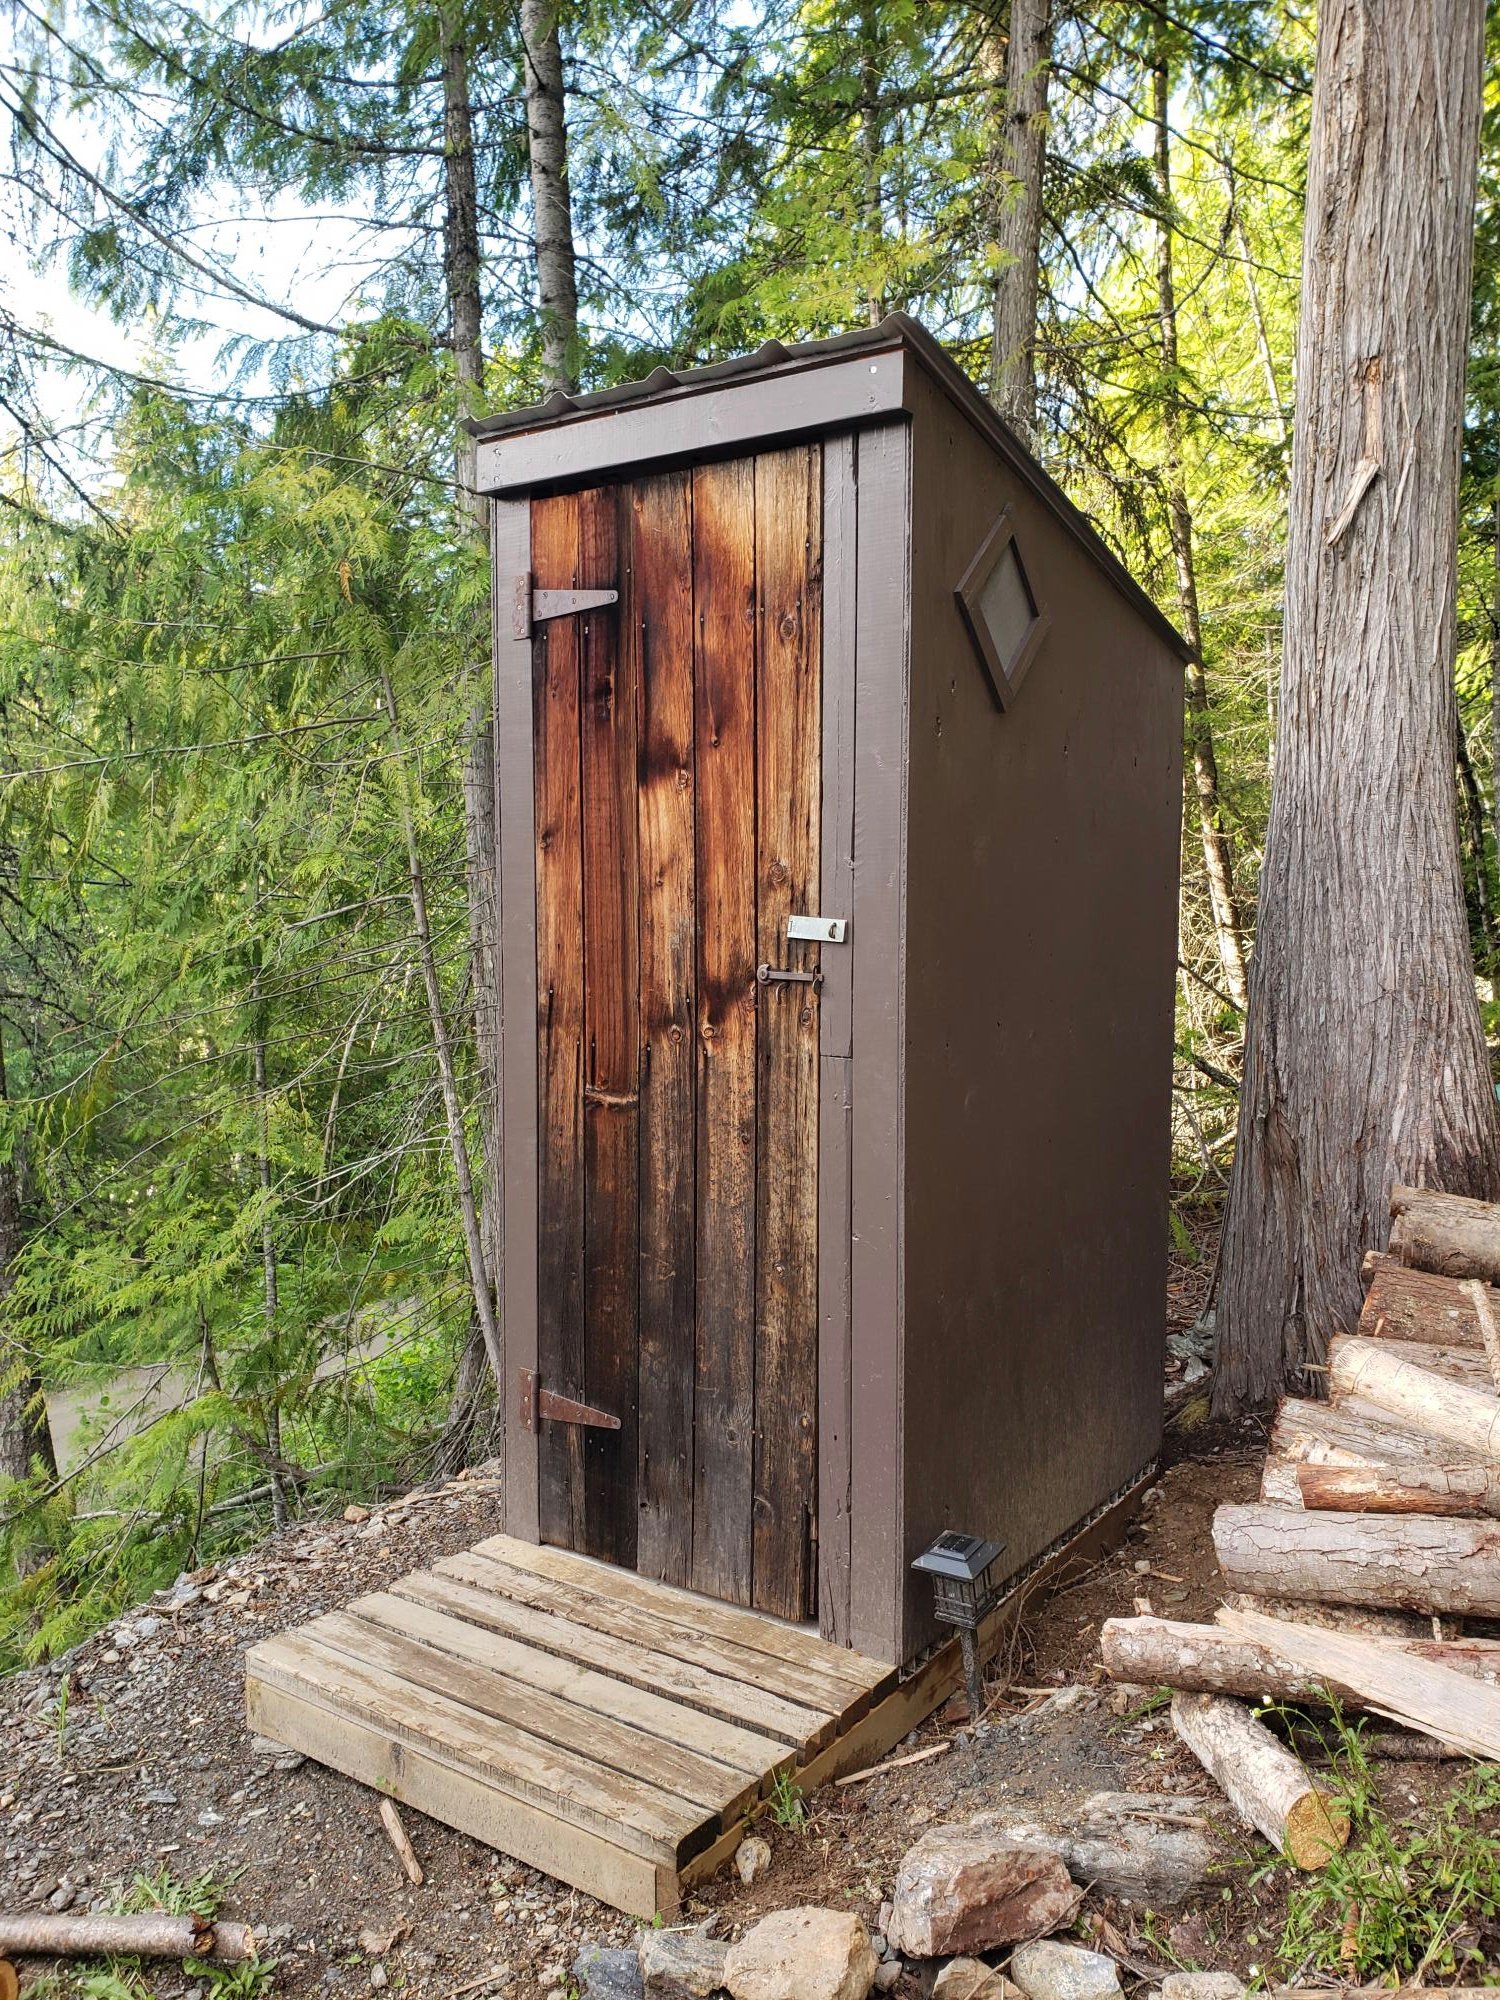
We used the plans from the Simple Outhouse to make a space to hold our porta potty. The door is a repurposed barn door and I think it looks amazing! These plans were perfect for us as we were able to build it in panels and reassemble on our property by the lake. Some screened windows to allow for ventilation and light were the finishing touches. Thanks Anna for the simple to follow plans!

Built from Plan(s)
Estimated Cost
$200 Canadian
Estimated Time Investment
Weekend Project (10-20 Hours)
Finish Used
We used pressure treated wood for the base and deck. For inside, we repurposed some scraps of composite decking. Painted with exterior latex "driftwood".
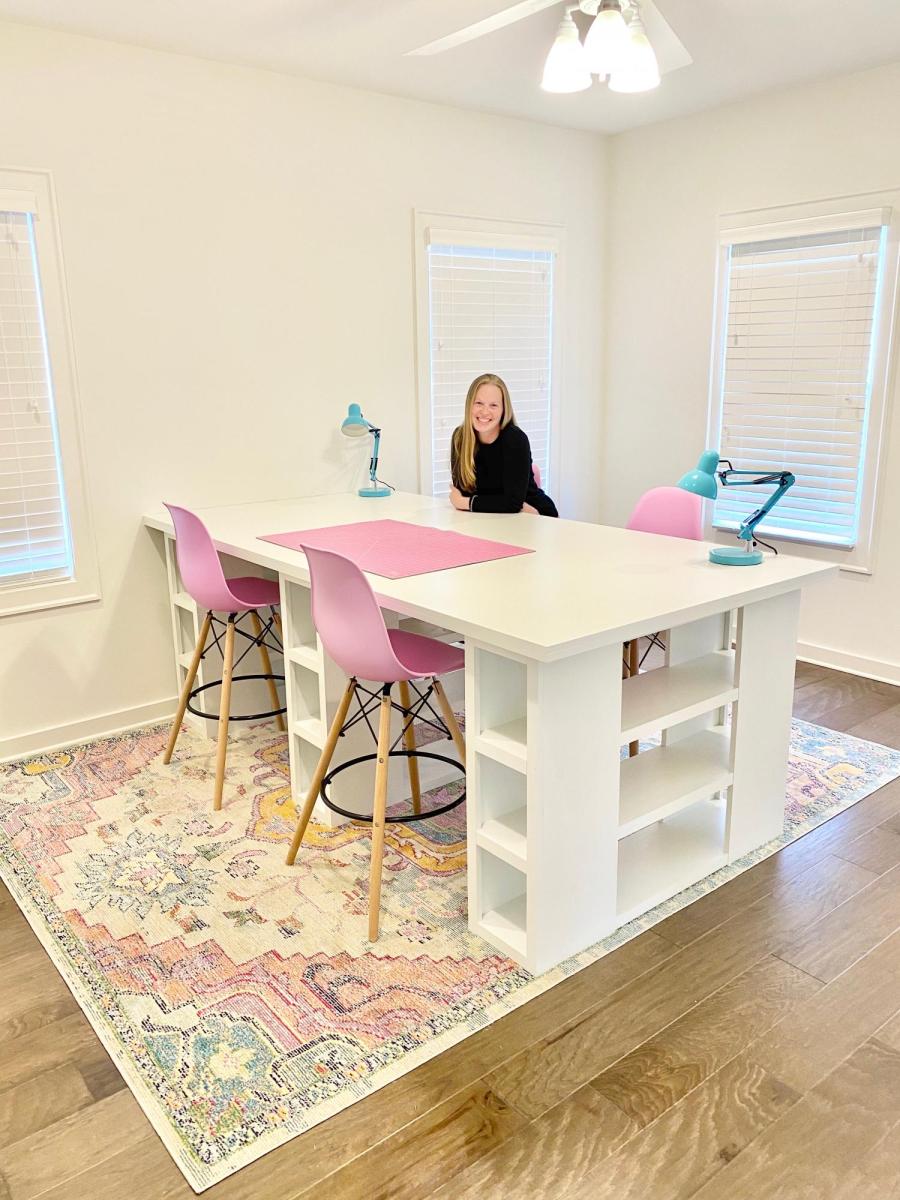
XL Modern Craft Table
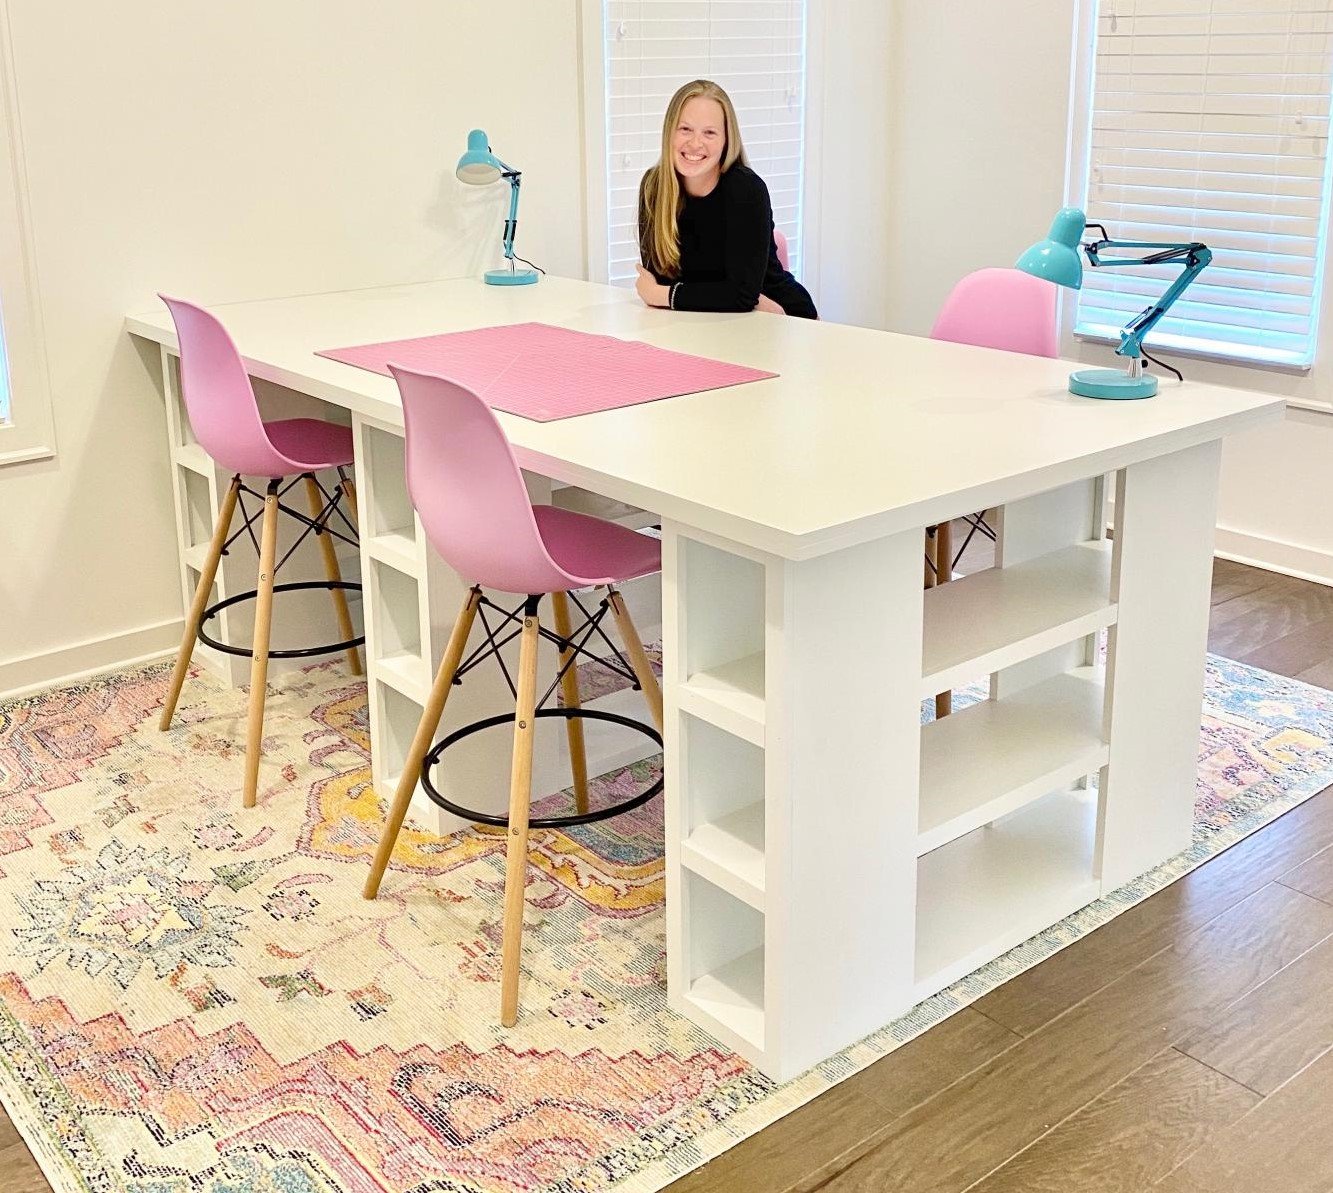
I modified this plan so I could have 4 total work areas. Total Size: 48" x 96"
Built from Plan(s)
Estimated Time Investment
Weekend Project (10-20 Hours)
Finish Used
White paint to match walls and trim (SW Alabaster)
Recommended Skill Level
Intermediate
Comments
Tue, 09/08/2020 - 19:42
Love this table!
Is there anyway you can share these plans with me!? I drew out some plans for an identical table but I think my cuts may be off! It would be so helpful.
Fri, 11/06/2020 - 12:47
Is there a full update post…
Is there a full update post with instructions for the table shown?
Tue, 12/20/2022 - 22:03
LOVE this! Just what I'm…
LOVE this! Just what I'm looking for! Can you tell me what you used for the top?
Hybrid Farmhouse / Trestle Table, bench, chairs

I spent a lot of time looking at photos that my wife tagged on pinterest, most from builders who frequent Ana's site. I learned a lot just from looking.
I stole particular ideas from Ana, Tommie and Ellie, and another site that I can't find right now, but they really did the trestle / farmhouse hybrid idea first and I just modified their idea a bit. If anyone has seen their site, please remind me so I can give credit where it is due!
I didn't really use a plan other than having a general idea of what I wanted the size of the table to be. I believe it came out to about 102" x 44"
I built 6 chairs and the bench.
All is built out of construction grade lumber, and gets lots of compliments.
The table came together in a solid weekend, the bench took a couple of evenings, and the chairs...those chairs took forever to cut out, shape, assemble, and finish.

Built from Plan(s)
Estimated Cost
About $400, including purchasing a couple of jigs, but I had a lot of stuff "laying around"
Estimated Time Investment
Week Long Project (20 Hours or More)
Finish Used
Minwax English Chestnut and about 8 coats of satin lacquer. Steel wool between coats and finished with carnuba wax and buffed out.
Recommended Skill Level
Intermediate
Comments

Mon, 02/02/2015 - 18:15
Gorgeous dining room!
Wow these are so great! Beautifully built, and your finish looks flawless! You have a dining room that will last for generations! Love it!
Tue, 03/07/2023 - 12:47
Looks great!
Truly an inspiration for when we are to the point of building our table. Thank you for sharing.
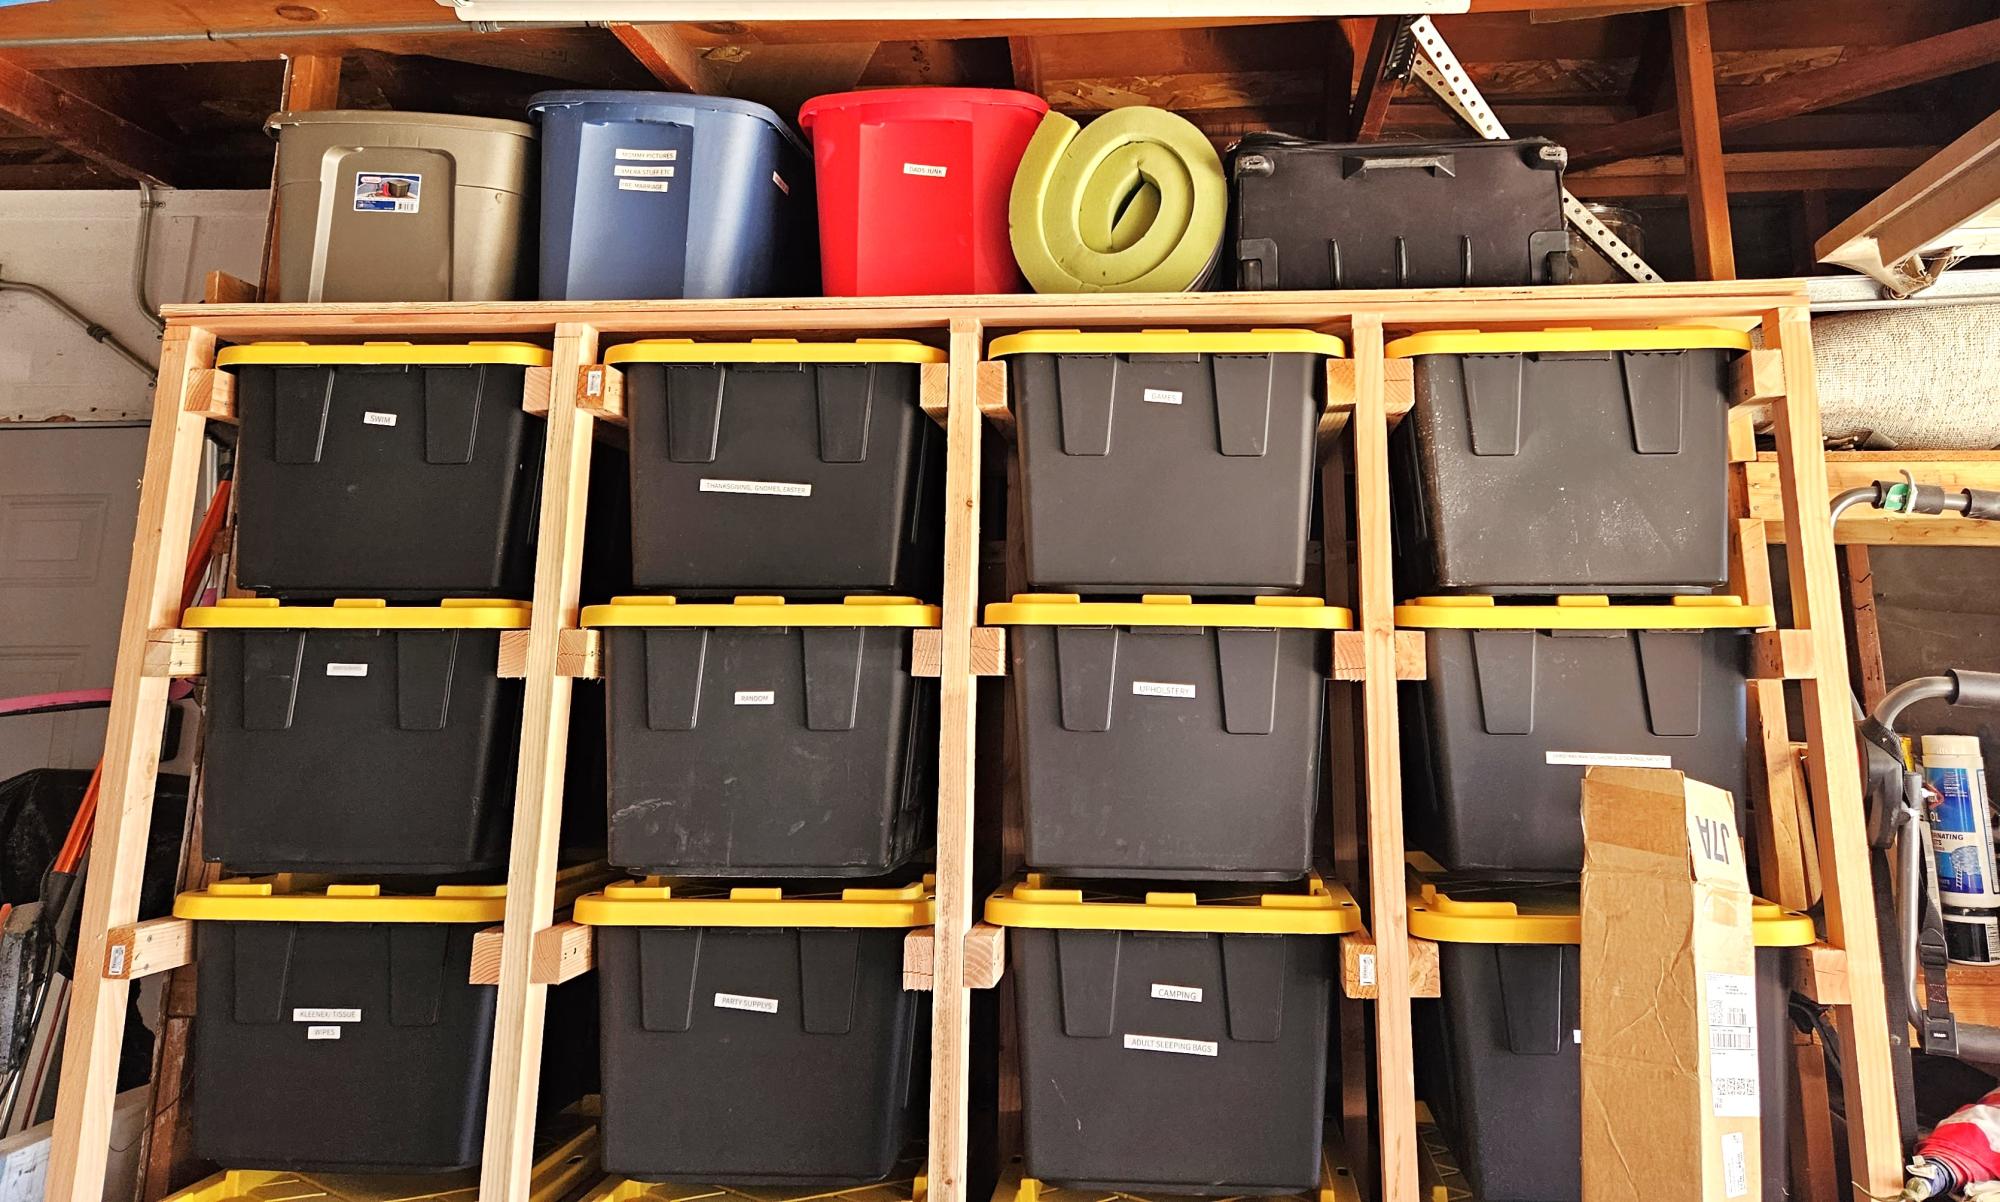
Laundry Basket Rack

This was a great last minute Christmas gift. Took me a little over two hours. Made completely out if pallet wood.
Comments
Sun, 12/26/2021 - 13:19
Great pallet project!
It looks great, I'm sure the recipient loved it! Thanks for sharing:)
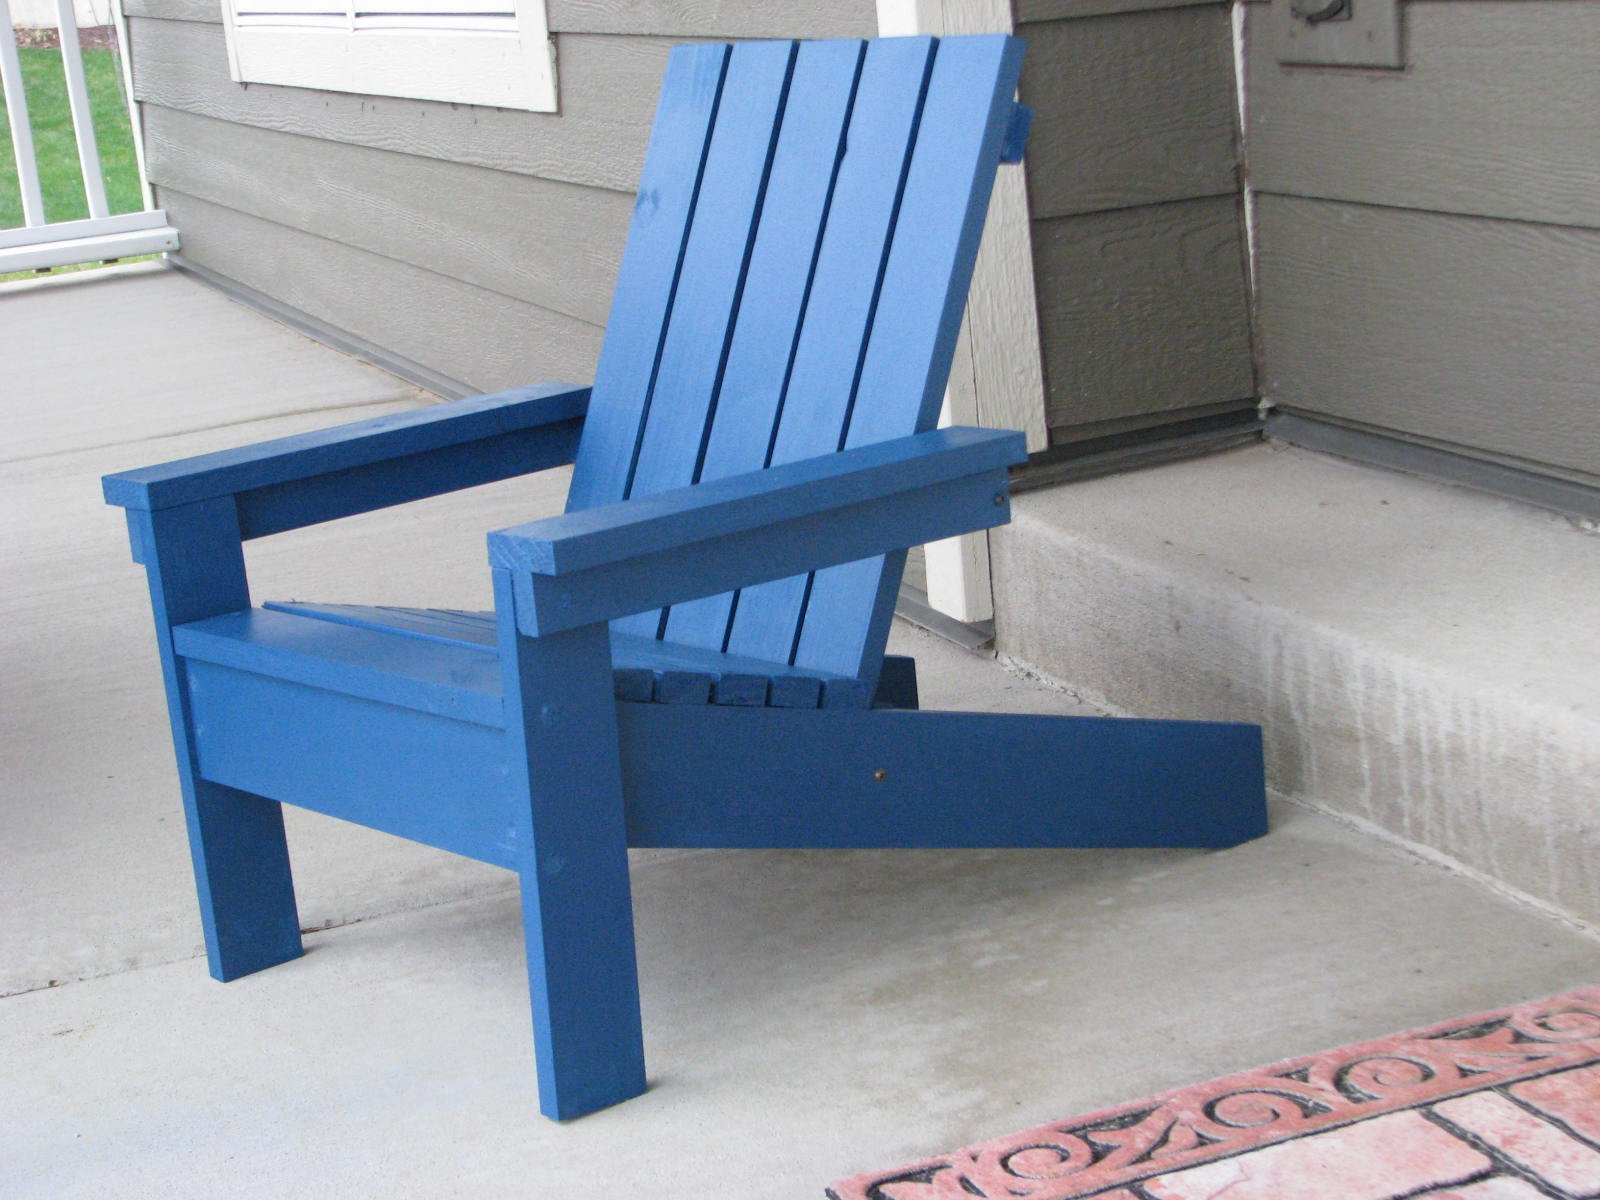
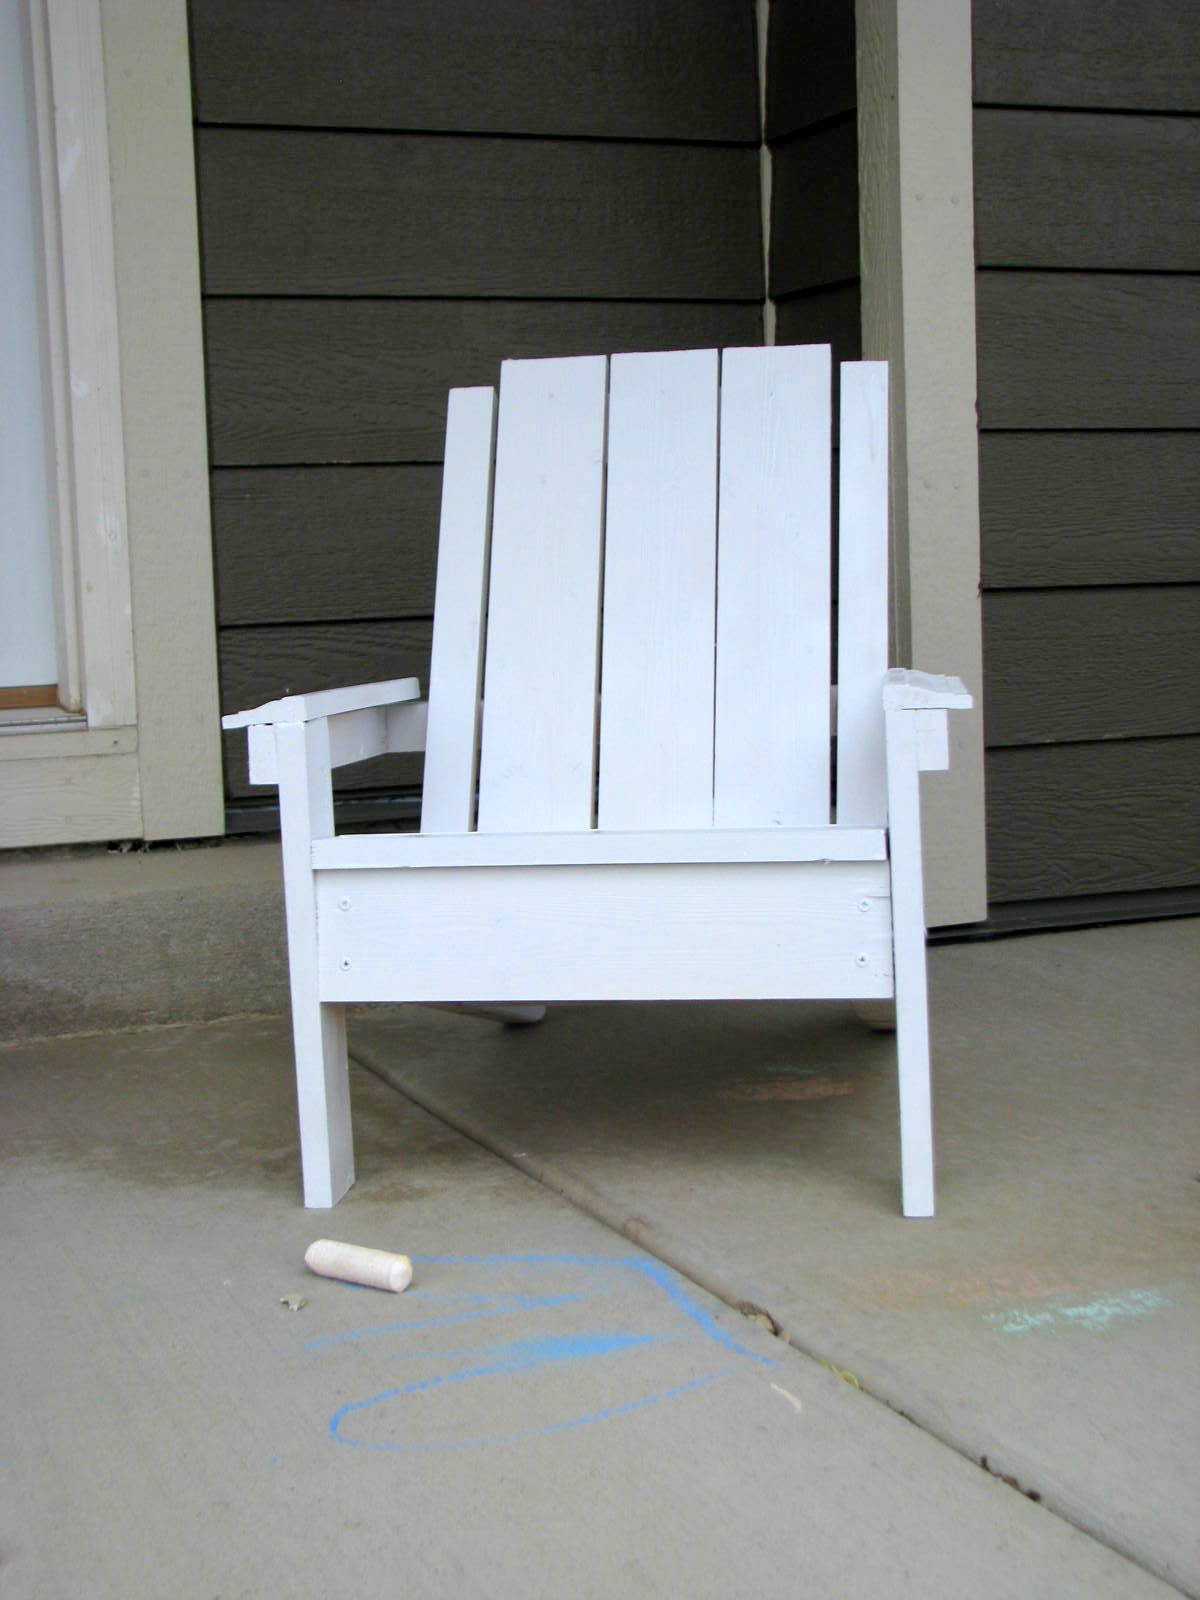
Kid's Adirondack Chairs
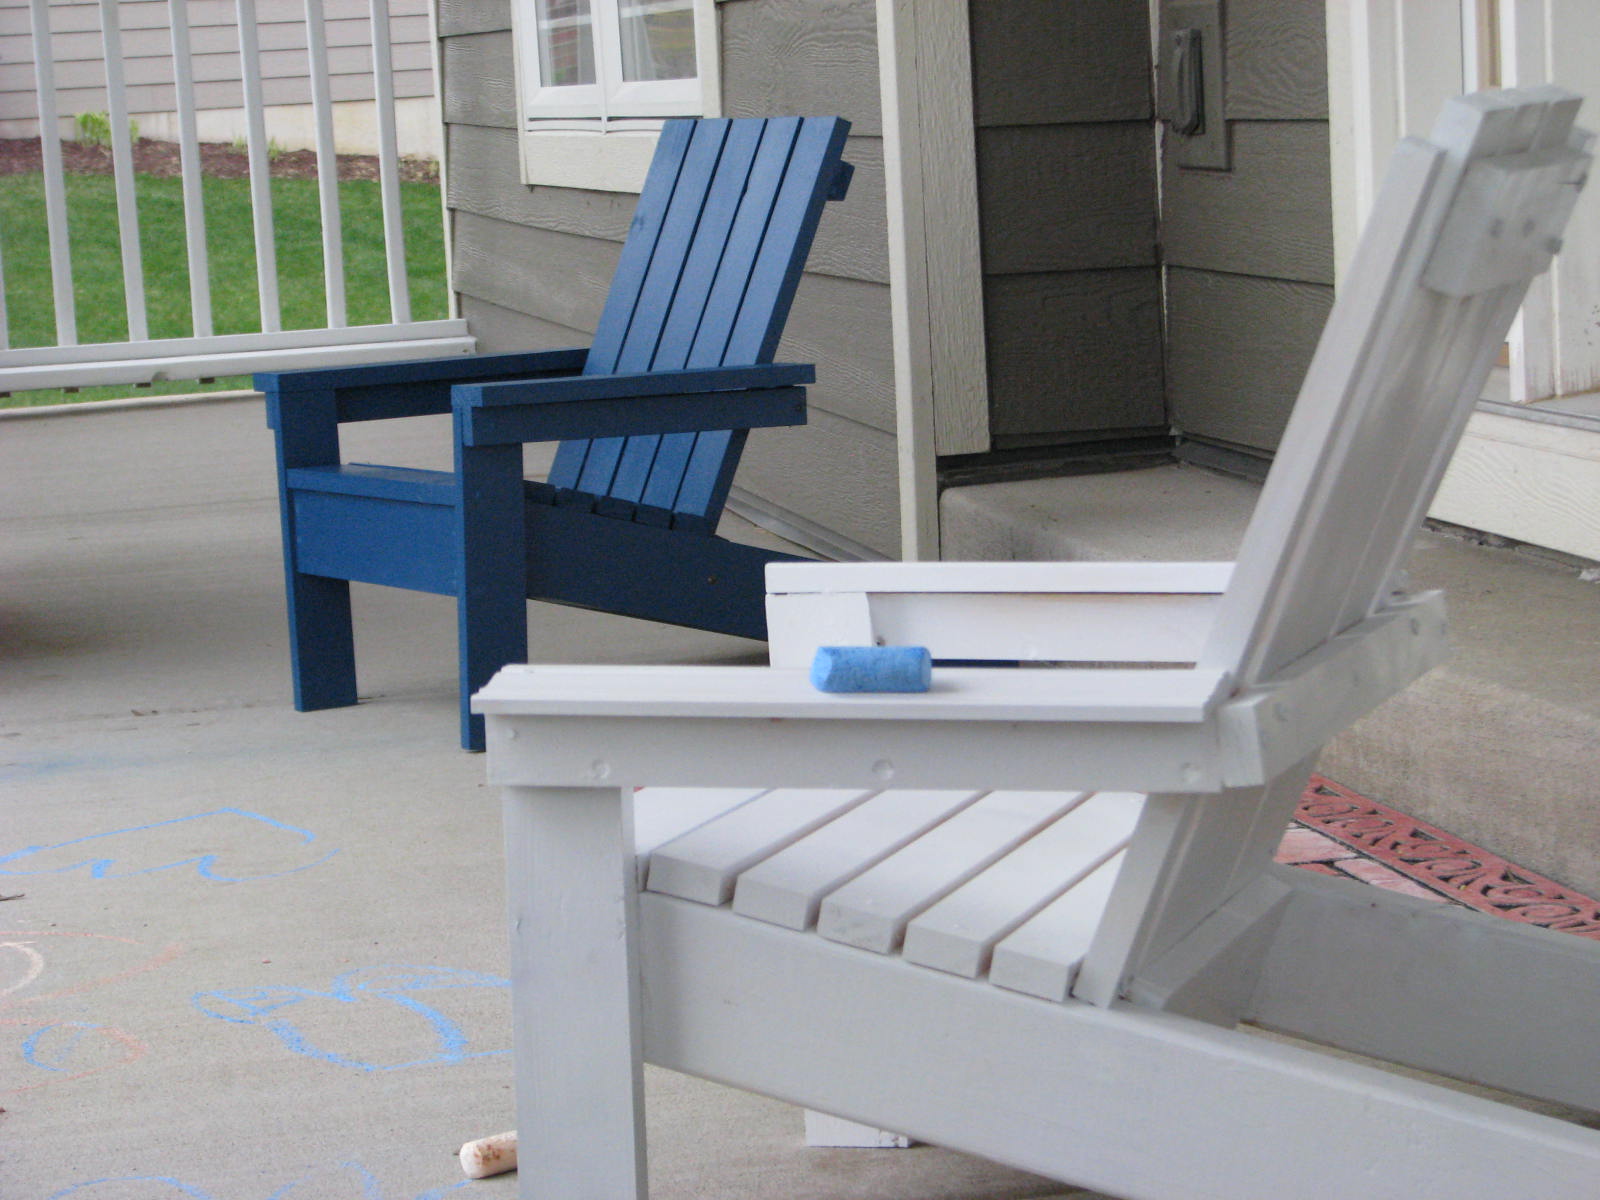
The first one I built (the white one) was a terrible failure because I rushed through it and didn't read directions! Also, I used only scraps that I had on hand. The blue one went smoothly because I used the right materials and took my time.
Built from Plan(s)
Estimated Cost
12 - 15 dollars
Estimated Time Investment
Afternoon Project (3-6 Hours)
Finish Used
The blue paint is oops paint from Lowes & the white is spray paint
Recommended Skill Level
Beginner
Special Teacher Gifts
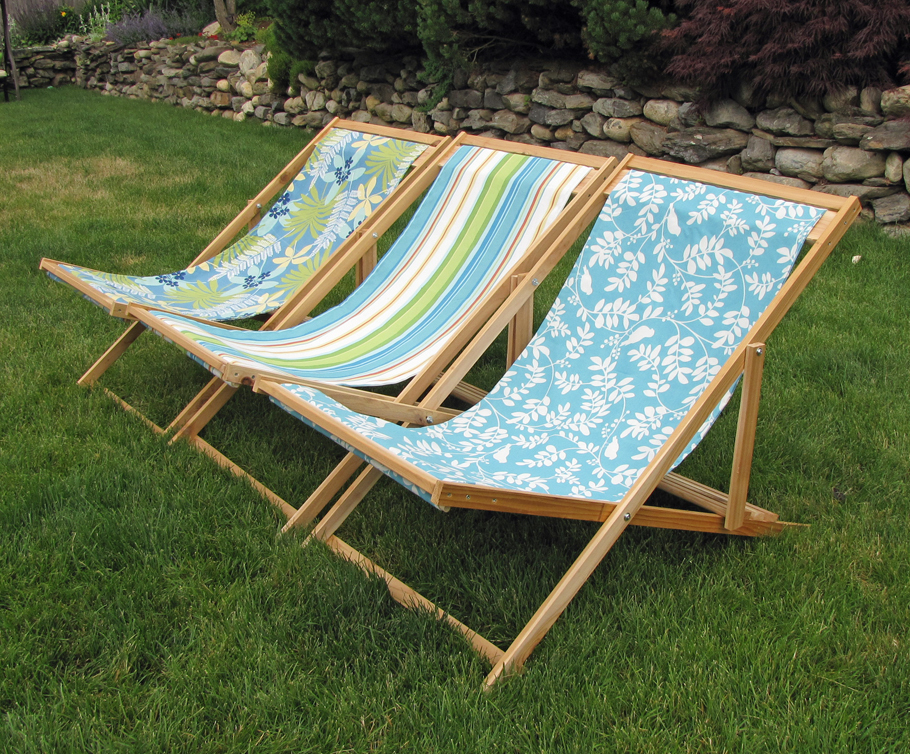
My son Jack, has Down syndrome. He's had the same preschool teacher for the last 3 years, and now it's time to move on to kindergarten. Not only does he have a dedicated teacher, but he has two paraprofessionals (teacher's aides) that take turns in helping him 1:1 all day long. I figured that it was time for all three of them to relax this summer. So, in appreciation, I made three of the adult sling chairs so they can enjoy their much deserved relaxation.
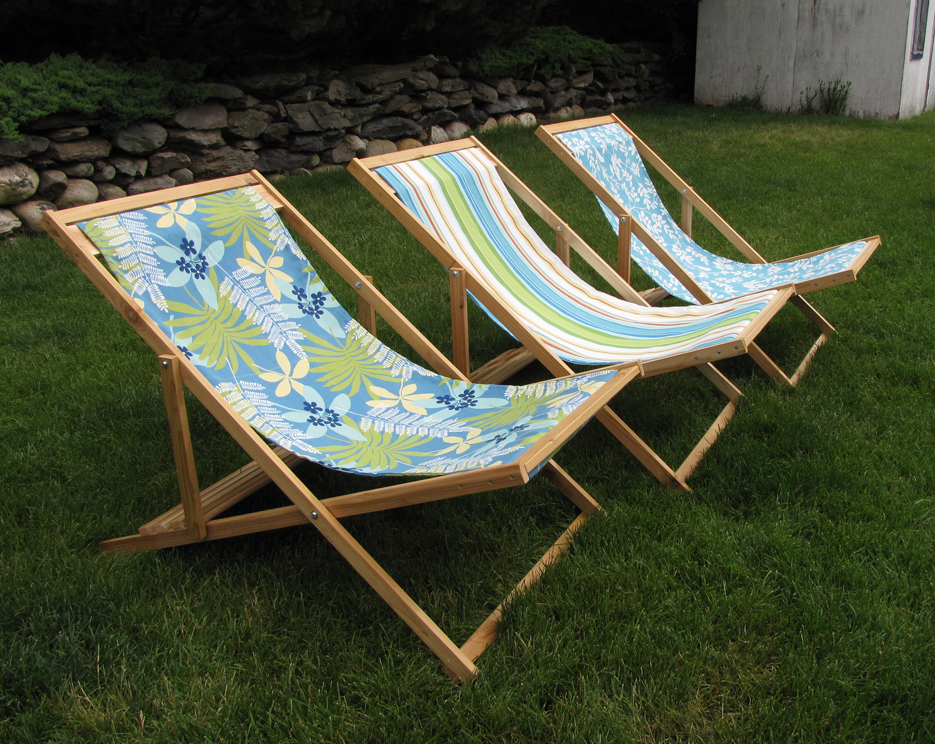
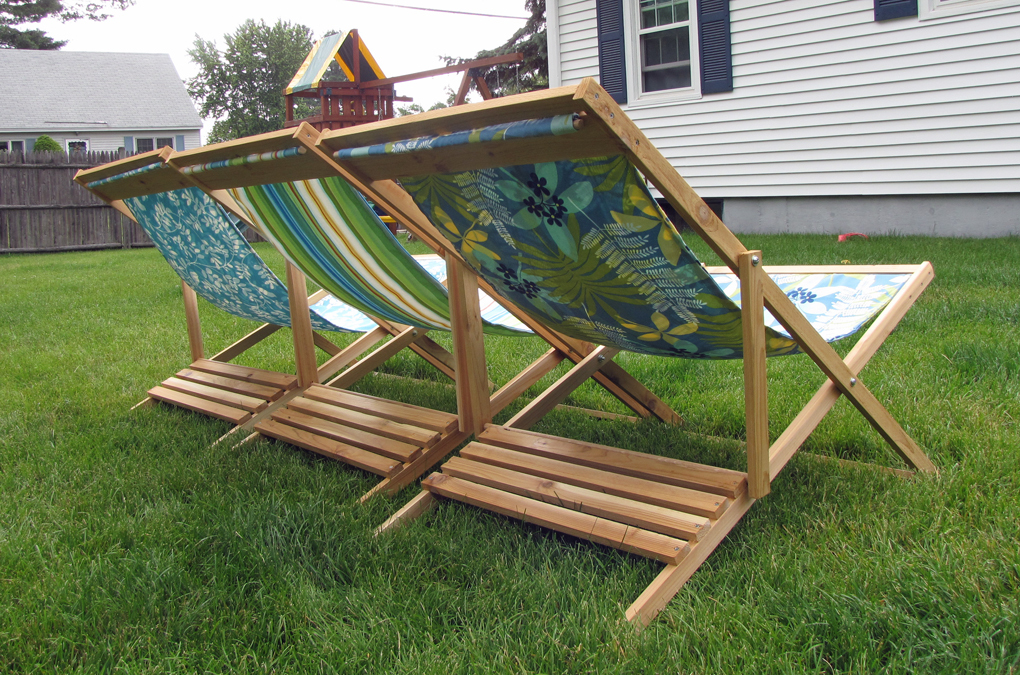
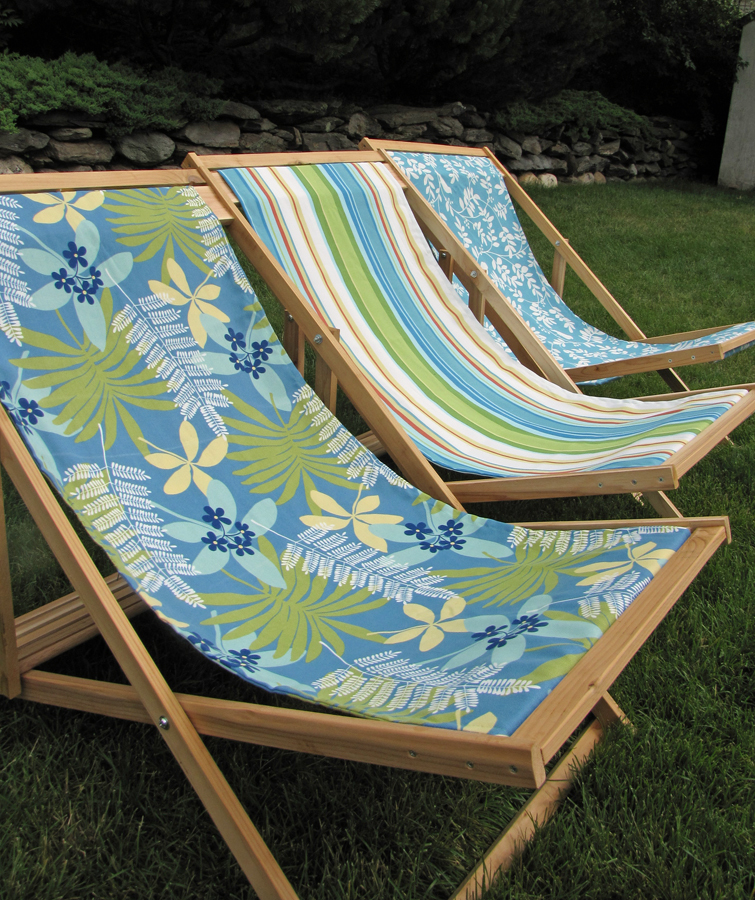
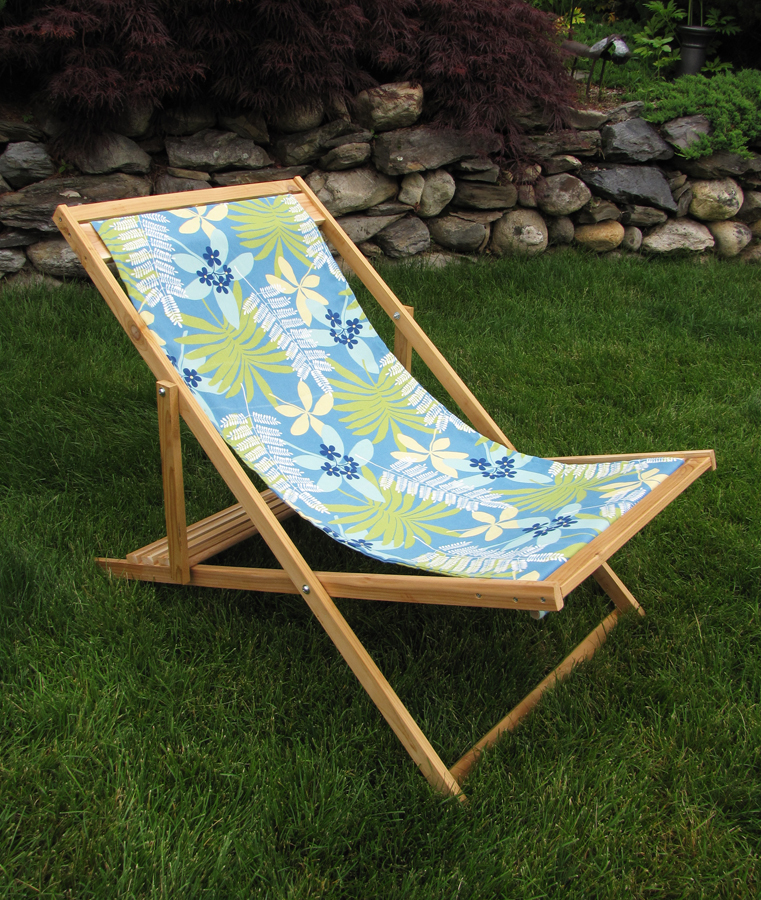
Built from Plan(s)
Estimated Cost
$25 - $30
Estimated Time Investment
Afternoon Project (3-6 Hours)
Finish Used
Since I used cedar, I didn't want to do anything to it except put a coat of Thompson's water sealer on it.
Recommended Skill Level
Beginner
Comments
Tue, 06/21/2011 - 00:00
As an OT in the schools, I
As an OT in the schools, I can understand your connection to the dedicated teacher and staff that work for your son. I'm sure that these gorgeous chairs will show your appreciation! What great choices in fabric, too!

Tue, 06/21/2011 - 15:18
What a fantastic gift!!!
Seriously so thoughtful! I love how they turned out!!!
Tue, 06/21/2011 - 18:20
I got my fabric at JoAnn's too!
I made this same chair for my husband and I got my fabric at JoAnn on sale! They have a great selection of outdoor fabric. :)
Fri, 09/23/2011 - 19:31
instructions
Would you mind sending the instructions for these chairs. I think this is something that I could do and would love to make a set for my husband for Christmas. We are all about homemade. That would be so great!
Wed, 09/28/2011 - 20:05
Instructions
Hi Sherry. To find the page where I got the plans, just click on the words "Wood folding sling chair - adult" next to the bolded "From Plan" listed above. That will take you directly to Ana's plan.
Fri, 02/10/2012 - 03:45
instuction for sling chair
would love to make could i get these instuction thanks
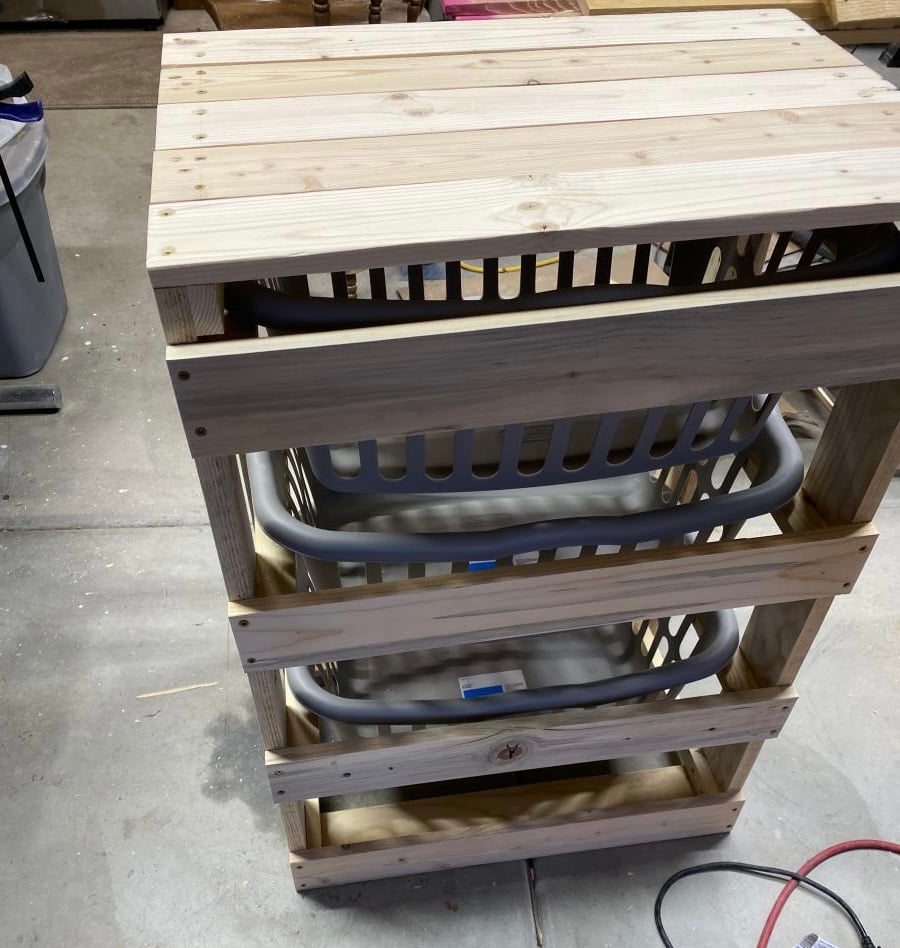
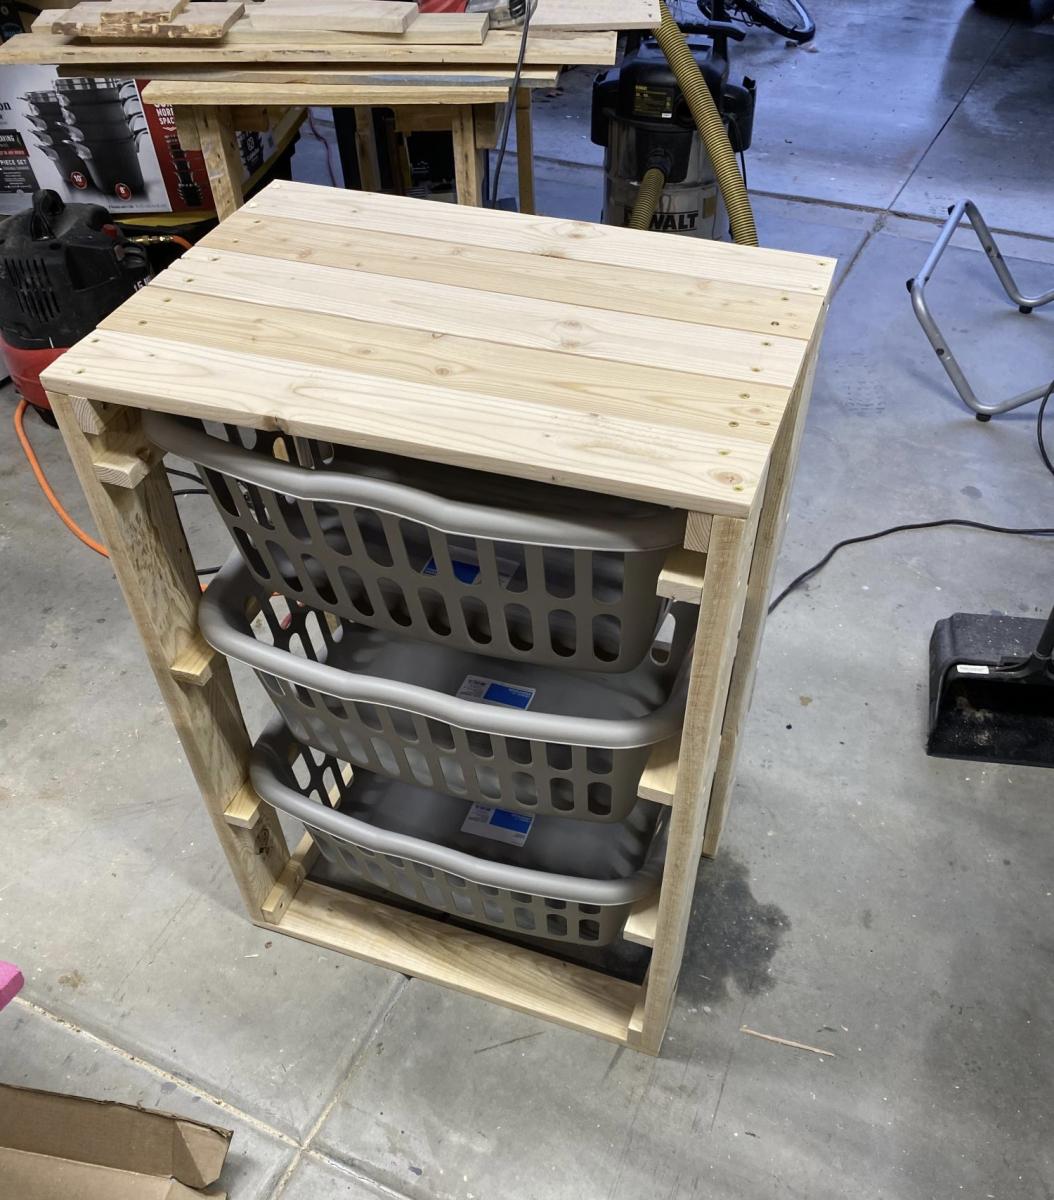
Rustc X Laundry table
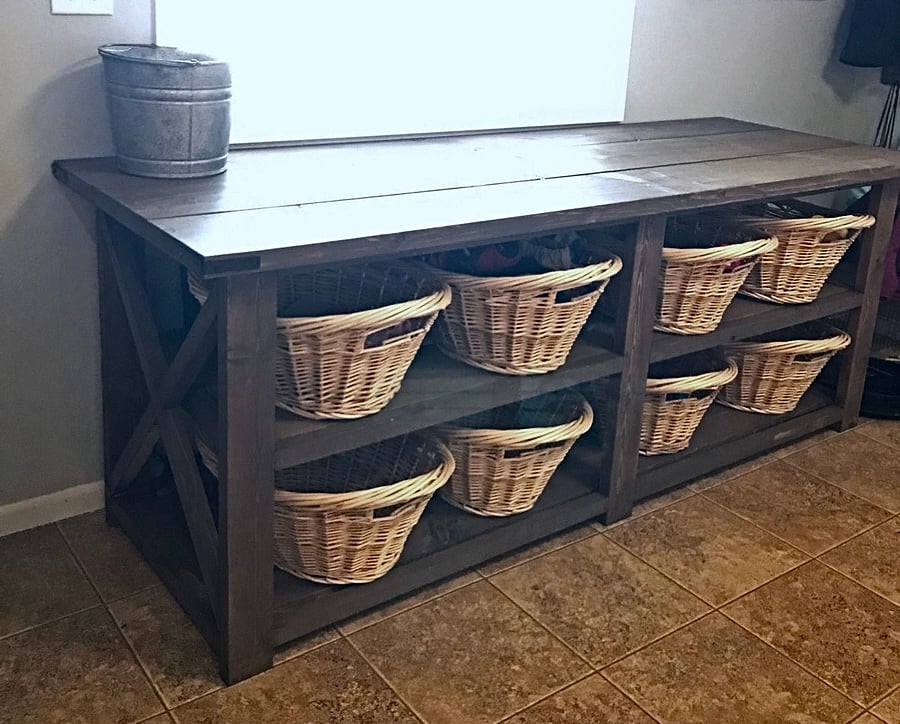
Customized this table to fit perfectly in my laundry room. It turned out exactly how I had hoped!
Built from Plan(s)
Estimated Cost
$150 for lumber and stain, $80 for 8 baskets
Estimated Time Investment
Weekend Project (10-20 Hours)
Finish Used
Stain color Briarwood
Recommended Skill Level
Beginner
Comments

Sun, 10/14/2018 - 13:31
Amazing Build!!!
Wow, this is absolutely amazing! What a perfect and lovely spot to fold and sort laundry! Thank you so much for bragging.
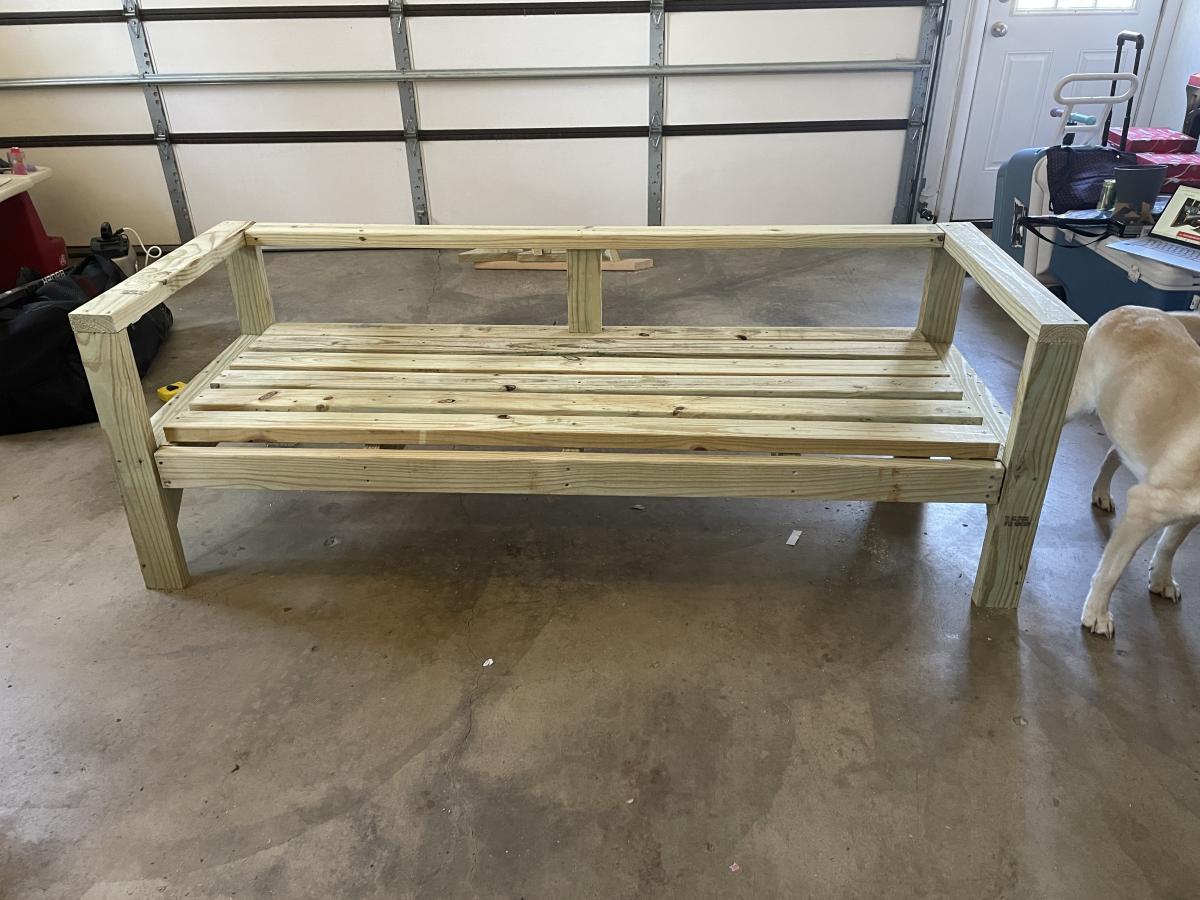
Patio couch
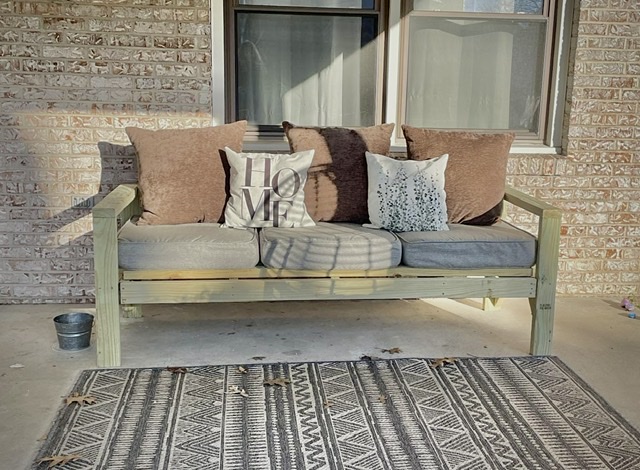
I have been looking at your blog and always been interested in making my own furniture. However, I was scared to try. Your diagrams and measurements were awesome. Thank you! Gave me the encouragement to try!

Built from Plan(s)
Comments
Sturdy Workbench Sink
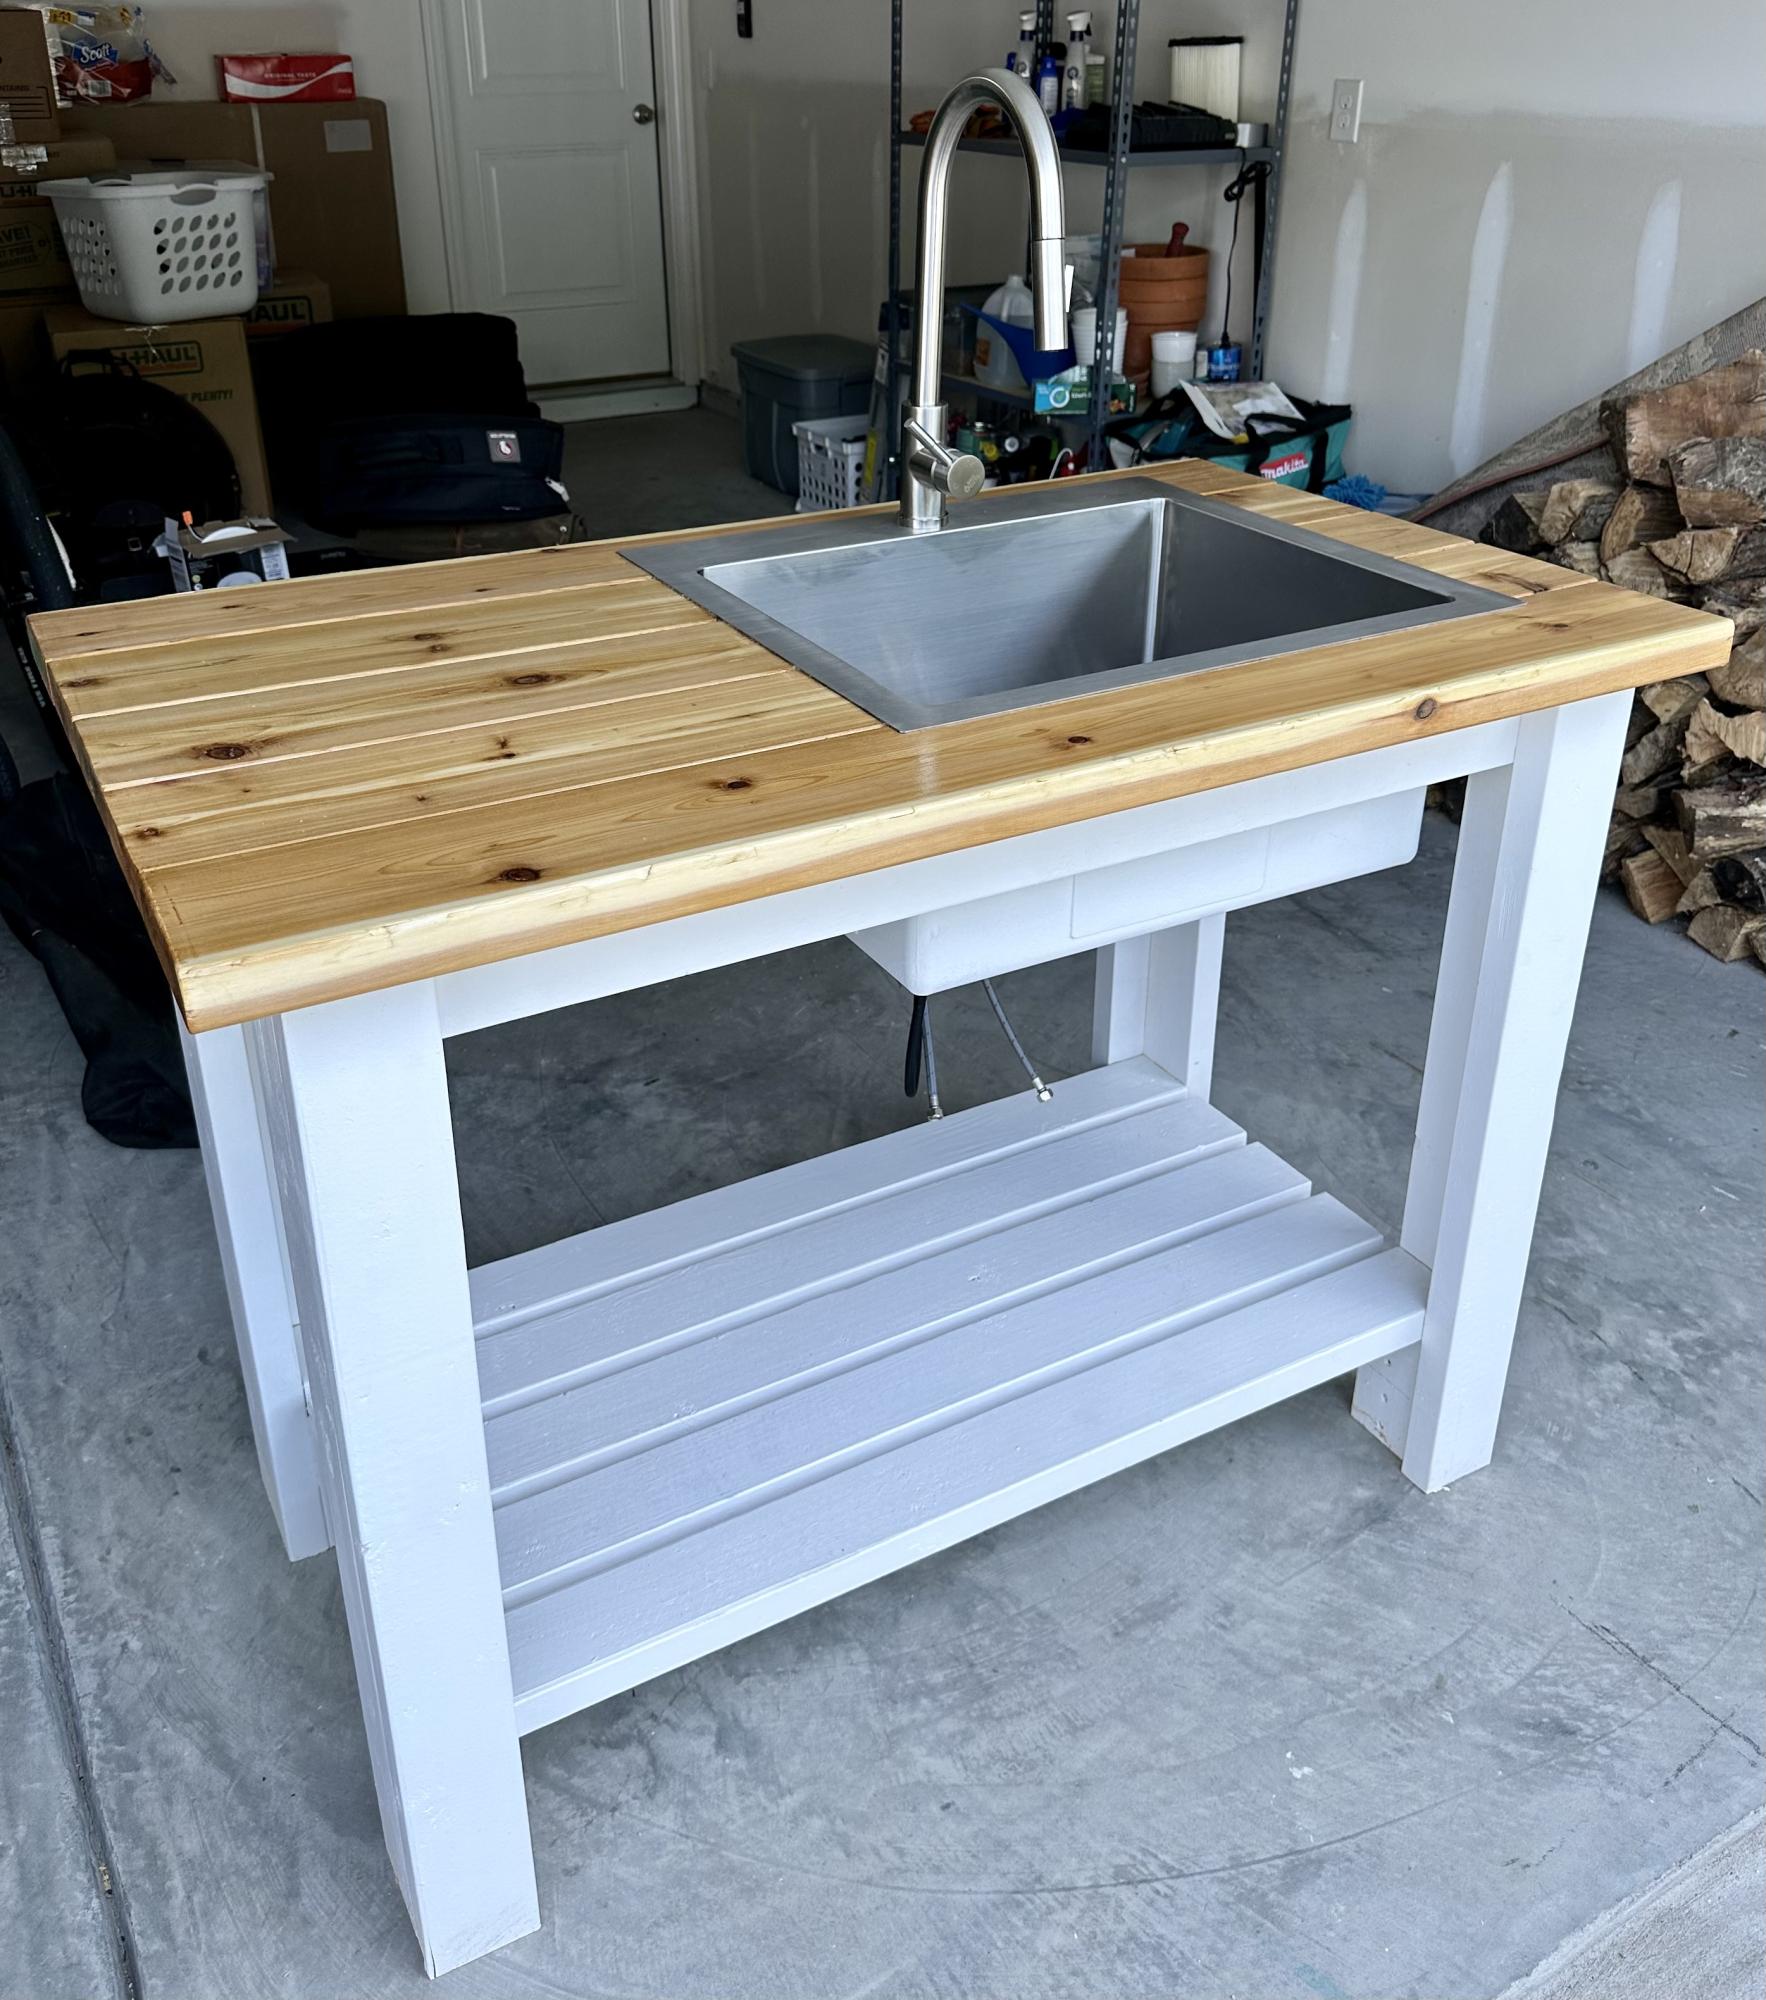
Used sturdy workbench plans with 2x6 cedar top for outdoor sink. Turned out much better than I expected!!
Built from Plan(s)
Comments
Tue, 05/02/2023 - 07:09
This is so great!
Way to go, it is beautiful and functional! Thanks for sharing.
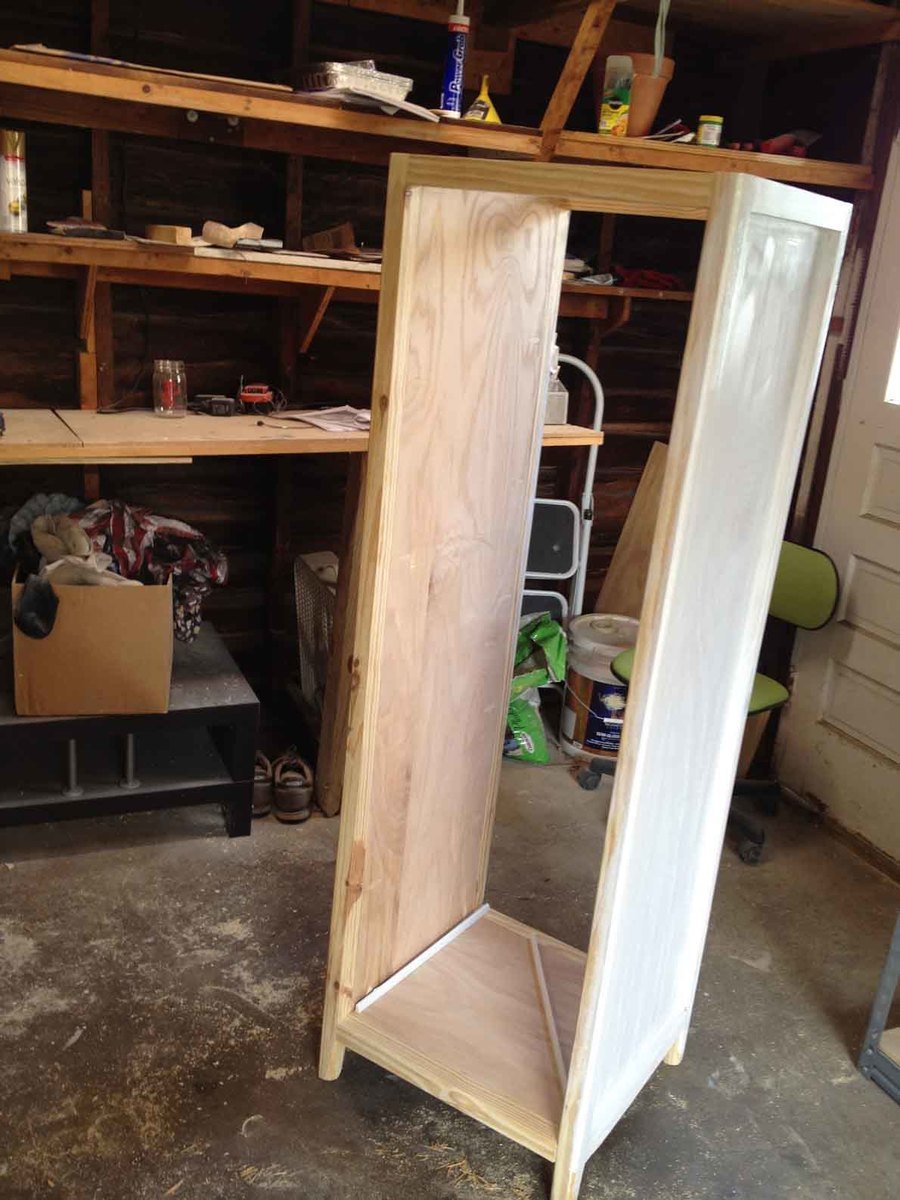
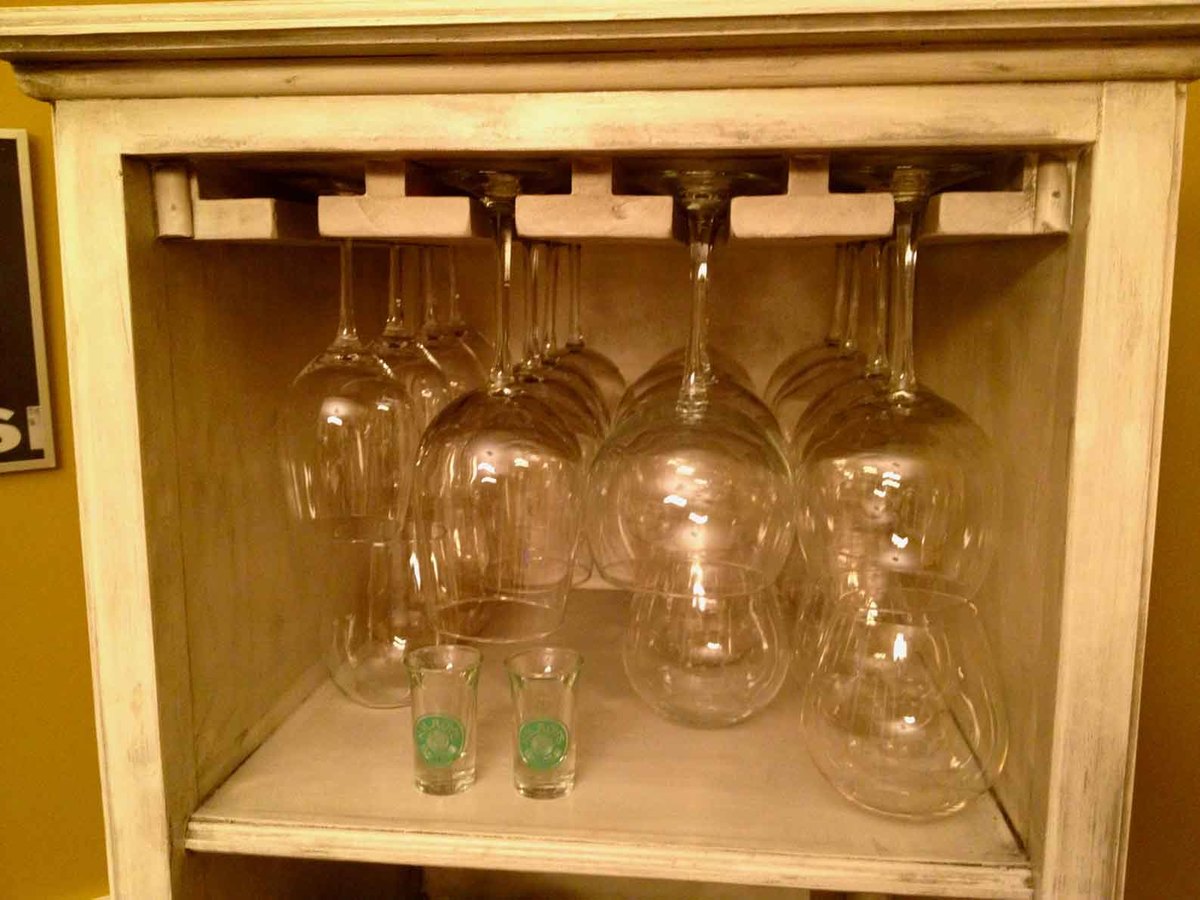
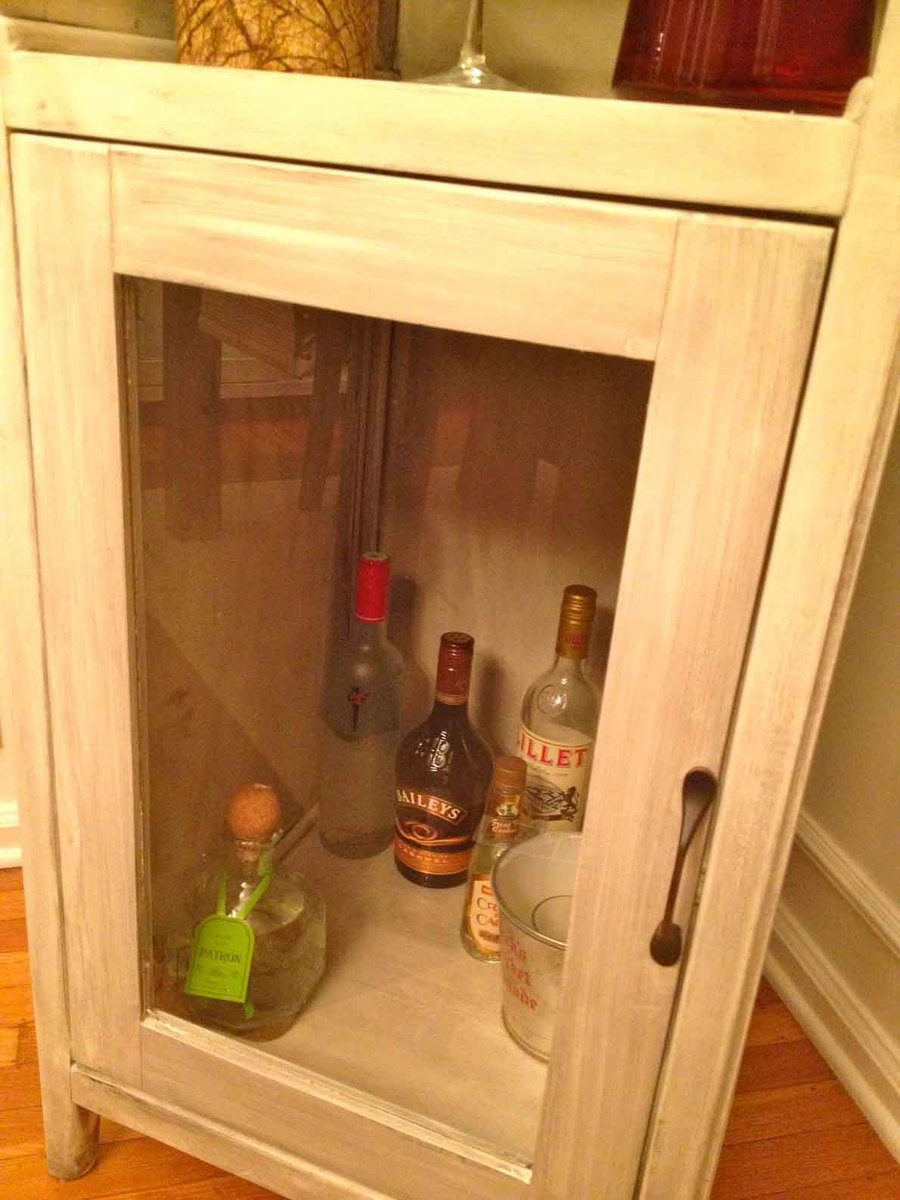
Liquor Cabinet from Benchmark Storage/Media Unit
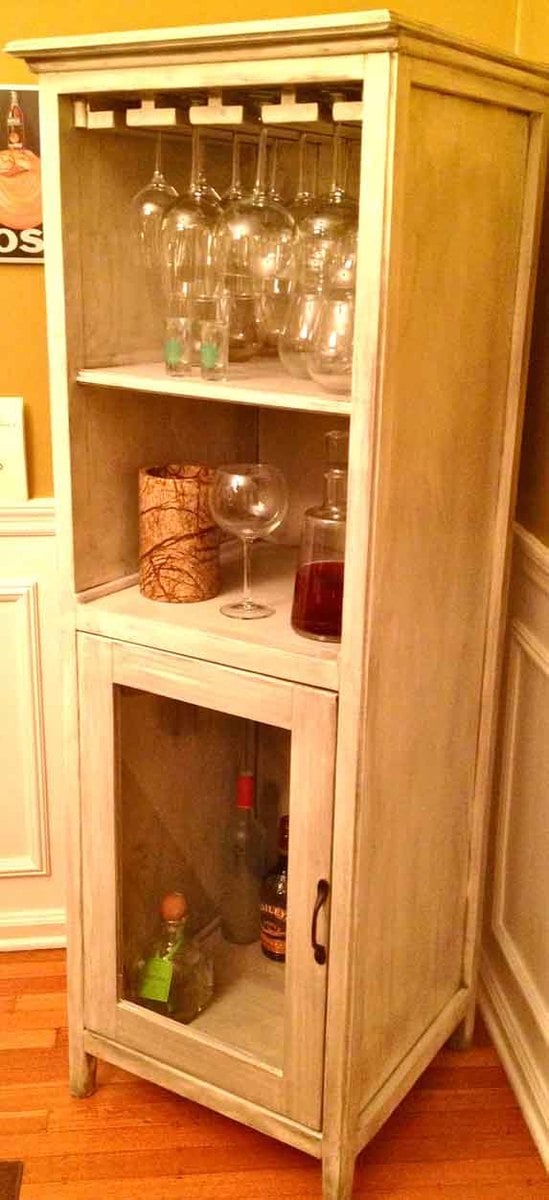
Hallelujah!! Finally, somewhere to store all our alcohol-related necessities :) We adapted Ana's Benchmark Storage Unit to work as a liquor cabinet. We kept the basic design the same, but added some stemware storage across the top (a feature we loved in a Crate and Barrel liquor cabinet that was $$$$$) and some decorative molding to bulk it up a little bit. We lovvvvvve it! Thanks Ana!
PS: everyone please check out our blog for more details on this and other projects!
Built from Plan(s)
Estimated Cost
$100 (using paint and supplies on hand)
Estimated Time Investment
Week Long Project (20 Hours or More)
Finish Used
White semi-gloss paint followed by a thin coat of Minwax stain (Ebony) wiped off immediately after applying (more details on our blog)
Recommended Skill Level
Intermediate
Comments

Thu, 01/05/2012 - 17:18
Wow, that is so awesome! I'm
Wow, that is so awesome! I'm gonna have to build one now!
Reclaimed Wood Outdoor Sofa
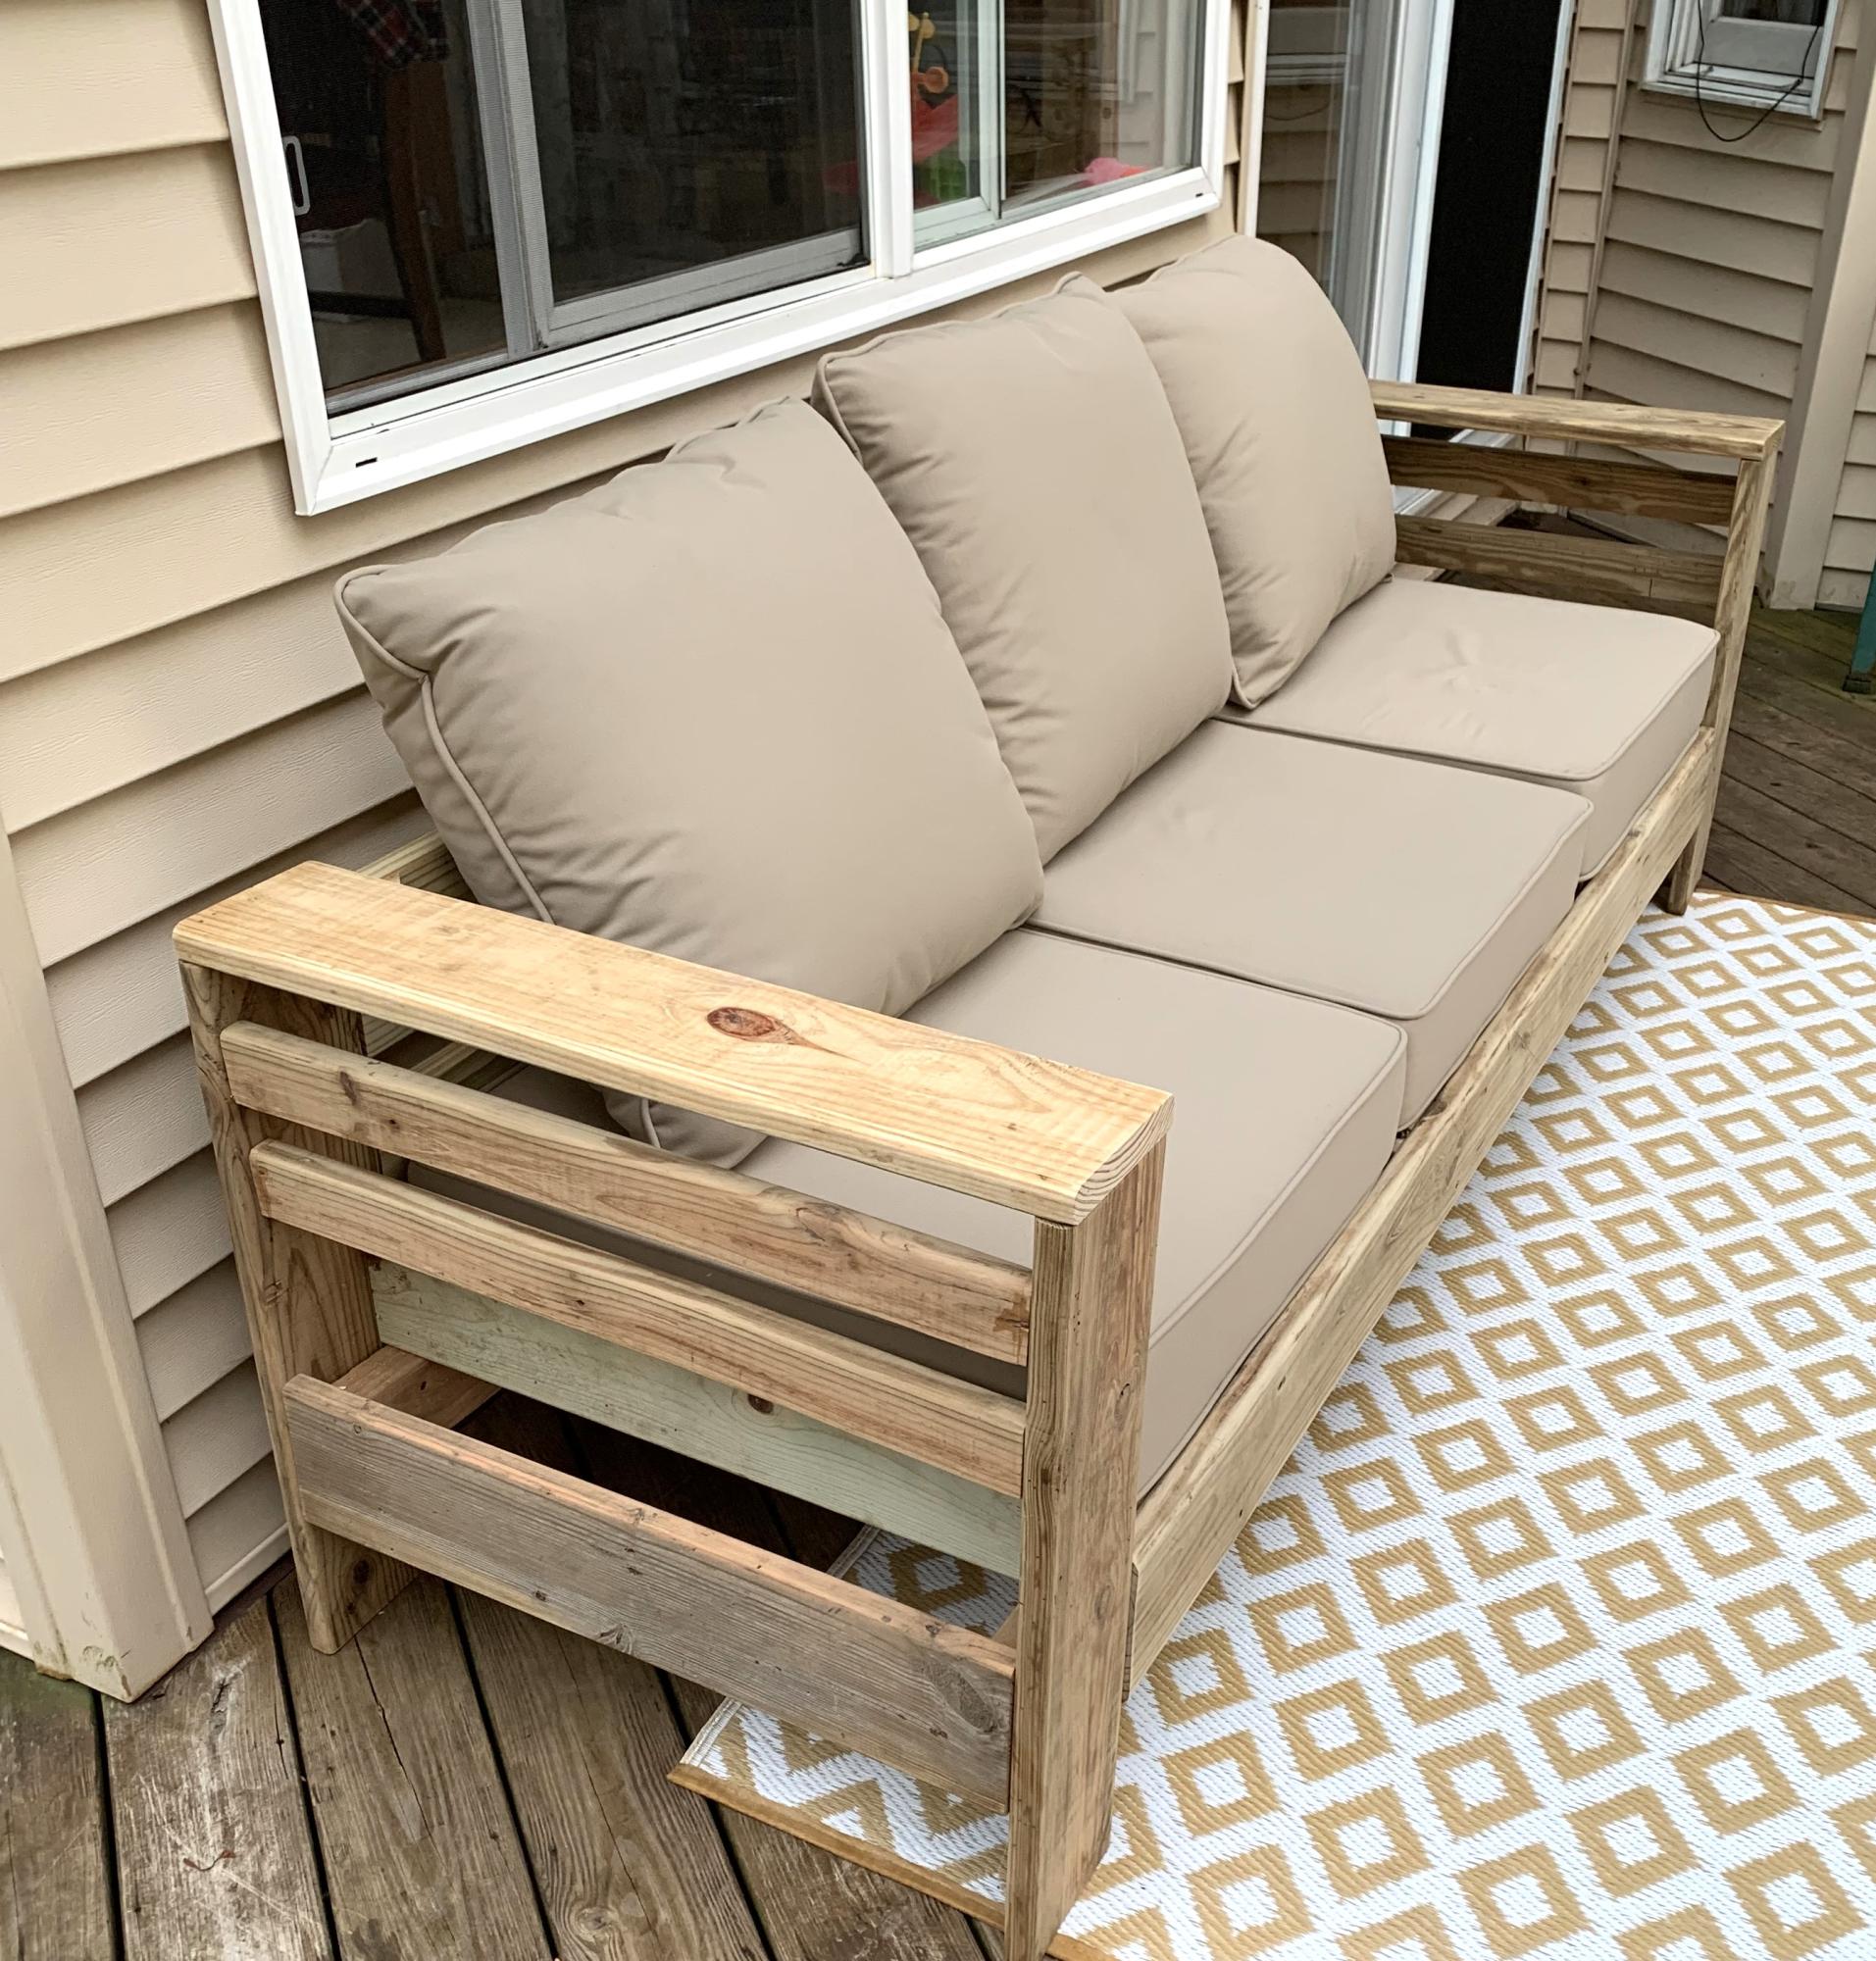
We had a small deck with many rotted boards. The contractor who demoed it, knowing my interest in diy projects, sorted out any usable boards. I loved the idea of an outdoor sofa, so altered your beautiful pattern to accommodate decking boards - I literally only had to purchase 2 boards for the entire project! I’m so thrilled with how it turned out! Thank you!!
Camey Brown
Built from Plan(s)
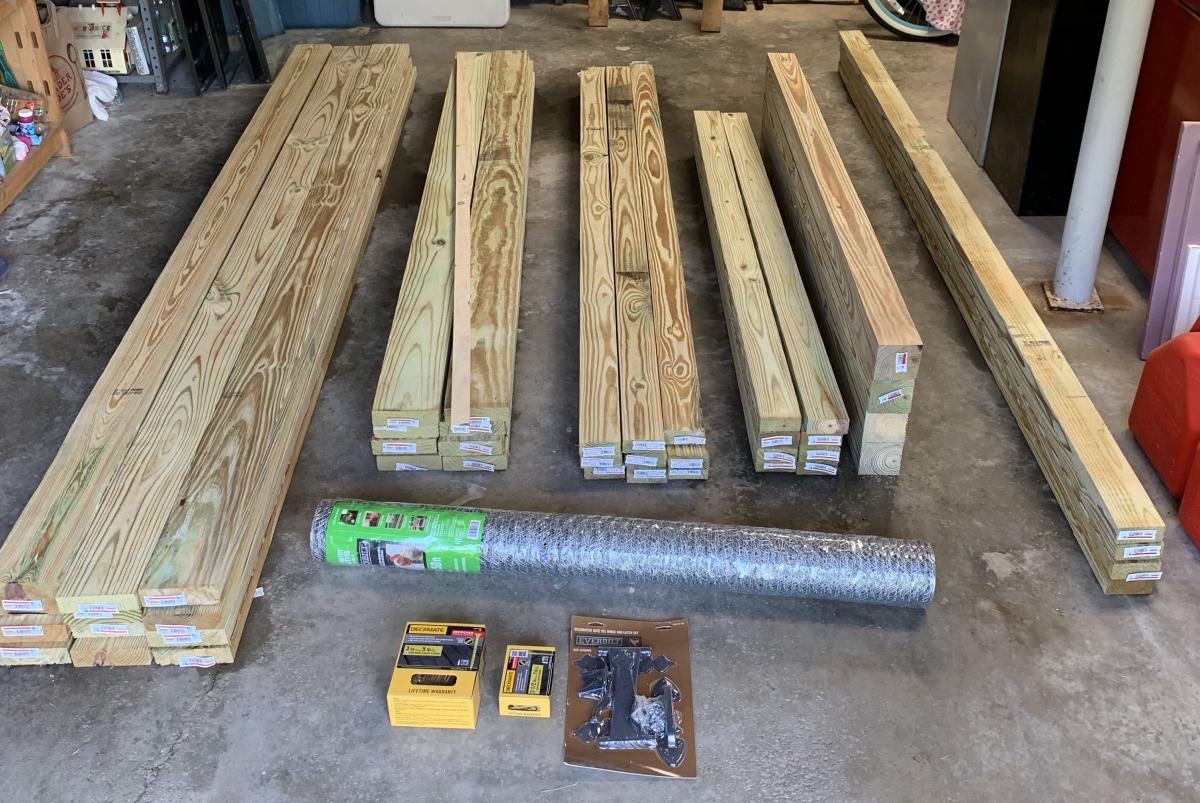
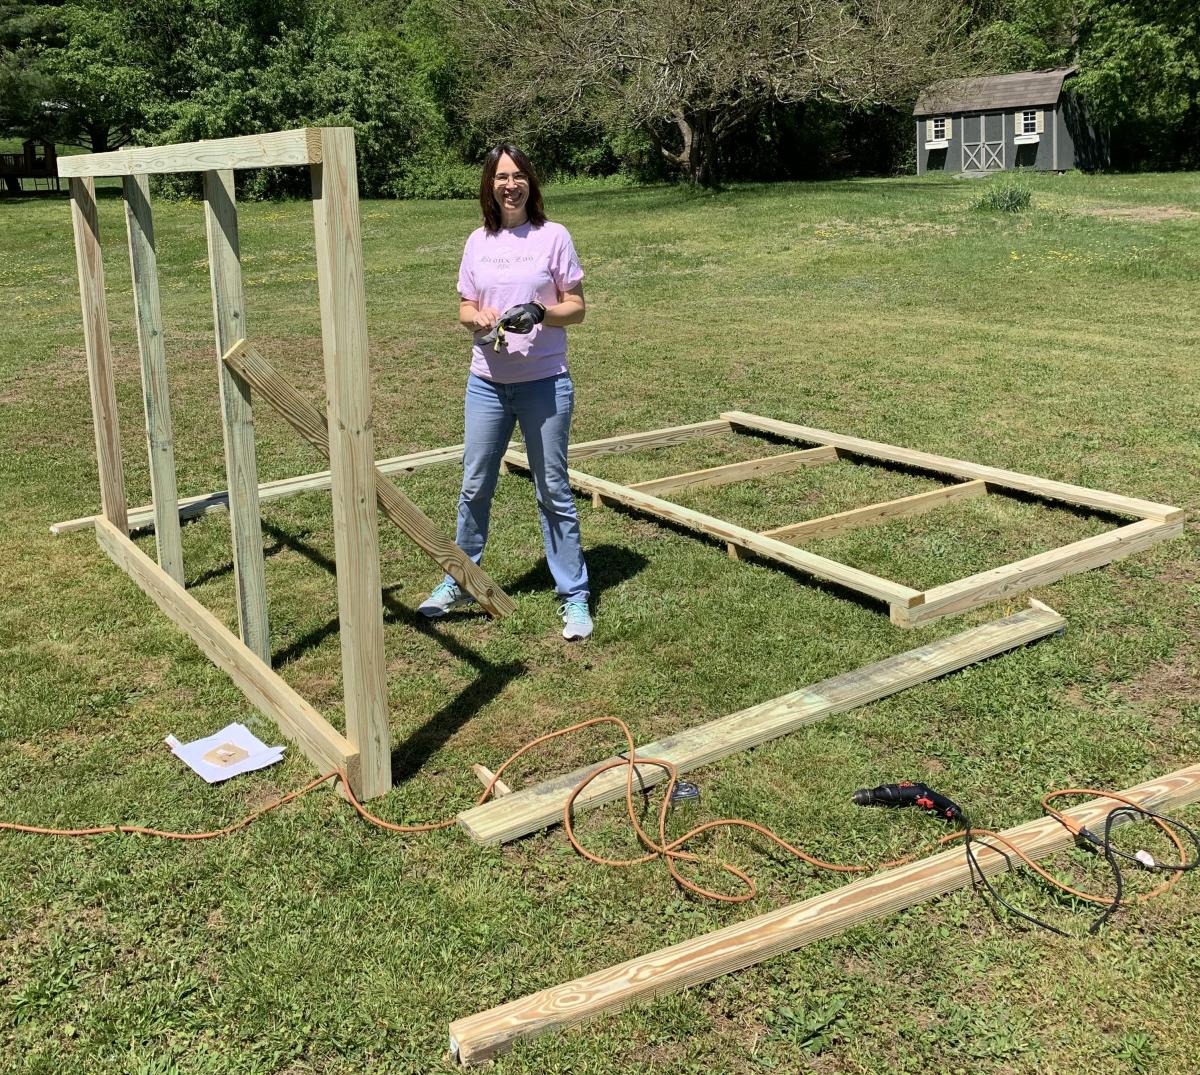
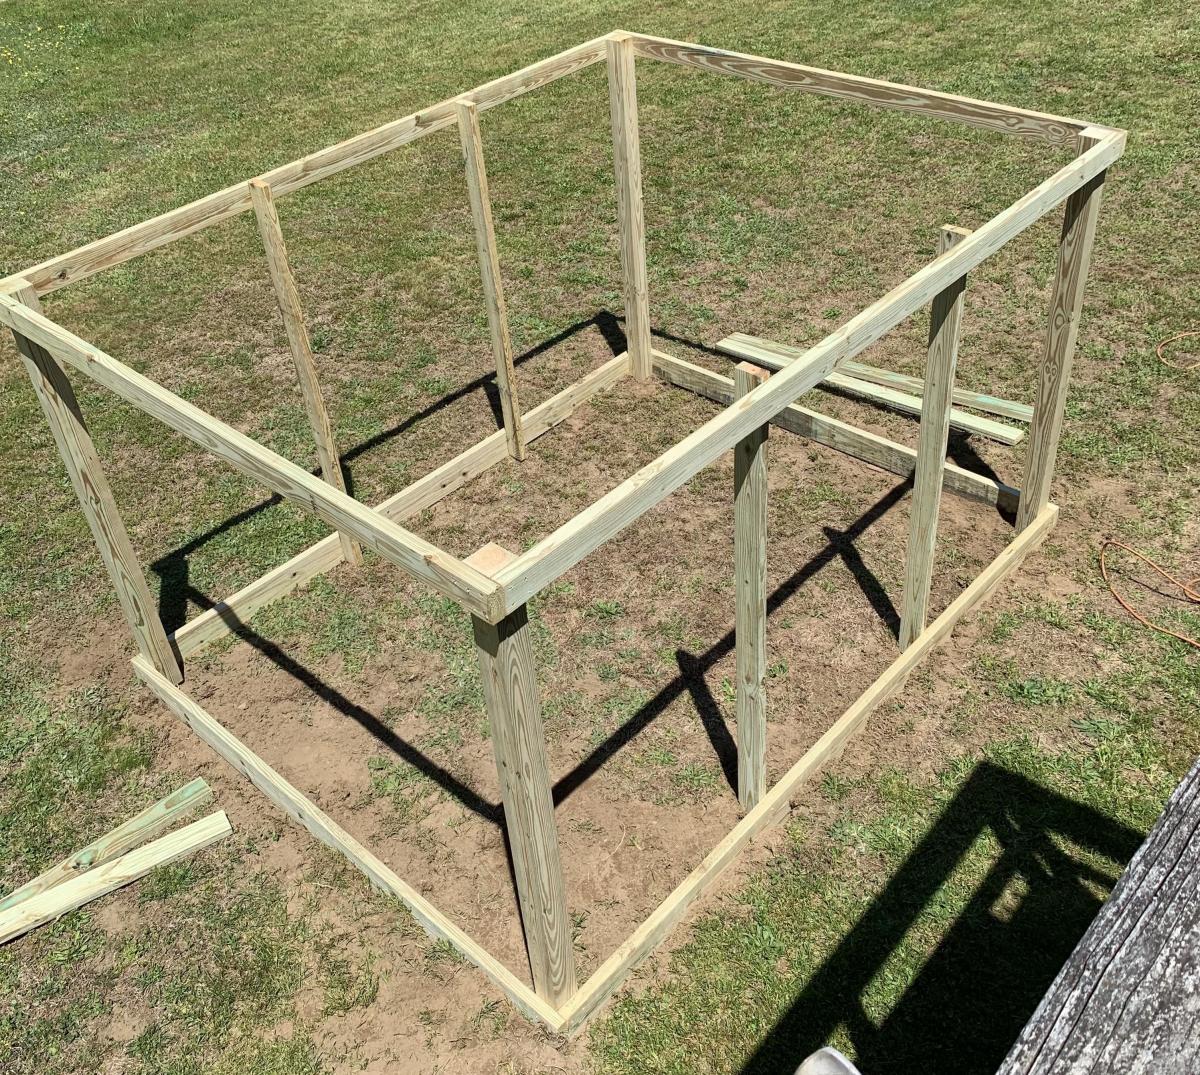
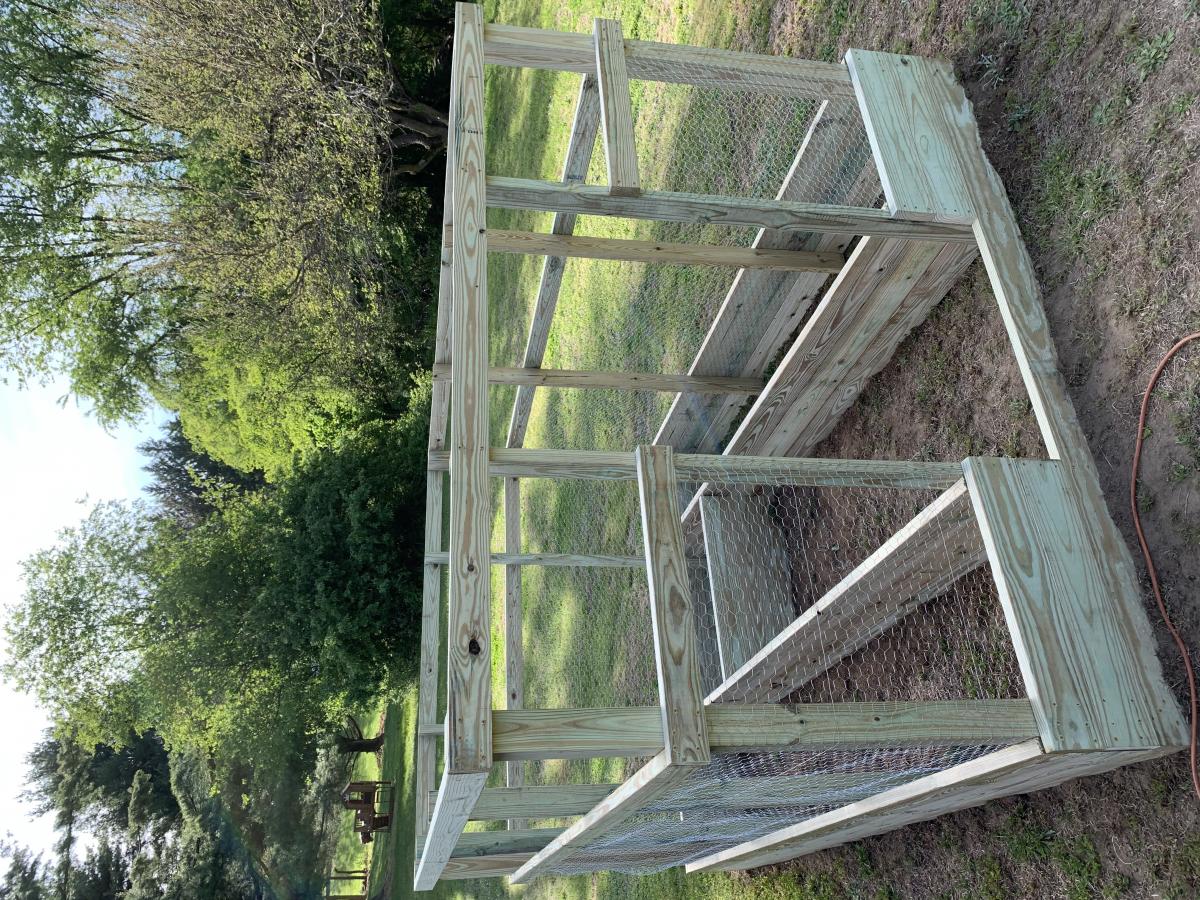
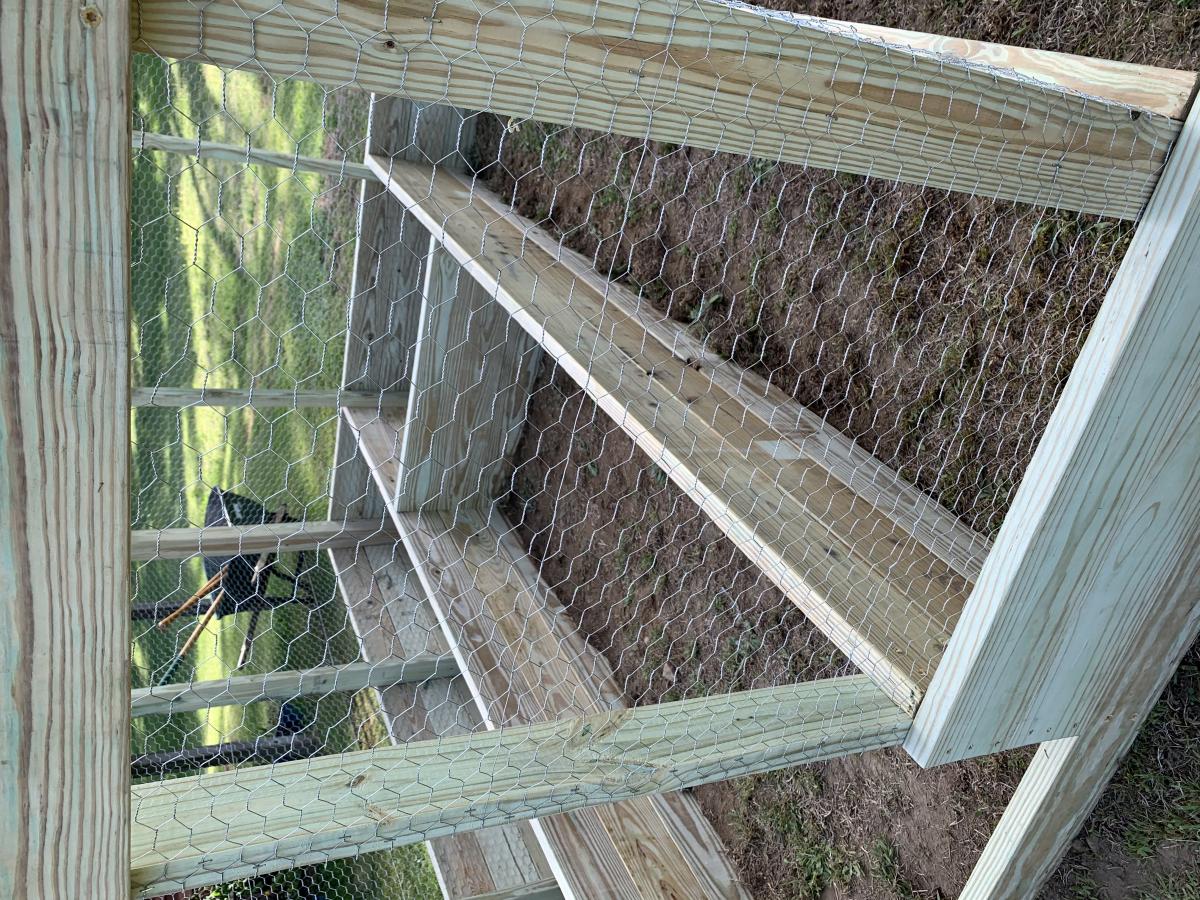
Raised Bed Garden Enclosure

We perviously had a larger garden farther back in the yard, it was on the ground which is very hard and rocky. It was tough to till and maintain, so it was taken down a few years ago.
My wife and teenage daughter have green thumbs and have planted herbs and tomatoes in pots over the past few years, but this year they wanted something more substantial. After an online search we found this plan.
It was a bit small for what the girls had planned, so with a little bit of tweaking, we changed the depth of the enclosure to 10'. It was pretty easy to do. Also the girls wanted the beds to be a bit deeper, so we made them three 2x6's deep instead of two
It was built by my wife and I in one weekend, well actually the truth is we built the entire enclosure, minus the door on Saturday about 10am and finish up about 5:30pm. I built the door the next day and we hung it together.
Just an FYI, I have quite a bit of woodworking experience and have a workshop with table saw, band saw and much, much more. I did use the table saw for most of the cuts, with the exception of the gate support which I cut using the band saw.
One caveat, if you have the lumber yard cut any pieces for you, make sure all the lumber is the same length. It's kind os a nit picky thing, but none of the lumber was exactly the length shown on the labels. If you want all the joints to be "perfect" I suggest measuring and cutting all the pieces to the correct length to match the plans.
We also used an industrial hand held staple gun to fasten the chicken wire.
The cost of all the materials, including two sets of work gloves came out to $447.92 from Home Depot in 2020.
We are now waiting for a delivery of the top soil to fill the beds. Since we used weatherguard lumber, we are going to gat plastic sheeting and line the beds.
It was a fun project and my girls are looking forward to planting all their seedlings.
For fun we made a time lapse video, which I have uploaded to Youtube. If you watch closely, you will see that we started the build in one area of the yard and moved it because the ground sloped much more than we originally thought.
https://www.youtube.com/watch?v=h7vvBLy034U&list=WL&index=112&t=0s
I hope that our experience may help others in some small way.
Thank you Ana for making these plans available!!
Built from Plan(s)
Estimated Cost
$447.92
Estimated Time Investment
Weekend Project (10-20 Hours)
Finish Used
None.
Recommended Skill Level
Intermediate
Comments
Sat, 05/30/2020 - 18:27
Love the added length! …
Love the added length! Thanks so much for sharing photos of your build!
DIY Garden Box with Trellis

We wanted a small garden to fit on the back patio stones and this plan fit well. We reduced the height because we have 3 small children to "help" water the plants. The trellis was hoping that we could extend the amount of produce we could grow. They're very heavy, sturdy and straightforward to build. Thanks very much!!
Built from Plan(s)
Estimated Cost
$120
Estimated Time Investment
Weekend Project (10-20 Hours)
Recommended Skill Level
Beginner
Big kids picnic table
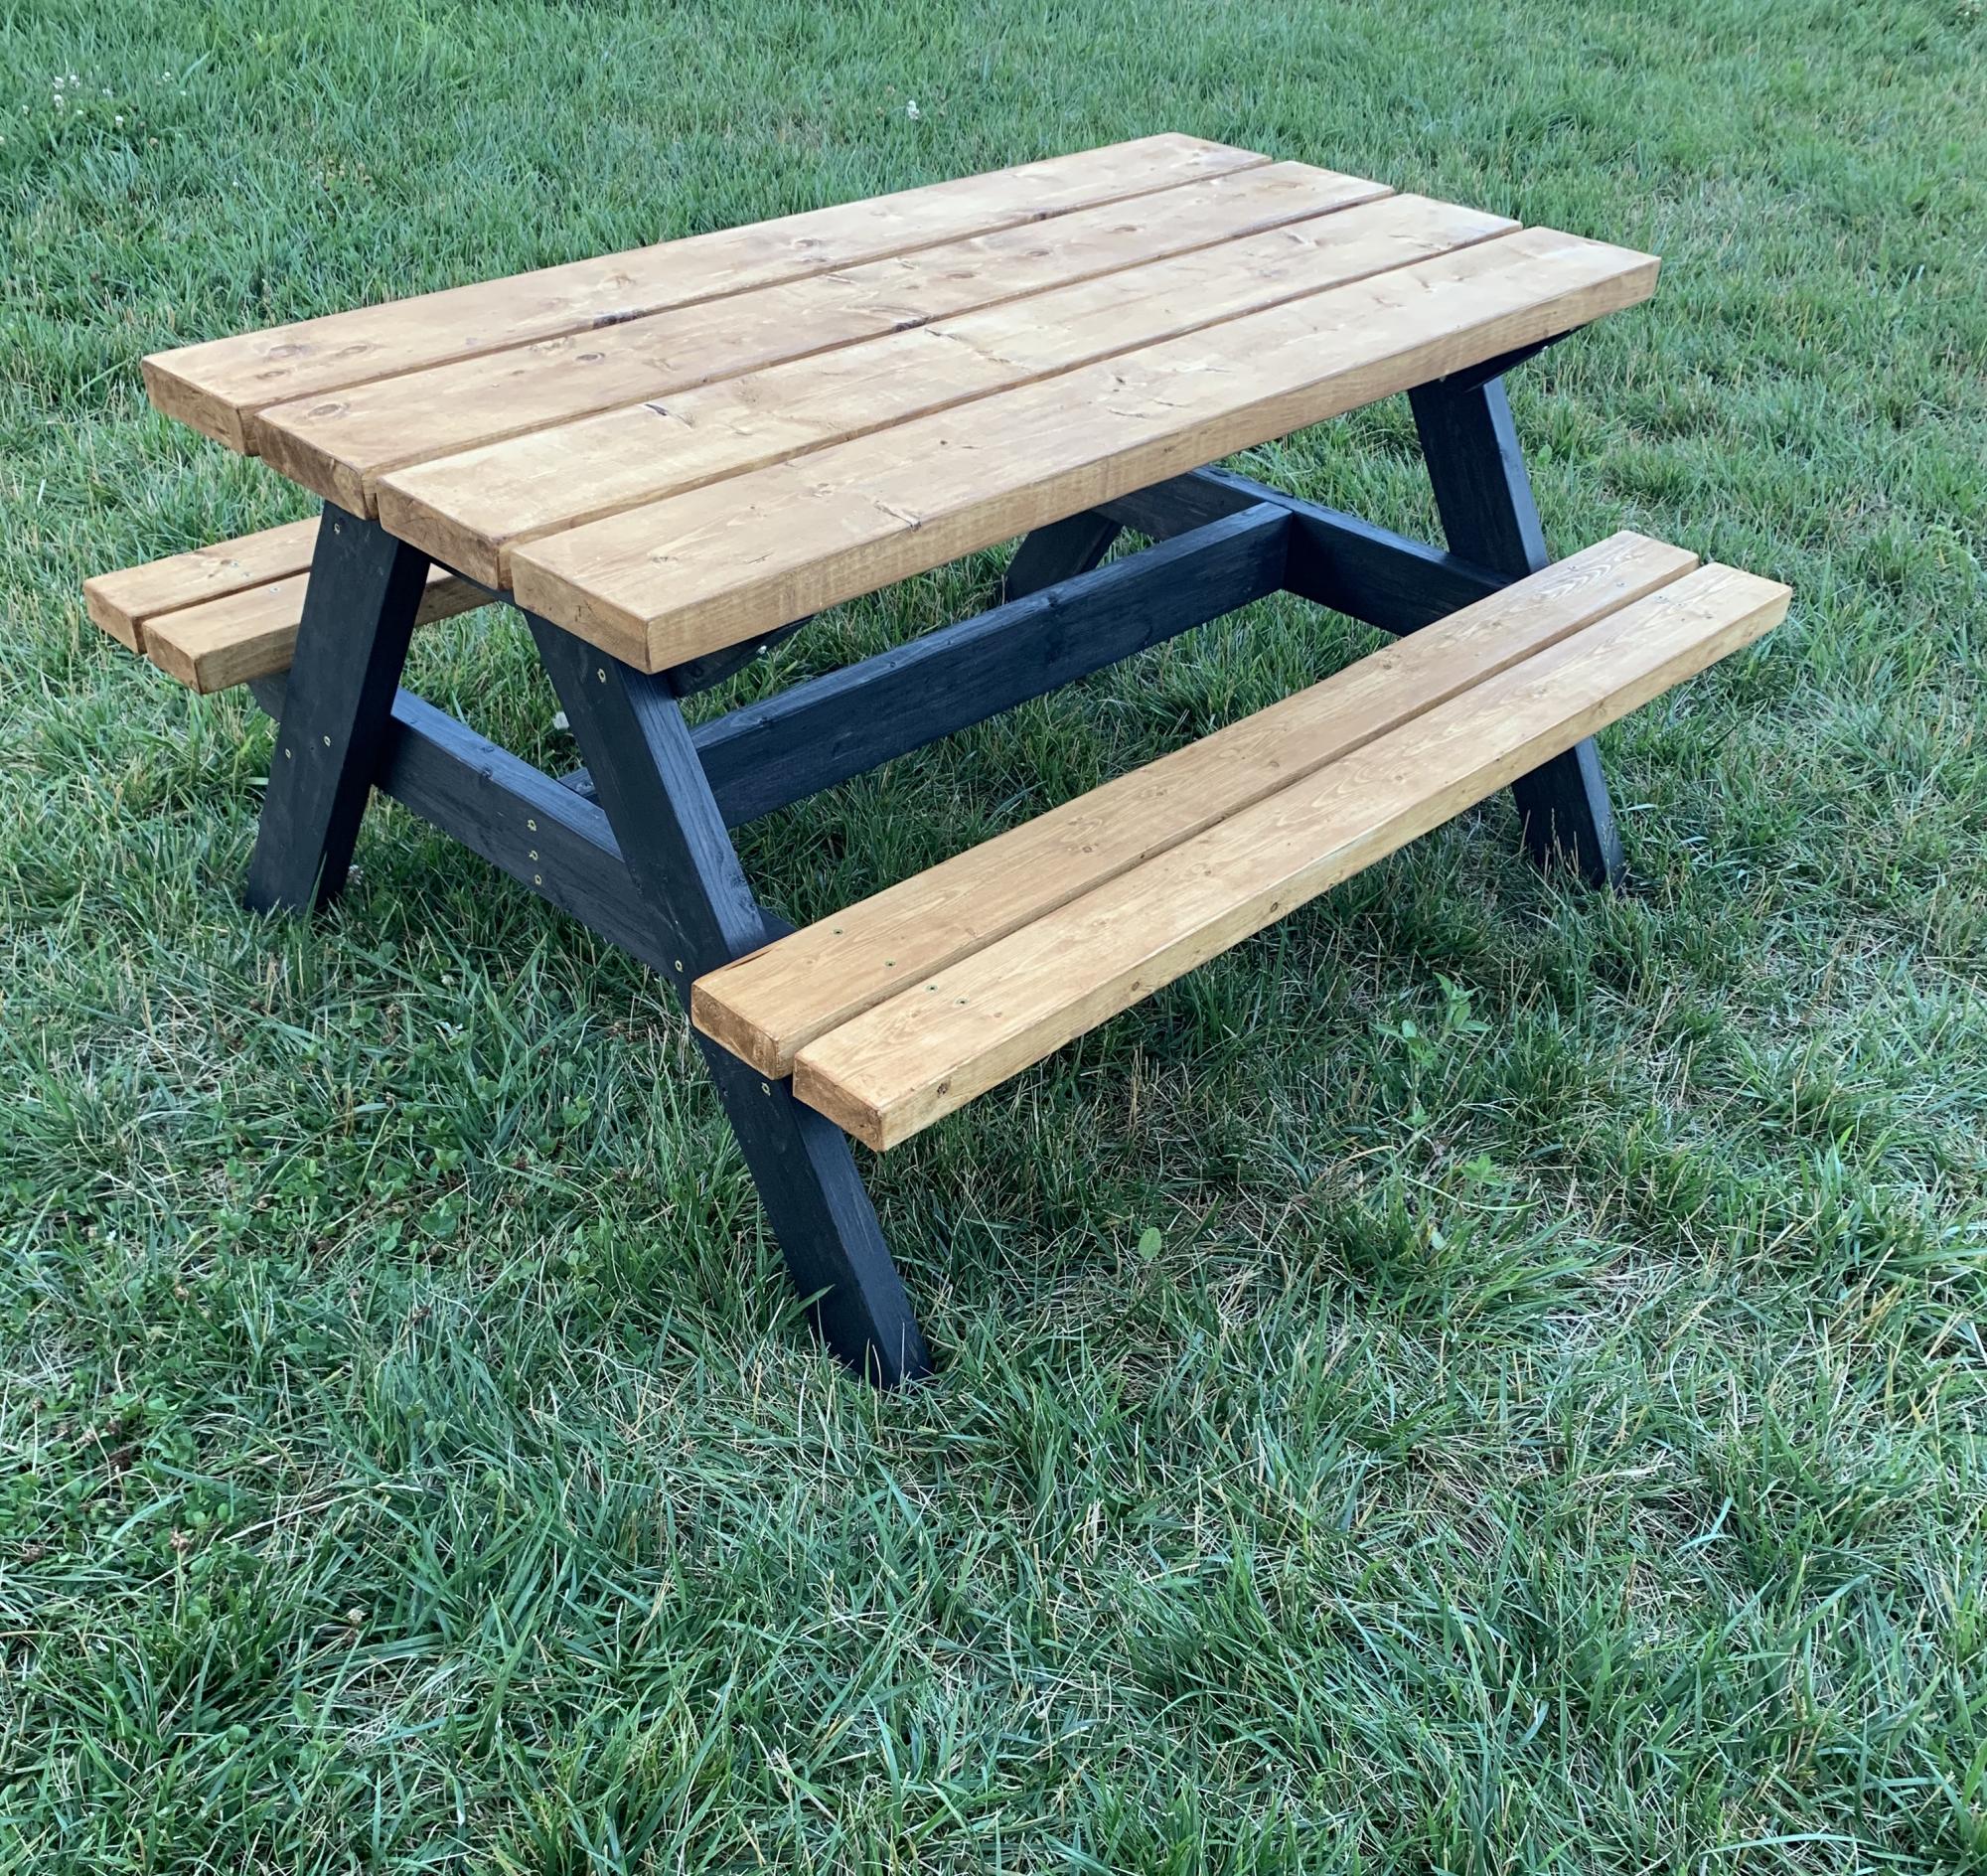
This was a easy build and is super strong . ITs built for a kid sized picnic table but I tested It with my weight to see how it holds up and (200 lbs) didn’t hurt it or even make the seat budge.
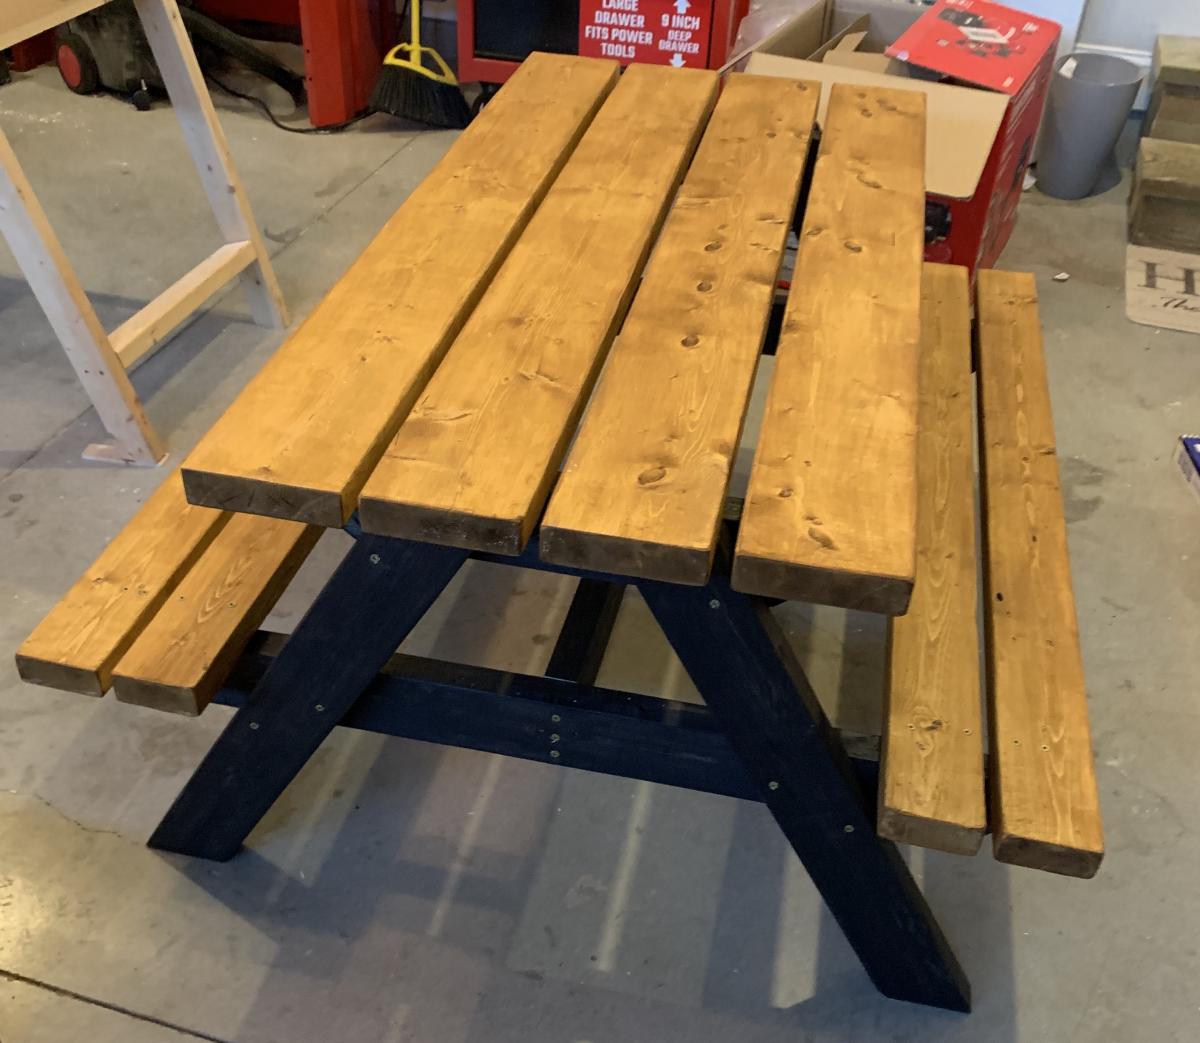
Built from Plan(s)
Estimated Cost
$55
Estimated Time Investment
Afternoon Project (3-6 Hours)
Finish Used
Valspar canyon brown transparent on seats and Table top . Black (midnight ) solid stain on the frame .
Recommended Skill Level
Intermediate
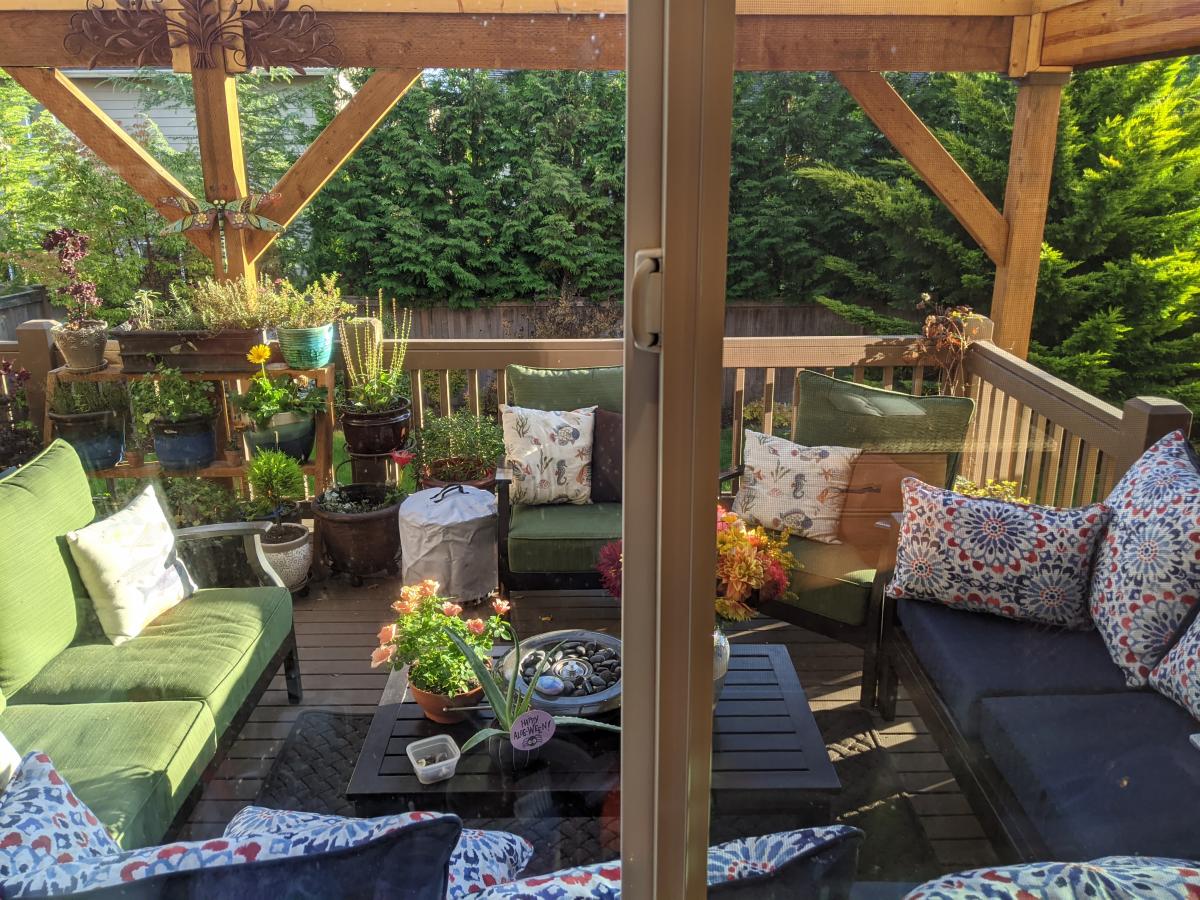
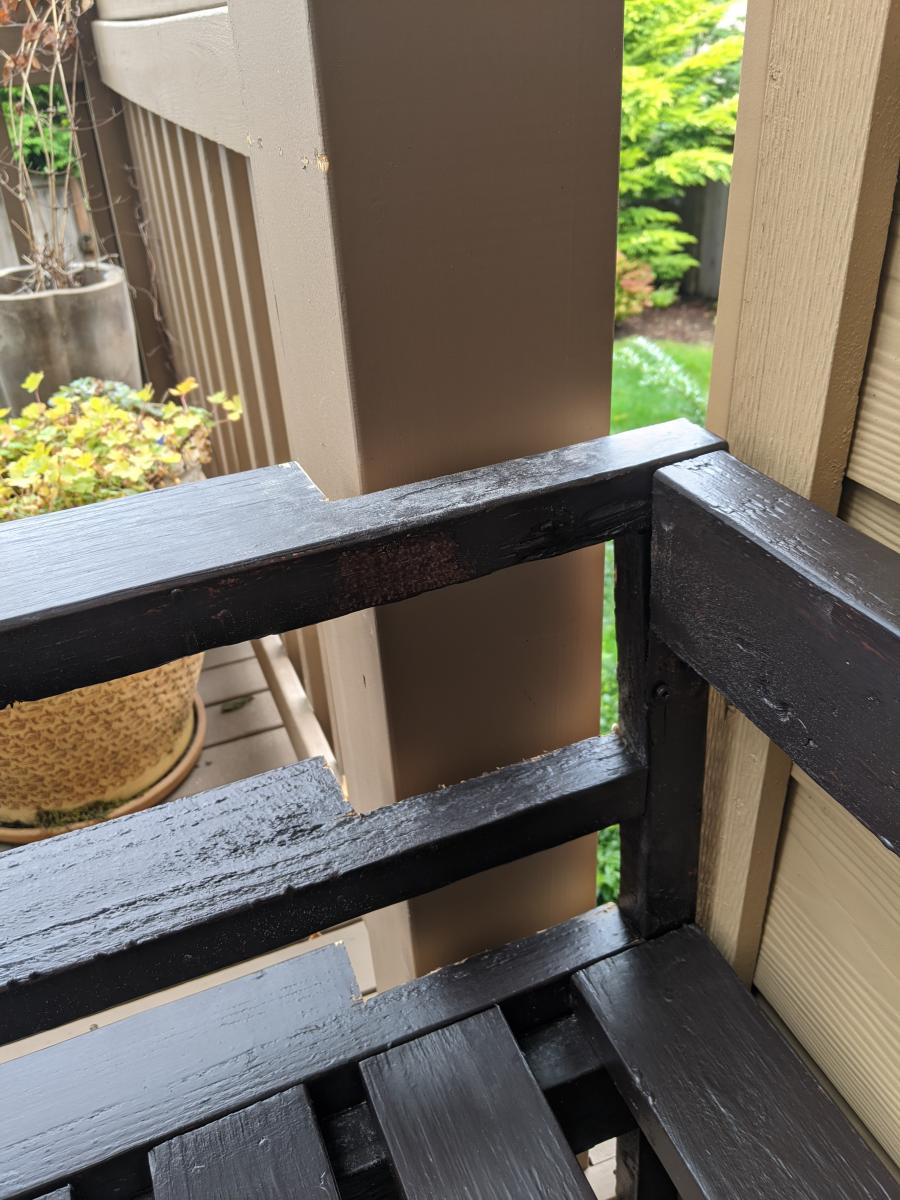
Outdoor Sectional - Love It !
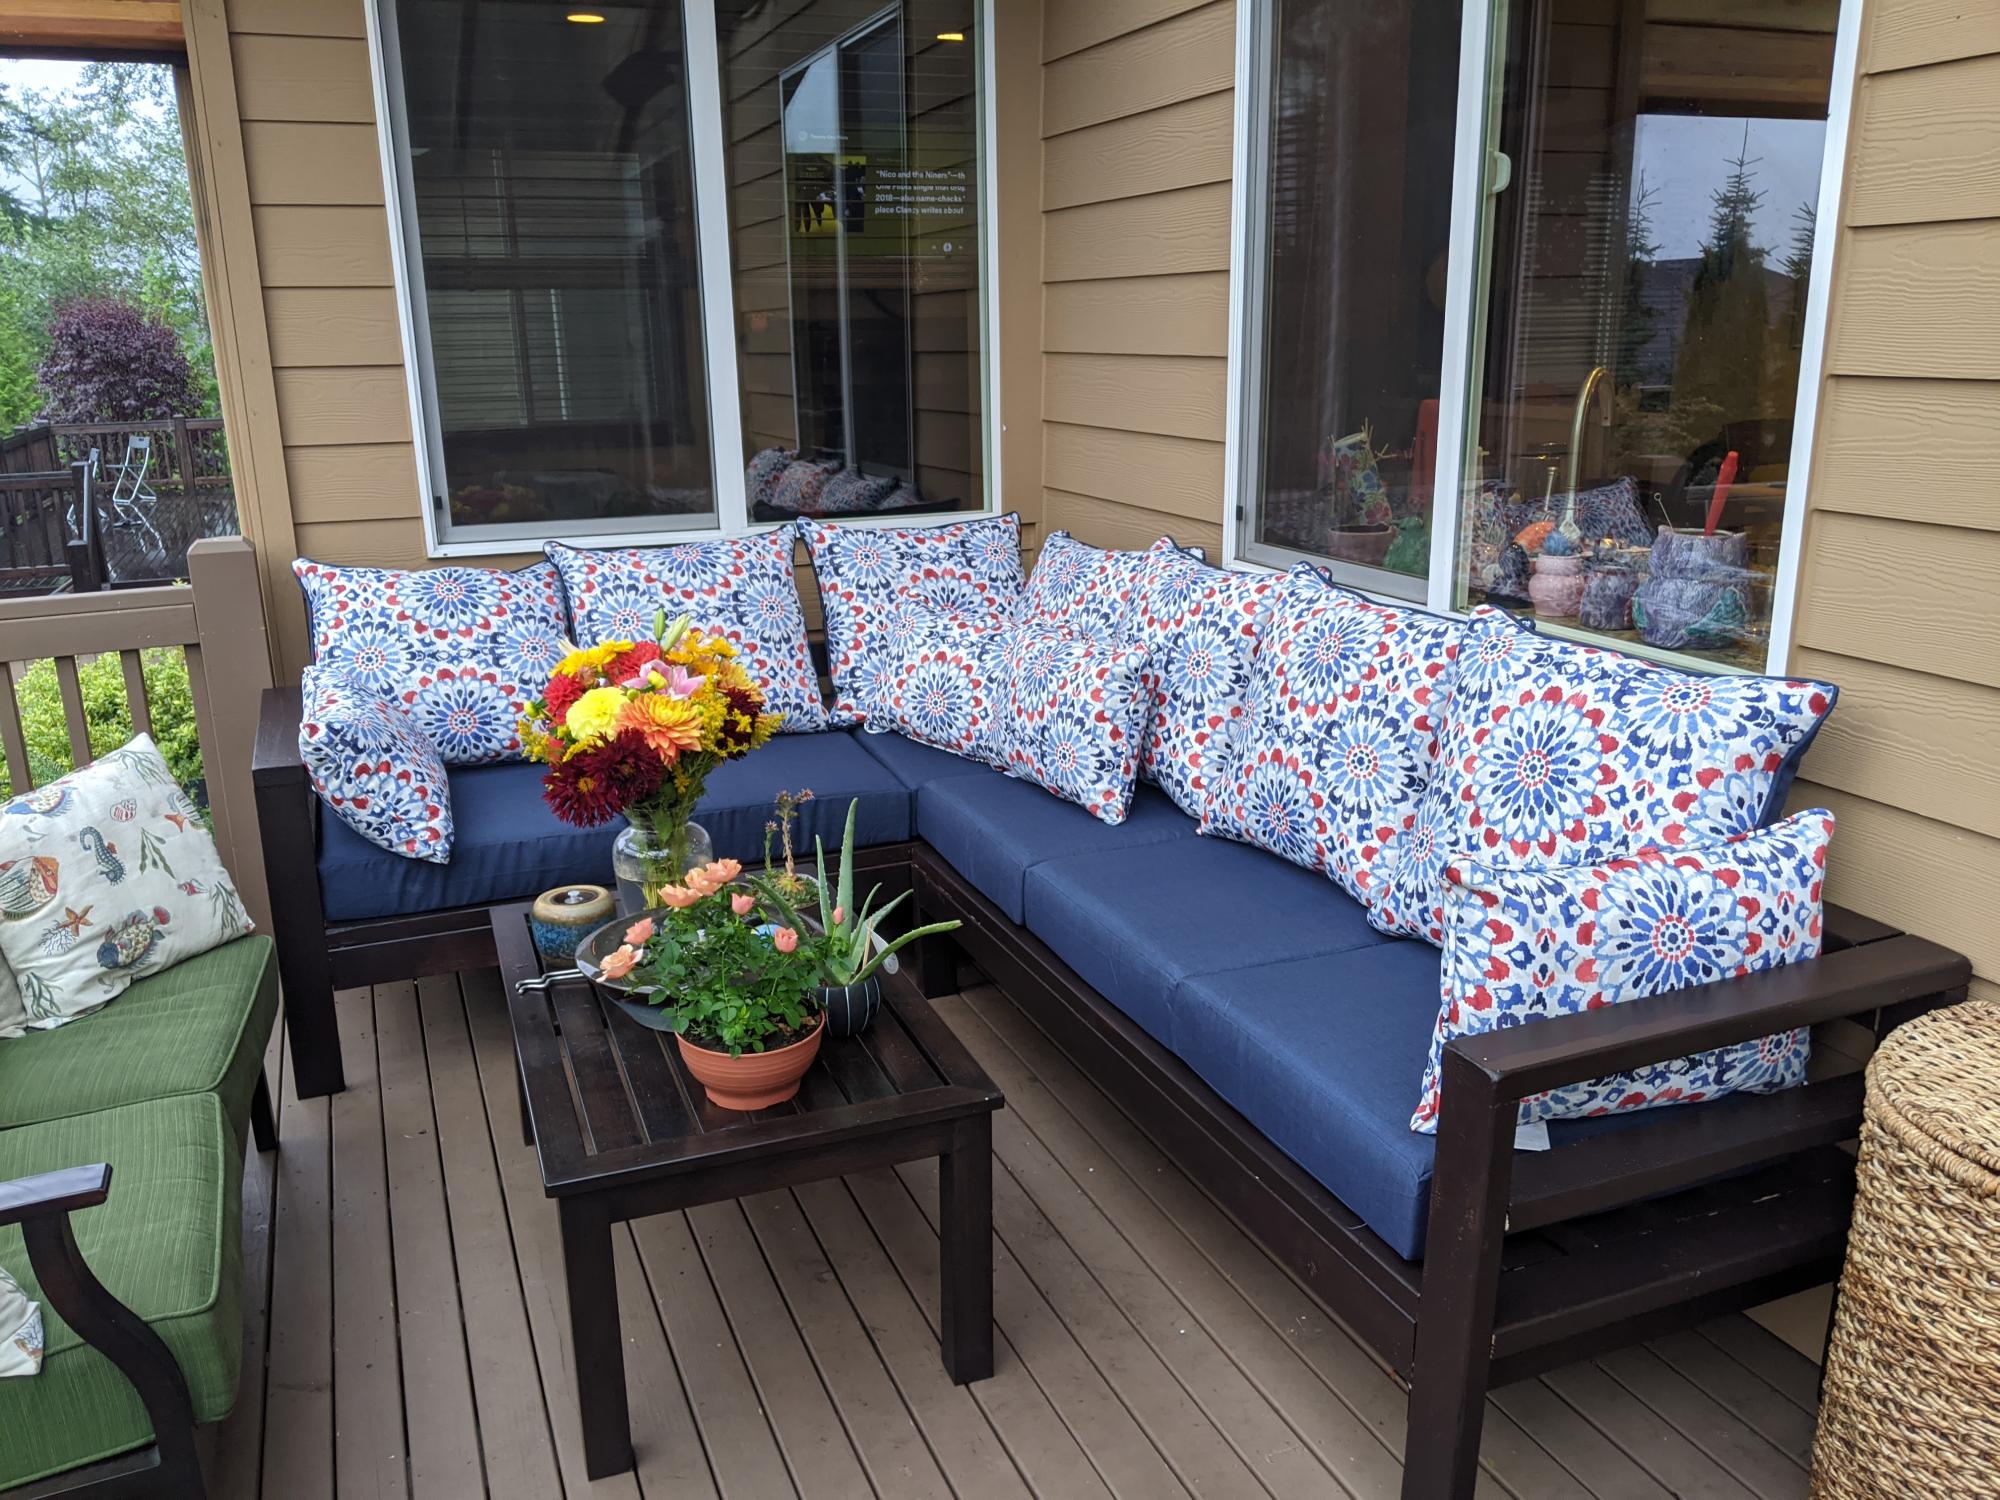
Great experience building this sectional, although would recommend pre-drilling the holes where practical to avoid splitting. It only happened to me a few times on #2 douglas fir, but I would have preferred to avoid it. As you can see from the picture, I didn't account for the siding taking up the space, and was expecting a perfect fit. Easily fixed with a bit of saw work, and now it's really custom fit for the space. :-)
I've added the details of the finish we used, and really happy with how it turned out, with the exception of my garage workshop lighting not revealing the spots I need to touch up now that it is in the natural light.
And of course, this is a terrific time to purchase couch cushions at the end of the season. Lots of great sales, and we found these at Target for $47 per top/bottom set.
Built from Plan(s)
Estimated Cost
$600
Estimated Time Investment
Week Long Project (20 Hours or More)
Finish Used
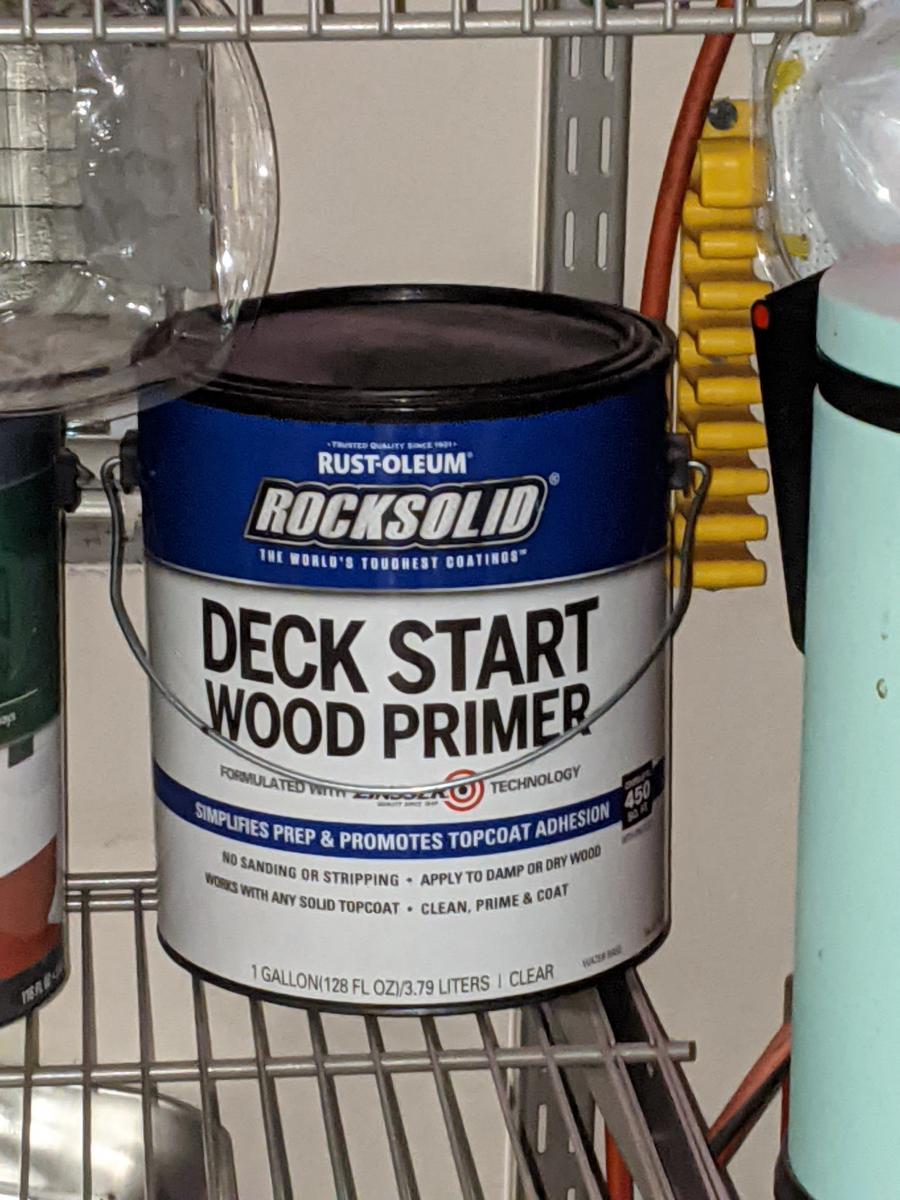
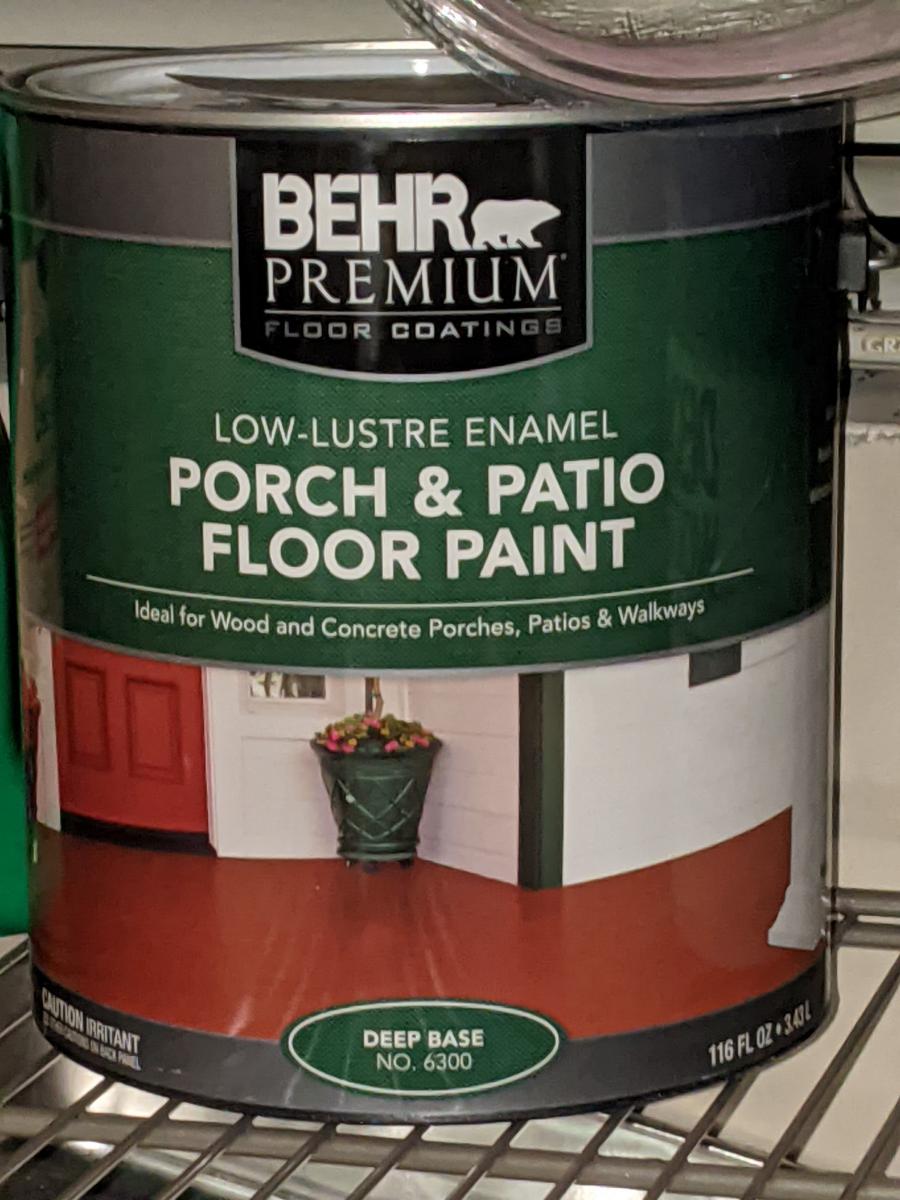
Rustoleum Rock Solid Deck Start Wood Primer followed by Behr Premium Porch and Patio Floor Paint. This gave a really matte finish that looks a lot like the metal patio furniture we will have next to it, and Home Depot was able to tint this for us. We also added a mildew and moss inhibitor to the paint at the store for a couple extra bucks since we live in the PNW. The extra time needed to get multiple coats on for full coverage was totally worth it.
Recommended Skill Level
Beginner
Adirondack chair from Pallets
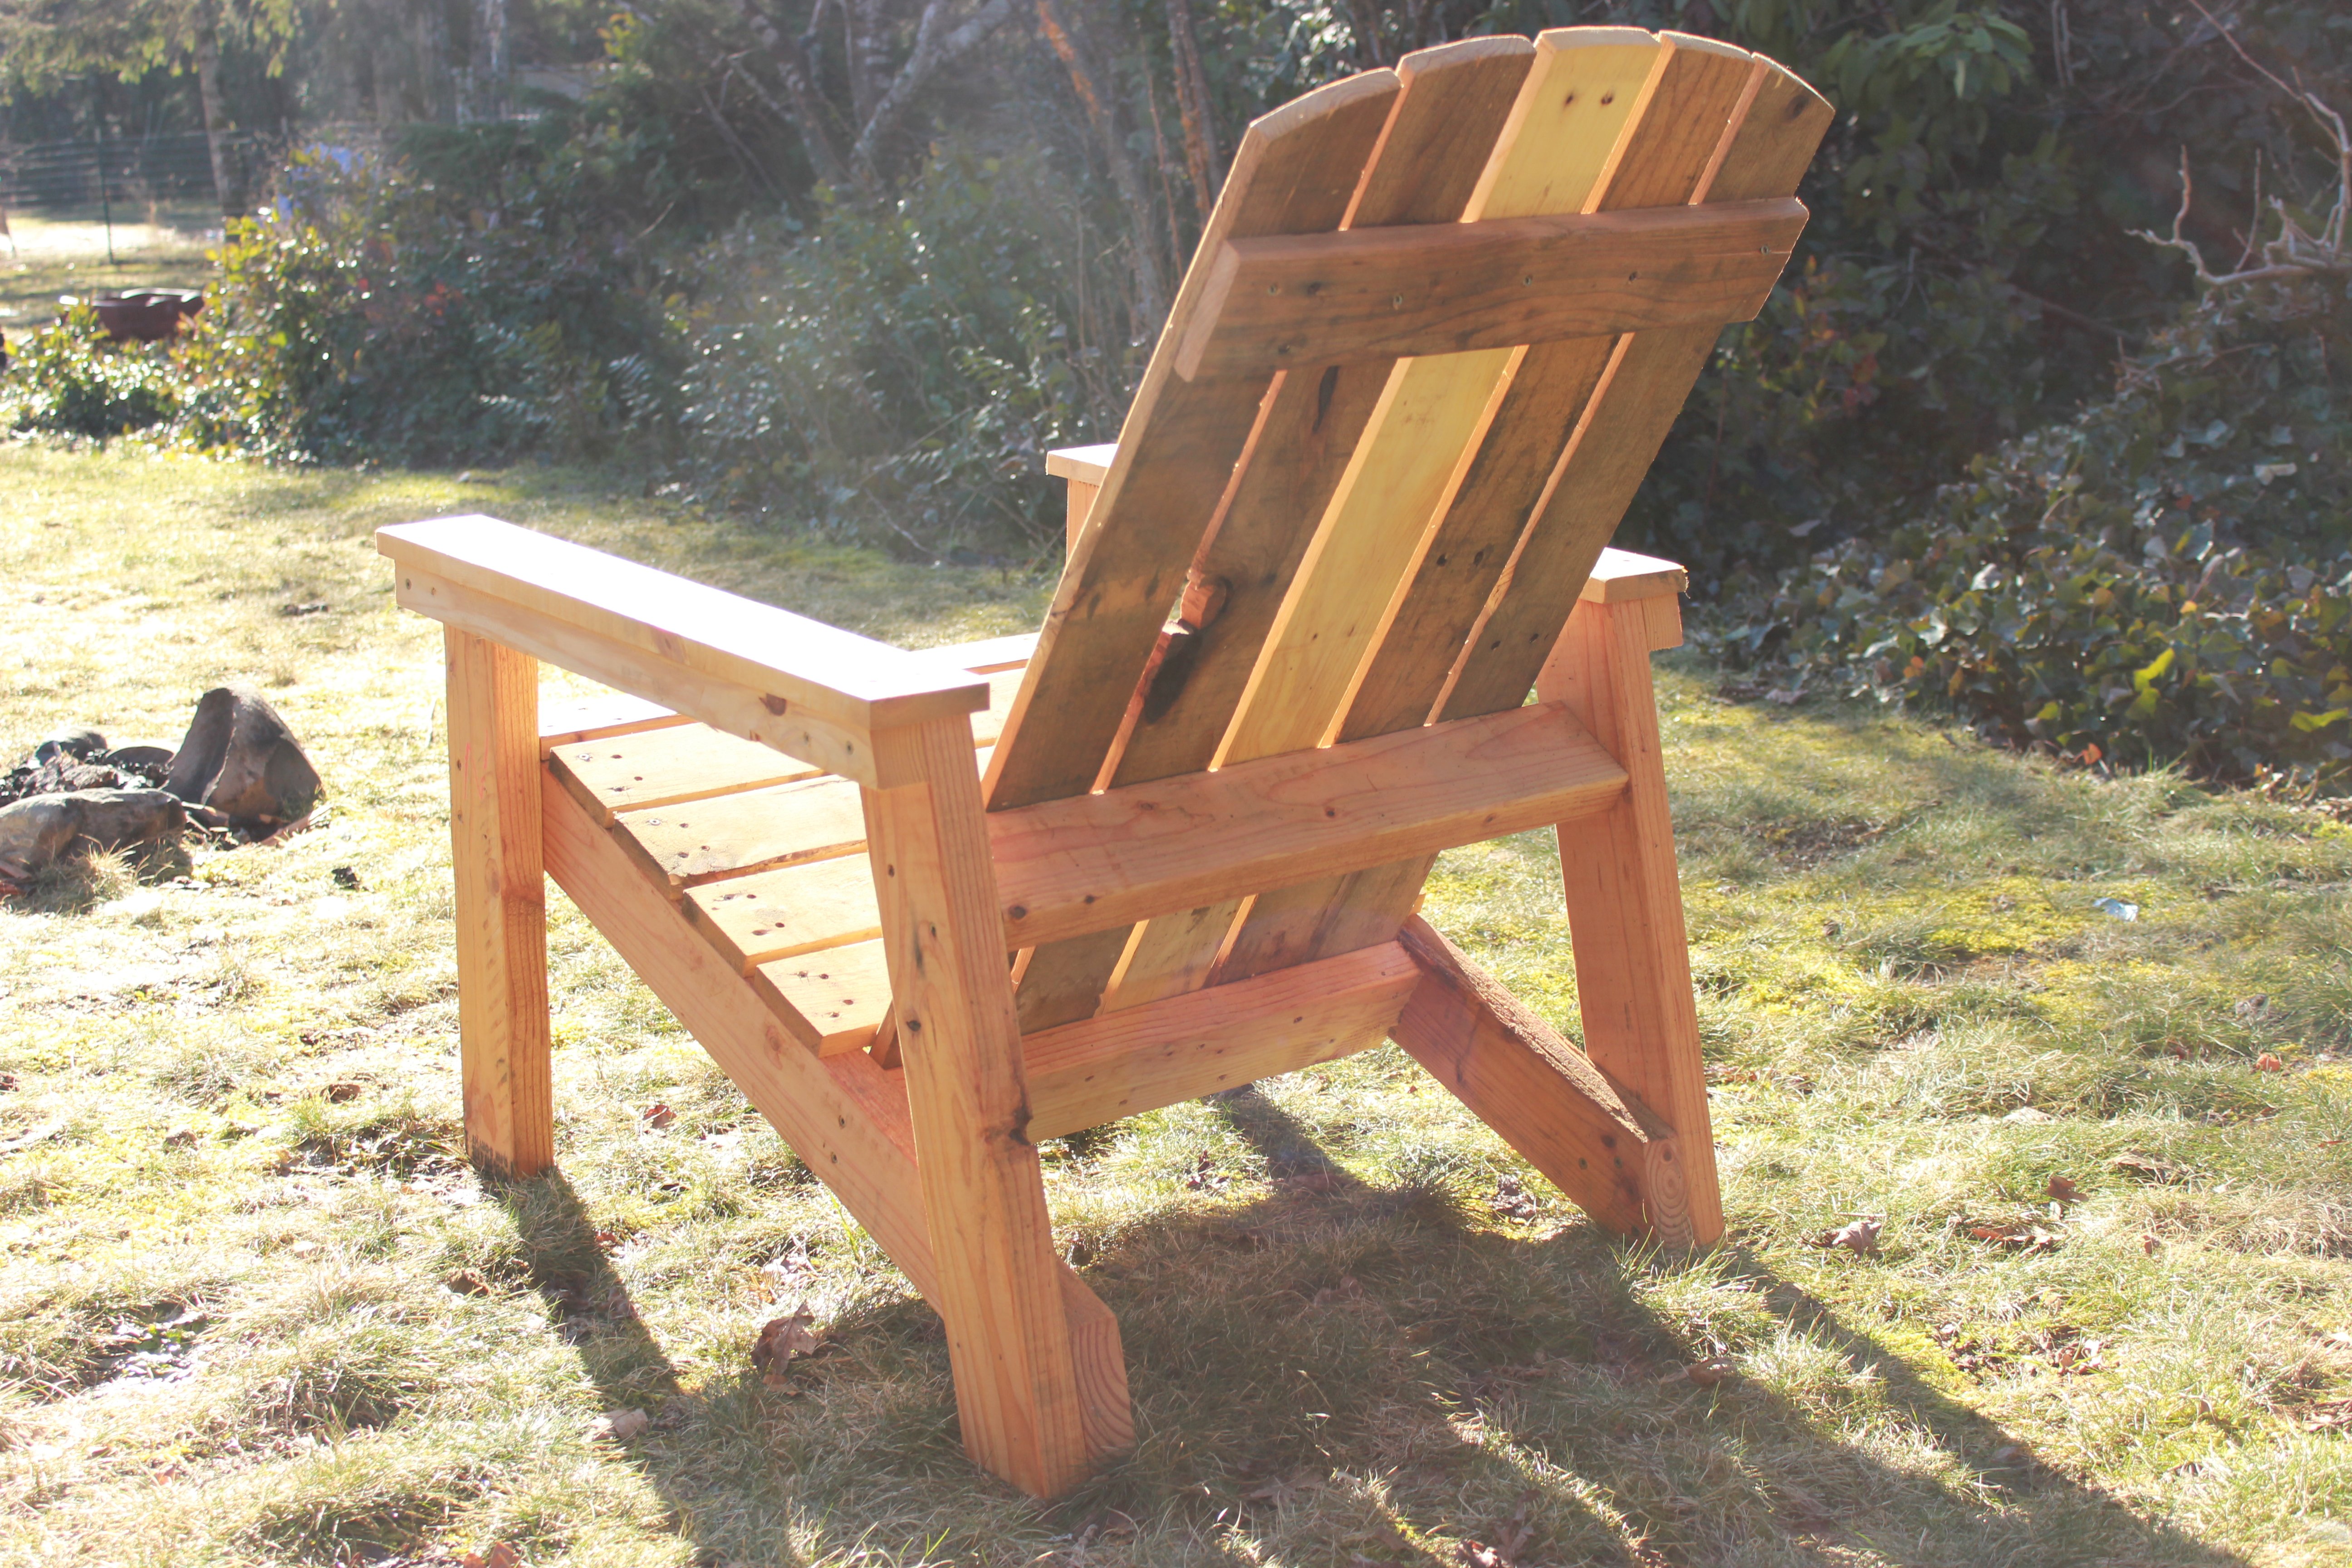
I decided to try and use the plans on Ana's site but with a twist. I wanted to limit myself to using only pallets. I think it turned out great! I can't upload all the photos because they exceed the maximum size limit. If I was able to you could see how each chair is slightly different and has a lot of character. I finished them with a waterproofing oil which I highly recommend over other finishes.

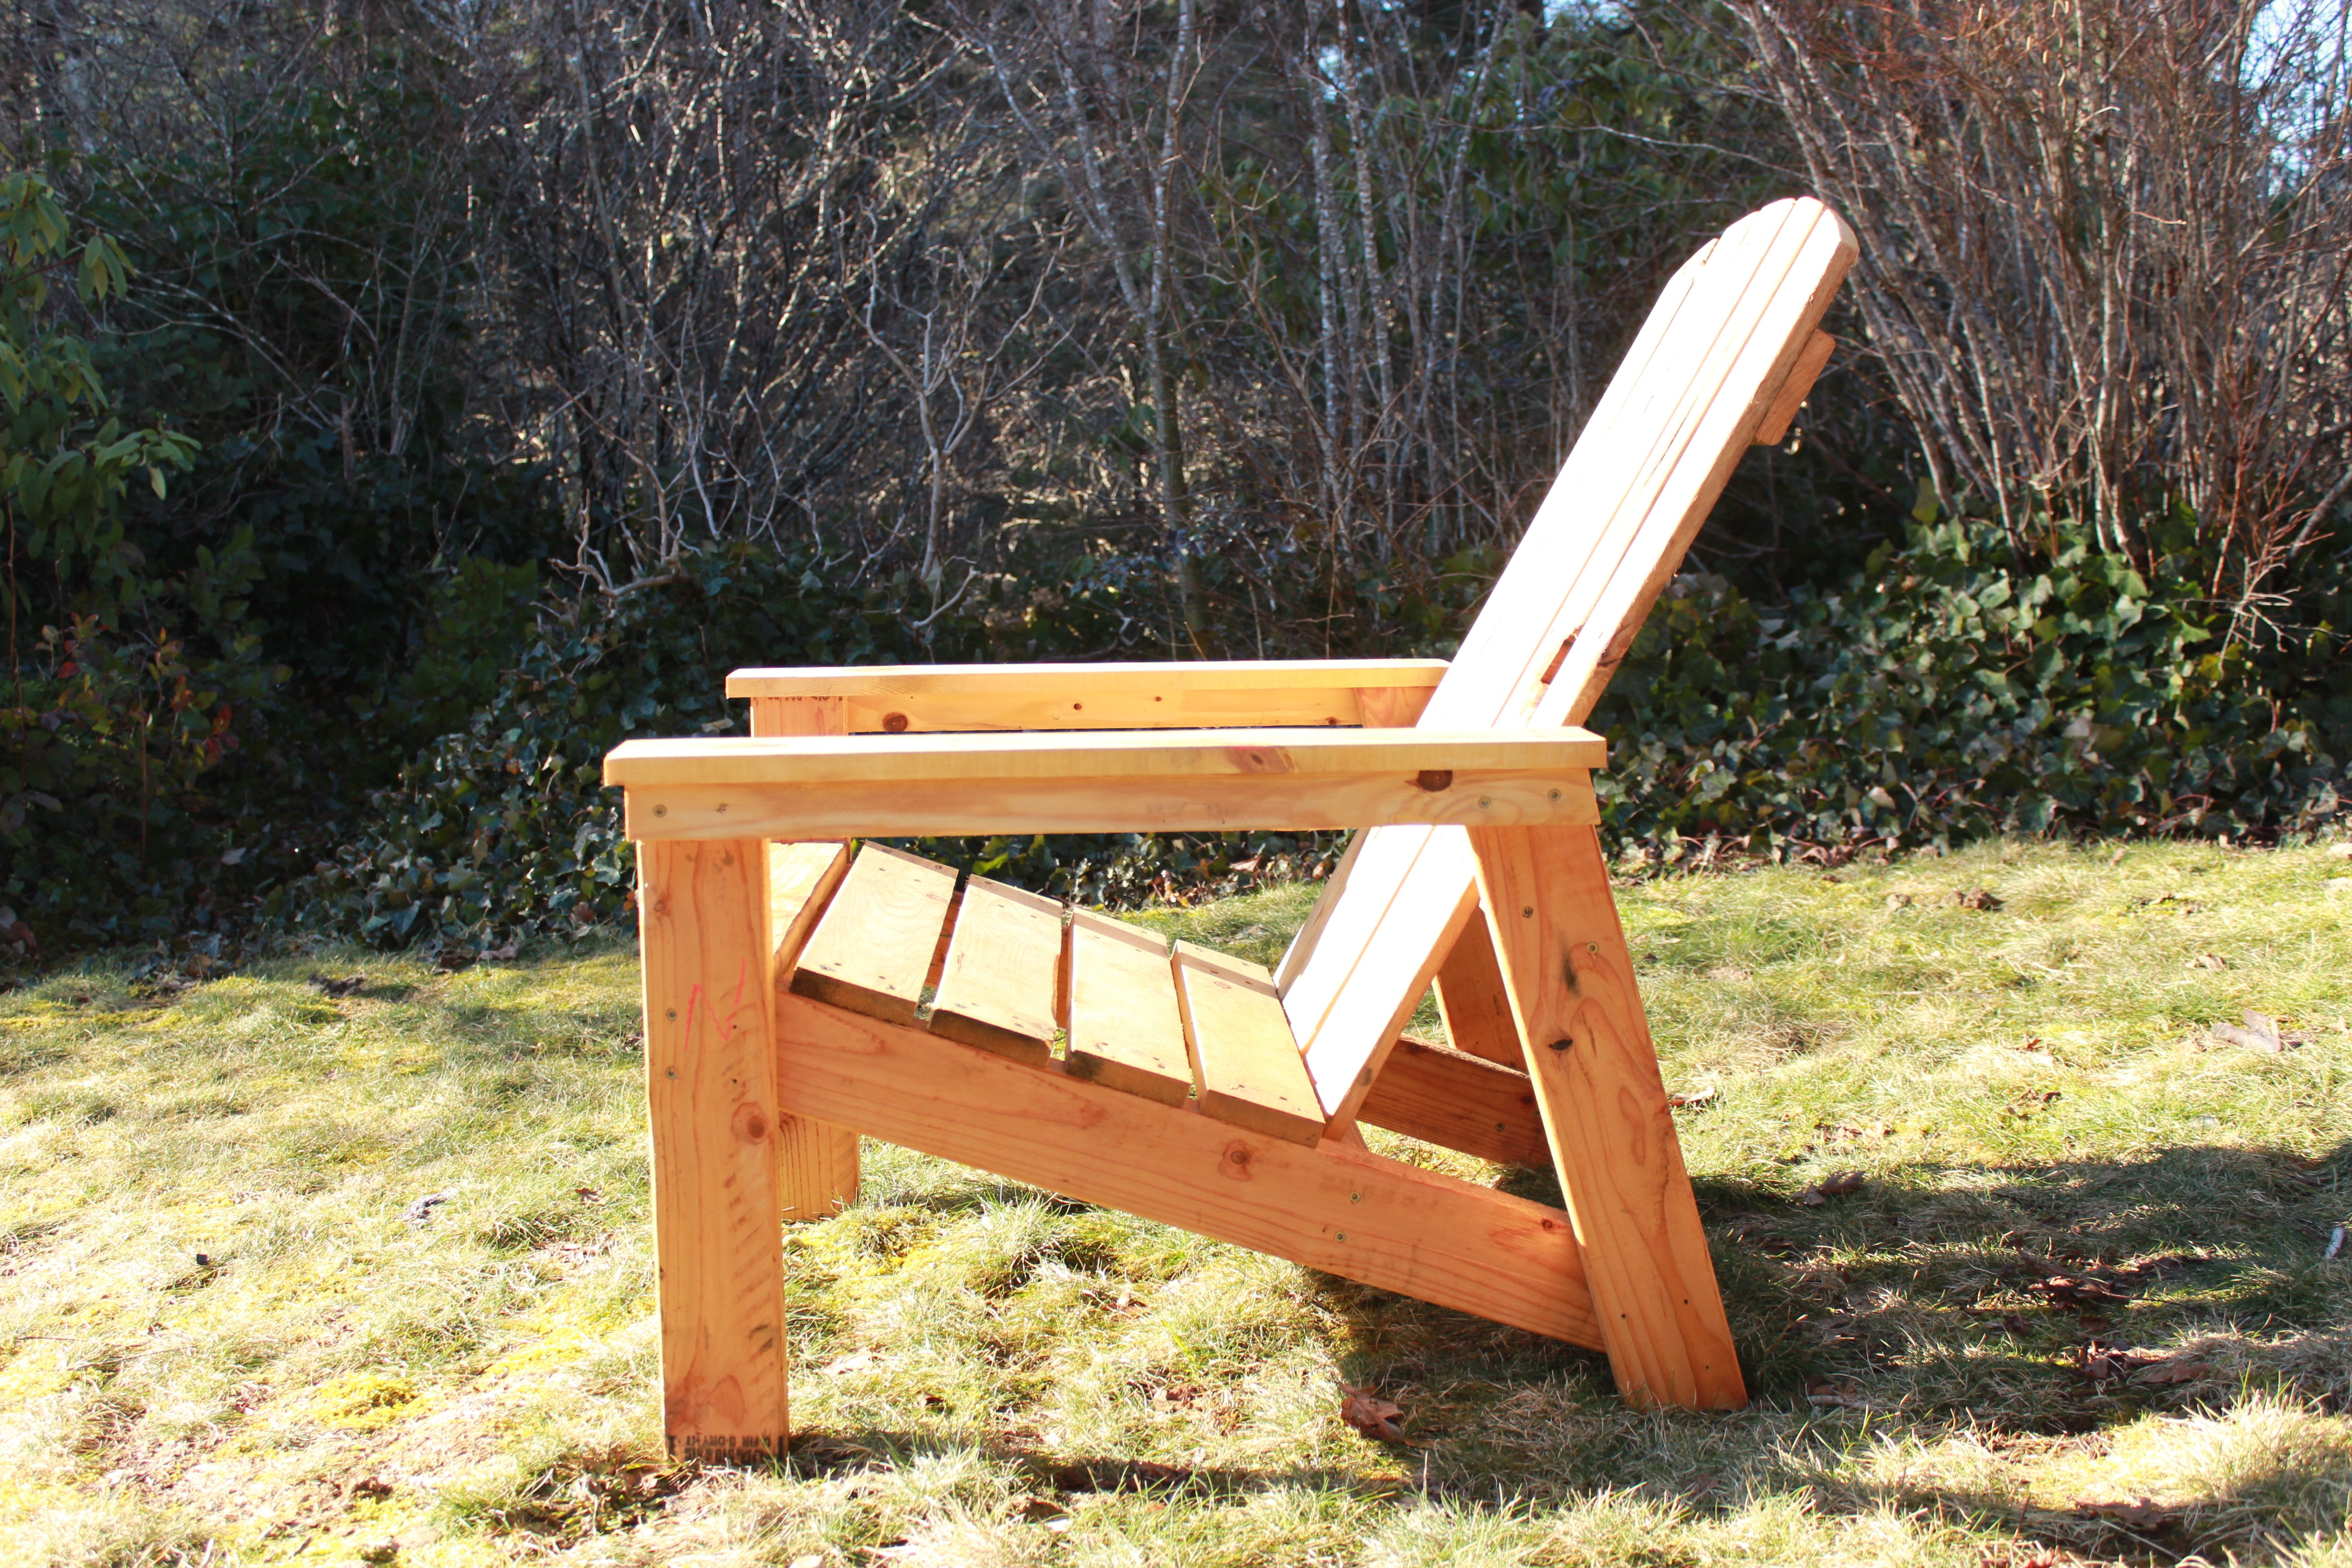
Built from Plan(s)
Estimated Cost
$10 for screws.
Estimated Time Investment
Afternoon Project (3-6 Hours)
Finish Used
Cabot oil
Recommended Skill Level
Beginner
Comments
Mon, 04/10/2017 - 08:51
Great Re-use project!
This is exactly what I'm looking for !! Fantastic build and re-purposing is always better.
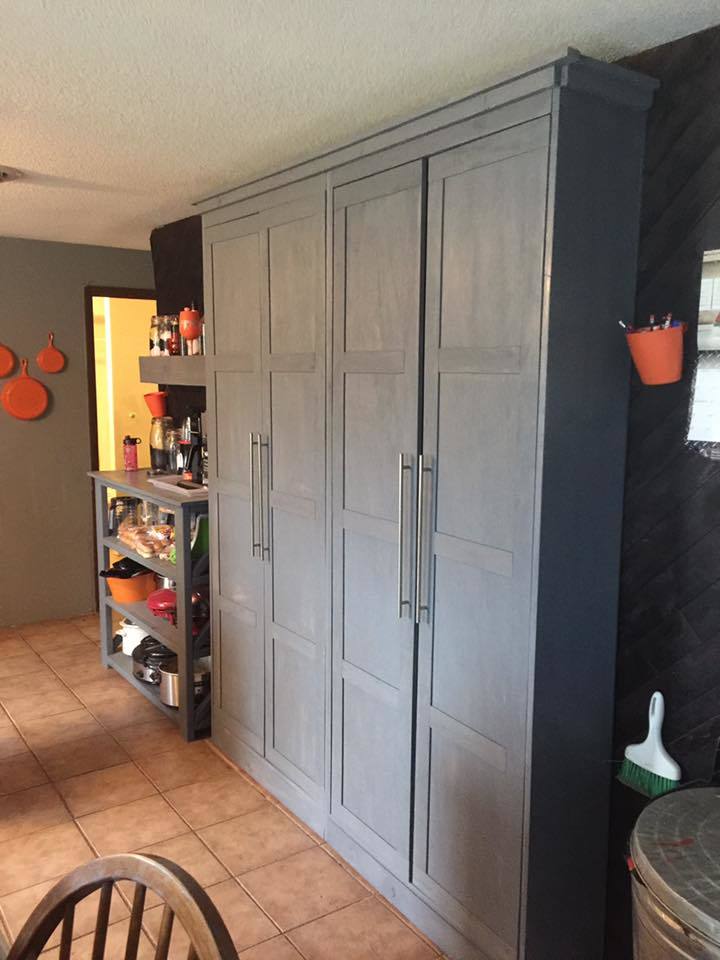
Pantry Wall
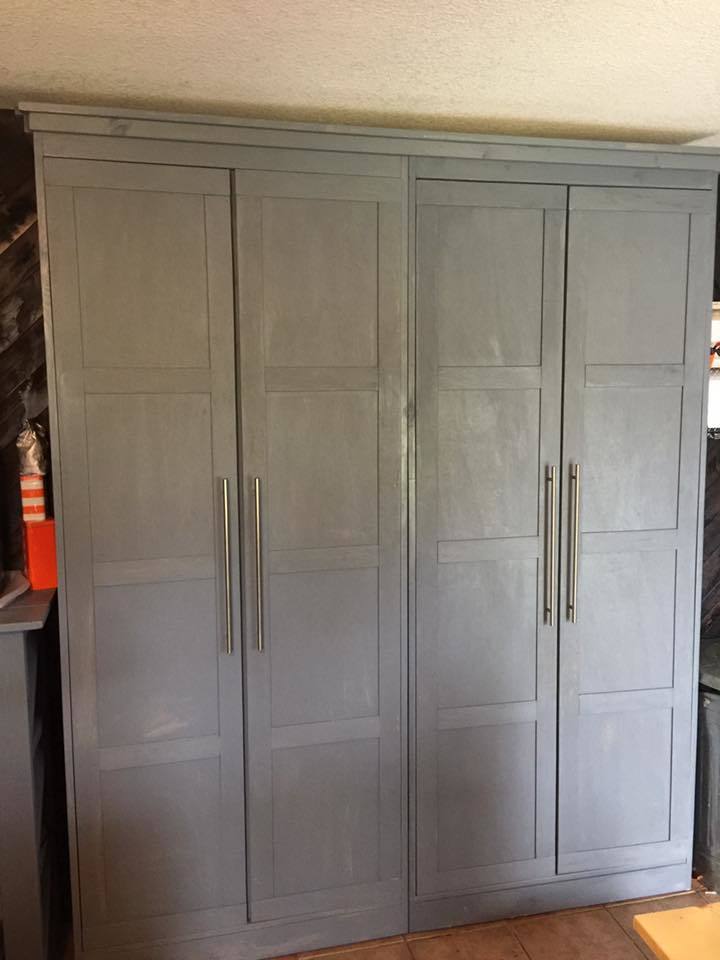
I modified the origianl plans by making the cabinet taller. I also built 2 cabinets and trimmed them both together to make it appear as if it is 1 giant cabient. It measure over 7 feet tall and just over 6 feet wide. I did add an additional 1x2 brace in the center of the cabinet to help support. I also cut an additional 1x4 to use a brace when anchoring it to the wall. I also chose to add an additional 2 trim pieces to each door because they are much taller than the original plan doors.
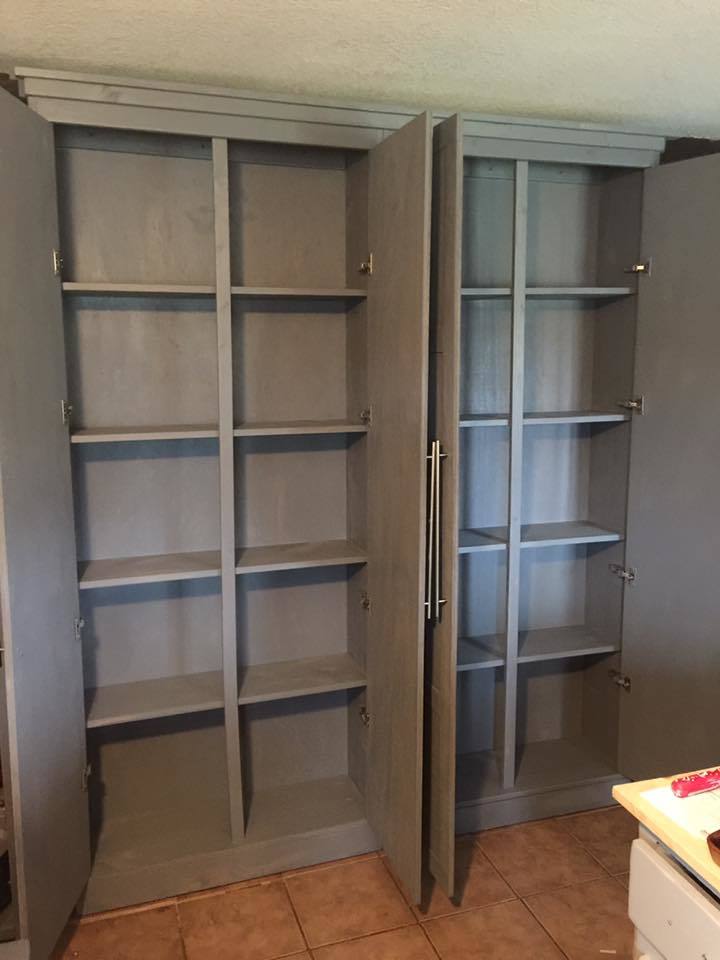
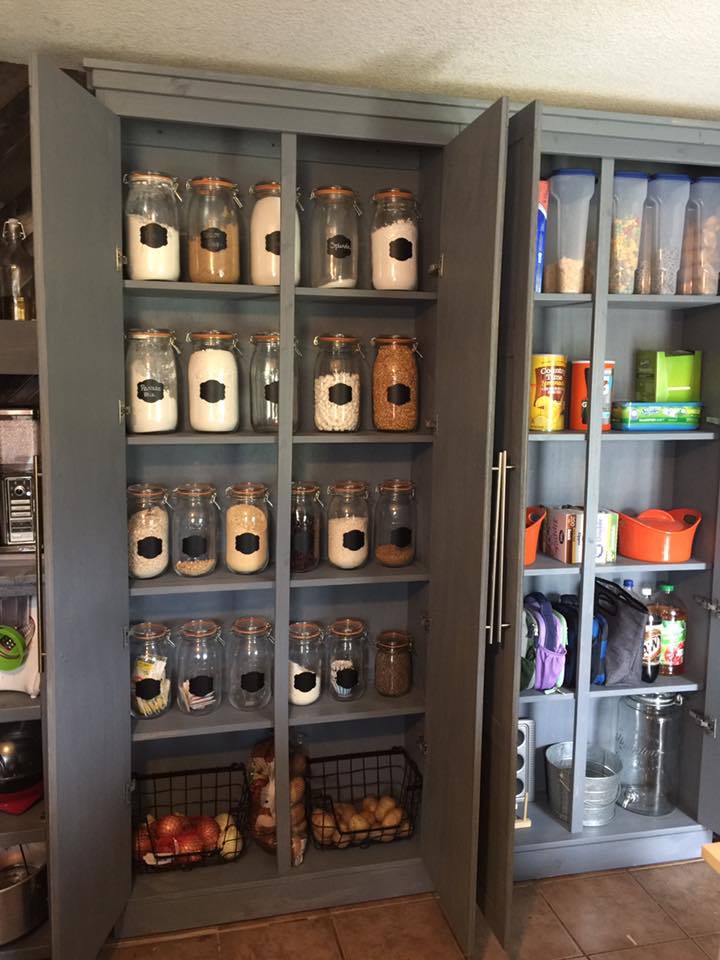

Built from Plan(s)
Estimated Cost
$400
Estimated Time Investment
Weekend Project (10-20 Hours)
Finish Used
Varathane Stain, Weathered Grey
15 7/8" center to center cabinet pulls
Fully Inset, Frameless Hinges
15 7/8" center to center cabinet pulls
Fully Inset, Frameless Hinges
Recommended Skill Level
Beginner
Comments
Jeep Bed
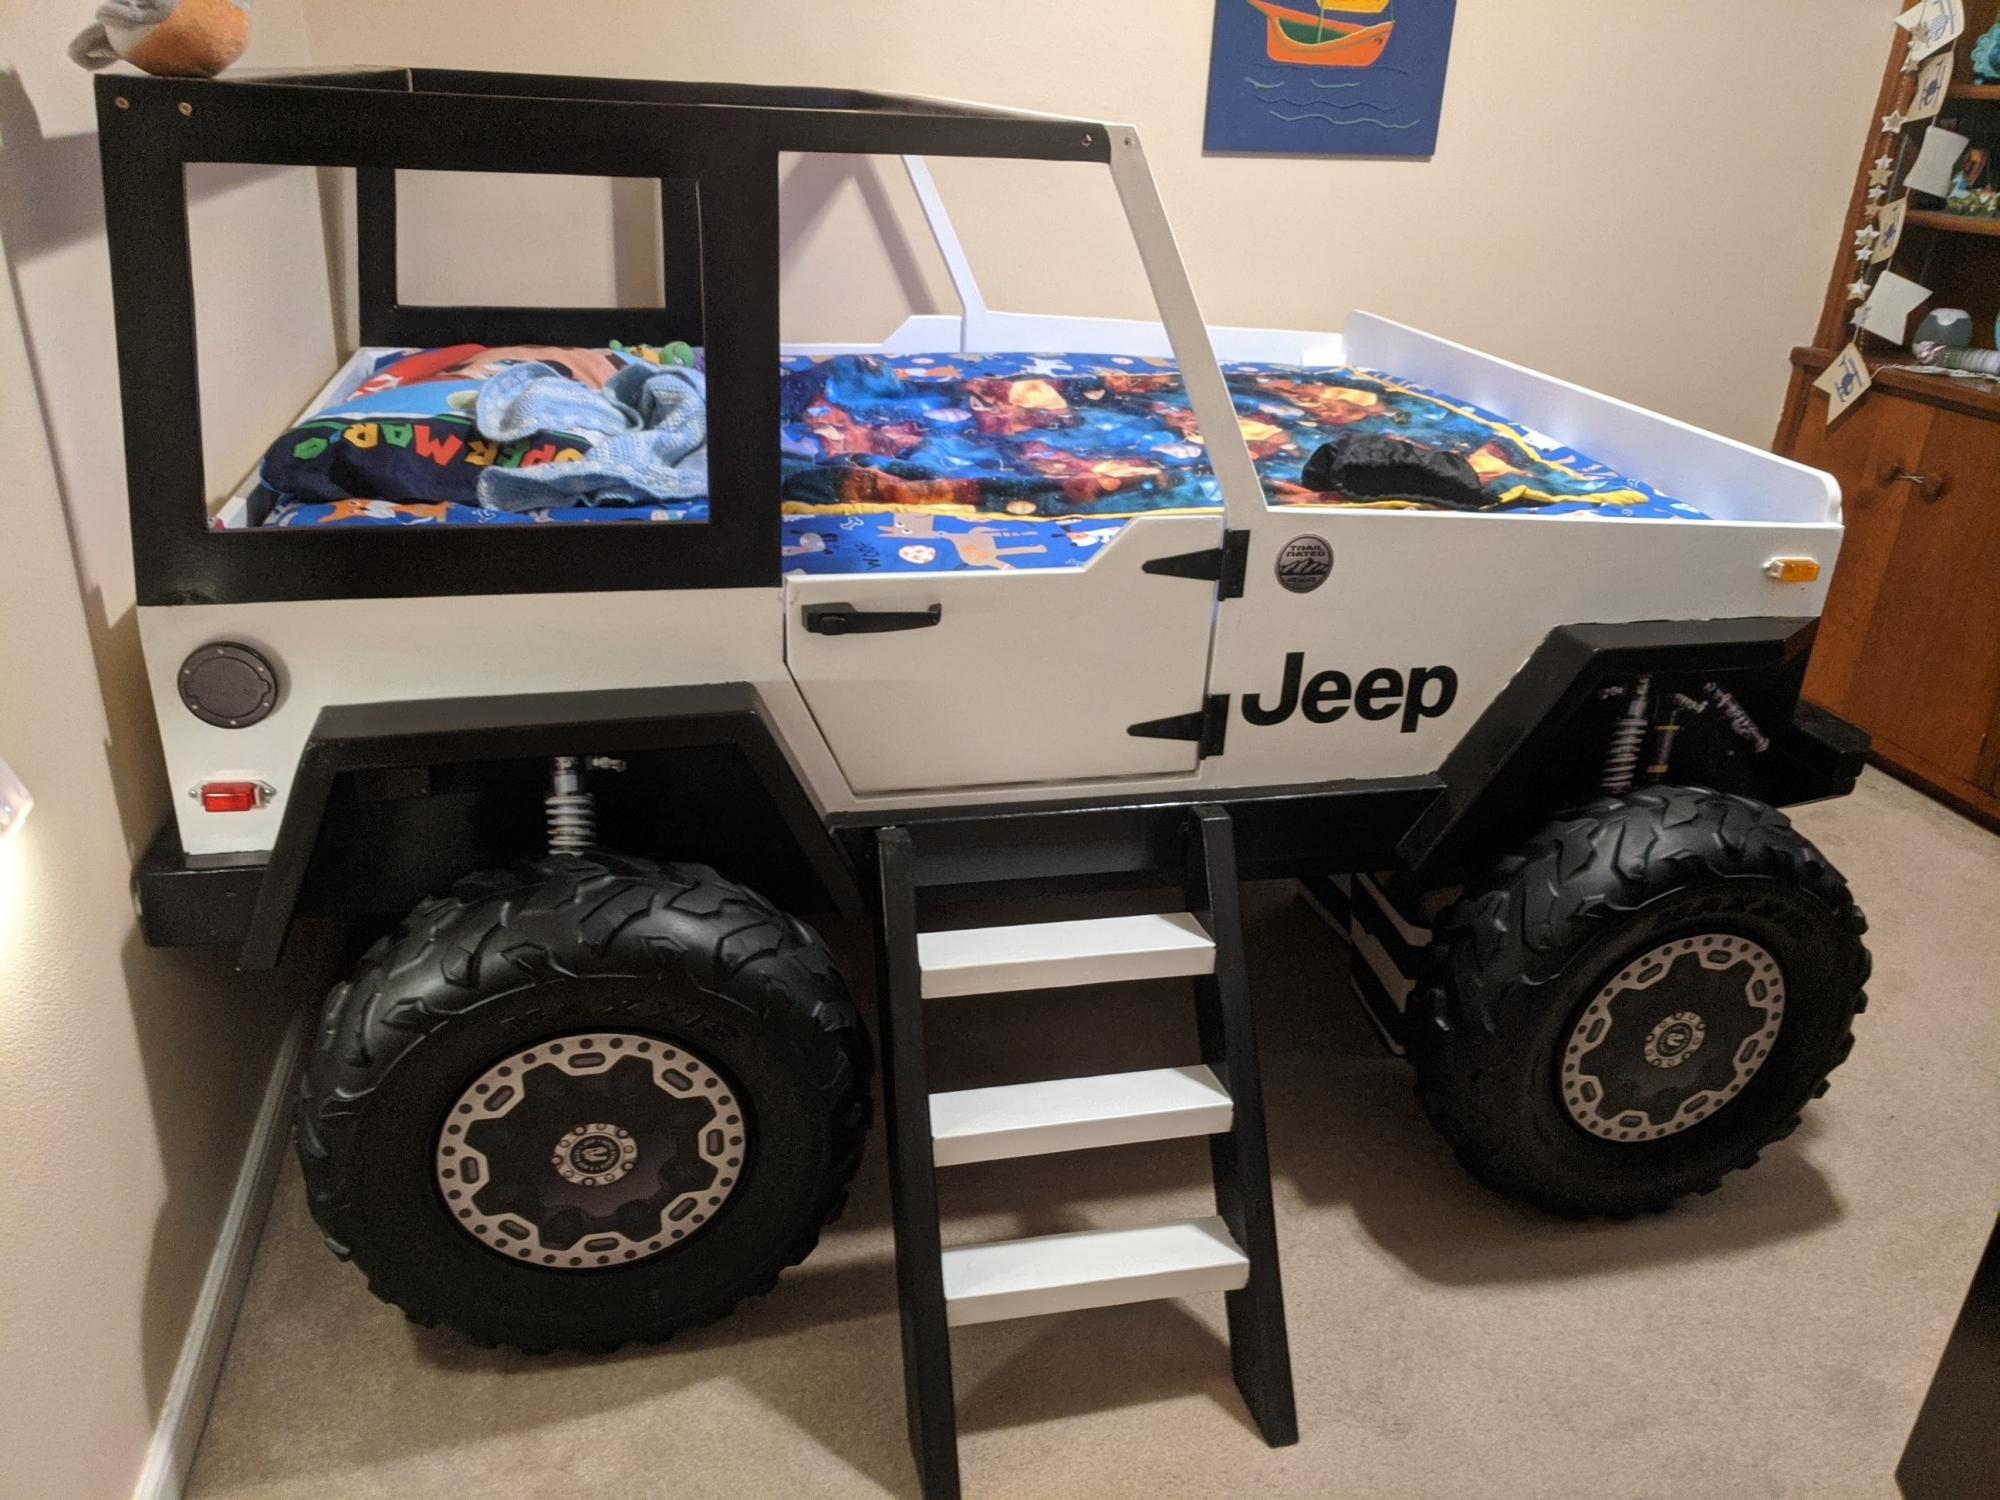
I hope this is OK to add here. It's not an Ana White plan, so moderator please delete if it is not allowed. I made this bed for my grandson. I bought a plan online and modified it from a twin to a full size bed. The dome light and running lights work as night lights. A motion sensor light activates if he crosses the door to illuminate the ladder. Front tire is made as a step so his parents can climb in and read to him. The whole thing is on EZ Sliders so they can move it away from the wall to make the bed.
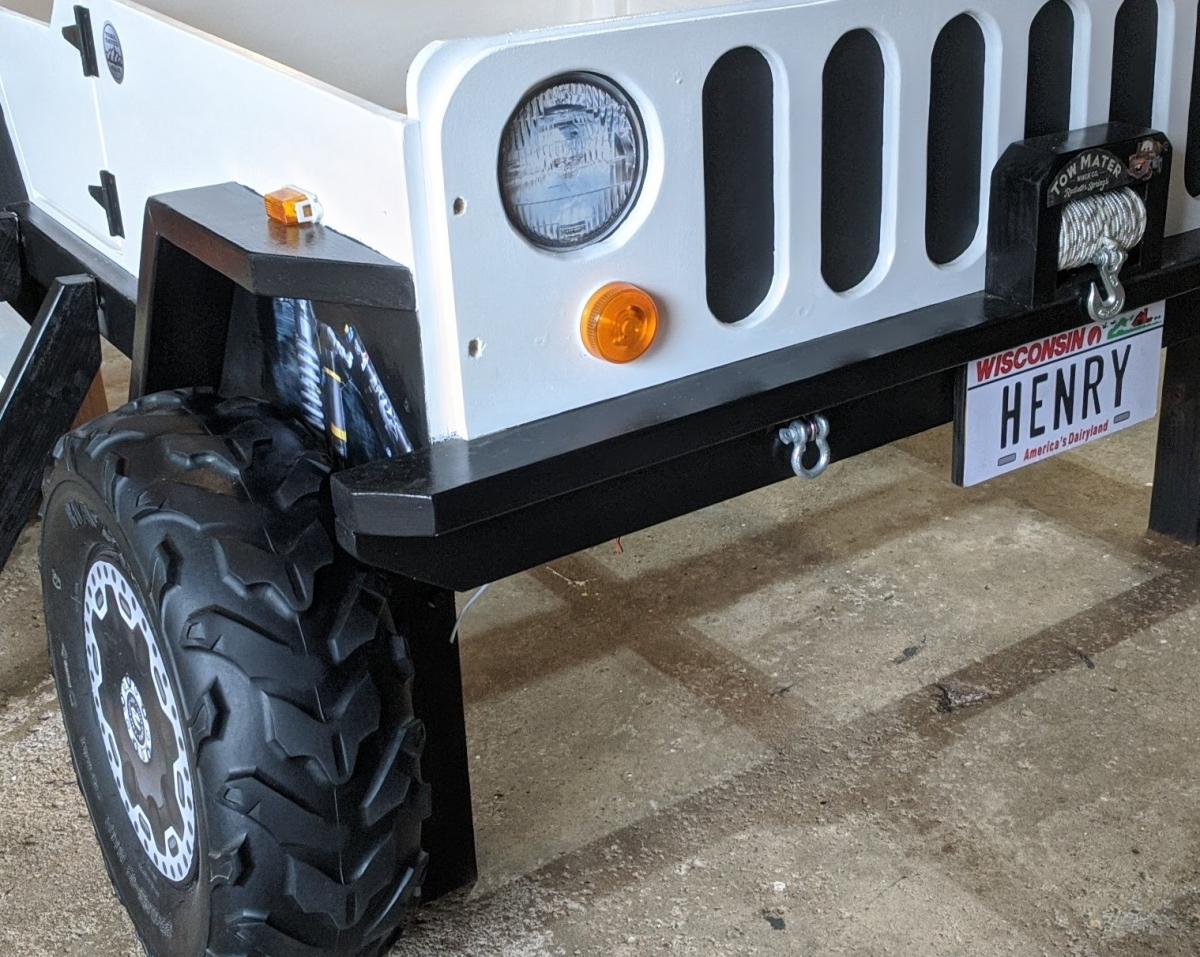
Estimated Cost
$150.00
Estimated Time Investment
Weekend Project (10-20 Hours)
Finish Used
Latex paint.
Recommended Skill Level
Beginner
Comments
Mon, 07/05/2021 - 21:59
AH-MAZING!!!
Wonderful job, thank you for sharing! The details are spot on:)