Community Brag Posts
John Deere Tractor Bunk Bed
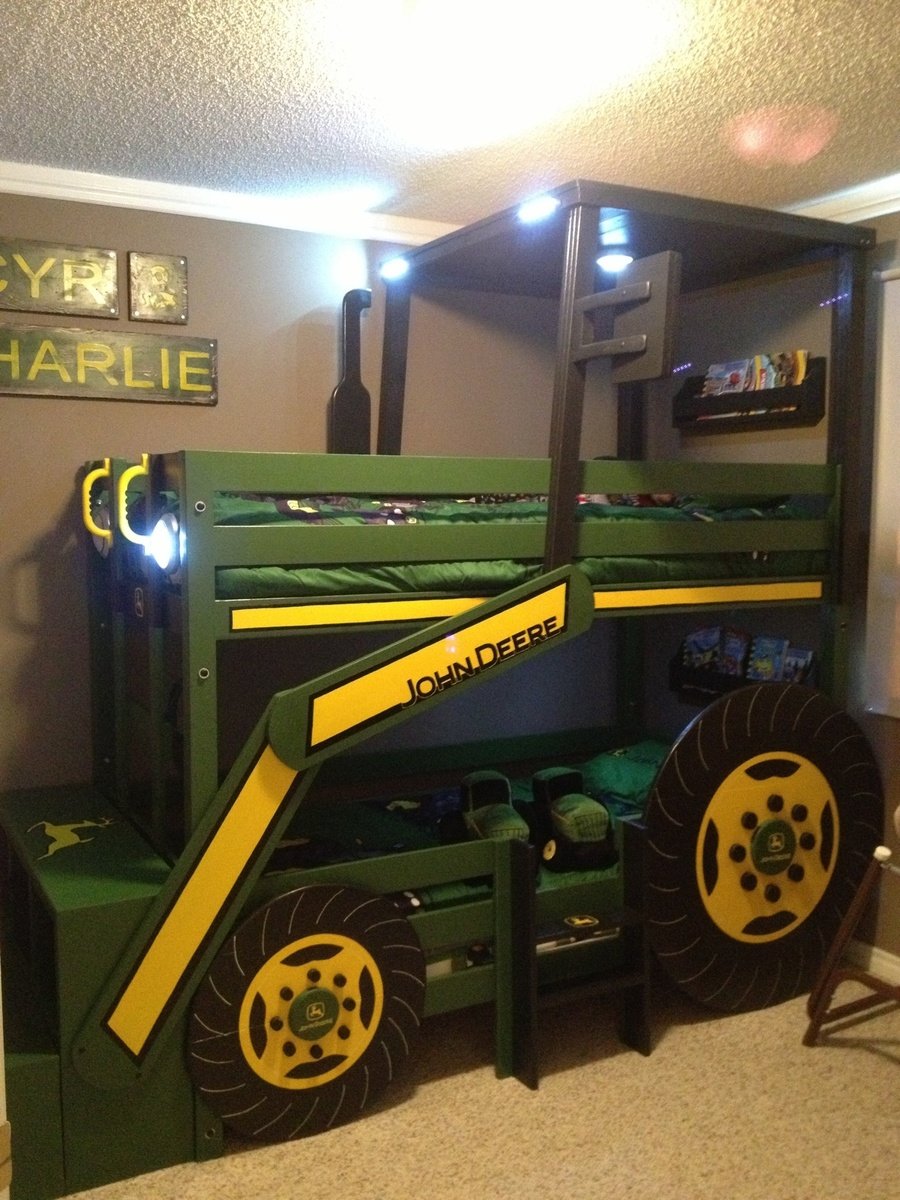
With another baby boy arriving in August, my one and three year olds are moving to a "big boy" room. My oldest decided he wanted a bunk bed and as they both are obsessed with tractors, when I saw the "John Deere Tractor Bunk Bed" plan, I was sold.
We would be needing a twin sized bunk bed though not a toddler. I used the classic bunk bed plans and simply modified them to suit our needs. I moved the ladder to the front, added a rail on the bottom bunk and added a small ladder to the side for my one year old to climb into the bottom bunk.
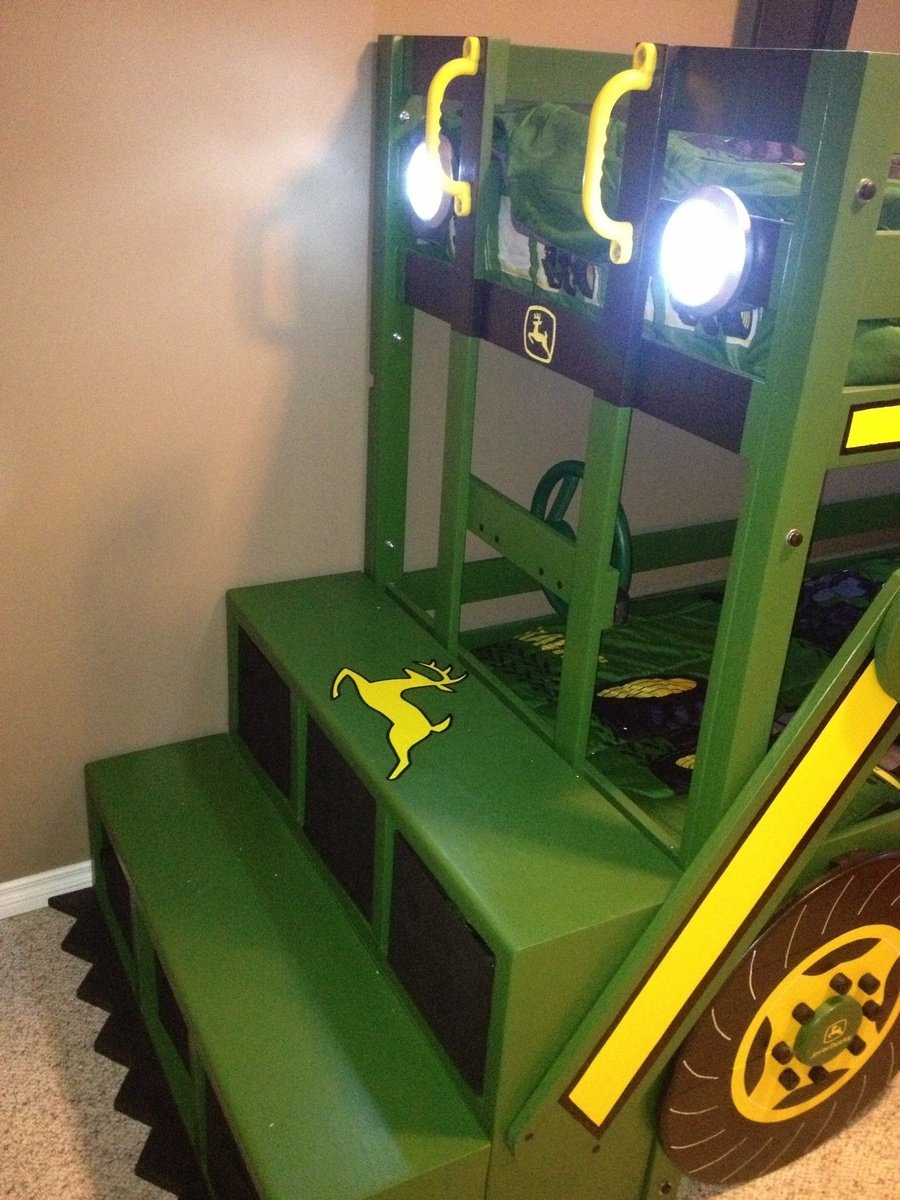
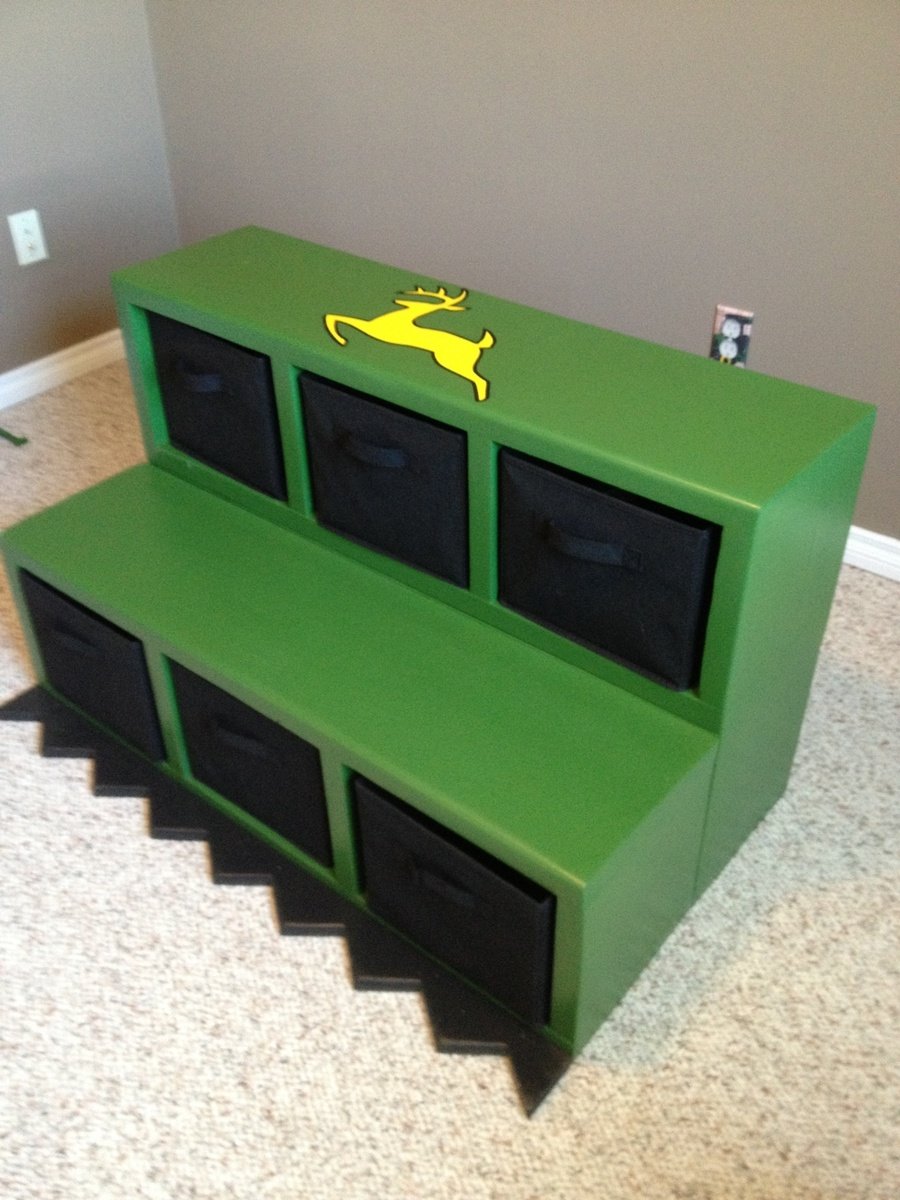
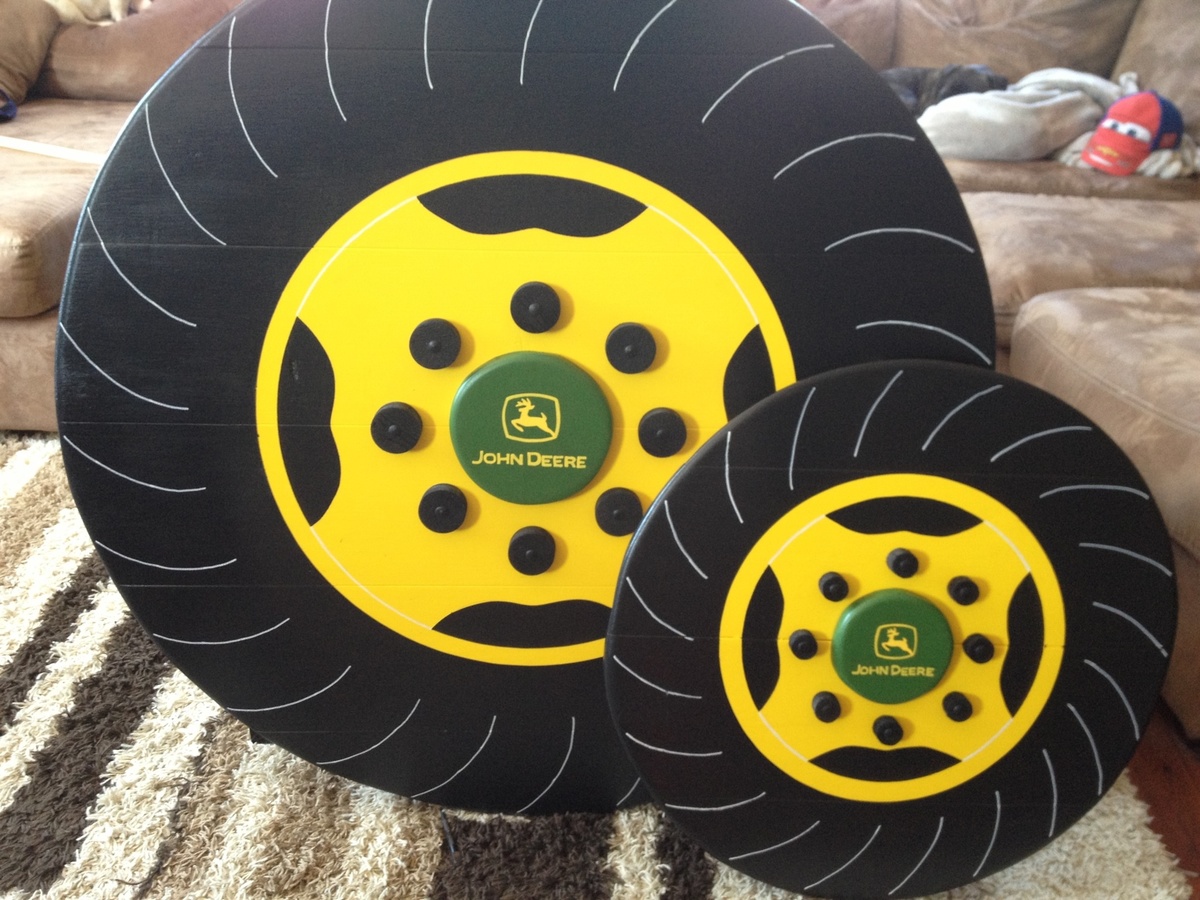
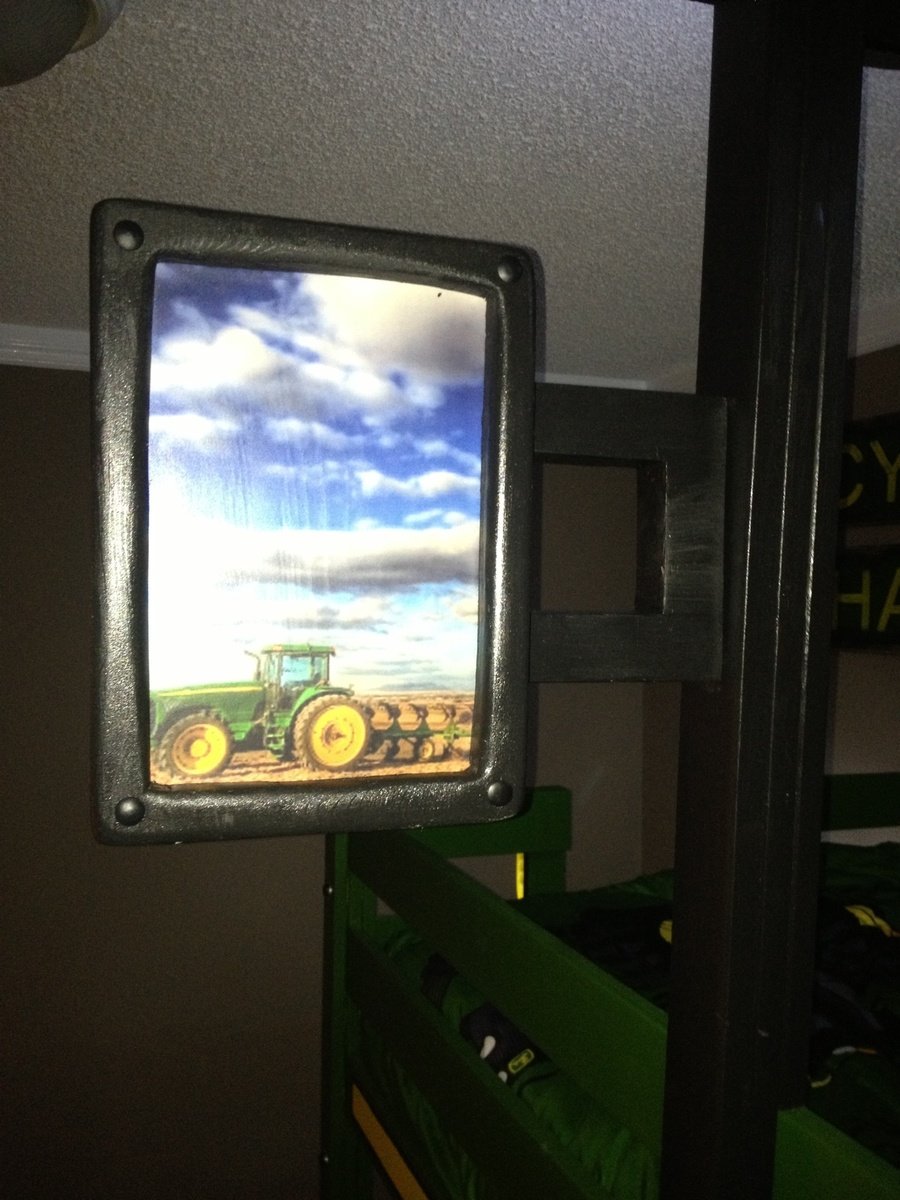
Once the the frame of the bed was complete, I added the tractor accessories. A couple of storage cubby shelves with fabric baskets for toy tractors which act as stairs up to the ladder and make the tractor bucket at the front. Also, the wheels which are made from joined 1x6s as I find plywood hard to sand and paint to the quality of finish I like. A cab & roof from 1x4s framed together. A side mirror that I decoupaged a picture of another tractor on. I used push lights for the headlights as well as a reading light above each bed (they're on timers so they'll turn themselves off). A steering wheel (play equipment access from toys r us). Also, I built and mounted by the head of both beds a "flat wall book holder" so they would have somewhere to store a few books.
My boys and I are fairly new to building so I spent a lot of time planning and measuring to ensure it would all come together in the end. It paid off because it all went smoothly (even with "help" from my boys). It's not perfect but they're very happy with the result. We also built a John Deere themed "Just my size closet" and even finished with over a month to spare before the new baby arrives! :)
Just want to say a quick thank you to Ana both for the amazing plans and also the inspiration to take on these projects. The time spent with my boys building as well as the resulting treasures are priceless and I would have never realized what we were capable of had I not stumbled upon your website and been so inspired by you and everything you've accomplished. Thank you!

Built from Plan(s)
Estimated Cost
$550.00
Estimated Time Investment
Week Long Project (20 Hours or More)
Finish Used
John Deere Green paint (home depot was able to color match a toy tractor), marigold yellow and black and polyurethane.
Recommended Skill Level
Beginner
Comments

Thu, 10/09/2014 - 14:12
This is amazing!!
I am new to this and I was wondering were to find the measurements for the twin size bed? I would love to make this for my boys!!
Mon, 10/20/2014 - 13:10
Plans Please
HI! You did an amazing job with this! Is there any way you can post the plans or send them to me? Thanks in advance.
Mon, 11/03/2014 - 07:48
Plan Request
Sorry for the slow response to those requesting plans. For main structure of the bunk bed, I used Ana's "Classic Bunk Bed" plans. For all of the add-ons, I made up my own plans. I'm pretty low tech so unfortunately they're just pencil & paper plans but I'd be happy to scan and email them to you if you're interested. Just message me and I'll send them your way. :)
Fri, 11/21/2014 - 13:26
Love your plan
Can you please email me your plans? [email protected]. Thanks!
Thu, 07/09/2015 - 19:48
Did you get tree bunk bed plan?
I was just wondering if you by chance got three bunk bed plans?? If so would you be willing too send them my way??? [email protected] thanks so much
Thu, 05/26/2016 - 14:54
Plans please!
I know that it has been a while, but did you ever get plans for this bed? If so, will you please forward them to me at [email protected]? Thank you!

In reply to Plans please! by kerrihicken
Sun, 02/12/2017 - 07:36
plans
if you recieved plans for this can you please forward them to me [email protected]
Fri, 01/02/2015 - 12:36
If you wouldn't mind sharing
If you wouldn't mind sharing with me also I would love a copy. Email ... [email protected] This is by far the BEST tractor bed I have seen online! You did an awesome job!!!!! Hopefully I can recreate!!!!
Mon, 01/05/2015 - 08:44
AWESOME!!!!
I love this! You did an amazing job! Could you please send the plans to [email protected]
Thank you so much!!
Wed, 01/28/2015 - 14:08
Plans Please
Hi Veronica, Well done fantastic job! Two little men who want to move in together because of a new addition on the way. Their request though is a John Deere Bunk Bed! would be grateful if you could forward on your plans if you have time, Kindest regards.
In reply to Plan Request by Veronica P
Thu, 01/29/2015 - 07:18
Plans for making this John Deere Bunk Bed
Hi, I would love to get a copy of the plans used to make this bunk bed for my grand kids. Have two grandkids and a third one due the middle of February so got to get a bed made quickly for them to have a great bed to sleep in when staying with nana and pa. Plans can be emailed to me at [email protected] 731-415-9666. Thanks Diana
Mon, 02/02/2015 - 07:31
This looks so great. Could I
This looks so great. Could I get a copy of your plans? Thanks [email protected]
Mon, 02/09/2015 - 21:06
John Deere bunk bed plans
I would love to receive a copy of of the Plans for the John Deere bunk bed. My email is [email protected]
Tue, 03/03/2015 - 10:43
Tracktor Bunk Bed
Can you please email me the plans. I have a 4yr old that is obsessed with John Deere. We would like to make this for his birthday. [email protected]
Thu, 03/05/2015 - 22:31
Love the jd bed
Just love the whole thing very beautiful & I was wondering if you could send me the plans for the whole set up. My email is [email protected] thanks
Mon, 04/06/2015 - 21:04
Bunk Bed
Hi Veronica, like everyone else i love your plans, could you possibly email them to me? Thanks in advance.
Thu, 05/28/2015 - 10:35
John deere bunk
Please send me the plans for the John Deere Bunk Bed. I love it.
Fri, 05/29/2015 - 09:06
Plans
Please send me your plans for the John Deere Bunk Bed in the twin size. [email protected]
Sun, 05/31/2015 - 23:36
plan request
Will you please email me the plans for the John Deere tractor bunk bed? Thank you. You did awesome
Tue, 06/09/2015 - 08:06
Plans for tractor bed
Hi! Can you please forward me your plans for the john deere tractor bed to [email protected]?
Thank you so much and awesome idea!

In reply to Plan Request by Veronica P
Fri, 06/12/2015 - 19:31
John Deere Bunk Bed Plans
Please, please email these plans to me! My son will love this!!!! Email is [email protected]. Thank you!!!
Thu, 06/18/2015 - 14:04
Tractor Bunk Bed Plans
Thanks for being willing to share your plans. Your tractor bed is amazing. I have 2 boys who would LOVE a bed like this. Could you please send your plans to [email protected]?
Thank you so much
Sun, 09/06/2015 - 10:06
John Deere bunk bed plans
Dear Veronica,
Our grandson, 6 years old, will absolutely adore this bed. He loved riding on Grandpa's real JD tractor. Please send me your plans for the attachments. They are just darling and I could not do any better. Thanks for your generosity!
Fri, 01/15/2016 - 10:52
Can you please send me your
Can you please send me your plans? i am stumped on the arms of the tractor
Wed, 07/13/2016 - 12:12
Plans
Veronica P this bunk bed is amazing! Could you email me your low tech paper and pencil plans please? :) [email protected]
Fri, 09/13/2019 - 21:11
Tractor bunk beds
Hi Veronica. My 3 year old just loves the tractor bunk bed. I was wondering if you would mind sending me the plans you have. It would be greatly appreciated. My email is [email protected]
Thanks in advance
Wed, 10/16/2019 - 17:56
Plan Request
If you're still sharing, we would love a copy of your add-ons plans.
Thanks,
MyMaw and PawPaw
Sun, 08/23/2020 - 11:32
tractor bunk bed
What an awesome build! We would love a copy of your plans if you could please share. Thanks!
[email protected]
Mon, 12/15/2014 - 20:19
would love to have this plan
Would you please email me these plans for your bunk bed? Thanks A lot!!! email to [email protected]
Thu, 05/26/2016 - 15:00
Tractor Bunk Bed Plans
Hi! I know that it has been a while, but I see a message where Veronica says she emailed you the plans. If you still have them, will you please send them to [email protected]. Thank you!
Tue, 12/16/2014 - 19:22
Is there any way I could have
Is there any way I could have email plans? [email protected] . Thank you.
Sun, 12/21/2014 - 00:35
Plans
Please email the plans for this to [email protected]
Thank you in advance!
Tue, 12/23/2014 - 07:33
Bunk Bed Plans Request
Hi Veronica! I would love an email of the plans to make this bed. My sons thinks it is out of this world!!! Thanks for all you effort and wonderful job.
Sat, 12/27/2014 - 15:12
Would you please consider
Would you please consider emailing the plans to me? We have started this for my son today and would love your insight on some measurements. Such a wonderful idea, thank you for sharing! [email protected]
Tue, 01/06/2015 - 08:21
Plans Emailed
Hello all. I've tried emailing plans to all those who've requested them. I had some trouble attaching the files as they were large so if you didn't receive them, please let me know and I can resend. Thanks
Tue, 01/06/2015 - 11:53
Hi Veronica. I did not
Hi Veronica. I did not receive an email. Woul you have time to try again? If you email me your address I can send you my fax number if that's easier too. Thank you so much! I can not tell you how much I appreciate your dedication to this! [email protected]
Sun, 11/01/2015 - 16:58
John Deere plans
Hi
I didnt receive any plans. couldyou send methem please
Thanks
Jason
Baby Ray's New Closet!
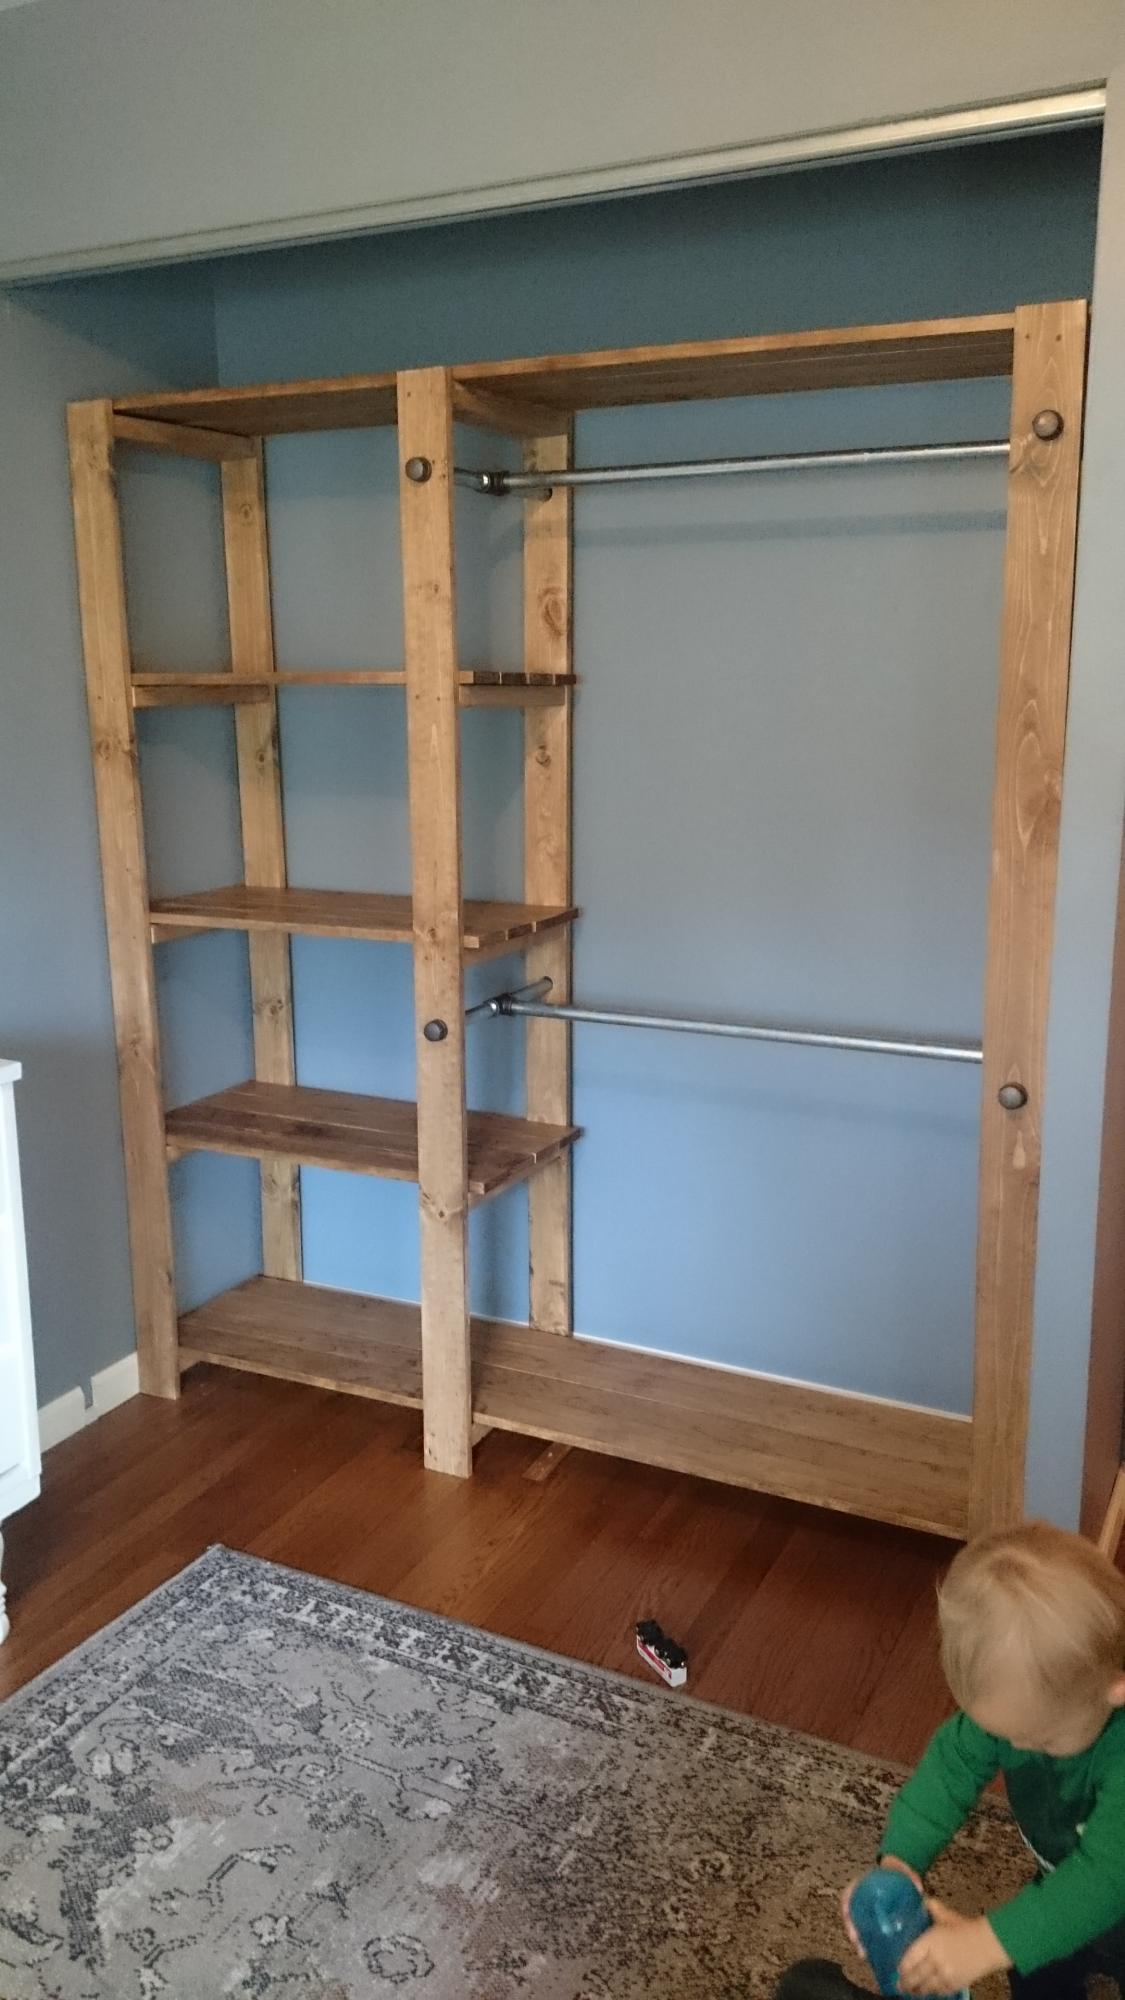
This was the second building project I've ever completed. I had to make a few adjustments to make it fit the size of ray's closet, but it was totally worth it. most of the work was in the measuring, sanding, and sealing of the wood. Ftting the frames can be a little tricky if your planks aren't perfectly straight. Otherwise, this project was pretty straight forward and can be done in just a few days depending on how much time you have to dedicate to it. Thanks Ana!
Built from Plan(s)
Estimated Cost
About $150
Estimated Time Investment
Week Long Project (20 Hours or More)
Finish Used
Early American stain and polyurethane
Recommended Skill Level
Beginner
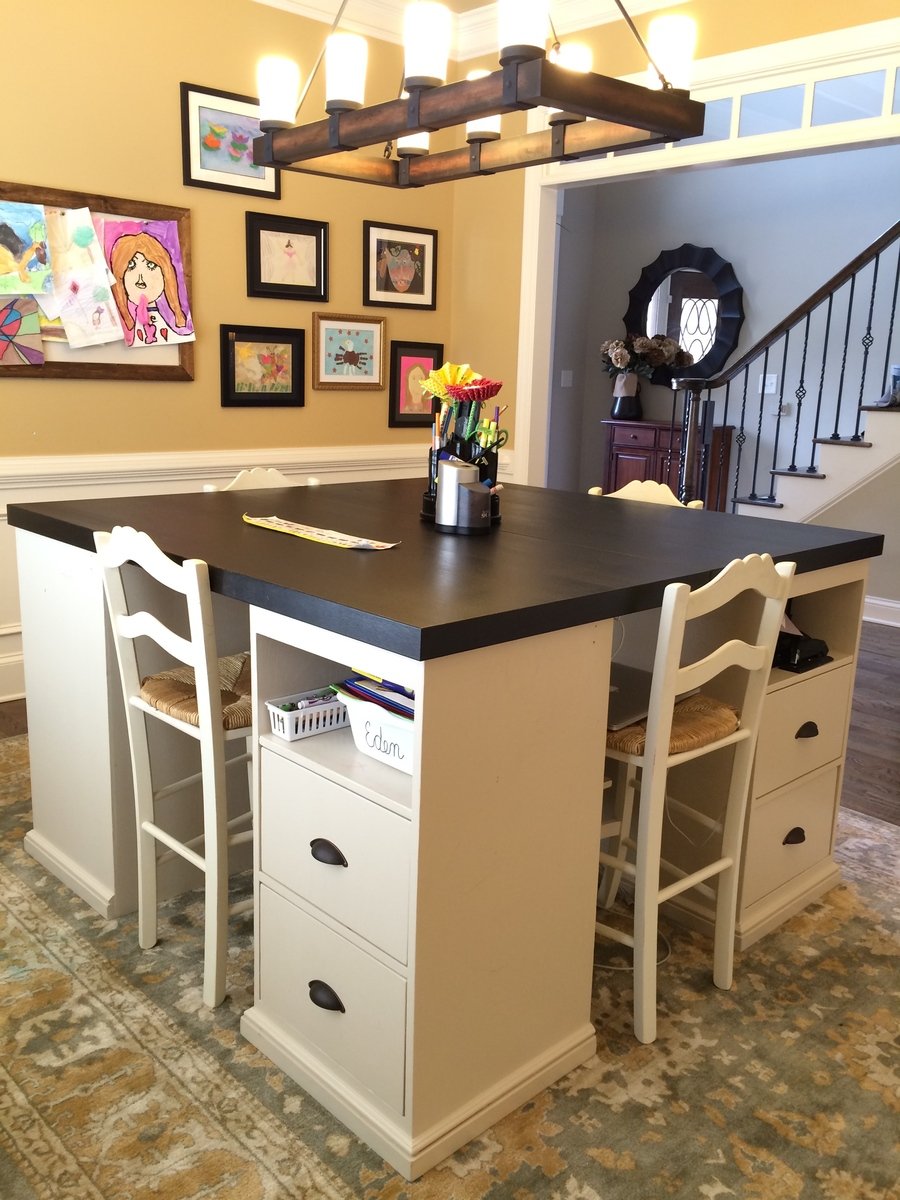
Four station desk (PB inspired)

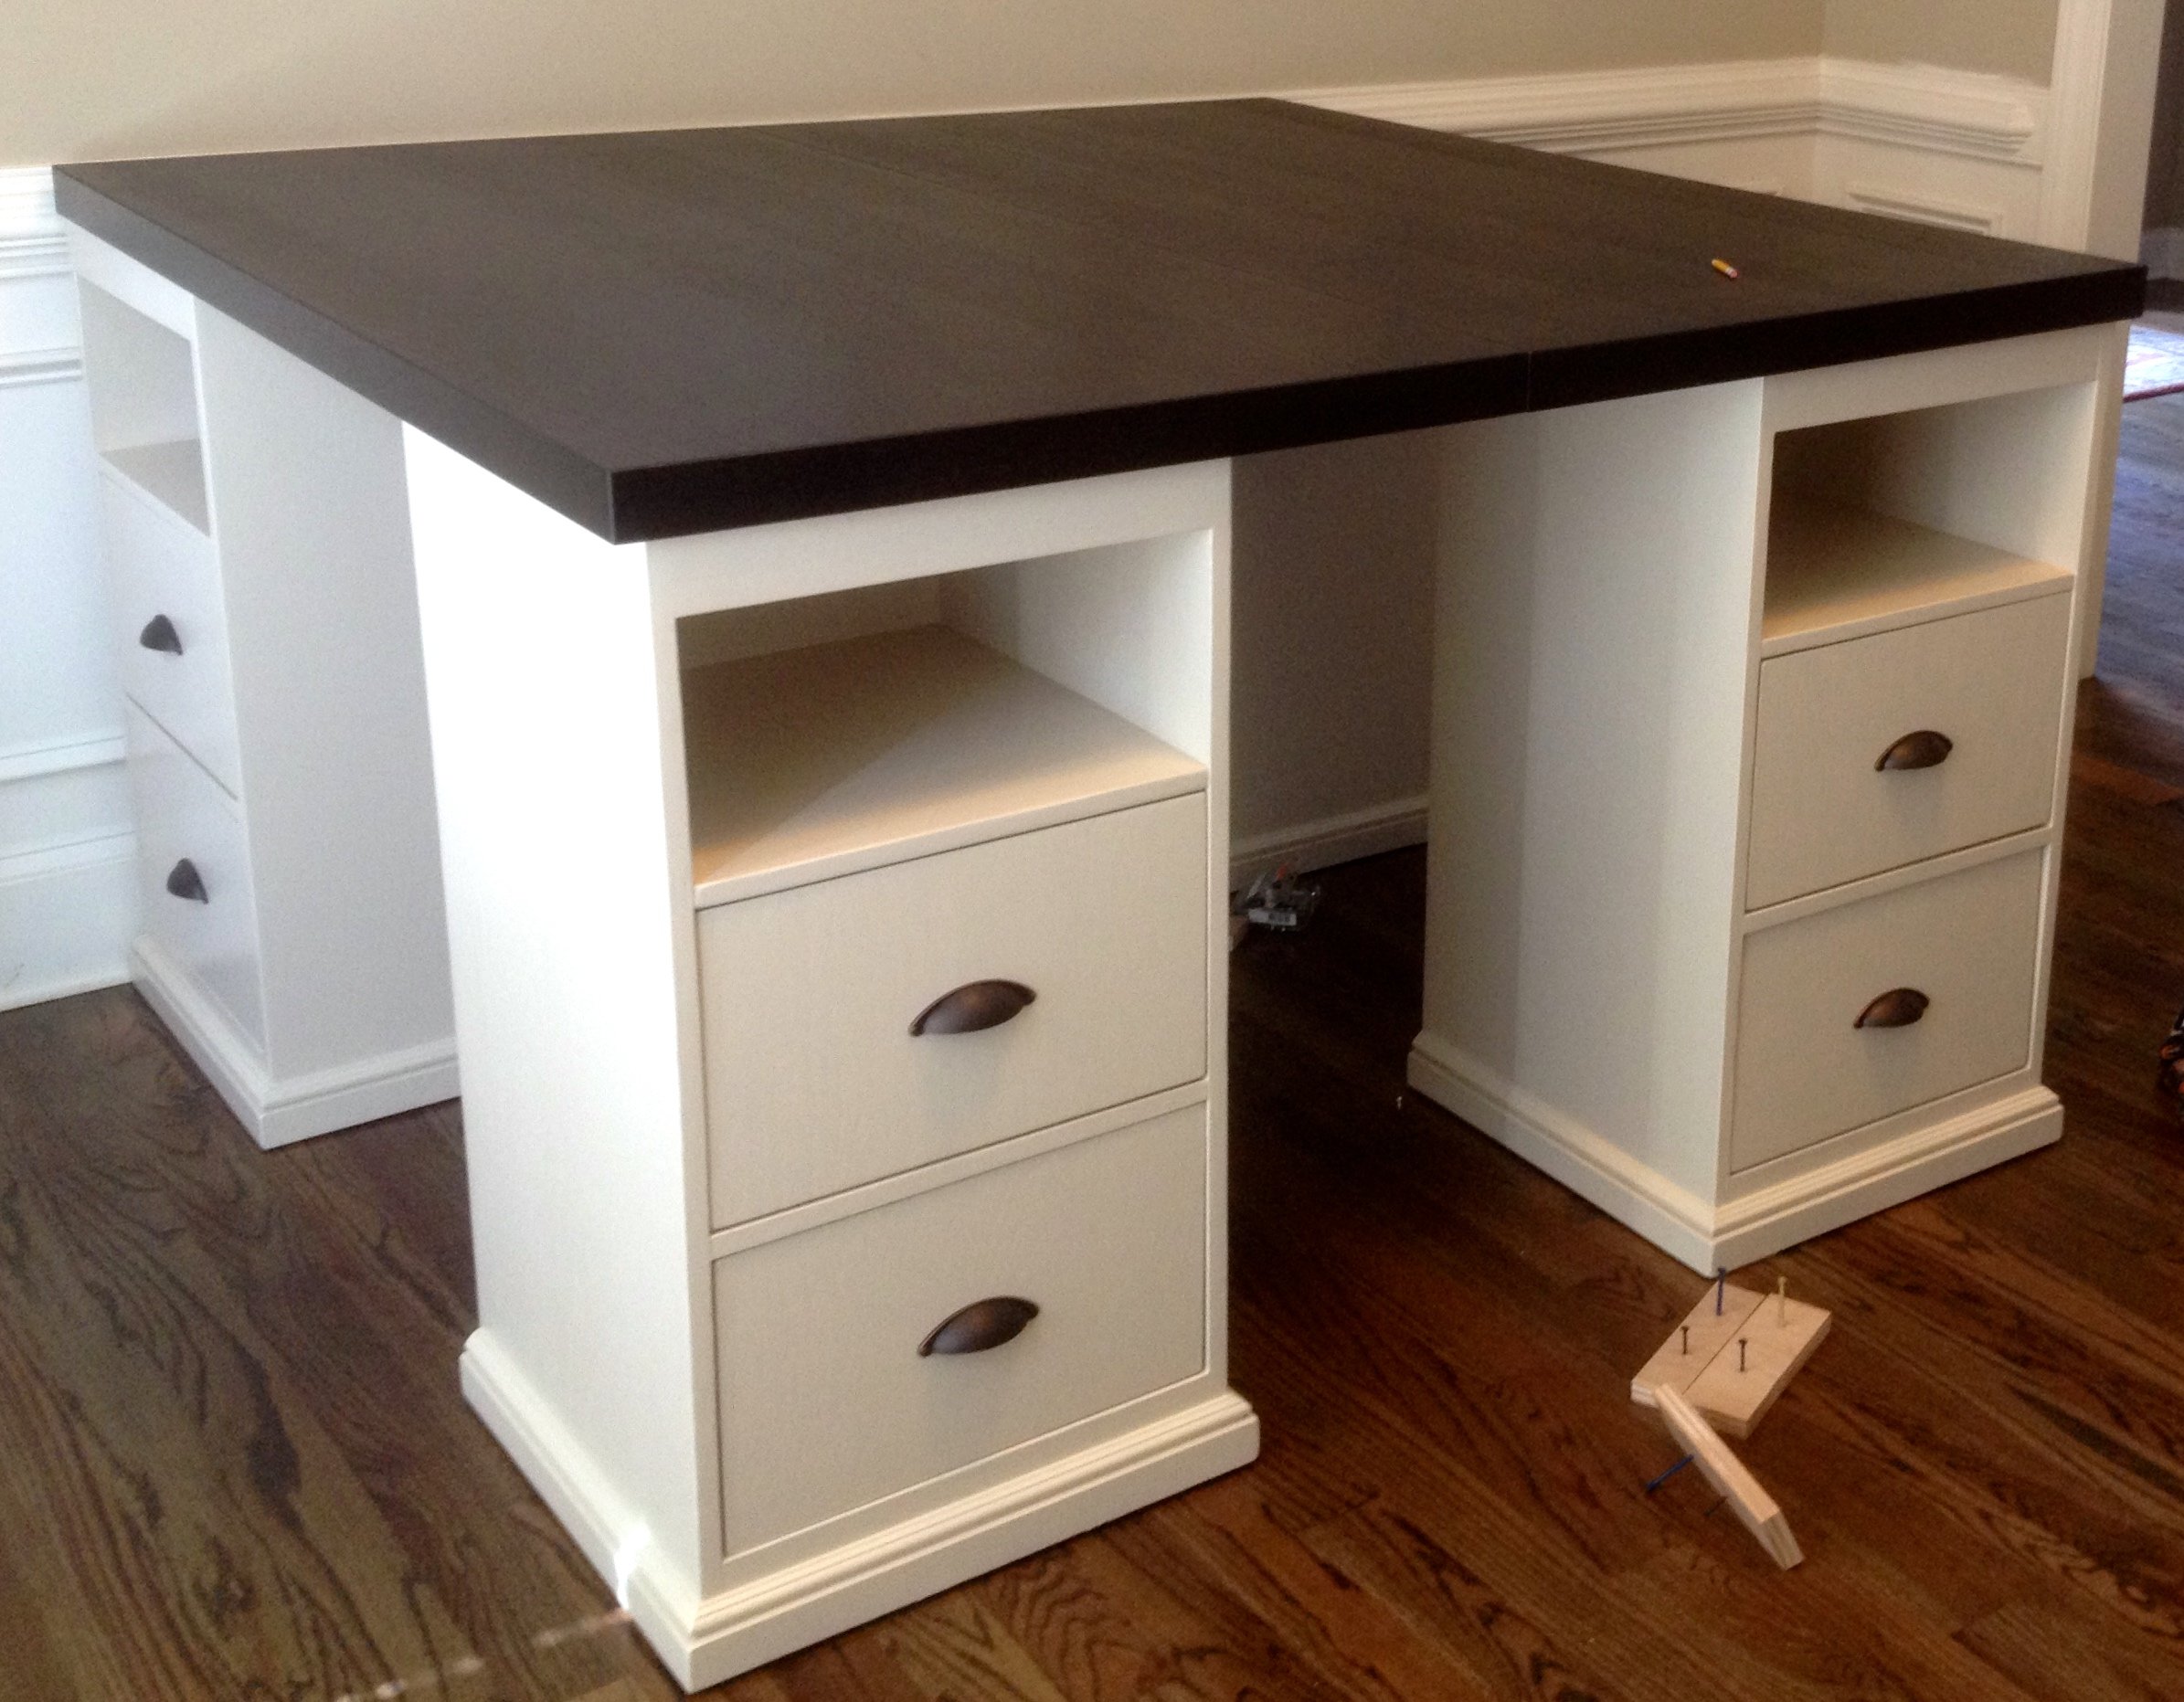
I really liked the PB mega desk, but I didn't want to spend $1600 on it. After seeing someone's post here (a couple years ago...) asking for plans on that desk, I decided to do it myself. I took these two plans and made 4 base units. They are 18" square at the top and 34" tall. I used 2 IKEA table tops connected underneath for the top, to make a total height of 36" - counter stool height. I constructed them a little differently than the plans, but no matter how you make them, the idea is the same. The plan is to take them apart and make 2 desks once everyone is too old and cool to do homework/artwork together.
Built from Plan(s)
Estimated Cost
$500
Estimated Time Investment
Week Long Project (20 Hours or More)
Finish Used
Kitchen and Bath finish paint (2 coats) - it's a little shinier than eggshell (I only used it because I had 2 or 3 gallons extra at home :) then 2 coats acrylic top coat matte finish.
Recommended Skill Level
Intermediate
Comments

Mon, 03/16/2015 - 20:39
this is really awesome! What
this is really awesome! What a cool work area :)

Sun, 08/02/2015 - 11:39
four station desk
Where did you get the chairs to complete your project? And how much were they?
Sat, 08/15/2015 - 04:33
Stools from Ballard Outlet
Just seeing your comment...sorry for the delay! I got the stools and the light fixture at a Ballard Backroom (outlet) store near me. 3 of the stools ended up being about $40 each with the sale they had at the time, and the 4th was $60? - bought at a later time than the first 3.
Sun, 08/30/2015 - 13:54
Could we get more detail on
Could we get more detail on how this was built? The base units, for instance.
Thanks!
Wed, 11/04/2015 - 07:40
Connecting Table Tops
How did you connect the table tops from the bottom so that the tables were secure together? I'm curious what's the best way to do this. Since two of the four seats will be where the seam is, I want to make sure I secure it properly so it's not wobbly. Thanks so much.
Sat, 01/09/2016 - 05:06
connecting table tops
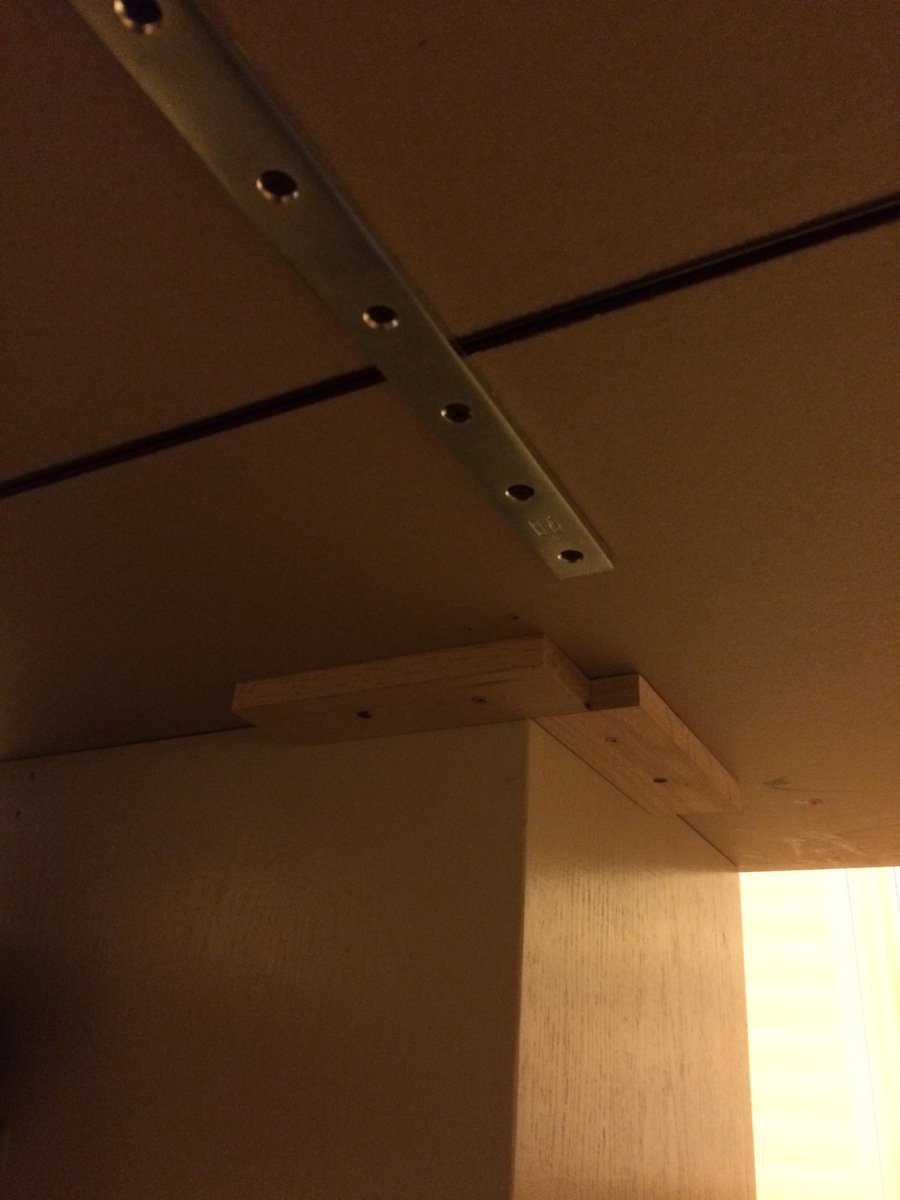
I'm just seeing these latest comments for the first time, so you may have long finished this project already! The tops were surprisingly sturdy but I did reinforce them. I placed the tops on the floor upside down and screwed some metal brackets (about 12" long each) across the joint in four places. I just screwed them in through holes already in the brackets. This wasn't the most stable because those tops are particle board and don't hold screws very well... But since it was already pretty sturdy, I figured it would do. It has been fine, even with standing on the top (kids who get up there and me hanging the light fixture above).
Once the tops were joined, I placed the bases so there was about a 1" overhang on the top. To hold the top in place, I used small pieces of wood screwed to the underside of the top at the inside corner to act as a placement stop. The top is pretty big and heavy even though they are IKEA tops, so they don't have a tendency to move or slide at all anyway. I'm going to try to figure out how to post another picture of the braces and corner stops...we'll see if I can do it! Let me know if you have any more questions...again, sorry I didn't see this in a more timely manner!
Sat, 01/02/2016 - 05:55
Photo
Is the photo above the Pottery Barn version or your product result? I'm trying to figure out the dimensions for the drawer and shelf configurations. Thanks! BTW, I'm totally addicted to your style and personality...my husband loves the productivity inspiration I've received. :-)
Sat, 01/09/2016 - 10:17
more detailed measurements
Hi!
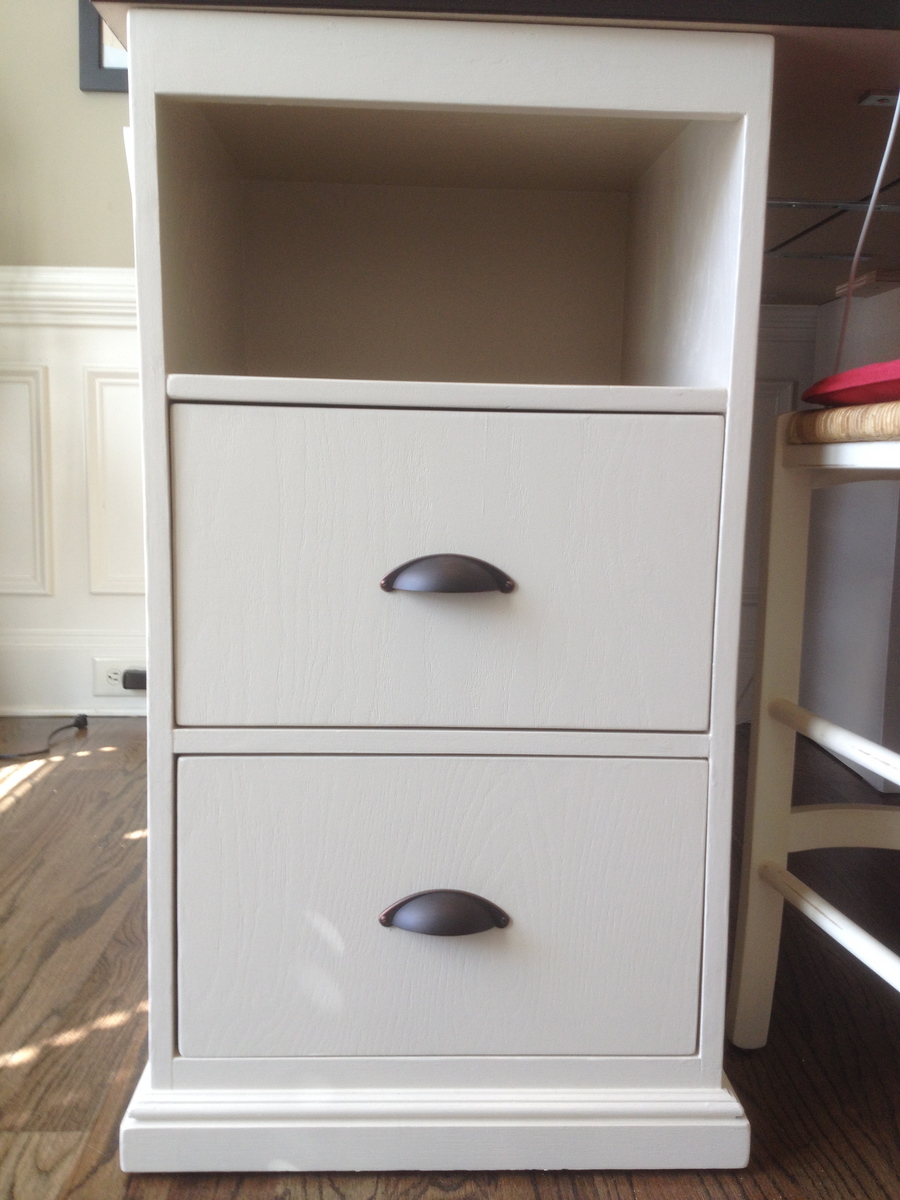
I'm glad you like the desk! The one in the picture is the one I built, not the pottery barn one! My dimensions were a good bit different than the PB desk - square bases instead of rectangular and counter stool height instead of desk/table height. So, I have no idea if I have my plans for this anymore, so I went and measured it again for you!
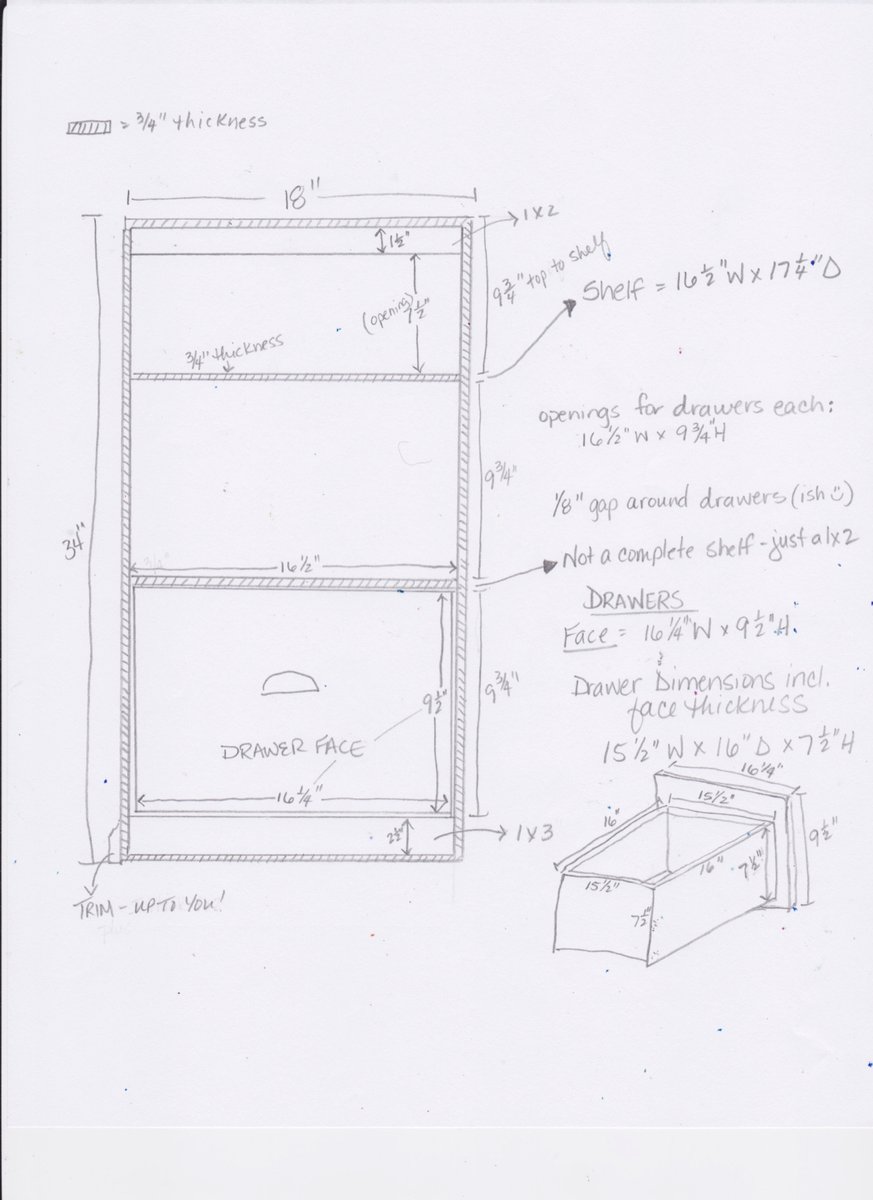
So each base is 18" x 18" square and 34" high so that with the 2" top the total height is 36".
Each base was made of oak plywood that made with 3 sides, a top and a bottom. All edges were rabbit joints (3/8" deep in thickness of boards and probably 3/8" wide - not 100% on width of rabbits). It's kind of a pain to do rabbit joints if you don't have a dado blade for your table saw, so you could use pocket hole screws instead. I glued and nailed these joints with a finish nailer, I believe.
I figured a diagram with measurements would be easier than trying to write descriptions...so I'm adding another pic with the dimensions outlined. Drawing is NOT to scale, so sorry about that! I really need to learn to use SketchUp. Let me know if you have any questions!
Sat, 01/09/2016 - 07:57
more detailed measurements
Hi!
I'm glad you like the desk! The one in the picture is the one I built, not the pottery barn one! My dimensions were a good bit different than the PB desk - square bases instead of rectangular and counter stool height instead of desk/table height. So, I have no idea if I have my plans for this anymore, so I went and measured it again for you!
So each base is 18" x 18" square and 34" high so that with the 2" top the total height is 36".
Each base was made of oak plywood that made with 3 sides, a top and a bottom. All edges were rabbit joints (3/8" deep in thickness of boards and probably 3/8" wide - not 100% on width of rabbits). It's kind of a pain to do rabbit joints if you don't have a dado blade for your table saw, so you could use pocket hole screws instead. I glued and nailed these joints with a finish nailer, I believe.
I figured a diagram with measurements would be easier than trying to write descriptions...so I'm adding another pic with the dimensions outlined. Drawing is NOT to scale, so sorry about that! I really need to learn to use SketchUp. Let me know if you have any questions!
Wed, 06/22/2016 - 15:26
Can you buy the bases from
Can you buy the bases from ikea? or did you build them from scratch?
Thu, 07/28/2016 - 14:13
No you can't buy them from
No you can't buy them from Ikea. I bought the table tops from Ikea, but I built the bases. The dimensions for the bases are in one of the additional pictures with the post if you want to see them!
Mon, 10/10/2016 - 07:41
Table top size
What are the total dimensions of the table top? Thinking of building something like this, but want to make sure it will fit in my space.
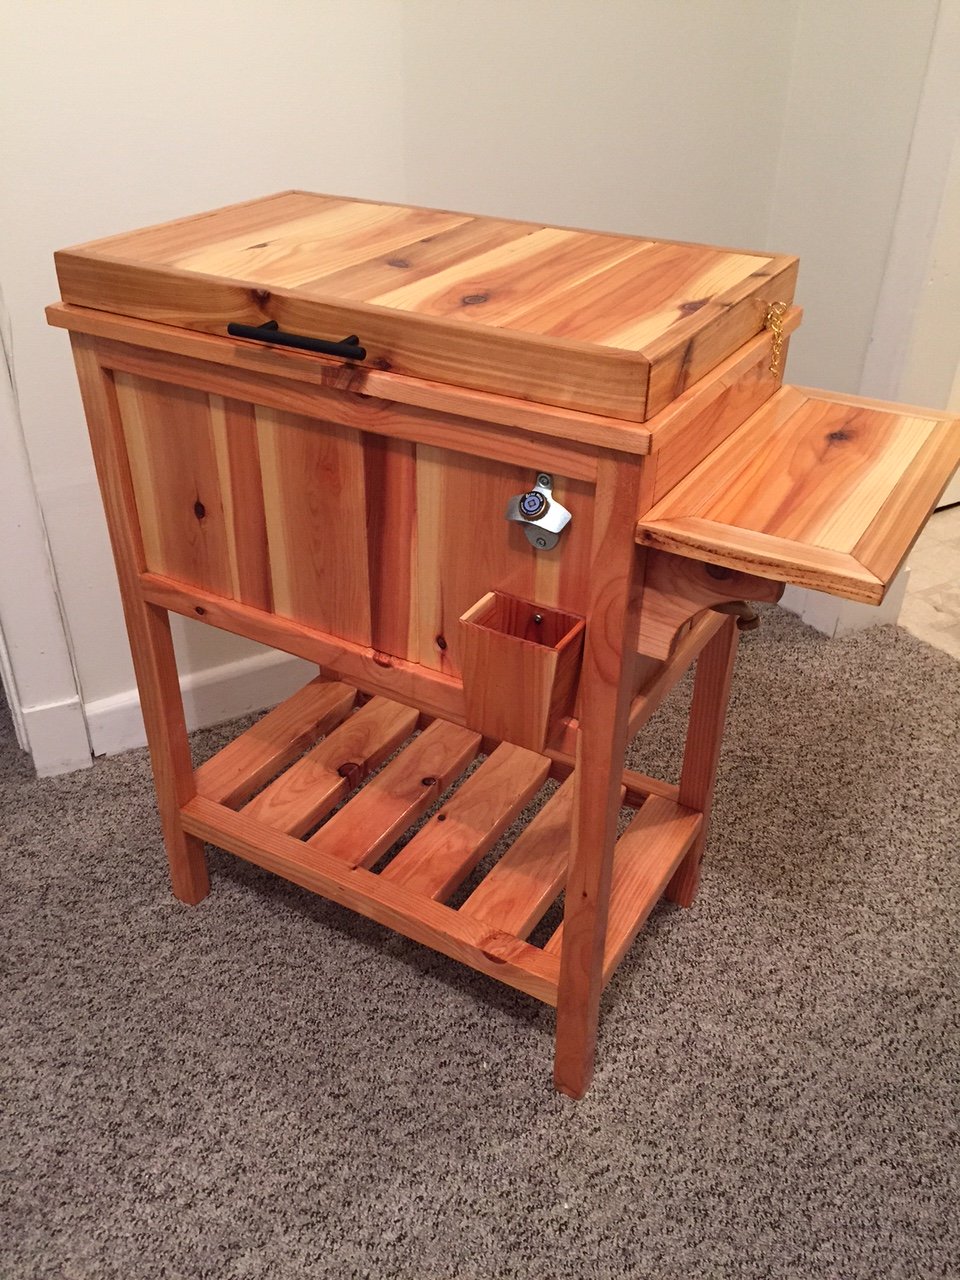
wooden cooler stand
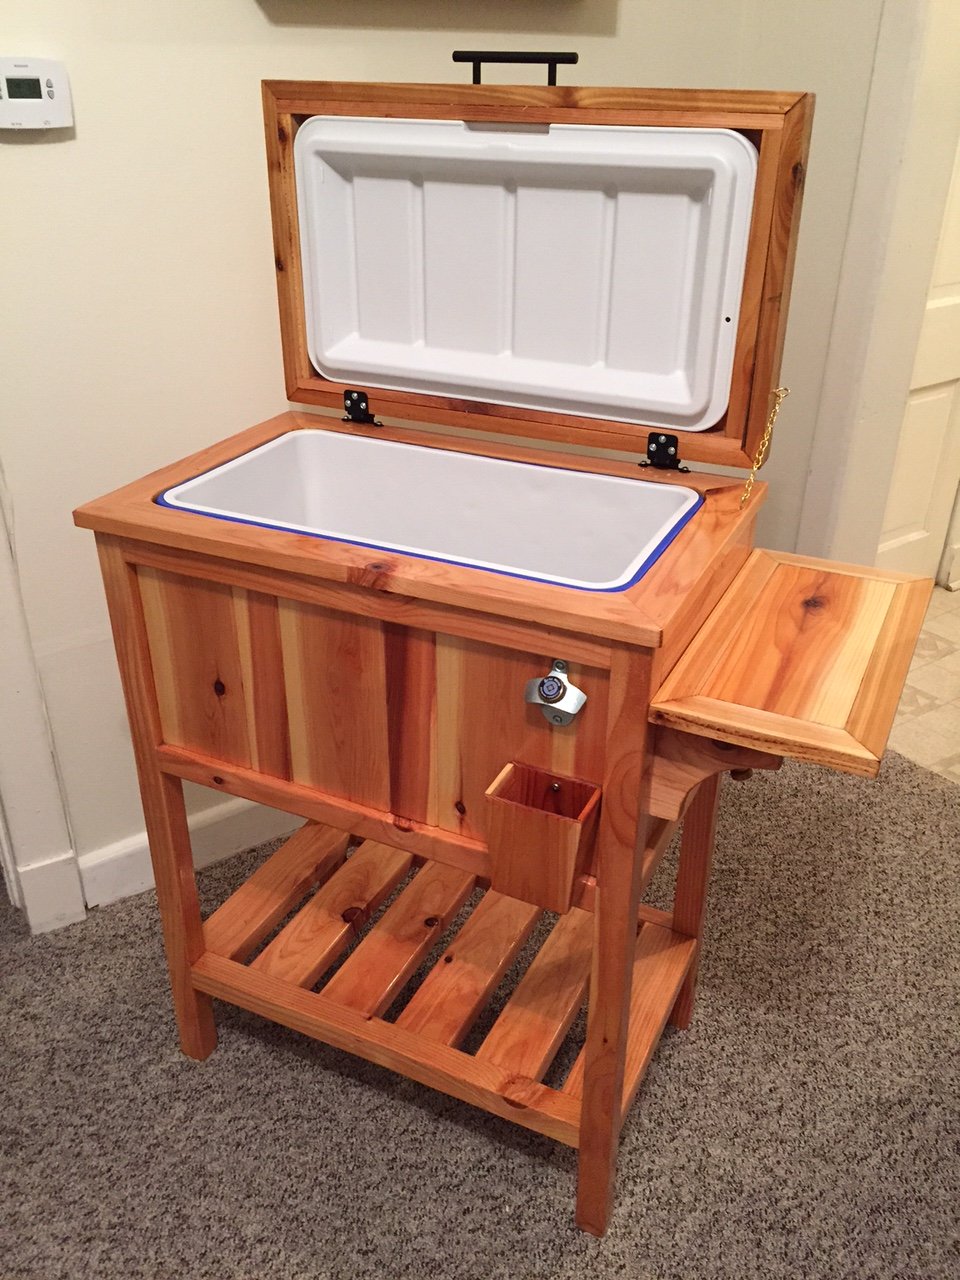
This is the cooler stand presented by Jenny from Birdsandsaoap. Very easy to build and always ends up with someone asking to buy it or have you make them one.
Built from Plan(s)
Estimated Cost
$120.00
Estimated Time Investment
Week Long Project (20 Hours or More)
Finish Used
Minwax gloss polyurethane.
Recommended Skill Level
Intermediate
Comments
Wed, 06/10/2015 - 11:34
Plans
The plans for this can be found at the following web adress: http://ana-white.com/2013/06/plans/wood-cooler-birds-and-soap
Hope this helps

Wed, 09/21/2016 - 08:07
Wooden Cooler Stand
New to this site. How do I get the plans for the Wooden Cooler Stand?
Thank you!

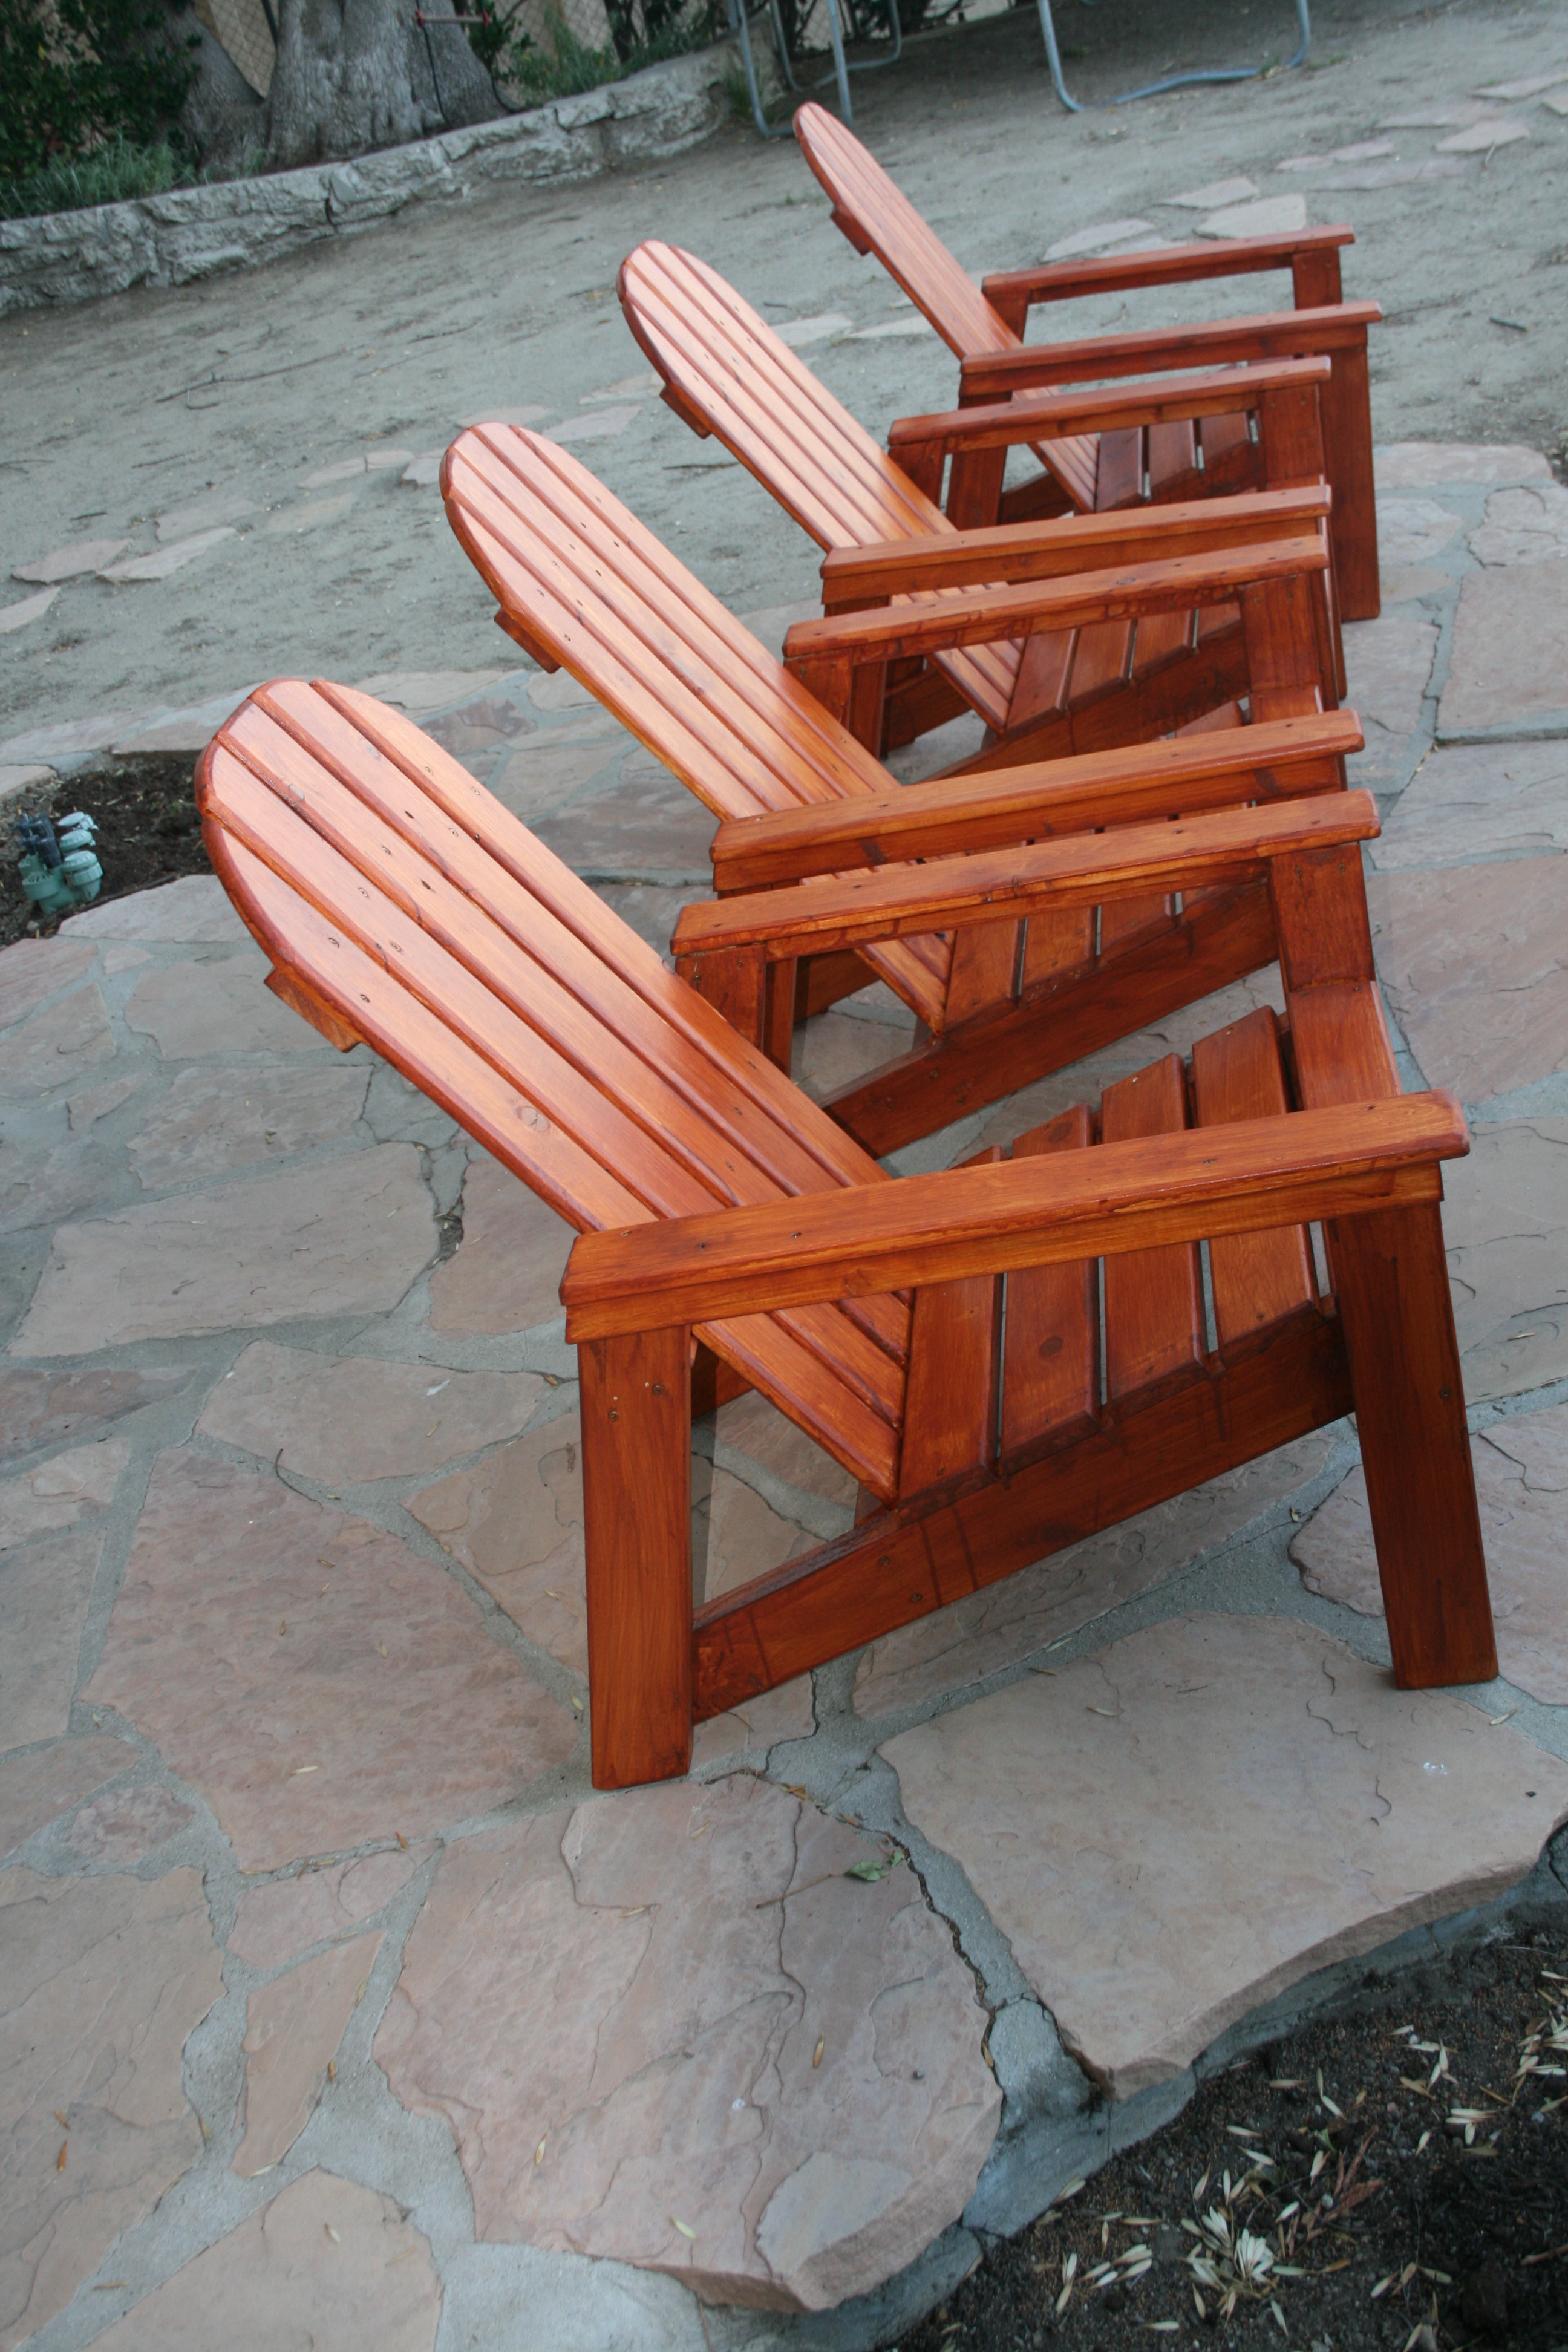
Adirondack Chair
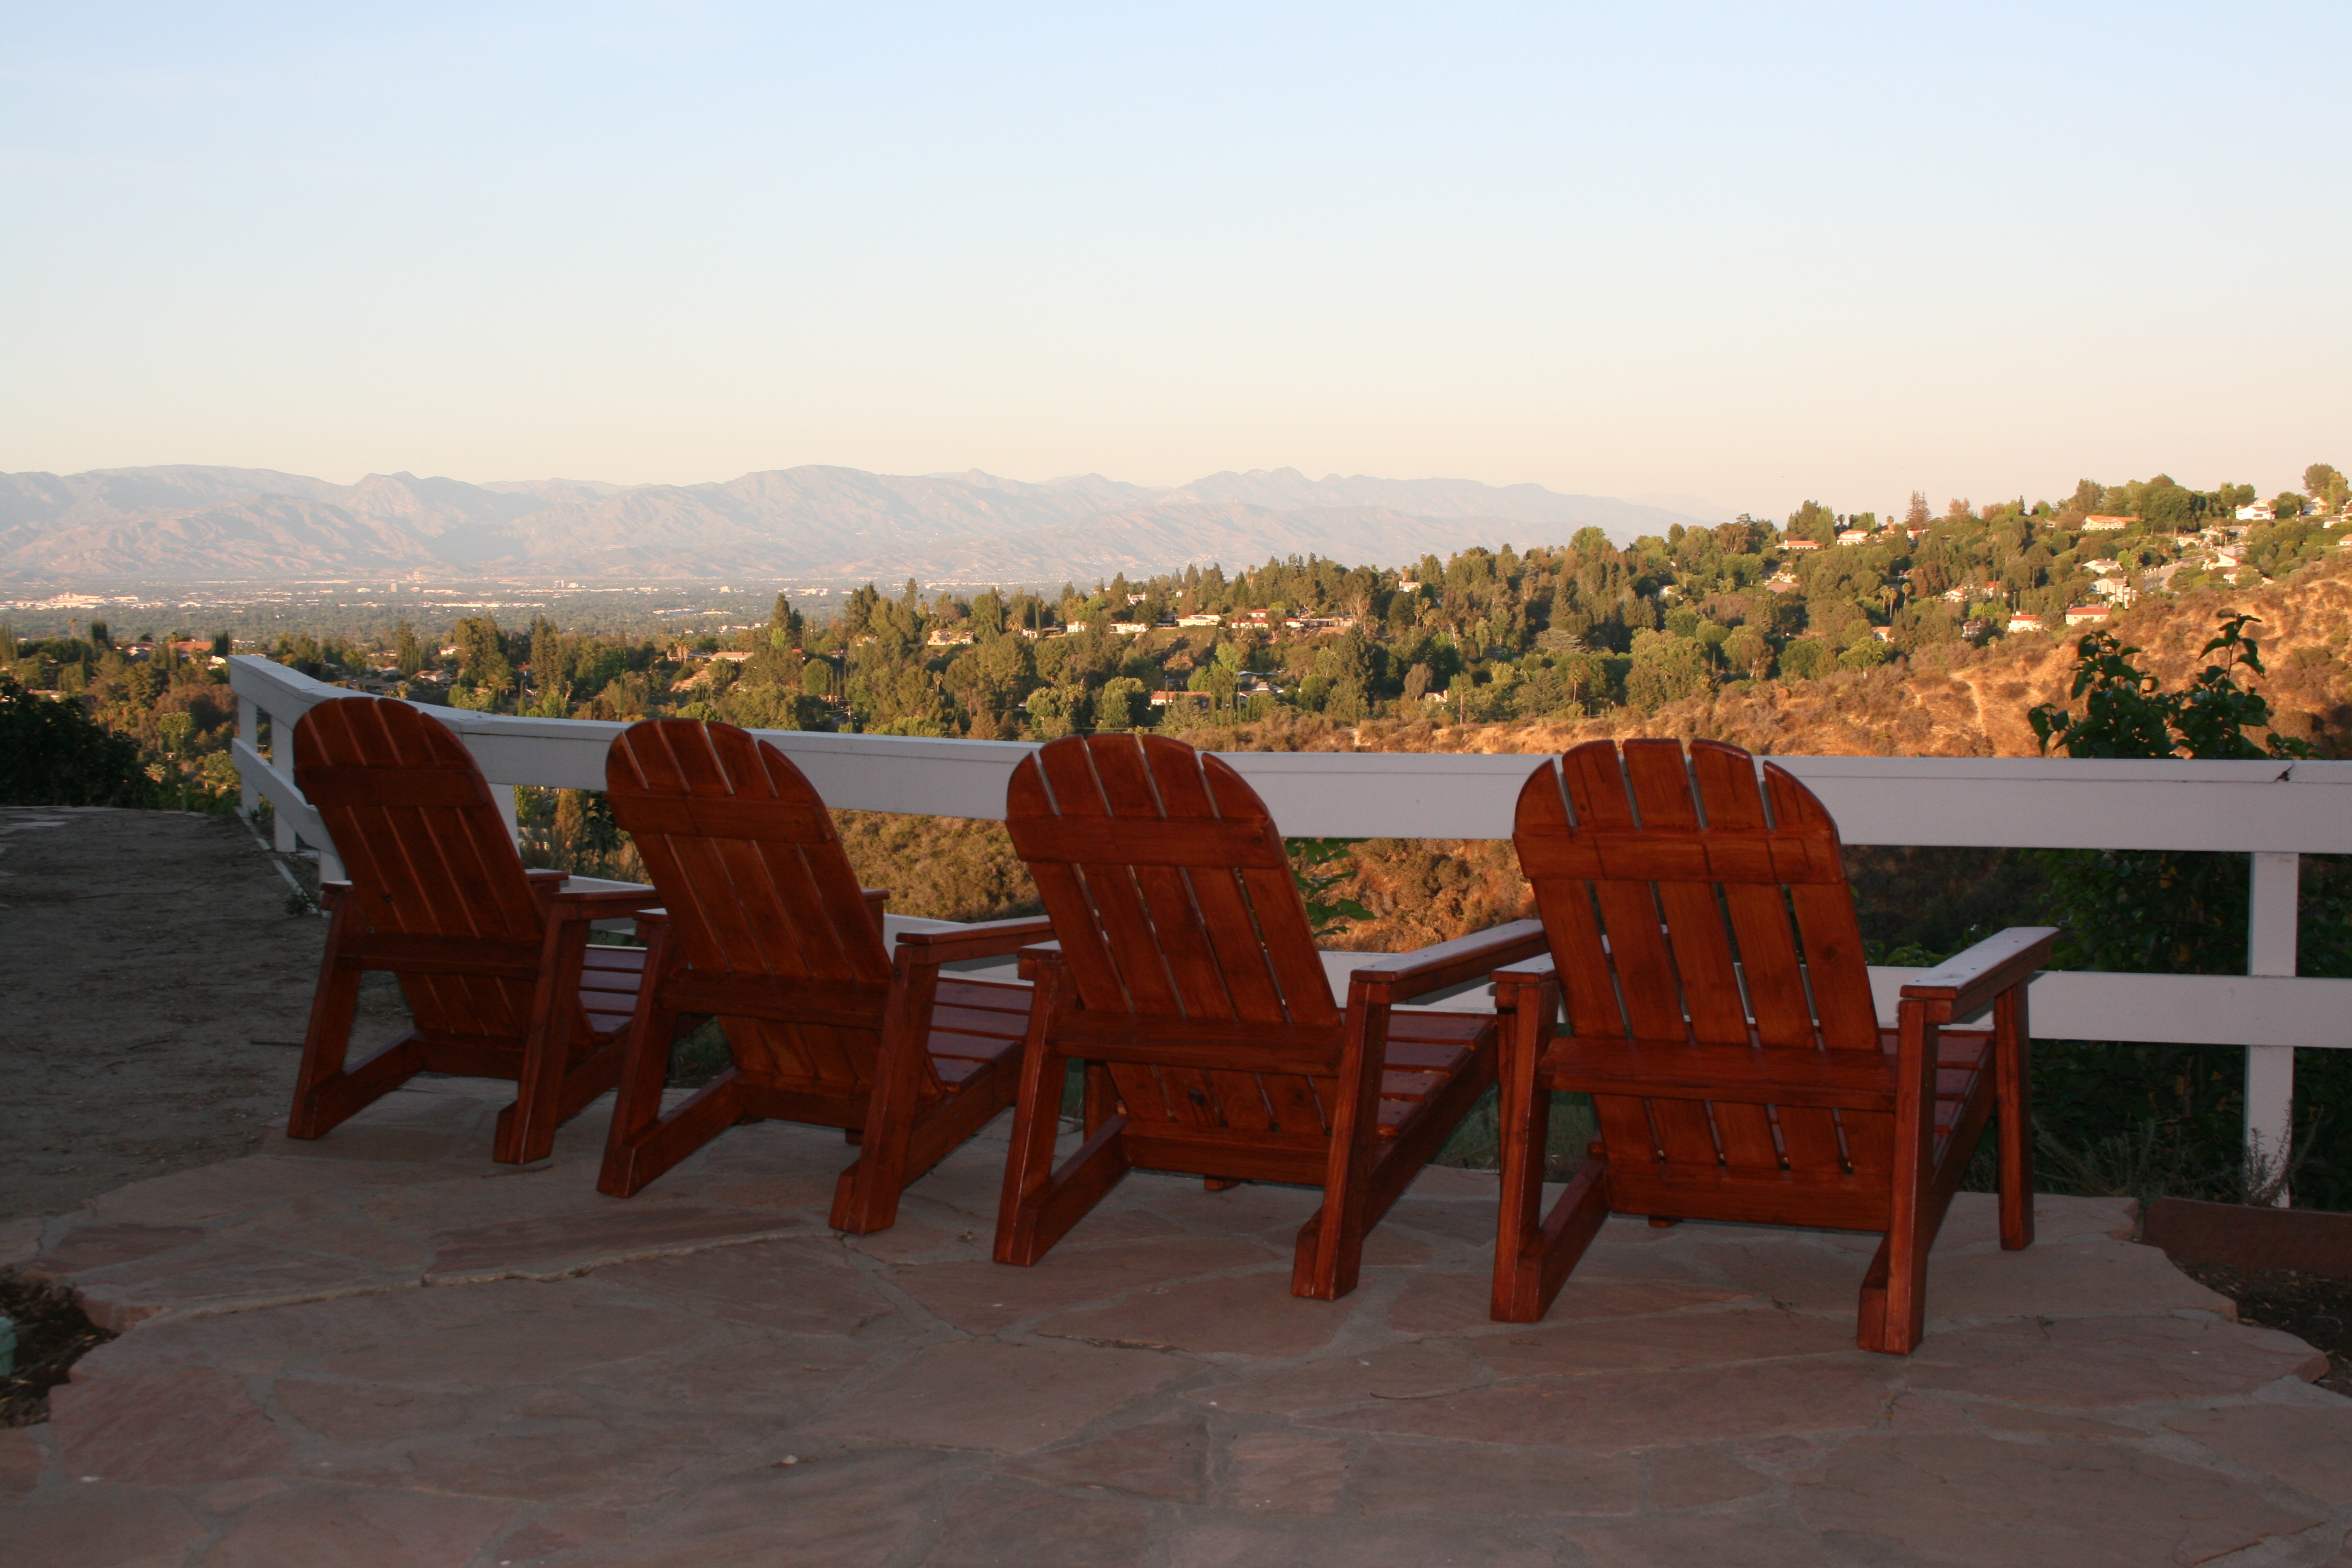
Watts Built on Wolfe Way
Built from Plan(s)
Estimated Cost
$150 for all 4
Finish Used
Behr Transparent Weather Proofing all-in-one Cedar Naturaltone No 501
Recommended Skill Level
Intermediate
Comments
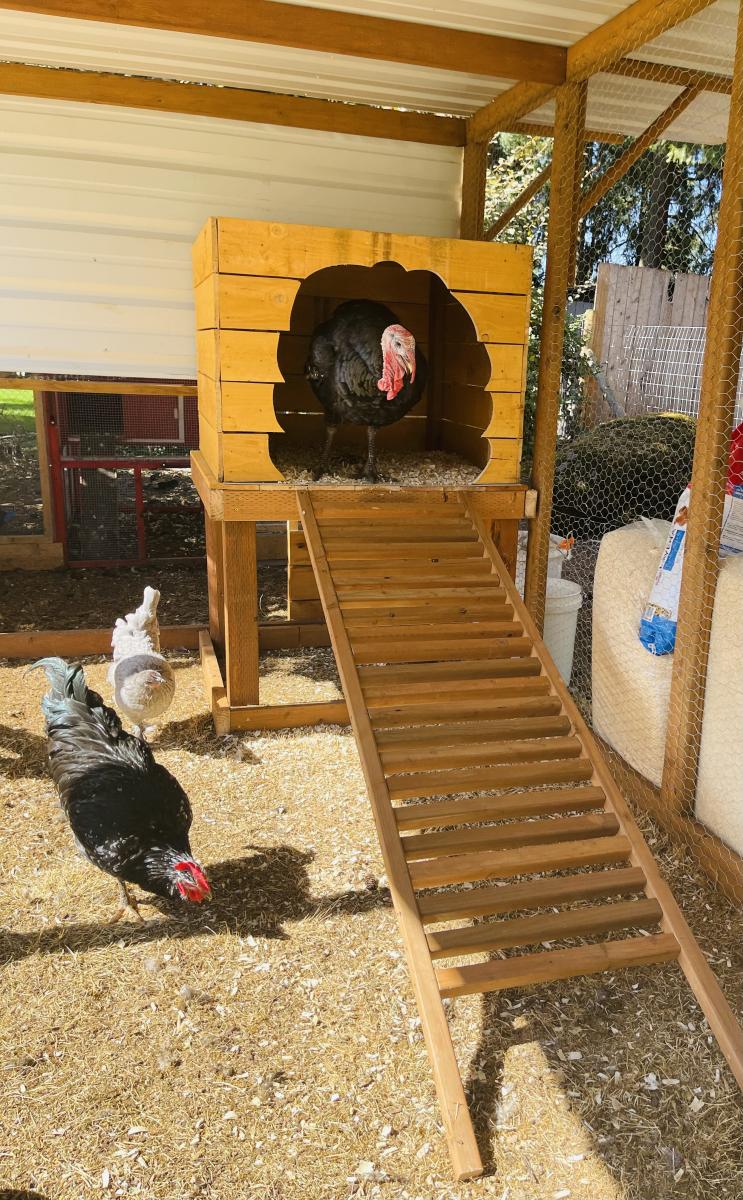
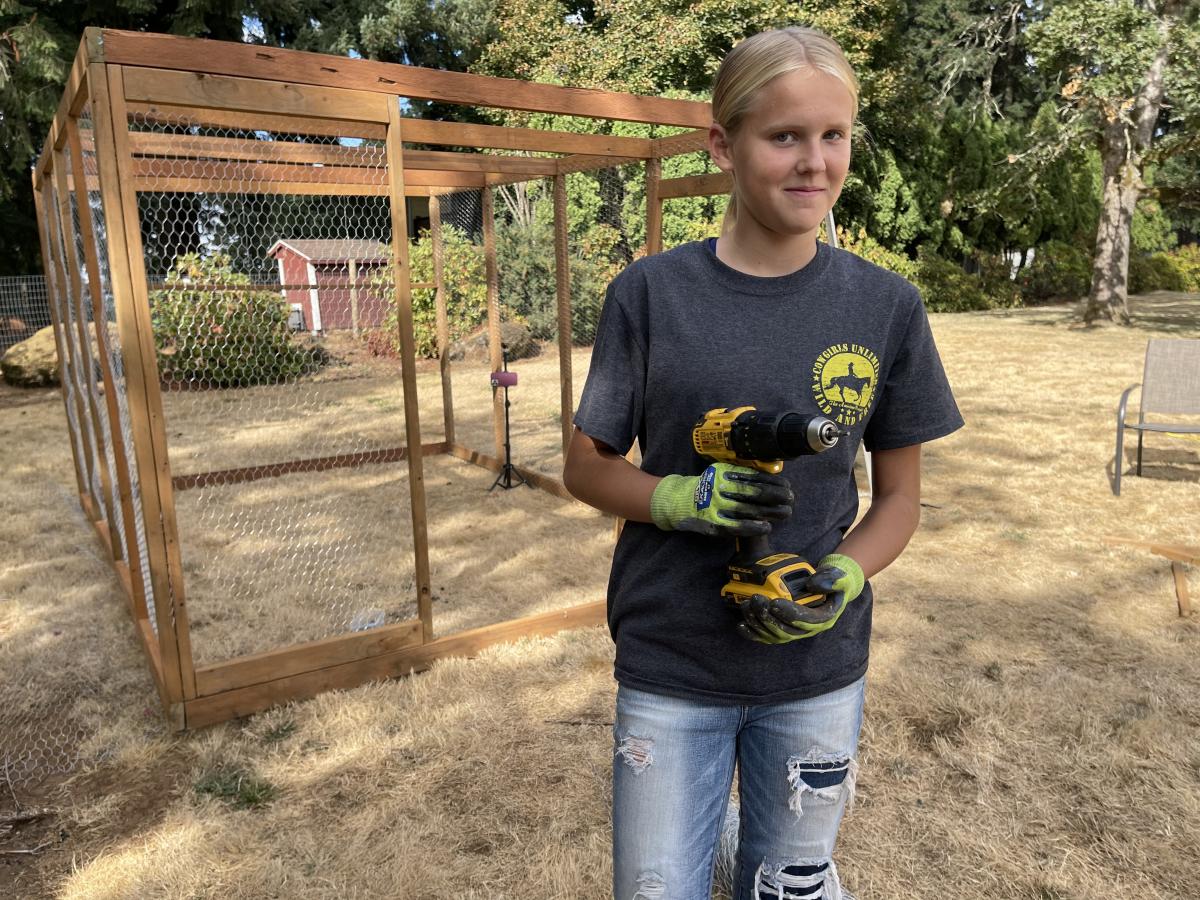
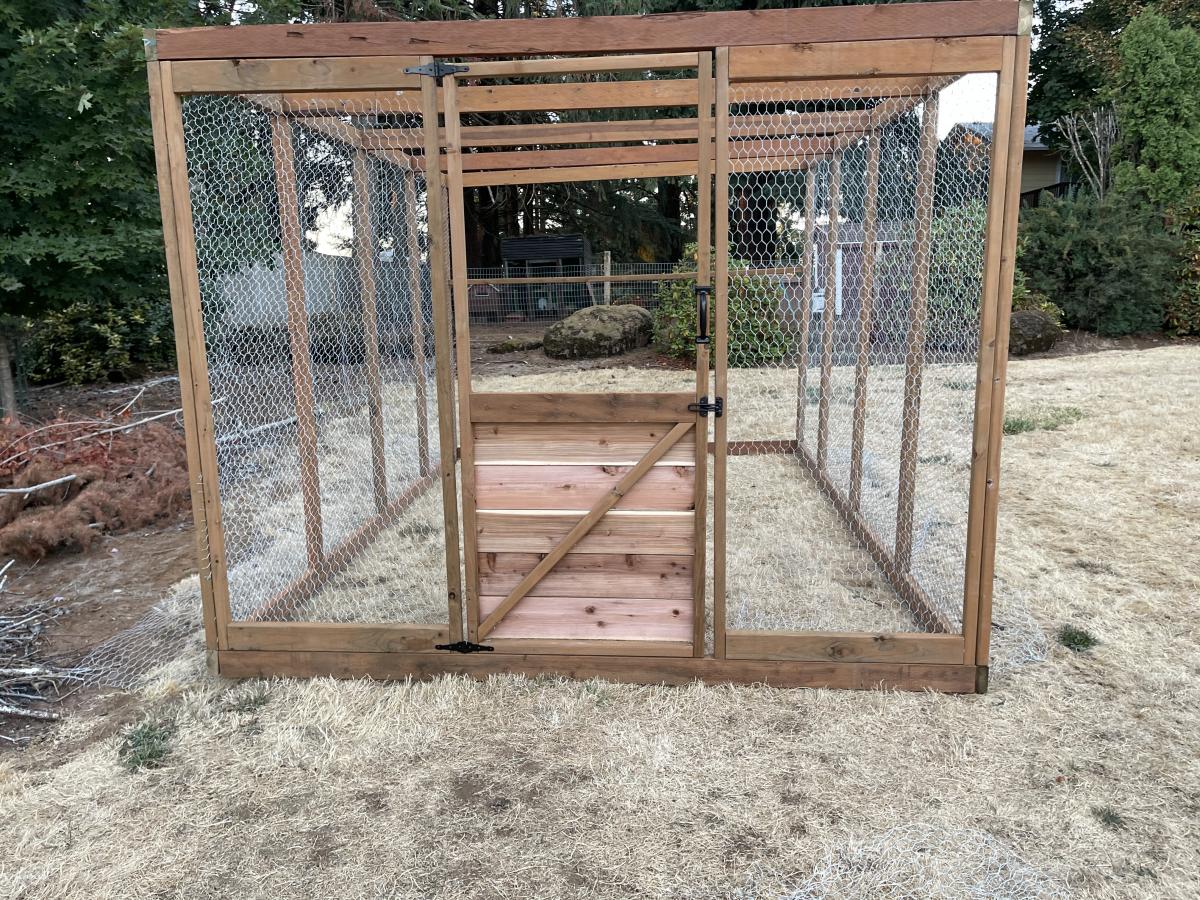
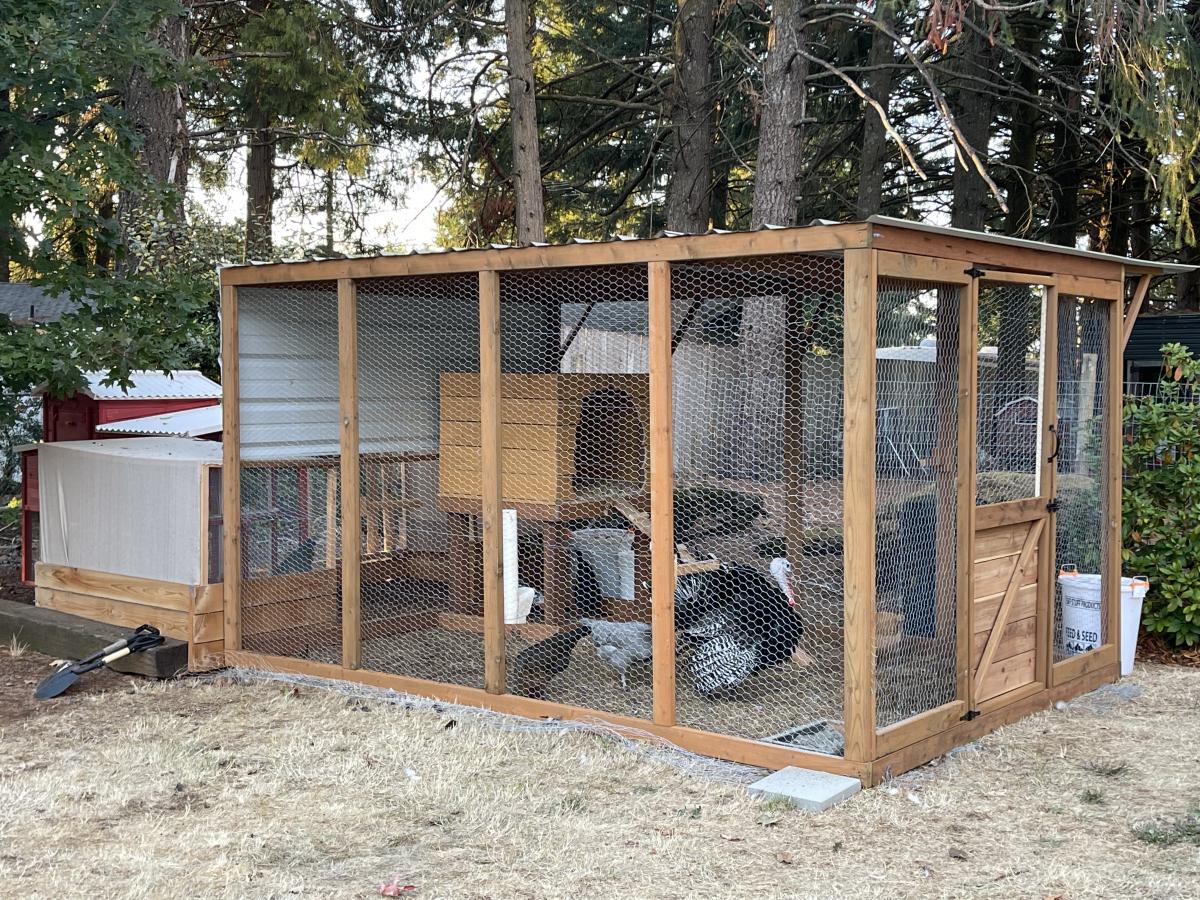
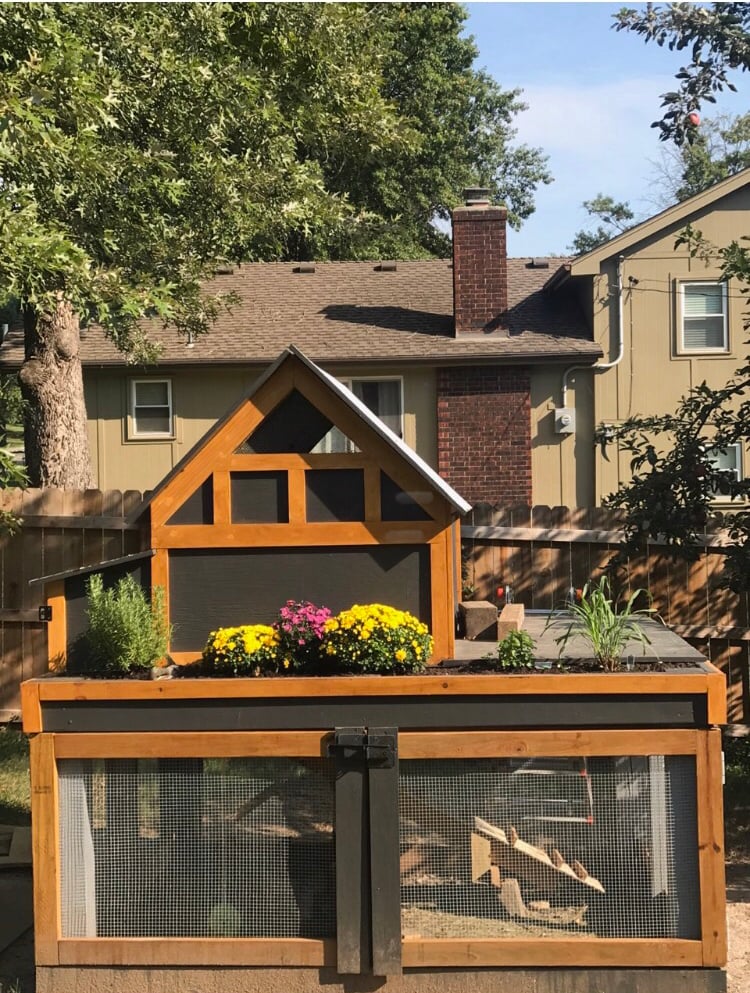
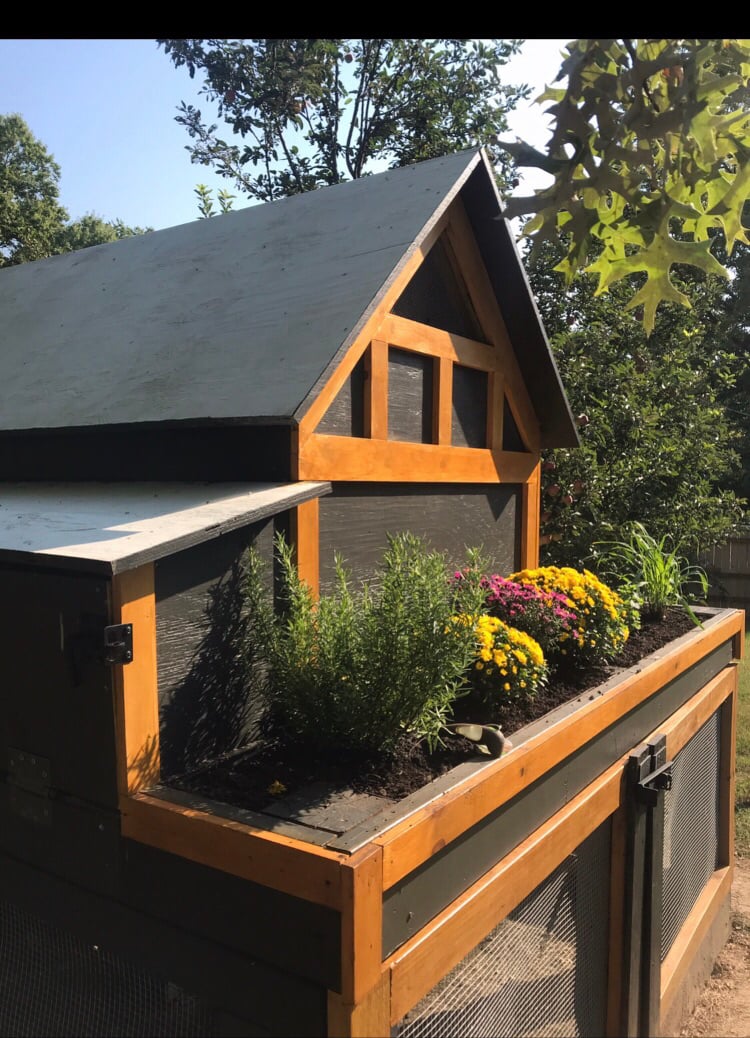
Chicken Run with Turkey House
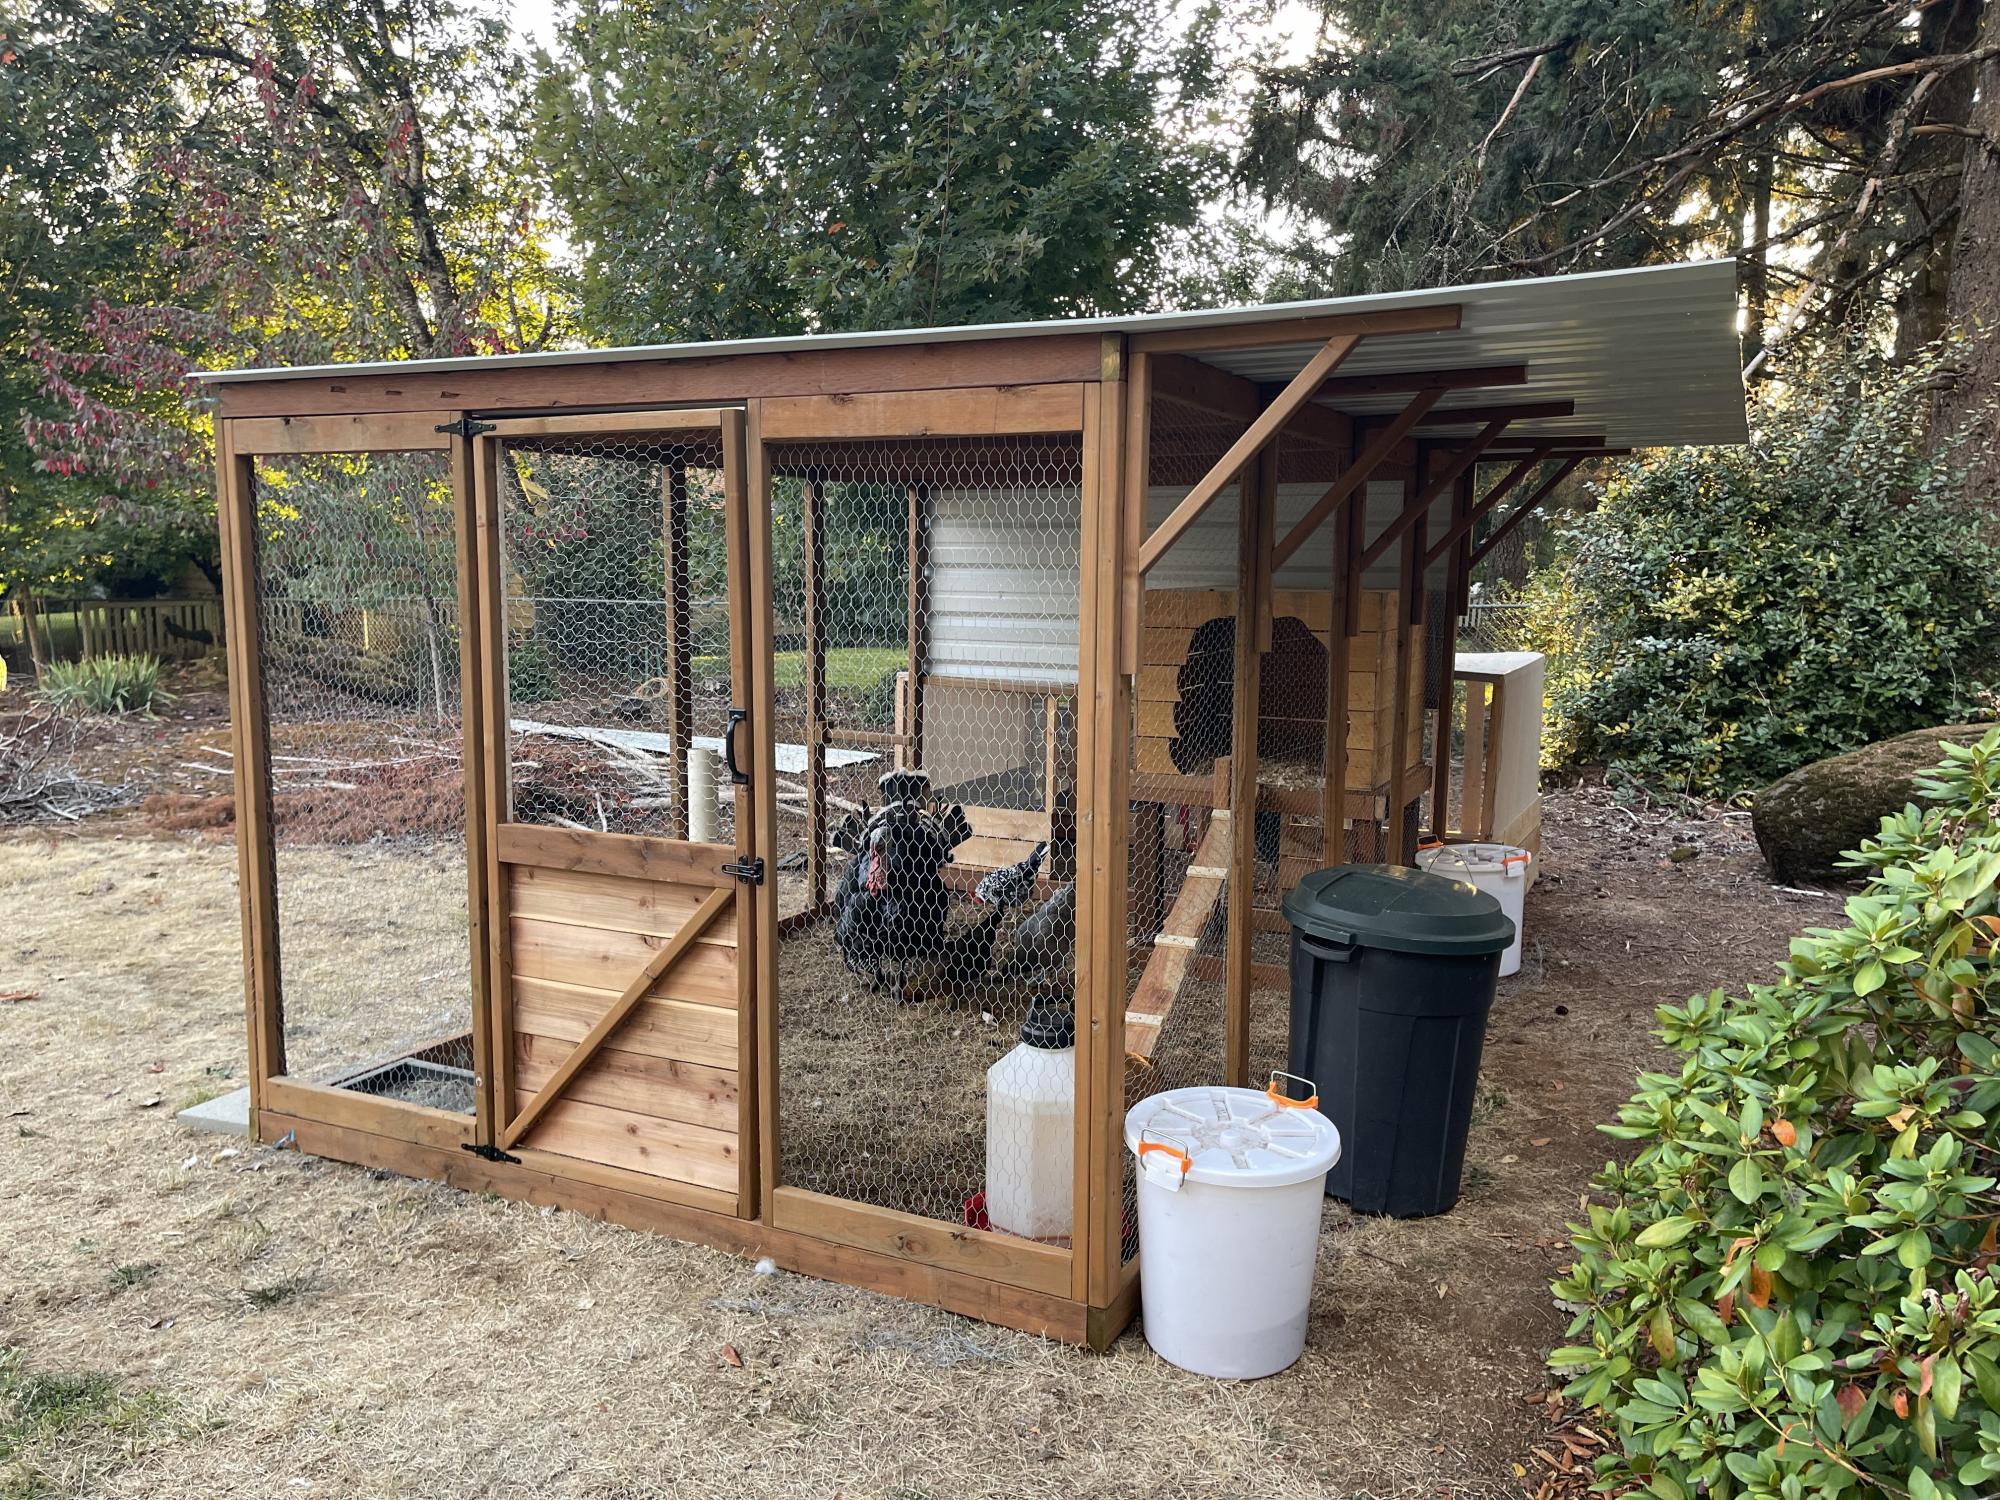
My daughter helped me build this enclosure. We used Ana's chicken run plan, but just made it taller so we could walk in easily. We added an overhang to store food and pellets under, for the supports we used Ana's easy shelves angle support plan, and finally we used the playhouse base plan for the base of turkeys house. All plans used are linked below. We ran the chicken wire out under the structure and still need to bring in some large rocks or pavers, but so far no issues with predators. Turkey was getting too big to fit in the smaller coop, so we decided to have fun with his house and used cedar fence pickets and some treated 2x4's, built a box and jig sawed the shape of a turkey. As you can see in the first photo the ladder for turkey wasn't big enough, all the other chickens were in his house, lol. So I beefed up the ladder and he happily can put himself up at night now:) Overall a super successful project, I wasn't sure what to do with the top and just at that point, the neighbor walked over and offered the metal, talk about a huge win and the perfect solution! We attached the run to the previous smaller structure and now they have so much more room and are laying like crazy:) Finally, I think this would make a great dog kennel as well...
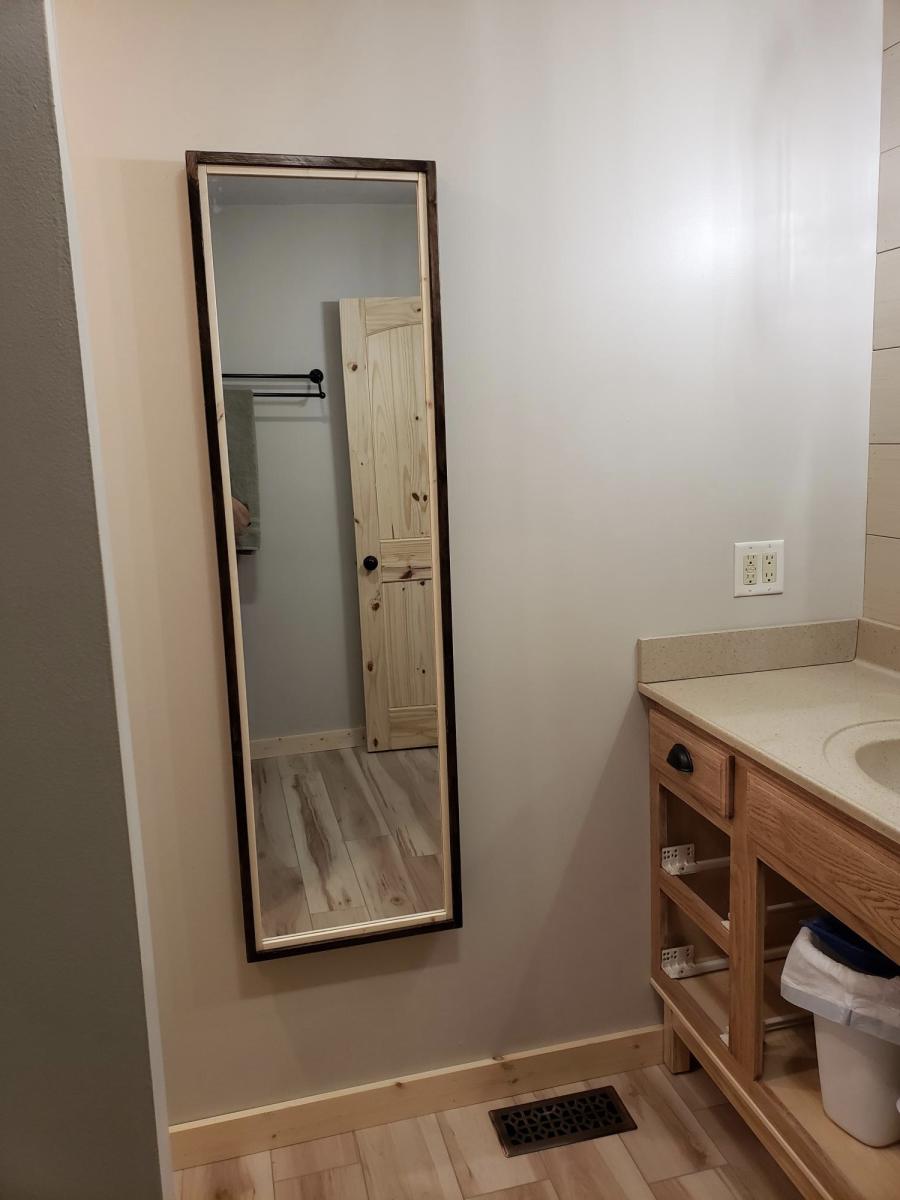
Recessed cabinet
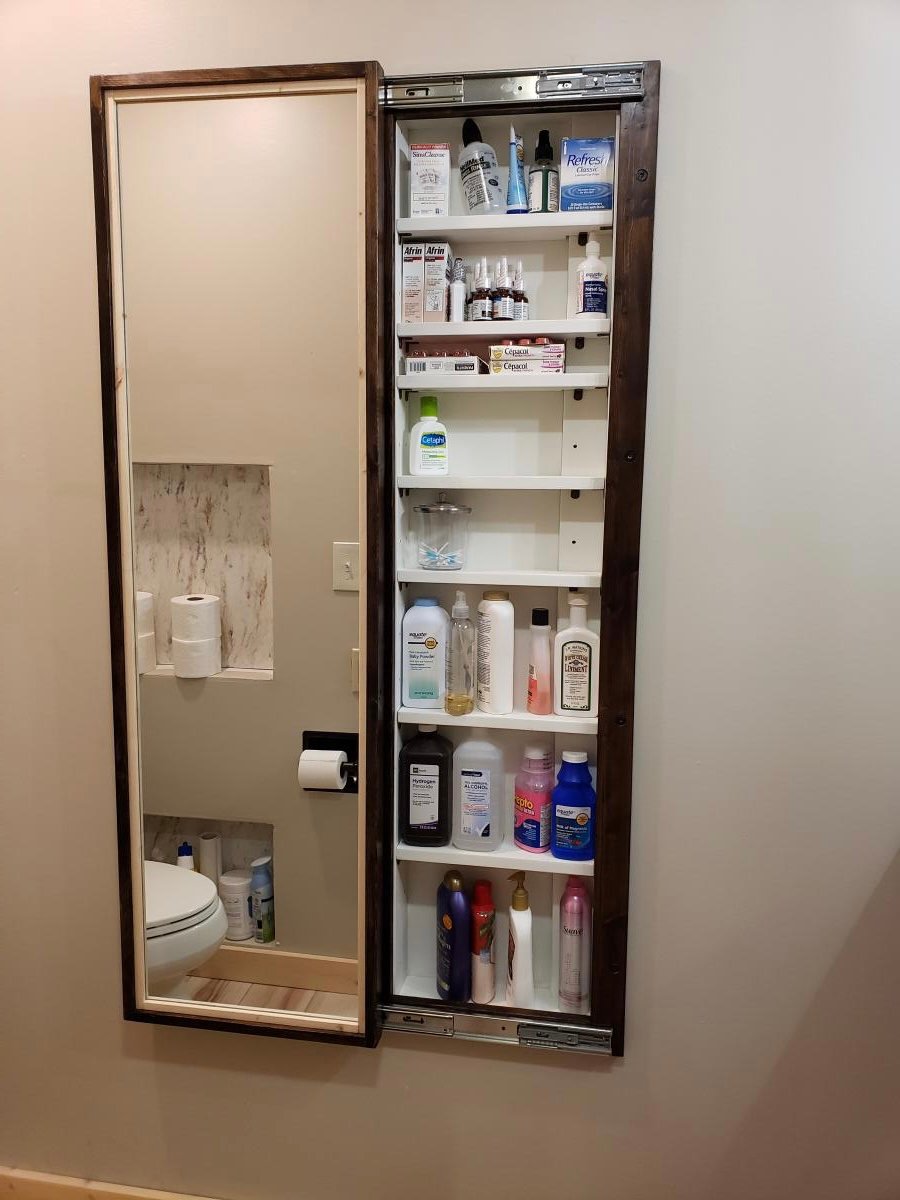
My bathroom has very little storage space. So during our recent remodeling of the room, I decided to add this cabinet. Changed the plan a little to make it recessed in the wall. I love how it turned out!

Built from Plan(s)
Comments
Sat, 09/03/2022 - 13:28
Fantastic bathroom storage!
This looks amazing, love how it's recessed! Thankyou for sharing.
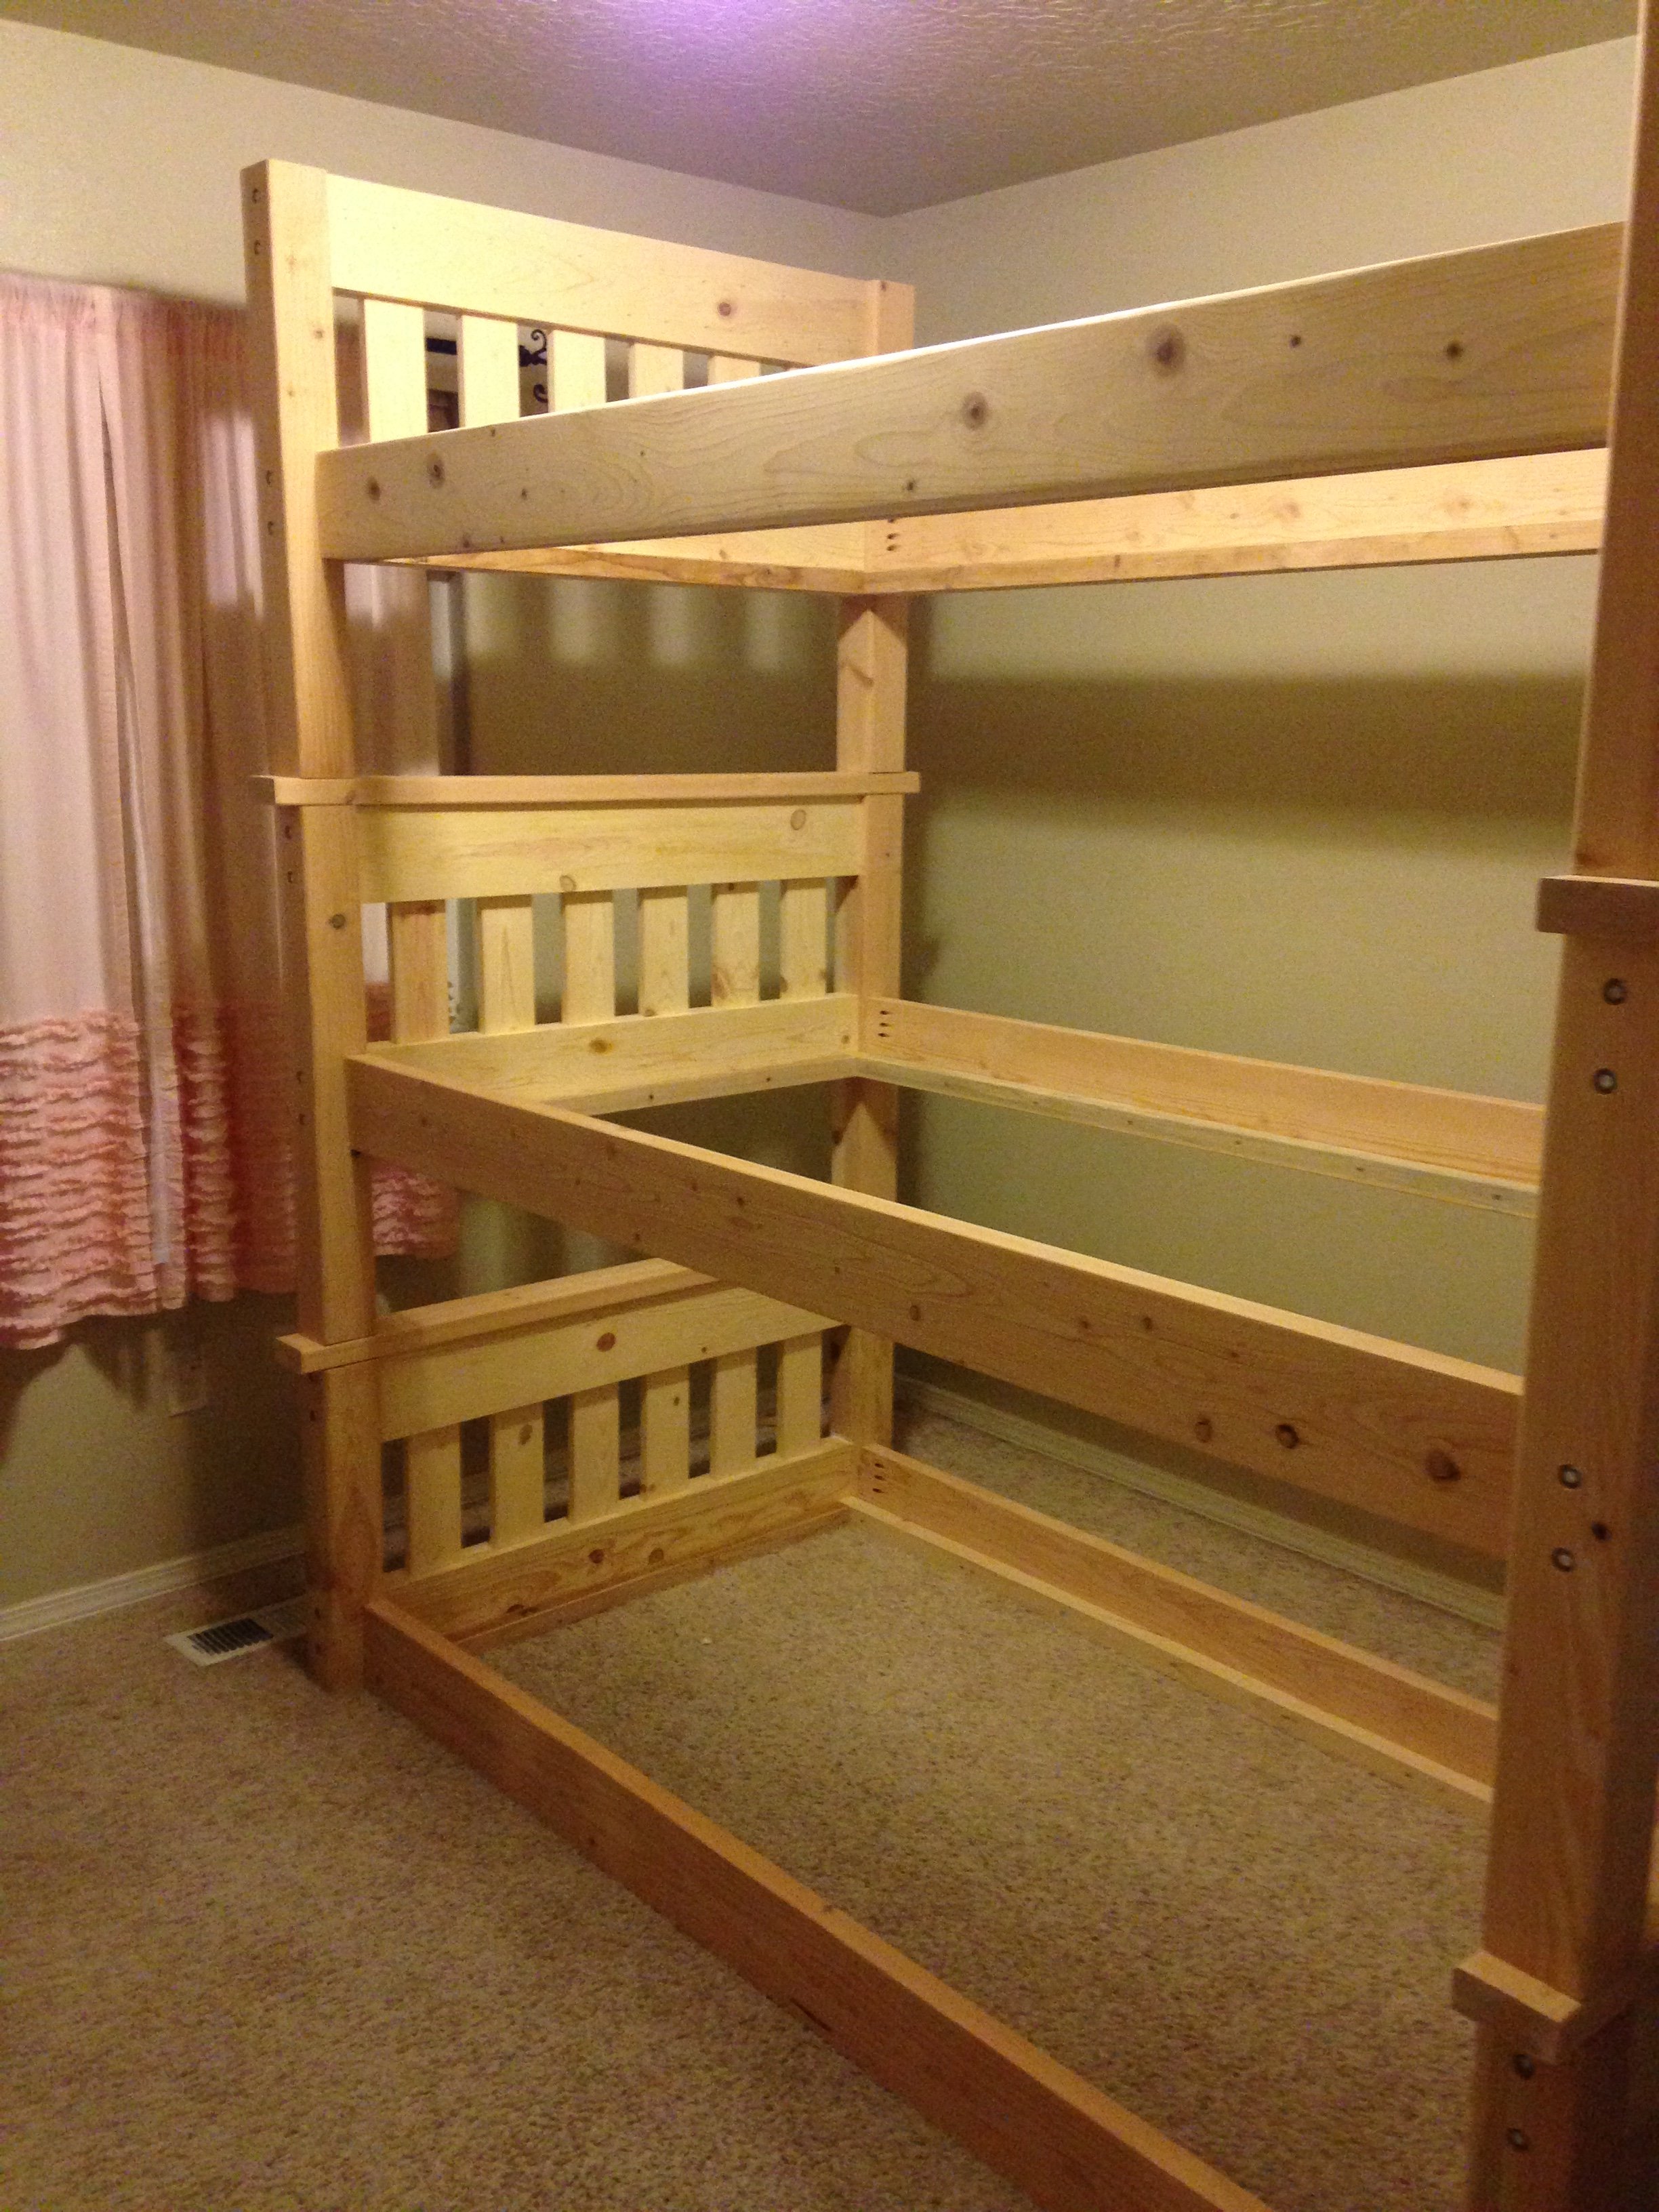
Simple Bunk Bed Triple Bunk

I loved the look and design of Ana's Simple Bunk Bed but due to limited space in our home, needed a triple bunk bed. I wasn't interested in the hassle of a trundle so I decided to modify the simple bunk bed plan and make it a triple. I have to say, I was a little worried about how sturdy it would be but this plan is so solid with the 4x4 posts that there is no need to even even think about that for another second!
I changed the ladder so that it was attached to the side rails of the bunk bed as someone had posted they did earlier and decided to add another little ladder for the middle bunk so my little one wouldn't have to leap from the ladder to get into her bed. ;D
In order to do a triple in our home (with 8 ft. ceilings), I needed to bring the height down so I made the bottom bunk sit on the floor with the legs only being as long as the height of the headboard. I also made all the headboards and footboards only as tall as the footboards in Ana's original Simple Bunk Bed plans.
This was my first build and there are definitely things I would do differently to make this work better if I had it to do all over again. I would make the legs a little shorter on the 2nd and 3rd bunk so that there is more head room for the person on the top bunk.
All in all though, I had a great time building this and can't wait to try some more of Ana's plans!!!
Estimated Cost
$450 including hardware
Estimated Time Investment
Week Long Project (20 Hours or More)
Finish Used
White paint, not sealed
Recommended Skill Level
Intermediate
Comments
Mon, 01/13/2020 - 09:09
Plans for stackable triple bunk bed
This is absolutely gorgeous. How has it held up? If Would you mind sharing the plans for this as I too have low ceilings and will have to tweak the dimensions a bit.
Thank you.
Mon, 11/01/2021 - 21:30
Written plans?
Do you happen to have the exact plans for this triple bunk? I saw that you modified the simple double bunk to fit your space but I'm wondering if you drew up plans wih measurements to make it easier for beginner folks.
DIY Can Organizer
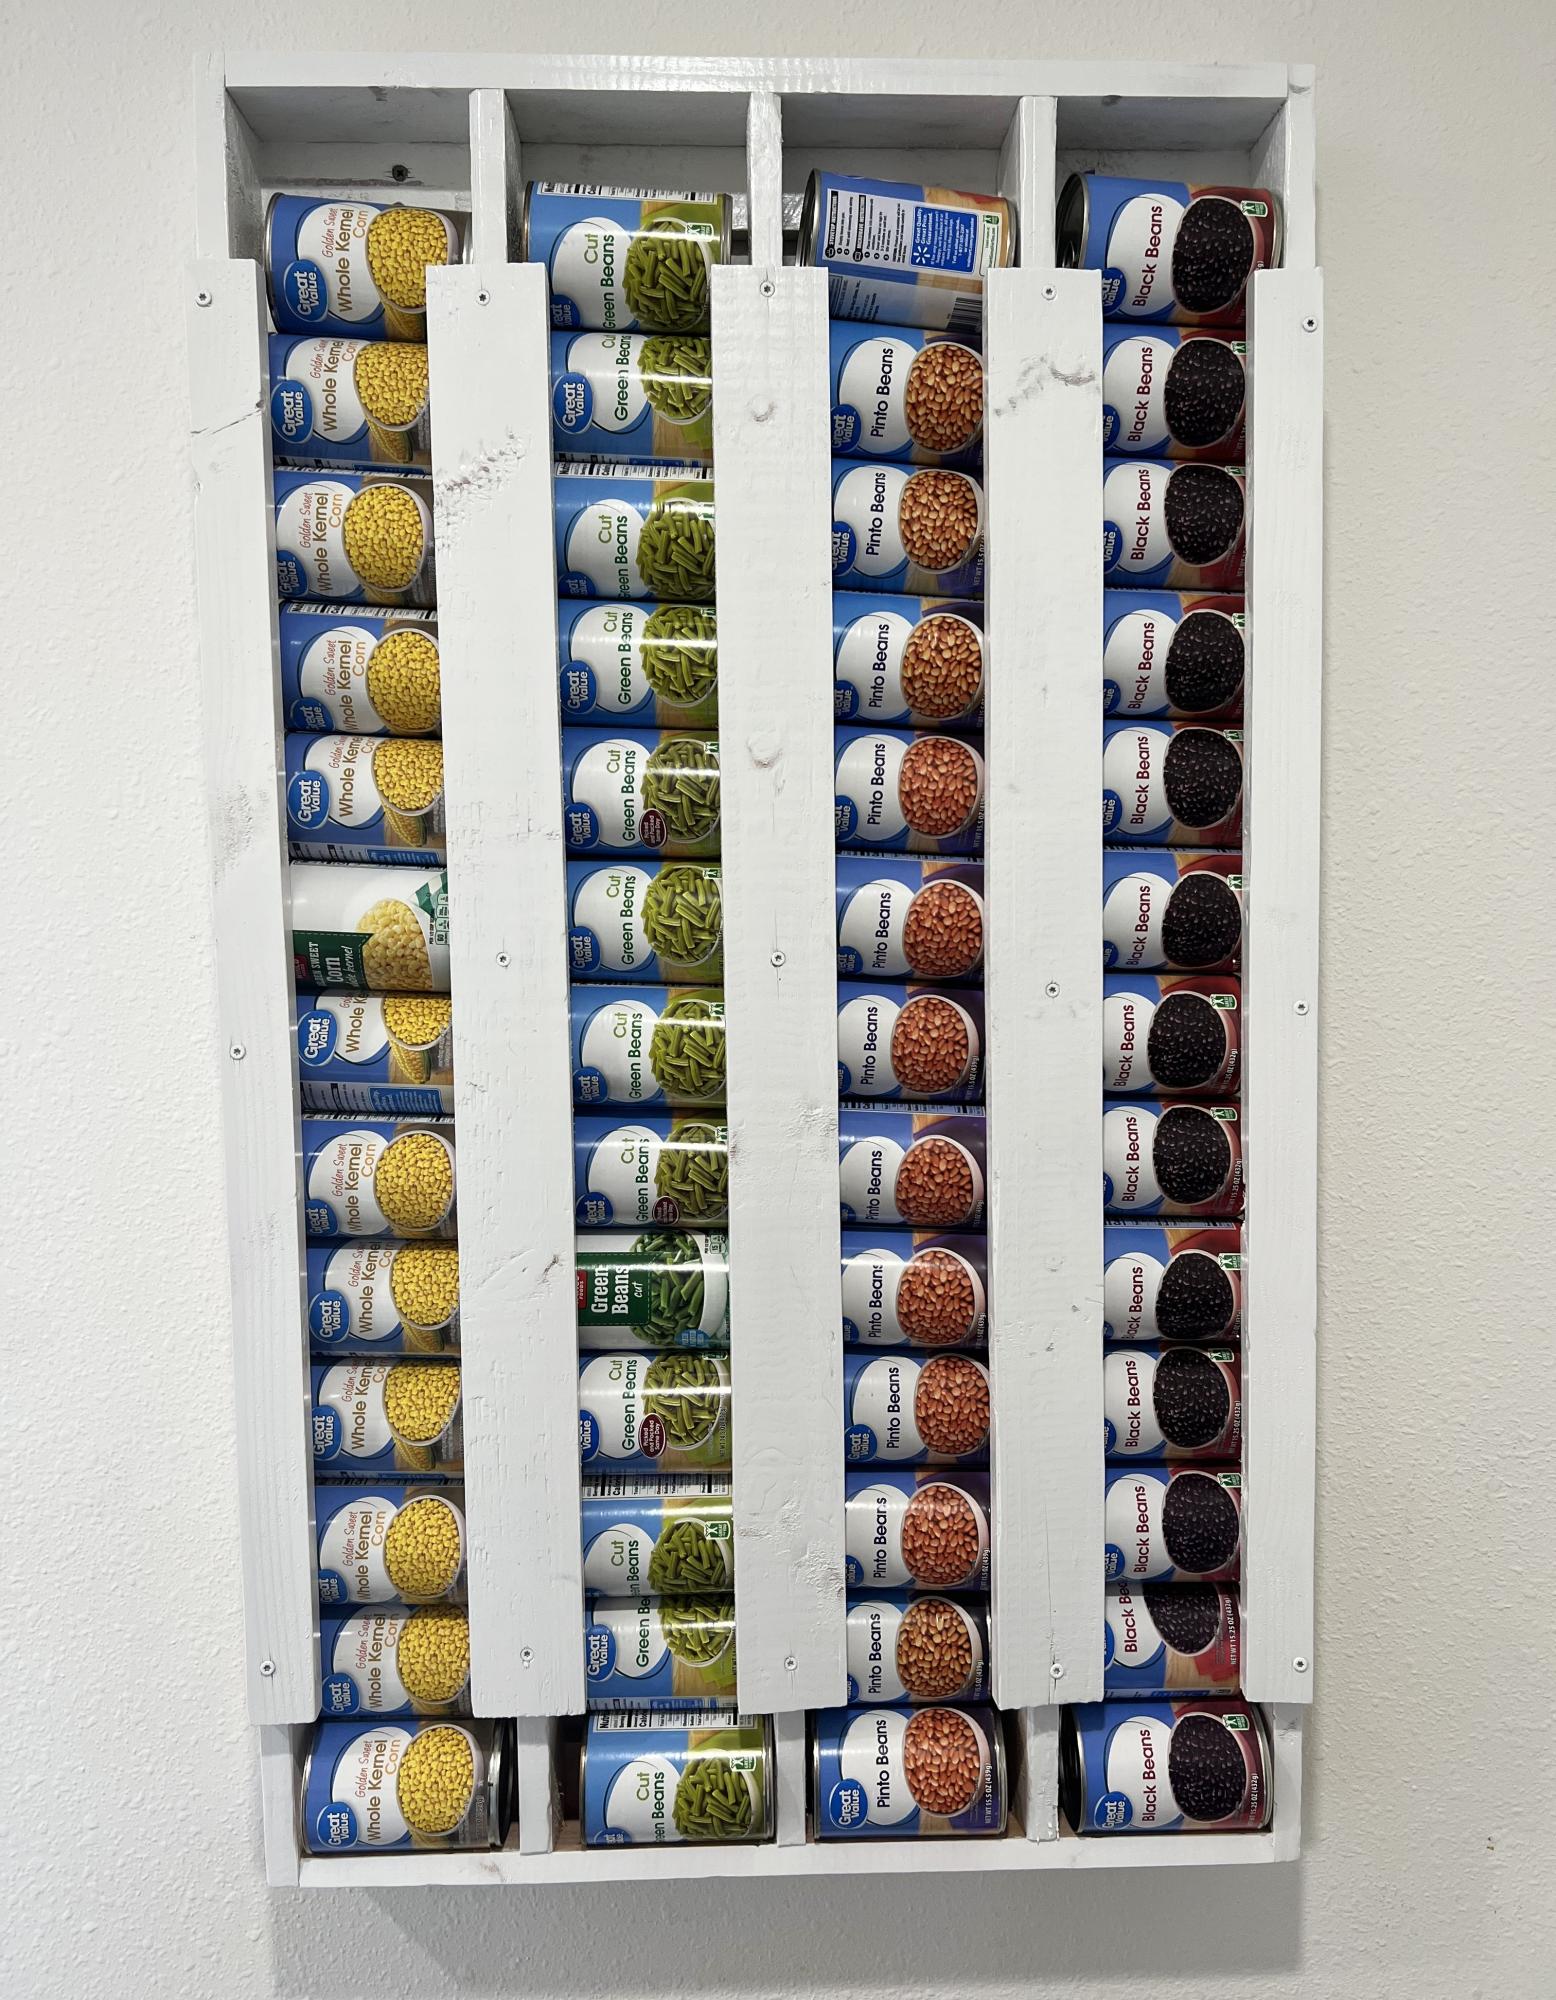
Super easy! I love it!
Built from Plan(s)
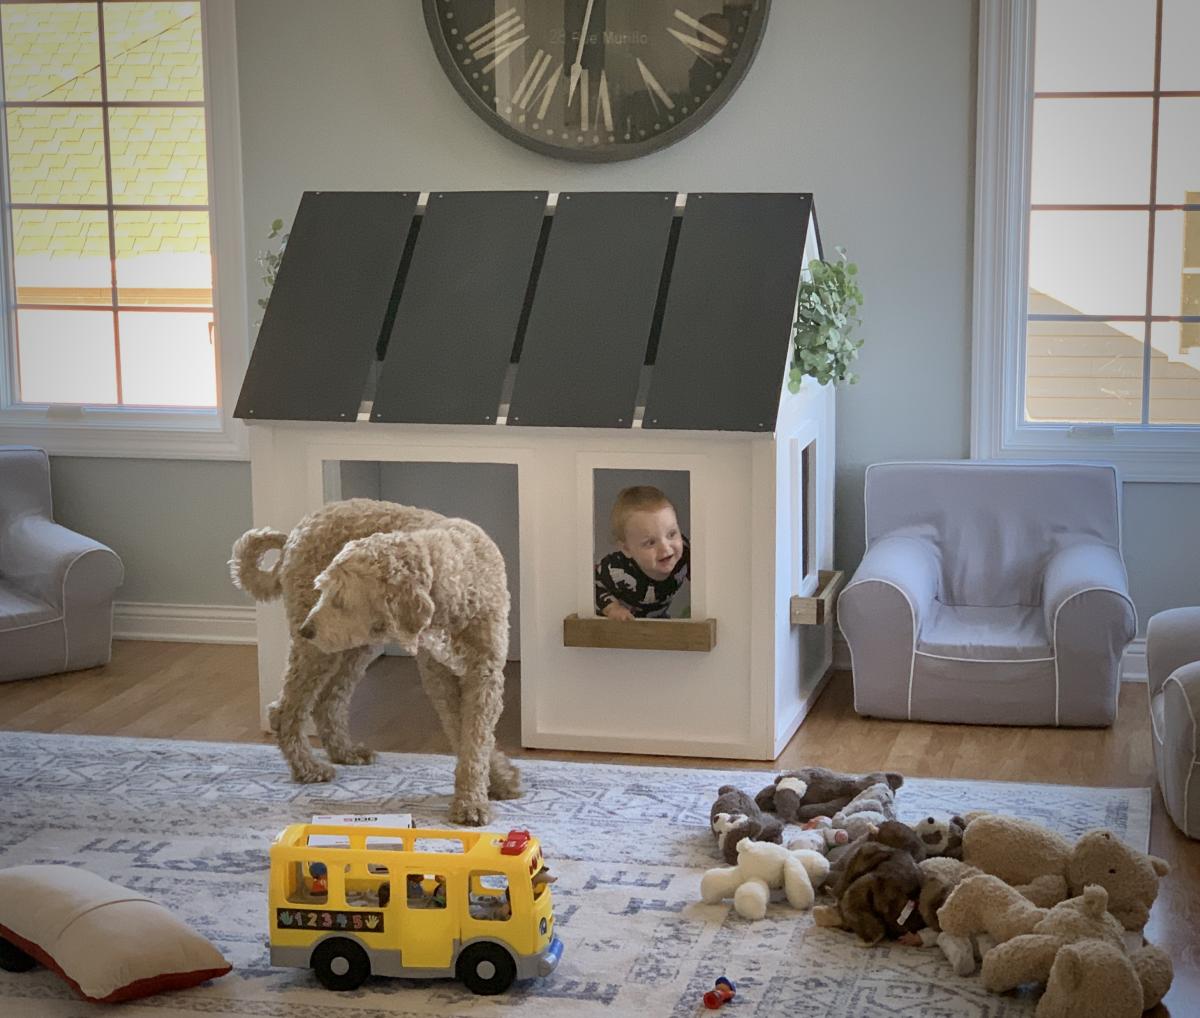
Farmhouse Playhouse for the Grandsons

Ana White's plans were amazing and the outcome was perfect! What a fun project for Christmas! Thanks a Zillion, Ana!!
Built from Plan(s)
Estimated Cost
$100.00
Estimated Time Investment
Weekend Project (10-20 Hours)
Finish Used
Sanded, Primed and Painted
Recommended Skill Level
Intermediate
Comments
Fri, 12/25/2020 - 12:41
Heartwarming!
This just makes me smile so big, great job and Merry Christmas!

In reply to Heartwarming! by Ana White Admin
Tue, 12/29/2020 - 11:17
Thanks!
You ARE the Master!! Looking forward to more fun projects!
Tiered Planter
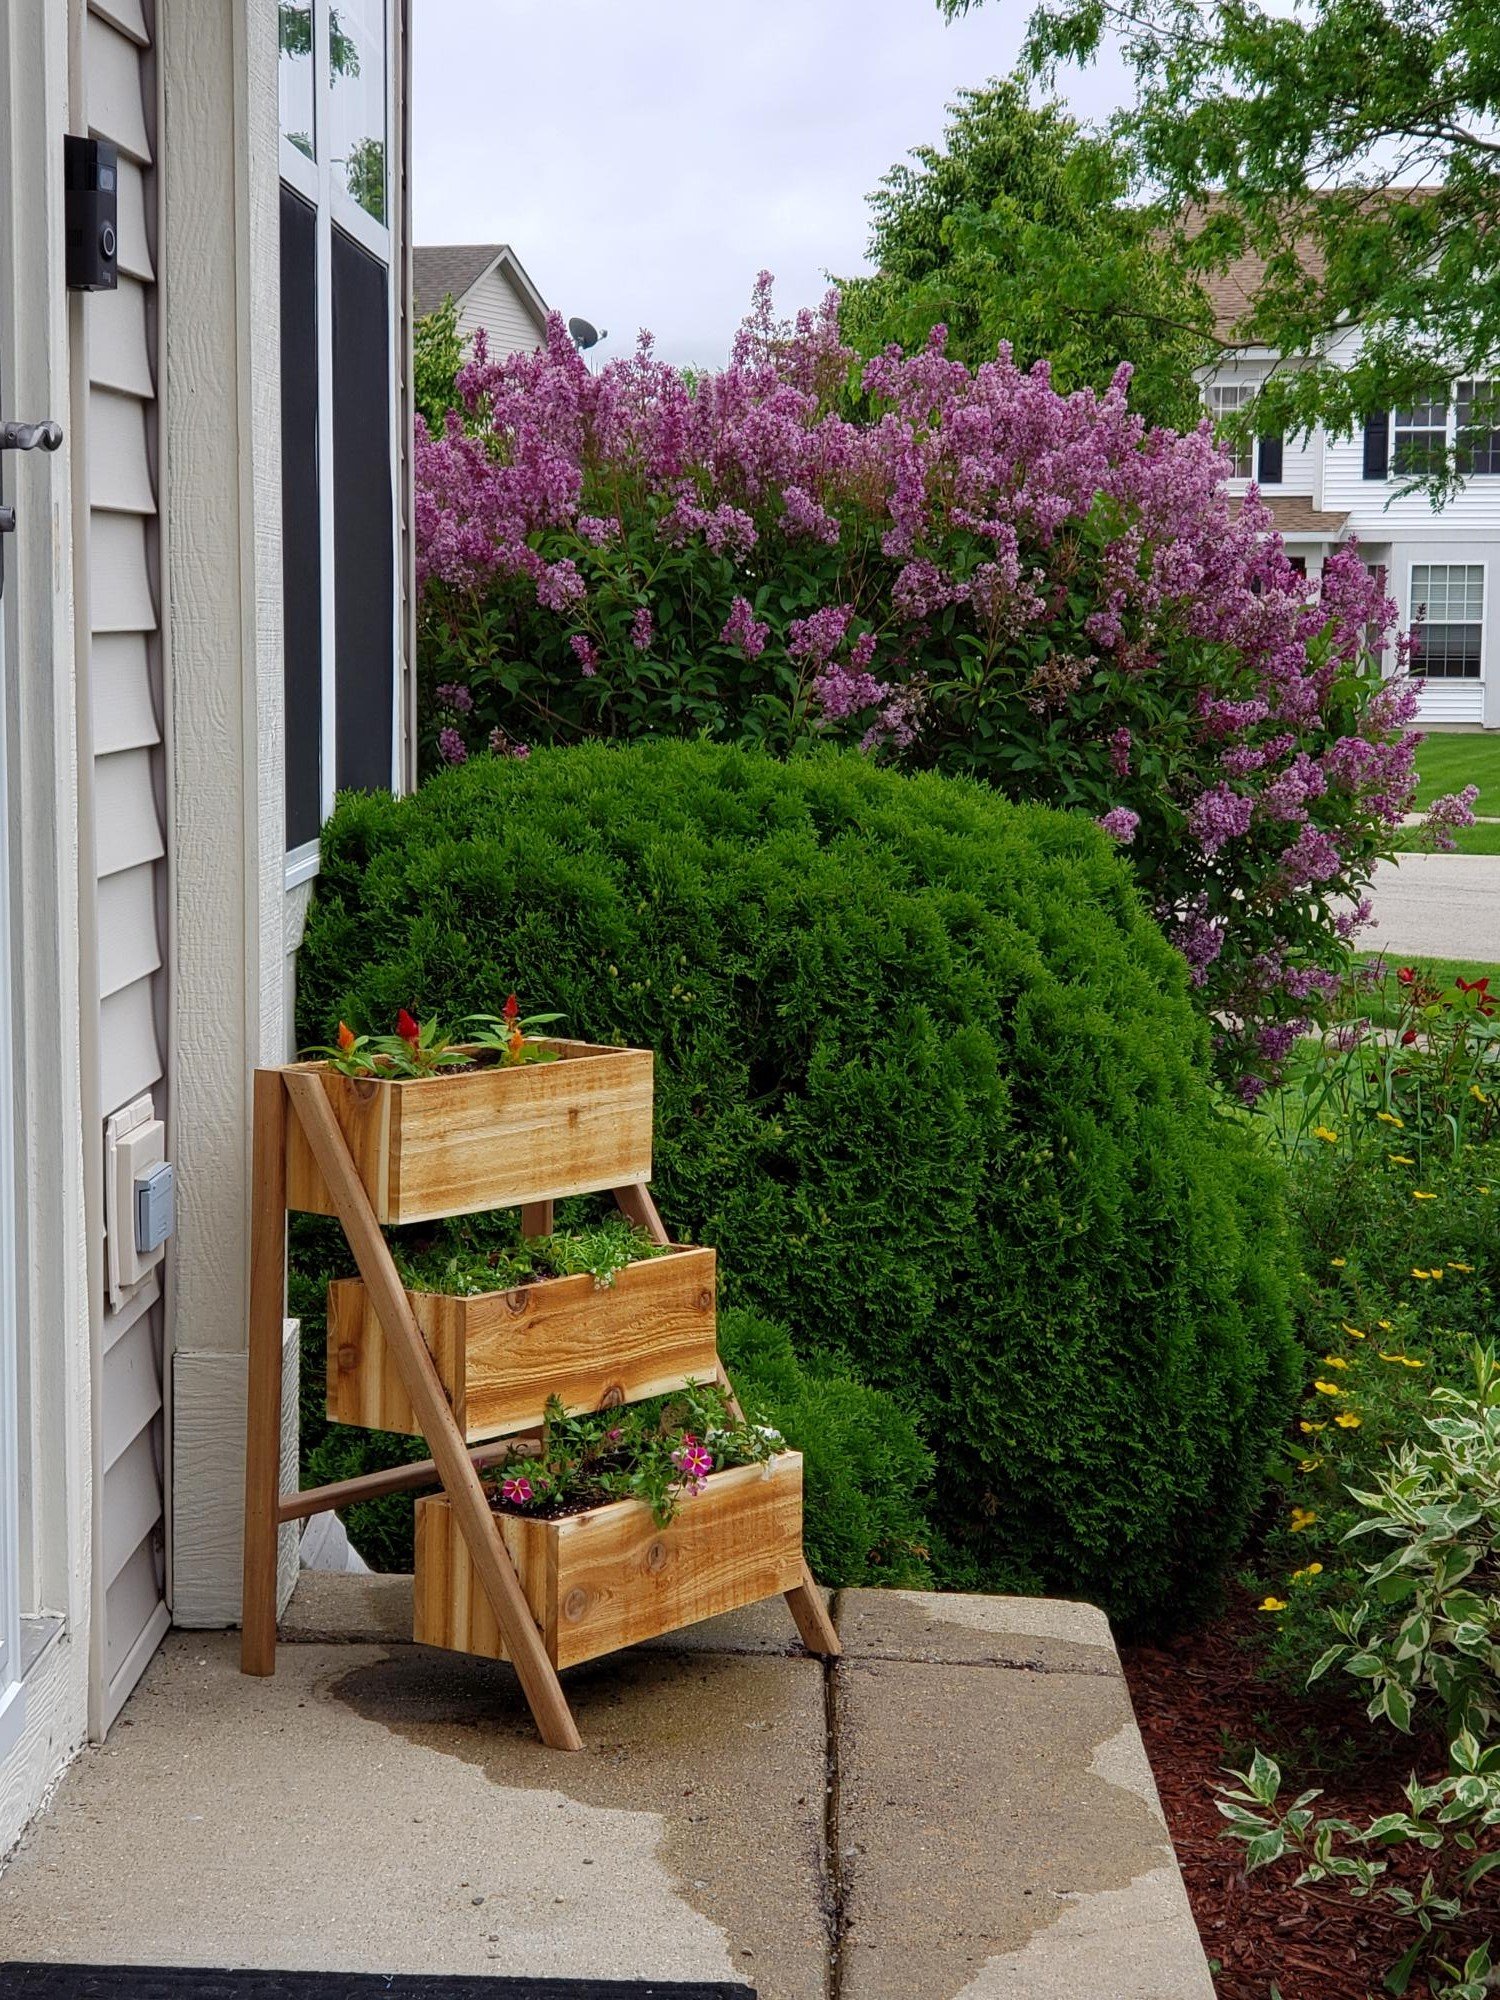
Great planter plan. very easy to build
Built from Plan(s)
Comments
Bike Storage
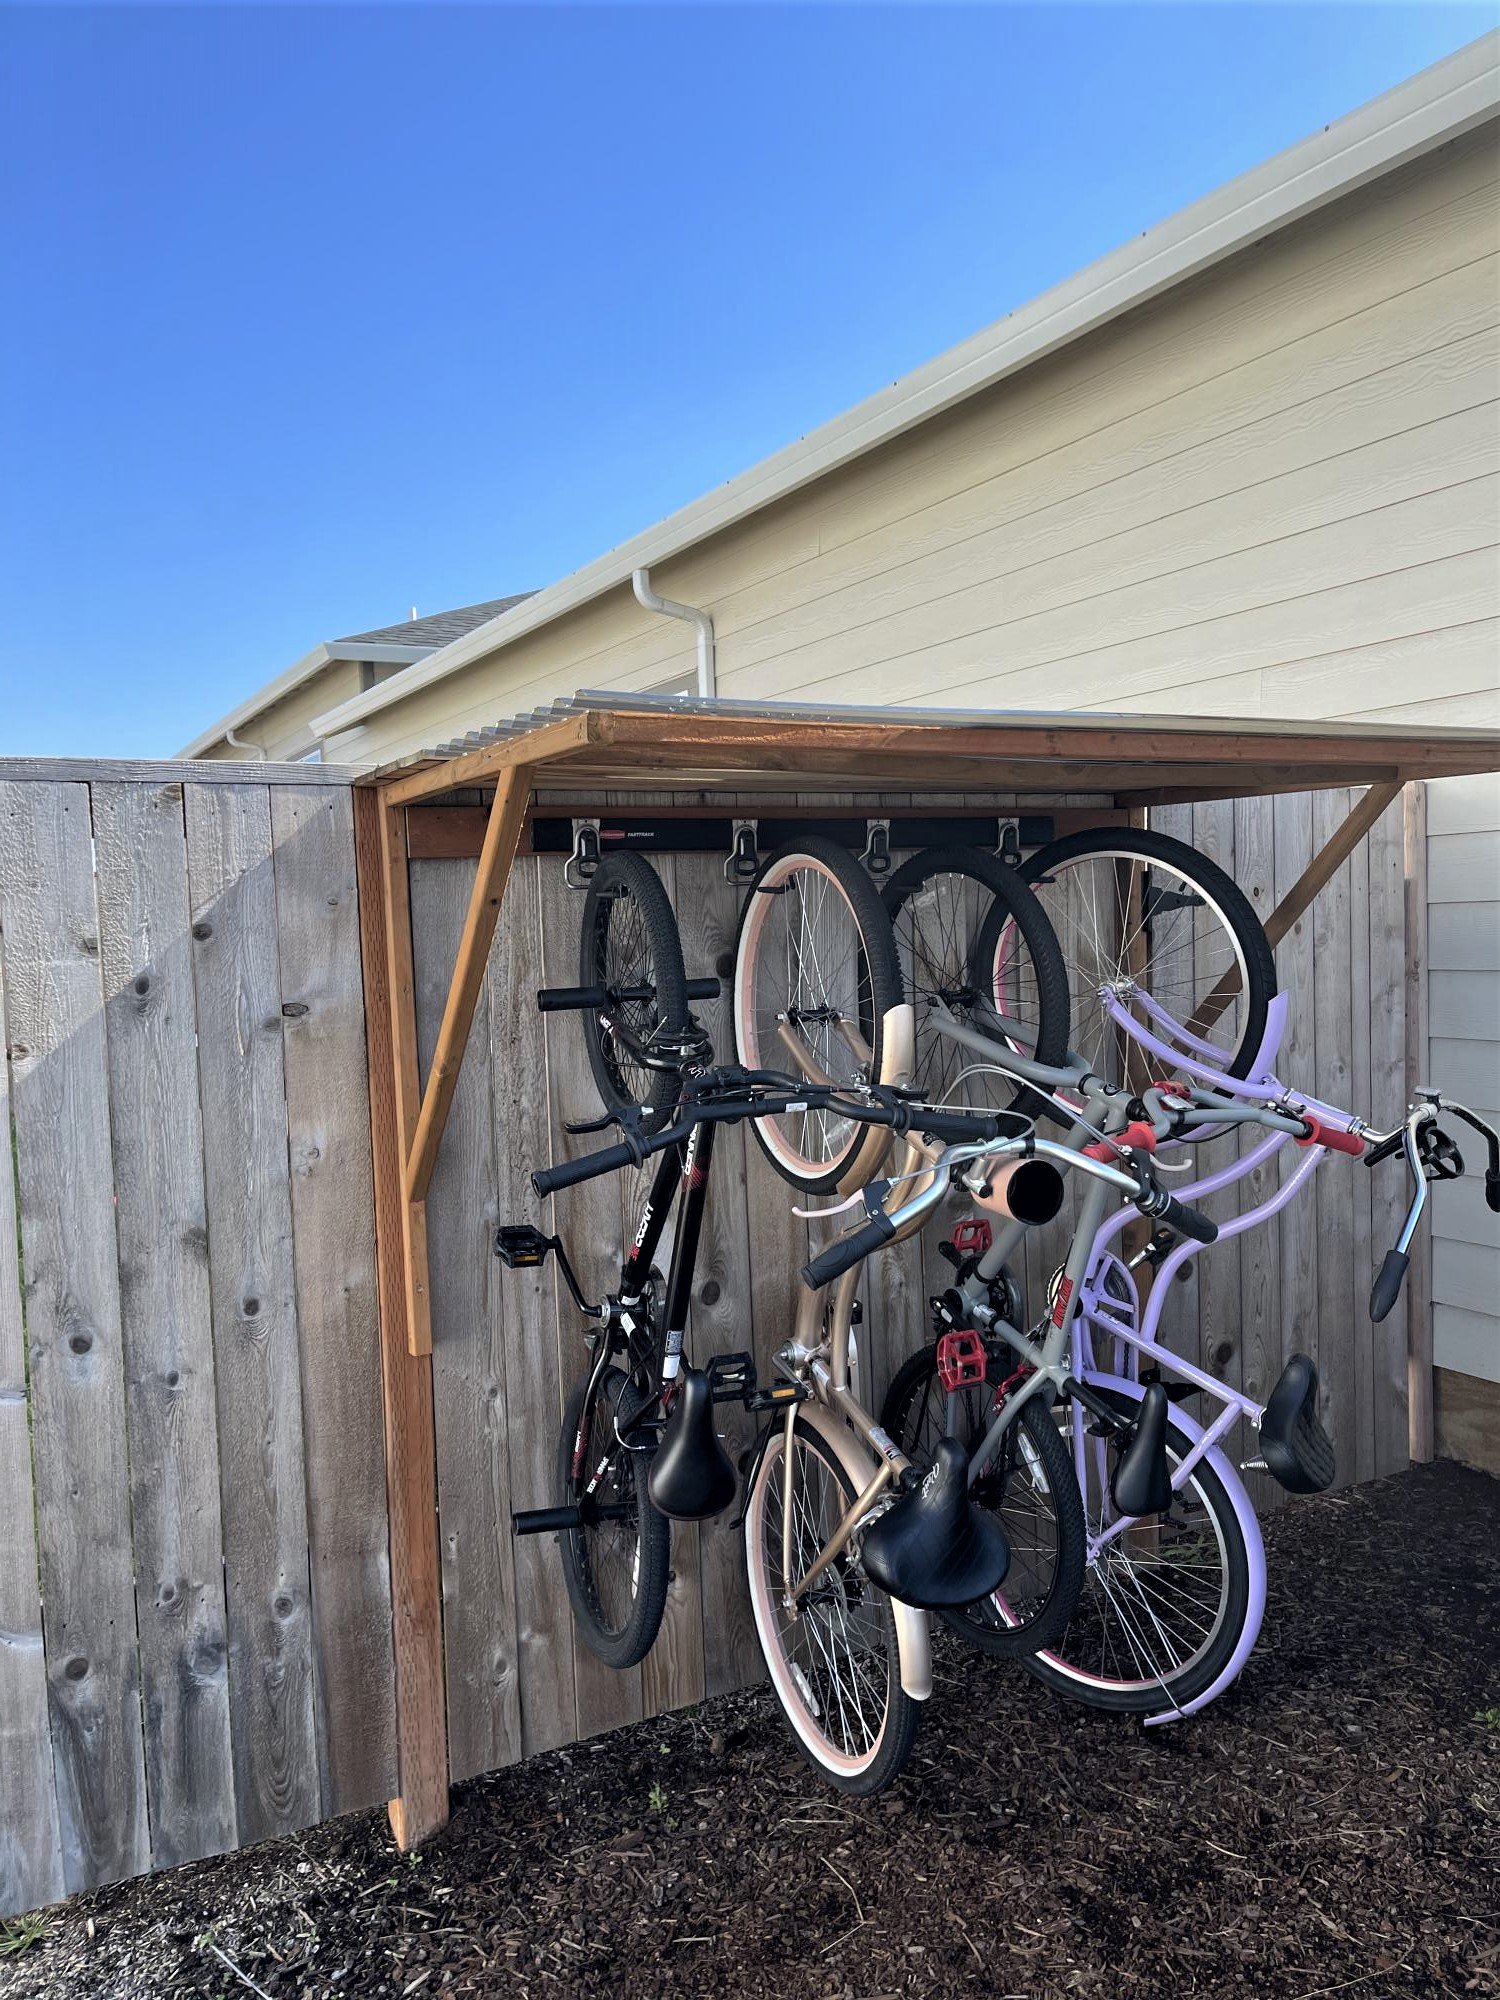
I live in a smaller rental with limited garage space, so I needed a place for my kids bikes. This is what I came up with. It required minimal screw holes in the treated fence posts and I attached a rail system(rubbermaid fasttrak) for the bikes to hang from. I used Ana's easy shelves plan for the upright supports and then just added some corrugated roofing and cedar fence pickets (which I had on hand) to finish off the top.
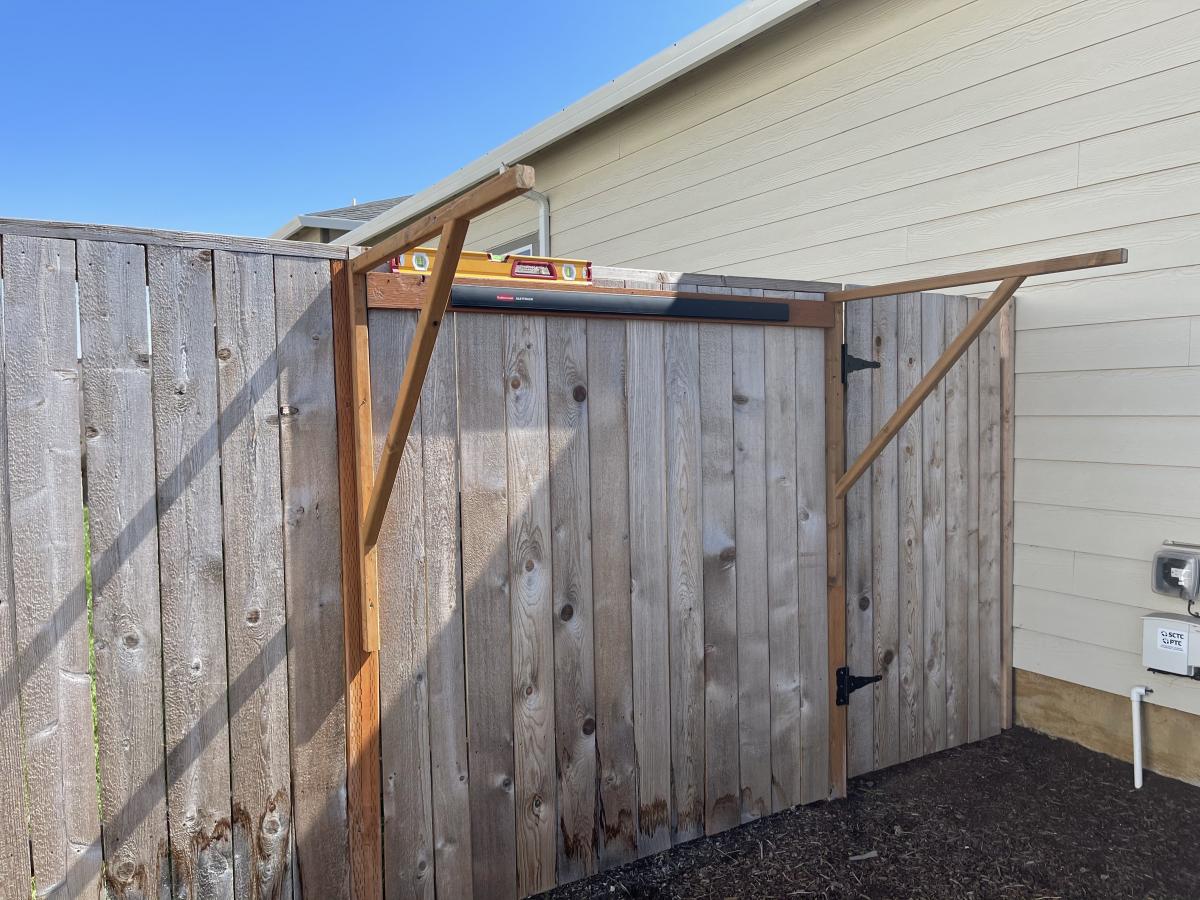
Built from Plan(s)
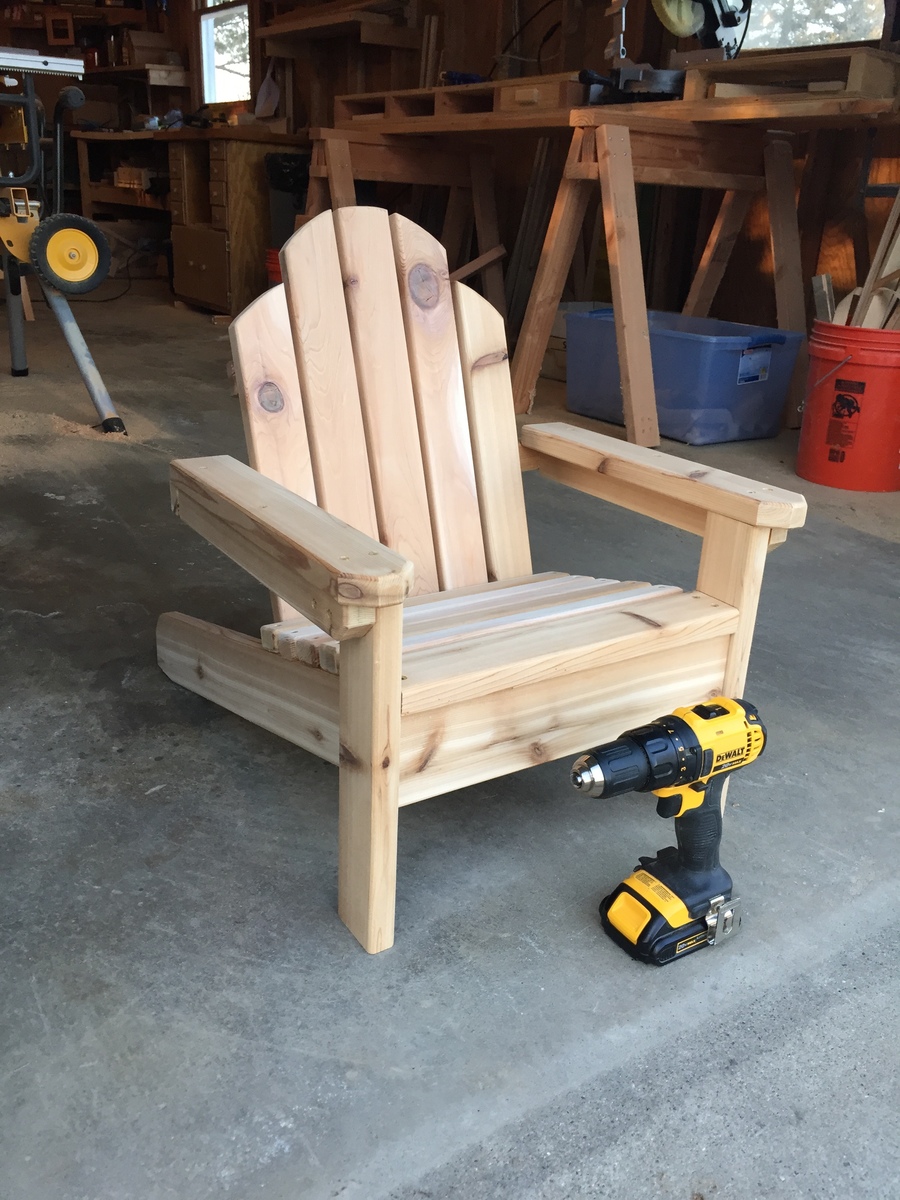
Mini Adirondack Chair
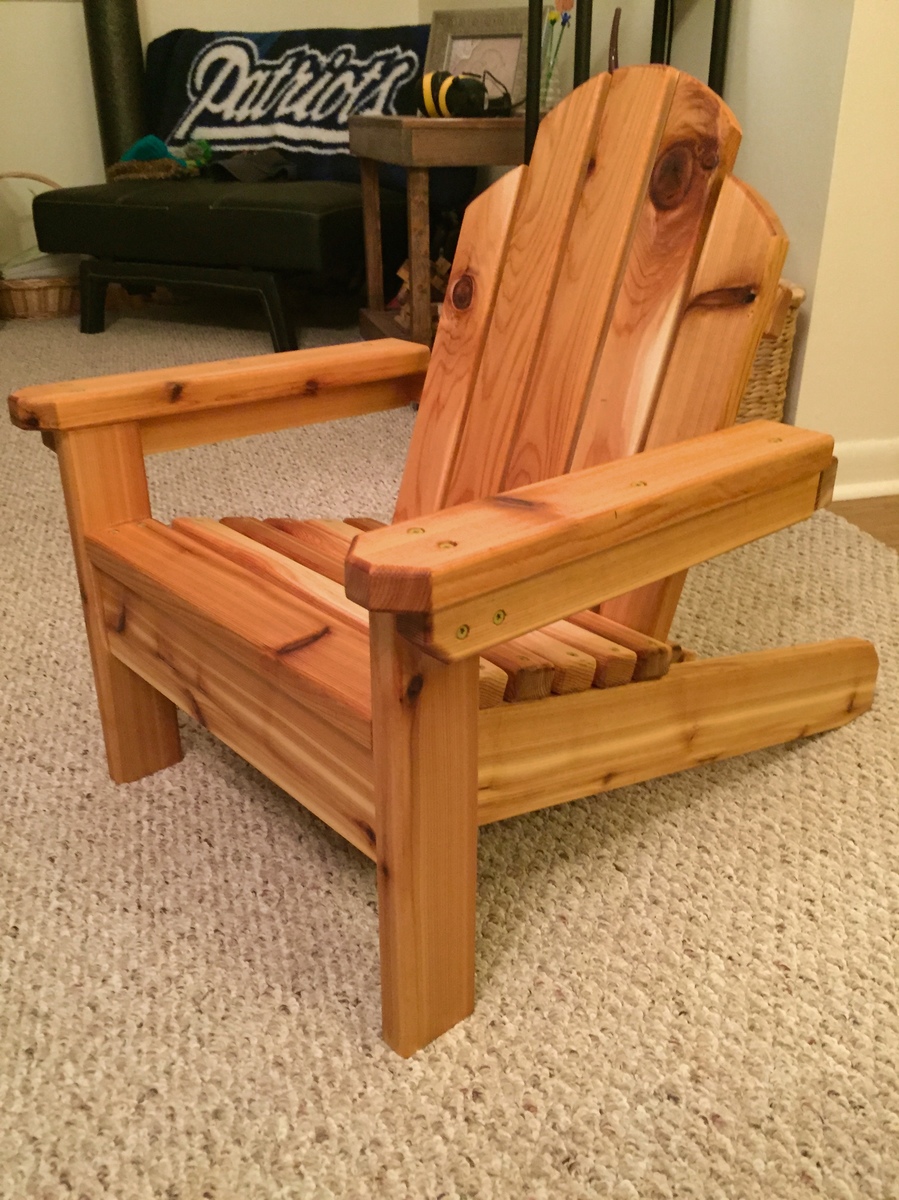
This was a fun little project that I built for a friend, whose son was turning one year old. I used 5/4 cedar deck boards and ripped them down to size. For a finish I used Watco's teak oil. I love the way it brings out the cedar's natural tones. You can see in one of my pictures the before/after when applying the teak oil.

Built from Plan(s)
Estimated Cost
$30
Estimated Time Investment
Weekend Project (10-20 Hours)
Finish Used
I used Watco Teak oil for a finish and applied as directed by the can.
Recommended Skill Level
Intermediate
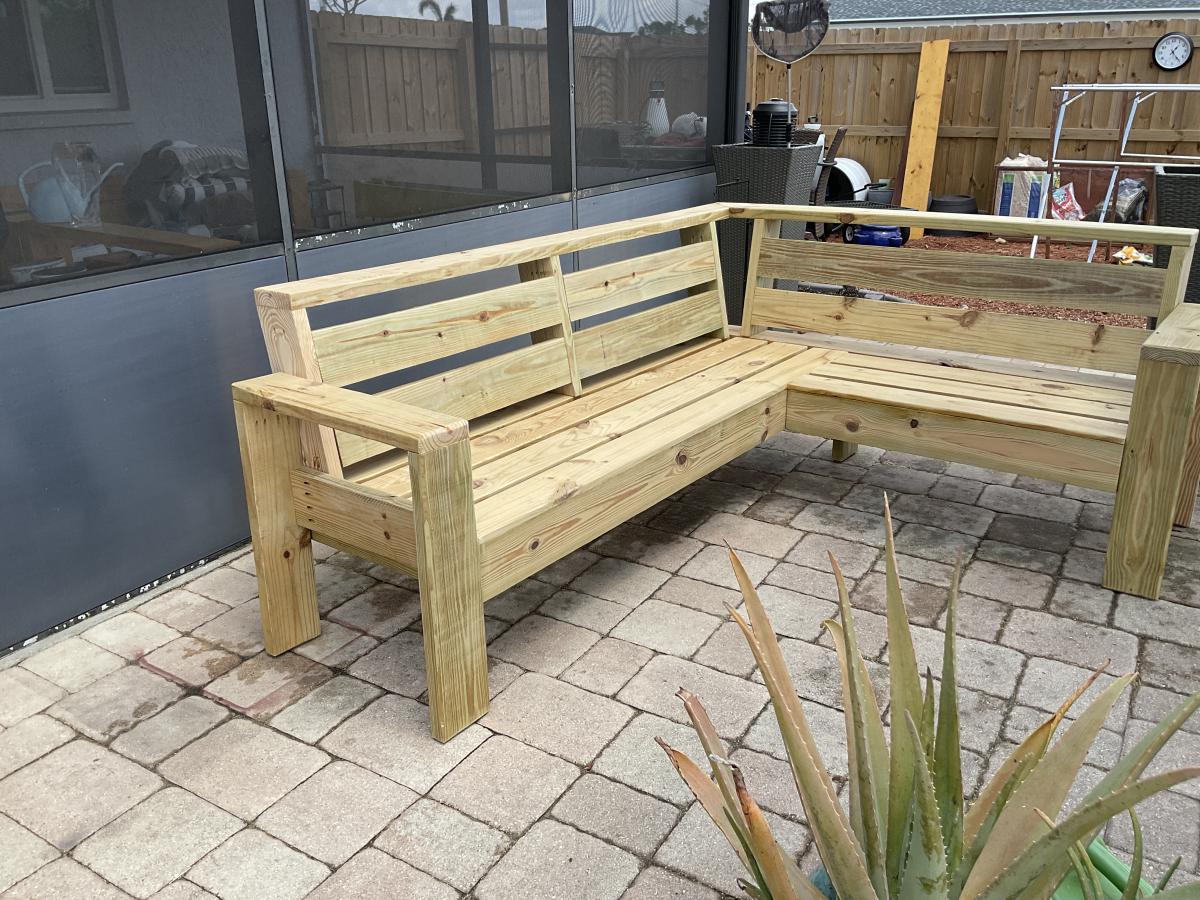
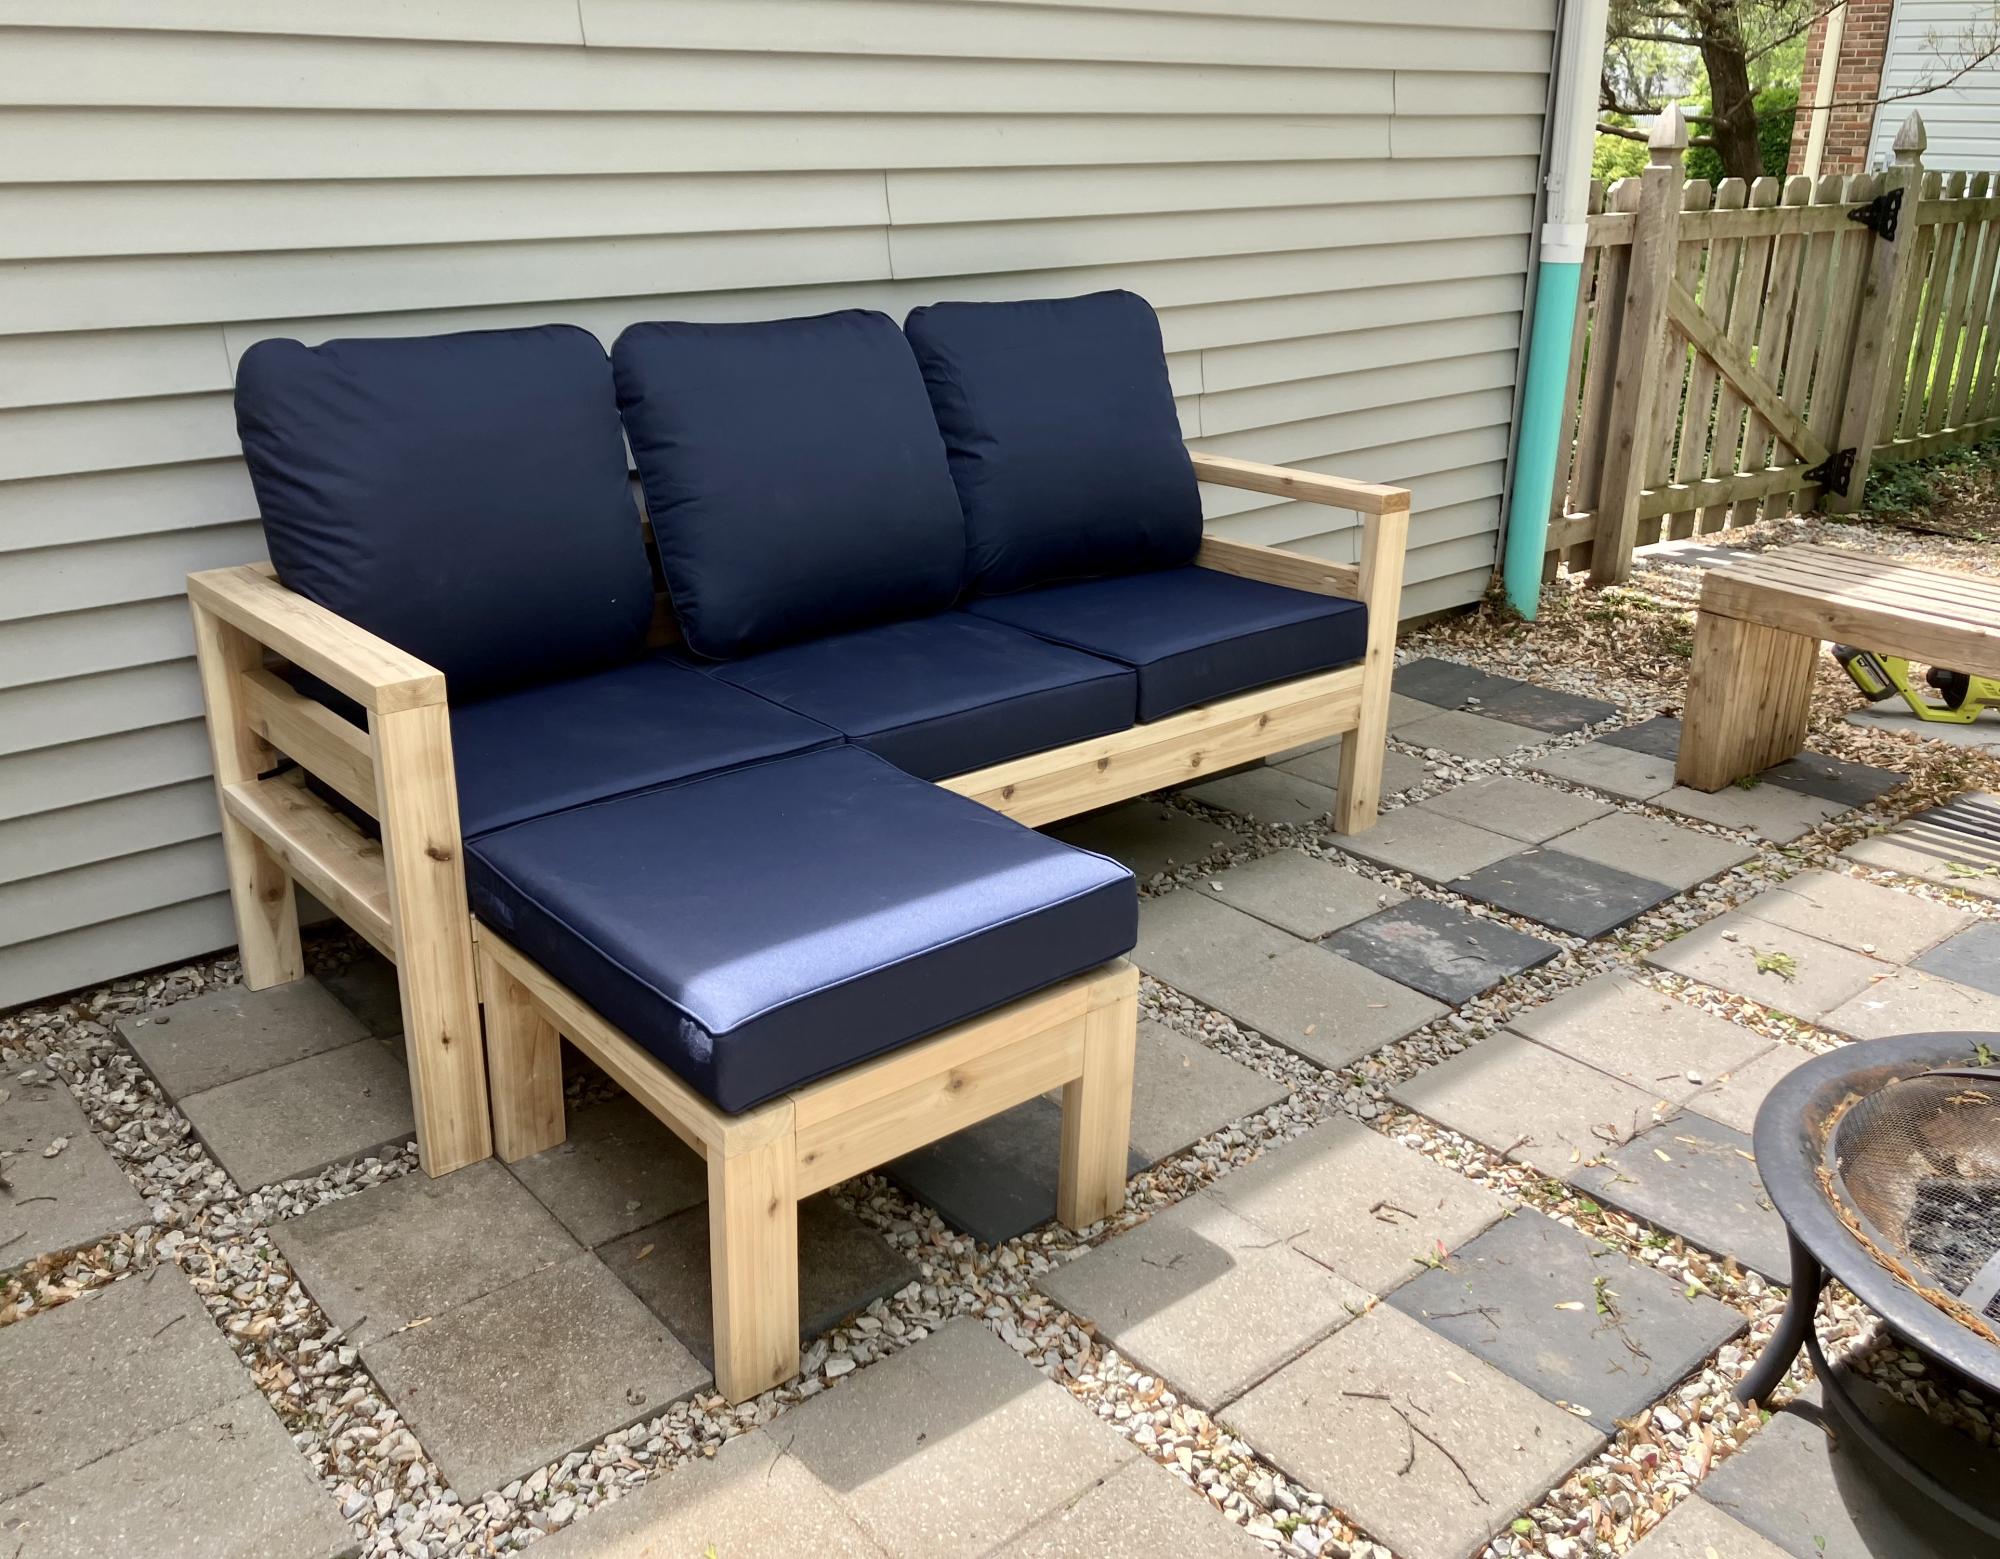
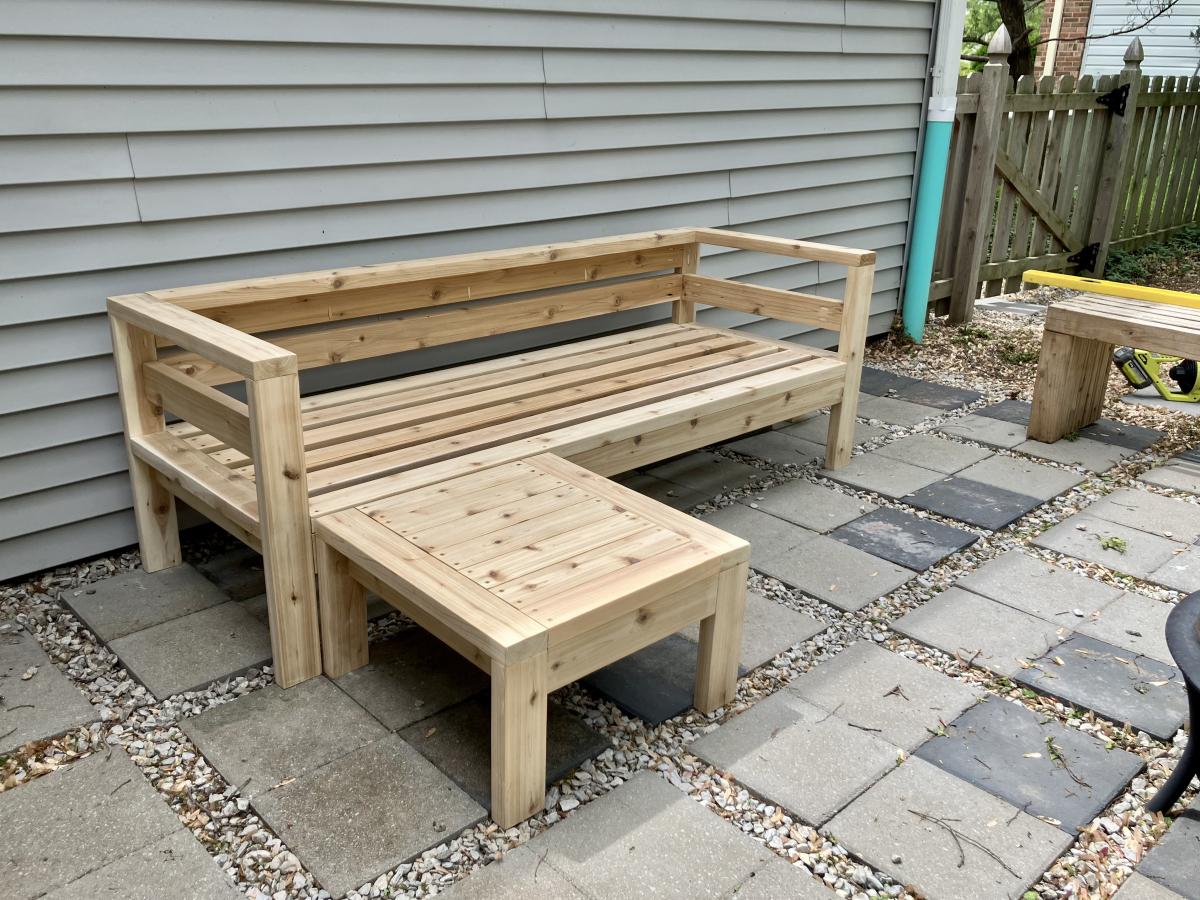
Outdoor Sectional with Slat Design
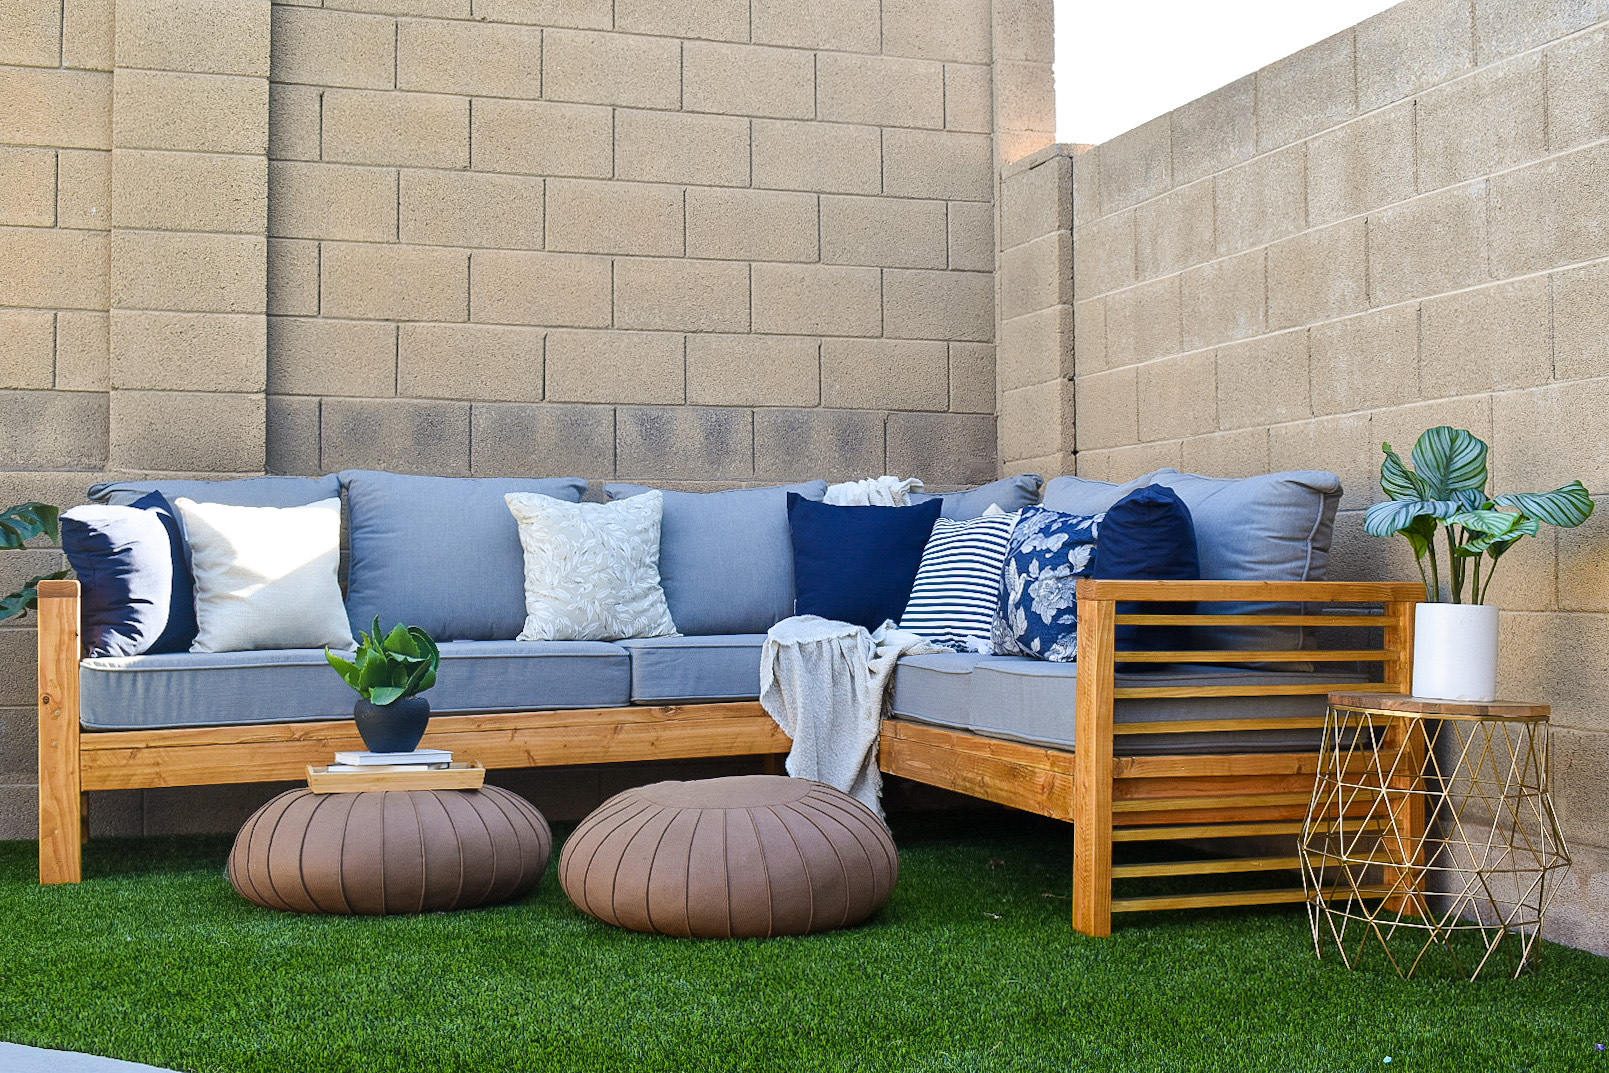
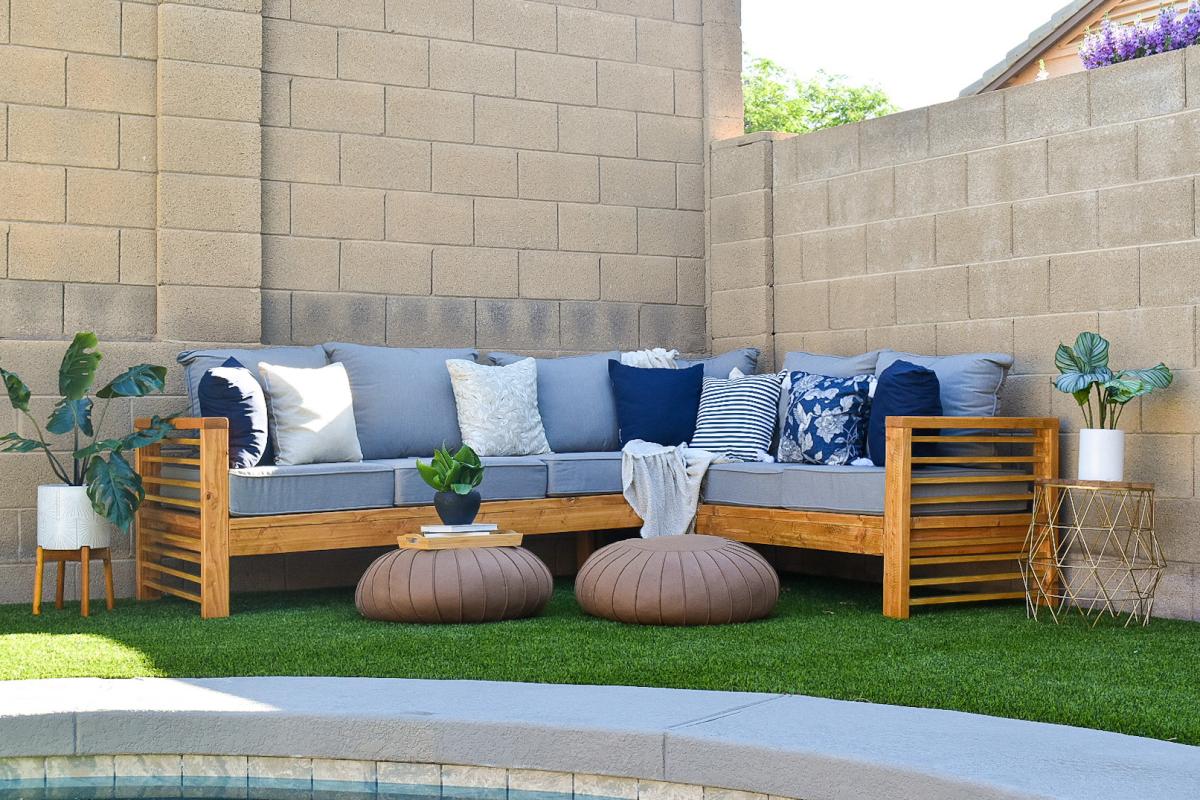
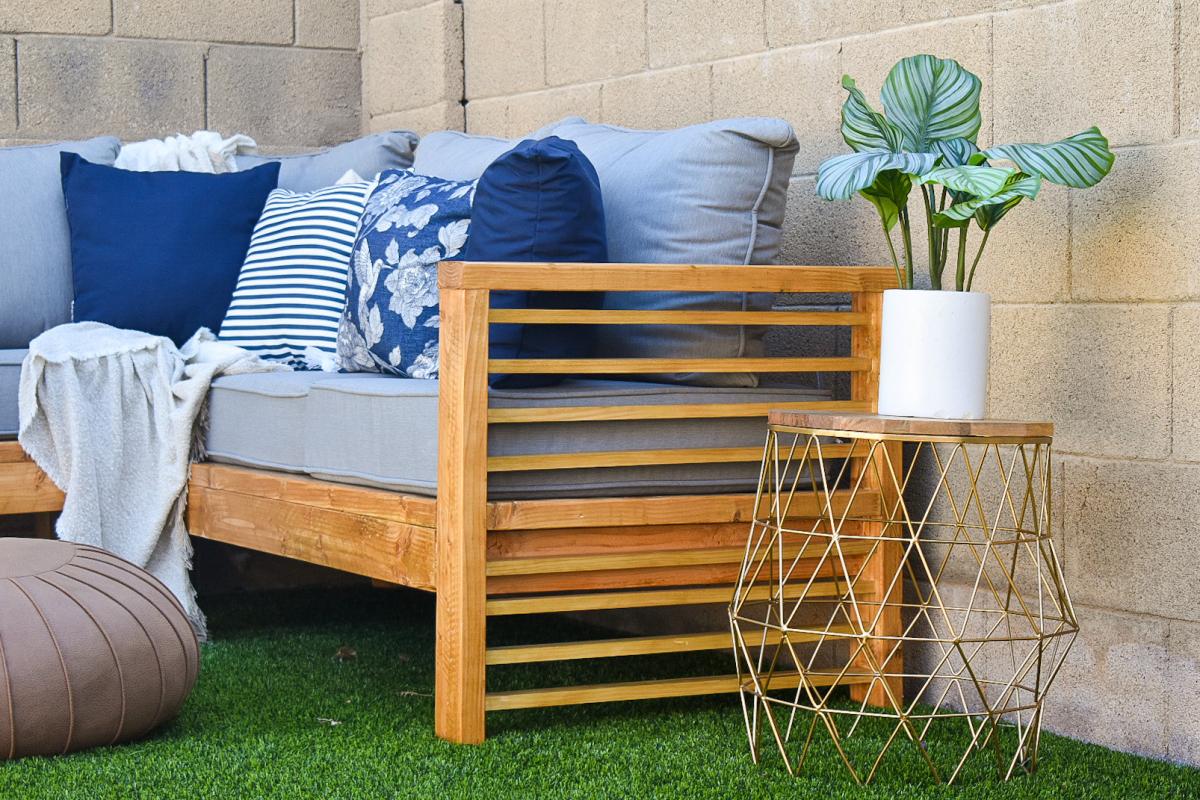
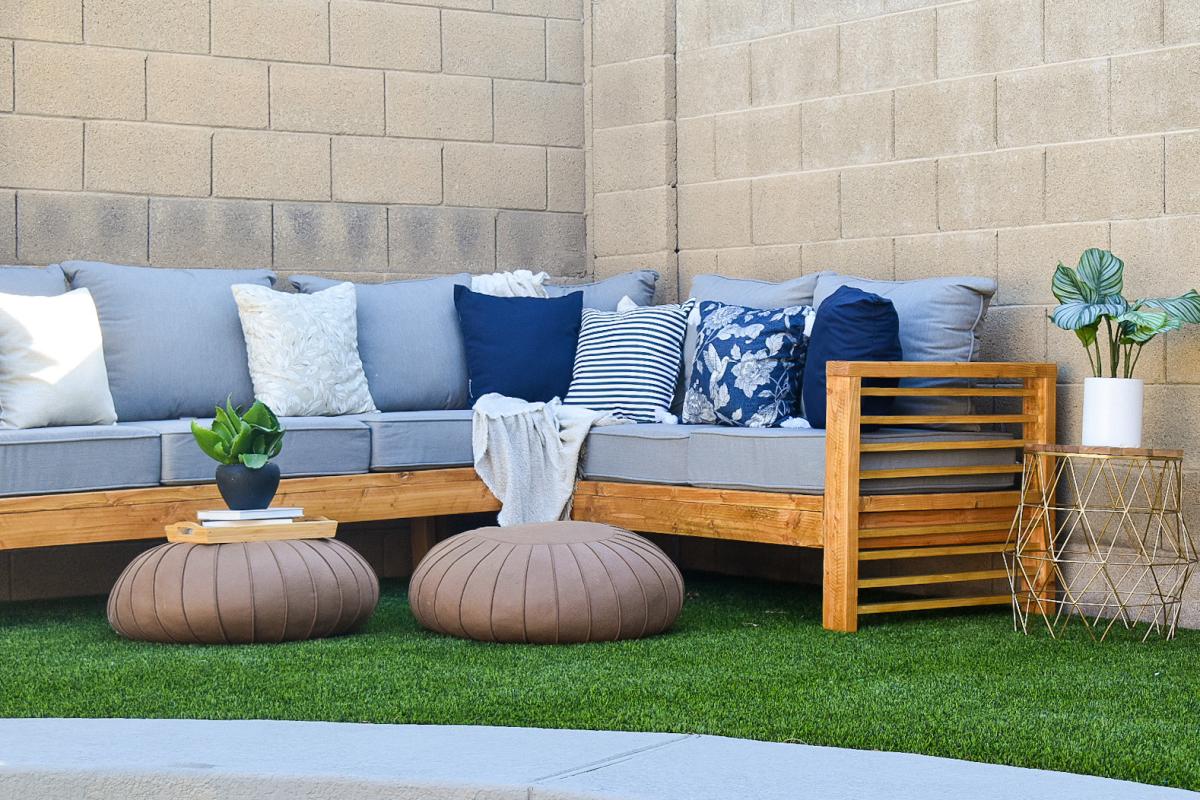

Outdoor Sectional
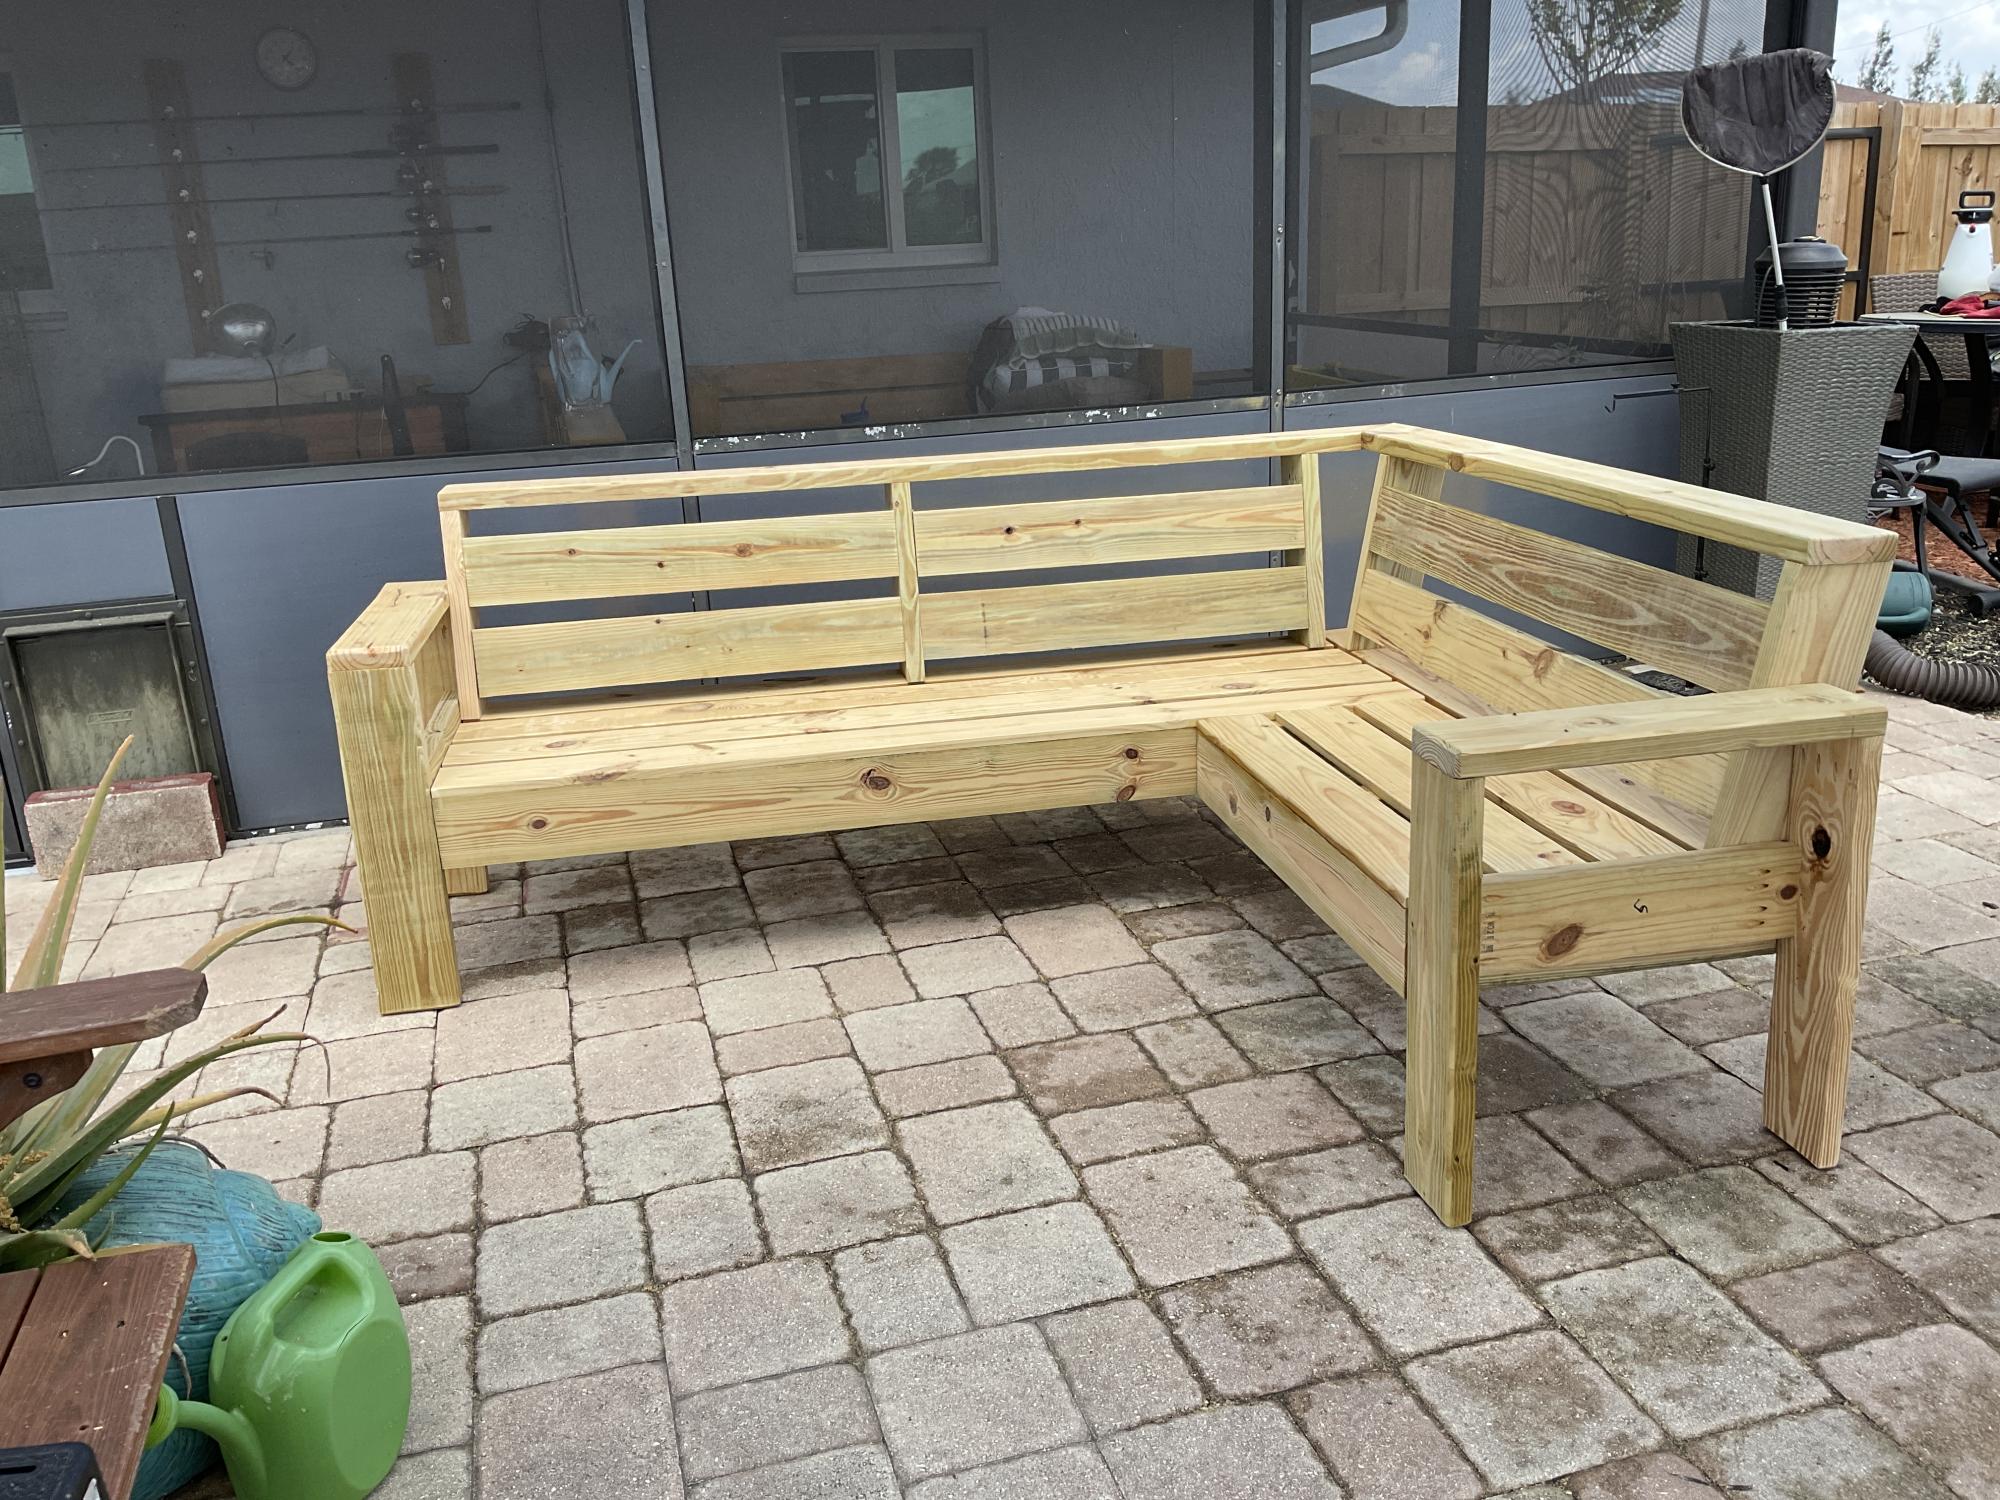
This was my seventh outdoor couch but my first sectional. My very first couches were all inspired by Ana White's plans and I have gotten so much better with my skills that I building other things as well. Thanks Ana for all your inspiration!
Built from Plan(s)
Comments
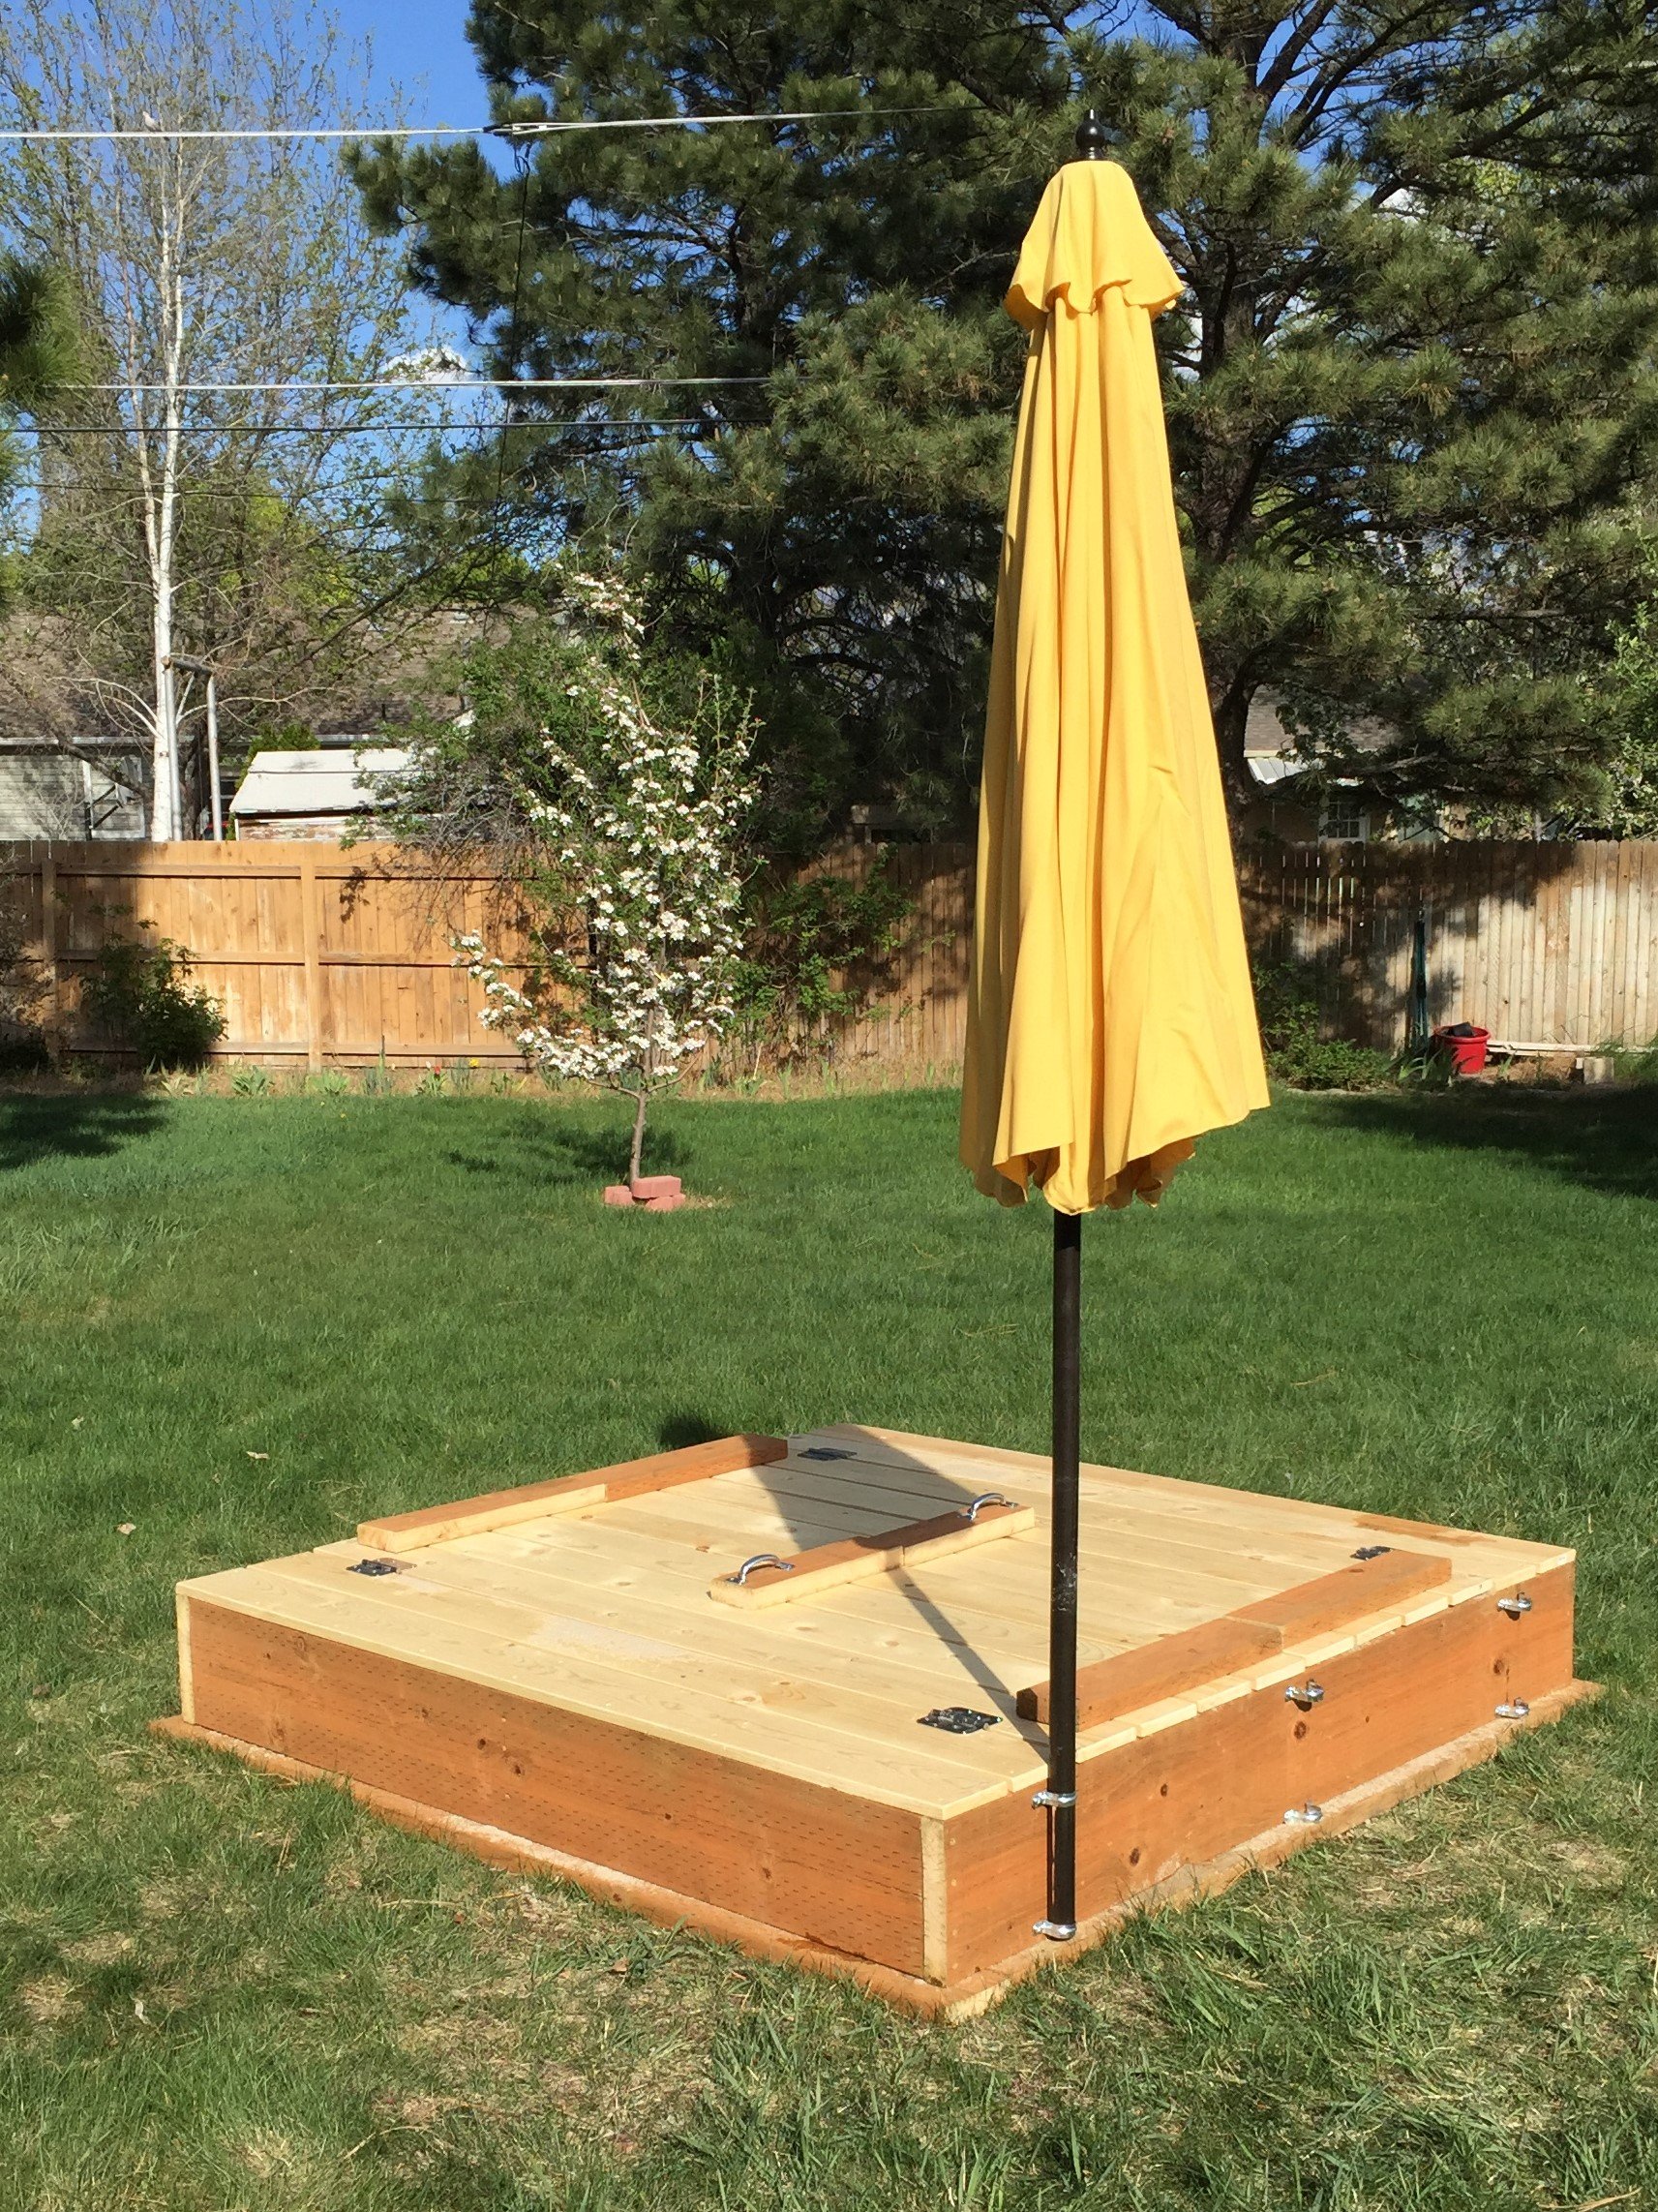
6'x6' Box
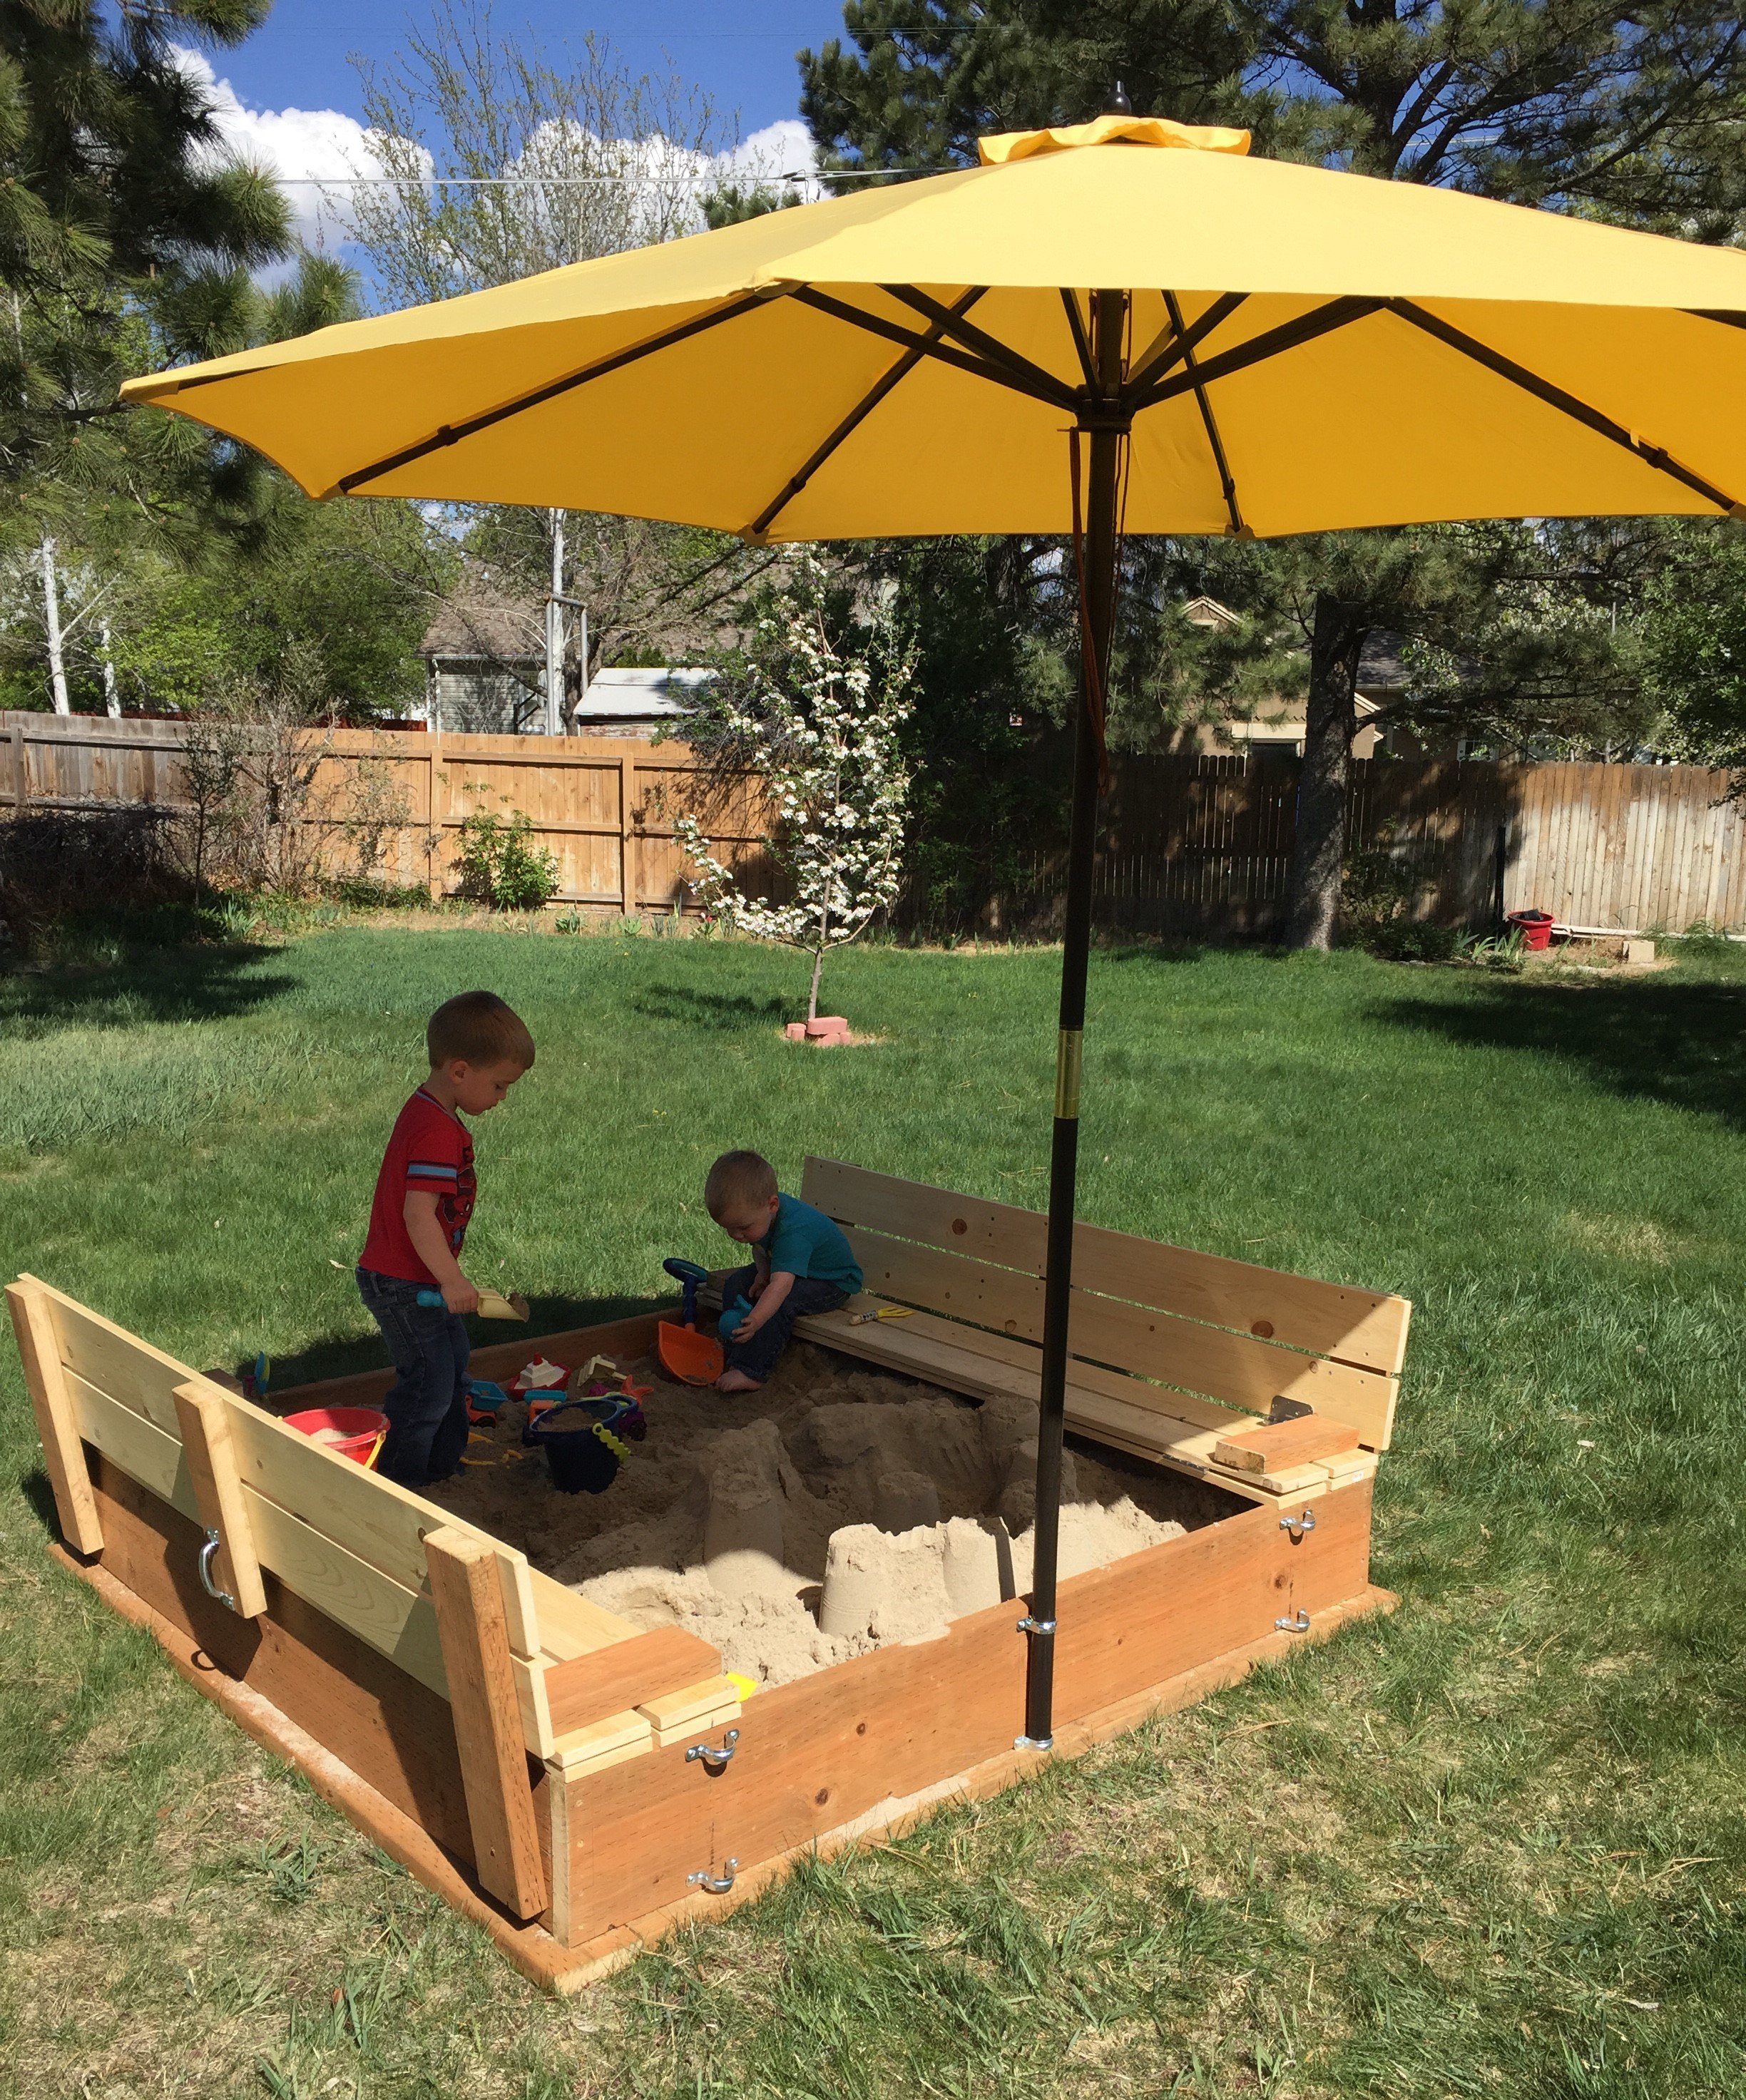
I found these plans online and was just waiting for the kids' grandpa to come out and build it. Could be built in one afternoon (depending on how many trips to your local Home Depot, and availability of the correct tools)
Modifications from original plan:
6x6 instead of 4x4
Brackets to hold patio umbrella for shade
Added seat gussets for additional support
Added "wooden flange" around bottom of box to run lawnmower on
One additional center back support on each bench
One centered handle (instead of a handle on each end)
Stapled landscape weed barrier fabric onto the bottom
Sanded all exposed edges
Materials:
4@2x10x8'
12@1x6x6'
2@2x6x12'
8 hinges
2 handles
3 1/2" decking screws (for attaching 2"x boards)
1 5/8" decking screws (for attaching 1"x boards)
2+ 1 1/4" 2-hole straps for metal conduit (for attaching patio umbrella*)
*Our patio umbrella pole was 1 1/2" diameter, but 1 1/2" straps had too much play, so we used 1 1/4" straps and misc flat washers to adjust the snugness to the pole
Cut lengths:
2@2x10 cut to 72" (long sides of the box)
2@2x10 cut to 69" (short sides of the box)
Cut one each of the following out of a 12 footer:
2@2x6 cut to 75" (long side "flange")
2@2x6 cut to 64" (short side "flange")
No cuts were made to the 12 1x6's
Used one leftover 2' from the 2x8x10's ripped in half cut to 11.5" for arm rests
Used two leftover 2' sections from the 2x8x10's ripped in half cut to 21" for back supports
Used the last 2' cutoff to make two seat gussets (cut about 9 1/2" off and then ripped it at 45 degrees)
Used the remaining piece (ripped in half length-ways) to attach to the center of the backrest for additional support and as the attachment point for our handles
We decided to do one handle in the center of the backrest so one reasonably strong adult could open the lid
The bottom "flange" was assembled with the box upside down. Basically a 2x6 screwed to the bottom edge of the box allowing 1 1/2" overhang all the way around
After making cuts, but before assembly, we recommend using a quarter-sheet pad sander (or similar) with 60 grit paper to break all of the edges and round over any ends or corners that will be in contact with sandbox users
Followed other general assembly instructions
Built from Plan(s)
Estimated Cost
$300 with umbrella and sand
Estimated Time Investment
Day Project (6-9 Hours)
Finish Used
We live in a very arid climate (Utah) so we chose not to varnish or paint this project
Recommended Skill Level
Beginner
Chicken Coop
We made this Chicken Coop this summer , with lots of help. We doubled the coop and the chicken run is 8x8 . We used the base of a previous clubhouse!! Thanks so much for the plans
Built from Plan(s)
Comments
Mon, 10/04/2021 - 16:40
So smart using the clubhouse base!
Beautiful, love the finish, thank you for sharing!
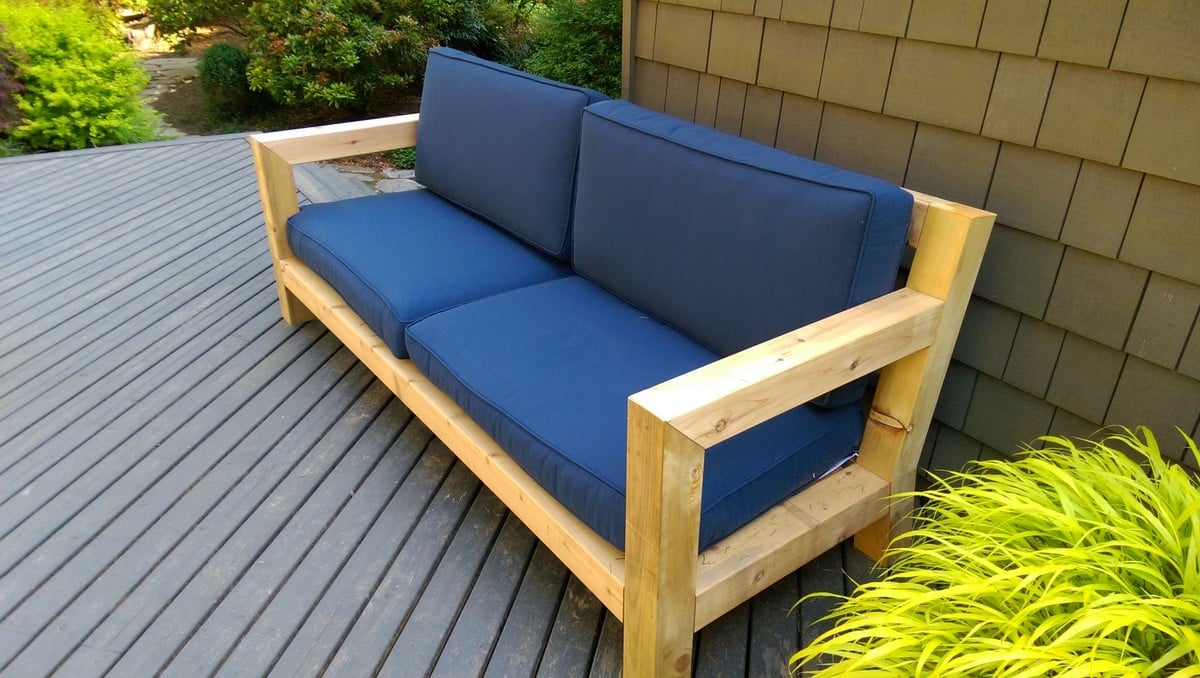
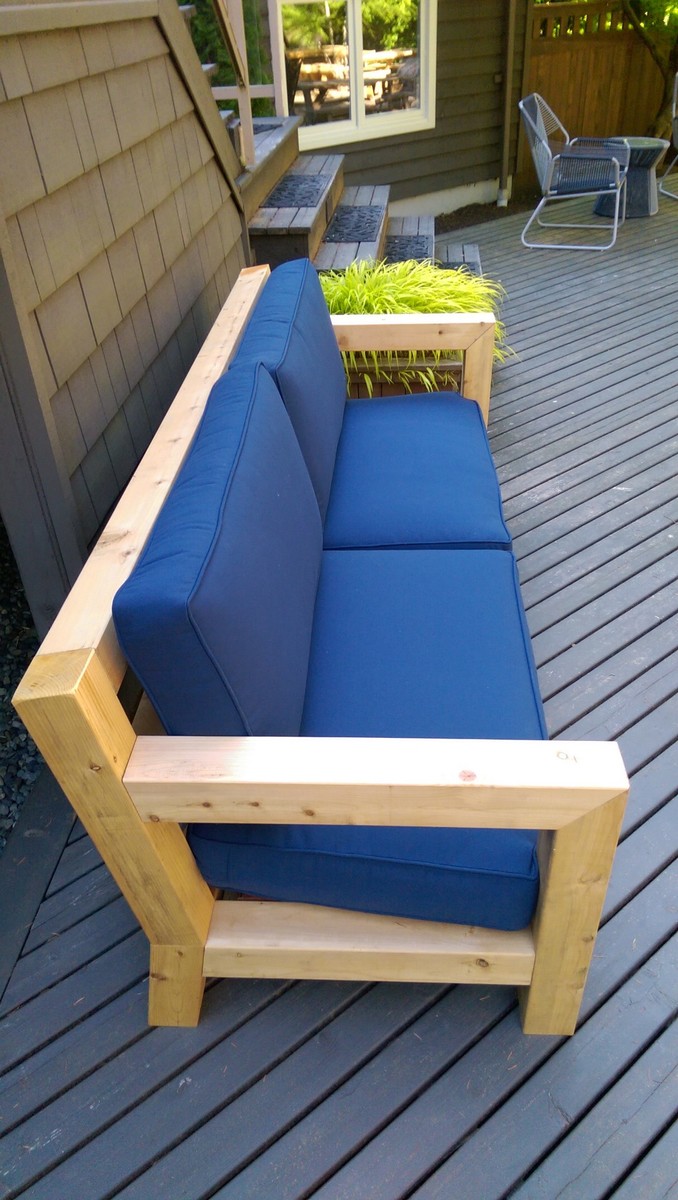
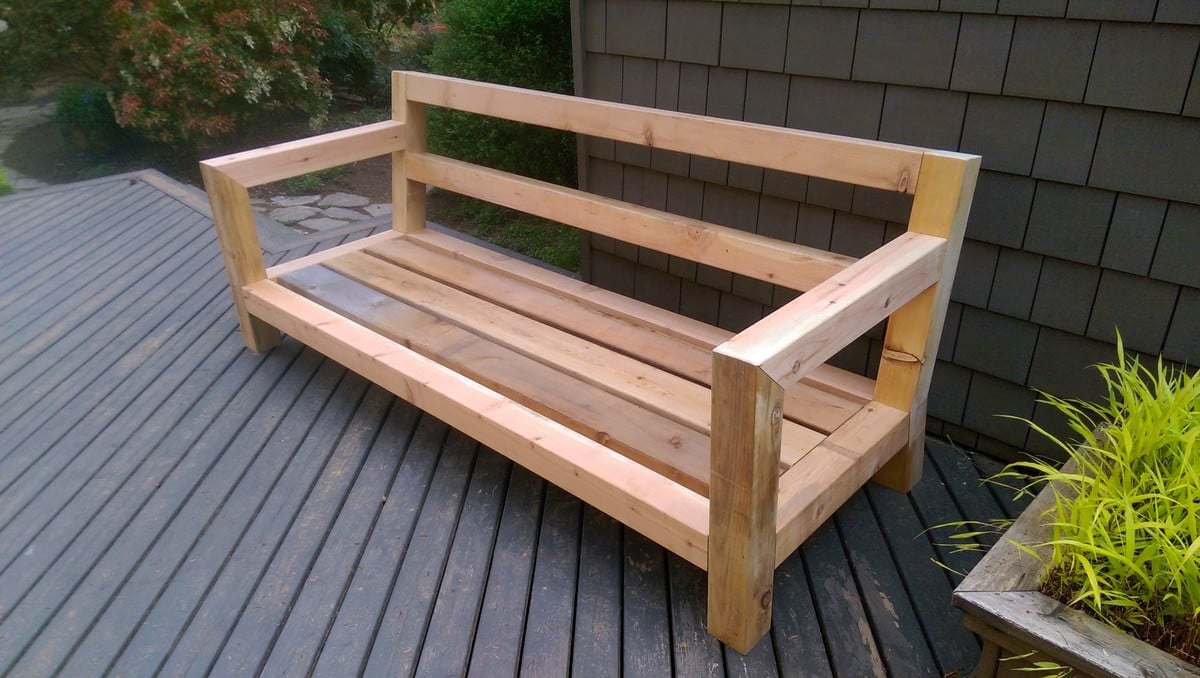
Modern Rustic Outdoor Sofa Inspired by RH Merida
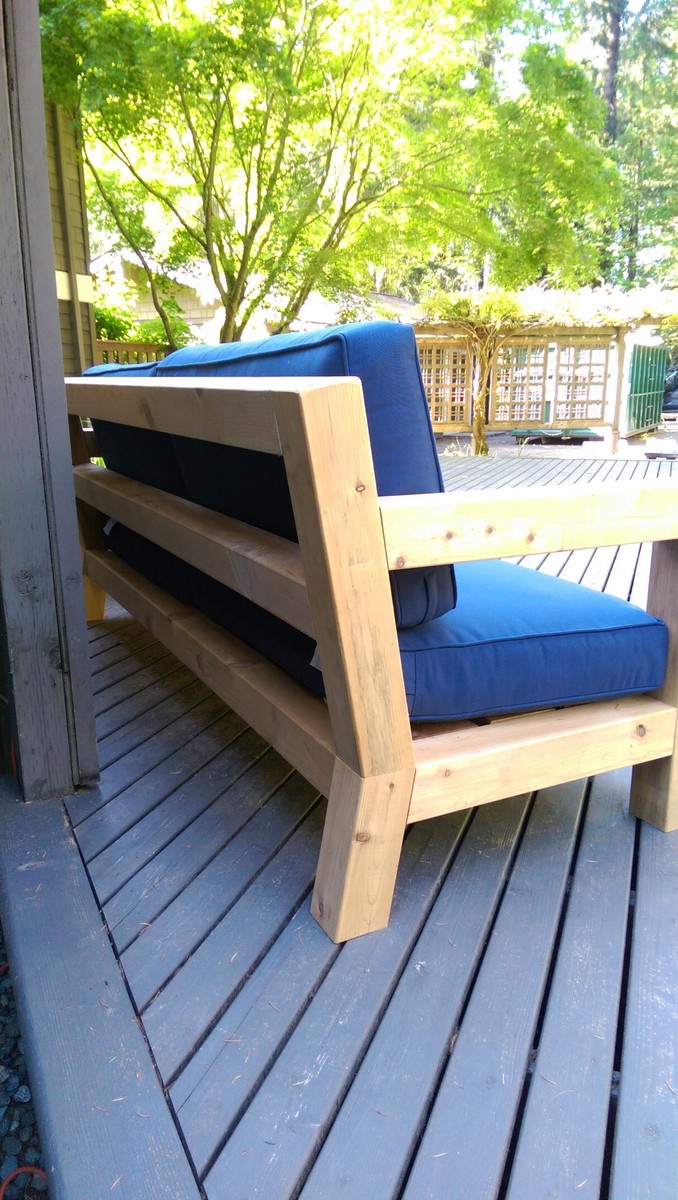
I was in love with the RH Merida set because of its clean lines and modern style. Also, the plan seemed simple enough that I could re-create it without a pattern. The only thing that I did not like about it is the lack of arms. I really like to have a place to put my arm or my beverage :) - so I added arms to the design.
Estimated Cost
$150
Estimated Time Investment
Day Project (6-9 Hours)
Finish Used
Natural
Recommended Skill Level
Intermediate
Comments

Thu, 05/30/2019 - 18:45
It’s beautiful! Do you have…
It’s beautiful! Do you have a set of plans that you might be willing to share?
Wed, 05/20/2020 - 10:45
stuck in the middle.
This is Awesome. I'm halfway in the middle as i thought I could complete without plans. Do you have any plans could share. Please....
Fri, 06/19/2020 - 15:54
plans for the RH Merida
were you able to get plans? I would LOVE plans too! we want to try and re-create this and would prefer NOT to get stuck!
Fri, 06/19/2020 - 15:55
Would LOVE to get plans,…
Would LOVE to get plans, would even pay for them! Found rough drawings online but they are chicken scratch and hard to interpret!
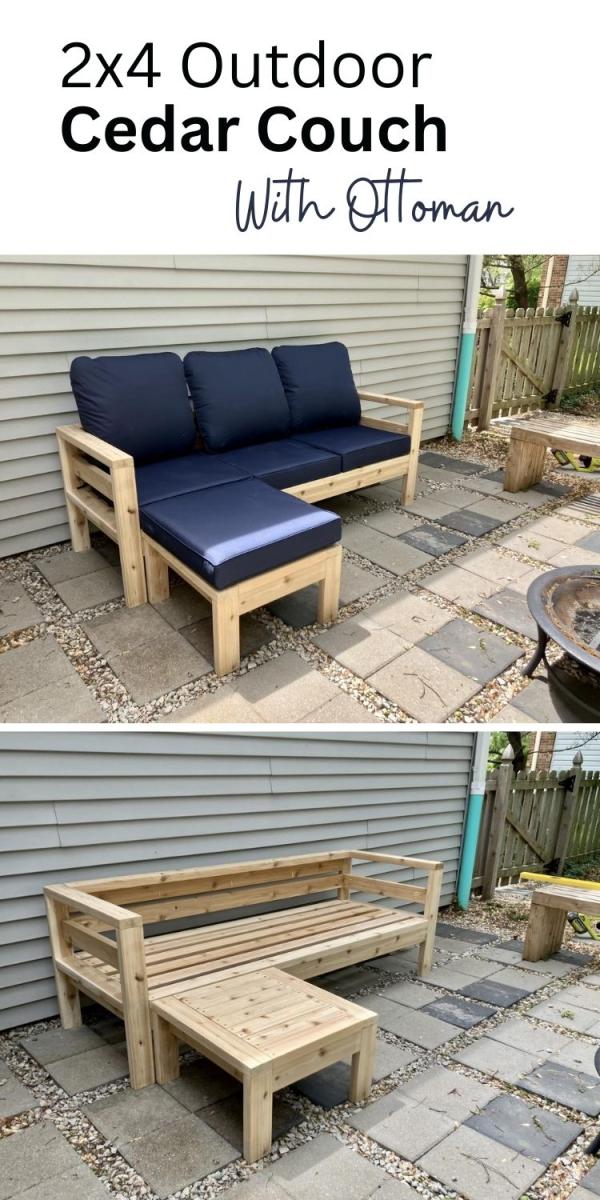
2x4 outdoor cedar couch with ottoman
I used pocket holes to hide the screws. I made an ottoman out of the outdoor coffee table plans to my dimensions that can be used as a coffee table when we need it.
Built from Plan(s)
Comments
Outdoor Sectional
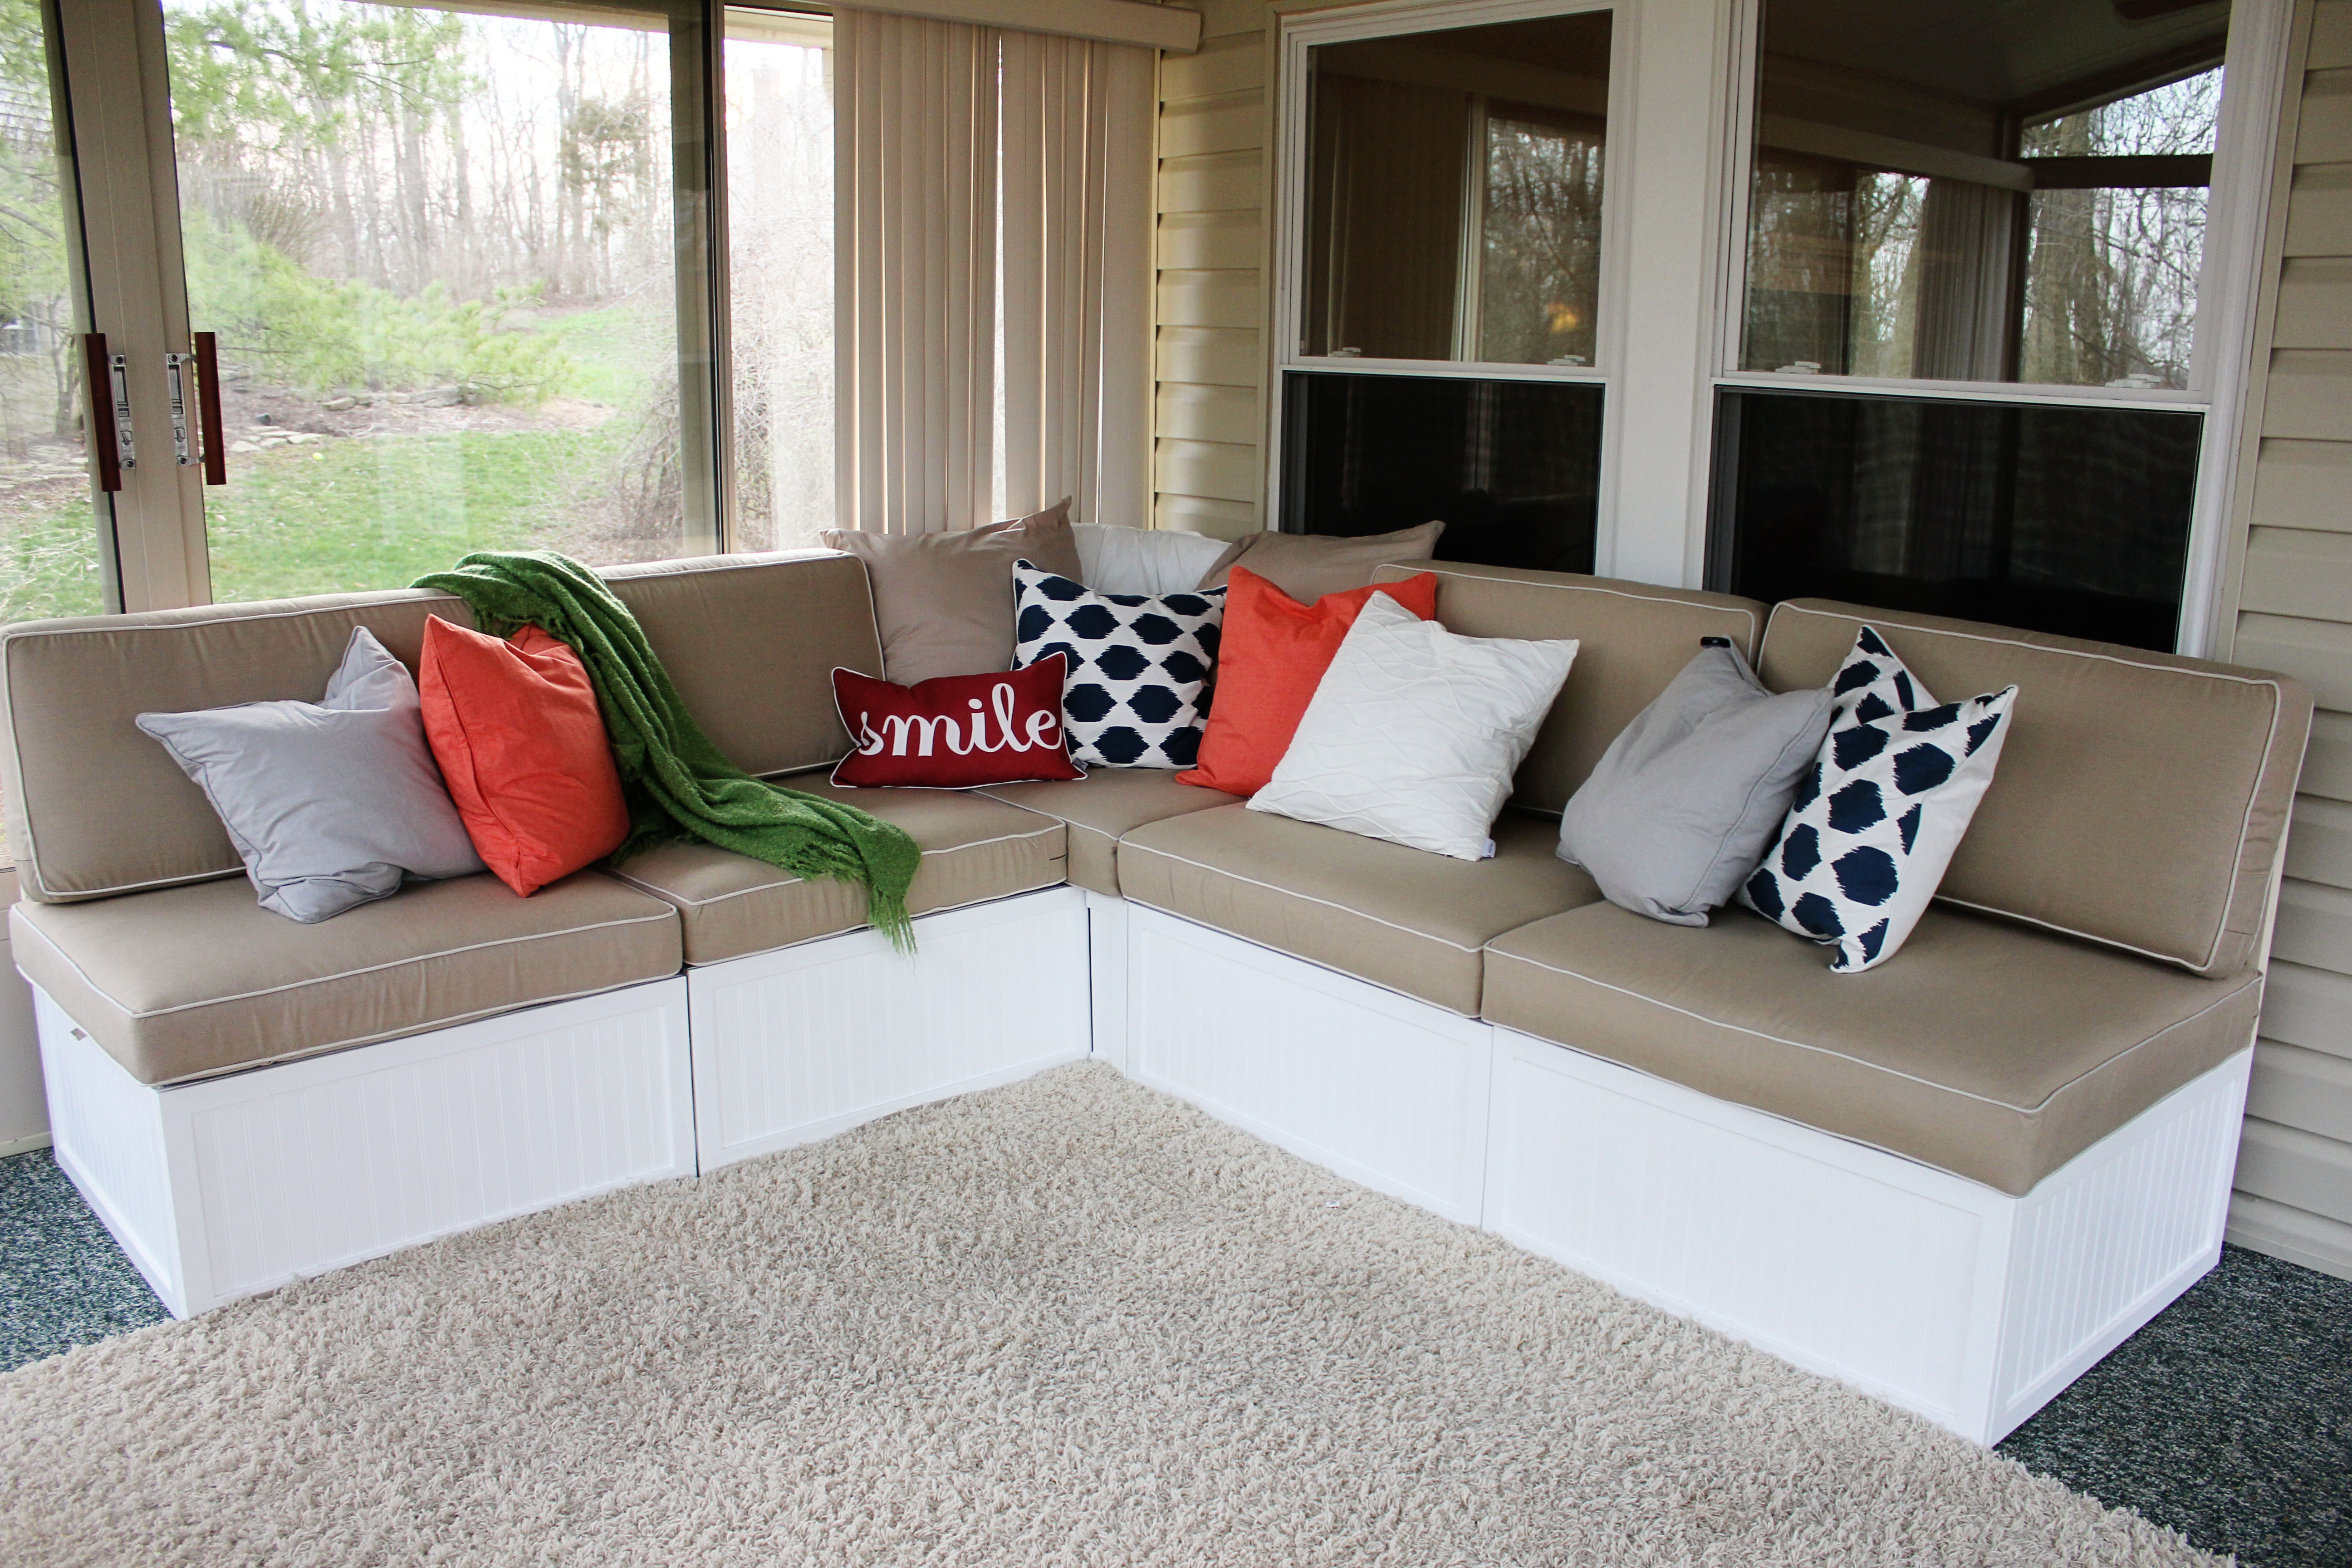
We followed the outdoor sectional plan from Ana Whites blog to create this outdoor sectional. First we bought the cushions and custom built this sectional to fit the cushions. We used 2x4's and the kreg jig for pocket screws, then covered the base in beadboard and some pine trim, gave it a good sanding and a nice paint job.

Built from Plan(s)
Estimated Cost
900
Estimated Time Investment
Week Long Project (20 Hours or More)
Finish Used
bead board and pine trim
Recommended Skill Level
Intermediate
Comments
Fri, 04/12/2013 - 05:46
Thanks! We built the frame
Thanks! We built the frame according to Ana's design (customized dimensions for our cushions) and then covered the base in bead board and used pine trim around the edges. The cushions are from the Frontgate Outlet in Cincinnati.
Wed, 05/07/2014 - 15:34
Planning on building this
Is there a link to the side/corner section of this so I do not have to guess. Thanks.