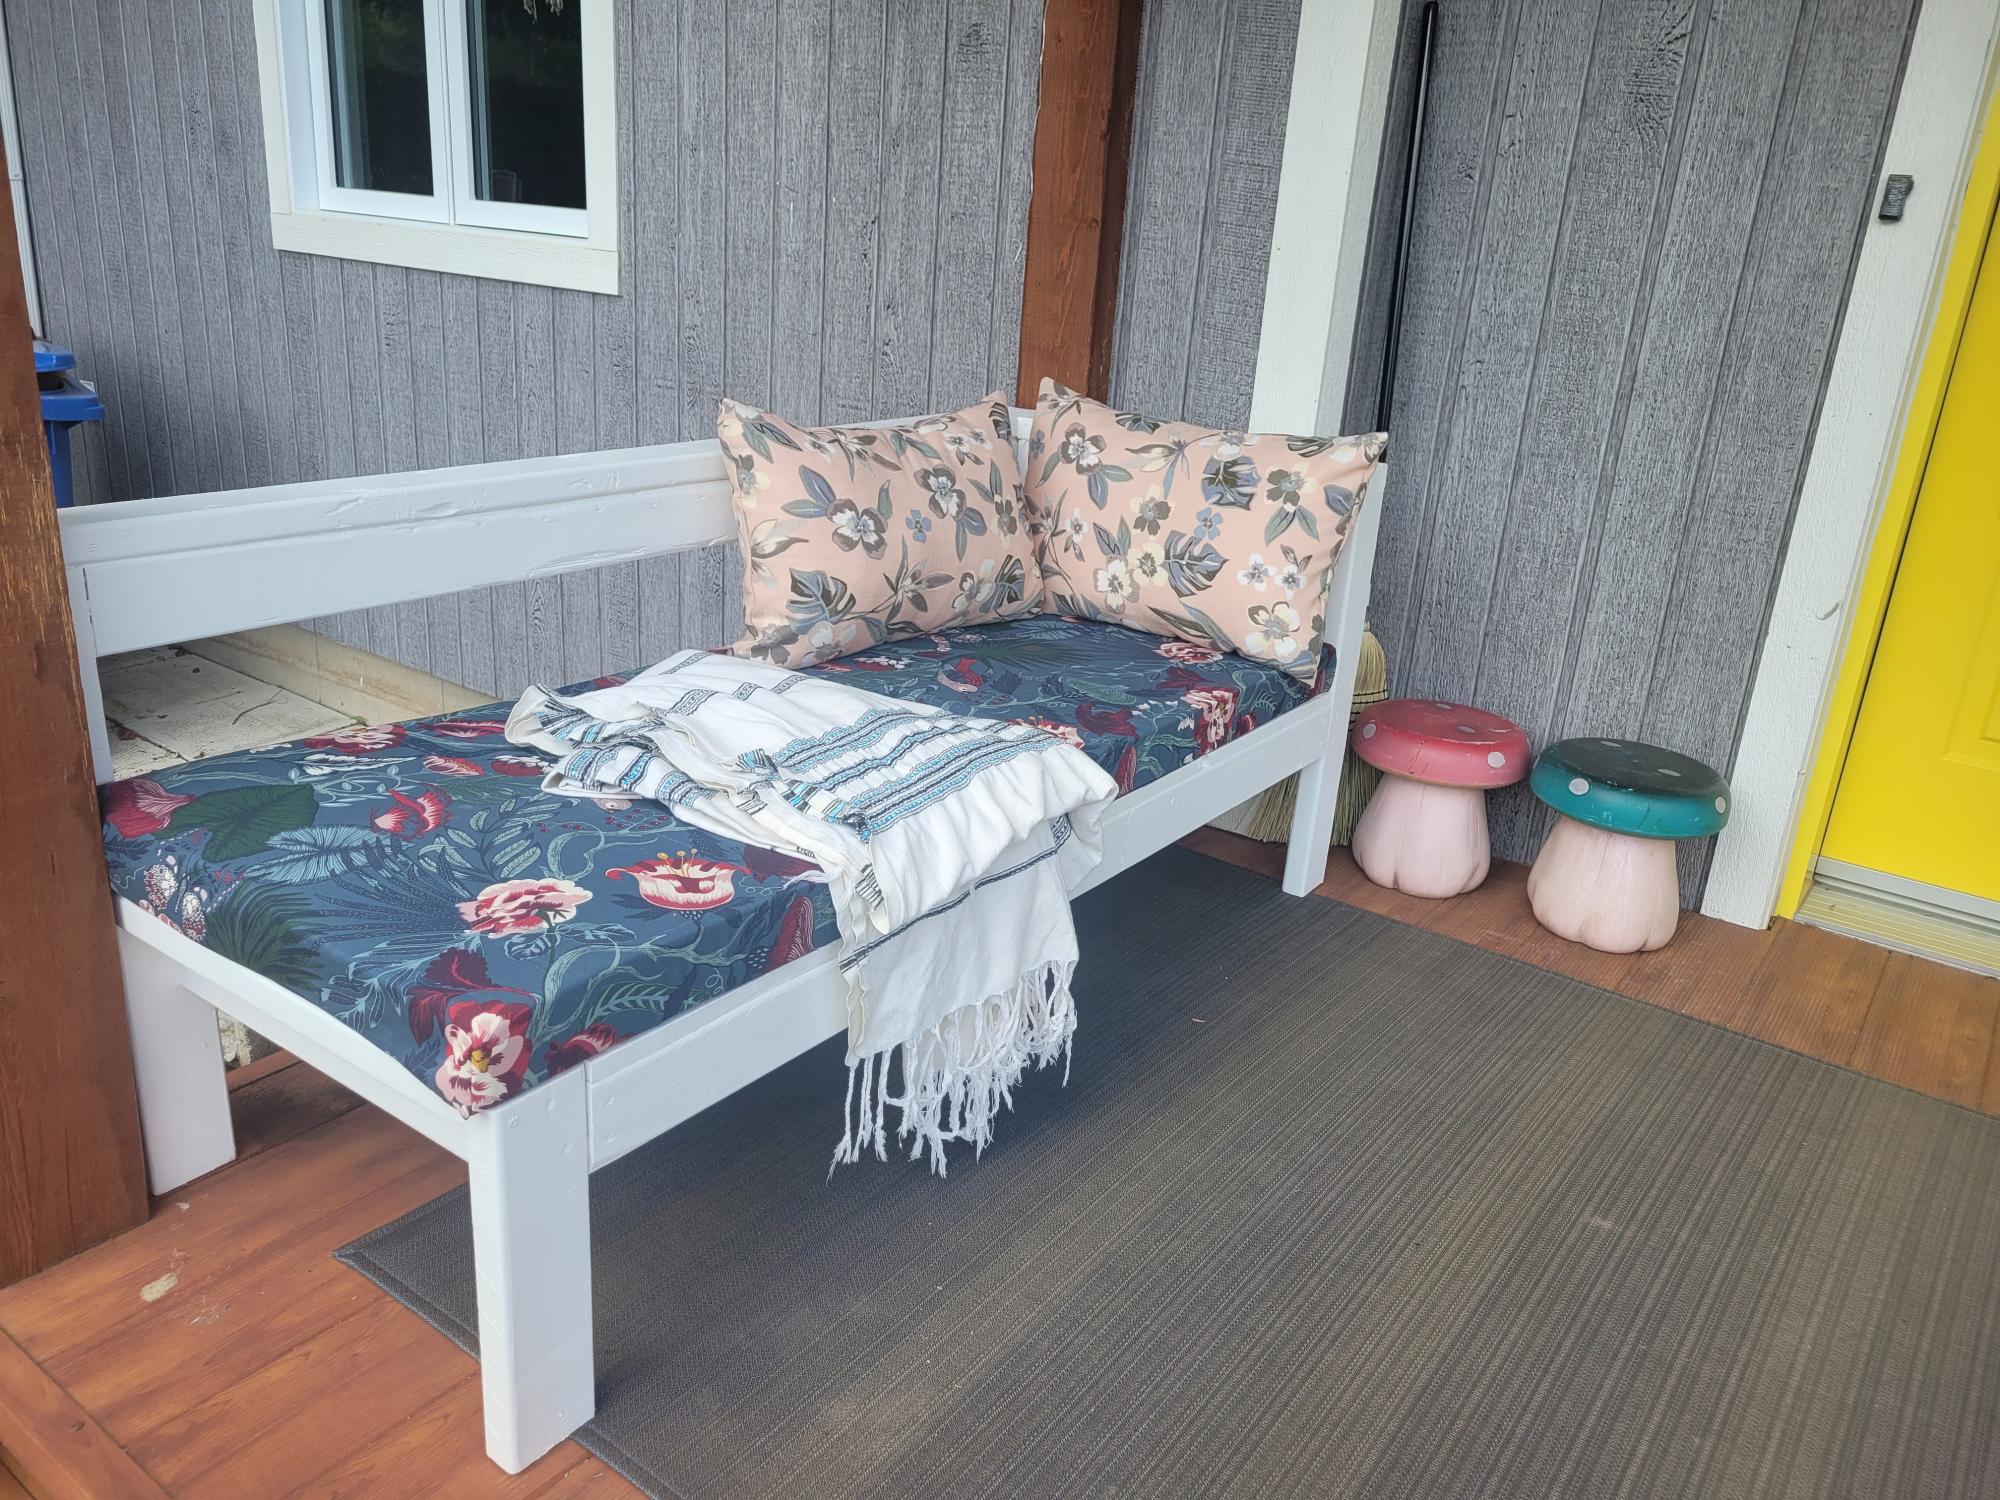
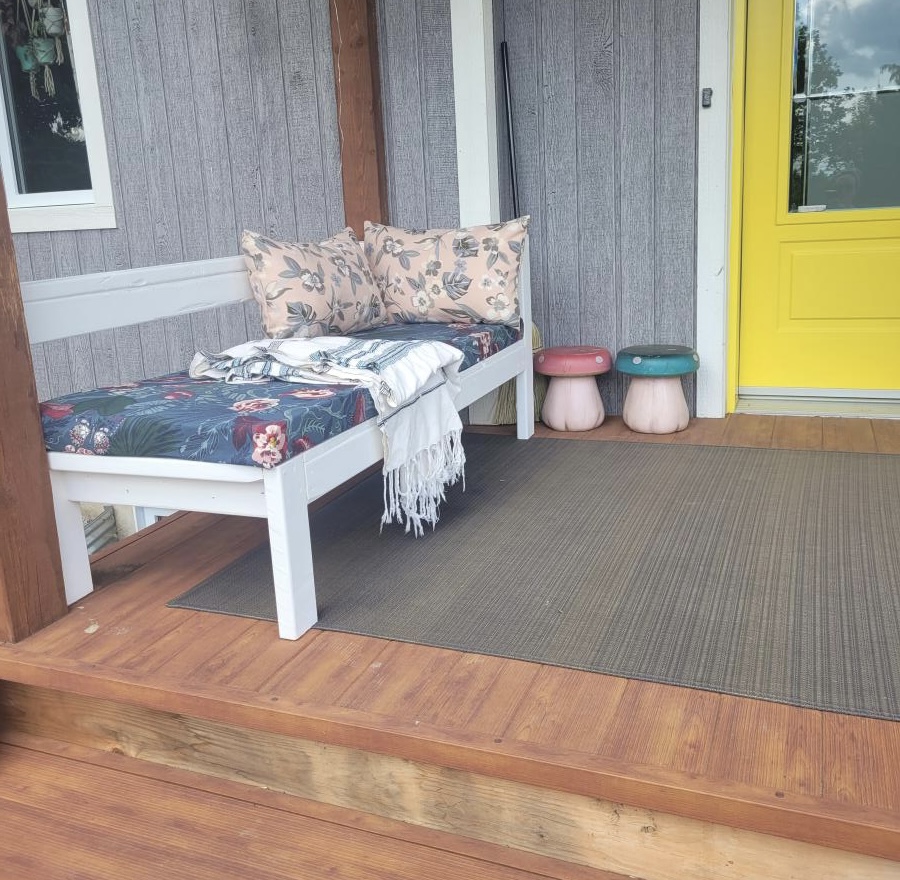
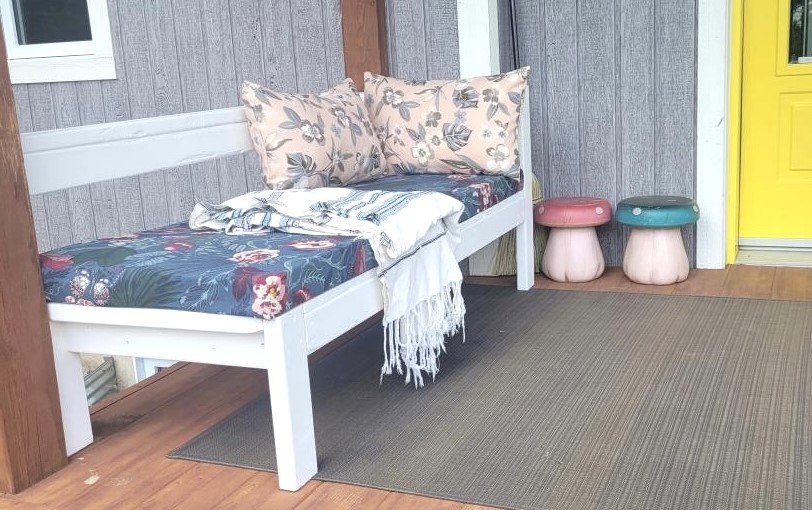
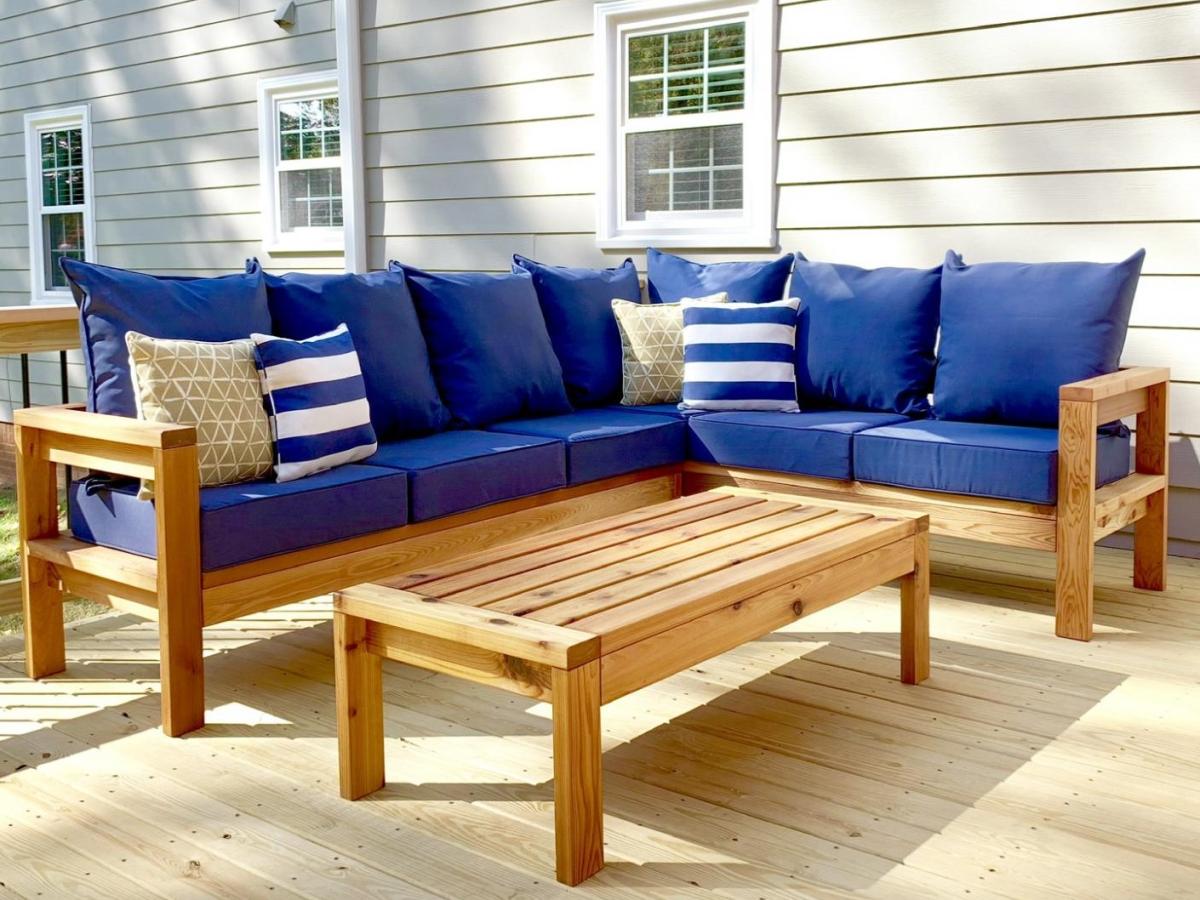
Community Brag Posts

Outdoor Sofa

Submitted by dionneds on Sun, 04/10/2022 - 07:16

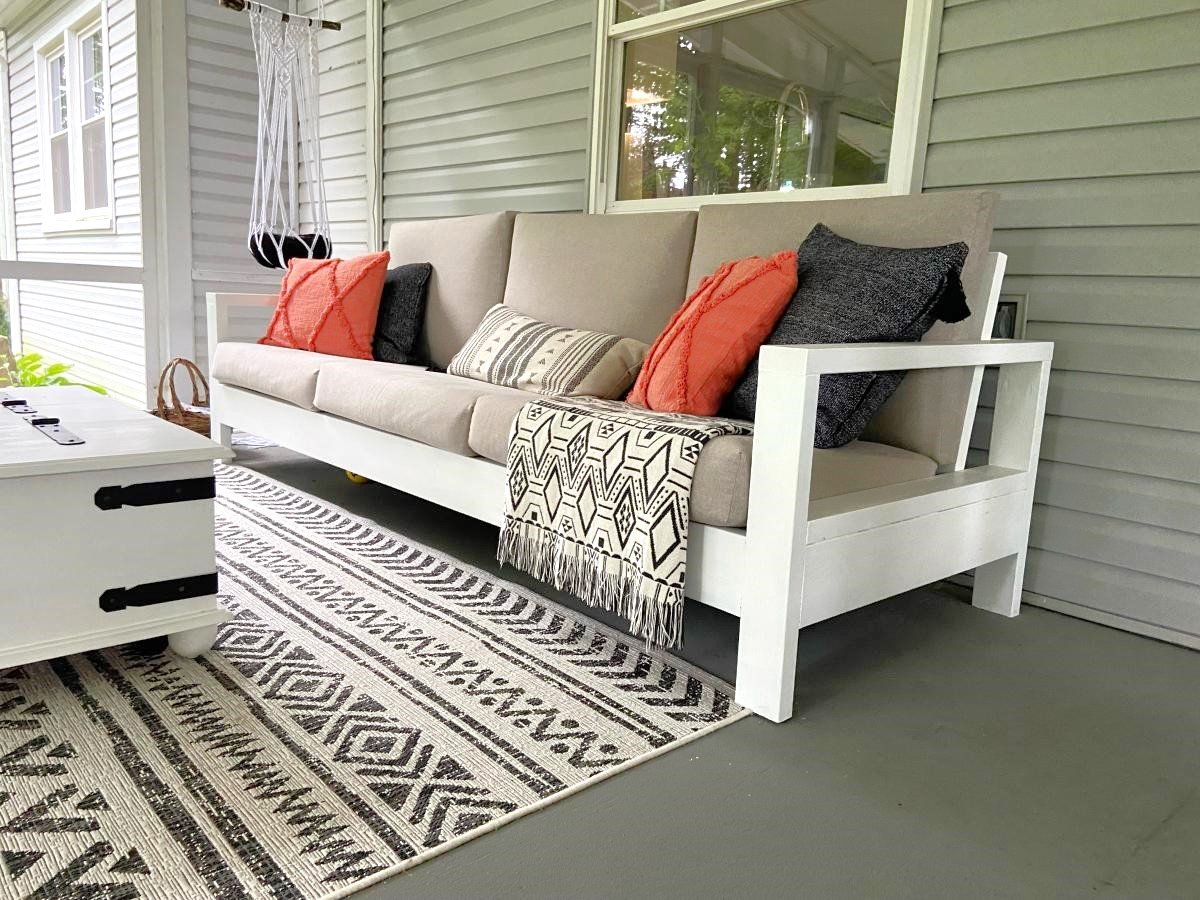
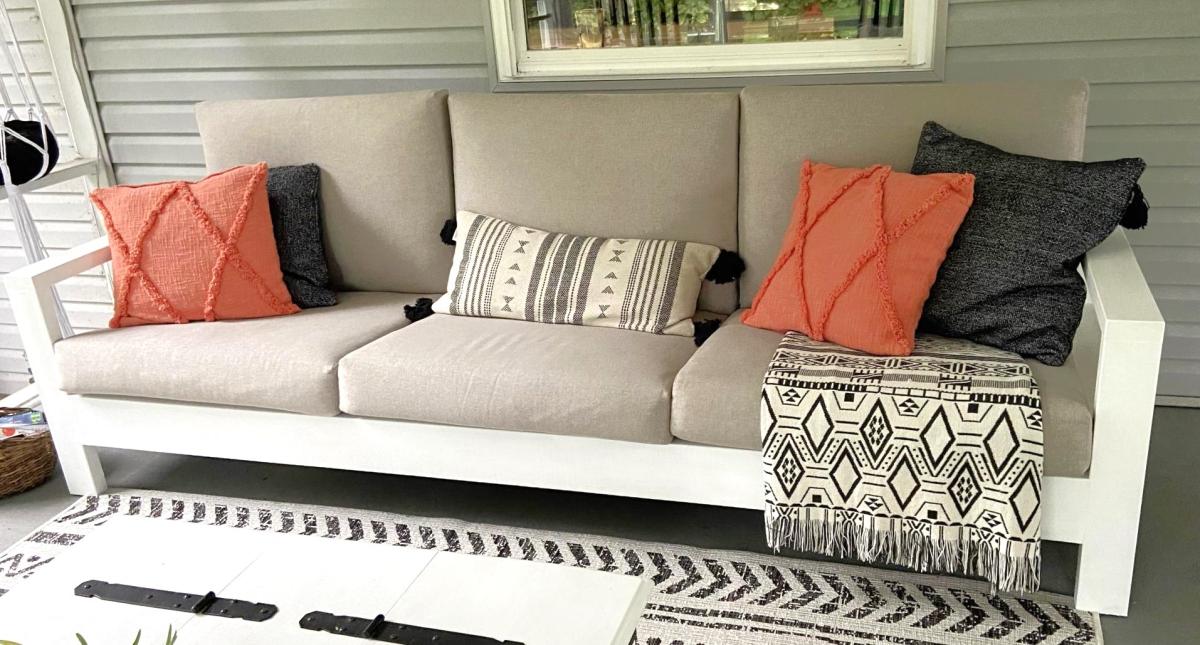
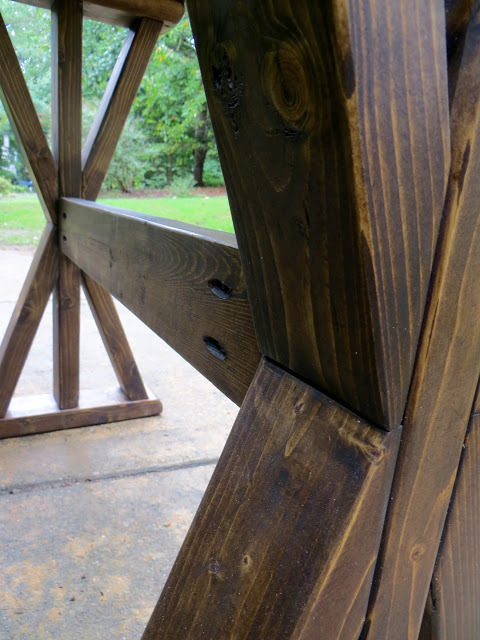
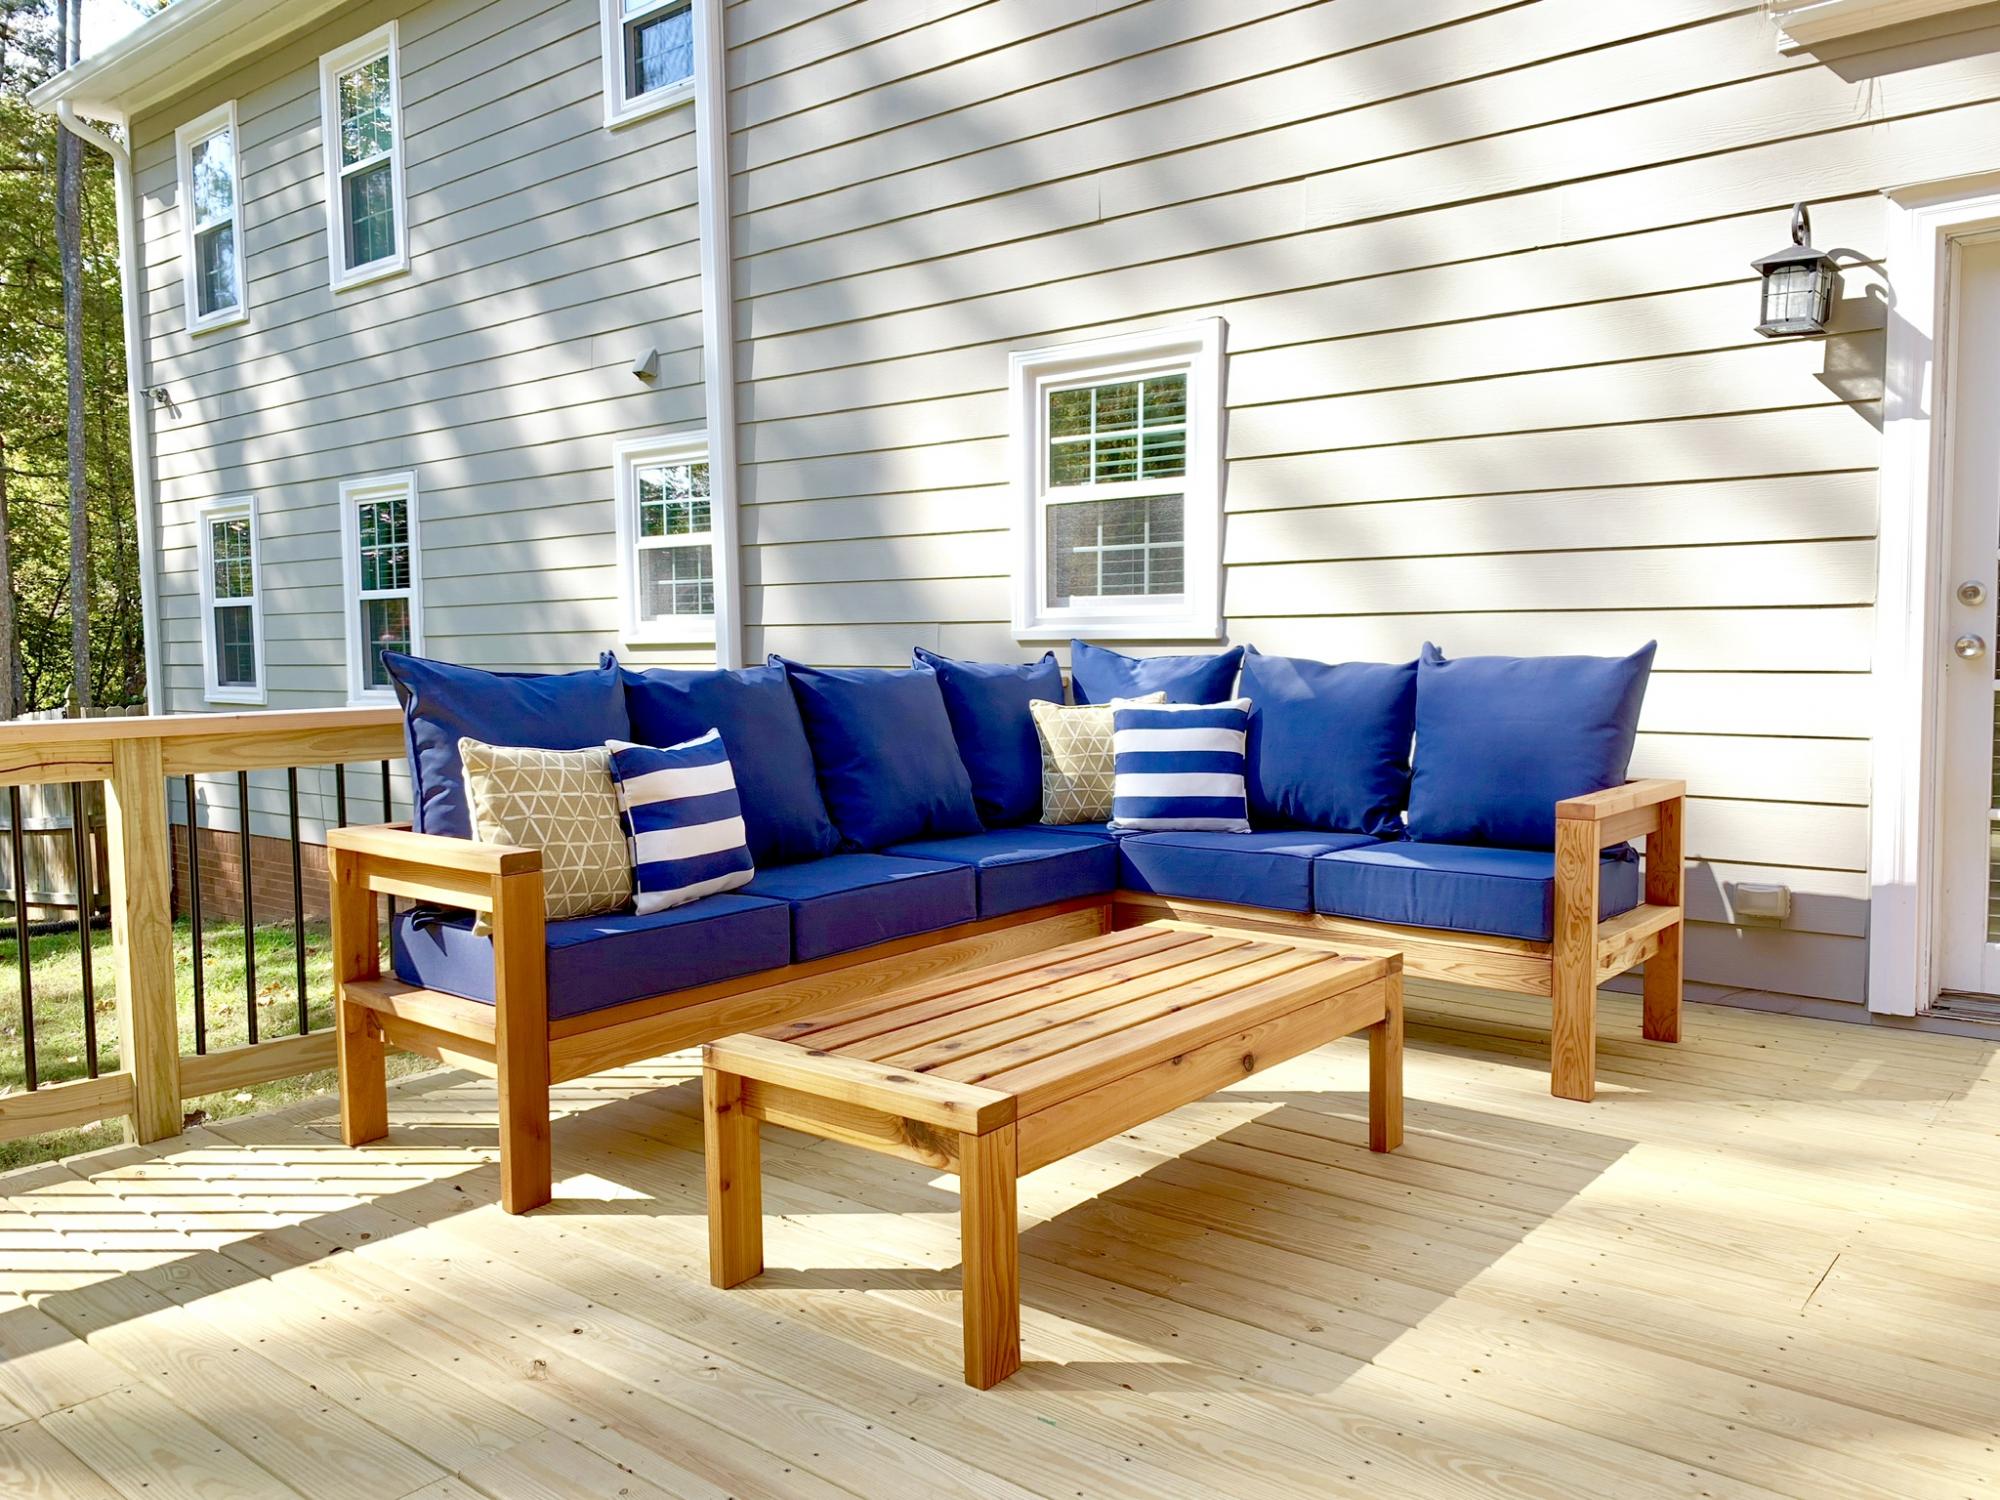
This was our first big project with our Kreg Jig. We adapted the plans to make the sofa 8' long. On Friday night, my husband did all the cuts and I pre-painted everything. With the help of our son, we had the whole sofa built in a few hours on Saturday morning. I puttied the visible holes, did a second coat of paint, and made custom cushions. The plans were very easy to follow. I followed the others' advice about pre-painting and assembling the back on a perfectly level surface. It came out better than I expected and it's super comfortable!

Built from Plan(s)

Comments

kdykes08

Mon, 04/11/2022 - 07:44

I want the plans for this one! I like this style a lot better. I really like how the bottom cushions are at a slant. I suck at modifying plans.

Seasonal And Holiday

Full size storage bed with trundle

Submitted by ellehcim88 on Fri, 08/14/2020 - 15:14

Full size storage bed with trundle. Three drawers and a trundle on one side and four drawers on the other. I started with the farmhouse design (headboard and footboard) and modified it to make it not so heavy and I designed the rest using SketchUp. See more photos in blog link.

Built from Plan(s)
Estimated Cost
$1000
Estimated Time Investment
Week Long Project (20 Hours or More)
Finish Used
White satin finish latex paint
Recommended Skill Level
Intermediate

3 hook coat rack

Submitted by Anonymous (not verified) on Wed, 11/03/2021 - 12:40

Thank you for this - I just made it slightly longer.

Comments

Built in closet

Submitted by AndyH on Mon, 06/13/2016 - 19:14

Built in closet to replace builder grade wire wracking.  Closet is approximately 11 feet by 5 feet.  consists of two shoe racks with 7 shelves each.  6 large drawers and 4 small drawers.  Two hanger sections with storage  above them.  End wall has hanger for longer items and storage above and a cabinet with shelves.

Yet to finish the floor.

Estimated Cost
$1000
Estimated Time Investment
Week Long Project (20 Hours or More)
Finish Used
Sherwin Williams Extra White satin paint.
Recommended Skill Level
Intermediate

modified bench swing

Luv your site. Took your bench swing plan and modified it a bit (shortened depth) and then created a small pergola to hang it from. Just need to stain/poly to finish it off. Thanks for your plan and website it is very inspiring.

Estimated Time Investment
Weekend Project (10-20 Hours)
Recommended Skill Level
Beginner

Farm House Dining Room Table (Modified with Breadboard Extensions)

Submitted by jvanhorn on Fri, 05/10/2013 - 07:56

This is a modified plan for Ana White's Farm House Table.

I shortened the table to about 72 inches with breadboards on the ends and added removable breadboard extensions for a total of about 100 inches of table for a 12x11 room. I also built the Farm House bench but shortened it to 48 inches.

The wood is white pine and Douglas Fir 4x4 legs. The total cost was $198 for the wood/screws and about $30 for the stain and sand paper. I bought an additional set of countersink bits for holes.

I used the following tools:

  • Hand Saw
  • Table Saw
  • Compound Miter Saw
  • Hand Drill with various bits and countersinks
  • Square, pencil and straight edges
  • Tape measure
  • Clamps
  • Wood Chisel Set
  • Sharpening Stone
  • Level
  • It took about 35 hours of work.

    The stain is English Chestnut and we pretreated the wood to accept the stain by using wood conditioner. This made a dramatic difference in leveling out the stain between the white pine and Douglas Fir. I used 3 coats of clear polyurethane and 2 coats of satin on the top with gentle sanding in between coats.

Estimated Cost
$230
Estimated Time Investment
Week Long Project (20 Hours or More)
Finish Used
Prepped the wood with wood conditioner before applying stain. English Chestnut stain with 3-clear polyurethane coats followed by 2-satin coats. Light sanding in between coats.
Recommended Skill Level
Intermediate

Chaise Lounge

Submitted by Anonymous (not verified) on Fri, 06/09/2023 - 15:53

It was so much fun to do and it's perfect for my front porch! I modified it a bit to fit and it was easy to do so.

Built from Plan(s)

Comments

Corner Media Console

Submitted by craw4dz on Thu, 02/27/2020 - 10:39

We had just moved into our new house and were using an end table for our TV stand I just didn't like it.  I found this and modified it so it's shorter and fits in our room better.  I also opted to not put doors on it and use it to display items instead.  This was a relatively easy build and I'm learning new things with every build I make.  It took about 2 days to complete not including filling holes/paint/stain.  I love it, it looks so great in our room and I am planning on building end tables to match as well as replacing our buffet with movies in it to match also.  Thanks for the easy-to-follow plans!

Built from Plan(s)
Estimated Cost
$45
Estimated Time Investment
Weekend Project (10-20 Hours)
Finish Used
Whatever white paint I had on hand (haha) and Varathane Kona with a satin poly for the top.
Recommended Skill Level
Beginner

'X' Entryway Table

Submitted by danicarby on Sat, 09/24/2016 - 14:32

This table is built out of only 2x4's - that's 5 boards for about $15!  It was pretty easy and took half a day.  If the fancy angles are too hard to cut safely I recommend doing 45-degree angles!  I'm happy to have a nice entryway - first time my whole life! :)

I've created a post on my project blog wth instructions & pictures for anyone to make their own.

Rustic console table

Estimated Cost
$15 for Lumber
Additional for Screws and Wood Finish
Estimated Time Investment
Afternoon Project (3-6 Hours)
Finish Used
Minwax Wood Conditioner, Minwax Dark Walnut Stain then lasly, Paste Wax (Dark Brown).
Recommended Skill Level
Beginner

Comments

danicarby

Tue, 09/27/2016 - 12:16

Thank you Ana!  You made my day!  It was such a treat to see it posted on your Facebook page!  I told my husband that NOW that "I am famous" (haha) that I should be able to get the jointer & planer I've been begging him to let me buy!  I'm thinking maybe a direct message from  you would be just the trick! :)

Richard6959

Wed, 01/29/2020 - 13:54

What angle were the leg cuts? More than 50* because my saw wont go that far. Please let me know. 

Cat Tree/Condo

Submitted by Joni on Sat, 05/11/2013 - 07:22

I always wanted a cabin-type cat tree where my cats could crawl in and feel safe, but still have a great view of the birds out of a window. I tried to draw my vision on paper, but that had a hideous result. Learning Google SketchUp (at least the basics) was an absolute necessity. I could never have built this without drawing it in 3D first, and seeing how the boards would connect, etc.

For the scratch pad, I built a frame out of 2x4s on top of plywood, covered it with carpet, and dropped the standard size scratch pad in place. This is the cat's favorite feature. I put barn doors on the window with tiny hinges so that I can close for added privacy. The tree sits against a window so that the back side is totally open. I made cozy zippered cushions for the platforms (that can be taken off and washed). I covered the carpeted areas with spare carpeting.

Estimated Cost
Approx. $30 for can of paint, varnish and a 4x4 (all other was scrap material)
Estimated Time Investment
Weekend Project (10-20 Hours)
Finish Used
Combination of Minwax Water-based stains: 6 parts Colonial Pine: 1 part American Walnut, followed 3-4 coats Minwax Polycrylic
Recommended Skill Level
Intermediate

Comments

bhoppy

Fri, 07/12/2013 - 09:36

Would you mind sharing your dimensions for this? It is absolutely beautiful!

Jodi W

Sun, 08/25/2013 - 08:10

Do you have the plans somewhere? I really want to build this (even got the okay from the hubby!) but I don't think I could do it without some serious guidelines...

Joni

Fri, 08/30/2013 - 15:55

First, sorry for the late notice; I just happened to look and saw the comments/questions.

I don't have plans...all I have is a google sketchup diagram that I created as a guideline for my construction (which is included in the photos), which is not to scale. Actual measurements are:

* Base (green carpeted base): 33.5" x 19"
* 4x4 legs: 35" tall
* 'Mezzanine' scratch pad level: 22" x 17.5"
* Mid-level base: 18" x 32"
* Enclosed cabin: 18.25" x 22.5" x 17" high
* Highest point: 56"

This has turned out to be a fantastic hit with the cats. They use all 5 levels, but the scratch pad and cabin are their favorite spots. If you need anything else or additional pics, please contact me.

Jodi W

Fri, 08/30/2013 - 18:15

Thanks for the dimensions, Joni! I'm trying to learn SketchUp so I can draw up my own plans, also. If I can't figure it out, I'll hand it off to my 12 year old, who is a pro at it (go figure). I know my cats will love it if I can manage to get it built!

Joni

Thu, 10/31/2013 - 14:30

Bhoppy -- I looked at your cat tree on facebook. It's awesome! The sturdiness of it shocked me too. And I was initially worried that my cats might knock it down!!

The worst part of building it was getting that lower scratch pad level on straight with the 3 posts. I'd never want to do that again!
Thanks for sharing, Joni

gregmasciola

Fri, 01/02/2015 - 01:18

Funny, almost every time I'm looking for ideas or inspiration when I want to build something, I end up back on this site. I was searching for pictures of cat trees and this was the only one that made me say "Holy crap, that's EXACTLY what I want!" My cat will love it!

M0710NM4N

Mon, 04/27/2020 - 20:41

Not sure if anyone is still around to see this, but I fell in love with this tree the second I saw it. Wondering if anyone created a detailed plan and might have it handy or possibly a detailed sketchup and wouldn't mind sharing the save file?

In the event nobody has either... I'm planning on having someone else build this for me as I don't have the tools nor skill to do it myself. I have a few questions:

1. The tree base/platform, what's a good recommended thickness?
2. The platform for the scratchpad... is there any certain reason it's so much thicker compared to the other platforms?

Thanks.

whiteroses9

Sun, 09/12/2021 - 11:51

Reverse engineering this project, using just 2x4s. None of the photos show the undersides. How are the plywood pillow bases attached for the top and bottom of the cabin? and the base of the top viewing platform?

Just Couldn't Reach

My son is a little short for his age and we have been searching for a stool that he could use to wash his hands by himself. I came across these simple and quick plans for an amazingly, functional stool. I spent about 4 total hours on it, made it from scraps that I already had, it looks great and it hold me too... all 230 lbs.

Built from Plan(s)
Estimated Time Investment
Afternoon Project (3-6 Hours)
Finish Used
Semi-Gloss Paint (left over from painting my ceiling)
Minwax stain and poly.
Recommended Skill Level
Beginner

2x4 Outdoor Sectional and Coffee Table

Submitted by Anonymous (not verified) on Tue, 10/01/2019 - 17:56

I followed the instructions on the Ana White website, and followed a few of the commenters ideas to reduce the size slightly to minimize the wood costs. I used pocket holes wherever I could to try and reduce the amount of visible screw heads. The cushions were purchased at Big Lots and the cedar was purchased at the big home improvement store. My 5 year old and I worked on this and are so proud of how it turned out.

Estimated Cost
$250
Estimated Time Investment
Day Project (6-9 Hours)
Finish Used
Teak Oil
Recommended Skill Level
Intermediate

Comments

Seasonal And Holiday

Cube Storage Shelf

This is another piece for my living room to go along with the console table I've already finished. My hope is to replace all of the furniture in the living room with matching pieces to finally have a house that doesn't look like it was decorated through the Salvation Army.

This one has the specific purpose of a toy box for our two year old. Now she has a place to store her toys that she keeps in the living room instead of just piling them up in that corner. It's based on the 6 cube bookshelf design and finished with three coats of Varathane's Kona poly blend over regular pine.

Built from Plan(s)
Estimated Cost
$50
Estimated Time Investment
Day Project (6-9 Hours)
Finish Used
Varathane's Kona polyblend
Recommended Skill Level
Starter Project

Comments

Fireplace Mantle with Drawers and Hidden Storage

Modified plans to include game storage drawers, a flip open mantle for DVD player and hidden charging port, and hidden cupboards on both sides for DVD storage. I scoured the Internet for months before drawing this up to fit my space and tackling all on my own! I love it and all of my other Ana White inspired projects!

Casey O.

Seasonal And Holiday

Playset Addition

Submitted by Derek S on Wed, 06/10/2020 - 08:27

Decided our old play set needed an addition, landed on these plans of Ana's. Sat on them and mulled them over for months. Once the wife said something about adding on to it I made the purchases needed. Connected the two platforms with a bridge. I used 4"x4"x10' for the runners, same boards as the decking for the platform of the bridge(5/4"x6"), 2x4's and 1x4's for the railing. If you look at the 3rd photo, I had to chisel out the 4x4 post to get the 2"x6"x12" support to fit correctly. This should measure 2"x6"x13". Another change I made was to cut the bottom and top trim pieces longer on the front and back sections so that the trim would cover the framing of the gable end walls (see last photo). my son wanted windows so I faked in some windows with scrap 2x2's. I used 2x6's as supports from the 4x4's to the 2x6 framing (see photo 3) I added the monkey bars about a month before deciding to do the platform/deck and playhouse. The ladder is based loosely off of a couple of plans I found online. I was able to do all of this work myself except for the roof. Need my dads help to lift the plywood, he then helped me with the rest of the roof.

Estimated Cost
$1000
Estimated Time Investment
Week Long Project (20 Hours or More)
Finish Used
I used a dark wood stain fore the house, green exterior paint for the trim and white exterior paint for the interior of the house.
Recommended Skill Level
Intermediate
Seasonal And Holiday

Our twin elevated gardens

Here's our planters, and they're our first carpentry projects! We found that there were cost efficiencies when building 2 units. We also opted for nut and bolt attachments for the legs instead of making pocket holes…mainly because I don't have the guides for making pocket holes. Seems to work fine, although I do still need to get a saw that I can cut off the excess bolt length on the inside (see pics). Perhaps next time I should trust my measurements and buy the correct bolt length. Ended up costing about $250. Slightly more than the cost of ready-to-build planters at home depot, but those weren't elevated and not nearly as heavy duty or as large. Well worth the investment of both time and money, and a great starter project for beginners. Good luck to you all! -Don and Staci

Built from Plan(s)
Estimated Cost
250
Estimated Time Investment
Weekend Project (10-20 Hours)
Finish Used
Only a light red stain on the exterior as we didn't want the chemicals to invade our vegetables. Ended up with a very nice orange hue when the red stain combined with the pine's natural yellow coloring.
Recommended Skill Level
Starter Project
Seasonal And Holiday

Fold down laptop desk

Submitted by Taa-daa on Wed, 09/21/2016 - 21:42

Inspired by Ana's Flip down wall art desk. It has different dimentions since wall space was limited. I used a magnet as a lock, added upholstered back, dowel for storage and extended the bottom part to add some strength. It is very handy!


Built from Plan(s)
Estimated Cost
30$
Estimated Time Investment
Afternoon Project (3-6 Hours)
Finish Used
spray paint and home made chalk paint
Recommended Skill Level
Beginner

Comments