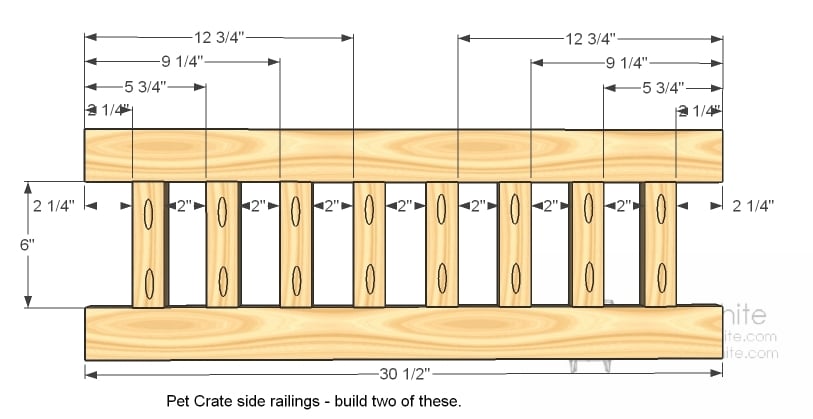
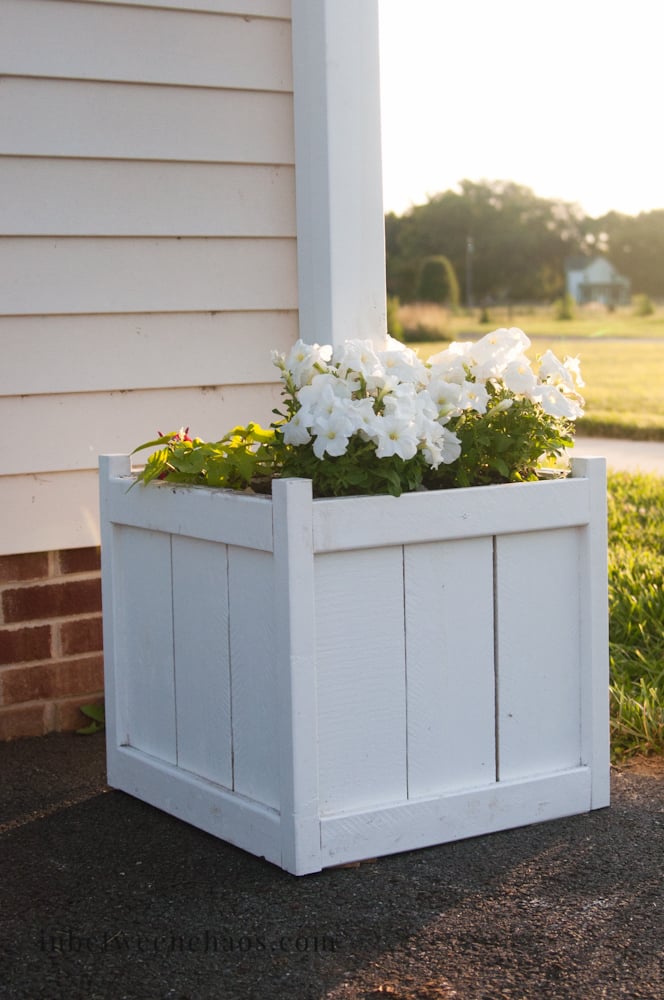
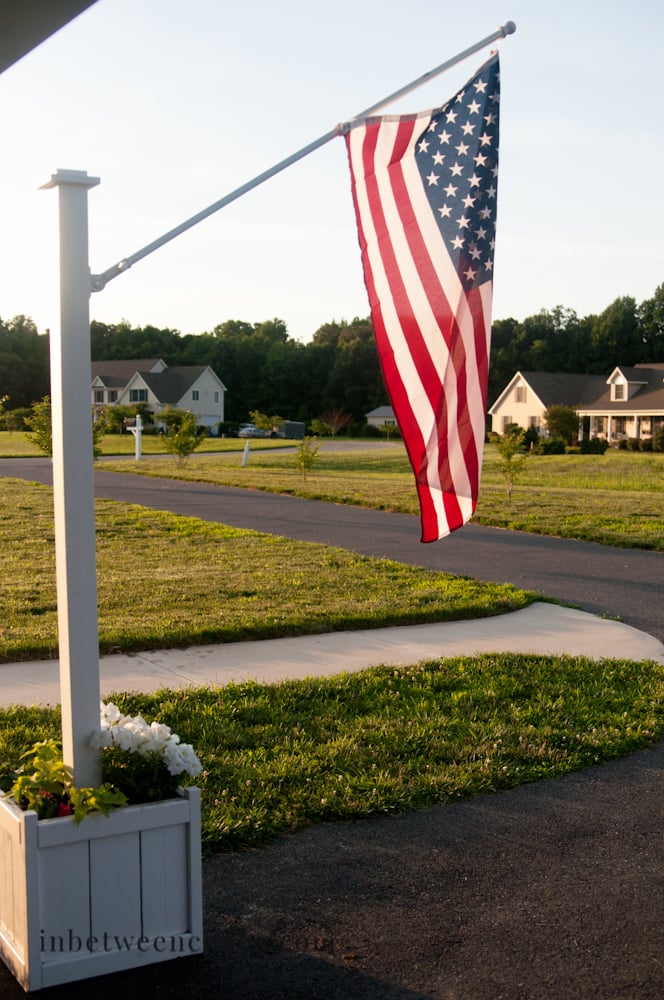
Community Brag Posts

Flag Pole Planter

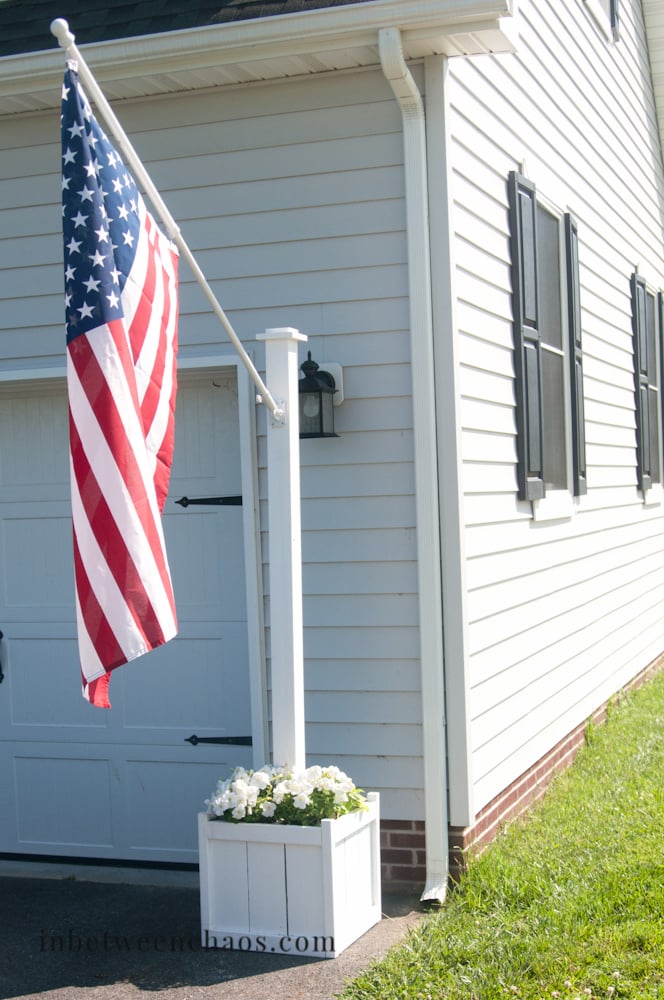
I wanted a place for a flag pole, but I didn't want to put one in the ground or screw into my siding, so I modified the cedar planter to hold a flag pole. It was a fun project!  Check out more here!

Built from Plan(s)
Estimated Cost
$40 plus flag pole
Estimated Time Investment
Afternoon Project (3-6 Hours)
Finish Used
White Exterior Paint
Recommended Skill Level
Intermediate

Workbench

Submitted by Ulrike on Sun, 06/21/2020 - 09:37

Built 2 of the workbenches for our garage. The plans made assembly very easy and quick. We had Home Depot cut the plywood to size.

Estimated Time Investment
Afternoon Project (3-6 Hours)

Comments

Ultimate Workbench for me

Submitted by ianr on Mon, 06/22/2020 - 15:13

I altered the original plans in the following ways:

  • Only built one rolling cart because I already had a multi-drawer tool chest that fit right under the workbench.
  • Built the right half of the workbench as a separate piece from the miter table because attic access is right above it and we need to move the workbench to get to it.
  • Built a half cart for the table saw because the Dewalt contractor saw extends too far to the sides to have it boxed in.
  • I'm going to add a sliding plate that locks down for my miter saw so I can pull it away from the wall without dragging or lifting it.
  • I used a nail gun with two inch nails instead of staples since I don't own a staple gun that holds staples that long.

I'm not that experienced with projects so here are a couple of things I learned:

  • Attach the castors far enough under the cart so that the wheel never extends beyond the sides.
  • Watch what grade sandpaper you use on the plywood. It's easy to strip off a layer.
  • This was not a one-person project for me. Even with clamps, I still needed help bracing parts and rotating pieces.

Thanks for the great plan! Now I can start on all the other projects on our improvement list.

Estimated Cost
350
Estimated Time Investment
Weekend Project (10-20 Hours)
Recommended Skill Level
Intermediate

Outdoor rolling bar top

Submitted by Anonymous (not verified) on Wed, 07/08/2020 - 19:43

We had some leftover granite from an outdoor kitchen build and wanted to maximize the use of it. We loved the look of a rustic table from Pottery Barn and set out to find something that was asking the same aesthetic. I came across the Jilly and Mia workbench console and thought it would work great with some minor modifications. I shortened the overall length and height, went with some heavy duty casters to support the weight of the granite, and reinforced the cross beams that would support the 3/4" plywood sheet and granite. I went with cedar for this build since it was outdoors and I'll finish it with a clear sealant.

Built from Plan(s)
Estimated Cost
$300
Estimated Time Investment
Day Project (6-9 Hours)
Recommended Skill Level
Intermediate

Comments

2x4 Essential Adirondack Chair

Submitted by mricks1960 on Mon, 11/16/2020 - 11:31

I used Western red cedar to build my chairs. The build was a little more expensive but well worth it. The chairs were stained with Cabot’s Australian Timber Oil ( Jarrah Brown). Thanks for the plans Ana, your site is awesome and you do a great job! Mark


Comments

Outdoor bar grill surround with 2 post pergola

I wanted to build an L shaped outdoor bar with a 2 post pergola over the grill.  I couldn't find any plans online that would fit the space I had, so I decided to build it myself with custom dimensions.  The top bar is approx. 7'3" across, and 15" wide, while the distance from the right edge (next to the house) to the end of the bar is approx. 9'1".  

I framed it with PT lumber and the 2 pergola posts are sitting on top of the pavers and supported internally within some of the framing studs.  Since the pavers sit on top of concrete, I didn't feel the need to dig up the existing pavers and achor them in the ground.  

I used hardiboard for the exterior and tiled the lower section of the bar.

For the actual high bar top, I wanted to do something unique, and found a 900 year old scrap slab of Cypress at a local lumber yard.  One side was smooth, but underneath was gouged out from different saw cuts and very uneven.  I screwed a piece of 3/4" PT plywood underneath and trimmed it with 1-1/2" Cypress.  I stained the whole thing with a dark honey colored stain and put a generous amount of poly on it once it was dry.  There are a few cracks and nicks on it, but once it was stained, it looked awesome.  

Estimated Cost
I lost track after a while, but I would say $600-700.
Estimated Time Investment
Week Long Project (20 Hours or More)
Finish Used
Minwax honey colored stain for the bar top. Minwax provincial stain for the pergola and minwax dark walnut stain for the oak trim.
Recommended Skill Level
Intermediate

Comments

Miter Saw Cart named Dolley

I made the miter saw cart today. It took me about 2.5 hrs, but I was going slow and taking lots of breaks.

Built from Plan(s)
Estimated Time Investment
An Hour or Two (0-2 Hours)
Recommended Skill Level
Starter Project

Comments

Modern Dorm Mini Refrigerator Microwave Cabinet

Submitted by rachelcb on Sat, 07/31/2021 - 12:35

I changed plan to make deeper. I also modified the bottom trim and top. I put a ball bearing soft door drawer guide on modern door so it can slide back and forth. I feel we need more modern plans on here but with a bit of creativity and using plans you can make anything. I have never built anything before. I love General Finishes Milk Paint in Snow White and I brushed rolled it on (sanded between 3 coats). It’s basically self leveling and leaves a nice matte finish. Used door glide in picture bought from homedepot in the 24 inch and that’s how wide door was and it was 36” tall. Door glide I only used one on top of the door not on bottom as well. Door piece of fiberboard with just strips glued on and quarters spacing them correct.

Estimated Cost
$200
Estimated Time Investment
Weekend Project (10-20 Hours)
Finish Used
Dorm mini refrigerator microwave cabinet
Recommended Skill Level
Starter Project

Comments

My first Easy Build Headboard, King Size

Submitted by andreak on Thu, 05/12/2011 - 16:15

This was my first project and it come out beautifully. I did learn a valuable lesson - if you are going to build something in the basement, make sure it fits up the stairs. Not sure if you can tell from the picture but this ended up 6 inches shorter than the plans. Can wait to find my next project!

Estimated Cost
$150
Estimated Time Investment
Day Project (6-9 Hours)
Finish Used
MinWax Wood Finish Red Mahogany 25 - Minwax Polyurethane
Recommended Skill Level
Beginner

OCTAGON PICNIC TABLE

Submitted by BigBry on Sat, 03/01/2014 - 07:36

My son and I had a blast building this table last October. I have been meaning to write and thank you for the great plans. We took the suggestion of staggering the legs for better access and it turned out great. I also used deck boards for the top to help reduce weight and they were already slightly curved on the sides which made sanding easier. Thank you!
My cost includes a nice Kreg Jig set up (approx $100)

Built from Plan(s)
Estimated Cost
$220
Estimated Time Investment
Weekend Project (10-20 Hours)
Recommended Skill Level
Intermediate

Arched Bridge

Submitted by RandyW on Fri, 01/09/2015 - 16:03

Used some basic tips found online to draw out the cut lines. The runners are 2x12x12. Regular ole decking for the platform and 4x4 for the posts. Anchored in concrete. Lag bolts and hex bolts to secure to the posts.

Estimated Time Investment
Weekend Project (10-20 Hours)
Finish Used
After letting the treated lumber dry for a month or so in the summer heat I used an exterior latex for the white and Minwax Red Mohogany on the decking.
Recommended Skill Level
Intermediate

Comments

Kitchen Cabinets

Submitted by Anonymous (not verified) on Wed, 10/02/2019 - 21:30

I followed the kitchen cabinet building plans to build all new upper cabinets up to my ceiling. I built all new drawers with soft close drawer slides also and built the refrigerator enclosure cabinet.I did the entire remodel myself including the new doors out of MdF.

Finish Used
Emerald urethane paint
BIN Shellac Primer

Comments

Ana White

Tue, 11/05/2019 - 10:41

We are so thrilled to let you know your entry WON the Best Brag contest!  There were many amazing entries, and it was tough to choose.

Look out for an email from us shortly!

Modern Sectional Sofa

Submitted by reinkense on Fri, 05/30/2014 - 17:22

I looked all around my town for a sofa that meet my needs. I wanted something with tall legs, modern lines and fit my living room. I did not have $3,000 to buy one online so I said to myself why not???


Estimated Cost
$400
Estimated Time Investment
Week Long Project (20 Hours or More)
Recommended Skill Level
Intermediate

Comments

reinkense

Sat, 05/31/2014 - 15:58

Thank you! I am really proud of it. I was thinking of putting together some plans.

Samigdal

Fri, 12/25/2015 - 17:48

Are there step-by-step instructions for building this posted anywhere?

walthoca

Fri, 01/06/2017 - 11:06

I am so impressed. We recently spent a small fortune on a sectional, but yours looks equally beautiful. You are incredibly talented! 

X - Farm House Table

I modified this plan just a little on the ends, and I can not tell you how pleased I am with it! I did run into some issues with lining the boards up properly due to imperfections (and not laying the boards out ahead of time in the store because I was rushing at closing time), but in the end, I decided to add a wood filler in between the boards and everyone just raves over it. I could not imagine it having come out better. I would not do it any other way. 

Thank you Ana!! 

PS... I have a wonderful idea for a loft bed, but the plans are not provided. I know you would do it justice.. how do I submit the photo????

Built from Plan(s)
Estimated Time Investment
Day Project (6-9 Hours)
Finish Used
Satin, Custom mixed stain, stainable wood filler, sander.

Recommended Skill Level
Intermediate

Comments

jeffross

Sun, 01/07/2018 - 07:22

My appologies if I'm missing it but are there build plans for this table.  I would really like to build this for a friend but I'm not sure my skills will enable me to free style this. Thanks in Advance.  Jeff

cjtrunk21

Fri, 05/29/2020 - 11:50

Did plans over get posted for this table? Love the design. Thanks.

Outdoor Sofa Mash-up

Submitted by Anonymous (not verified) on Thu, 06/30/2016 - 19:51

My wife loves the X pattern of the Weatherly Sofa, but wanted the tilted back from the Simple White Outdoor Sofa. This was our best of both worlds effort!

Estimated Cost
$85 for lumber and materials without cushions.
Estimated Time Investment
Afternoon Project (3-6 Hours)
Finish Used
Primer and outdoor paint.
Recommended Skill Level
Beginner

Comments

Katie.Belmont88

Wed, 07/06/2016 - 19:18

I love this! I was so excited until I realized that this was a brag and didn't have plans. I don't know if I'm as talented at modifying as you are. :)

Seasonal And Holiday

Sewing Table for Small Spaces

Submitted by Linda7 on Sun, 02/03/2013 - 16:51

My daughter-in-law needed a compact sewing table, and this plan fit the bill perfectly! I did use 2 x 2 legs instead of 1 x 2s. This makes the table considerably more stable if you plan to use this table with your machine. If you do use the 2 x 2s for legs, you will need to widen your table top dimensions from 15 1/2" to 17" to accommodate the larger diameter of the legs. I also used a piano hinge for each drop leaf. They weren't much more expensive than the hinges listed in the plans, but again, they provide more stability (imho).

I wanted to show the locking mechanism for the legs in detail. I love these as they hold the legs in place when the drop leaf is down, and they pop into place when the leaf is in use. Called "folding leg fitting" it is part S-149L at $3.65 each at the following link:

http://www.hardwaretree.com/proddetail.php?prod=S-149L

When my daughter-in-law received her gift on Christmas Eve, she wouldn't even let me keep it for another day or two so I could touch-uppaint some spots...she loves it.

Thank you, Ana, for the wonderful plans!!

Built from Plan(s)
Estimated Cost
Around $75.00 not including stain and paint, which I had on hand.
Estimated Time Investment
Weekend Project (10-20 Hours)
Finish Used
Top and leaves stained with pine; box and legs painted w/ semi-gloss wall paint from my daughter-in-law's house (can't tell you the color, but it's from the terracotta color family). Three coats of poly on stained top.
Recommended Skill Level
Beginner

Comments

ACM

Mon, 02/04/2013 - 07:49

The table for my sewing machine costs almost as much as the machine did! This is a wonderful build. You have a very luck daughter-in-law.

sksan

Mon, 02/23/2015 - 14:33

The hinges that hold the leaves look like they run the width of the table as opposed to separate hinges. What did you use? Thanks!

Linda7

Fri, 04/17/2015 - 18:58

I'm sorry. Just now seeing your question. Yes, I used piano hinges so that they would run the entire length. The worked well.

Christmas 3-tier cookie stand

Submitted by calcowoods on Thu, 12/31/2020 - 12:51

Inspired by Shara of Woodshop Diaries, created this 3 tier tray for displaying cookies for Santa. Added a 3 dimensional star as the topper and simply followed the excellent photos and schematics on Shara's website.

Estimated Cost
$5
Estimated Time Investment
Afternoon Project (3-6 Hours)
Finish Used
Minwax paste wax
Recommended Skill Level
Beginner

Comments

King Size Farmhouse Bed with Dog Stairs and Storage

Submitted by jkjackson on Sun, 05/30/2021 - 15:21

We have a frosty faced blind girl and an aging tri-pawed that we wanted to be able to continue snuggling with us so we adapted the Farmhouse Bed with Storage to make it a king size. We made the drawer boxes deeper which allowed us to get rid of our dresser to create more space in our room. And we added a flight of stairs for the pups.

Estimated Time Investment
Weekend Project (10-20 Hours)
Finish Used
General Finishes White Wash with Arm R Seal Oil Based Satin Finish top coat. (If you want the white wash to be more white and less amber, use water based.)
Recommended Skill Level
Intermediate

Comments

Church Pulpit

Submitted by BBLinda on Sat, 06/08/2013 - 10:34

A good friend of mine, a pastor of a local church, asked me to build a pulpit for their recently finished church up in the countryside of Grenada. She showed me a picture of what she had in mind and based on that, I drew my own plan in SketchUp, and then built it out of Yellow Pine boards and Plywood.

Note to the dimensions:
After I drew the plan, and just when I was at the lumberyard to have the plywood and boards cut, I thought I might have had it estimated not wide enough, so I decided on the spot to make it 2" wider and the top panel 2" wider and deeper too. So if you'd like to build based on my plans, please consider if it's wide enough for your purposes.

This is what I used (corrected measurements here):

2x 2x8 26" long YP Boards (Base)
1x 18 1/2" x 6 1/2" Plywood (Base Support Panel)
1x 26" x 16" Plywood (Top)
1x 18 1/2" x 9" Plywood (Shelf Panel)
2x 45" x 9 1/2" Plywood (Side Panels ) - these are cut angled, see plans
1x 44 1/2" Wood Moulding (for the "stopper" on the top panel, and the "back" of the top shelf.

Estimated Cost
~ US$ 115 (material is very expensive here on the island, and I guess you could build it for about half or 2/3 of this in the USA)
Estimated Time Investment
Weekend Project (10-20 Hours)
Finish Used
MINWAX Polyshades / American Chestnut Satin (375)
Recommended Skill Level
Beginner