Community Brag Posts

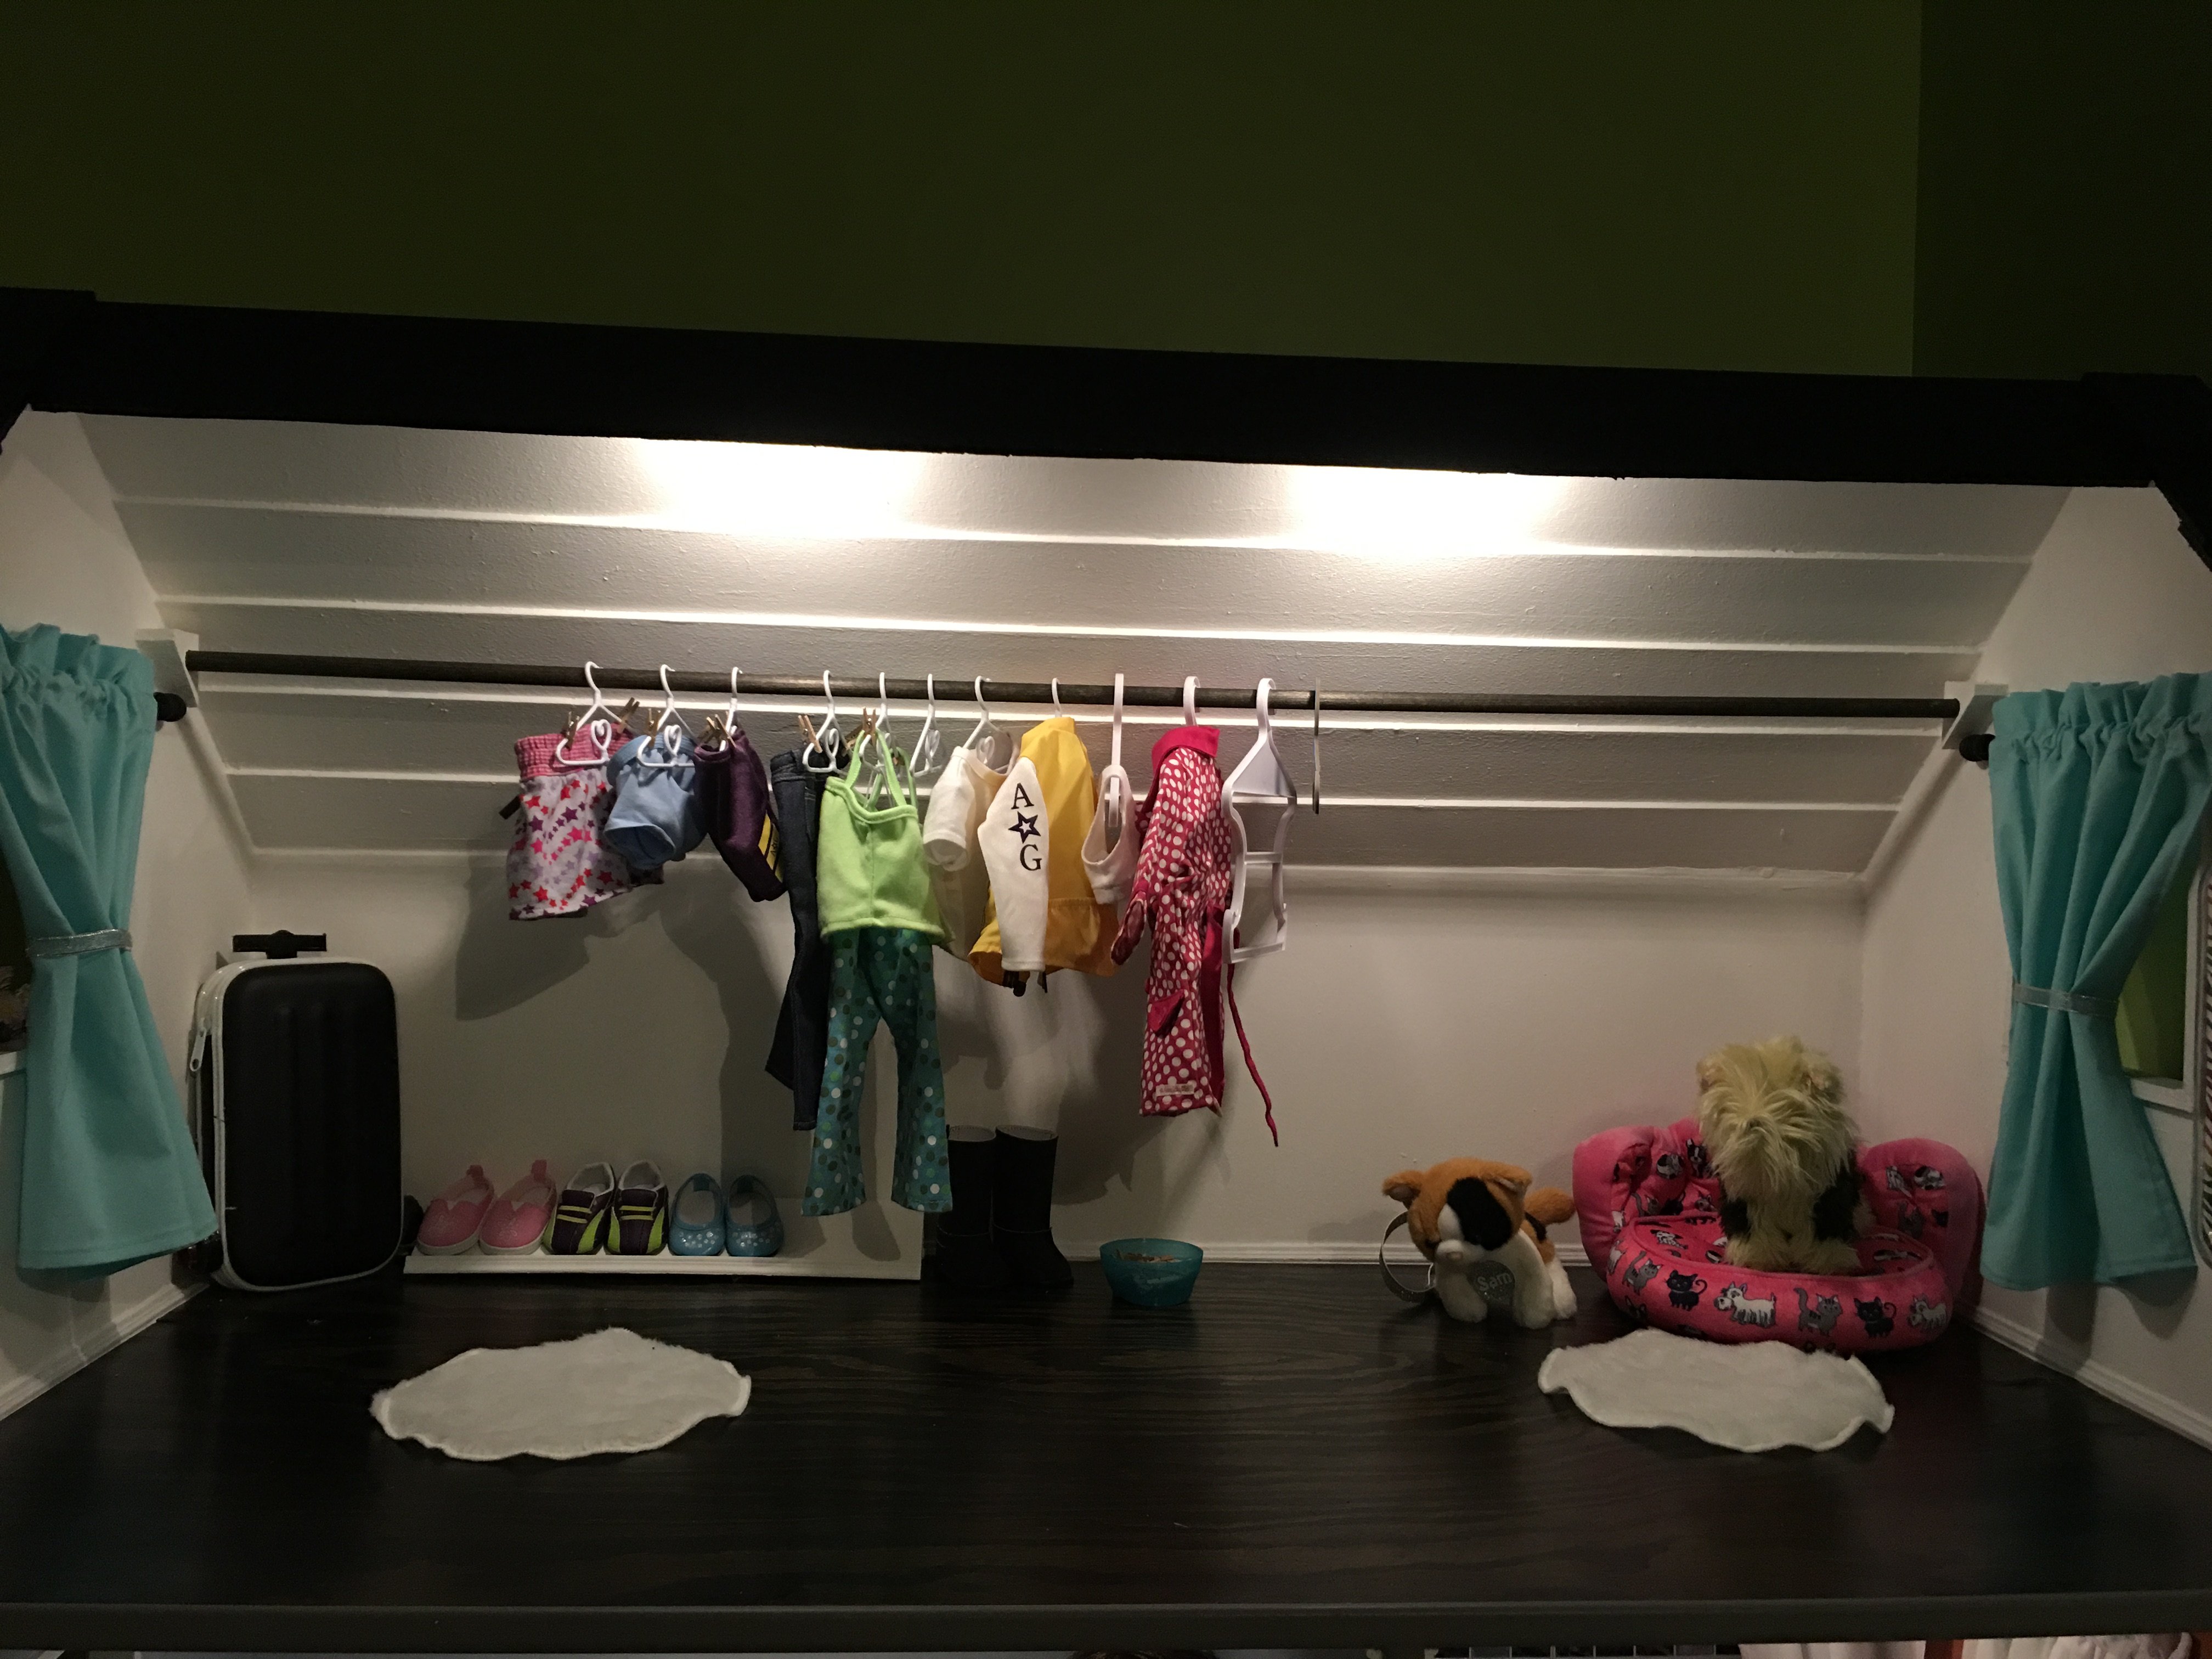
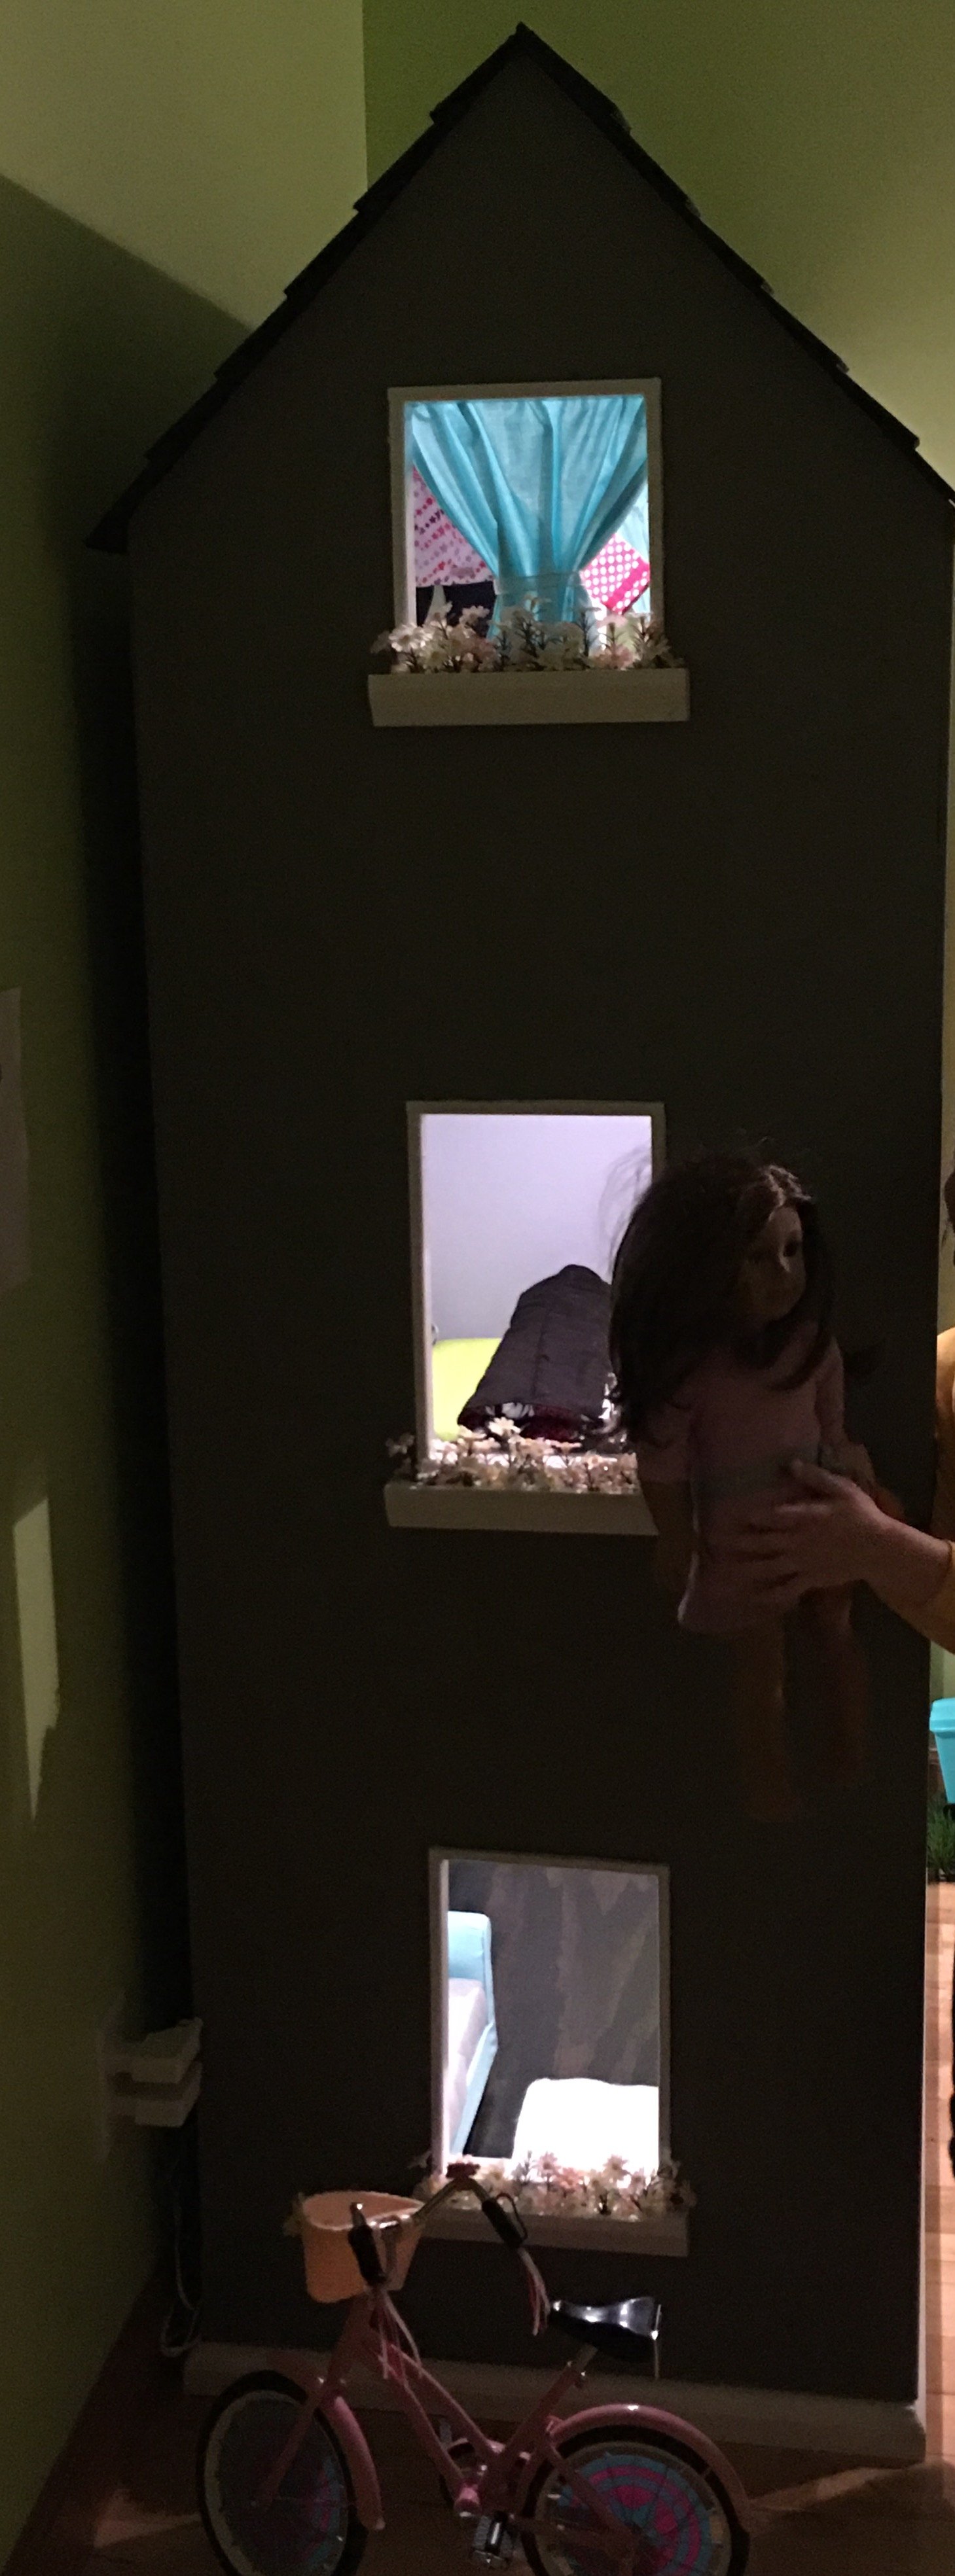
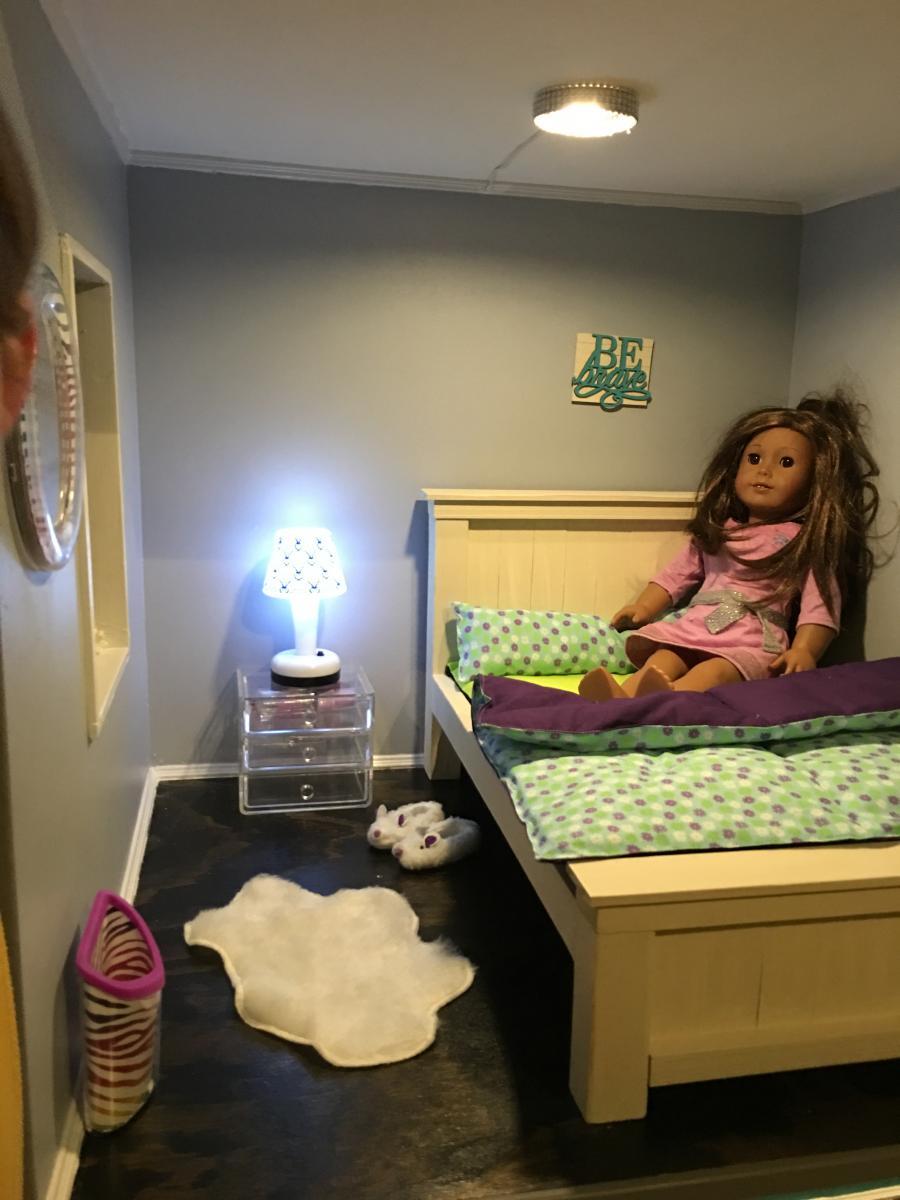
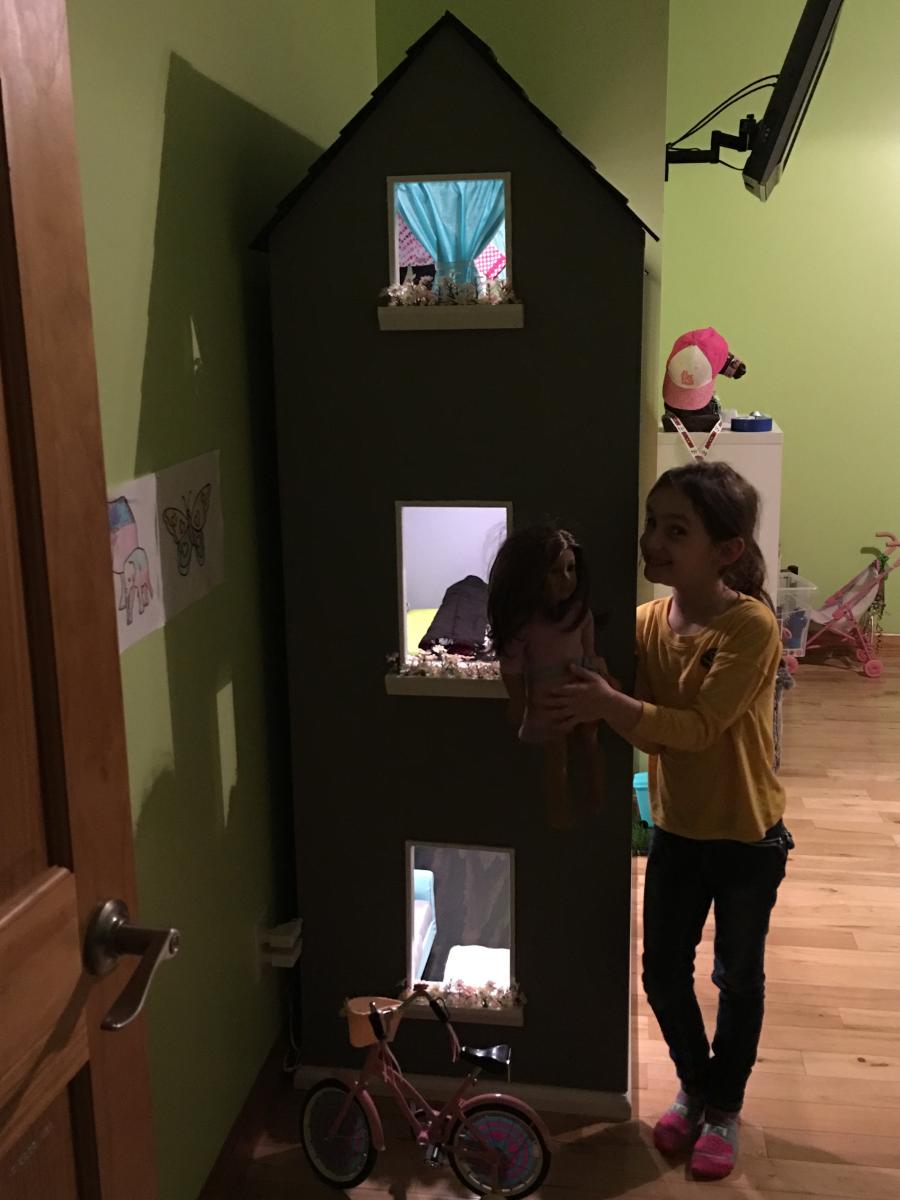
American Girl Dollhouse Masterpiece!

Submitted by MendiB on Mon, 03/13/2017 - 12:06

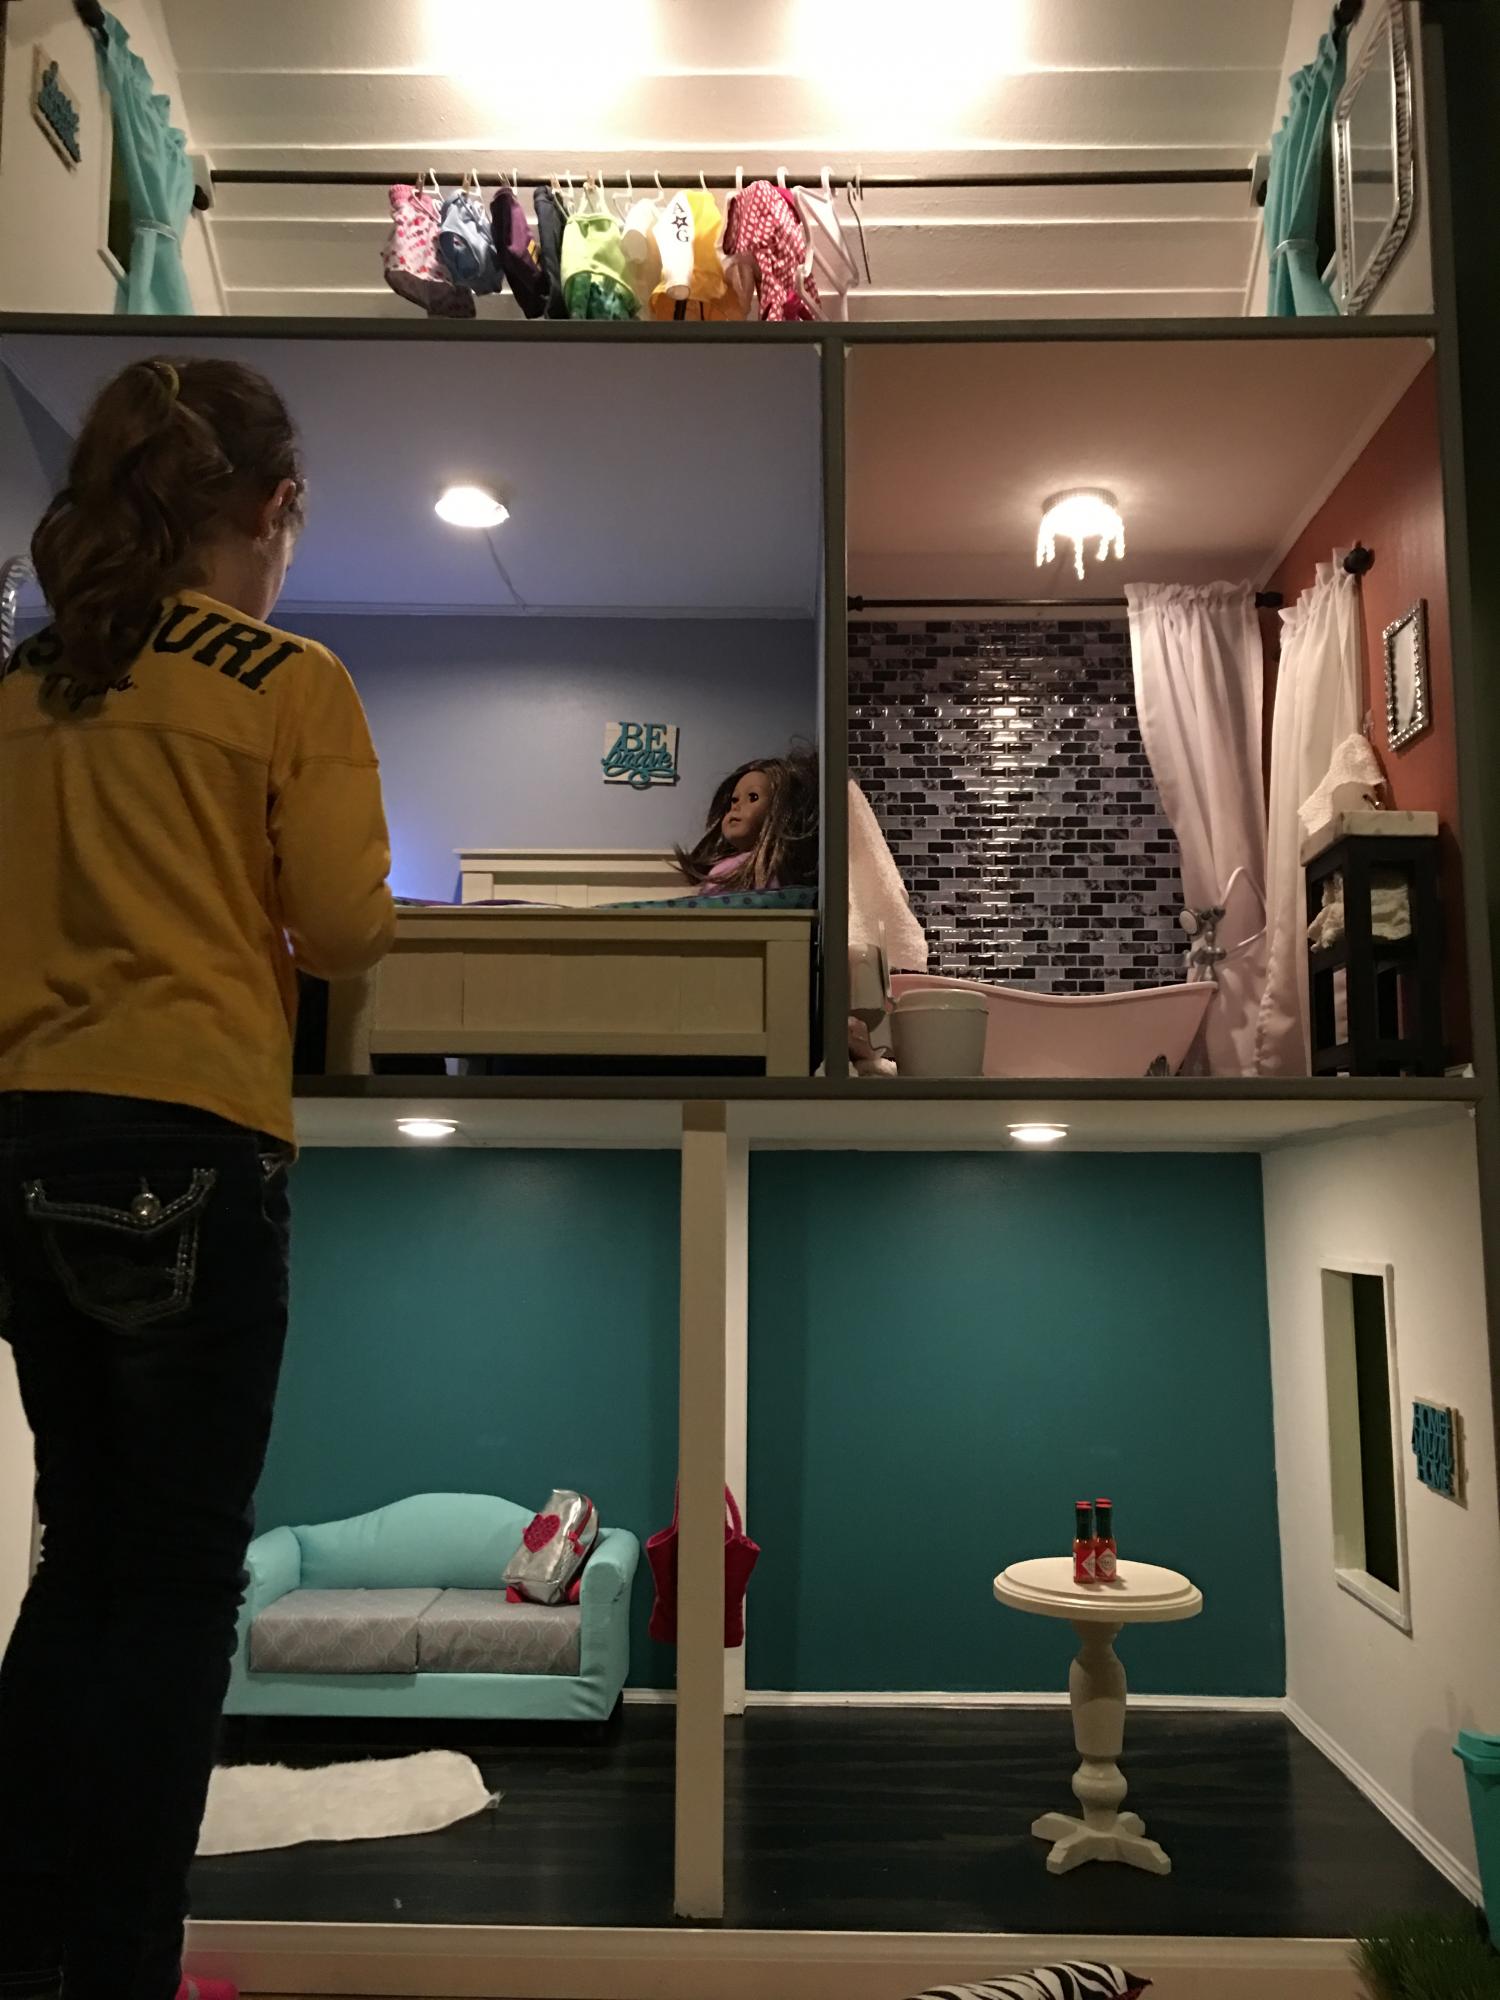
This dollhouse was super easy to make! Harper (the doll) wanted an open concept living/kitchen, and that is the first floor. Second floor are the bedroom and bathroom. Top floor is the closet. The roof is made from 3.5" slats of luan glued together and painted with black sanded paint. Notice the baseboards and crown molding? The window boxes are really cute, too! I still owe my granddaughter a garage and patio with pergola, and kitchen appliances and chairs, but that will wait until summer when she can help craft/build them. 

Harper's bed is modeled after the farmhouse bed plans available on this site, but I used smaller scrap lumber. I wanted milk paint but was unwilling to pay the high price, so I bought a sample jar of antique ivory paint and watered it down. It turned out great!

Estimated Time Investment
Week Long Project (20 Hours or More)
Finish Used
Kilz primer, Behr satin indoor paint (leftovers from our house)
Recommended Skill Level
Intermediate

Octagonal Picnic Table

Submitted by frmoody on Fri, 05/28/2021 - 15:08

To say this was a complicated build is an understatement. Lots of pieces, lots of different angles and lots of screwing it together. It was really tough to keep everything perfectly square but in the end it turned out well. It is a very heavy table. I want to get it outside on a sunny day for some photos.

Estimated Cost
The price of lumber is ridiculous right now. Last summer this would have cost me about $200 in materials but I spent about $450 on wood, finish and screws. 2 x 4 x 8's right now are about $10.40 CAD$ and 2 x 4 x 6's are about $15.00
Estimated Time Investment
Weekend Project (10-20 Hours)
Finish Used
I first painted all black parts with Wood Shield Oil Deck & Siding solid stain. I used two coats. I painted most of the boards prior to cutting to save time. The top and seats were stained with MinWax Gunstock Stain. Once everything was together I put on two coats of Helmsman outdoor polyurethane.
Recommended Skill Level
Advanced

Comments

Gabriel Wall System Hanging Organizer

This was a very fun project to build. I pretty much followed the directions that were posted, but I used 1x6's instead of 1x4's because I wanted more storage space on the shelves. I also used 1/2" iron piping instead of 3/4" and am happy with how it turned out. Since the guest bathroom is gray, we didn't want to stain the wood and chose to do an easy to do "weathered" (directions below) look. Now all we need to do is replace the ugly shower curtain!

Estimated Cost
$40 (paint not included).
Estimated Time Investment
Day Project (6-9 Hours)
Finish Used
"Weathered" look – First, paint a gray undercoat of paint and let dry. Secondly, coat the piece with paraffin wax (especially the edges and corners). Next, paint a top coat of white and let dry. Lastly, scrape off the wax (with a razor blade), to your liking, to give it the "weathered" look.
Recommended Skill Level
Beginner

Comments

tgrott

Wed, 03/30/2016 - 06:41

Love the weathered/distressed look you did.  Can you share your technique for the paint job?

tgrott

Wed, 03/30/2016 - 06:42

I;m sorry!! I just noticed that you did share the paint job!  Thanks! :P

tgrott

Wed, 03/30/2016 - 06:43

I;m sorry!! I just noticed that you did share the paint job!  Thanks! :P

Using Ana White’s Garage Cabinet Plans

Submitted by Anonymous (not verified) on Wed, 04/20/2022 - 09:23

Thank you so much for the two videos we watched of you and your husband explaining and demonstrating how to build garage shelves. We used your plans as a guide. We chose to add shaker style doors to create cabinet shelves. We absolutely love them. We are not handy as you can see we had a living room lamp for a work light and a lifetime table as a work bench. Thank you!
The Paulsons

Comments

Easy Build Fence Picket Planters

Submitted by vendo on Thu, 05/11/2023 - 12:14

I've been wanting to build this plan for quite some time! Took me about 2 hours to build and 1 hour to finish. Giving these as gifts for Mother's Day! Total cost was about $15 per planter. I scaled down the design after I found the plants I wanted to put in them. Ana has the best and easiest plans!


Seasonal And Holiday

Large Porch Bench

Submitted by kwildman on Thu, 11/14/2019 - 18:55

I used untreated pine for this project and painted with benjamin moore exterior paint. 

I modified the back a little and I love how it turned out.  I also added an extra brace against the back of each leg that fits under the seat for more support. 

Very easy to build.  I love the plan.

Estimated Cost
75
Estimated Time Investment
Weekend Project (10-20 Hours)
Finish Used
Black exterior paint
Recommended Skill Level
Intermediate

Comments

Truss Style Coffee Table

Submitted by Anonymous (not verified) on Wed, 04/03/2024 - 10:52

I saw the Truss Coffee table and HAD to make it!
I couldn’t find 2x3 at my hardware store so I ripped 2x6’s for the base. I also ripped 2x4 for the top end pieces. I used the color Provincial to stain and covered it in Polyurethane. I just love it.

Mélanie S.

Built from Plan(s)
Seasonal And Holiday

Rocking Chair

Submitted by PPTG on Mon, 08/31/2020 - 12:11

Getting ready for retirement, so I thought I needed a rocking chair.
No plans, just built what looked and felt right.

Estimated Time Investment
Week Long Project (20 Hours or More)
Finish Used
Early American
Recommended Skill Level
Intermediate

Comments

David King

Thu, 03/18/2021 - 01:27

Lovely chair. Nice proportions. Would like to copy it. Have you got any plans, sketches, or dimensions to share?

jlxvnwk

Fri, 02/10/2023 - 13:10

Love this rocking chair! Do you have any dimensions or plans. I would live to take this project on. Thank you.

Playhouse loft bed with stairs and slide

Submitted by alminter on Wed, 07/08/2015 - 21:29

This is by far the biggest project I've completed yet. It actually surprised me how easy it was to complete. It did take me about 4 days to build the project and an additional week to sand and paint the project.

I followed the playhouse loft plans and the storage stairs plans, adjusting only the back to allow for the additional length of the slide. I didn't add the windows to the sides (I didn't see any point in having them there). I also used the castle loft plans for the slide. When I first started this project I was planning on making the slide completely separate. I changed my mind mid project after I had the side wall cut to length at Lowe's, so I just added that small piece to the left of the slide to make up for the gap. I also made this project in 4 separate pieces (stairs, slide, front wall, back) so I could put it together in her room in one evening and not have to kick her out. Once we moved it to her room all I had to do was screw the four corners in and attach the back wall and bed slats.

I definitely recommend not using particle board. I had no idea what the difference was between particle board, mdf and plywood when I started this project. Particle board was less then half the cost of plywood, but looking back I would pay the extra for the plywood. I don't feel like the screws hold well in the particle board and it also chipped on the bottom some. I actually had a chunk come off in the corner where I must of screwed to closely to the edge. I'm sure this is basic knowledge for most, but for those newbies (like me) just a little tip.

I had a lot of fun building this bed (not so much sanding and painting) and learned a lot. Now off to browse for my next project :)

Estimated Cost
400-500
Estimated Time Investment
Week Long Project (20 Hours or More)
Recommended Skill Level
Beginner

Comments

Petra's Doggie Day Bed

Submitted by Joni on Sat, 08/25/2012 - 10:33

Yes, my husband and I share our bedroom with 6 dogs and an occasional cat (or 4). Our older dog (Petra) has slept on our bed for over 10 years, and she's getting too old to jump anymore. We didn't want her to feel like she was getting kicked off the bed, so I made Petra her very own bed at the end of ours so that she wouldn't feel left out. I was inspired by MurdaRae's dog bed (http://ana-white.com/2012/06/doggie-daybed), and thought it was genius to use a toddler/crib bed. So I went looking for plans on Ana-White, and came up with a mixture between a couple of twin bed plans. I love that the plans are easy enough to modify my sizes, and come up with exactly the custom solution that I need. This was my first big project using Bri-Wax. The last one was kind of a disaster when the wax changed the stain color to something not-so-great. With this project, I learned to wait at least 2 weeks before attempting to wax it. I was blown away with the results. It is a beautiful subtle satin finish that feels great to the touch. Plus, I can easily touch up all the dog fingernail scratches that will inevitably occur. When I re-assembled the bed in my bedroom, I actually nicked it in a few places. No problem -- slap on some more Bri-Wax! My Bri-Wax was 11 years old, and pure liquid. I tossed it in the fridge (per Bri-Wax's recommendation), and it was as good as new. The only real problem I had with this project was leaking sap from one of the 4x4s. I'm still fighting this today. In talking with Rustoleum/Zinsser reps, they said that no sap could penetrate their "Seal Coat" shellac product. After 5 coats, the sap is still penetrating, but only if I turn it on it's side or upside down. I'm still baffled. I made the mattress cover out of a dog blanket, and made the cushions from some remnant fabric (suitable for dogs and weekly washing), so this was a fairly inexpensive project. It was a success because Petra slept in her bed from the fist night and loved that she had all the room to herself, and no boston terrorists (I mean terriers) attempted to bother her.

Estimated Cost
$65 for Wood, $60 for Crib Mattress, $7 for stain, $9 for Decorative Clavos
Estimated Time Investment
Weekend Project (10-20 Hours)
Finish Used
Combination of Minwax Water-based stains: 6 parts Colonial Pine: 1 part American Walnut, followed 4-5 Coats Bri-Wax (Light Brown)
Recommended Skill Level
Beginner

Comments

spiceylg

Sat, 08/25/2012 - 18:41

You did an amazing job! Looks professional and at first glance, you definitely can't tell it's a dog bed.

StacieM

Sun, 08/26/2012 - 10:24

It matches the woods in your bedroom so well and looks great! Also, I love the bolster pillows around the edges. That is something I need to make for our dog bed. Thanks for sharing.

Octagon picnic table

Submitted by Anonymous (not verified) on Wed, 05/24/2017 - 20:34

I love our new table. 

Built from Plan(s)
Estimated Cost
$150
Estimated Time Investment
Week Long Project (20 Hours or More)
Finish Used
Thompson deck stain (cedar) and black Laytex paint.

Recommended Skill Level
Intermediate
Seasonal And Holiday

Modern Farmhouse Bed Frame

Submitted by SofiaTaz on Thu, 01/06/2022 - 23:15

I love how this bed frame turned out! Everywhere that has stain is cedar and the rest is all scrap spruce. Thanks for another great plan Ana!

Built from Plan(s)

Comments

DIY Sofa - Storage Sectional

Submitted by LittleG on Thu, 08/09/2012 - 15:38

Basically I took Ana's plan and tweaked it to create a diy sofa, a love seat, and a corner piece to make a sectional. All 3 pieces have the same basic design and function (they all have a storage compartment), although the corner piece, because of its placement and the thickness of the seating cushions, doesn't open unless the couch is opened first. We purchased custom cut, 6" thick foam cushions for the seats (we bought the XL-38 foam from https://www.buyfoam.com/, but if we had to do it again, we'd go with the XL-28 as the 38 is VERY firm). We also used upholstery fabric instead of a paint drop-cloth to cover the couches. The foam and upholstery fabric upped the overall cost significantly. Other changes from Ana's plan, I used 15/32" OSB because the 1/4" plywood just felt too flimsy (I'm a large guy). I also added I bolts to the underside of the seat before the foam and upholstery so I could add a stress relief rope to prevent the kids from opening the top and dropping it and ripping out the hinges. I used piano hinges as they seemed to me to provide the most support. Finally, I ended up using 1x2s for the base trim since I couldn't find any 2x2s that were straight and finish-ready, then I added router detailing to provide some visual interest. I used 3" pieces of 4x6 for the feet and added matching router detail. Additionally, I used T-Nuts and bolts to make the feet and base trim completely removable.


Built from Plan(s)
Estimated Cost
$1300
Estimated Time Investment
Week Long Project (20 Hours or More)
Finish Used
Minwax PolyShades Espresso
Recommended Skill Level
Intermediate

Comments

masmith38

Fri, 10/23/2015 - 11:11

Love this!  Totally want to think hard about doing this instead of buying when time for a new couch comes. Job well done, and the storage is a total plus.  

Chased

Sun, 05/15/2016 - 21:15

Where can I find the plans to this or the cut list

mikeyb

Mon, 10/03/2016 - 18:11

Awsome job!!! question? is that a typo on the cost to build??

mikeyb

Mon, 10/03/2016 - 18:12

Awsome job!!! question? is that a typo on the cost to build??

albertmick30

Mon, 08/17/2020 - 07:46

It is superb blog and i really appreciate your blog. It is because i always like the informative blogs. You did a great job and thanks for sharing.I am impressed by your post. It contains very informative data and i gain a lot information from it. It is very useful for me. Thanks for sharing and keep on sharing that type of posts.The Mobile App Developer Dubai provides good service you visit here site https://www.mistersaad.com/

Workbench

Submitted by Ulrike on Sun, 06/21/2020 - 09:37

Built 2 of the workbenches for our garage. The plans made assembly very easy and quick. We had Home Depot cut the plywood to size.

Estimated Time Investment
Afternoon Project (3-6 Hours)

Comments

Outdoor rolling bar top

Submitted by Anonymous (not verified) on Wed, 07/08/2020 - 19:43

We had some leftover granite from an outdoor kitchen build and wanted to maximize the use of it. We loved the look of a rustic table from Pottery Barn and set out to find something that was asking the same aesthetic. I came across the Jilly and Mia workbench console and thought it would work great with some minor modifications. I shortened the overall length and height, went with some heavy duty casters to support the weight of the granite, and reinforced the cross beams that would support the 3/4" plywood sheet and granite. I went with cedar for this build since it was outdoors and I'll finish it with a clear sealant.

Built from Plan(s)
Estimated Cost
$300
Estimated Time Investment
Day Project (6-9 Hours)
Recommended Skill Level
Intermediate

Comments

Outdoor bar grill surround with 2 post pergola

I wanted to build an L shaped outdoor bar with a 2 post pergola over the grill.  I couldn't find any plans online that would fit the space I had, so I decided to build it myself with custom dimensions.  The top bar is approx. 7'3" across, and 15" wide, while the distance from the right edge (next to the house) to the end of the bar is approx. 9'1".  

I framed it with PT lumber and the 2 pergola posts are sitting on top of the pavers and supported internally within some of the framing studs.  Since the pavers sit on top of concrete, I didn't feel the need to dig up the existing pavers and achor them in the ground.  

I used hardiboard for the exterior and tiled the lower section of the bar.

For the actual high bar top, I wanted to do something unique, and found a 900 year old scrap slab of Cypress at a local lumber yard.  One side was smooth, but underneath was gouged out from different saw cuts and very uneven.  I screwed a piece of 3/4" PT plywood underneath and trimmed it with 1-1/2" Cypress.  I stained the whole thing with a dark honey colored stain and put a generous amount of poly on it once it was dry.  There are a few cracks and nicks on it, but once it was stained, it looked awesome.  

Estimated Cost
I lost track after a while, but I would say $600-700.
Estimated Time Investment
Week Long Project (20 Hours or More)
Finish Used
Minwax honey colored stain for the bar top. Minwax provincial stain for the pergola and minwax dark walnut stain for the oak trim.
Recommended Skill Level
Intermediate

Comments

Beautiful Cedar Patio Table

Submitted by NeoMoses on Wed, 06/19/2013 - 13:48

Slightly more elegant version of an outdoor cedar patio table. This is made from 100% cedar and joined using Kreg pocket hole screws. The finish is 2 coats of Sikkens Cetol MRD that has been hand rubbed on using a cloth, with 24 hours of dry time between coats.

Built from Plan(s)
Estimated Cost
$140
Estimated Time Investment
Weekend Project (10-20 Hours)
Finish Used
2 coats of Sikkens Cetol MRD, hand rubbed with cloth.
Recommended Skill Level
Beginner

Comments

odpdxo

Wed, 06/19/2013 - 23:22

I really like the way you modified this design and I would like to duplicate it. I am curious about how you changed to framework to accommodate table top with the boards running lengthwise. The original design has the framework running lengthwise, so I am assuming you added framing that runs perpendicular. Is there any way you could include pictures and measurements of the framework under the tabletop? Thanks. Great work!

Chicken Coop with run

Submitted by Anonymous (not verified) on Sun, 01/31/2016 - 19:36

It took a while to come together and made several modifications but it is a great coop and was a major selling point of the house when we were relocated.  I had added a main tray under the roosts and a door to srape the poop out.  This made keeping the coop clean very easy.  

Built from Plan(s)
Estimated Cost
$800
Estimated Time Investment
Week Long Project (20 Hours or More)
Finish Used
Chicken Coop
Recommended Skill Level
Intermediate
Back