Modern Farmhouse Bed
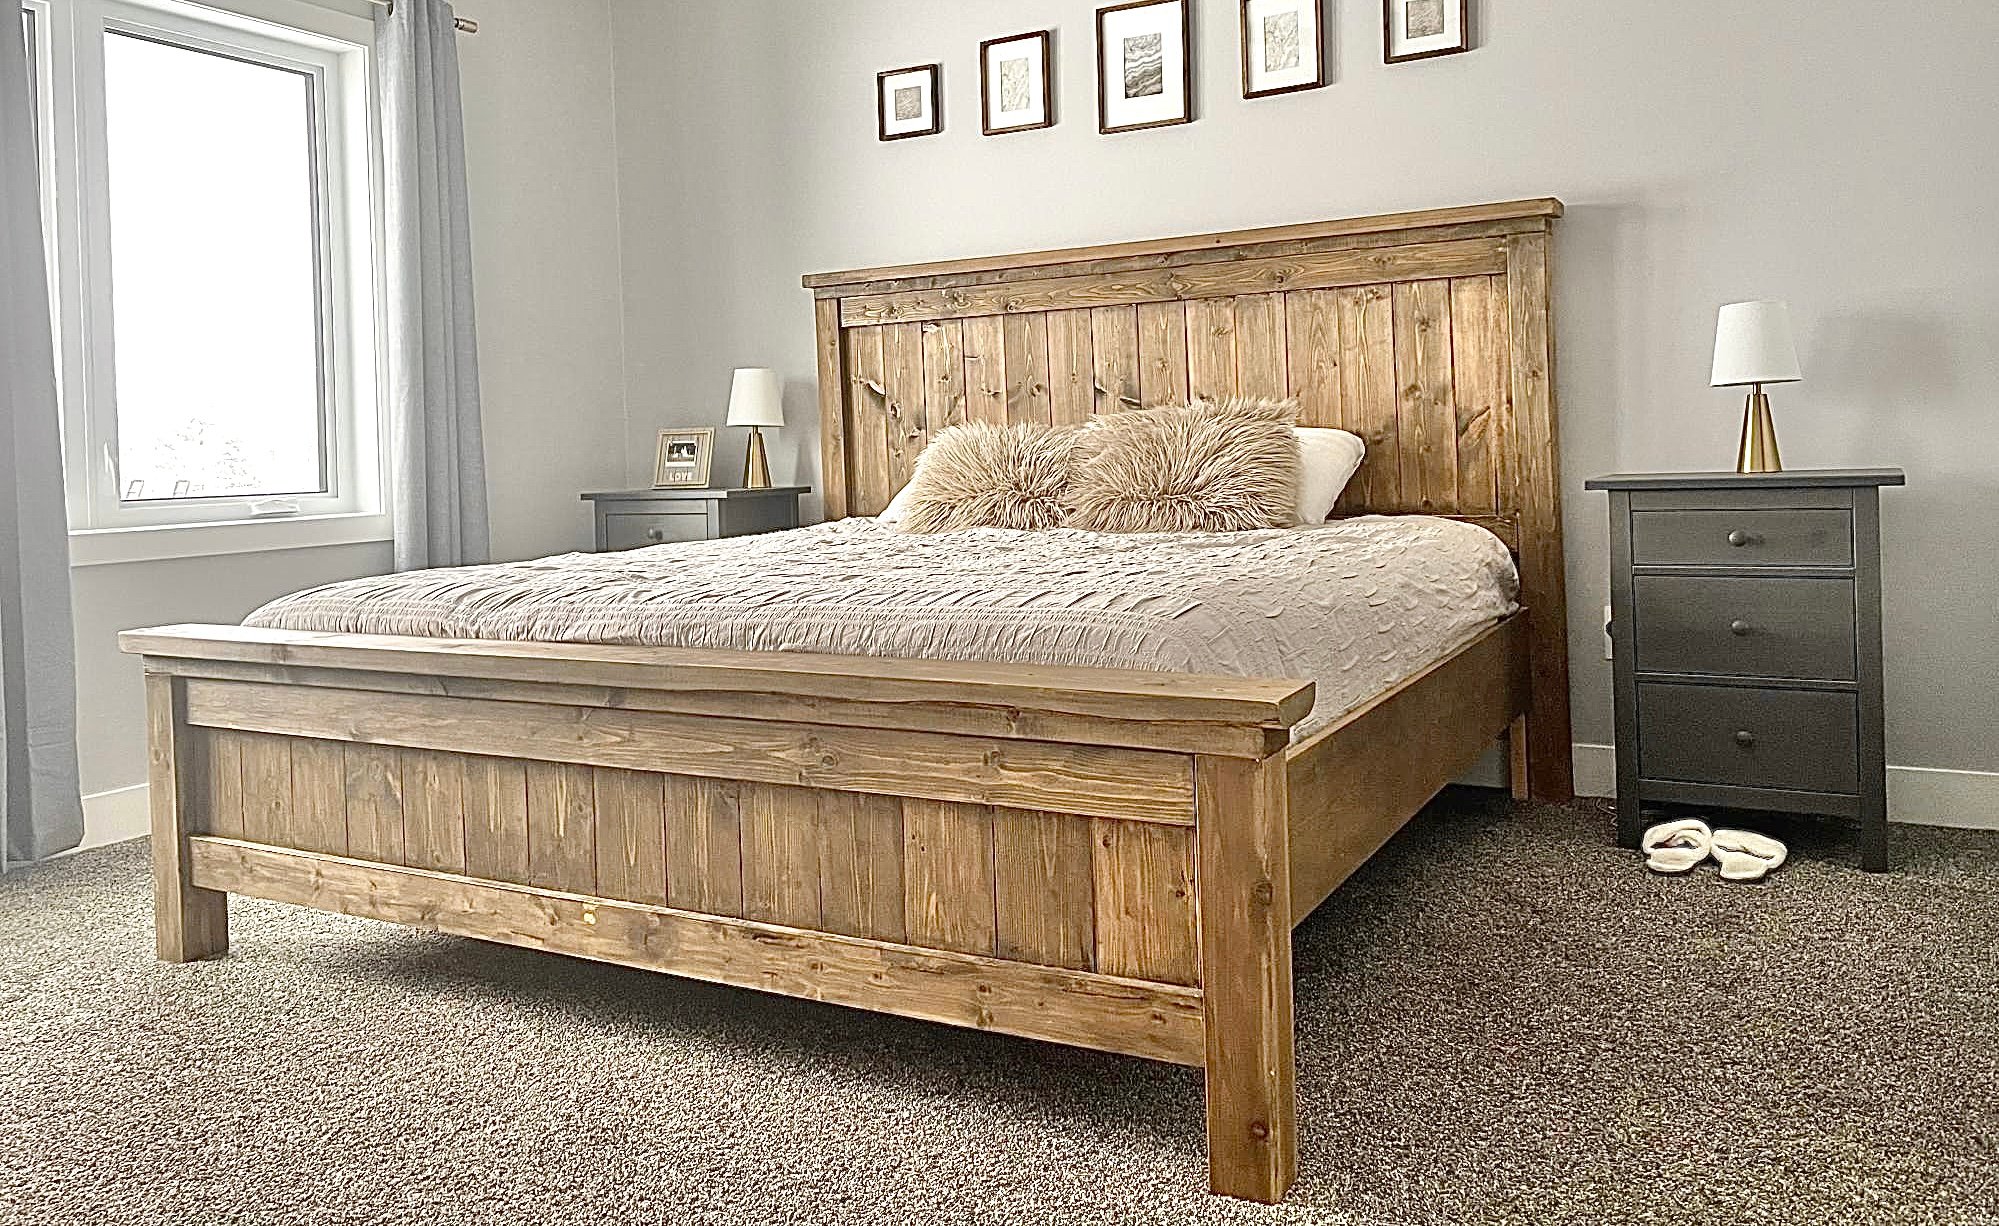
My husband and I had worked on this bed together, and we are so happy with it! We went with taller side tables that we purchased, and just stained the wood instead of painting it.
Built from Plan(s)
My husband and I had worked on this bed together, and we are so happy with it! We went with taller side tables that we purchased, and just stained the wood instead of painting it.

This was my most ambitious project yet - and I did it during my 2nd trimester of my first pregnancy! I knew I wanted a dresser that would double as a changing table & fell in love with the Madison as soon as I saw it. This is no small project - those drawers were certainly a learning experience! Wish I'd paid more attention to the 1x2s (& sprung for top pine to try to get a straighter frame). We're happy with how it's turned out & can't wait to start using it for our daughter when she arrives in May!

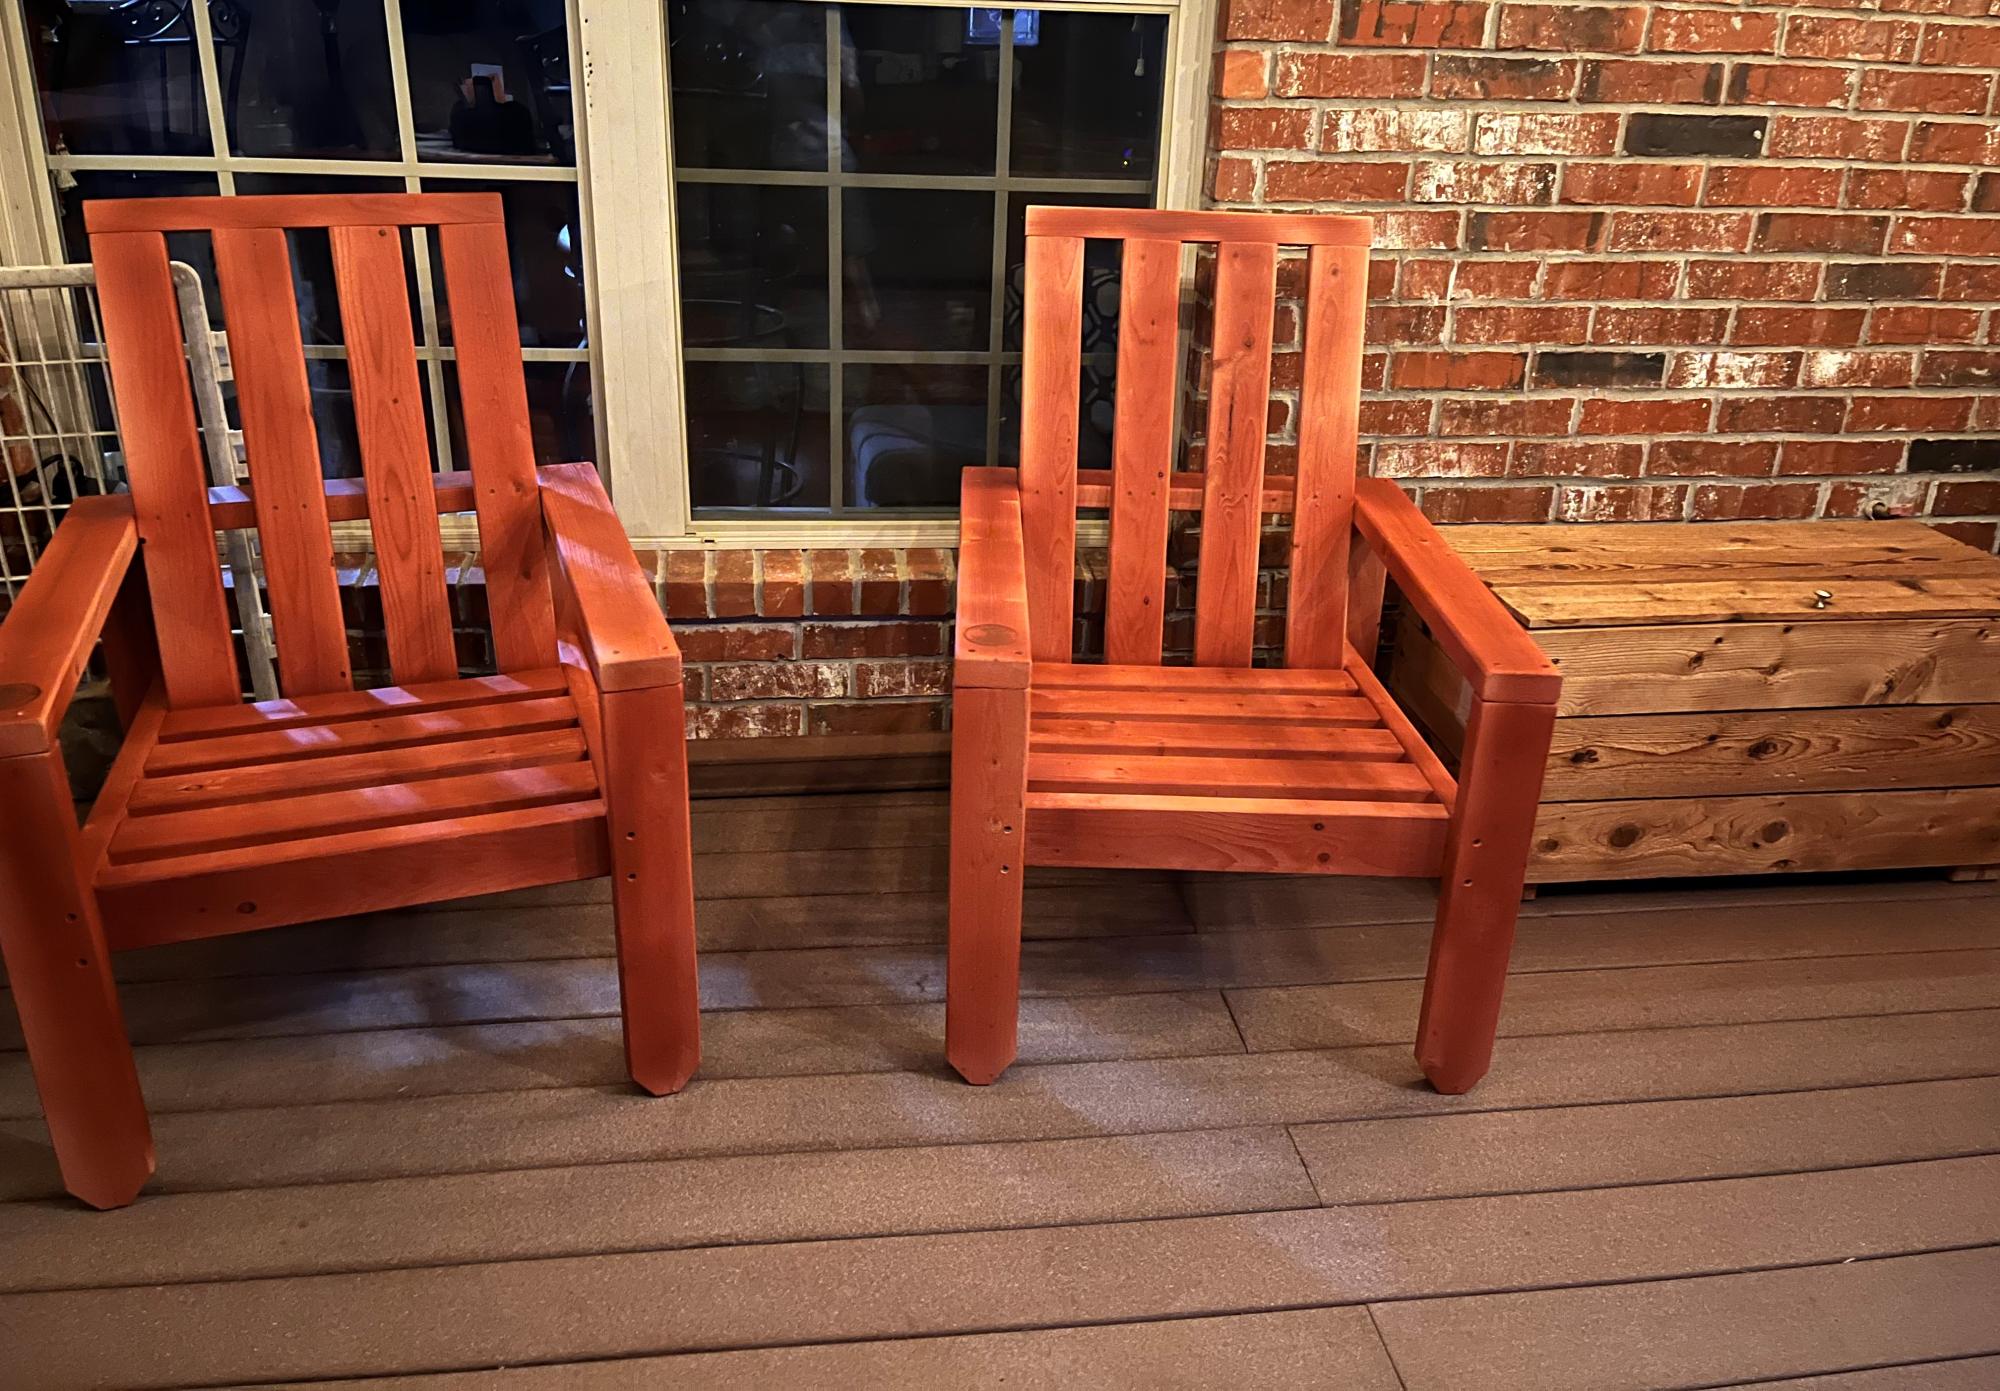
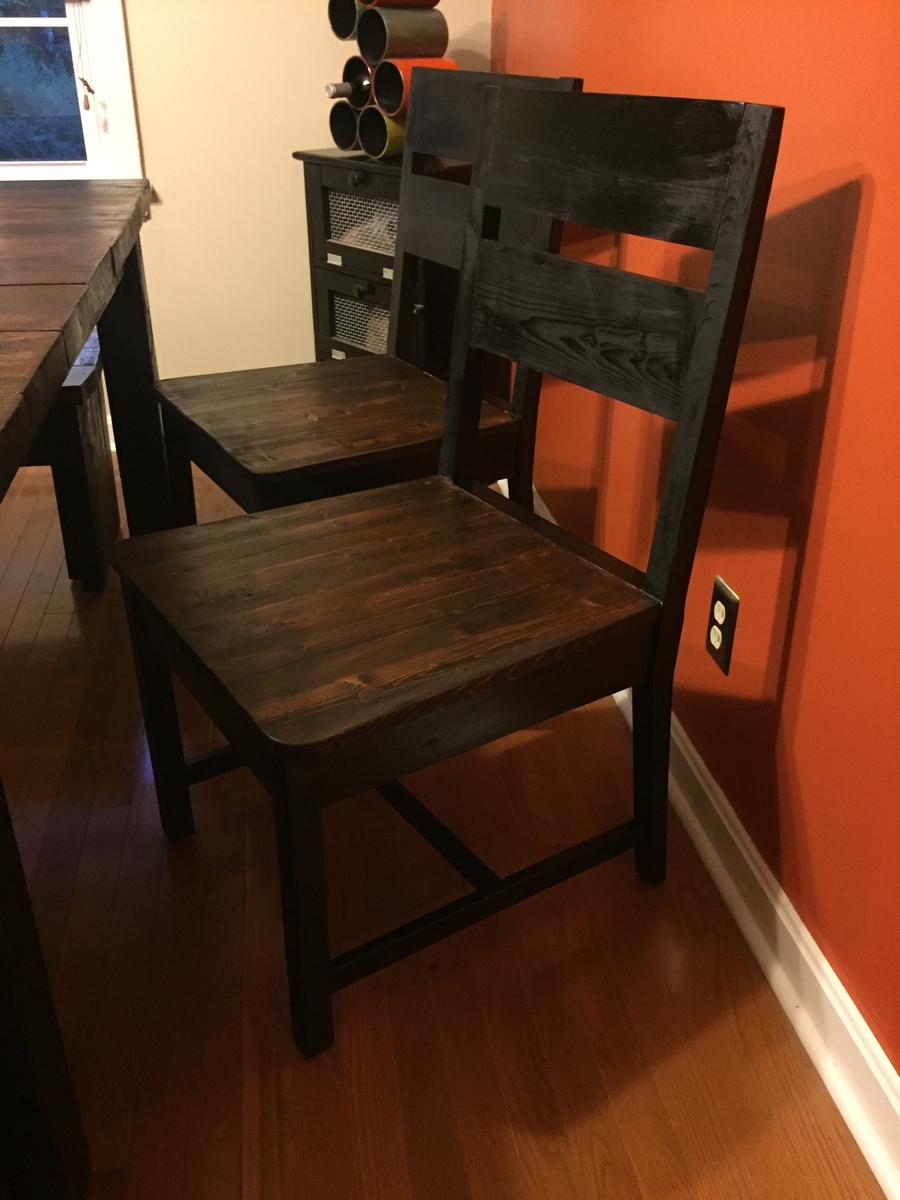
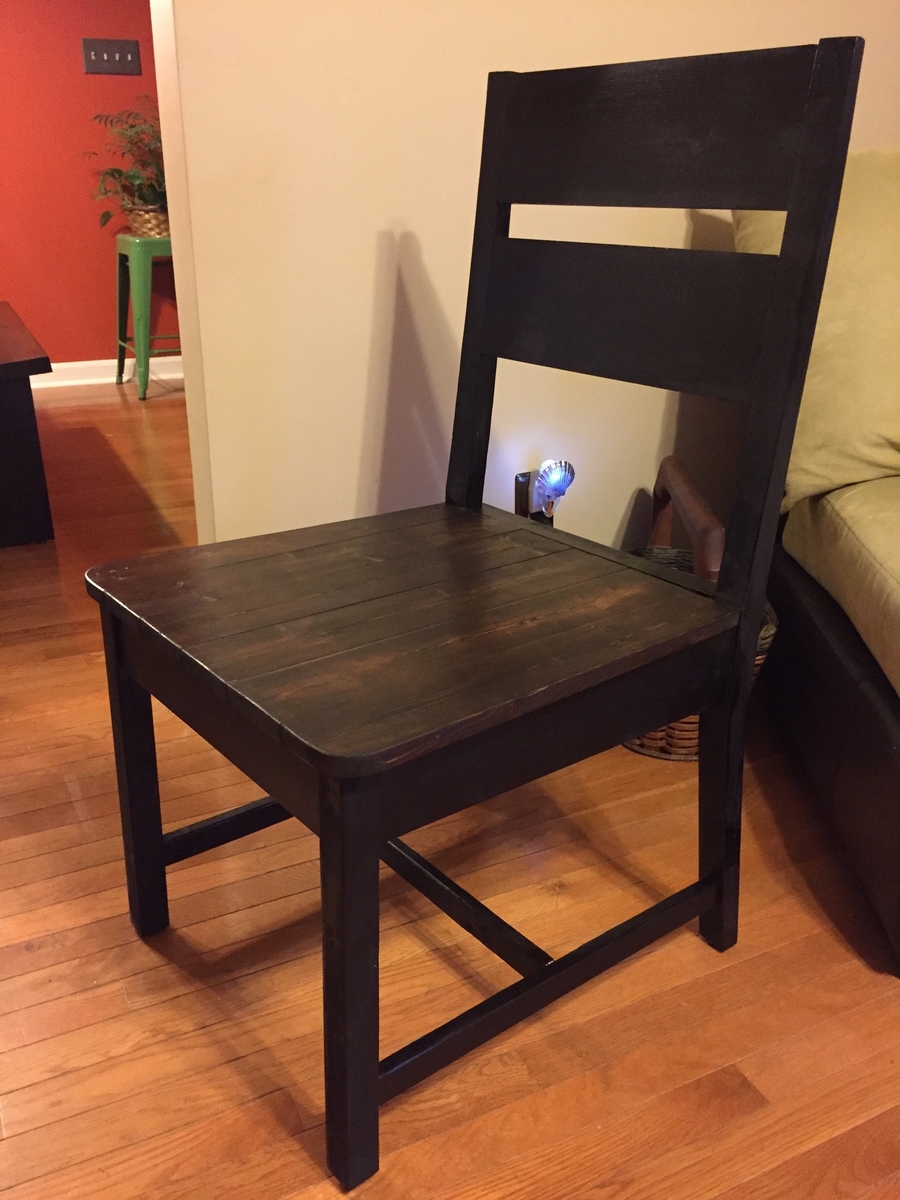
Ana White chairs along side my Ana White cedar storage chest (one of my 1st builds). Ana, thank you for the plans & for inspiring us to build!
Keith from Springdale, AR

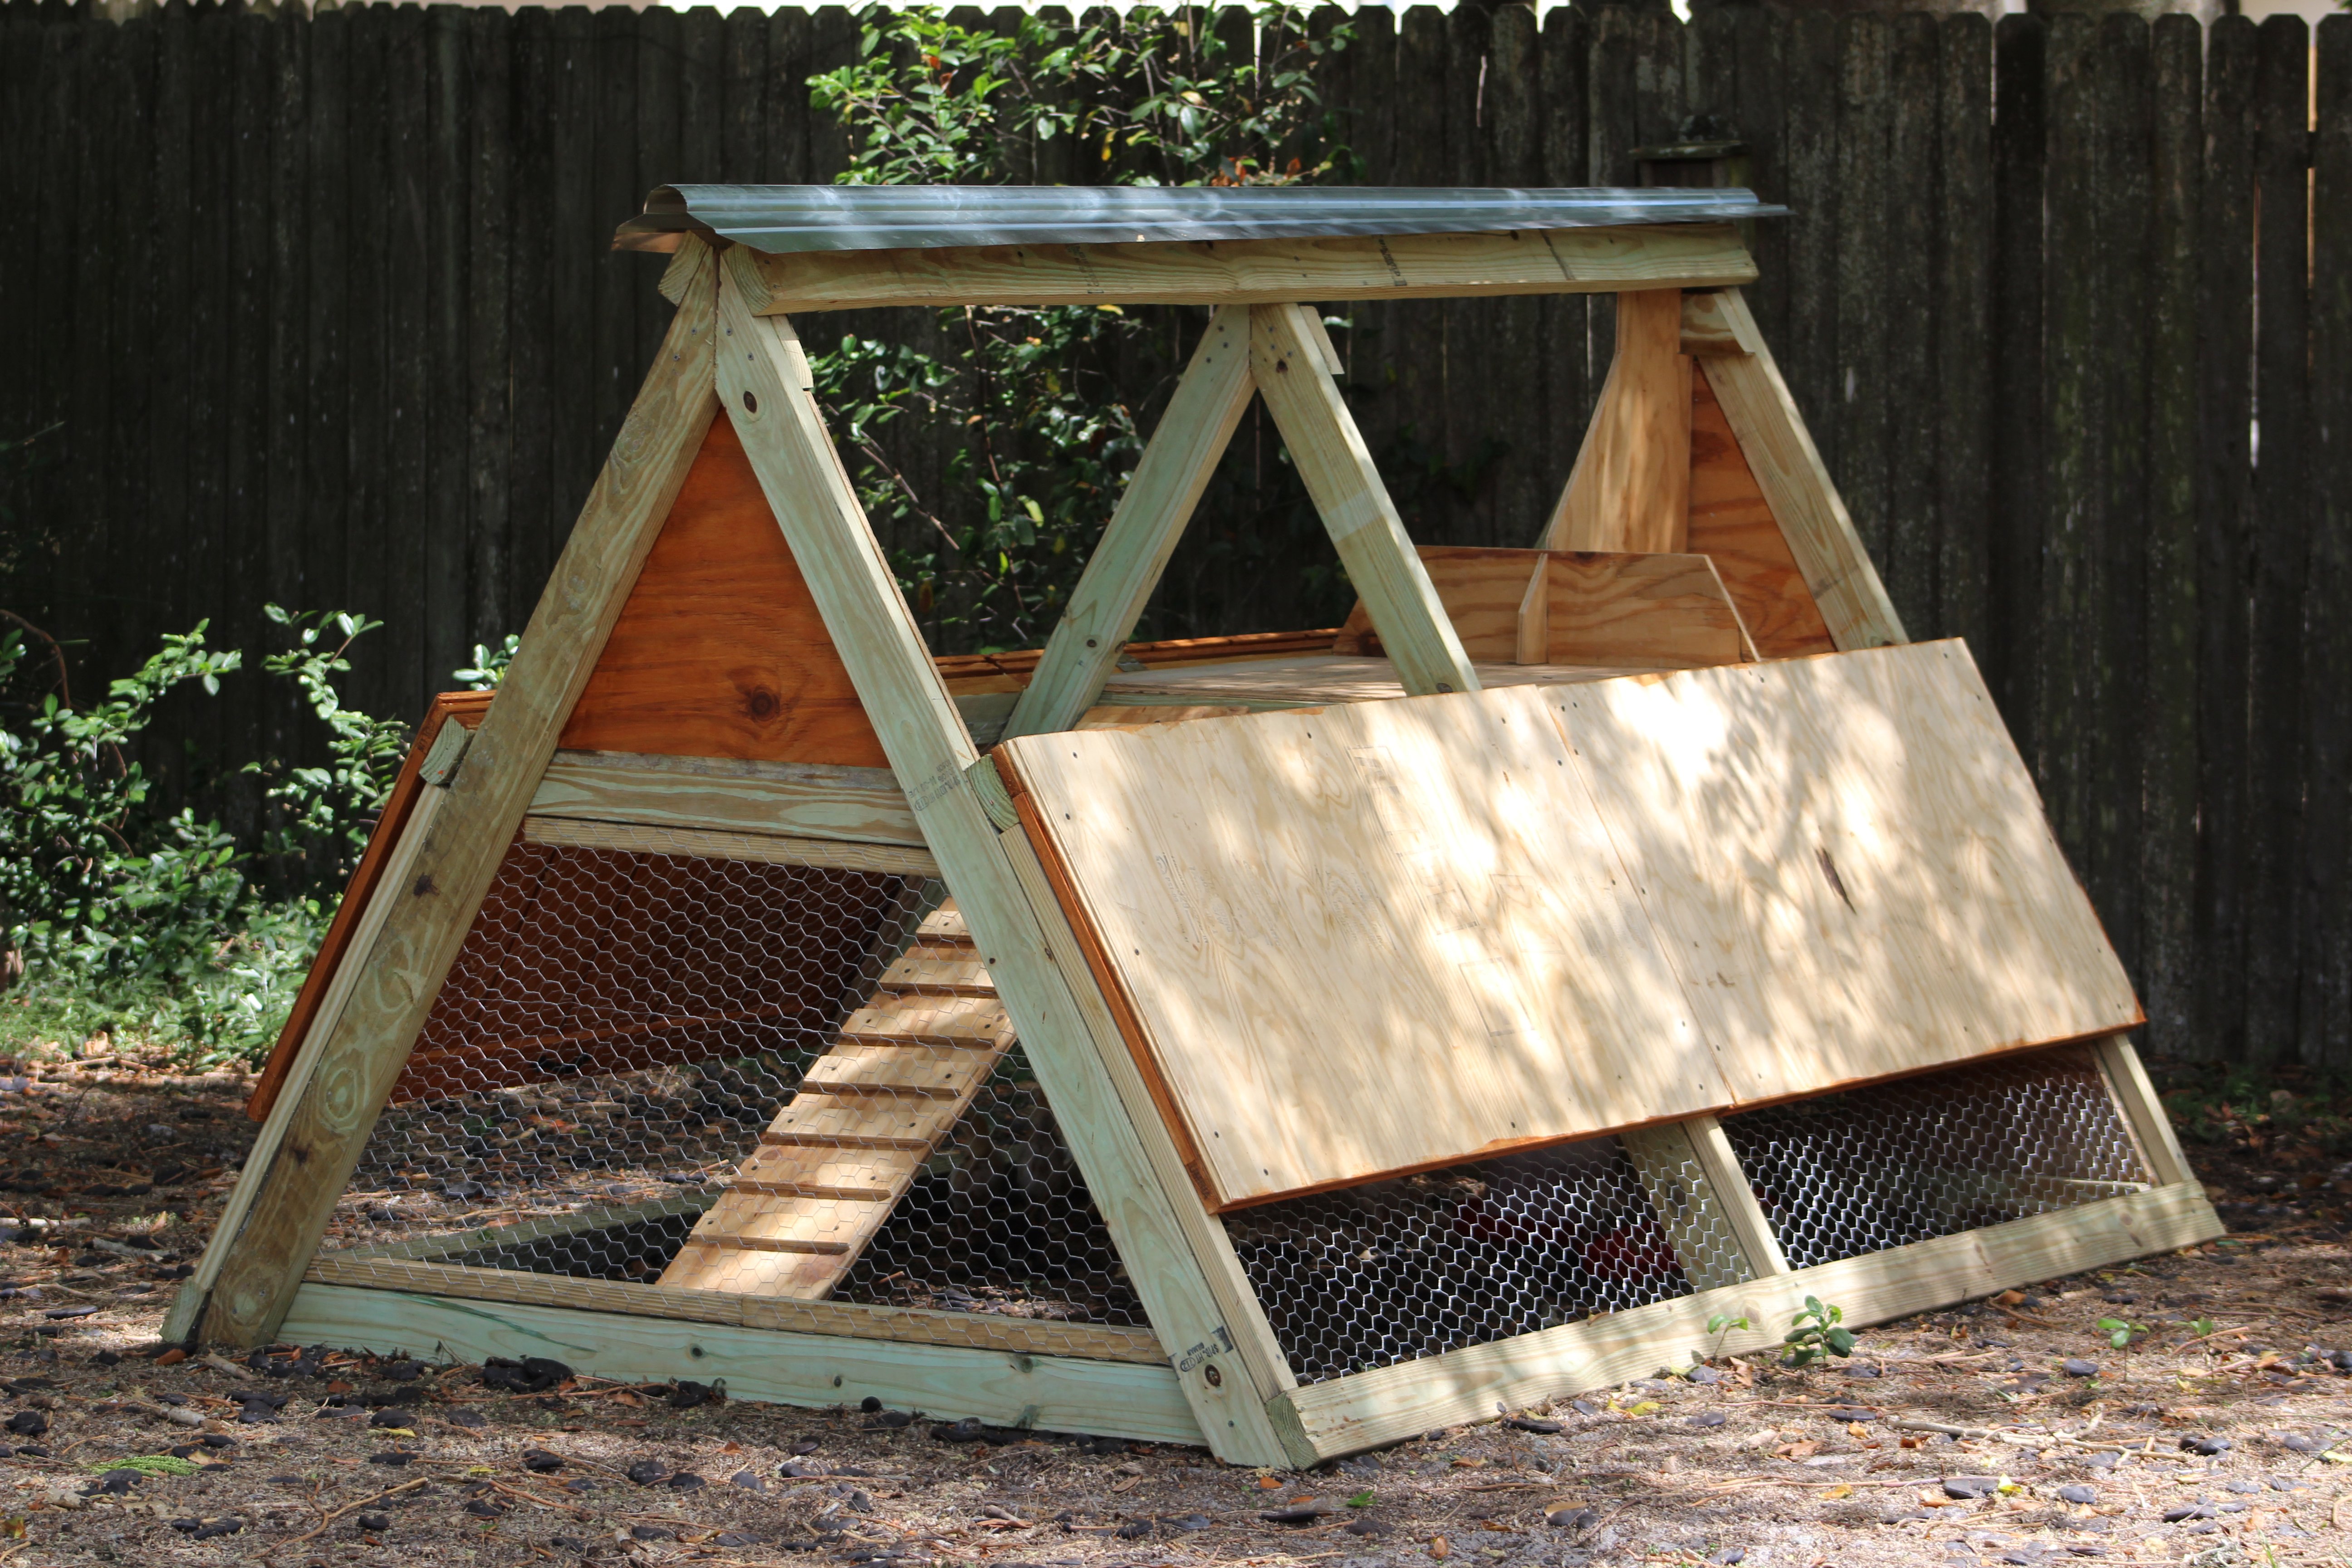
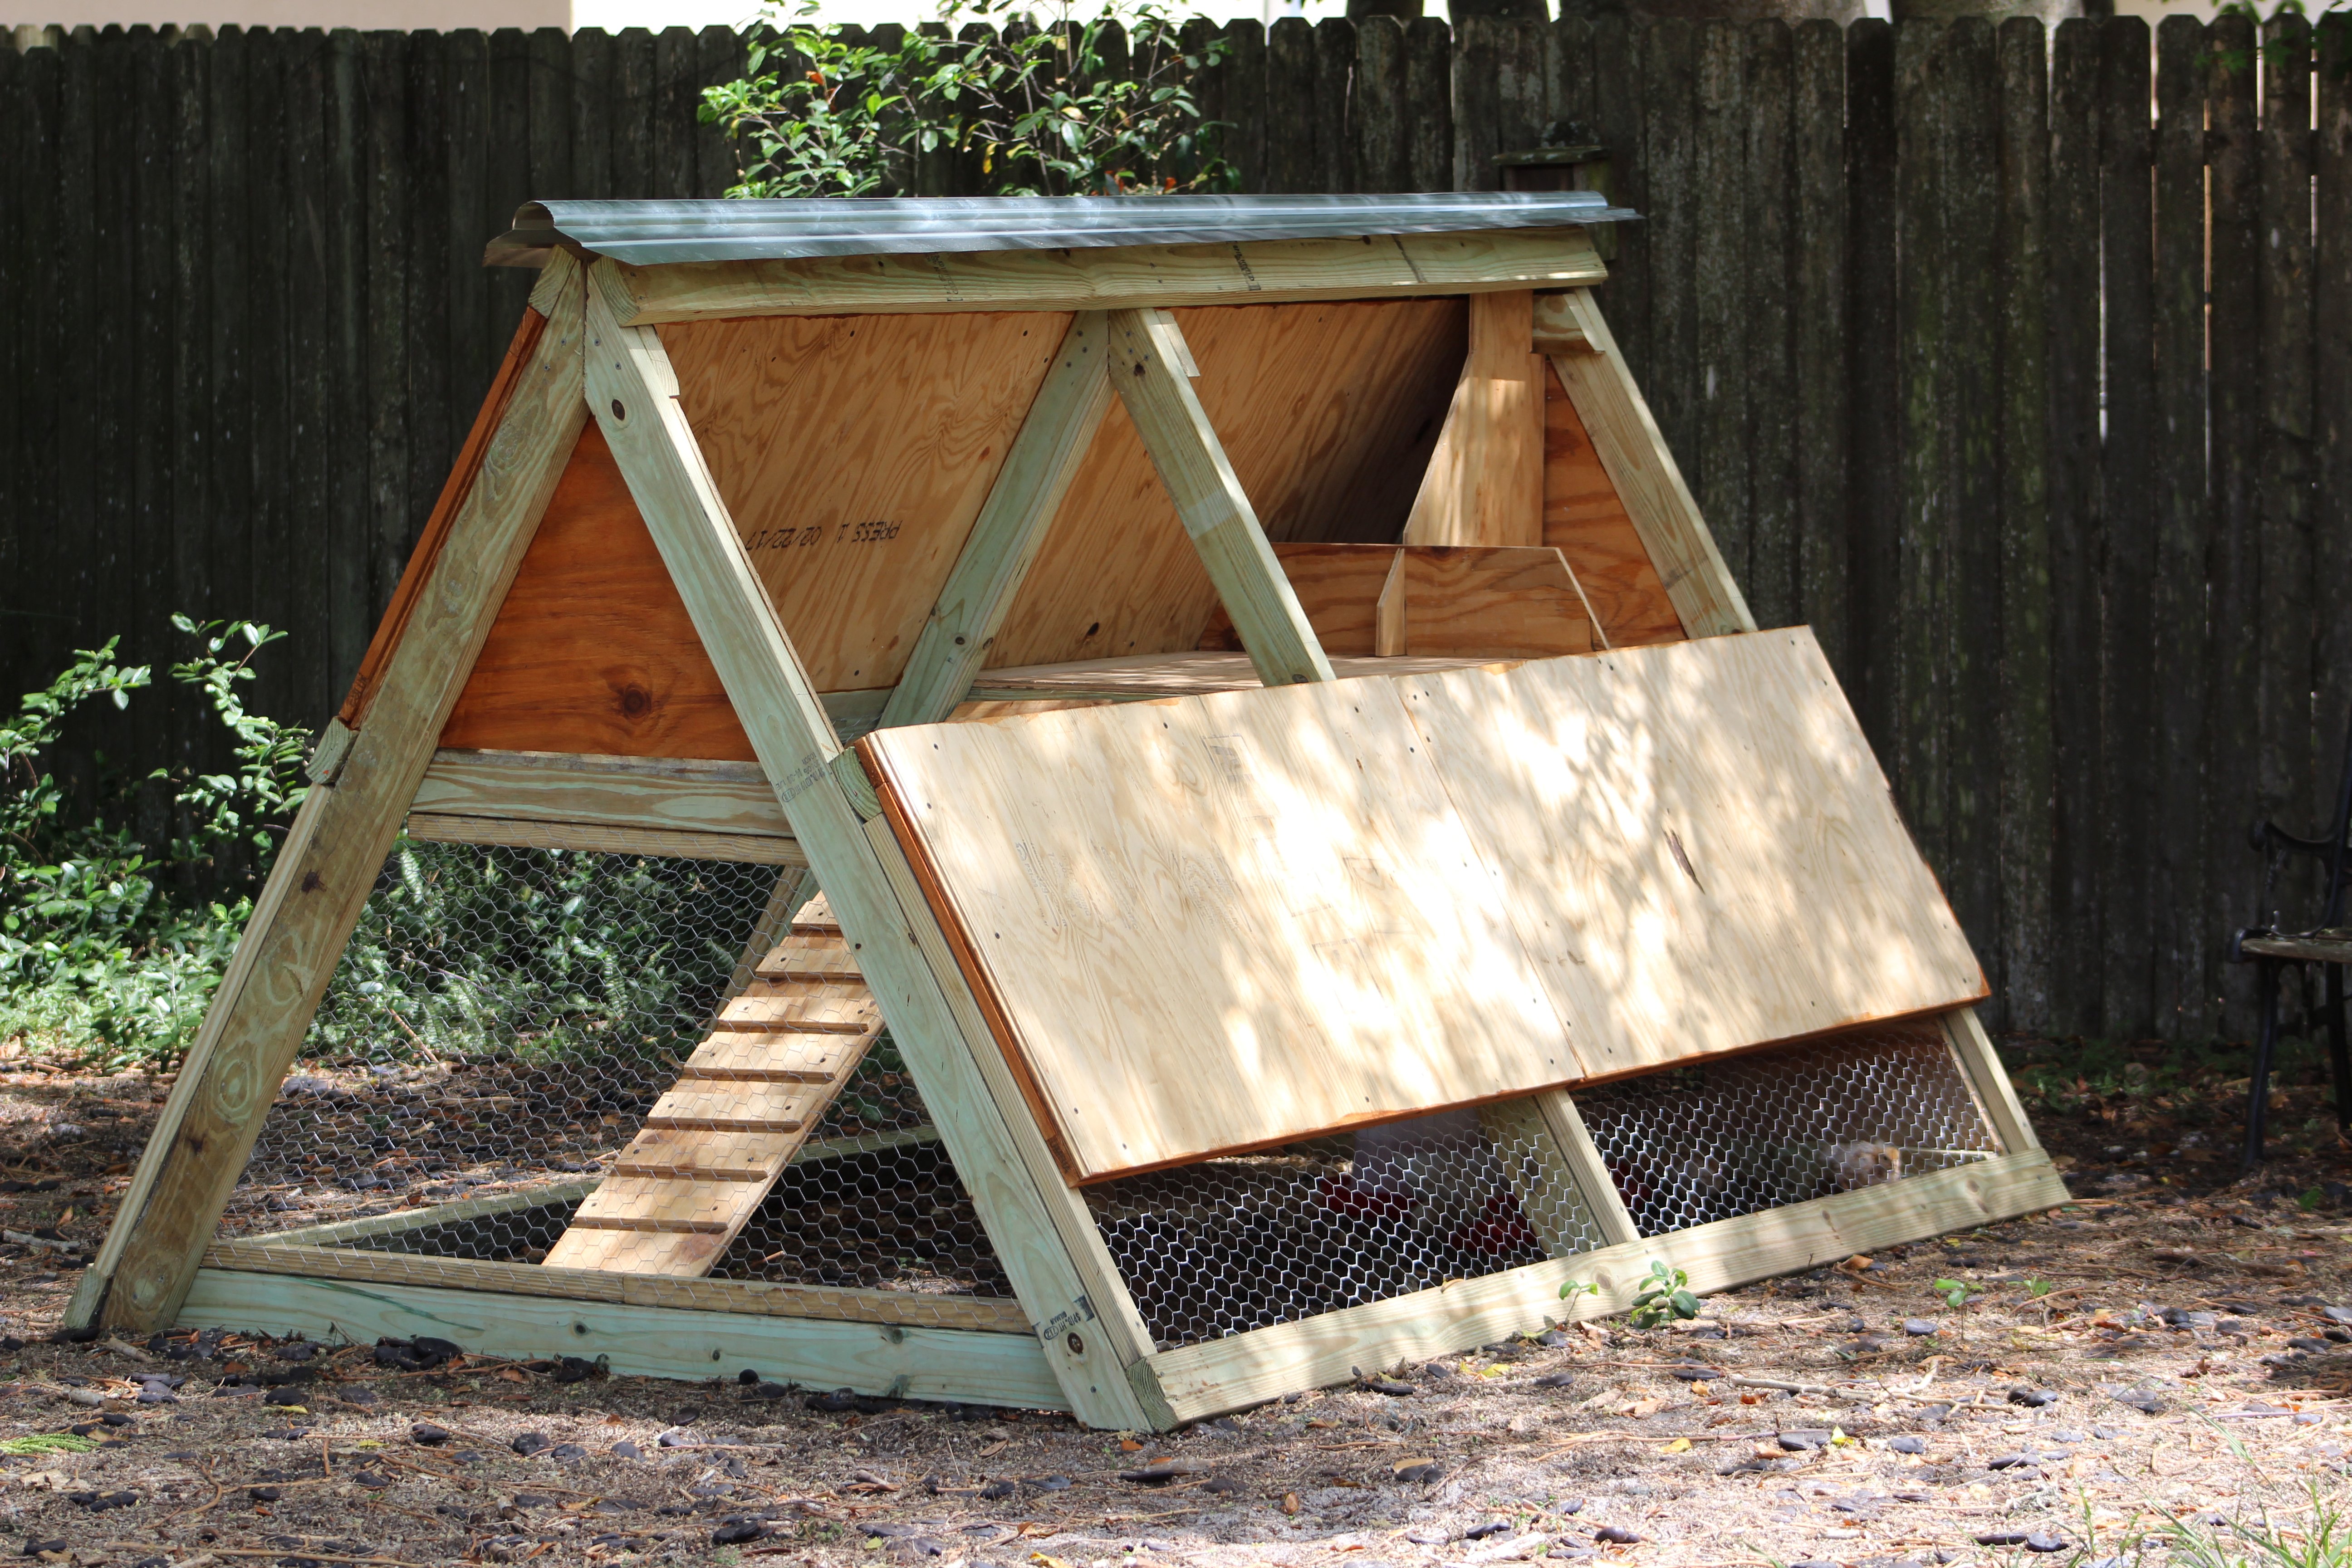
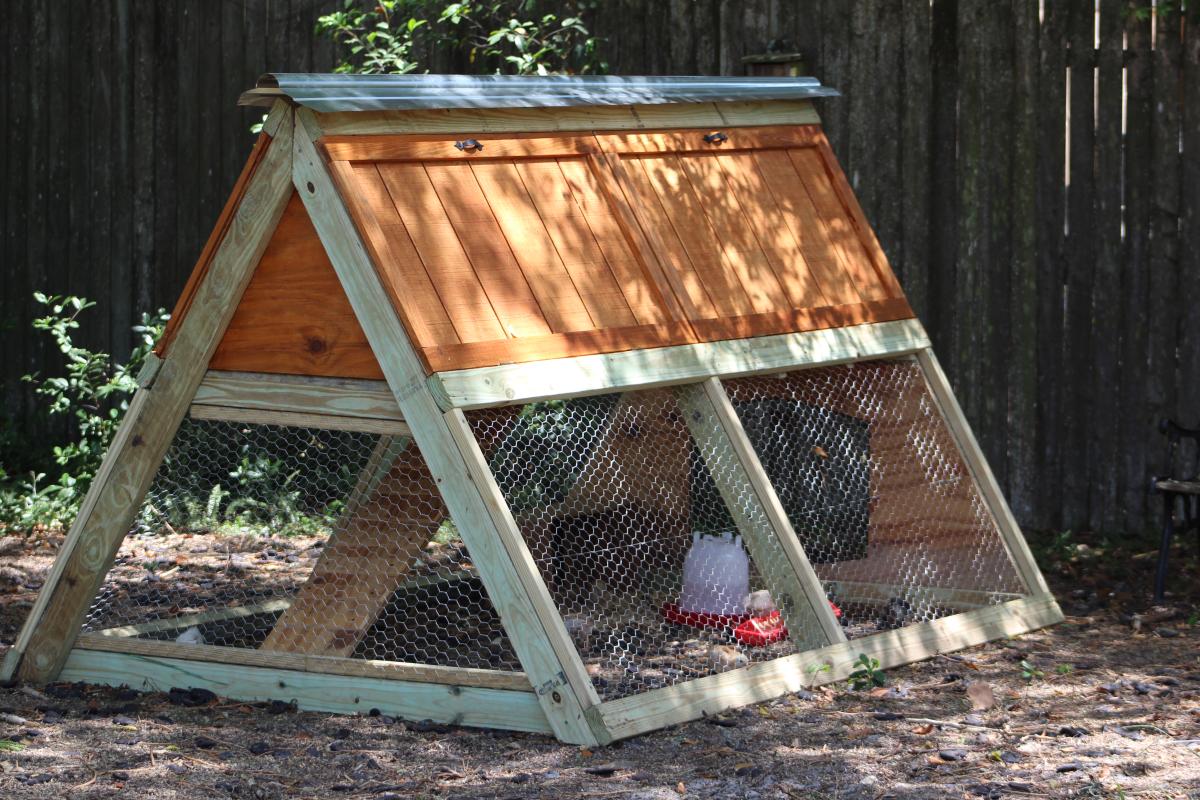
Thanks for the free plans. I did have to make modifications for the doors. i hid the hinges to give it a clean look. i used cedar for the trim and Plywood Siding Panel T1-11 4 IN OC (Common: 19/32 in. x 4 ft. x 8 ft.; Actual: 0.563 in. x 48 in. x 96 in.) for the doors. i used a metal flashing for the roof so it will vent.
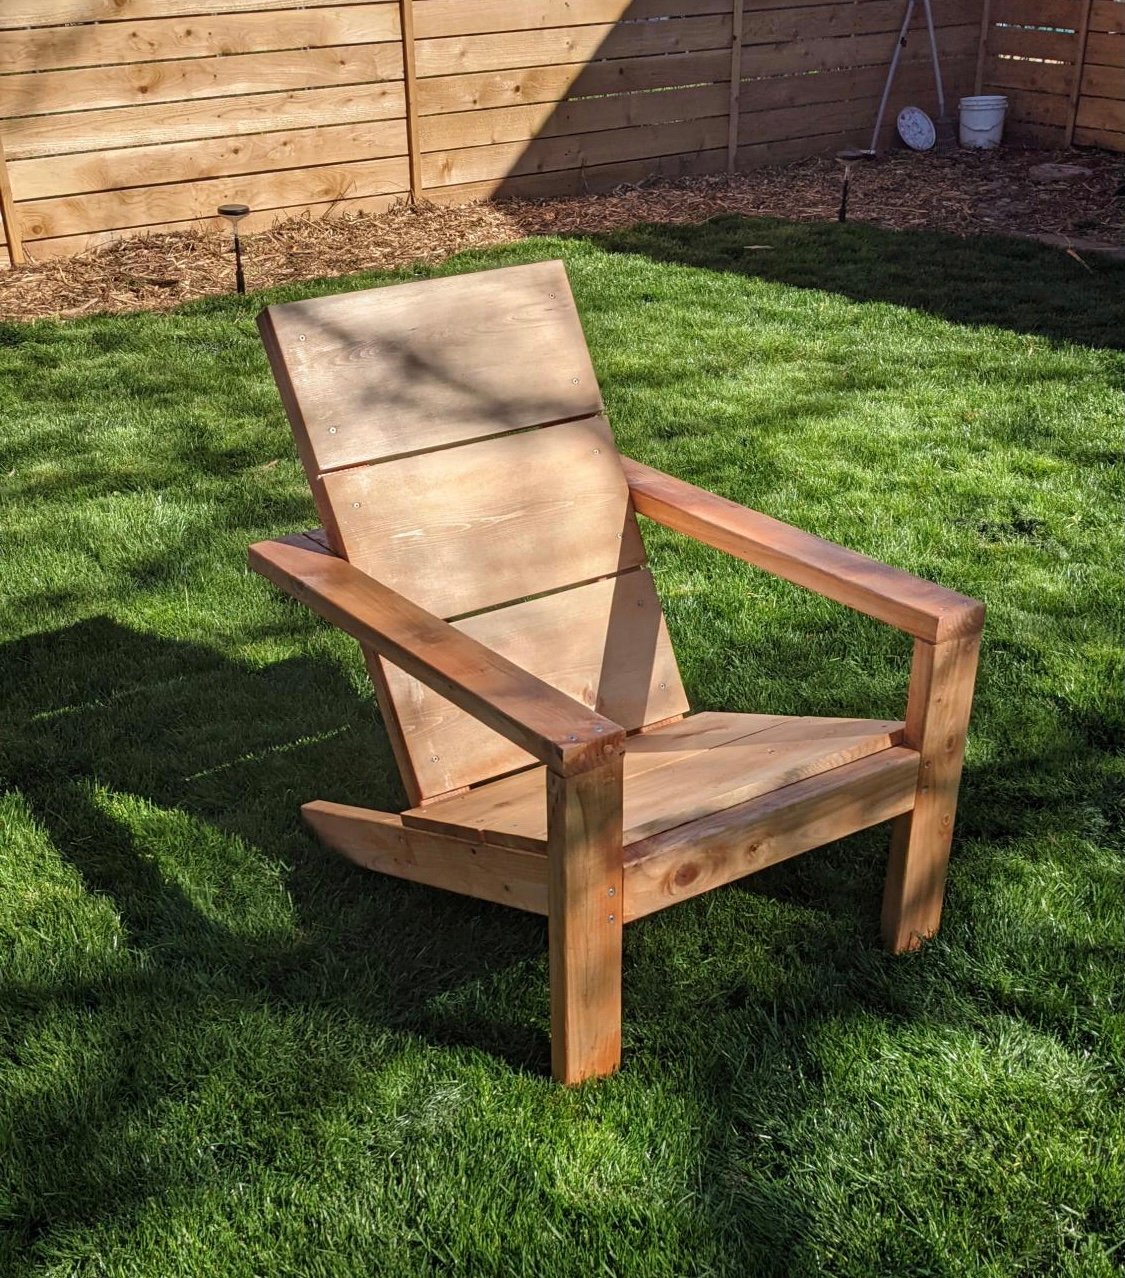
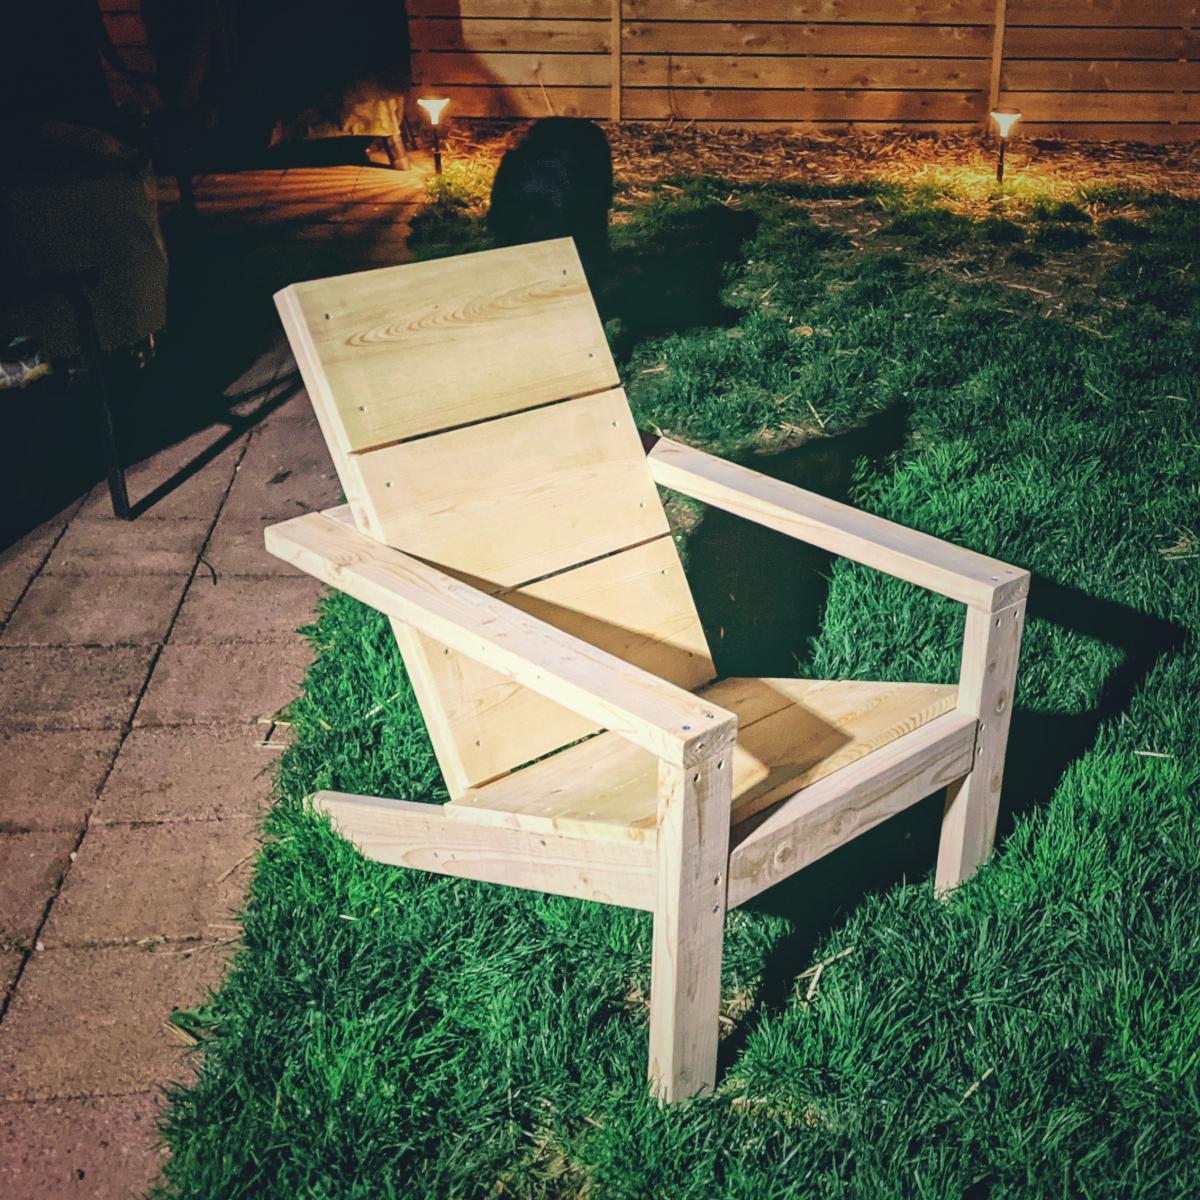
I've made 2 of the Modern adirondack chairs. Really enjoyed the plans and the video for help as I'm new to woodworking. I look for new plans all the time to see what I might build next

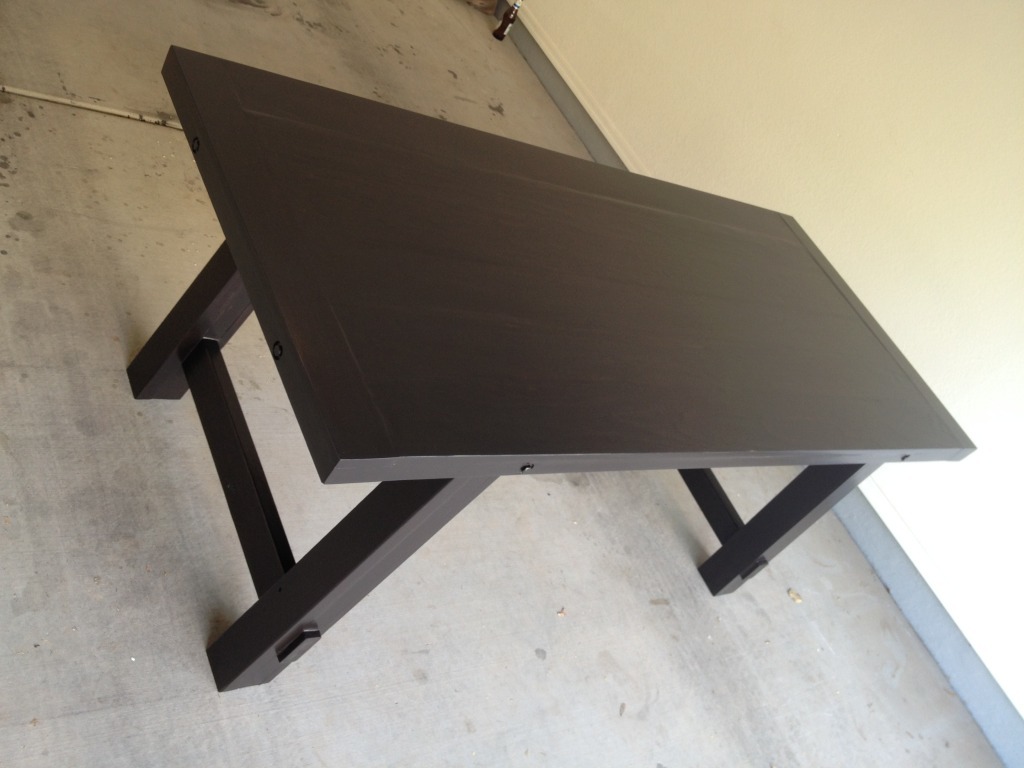
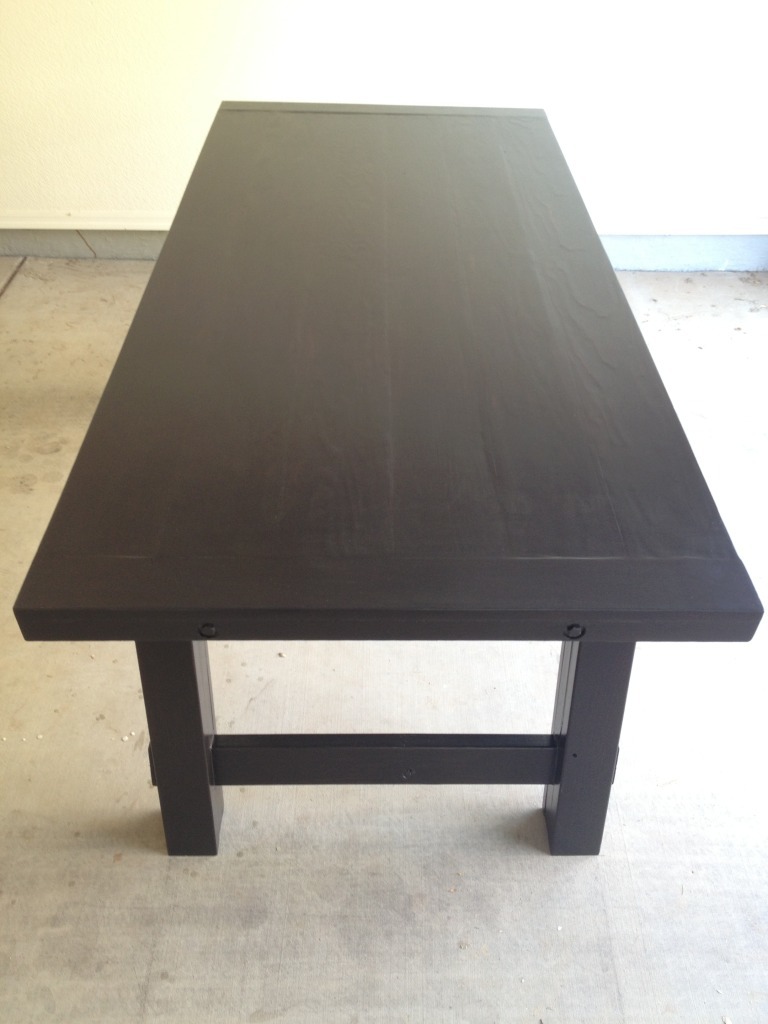
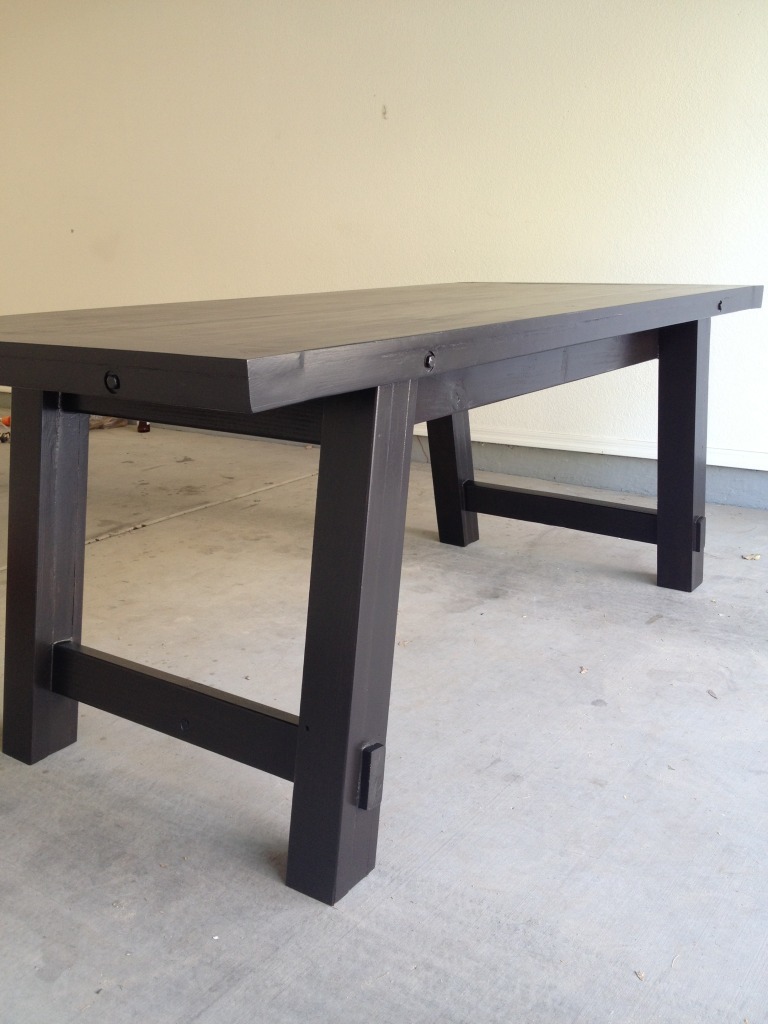
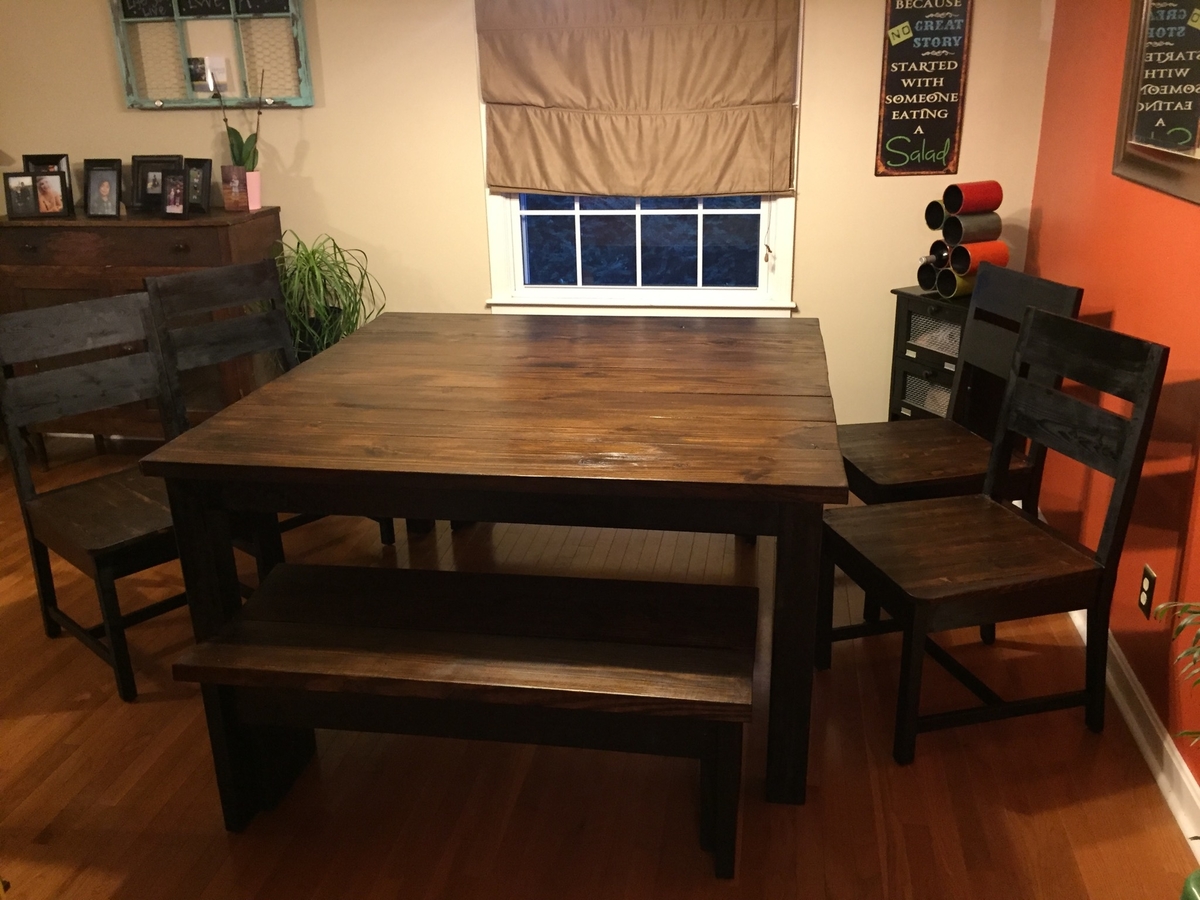
After doing my first build, pallet media center, I was hooked. My family and I desperately needed a dining room table. We wanted a rustic looking table and I was thankful I found the benchright table plan. Thanks Ana!! This build was fairly easy. I did mess up a couple times with the angle/bevel cuts. Totally ruining a couple boards. Which I had to run back to Lowes and purchase a couple more boards. I used 3/8 hardware bolts/washers/nuts in galvanized for the sides (3") and breadboards (6"). The stain basically painted them, which we love. I still need to add the hardware for the bottom (threaded rods, turnbuckle, nuts/bolts/washers, etc). The pics above really dont show the detail with the stain. The pics make the table look black. But you can actually see the wood grain on the table top. The table looks amazing in person, we love it!!! Thanks again Ana!!

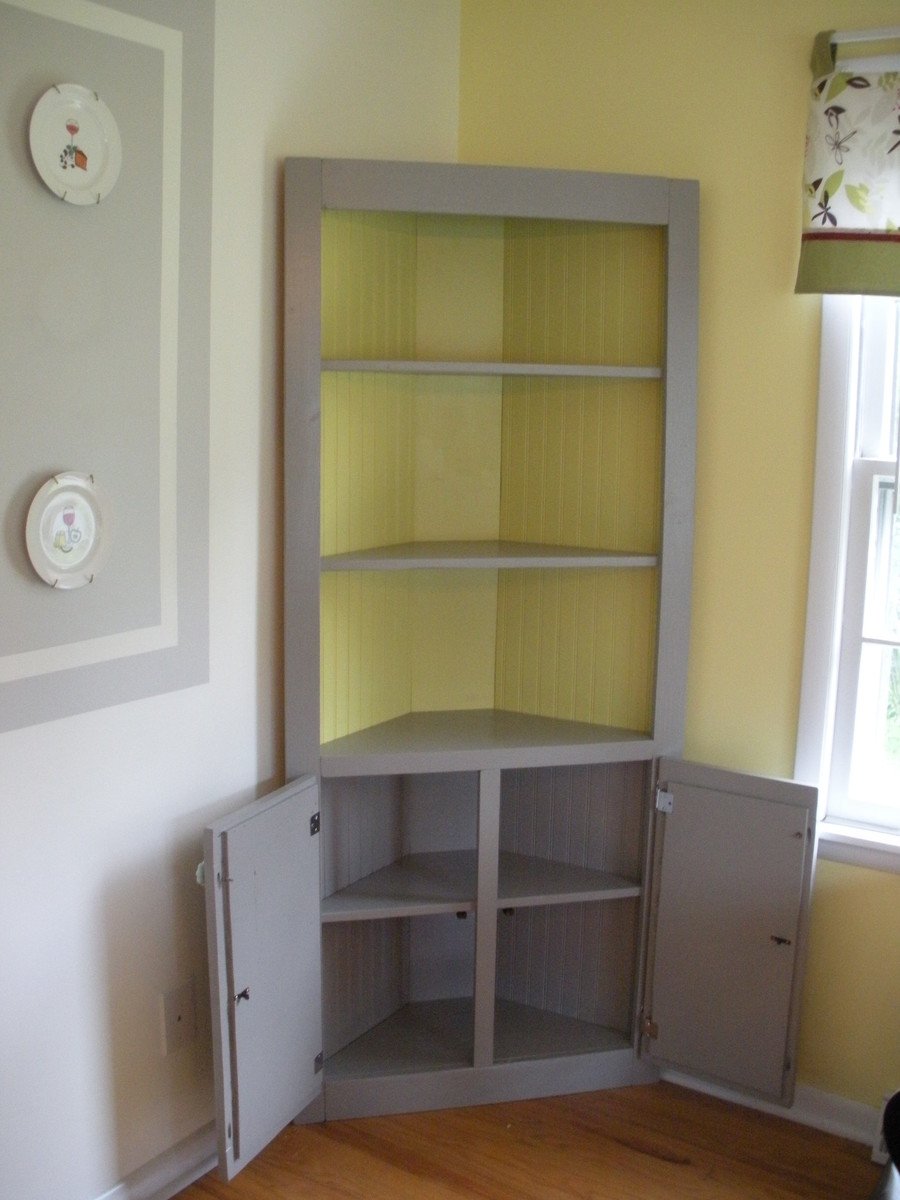
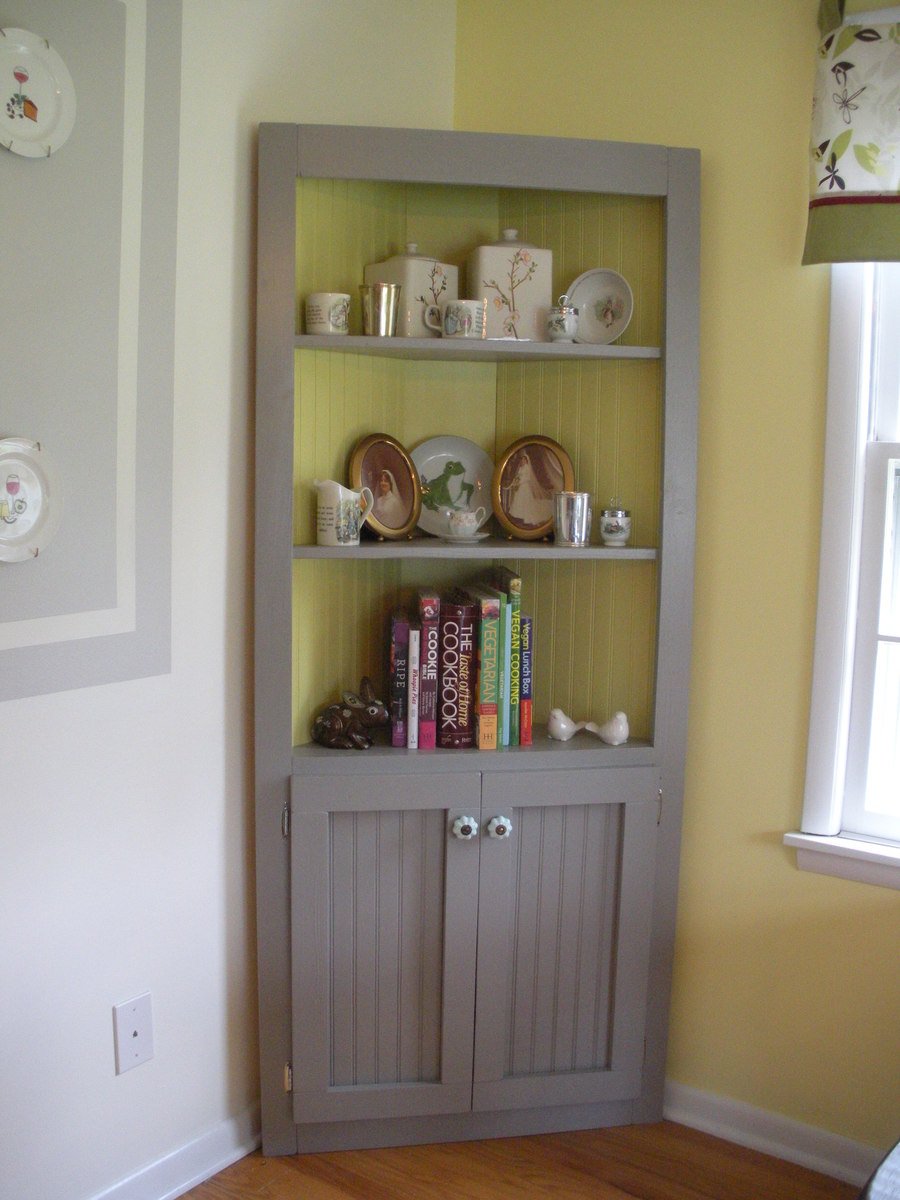
This project took me the majority of a three-day weekend to complete, but it was well worth it! I had the lumber store cut the beadboard panel for me so that it would fit in my car. This was also the first time I built something with doors on it, which was a bit of a learning curve, but came out alright in the end. I used pocket holes to build the face frame, and attached the shelves to the frame first before attaching them to the 1x8 back. I used 1 1/4" pocket hole screws and 2" wood screws. I left off the trim at the top and didn't bother to cut out the footer, but I think it still looks pretty cute.
My very first project. Was so easy thanks to Ana's instructions. Dark walnut gel stain and Fusion Seaside. Thank you so much Ana.
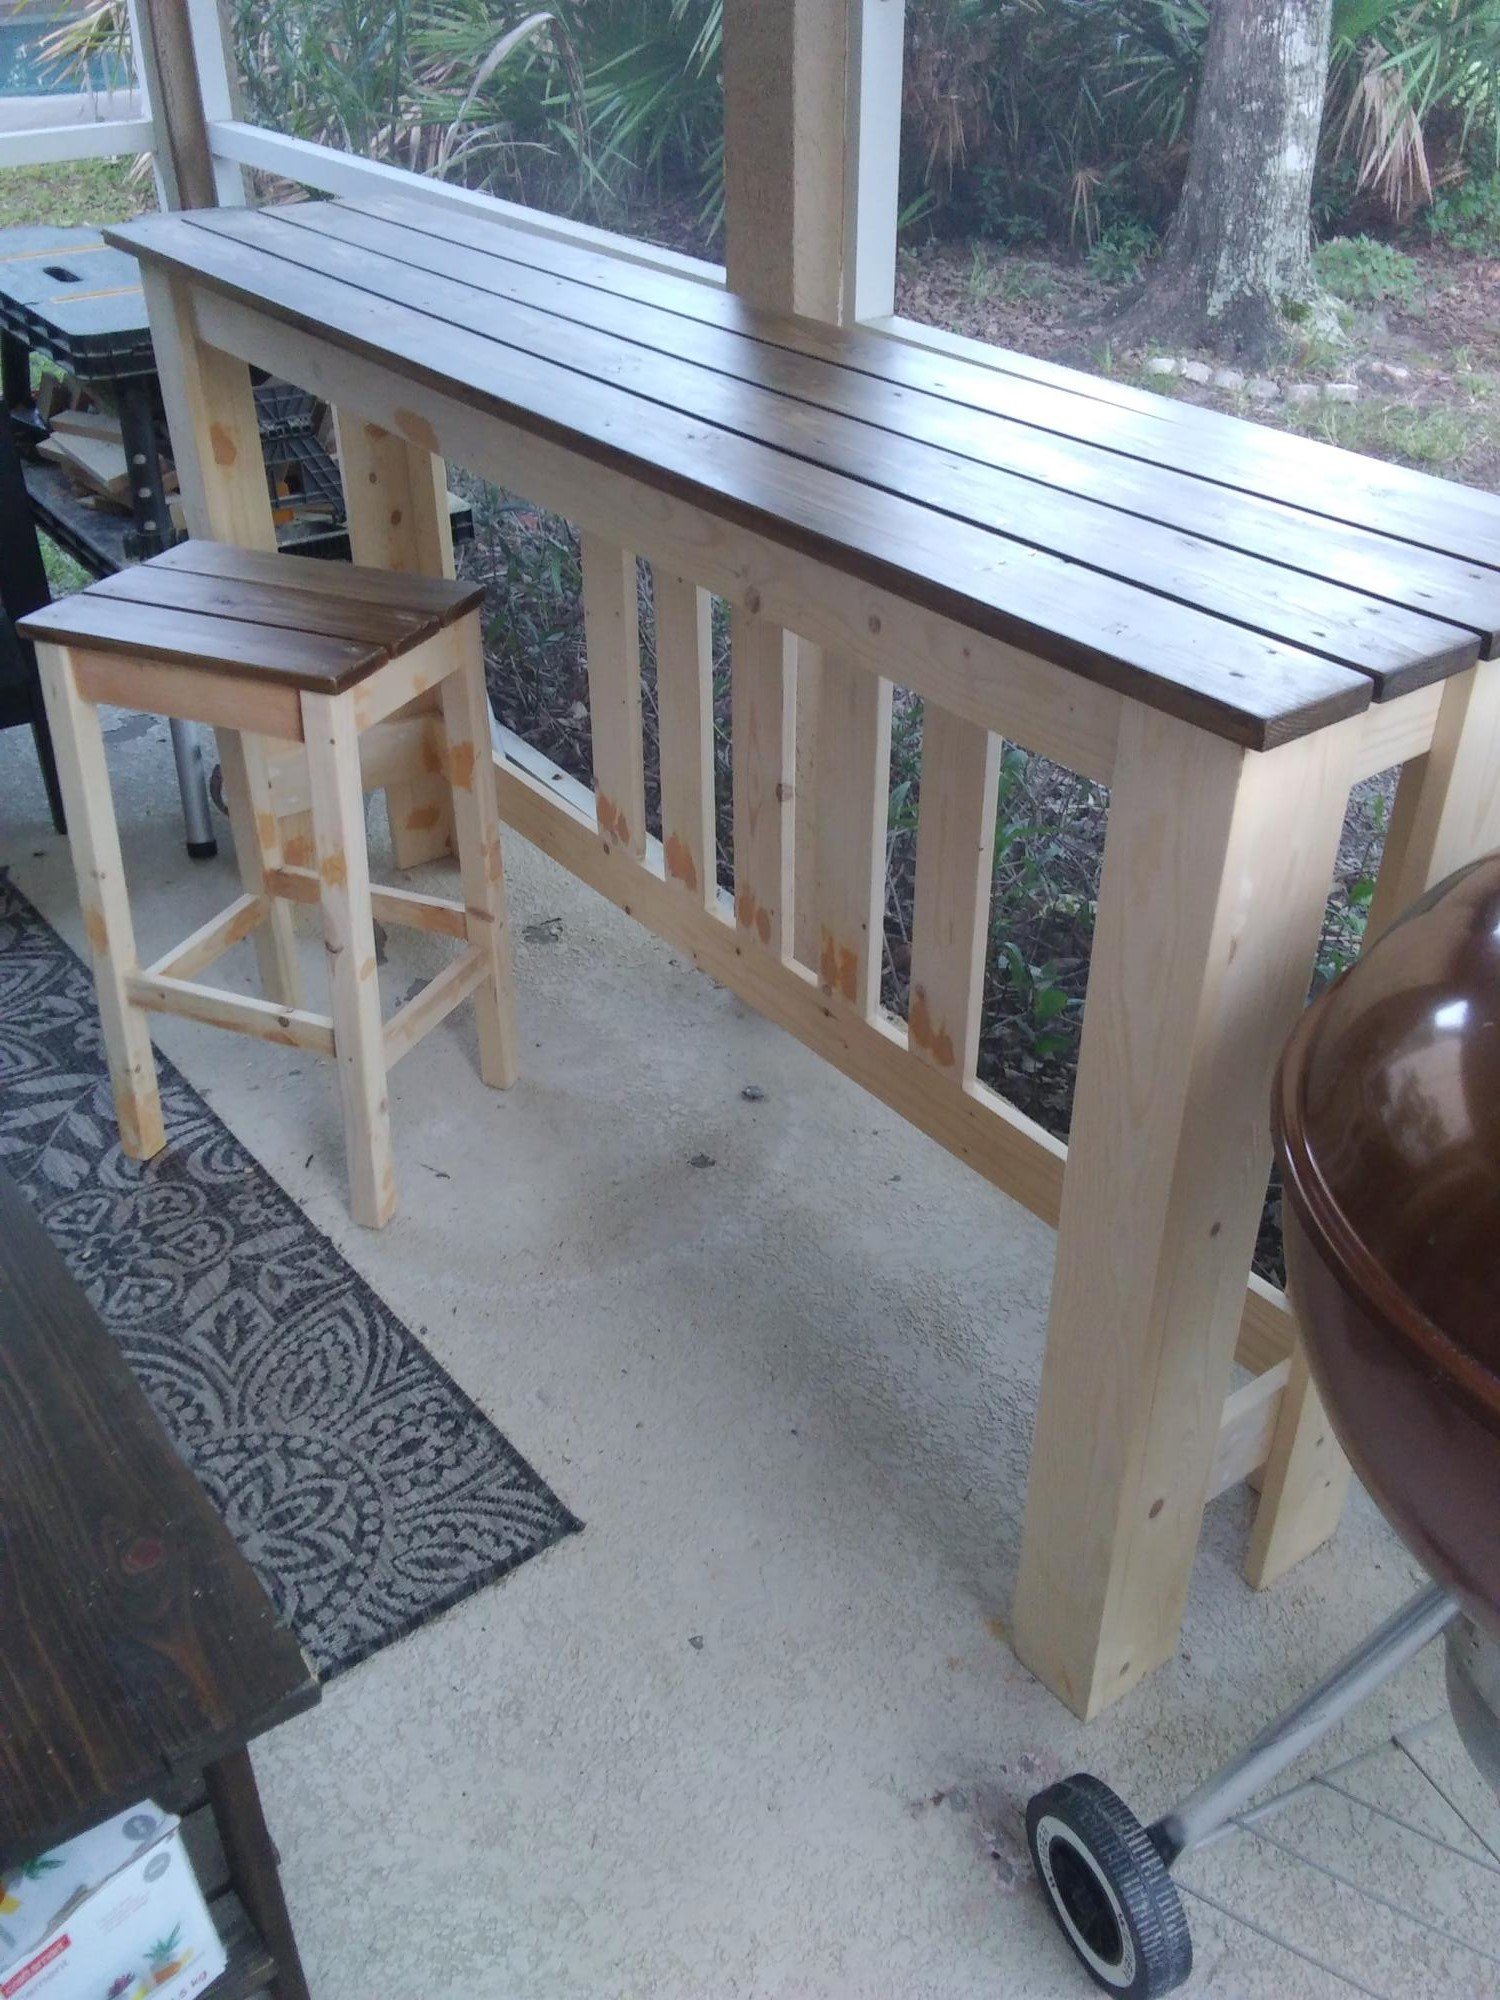
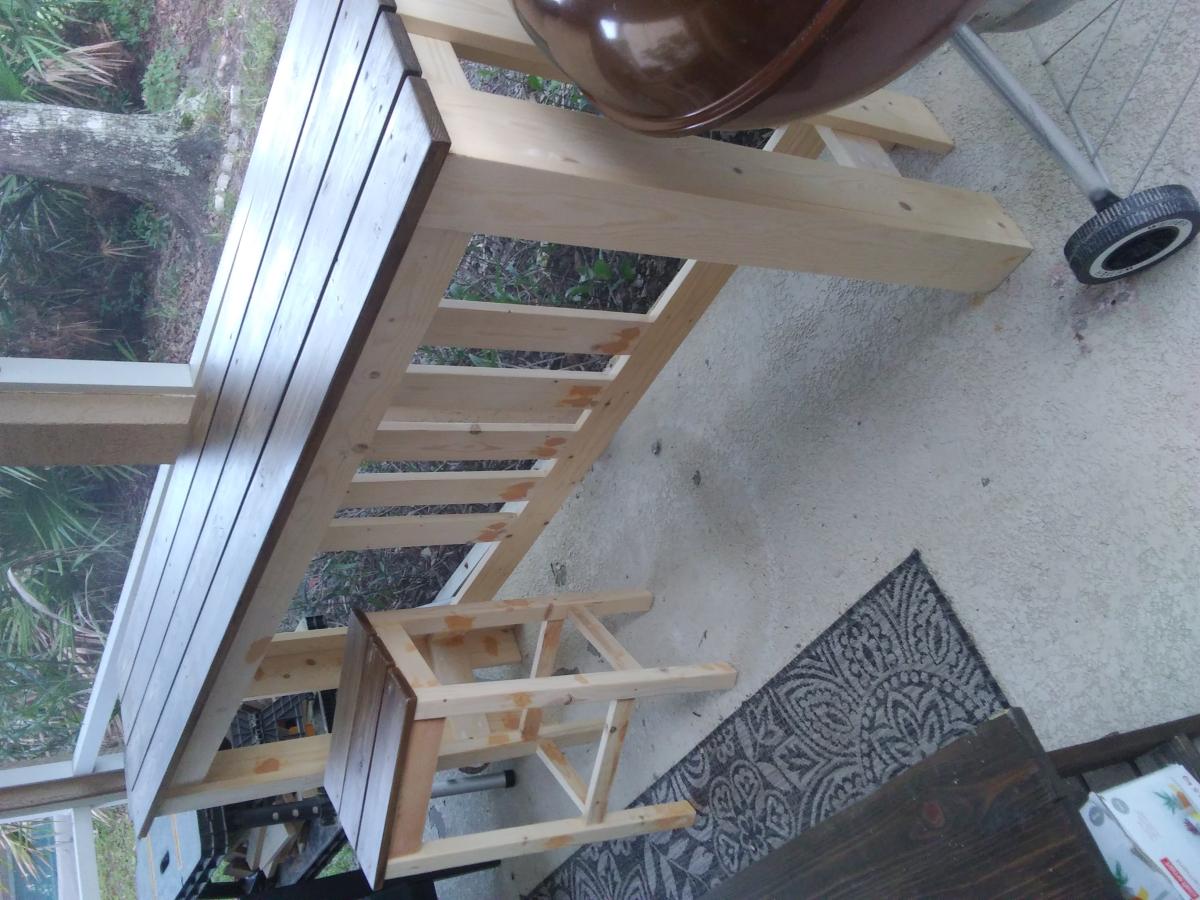
I love this bar table! I needed something long and narrow for our small patio - just deep enough to fit a plate and a drink, or a laptop, and long enough to fit three stools, so I modified Ana's dimensions. Also, living in Florida, we occasionally need to bring our furniture inside for hurricanes, so I made it a lighter by using 1x3s and 1x4s instead of 2x or 4x4s. I still need to paint the bottoms a cream color and build two more stools, but I already use it a lot. Thanks Ana! (The photo was upright on my computer, but I didn't see how to rotate it once it was uploaded)
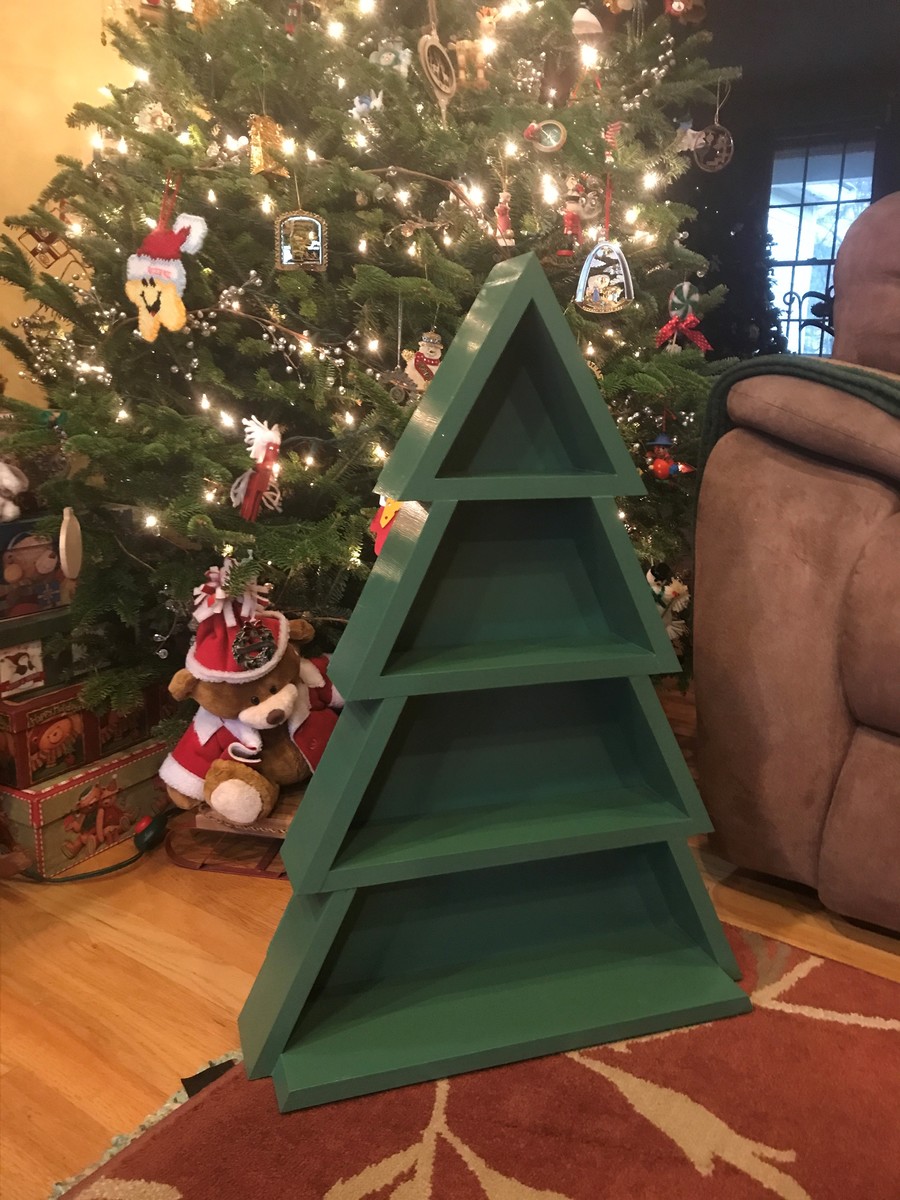
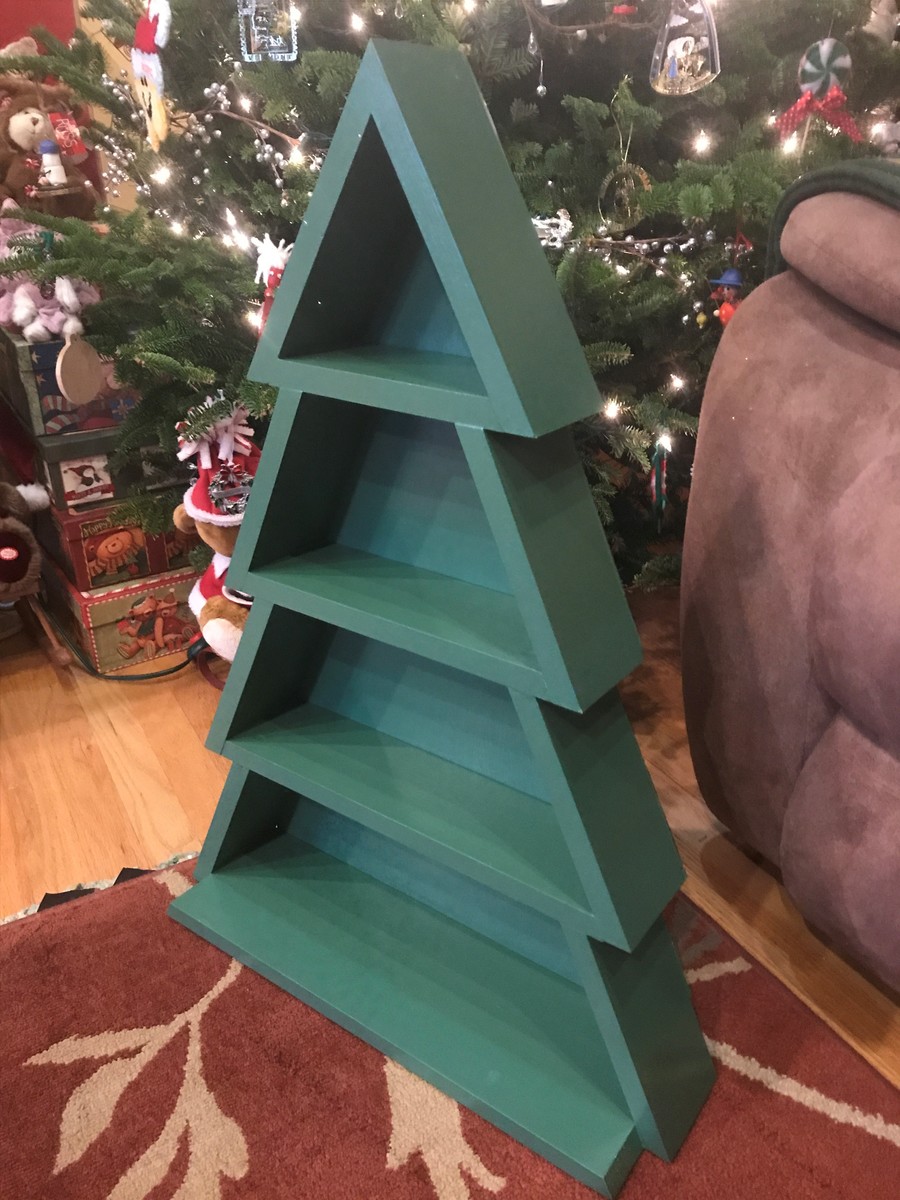
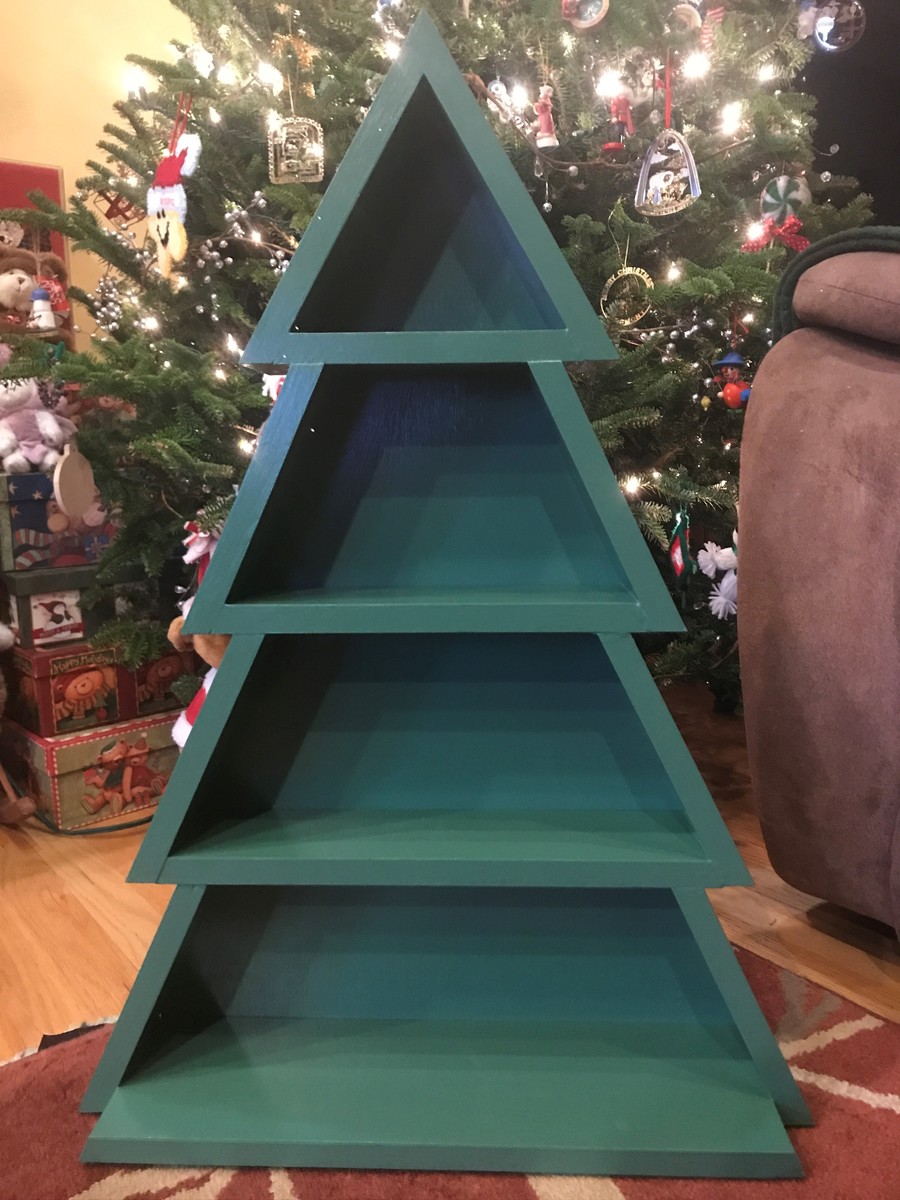
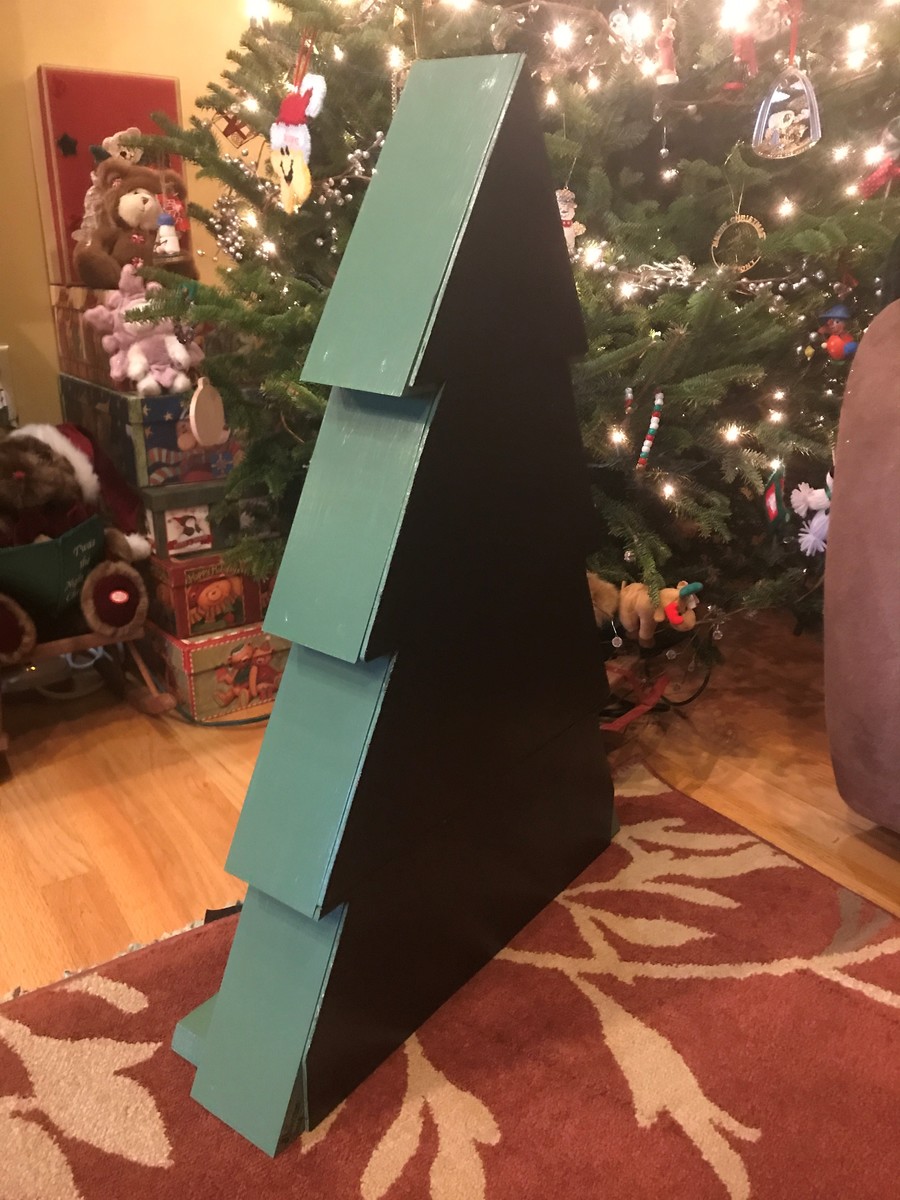
I found the Christmas tree shelf plans and since I had drawn my wife's aunt's name for this year I knew she'd appreciate this build. I chose 1x6 top choice pine and a wider piece for the base since she may decide to set this on the floor instead of hanging it. I also had some oak plywood I used for the back. I screwed all the pieces together, countersunk and filled the screw holes with wood putty. The paint I used was Benjamin Moore, the color was Balsam (567) and I really like how the color came out. I painted the back and the bottom with standard black interior paint just to protect the wood a little. I coated it with a couple of coats polycrylic and bought a couple of Christmassy items for the shelf to get her started. Can't wait to see what she thinks on Christmas day.
This can easily be built in less than a weekend depending on your skill level. I had to recut one of the boards when I caused some damage while putting it all together. The sanding, painting and finishing takes as long as you want depending on the finish and care taken.
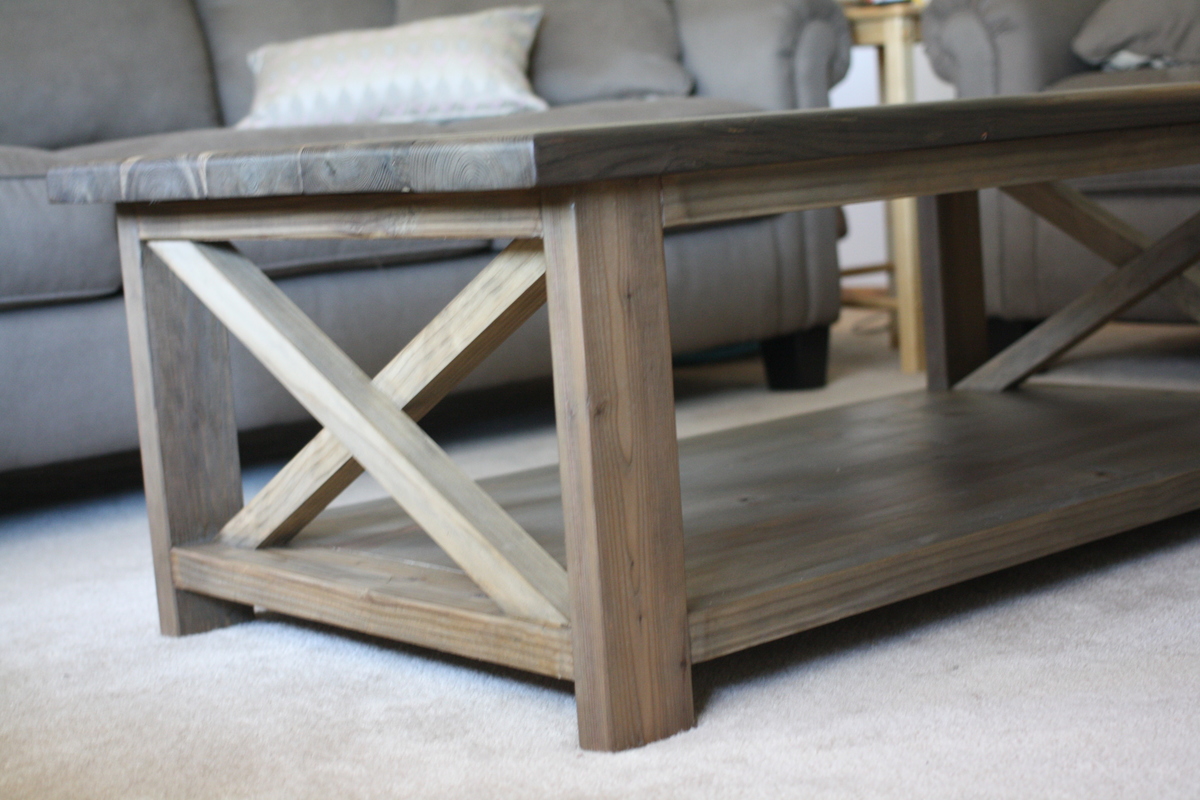
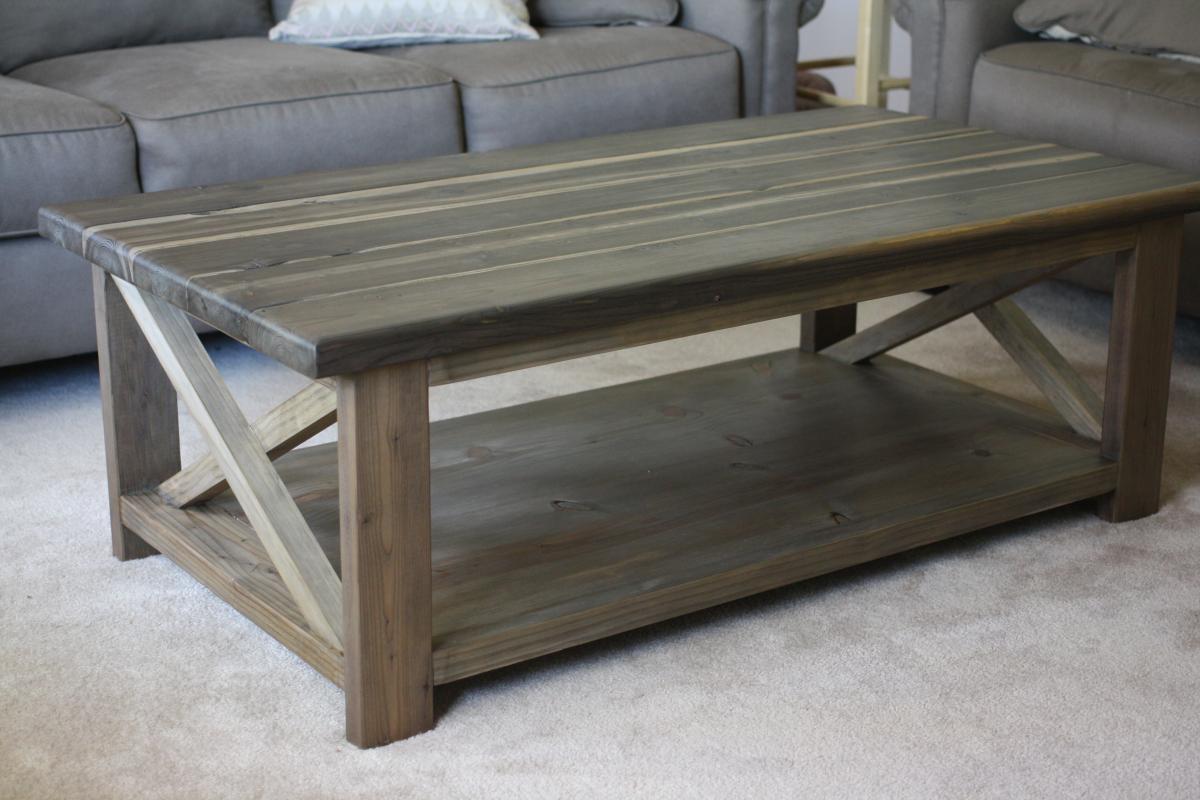
coffee table
This was my first attempt at making furniture...but it turned out GREAT! My fiance was about to buy a VERY similar dining room set for $1300 before I stopped her and insisted that I could build it myself, finish it to match our kitchen/dining room, and save a TON of money!

Golf Locker. We love it!

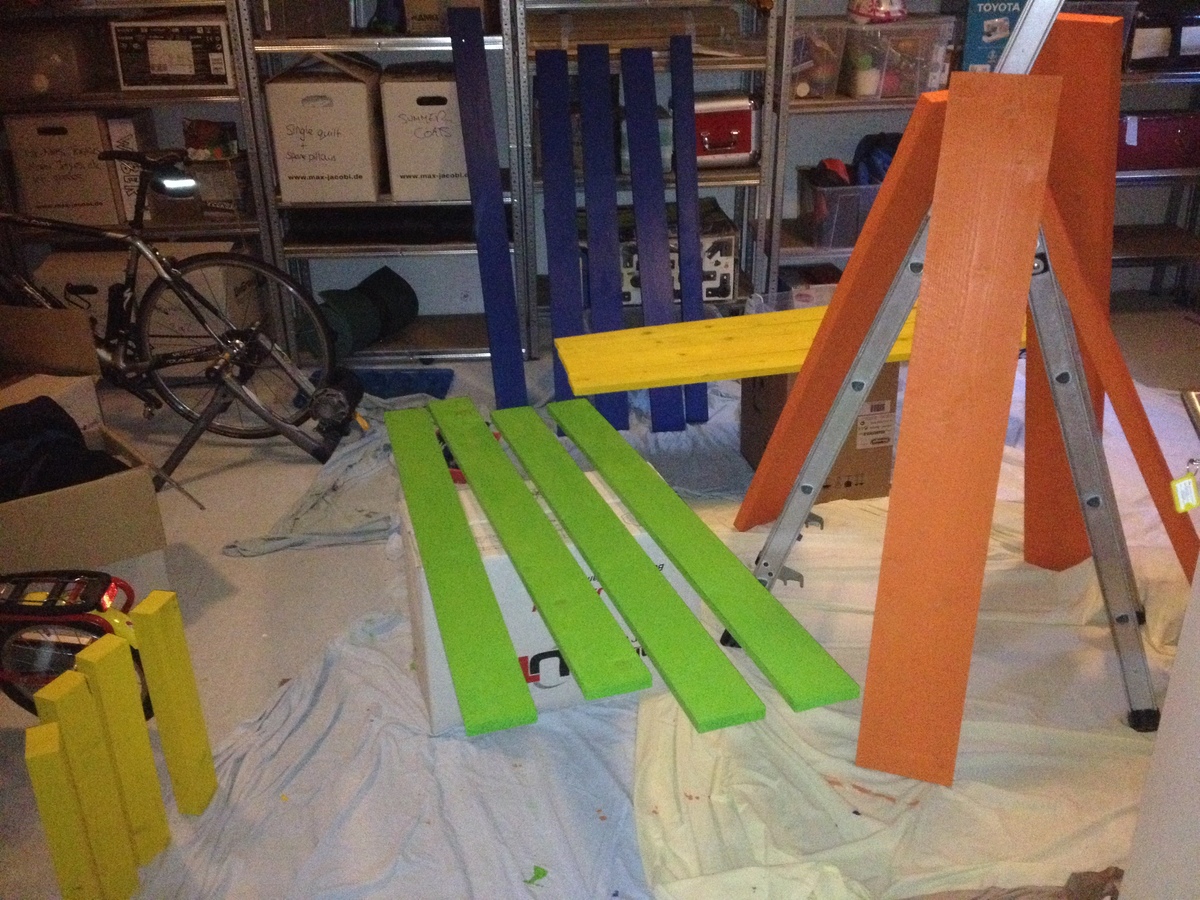
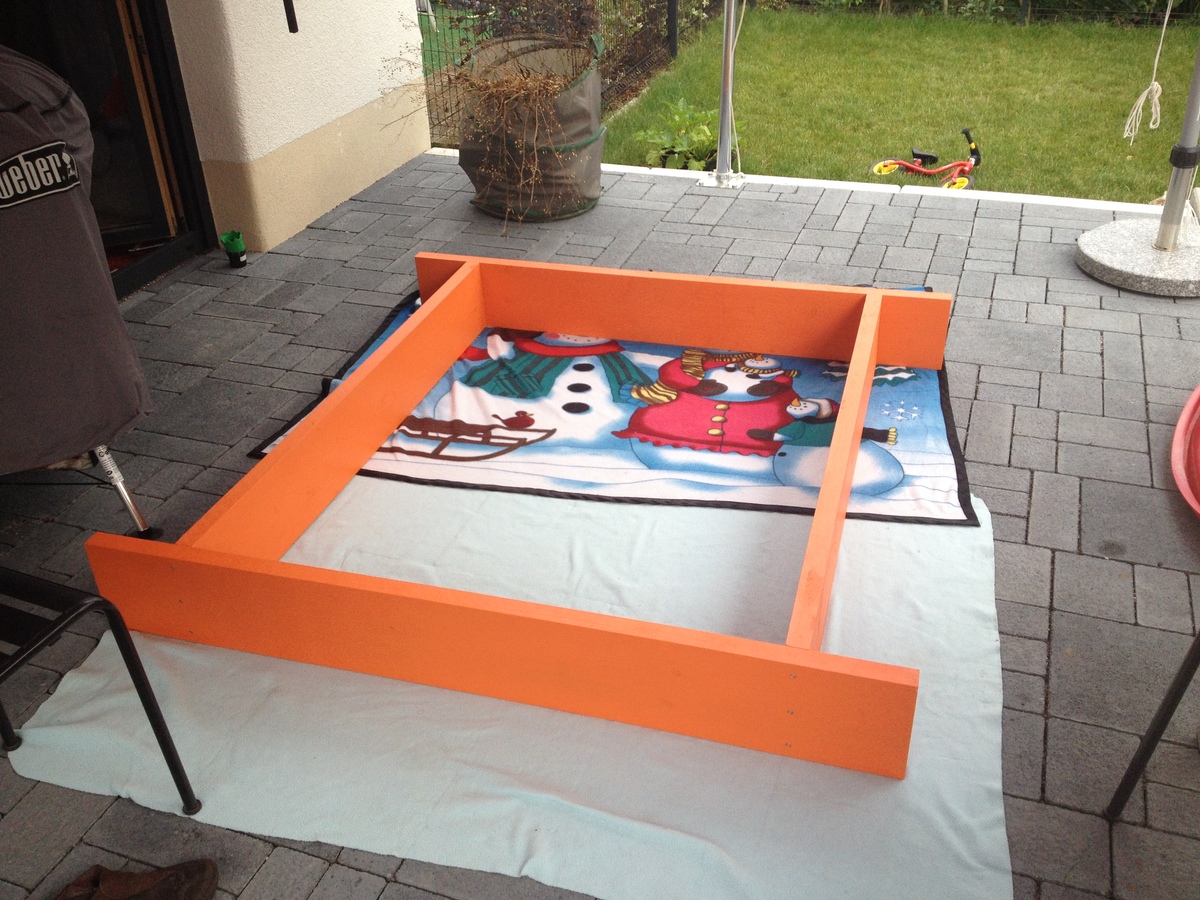
This was our first build from this website and we are so pleased! Having seen very involved plans on an Australian website for a similar sandpit, I was so pleased to come across this version, with its far simpler design!
We wanted a slightly bigger sandpit, so I needed to do some modifications, and while I was enlarging it, I also converted to metric sizes, and designed specifically for the timber I knew I could buy locally (very obscure and inconsistent seeming German sizes). So the end result is a 1.5x1.5m sandpit, that has so far had 6 kids playing happily in it at once!
I've put in the drawings I used, and the cutting list for larger sizes in case anyone else is working in metric, or wants a bigger size!
Our other modification was to offset the shorter sections of the base to run along the front plank of the bench seat - there were two main benefits for this - we need a lot less sand, as there is none wasted under the seat, and the seat is supported and can't bow downwards!
The dimensions and layout we used are in the images.
Supplies
Timber
2 - 200 x 40 x 3000mm
6 - 120 x 24 x 3000mm
1 - 80 x 50 x 3000mm
Hinges
12 - 140mm long (the original design had 8, we went with three per edge to allow for the extra width)
Self tapping decking screws
18 - 5 x 80
48 - 5 x 50
96 - 3 x 20 (or enough for your hinges, depending on the design)
Paint
3 - 375ml PU Acrylic Paint, suitable for exterior use (top planks and seat supports)
1 - 750ml PU Acrylic Paint, suitable for exterior use (base)
Weed matting and staple gun
Sand
I calculated I would need 20 x 25kg bags - in the end we needed 11 - don't ask me where we went so wrong!
Cutting list
2 - 200 x 40 x 1500 (long sides of base)
2 - 200 x 40 x 1415 (short sides of base)
12 - 120 x 24 x 1495 (top slats - just under half a plank, to allow for waste)
4 - 80 x 50 x 245 (armrests / seat braces)
4 - 80 x 50 x 495 (back supports of seats)
I gladly paid 5 Euro for the wood to be cut in Hornbach - it should have been more than this, but the guy was generous!
12 hinges (the original design had 8, we went with three per edge to allow for the extra width)
On Sunday we had the idea, on Monday I drew up the plans, on Tuesday I went shopping! Once all our wood was home safely, we sanded it down - most edges weren't badly finished, but there were a few splinters that needed getting rid of!
The next two nights Mr W gallantly set to work with the paint brush. After two nights, the wood all had two good coats of paint and we were ready to start assembling on Friday.
I pre-drilled the base of the bench before the second coat of paint - three holes for each butt joint - with some careful measuring this made screwing the base together really easy!
The top planks were also pre drilled, but there unfortunately my tiredness made me make mistakes, and some had to be re-drilled! Spacing the planks out took a lot of time, but I am glad I made the effort. I used cereal box, and experimented with different numbers of layers - I knew I wanted a theoretical 5.4mm gap, but it took some time to get the right number of layers of carefully creased and concertinaed card!
Having got our spacing wedge sorted, we screwed the blue planks in place at either end of the base. We then assembled the green seat section, and the blue/yellow back rest. Following a tip from the comments section, we added the hinge to the seat/back combo first, as this ends up being on the underside. Once those two hinged sections were made, they were then laid in place on the base (card wedge spacers in place) and then the final hinges added. The final assembly took about 5 hours - but this was partly because we started outside, then had to move everything inside when a huge thunderstorm rolled in!
The next morning we got busy with the staple gun and tacked weed matting over the base, then it was hauled in to position and filled up! For us getting this done and dusted was important, otherwise it could have dragged on a lot, but we are terribly proud that it was done in less than a week from being fist conceived!
I hope the metric/enlarged plans are of use to someone else too. One other idea we had, which we didn't get round to building in, was a support bar to be fitted when you close the pit, so the kids can play on top as a stage when it is not being used for a sandpit!


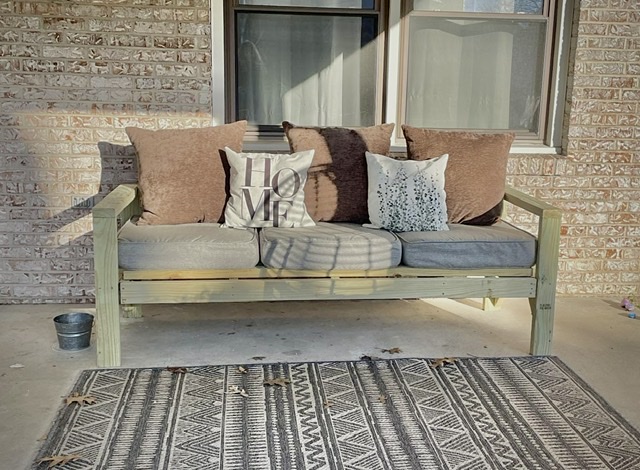
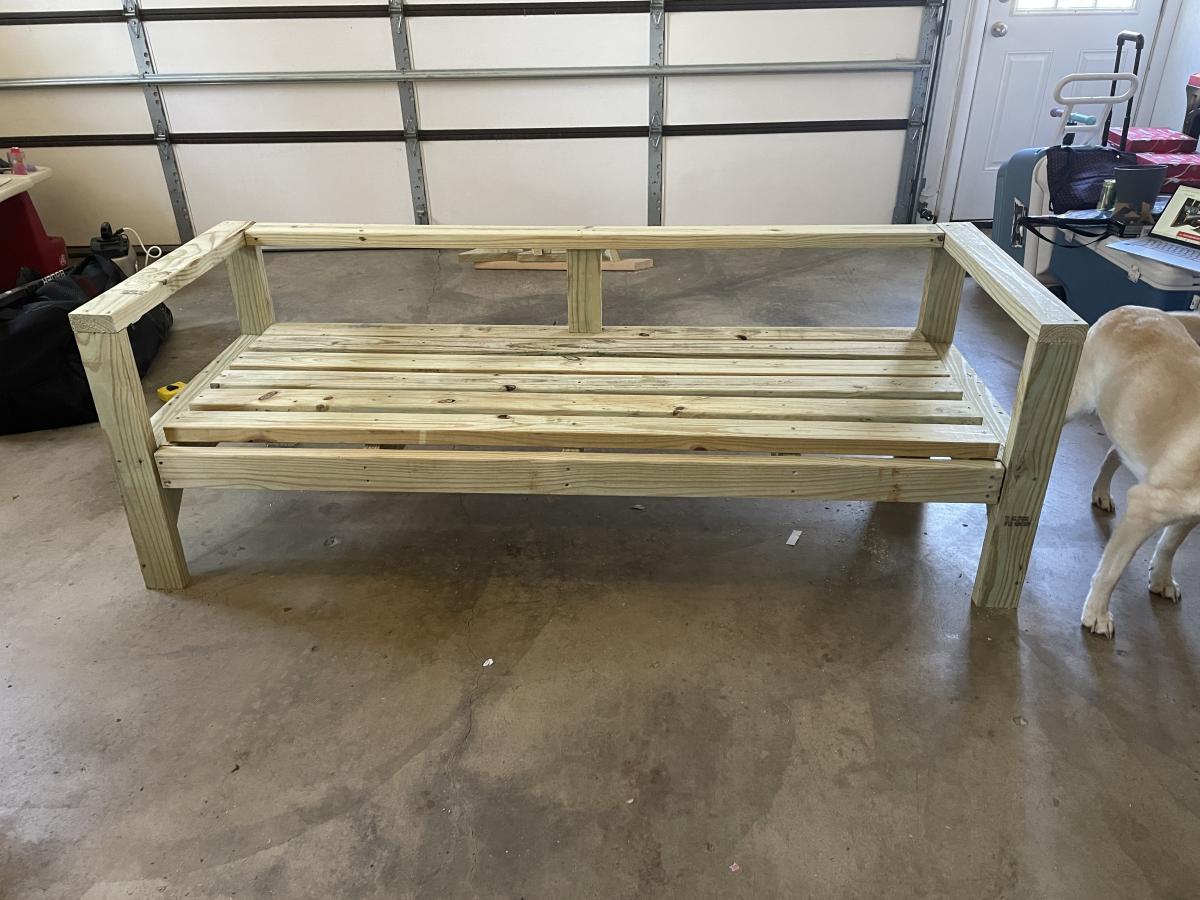
Well this was first project my hubby and I tackled together. He actually let me use the power tools. The plans were great! Loved having a shopping list! I made the cushion s myself. I have to say, I wish I had made the couch and chairs the size of cushions available at Lowes . AFt e r you buy foam batting fabric and chording I found set at lowes for a lot less but I am so happy how it all turned out . Thks for providing plNz!

I loved the look of the Craft room Storage tower but modified to suit my wife's bathroom theme/decor. The inside back (MDF beadboard) is painted a milk coffee color to lighten it up. The door inserts are plexiglass, which was more expensive than glass but with 2 boys 6 and 2 it is well spent, and the MDF beadboard. Covered the plexiglass with self-adhesive film for glass on both sides to hide the towels inside. This project took me about 12 hours to complete but over a 3 month period, mostly spent on finishing the project with my boys underfoot or at 12-2am. YIKES!!! If i keep this up she will want to buy instead of letting me build.
Price List:
wood: $100
Stain/Paint: left over from house reno. would have been $15 stain $20 Varnish 30$ quart of paint
Handle: $7
Hinges: $4 basic style
I wanted to use Eurostyle hinges but opted to buy the Kreg system instead of Forstner drill bits.
Will be building another just different dimensions for laundry room makeover.
Sat, 01/26/2013 - 12:18
Thanks! It was my first furniture building project! I did a huge reno that i did on my house but that is construction and 1/8th in isnt as big of an issue as in furniture.

Mon, 01/28/2013 - 20:45
I've been wanting to build something similar for my bathroom! Yours turned out great. It inspires me to get to work!
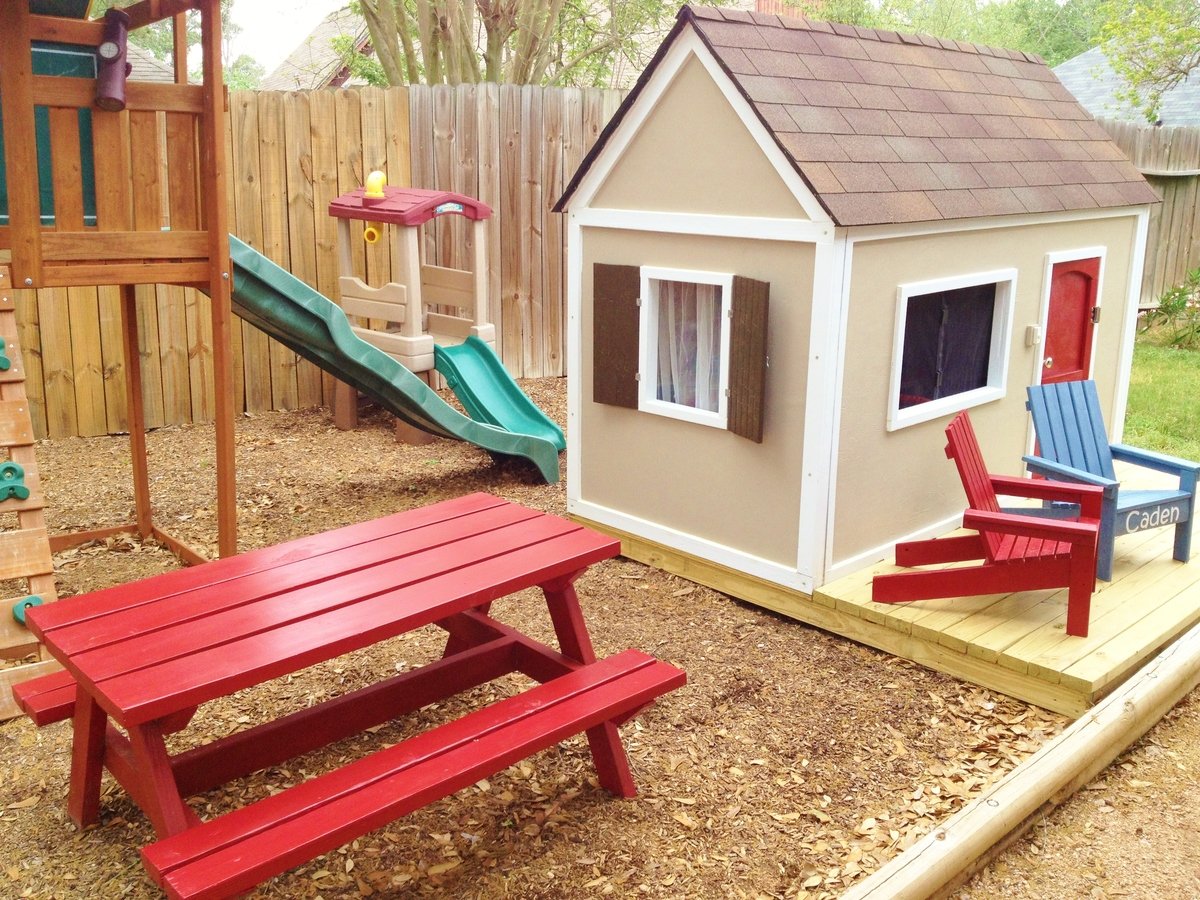
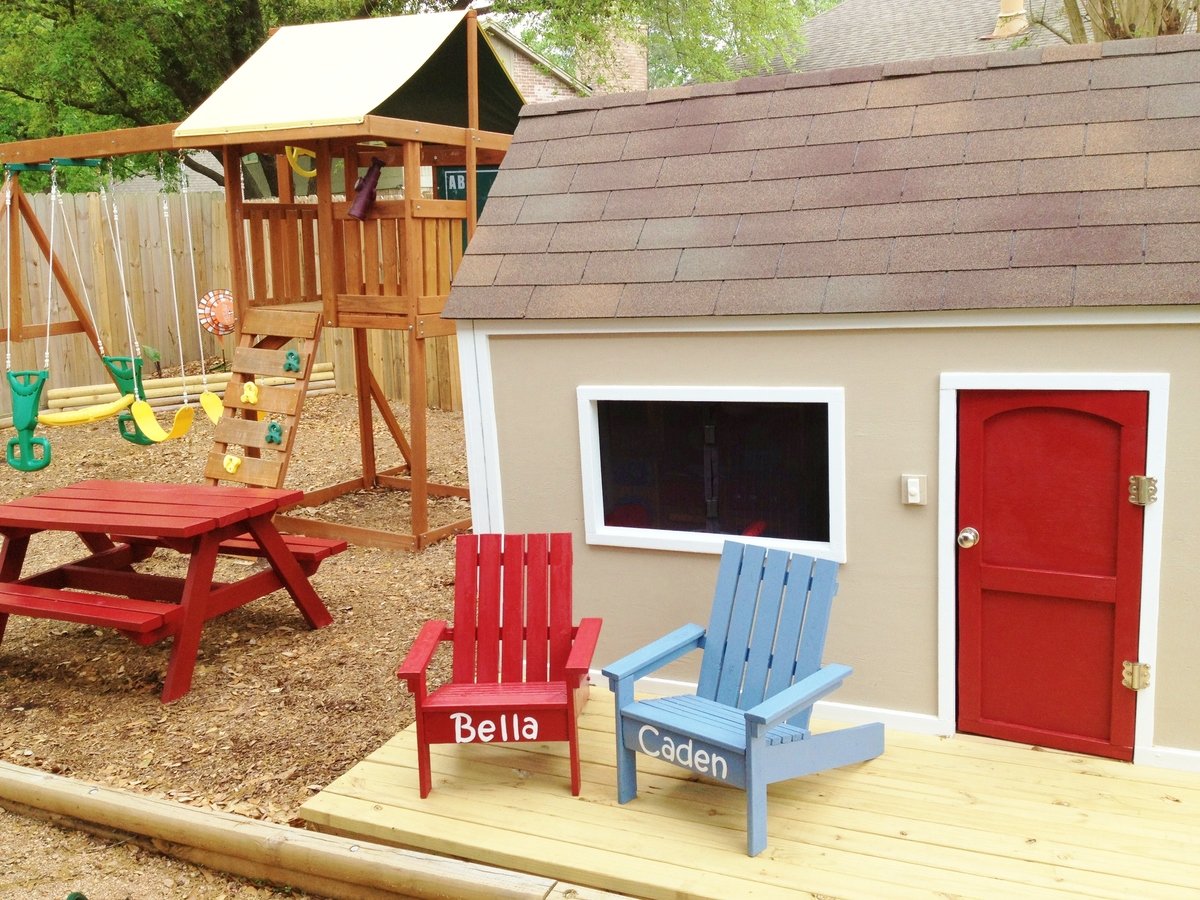
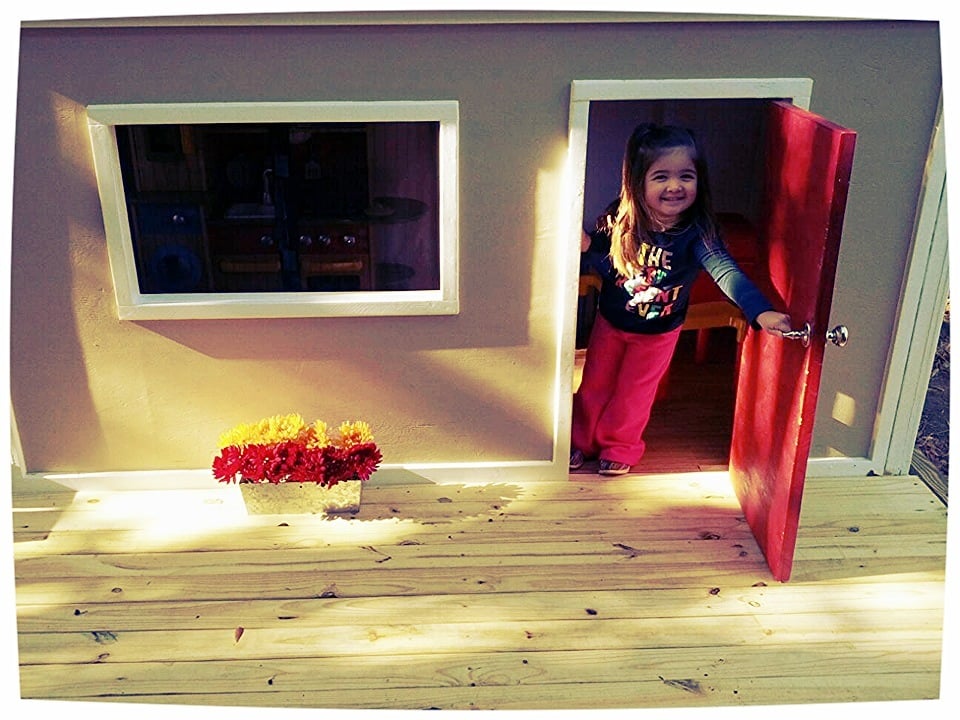
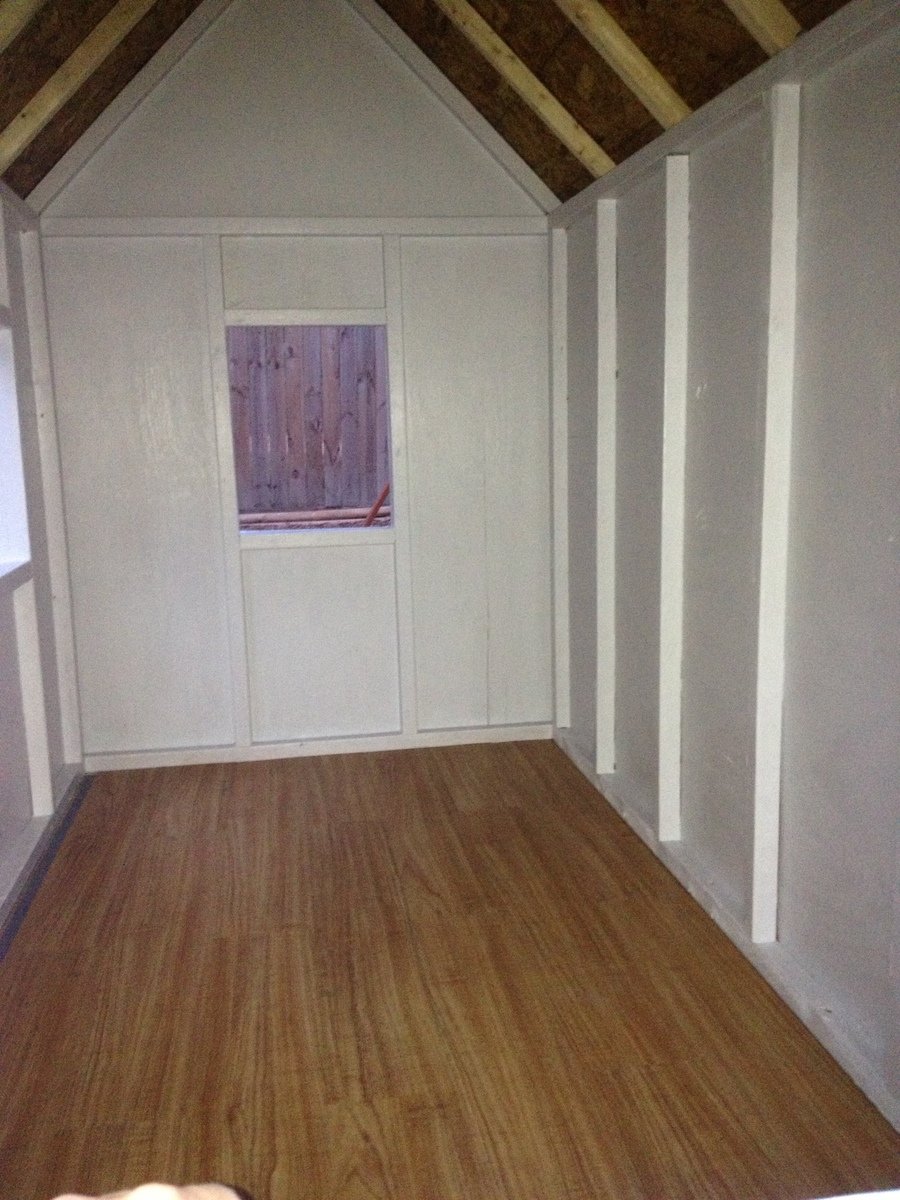
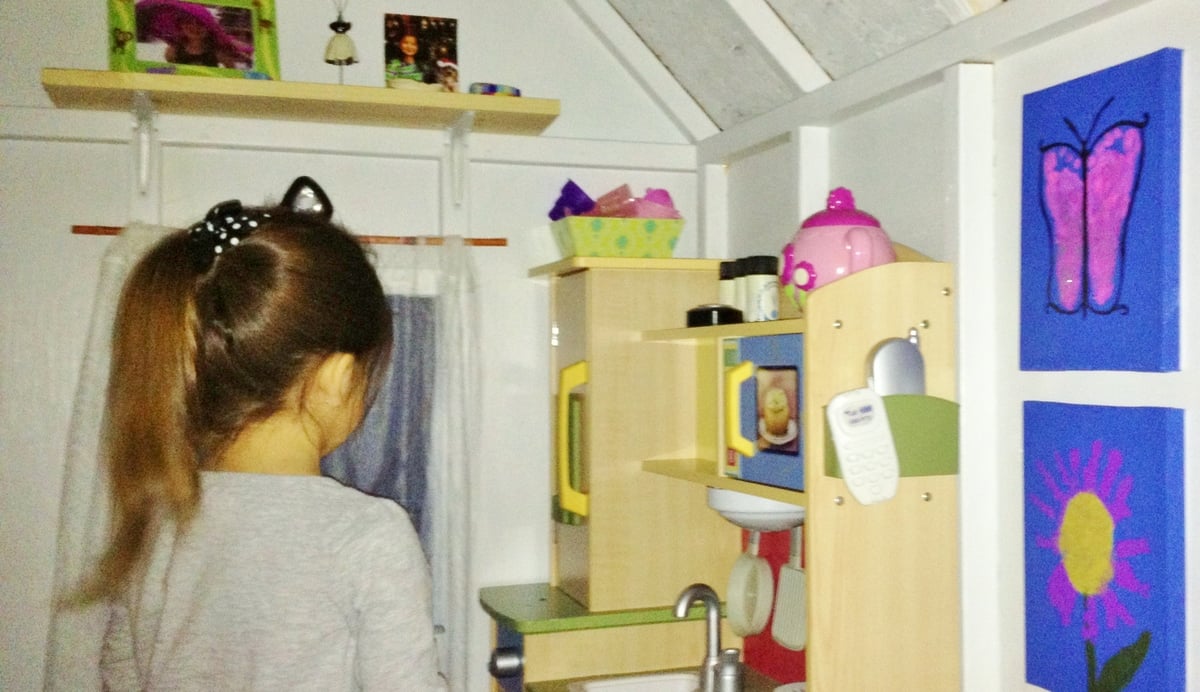
My first project ever was the red picnic table about a year ago and have built many more as housewarming/kid's bday gifts. This Christmas, instead of buying my daughter more toys, I decided to build her a playhouse. Not only was it a very special gift for her but also freed up space in my house being able to put her play kitchen, table, and other toys in it. The small changes we made were the size of the deck to better fit our available space and the shutters (made out of scrap 1x2s and hinged to close with a hook and eye). We put down 3/4" treated plywood as the base and then used 1 box of vinyl plank flooring that looks like wood to hold up to the Texas humidity. I eventually want to make accordion-like shutters for the front window but have up a bug curtain (used for regular size doorways and closes together with magnets) that I cut in half to fit. We have bad mosquitoes here in Texas! I also added a wireless doorbell.

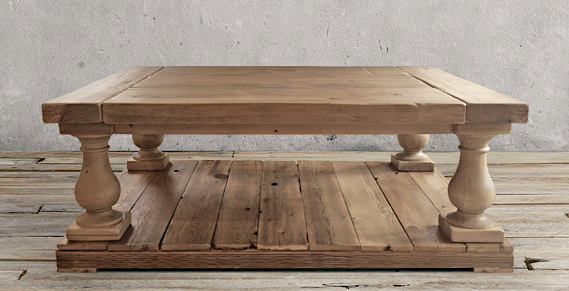
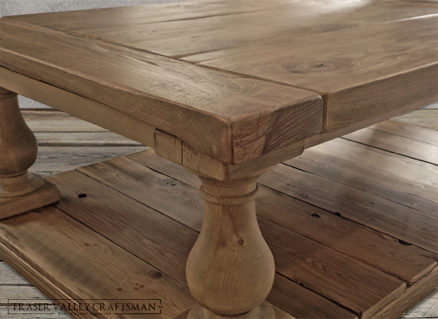
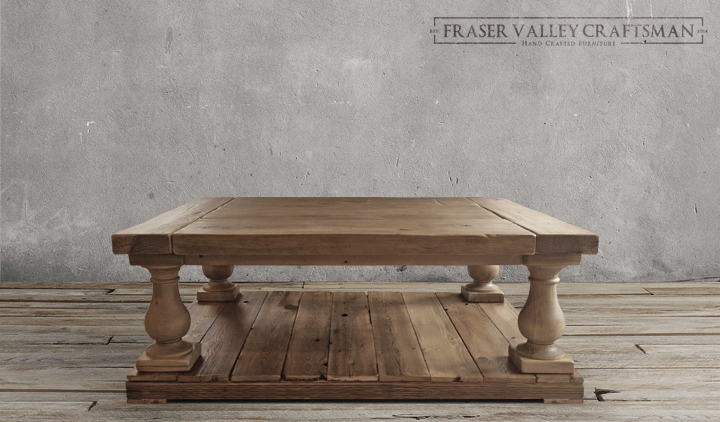
Here is the latest Table I have made. I cant get enough of this table design, the rustic bold feel blending with curved lines is awesome.
I have been looking at your blog and always been interested in making my own furniture. However, I was scared to try. Your diagrams and measurements were awesome. Thank you! Gave me the encouragement to try!

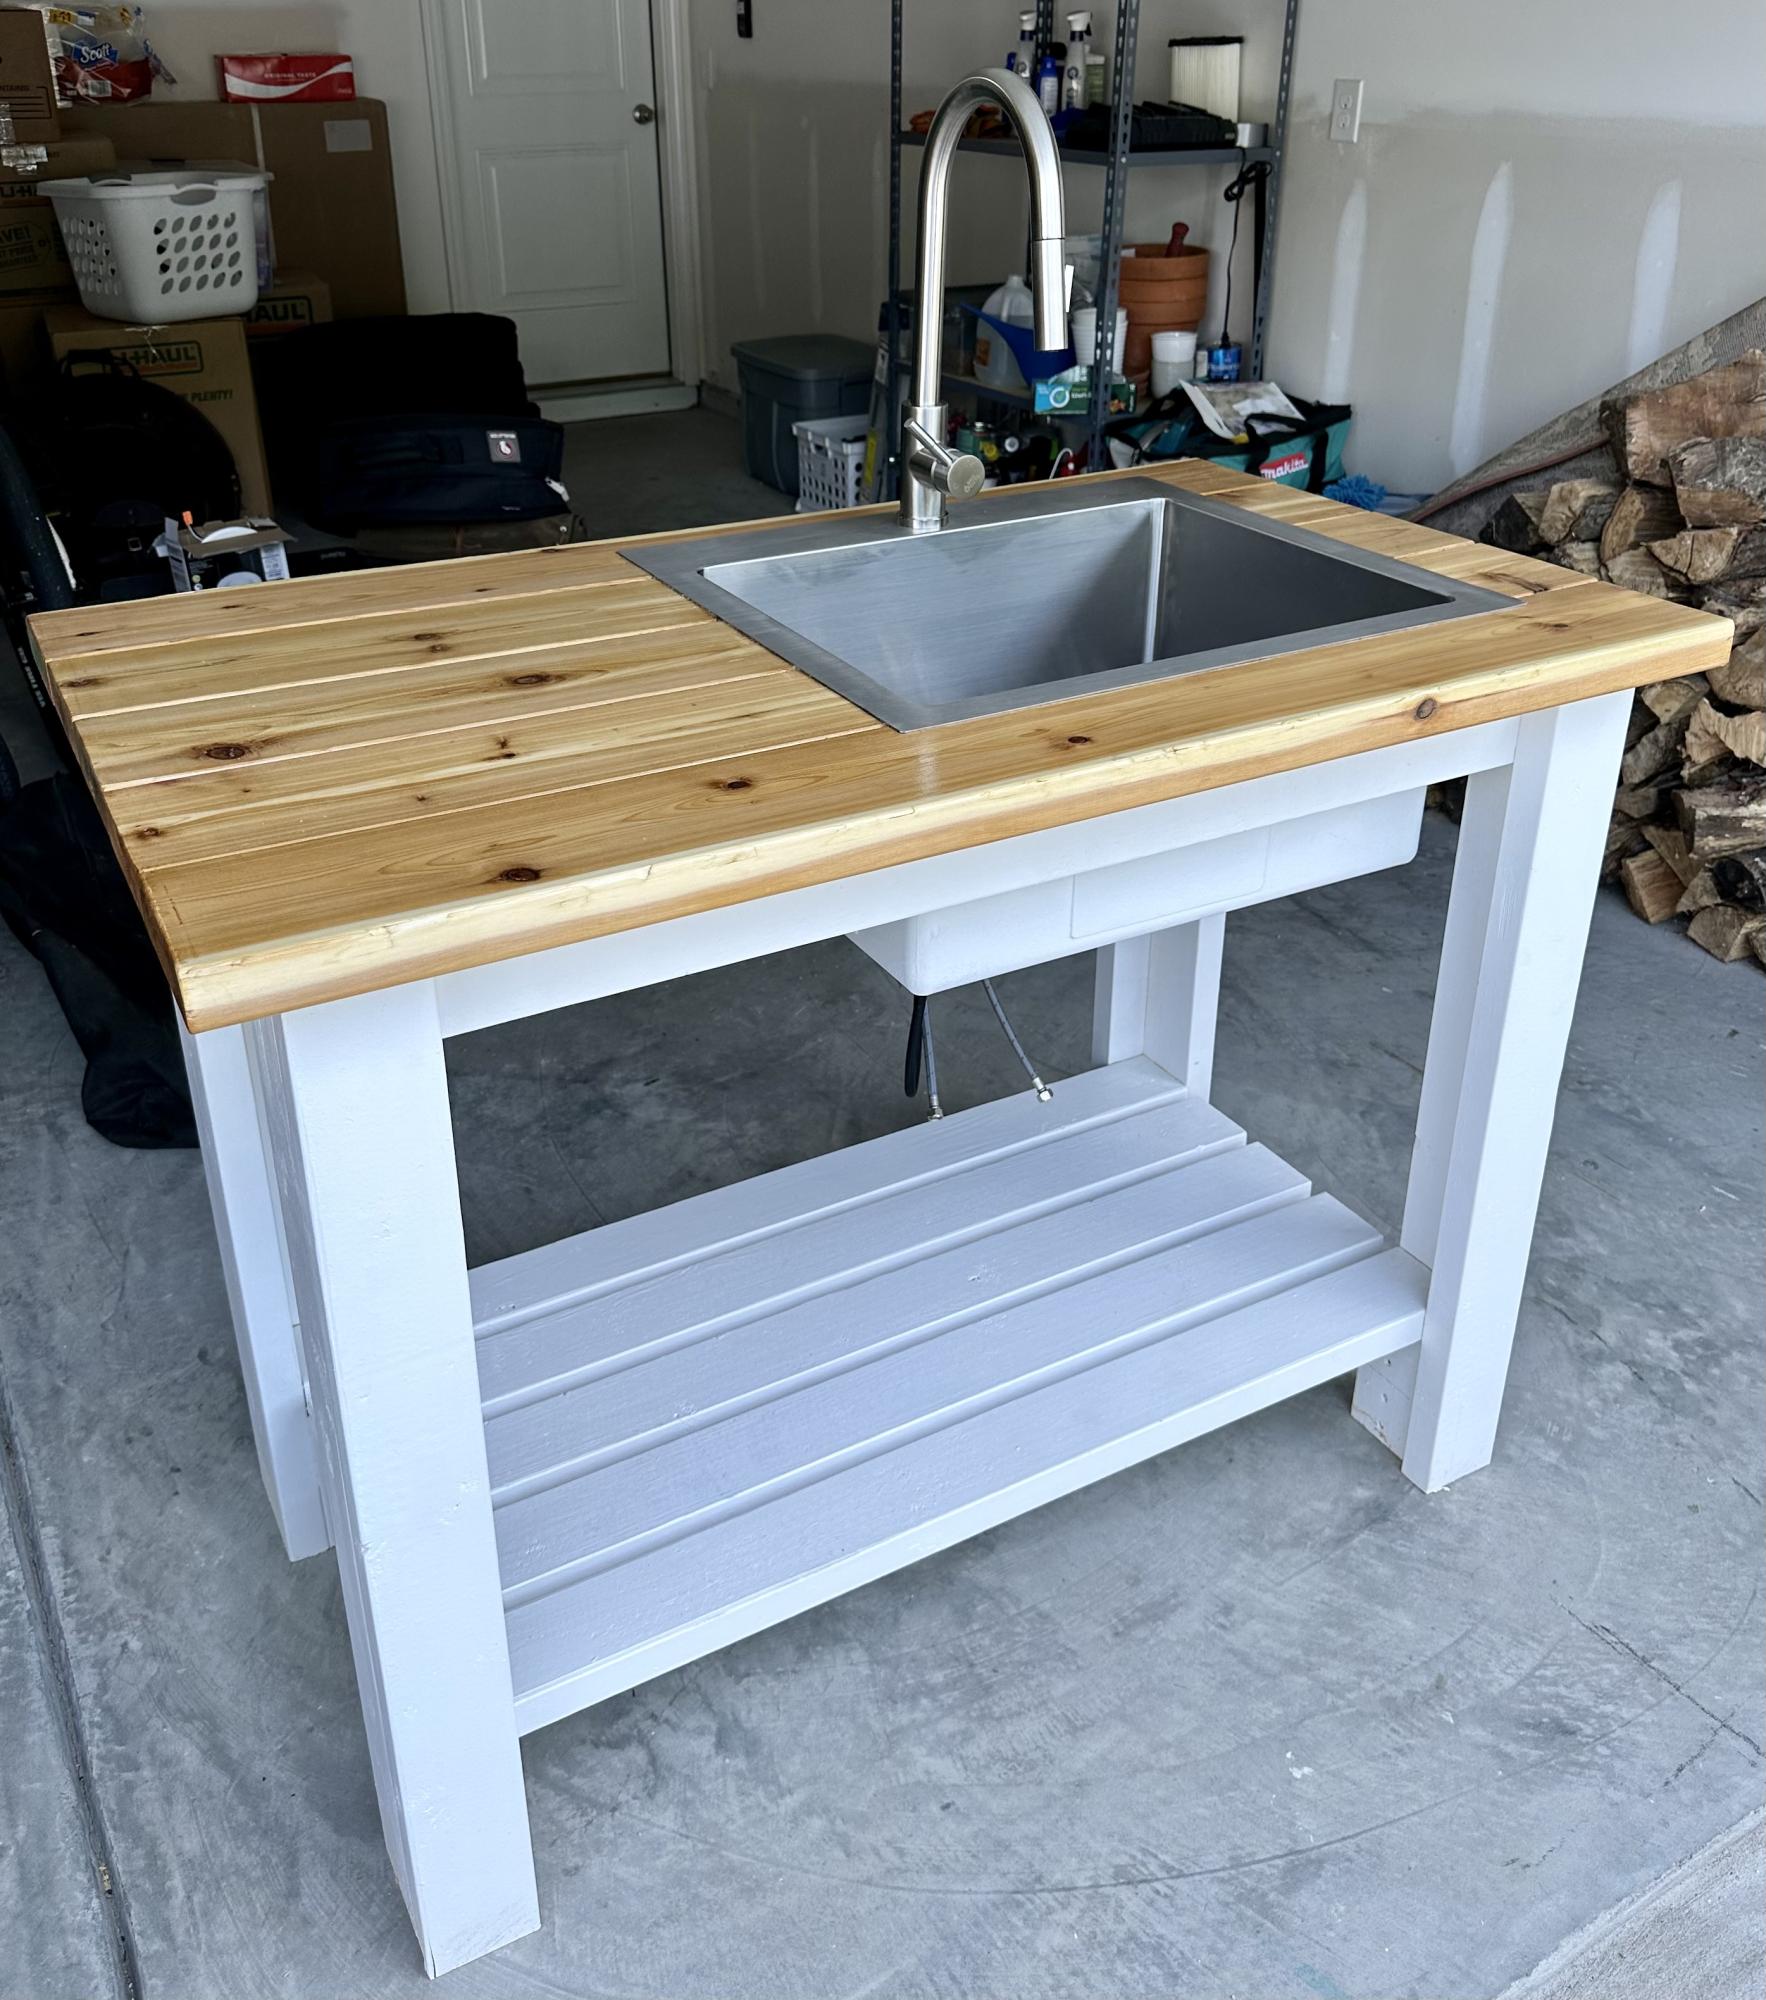
Used sturdy workbench plans with 2x6 cedar top for outdoor sink. Turned out much better than I expected!!
Tue, 05/02/2023 - 07:09
Way to go, it is beautiful and functional! Thanks for sharing.
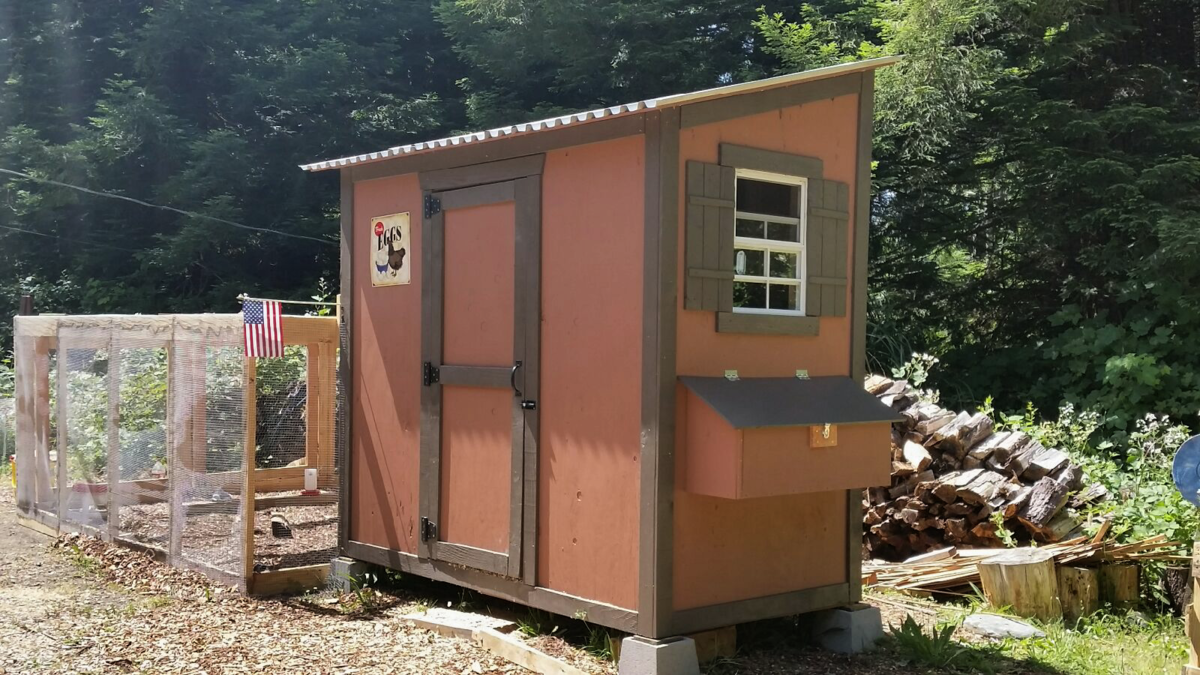
My 7 week old chicks love thier new home


Comments
Ana White Admin
Sun, 01/15/2023 - 20:21
Thank you!
Gorgeous, thank you for uploading a brag post!