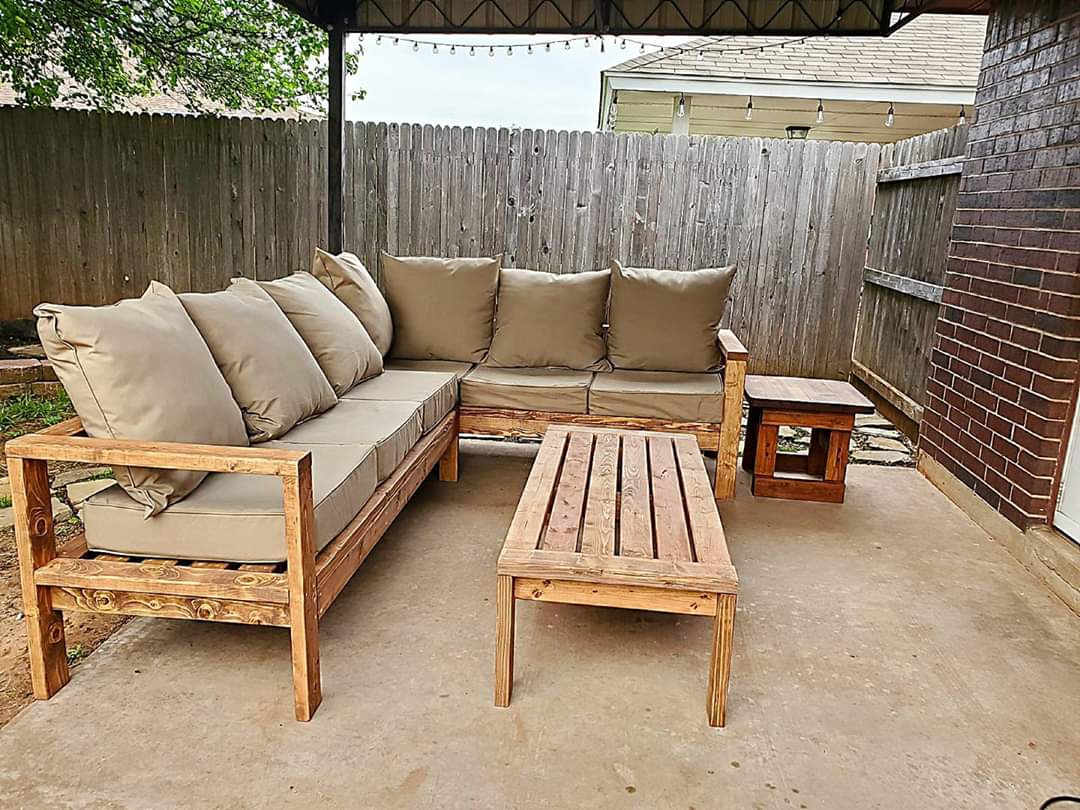
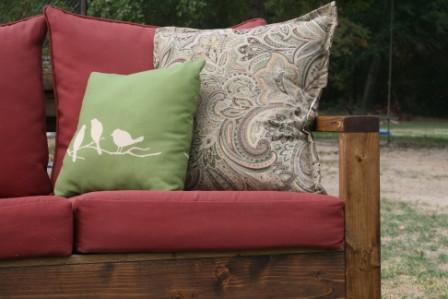
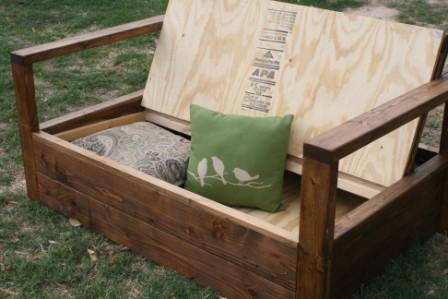
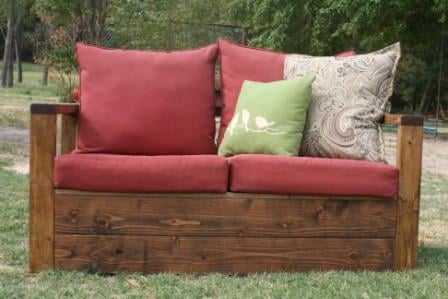
12 Foot Long Outdoor Sofa
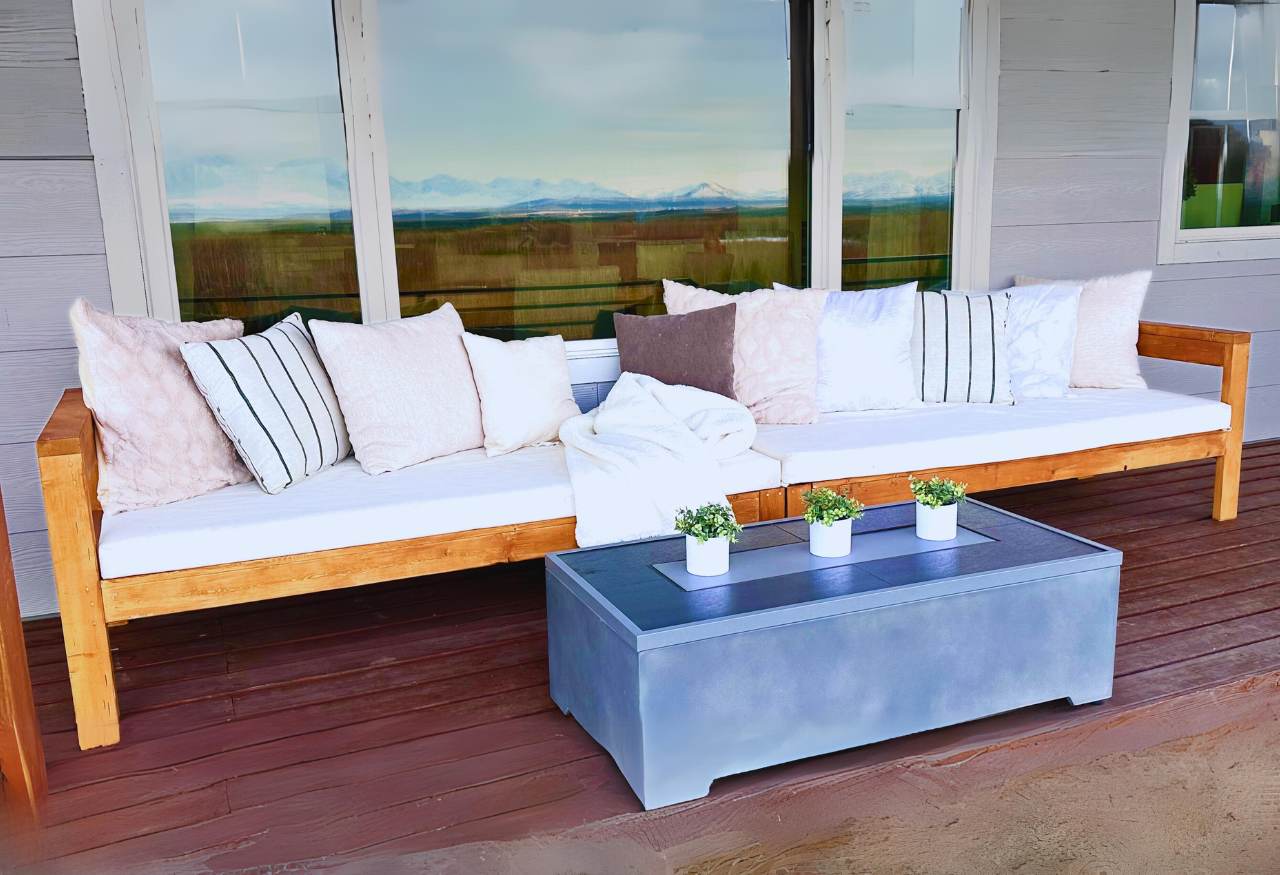
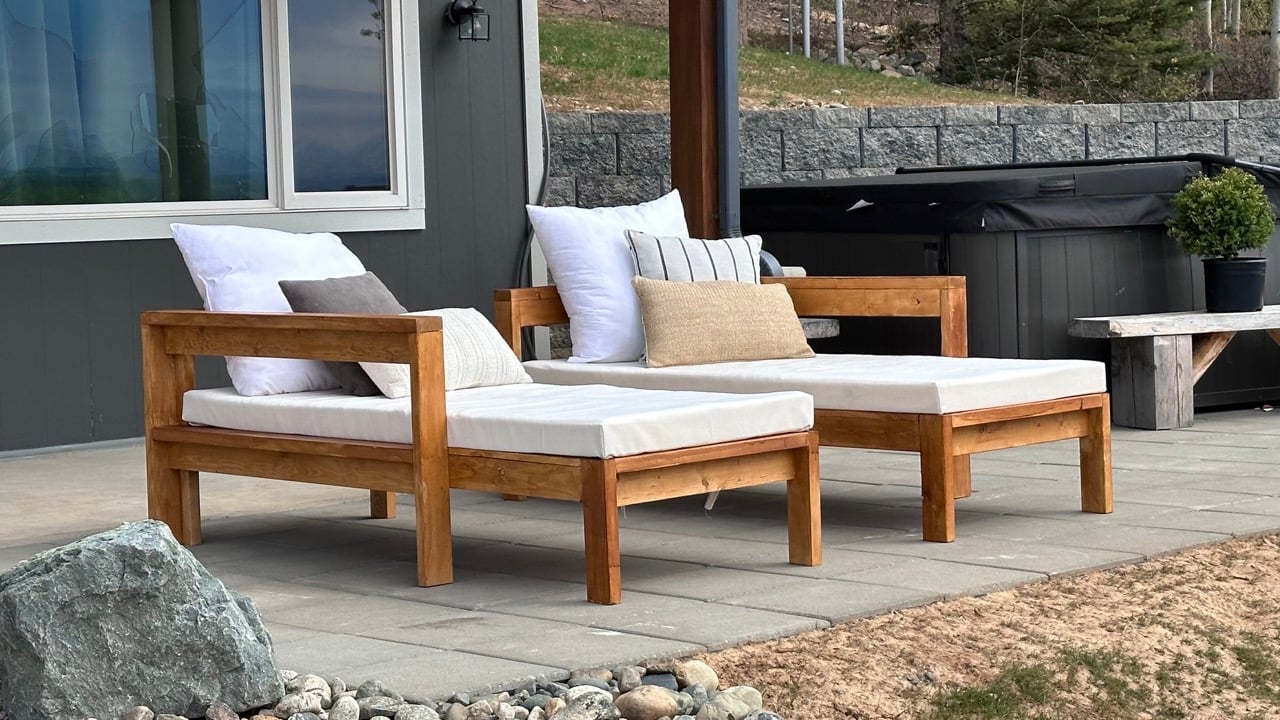
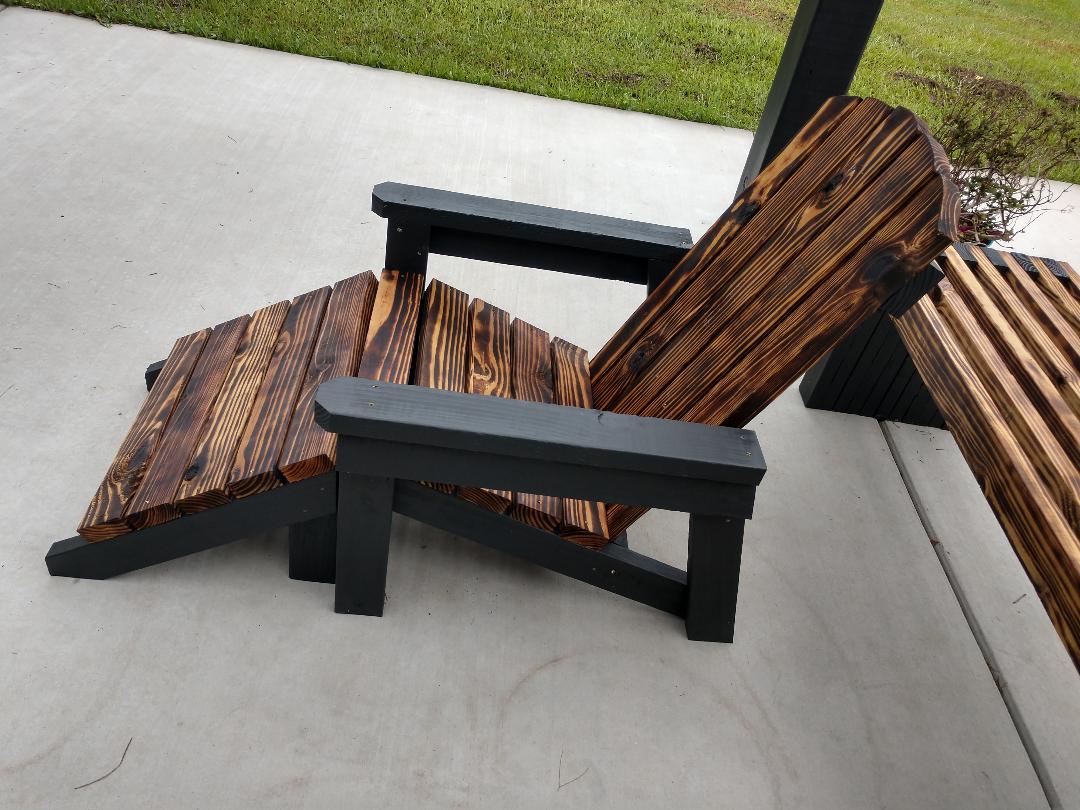
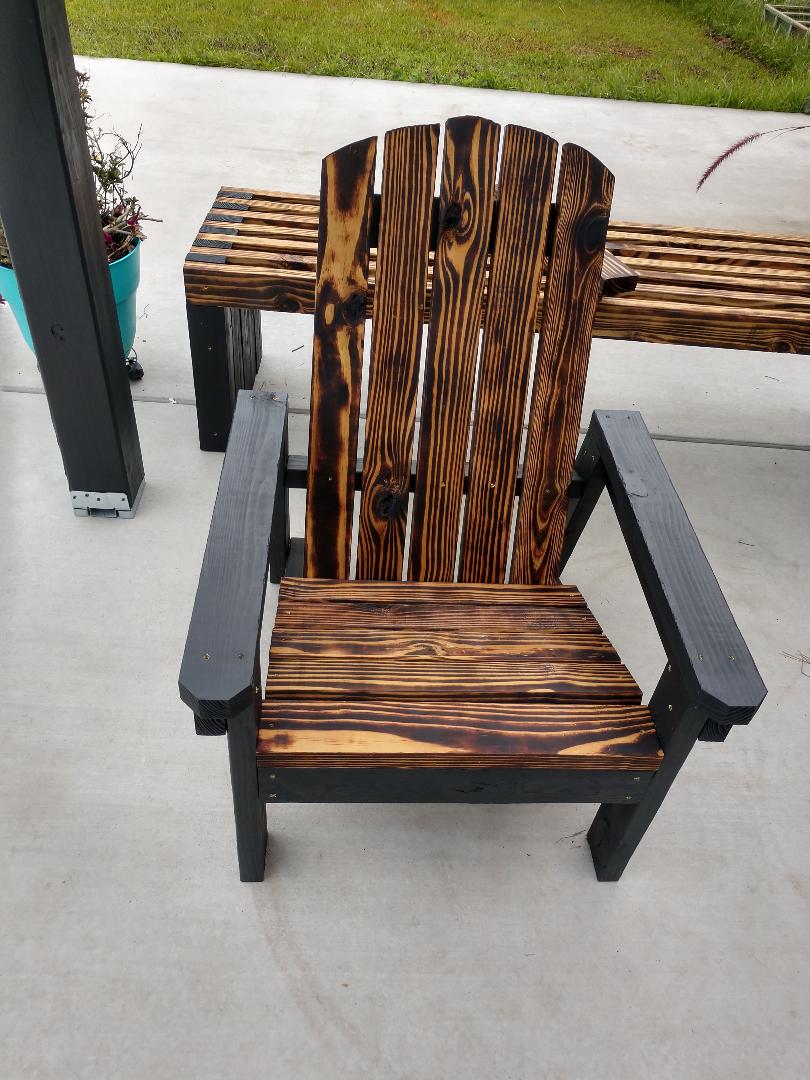
I built these two outdoor chaise lounges last year
Over the winter, I stored them on the deck, turning them into a huge outdoor sofa!
Built from Plan(s)
I built these two outdoor chaise lounges last year
Over the winter, I stored them on the deck, turning them into a huge outdoor sofa!
Loved these plans! Was my first project I tackled trying my hand with a new hobby of wood working to stave off quarantine craziness :-) finished project looked awesome and got me started working on other plans on the site.
**note**
Side table was just sanded and refinished, wasn't built just tried to match.
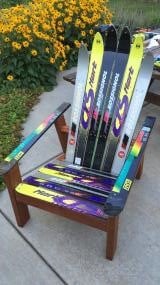
Had some old skis I've been wanting to make into a chair. The Home Depot plans worked perfectly for the base. Cut the back brace a bit longer to fit the skis

I built six armless and two corner sections of the outdoor sectional but now I need to paint it and make cushions. For more details: http://www.homeandawaywithlisa.com/blog/2012/1/5/patio-furniture-in-pro…
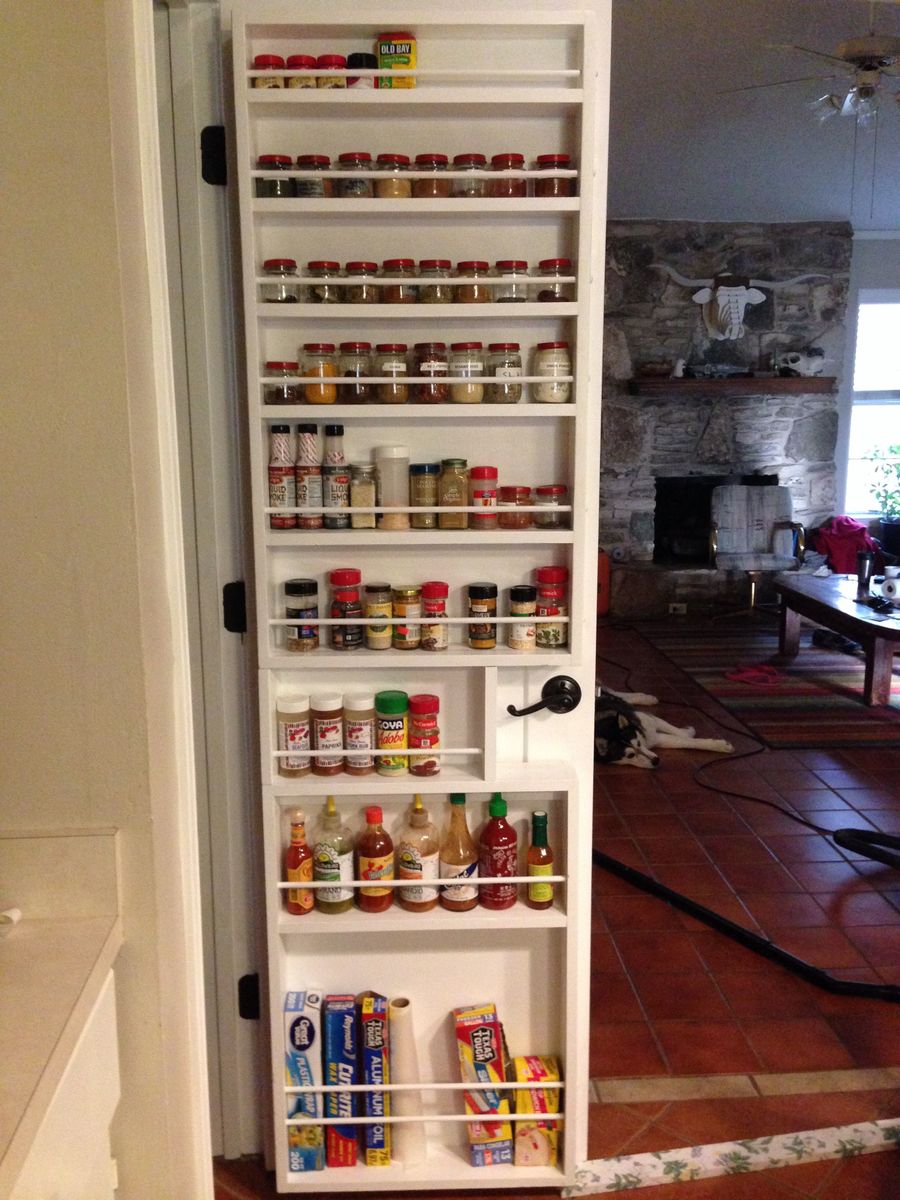
The plan is great, I followed the instructions exactly. Then altered the plan to build a second rack that would fit the bottom of the door, with foil, saran and bag storage at the bottom. Consequently it was heavy and I was very skeptical of the hollow core door anchors, but I installed 3 at the top and 2 at the bottom of both pieces. It's very solid and secure....would probably have worked fine with even less. This door is only 32" wide but has plenty of room for this project. Thank you, looking forward to trying more of your plans.
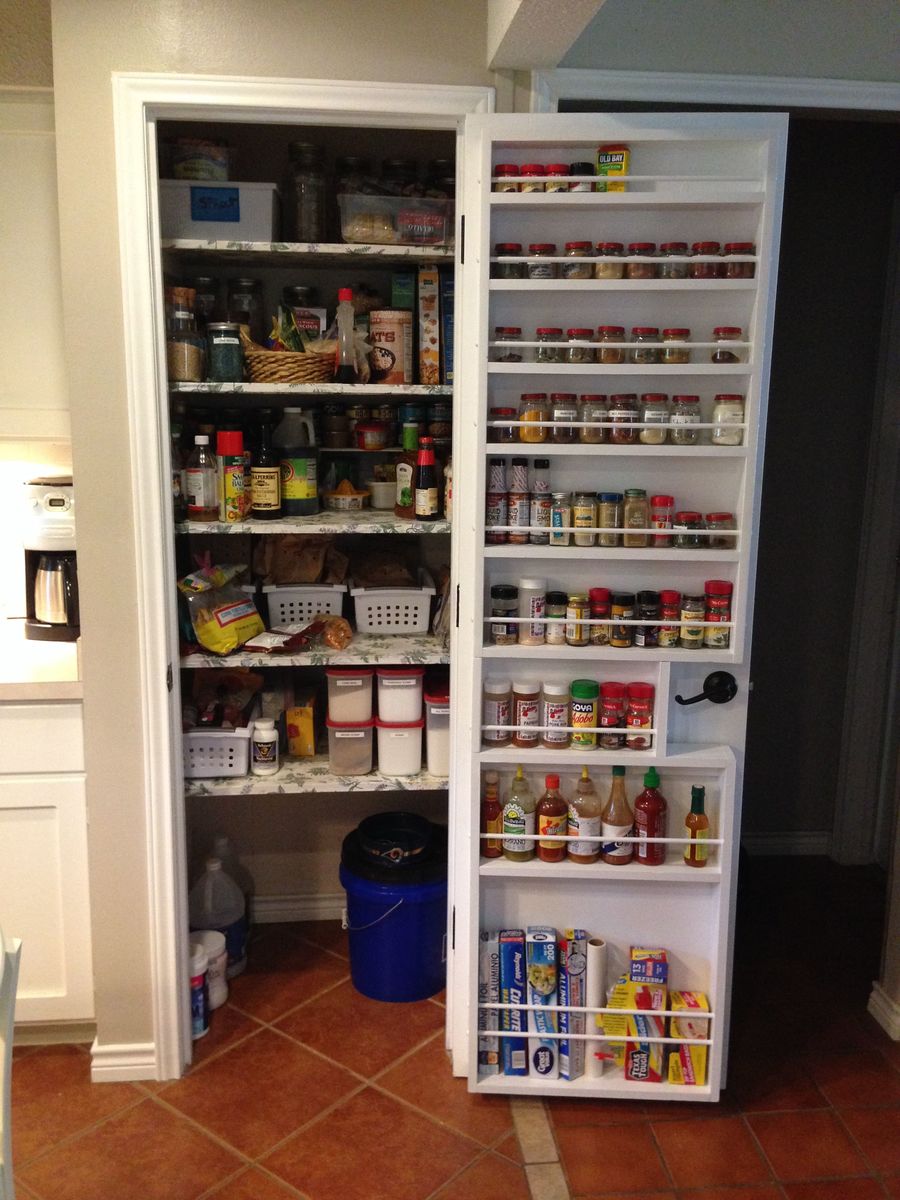

This took a lot of time and money but I like the way it looks. We have 4 kitchen cabinets and one drawer and no room for more so storage is tight.
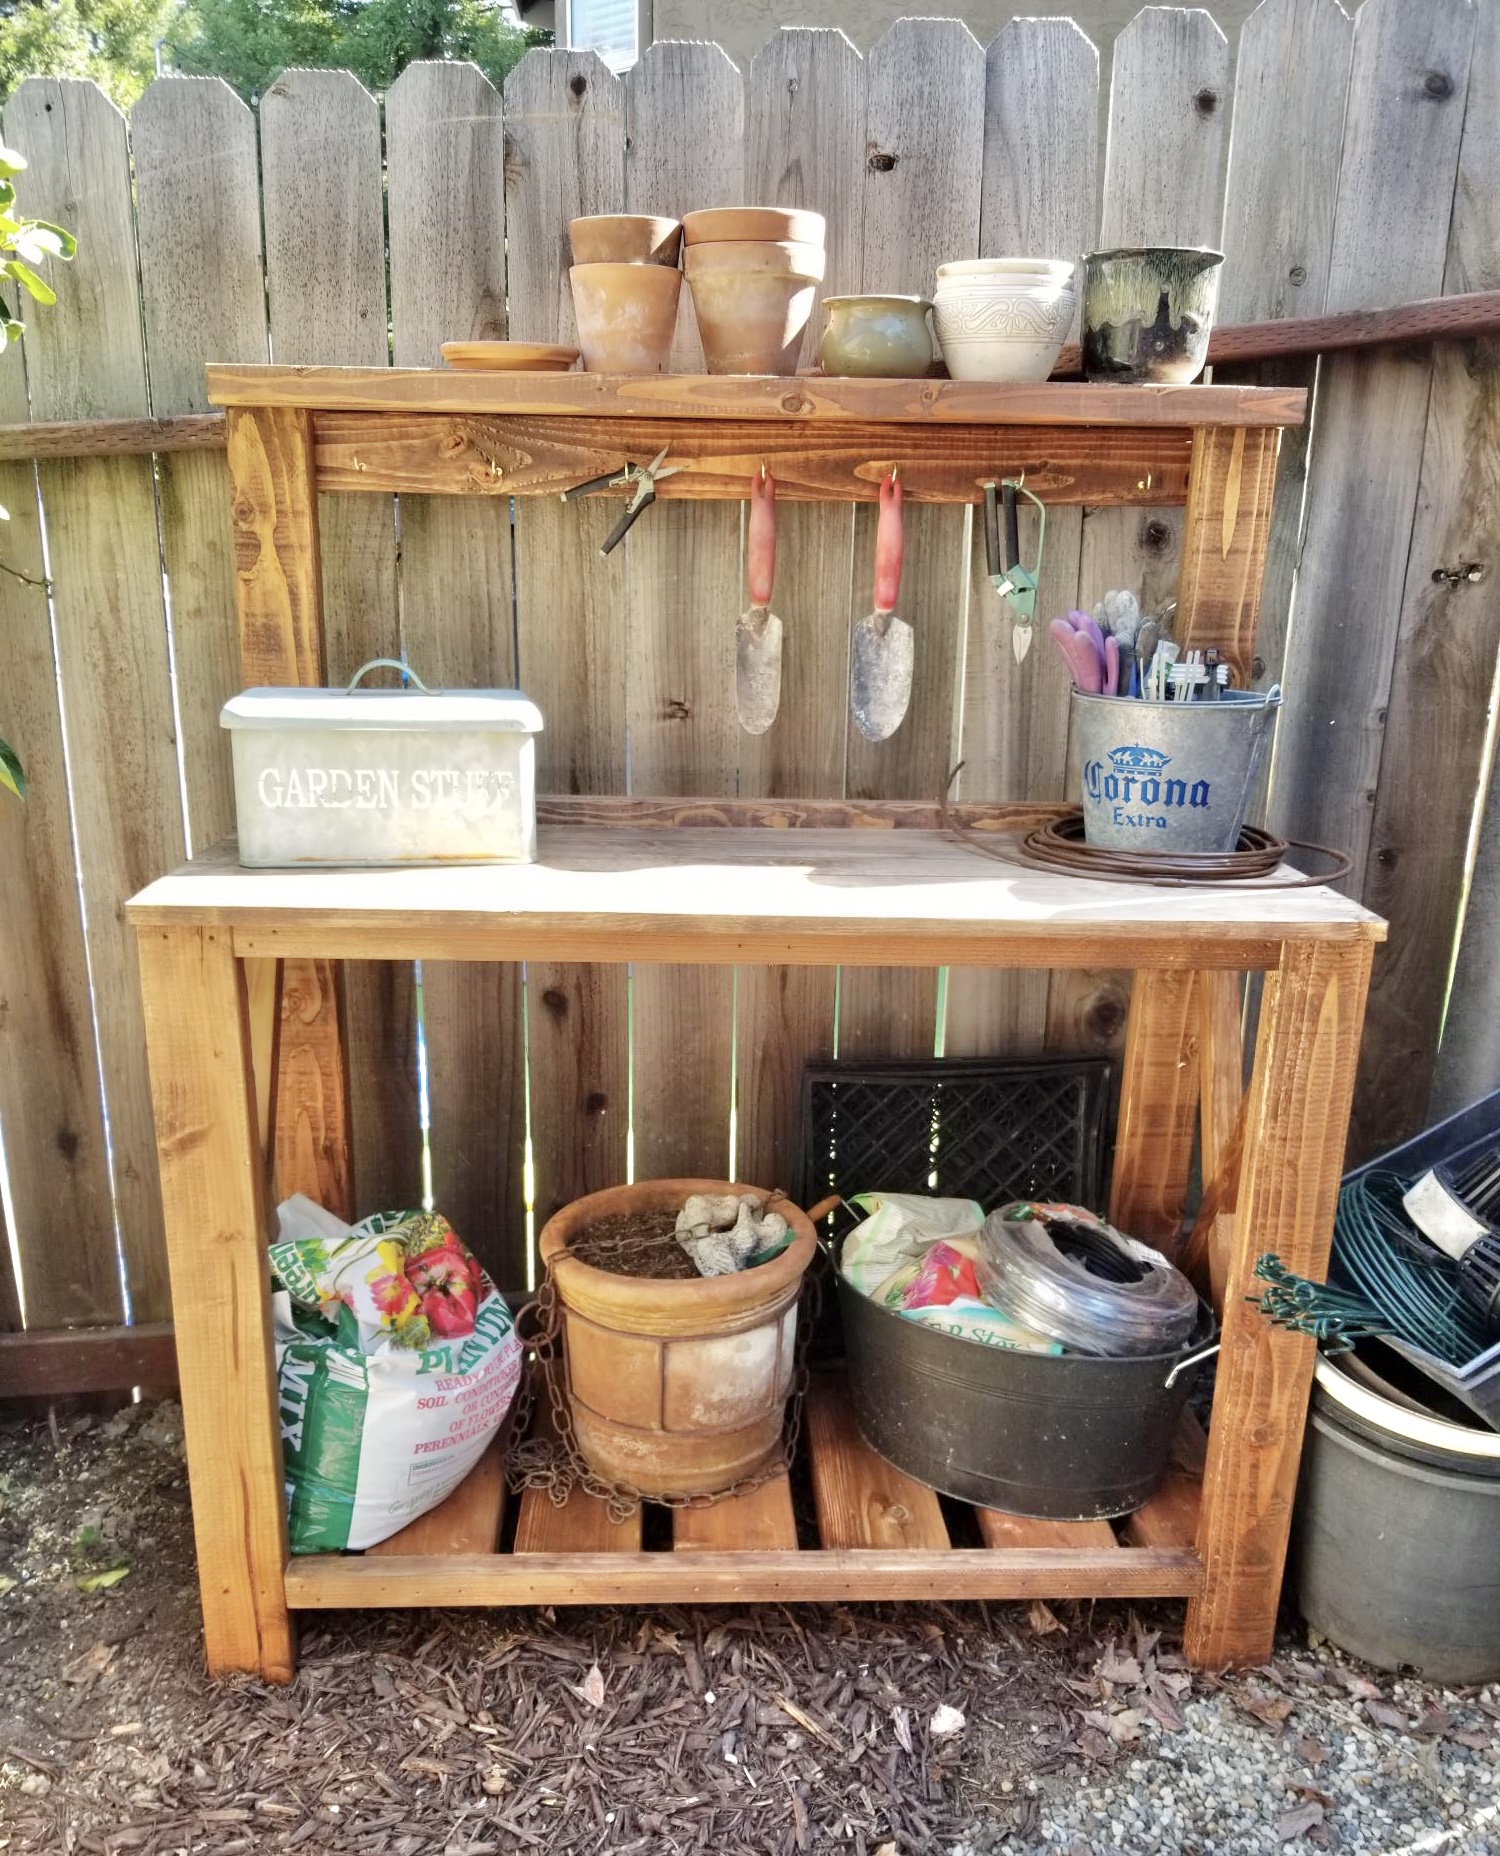
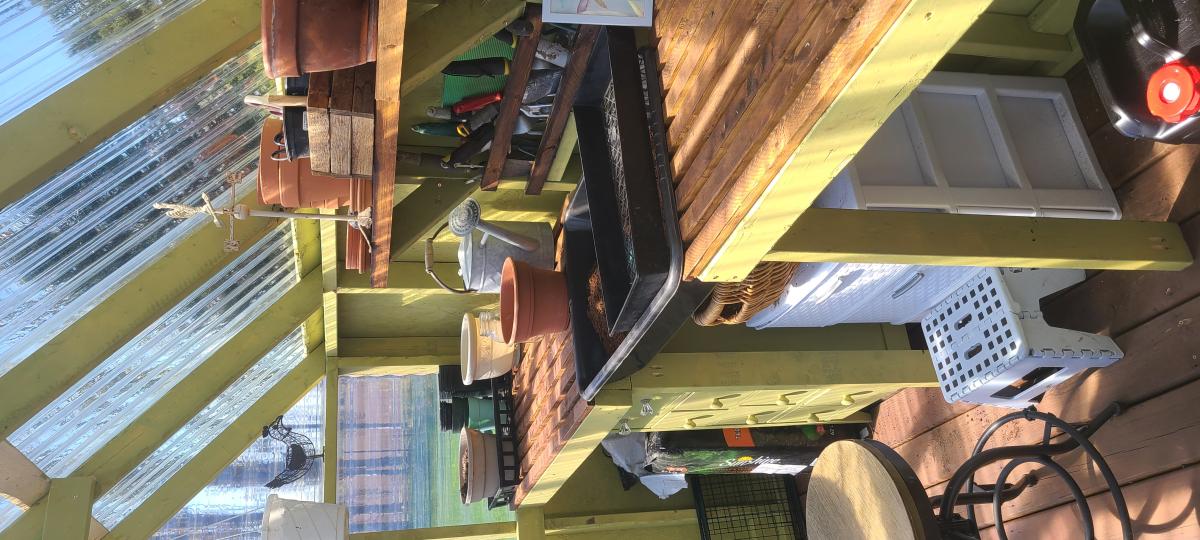
My honey built this farmhouse potting bench in a few hours. I needed it to store all the junk that was laying on the ground. It's so cute!
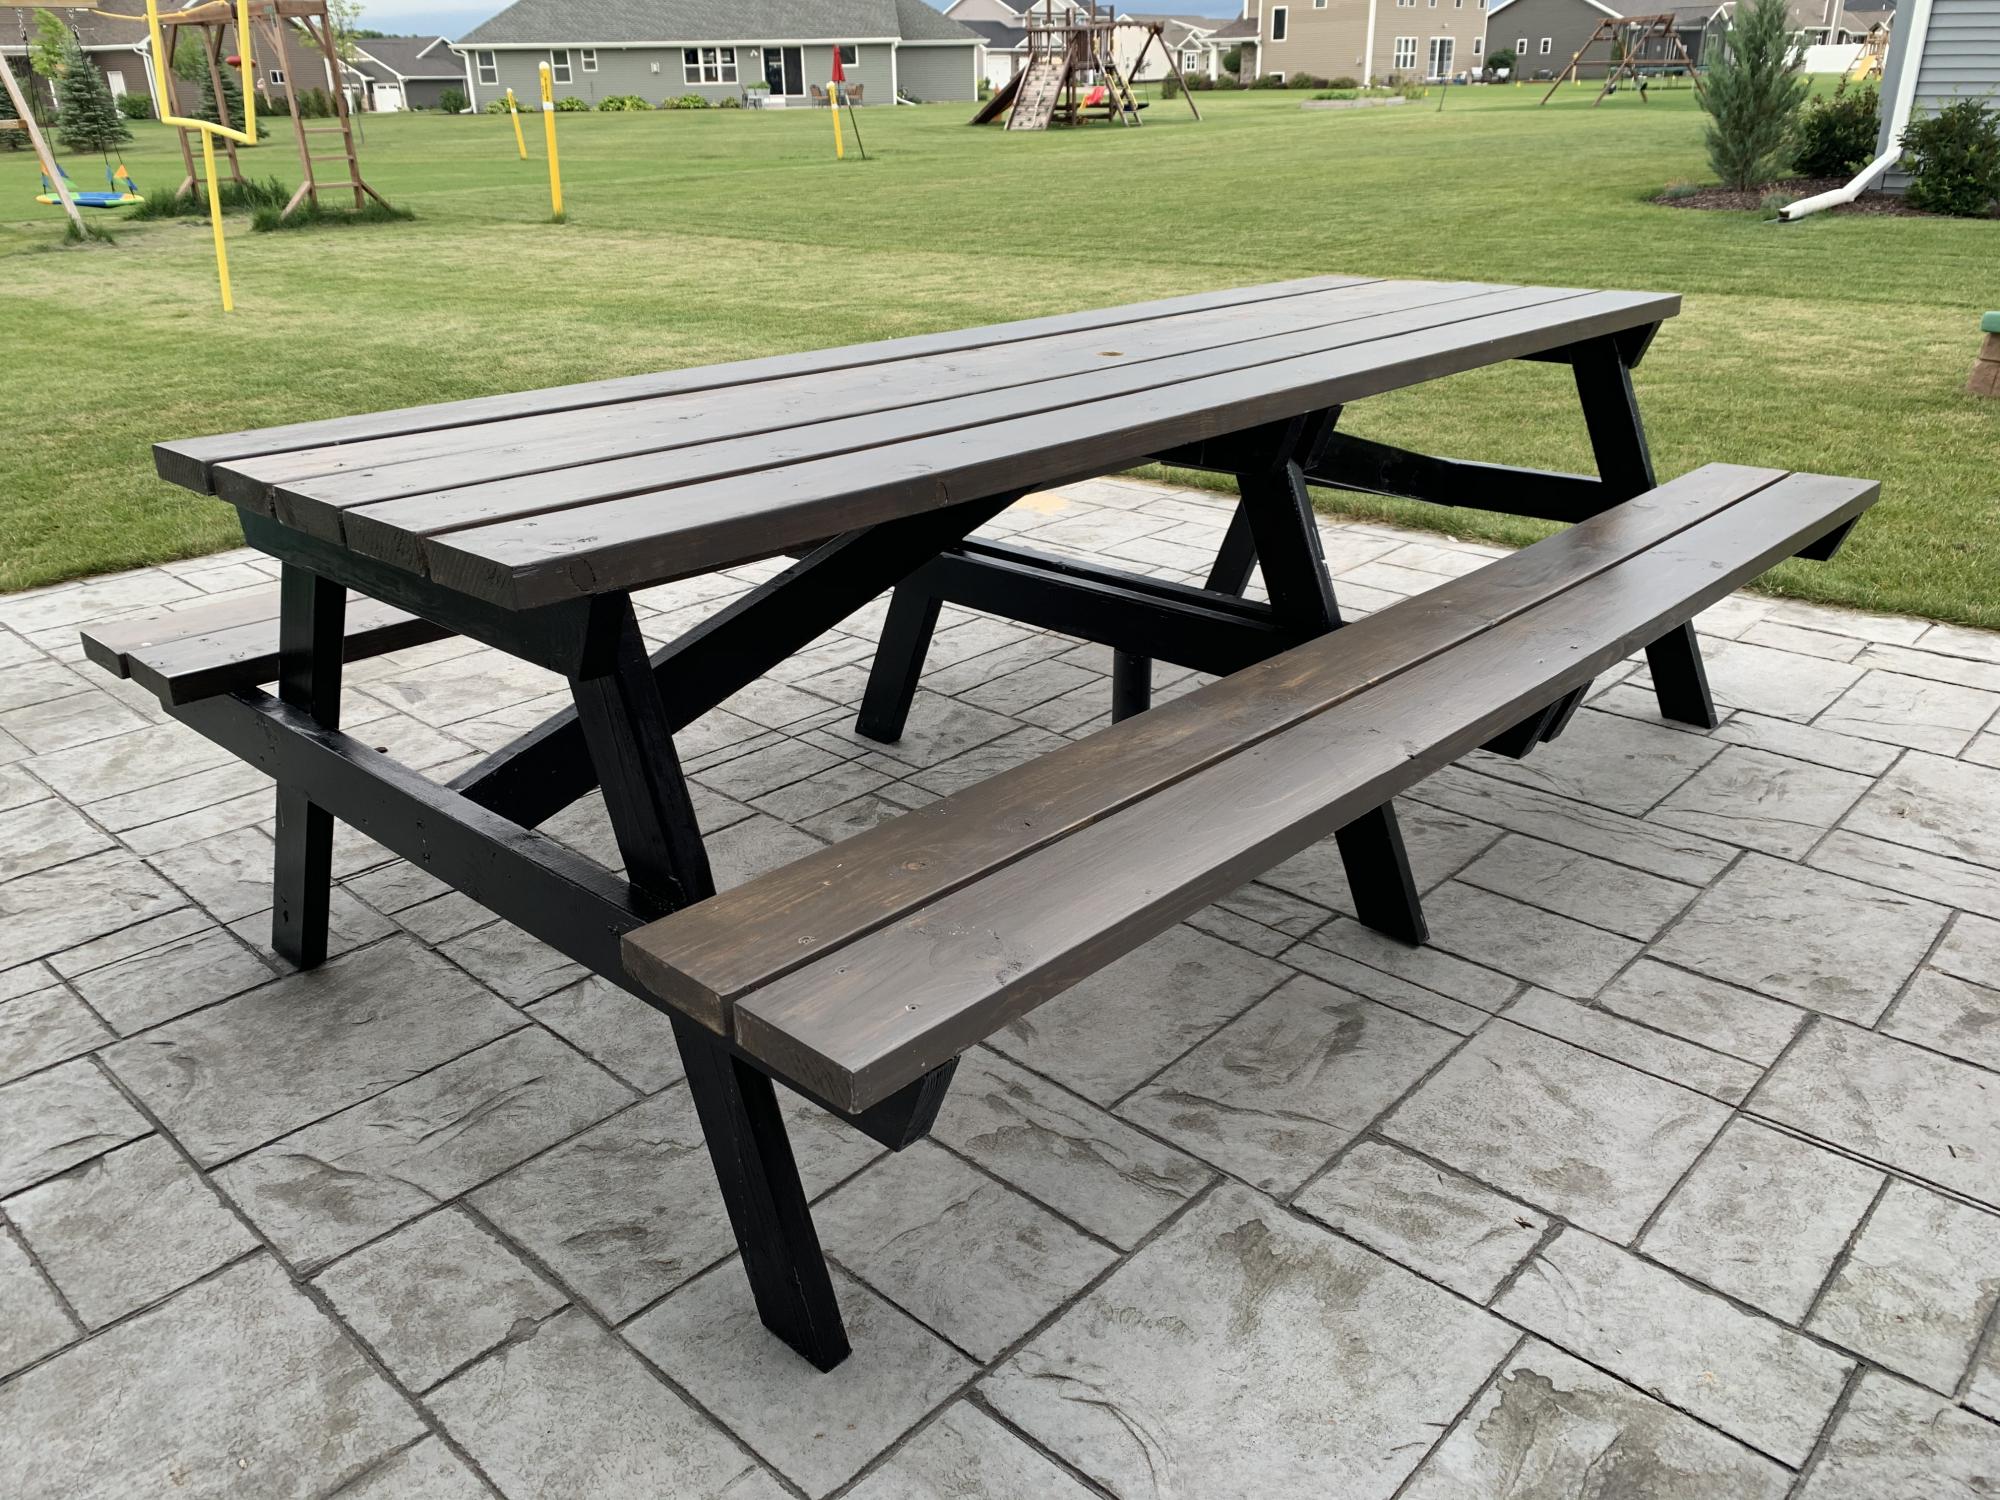
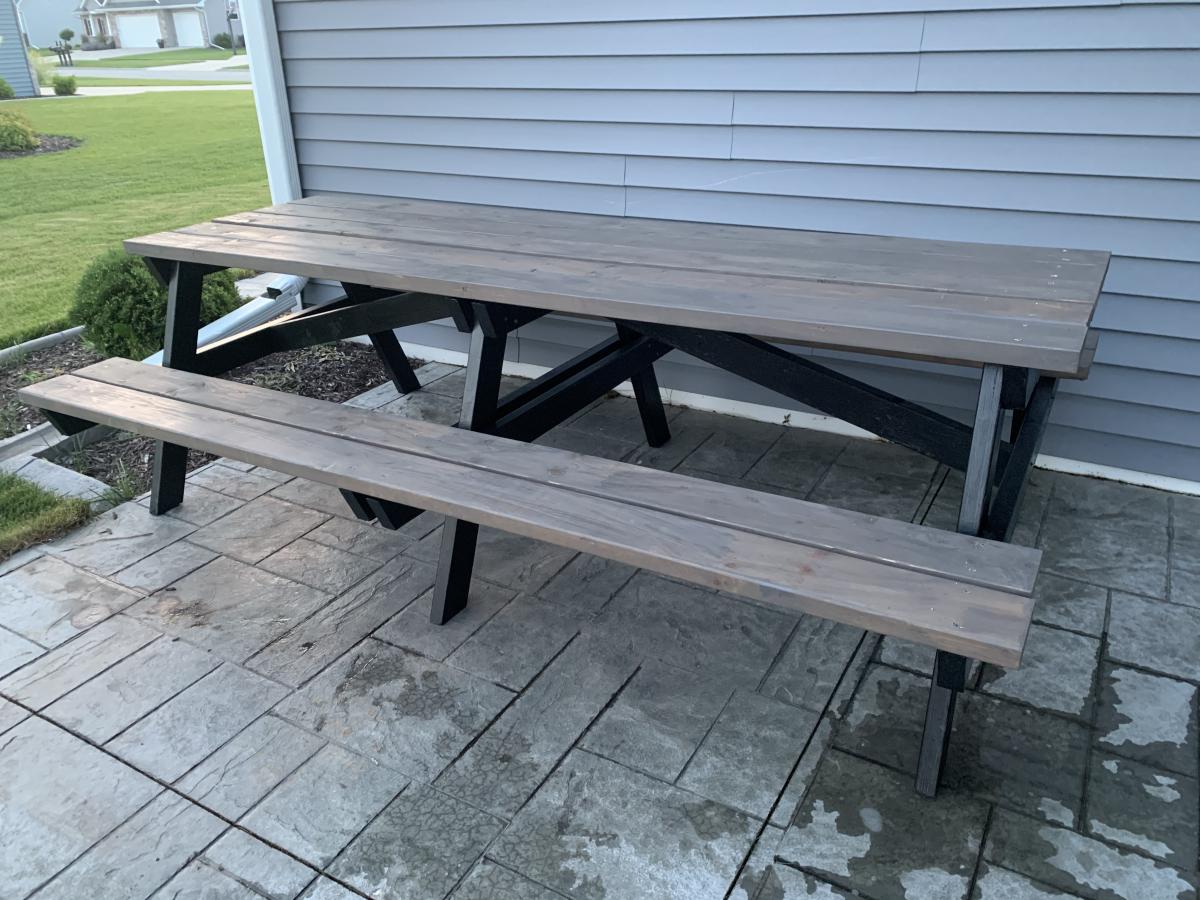
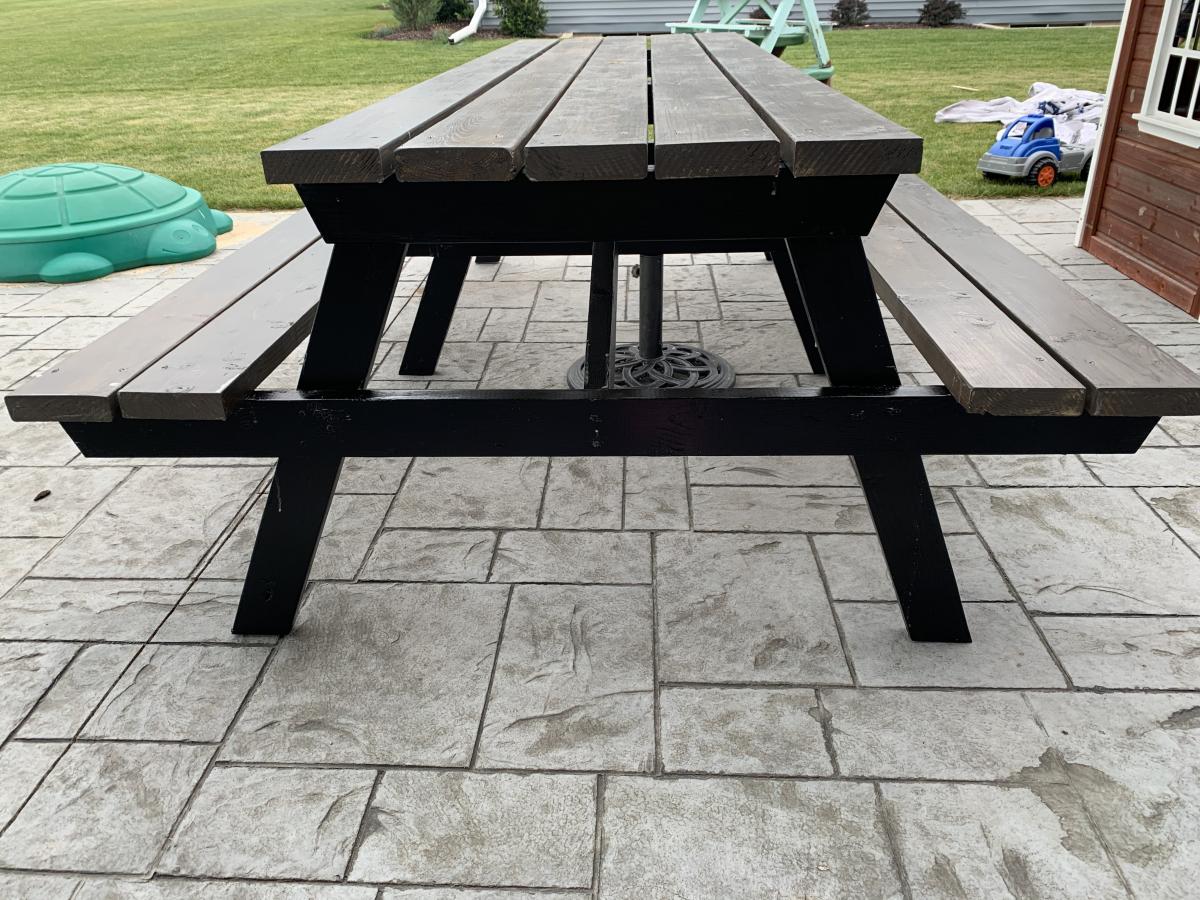
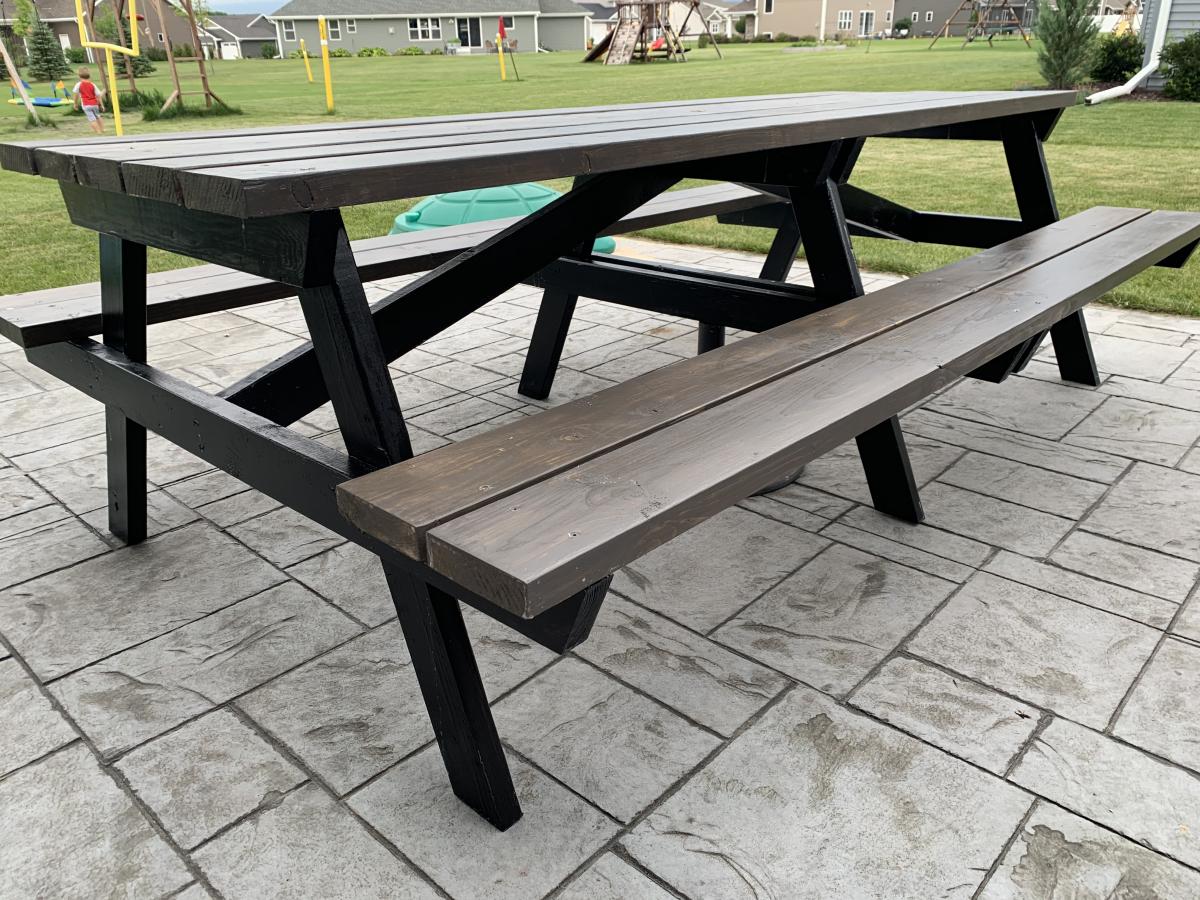
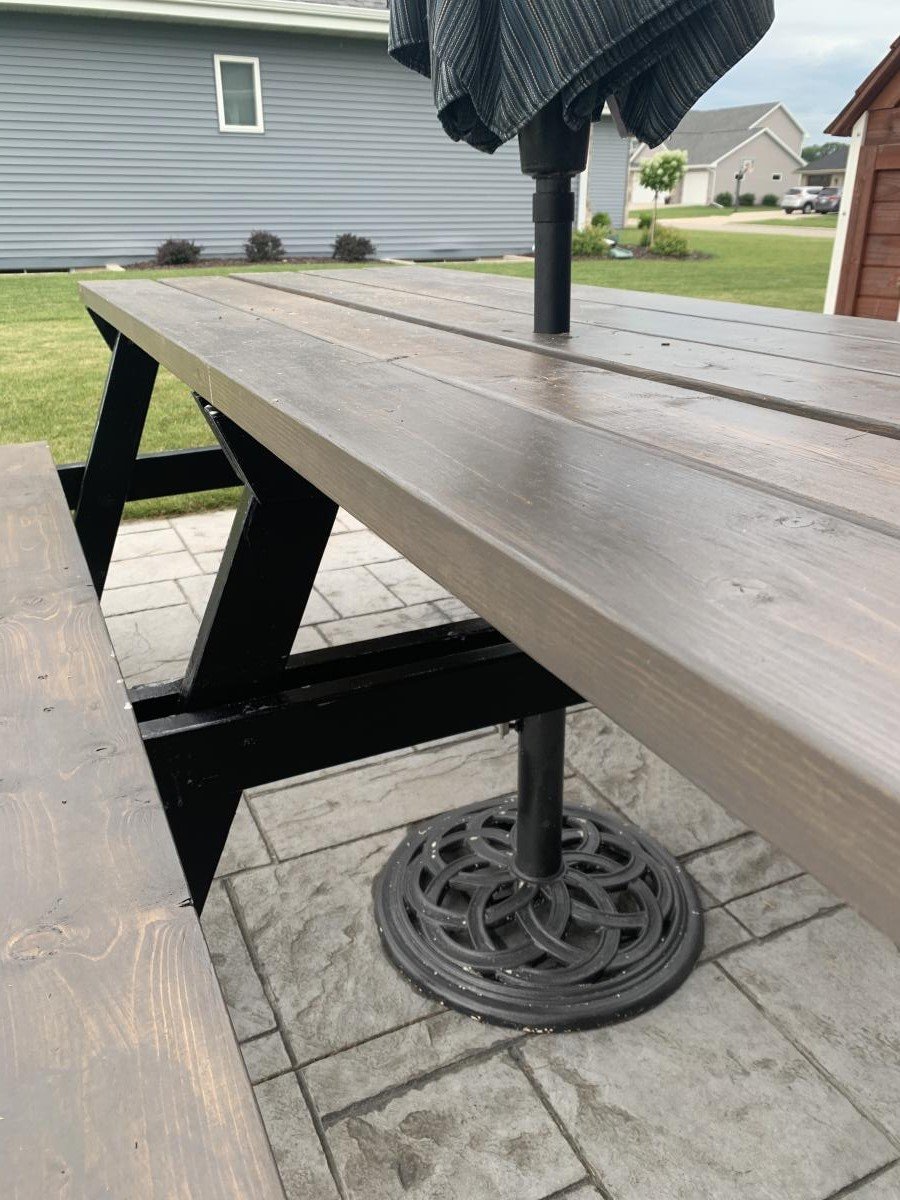
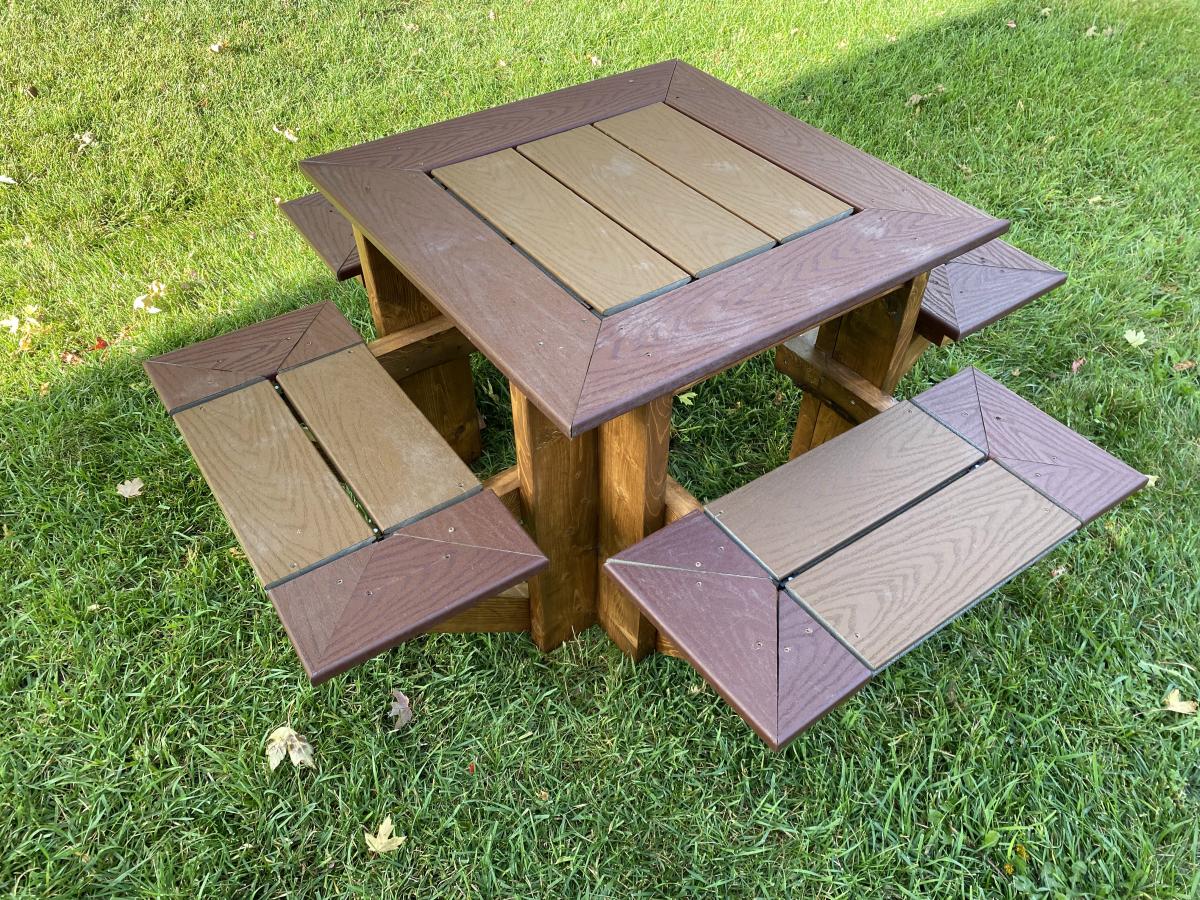
This picnic table was a quick build and turned out amazing. I modified the center base support by adding an extra table top support and seat support board to the opposite side of the center legs to give the table symmetry to accommodate an umbrella hole. I also shortened both cross supports by an inch to make sure the base wouldn’t be longer than the top boards. The space between the center table support boards and seat support boards is the perfect size to fit a standard umbrella. I used a 1 3/4” hole saw to make the umbrella hole. The build and stain/paint took me about 5 hours but additional time is needed to properly seal the table. I used untreated pine. Treated pine may give the table longevity but it would also add a lot of weight to an already heavy table. This was a relatively easy and quick build and is a great size to fit my whole family plus a couple guests! I’m happy with how it turned out and would recommend this build to anyone looking for a budget friendly and simple patio table.


Sat, 07/18/2020 - 13:17
Thank you Abby!!! Your picnic table turned out amazing, I love the added umbrella modification!
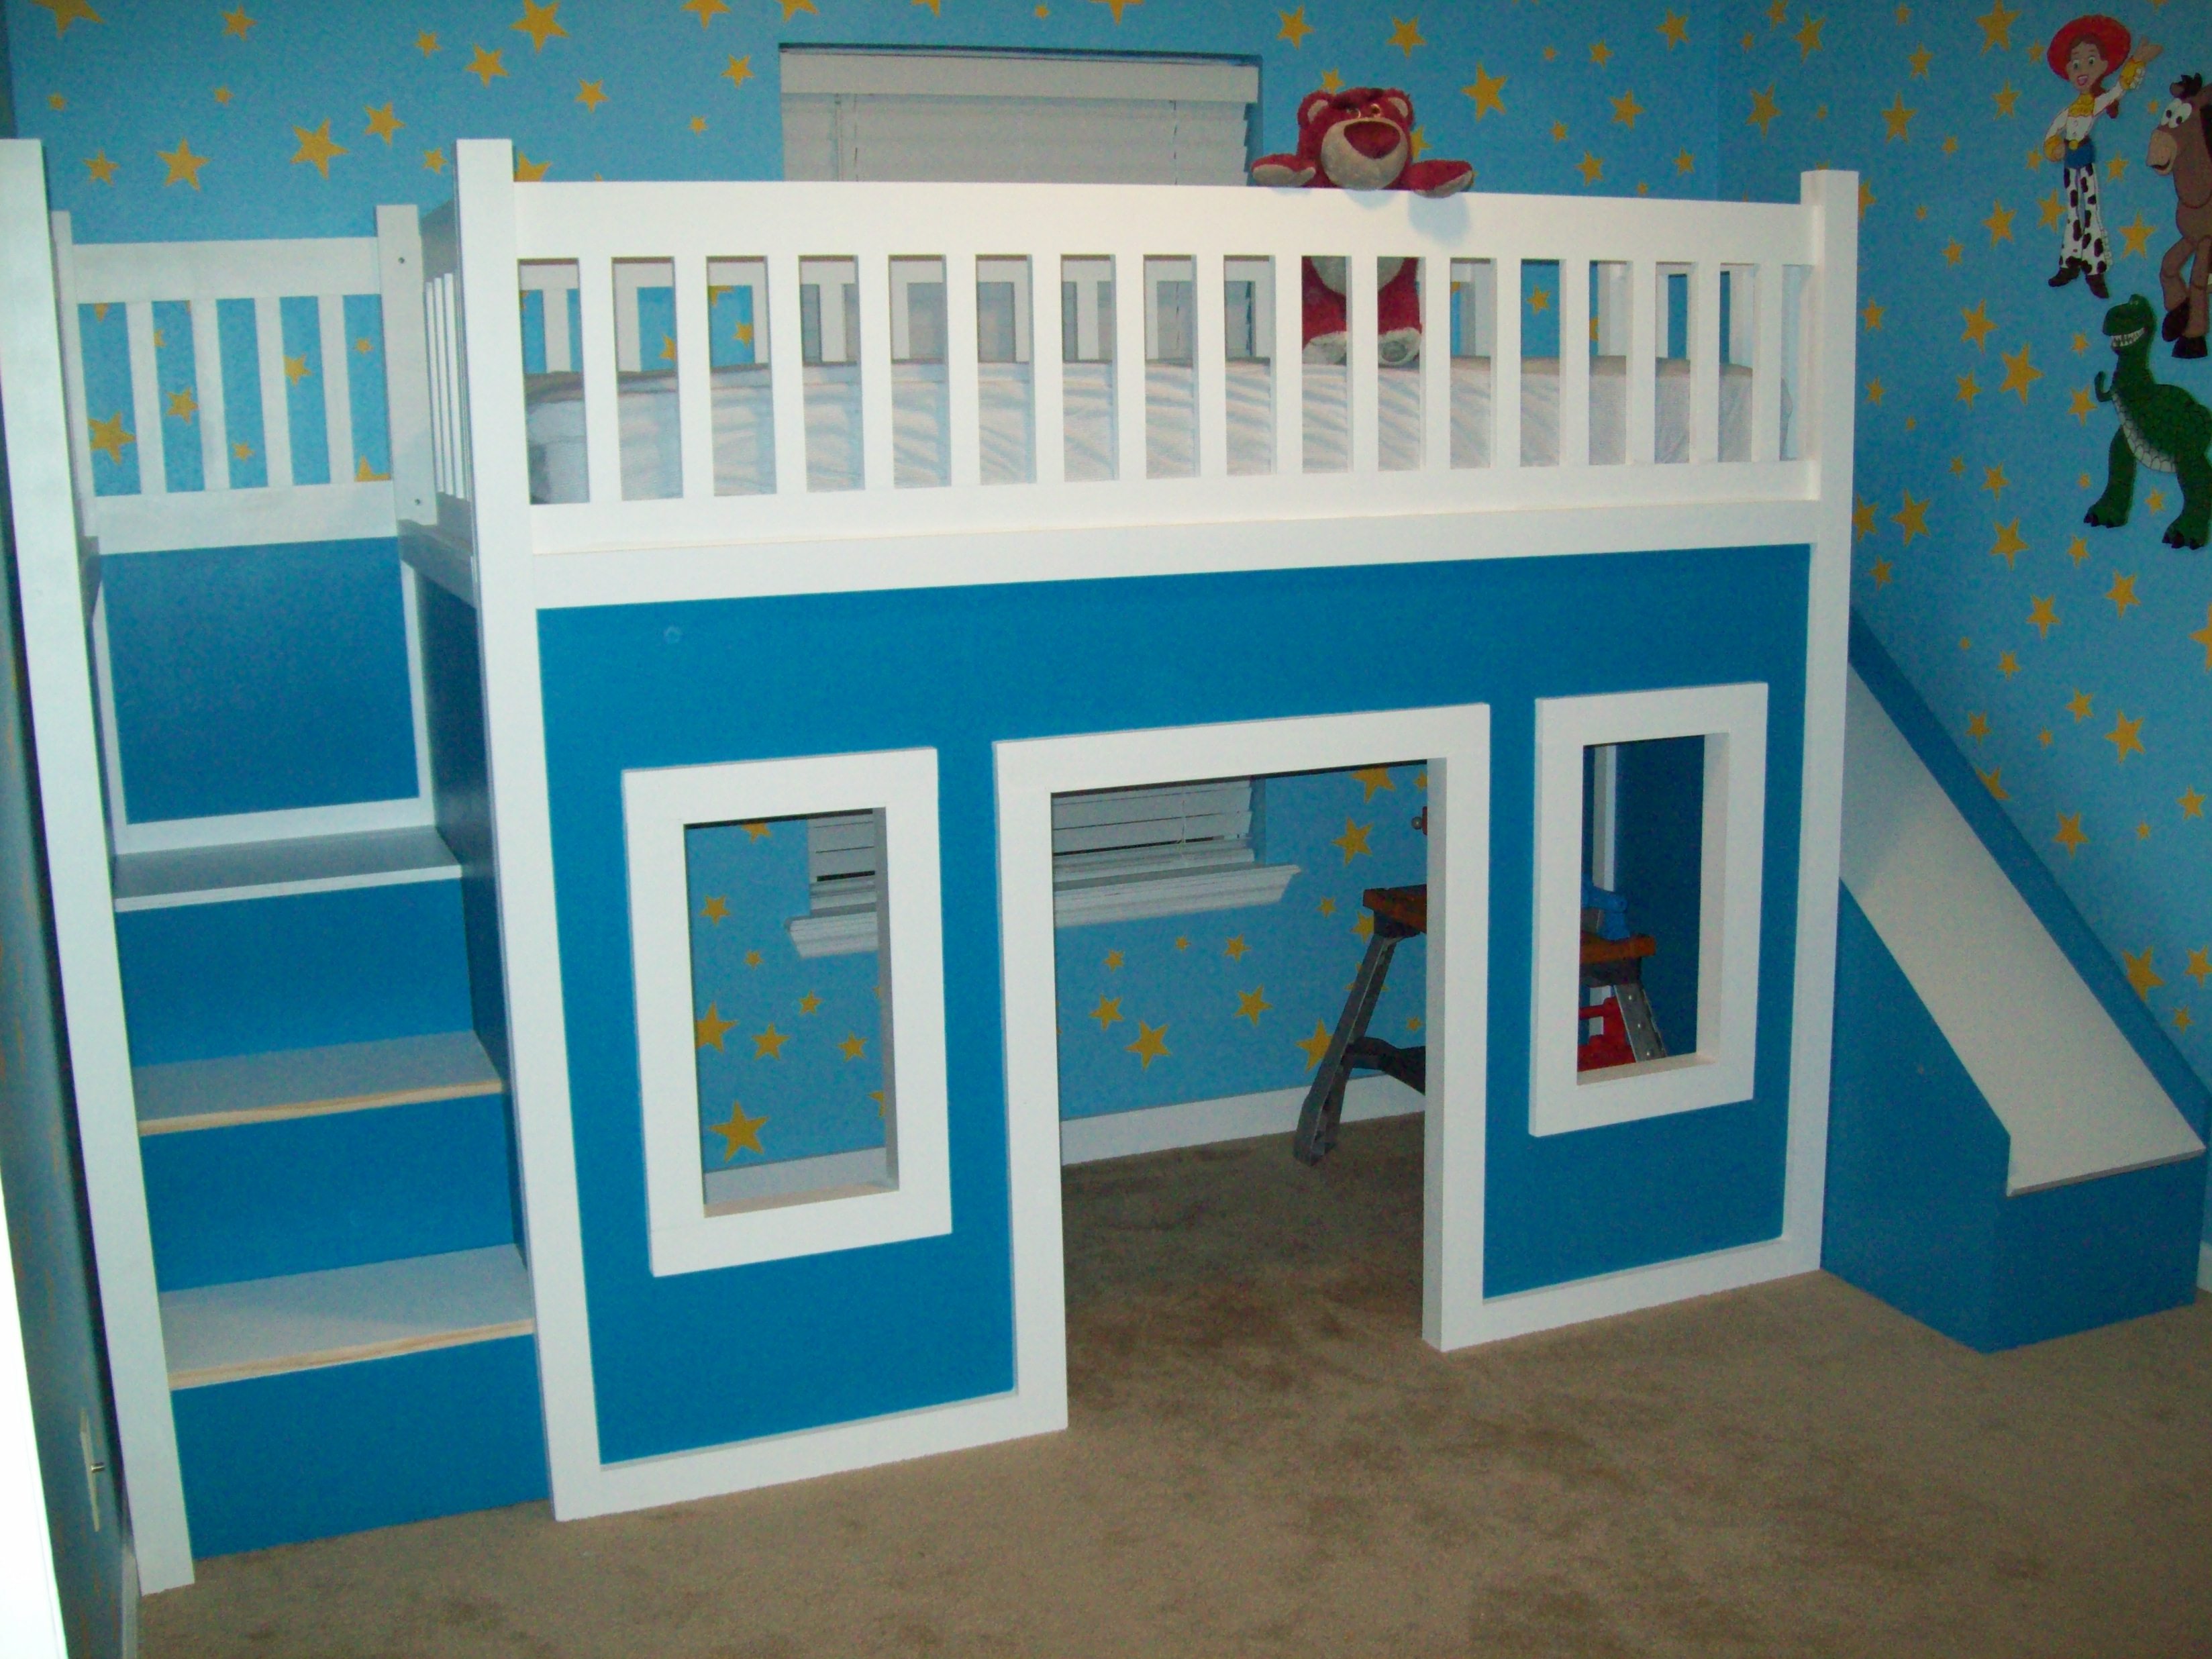
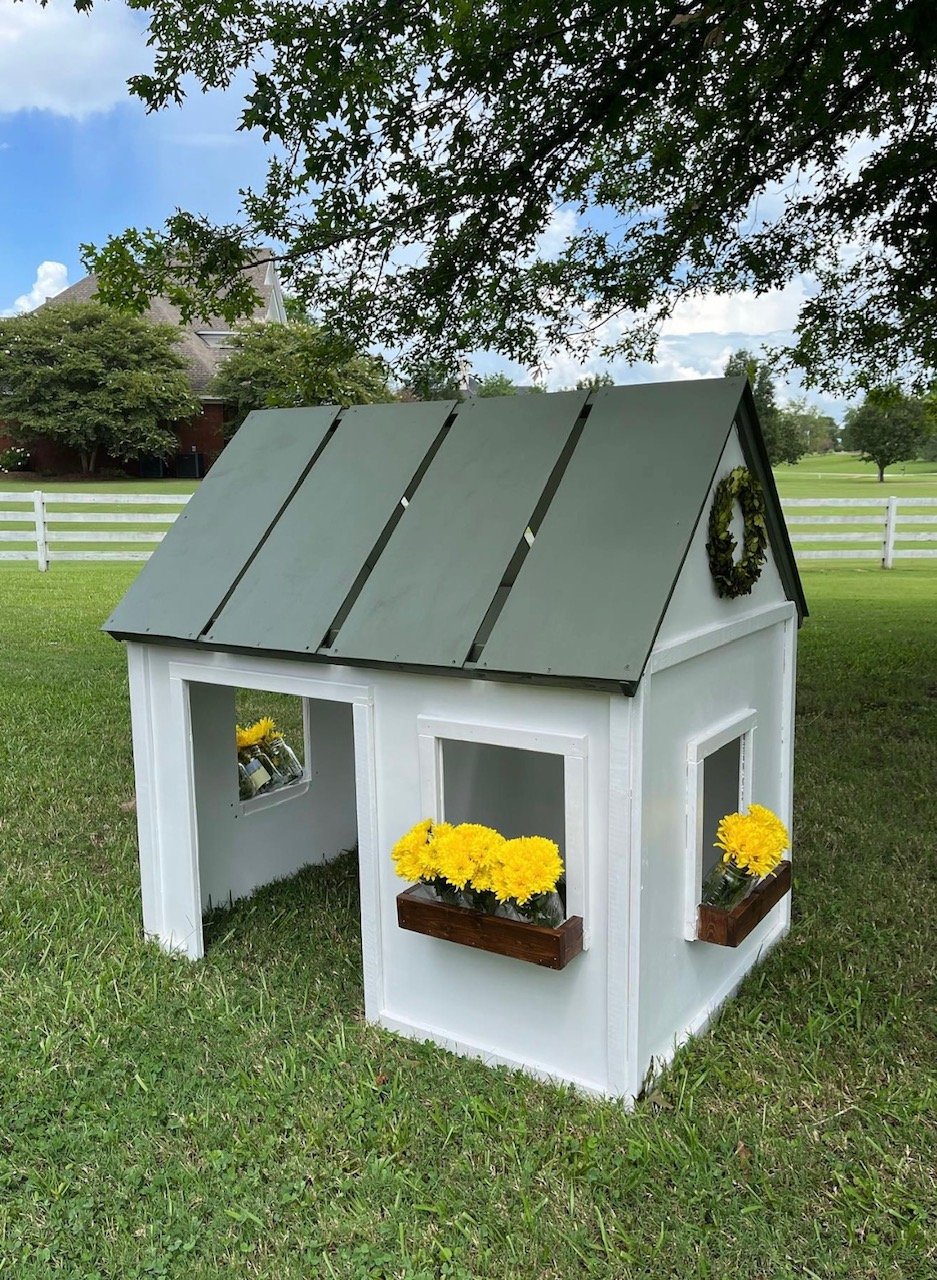
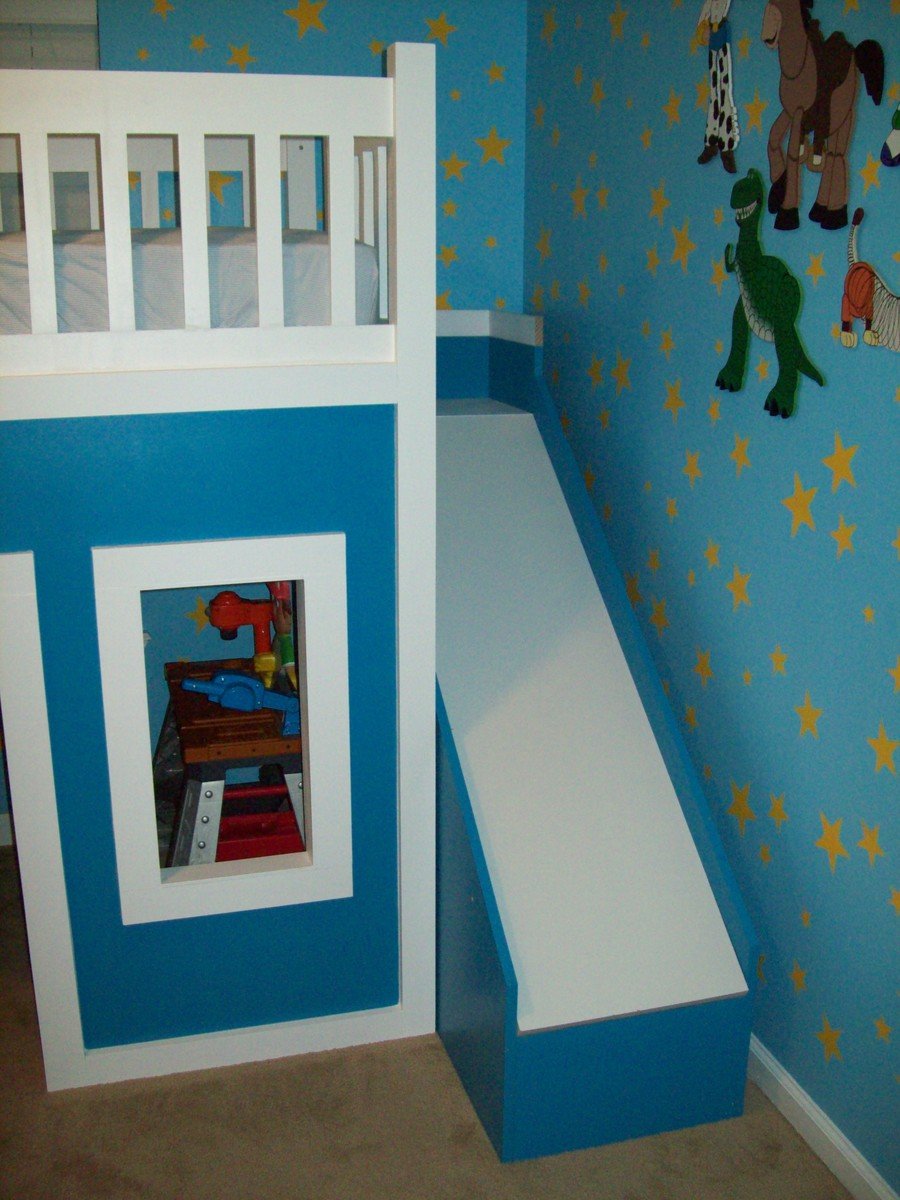
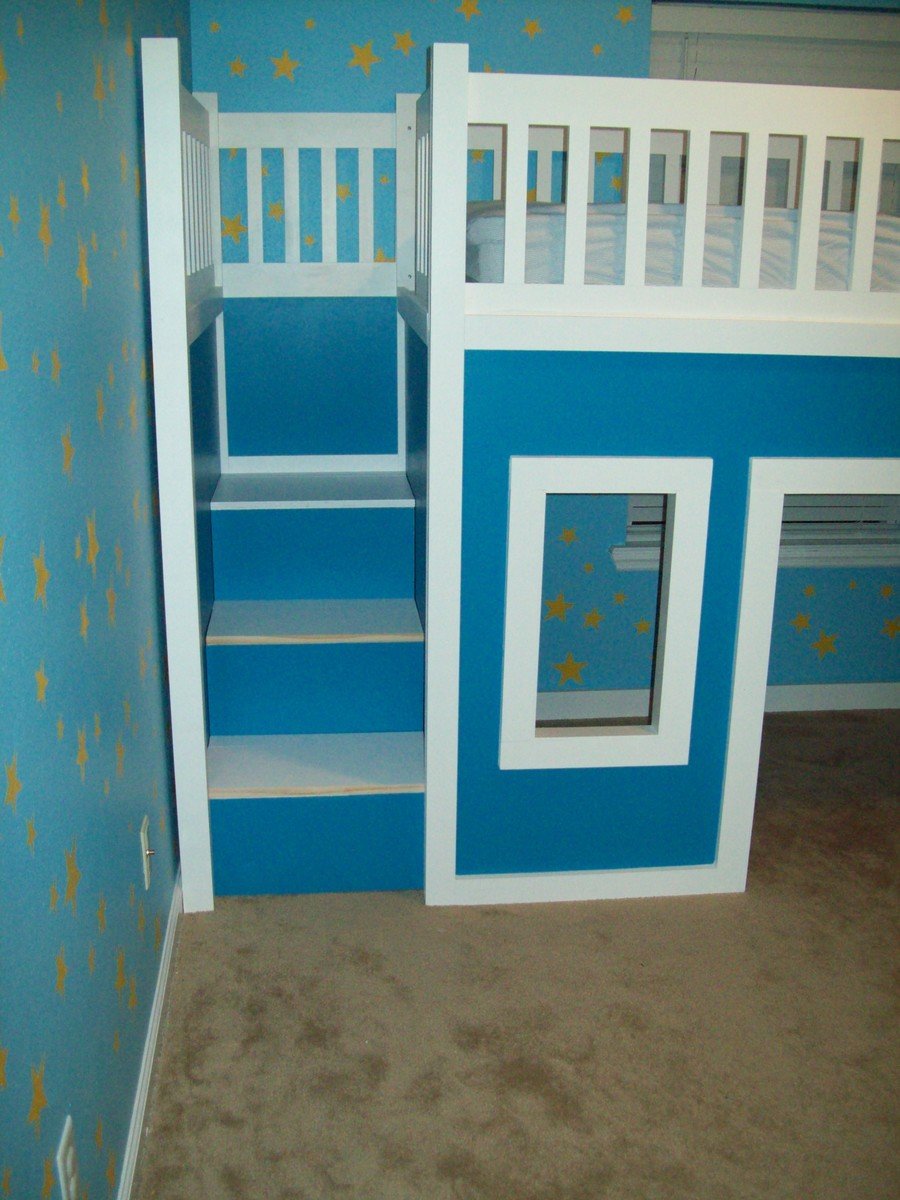
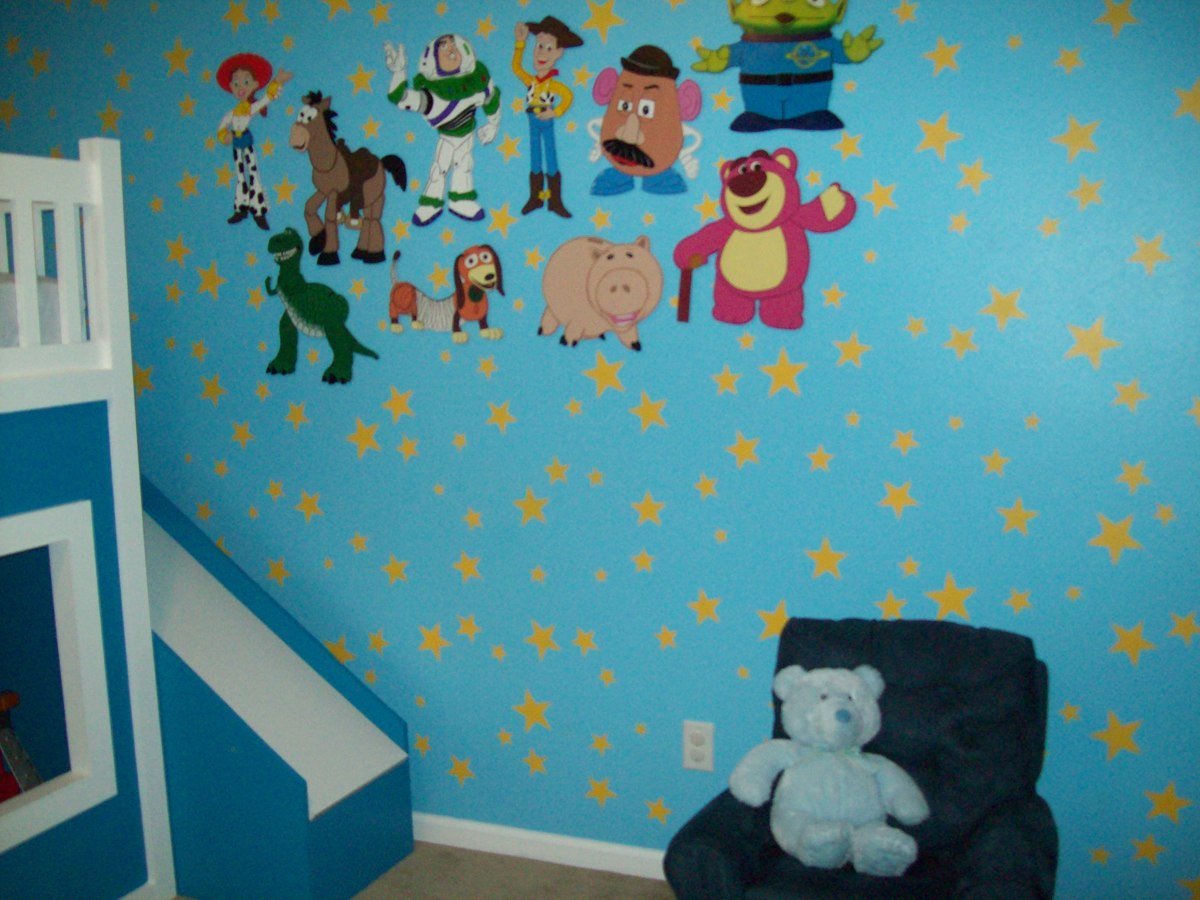
My son was about to turn 3 and I really wanted to redesign his bedroom as a birthday surprise. We went with a Toy Story themed room, he just loves Toy Story.
I started off by painting the walls blue with yellow stars like Andy's room in the movie. I added some custom painted art work and then it was off to find a cool playhouse bed. My husband and I were shopping around and we could never really find what we were looking for in the store. So we decided to build one ourselves using plans from this website.
I used the playhouse loft bed and the playhouse loft bed stair plans, for the bed and the stairs. I used the castle loft bed plan as inspiration for the slide. The project took us about 5 weeks from start to finish. We both have full time jobs and we did most of the work on the weekends. I looked at each plan very carefully and made notes. I had to modify the stair plans slightly to fit the space where we wanted to put the bed. The stairs look narrow, but they work just fine. My husband and I can both use them to get up in the bed. The stairs feature hinged stair tread with built in storage. We built them like that at first, but then later decided to make them stationary stair treads, with plywood. I didn't like the way the hinges looked and the top stair was so deep that I was worried my son would fall in there and get stuck. The storage idea was neat, but his safety was more important to me. The bed turned out really nice and VERY sturdy. Both my husband and I are able to get up there with my son (not at the same time).
Another modification that I made was instead of slats to hold on the mattress, I used a piece of plywood. I wanted the roof in the playhouse to look finished, and I didn't want to see his bedding hanging down from the slats. I painted the top of the plywood white, where the mattress goes to blend in with the slats, and the other side was painted blue to match the walls inside the playhouse.
I did modify the playhouse front facade to have 2 windows and one door. I like the symmetrical look. The total project cost about $400. I used birch plywood and select pine boards, and about 6 quarts of paint. I noticed AFTER we had finished the bed using the birch plywood, that Home Depot had cabinet grade plywood on a random end cap, that was just as nice for $12 less a sheet. If I could do it all over again, I would definitely use that!. I wanted the paint to have a nice smooth finish, without having to do a lot of sanding or patching.
We had Home Depot cut the plywood to the dimensions we needed. I had my husband cut the rest of the wood dimensions listed in the plans, and then I painted all of them before we put the pieces together. I used a small roller and self priming paint. The paint finish looks great. After assembling the bed I can not imagine what I would have gone through trying to paint it after the fact.
The slide was a bit tricky, I looked at the plan for the castle loft bed and attempted to use those dimensions, and for the most part they worked. But when we went to assemble the slide, we did end up recutting some of the wood to different dimensions. I used a piece of the melamine coated closet shelf material for the slide.
It is already finished in white and its nice and slick, like a slide should be! I hate MDF, but for this it seemed the best fit. We cut the top edge at an angle to meet up with the slide platform. PLEASE BE CAREFUL with this material. After it was angle cut the edge was razor sharp and I sliced my fingers up. Once it was installed it butted up perfectly to the slide platform, and the edge was hidden and not a danger. But use caution during the install.
Clamps are your friend! We used Kreg clamps for everything. They kept the wood in place while we were screwing the parts together. The coolest thing that my husband came up with was clamping two identical pieces for plywood together, and drawing the template for the slide support walls. Then he used his circular saw to cut them out. We ended up with two mirror image pieces. They looked awesome. I left them clamped together when I sanded the edges as well.
We really didn't have any building experience other, than building tables and chairs for children, We got the deluxe Kreg jig kit and a miter saw on Craigslist for $50 each and they were both practically brand new. This was the first time we had ever used a Kreg jig and we are both addicted. That thing is the bomb.
We locked my son out of his room for a week while we assembled everything. We had the big reveal at his birthday party and all of the guests were excited to see it after seeing my facebook teaser posts of our progress. There were 8 kids up there at one time and the bed did not budge. They all enjoyed the slide. I did the planning and paint and my husband did an awesome job making all of the cuts and sanding everything. We are both very proud of the final product. My son love his new big boy bed.
DISCLAIMER: This bed is not recommended for a child under 6 years old. My son is mature for his age and we monitor him carefully.

Mon, 01/21/2013 - 12:41
This bed is awesome. My boyfriend and I want one just like this for are son. Did you happen to write out all your dimensions? I would love to make this bed for my son.
Mon, 10/20/2014 - 03:10
I also would like to know the finished dimensions of your project. What is the hight, length, and depth?

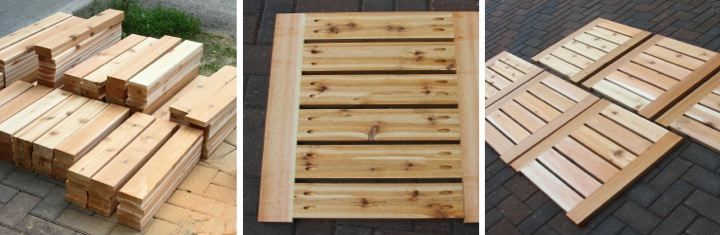
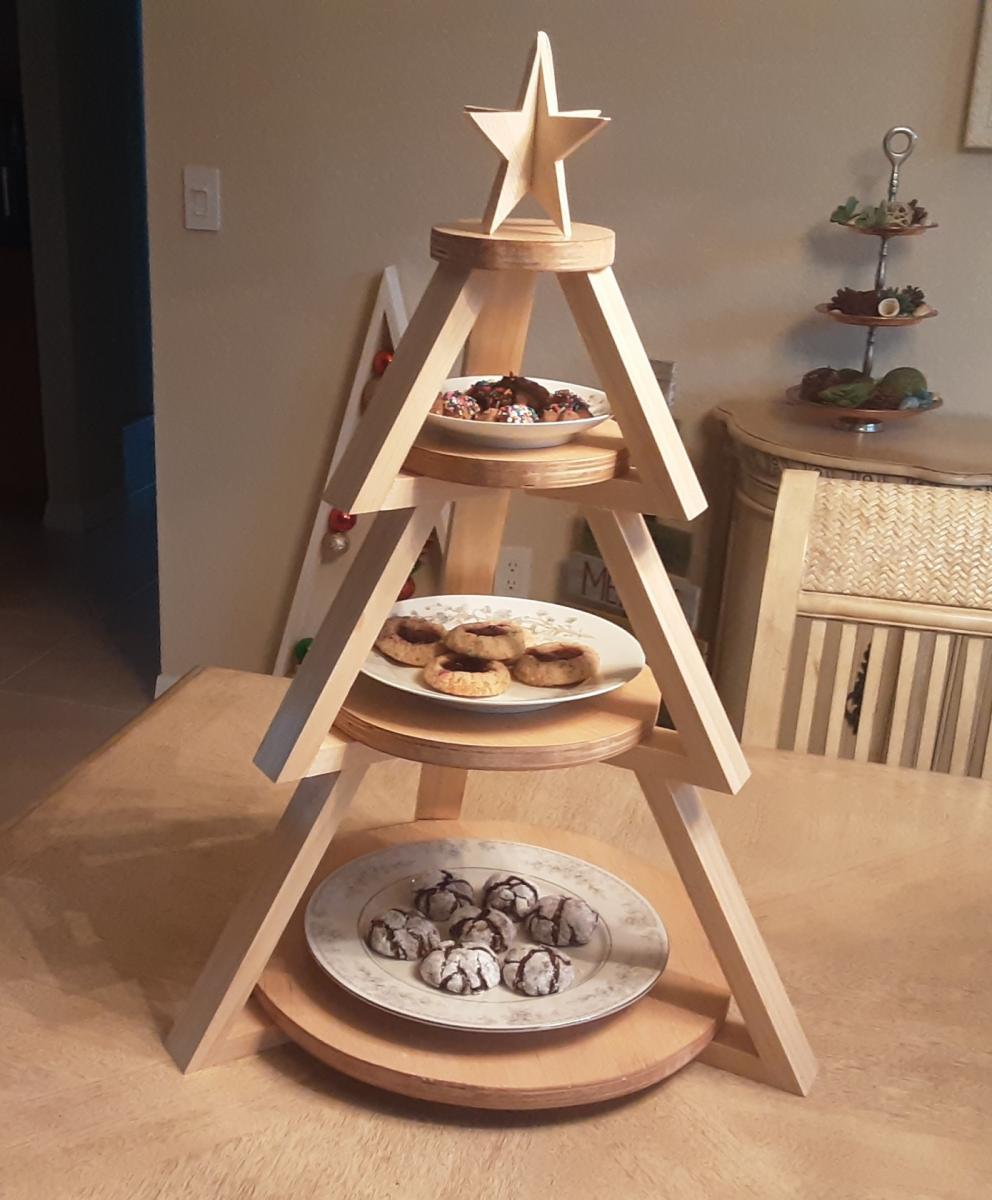
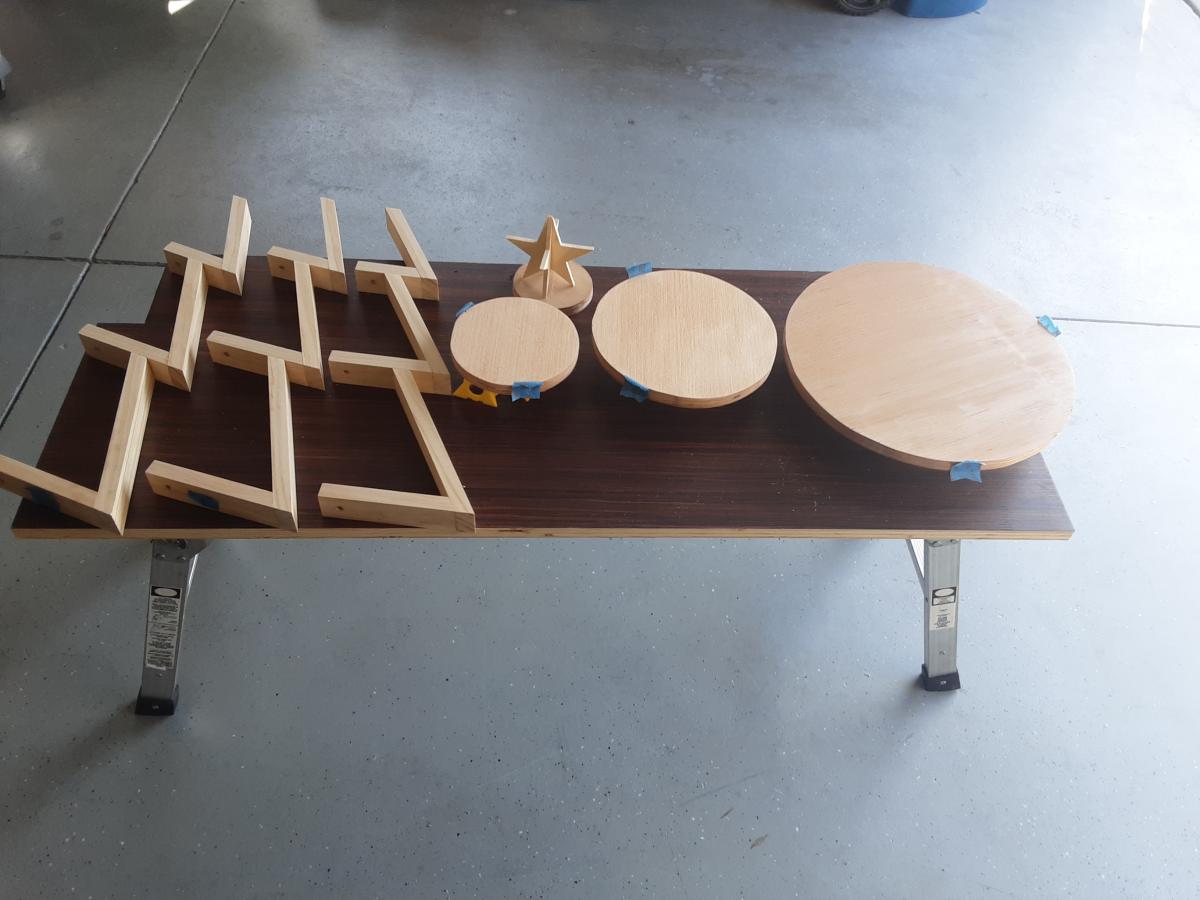
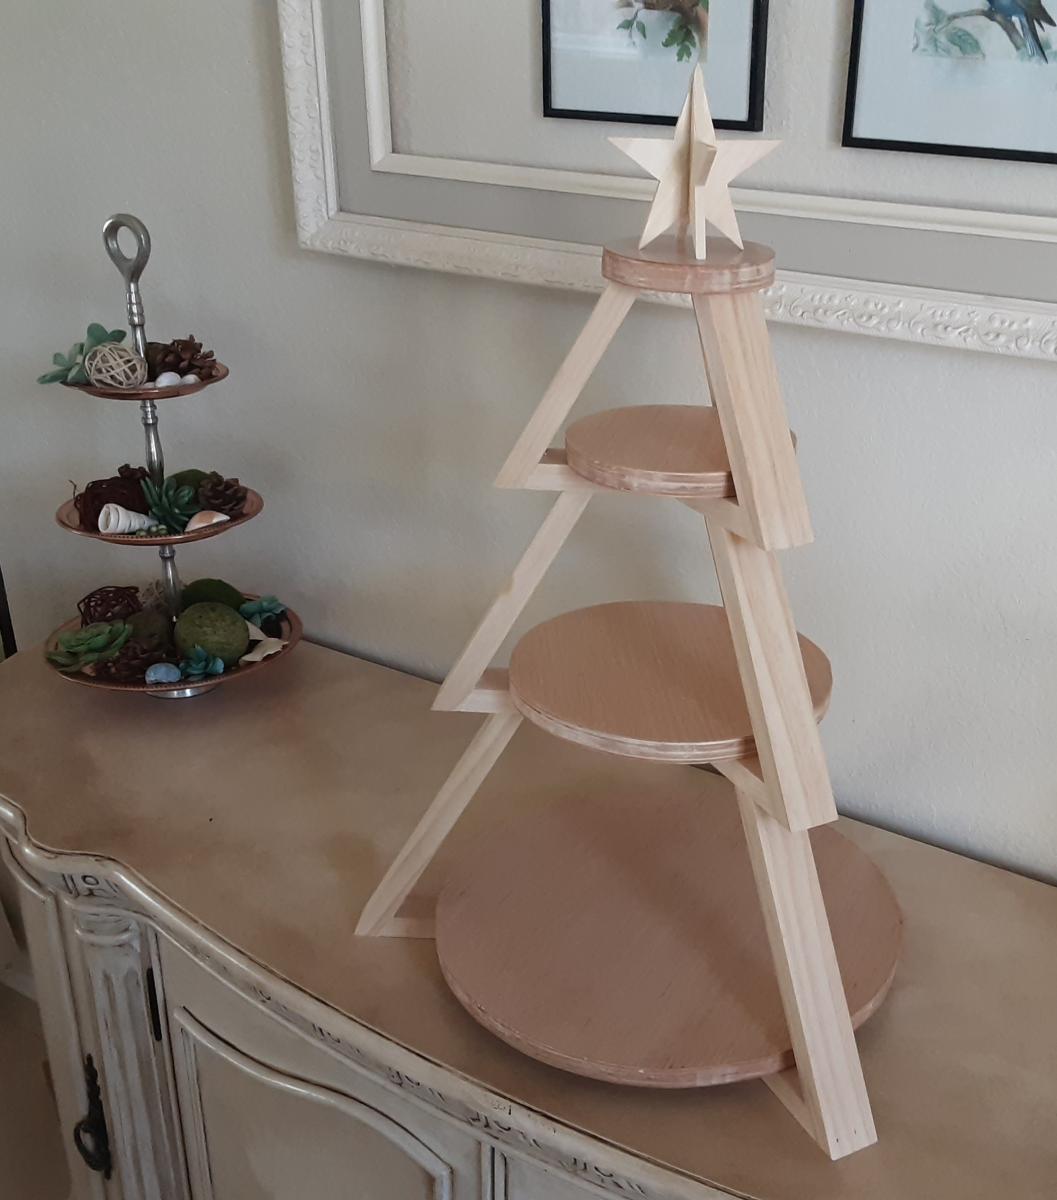
Inspired by Shara of Woodshop Diaries, created this 3 tier tray for displaying cookies for Santa. Added a 3 dimensional star as the topper and simply followed the excellent photos and schematics on Shara's website.
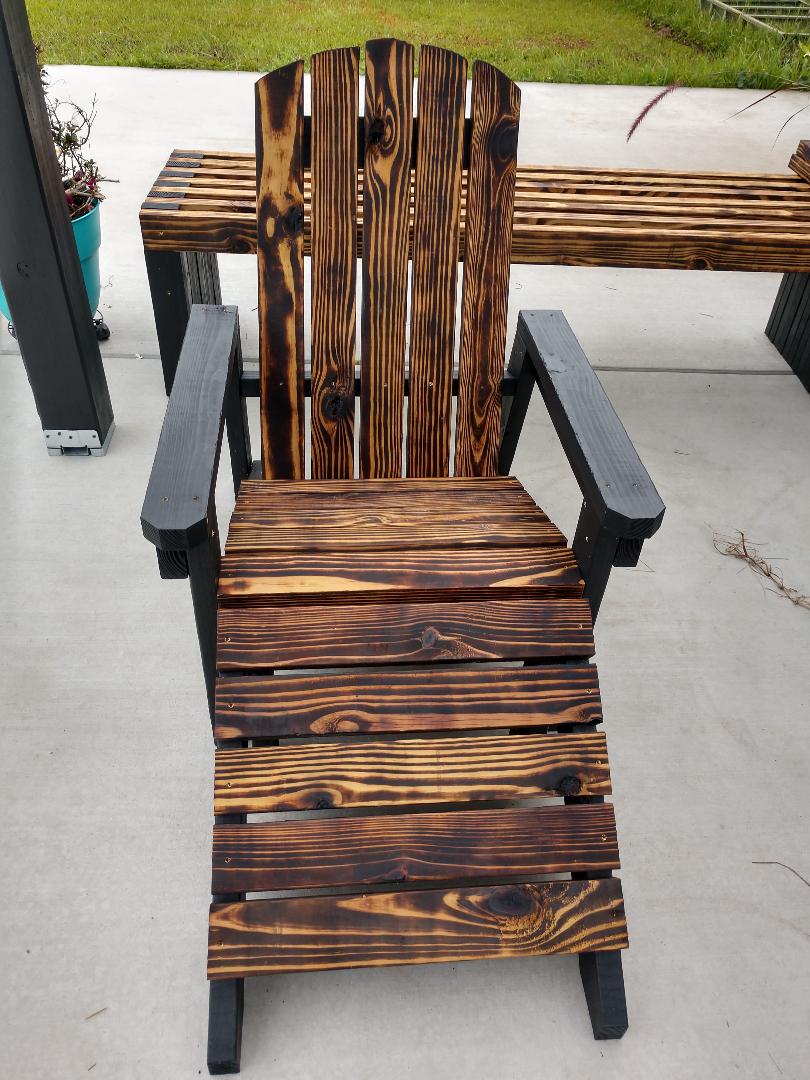
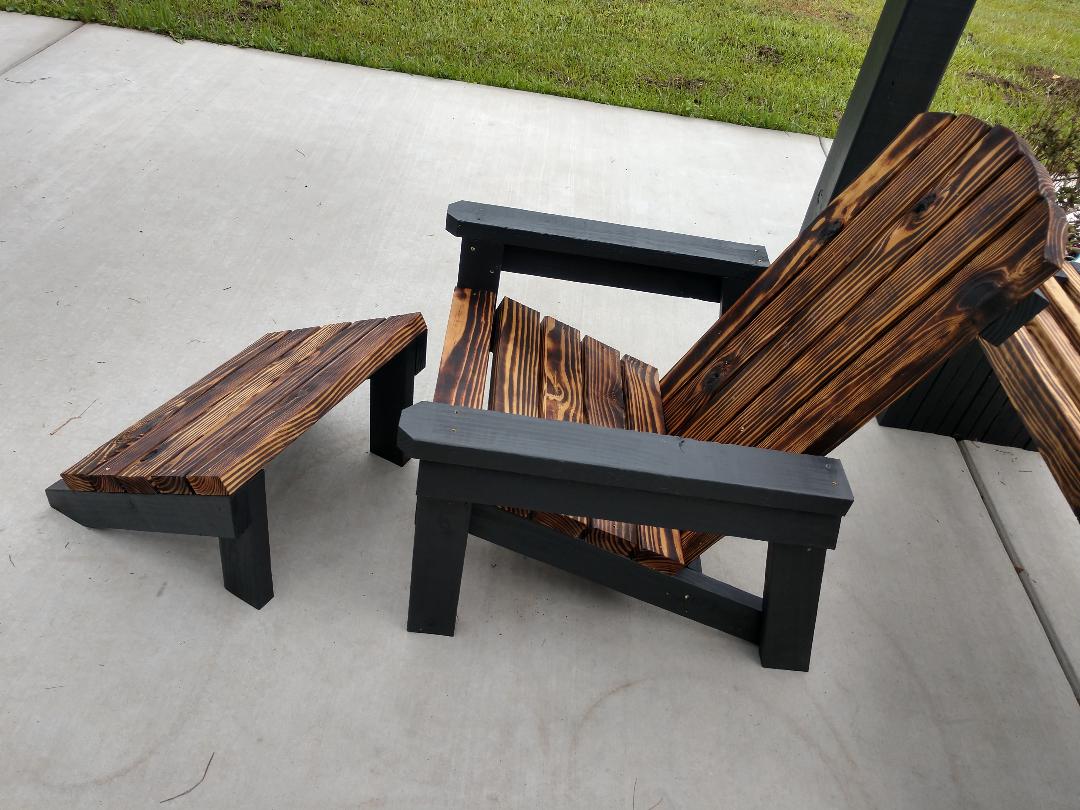
Very easy instructions. I love the way they turned out. I used all 2x4's that I had left over from another project. I burned the top pieces and painted all other pieces. Love your easy instructions. My first time making furniture.
Thanks
Yvette


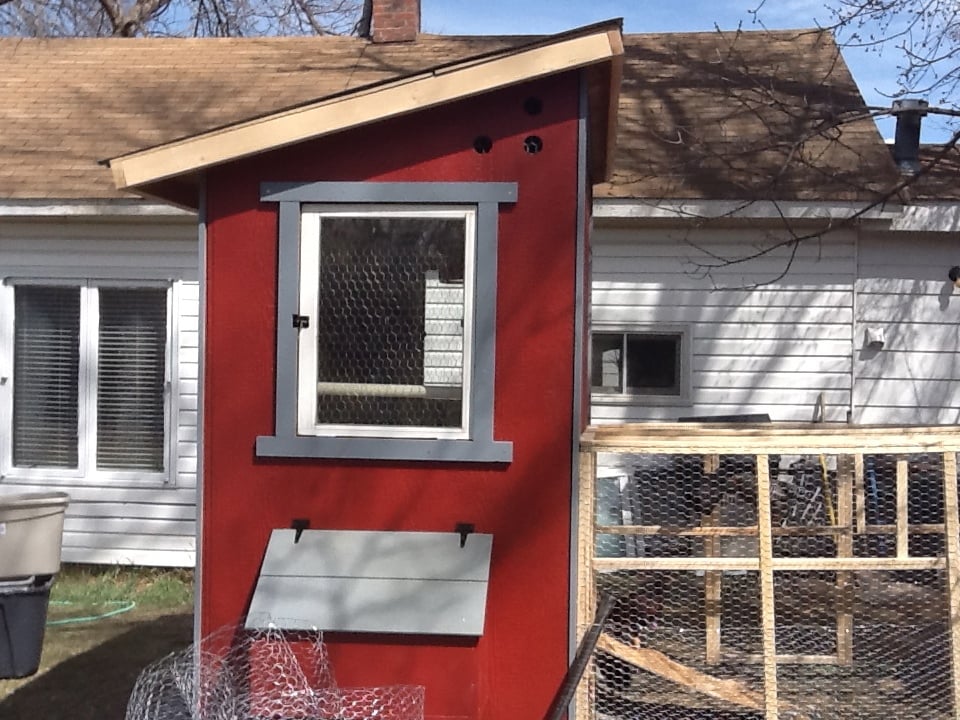
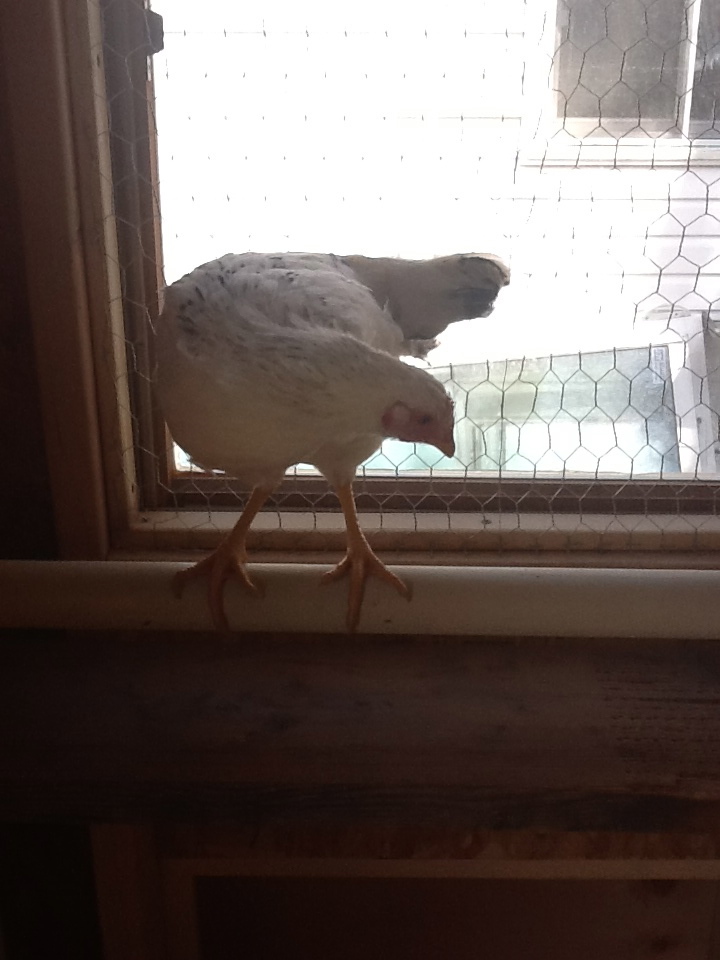
I used the chicken shed plans to create the coop, with a modification to include two nesting boxes, one on each side.
I slightly modified the nesting boxes, using a U shaped frame and added hinges for the front to swing down and the pine shavings to be swept out.
For the siding, we found it easiest to do the tack and trace method. We tacked each full sheet of siding in place and traced the cuts for the window, roof line, doors, and nesting boxes. We then took them down, darkened the lines, cut 'em, and re-hung them. It made it a million times easier, IMHO.
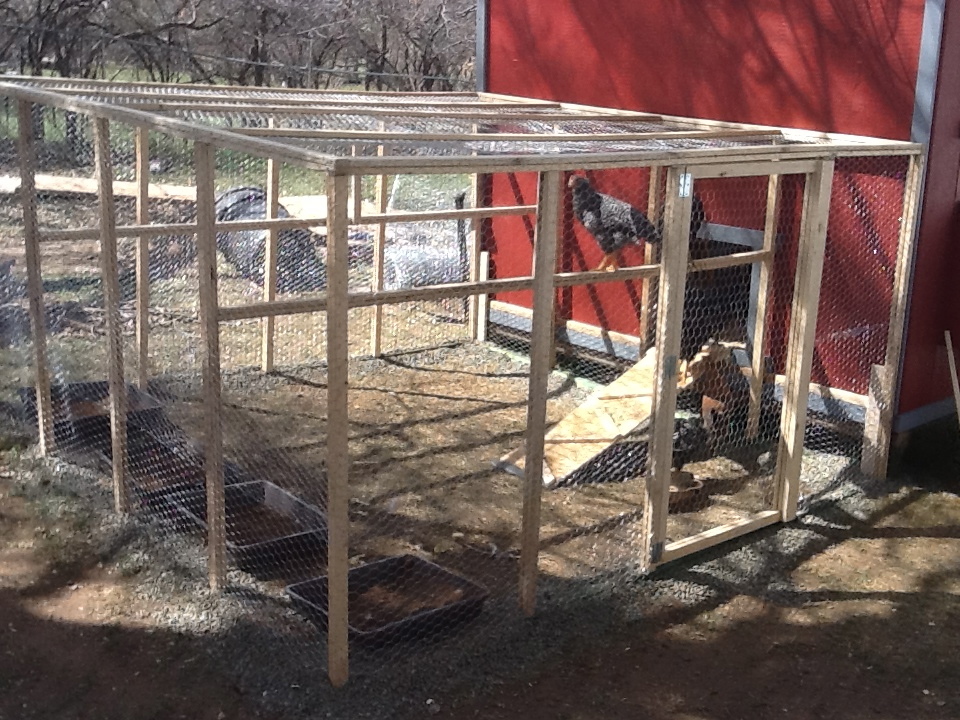
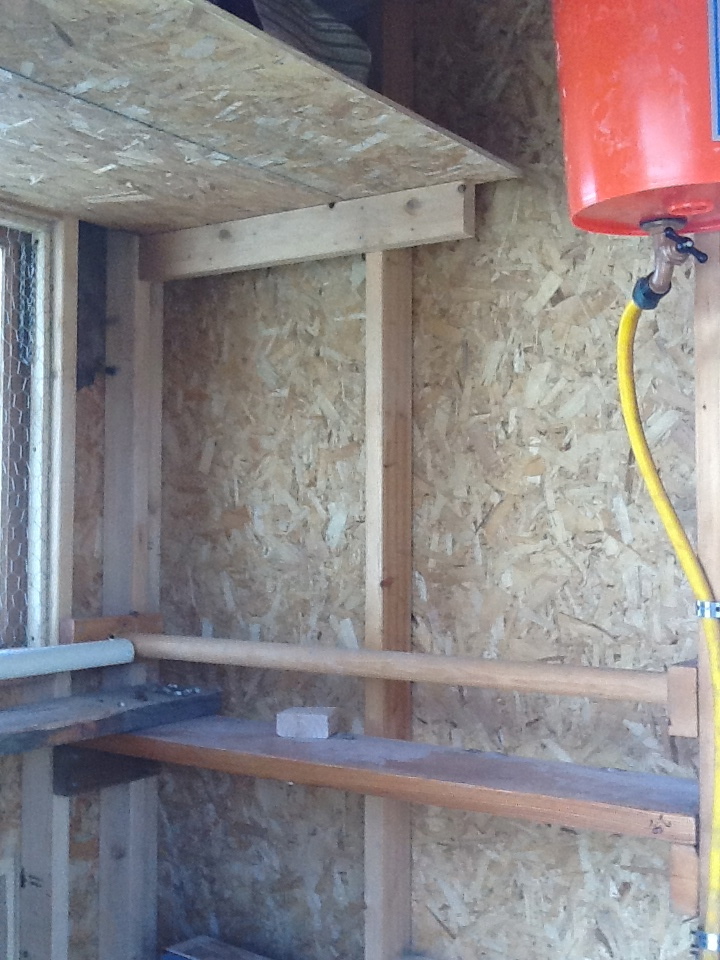
For the inside, I designed several roosting bars with poop platforms. The water is a gravity fed chicken nipple/pvc setup, which I found online.
The food stations, also gravity fed, are (new) sewer pipes with wye connectors.
I used the roof and siding scraps to make shelves for storage inside.
By sourcing reclaimed materials, I built the coop, run, interior, feeding stations (5), and waterer for $550. I only bought 27 pieces of new lumber (15 2x4's and the 12 8 foot long 1x3's)
Even the paint was free! (We have a drop and swap at the haz mat recycling center run by the county. We have gotten 100's of dollars of free paint, stain, and varnish there. I even used a can of free spar varnish to seal the inside of the coop)
There are still a few pieces of trim to be cut and painted, but the girls are inside eating, drinking, and merry!
I did find that at the Home Depot, if you buy chicken wire, it costs way more then 150 feet x 36 inch "stucco netting". The stucco netting was $54 for 150 feet, and chicken wire is $76 for the same amount. It is the exact same wire.
I built the run out of resourced 1x2 furring strips. They were a pain to work with, very prone to breaking when not supported, but with the entire run costing $25 for wood and $54 (with half a roll left over) for chicken wire, I can handle some extra time and effort.
If anyone has any questions for me, feel free to contact me! I'd love to help!

Mon, 02/06/2023 - 08:12
Hi! Do you still have this coop? It's been about a decade now and wondering how it has held up, if you have any suggestions, or additional pictures of the inside. Thank you!
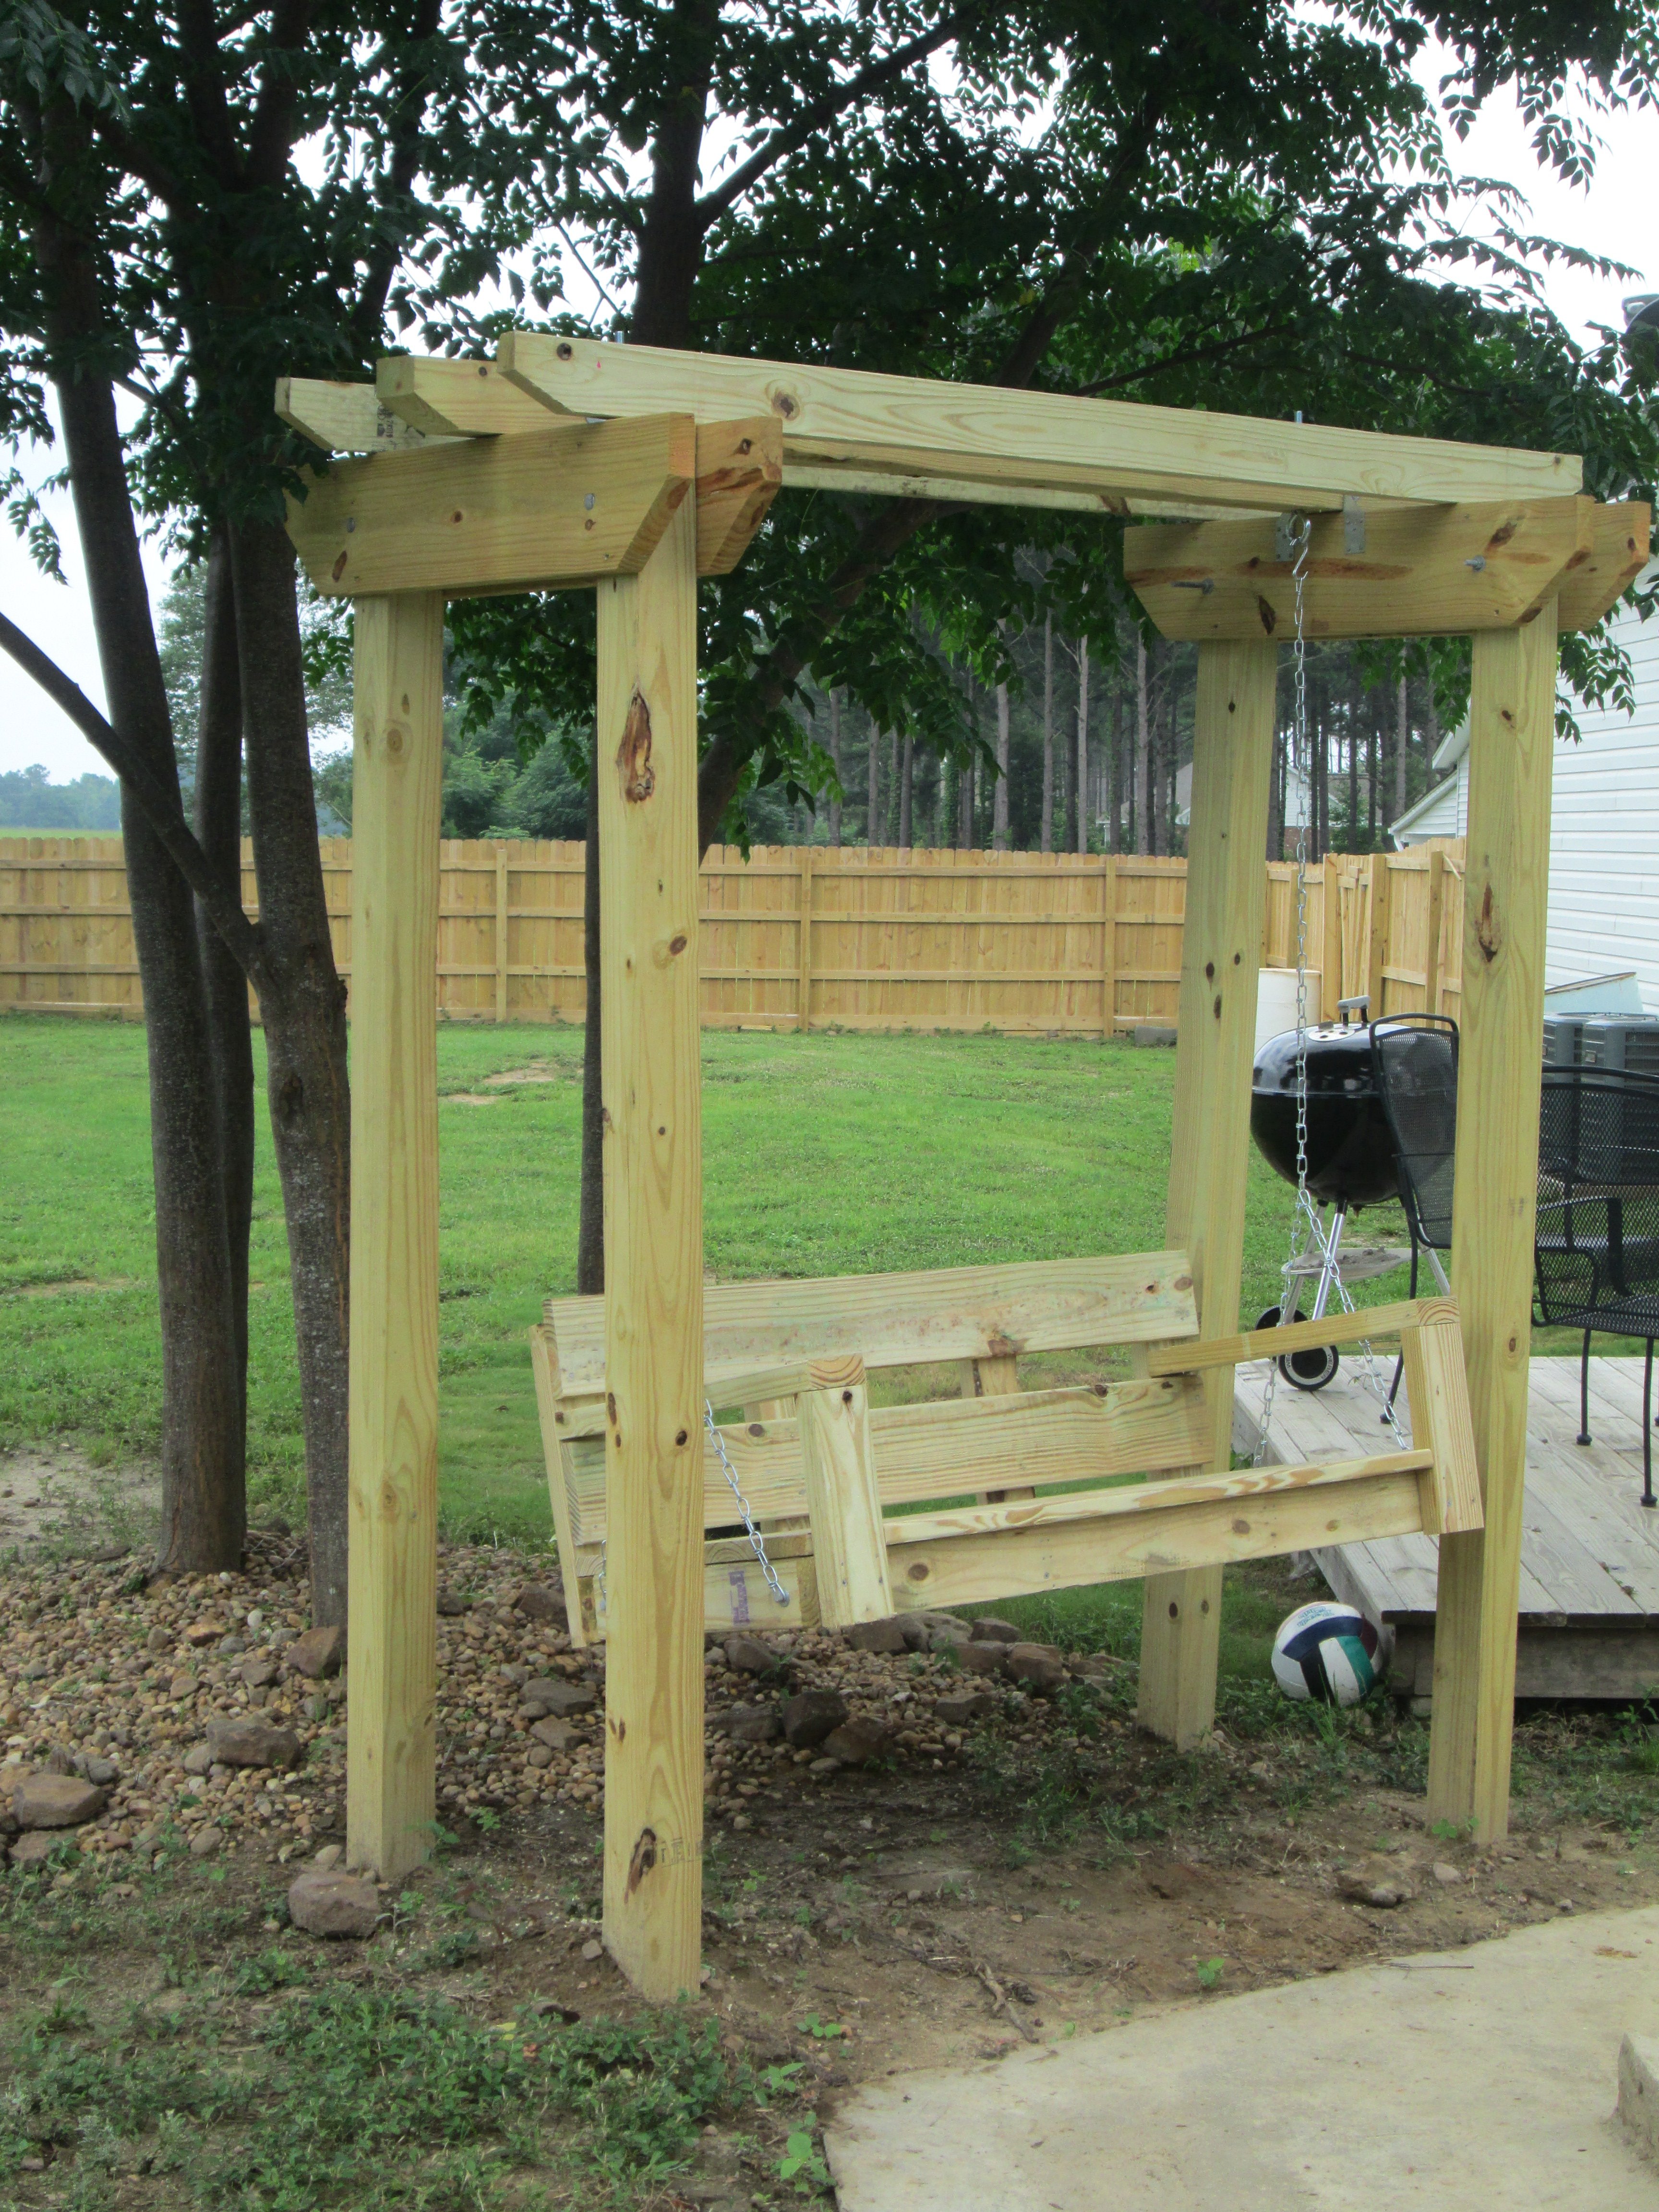
Weekend swing project
Tue, 05/07/2019 - 10:42
We don't currently have this plan available, although I'd be happy to draw it with the author's permission.
I have linked a few plans above that could be used to create this plan. Just make sure you bury the arbor uprights underground on concrete pier posts or similar (like building a fence)
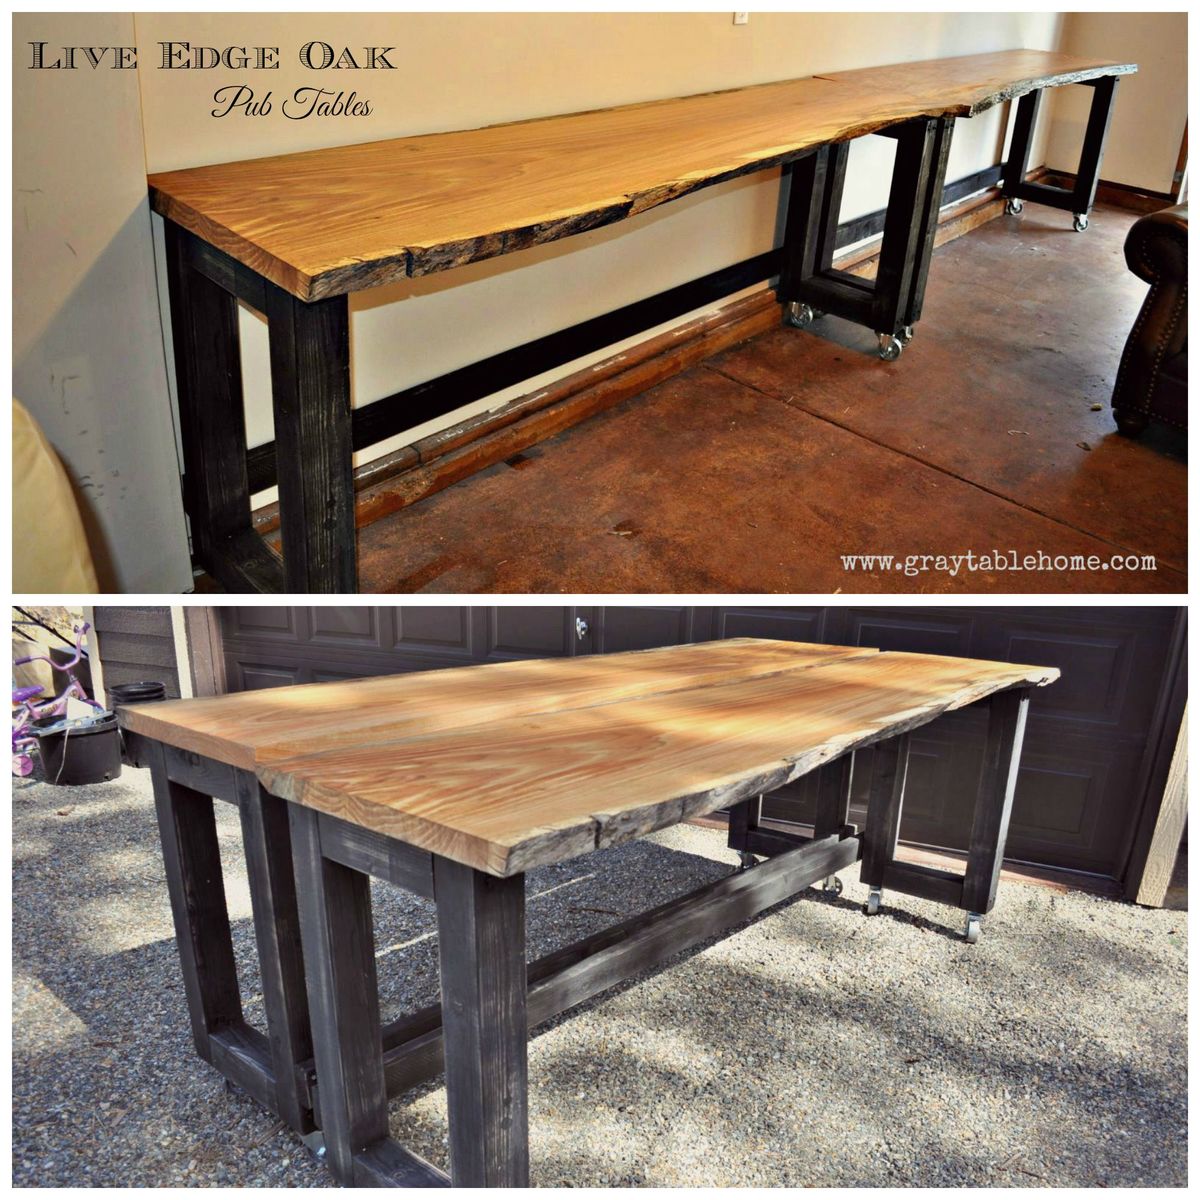
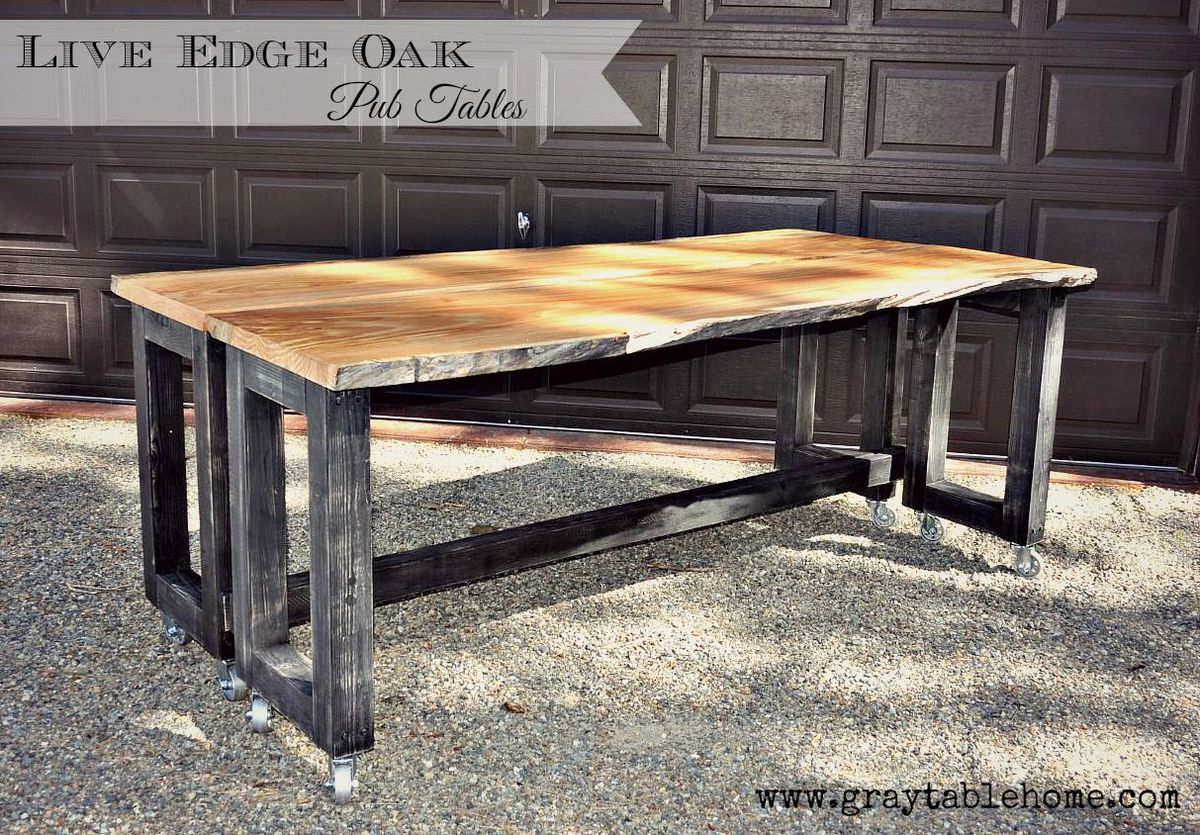
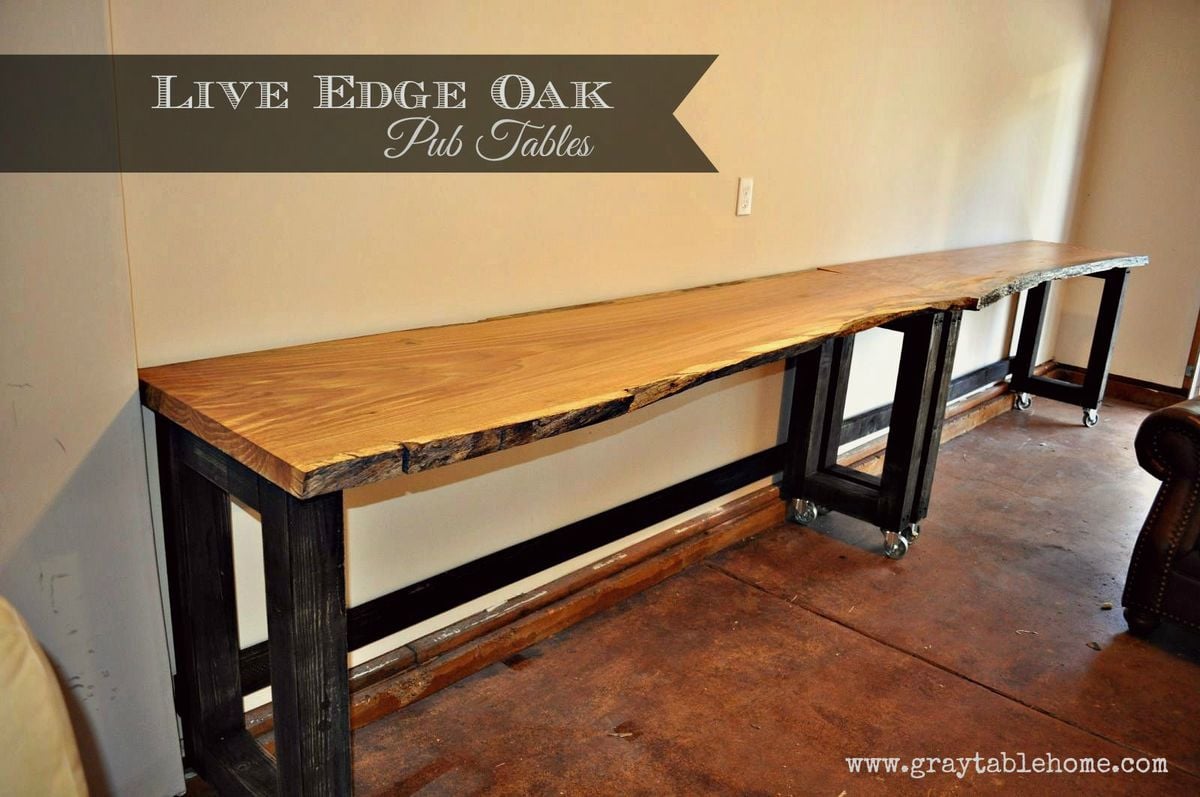
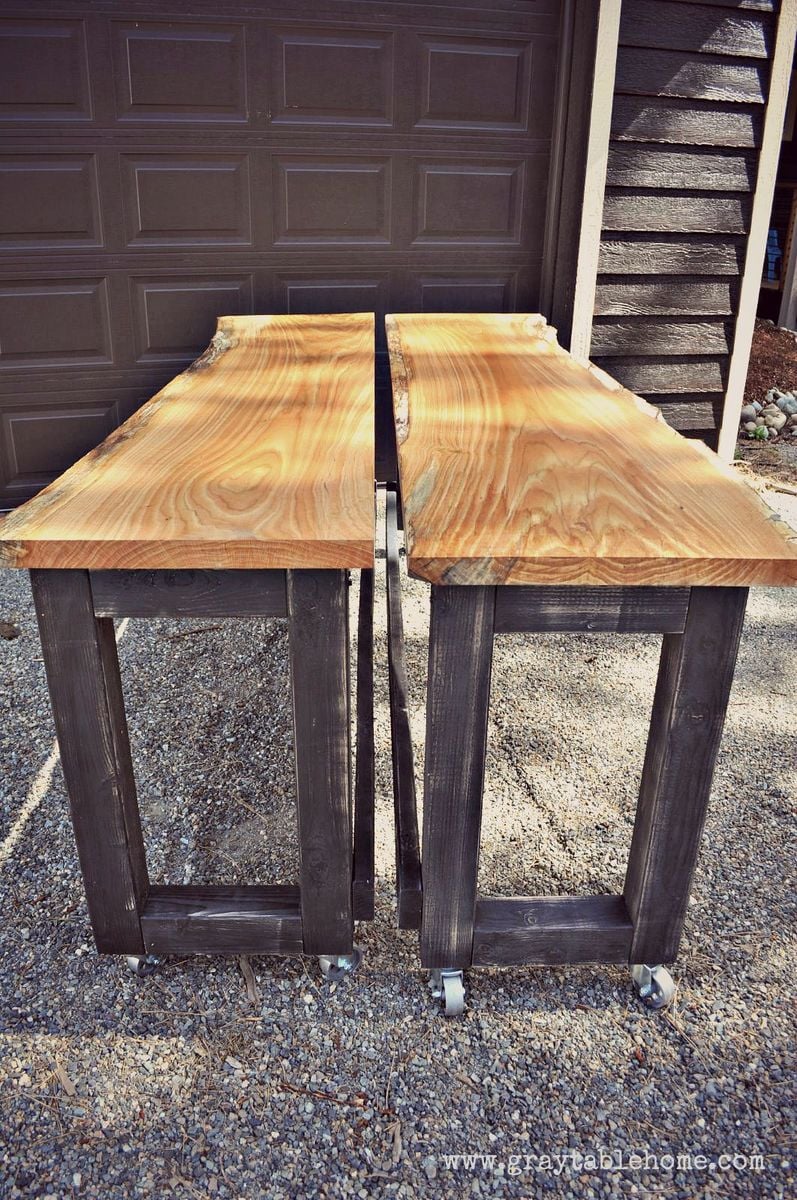
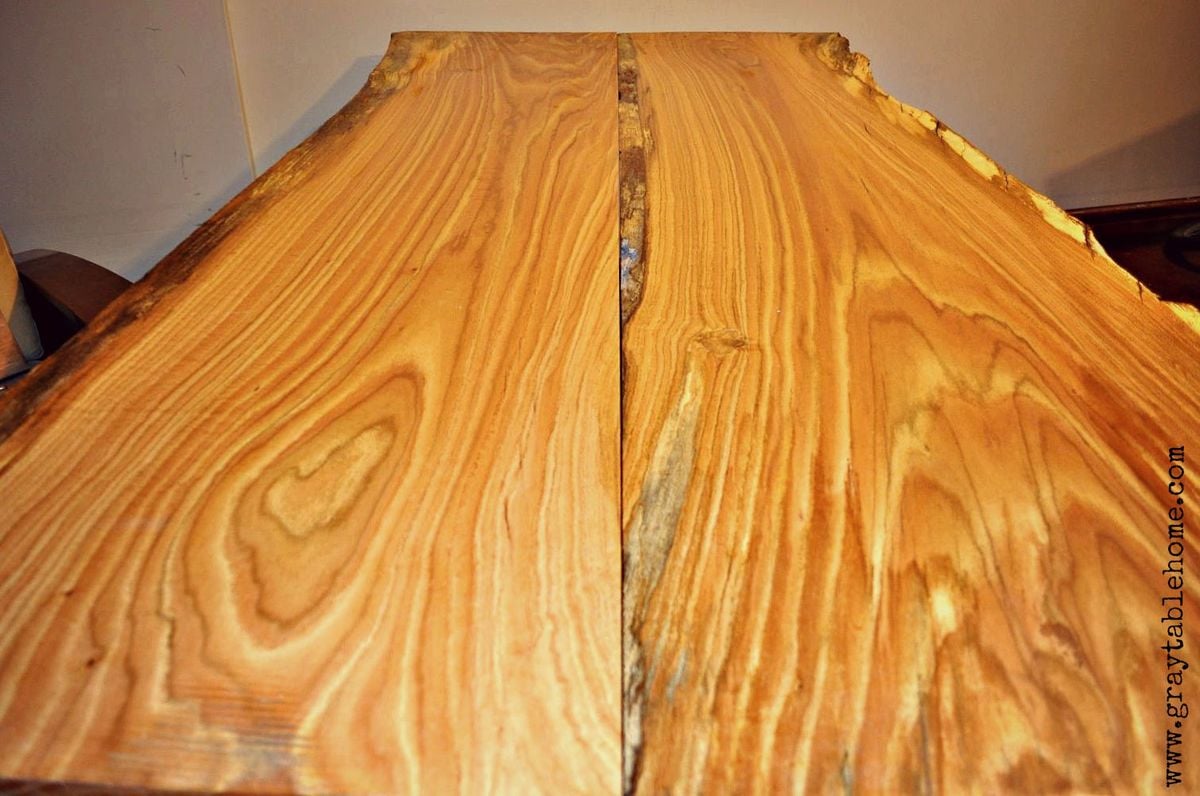
This rustic modern version of a pub table has multiple uses - it can rest along a wall to make a 16 foot long bar, or rolled together to form an 8 foot long pub table. It is standard counter height 36" and will accomodate seating for 8-10 counter stools. If you don't have live edge wood slabs, you can also use construction lumber (2x8s or 2x12s) to achieve similar dimensions and versatile use in a more cost effective way.

Fri, 07/31/2015 - 04:10
Awesome idea! I think I will have to try for a dining table version of this table. Do you happen to have a way to lock the 2 pieces together?

I love the design but needed it to fit my young kids instead of adults. So I modified the scale of this plan to make it fit my kids. The other kids picnic tables we have tried all had some negatives to them. Additionally, it seems if my kids are sitting next to each other there will always be fights and/or someone bumping their brothers plate on the ground. So the four sided table was a must and it apparently is not a very common style. That was why I fell in love with Ana Whites design.
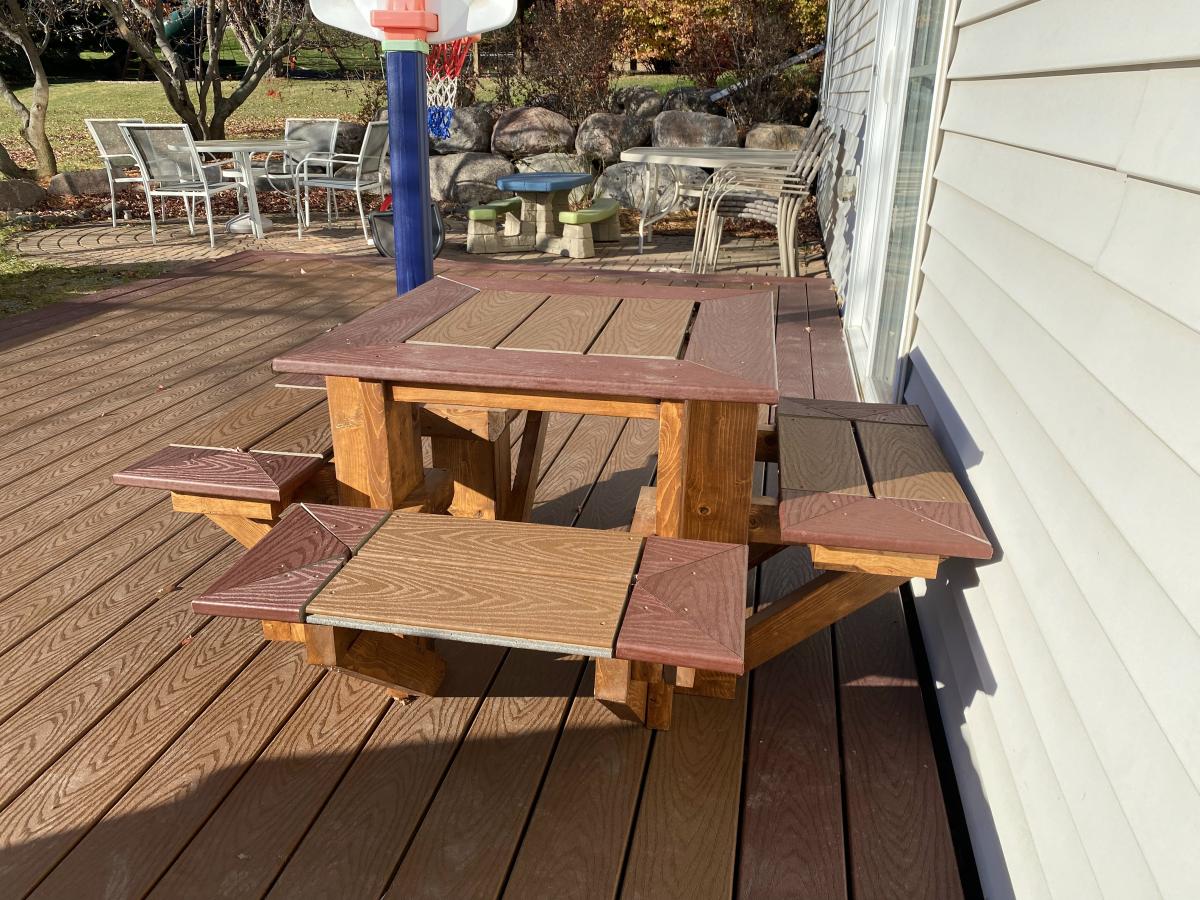
I had just completed a deck and had leftover materials. This table was designed to compliment the deck - using the leftover Trex decking materials for the top and seats. This also led to some of the design decisions on how I altered the seat design to match the look and style of my deck.
This was a great project and a VERY sturdy table. It's rugged, heavy, and easily holds adults as well.
Mon, 06/13/2022 - 11:52
This is so smart and looks amazing! Thank you for sharing:)

Hello everyone, today I’m sharing details on something I built recently: a Bailey Chair for dogs suffering from Megaesophagus.
Dogs with megaesophagus have an enlarged esophagus. This makes swallowing food difficult. Eating while in an upright position helps and the task of keeping the dog vertical is easier when the dog is sitting in a Bailey chair.
This blog post is less of a detailed how to and more of showing in progress photos. Adam, over at Lazy Guy DIY, has put together a great tutorial on how to build the Bailey Dog Chair. I followed his instructions with very few modifications.


I added storage to the bottom of the simple outdoor loveseat by creating one big board from 2 2x6 boards for each of the front, back, and side aprons using my KregJig. Then I added cleats around the bottom for a sheet of plywood, extra cleats around the top edge for the seat, and put the hinge on the original seat support board.

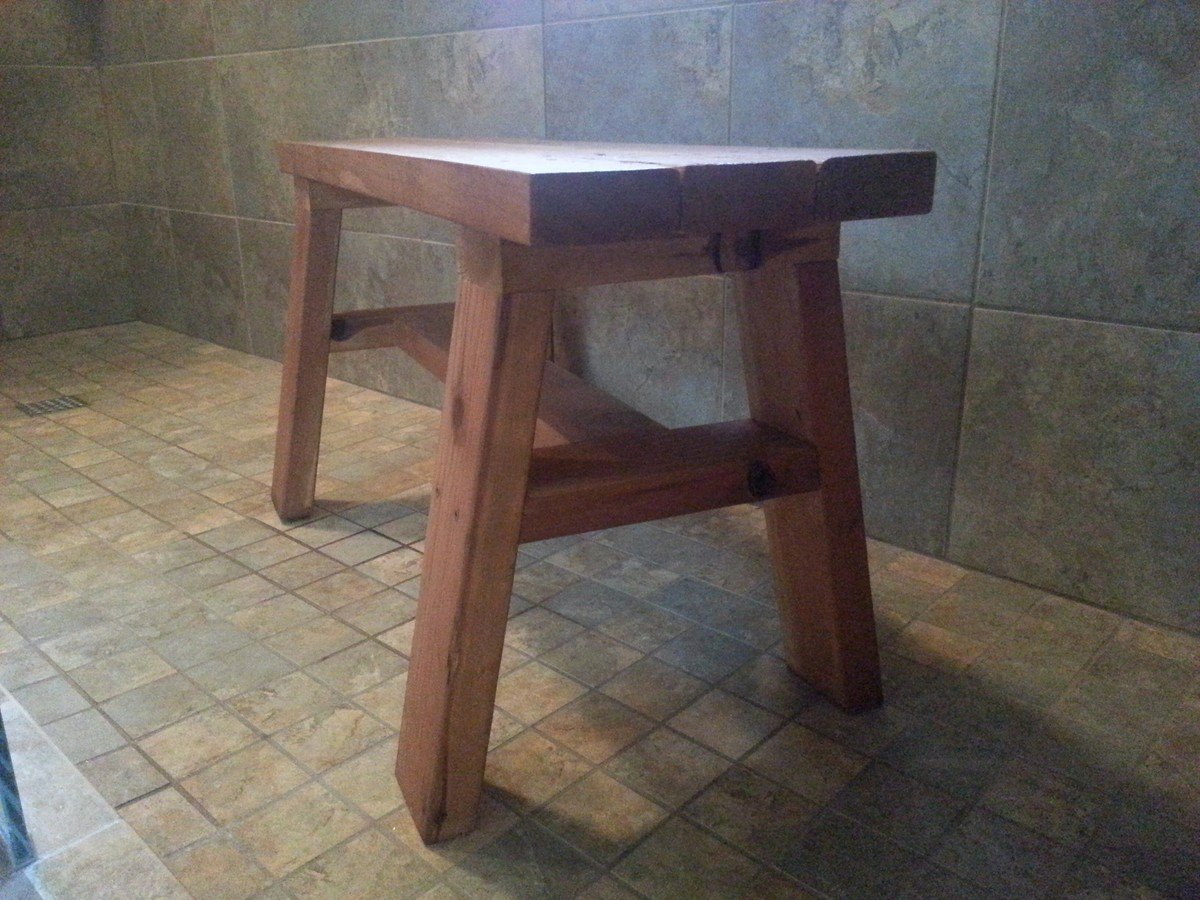
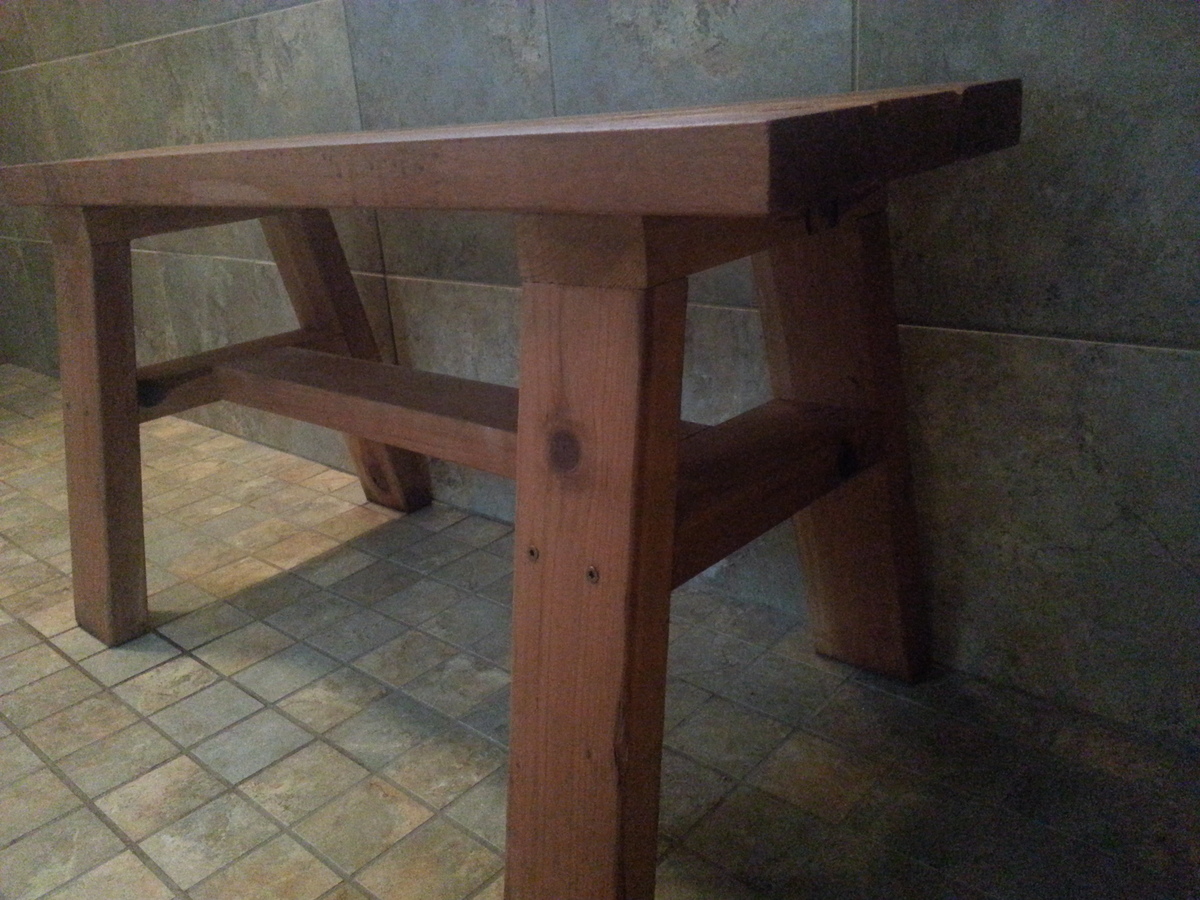
I wanted to build a small shower bench. I used the Providence Bench Plans and just made it a bit smaller with a few adjustments. This bench is 35" long and 18" tall. I did not use the cross supports on the bottom because it was so short. Also, you will see that I turned the bottom stretcher and side supports flat/horizontal. I put the screws for the seat boards through the top down just because this was the easiest way for me to do it. The plans did not show in detail how to attach the seat boards from the underside. It just said "finally, the seat boards." I guess they probably used a pocket jig. I bought a pocket jig and used it in the couple of places, but this was my first time using it. I used brown, coated decking screws in the places I did not use the pocket screws. This was my first attempt at building anything and my first time to use a pocket jig. I used a natural wood stain and Behr Weather-Proofing since it will be in a wet area.

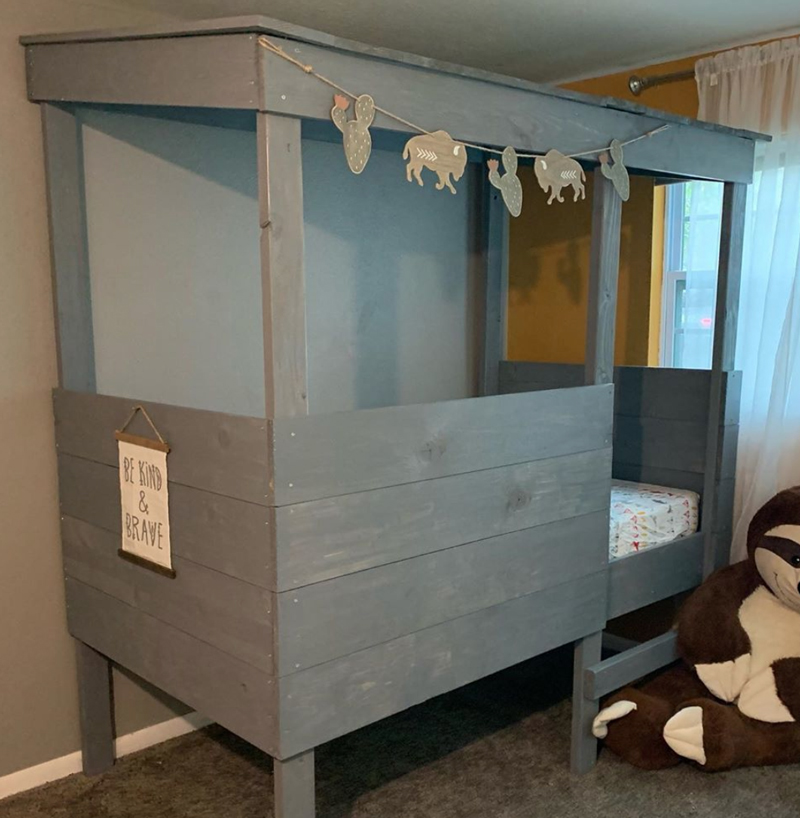
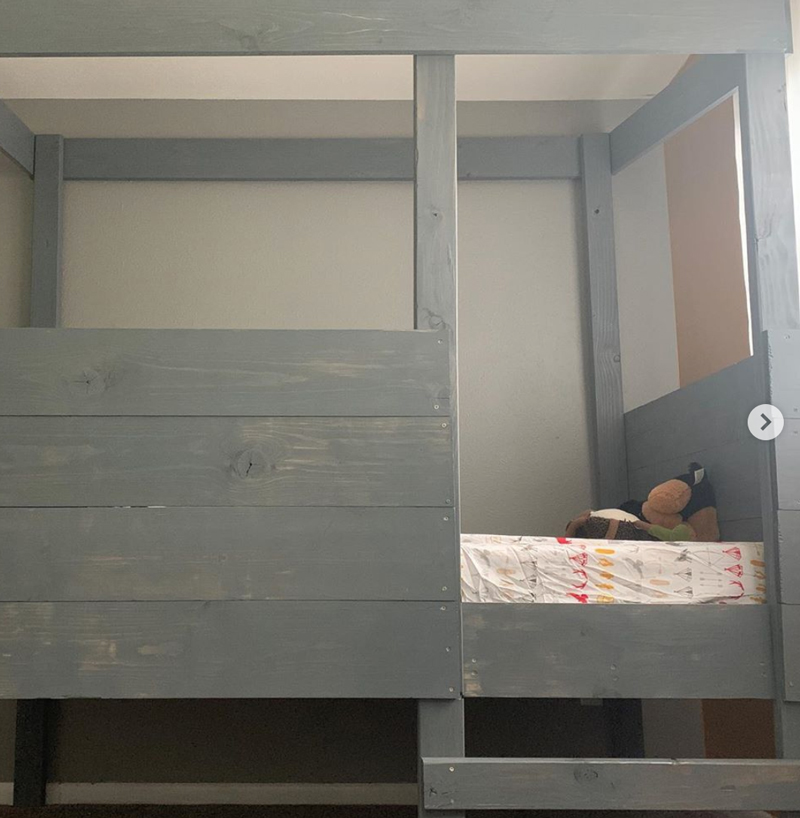
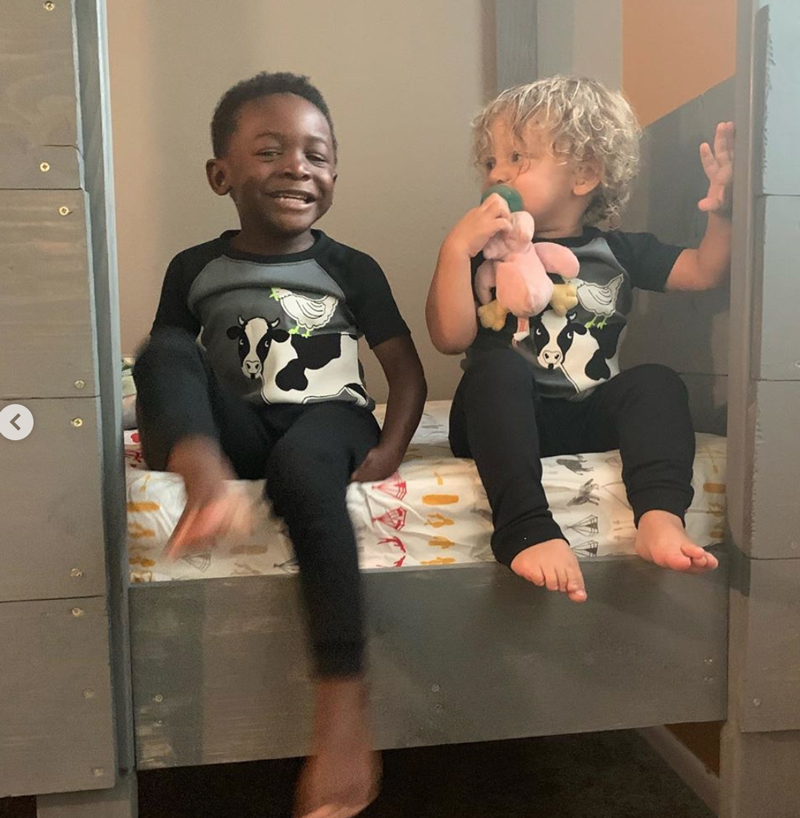
My boys LOVE this bed. I am making one for my other son who shares the room next so there will be two matching. They take up almost the whole room but they look so cute and double as play space in and under the bed so it works!
It took about 2 days to build and I had help from my husband and friend to make construction easier and cuts and staining more efficient.
One problem I had at the end was screwing in the roof boards. I hadn't thought about the fact that my ceilings are low on my old ranch house and could barely get the screwdriver in the space above the bed, so I had to tip the bed over to make it easier. Next time I may predrill the screws til just before breakthrough so I can fit the drill above.
Also those boards around the bed are probably the most expensive piece - if I didn't want the second bed to match exactly I would wonder if 1x6s wouldn't have been more economical.
I did sand and stain before assembly which made things much easier. I used my standard weathered grey stain.
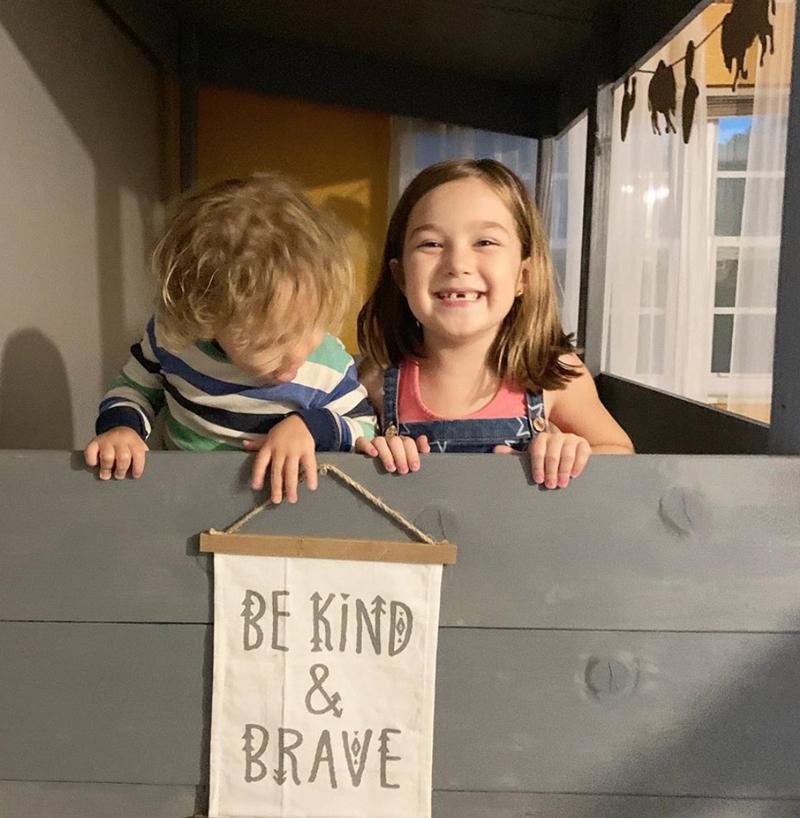
The sheets are Pillowfort : Rustler's Ranch twin set. The sign and banner hung on the bed I got from Hobby Lobby.
Sun, 08/04/2019 - 21:54
Thank you for submitting! This is awesome!
That is a smart suggestion to swap 1X6S for the siding that could save a lot of money.
very much appreciate all the photos and the details!
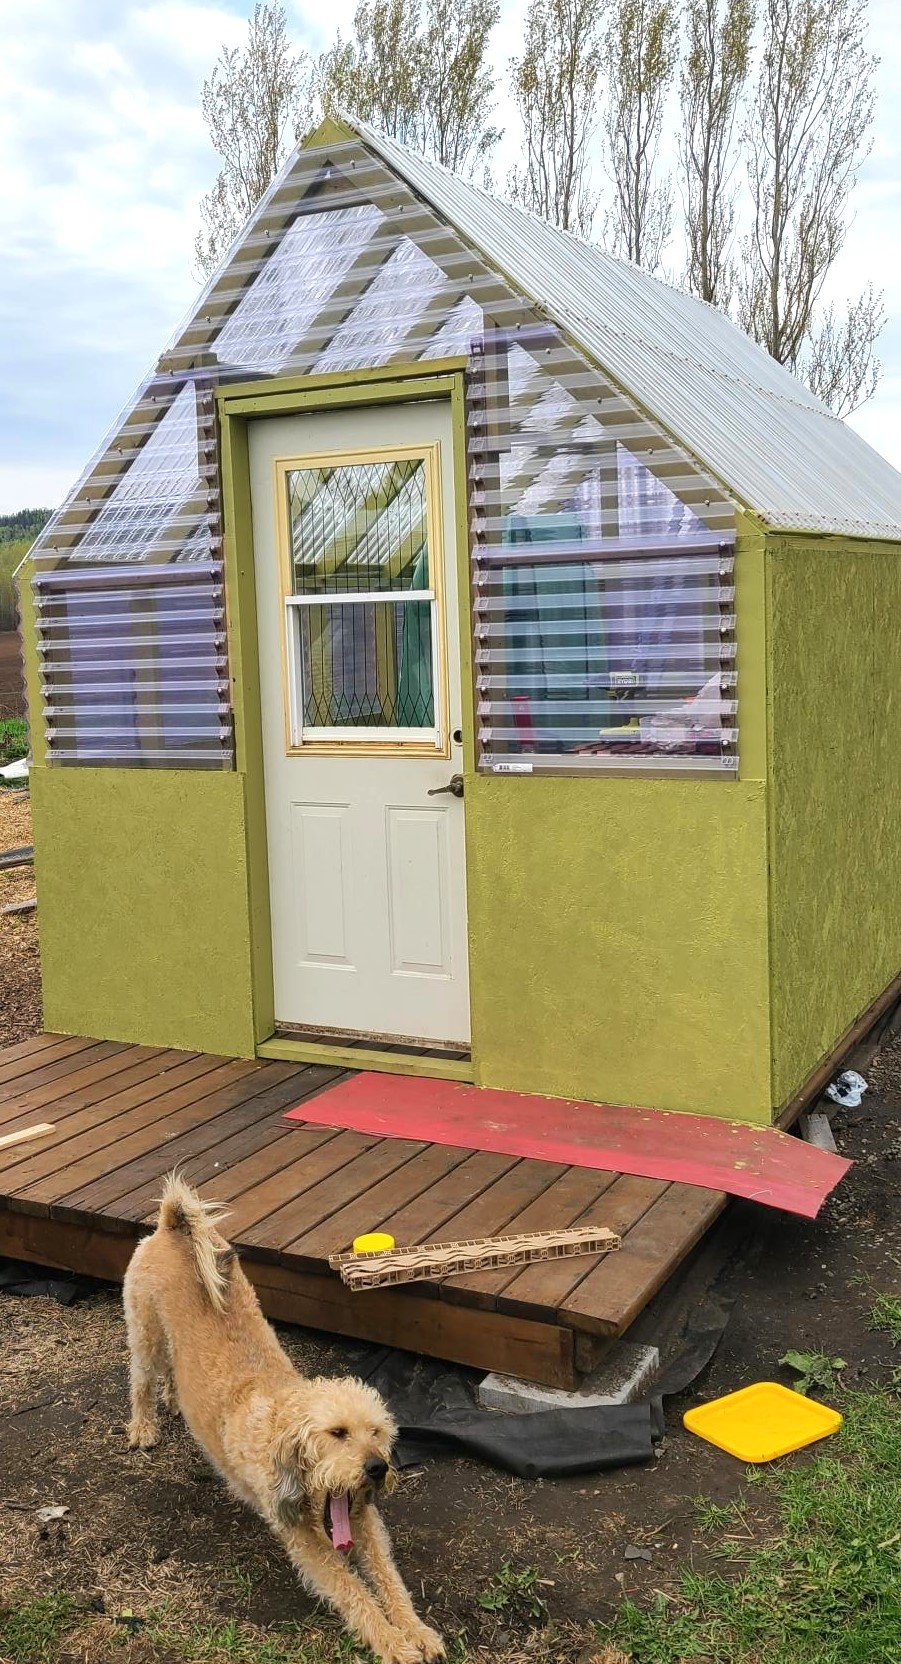
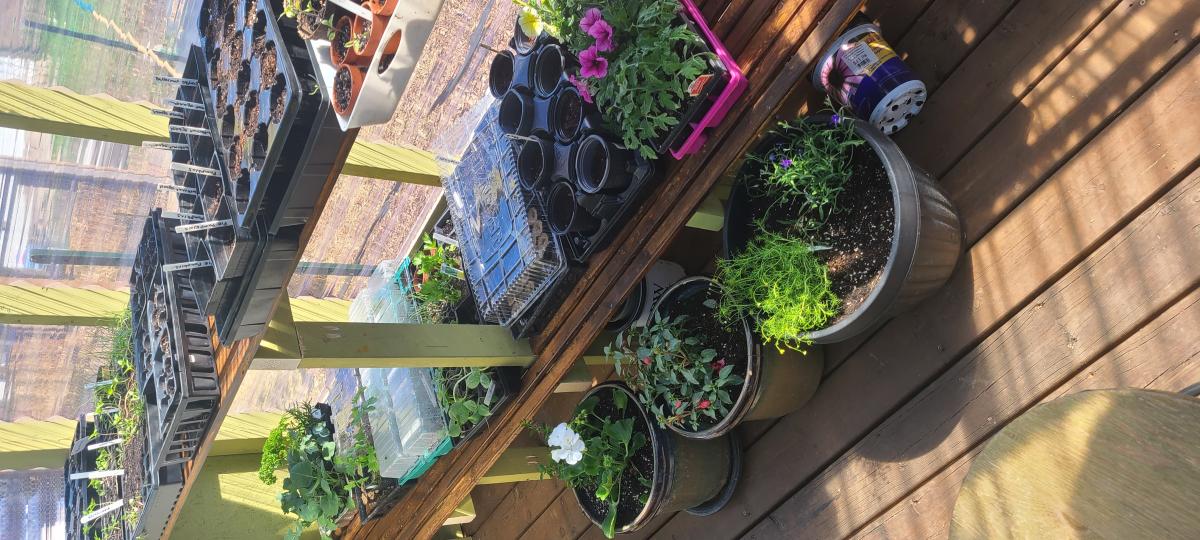
We followed Ana's plans but went 1 ft taller on the pony walls to increase the height. We are so impressed with how it turned out. I'm excited to grow plants in Northwestern Ontario.
Fri, 05/26/2023 - 19:43
It looks awesome and love your pup! Thank you so much for sharing.