Community Brag Posts

Sewing Desk

Submitted by Acasale on Sat, 07/14/2012 - 11:18

Our first woodworking project! A sewing desk that was featured on this site.

Estimated Cost
$60
Estimated Time Investment
Weekend Project (10-20 Hours)
Finish Used
make sure you sand the pieces multiple times. I used semigloss paint and also a stain and finished it off with a clear poly protector for the table top.
Recommended Skill Level
Beginner

Garden bed with folding screens

Submitted by Kate_14 on Wed, 05/27/2020 - 09:39

I added folding screens to my garden bed to prevent my dog to go in it. It can also discourage hares, cats and other animals. The folding screens make it easy to work in your garden.

Estimated Time Investment
Day Project (6-9 Hours)
Finish Used
None
Recommended Skill Level
Beginner

Tall Wedding Planters

Submitted by swhitead on Mon, 07/20/2020 - 10:14

Made the planters to hold flowers for a small garden wedding. Used 3-1/2" wide fence boards as my HD was out of standard 5-1/2" boards. Used 11 boards for finished height of 38" top was 18" wide, bottom 12-1/2" using a 4° angle. Ripped fence boards to size to use in place of 1x2/1x3 boards. Added center trim as on another brag post, as well as, framed the top to finish off the planter.

Built from Plan(s)
Estimated Cost
$20 each
Estimated Time Investment
Afternoon Project (3-6 Hours)
Finish Used
None
Recommended Skill Level
Intermediate

Comments

Workbench

Submitted by Anonymous (not verified) on Sun, 11/22/2020 - 05:47

Thanks for the simple plans Anna, they worked out great!. I resized the table to make maximum use of the material, still within the same quantity you specified in your plans. I glued the legs along the lengths of the table, and kept the table top and shelf screwed in, for easy dismantling, if necessary.

Finally I added pop down heavy duty wheels allowing me to move the table (not shown in this pic) easily. When the wheels are not being used they pop up, making the table very stable. The height of the table is about 1/2” lower than the table saw, making it an ideal outfeed table as well.

Great design, and fun build.

Estimated Cost
Cn$148 (went with a finished 3/4” 4x8’ ply board)
Estimated Time Investment
Day Project (6-9 Hours)
Finish Used
None
Recommended Skill Level
Intermediate

Comments

Farmhouse Console Table - Modified

Submitted by mpjacob08 on Thu, 12/10/2020 - 05:35

I Modified the plan to eliminate the middle shelf and shortened the length to fit as an entryway table.

Built from Plan(s)
Estimated Cost
$68
Estimated Time Investment
Day Project (6-9 Hours)
Finish Used
White alkyd for bottom then conditioned the top before staining with special walnut then once dry used weathered oak. Sealed with oil based polyurethane.
Recommended Skill Level
Beginner

Comments

Game Cabinet

Submitted by Wifey on Wed, 03/01/2017 - 11:48

We have very little storage in our house and wanted someplace to store board games. This works great in the dining room. I made the hardware using patio door rollers and used my jigsaw to cut steel and aluminum bars to fit. I hammered the ends of the track in a curve and put a track on the bottom of the cabinet to keep the doors more flush against the cabinet. I spray-painted all the metal and bolts to match. It is 36" high, 13" deep and 63" long. I didn't use the center board in the front because I wanted to accomodate for larger games.

Estimated Cost
About $200
Estimated Time Investment
Weekend Project (10-20 Hours)
Finish Used
Behr paint and satin poly on top
Recommended Skill Level
Intermediate

Comments

Monika

Mon, 04/01/2024 - 01:12

Having a game cabinet is essential for any gaming enthusiast like me. It's where I keep all my favorite board games, card games, and video games neatly organized and ready to play. And if you're into online gaming, check out Duelbits promo codes on http://cs2lords.com/duelbits-promo-codes for some awesome bonuses and rewards. It improved my gaming experience and I recommend it to you!

Loft Bed with Desk & Bookcase

Submitted by Anonymous (not verified) on Tue, 04/04/2017 - 12:47

Created but Modified from the plans found on here, my daughter has a great new bed. This bed saved a ton of space in her very small room. PLUS it allowed her to have an area to do her homework and all the art projects she does! Very easy build. Took a day to build and another to paint. 

Estimated Cost
$250.00 CDN
Estimated Time Investment
Weekend Project (10-20 Hours)
Finish Used
Behr Marquee Paint
Recommended Skill Level
Beginner

Cat Tree/Condo

Submitted by Joni on Sat, 05/11/2013 - 07:22

I always wanted a cabin-type cat tree where my cats could crawl in and feel safe, but still have a great view of the birds out of a window. I tried to draw my vision on paper, but that had a hideous result. Learning Google SketchUp (at least the basics) was an absolute necessity. I could never have built this without drawing it in 3D first, and seeing how the boards would connect, etc.

For the scratch pad, I built a frame out of 2x4s on top of plywood, covered it with carpet, and dropped the standard size scratch pad in place. This is the cat's favorite feature. I put barn doors on the window with tiny hinges so that I can close for added privacy. The tree sits against a window so that the back side is totally open. I made cozy zippered cushions for the platforms (that can be taken off and washed). I covered the carpeted areas with spare carpeting.

Estimated Cost
Approx. $30 for can of paint, varnish and a 4x4 (all other was scrap material)
Estimated Time Investment
Weekend Project (10-20 Hours)
Finish Used
Combination of Minwax Water-based stains: 6 parts Colonial Pine: 1 part American Walnut, followed 3-4 coats Minwax Polycrylic
Recommended Skill Level
Intermediate

Comments

bhoppy

Fri, 07/12/2013 - 09:36

Would you mind sharing your dimensions for this? It is absolutely beautiful!

Jodi W

Sun, 08/25/2013 - 08:10

Do you have the plans somewhere? I really want to build this (even got the okay from the hubby!) but I don't think I could do it without some serious guidelines...

Joni

Fri, 08/30/2013 - 15:55

First, sorry for the late notice; I just happened to look and saw the comments/questions.

I don't have plans...all I have is a google sketchup diagram that I created as a guideline for my construction (which is included in the photos), which is not to scale. Actual measurements are:

* Base (green carpeted base): 33.5" x 19"
* 4x4 legs: 35" tall
* 'Mezzanine' scratch pad level: 22" x 17.5"
* Mid-level base: 18" x 32"
* Enclosed cabin: 18.25" x 22.5" x 17" high
* Highest point: 56"

This has turned out to be a fantastic hit with the cats. They use all 5 levels, but the scratch pad and cabin are their favorite spots. If you need anything else or additional pics, please contact me.

Jodi W

Fri, 08/30/2013 - 18:15

Thanks for the dimensions, Joni! I'm trying to learn SketchUp so I can draw up my own plans, also. If I can't figure it out, I'll hand it off to my 12 year old, who is a pro at it (go figure). I know my cats will love it if I can manage to get it built!

Joni

Thu, 10/31/2013 - 14:30

Bhoppy -- I looked at your cat tree on facebook. It's awesome! The sturdiness of it shocked me too. And I was initially worried that my cats might knock it down!!

The worst part of building it was getting that lower scratch pad level on straight with the 3 posts. I'd never want to do that again!
Thanks for sharing, Joni

gregmasciola

Fri, 01/02/2015 - 01:18

Funny, almost every time I'm looking for ideas or inspiration when I want to build something, I end up back on this site. I was searching for pictures of cat trees and this was the only one that made me say "Holy crap, that's EXACTLY what I want!" My cat will love it!

M0710NM4N

Mon, 04/27/2020 - 20:41

Not sure if anyone is still around to see this, but I fell in love with this tree the second I saw it. Wondering if anyone created a detailed plan and might have it handy or possibly a detailed sketchup and wouldn't mind sharing the save file?

In the event nobody has either... I'm planning on having someone else build this for me as I don't have the tools nor skill to do it myself. I have a few questions:

1. The tree base/platform, what's a good recommended thickness?
2. The platform for the scratchpad... is there any certain reason it's so much thicker compared to the other platforms?

Thanks.

whiteroses9

Sun, 09/12/2021 - 11:51

Reverse engineering this project, using just 2x4s. None of the photos show the undersides. How are the plywood pillow bases attached for the top and bottom of the cabin? and the base of the top viewing platform?

Custom Farmhouse Wainscotting

Submitted by Yodannos on Sun, 09/06/2015 - 22:54

This was a project that took me about 4 weekends.  Last year I installed the French doors.  I decided that this was the year to finish them and the rest of my wife's office with a custom Wainscotting, based off the farmhouse style.  In order to keep it cheap, I used 4' x 8' sheets of 3/4" mdf.  I would then rip them to the width of my choosing, based upon design.  Overall, I used 4 4'x8' 1/4" plywood (for backing), I used 5 4'x8' 3/4" mdf... At a cost of $29/sheet. After installation, filling holes and seams, I primed then painted using a spray gun.  Total cost: about $350.  The room is much more rich, and really lightens up the space.  

Estimated Cost
$350
Estimated Time Investment
Week Long Project (20 Hours or More)
Recommended Skill Level
Advanced

Cottage bedroom bookcase

Submitted by yhaas on Thu, 10/29/2015 - 20:42

I used 1 x 10s to make the bookcase a little shallower, and left the back open. Thanks for the great plan.

Built from Plan(s)
Estimated Cost
$100
Estimated Time Investment
Weekend Project (10-20 Hours)
Finish Used
Varathane diamond finish water-based polyurethane, satin.
Recommended Skill Level
Beginner

Roller Vertical Pantry

Submitted by MikeW on Mon, 05/06/2019 - 08:49

Made my wife happy!

Estimated Time Investment
Day Project (6-9 Hours)
Finish Used
Paint
Recommended Skill Level
Intermediate

Comments

Lean-To Shed

Submitted by Anonymous (not verified) on Fri, 03/24/2023 - 13:17

I’m a first year teacher of construction class at Waterloo High School in Illinois. We recently used your Small Cedar shed instructions with some modifications for a class project. It’s a bear getting cedar right now, so we used T1-11 for the outside and 2x4 for the frame.

Built from Plan(s)

Comments

Farmhouse Console Table

Submitted by boneill on Mon, 07/06/2020 - 20:31

Modified the size to 60” length , 12” depth , 36” height . Went with satin white frame , Minwax classic grey stained top with 3 coats of poly clear coat satin (quick dry).

Built from Plan(s)
Estimated Cost
$50
Estimated Time Investment
Weekend Project (10-20 Hours)
Finish Used
Minwax classic grey with poly 3 coats quick dry
Recommended Skill Level
Beginner

Comments

Porch Swing

Submitted by bbcarey on Tue, 10/23/2012 - 10:12

I wanted to make this porch swing ever since seeing it in the plan catalog (Large Modern Porch Swing). Just a matter of setting aside a weekend to get it done and then to find A frame to support it. I made the A-frame from a combination of this post:
http://www.buildeazy.com/newserve/swing_seat_support_dec07_1.html
and this one:
http://www.hgtv.com/home-improvement/custom-a-frame-childrens-swing-set…

I made the back a bit higher on our swing... and not quite as wide.

Reading several other blogs on this- I chose to attach the chains to the top back of the swing to keep it from tipping backwards...

Now just get to enjoy it!!

Built from Plan(s)
Estimated Cost
$50
Estimated Time Investment
Day Project (6-9 Hours)
Finish Used
Exterior Sealer/protector
Recommended Skill Level
Beginner

Comments

Outdoor bar grill surround with 2 post pergola

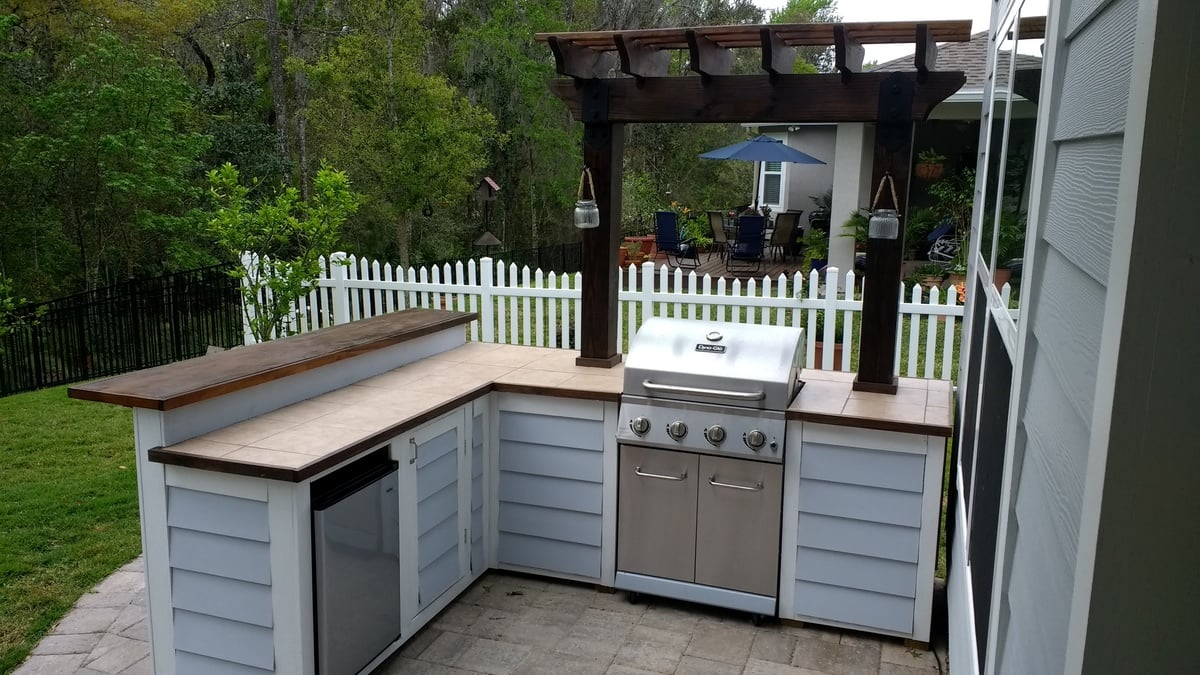
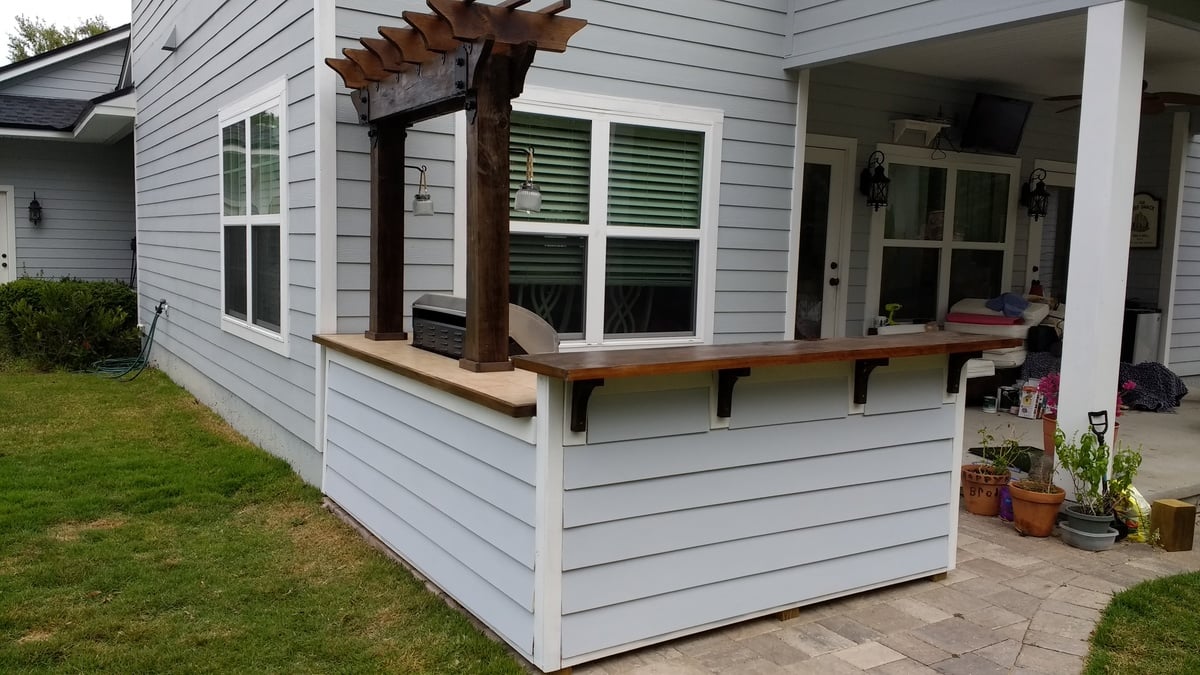
I wanted to build an L shaped outdoor bar with a 2 post pergola over the grill.  I couldn't find any plans online that would fit the space I had, so I decided to build it myself with custom dimensions.  The top bar is approx. 7'3" across, and 15" wide, while the distance from the right edge (next to the house) to the end of the bar is approx. 9'1".  

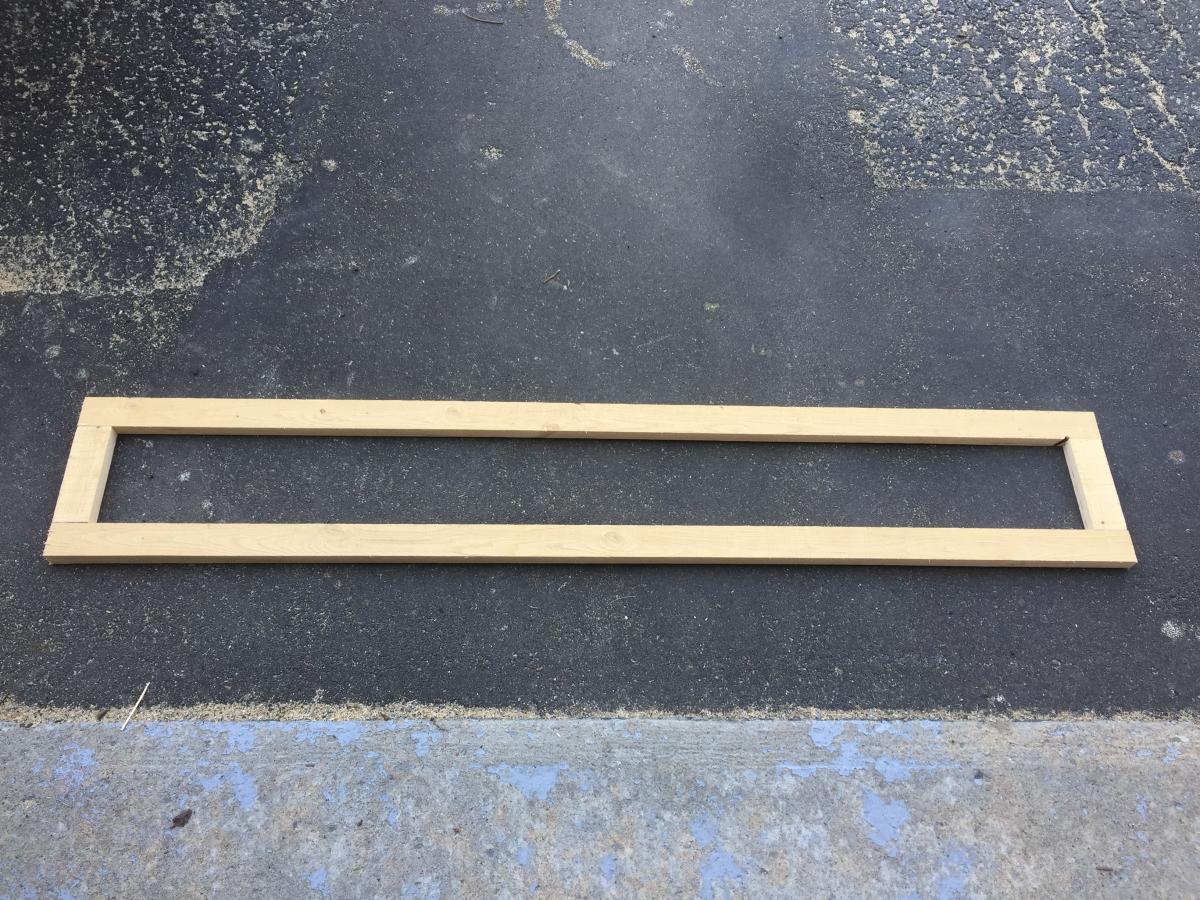
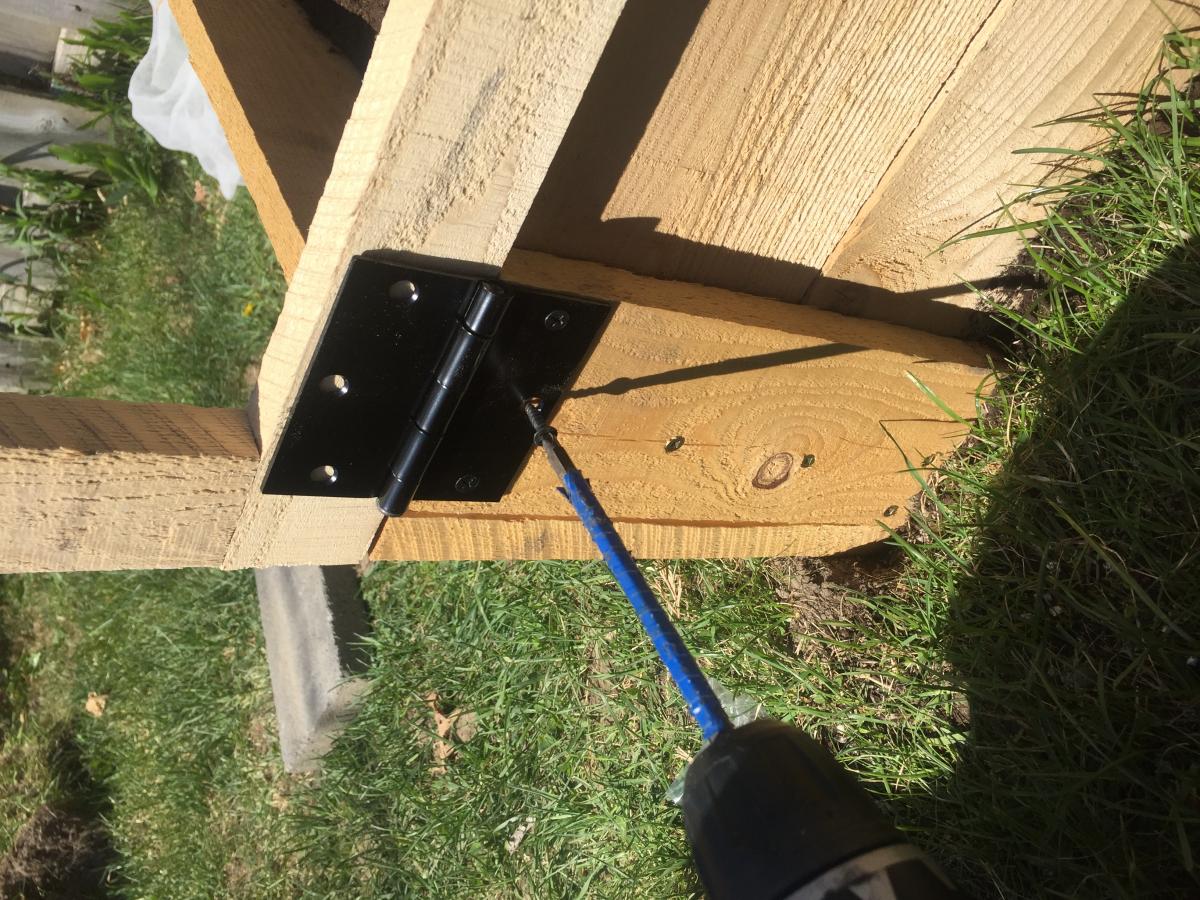
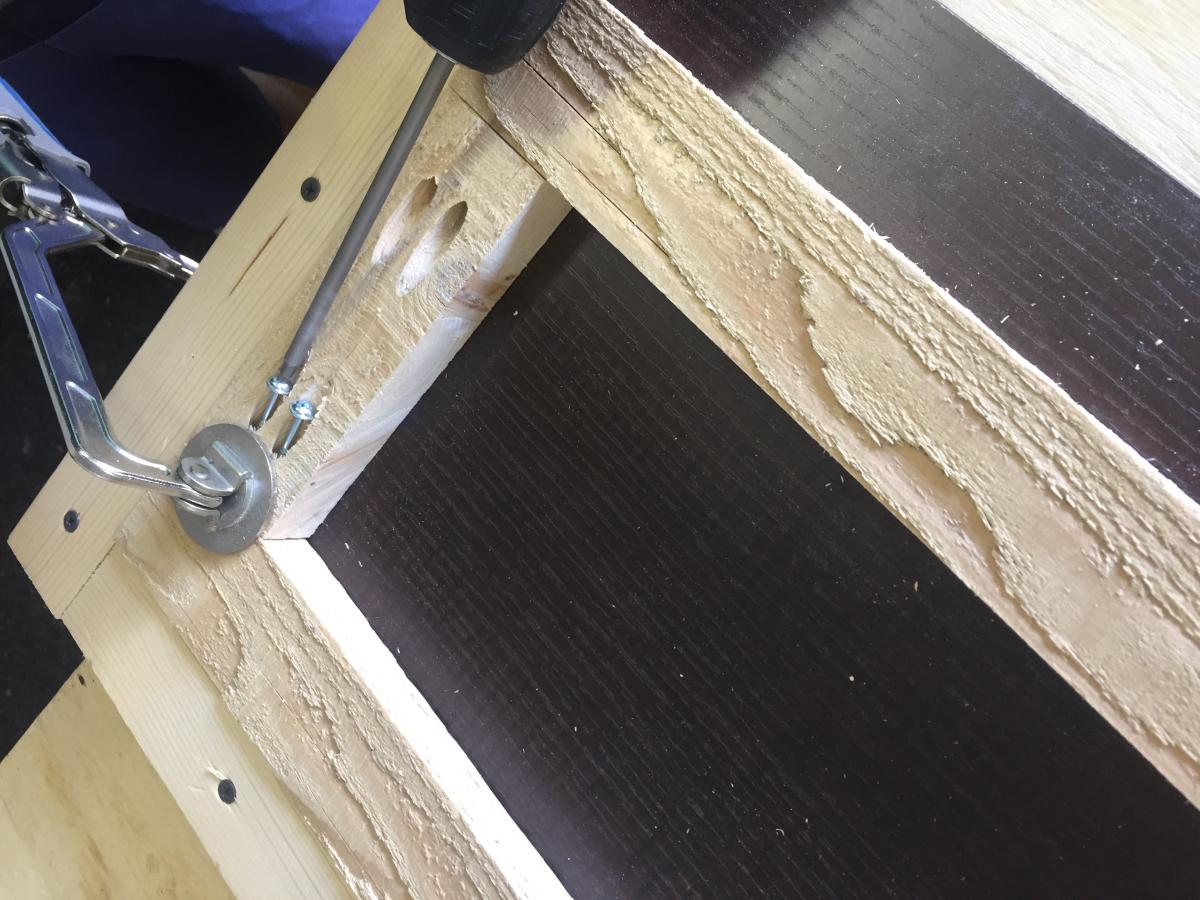
I framed it with PT lumber and the 2 pergola posts are sitting on top of the pavers and supported internally within some of the framing studs.  Since the pavers sit on top of concrete, I didn't feel the need to dig up the existing pavers and achor them in the ground.  

I used hardiboard for the exterior and tiled the lower section of the bar.

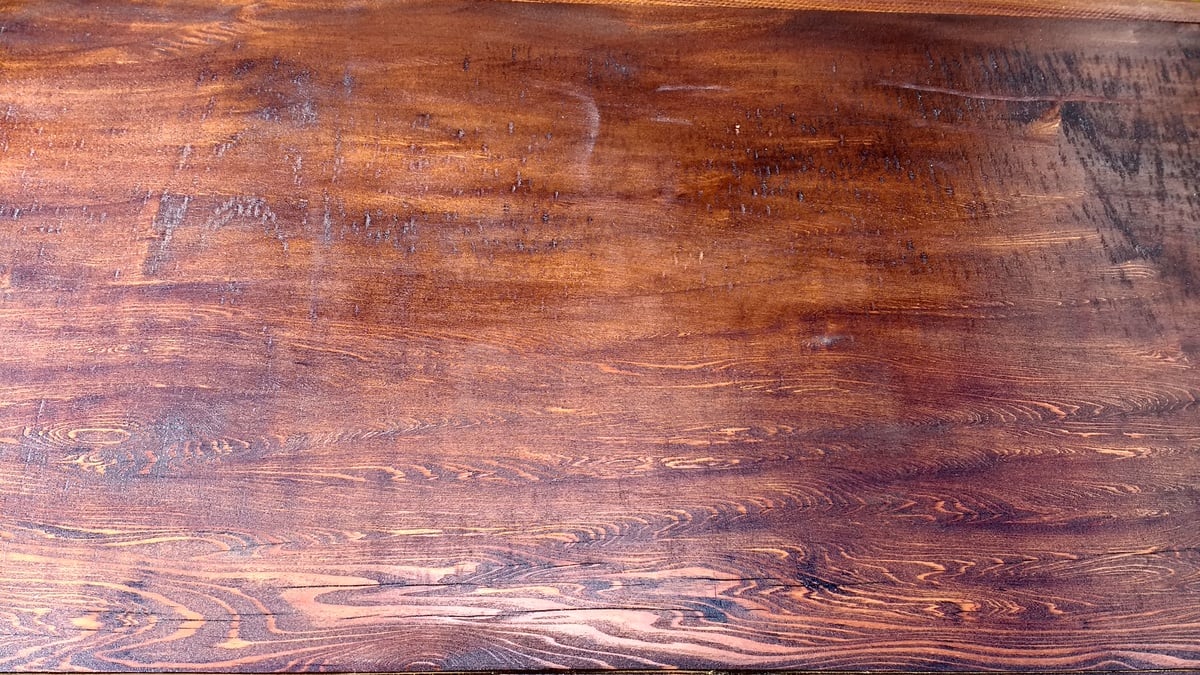
For the actual high bar top, I wanted to do something unique, and found a 900 year old scrap slab of Cypress at a local lumber yard.  One side was smooth, but underneath was gouged out from different saw cuts and very uneven.  I screwed a piece of 3/4" PT plywood underneath and trimmed it with 1-1/2" Cypress.  I stained the whole thing with a dark honey colored stain and put a generous amount of poly on it once it was dry.  There are a few cracks and nicks on it, but once it was stained, it looked awesome.  

Estimated Cost
I lost track after a while, but I would say $600-700.
Estimated Time Investment
Week Long Project (20 Hours or More)
Finish Used
Minwax honey colored stain for the bar top. Minwax provincial stain for the pergola and minwax dark walnut stain for the oak trim.
Recommended Skill Level
Intermediate

Comments

Simple console table with added shelves

I added the bottom shelf by using (4) 1x3's. I also swapped out the 1x4 back for a 1x6 to give the top shelf more height. Lots more details on my blog.

Estimated Cost
$45 without finishing supplies, $70 with.
Estimated Time Investment
Afternoon Project (3-6 Hours)
Finish Used
Sealed the boards with conditioner, then used Minwax red oak stain, followed by 2 coats of wipe on poly. If you do the shelves, be sure to sand and stain the edges of the boards first. Otherwise, you'll never get the stain in between the cracks!
Recommended Skill Level
Beginner

Garage shelving unit to inside shelving unit with barn door

Submitted by Anonymous (not verified) on Mon, 12/27/2021 - 12:08

We too you’re 2x4 shelving unit with some small tweaking of measurements and added a barn door!

Comments

My Simple Outdoor Sink

Submitted by kmatt55 on Sun, 08/14/2011 - 16:46

I finally completed the last piece to my customized simple two-toned outdoor collection...an outdoor kitchen sink!!! It still needs a couple of touch ups... but more on that later. This is by far my favorite and easiest project to date. We plan on using this as a grill caddie/garden station. This will eventually go onto a 24x12 deck up against our kitchen window (The indoor and outdoor sink will be against each others backs). I decided to go with the Sturdy Workbench plans for the base mainly because of the weight. We wanted something that's going to be difficult to move since it will be hooked up to outdoor plumbing. I used treated 2x4's for the base, cedar 1x4's for the top. I bought the bar sink for about $70. I also used a Kreg Jig to screw in the cedar slats from underneath so the screws won't be visible from the top. FYI - Wait a couple of weeks before you paint soaking wet treated wood. The green chemical from the 2x4 is starting to leak through my white paint. I'll have to go and prime/paint it again when it finally dries. Other than that, it came out 10 times better than I could ever imagine.

Built from Plan(s)
Estimated Cost
$120 ($70 for sink and hardware)
Estimated Time Investment
Weekend Project (10-20 Hours)
Finish Used
Thompson's Water Sealer, semi-gloss exterior white paint.
Recommended Skill Level
Beginner

Comments

Vegasboiz

Sun, 09/29/2013 - 08:16

I love the sink table a lot. I have been looking for one for a long time. Can you tell me what is the length, width, and height for this table. Thank you very much. Jimmy

Rustic X

Submitted by khump1990 on Tue, 04/25/2023 - 10:57

This was a big undertaking for indoor furniture and I learned so much! I slightly adjusted the size to what I had available with some scrap wood from my old stairs so saved a little on costs with lumber!

Built from Plan(s)

Comments

Back