Community Brag Posts

Community Garden Farm Stand

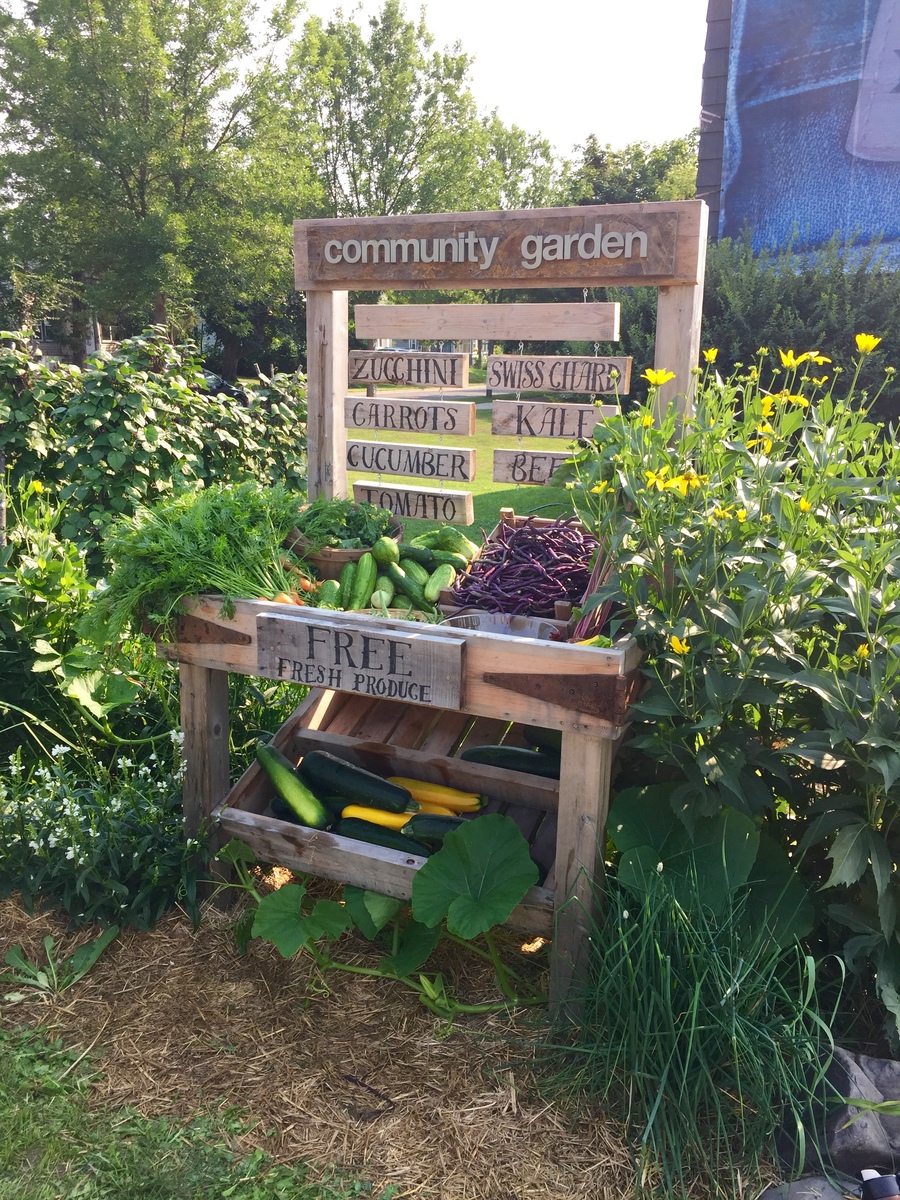
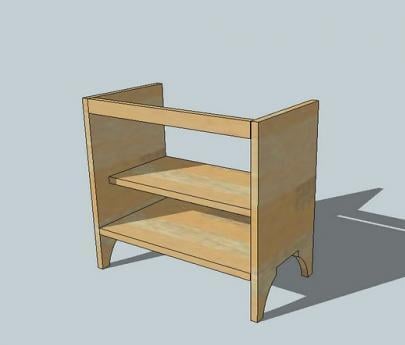
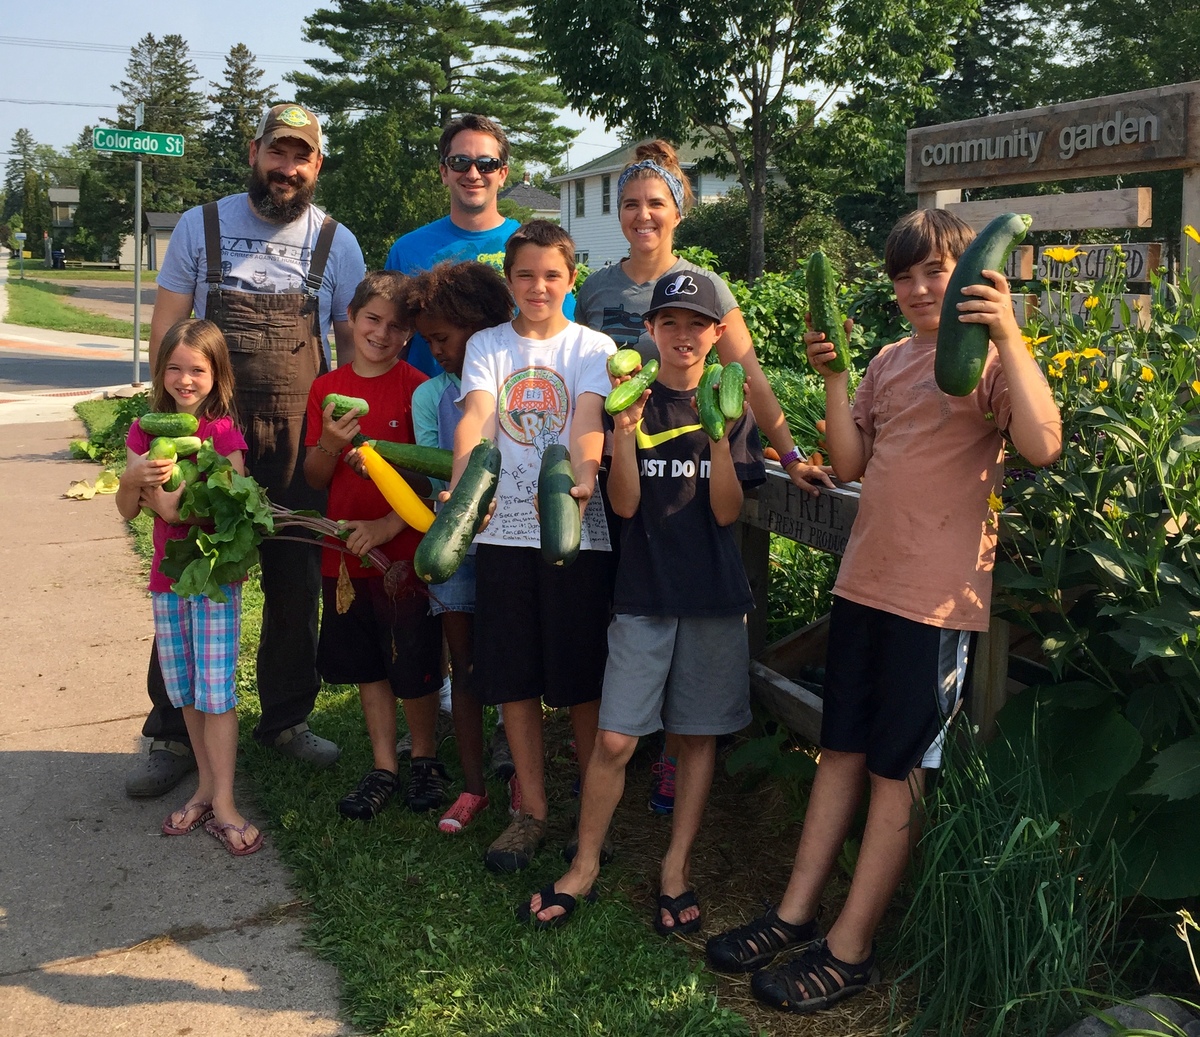
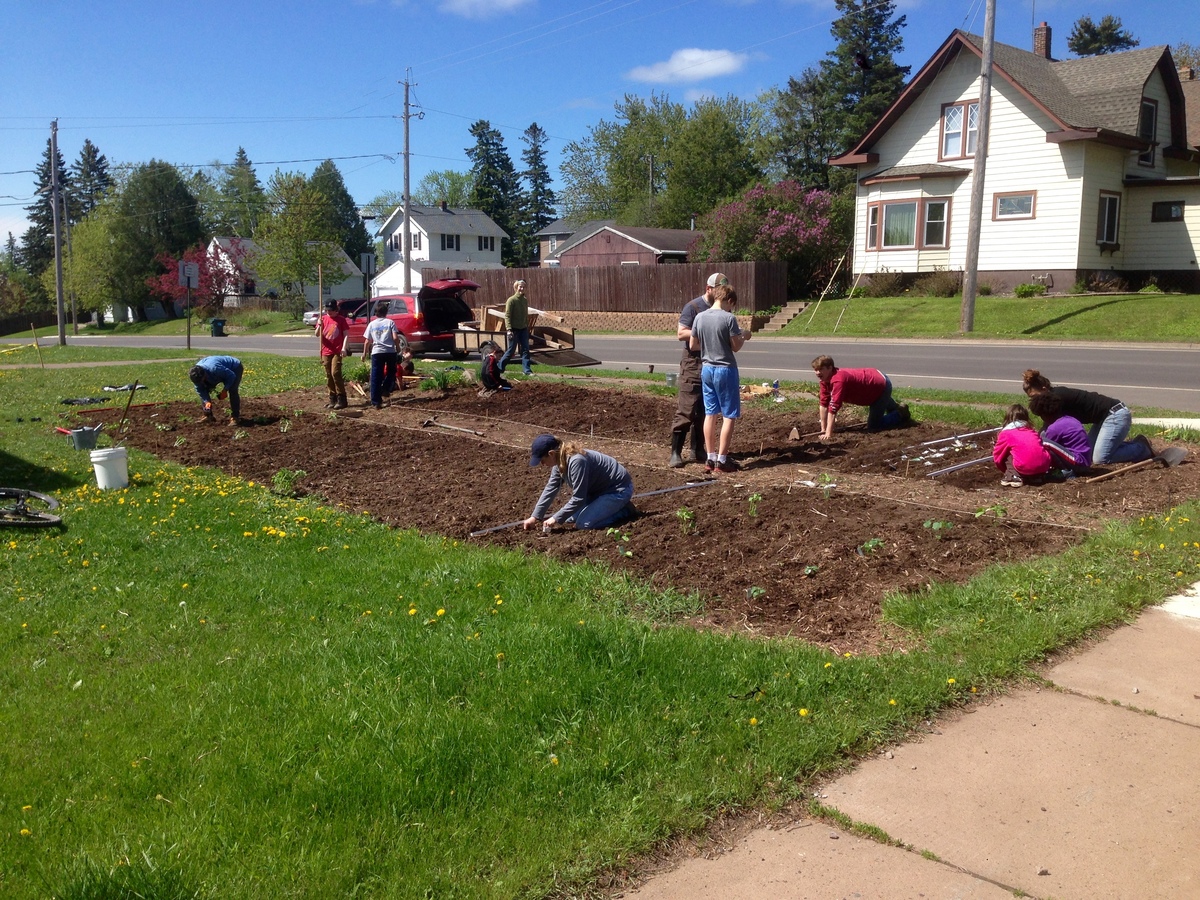
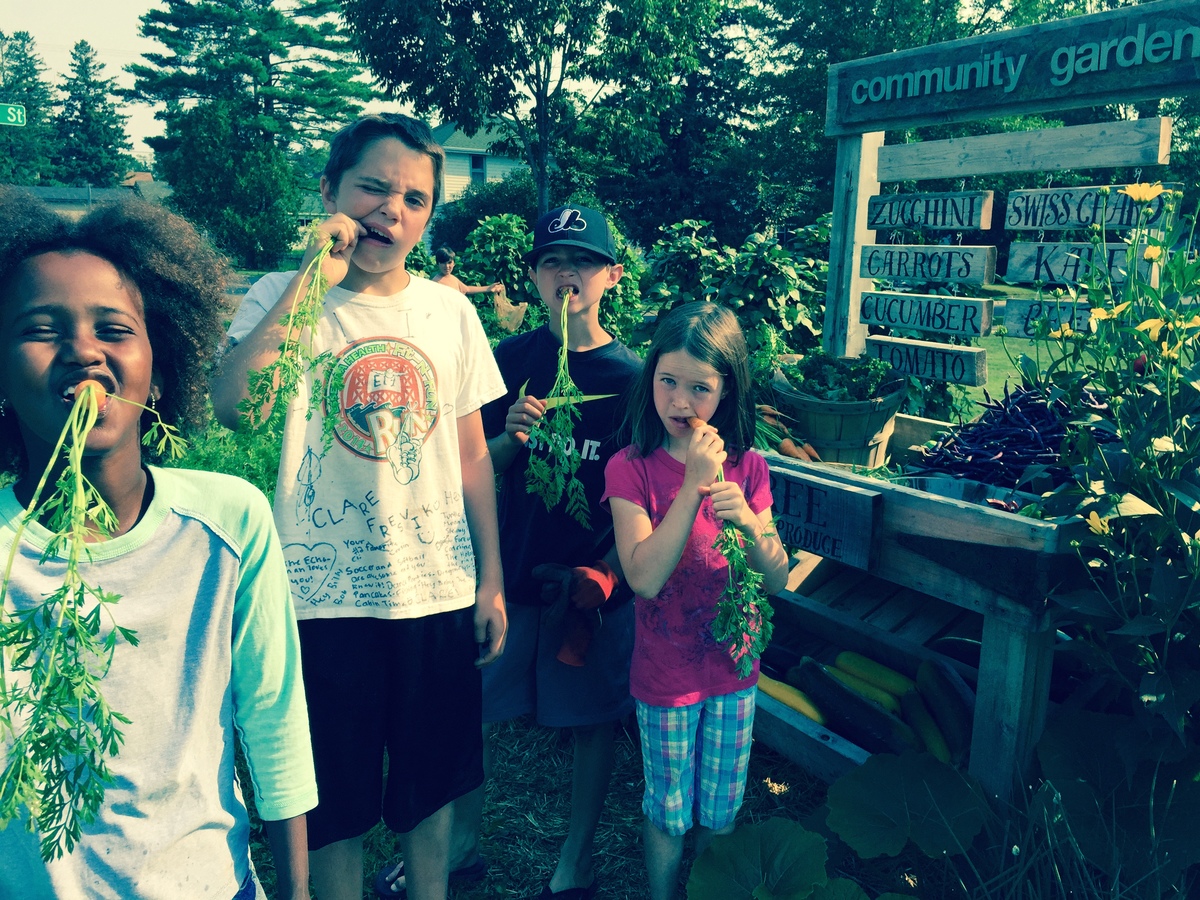
This spring, my neighborhood started a community garden.  Five families came together to break ground, sow, tend, and give away our produce.  The local church close by allowed us to use their front lawn for the "Lakeside Community Garden," located in Duluth, MN.   Every Saturday during harvest season, we gave away our produce to the community.  I took on the project of building a farm stand.  One of our neighborhood families donated re-claimed lumber to the cause, and I started building.  I had research many farm stands on-line, and knew I needed two large boxes to hold the veggies, as well as a sign to indicate what produce we were giving away.  

Estimated Cost
$free!!! Use what you can re-claim, and design your own stand.
Estimated Time Investment
Day Project (6-9 Hours)
Finish Used
none
Recommended Skill Level
Beginner

Outdoor Sectional

Submitted by rachelmlee on Sun, 01/26/2020 - 20:23

This was my first real woodworking project and was so much fun! I use my deck much more now and am excited to build more!

Estimated Cost
$500 (with cushions)
Estimated Time Investment
Week Long Project (20 Hours or More)
Finish Used
Varathane Jacobean stain
Recommended Skill Level
Beginner

Beginner Farm Table & Benches

This was my first time building anything! The plans were so easy to follow along! Once I master some things like this, I can work on fine tuning things a bit more so I can build some more intricate plans. Thanks so much for your website! My kids are loving the BBQ's outside at the table!

Estimated Time Investment
Afternoon Project (3-6 Hours)
Finish Used
I haven't added a finish yet but will be soon.
Recommended Skill Level
Starter Project

Comments

Beryl

Tue, 06/02/2020 - 15:09

re the farm table. your cut list calls for 8 2 x 4 at 28 1/2 inches but the plan actually only needs 4 of them. The pics do not show you doubling the 2 x 4s for legs. Am I missing something.

Garage Shelving

Submitted by Anonymous (not verified) on Sat, 07/16/2016 - 17:17

I am a beginner diy'er and this was one of my first projects.  Also it was my first time using the Kreg jig and I loved it!  My shelving system was around 8 feet tall, 12 feet wide and 30 inches deep.  I added some extra cleats to support my deeper shelves (30") and also used thicker (5/8") plywood.  This was a fun and easy project to do!  Thanks so much!

Estimated Cost
$150
Estimated Time Investment
Day Project (6-9 Hours)
Finish Used
none
Recommended Skill Level
Beginner

Garage Loft Bed

Submitted by GAno1Dad on Tue, 10/21/2014 - 20:24

The garage loft bed was inspired by the plans on your site. I beefed up the framing with 2xs and found siding panels at my local big box. 

Built from Plan(s)
Estimated Cost
$600
Estimated Time Investment
Weekend Project (10-20 Hours)
Recommended Skill Level
Intermediate

Comments

Wolfeman188

Wed, 08/03/2016 - 13:15

Hi, i was just curious if there was plans for this bed anywhere? My son has that exact corvette bed and he is not with me for a little while and i wanted to make it for him to come home to.

Nursery Shelves

Submitted by crisaphi on Fri, 07/22/2011 - 14:24

I used Ana's plans to build floating shelves and the ledge shelves for my nursery.

Estimated Cost
$50-75 for both
Estimated Time Investment
Day Project (6-9 Hours)
Finish Used
High gloss white
Recommended Skill Level
Intermediate

Comments

Guest (not verified)

Sun, 07/24/2011 - 09:03

It looks great! Also, where did you find the vintage reading week posters? I'd LOVE to know! Thanks!

Board and Batten

Submitted by kelli224 on Sat, 08/06/2011 - 10:51

Board and batten makes such a huge difference in any room for very little money and I knew this is just what we needed for our very small but very tall half bathroom. We did have to modify our boards at the bottom and cut them at an angle to meet our baseboards but it is still perfect. Such an easy way to dramatically change a room.

Estimated Cost
$60
Estimated Time Investment
Afternoon Project (3-6 Hours)
Finish Used
Just a semi-gloss white to match the rest of our trim and doors in the house. The walls are Sherwin Williams Plum Dandy
Recommended Skill Level
Starter Project

Comments

Ana White

Sat, 08/06/2011 - 13:41

What a beautiful transformation! I went to your blog and loved how you've put aside a little money each month to improve your home. Beautiful photos too!

kelli224

Sat, 08/06/2011 - 13:57

Thank you, Ana! We wouldn't be able to stay on that budget if it wasn't for you and all of your ideas! You've really changed how things are done at our house. We no longer "have to buy it right now"...but take our time to see if we can do it on our own and make it ours. That is a very powerful thing!

debandtom25

Fri, 08/12/2011 - 04:41

My husband and I just had to build a few walls to cover in a new furnace and duct work. Neither of us wanted to deal with the mud, tape, and sanding that would surely follow. So I suggested that we do a paneling like yours. I used furring strips vs. typical pine or moulding. It looks great!

kboarderchick85

Thu, 08/18/2011 - 13:47

I loved the bathroom so I checked out your blog, We have a mudroom followed by a small bathroom and then a small laundry room. I love your mud room area and the stripes, we are totally going to use your ideas to spruce our place up!

DIY Bailey Dog Chair for Dogs with Megaesophagus

Hello everyone, today I’m sharing details on something I built recently: a Bailey Chair for dogs suffering from Megaesophagus.

Dogs with megaesophagus have an enlarged esophagus. This makes swallowing food difficult. Eating while in an upright position helps and the task of keeping the dog vertical is easier when the dog is sitting in a Bailey chair.

This blog post is less of a detailed how to and more of showing in progress photos. Adam, over at Lazy Guy DIY, has put together a great tutorial on how to build the Bailey Dog Chair. I followed his instructions with very few modifications.

CLICK HERE to read my build details and see more photos!

Estimated Time Investment
Afternoon Project (3-6 Hours)
Finish Used
clear spray
Recommended Skill Level
Beginner

Rustic X Farmhouse Coffee Table with Storage

Submitted by Anonymous (not verified) on Sun, 02/05/2023 - 08:54

This project was made from reclaimed wood from my office where they had built a temporary safety railing out of 2x4s and 2x6s. I added a compartment for storage. The top is stained in a classic grey. I painted the body in black followed by white. I then sanded the body to allow the black to bleed through for a distressed look.

Comments

Redwood Shower Bench

Submitted by lwarteman on Sun, 10/20/2013 - 08:33

I wanted to build a small shower bench. I used the Providence Bench Plans and just made it a bit smaller with a few adjustments. This bench is 35" long and 18" tall. I did not use the cross supports on the bottom because it was so short. Also, you will see that I turned the bottom stretcher and side supports flat/horizontal. I put the screws for the seat boards through the top down just because this was the easiest way for me to do it. The plans did not show in detail how to attach the seat boards from the underside. It just said "finally, the seat boards." I guess they probably used a pocket jig. I bought a pocket jig and used it in the couple of places, but this was my first time using it. I used brown, coated decking screws in the places I did not use the pocket screws. This was my first attempt at building anything and my first time to use a pocket jig. I used a natural wood stain and Behr Weather-Proofing since it will be in a wet area.

Built from Plan(s)
Estimated Cost
$20
Estimated Time Investment
An Hour or Two (0-2 Hours)
Finish Used
Behr All-in-One Stain and Weatherproofing in Cedar Naturaltone (No. 5533). Because this is going to be in a wet area, I put 2 coats on and let each one dry 12-24 hours in between and before getting wet.
Recommended Skill Level
Beginner

Patio couches

Submitted by Anonymous (not verified) on Thu, 04/27/2023 - 19:14

This project was fun to build with hubby said the shopping list and the cut list was perfect! Love all your designs! King bed is next!

Comments

Seasonal And Holiday

Football Lockers DIY

Submitted by Anonymous (not verified) on Mon, 09/11/2023 - 11:27

Here are a few pictures of the football lockers I built for our school. I used your mudroom locker plans and changed the dimensions to accommodate the boys' football gear. It worked great! I built 6 sets of 4 lockers, for a total of 24 lockers. I also used one of your plans to build 6 benches for the fieldhouse. Three for the home locker room and three for the visitor locker room. Each locker is 30 inches wide and 6 feet tall. 

Melinda Glenn

Porch swing bed

Submitted by Beaulook on Tue, 01/28/2014 - 16:29

Started off with the original design but enlarged it to fit an oversize single mattress. The mattress cost me $35 from a local faith farm, while the materials came in around $200. I decided to hang under my backyard pergola. Fun and easy project.

Built from Plan(s)
Estimated Cost
$250
Estimated Time Investment
Day Project (6-9 Hours)
Finish Used
Cedar stain
Recommended Skill Level
Beginner

Comments

bhammond

Tue, 01/28/2014 - 21:10

Wow this looks so inviting I might just have to make one too! Nice work-- it looks great!

Shorty

Tue, 01/28/2014 - 21:26

Really great job on your porch swing bed AND an awesome looking patio/yard. Looks amazing all around!

Debbie Perkins

Mon, 07/27/2015 - 22:45

I want this!  I just made a couple of plant stands for my front porch.  My husband asked me what my next project was, why, a swing bed.  (This was only my second project!)  I want to put cup holders in those big ole arms!  We have a house at the beach in South Alabama, so, you gotta "hydrate."  This is an awesome swing.  I can't wait to do mine...pillows to rest on, one foot on the concrete pushing me in a slow swing. Cold beverage in my hand or in my cup holder. Yep, southern girl has a new project.  Love it!

Pallirondack Laundry Basket Dresser

I showed my wife the Laundry Dresser featured on Ana White's website and she asked if I could make one for her, but not quite so tall. I also turned the orientation to fit our laundry room space. I used primarily oak from recycled pallets to build the Laundry Basket Dresser. She wanted a work space on top, so folded laundry, empty baskets, etc. all have a temporary resting place depending on the day. From start to finish, it took me about 6 hours. She plans to stain the piece at some point, but its already in use, so I'm not 100% sure that will ever happen until we move or something. ;-) Great idea and laundry room organization!

Estimated Cost
Half a box of screws
Estimated Time Investment
Afternoon Project (3-6 Hours)
Recommended Skill Level
Intermediate

Comments

Kathy in Pittsburgh (not verified)

Mon, 09/10/2012 - 10:22

I love the open sides, plus it makes it much more feasible to build with scraps repurposed wood, which I love. Thanks for the inspriation

payne.kj

Mon, 04/08/2013 - 08:48

Hi, do you have any kind of plans for how you did this or atleast dimensions? I think this one fits more of what my wife needs, but I'm pretty new to making anything.

nicholas_ftm

Sun, 06/14/2015 - 20:16

Soooo I made this according to the measurements and no laundry basket I find fit. Kind of dissapointed in the fact that this cool thing I just built doesn't have any baskets that will fit it. Any advice on finding a basket that fits?

jkread

Fri, 07/10/2015 - 20:56

I think the idea is to build it to fit the baskets you have or buy some and build around them.

Simple Playhouse

Submitted by Anonymous (not verified) on Mon, 07/27/2020 - 12:06

My first big project and my kids couldn't be happier. I'm pretty proud too, just don't take a square or level anywhere near it :)

Comments

Seasonal And Holiday

Dog Crate

Submitted by Anonymous (not verified) on Fri, 02/24/2023 - 06:28

I modified the Grandy Console to be dog crates for my Grand Pups so we didn’t have to have crates set up in the house. Middle divider can be raised to make one big crate.

Built from Plan(s)

Comments

Double Bin Trash and Recycling Bin

Submitted by Anonymous (not verified) on Tue, 02/02/2016 - 12:54

Modified the design a bit to be lift up lids instead of tilt out.

Estimated Cost
125
Estimated Time Investment
Weekend Project (10-20 Hours)
Finish Used
White Painted Base, Dark Walnut stained top
Recommended Skill Level
Intermediate

Comments

Matt712

Sat, 03/07/2020 - 02:29

I’d be grateful for details, plans, measurements for this project. This is an amazing build, nicely done.With green top looks fantastic and complements the white very well.

smbanks75

Thu, 01/11/2024 - 20:31

To everyone asking for the plans, it's a modified tilt out. It states right there under the pics that it was modified and the original plans are there in red, under "Built from plans"

Greenhouse

Submitted by Anonymous (not verified) on Mon, 06/26/2023 - 13:04

I saw this greenhouse built on the Justin Rhodes YouTube channel and immediately wanted my own. My husband was a champ at making my dream come true!

Built from Plan(s)

Comments

nifof17547

Tue, 04/09/2024 - 01:43

What a great idea! Building your own greenhouse can be a rewarding and cost-effective project. With the right planning and choice of materials, you can create a sturdy structure that will last you for years to come. In fact, a greenhouse is a great way to take care of your health because the crops grown there are undoubtedly of higher quality and healthier for you. Speaking of health, if you want to improve your health, consider using natural supplements such as mullein. Mullein supplements are known for their potential respiratory benefits and can promote overall well-being. You can find organic mullein supplements https://www.amazon.com/USDA-Organic-Mullein-Drops-Lungs/dp/B0CKBPTPRL on Amazon. Adding them to your daily diet can complement the peaceful environment of your greenhouse. So, whether you are a gardening enthusiast or just starting out, remember to take care of both your plants and your health!

Seasonal And Holiday

Hanging Plant Stand

Submitted by Anonymous (not verified) on Sat, 07/08/2023 - 09:51

I made this for a friend. The hardest part of the build was finding the correct font.

Allyn