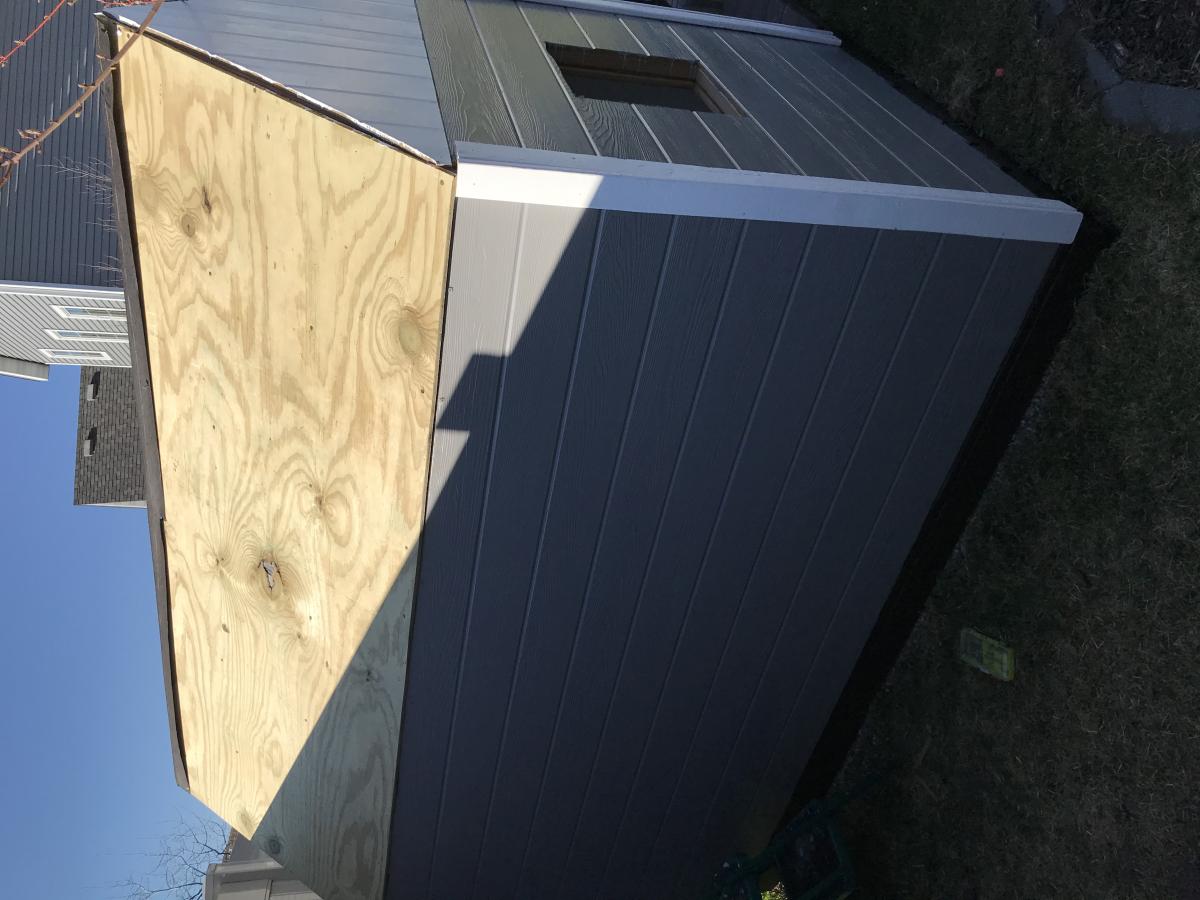
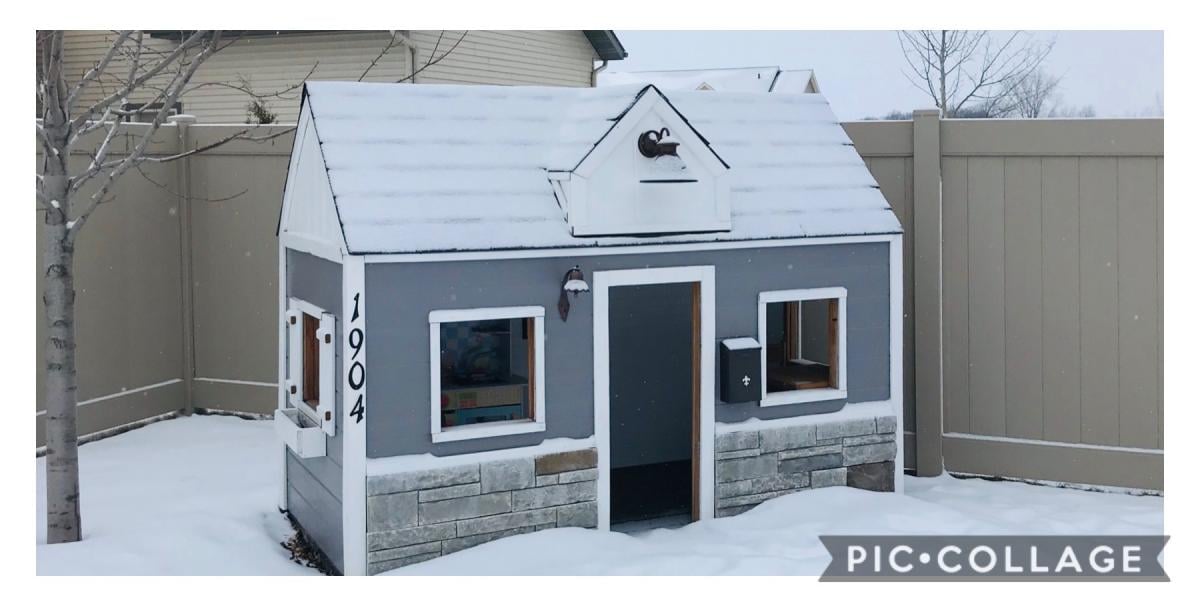
Playhouse - Drew Gaffke
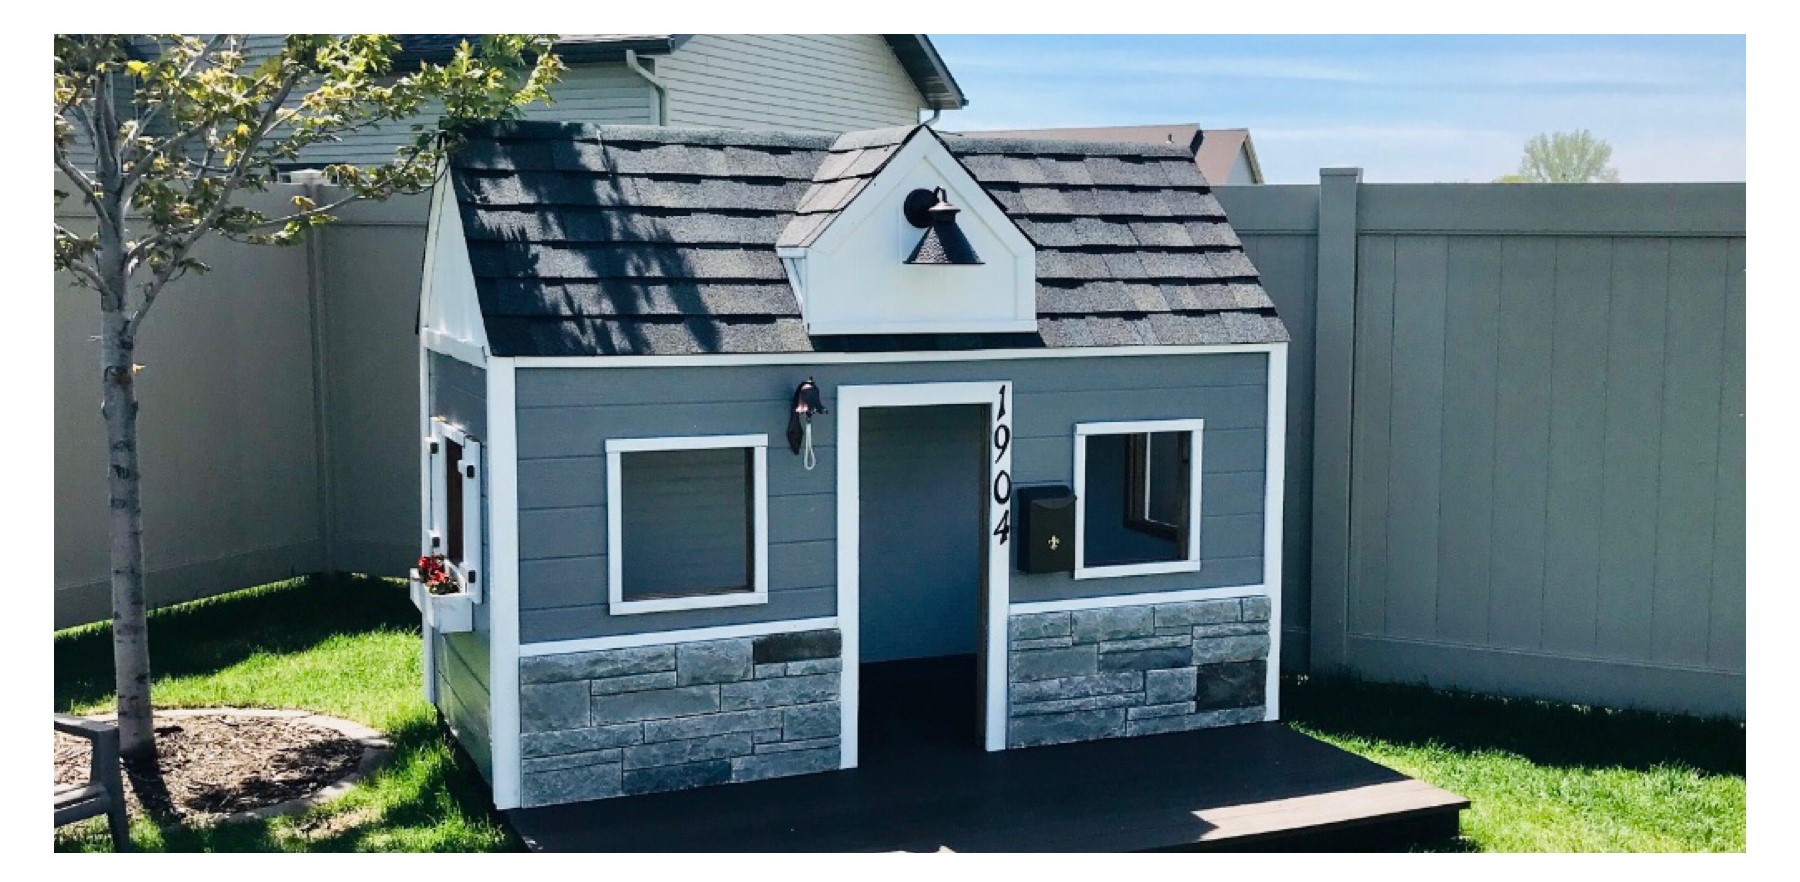
I combined a couple of playhouse plans for this one. The framing is 2x2 treated pine. The front is real stone. I tried to match our home the best that I could. The floor is made out of composite decking.
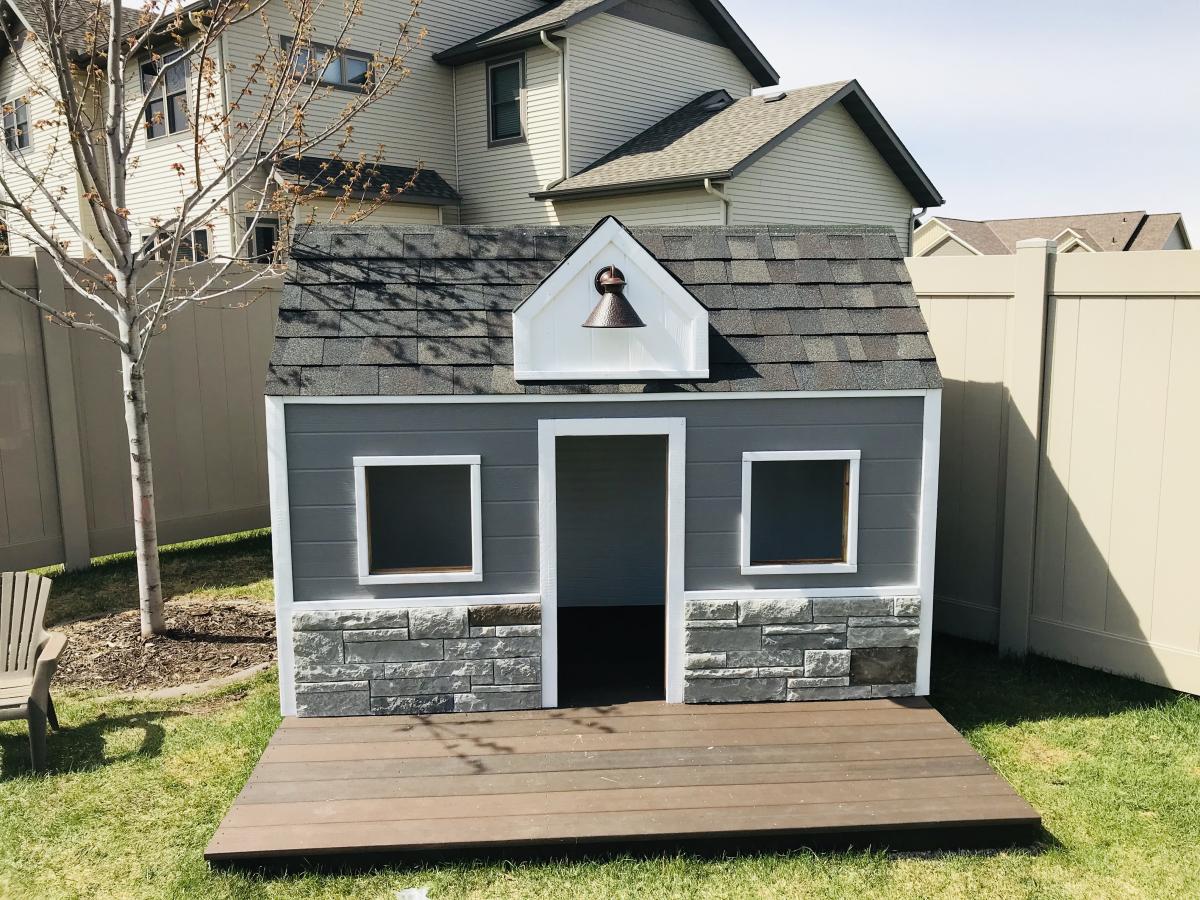
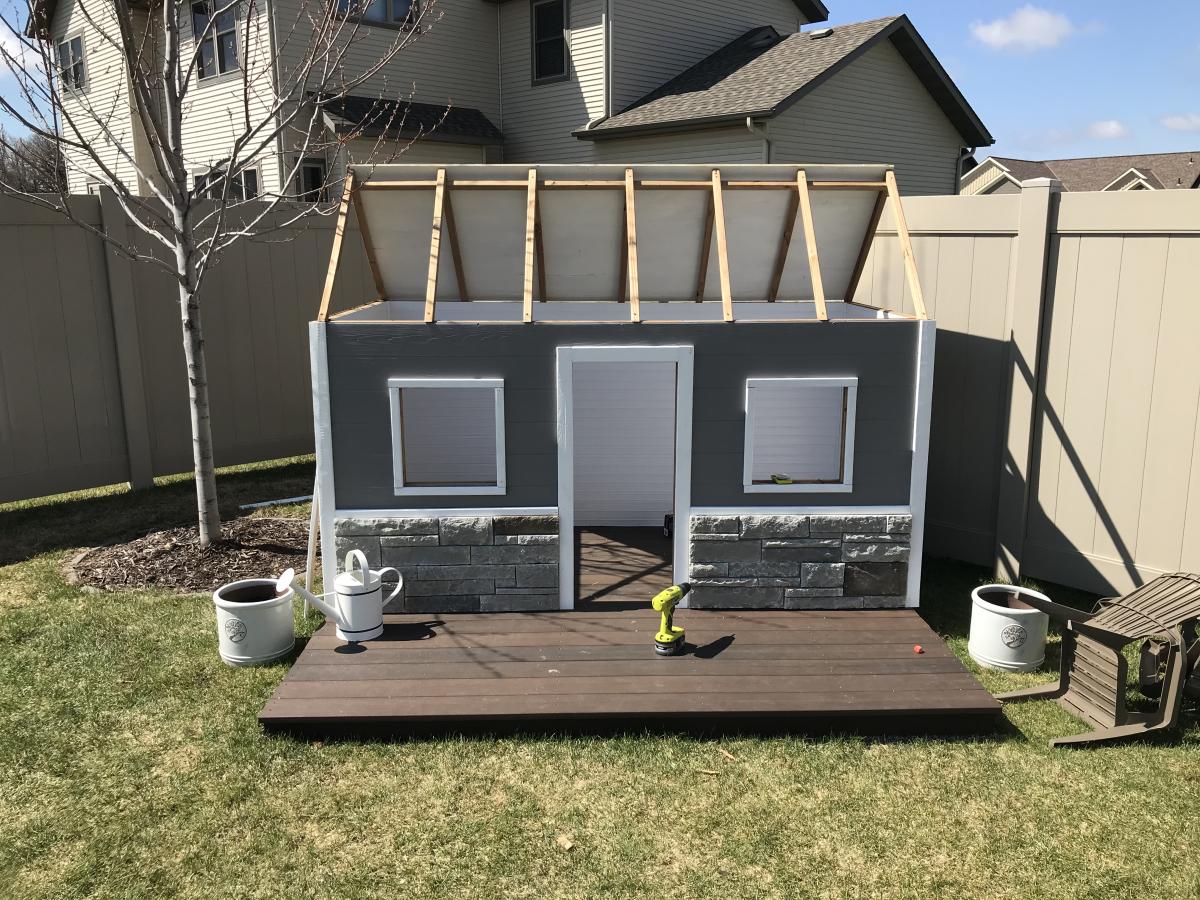
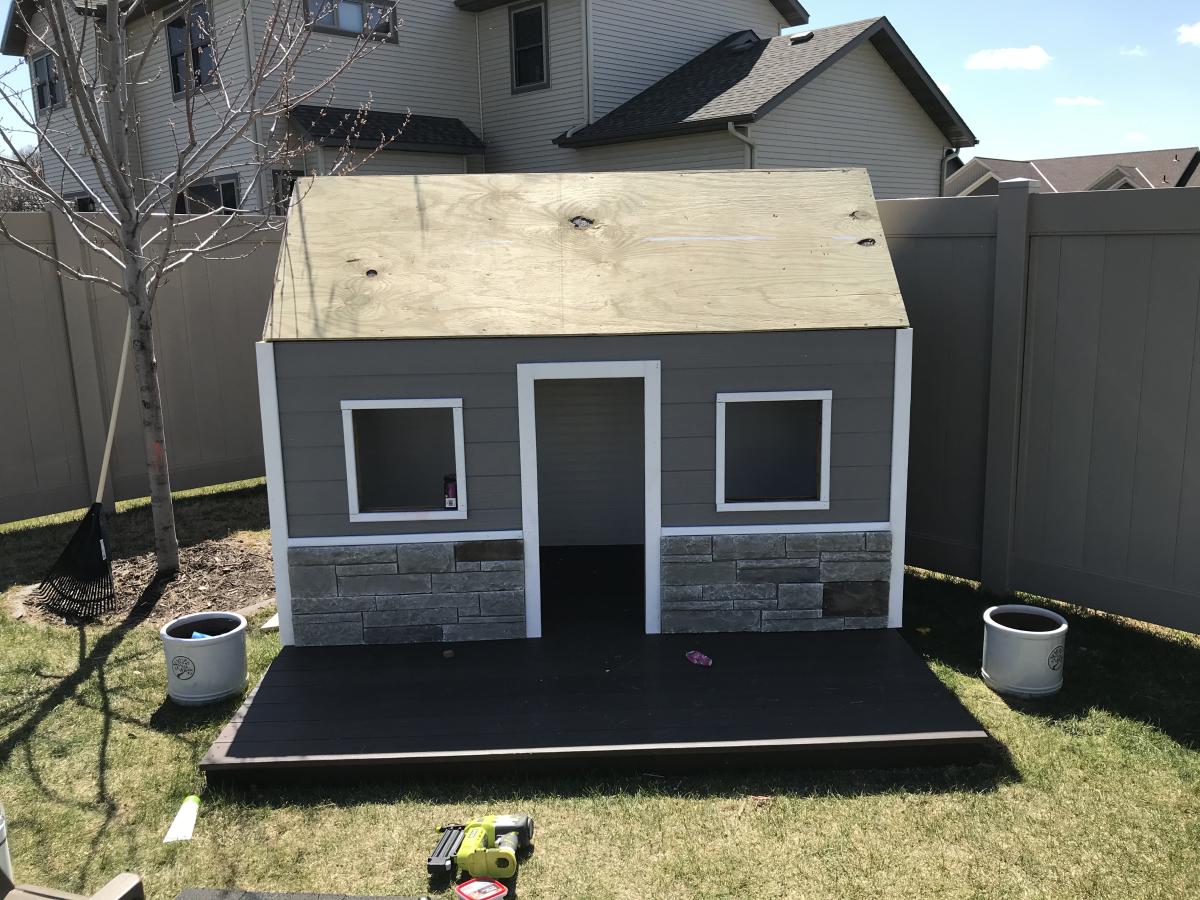
I combined a couple of playhouse plans for this one. The framing is 2x2 treated pine. The front is real stone. I tried to match our home the best that I could. The floor is made out of composite decking.

I am a mathematics teacher in Central IL. I teach a class called Geometry in Construction. I had my math students build this wood shed in pieces at the school, then I brought it home and put it together with a few of my son's friends. The students enjoy a math class that gets to go to the wood shop to apply their math skills to a wood working project. I am proud of my students hard work and dedication.
Shari Bruyn (I'm old, so I do not have Instagram or a blog page. lol)
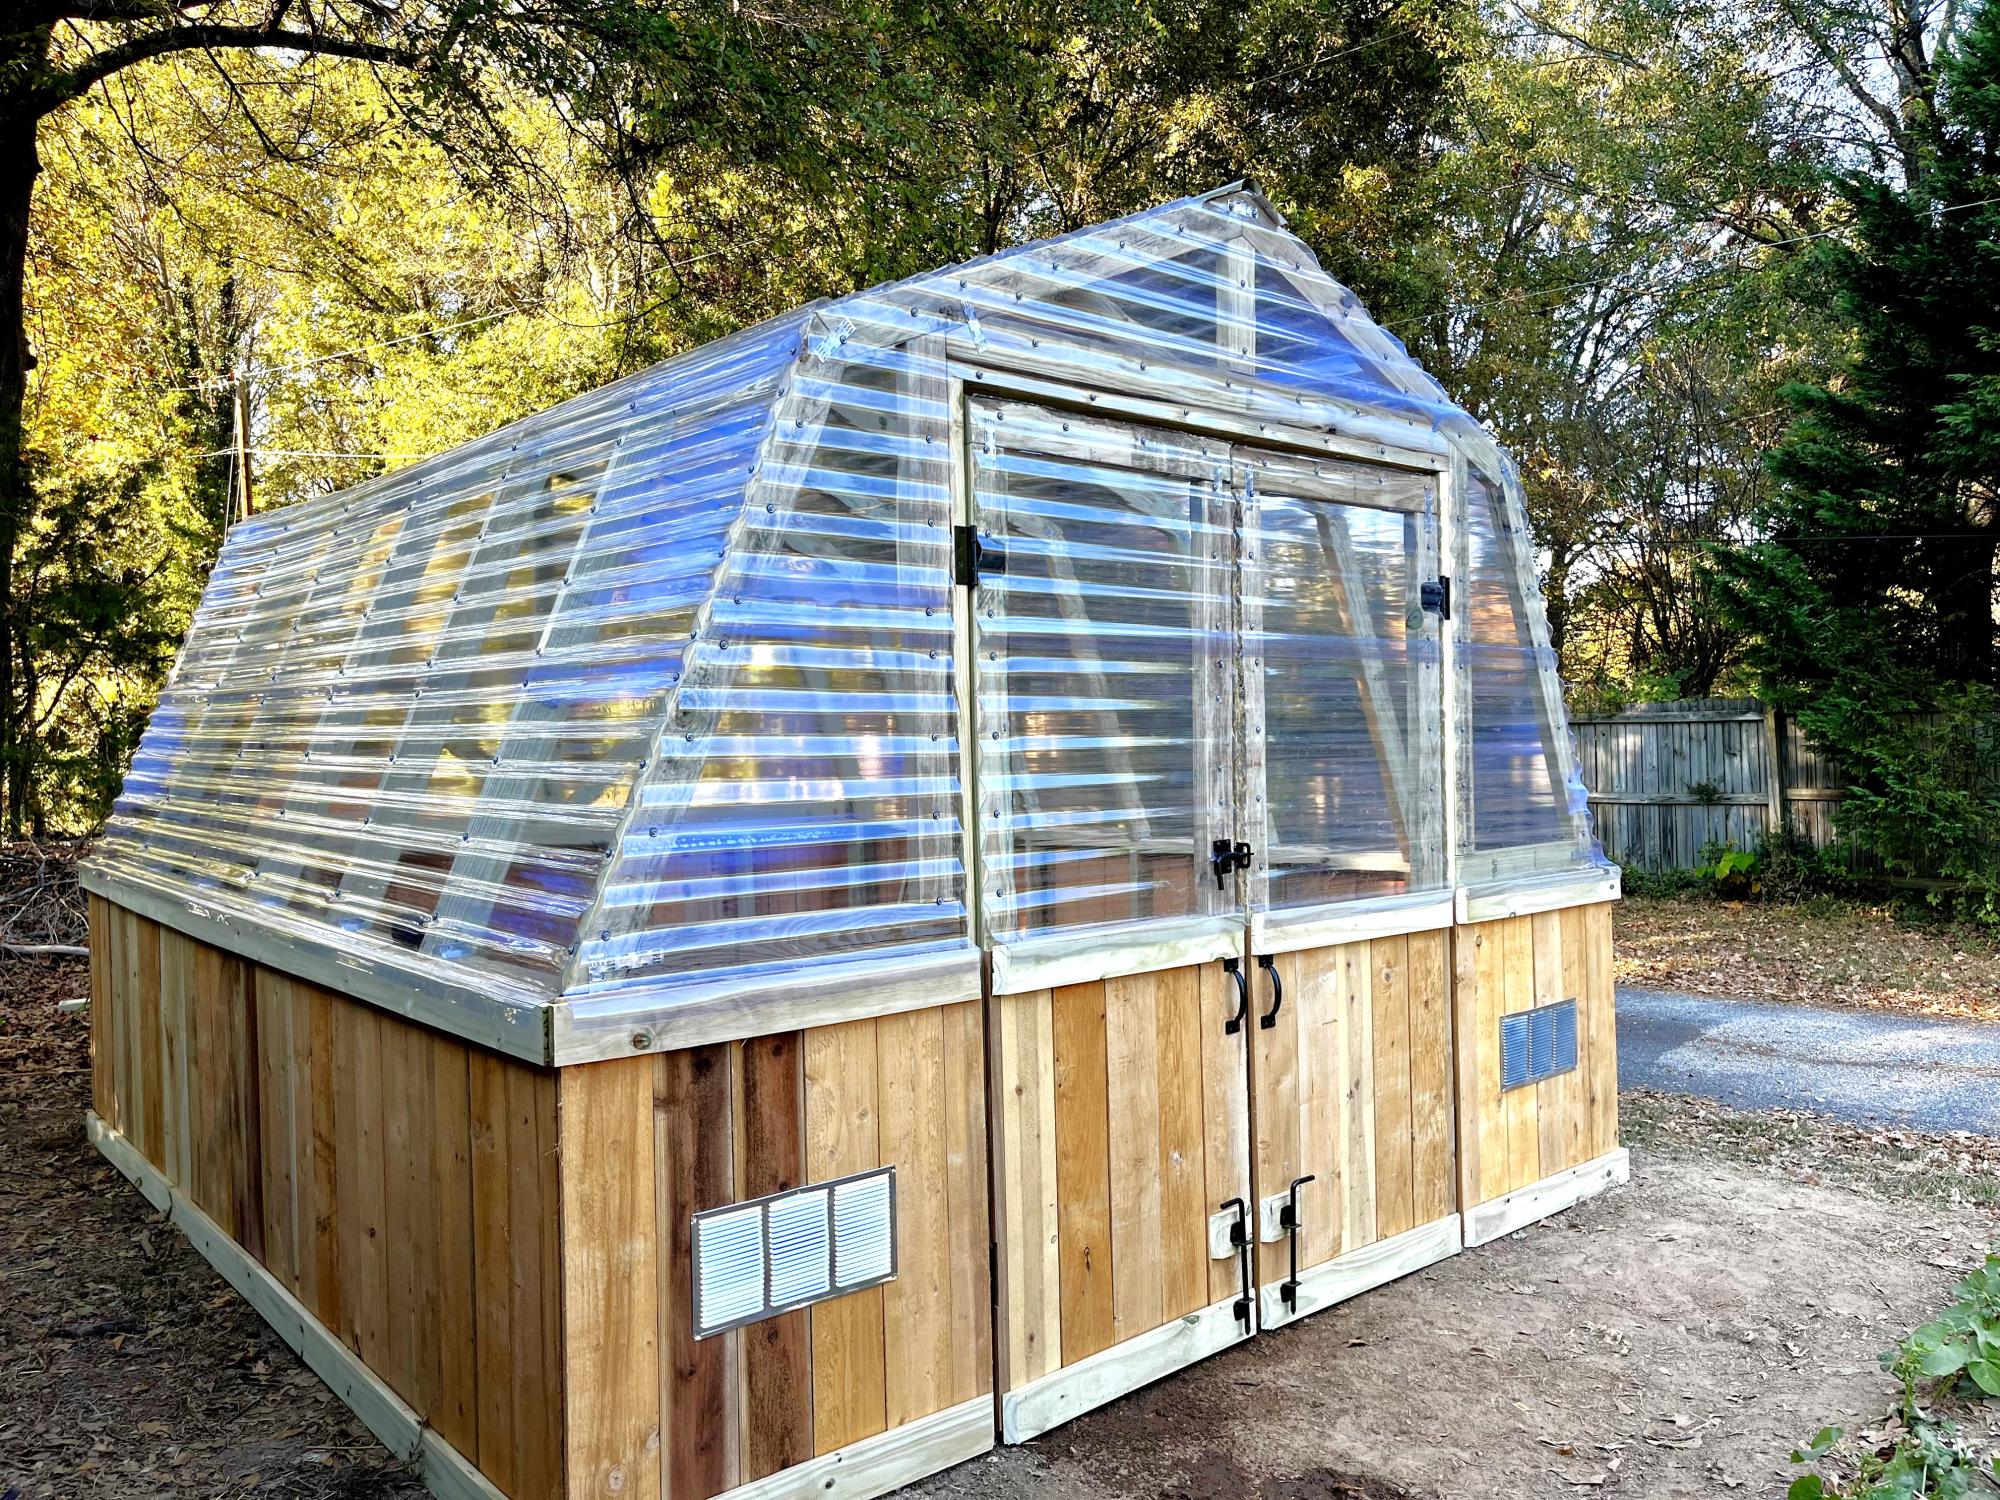
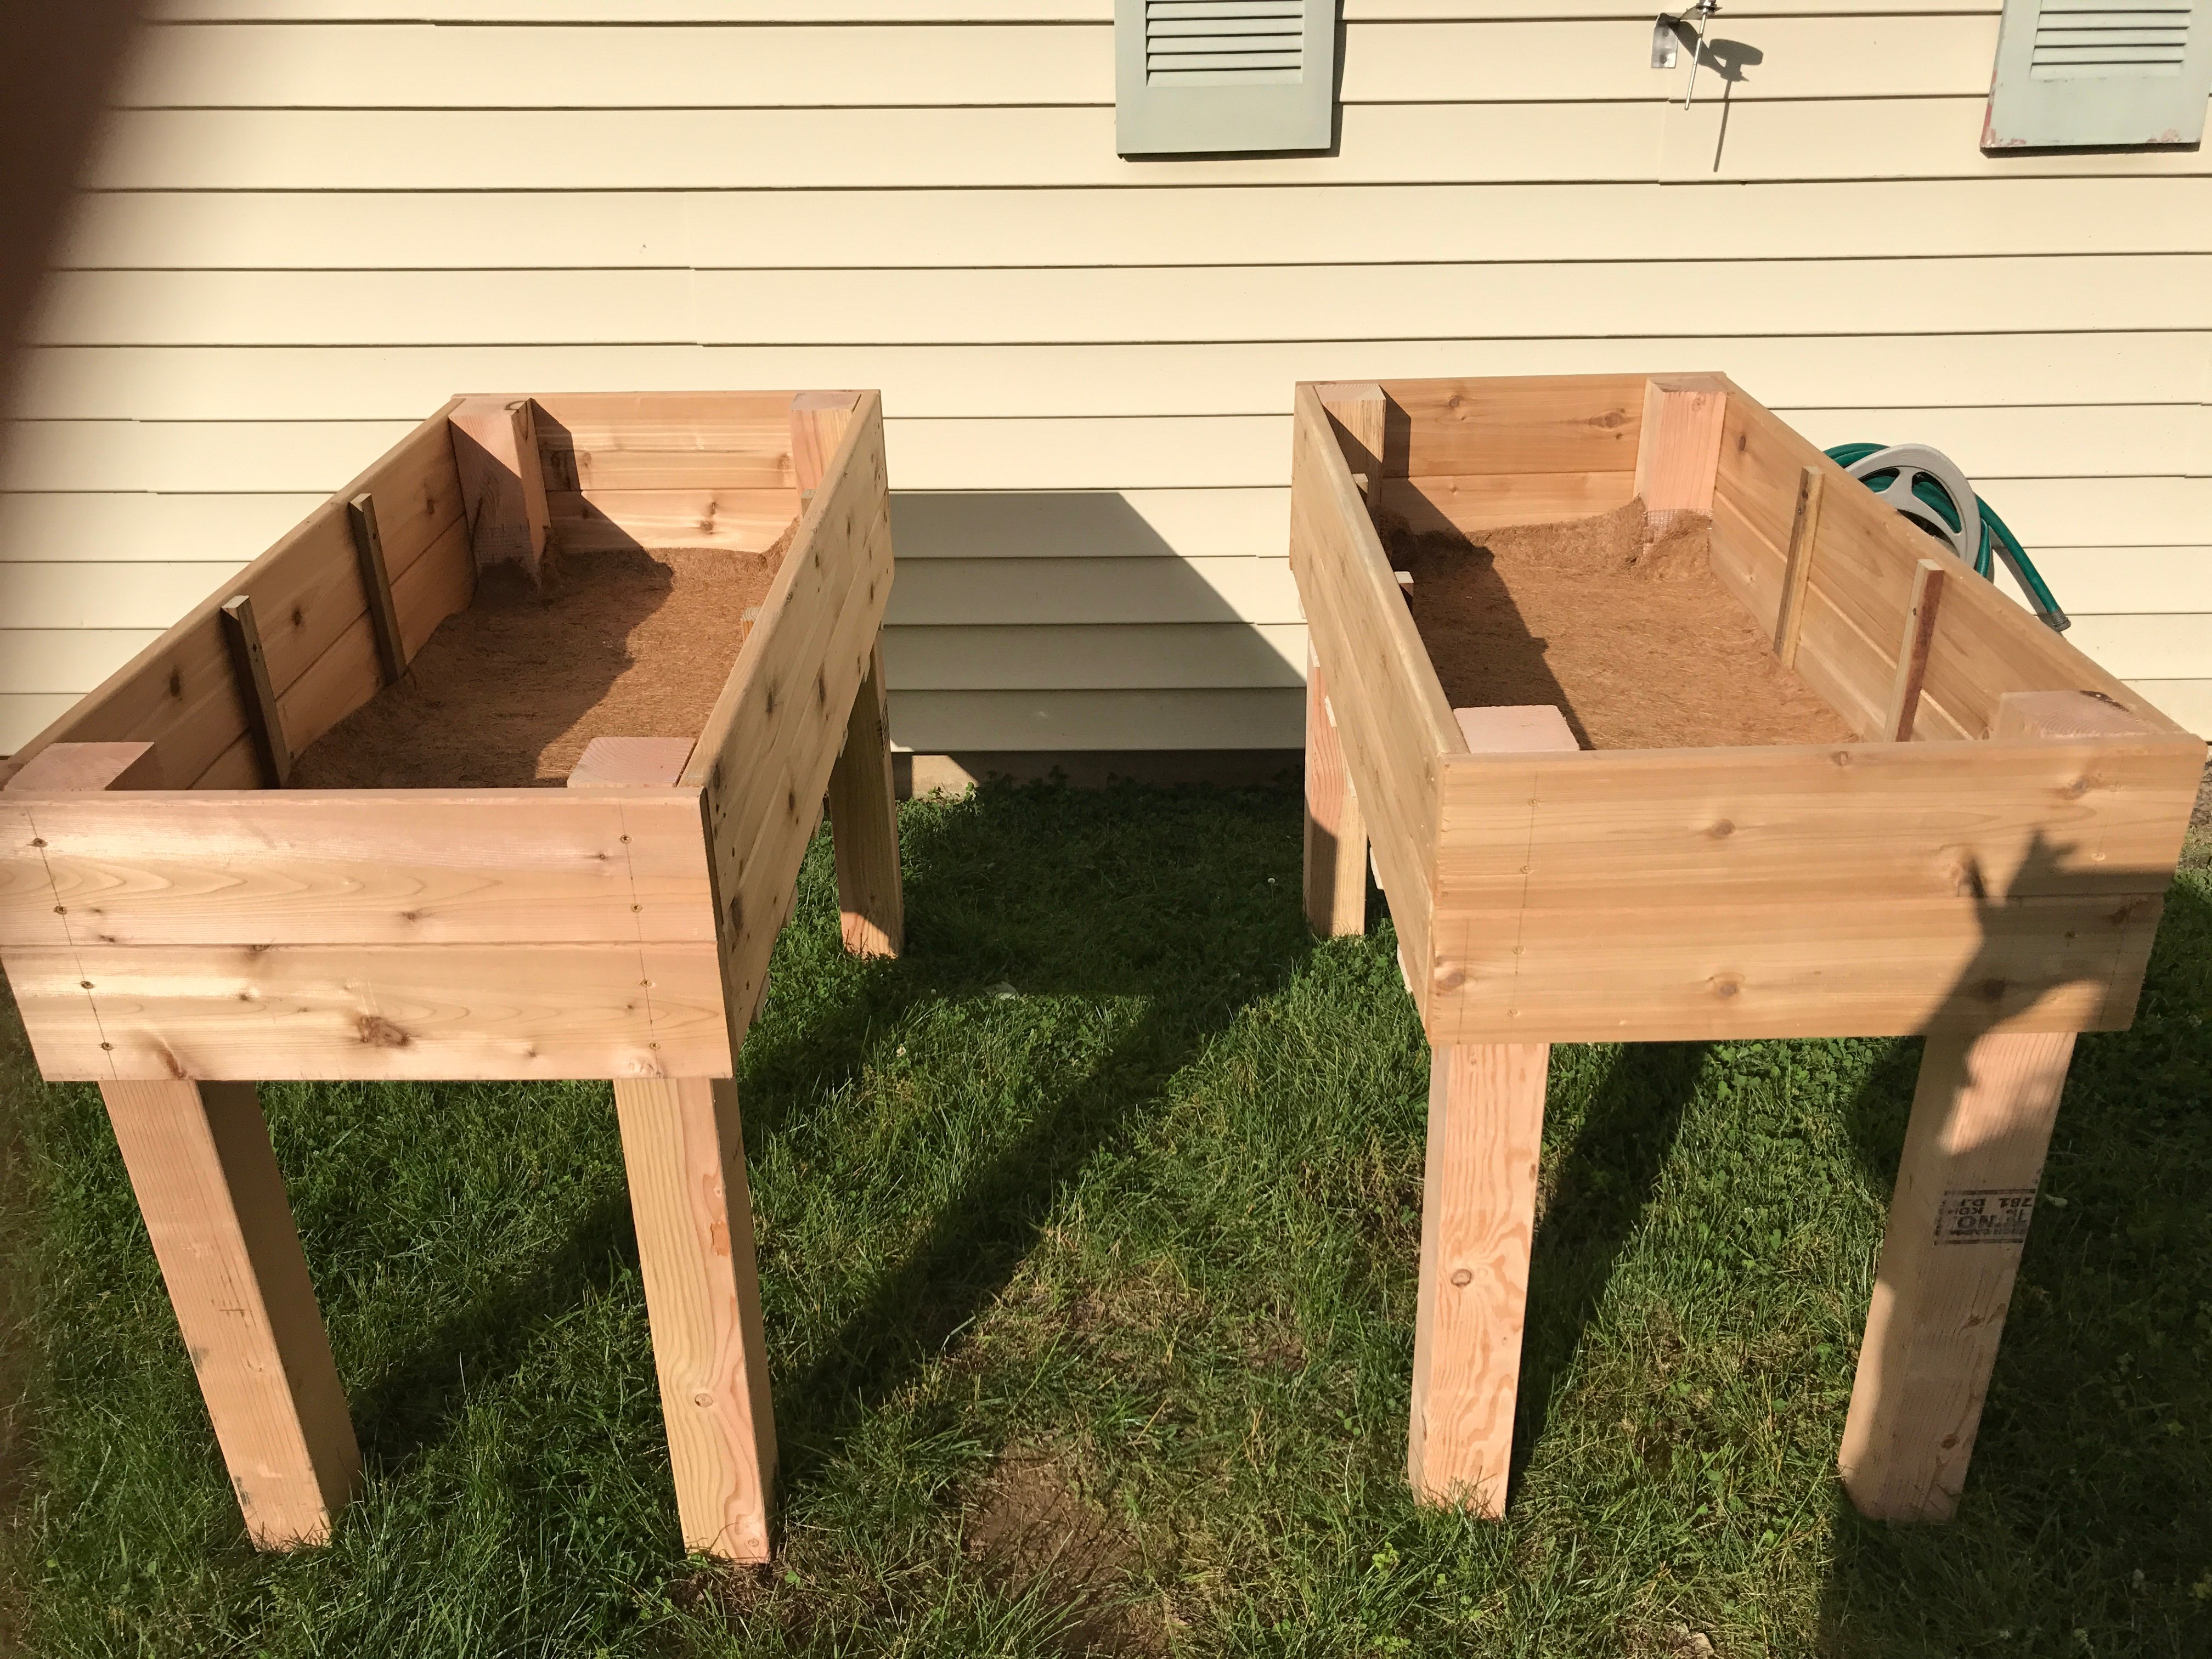
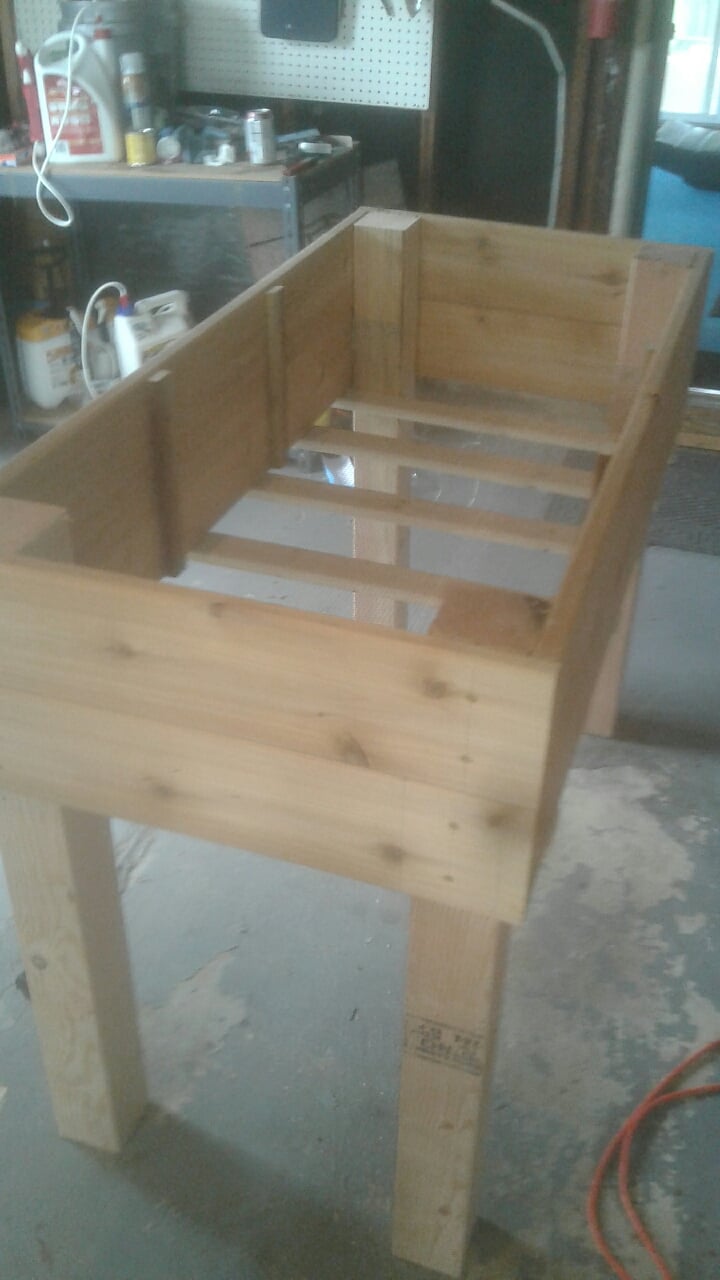
I loved this plan so much but I really wanted double doors so we made a few modifications to fit them. Can’t wait to build out the interior and start growing! Thank you for the amazing plans!
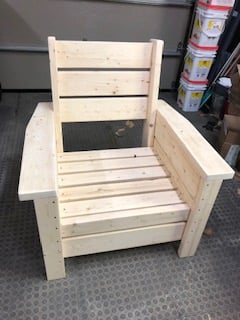
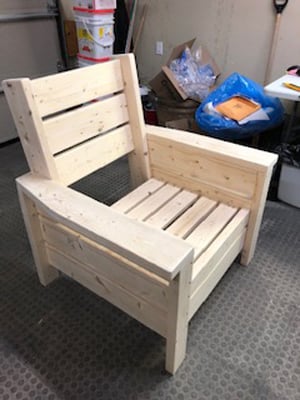
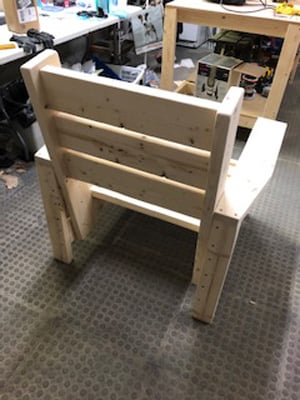
Modified with a high back and modern adirondack arms.
The base of the chair is built exactly to the plan except that the arms are done in a modern adirondack style.
The back was made independently to fit inside the base and then attached to the plan base.
Very comfortable but very heavy chair even without the modified back.
Not stained yet obviously.
Cushions are hard to find I think I would make it slightly smaller next time and maybe even find the cushions first and alter the plan to fit.

Tue, 06/09/2020 - 09:11
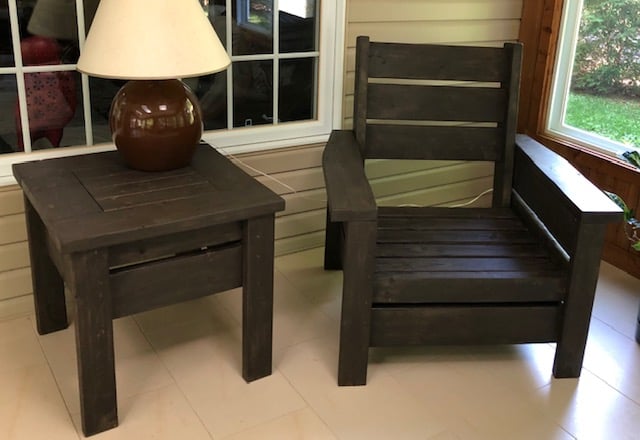
Stained with Saman: Urban Grey mixed with some left over brown 4:1 and now has a companion side table
Wed, 06/24/2020 - 07:33
Do you have the plans for the table you built? Im a brand ne beginner. I am trying the modern outdoor chairs and live this table with them.
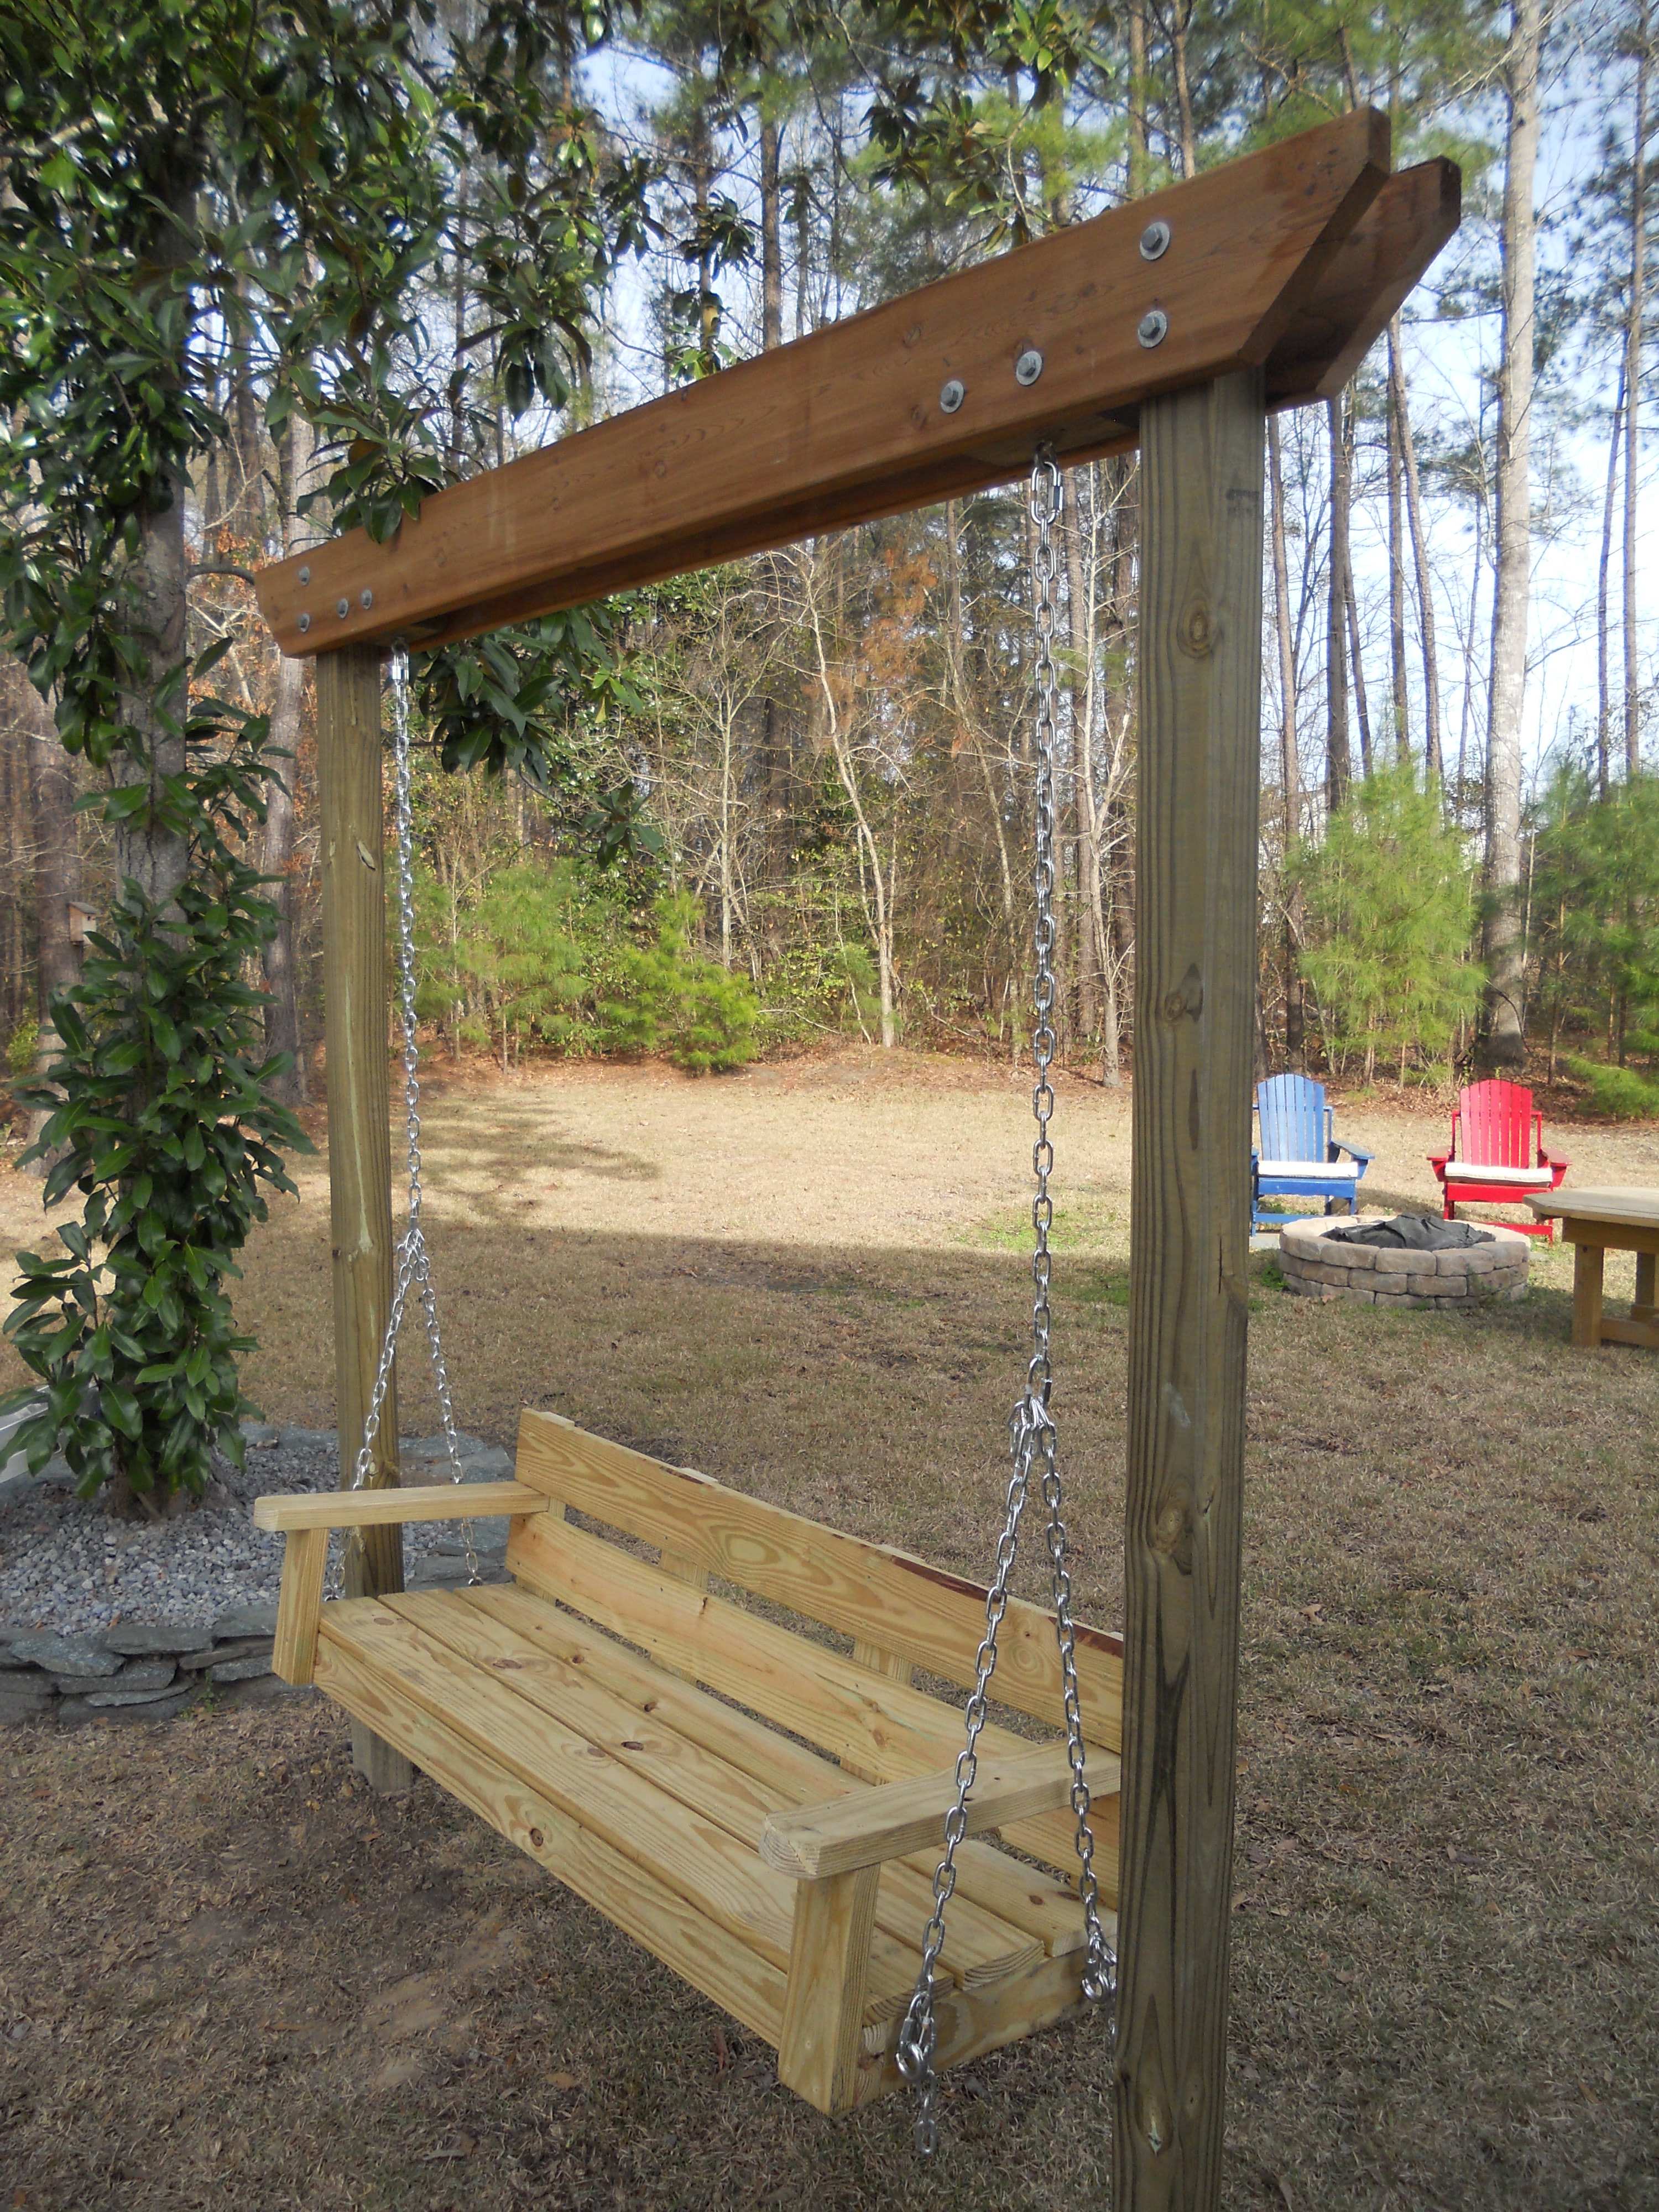
Luv your site. Took your bench swing plan and modified it a bit (shortened depth) and then created a small pergola to hang it from. Just need to stain/poly to finish it off. Thanks for your plan and website it is very inspiring.
Not pretty, but not bad for a start while working with an 11,7 and 5 yr old.

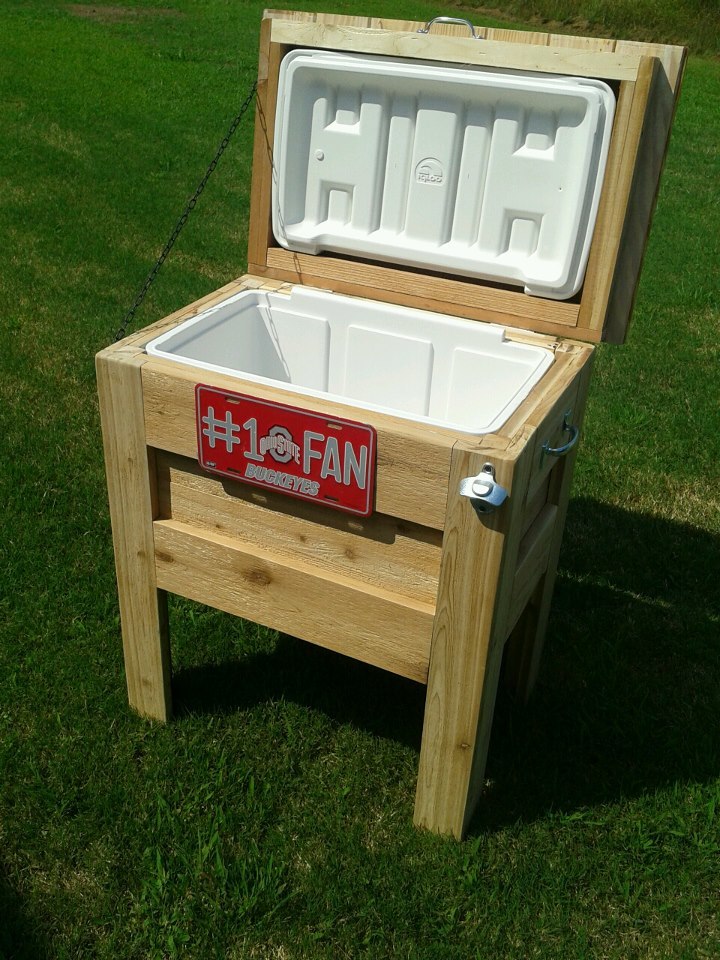
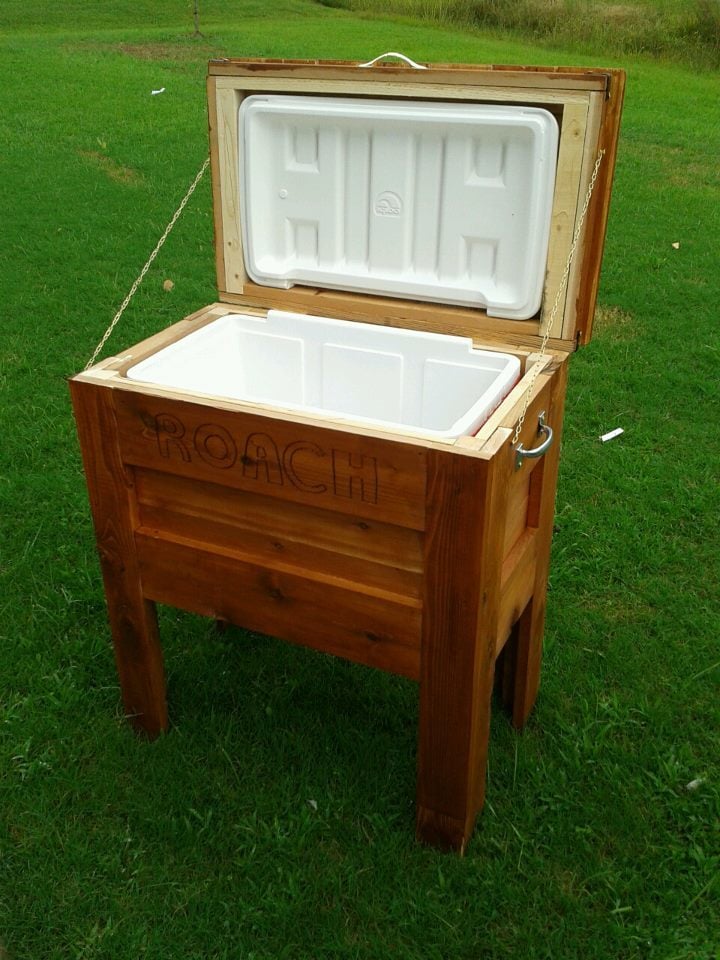
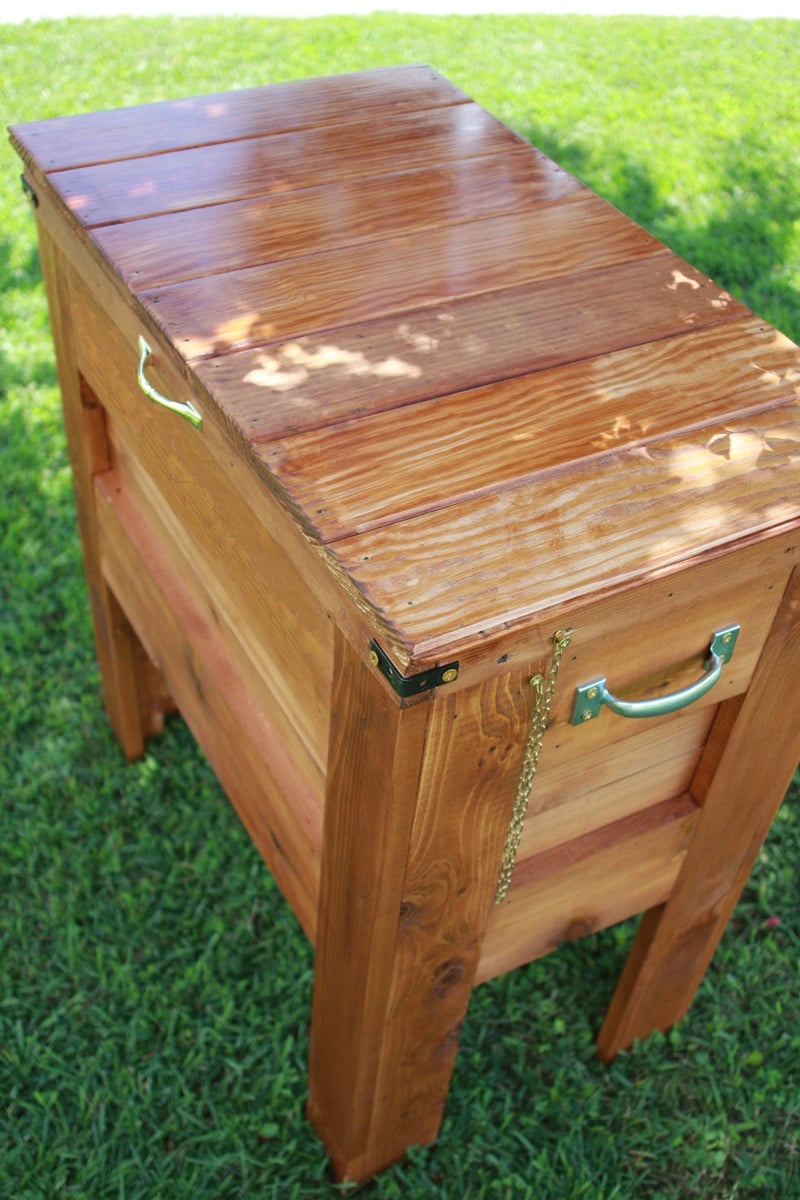
An Outdoor Wooden Cooler is the perfect way to accent any deck, patio, or garage. Can be made from Cedar, Pressure Treated, Cyprus, etc. Sizes can vary from small 28 qt coolers to Large 120 qt coolers capable of holding hundreds of drinks. These coolers can be themed for your favorite sports team, favorite hobby, or anything of your choice. Engraving or wood burning is available.
Fri, 08/31/2012 - 09:52
Well, actually, two. My beer loving son-in-laws would love this, and Christmas is coming! Do you happen to have any "step-by-step" directions you'd be willing to share? I can figure out the dimensions but it would be really helpful to read - or see - the components and how you put it all together.
Thanks for sharing!
In reply to I want to make one of these by sgilly
Fri, 09/28/2012 - 11:43
I had to make a new page because of some password issues. Thanks for comments. I have no plans yet, I've built so many it's sort of muscle memory now. Shoot me an email at [email protected] and perhaps I can help.

Sat, 09/01/2012 - 10:59
I want to make one too. Is the lid tricky at all?
Fri, 09/28/2012 - 11:41
I had to make a new page because of some password issues. Thanks for comments. I have no plans yet, I've built so many it's sort of muscle memory now. Shoot me an email at [email protected] and perhaps I can help.
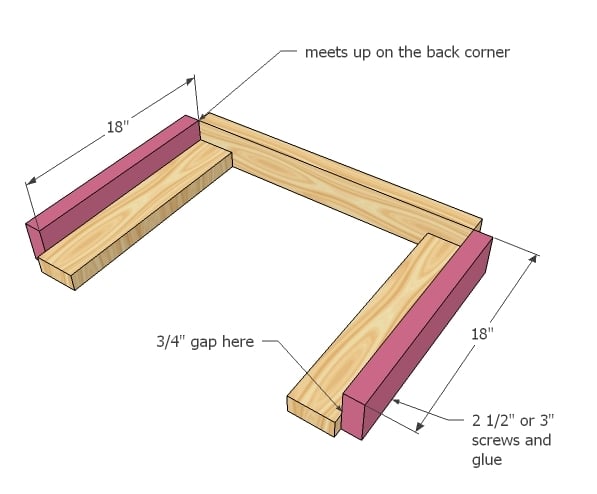
And no, the lid style I like is nothing more than some tongue~n~groove boards cut to length, attached with pocket holes and nailed to the lid frame. Tongue~N~groove is optional of course, you could just use regular boards.

Thu, 03/14/2013 - 21:08
I don't mean to hijack Adam's great build, but I have some step-by-step plans available for a cooler I built with a similar style. It has a 2x2 frame with old fencing facing. For those of you looking for plans/tutorial http://www.killerbdesigns.com/rustic-cooler-a-how-to/

Thu, 05/07/2015 - 07:20
My husband used a similar design to Adam's but made it a double. :) He also added wheels and a bottle opener/cap catcher. Great work Adam!
http://purposefulproductions.blogspot.com/2015/04/diy-wood-drink-cooler…
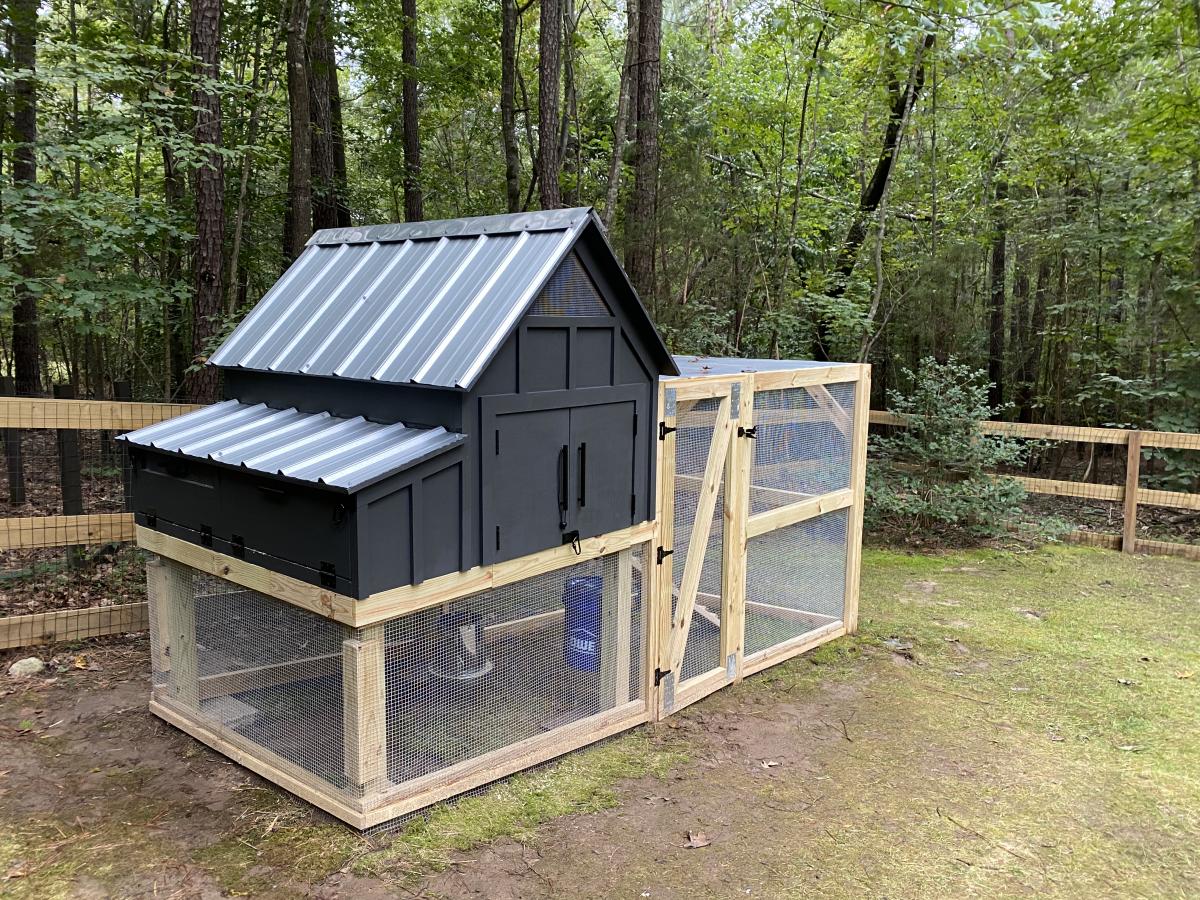
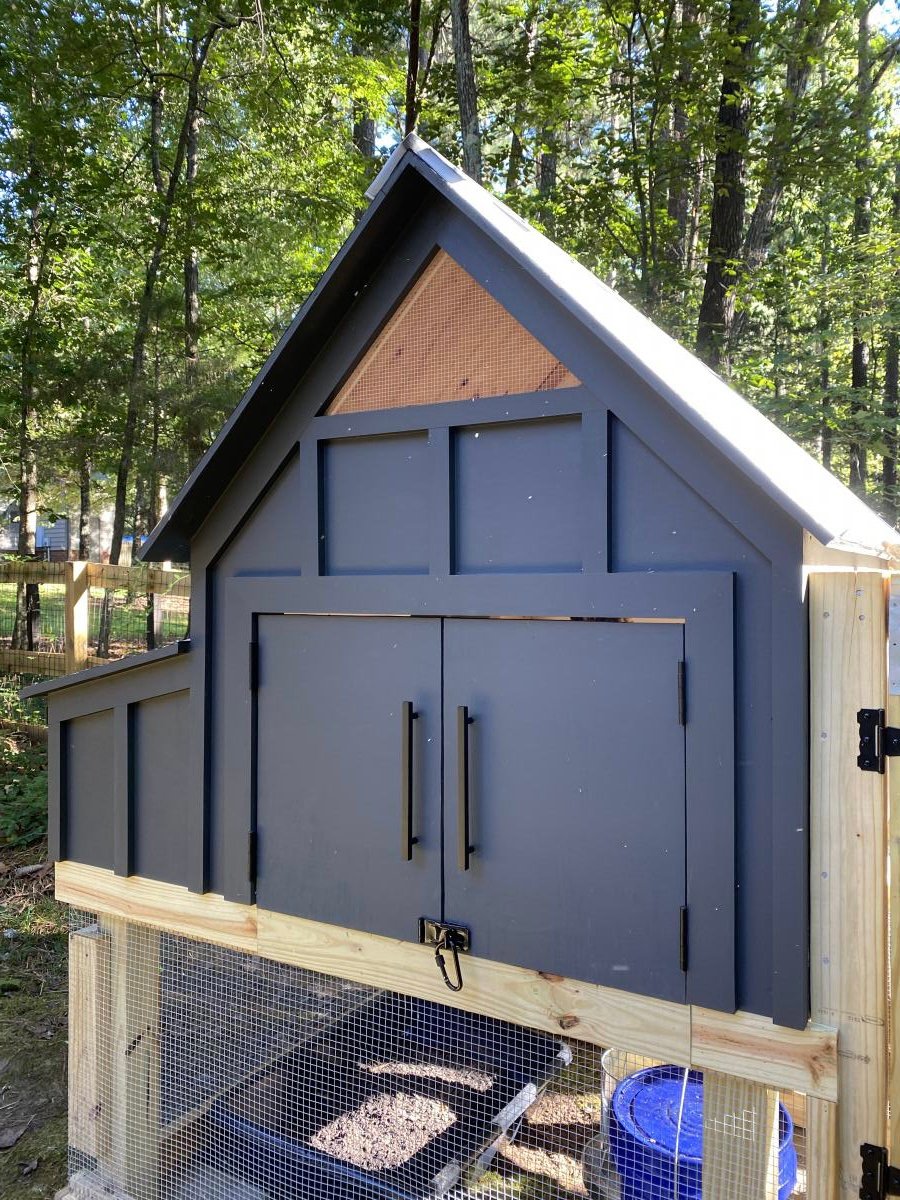
We took some creative liberties on the Williams Sonoma inspired coop posted here. Because we don’t get a whole ton of sun in our backyard, we eliminated the herb garden planter and instead built a longer run. We also made the coop a bit wider to accommodate for the inevitable chicken math. And, you’ll notice the vent both shaped differently and is a bit higher. This was to increase air flow, avoid the dreaded draft, and to lend a more Scandinavian vibe. We also decided to place the chicken exit on the outside wall to allow for more living space under the coop itself. The project took about a month to complete, dedicated to only working weekends. And, it was very much over budget! Who knew wood is so expensive?! But overall, the outcome was even better than I expected. The chickens love it and I don’t mind looking at it!
P.S. this was a pretty advanced project. The fractions alone had me yelling “uncle!” Thankfully my husband is pretty handy, and my father-in-law (career in the construction industry) had a few pointers, so they took the lead in executing. I chose the paint colors and suggested the deviations from the original blue print. ;-)

Wed, 11/18/2020 - 12:55
Thank you! Yes, I suppose everyone is wanting wood for home improvement projects now that we're not leaving the house! Also, I didn't mean to post a picture of my son and his friends. Am I able to delete?
Thu, 01/14/2021 - 07:43
does this roof have the same angle as the 'Small Chicken Coop with Plans'? It seems to be 'less steep'. Wanting to start this project next weekend and trying to get my mind wrapped around everything!. Thanks.
Wed, 03/16/2022 - 09:53
Do you have a run side photo? I am thinking about adding more run onto mine.....
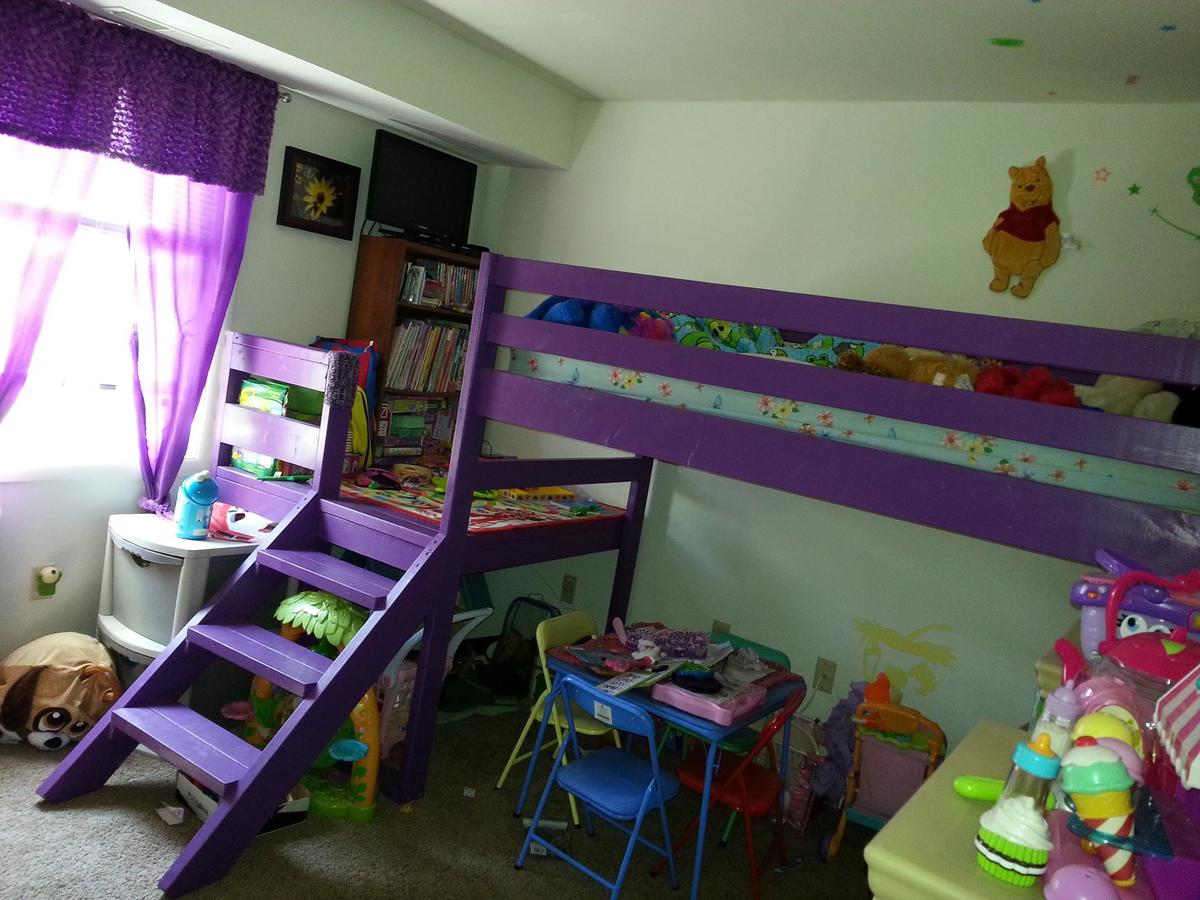
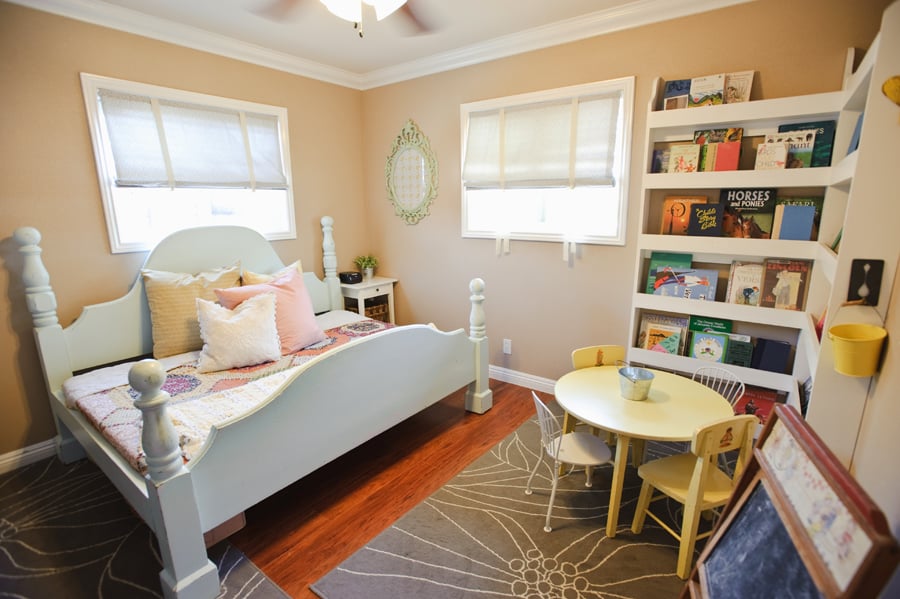
When we moved to our 3 bedroom apartment from our 4 bedroom townhome we knew having a place for all my daughter's stuff was going to be an issue. Finding this plan was the answer!! We extended the "porch" so we could put her bookcase up there and her tv. It's her pretty purple princess bed. = )
Wed, 07/03/2013 - 12:10
I'm getting ready to build this bed (in a modified taller & for a full size mattress) for my 9 yr old, I've also been considering letting her have a tv in her room but wasn't sure where to place it. This looks like a perfect idea!
Wed, 03/05/2014 - 14:49
I'm thinking about making this for my daughter but I'm curious how much longer the platform is than the original. We have an extra 14 inches from where the bed would bed and the wall so we figured we would extend the platform like you have done. Thanks for the great idea!
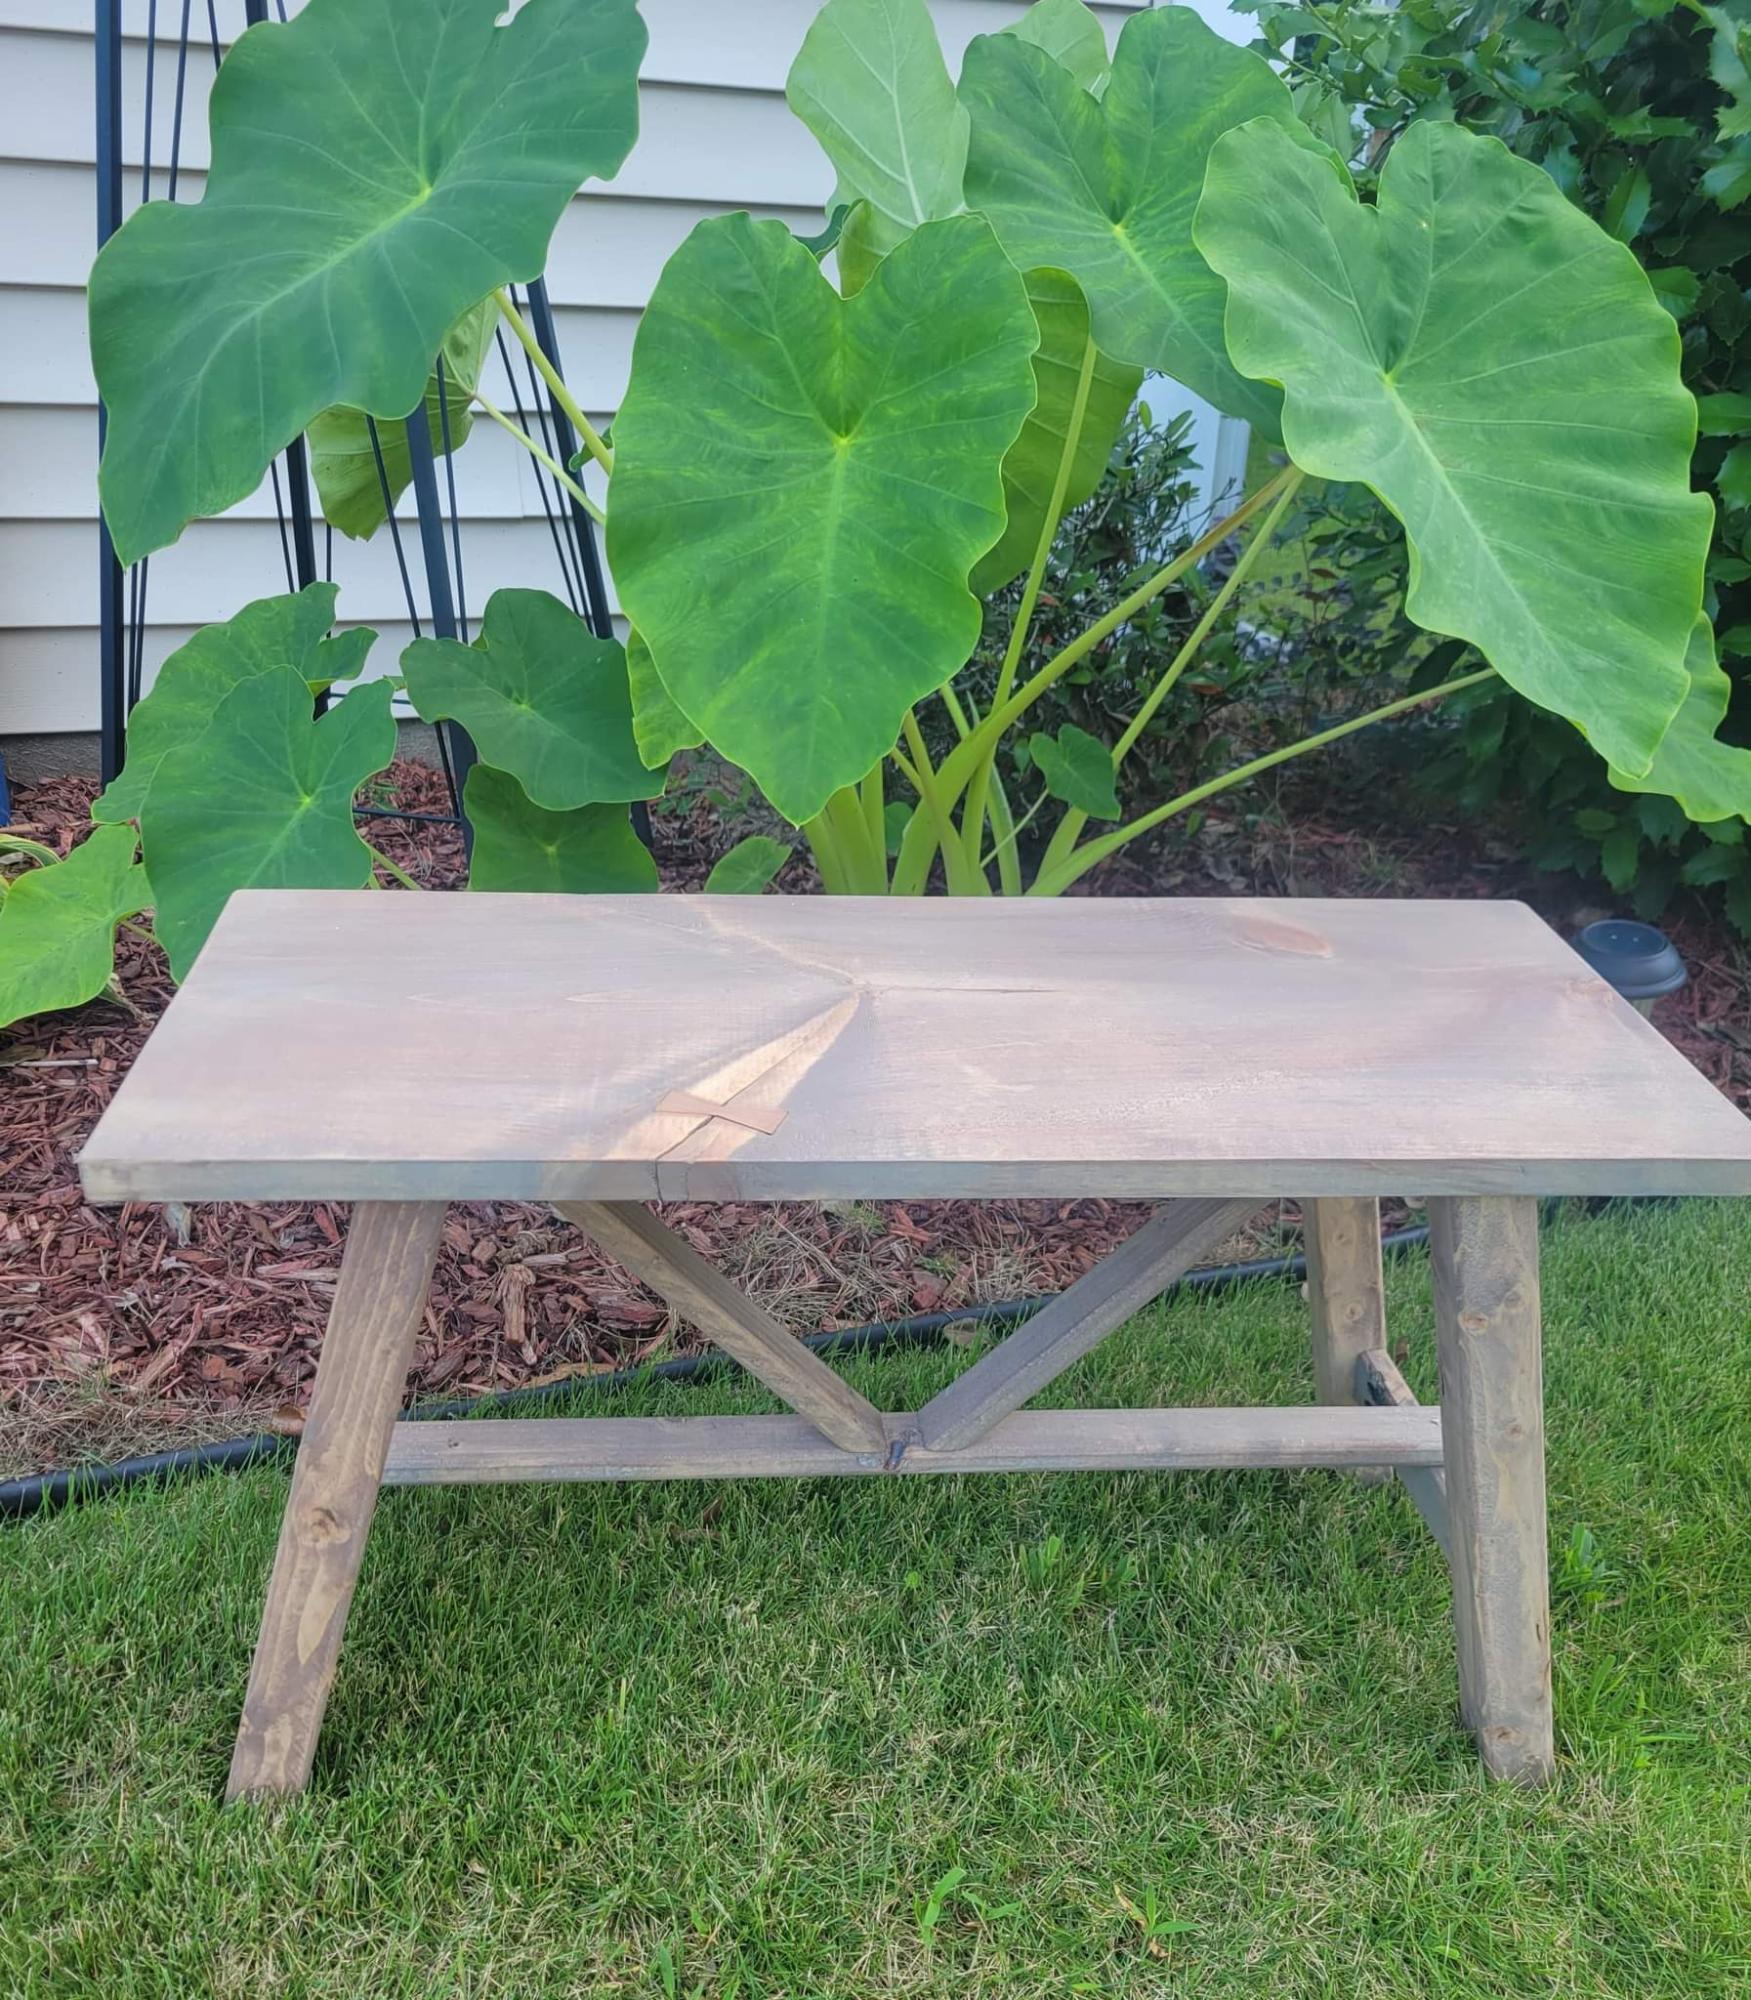
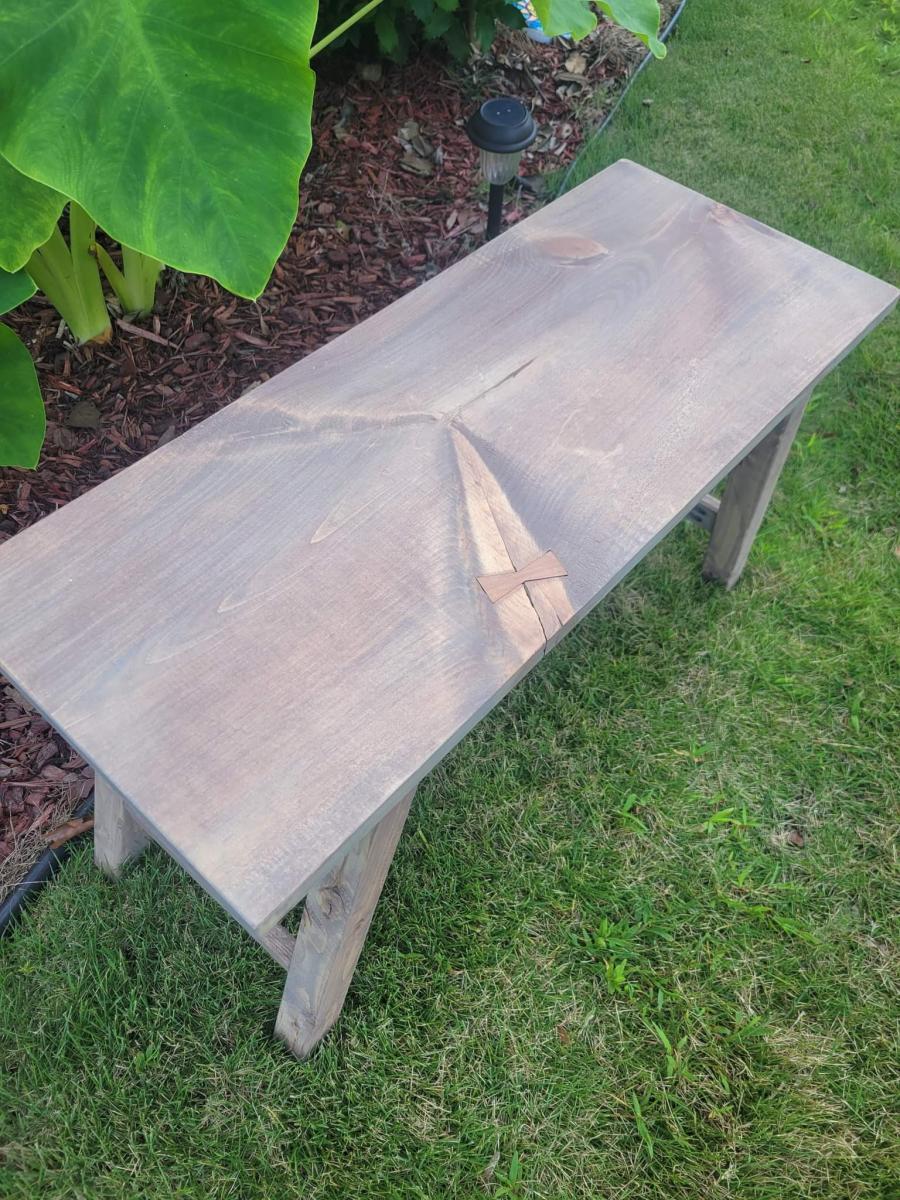
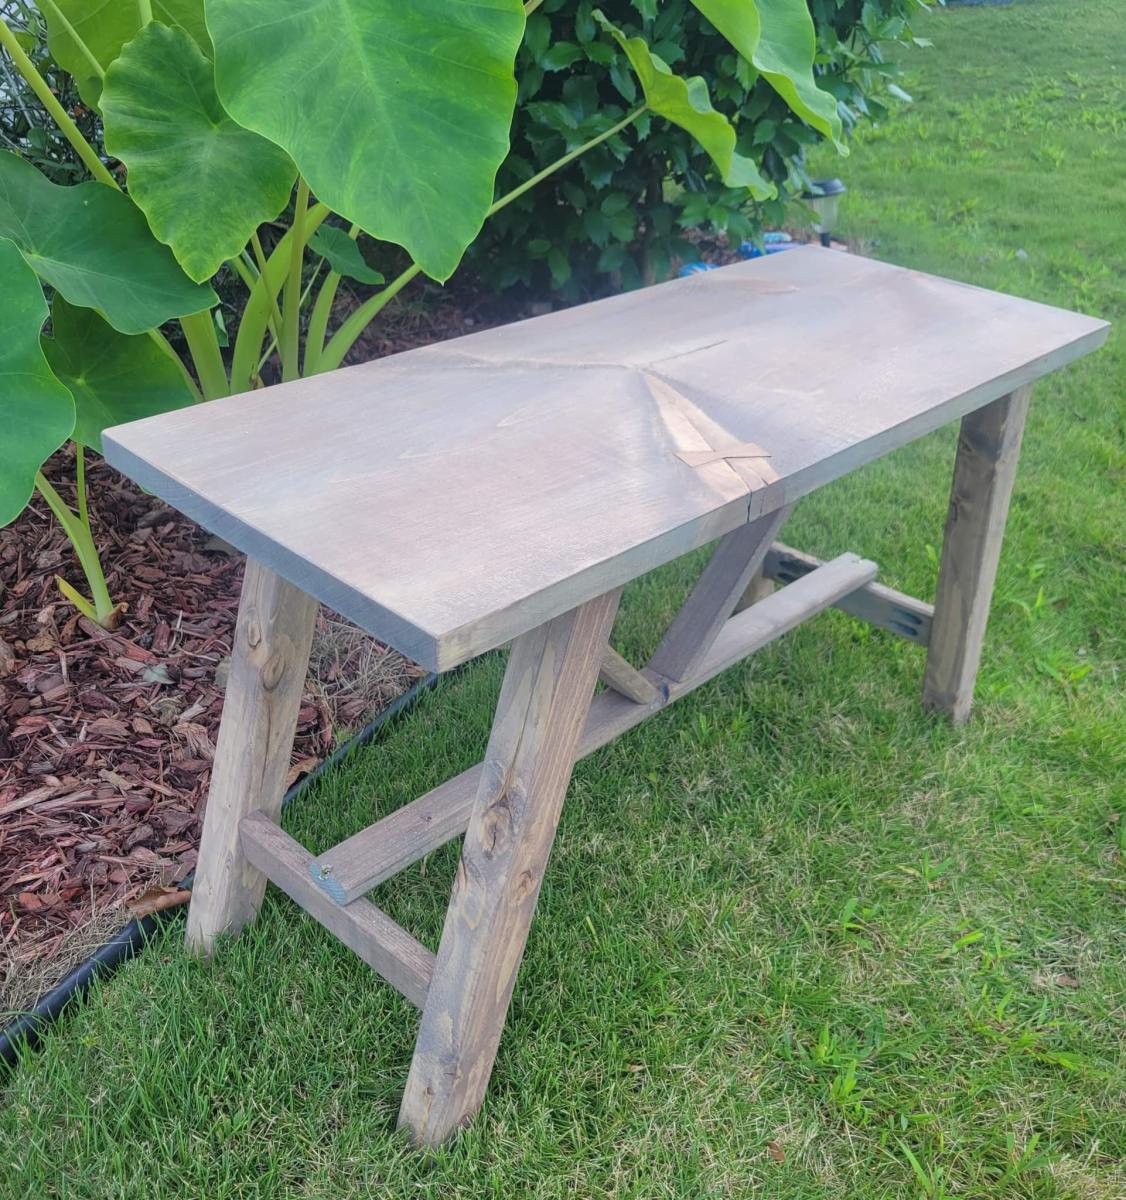
Fun build. We've been going through the scrap bin trying to figure out some ser projects to build. Had a piece of 1x12 that was perfect for this project. It had a little split in it, so we added a cherry bowtie to it.
Minwax weathered oak finish.
Tue, 09/13/2022 - 16:46
Thanks for sharing, great build and love the finish! Always feels nice to use up some scraps:)
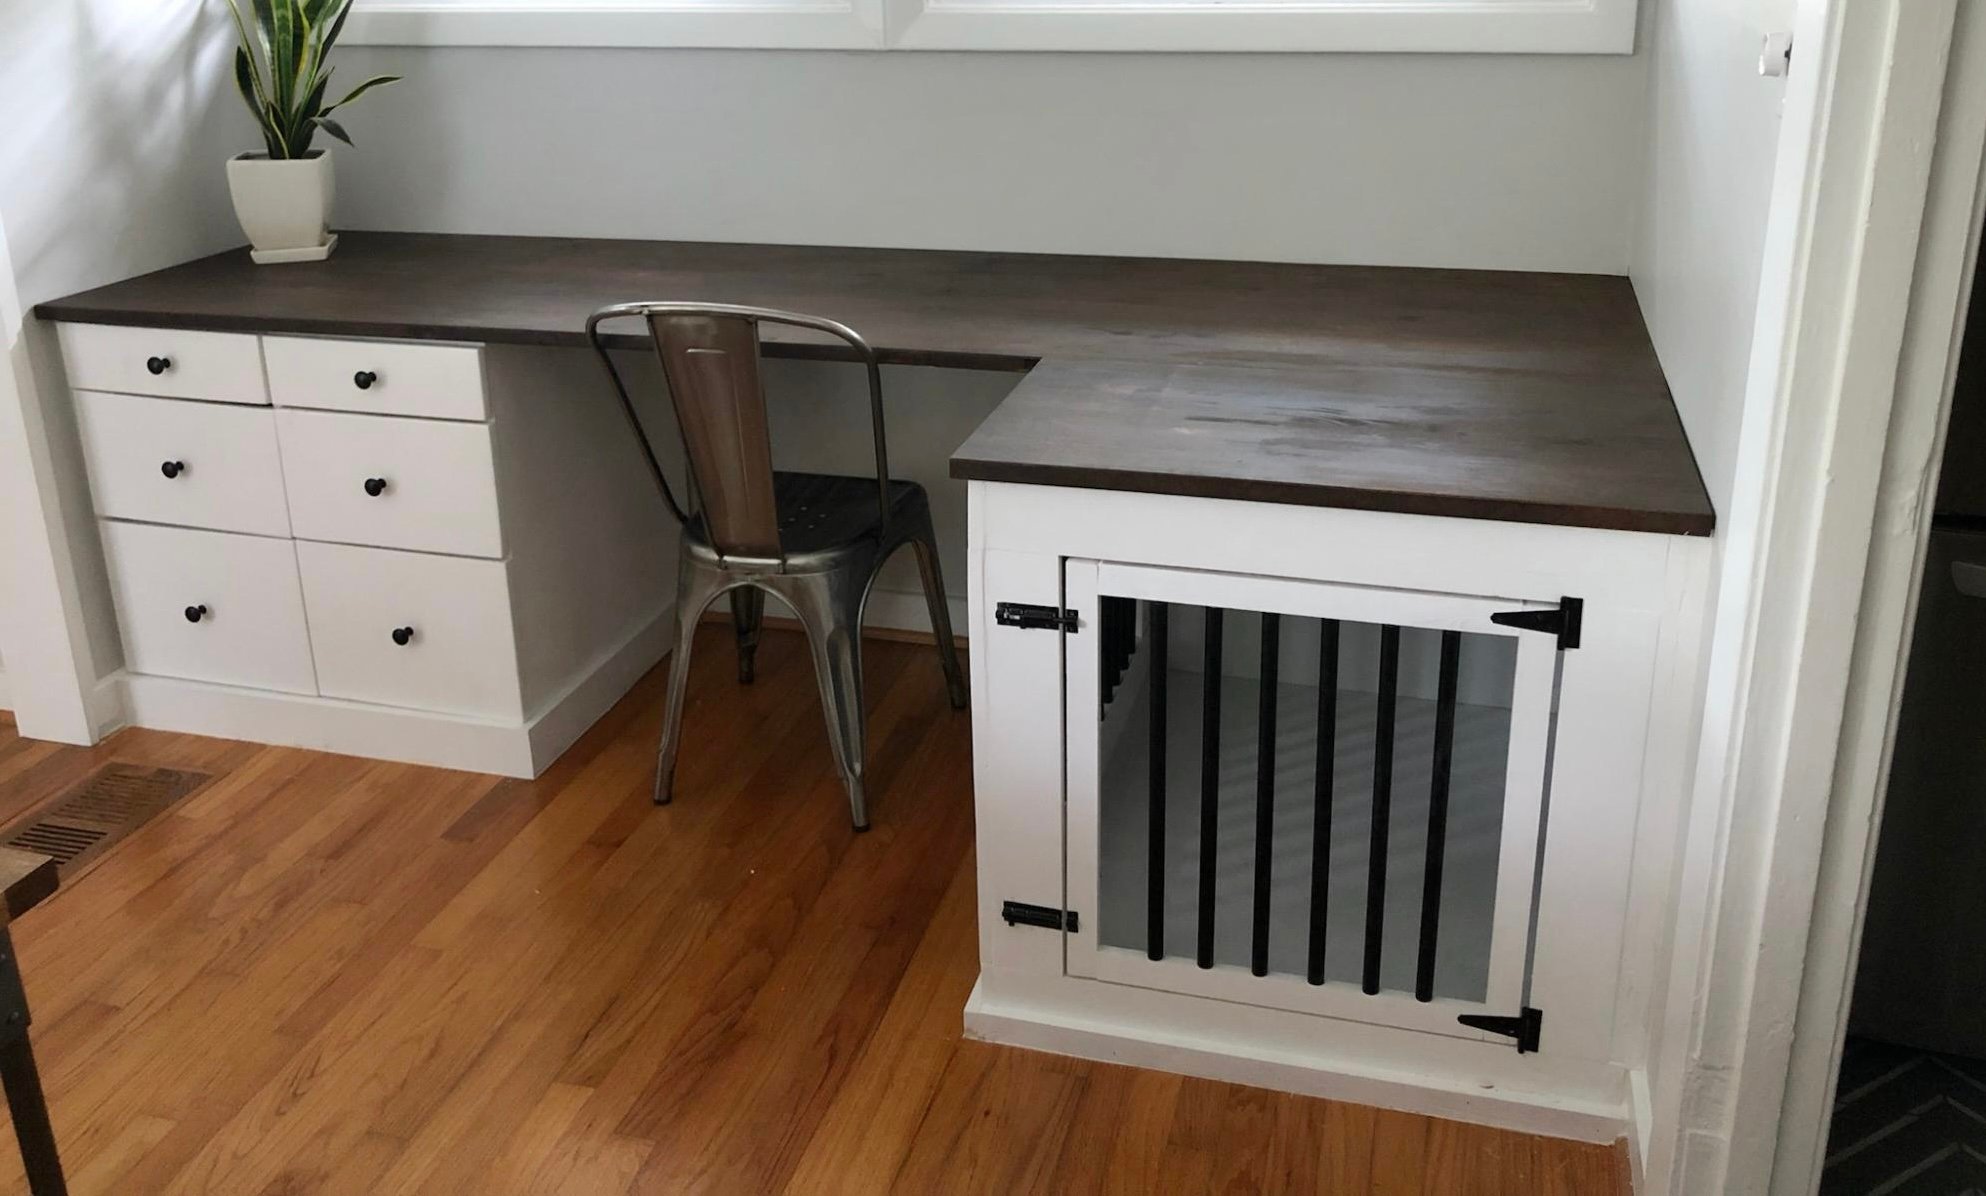
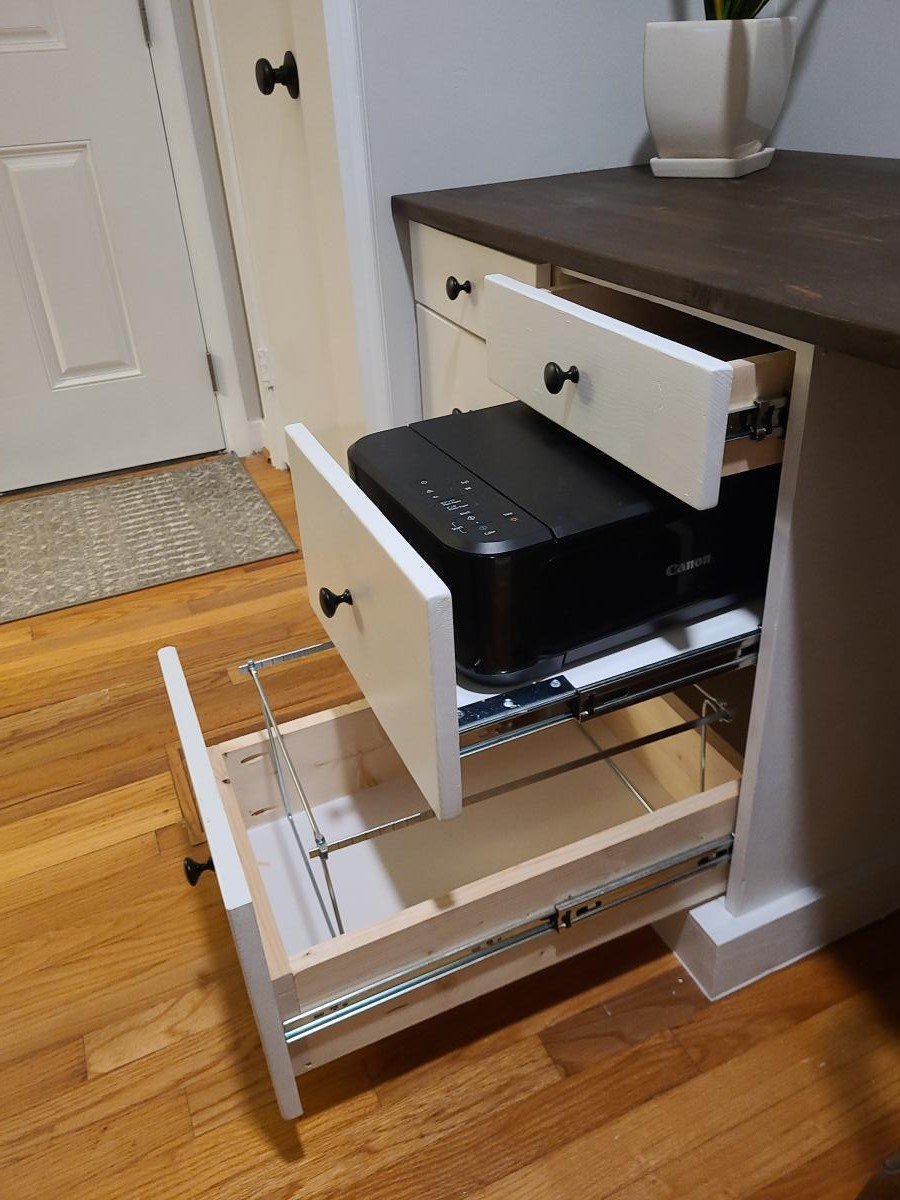
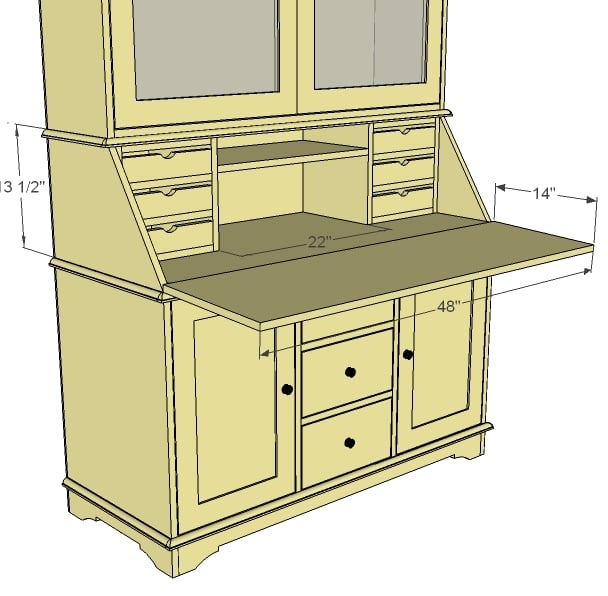
Built in desk with dog kennel complete with slide out printer drawer!
by Lisa
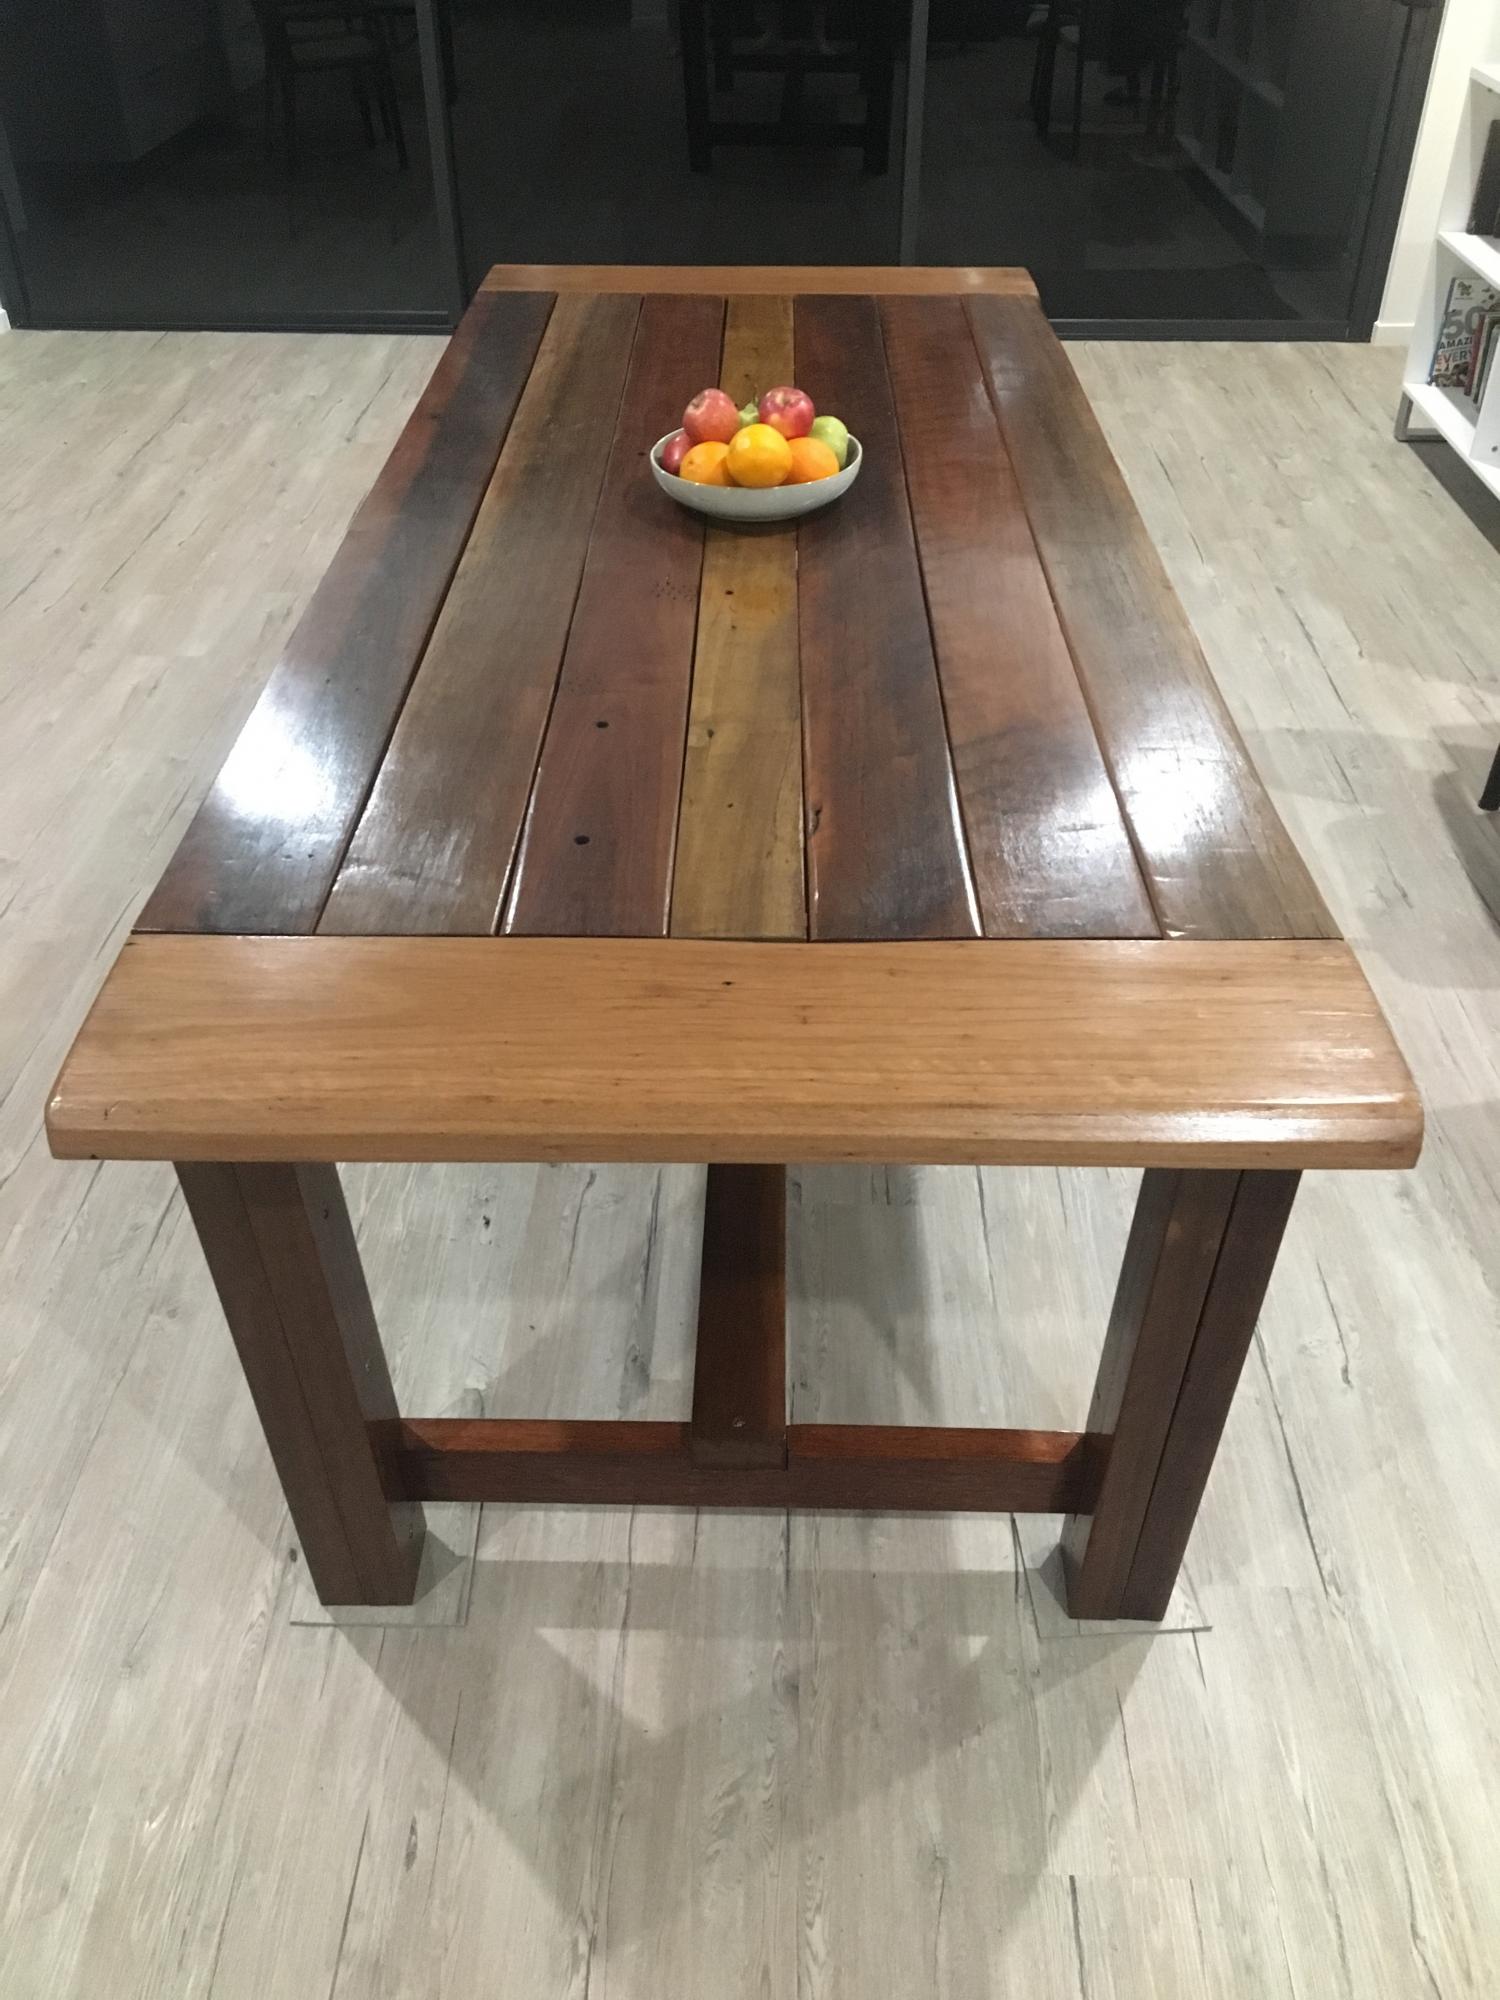
First Crack at any wood work since high school. All timber used was reclaimed hard wood, hours of
planing,sanding and clamping (its heavy). A few mistakes but that's learning.
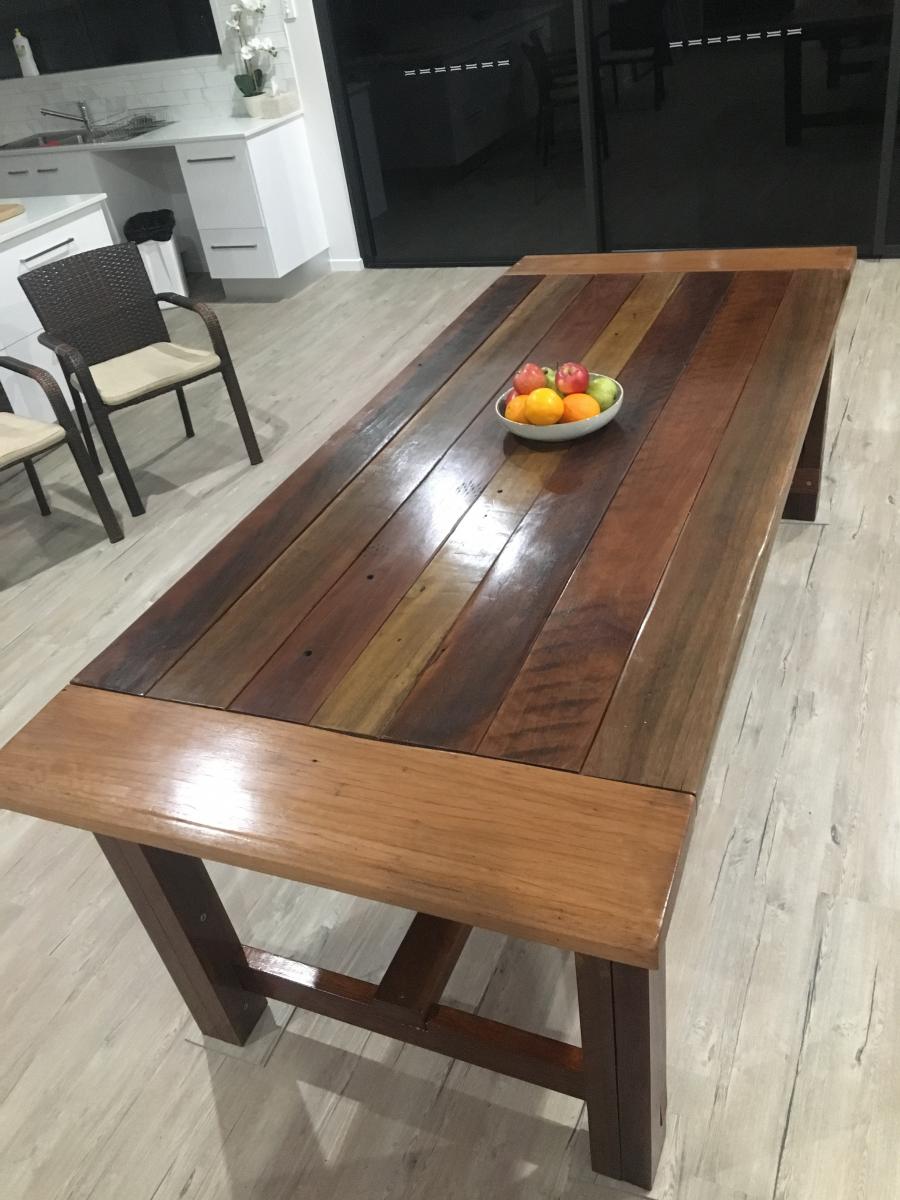
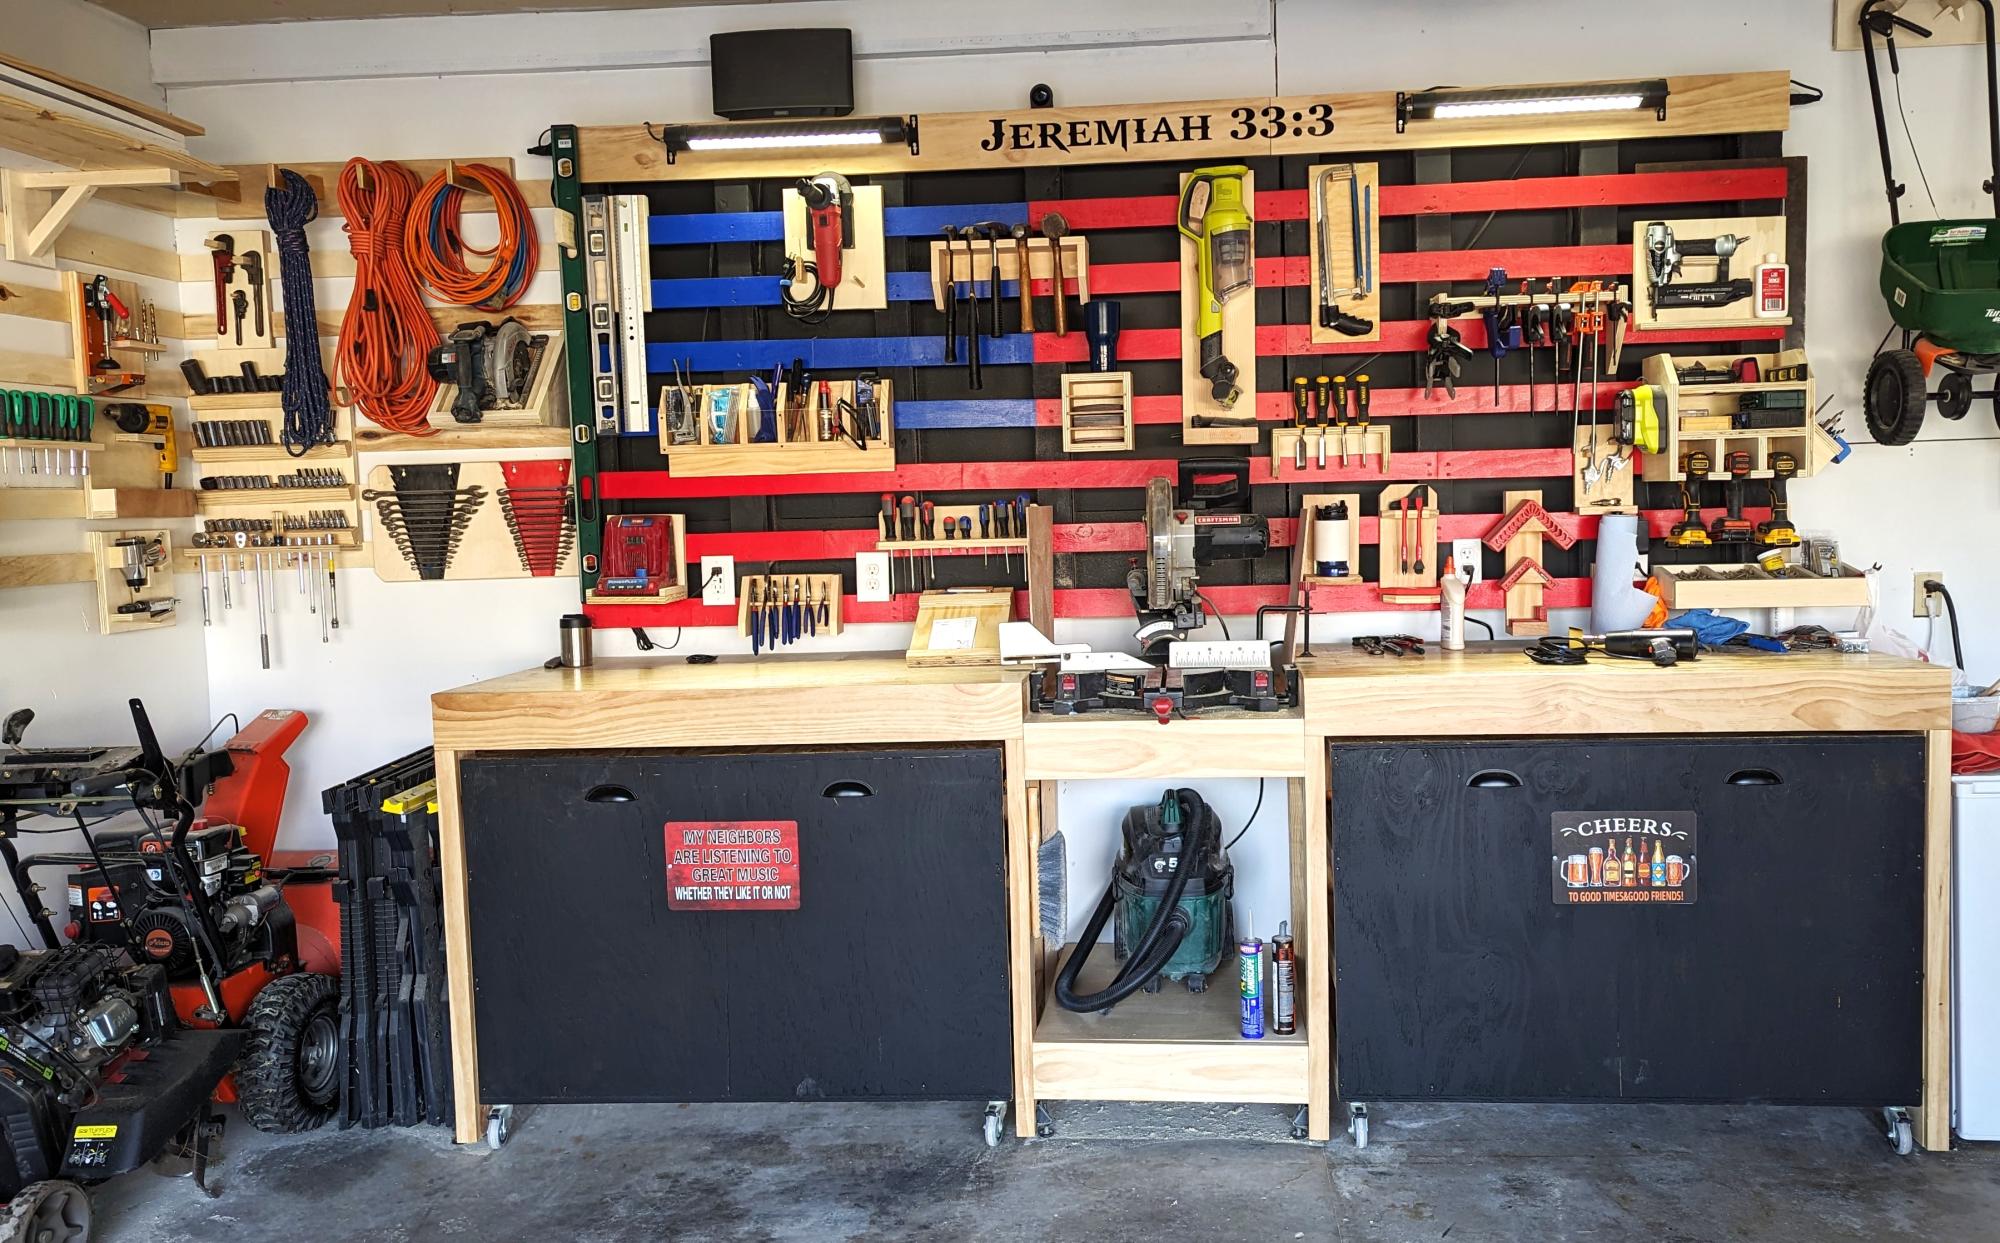
My garage needed an overhaul and I wanted to start a hobby in woodworking.
I found my way to Ana's website and found some of the best ideas and decided to try my attempt at building the Ultimate Roll Away Workbench with Miter Saw Stand.
This helped inspire me to augment my garage and build that workbench and new french cleat wall.
Thank you Ana for having such an awesome website and offering up ideas for free!!
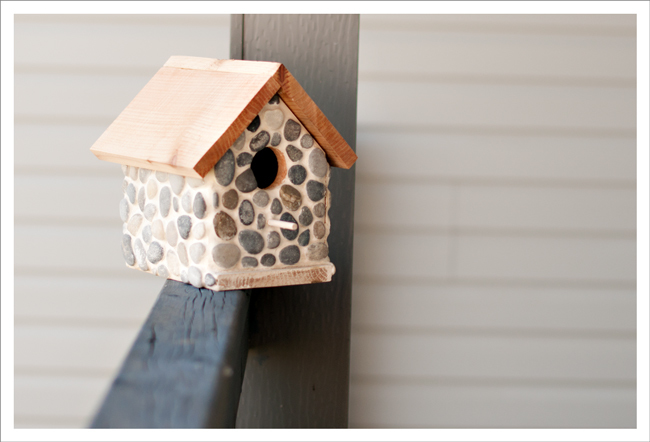
I've been collecting small flat rocks off the road every time I take the dog for a walk. Unfortunately my grout cracked, I probably used the wrong type. Anyone who can tell me what I should have used instead? Suggestions very welcome, as I might try this again.

Mon, 06/09/2014 - 14:28
I love this idea! What kind of grout did you use? I would imagine that for such large gaps between the rocks, you'd have to use a sanded grout (most state whether they're for indoor/outdoor use, but I've only seen ones that say both). But it could have cracked because the wood underneath expanded or contracted or the grout wasn't the right consistency.. Love, love, love!
In reply to Too cute! by Lady Goats
Wed, 06/18/2014 - 09:30
Thank you for your comment on my birdhouse! I talked to a contractor who suggested that my grout was too watery when I started. I also used Polyblend non-sanded grout. I may use sanded next time. Trying to decide if I should give it another go, I kind of want to!
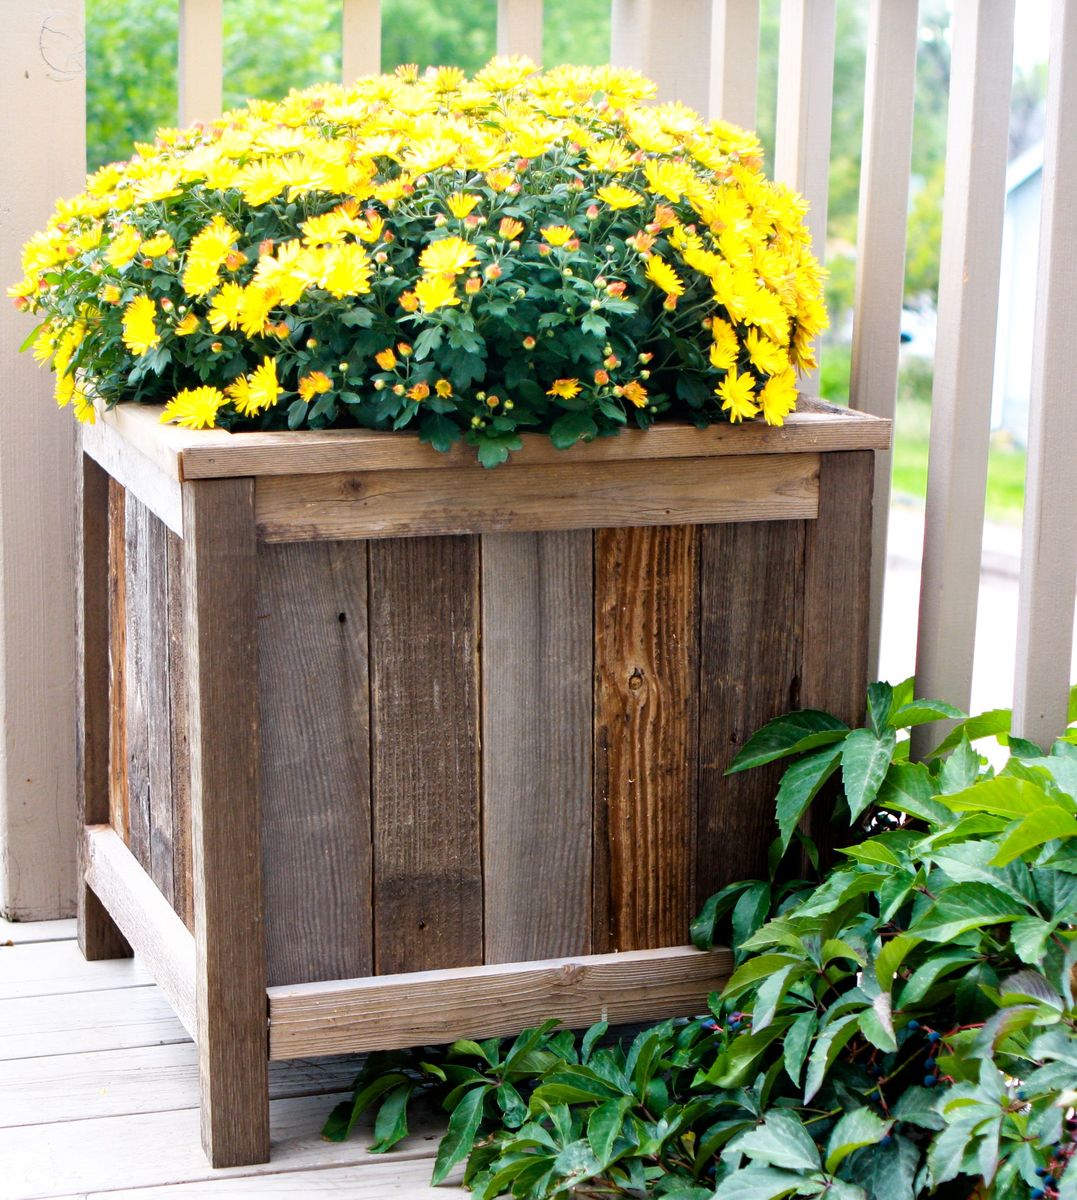
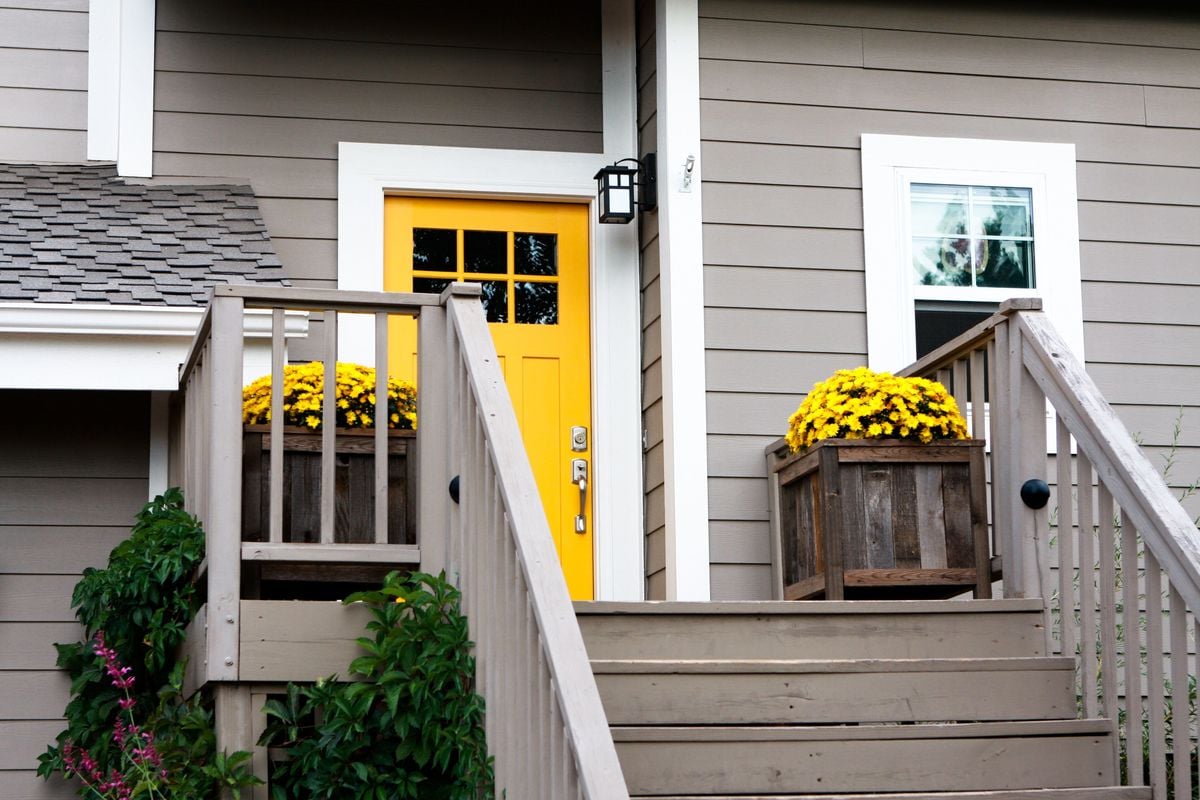
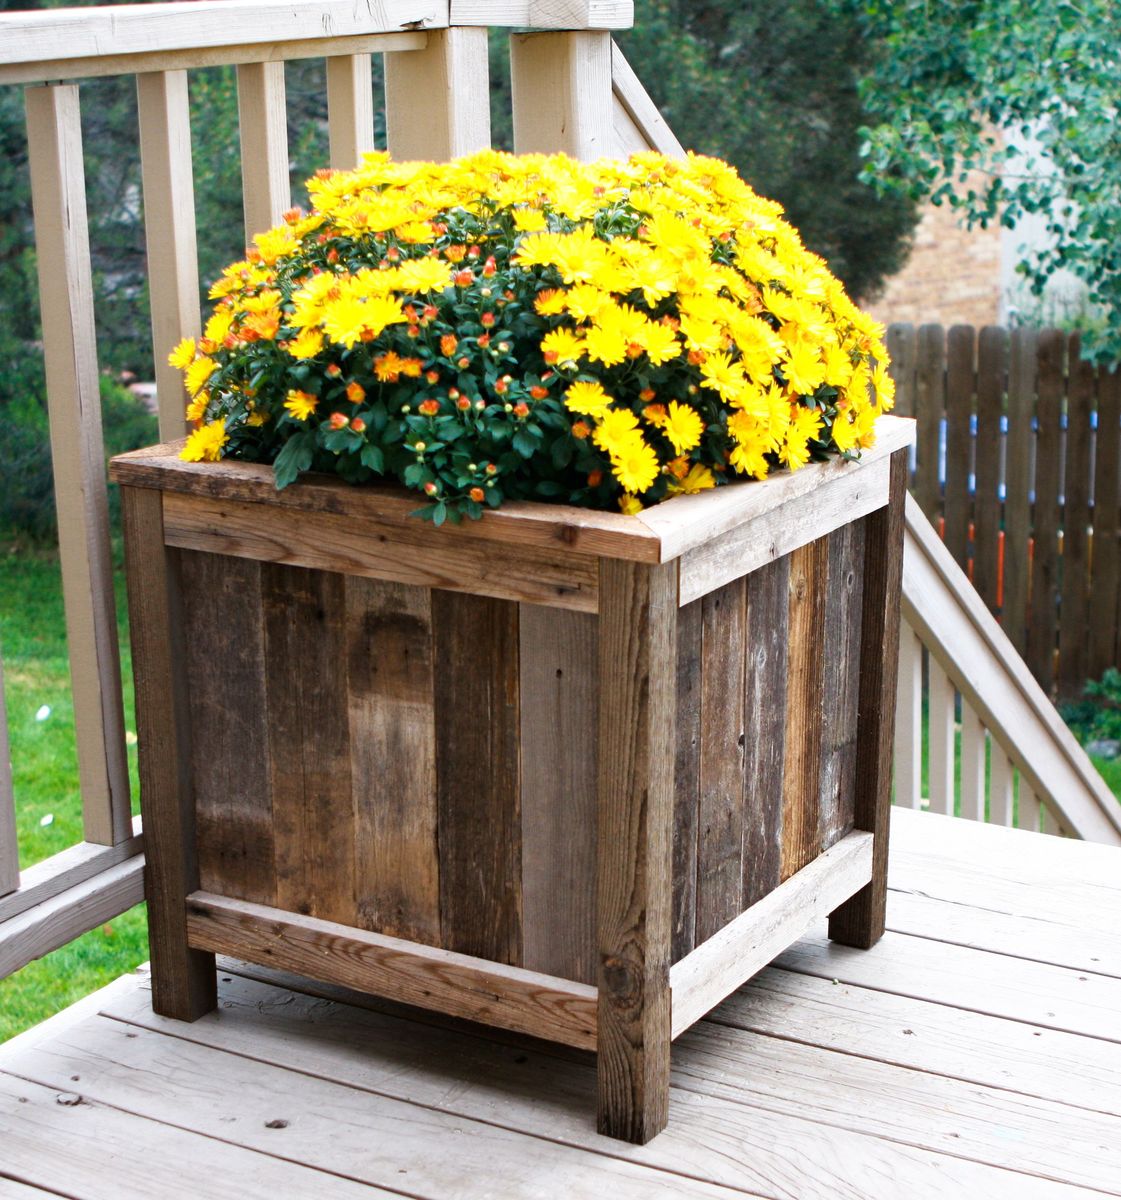
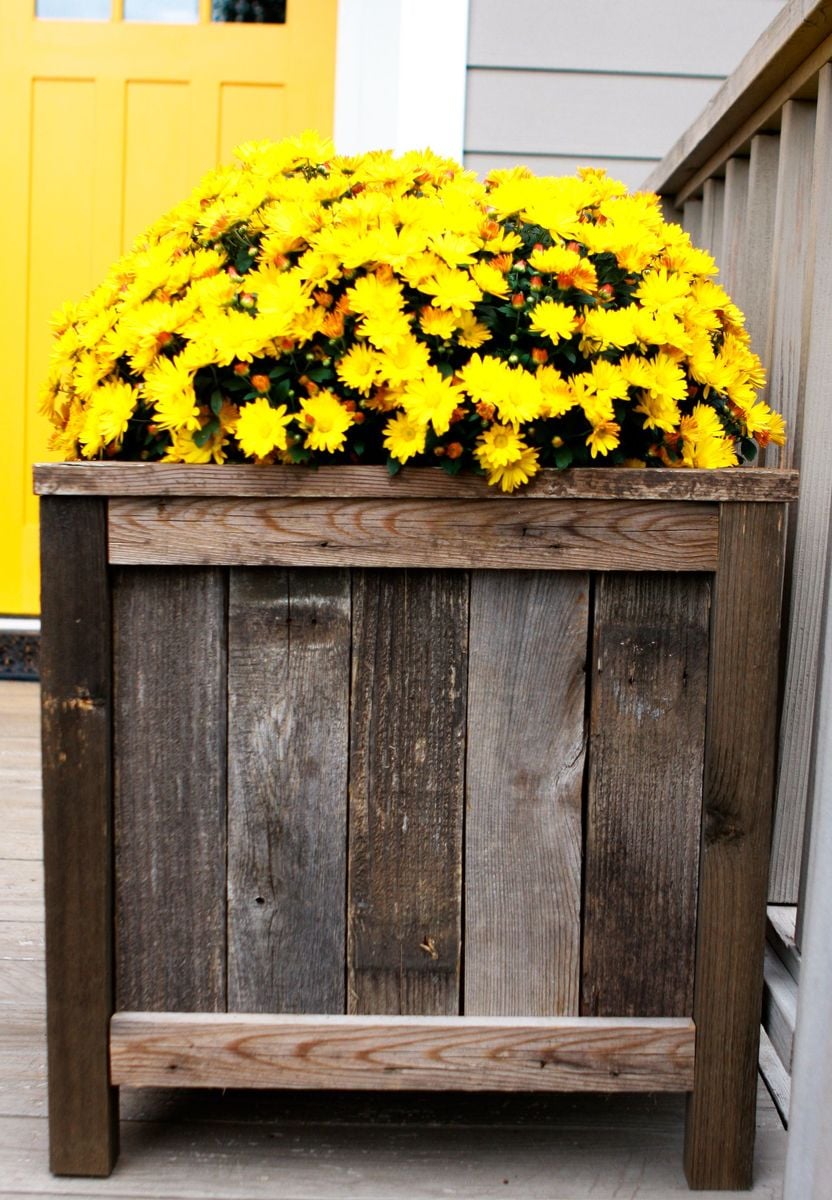
I built Ana's under $20 cedar planters for free. Or, almost free! I had to buy some more wood glue, but I had some of the wood on hand and took some from a friend's pile of old fence wood. It took me about five hours to build both planters from start to finish. See the blog link below for more info.

Tue, 09/08/2020 - 16:12
This is great. I just tore down my old fence and have tons of old cedar pickets. I want to make some planters for my new patio.
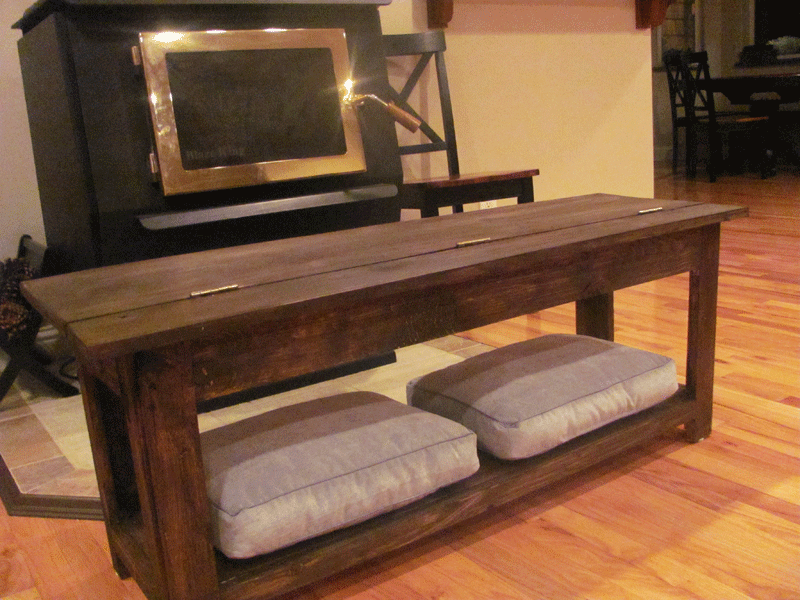
Ana's Flip Top Storage Bench. I made this ASAP, after I saw it in the book, and then online. I thought it was going to be longer and was thinking it would go great in the mudroom, but after it was finished it turned out to be the perfect size for a fireside seat.
This is my first time using hinges....are they supposed to show? By the time I got them on and working I was pooped and didn't want to test my luck. Maybe I'll have to get some more decorative looking ones!
Used my Kreg Jig, still had splitting issues.
Used finishing nails around the shelves to secure a bit.
Oh and HD didn't have a 1x12x12 so I had to get three 1x12x6 . Bet that cost more, but I'm happy to have some more scrap wood to play around with.
Thanks Ana!
Sun, 10/21/2012 - 09:27
You did a great job on this table. What color stain did you use? And did you put a coat of poly on it?
Yes, the hinges are supposed to show. I made this table about two years ago when Ana first posted the pans, but I don't use it as a table. I use it as a bench in my entryway to hold gloves, hats, etc. It's held up great all these years, and now I'm thinking of building another one for by my garage door, since that's where we come in and out most times.
Sun, 10/21/2012 - 09:38
Thanks, I used Minwax color expressions in walnut, I haven't put poly on it yet, I thought I might just put a wax over it to make it a bit smoother. I don't really know what I'm doing quite yet, so I'll have to learn my options!
I'm thinking of making the longer version for the mud room....should go quicker on round two right!
:) Valerie

Mon, 10/22/2012 - 09:06
I think in order to get your hinges to be more minimally showing you can inset them by using wood chisels to shave a rectangle of wood from the surface where the hinge lays. I've used hinges on a couple things so far and that's what my husband said to do but I was being to lazy to get some chisels. You can get them at any hardware store for pretty cheap I think. Now I'm not positive on any of this since I haven't been doing this hobby for too long. Your bench looks great by the way!
Created my own version out this plan.
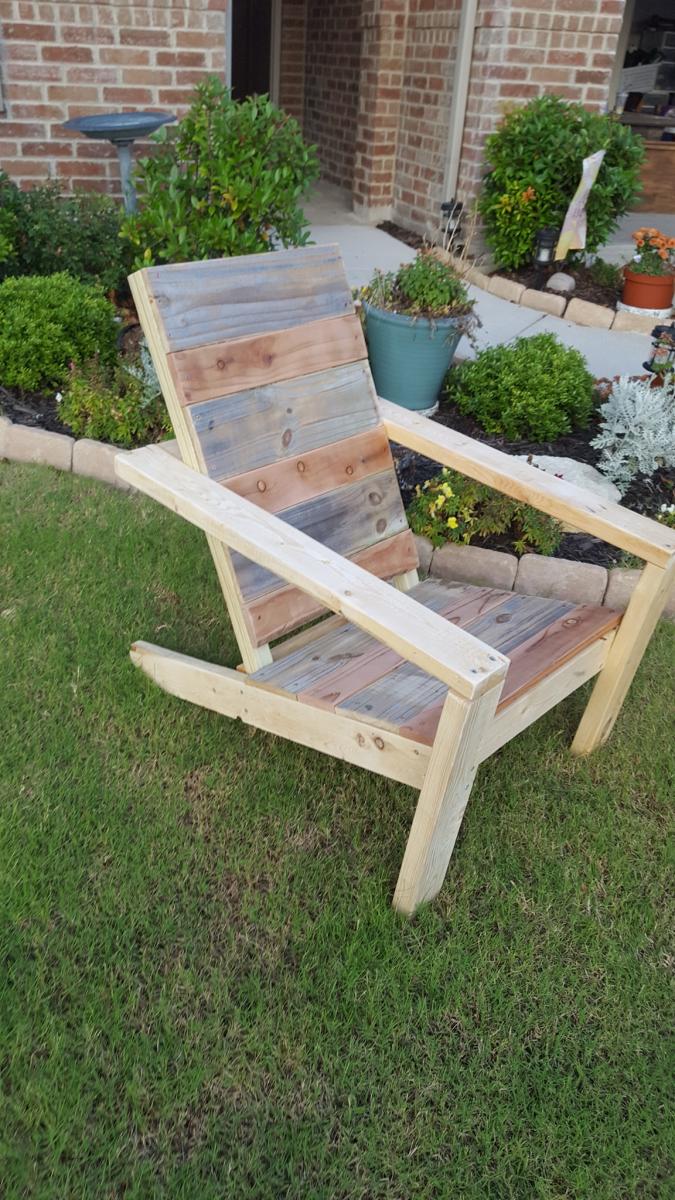
I love these chairs. I have made about 10 of them. I have several orders for 16 more. I use old fence planks for the seat and back. I also changed the back supports to 35 in. My husband is 6ft and he wanted to be able to rest his head back when he sits. Cutting the legs is the hardest part. I also changed the arms to jig holes so the Screws would not show.

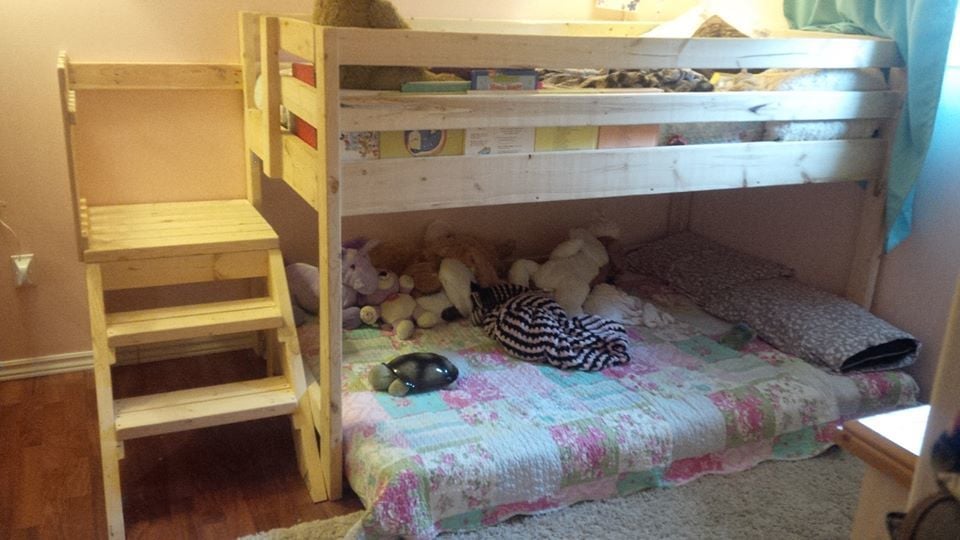
I needed bunk beds for my girls and found the camp loft bed - perfect! I liked how it used all 2x4s and 2x6s... made it easy to do everything with the chop saw. I customized the bed by lowering the overall height so that the actual bed is only 3 feet off the ground, and then I still had plenty of room for a mattress underneath for my three year old. I was strapped for space so I made the deck half the size so that the stairs stayed in between the bunk bed posts. I also added a little fence to the side of the deck since it's not up against a wall. I am so happy and proud of my work and I thank-you SO much for these wonderful easy-to-follow plans :)
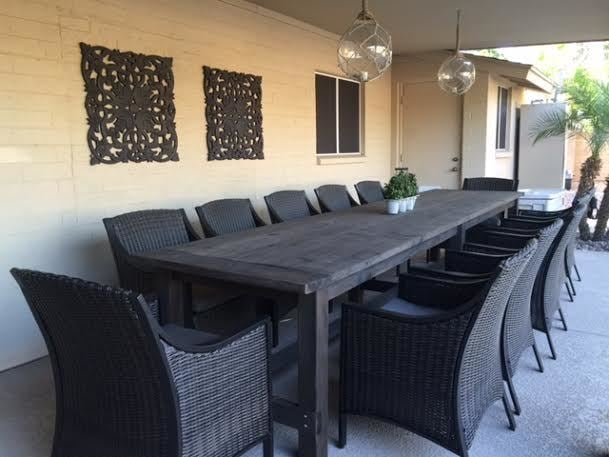
I used the Farmhouse Table plans and just extended the measurements to build an extra-long outdoor table that seats 12.
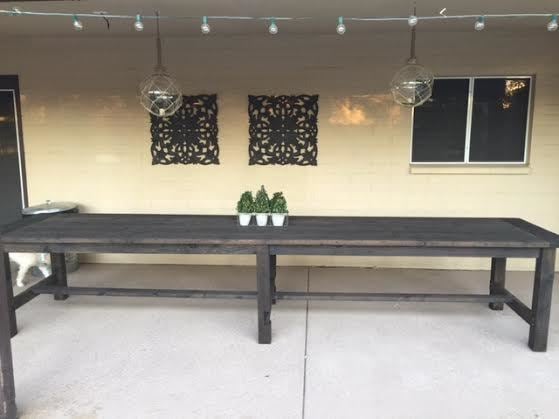
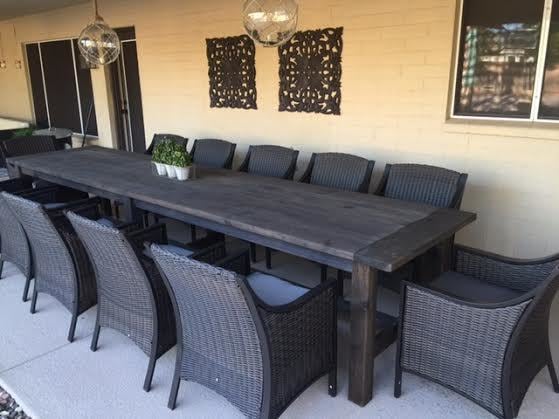
Used 36 inch legs instead of 32".
Also used two 6x1 inch boards for each side of the box.

Comments
Ana White Admin
Sun, 12/26/2021 - 17:23
Amazing Playhouse!
WOW, that is so awesome, love the real stone, composite decking and that you matched your house!