Community Brag Posts

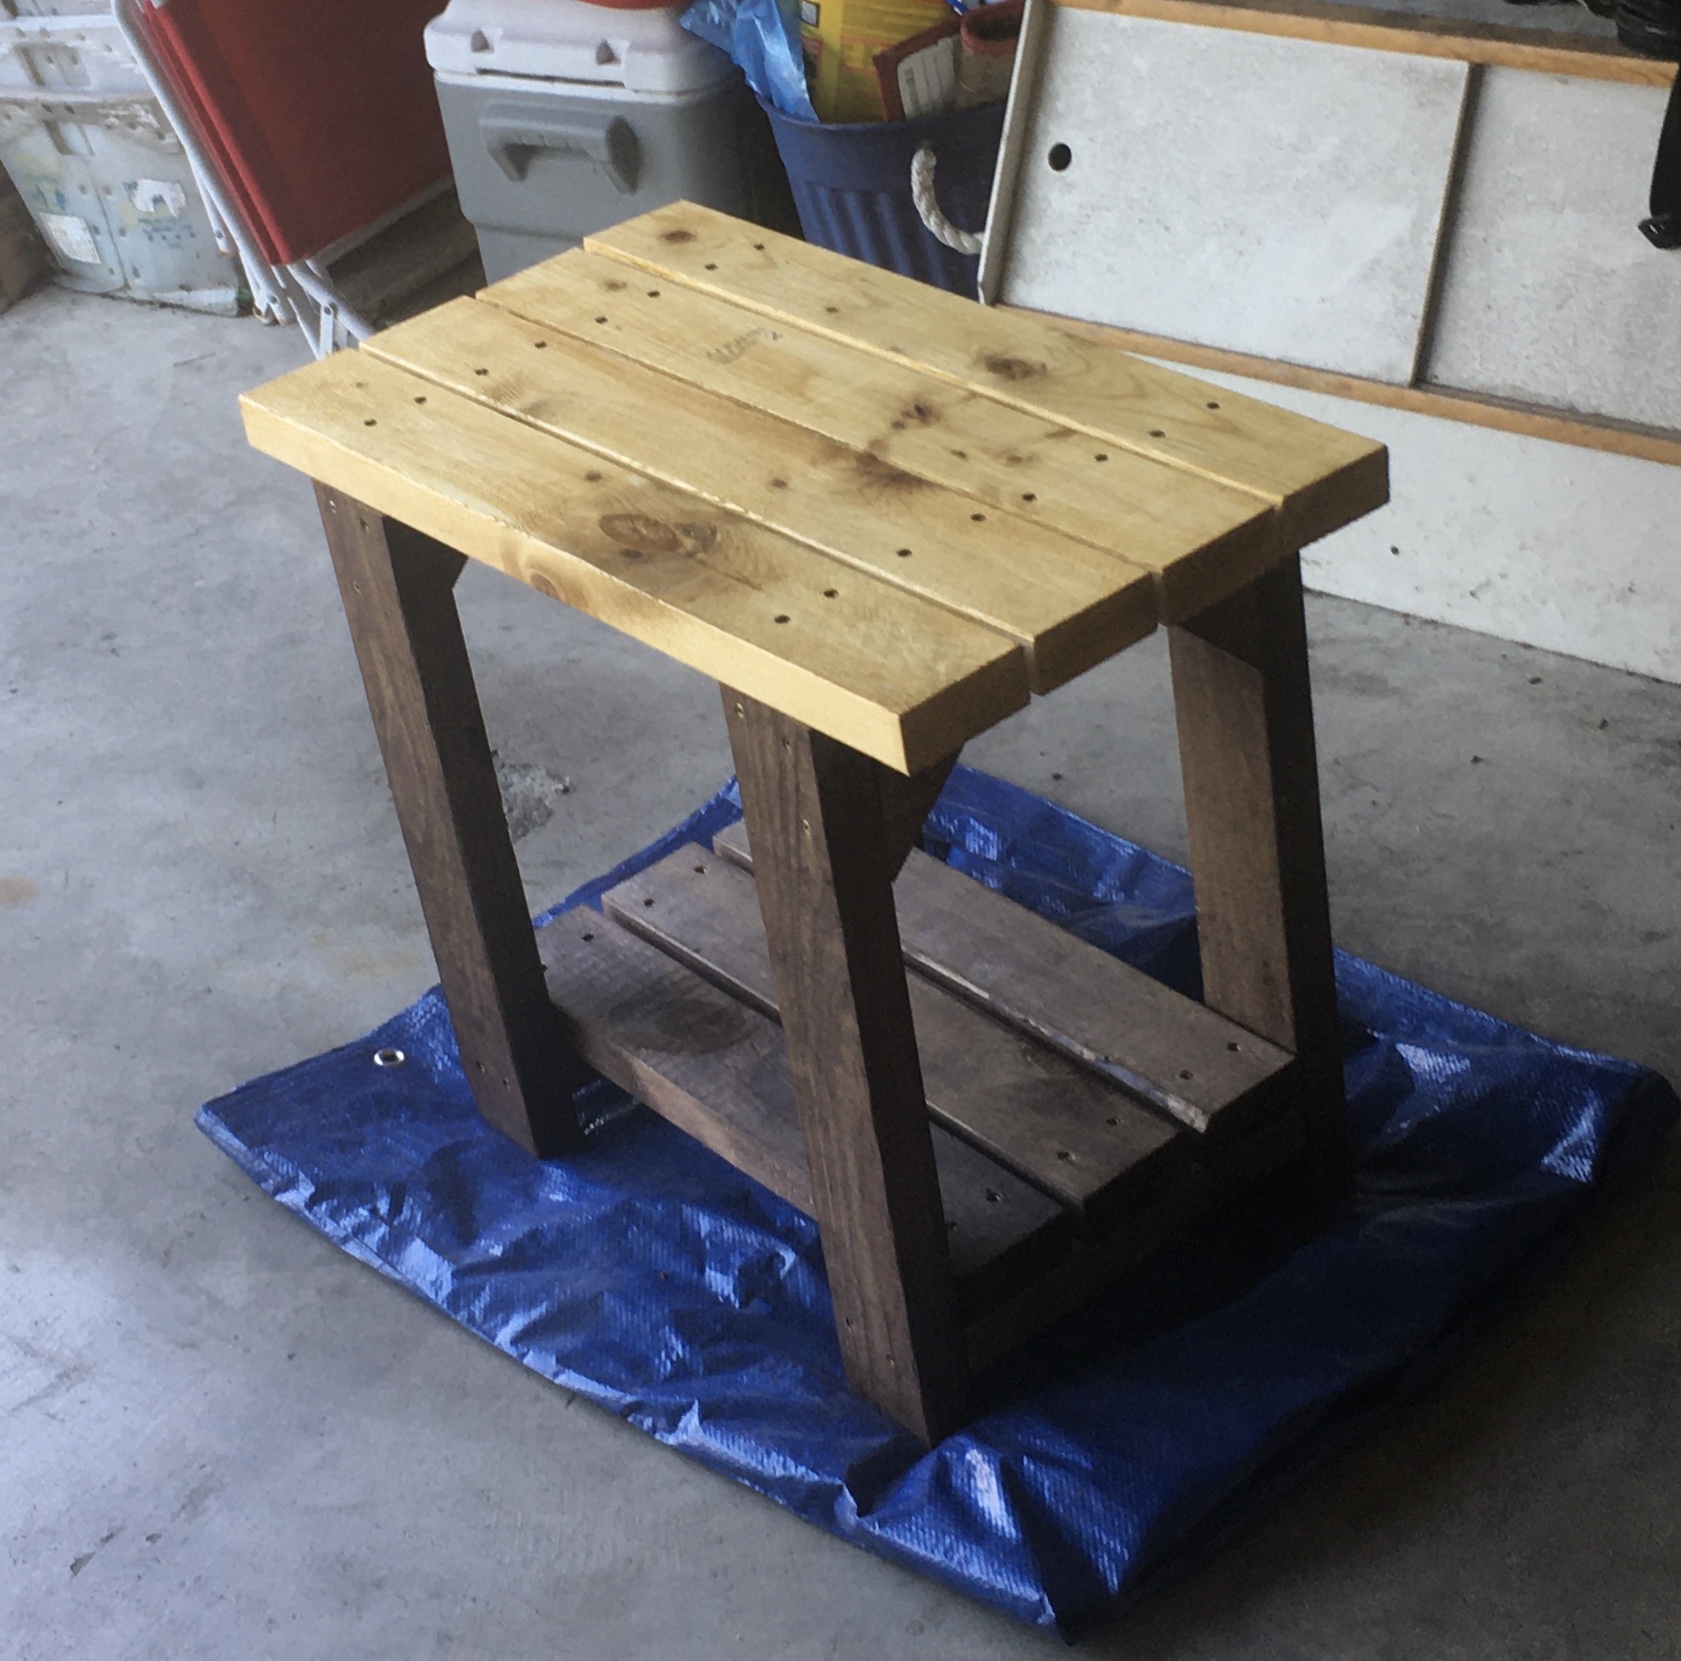
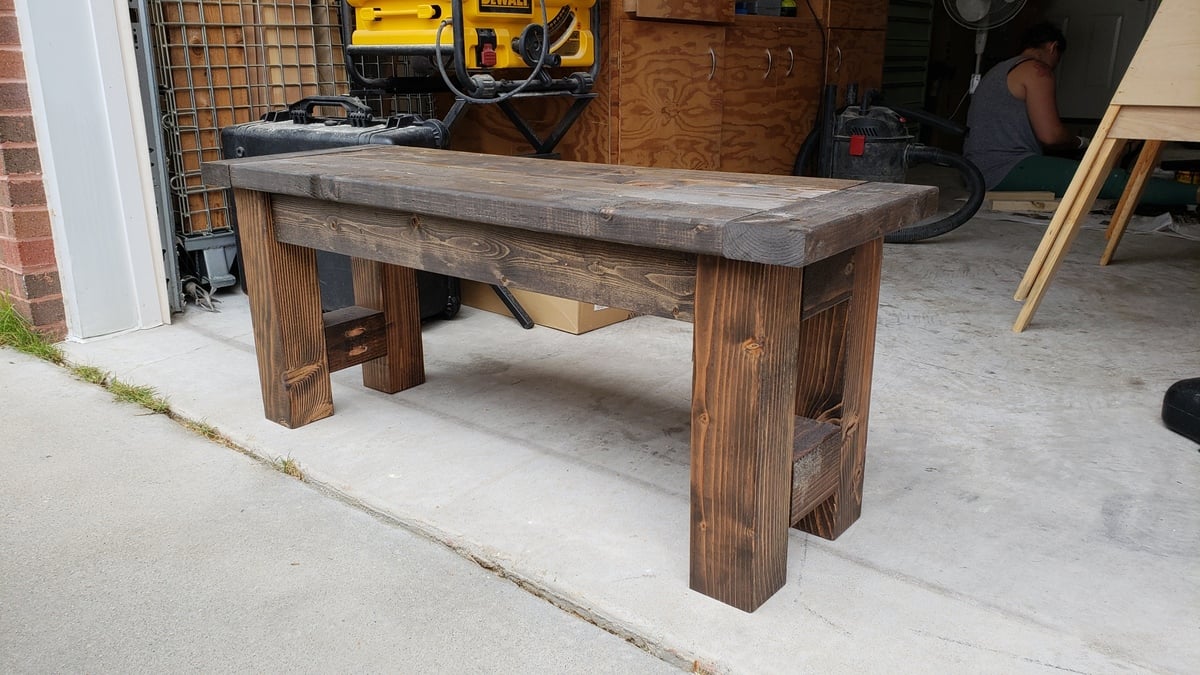
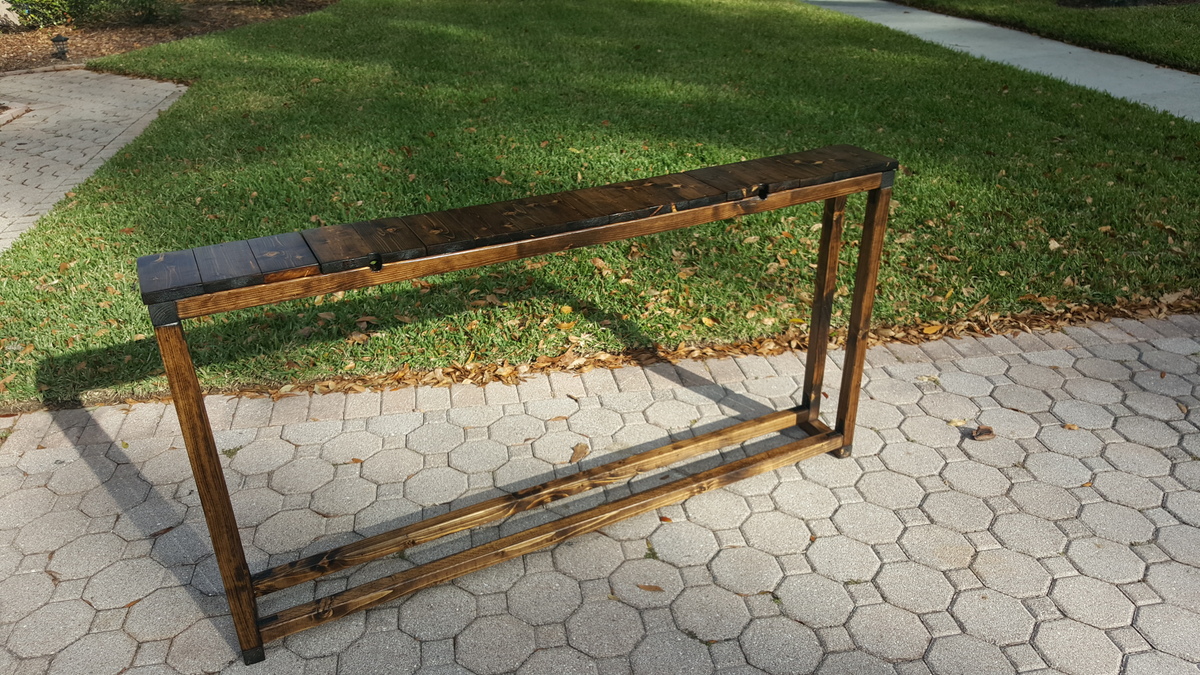
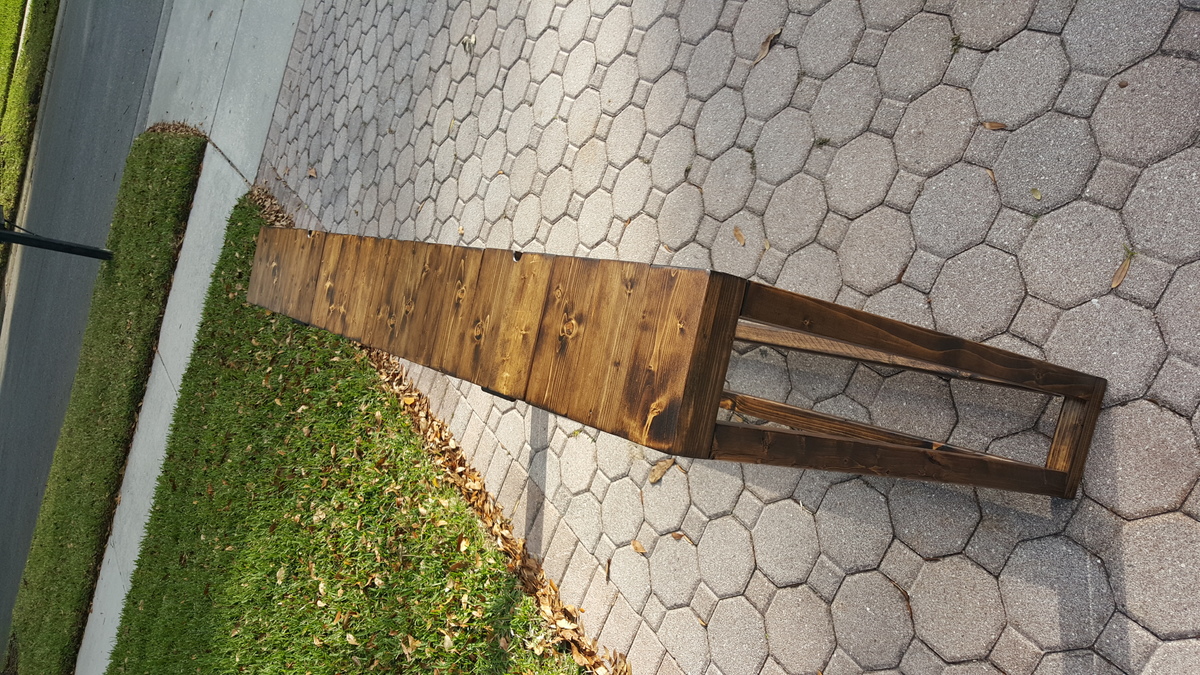
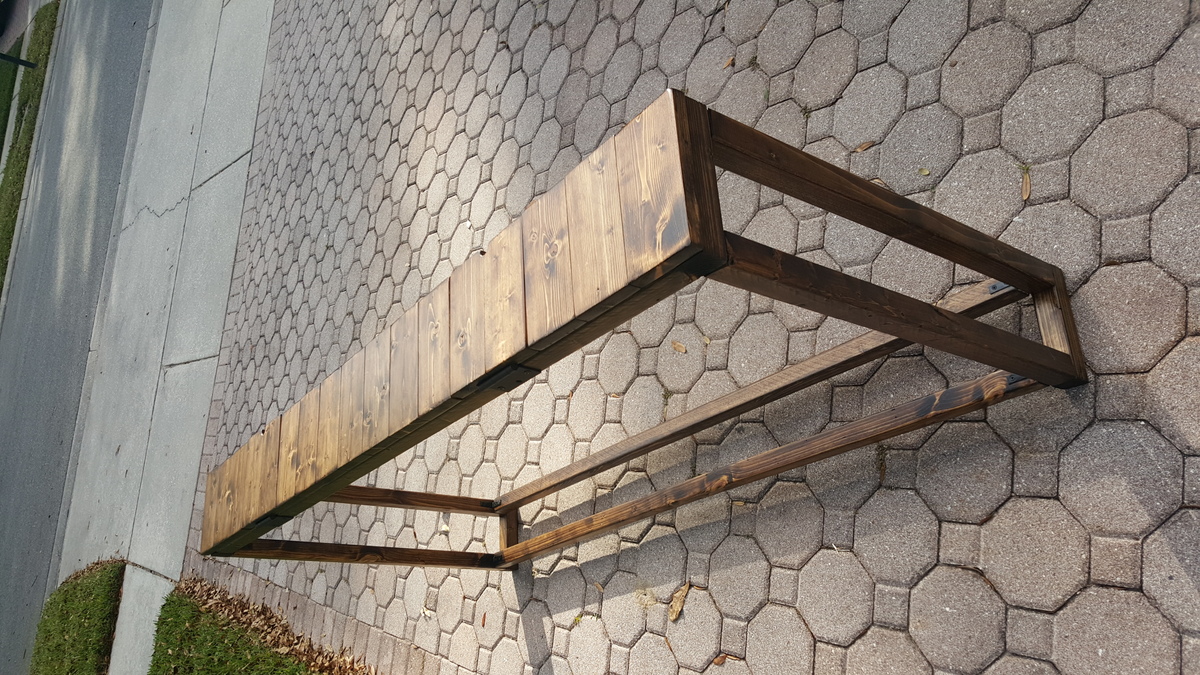
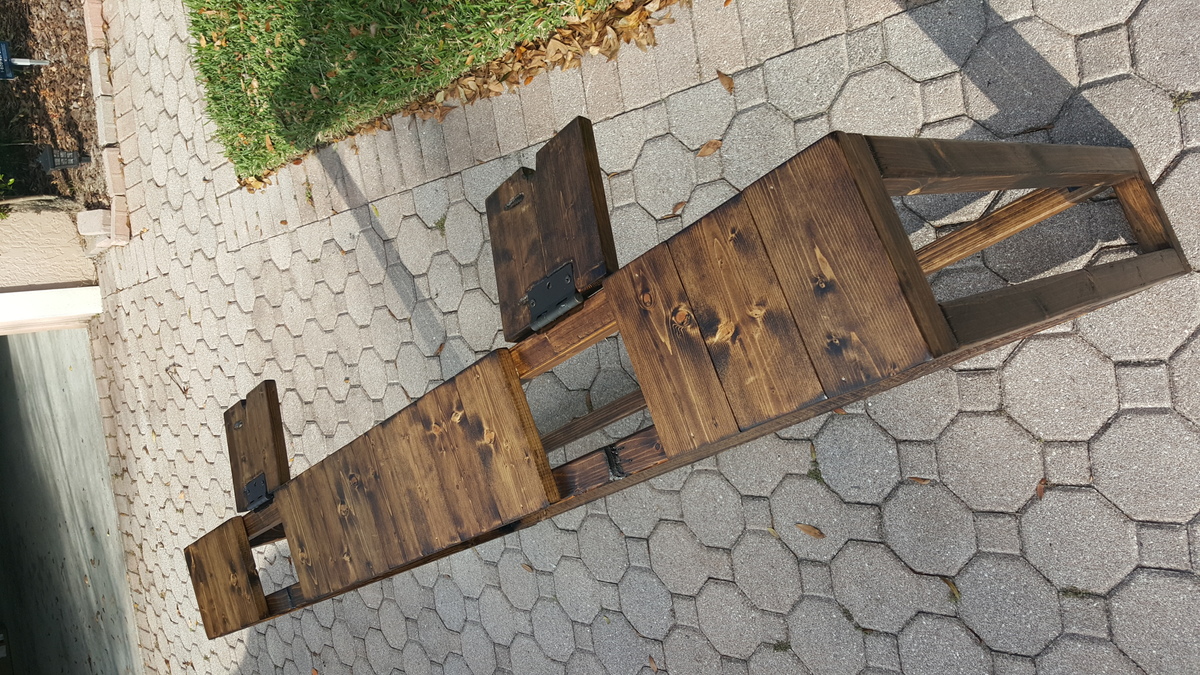
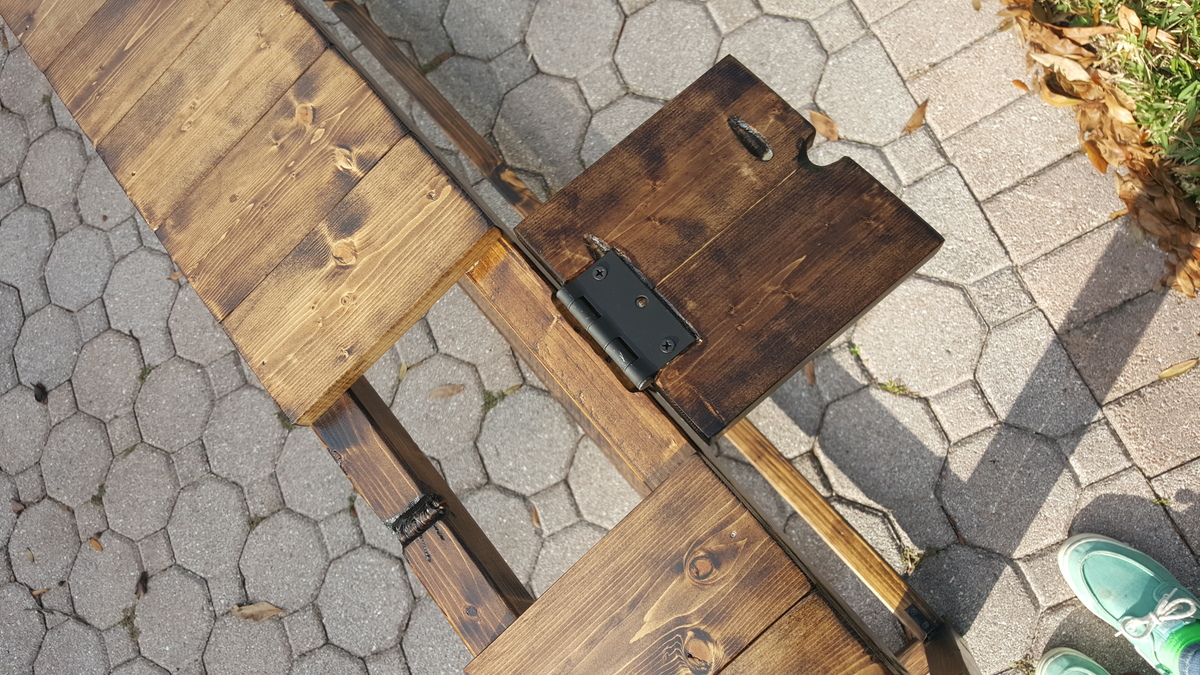
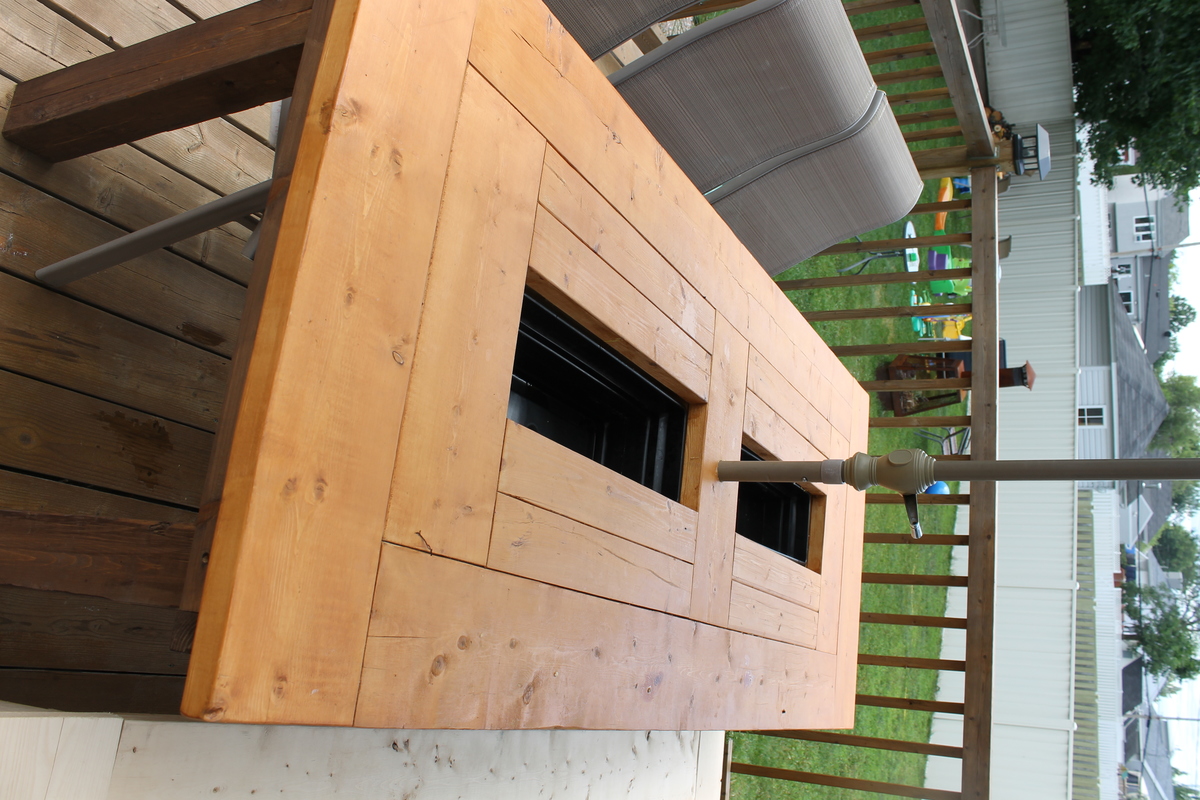
PATIO TABLE WITH BUILT-IN BEER/WINE COOLERS

Submitted by Joagirard on Fri, 07/04/2014 - 21:05

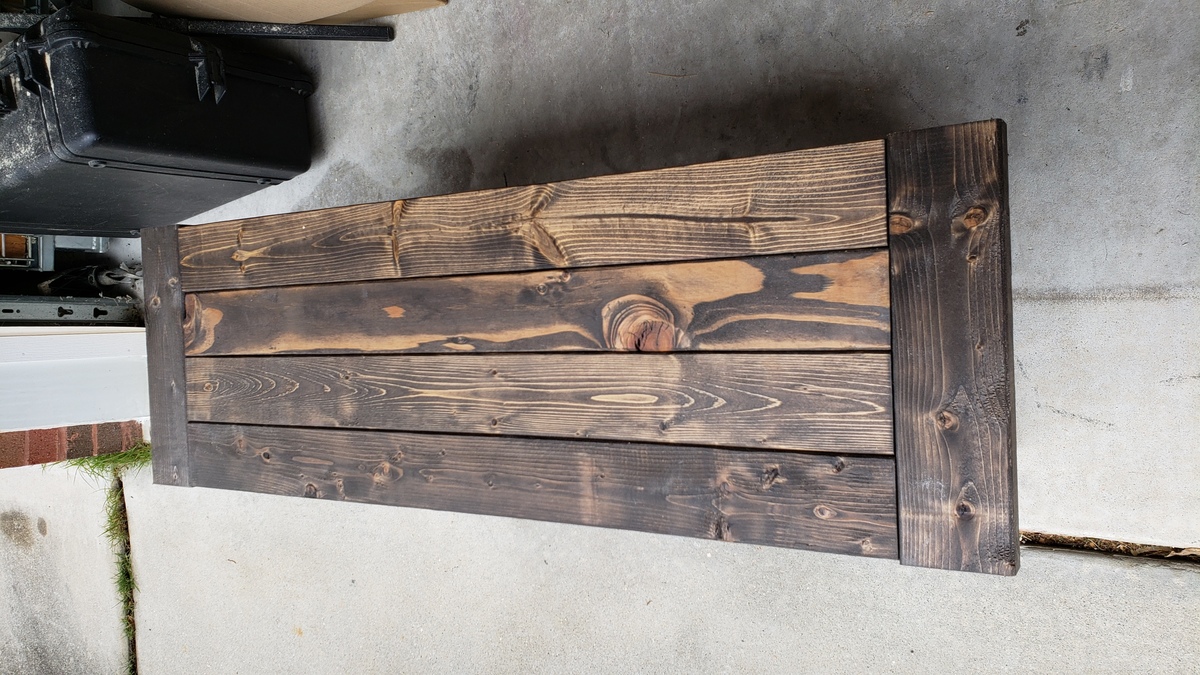
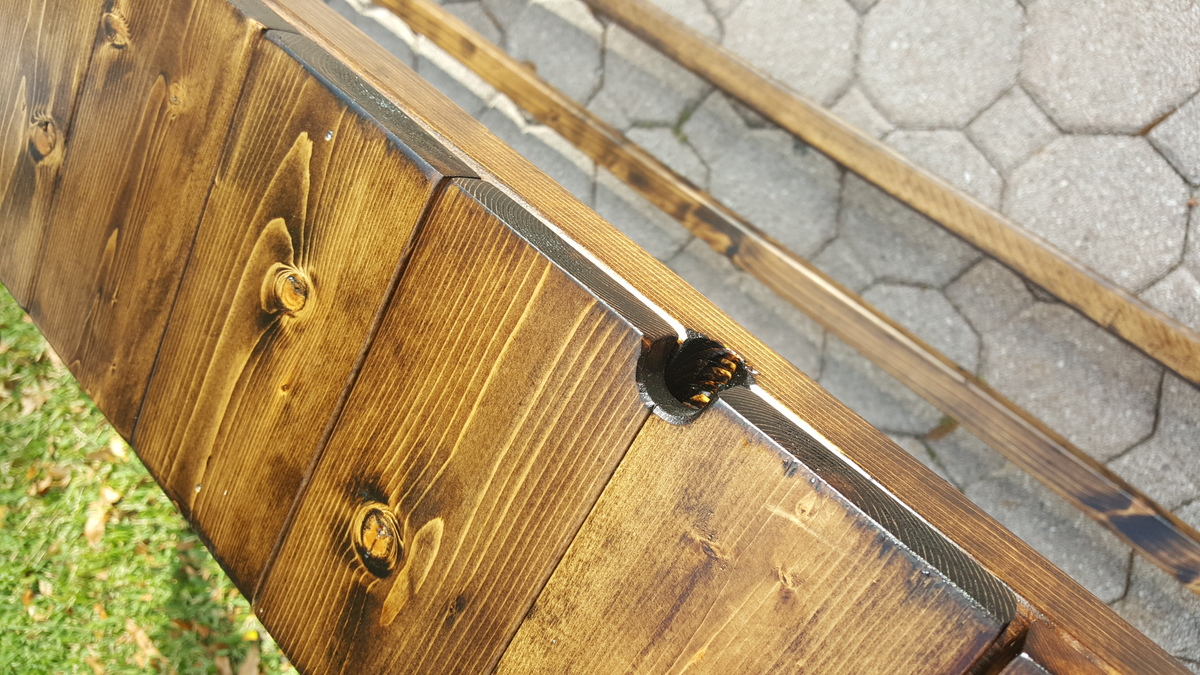
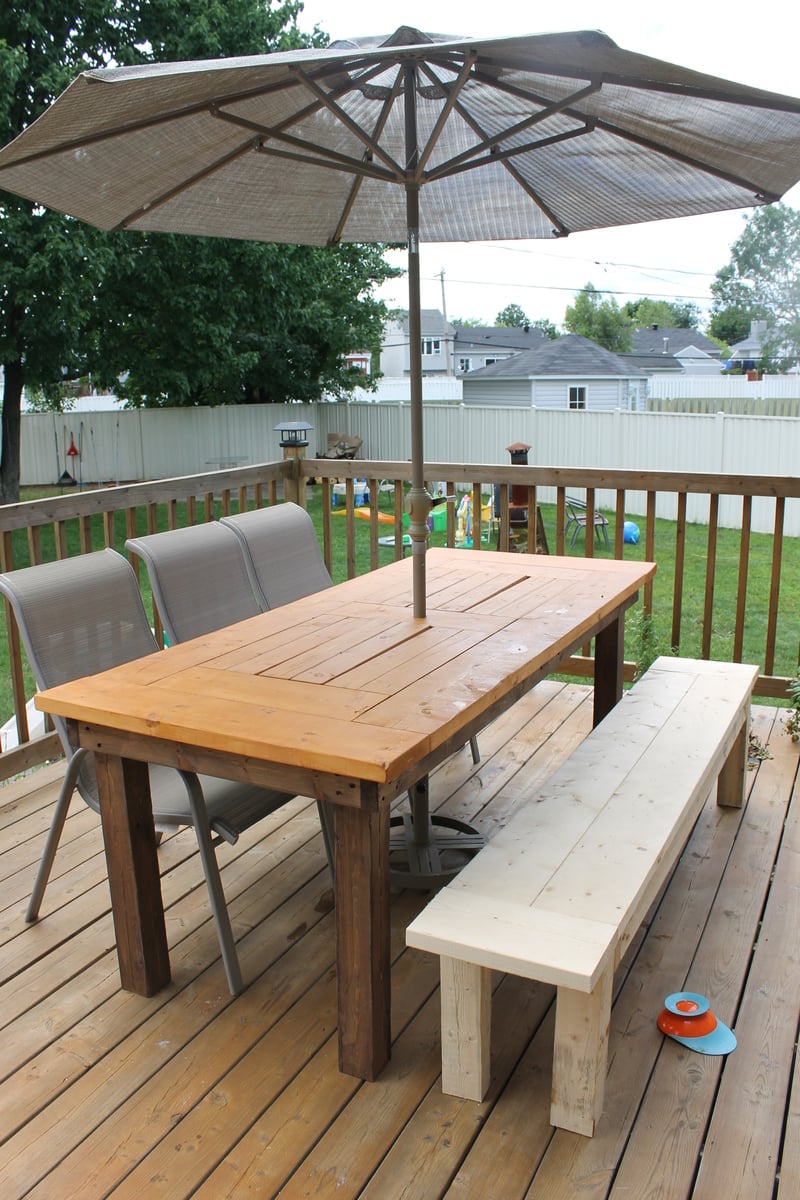
My sister was in love with my 4x4 truss table i made and needed a patio table so we decided to take one day to make 2 tables, one for each. We convinced both daddys to take care of the kids while we made the table by telling them the tables were gonna have beer coolers inside! Attaching the to of the table was a lot a job. If you plan of doing this you really want to have a kreg jig. It works well, we love it. I made a bench to go with it. I made my how plan for it.

Estimated Cost
200$
Estimated Time Investment
Weekend Project (10-20 Hours)
Finish Used
Sico outside wood stain color oak. 3 coats for the top and 3 coat sico chocolate for the bottom. All applied with a brush.
Recommended Skill Level
Intermediate

Toilet step stool

This was my first project at building some sort of furniture. we wanted a stool that really fits out toilet bowl shape, the height, etc. and 2x6's worked perfectly. I could have bought 2x12's for the sides, but it would have cost significantly more and with the inside support board it is plenty sturdy.

I bought 2# 2"x6"x6 foot coarse pine boards from Home Depot (not the expense Select Pine boards. They cost about $6 each. Then I bought a 100 count package of Kreg 1.25" coarse screws.

Cut lengths
2 @ 15 3/4" for lower sides
2 @ 10 1/4" for upper sides
5 @ 14" for steps and fronts
1 @ 12 1/2" for inside support

I used my Kreg Jig and connected all the pieces along with wood glue. I sanded the whole thing down after and tried to round/smooth the corners.

Estimated Cost
$17
Estimated Time Investment
An Hour or Two (0-2 Hours)
Finish Used
none yet.
Recommended Skill Level
Starter Project

Comments

pADDY1957

Tue, 03/01/2016 - 10:29

Does anybody have plans for a potty seat. I would like to build a childs chairs that has a ptty

Simple Bed, Simple Plan!

Submitted by Anonymous (not verified) on Mon, 11/07/2016 - 20:04

Total cost was around $170. I used western red cedar for 4x4 posts and 2x4's, all the rest is carpenter pine. For the slats I decided to go with .375" dowel pins and drilled holes to hold slats in place. I sunk 3" screws through frame to connect head and footboard, if I decide to move it one day, I will just remove screws and do the same again. The finish is Milk Paint, i absolutely love it, mostly because it is 100% non toxic for my kiddies :-). The bed is for my two year old who is delighted with it! Thanks Ana for once again saving the day! We have such great and solid furniture because of you!

Built from Plan(s)
Estimated Cost
$170
Estimated Time Investment
Weekend Project (10-20 Hours)
Finish Used
Milk Paint
Recommended Skill Level
Beginner

Chicken Coop

Submitted by Elloh on Tue, 08/11/2020 - 11:05

This was my biggest build yet and these plans along with being able to see a few brag posts with modicifactions made this project less intimidating. I extended the coop in order to add a walk in door. The drop down doors on both sides will give plenty of access and help with cleaning. I've added door latches to all the doors since putting it in place. My dad provided the cedar so that greatly reduced my costs. This project took about six days to complete. The fun part was getting it out of my carport : ) This was built for my daughter's chickens and she is thrilled with it. So am I! Thanks for the plans Ana!

Estimated Cost
Hardware, screws, hardware cloth and plywood - around $150

Outdoor side table

Keeping budget with wood projects, made side table for outdoor fire pit area.

Estimated Cost
$25
Estimated Time Investment
An Hour or Two (0-2 Hours)
Finish Used
Legs and braces=rosewood stain
Top=honey pine
Recommended Skill Level
Starter Project

Loft Bed

Submitted by Anonymous (not verified) on Fri, 02/10/2017 - 11:58

Made from the Camp Loft Bed plans.  Added some additional strength with 4x4 legs instead of 2X4 and added some additional supports underneath for the rambuncious kid that was going to be using it.


Also since the room was small, it was made to be dismantled with a ladder instead of the stairs.


Fun little project for a friend who is also expecting another.  So it looks like we will expand this loft bed for future expansion.

Estimated Cost
$100
Estimated Time Investment
Day Project (6-9 Hours)
Finish Used
Wood Stain - Mini Wax Red Oak
Recommended Skill Level
Intermediate

Farmhouse toy box

Submitted by Jayna on Fri, 02/12/2021 - 13:34

Made a few adjustments to the farmhouse toy box. Made it a little bigger and added Xs out of 1x2s around it to give it a little extra something! I'm using it as a storage coffee table and I couldn't be happier with it! So in love!

Built from Plan(s)
Estimated Time Investment
Day Project (6-9 Hours)
Finish Used
Minwax dark walnut stain, three coats of Varathane clear gloss polyurethane, and painted with Valspar white paint.
Recommended Skill Level
Beginner

Chicken Coop A Frame

Submitted by mdownie on Wed, 05/22/2013 - 11:54

I built this A-Frame Chicken Coop using the Ana White plans. It turned out adorable, strong, and I am very pleased. Final cost was $250, and it took me 4 days (in real time, as a mom of 3). One Saturday at Lowes shopping, one Sunday afternoon cutting, and two days of assembly. Then a 5th for painting. Give or take a dozen extra runs to the hardware store! My brother-in-law helped cut the angles on his miter saw, and my uncle helped with assembly. I kinda doubt this could be done for $100 - maybe if you have a bunch of scrap materials and spare paint. We even have 7 or 8 hens in there! I only intended 3 to live in it, but my uncle added the extras and they all get along happily. I found the roof cap at Home Depot (didn't find at Lowes).

I would also like to point out that I was very afraid to do carpentry - I was afraid to even buy the lumber. But I asked for a lot of help from a lot of Lowe's and Home Depot people, and resisted the naysayers, and just got brave and did it. And it came out beautifully! If you are new to using power tools, get someone to assist, and you would need help anyway with holding things up while another drills.

Built from Plan(s)
Estimated Cost
250.00
Estimated Time Investment
Week Long Project (20 Hours or More)
Recommended Skill Level
Beginner

Comments

mdownie

Wed, 05/22/2013 - 11:59

As an extra note, I used Hardware cloth, not chicken wire. Wire will not keep dogs or predators out (and my dog immediately tried but failed to claw his way in). I bought I believe 36 inch tall rolls - the standard size that I could tell (not 30 inches like in the plans). But it fit perfectly, so I think maybe the plans had a typo? Lay out the lumber according to the plans and it will fit perfectly.

6 Cube Bookshelf - Poplar

Submitted by kev117s on Tue, 07/28/2015 - 18:29

I built this set of cube shelves for my 3 yr old son's room. THANK YOU, ANA! I used poplar as I did not want to paint the wood and I love the irregular pattern of the wood grain. To save money, I used pine for the inner shelves and dividers. I stained it using the oxidized solution (http://www.friendly-home.net/2012/05/oxidized-x-console.html) that Ana recommended from the instructions of the Rustic Console. I added a cup of coffee to the solution to get a darker browner shade and unevenly sanded the wood for the distressed look. It matches the poplar wood more so than keeping the pine wood as is.

I also created a 5-tier version to match the 6 cube shelves but did not include the legs. I thought it would be more stable to keep the lower frame on the ground.

I purchased the storage boxes from Amazon It was around $20 for 6 boxes!


I am ready for the next project!

Built from Plan(s)
Estimated Time Investment
Week Long Project (20 Hours or More)
Finish Used
Oxidized solution for the shelves and dividers.
Recommended Skill Level
Beginner

Picket Planter Boxes

Submitted by JaxCopper on Mon, 05/09/2022 - 19:09

Thanks Ana, I built your planter box, actually built 2 of them, one for each mom. The were a huge hit and I already have people asking me to build them one.

So loved building this planter box. Thanks for all you do for your fellow woodworkers!

Dale G
Callahan, FL

Comments

These Adirondack Chairs are super comfortable

Submitted by Anonymous (not verified) on Fri, 02/03/2023 - 05:45

I built a couple of these for the garden area and they are wonderful to sit in. As an experiment I painted these with chalk paint then finished them with several thin coats of spar urethane. After a couple of years in the sun, they seem to be holding up pretty good. I may sand and apply more spar urethane this summer just to keep them looking good.

Comments

Fancy Jewelry Box built by my daughter and me

Submitted by wowmom_cs on Tue, 05/07/2019 - 09:25

My 10 year old daughter is always creating. She recently decided that she wanted to do a woodworking project with me. We started by searching online for a design that looked doable and came up with the Fancy Jewelry Box from the Ana White website.

We decided that using the full thickness of 1x stock gave the piece a bit more of a clunky look than we were after. And since I have a thickness plainer, we milled our stock down to just under 1/2”. But that meant that we had to rework many of the measurements on the plan. This also made the drawers deeper and wider. Which is nice. A happy mistake happened when, while rough cutting the individual pieces before milling them down, I inadvertently cut the pieces between the drawers too narrow. We ended up turning them 90 degrees which allowed them to fit. This is why you see the end grain on those pieces. But we like it.

We also altered the plan a bit so that the edges of the plywood on the faces of the drawers and doors do not show. We added a nice border to the top of the box with a curved router bit. We lined the drawers with felt and then added some dividers here and there using some scraps of oak which we sawed thin with a bandsaw.

The original plan was to paint the box, as opposed to staining it. It wasn't until after I had nailed on the top and the drawer fronts that my daughter decided she wanted to stain it. That's why you can see those nail holes!

We had such fun making this Jewelry box. 

Built from Plan(s)
Estimated Cost
I don't remember. Not much.
Estimated Time Investment
Week Long Project (20 Hours or More)
Finish Used
Stain and water based polyurethane. We used 2 coats of poly "sanding" it between coats with fine steel wool.
Recommended Skill Level
Beginner

Comments

Outdoor Sectional

Submitted by ghozt21 on Mon, 05/27/2019 - 16:54

I followed the plans as written,  It took me about 6 hours and that includes sanding and staining. Very simple yet offers a very wow finish.  I think in total we spent about $300 for all supplies including cushions which was the most expensive part. I just finished it off with Teak Oil and an Americana theme for our covered patio.  We love it.  

Estimated Cost
$300
Estimated Time Investment
Day Project (6-9 Hours)
Finish Used
Teak oil
Recommended Skill Level
Beginner

Outdoor day bed

Submitted by TamTamW on Wed, 07/03/2019 - 09:28

Loved making this. Used old sun curtains and a sheet for extra splendor. 

Built from Plan(s)
Estimated Time Investment
Weekend Project (10-20 Hours)
Finish Used
None.
Recommended Skill Level
Beginner

Comments

Slatted Sofa Table

Submitted by raybwright on Sat, 02/13/2016 - 09:36

I based this design of the simple Sofa Table by Jenna Sue. Instead of a 2x8 across the top, I opted to use 1x4s side by side. This slatted look matched some of the other items in the house and to allowed me to create two hinged sections. These sections allow for easy access to wall plugs and include small notch for the cables to come through.

Estimated Cost
$35
Estimated Time Investment
Weekend Project (10-20 Hours)
Finish Used
Minwax Wodd Finish Dark Walnut Stain with Minwax Clear Satin Polyeurethane
Recommended Skill Level
Beginner

Cubby Shelf with Ironing Board Top

Submitted by PinnSB on Sun, 02/02/2014 - 11:56

Originally I wanted a cubby shelf for the empty space between the sliding door and window in our master bedroom. However, that is also where the ironing board always sat out and I got tired of looking at it. So this project evolved and I decided to add an ironing board to the top of it. I used a 41" 1x12 for the top and 2-11" scraps for the flaps on either side. I covered each piece with one layer of felt and one layer of fabric. Flaps were attached to main board with hinges. Under-mount drawer slides were used to both allow the board to shift left and right and to support the flaps in open position.

Built from Plan(s)
Estimated Cost
$85
Estimated Time Investment
Day Project (6-9 Hours)
Finish Used
Valspar Ultra White Satin Paint
Recommended Skill Level
Starter Project

Comments

rlmilam3

Wed, 02/03/2016 - 21:07

Are there more specific plans for building the ironing board part of this? The other builds are so specific, having everything laid out even the amount of screws needed. But this one is definitely lacking. Is there further directions elsewhere that I'm missing?

itzann

Thu, 02/04/2016 - 09:24

Hi, this particular project was submitted by a reader, who modified the plans of the cubby shelf to include the ironing board top. It is not part of Ana White's project plan, so that is why there are no specifics. Perhaps you could try contacting the person who posted, and he/she could tell you more details. 

-Ann

Chicken run

Submitted by Anonymous (not verified) on Thu, 05/19/2016 - 19:28

Or use the same plans with the exception of I extended the height so I could actually walk into the run fairly simple to assemble I would strongly recommend an air compressor staple gun or you'll end up with four arms like Popeye

Built from Plan(s)
Estimated Cost
$250-$300
Estimated Time Investment
Weekend Project (10-20 Hours)
Recommended Skill Level
Beginner