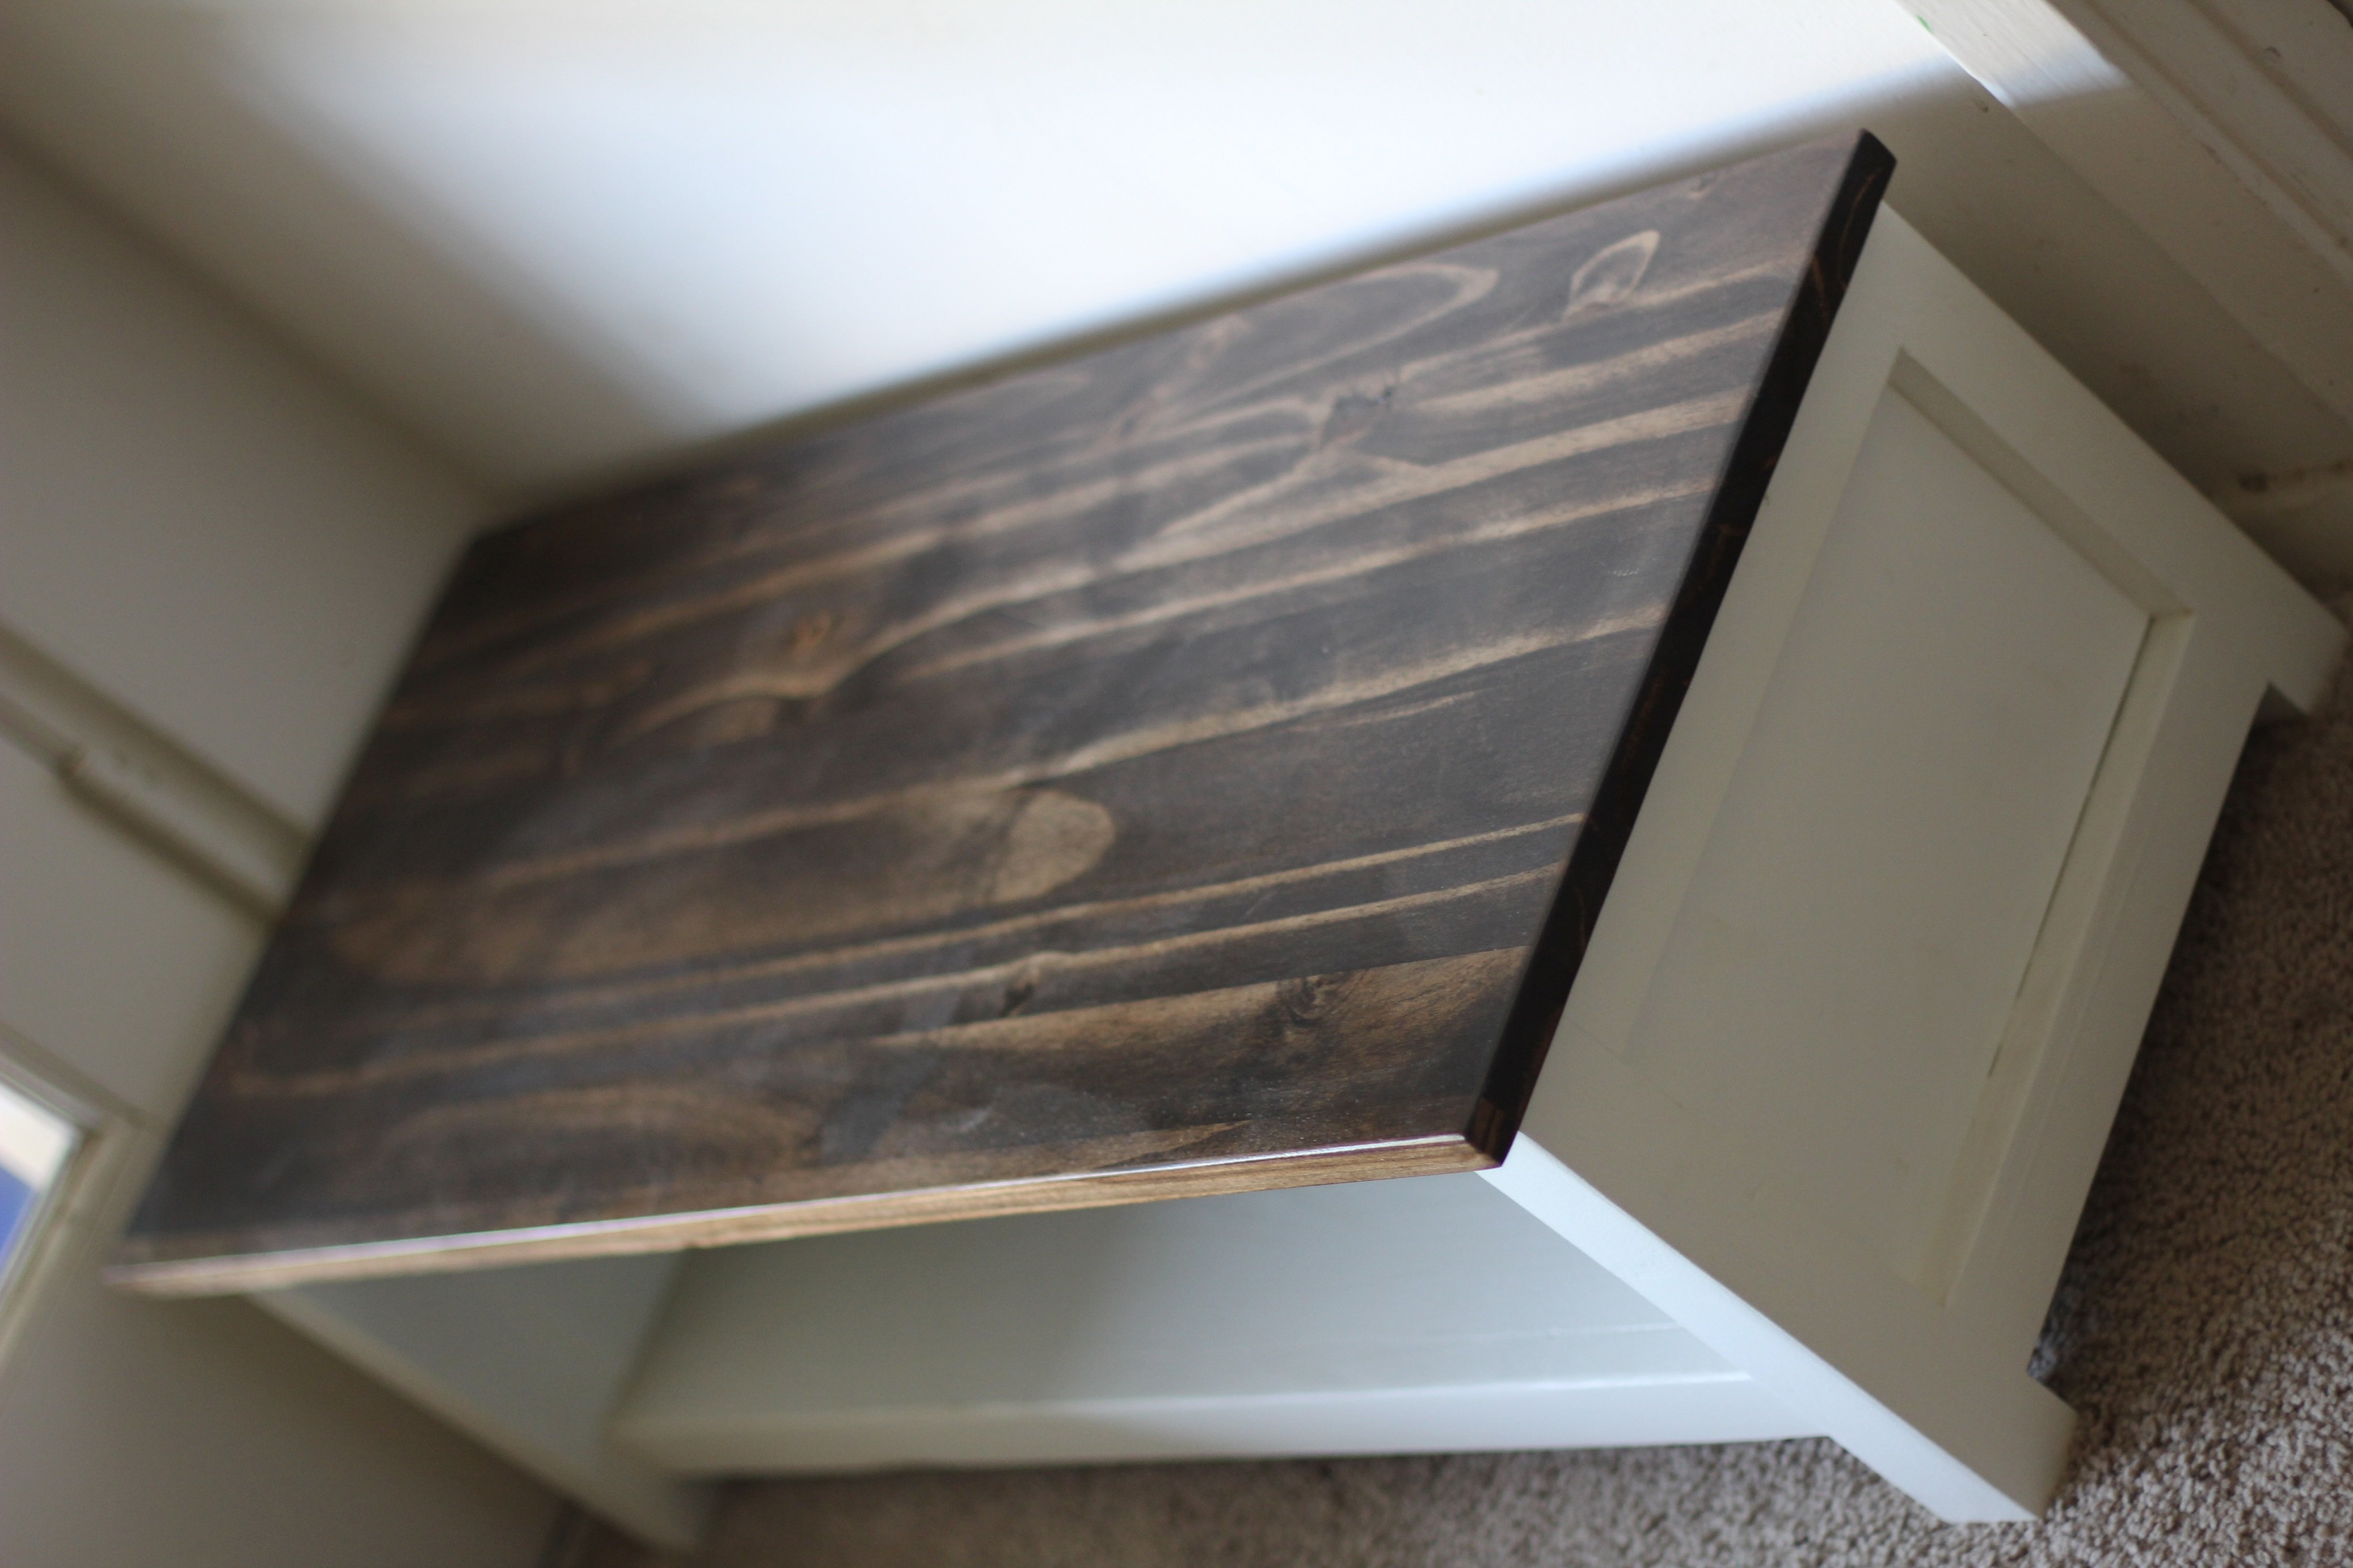
Corner computer cabinet
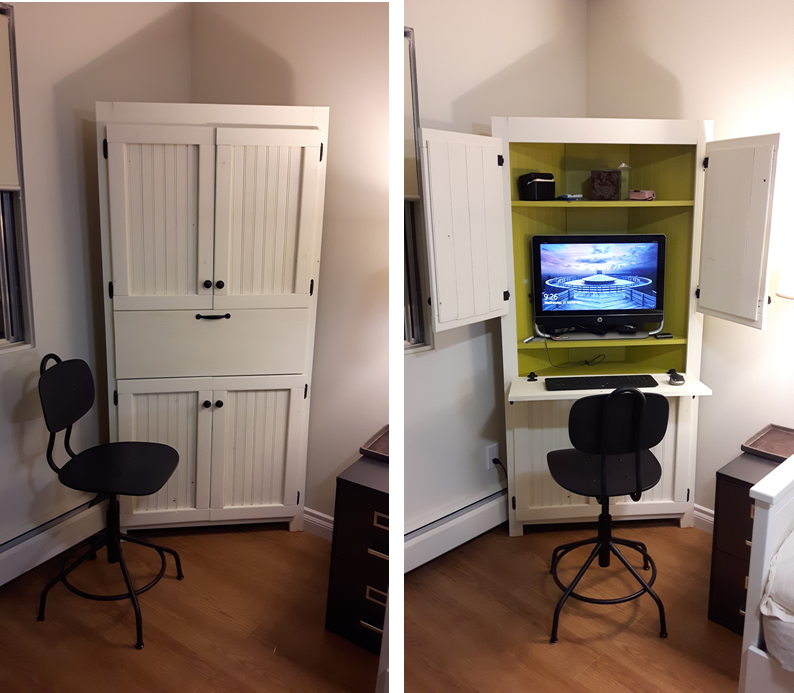
Flip down tray added for computer keyboard.
Built from Plan(s)
Recommended Skill Level
Beginner
Flip down tray added for computer keyboard.

This is a great project to clear up space in the pantry. I followed the Ana-White plans for the upper rack and then decided I needed more space for my larger Costco spices. For this I followed the plans for the top 23” but with 2 shelves. I gave myself extra depth by using 1x4’s instead of dowels. I work very slowly, so both portions took me about a day apiece with sanding, painting, etc. My favorite tool is now the Kreg jig. Totally worth the $40.
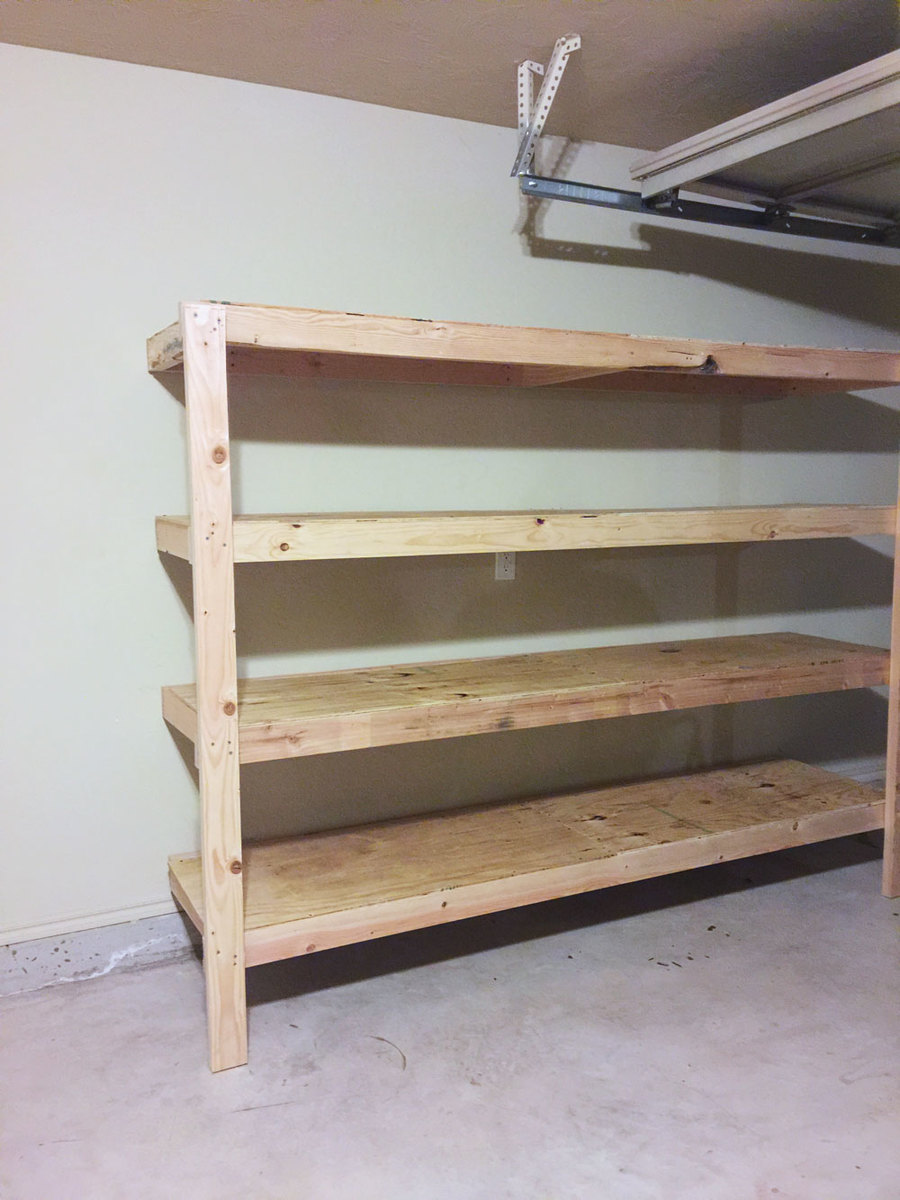
Wanted some easy storage shelving that didn't break the bank. These were perfect! $79 is what it cost for ours (which includes the $20 Kreg Jig). Lumber was only $58.68 and I bought and extra 8 foot 2x4, so it could have been slightly cheaper!


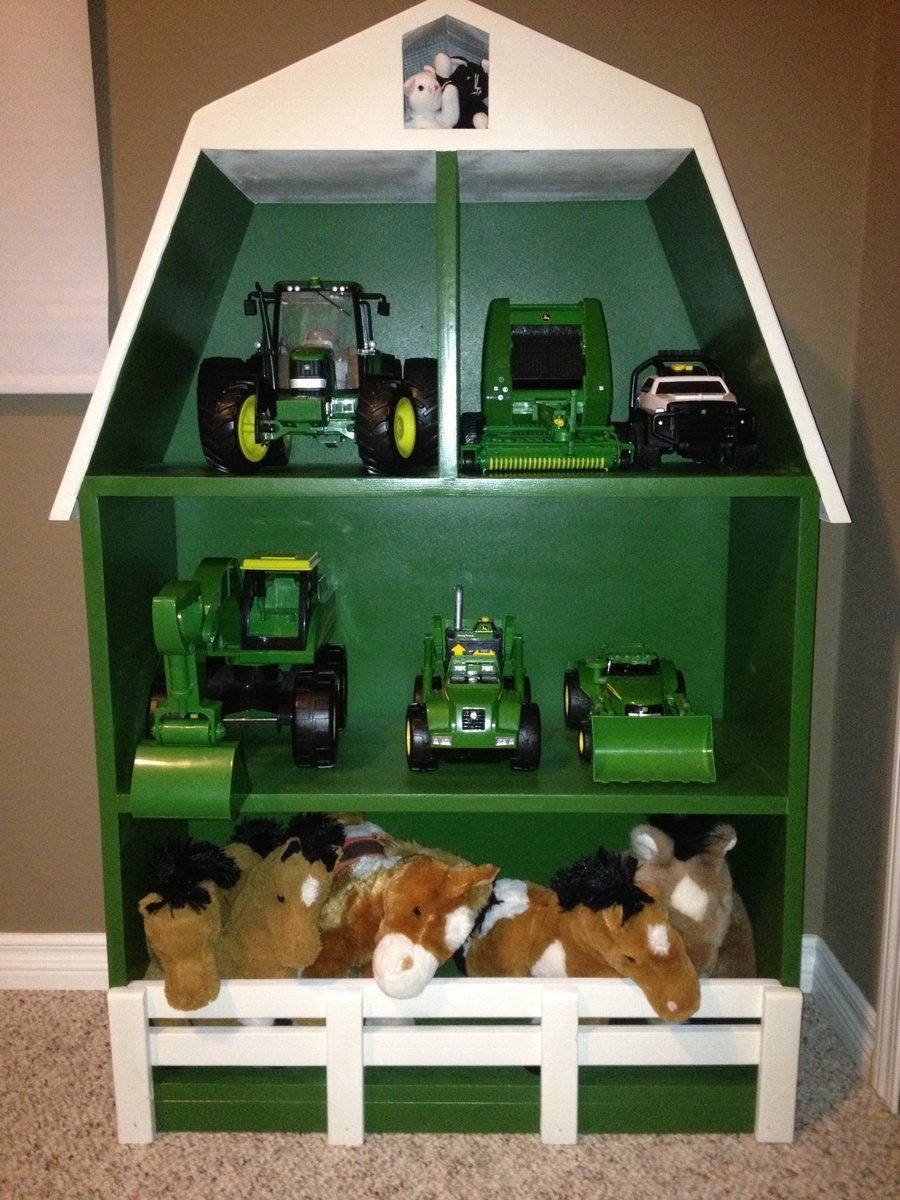
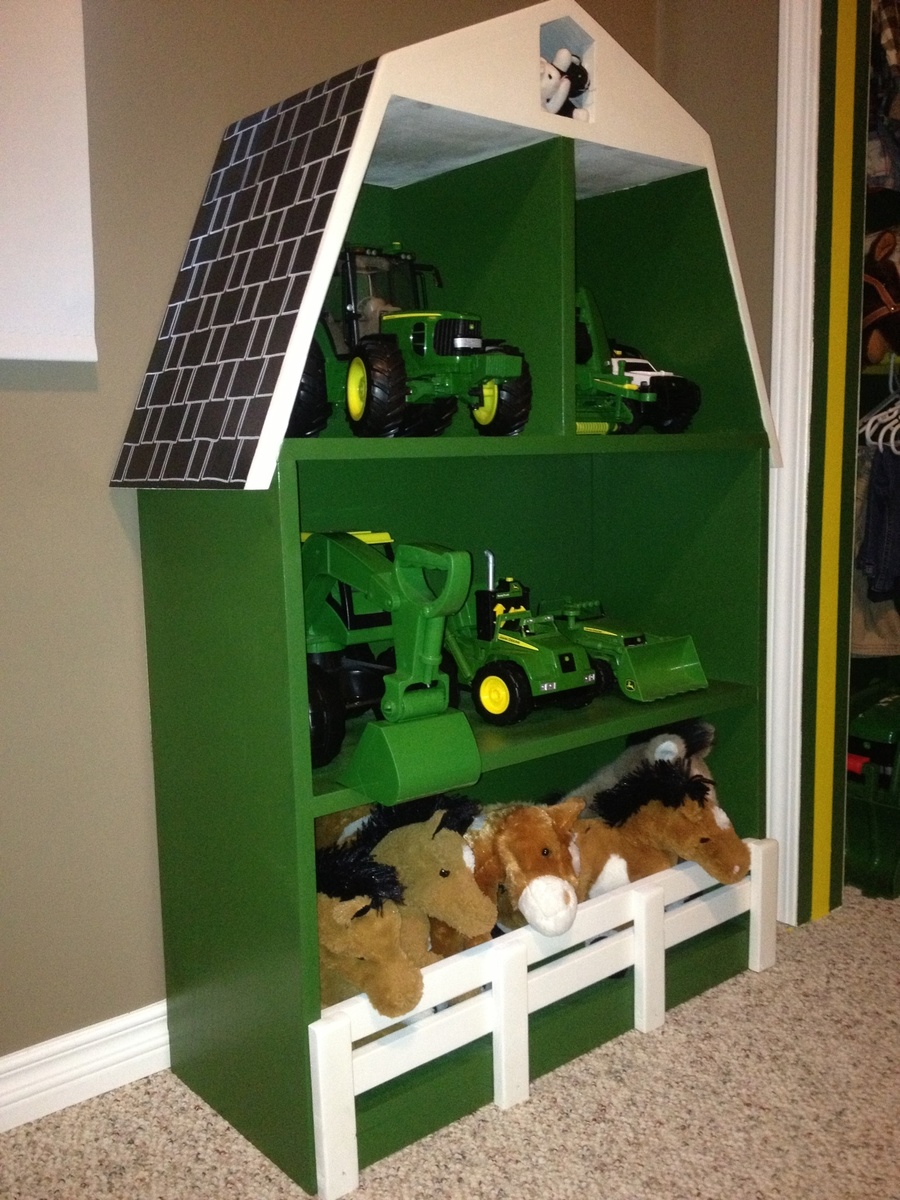
After finishing my boys' new John Deere room and tractor bunk bed (also posted), I saw this plan and thought it would be the perfect thing for some extra toy storage.
Yes, I know, barns are supposed to be red. Everything else in the room is John Deere green and I had paint leftover, which is not cheap. So green it is! I used my new paint sprayer for the first time on this project and am thrilled with it. I would recommend it to anyone who dislikes painting as much as I do. I bought the Wagner Flexio 590 which comes with a detail sprayer as well as the full size and I'm very happy with both.
Thanks to Ana for the well laid out, easy to follow plan and also for helping me create a big boy room that my boys love!
Thu, 07/31/2014 - 07:24
I love this. :) I especially love the spacing of your horses and cats... very realistic. lol. I also saw the bed when you posted it. VERY impressive little details!
Thu, 07/31/2014 - 09:38
Thanks so much for your comments. It's so nice to hear positive feedback since I'm very new to this! My 3yr old is quite particular about everything being in its place, I'll pass along that you liked his animal placement. Lol :)
Sun, 09/27/2015 - 18:26
Could u please send me the plans for this? My email addy is [email protected]
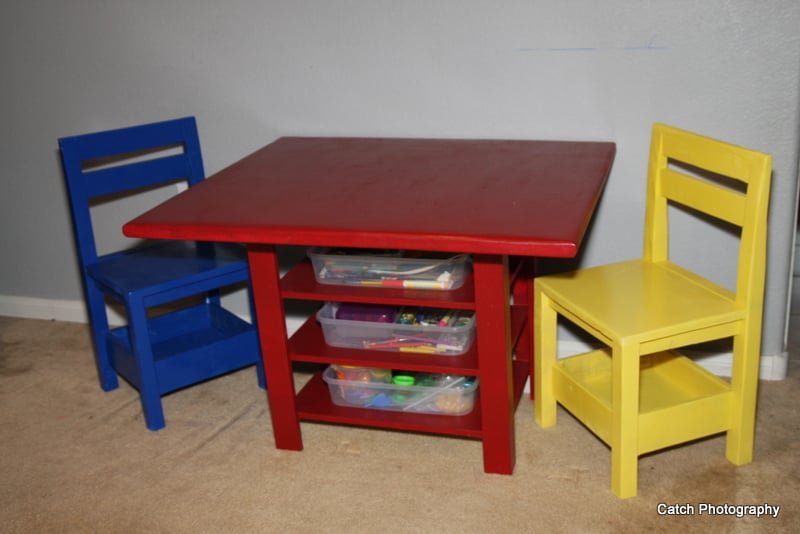
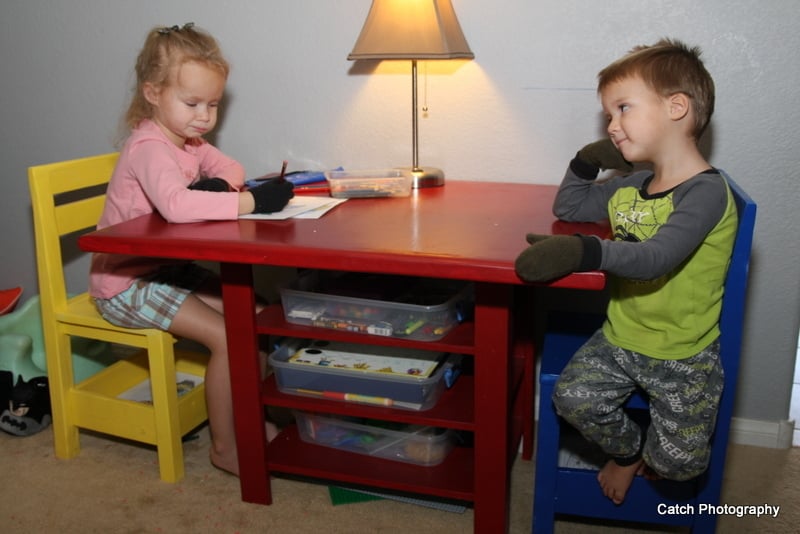
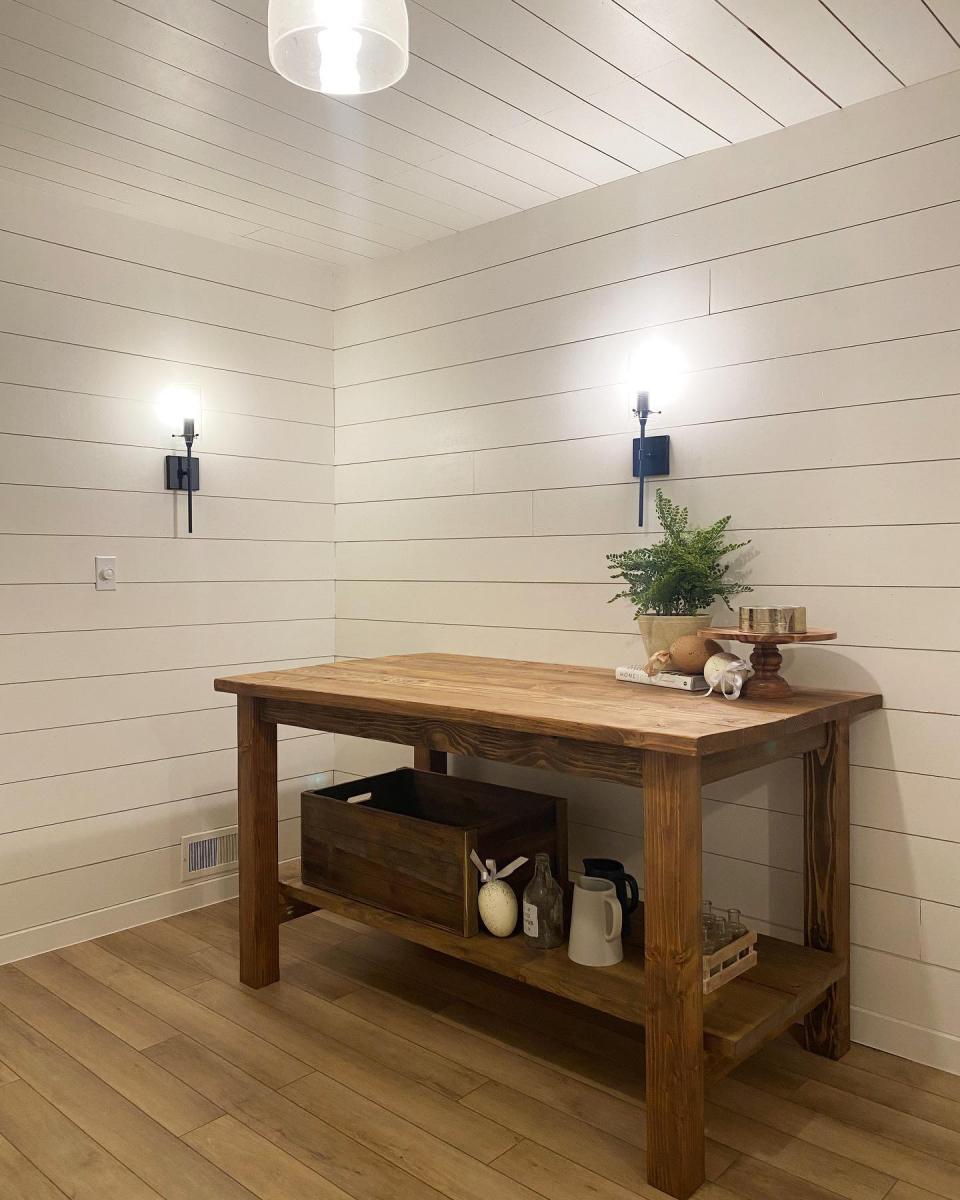
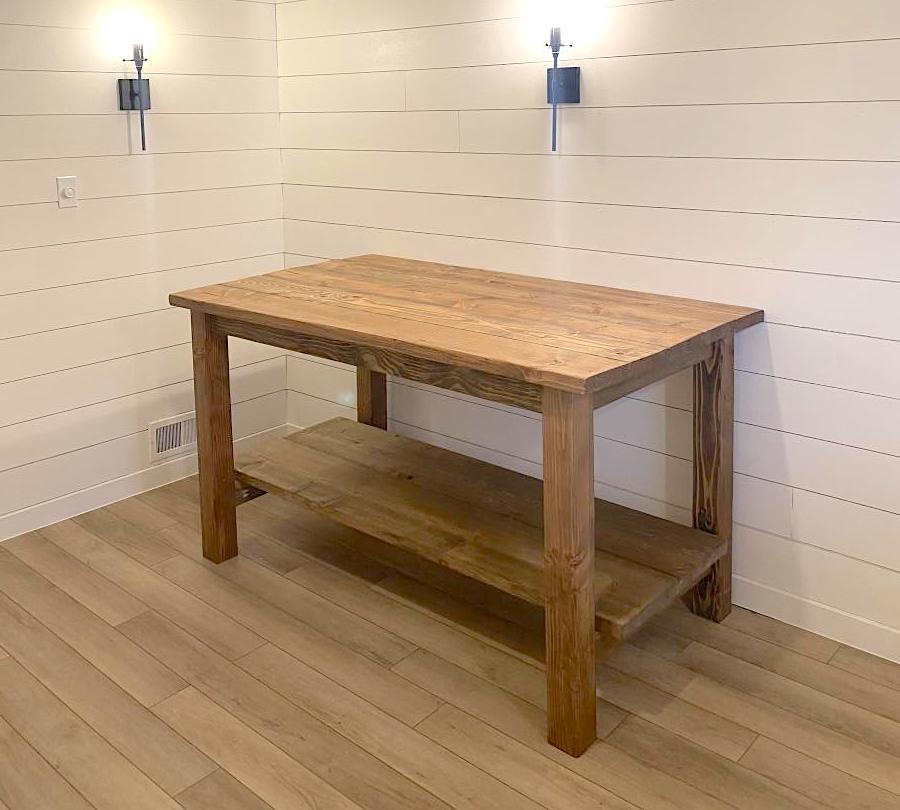
I wanted a table with storage, I added a couple extra "shelves" This was the easiest design to do this with. Just be sure to add from the top shelf to the bottom if you are using a Kreg Jig. You might want to pre-paint also . My shelves are 5 inches apart to fit perfectly my little flat style containers for art stuff and playdough.
This is our third bed built from Ana White plans. My husband has built the loft bed and a daybed. This is by far our favorite. When my dad cleared his farm 18 years ago, he milled all of the lumber and it has been sitting in a barn waiting for special projects. My husband cut down the large beams to make the post and my dad had some of the cherry boards milled into bead board, which we used in the headboard and footboard. I love the way it turned out and I hope my daughter cherishes it.

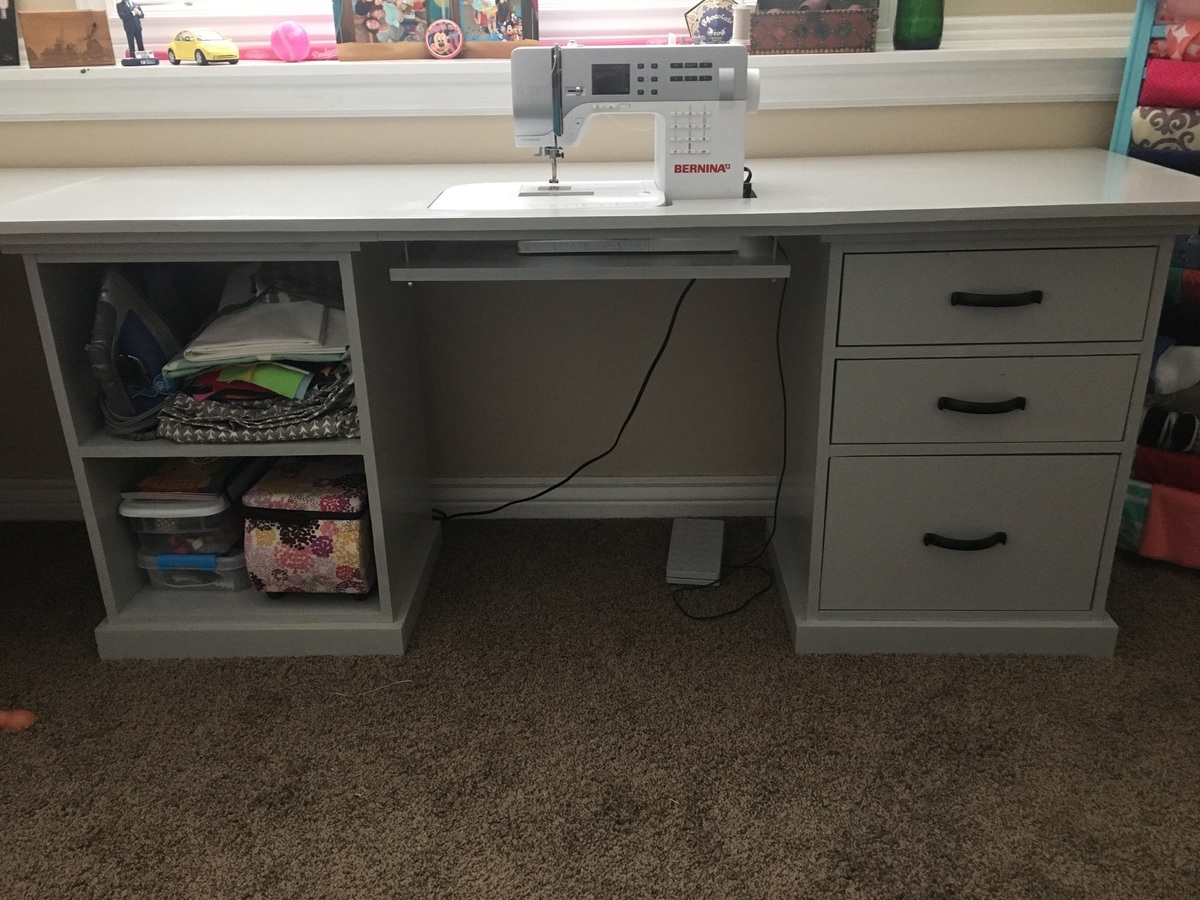
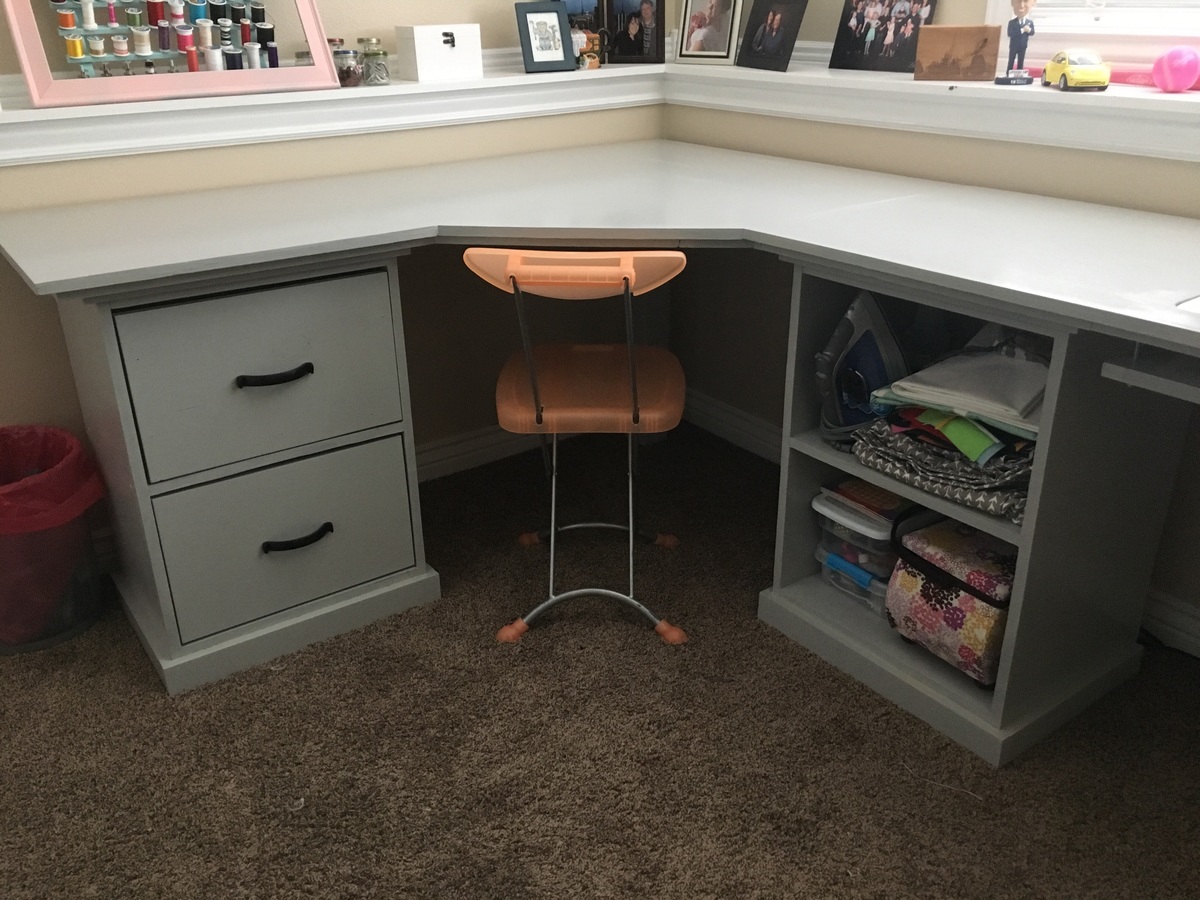
We built three base units-each with different storage options and used the corner desk plans. Then created our own long desk top using a 6ft long board and using a jigsaw to create an open space for the sewing machine.
Mon, 01/20/2020 - 07:49
It seems to me that this room is suitable for yoga or painting.
Mon, 12/27/2021 - 18:28
How did you go about cutting the hole for the sewing machine and what extra building did you do underneath?
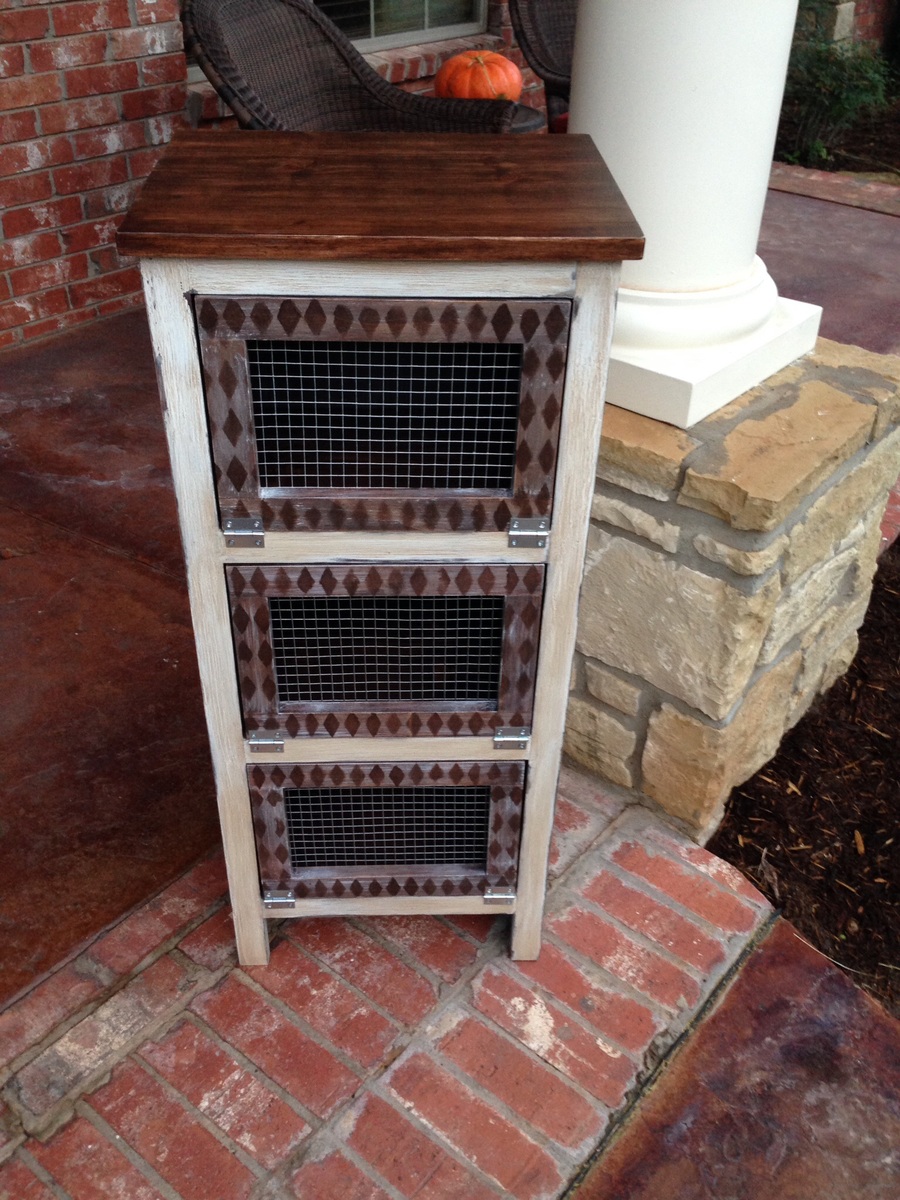
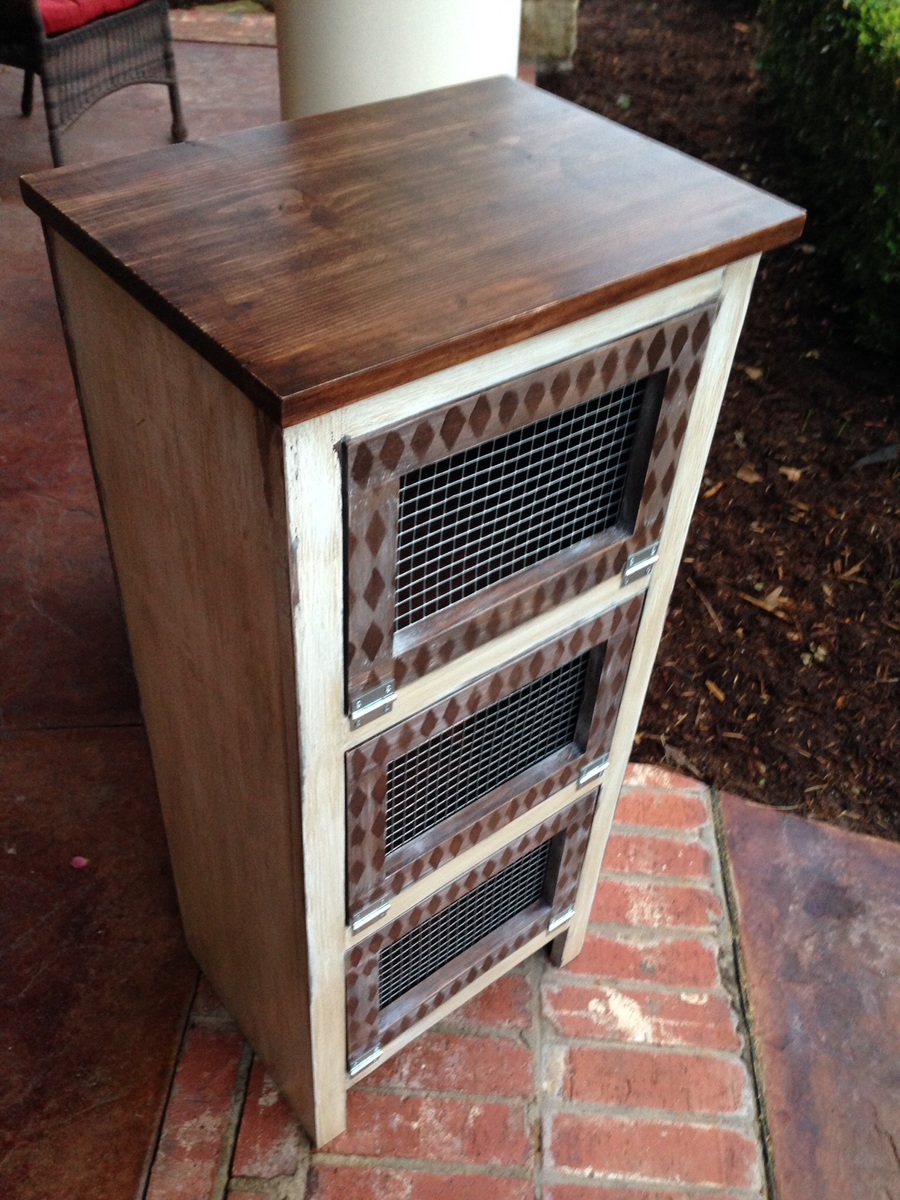
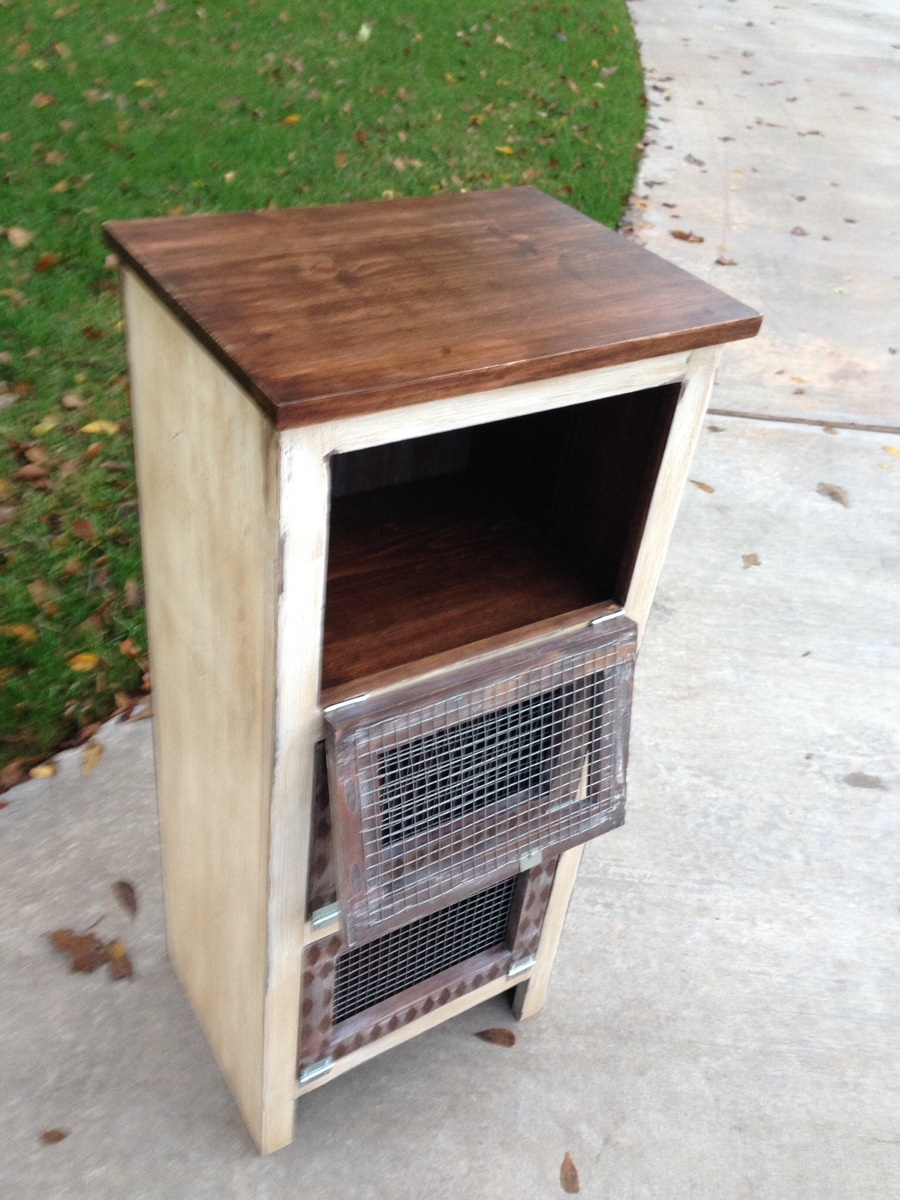
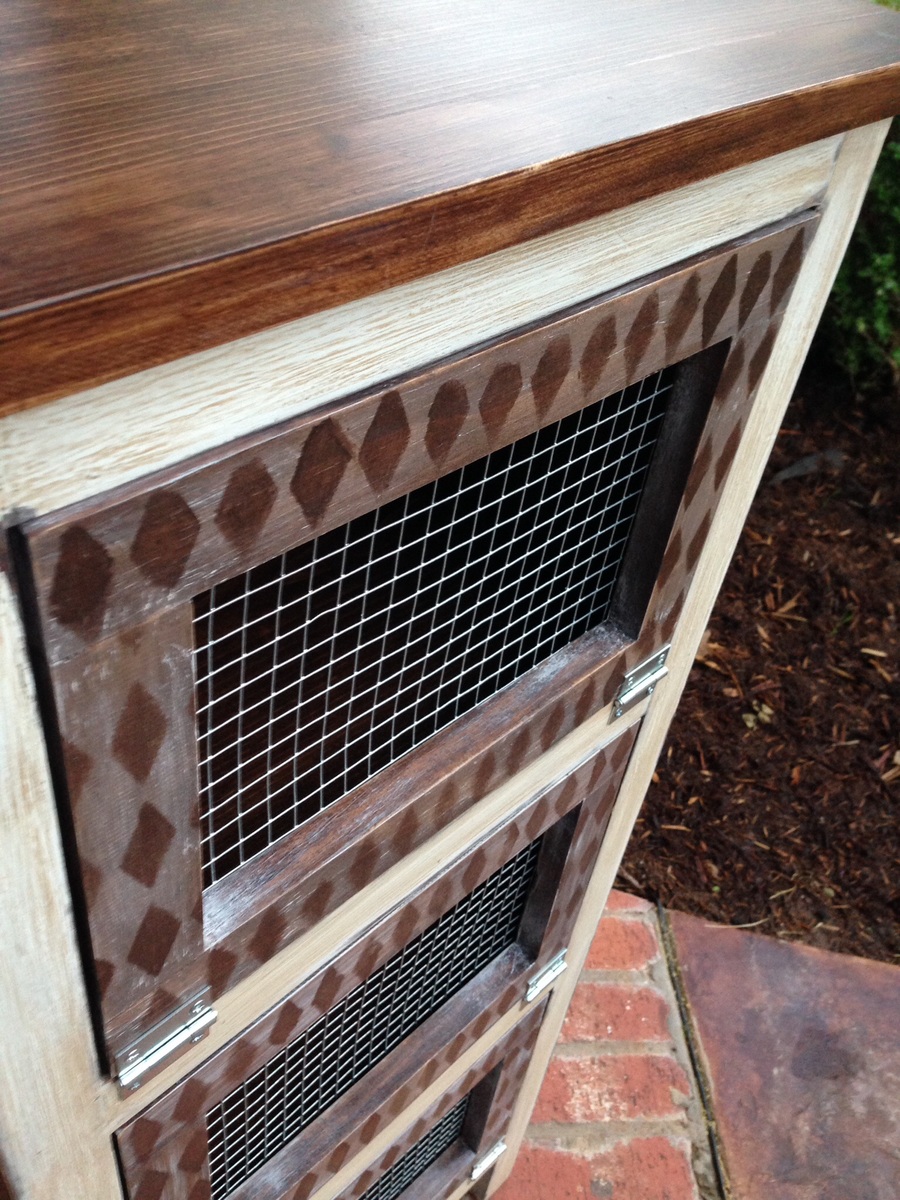
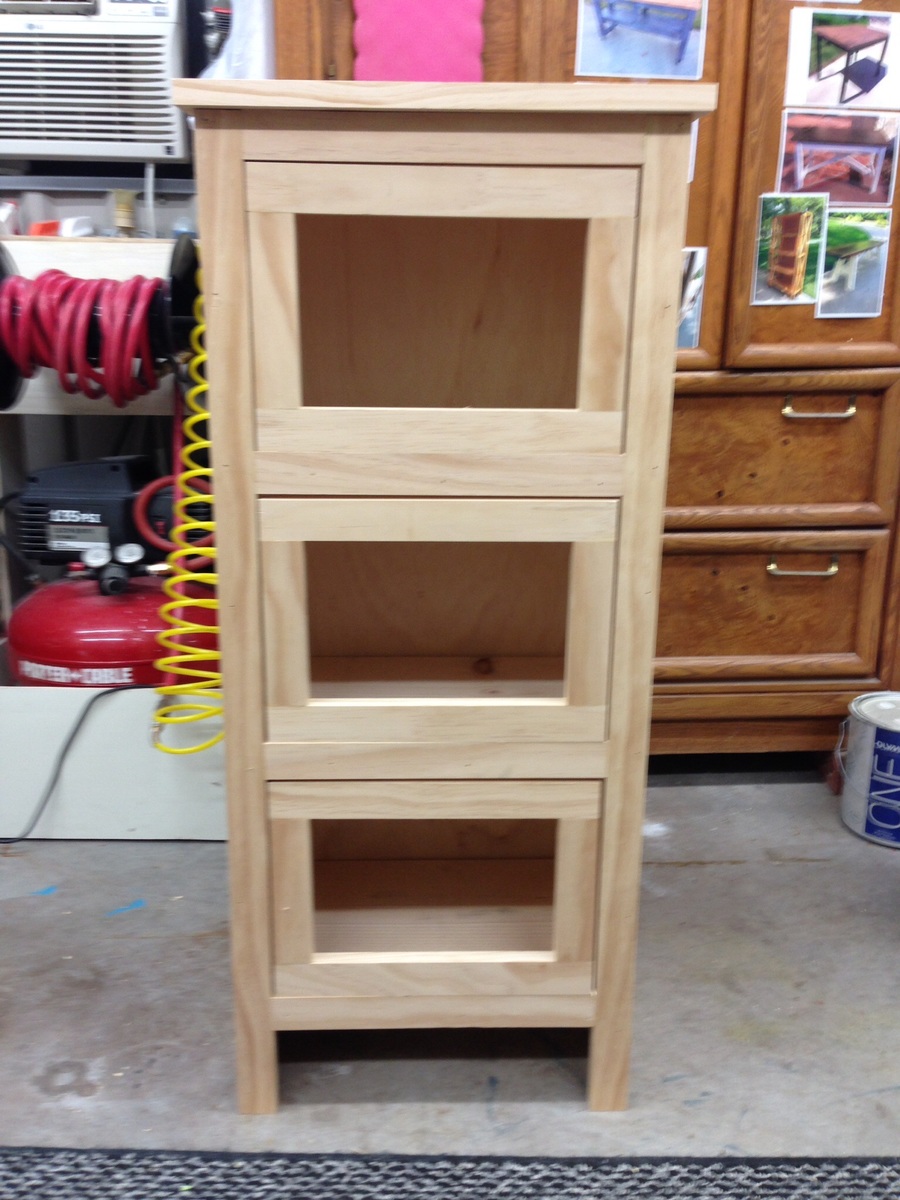
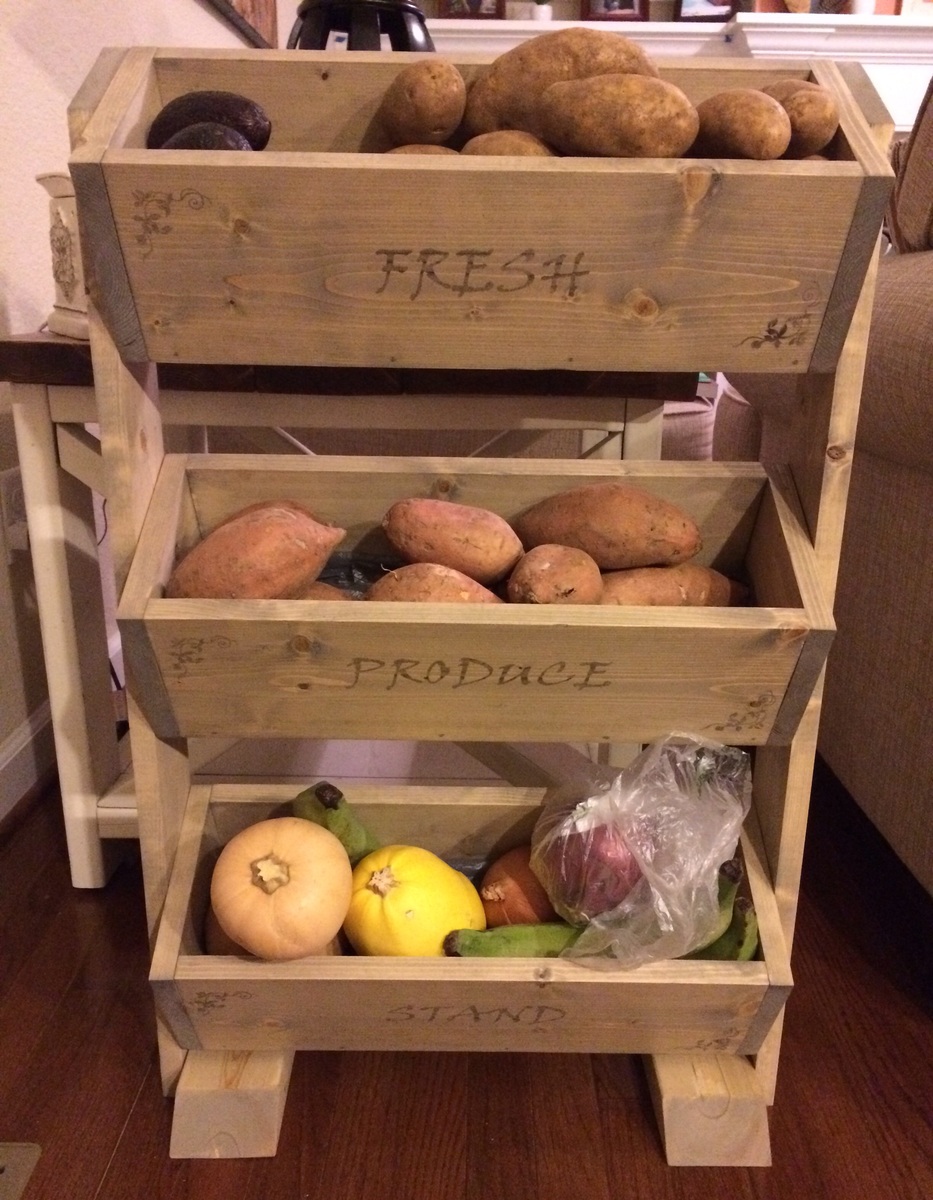
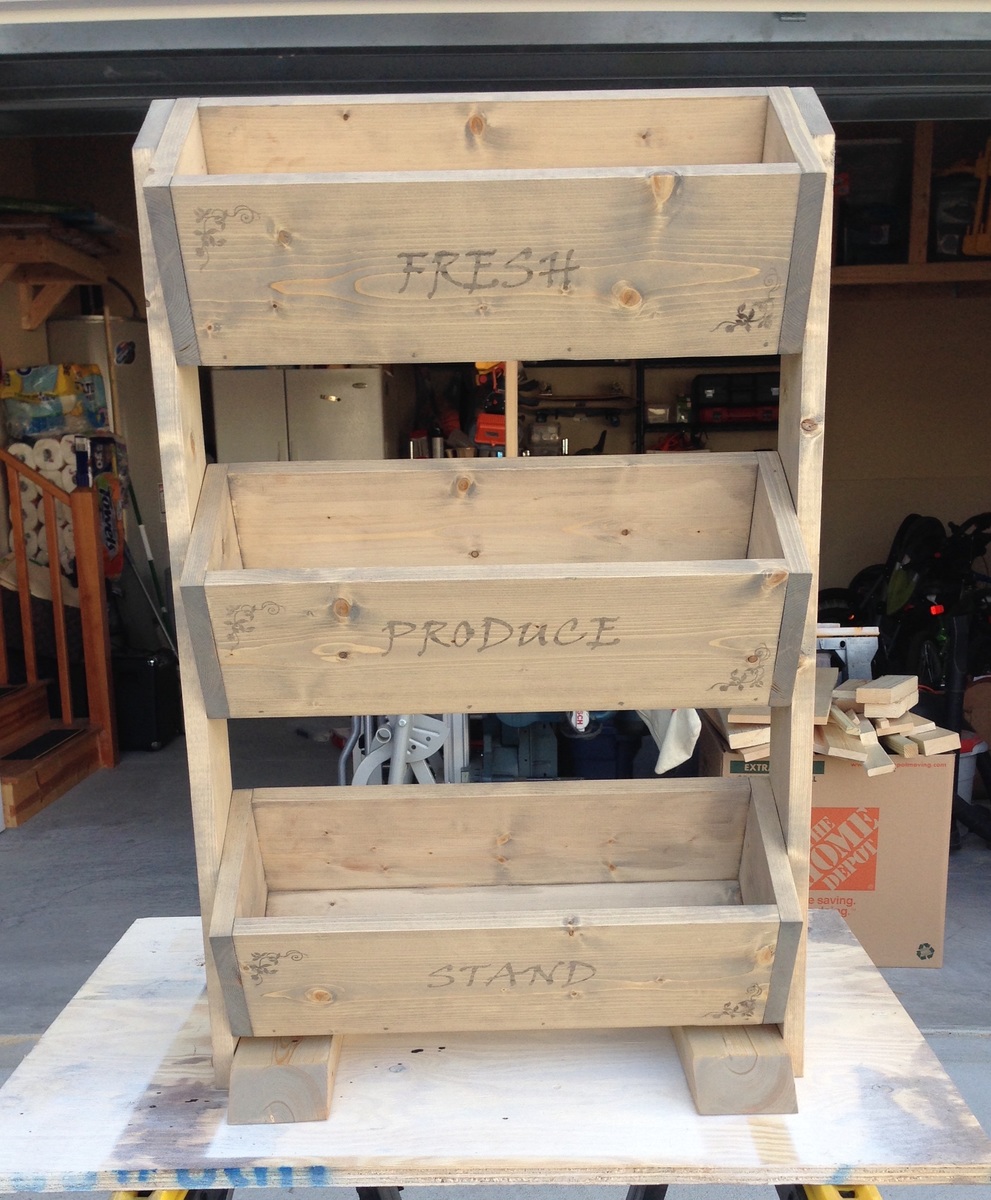
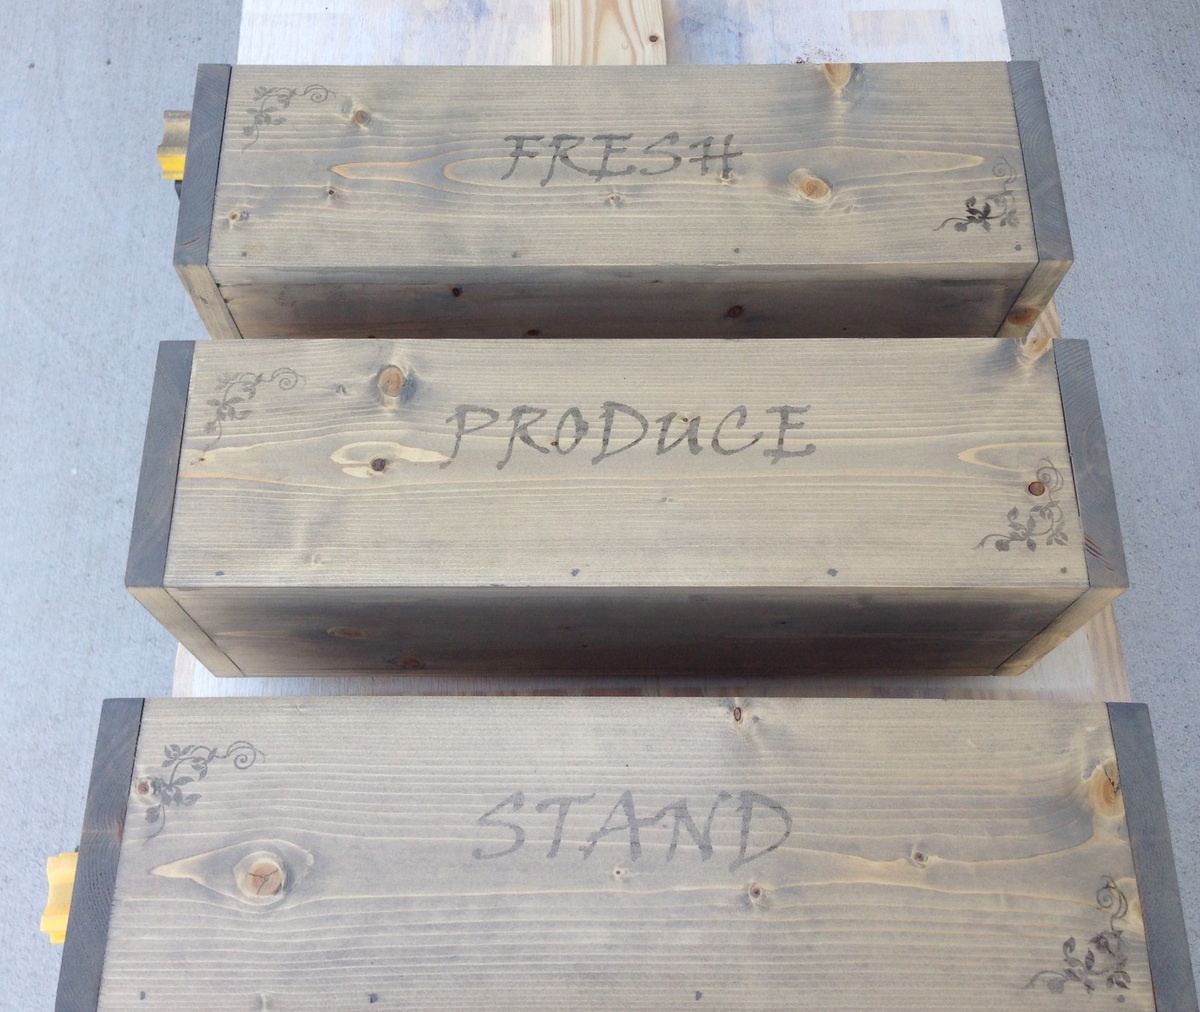
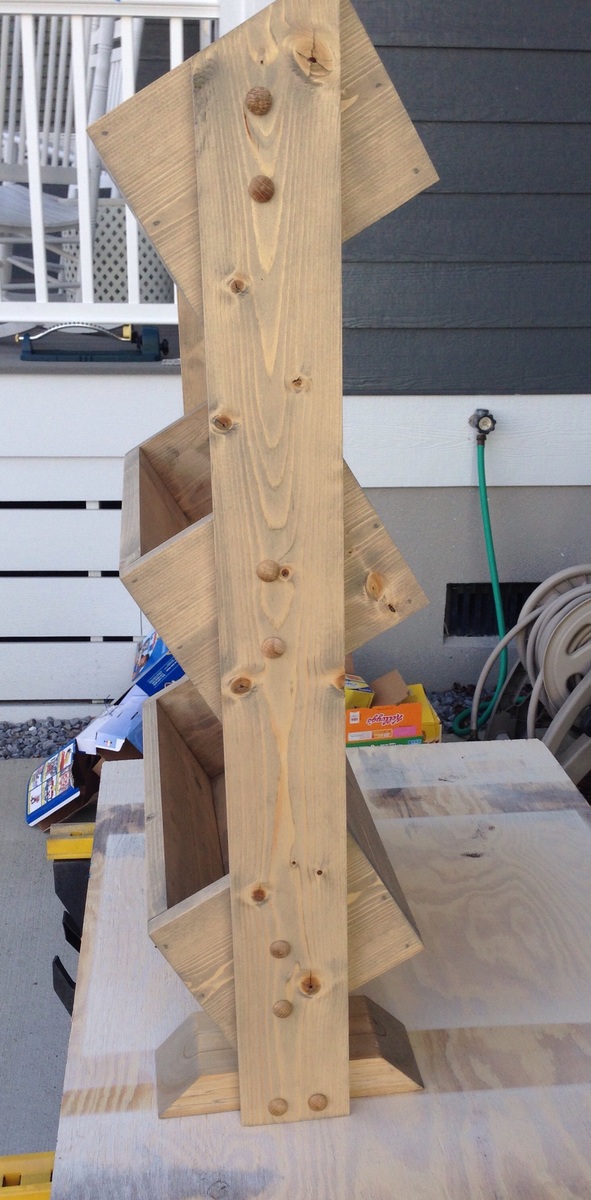
Built this vegetable bin for my sister in law. Just needs knobs, which I'm letting her pick out. Easy build finished in an afternoon. Stained and painted the next day. Could use this for other storage as well.
Wed, 10/15/2014 - 20:30
Thank you Joanne! Really enjoyed building this! This is also the first time I have shared one of my builds! Glad I did. :)
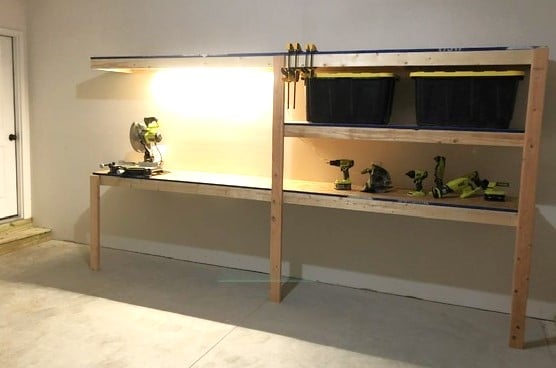
I used Ana’s plans for the garage shelves, but modified them to include a work bench. A lot of you tubers have done this, built a combination work bench and shelving, but I built nearly everything according to Ana’s plans. 12 feet long, 24 inches deep. I got some LED lights (two 1600 lumen strip lights) from menards that really brighten up my entire garage and make the work bench more useful. The one thing I really wanted was to not have a supporting pillar on the work bench to keep it open, and I loved how it turned out. I went for 3/4 plywood, mostly to have a stronger work surface, and I’m glad I did. I have since added a supporting 2x6 off of the study to support the top shelf above the bench and its strong enough to do pull-ups off of, and I have reinforced the support leg under the bench with a cross bar. Thanks for the great plans!!


I built a breakfast bar into an existing wall shared between our kitchen and living room. I built it on the taller side of average since I wanted to have room to install new electrical outlets above the counter on the kitchen side. After the project was done we went to buy bar stools to use with the new bar and found that even the "tall" stools were too short to work. Research into extra tall stools showed that what we needed was going to $400-600 each! Luckily my wife found these stools on your site and we were able to make three of them for around $115. Also, they are much sturdier than anything we looked at to buy.

Mon, 01/28/2013 - 20:40
I really like the crisp black and white. Looks great!
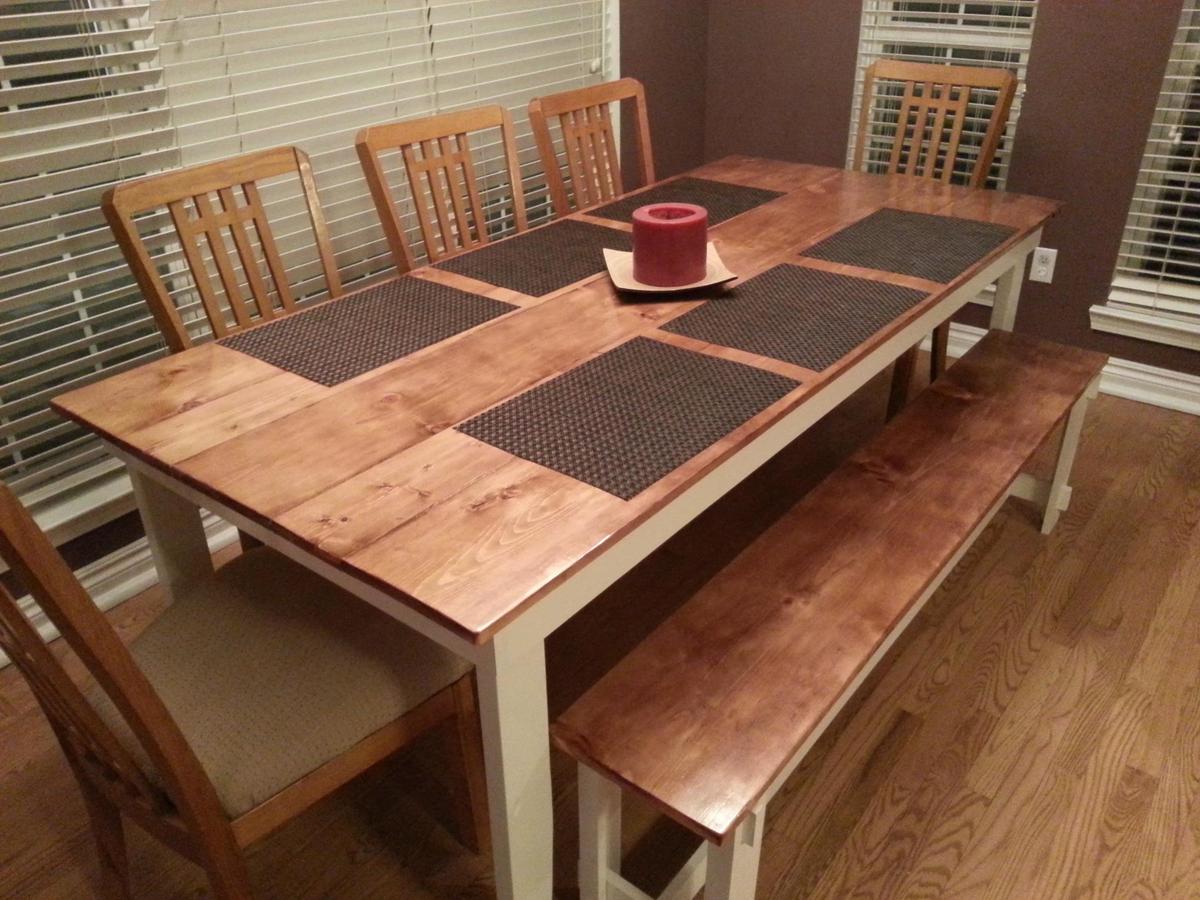
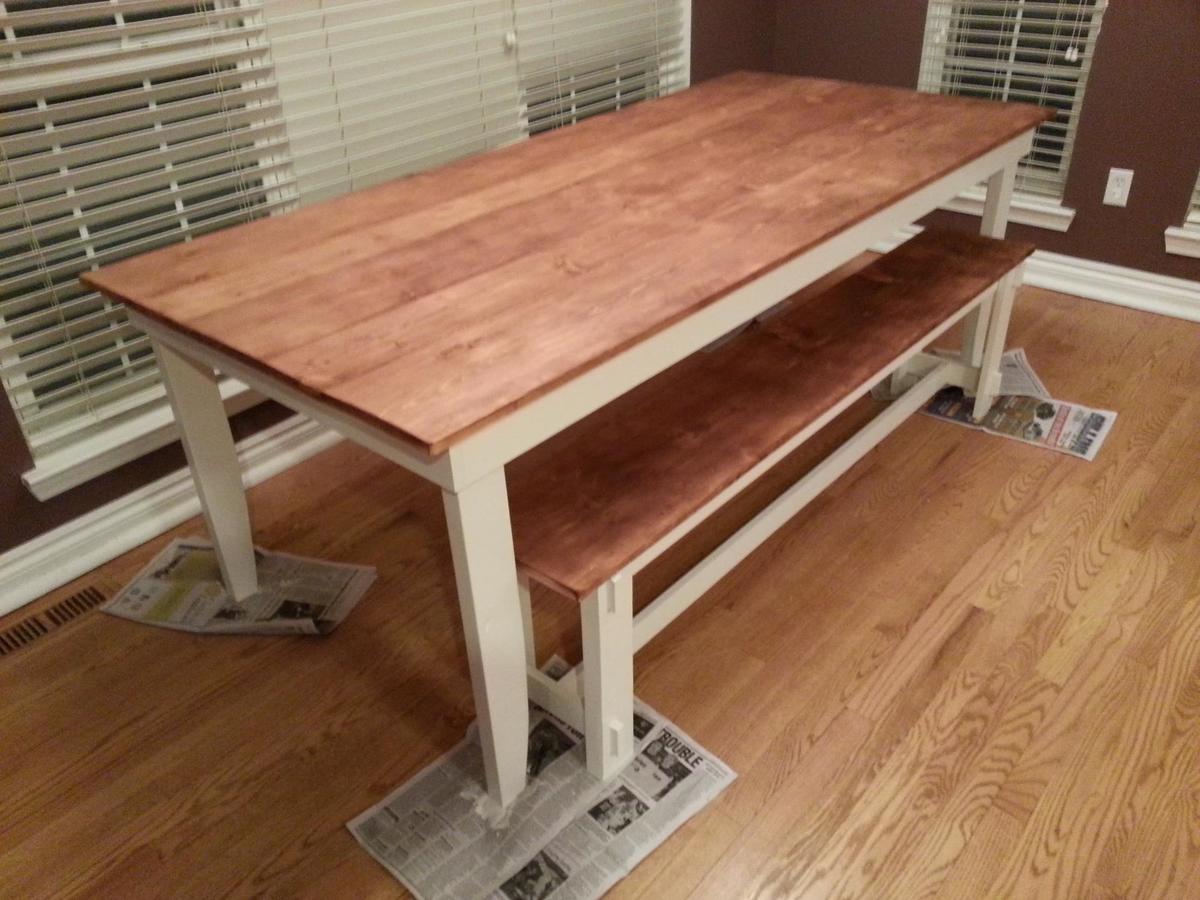
I basically stuck to the plans, but I shortened the length of the table just a touch, and lengthened the bench to fit just inside the legs. I also used 2x4s for the legs, tapered them for aesthetics (similar to some other posters), and reinforced them with "L" brackets to reduce the wobble. We finished it with Semigloss white paint, Minwax Honey stain, and Minwax Gloss Polyurethane.
If I can make this table, just about anyone can.

Mon, 11/07/2016 - 11:29
Your table is beautiful!
Do you remember how you tapered your legs? I'm trying to figure out if I can do it without a table saw.
Thank you!
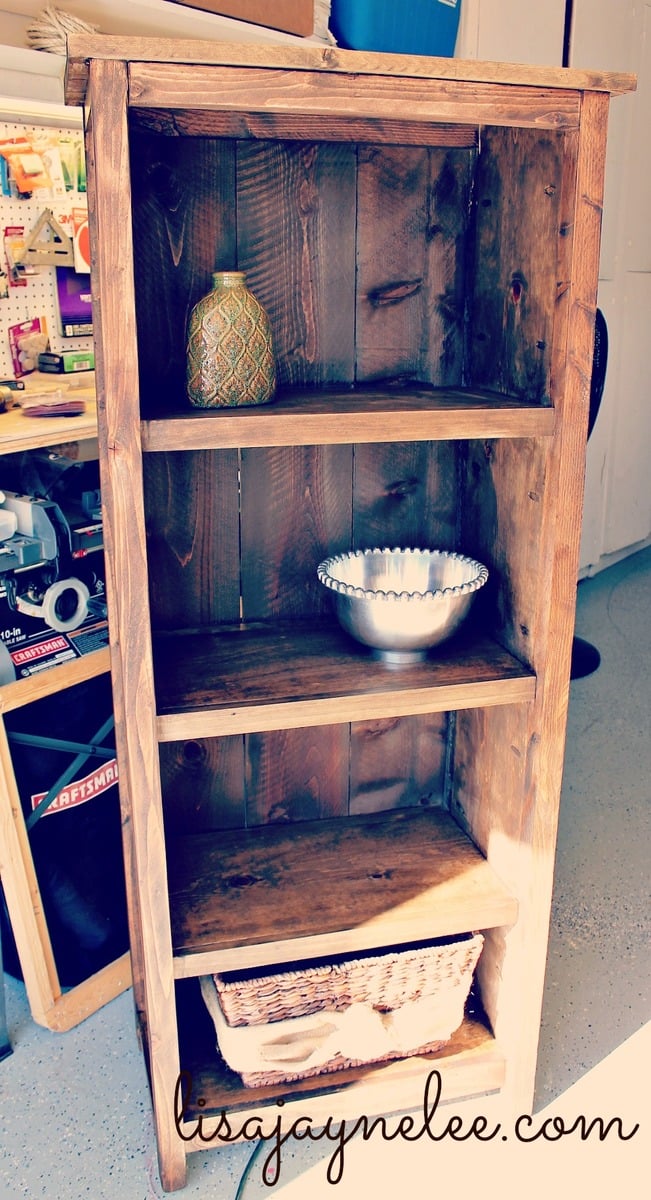
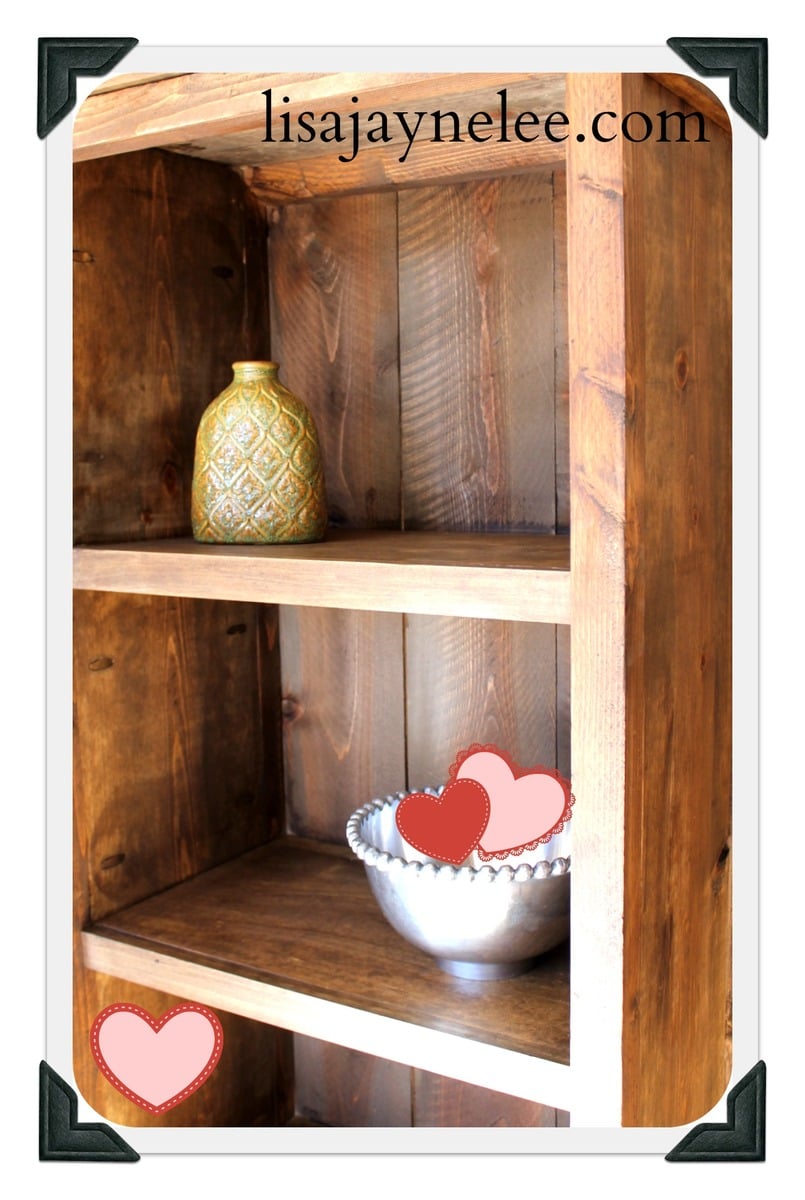
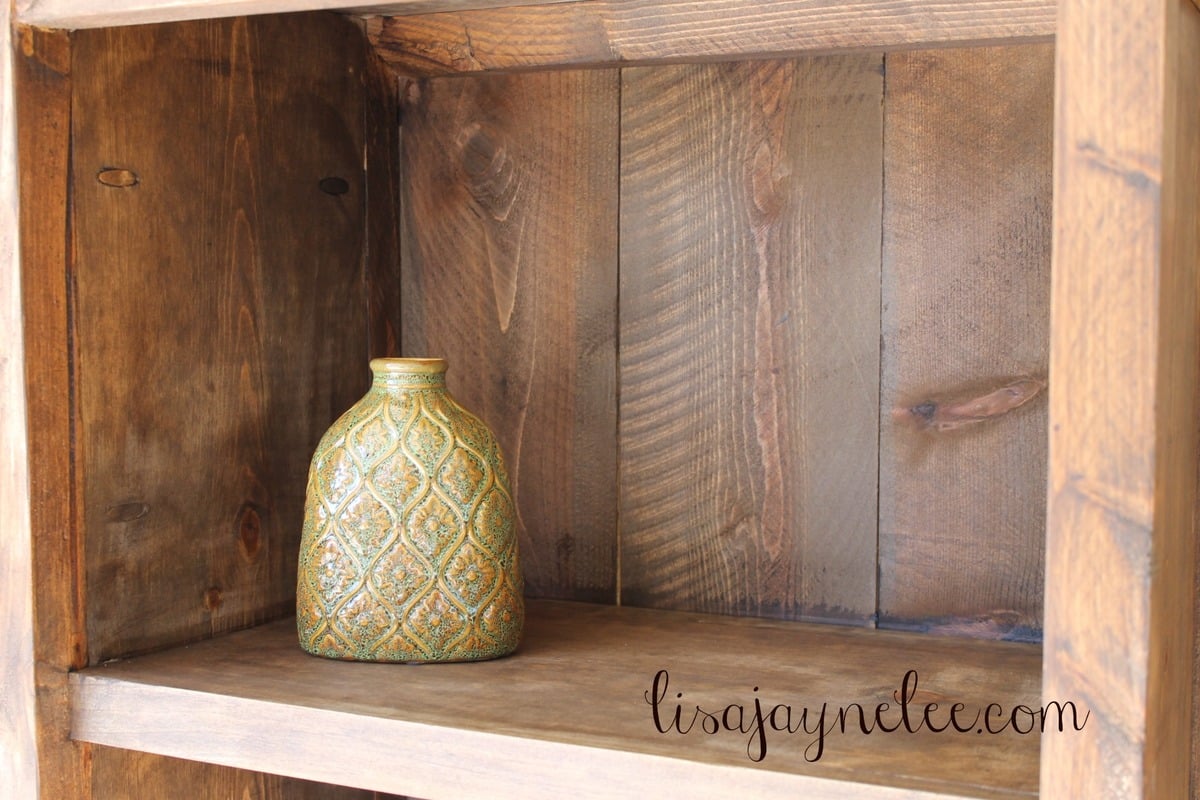
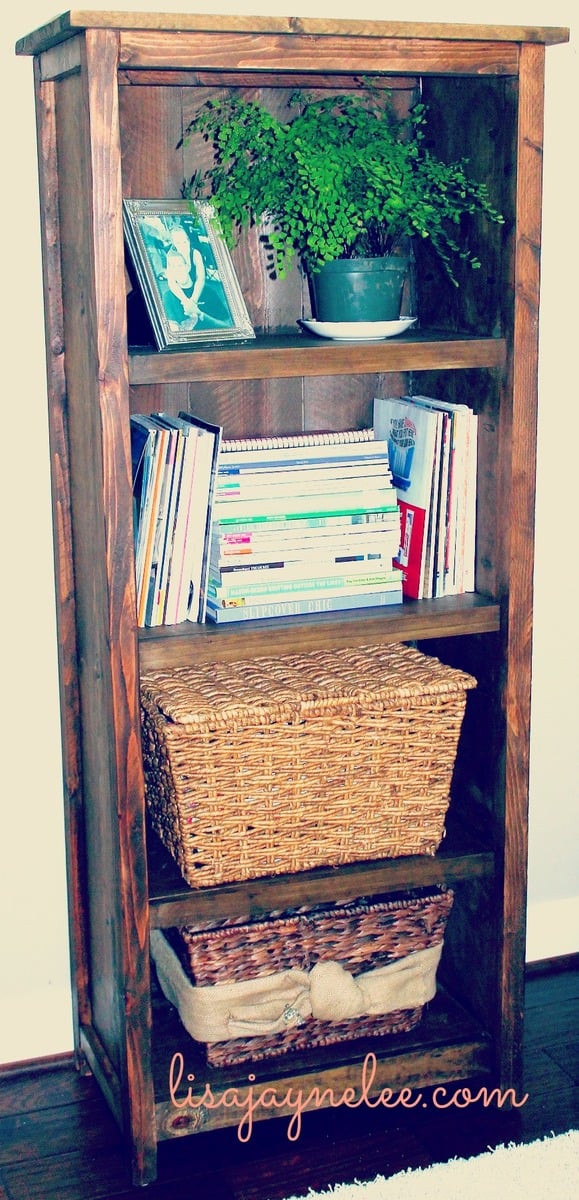
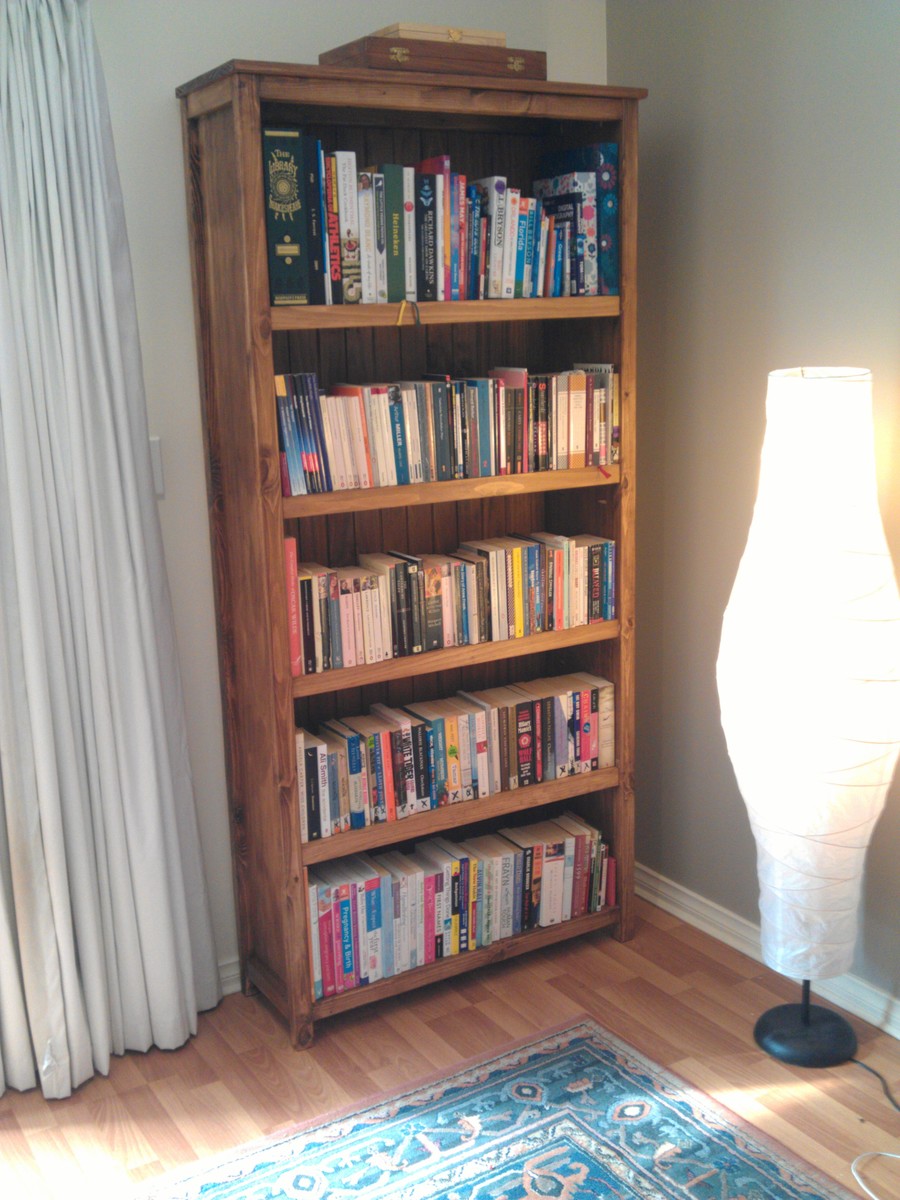
This was my first major build with plans from Ana. I actually found this bookcase via Shanty2Chic. It went smoothly and all in all took me a few evenings about an hour at a time. I have 3 kids so it did take me a little longer to finish. I am so impressed with myself and so is my husband. I used a 10" chopsaw for most of the cuts. I also used my KregJig. Thanks Ana!
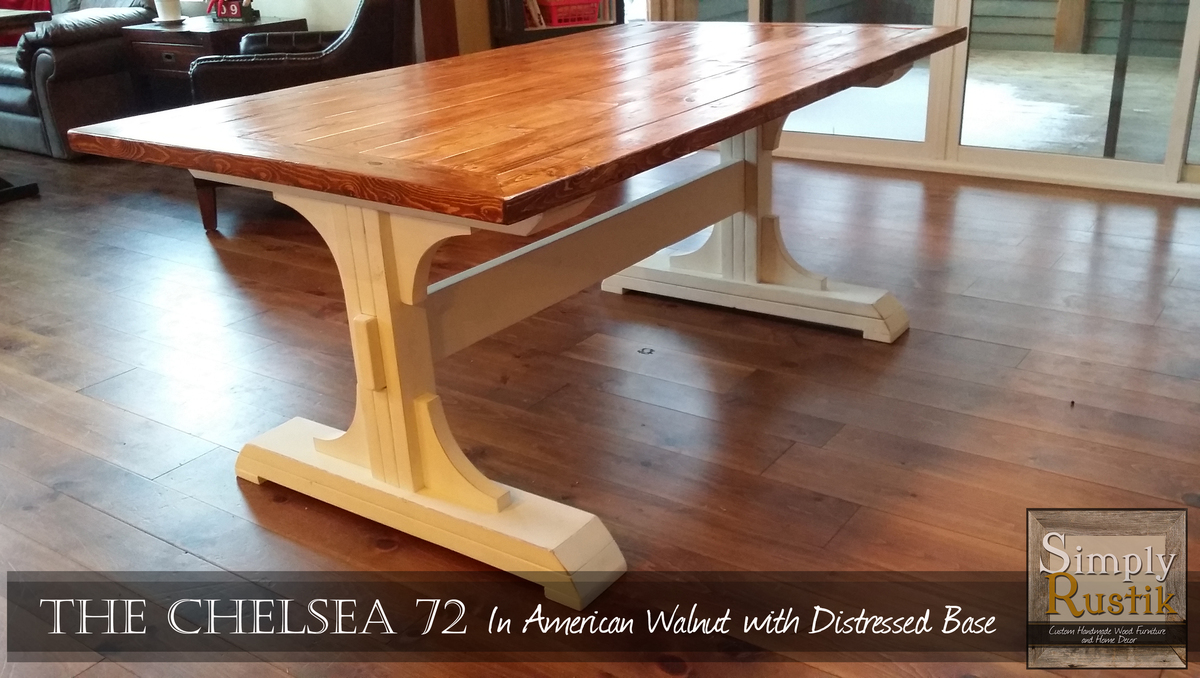
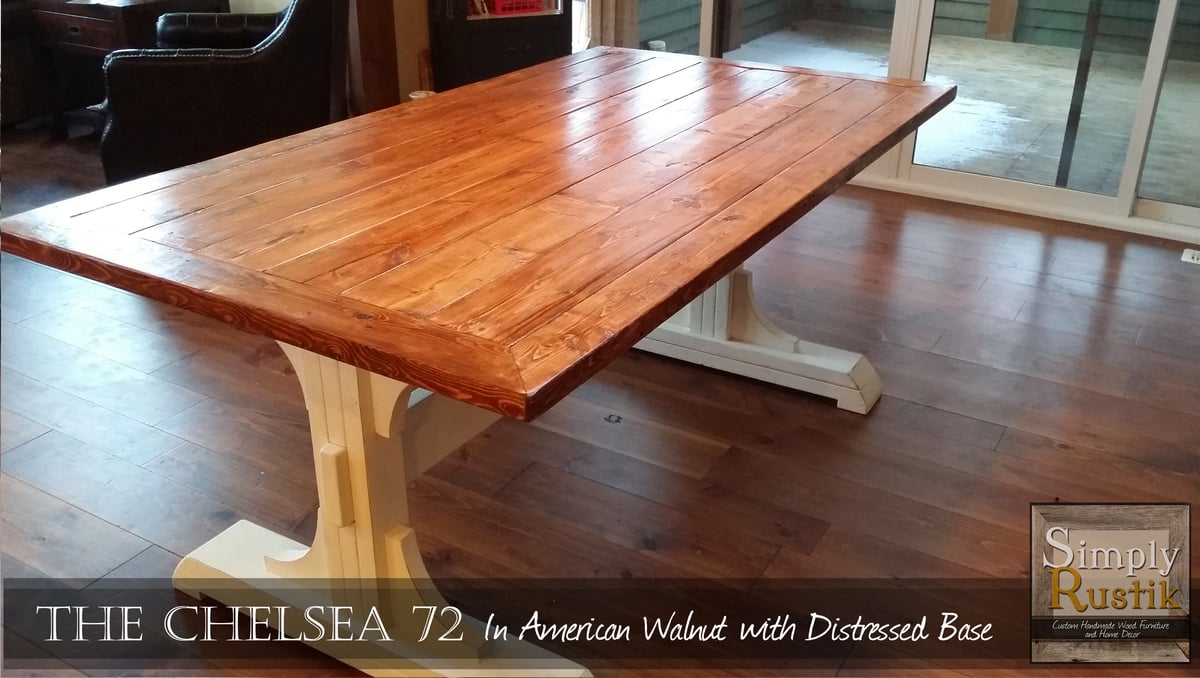
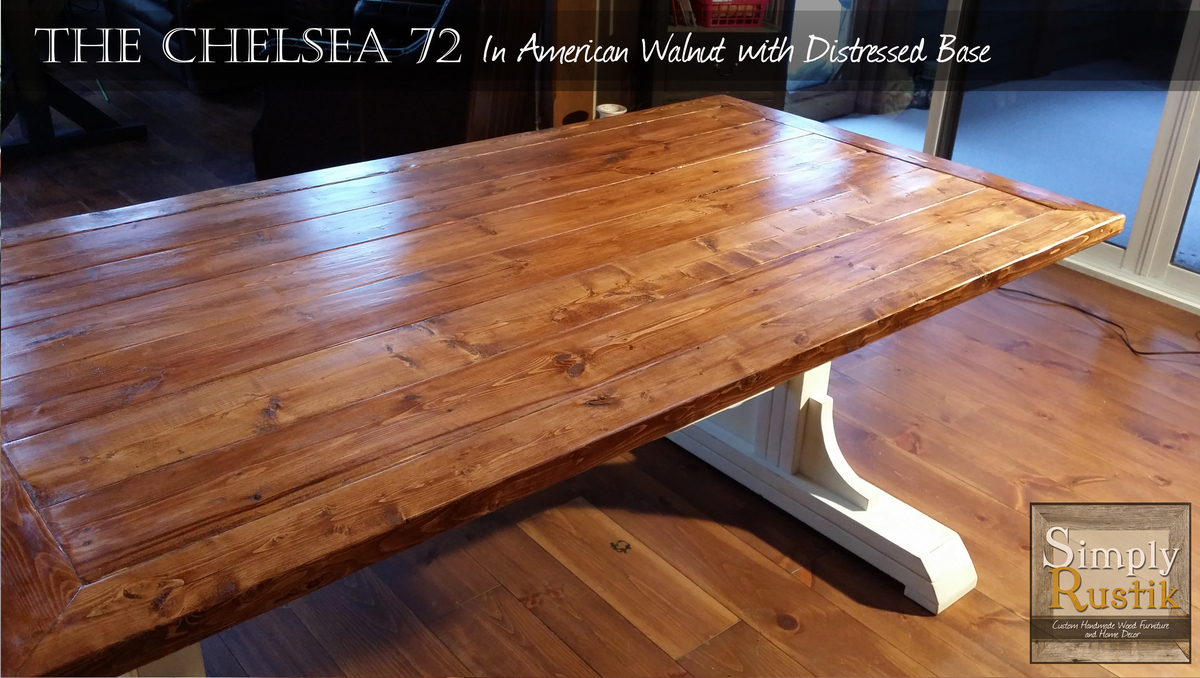
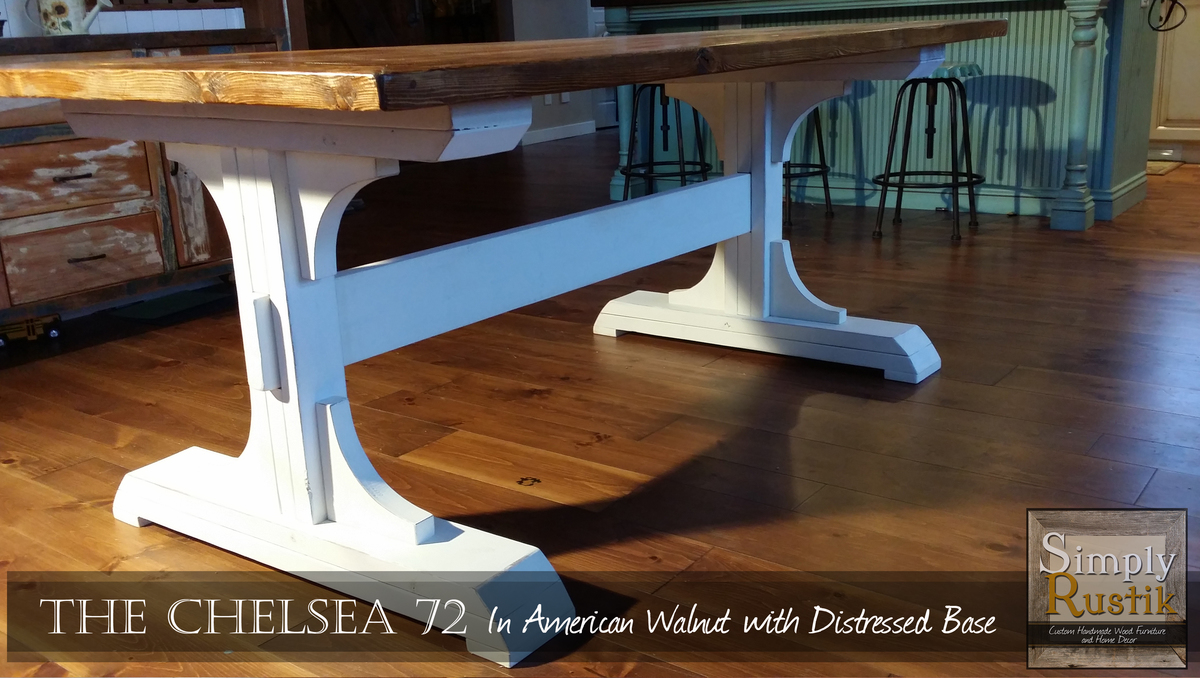
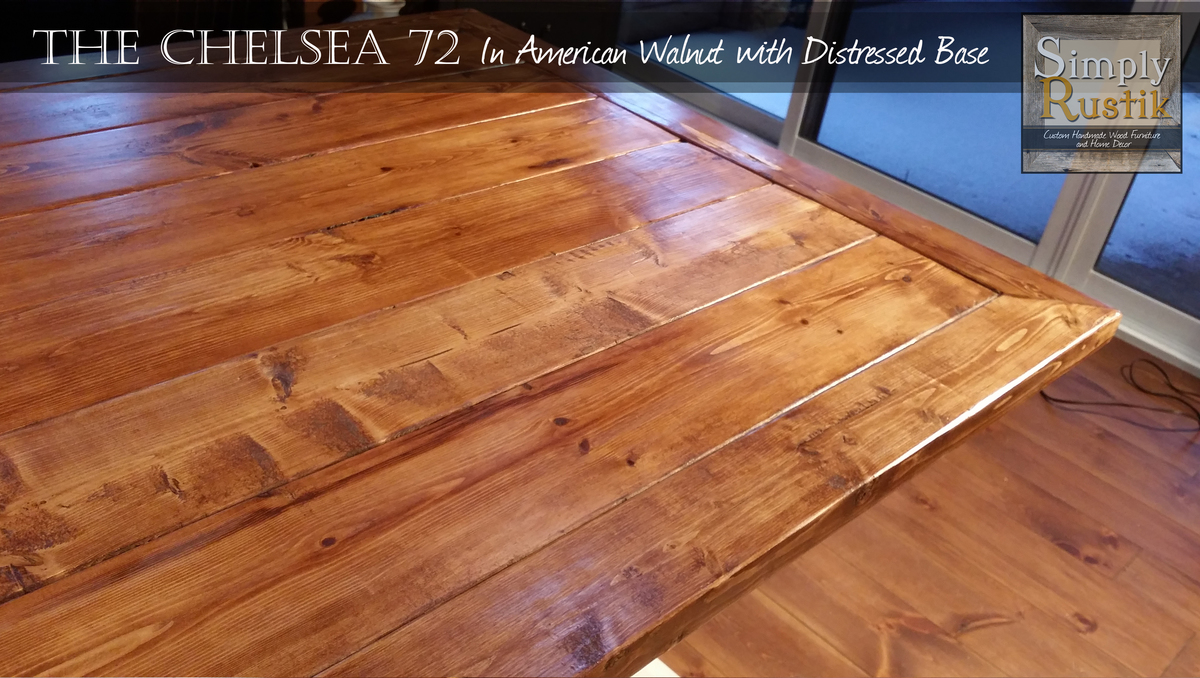
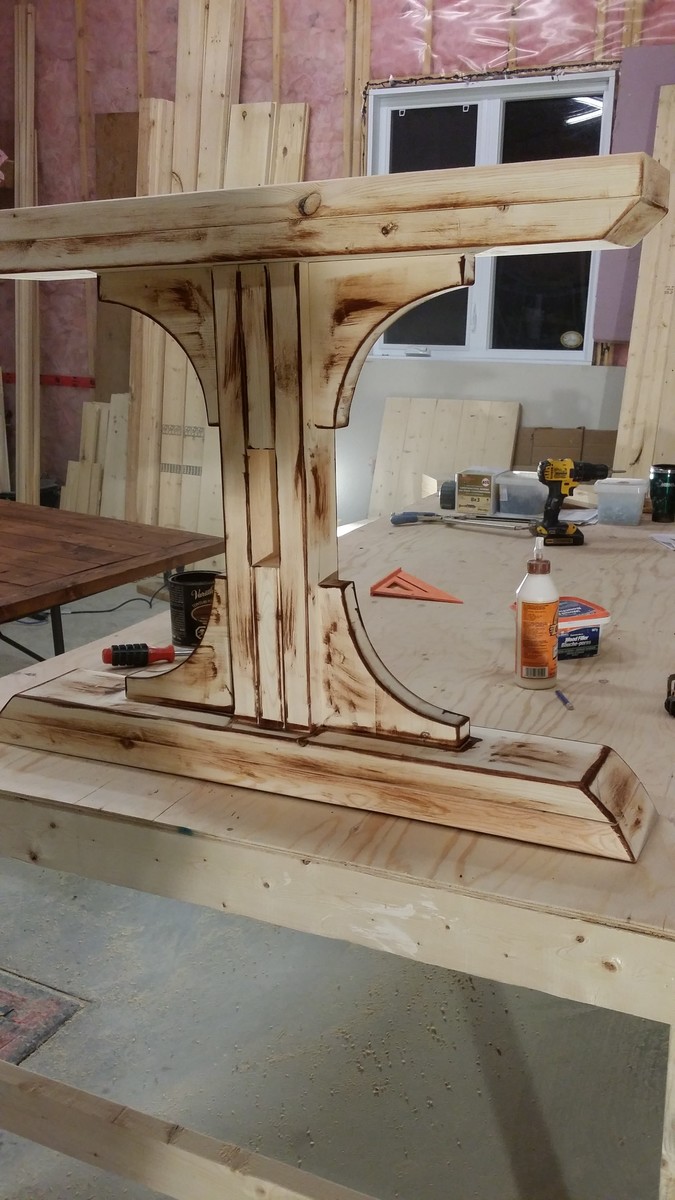
I based this build on the Triple Pedestal Farmhouse Table found on this site. I fell in love with the table and I just had to build one!
This table is only 72" long, so I ended up removing the third pedestal. I also removed the decorative apron that is pictured in the original plan. I also added a picture frame border using 2x4's with 45 degree angles on the corners. I think I like how this look turned out! I kept the legs the same size as the original plan called for.
This entire build took me about a day and the staining process another 2-3 days. I stained the table top using Varathane's American Walnut stain and I painted the base using an off-white milk paint. But before painting the base, I stained the corners with the same American Walnut stain so that when I was ready to add the distressed look, I could simply just sand the paint until the stain appeared through the white.
Visit my facebook page for more of my builds!
www.facebook.com/simplyrustik
The counter height farmhouse table plans were so helpful! Thank you Ana White! I replaced plywood on top with 2x8s and added a shelf underneath the table for some kitchen storage! I am in love thanks again😍 Follow me on Instagram @abbbclark_homeee for more home renovations, decor and DIY!
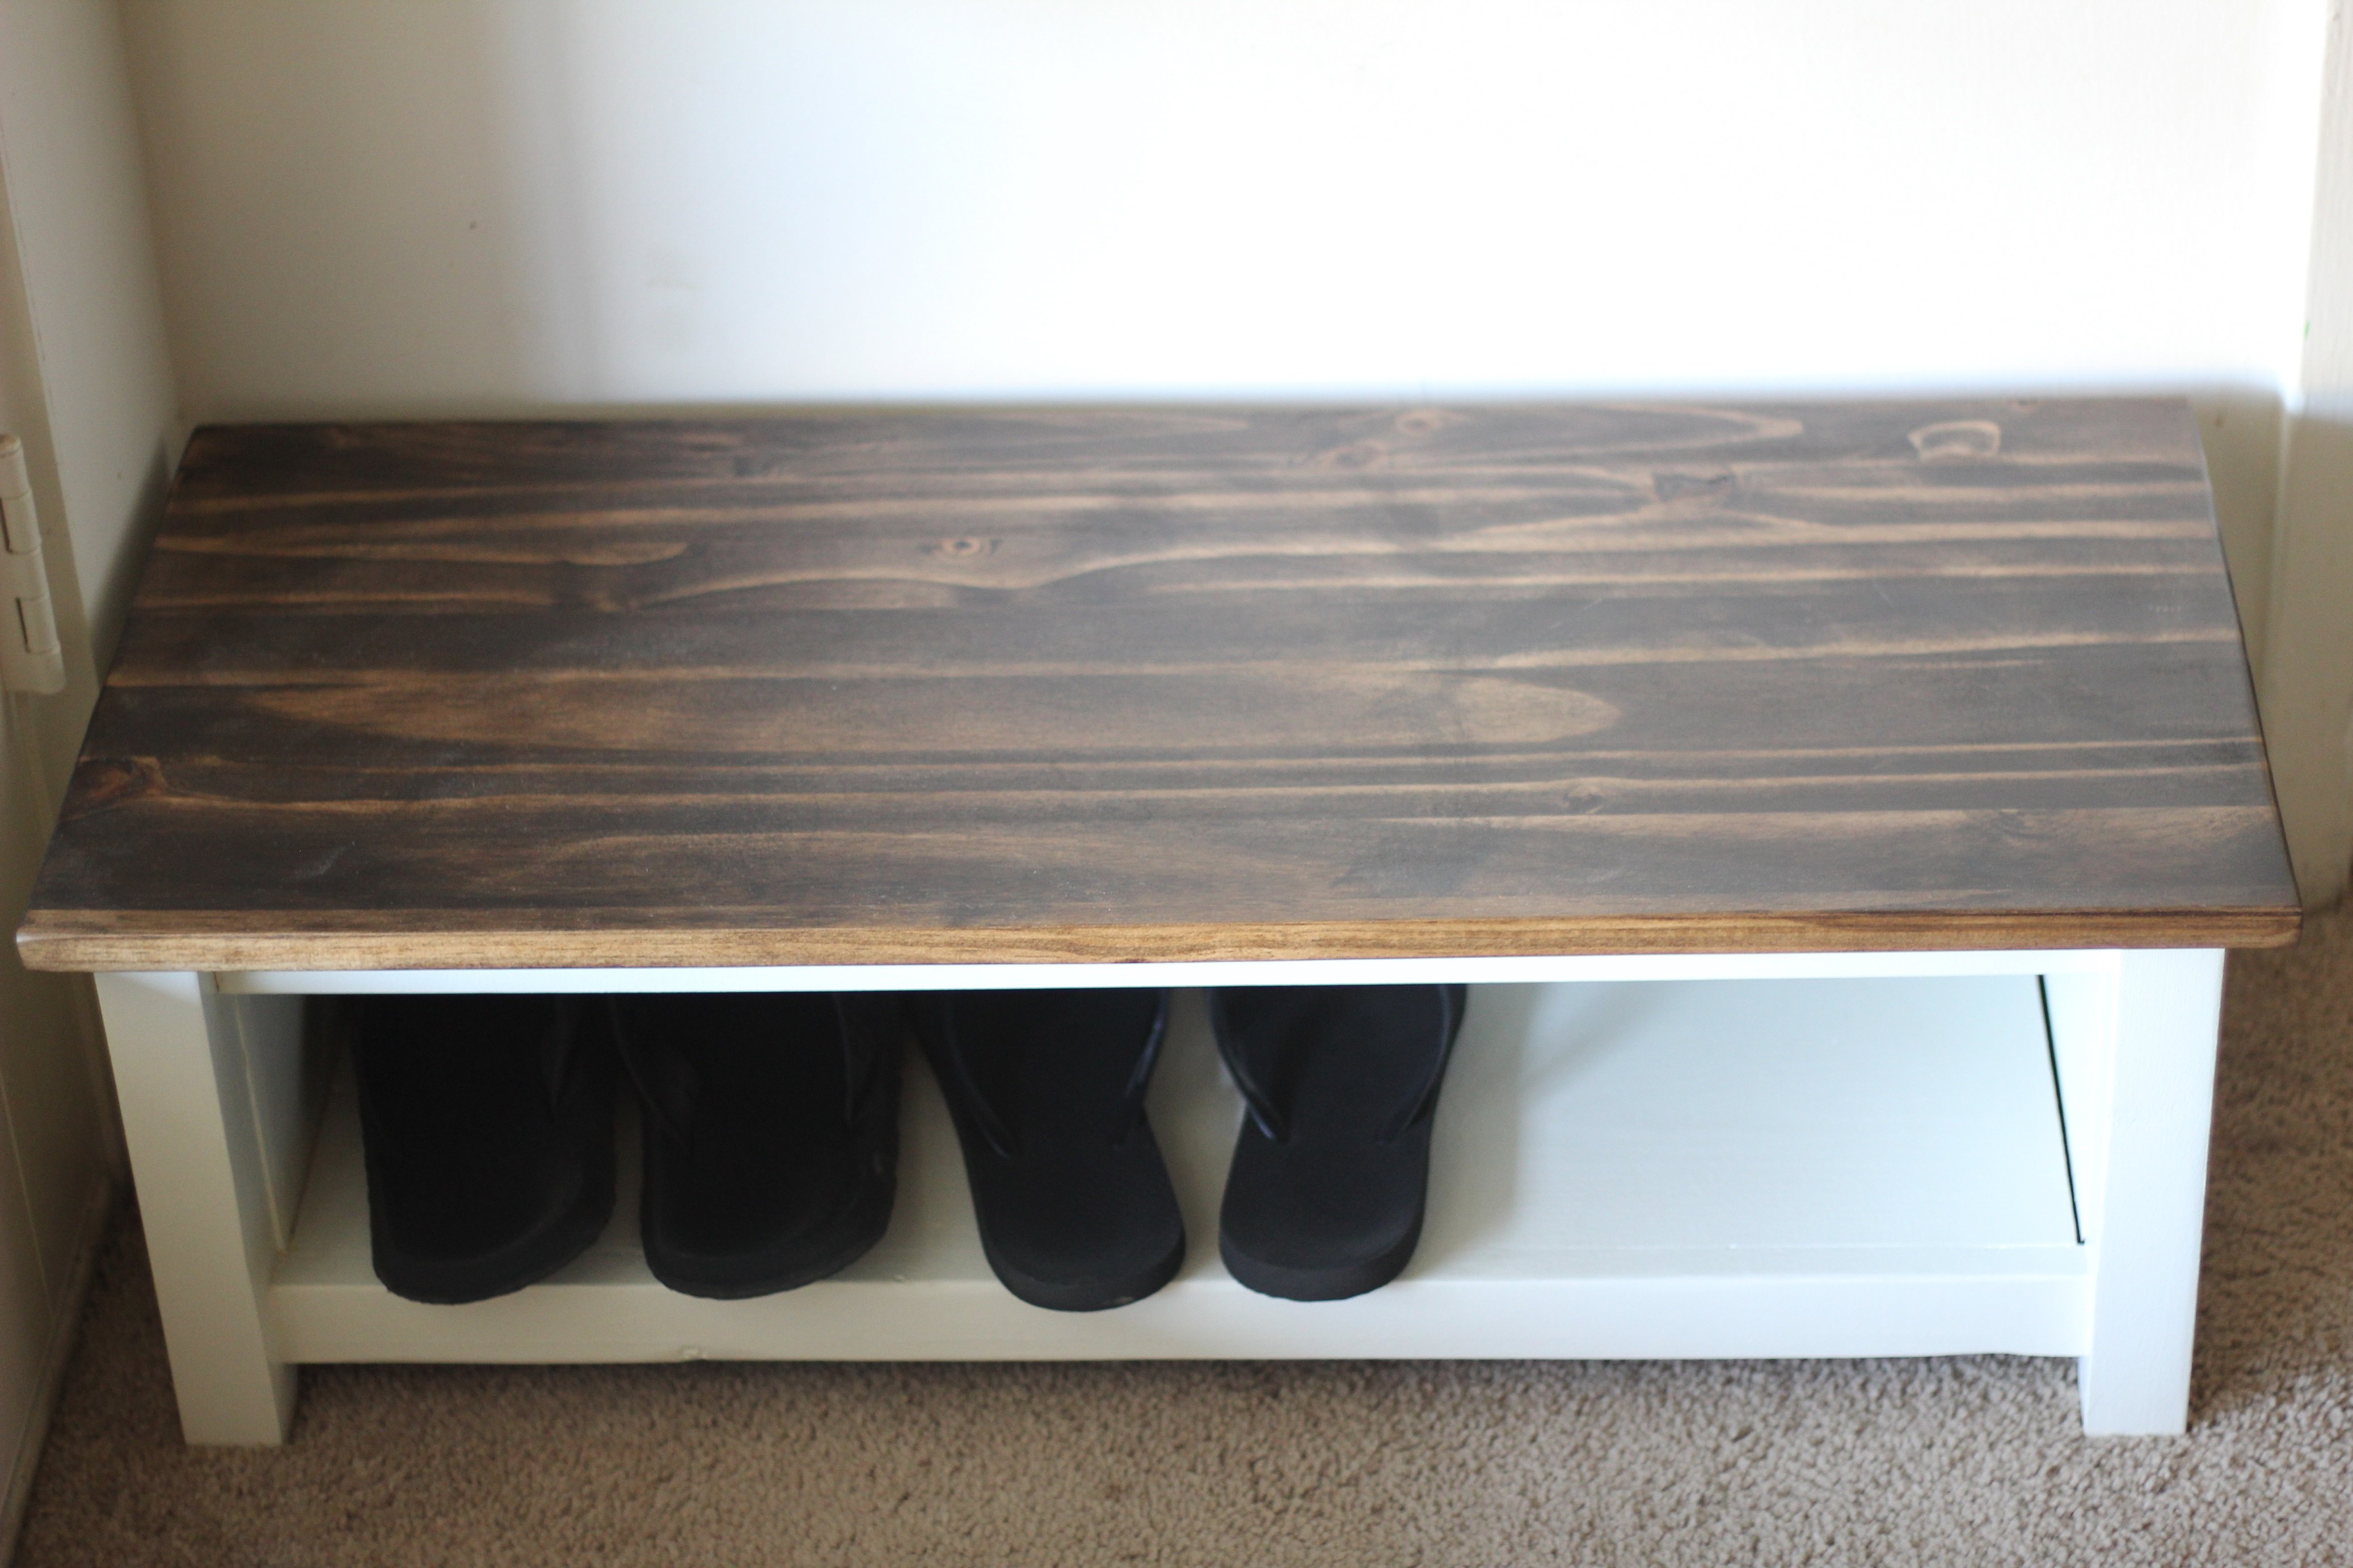
Husband wanted a shoe shelf for the back door entry, and I needed a quickie weekend project, so this fit the bill. Adapted from fix this build that's plan, but modified for a smaller space and less shoe storage. Easy project, and looks great.
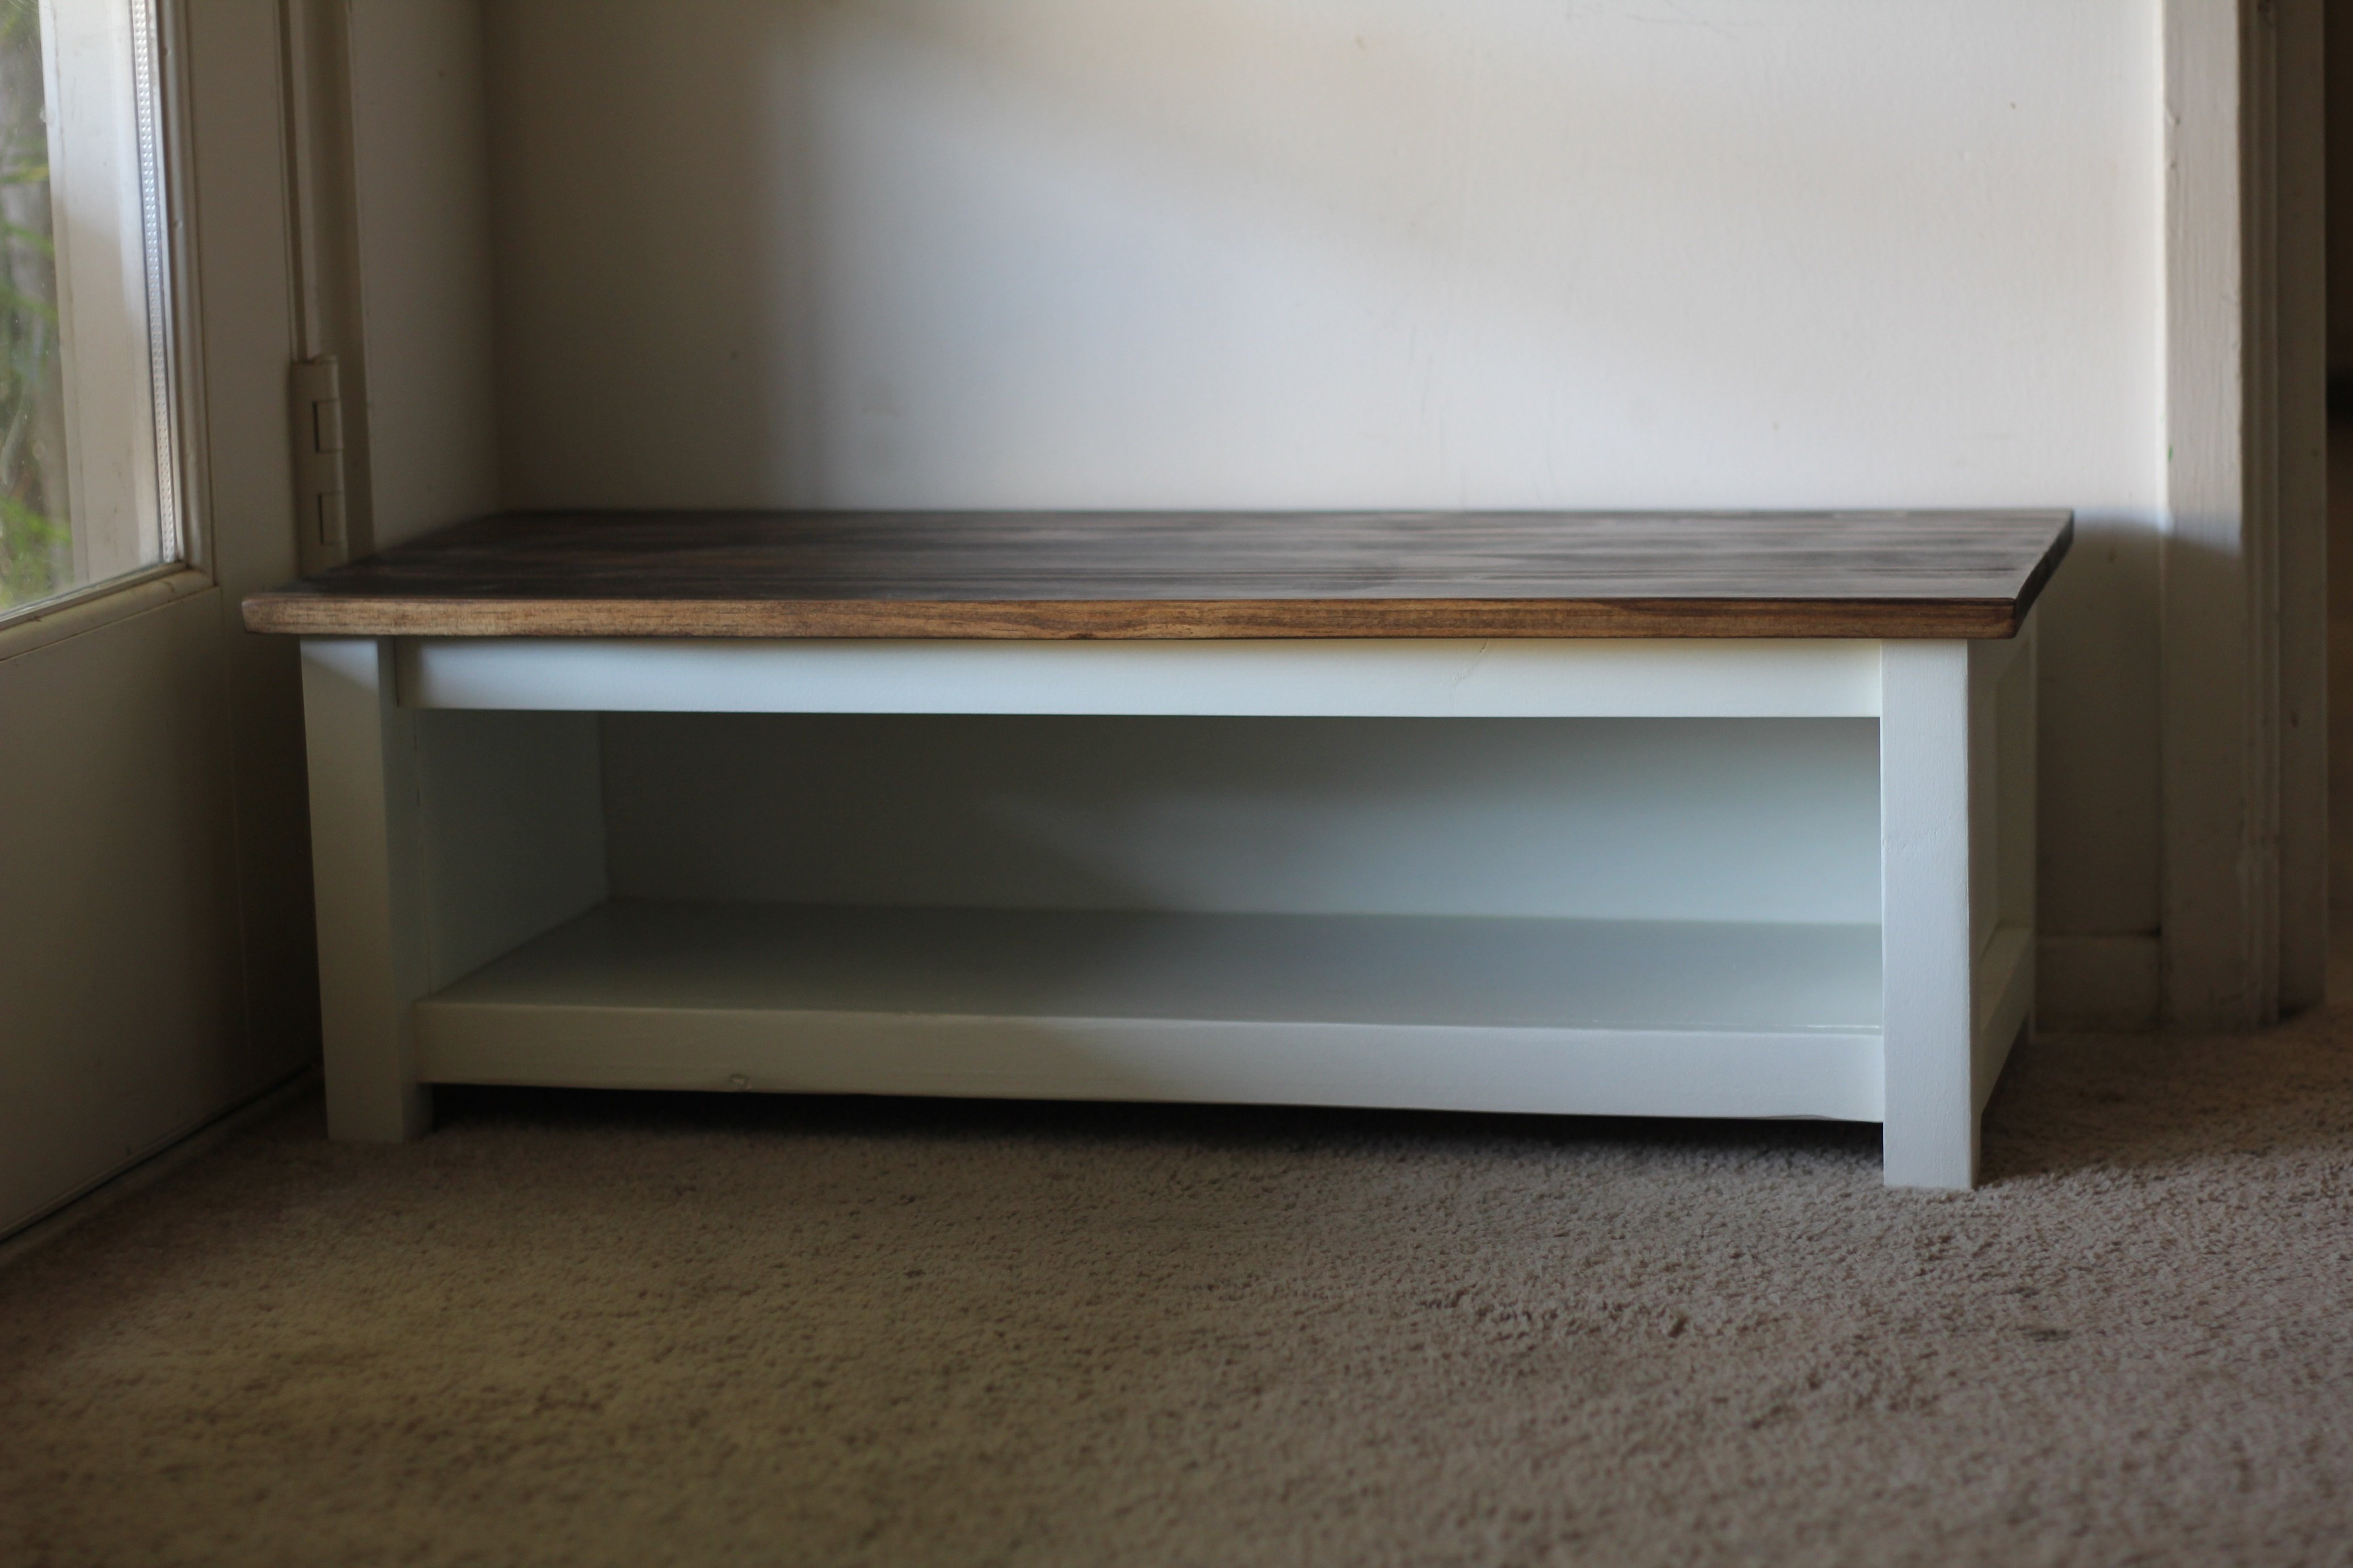

I made the original plan higher and wider, and added an extra shelf. Very pleased with the outcome!
Wed, 02/12/2014 - 09:11
This looks sweet. Do you have the dimensions to this upsized kentwood bookshelf? I'm afraid I'll screw it up if I try to add lengths to the original plan.
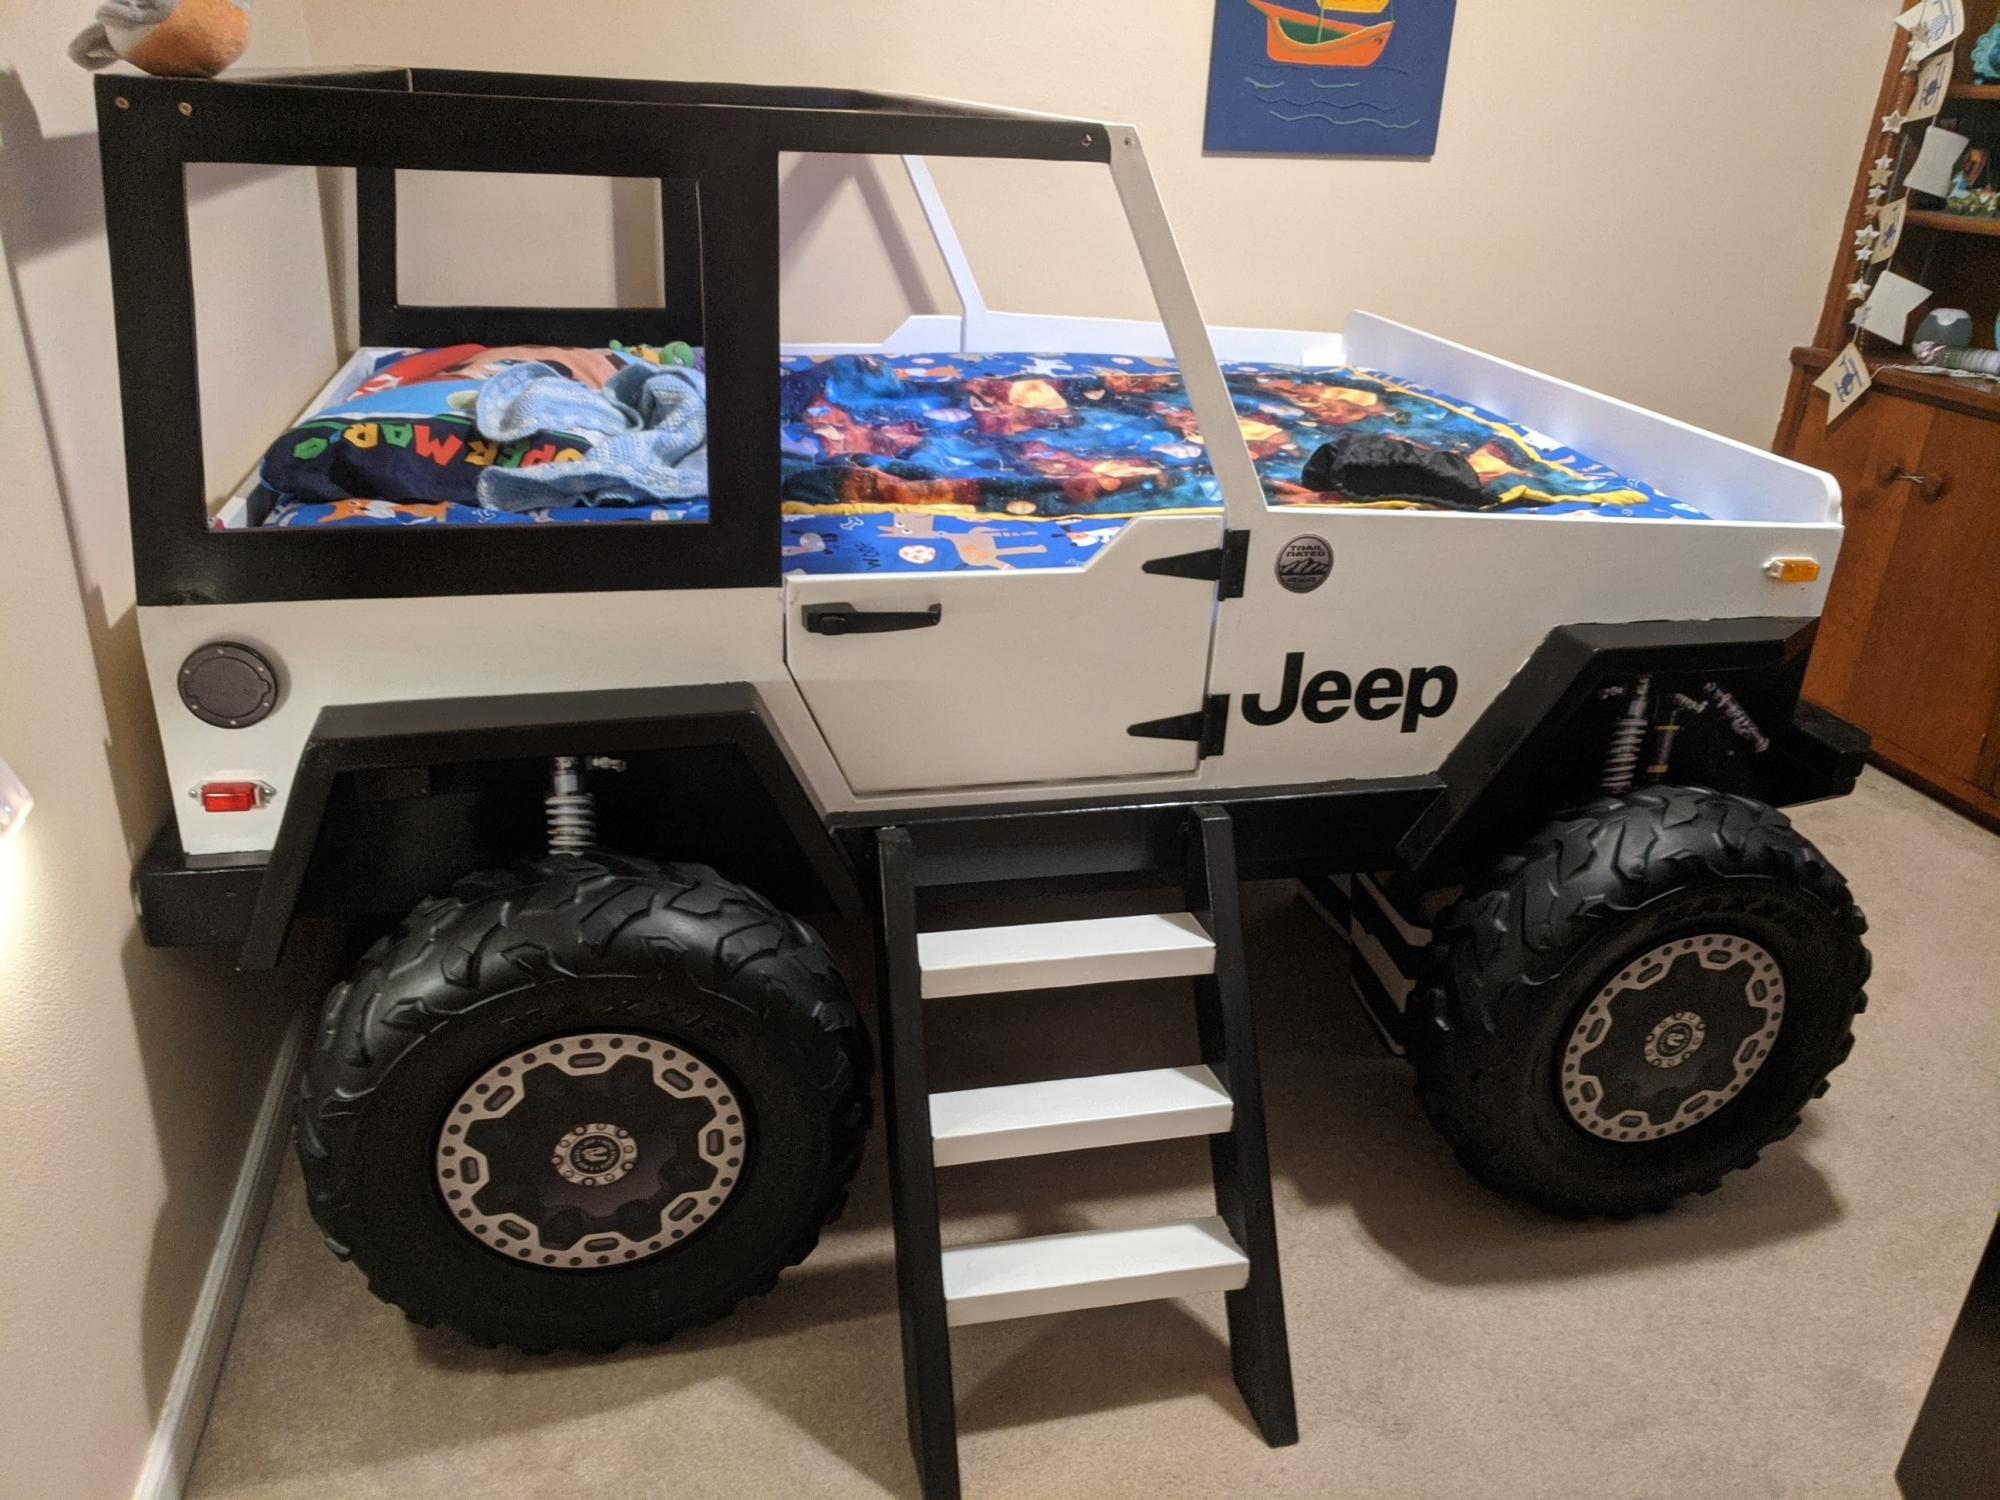
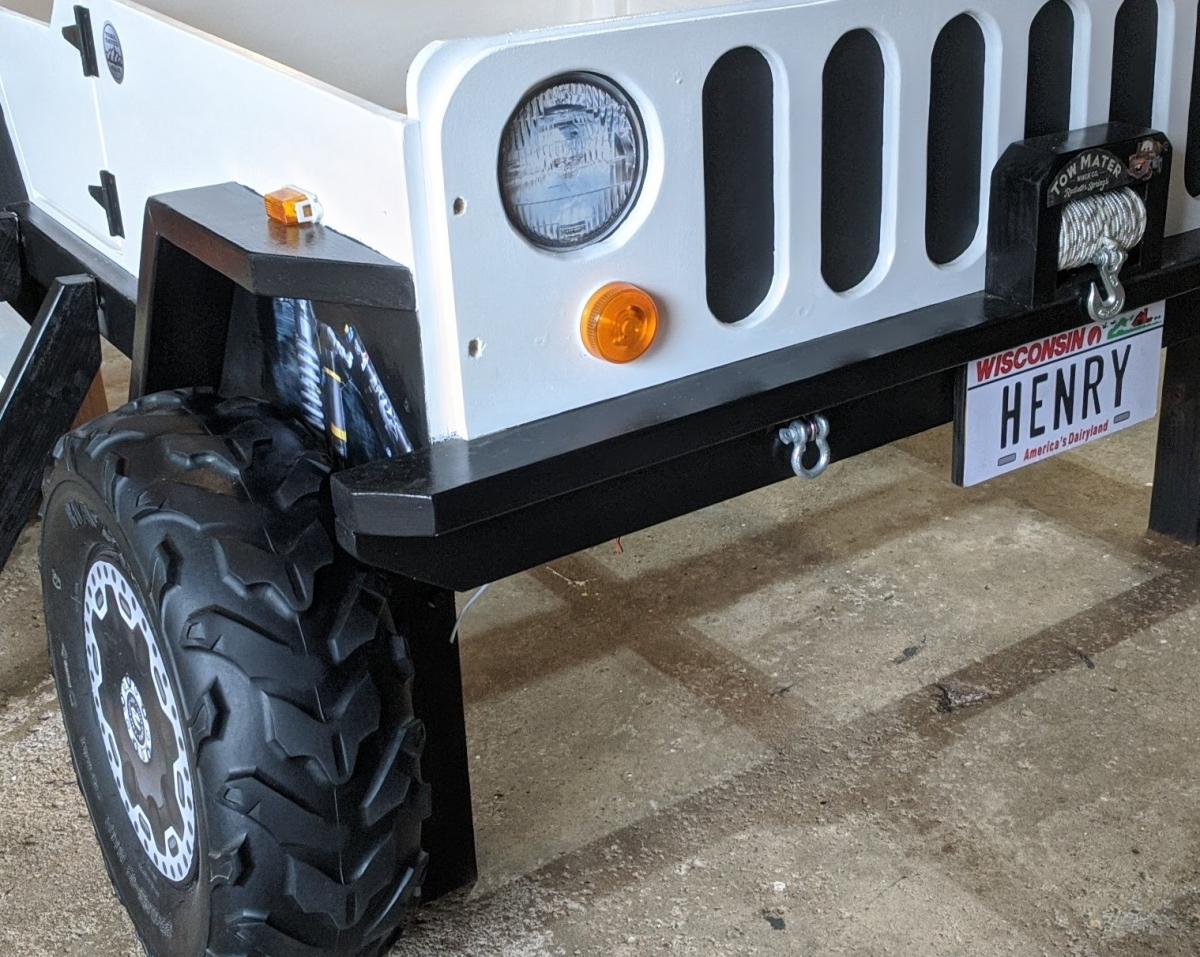
I hope this is OK to add here. It's not an Ana White plan, so moderator please delete if it is not allowed. I made this bed for my grandson. I bought a plan online and modified it from a twin to a full size bed. The dome light and running lights work as night lights. A motion sensor light activates if he crosses the door to illuminate the ladder. Front tire is made as a step so his parents can climb in and read to him. The whole thing is on EZ Sliders so they can move it away from the wall to make the bed.
Mon, 07/05/2021 - 21:59
Wonderful job, thank you for sharing! The details are spot on:)
I really enjoyed this project! It was very easy and inexpensive. I used Weathered Oak stain to make the pine look aged. I also countersunk all of the screws and used oak button dowels to give it a finished look. I learned how to create the wording and images through YouTube. Search: how to transfer an inkjet photo to wood. Cool trick.
Tue, 12/01/2015 - 04:50
My sister in law would like one of these and I'm wondering what angle cut you used for your support boards? I like the idea of going corner to corner vs trying to get each one centered and not making a mistake. I'm also wondering about spacing and if you kept the measurements the same as "Over The Big Moon" ? Thanks so much!!!
Debora Cadene
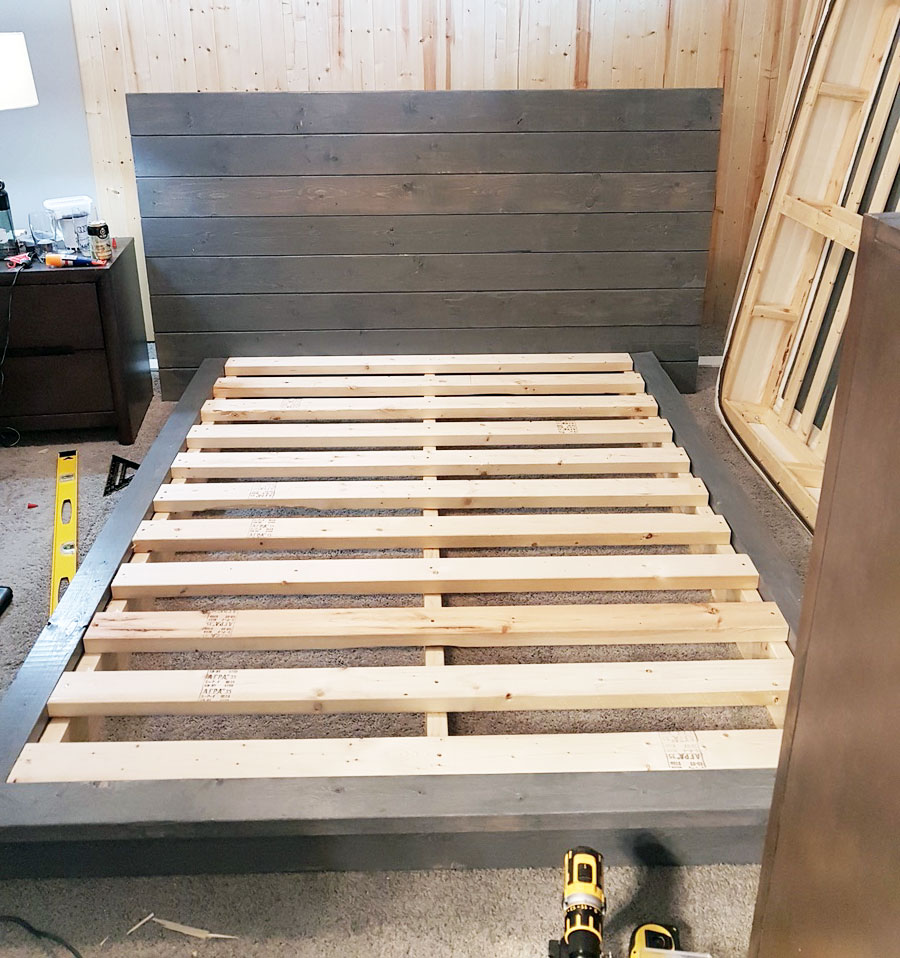
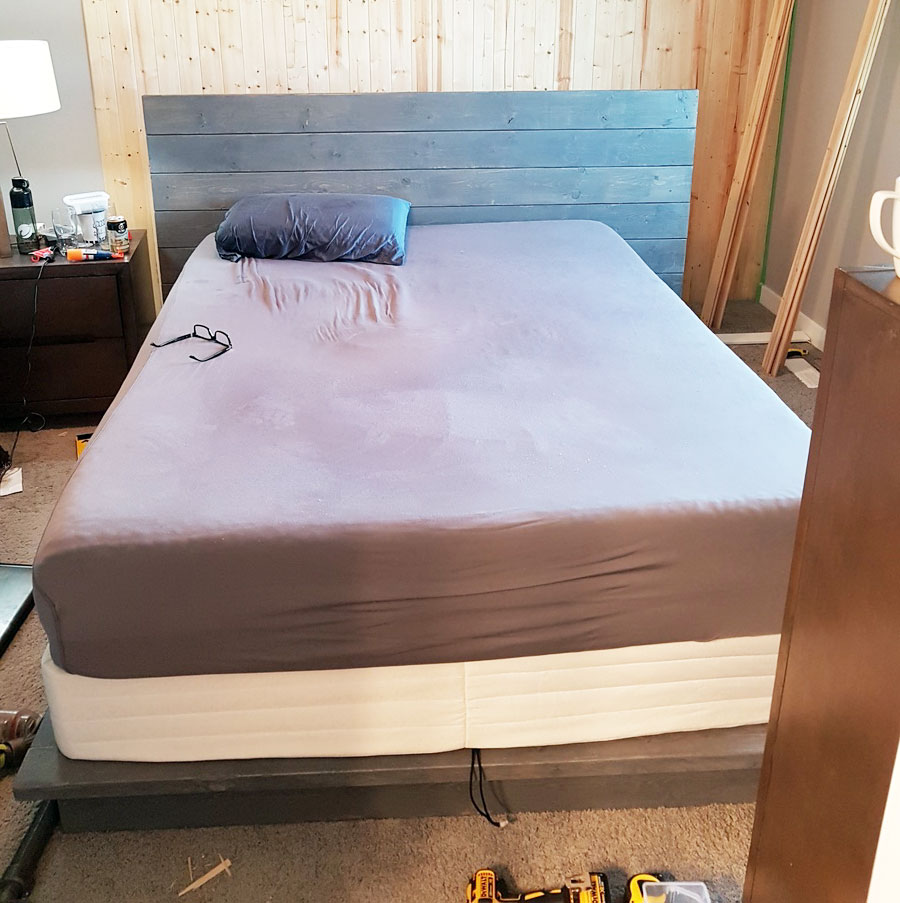
The bed in grey, also made the backboard taller (and doubled support on back) because the bed will have a box spring (photo 2). Awesome plans, love the look already. Excuse the background mess. The back wall is part of the same project! Thanks again for the plans!!
Note to future builders, learn from my one fatal mistake, be really picky on your quality of wood. I had some slight frame issues because on a bad board that resulted in about a 1/4 inch bow on one side. My slats are all use rival but you can see some done touch both sides...that is the bow. Still no one will likely notice but me.
Second, there was no info on spacing along the frame for attaching the 2x4 to the 2x6. I used 12", maybe overkill.
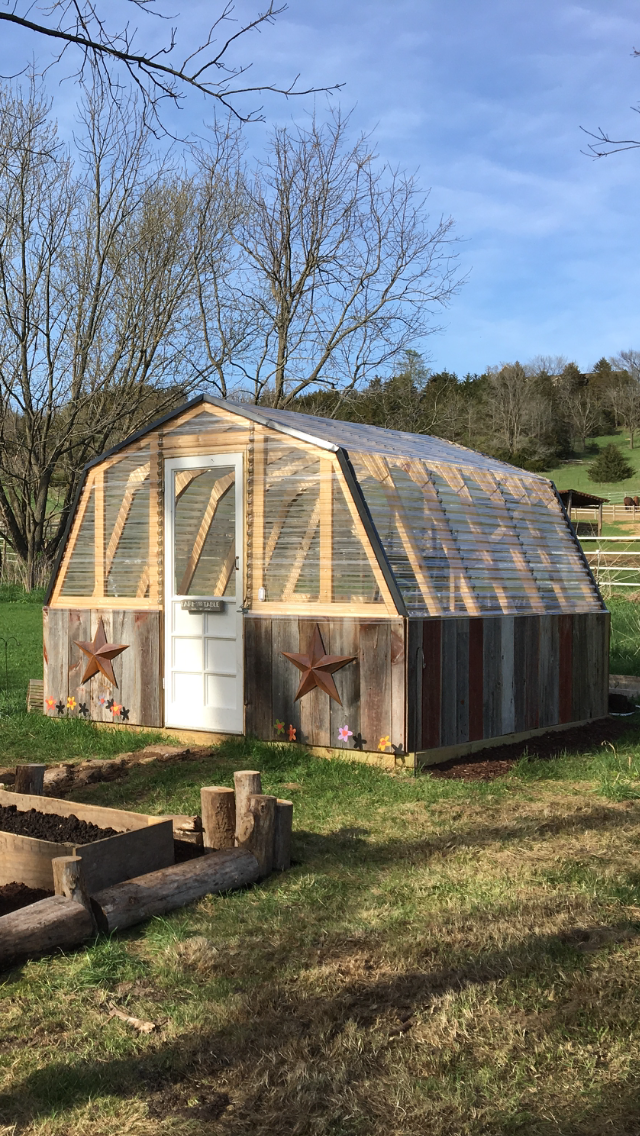
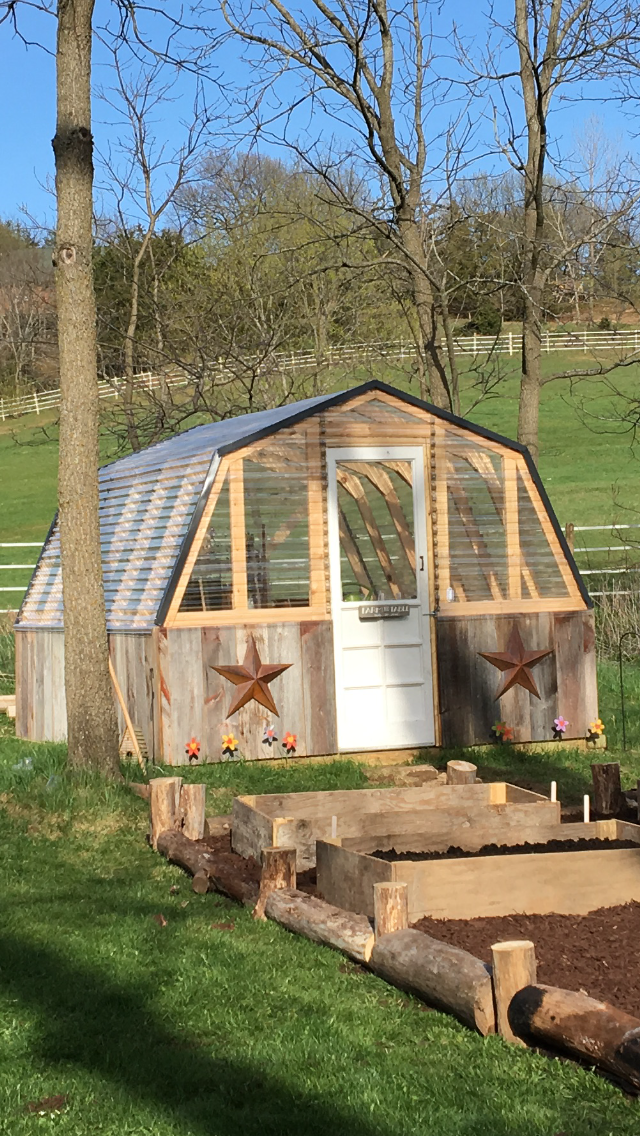
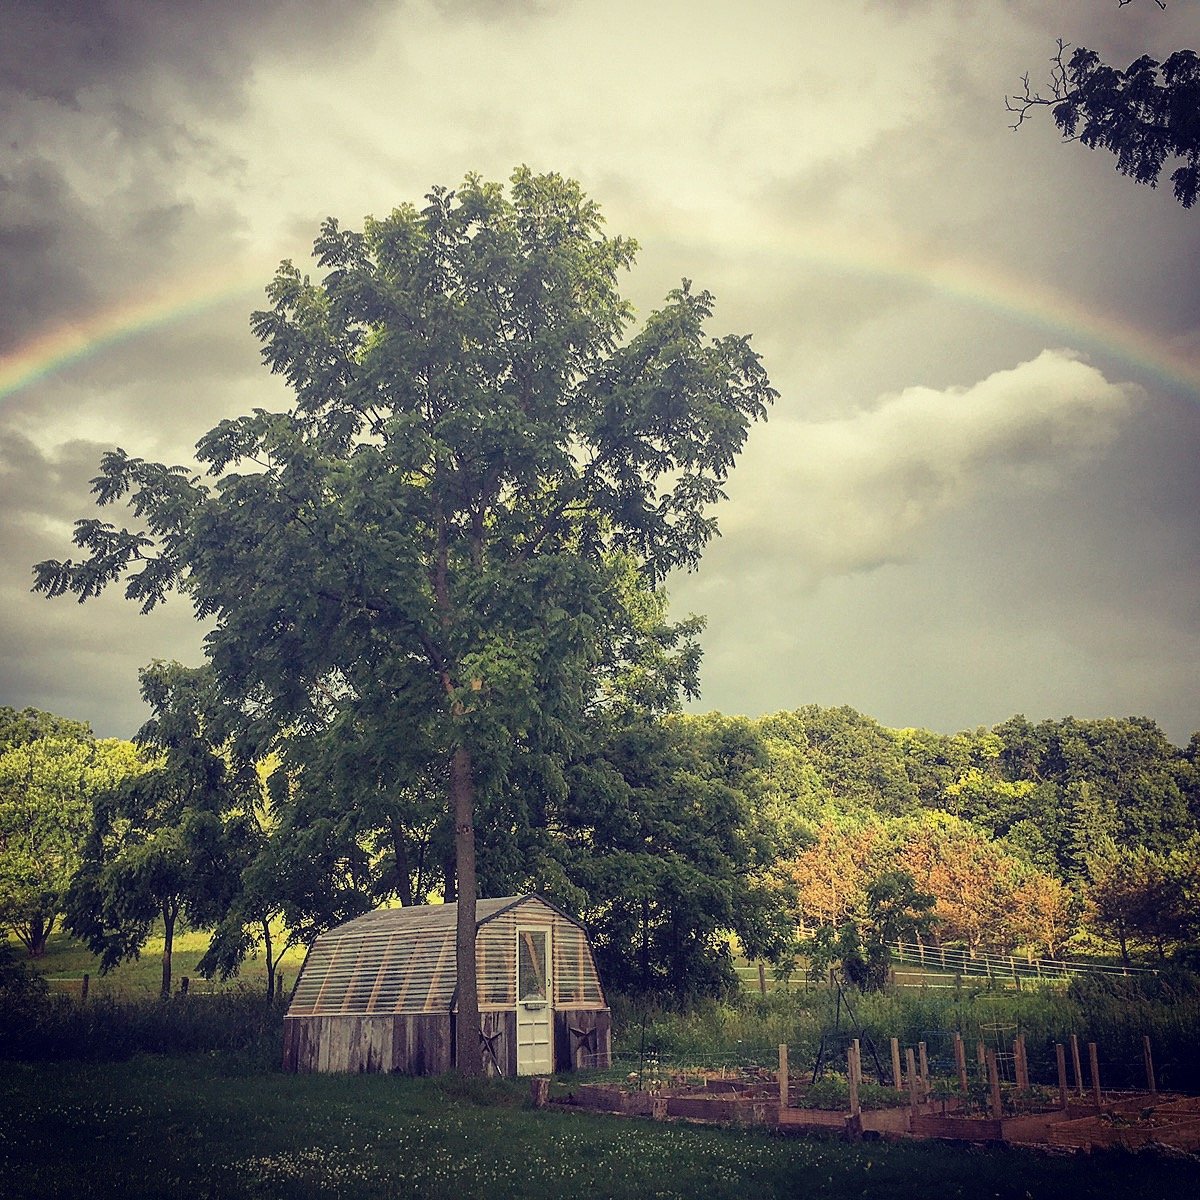
I built this amazing green house following your plans! My wife and I moved our family from the city to an amazing 5 acre homestead out in the country here in Wisconsin. We are super happy that we will be able to keep our new garden going longer! Thanks so much for the plans!

Fri, 06/21/2019 - 05:05
Cute, nice job. I'm going to build one in Tennessee.
This was an easy project that should help provide us with fresh, pesticide-free produce for many years to come. Thanks, Ana! xo


Comments
Ana White
Wed, 01/11/2017 - 12:03
This is amazing! Very
This is amazing! Very creative and useful!
shirleycanoe
Wed, 12/27/2017 - 20:15
Support for flip down tray for keyboard ?
I love this, it is exactly what I am looking for! Is some type of extra support needed for the flip down tray for the keyboard ? If so, what would it be, or is there a special hinge I should look for?