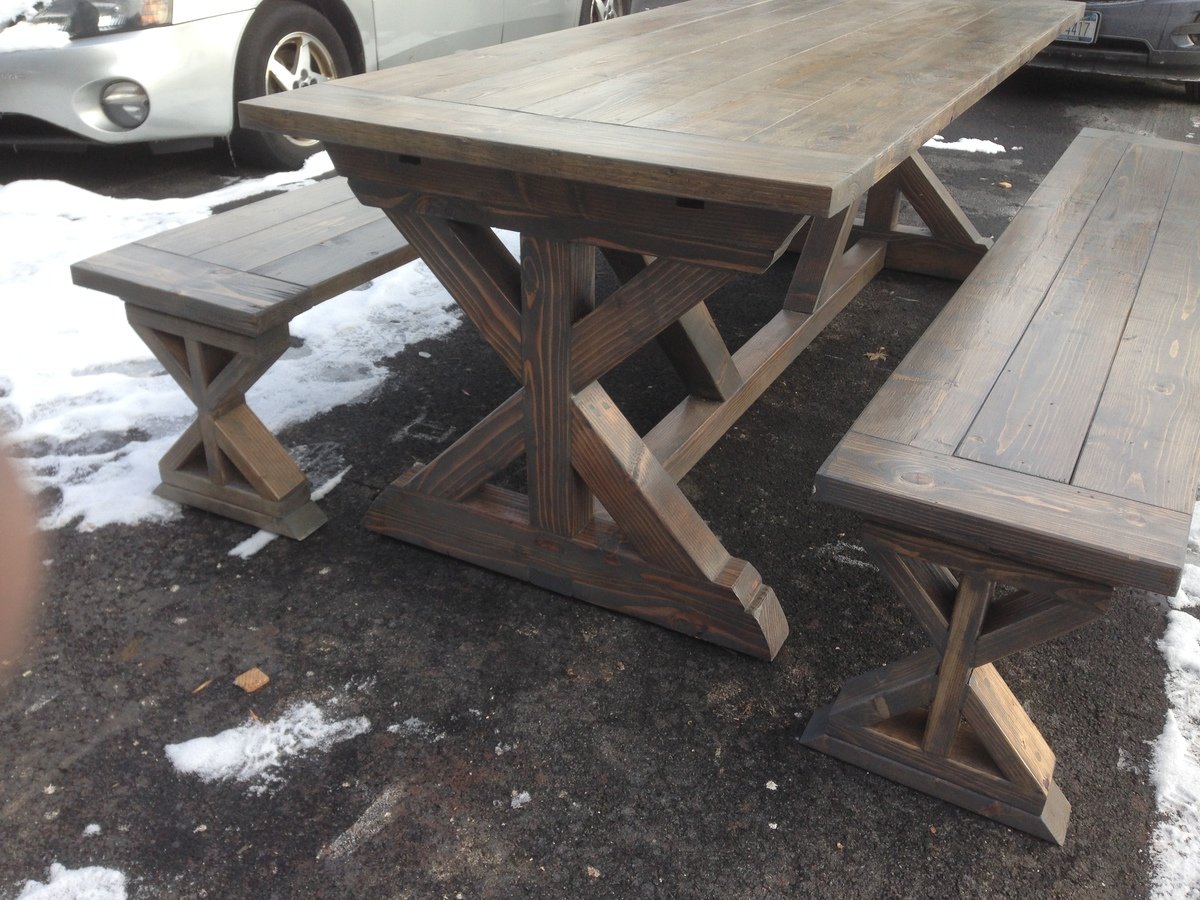
Community Brag Posts

Modern Farm Table

Submitted by AnnieAtoZ on Sun, 10/06/2013 - 22:44

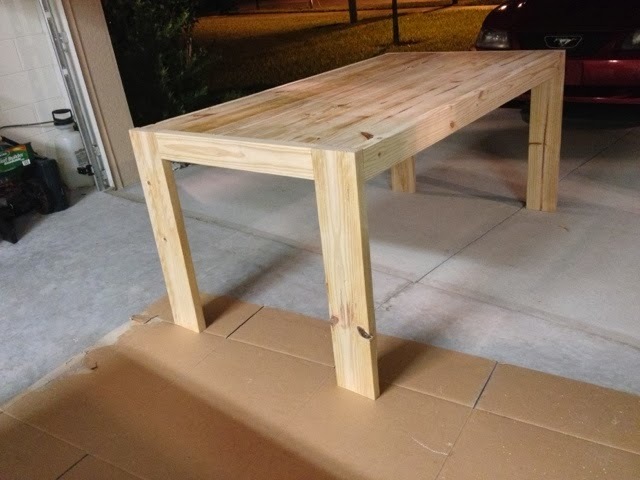
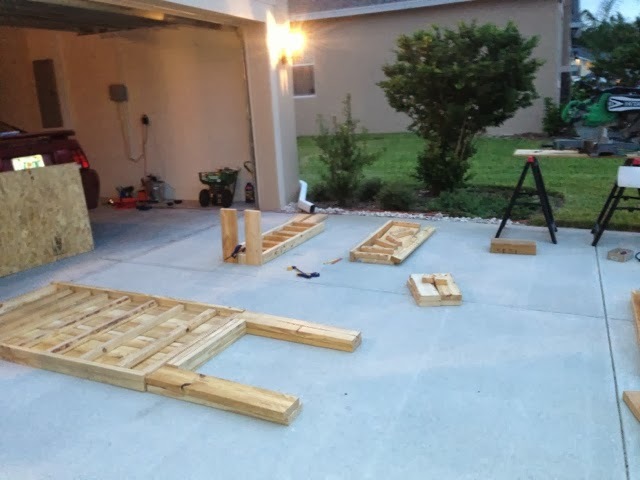
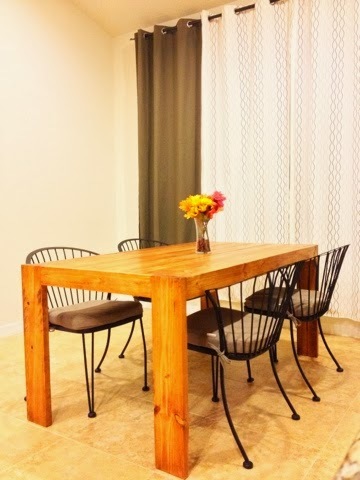
This project was a true labor of love by a first timer. We are first time homeowners and built our home, which was completed spring of this year. Like most wives, I wanted all the bells and whistles in this home. The bells and whistles add up, and next thing you know, we're eating most of our meals on our granite island upgrade, instead of a new dining set. My husband took it upon himself to purchase tools off of Craigslist and research online for modern farm table plans. He came across Ana's site and loved how she broke everything down in her plans. This was the plan he used http://ana-white.com/2009/11/plan-modern-farmhouse-table-knock-off.html The cutting, sanding, and putting the table together took about four to five hours, but staining and waiting around made the project about twenty hours. Also, everything cost $50 on our end, whereas, the West Elm table I wanted is $700. I'm one happy lady, especially since I think our table looks way better than the one from West Elm. I'm excited to report that my husband is currently refurbishing chairs to go with this beautiful table! Thanks a million for your easy to comprehend plans, Ana. You're the best. Here is a post where I featured my favorite piece of furniture http://www.AnnieAtoZ.com/2013/09/diy-modern-farmhouse-table.html

Built from Plan(s)
Estimated Cost
$50.00
Estimated Time Investment
Weekend Project (10-20 Hours)
Finish Used
Golden Oak mixed with American Standard. Satin polyurethane finish.
Recommended Skill Level
Beginner

Kitchen Island (or Cactus Table!)

Submitted by Joni on Sun, 10/09/2011 - 10:56

I absolutely loved Michaela's Kitchen Island (http://ana-white.com/2010/03/plans-michaelas-kitchen-island.html), so I modified it to suit my needs of having a table to place my cacti in the winter months. I modified the size, removed one of the shelves, and left the drawers out so that I could put my Texas stars.

Built from Plan(s)
Estimated Time Investment
Week Long Project (20 Hours or More)
Finish Used
Tabletops: Mixture of Minwax water-based stains using Antique Walnut & Onyx, topped with 4 coats of General Finish Satin EnduroVar.

Table: 2 coats of General Finish Milkpaint in Millstone, followed by 4 coats of General Finish Glaze in Van Dyke Brown, followed by 1 coat of General Finish Satin EnduroVar.
Recommended Skill Level
Beginner

Comments

BlueSky73

Sat, 05/17/2014 - 11:09

Love your version of this project! we are using your version for a bathroom vanity...any input as to the modifications you made would be appreciated!

DIY Breakfast Nook with Storage

Submitted by jfelker on Wed, 10/23/2013 - 08:54

DIY Breakfast Nook

I completed this project in a weekend, over 2 days. The space was an empty void in the corner of our kitchen, so I decided to fill with a functional seating and eating space.

I first removed the trim from the wall, so I could reuse it on the front of the box later, to make the bench match the rest of the kitchen. One challenge I came across was rerouting the a/c vent through the front of the box so we didn't lose that circulation.

My sister-in-law chipped in to make the cushions and pillows to soften it up. I added the DIY table, and further defined the space with wainscoting and trim.

Estimated Cost
$500
Estimated Time Investment
Weekend Project (10-20 Hours)
Finish Used
Semi-gloss trim paint was use, to have the ability to clean later after meals, etc.
Recommended Skill Level
Intermediate

Comments

homeideas5099

Wed, 10/23/2013 - 10:10

Looks fantastic. Love how you reused the trim to have the whole unit blend in with the rest of the kitchen. Well done.

PDubs74

Sun, 01/09/2022 - 16:45

Hey there,
Absolutely love your DIY breakfast nook. Unfortunately the additional blog/info link is no longer working as I'm trying to gather more information. Would anyone be able to send the instructions and/or new link?
Thank you

Work Bench

Submitted by Anonymous (not verified) on Sun, 02/26/2023 - 10:19

I used a lot of scrap 2 x 4's I had laying around. It's not pretty but I am really proud of it, I am going to be 70 this summer! So not bad for an "old lady!" I had so much fun making this!!

Comments

X Base Farmhouse Table and Benches

modeled after the Restoration Hardware Salvage Wood X Base Table which at this 8' table listed for $3395 just for the table. LOL

Used the Fancy x farm table plans and used all 4 x 4 on table, and followed plans for benches with 2x4

Estimated Cost
350
Estimated Time Investment
Week Long Project (20 Hours or More)
Finish Used
First stained with special walnut let dry, and then coated with weather grey, poly finish
Recommended Skill Level
Intermediate

Comments

Camp Loft Bed with Stair, Junior Height

Submitted by Anonymous (not verified) on Sat, 02/27/2016 - 12:23

This was a fun project for my husband and I! My 4 year old absolutely loves her bed. We have plans to add a curtain to the bottom to let her open and close it for her reading nook (or as curtains for her "stage")! :) 

Estimated Time Investment
Weekend Project (10-20 Hours)
Recommended Skill Level
Beginner

Easy to Build DIY Lemonade Stand

Submitted by Anonymous (not verified) on Sun, 07/30/2023 - 14:54

This is based on Ana's Lemonade Stand project- I made it taller and wider, added casters. It was a hit with the birthday girl and the customers!

Amy of The Navy House Goods Co. @thenavyhousegoodsco

Built from Plan(s)

Comments

2x4 and 2x6 Chairs and Couch

Submitted by clintusaf on Mon, 05/11/2020 - 16:43

I used the Modern Outdoor Chair from 2x4s and 2x6s plans and slightly modified then to make a 3 seater couch. My cushions(most expensive part) were 24 in x 24 in and purchased from Lowes for $40 per seat. The couch is 79 inches in total length. I also dropped the seat down to the lower level to allow more room for my cushion backs to sit further down into the seat.

Estimated Cost
$400
Estimated Time Investment
Weekend Project (10-20 Hours)
Finish Used
Thompsons Waterseal Teak Oil Walnut Semi-Transparent
Recommended Skill Level
Beginner

Modern Adirondack Chair Set

Submitted by Anonymous (not verified) on Wed, 06/10/2020 - 17:25

I used 5 5/8 fence pickets I had in the scrap box to give the chairs a wider arm rest. I wanted something wide enough to safely hold a paper plate and drinks.
I planned them, routered the edges and put a coat of oil based polyurethane on them.
The table is just something I put together and the top is a 1.5 inch thick 16x16 concrete paver.
If you like the wide arms, use wood glue and clamps, not nails or screws. Saves you from having to fill them and it looks better too.
Enjoy
And thank you Anna for a great build!

Estimated Cost
$60
Estimated Time Investment
Day Project (6-9 Hours)
Finish Used
Exterior paint and oil based polyurethane
Recommended Skill Level
Intermediate
Seasonal And Holiday

Perfect College Student's Desk Combo

I combined the Dorm Desk and Flip-down Children's art desk plans to make a perfect combination for my school work.

The Dorm Desk was designed to be used with bar stools, so it would be rather tall. I simply made the dimensions shorter to fit with a computer chair. I also tweaked the children's art desk a bit for use as a laptop desk, just took out the shelves and put a piece in to hold binders and whatnot.

Another note, most of the materials used were scraps from other projects, so the dimensions are a little different there too. For instance, I had some 6" strips of 3/4" plywood sitting around, so I used those for the shelves instead of 1x8's, and I used a piece of 1x12 for the front of the wall-mount desk instead of plywood.

The estimate cost is not at all what it would cost if you were starting from scratch. The only things I payed for up front for these two projects was the D-ring hangers for the wall-mount desk, a piece of plywood for he desk top, some tin flashing, and a 2x2 for the frame.

*the tin flashing I got ended up not being magnetic, which was disappointing, but it ended up working well with wet-erase markers (the kind teachers use on overhead projectors) so at least it still has a function. I may also end up puting a cork border around the edges so I can still hang things from there.

Hint: I used an old wallet chain for support on the wall-mount desk. I also found some left over hinges and a small clasp I had bought for a keepsake box I made years ago. If you're pretty handy, you probably have plenty of stuff you can use just lying around the house.

Built from Plan(s)
Estimated Cost
$15
Estimated Time Investment
Weekend Project (10-20 Hours)
Recommended Skill Level
Intermediate

Modern Outdoor Chairs

Submitted by zachnewc on Wed, 08/19/2020 - 07:59

This was my first woodworking project and they turned out great! My wife and I will use these around our fire pit for the summer. I spent one day cutting the wood and putting the project together, and then a couple weeknights sanding and staining the chairs. I thought the directions were spot on! I look forward to my next project!

Estimated Cost
$80
Estimated Time Investment
Weekend Project (10-20 Hours)
Finish Used
Paramount Semi-Transparent Deck Stain - Warm Teak
Recommended Skill Level
Beginner

Garage Shelves

Submitted by scoricha on Mon, 01/09/2017 - 11:01

I am loving my new garage shelves.  They were my first woodworking project and very easy to do!  I left the bottom right side open to fit my outdoor table and chairs in the winter (I live in Michigan).  I also used thicker plywood than plan because my shelves are a bit deeper.

Estimated Cost
$130
Estimated Time Investment
Weekend Project (10-20 Hours)
Finish Used
none
Recommended Skill Level
Beginner

Large Wood Pet Kennel End Table

Submitted by Anonymous (not verified) on Fri, 02/17/2017 - 14:02

I followed most of the instructions, but made adjustments on the sizing of the wood because I was using rebar.

Estimated Cost
$125
Estimated Time Investment
Day Project (6-9 Hours)
Recommended Skill Level
Intermediate

Loft bed with stairs

Submitted by donk on Tue, 11/24/2020 - 15:14

I started planning this project this spring when we bought and moved into our new house. I knew with the room size a loft bed would make the most of the room. My daughter is scared of heights a little bit so I was worried about using a ladder. I stumbled on this site and these plans and knew this is exactly what I was going to build. Ever since we finished painting it and getting her room done she has been glued to it!

Comments

Mario inspired cabin bed

Submitted by Anonymous (not verified) on Mon, 03/06/2017 - 09:11

Thank you for all the diagrams on this website, this project could not have been completed without these.  The entire project took a month worth of weekends.  I used 2 sheets of 3/4" Birch plywood, 2x12x10 Southern Yellow Pine (rip to 4" strips), and 1x8x10 Ponderosa Pine for the roof and slats.  Our 3 year old loves the bed and could not wait to use it.  All month he has been asking about his new room, normally he does not like change but he loved this bed.

Estimated Time Investment
Week Long Project (20 Hours or More)
Finish Used
Behr Marquee paint. 4 Quarts; 2 for the main color, 1 for the roof, and 1 for the plywood.
Recommended Skill Level
Intermediate

Classic Bunk Beds Re-Imagined With Stairs

Submitted by edeboode on Mon, 04/03/2017 - 07:57

I modified the plans for the Classic Bunk beds by making them 74" tall instead of 63" and added a fourth slat all the way around to add more protection from potential falls.  I created one opening in the front for my youngest to get into the bottom bunk, and built slats about 2/3's across the front to act as a gaurd rail. I created another opening on the side for my oldest to get into the top bunk with stairs instead of ladders to again prevent falls.  I had to modify the Sweet Pea stairs to accomodate for the extra height in the bunk beds, simplified the railings, and I created each cubby to be big enough to use cloth storage totes that were 11x11x11.  Sanded the whole bed and stairs so the corners and edges were all rounded and smooth, and put two coats of white Deck and Porch paint to stand up to the the boys running up and down.  I used brackets to secure the stairs to the bed, and sixteen 3" bolts to bind the bed together.  Precut and drilled 17 slats for each bed seperated them 2" apart.  Spent a few hours every night during the week measuring, cutting, glueing, drilling and assembling the bed and stairs.  Spent an entire weekend sanding and painting.  Very happy with the way these beds turned out.  Overall cost of the project including the paint was around $400.  

Estimated Cost
$400
Estimated Time Investment
Week Long Project (20 Hours or More)
Finish Used
Porch and Deck Paint
Recommended Skill Level
Beginner

Comments

Back