Community Brag Posts
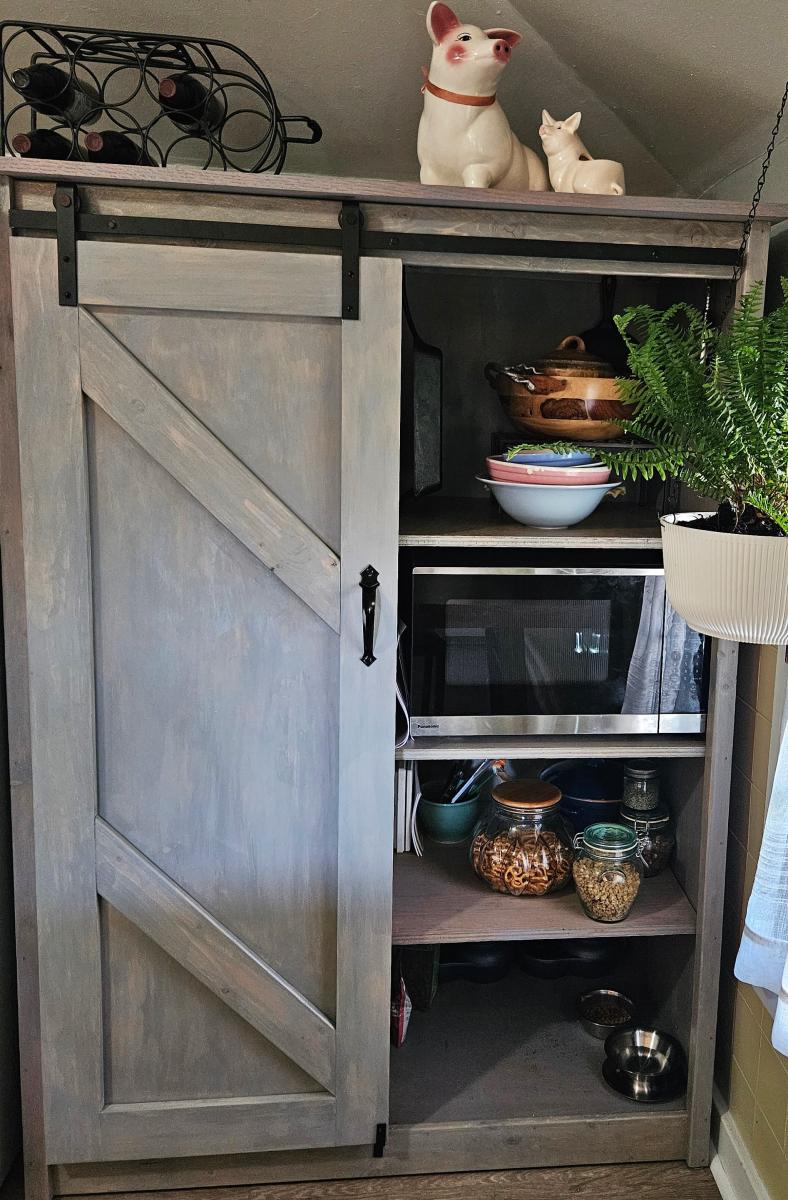
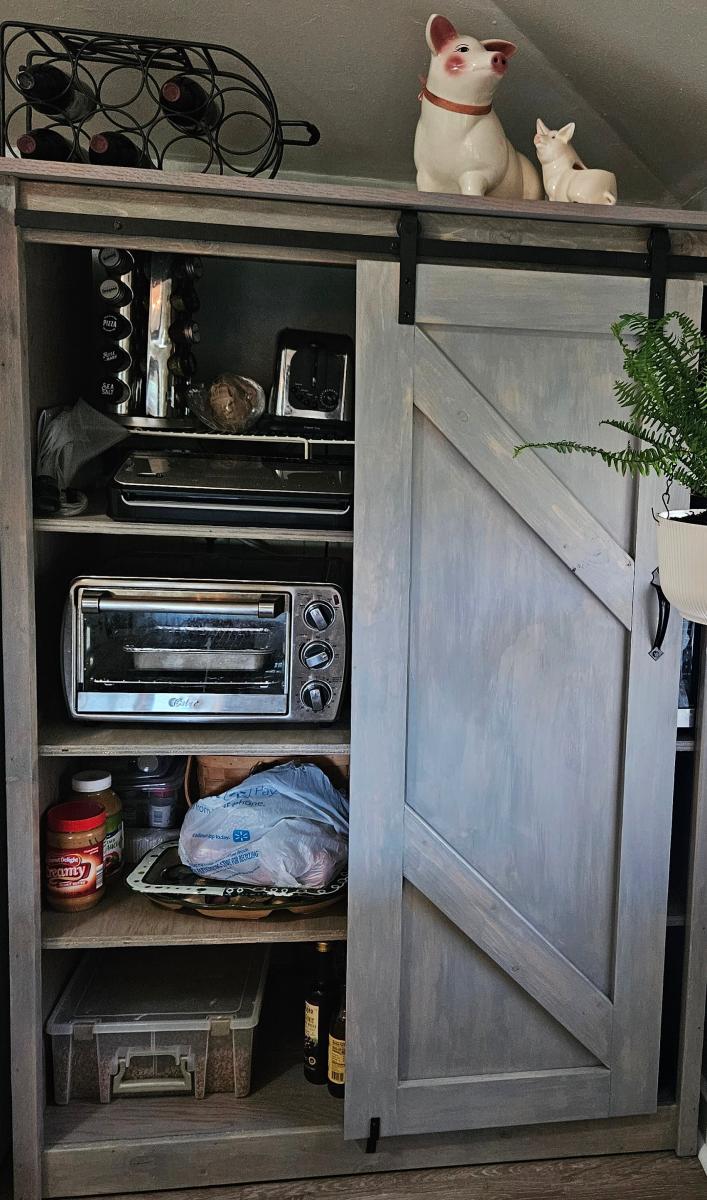
Small Kitchen Storage Pantry
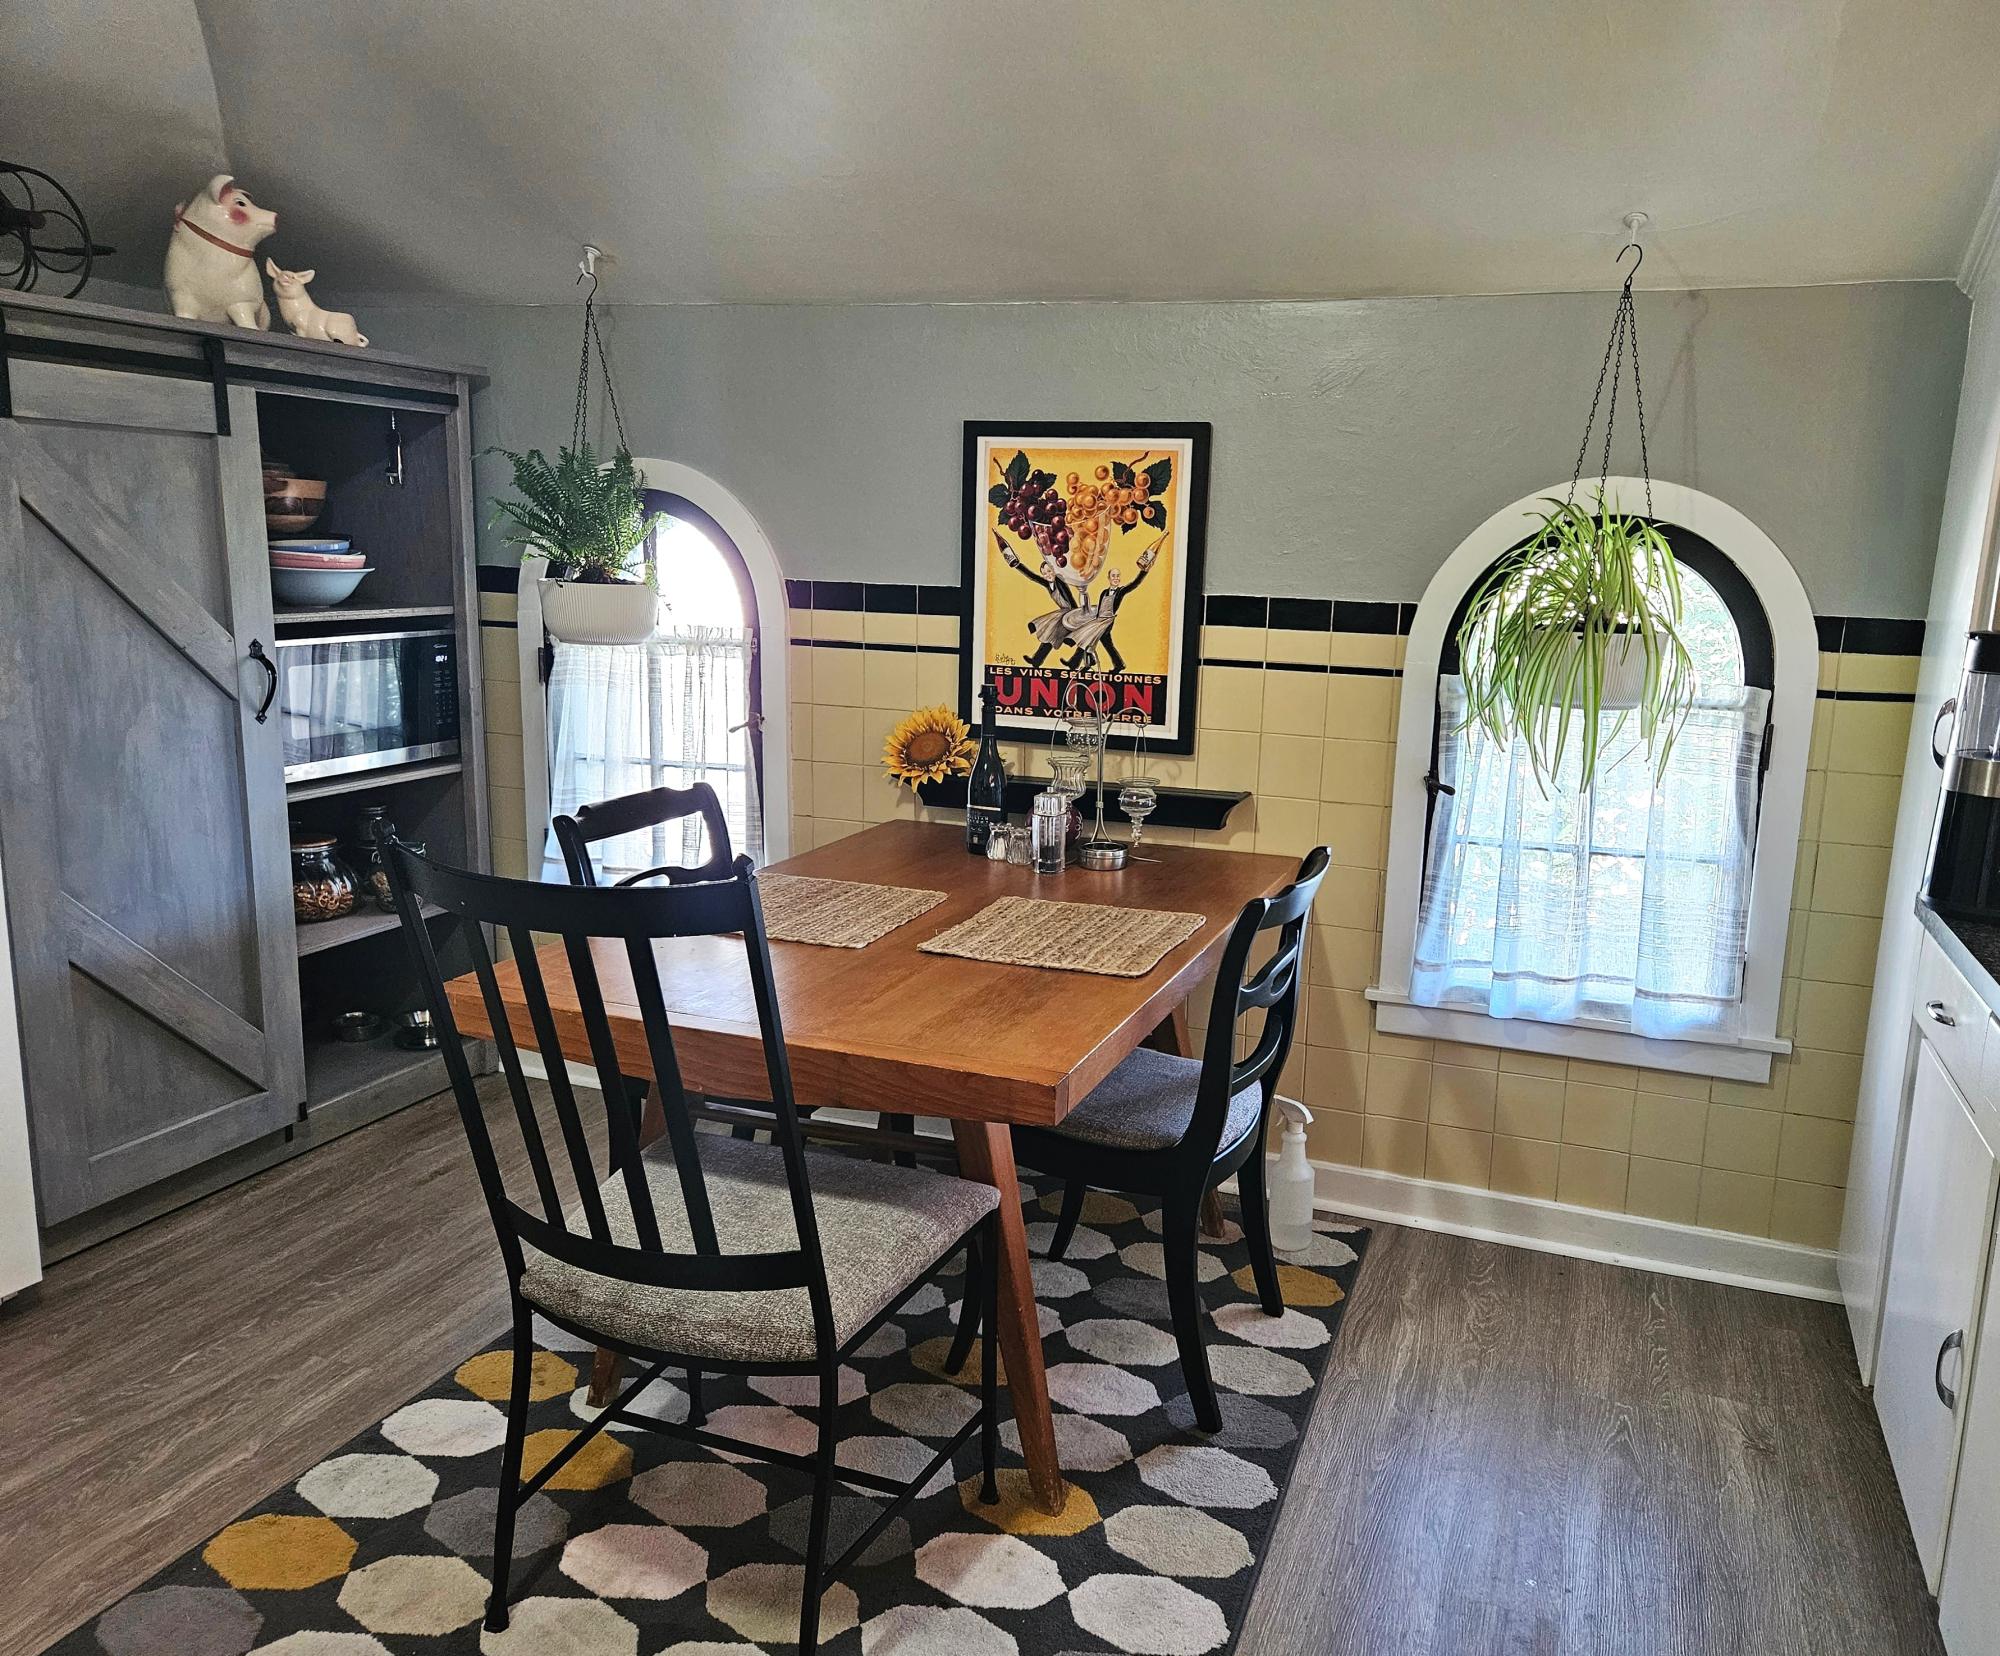
I adjusted your Barndoor l Pantry plans to utilize repurposed lumber from a Murphy bed. The shelves are 22" deep for my microwave, toaster oven, etc. It's so functional and much easier to work in my small kitchen.
Cheryl G
Built from Plan(s)
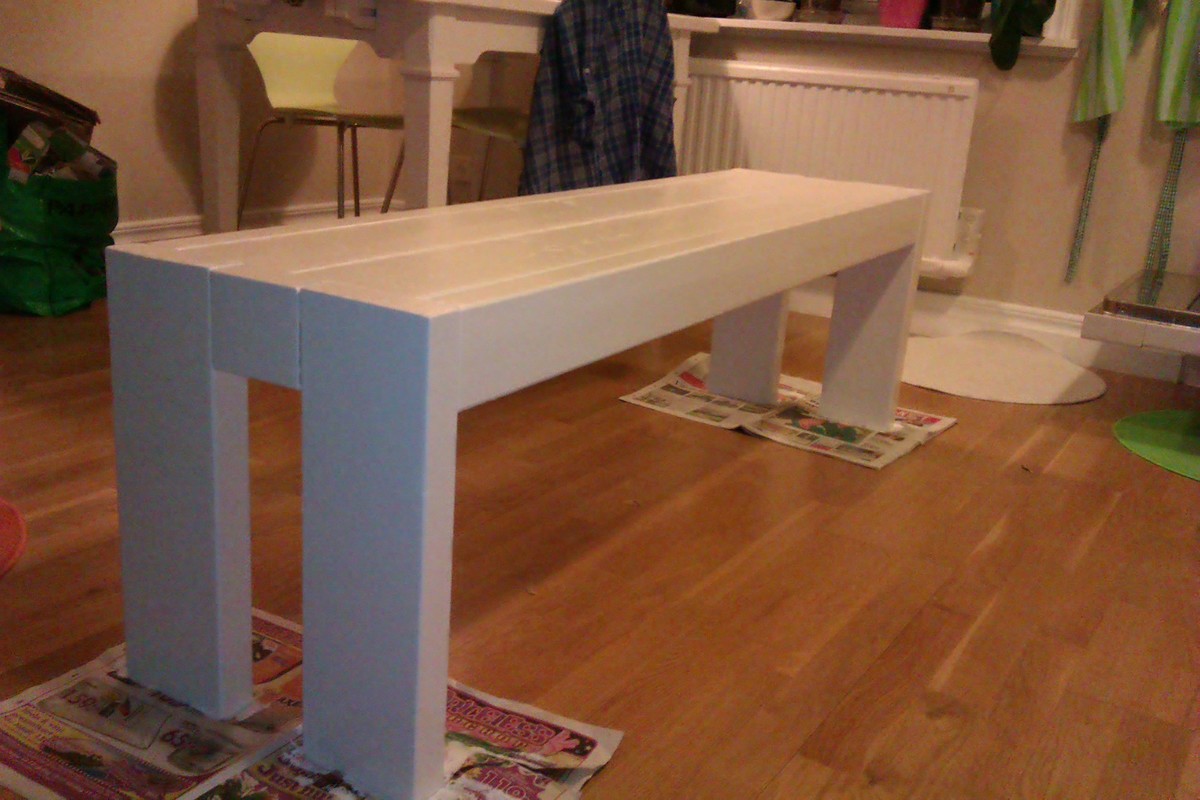
Box Style Console Table for Staging
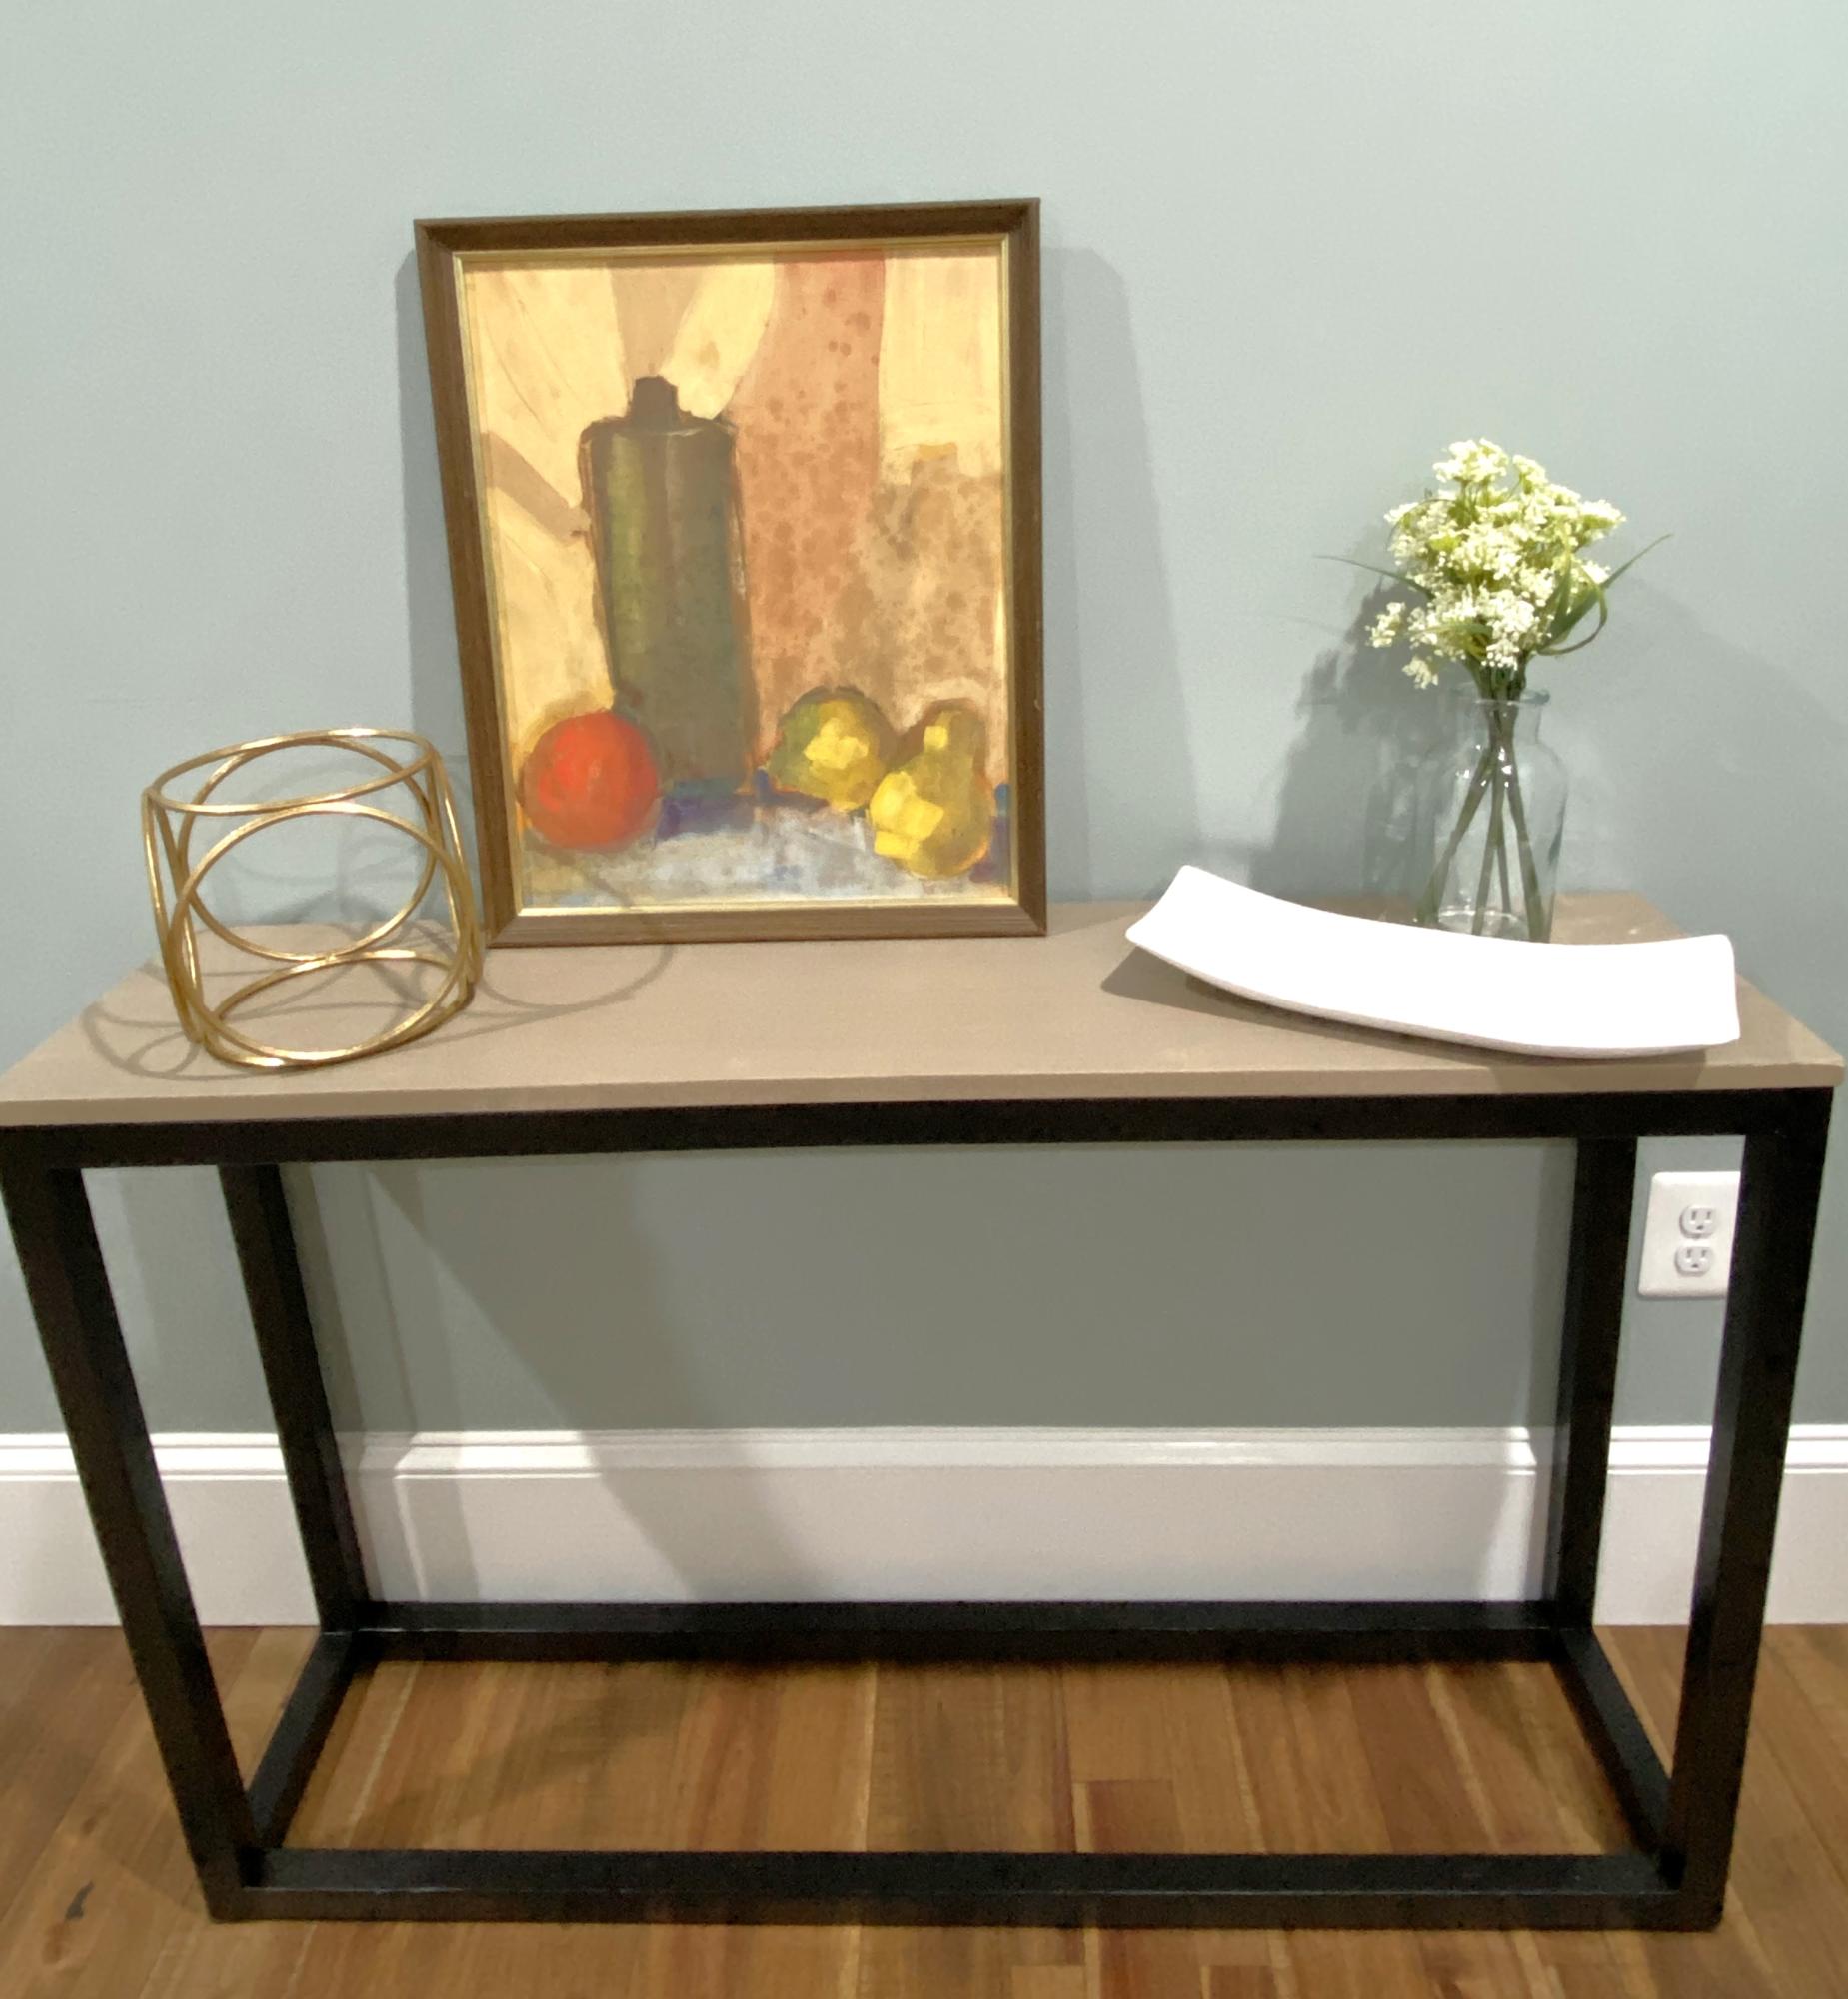
I built Ana’s console table plan to use in staging homes. I paint washed the top and painted the frame black. This is my very first project and I love how it turned out!
Built from Plan(s)
Bunk Bed Shelf Organizer
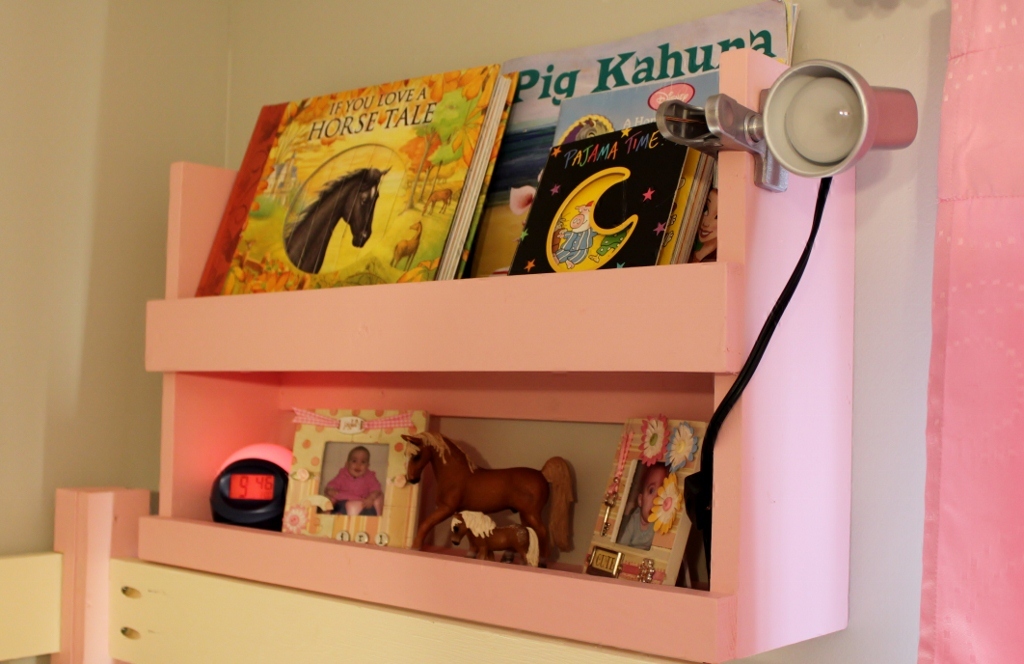
I had just finished my daughter's playhouse loft bed when I saw this plan. It was super easy to build and I used all left over wood from the playhouse. I used 6-inch boards for the sides and shelves since that was what I had left over. Other than that, I followed this plan exactly. Thanks for posting!
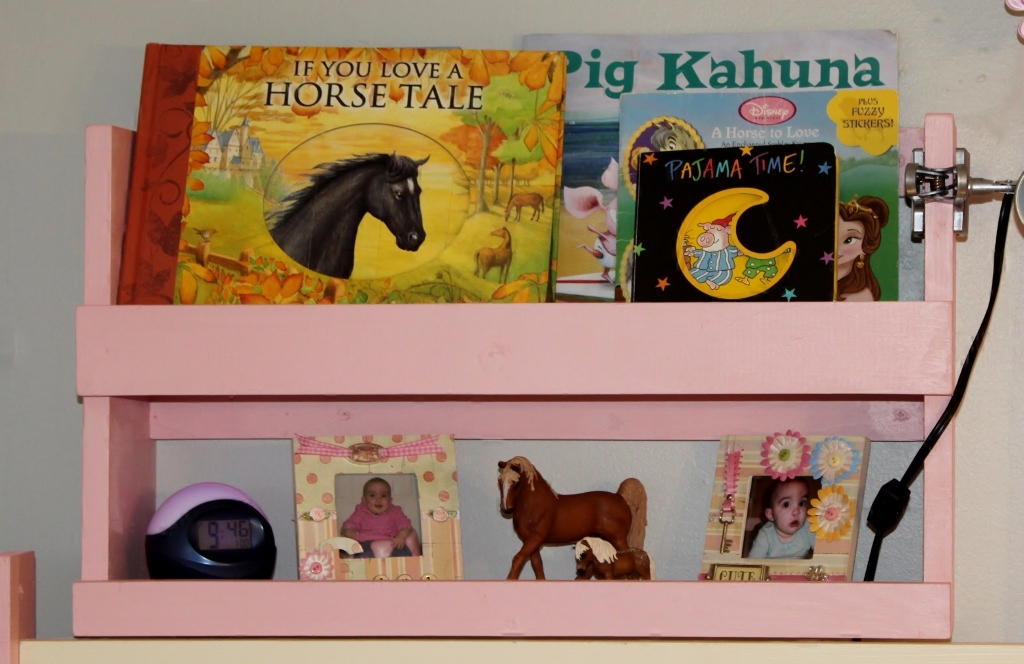
Built from Plan(s)
Estimated Time Investment
An Hour or Two (0-2 Hours)
Recommended Skill Level
Beginner
Comments

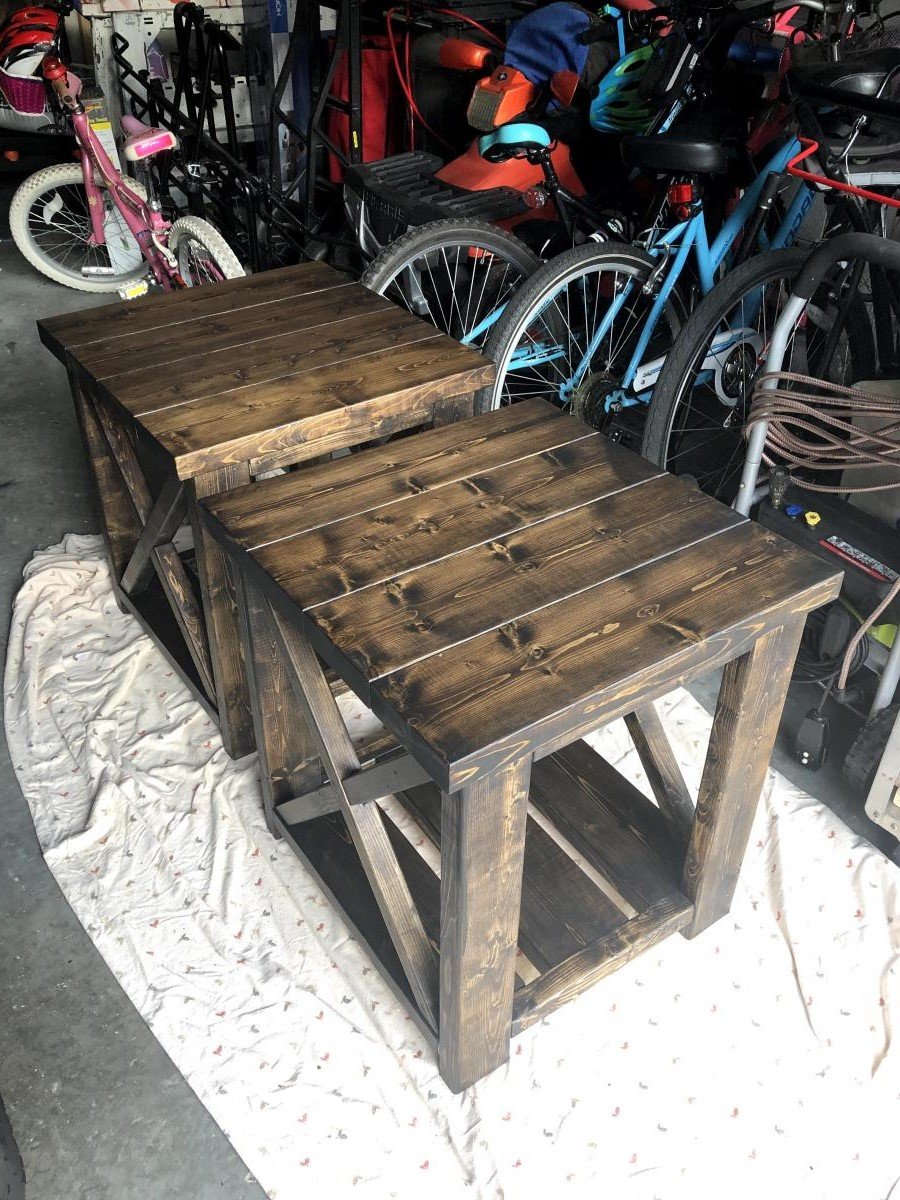
2x4 sectional + 2x4 end tables

I reduced the size of the 2x4 coffee table to make 2 end tables. They can be used as additional seating when needed.

Built from Plan(s)
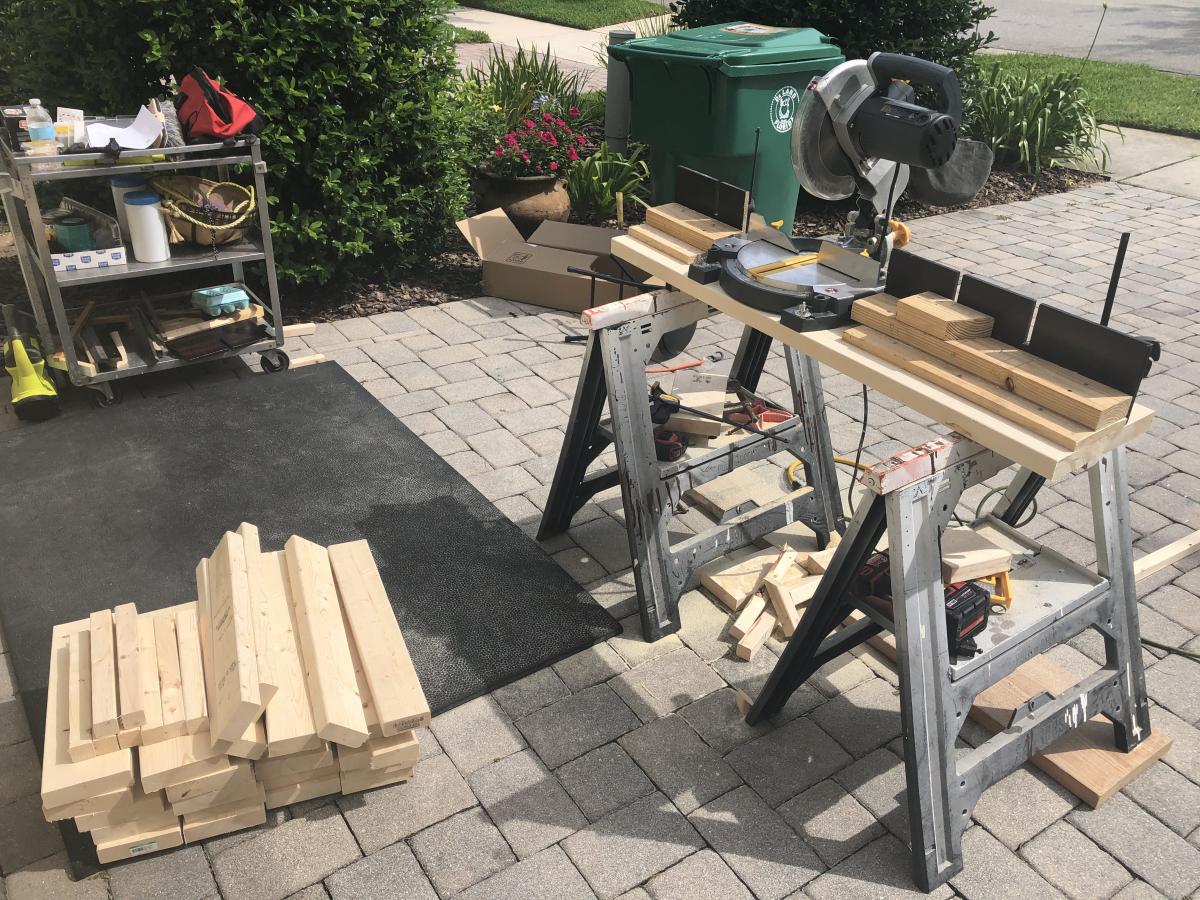
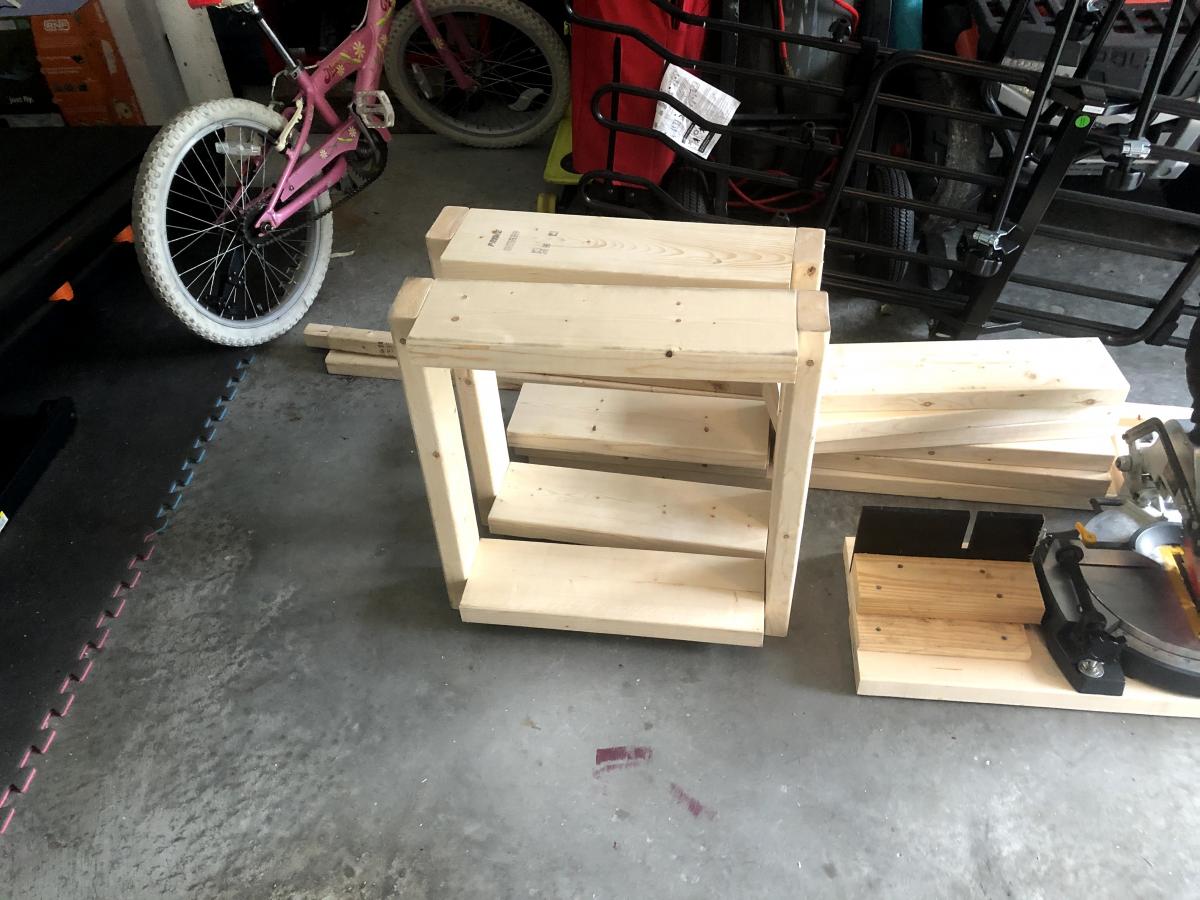
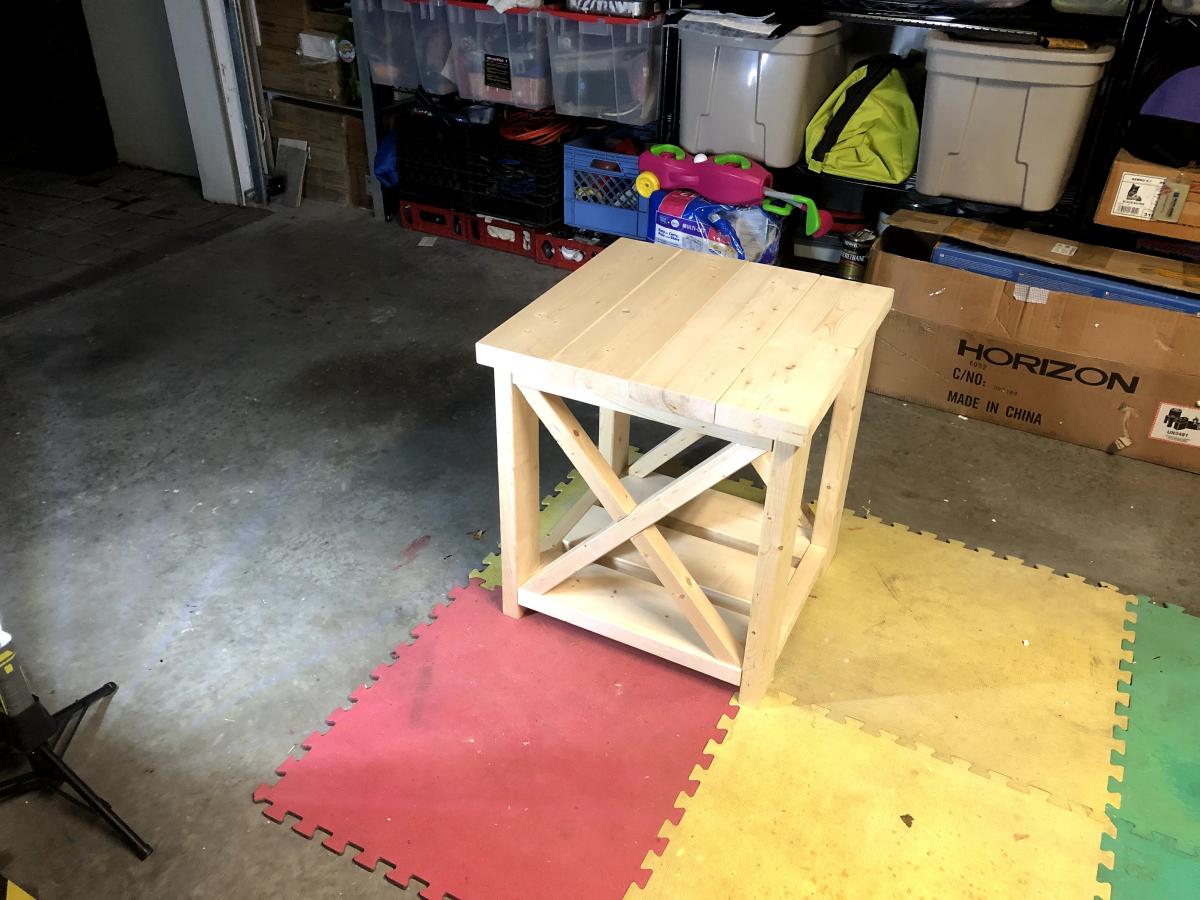
Farmhouse side tables to match the $40 Farmhouse Coffee Table
First it was the $40 Coffee Table, after it was finished my wife asked for the matching side tables see my other Brag Post. This time I built and used a proper miter saw stand, as well as purchased a new 60t saw blade for cleaner cuts. My wife didn't think they were tall enough so I increased the height by 2" with no need of additional wood. I took my time with these and even bought wood filler to even out and fill the knots. Ana does make it look easy having a workshop, but it wasn't that hard to build in my garage. I hated making the Xs on the Coffee Table and tried a different technique. I decided to notch them using my circular saw and my multi-tool as a plunge cutter. Sanded all the wood stained with Jacobean 2750 tint Minwax and sealed with Satin Polycrylic. See Photos for Details.
Built from Plan(s)
Estimated Cost
$60
Estimated Time Investment
Weekend Project (10-20 Hours)
Finish Used
Minwax Jacobean 2750 tint and sealed with Satin Polycrylic
Recommended Skill Level
Beginner
Modern Farm Bench
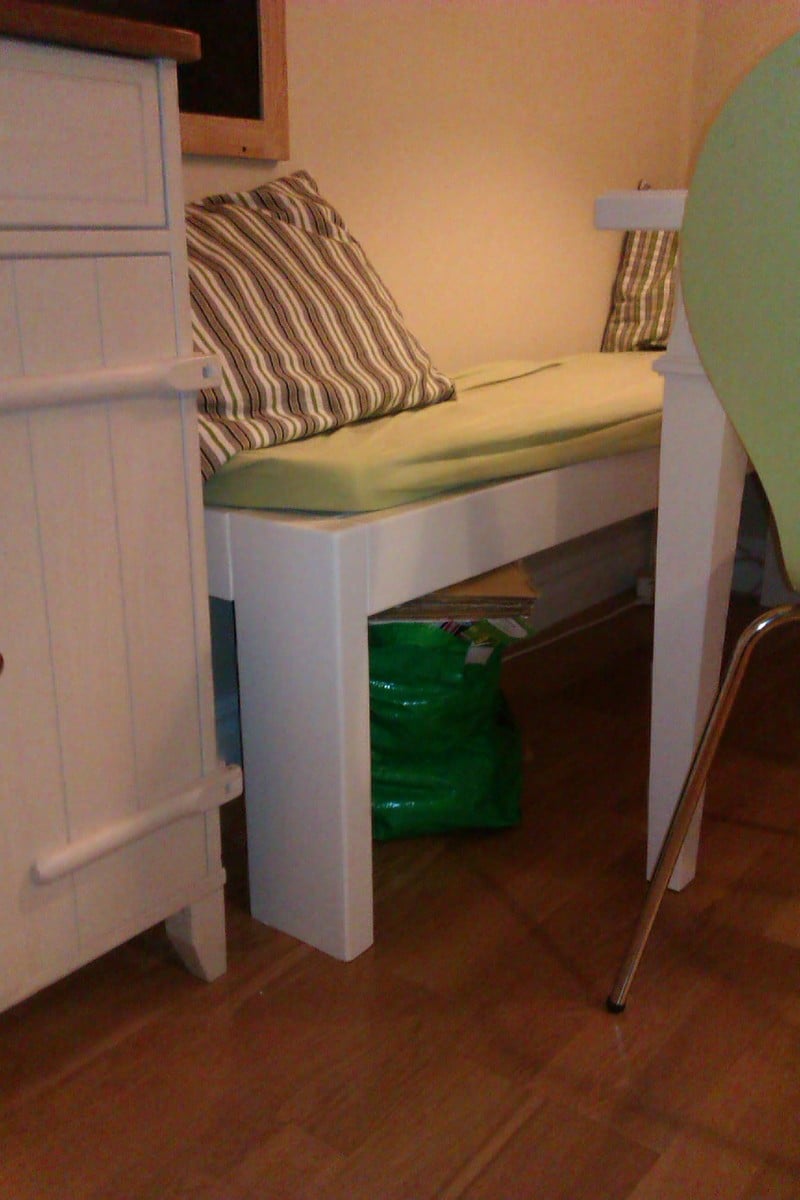
My 8 year old daughter and I decided we wanted a bench to the kitchen. Found this plan here and went to the local lumber yard. My daughter drilled and screwed about half of the bench. So much fun doing this together.
Built from Plan(s)
Estimated Cost
200 SEK
Estimated Time Investment
Afternoon Project (3-6 Hours)
Finish Used
Paint.
Recommended Skill Level
Beginner
Wooden Cooler Stand
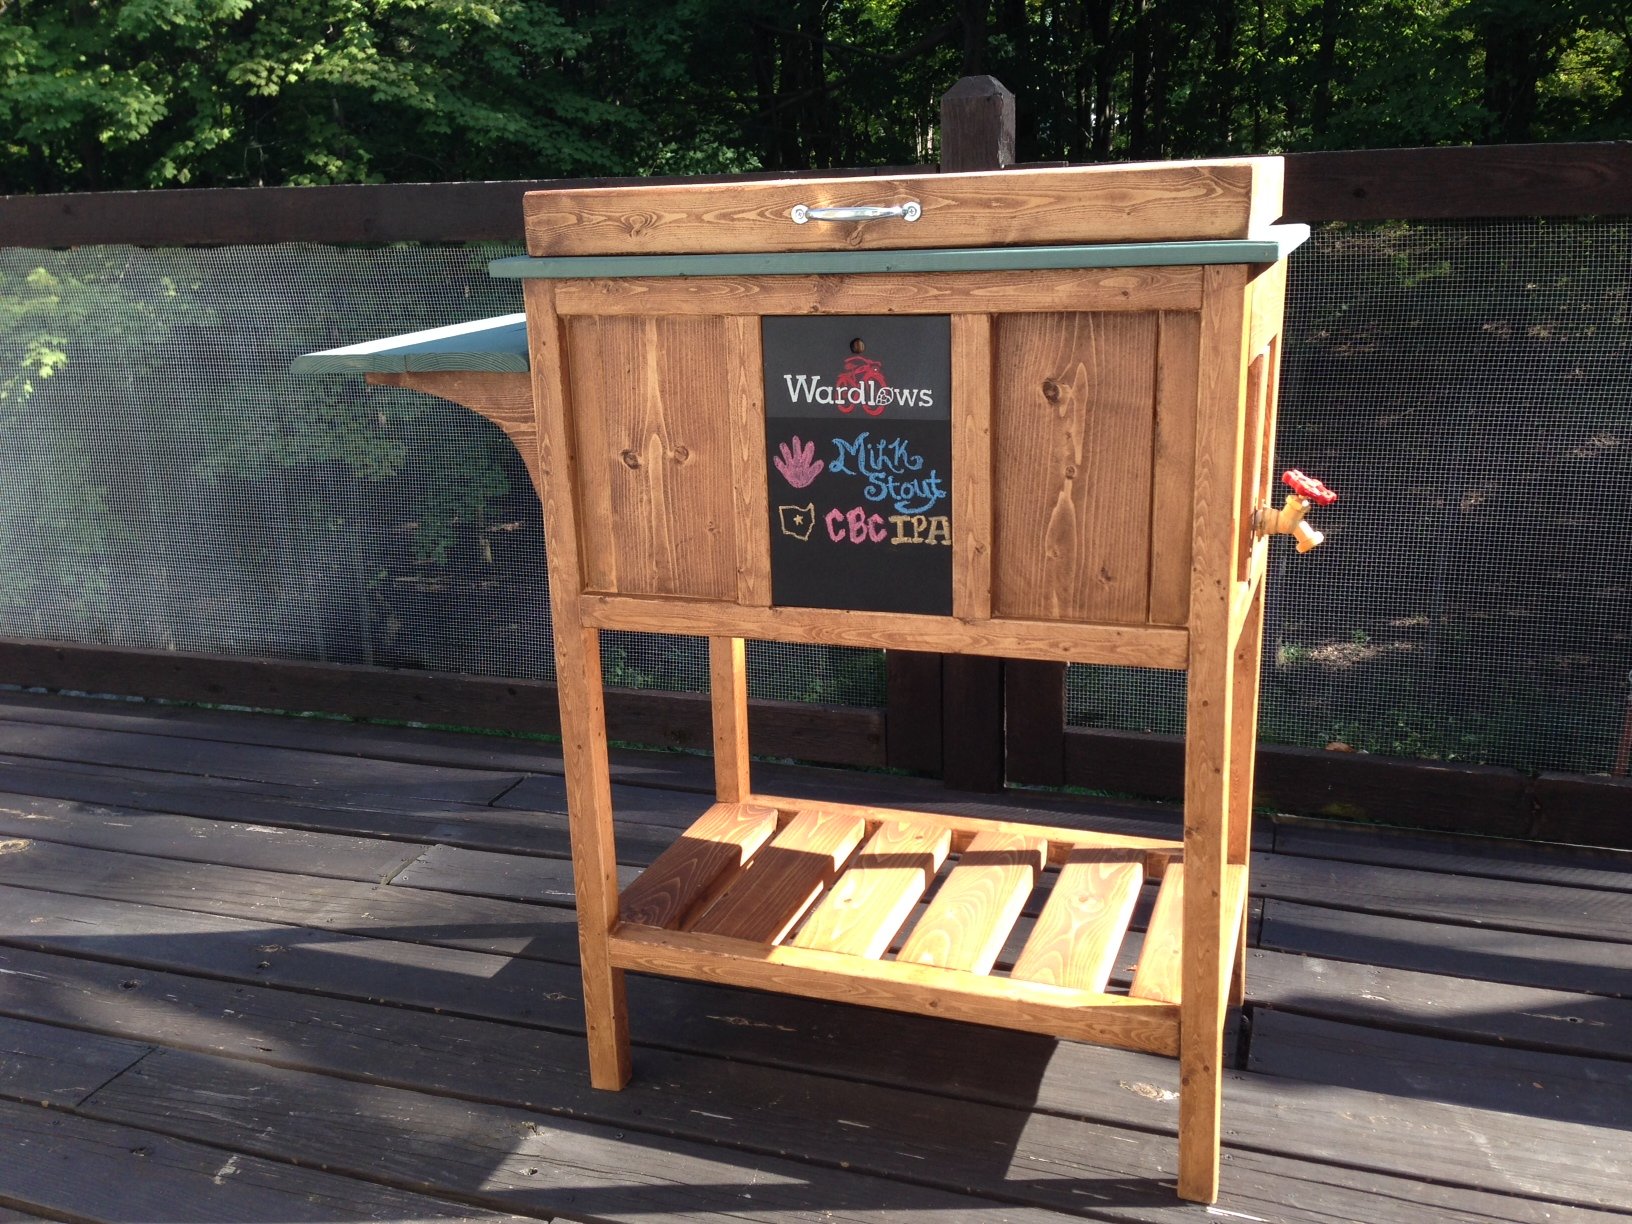
We built this as a birthday gift for family members and boy were they excited. We, though, were not excited to let it go. So happy with how it turned out. The plans are good for reference but make sure to make your own measurements when using milled lumber from a big box store. Some of the the changes we had to make on the fly were to the back and front panels having to use a different combination of board sizes to fill it in without massive gaps. Its recommended that you lay them out first before attaching them to the frames. Also the measurements on the cooler lid were smaller by 1/4" to 1/2" of what's listed in order to get a snug fit. The shelf on ours is two 1x6's cut to the width of the whole project (around 16.5") and then the shelf brackets were also 1x6's cut to a length of 10". Brackets are mounted inside the legs using wood glue and three 2.5" screws through the backside/inside of the cooler box to hide (obviously done before the cooler was inserted). For drainage we attached a 2" piece of 1/2" inside diameter clear tubing that was fed/jammed through the cooler drain and pulled through the other side and then a 1/2" push on adapter, threaded on the other end screwed unto a 1/2" faucet head. Drilled a 3/4" hole about 2.5" (center mass) from the 2x4 cooler base through the middle piece on the side. We placed the cooler in first and used a pair of pliers to grab the clear tube and line it up with the hole and then pushed a long screw driver through the tube from inside the cooler in order to guide the faucet head/adapter combo into the tube and stiffening the tube so it didn't collapse when pushing it on. We couldn't decide what do to with the center display piece and then remembered we had a can of chalkboard spray paint left over from another project. We spray painted the whole menu board and then painted the "logo" at the top before clear-coating it with a protective enamel. Its a snug fit so the pressure holds it in place but you could also use velcro strips on the back if that tickles your fancy. We took the snug fit route that way if they didn't want the menu board in. A 1/2' hole was drilled towards the top so they can use a finger to pull the board out.
Built from Plan(s)
Estimated Cost
$70 + the cost of beer to fill it
Estimated Time Investment
Weekend Project (10-20 Hours)
Finish Used
Custom mix of Minwax American Pine and Rustoleum Kona. Paint
Recommended Skill Level
Beginner
Reclaimed Wood Headboard, Double Size (Cedar Siding)
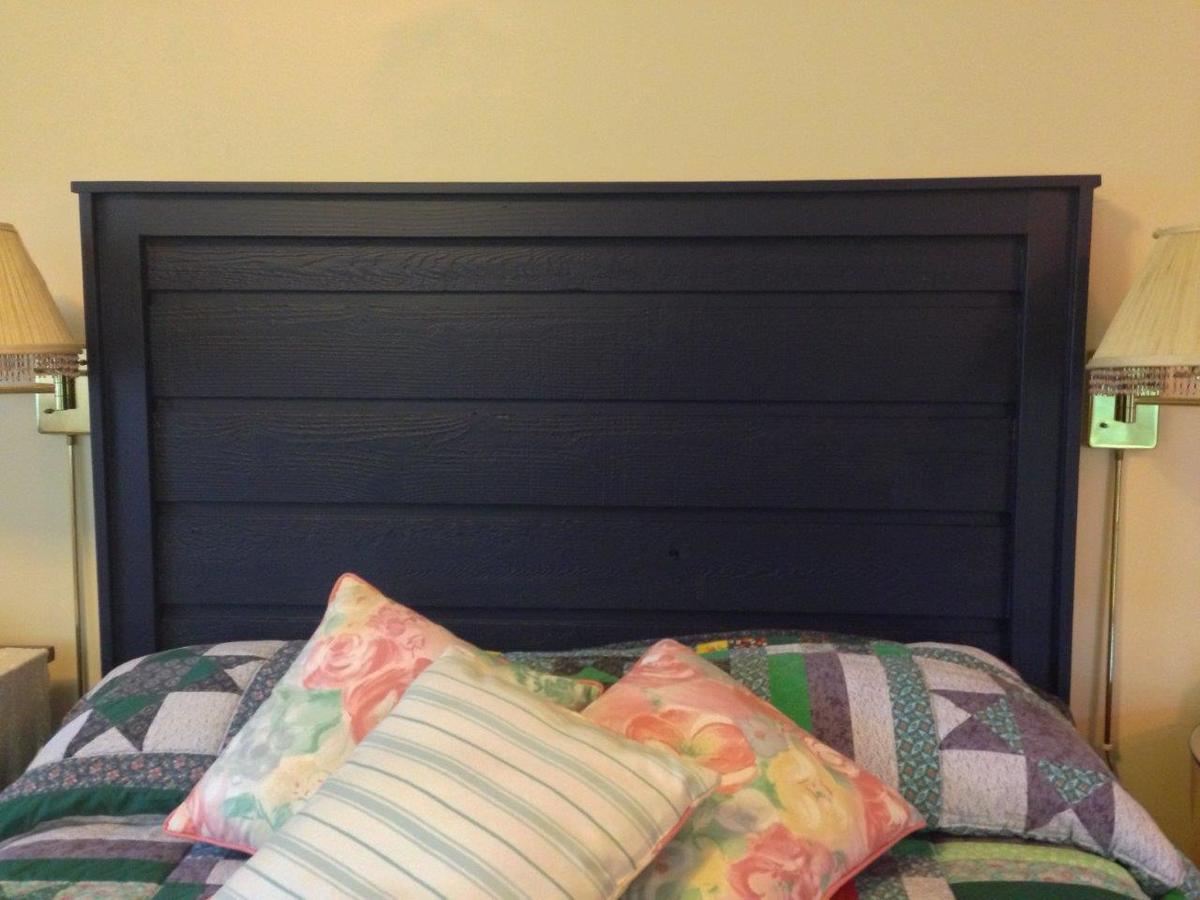
Made with leftover lapped cedar siding from our woodshed, plus a few pieces of reclaimed 1x4 and some new 1x3. Wanted it to be navy, and it is.
Built from Plan(s)
Estimated Time Investment
Day Project (6-9 Hours)
Finish Used
Navy blue satin paint. Don't - I repeat - don't prime with white primer, if painting a final dark color! It took 4 coats of navy to completely cover the primer. Either skip primer or have it tinted closer to the final color. Should have known better.
Recommended Skill Level
Beginner
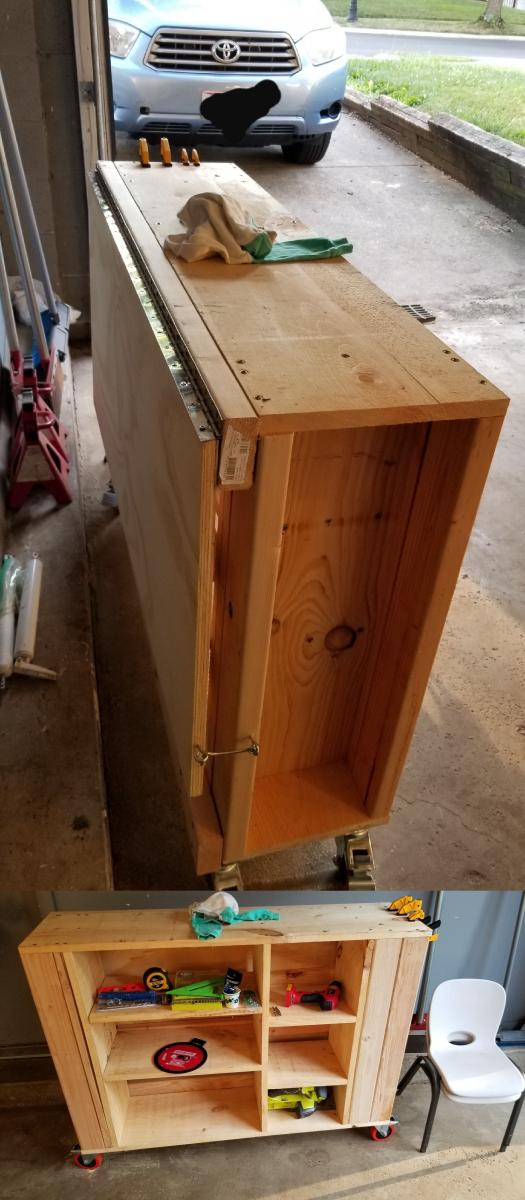
Modified Folding Workbench
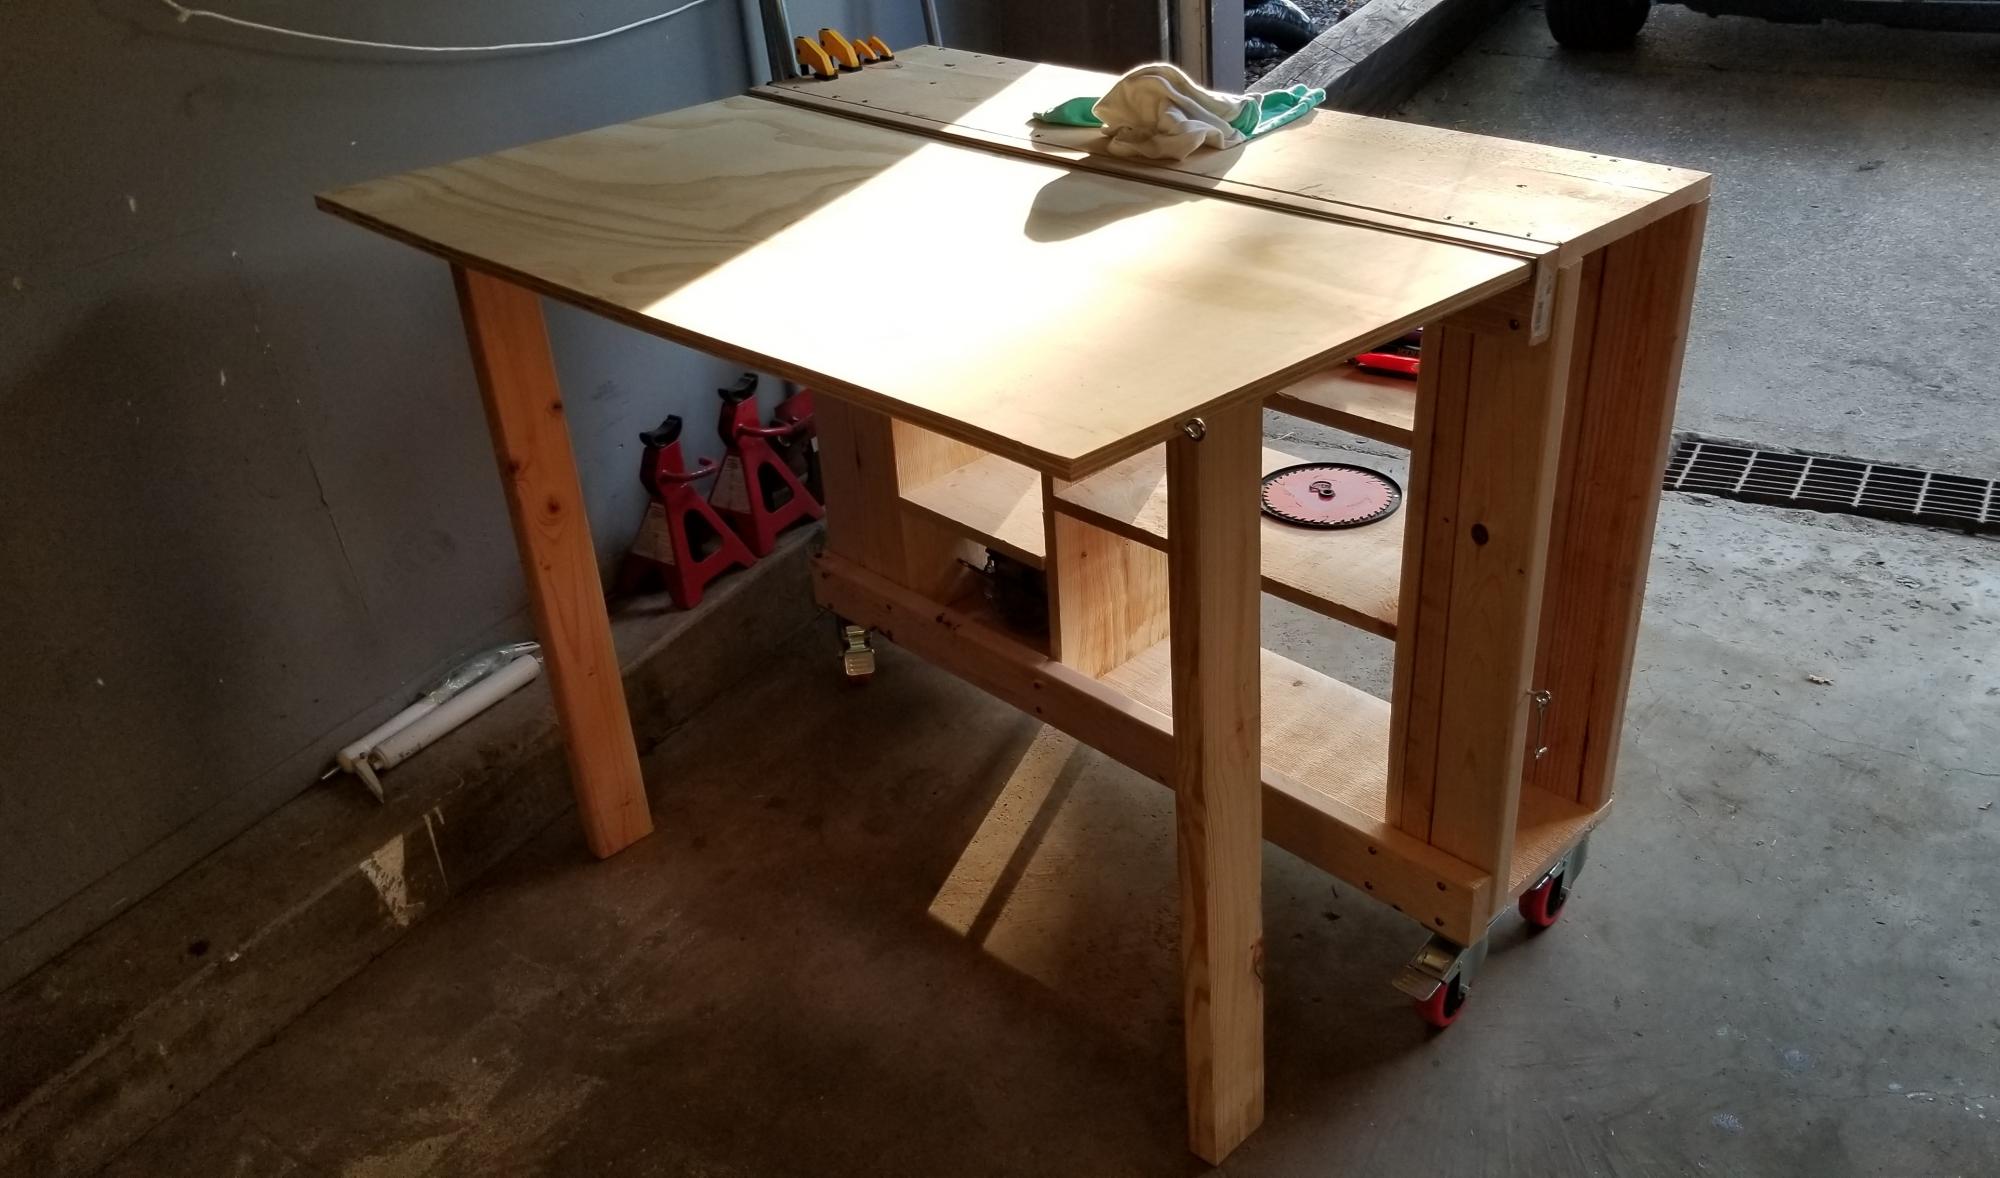
First build of my woodworking journey
Comments
Thu, 09/17/2020 - 10:50
Love seeing first builds!
Workbench is a great place to start, I can't wait to see all the projects that are built on it!
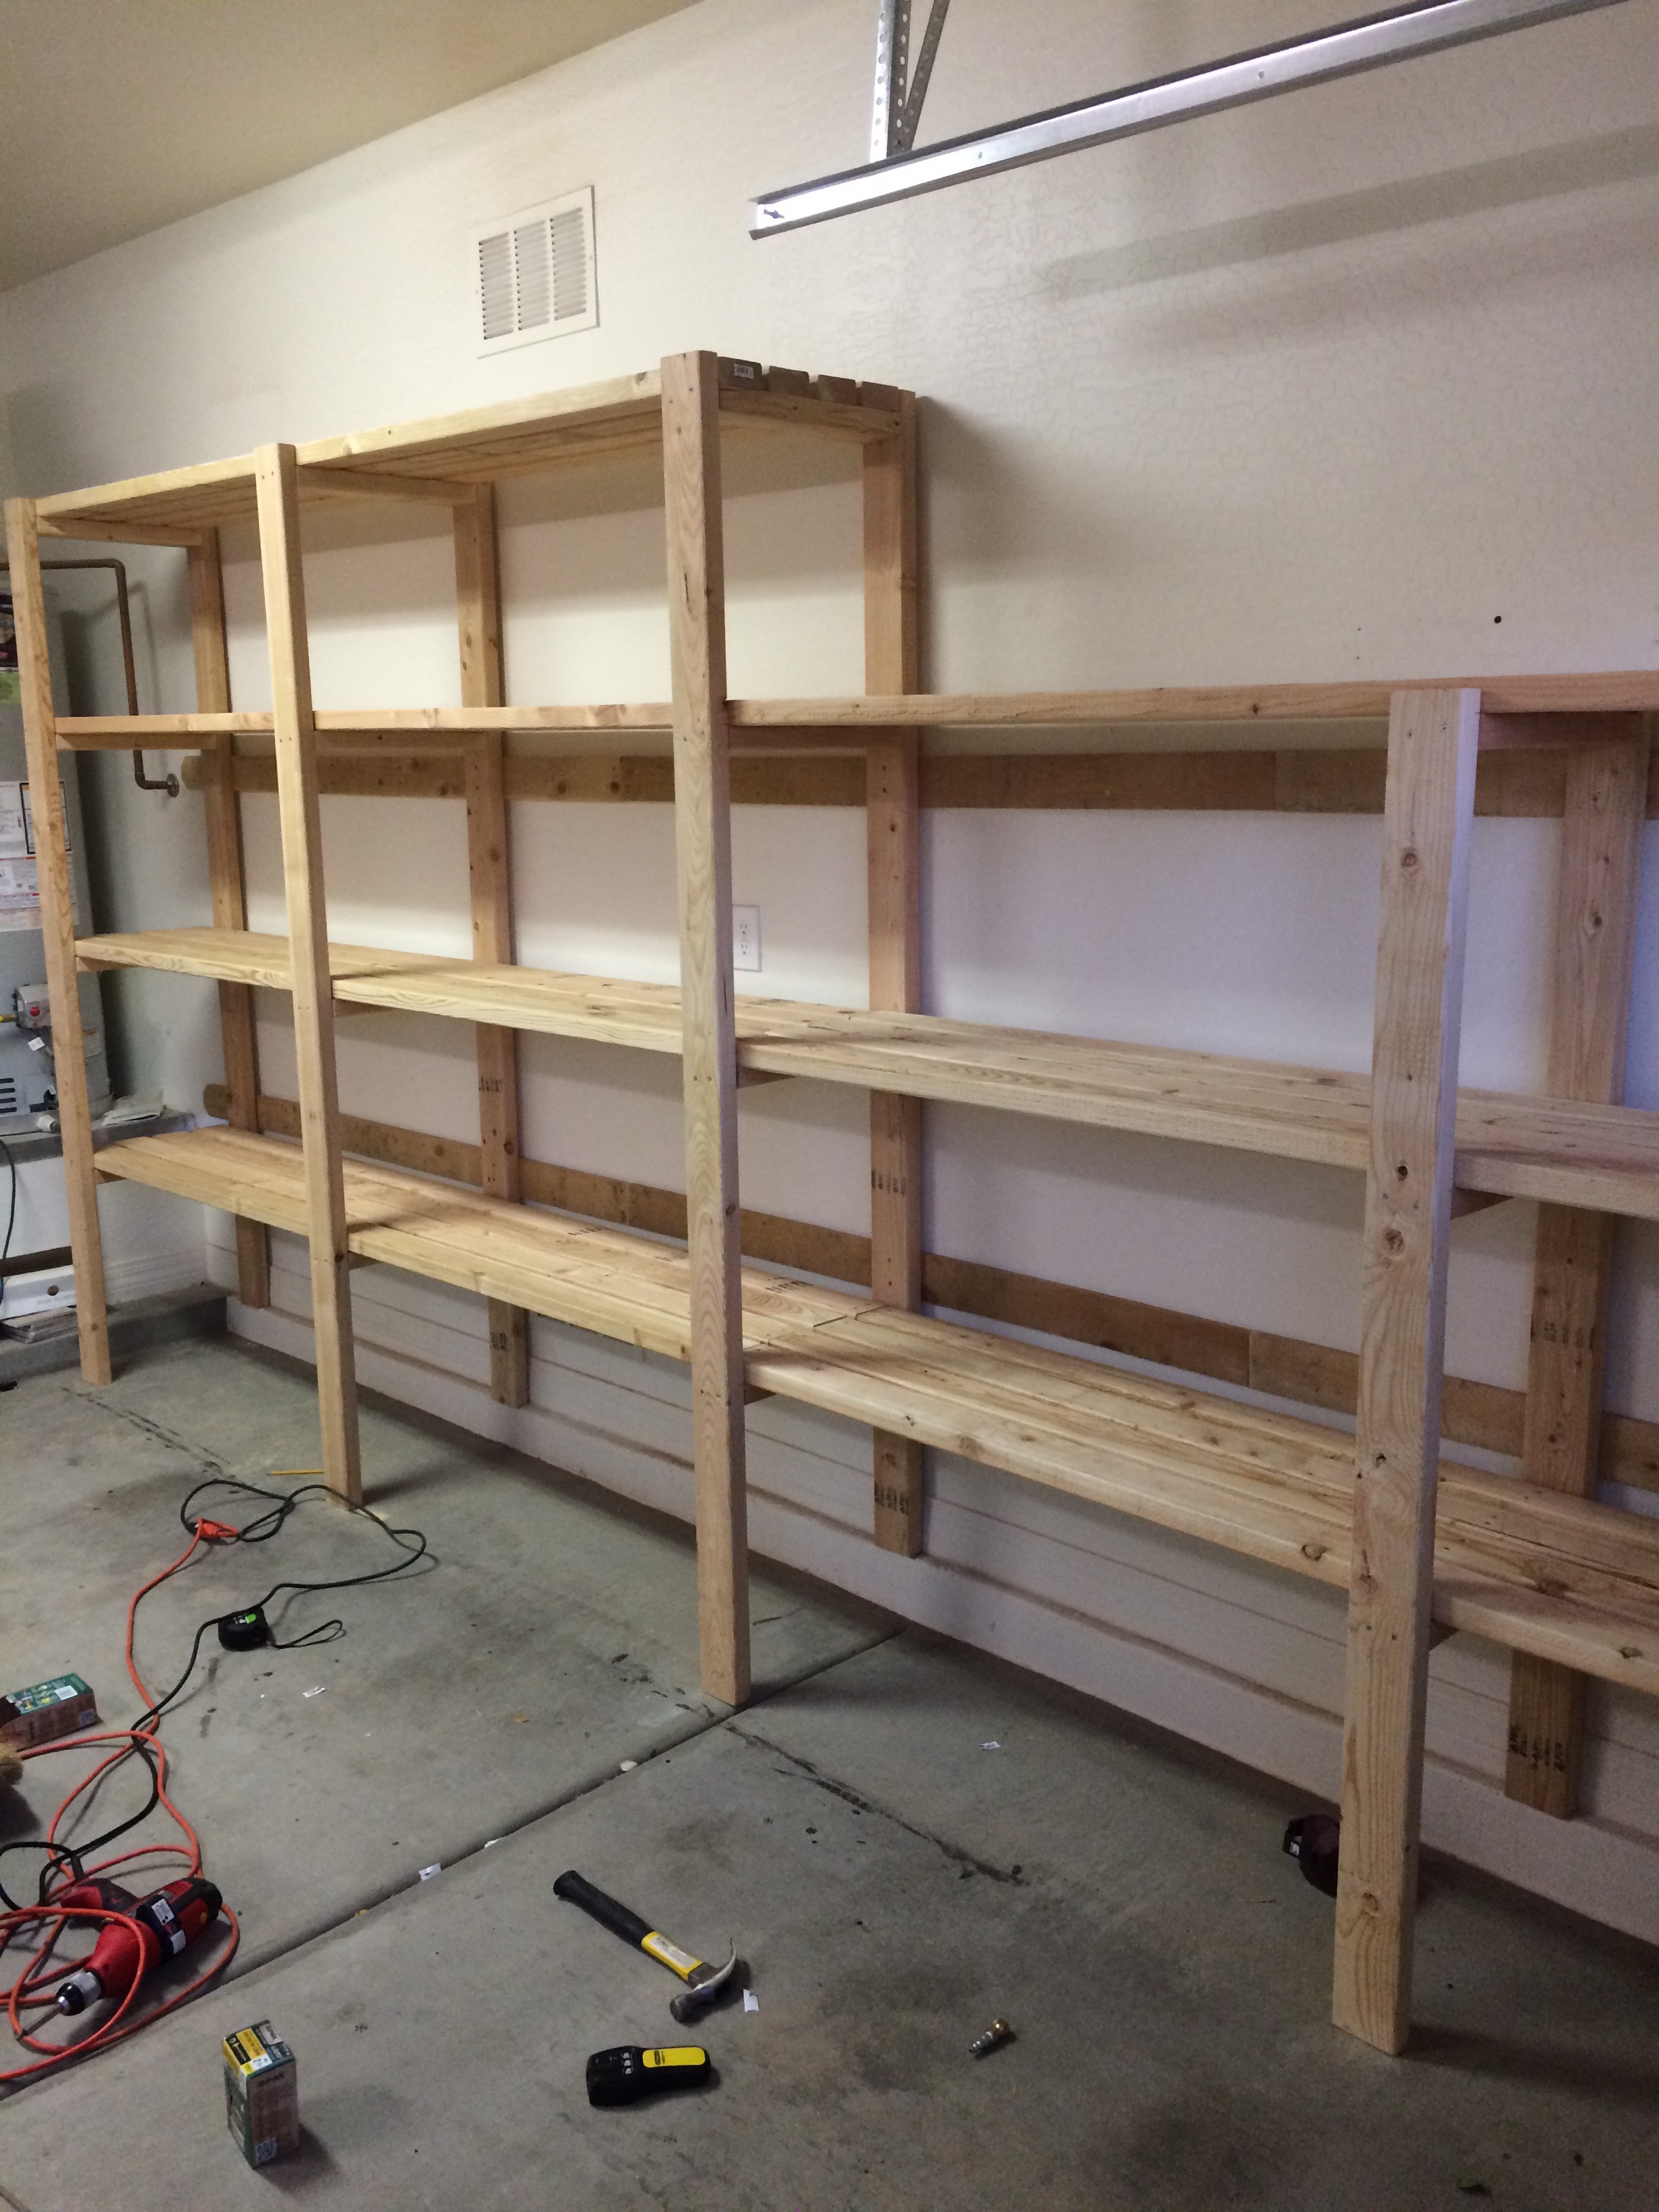
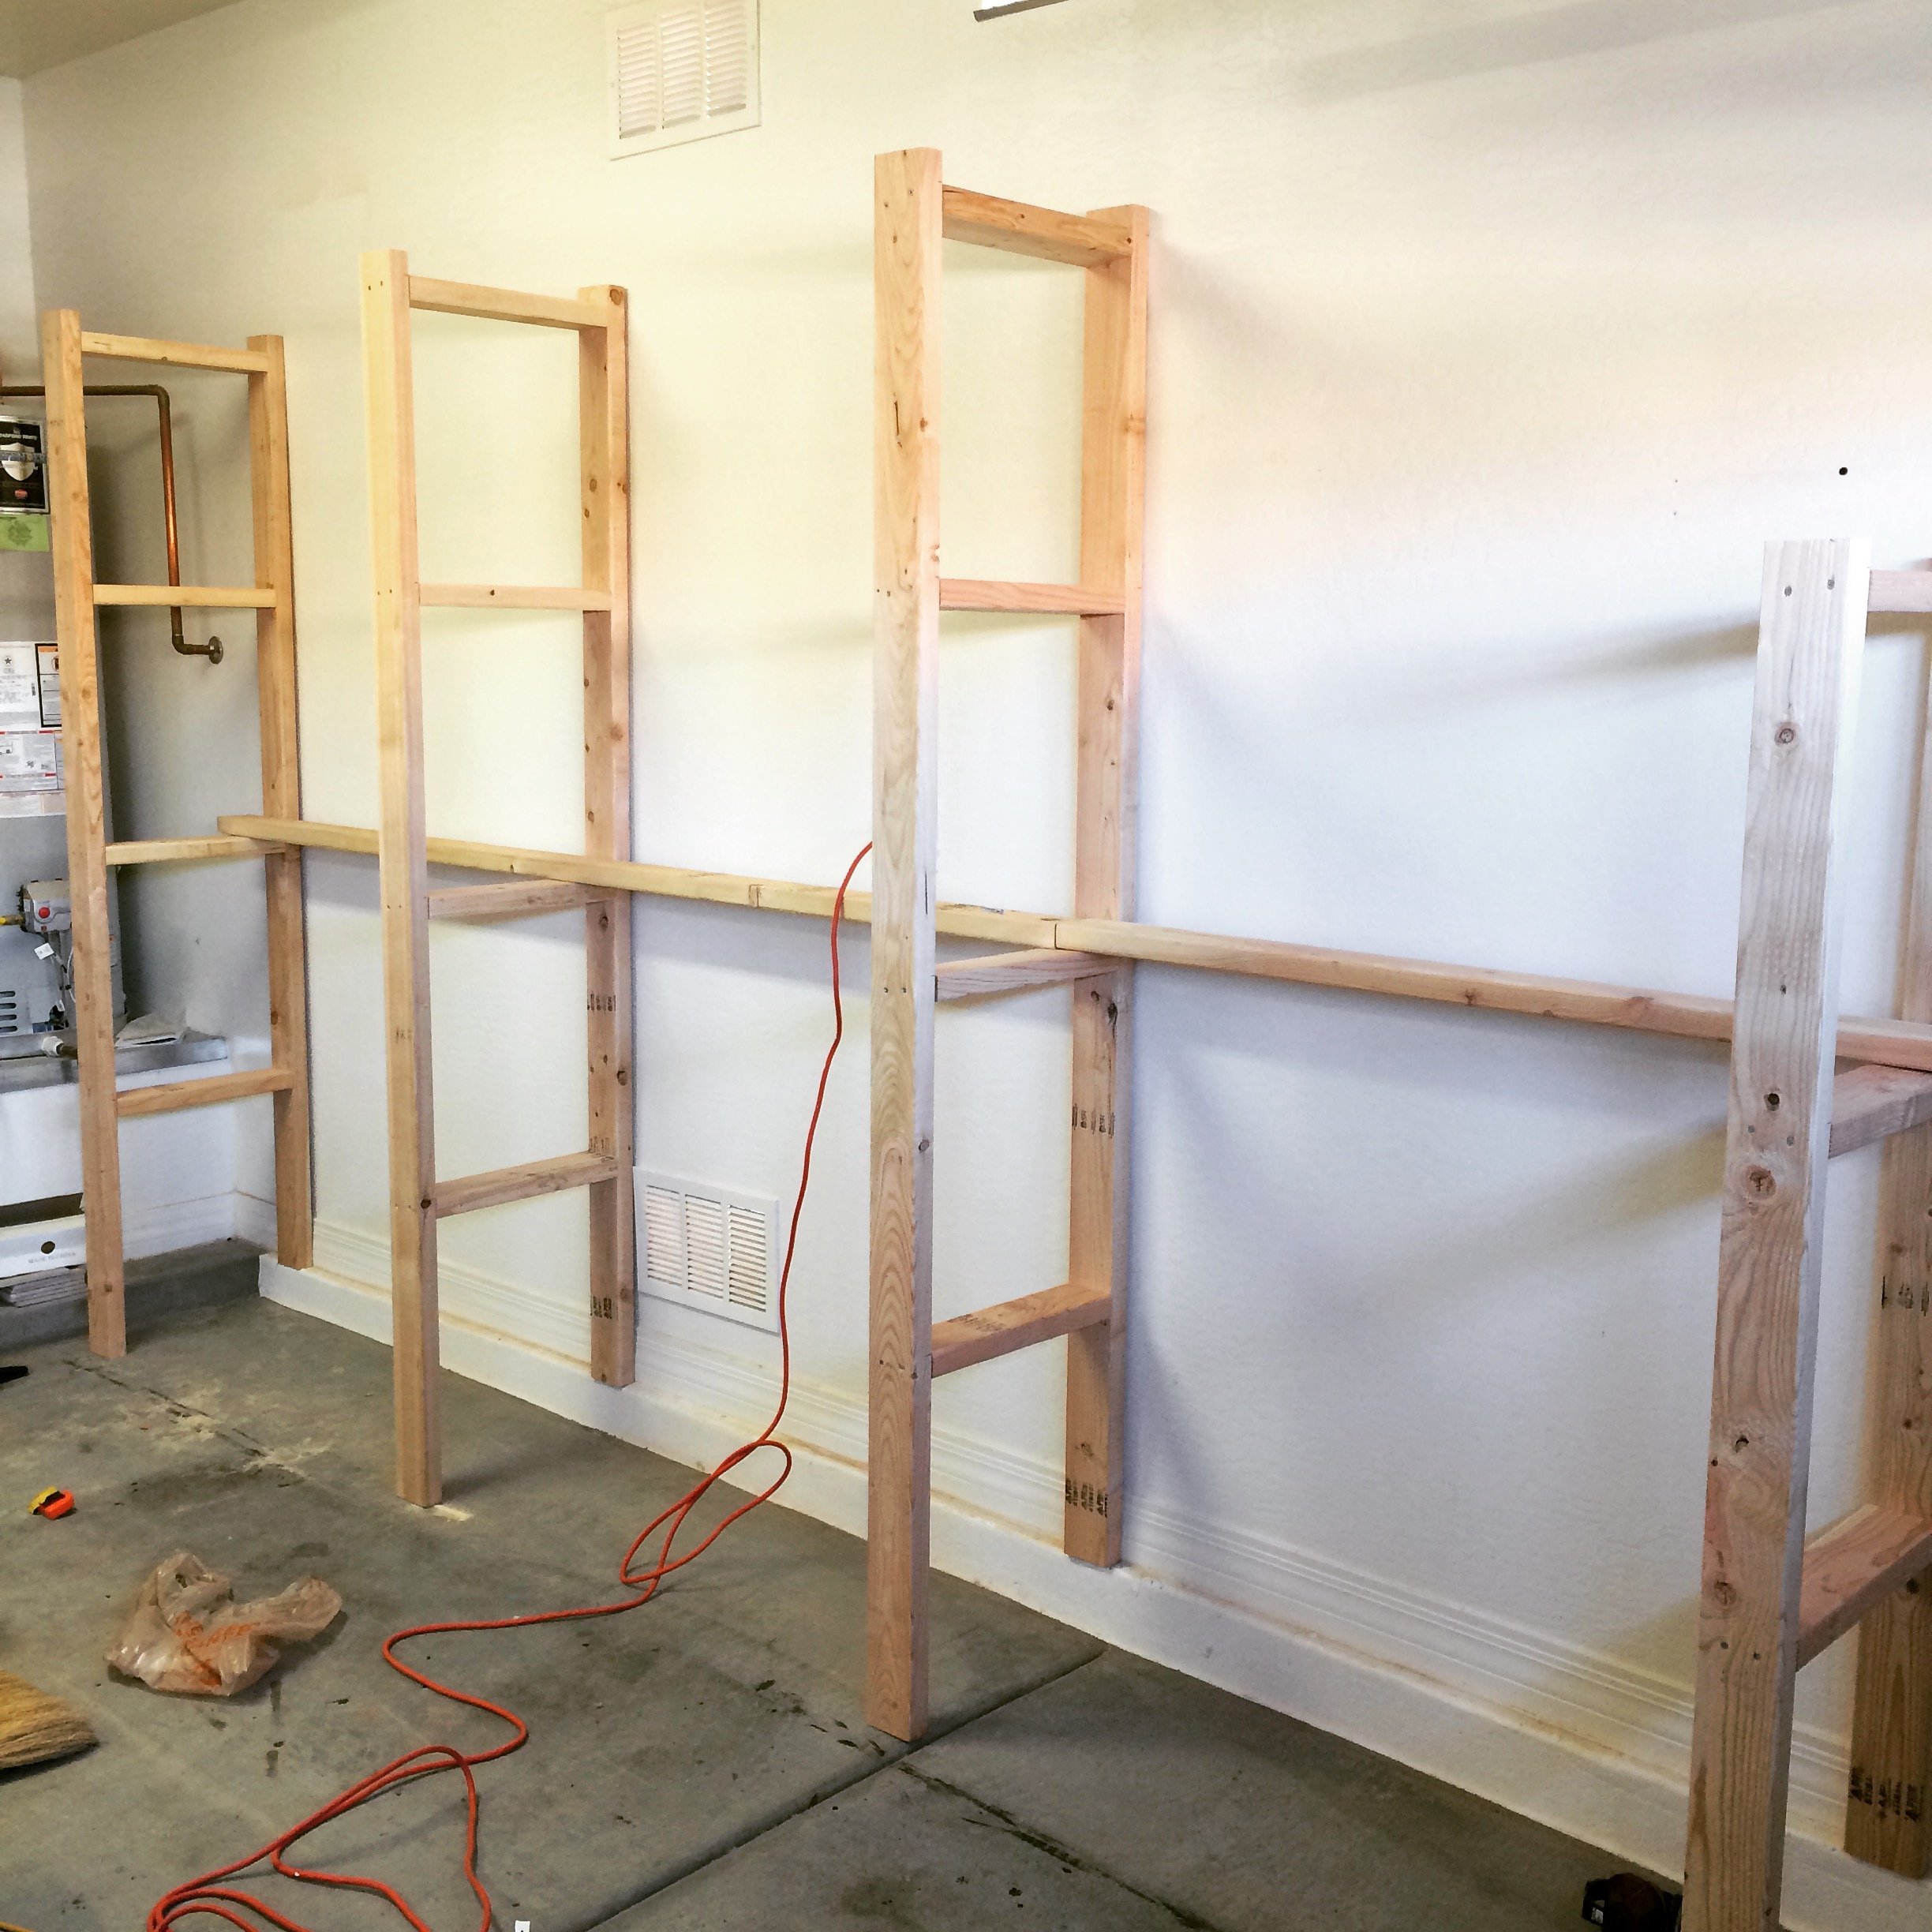
Loving These Shelves
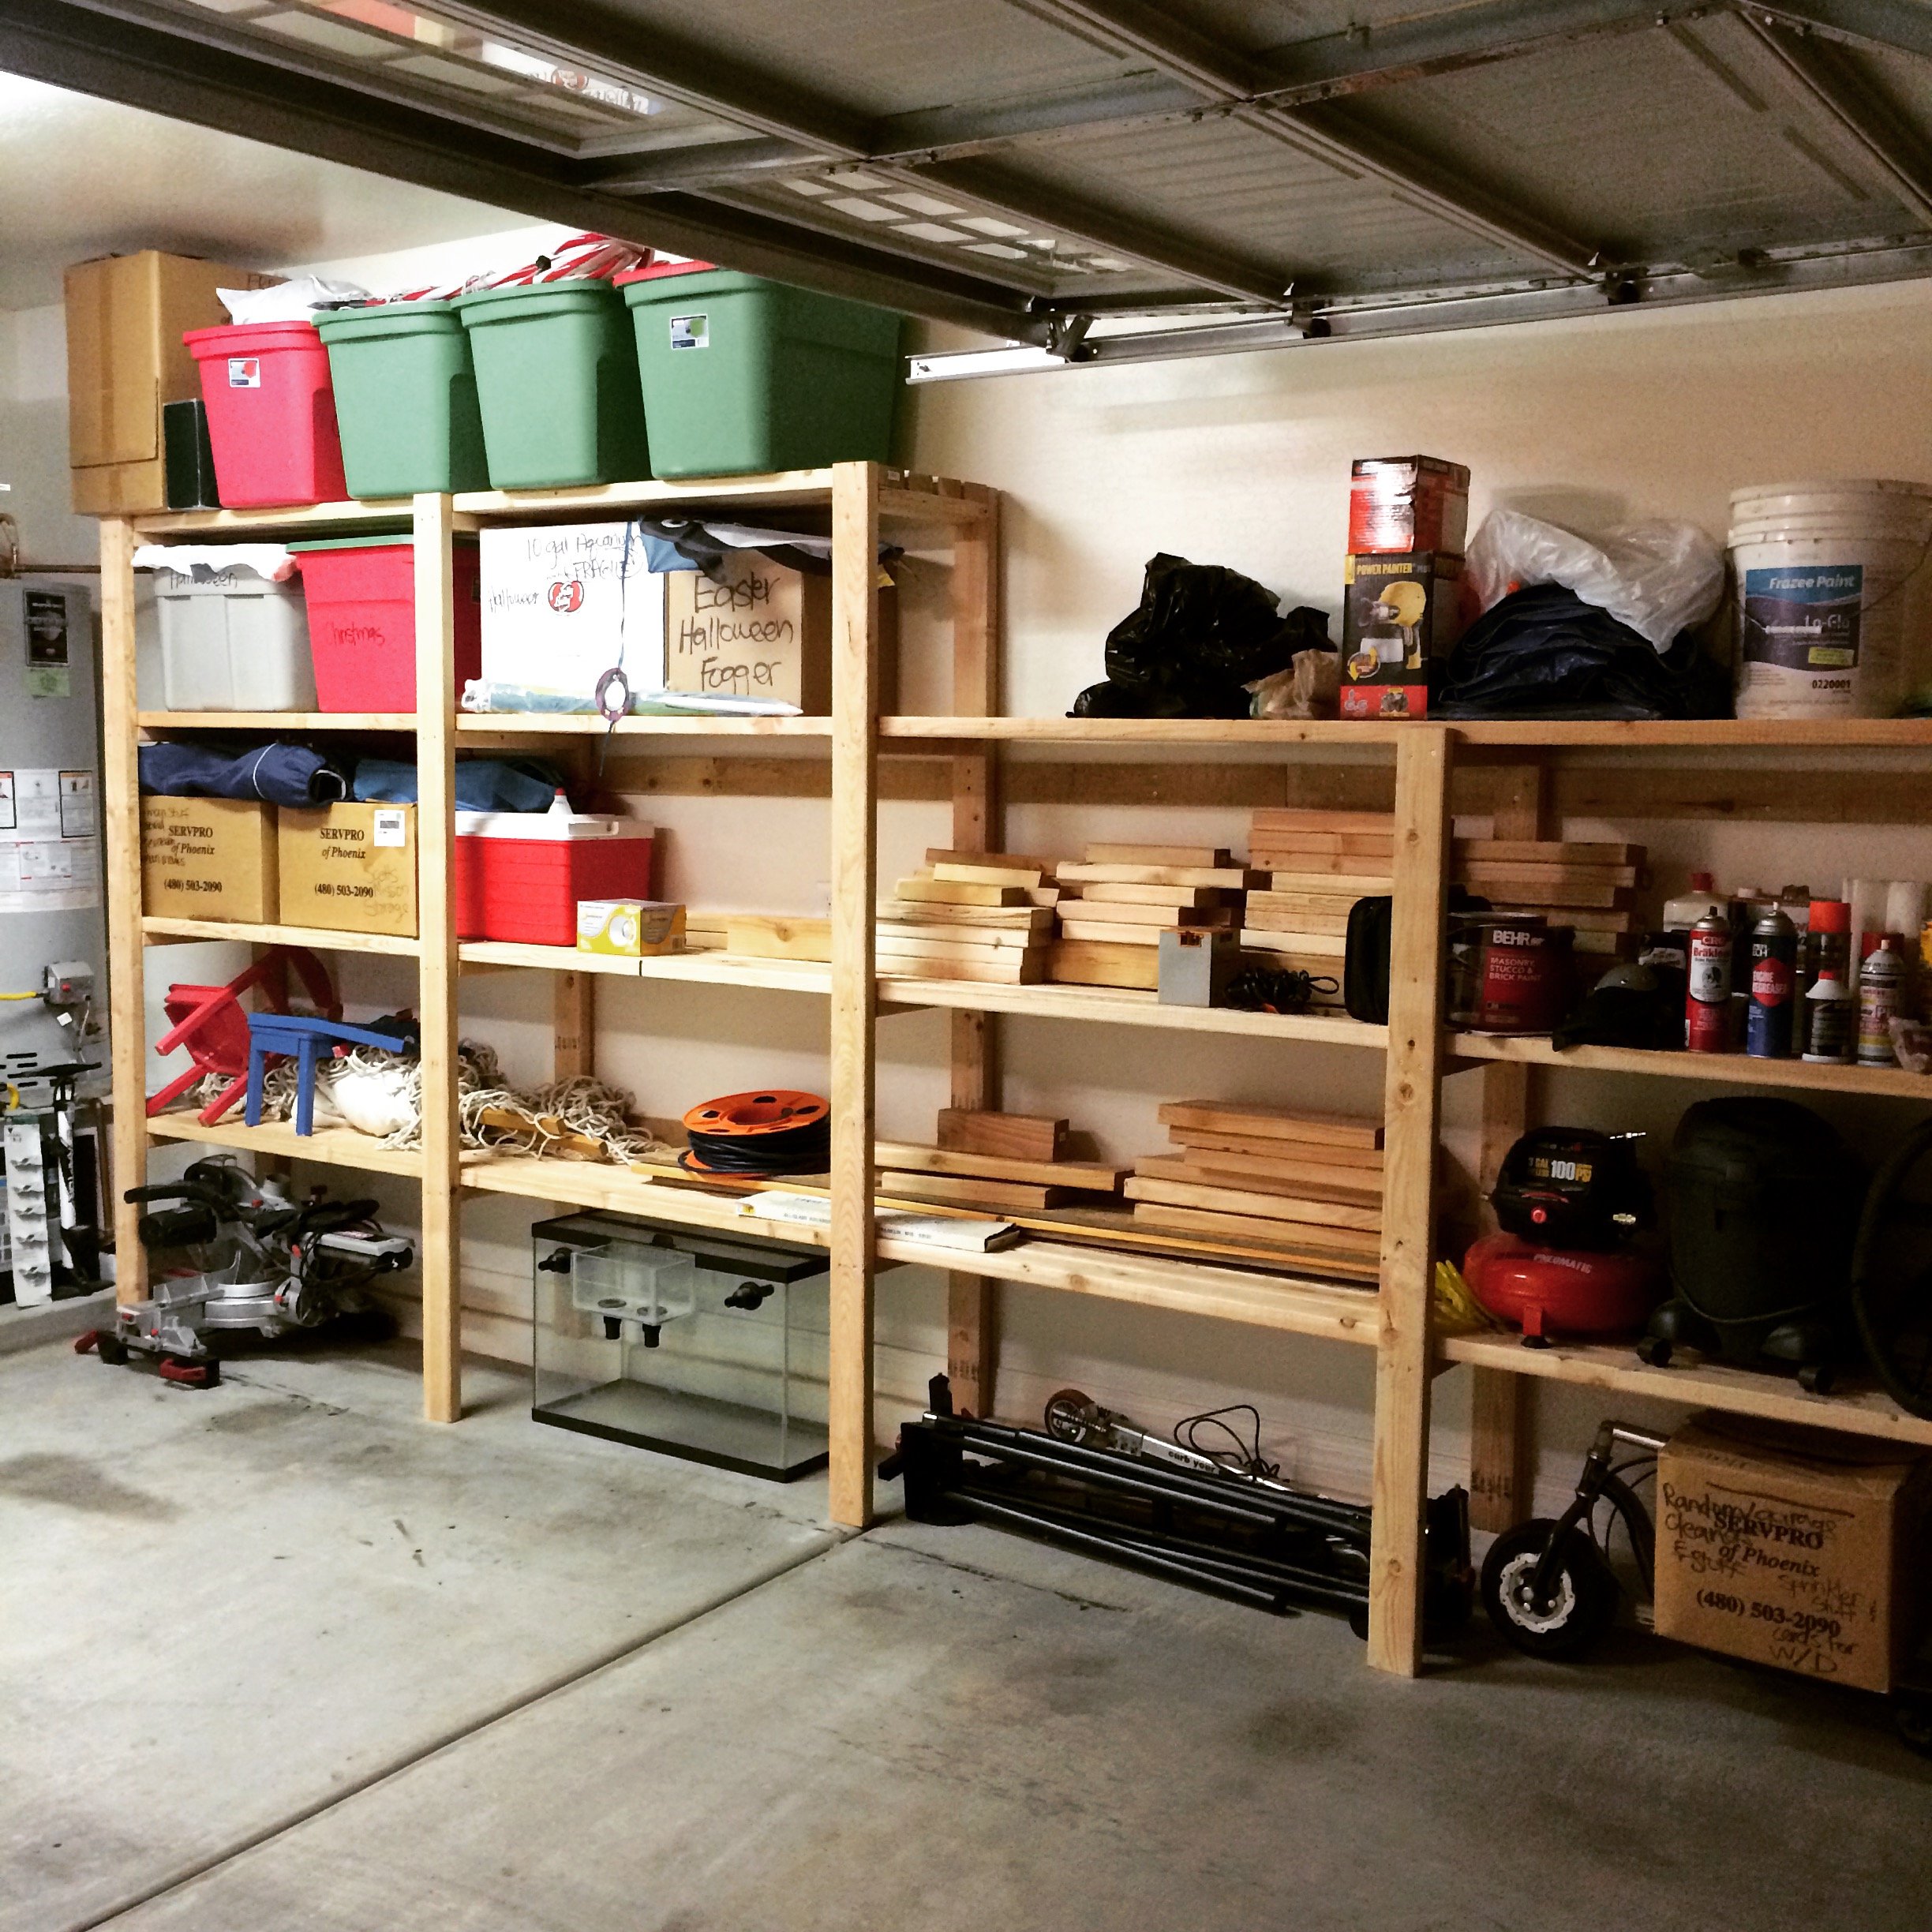
I changed the plans a little bit to add on the extra shelf on top as well as making the shelves an inch narrower than the plans. The project was actually pretty easy and really only took me about a days worth of work.
Built from Plan(s)
Estimated Cost
$160
Estimated Time Investment
Day Project (6-9 Hours)
Finish Used
None
Recommended Skill Level
Beginner
Comments
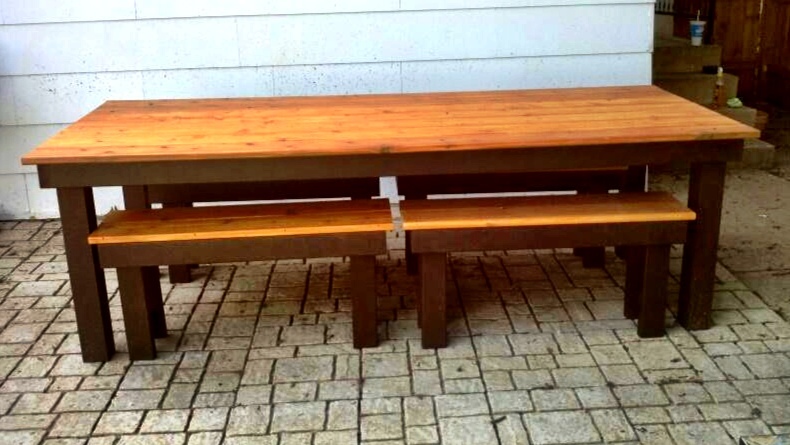
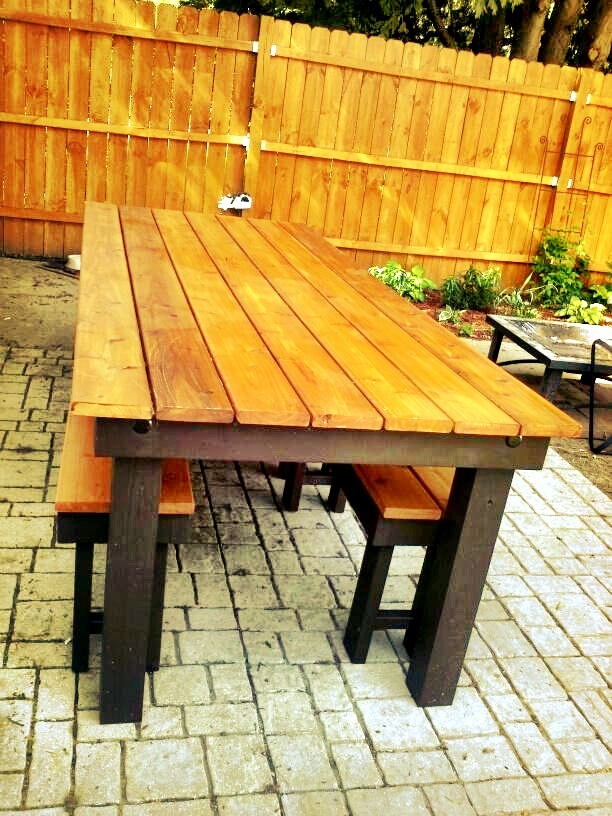
I doubled the recipe and built a table that seats 12!
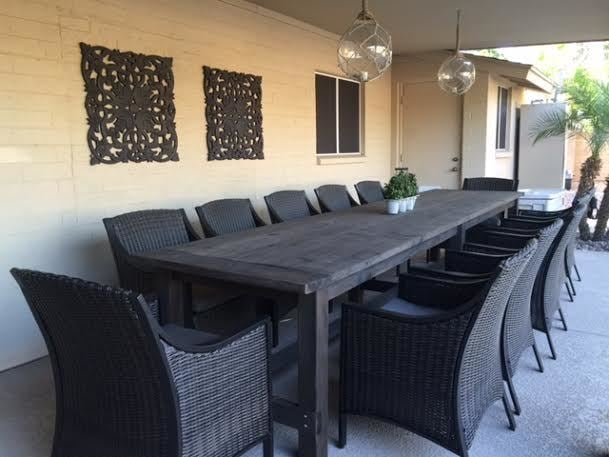
I used the Farmhouse Table plans and just extended the measurements to build an extra-long outdoor table that seats 12.
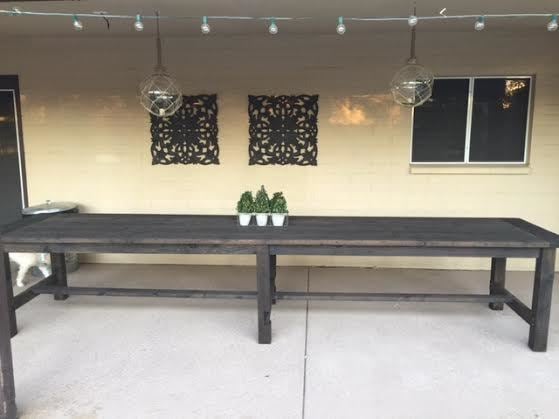
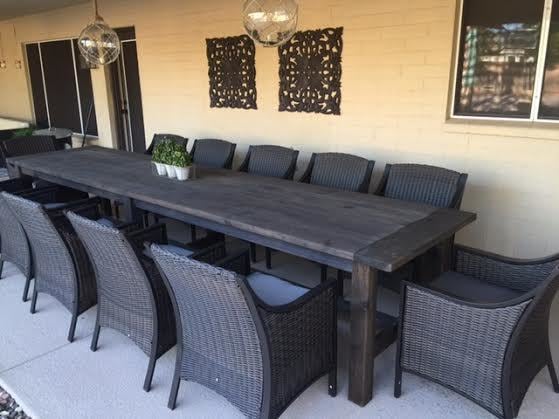
Built from Plan(s)
Estimated Cost
$250
Estimated Time Investment
Weekend Project (10-20 Hours)
Finish Used
Tea, vinegar, and steel wool
Recommended Skill Level
Intermediate
Comments
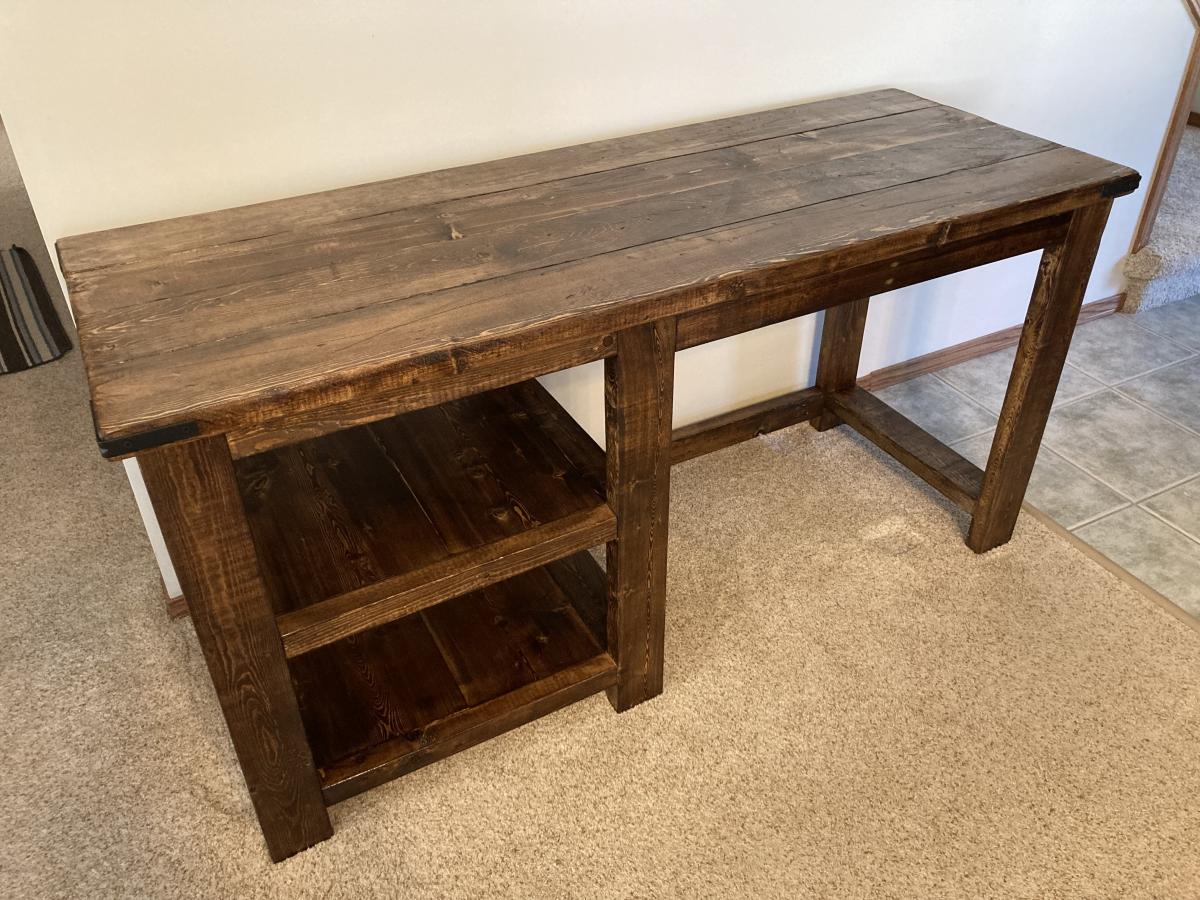
Rustic Desk
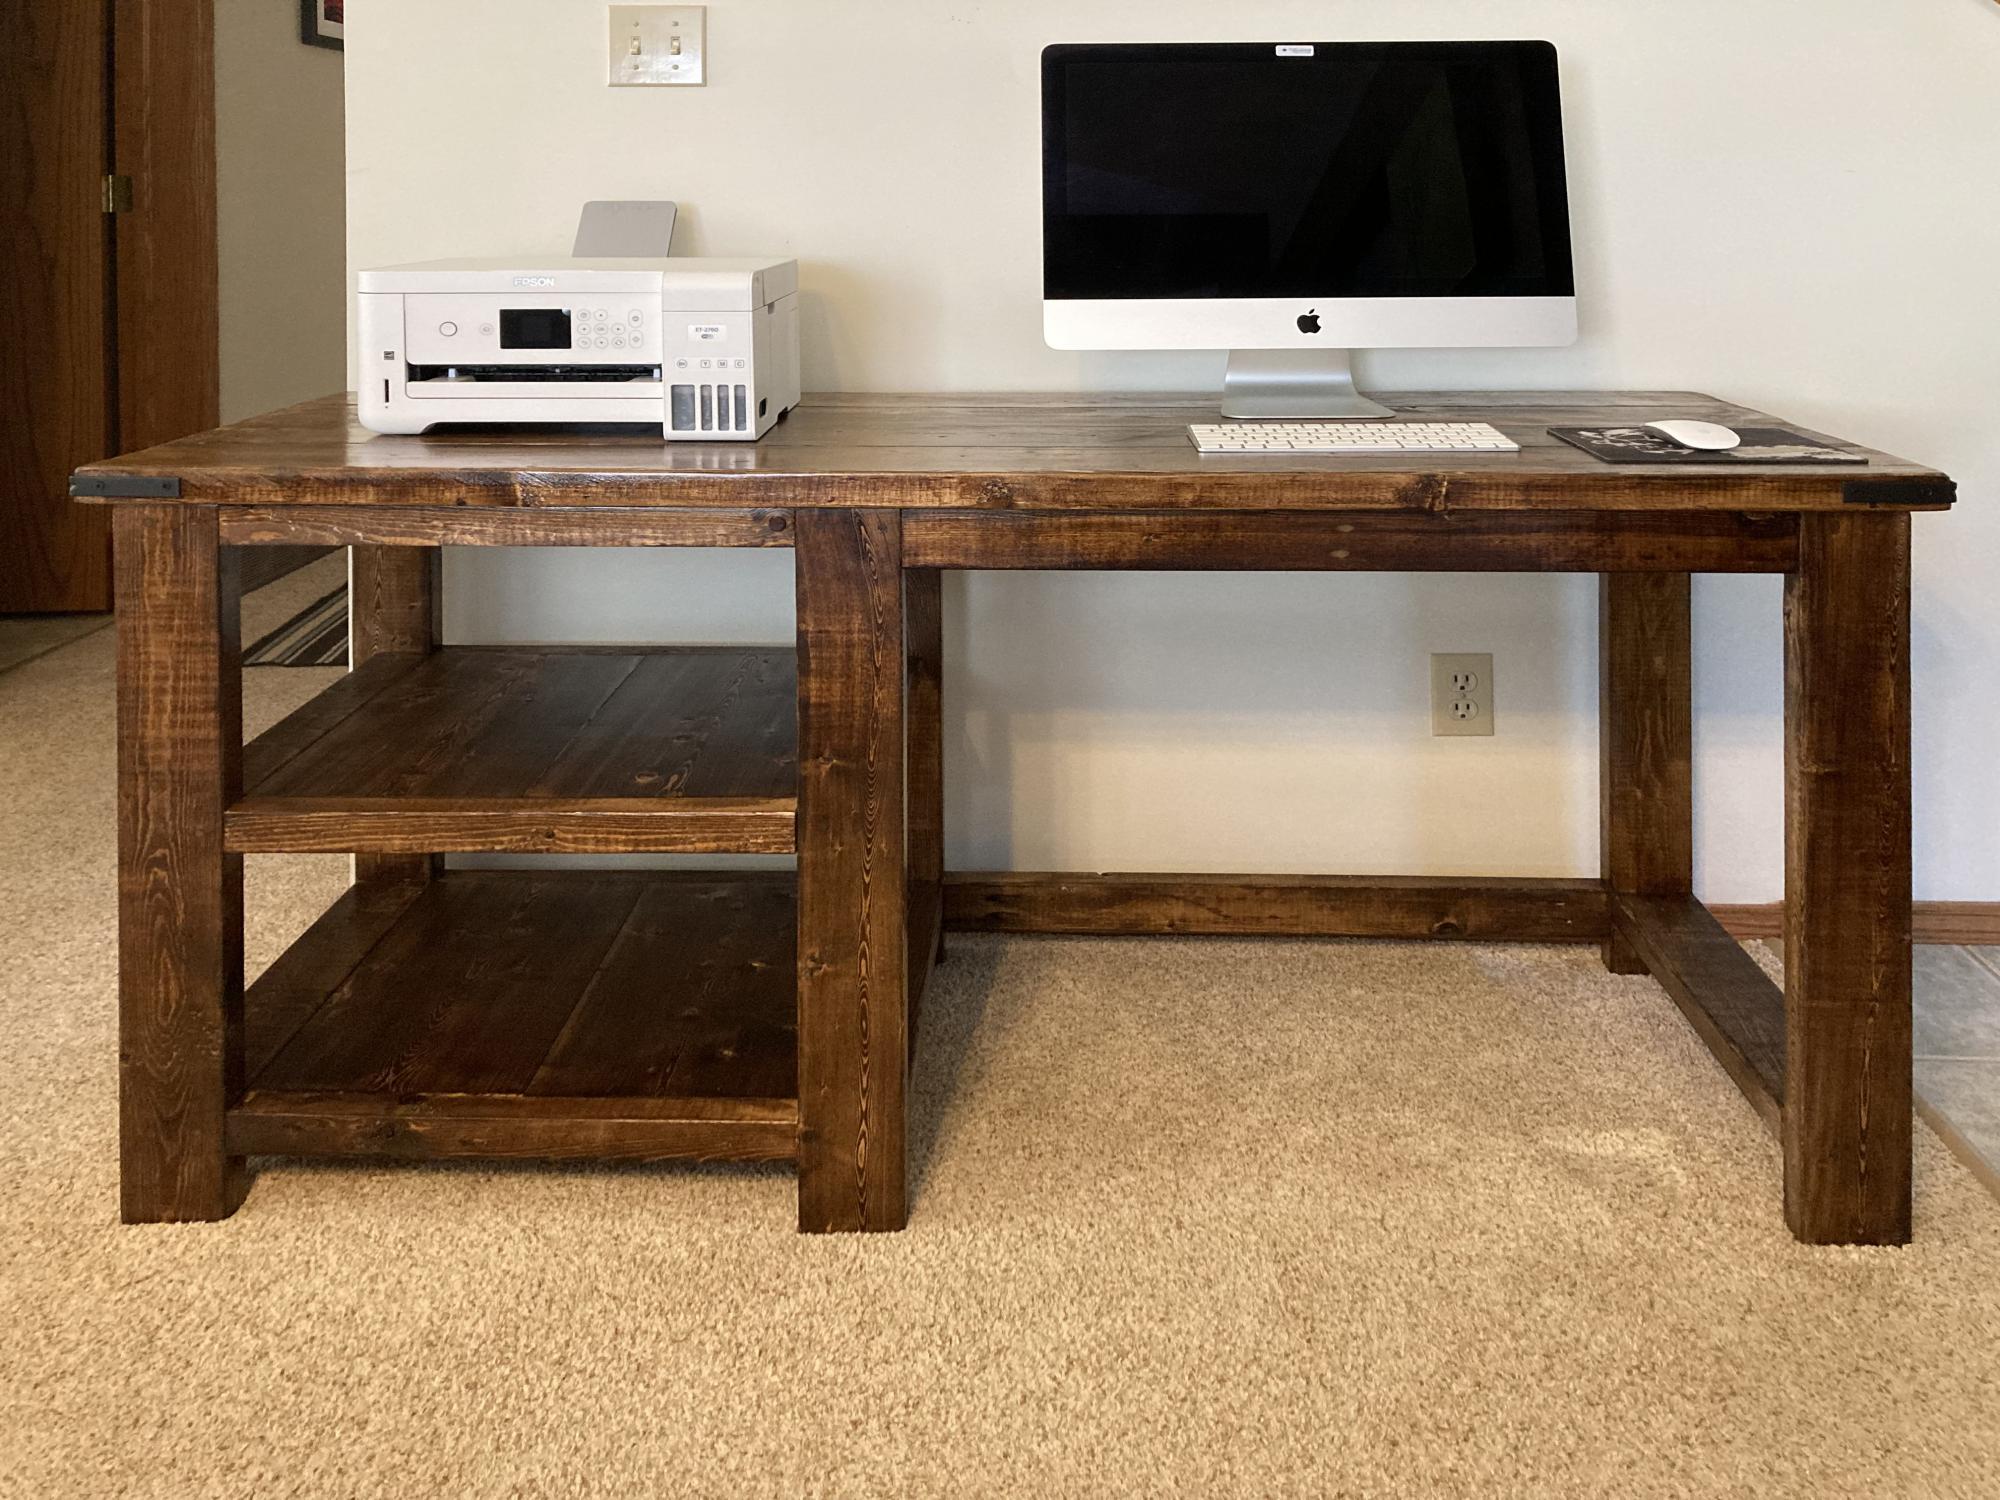
I have build several of these rustic desks. I left the "X" off of this one as I had trouble getting it to fit properly. My last desk I had no issues but not this time. I use MinWax "Provincial" stain followed by three coats of Varathan 3X glossy finish on the top and two everywhere else. I also added a cross piece between the two end sections to better secure the top to.
Built from Plan(s)
Comments
Adirondack chairs
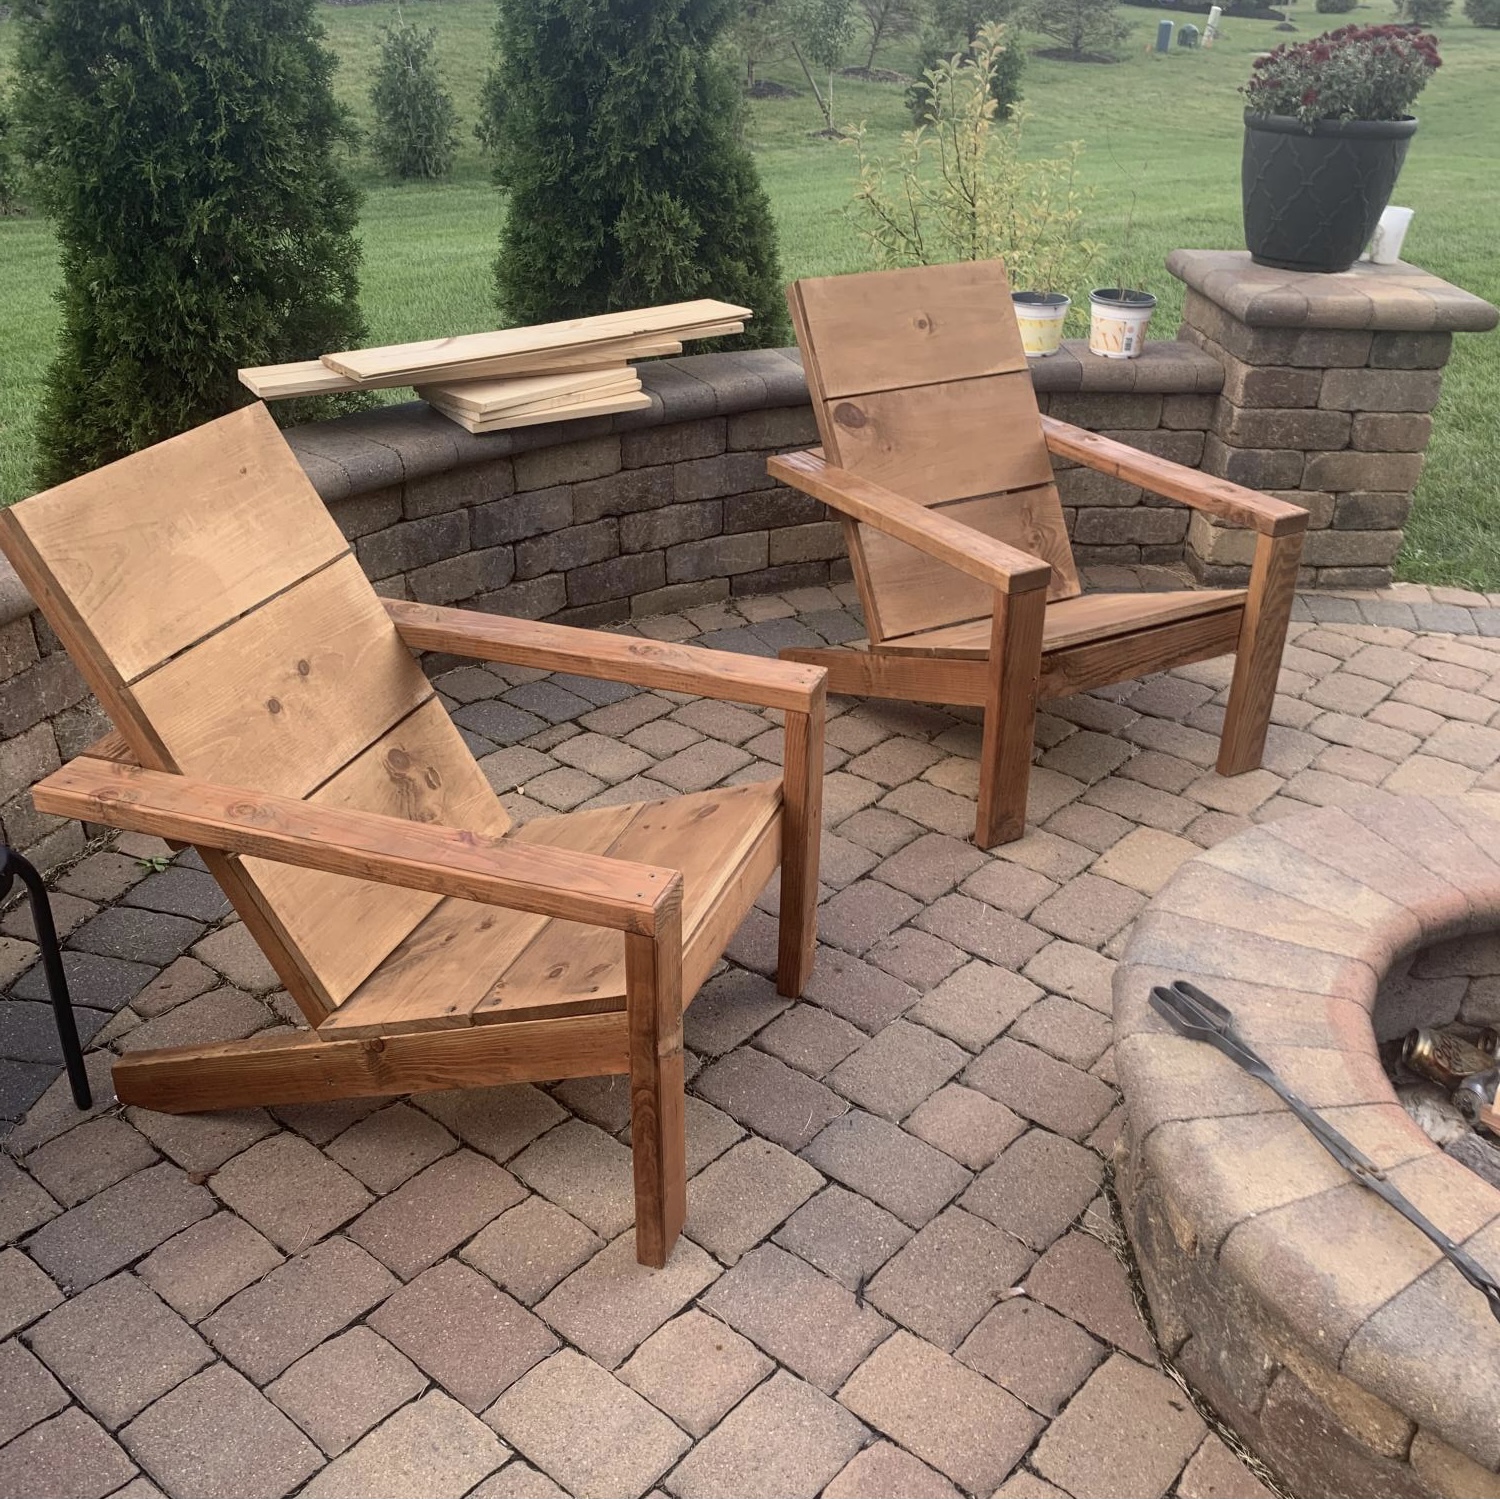
I made five of your 2 x 4 Adirondack chairs. Well I started with one and then my wife wanted four more after she saw how it turned out. We absolutely Iove them and they are easy to make! Thanks Ana!
David Knight
Built from Plan(s)
Comments
Tue, 10/05/2021 - 09:30
Wonderful addition!
Those looks great, so happy to hear you're enjoying them!
Paper Roll Dispenser
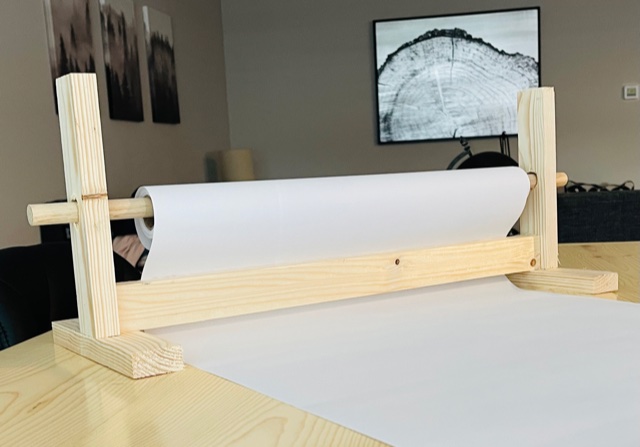
This took me about 20 minutes! I love the look of it and that it can just be left out when the kids aren't doing art. A great little item to add to keep the kids busy and inspired. I made a couple of mods from the plan. I used glue and nails instead of pocket holes and I did that bottom board flat instead of on it's side. I also used a little bigger dowel, and bought two rolls of paper on Amazon for $14.I'm giving this to my daughter for her birthday with some fun art supplies, so I think it's a great gift idea for any occasion for those crafty people out there!
Built from Plan(s)
Comments

Tue, 04/02/2024 - 06:09
Sometimes, when working with…
Sometimes, when working with papers, you might need to convert file formats, right? So, I recently came across this website https://pdfflex.com/webp-to-png It's super handy for converting. It's been a real time-saver for me, especially when I need to tweak documents for printing or sharing. I'd desided to share in case it helps someone else out there too!
Modified rustic table and benches

We built this table for my brother and new wife's wedding present. We modified it to use as an outdoor dining set. Instead of using the 1x10 for the tabletop we used 2x6's and for the legs we used 4x4's. We attached the top boards with a Camo fastening system we used last year on our deck (works great to conceal the screws). I stained the frame in Behr Cordovan Brown and the top boards in Behr Cedar Naturaltone. It was our first attempt at building a table and I think it turned out great, only problem was giving it away!
Built from Plan(s)
Estimated Cost
$300
Estimated Time Investment
Week Long Project (20 Hours or More)
Finish Used
Behr cordovan brown stain and Behr natural cedartone
Recommended Skill Level
Beginner
Comments
Mon, 06/17/2013 - 10:57
Very nice! I'd been
Very nice! I'd been considering this plan for my outdoor table, but my husband liked the modern farm table better. Same idea--I am leaving gaps to allow the water to drain. Love the two-tone finish! It's amazing what you can do with plain old 2 x 6s!
Man Cave Chair from Reclaimed Wood

Man cave chair for my Hubby, made entirely from reclaimed/scrap wood. This took a long weekend to build (includes time to rip down the reclaimed wood, and a couple of tries to get the padded arm rests right).
This build uses the Simple White Outdoor Chair plan, adjusted to fit smaller cushions and use my scrap/reclaimed wood.
The seat cushion is covered with marine vinyl, and the back cushion is covered with fabric from a curtain already on hand. The covers are done in a simple box style. The seat cushion closes with ties at the back, and the back cushion has an envelope back.
The end result is a sturdy, comfortable chair that’s not too heavy, and is decked out with colors from Hubby’s favorite football team. I’m very pleased to say that Hubby likes his new chair!
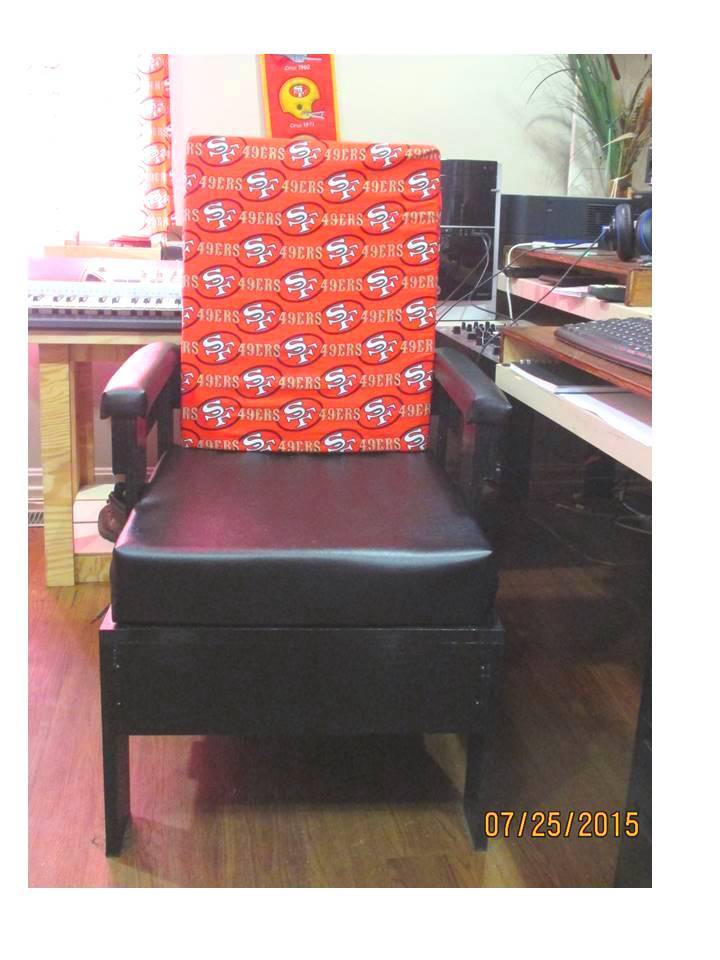
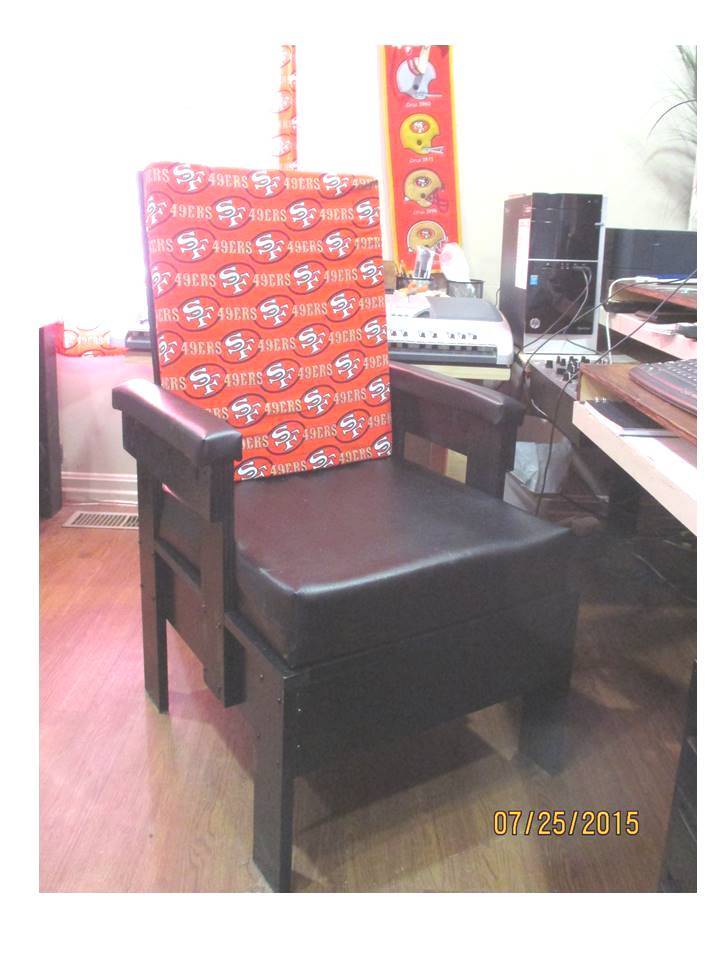
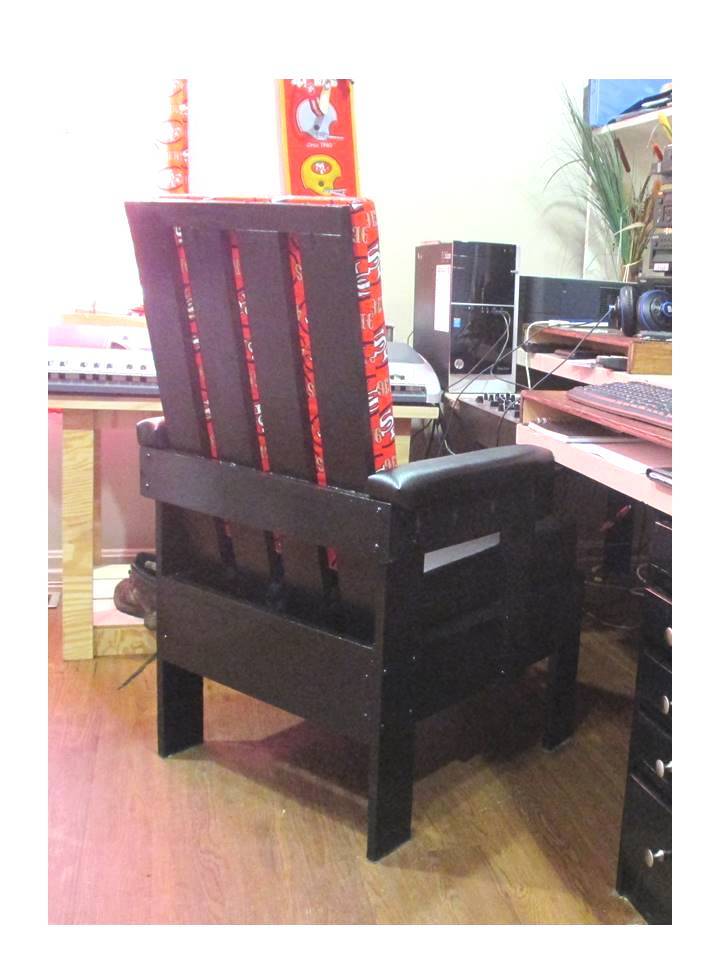
Built from Plan(s)
Estimated Cost
Cost: $75 for cushion materials (high density foam and vinyl). Everything else was reclaimed or already on hand.
Estimated Time Investment
Weekend Project (10-20 Hours)
Finish Used
Finish: 2 coats gloss black (Valspar Ultra paint + primer). The bottom surfaces of the legs are covered with some adhesive backed felt for easy sliding.
Recommended Skill Level
Intermediate
Harriet Outdoor Table & Chairs
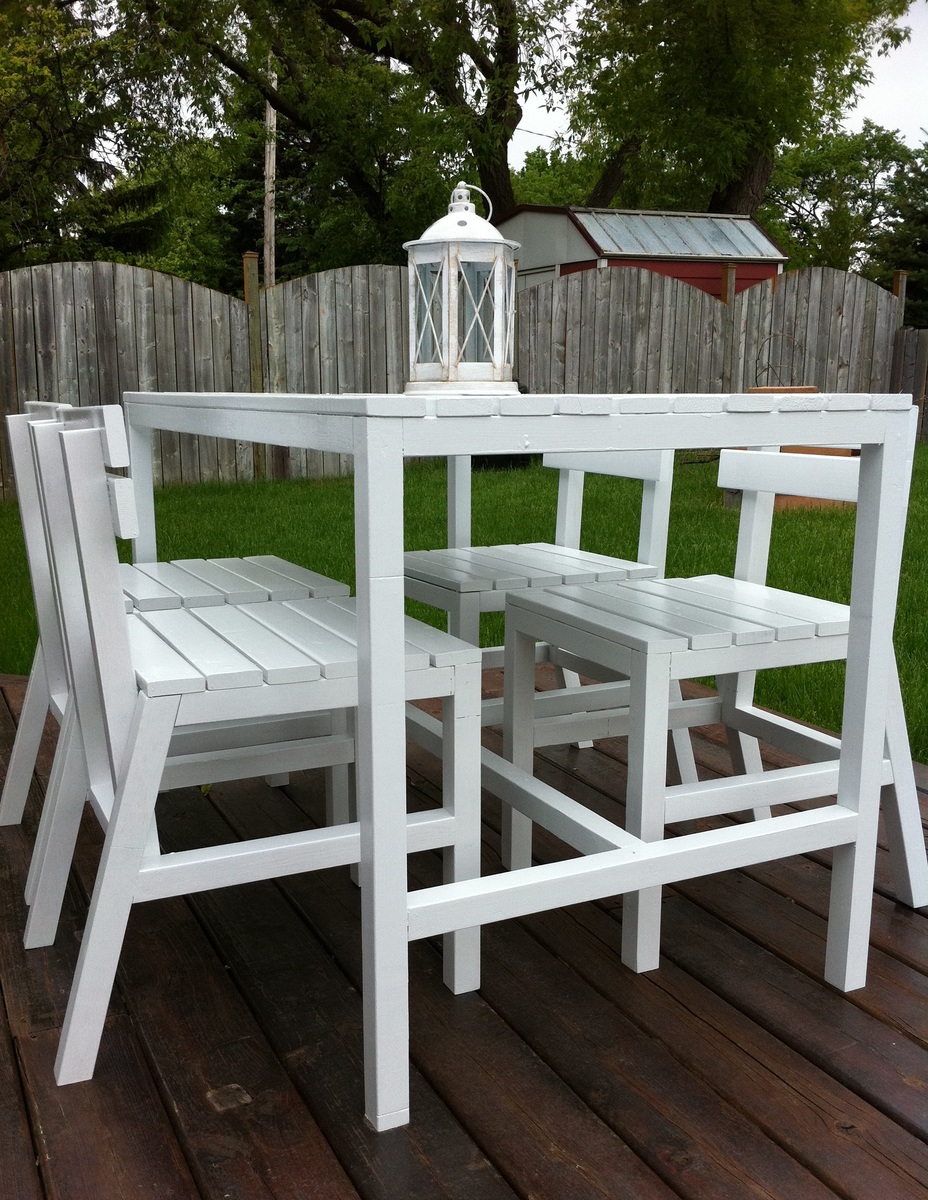
When I saw these plans I couldn't wait to build them for my deck. I'm so happy to finally have some outdoor furniture, especially solid wood pieces that I built myself. Thanks Ana!
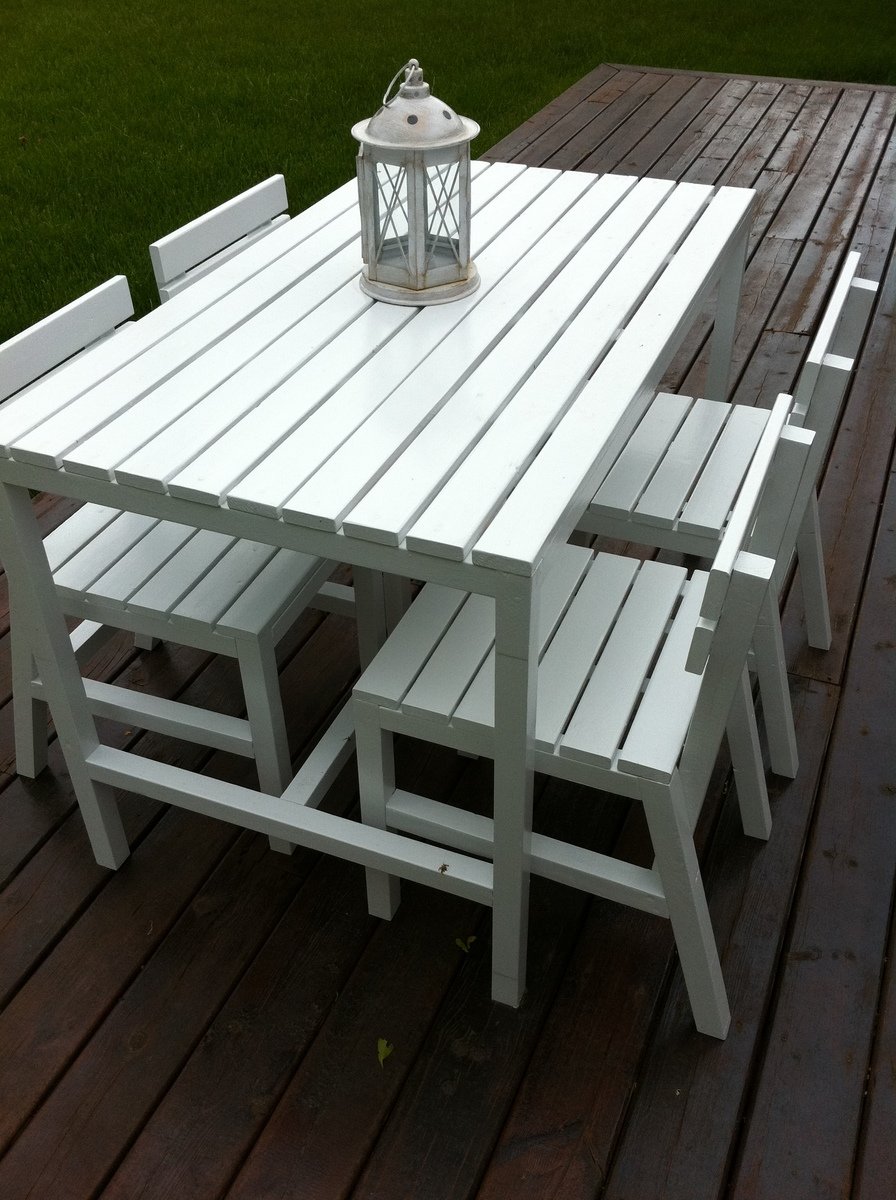
Built from Plan(s)
Estimated Cost
$80
Estimated Time Investment
Week Long Project (20 Hours or More)
Finish Used
Rust-Oleum High Gloss White Outdoor Paint
Recommended Skill Level
Beginner
Comments

Mon, 06/06/2011 - 10:38
Beautiful! Love this, thank
Beautiful! Love this, thank you so much for sharing!

Book Ledges in the Tree House

I love these plans! I build a reading loft tree house for the kiddos that they love... and I might love even more.
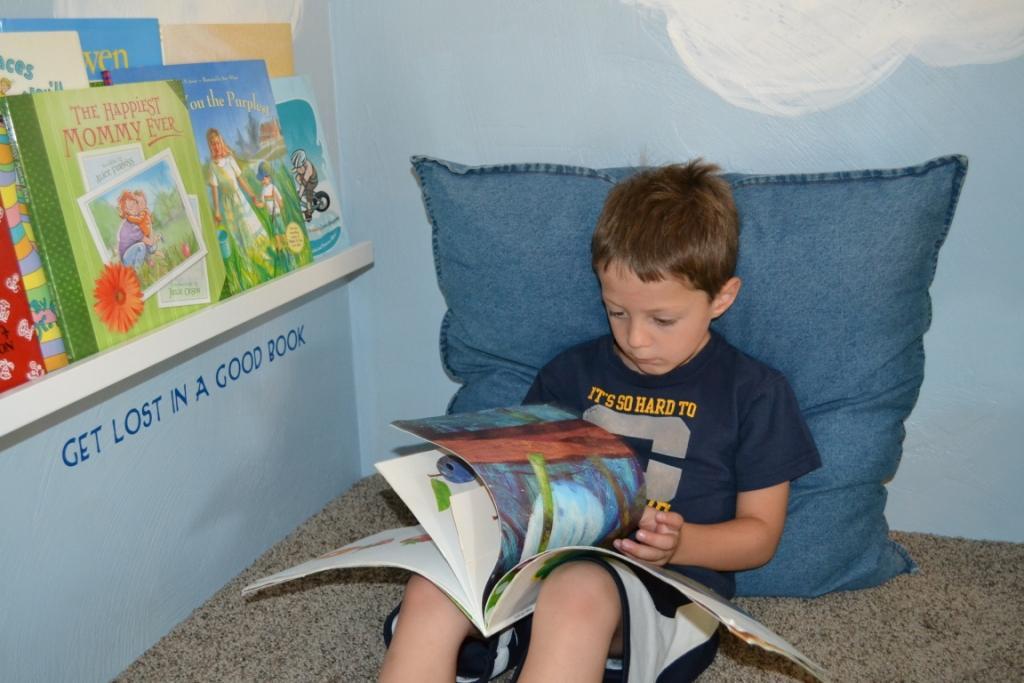
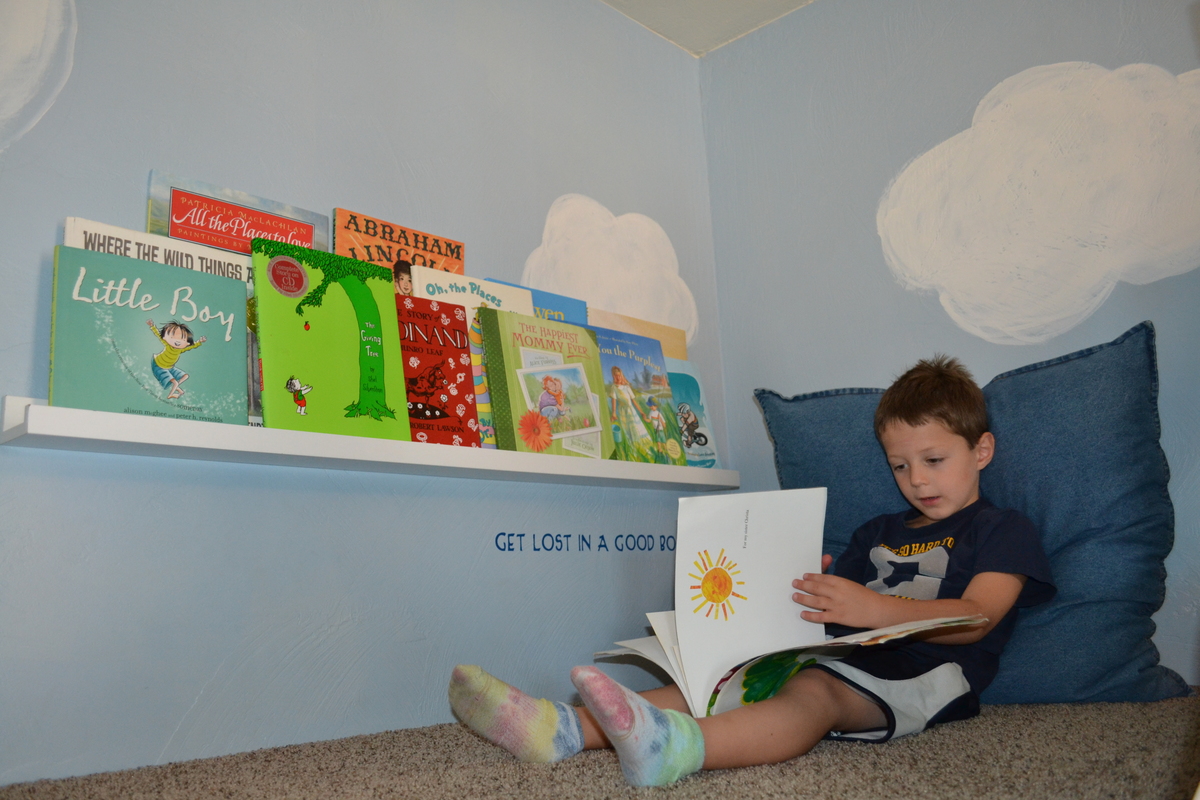
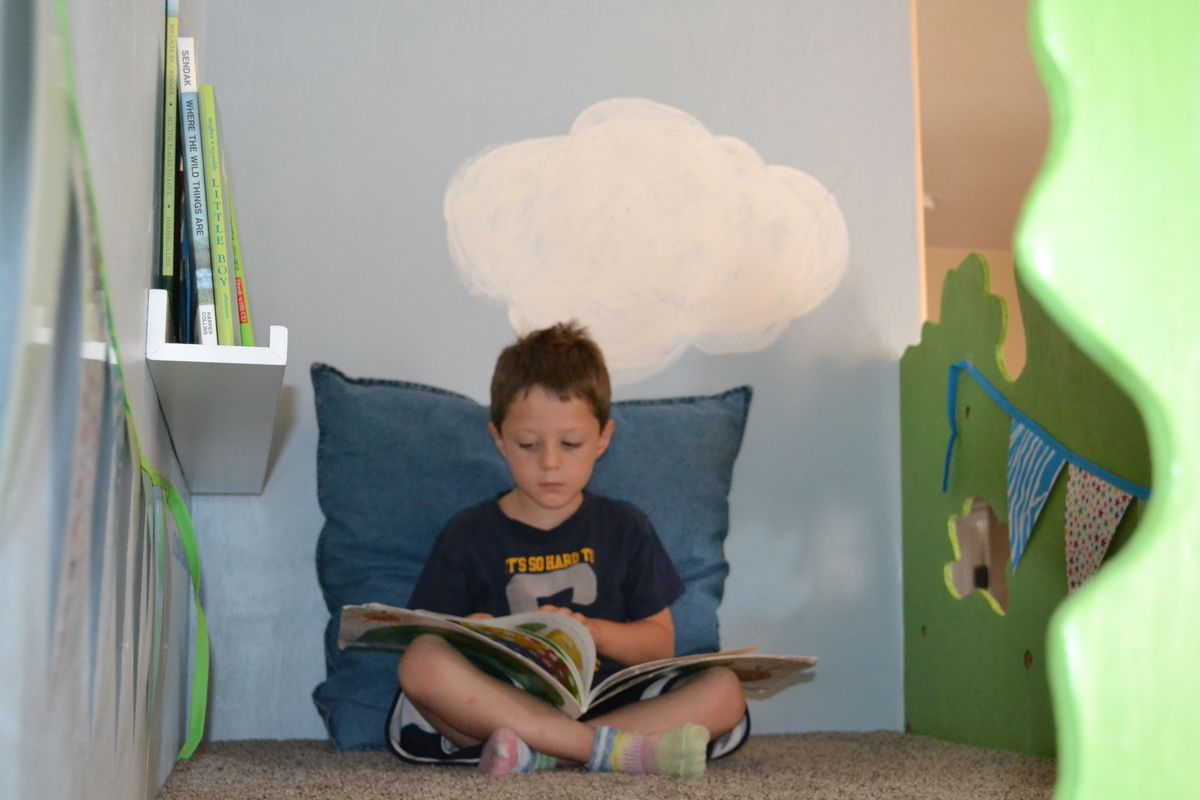
Built from Plan(s)
Estimated Cost
$10
Estimated Time Investment
An Hour or Two (0-2 Hours)
Finish Used
white spray paing
Recommended Skill Level
Beginner
Vintage simple bench nightstand
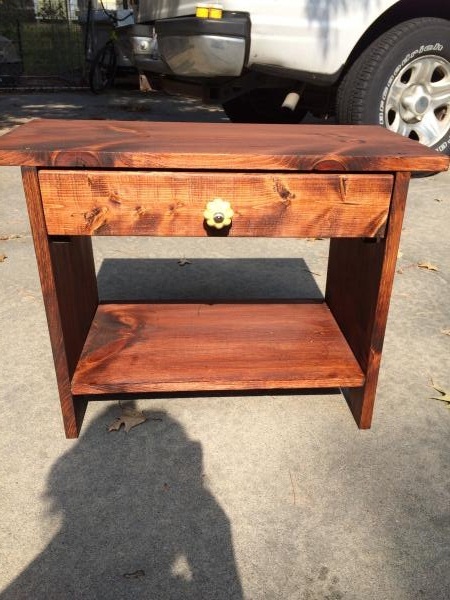
I followed the plan but added a drawer. I had a drawer that I had previously built but it didn't fit that project. It just happened to be the right width for this, I had to cut off some on the length, and that turned out to be easier than I thought it would be. I used wooden slides.
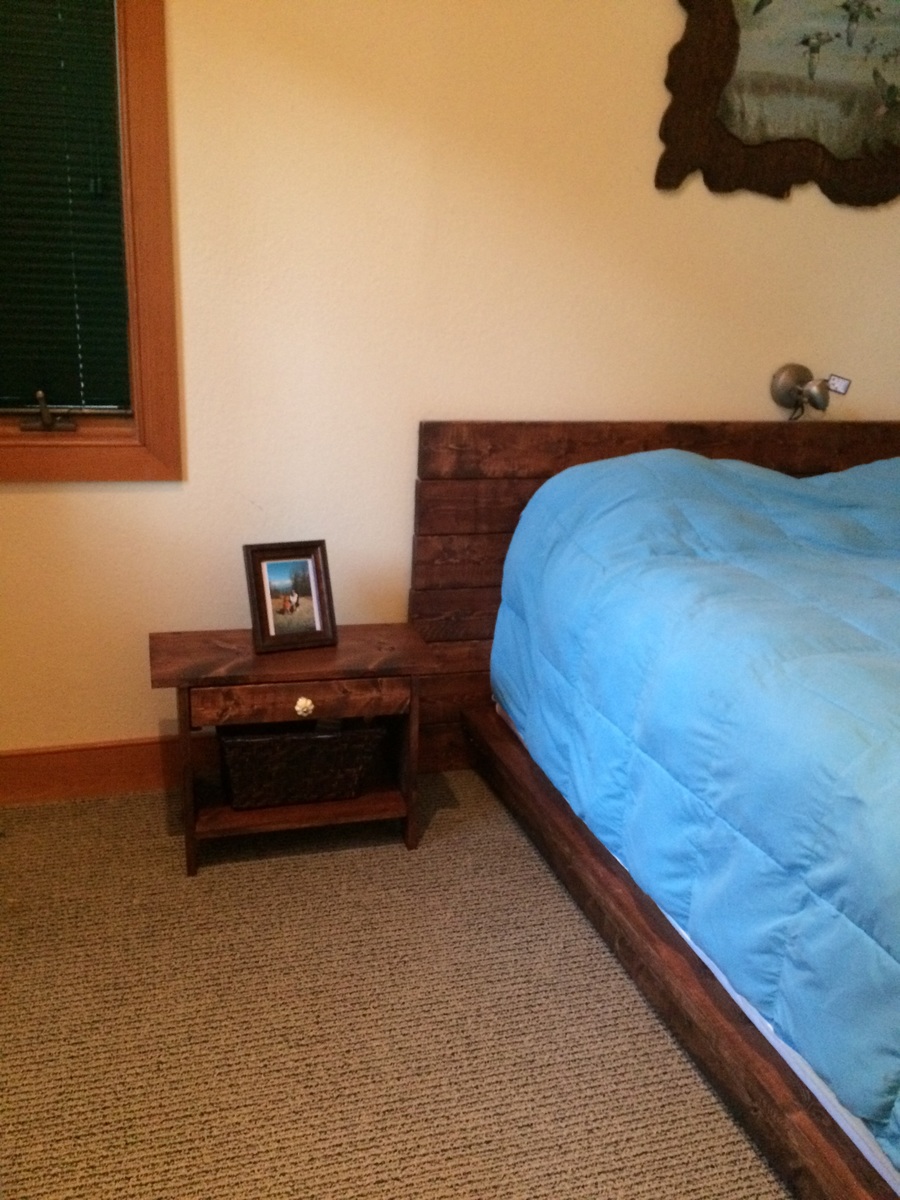
Built from Plan(s)
Estimated Cost
Less than 20.00
Estimated Time Investment
Afternoon Project (3-6 Hours)
Finish Used
Red oak and golden oak mixed. Wax finish.
Recommended Skill Level
Beginner