Community Brag Posts
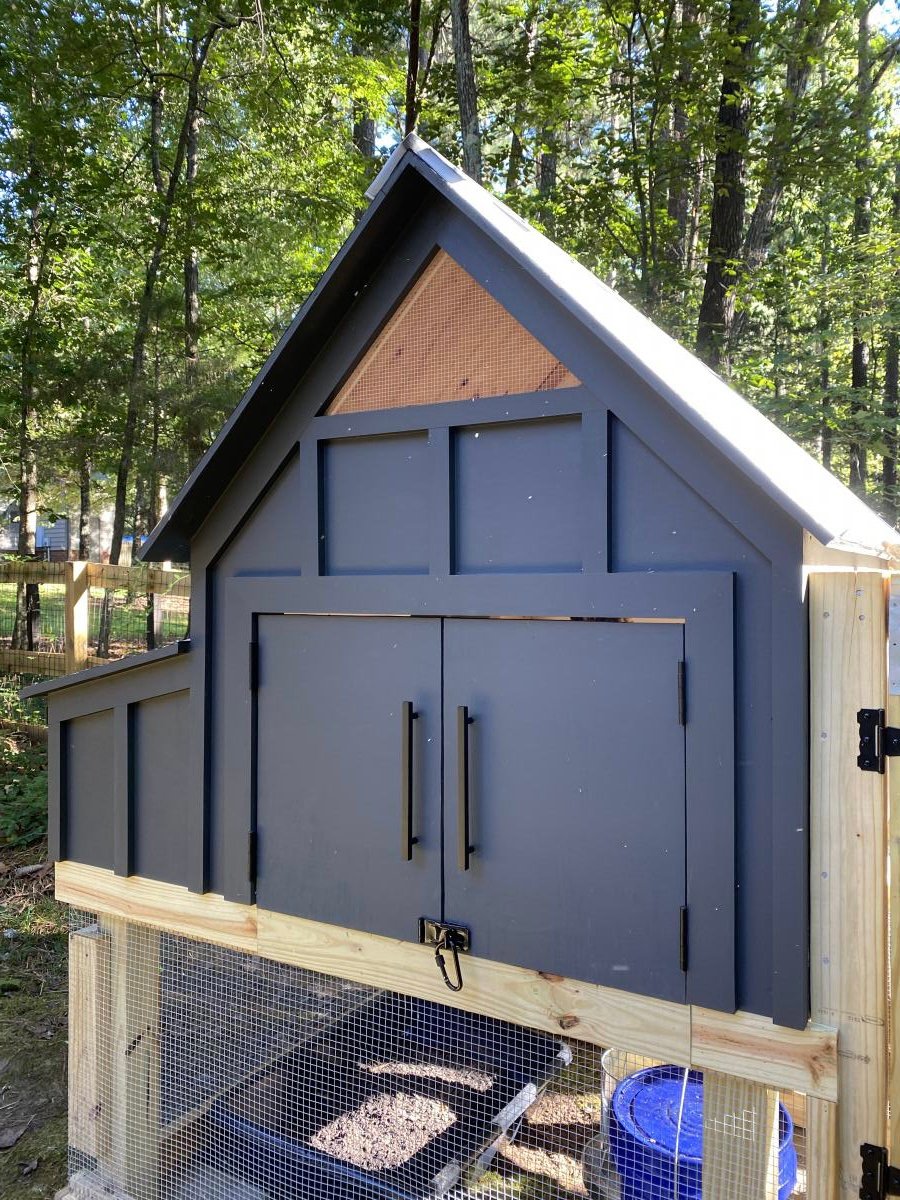
Cluckingham Cottage
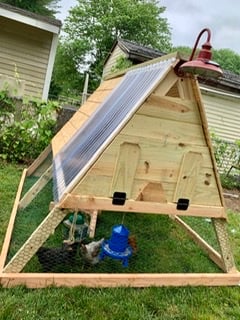
Cluckingham Cottage wasn’t built in a day, but it WAS built by a DAME!
A-frame instructions were pretty helpful considering the builder knows nothing about construction. I made a few modifications to accommodate my 5 chooks + 2 bantams . Sturdy and tight structure.
Built from Plan(s)
Estimated Cost
Under $400
Estimated Time Investment
Weekend Project (10-20 Hours)
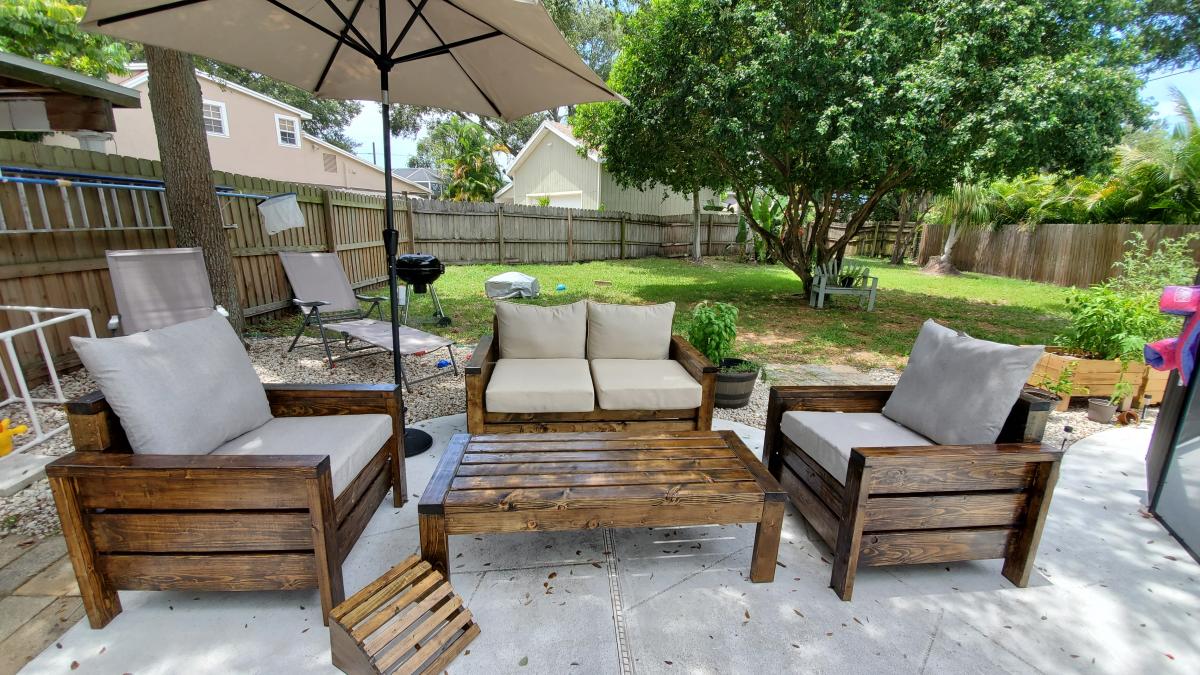
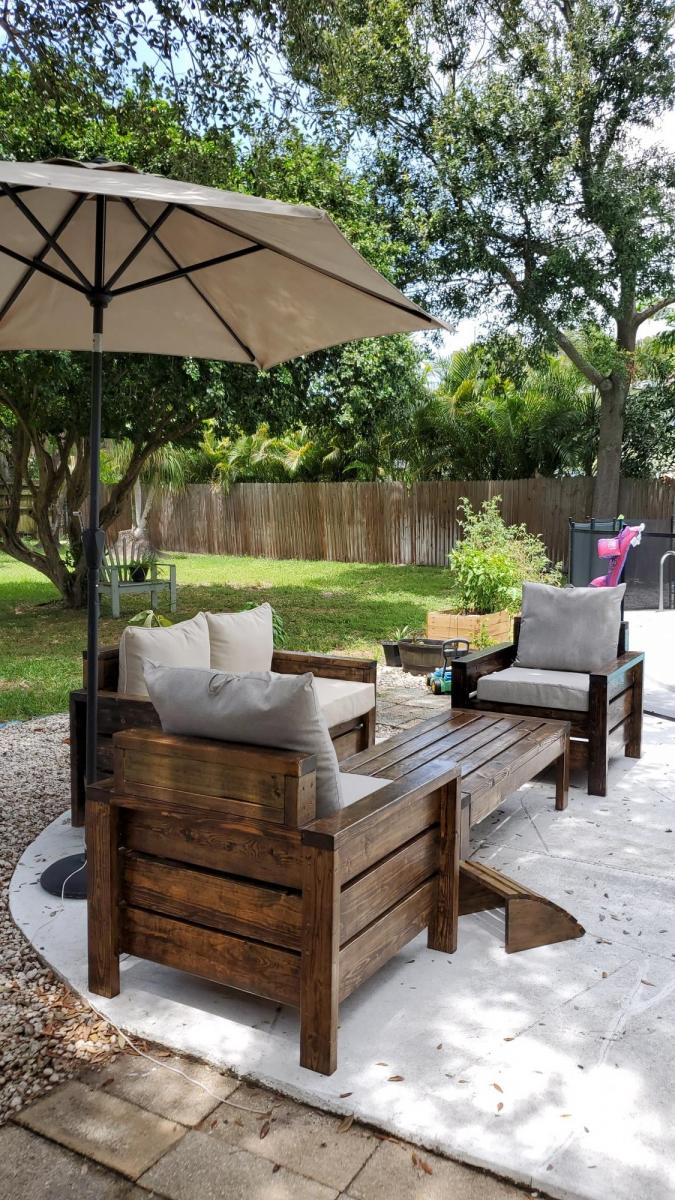
L Shaped Patio Couch

One day project with hubby! Wanted a wood set, but couldn’t find a reasonable price. Bought tools, wood, supplies, and cushions for under the cost of one online!
Built from Plan(s)
Best Chairs Ever!
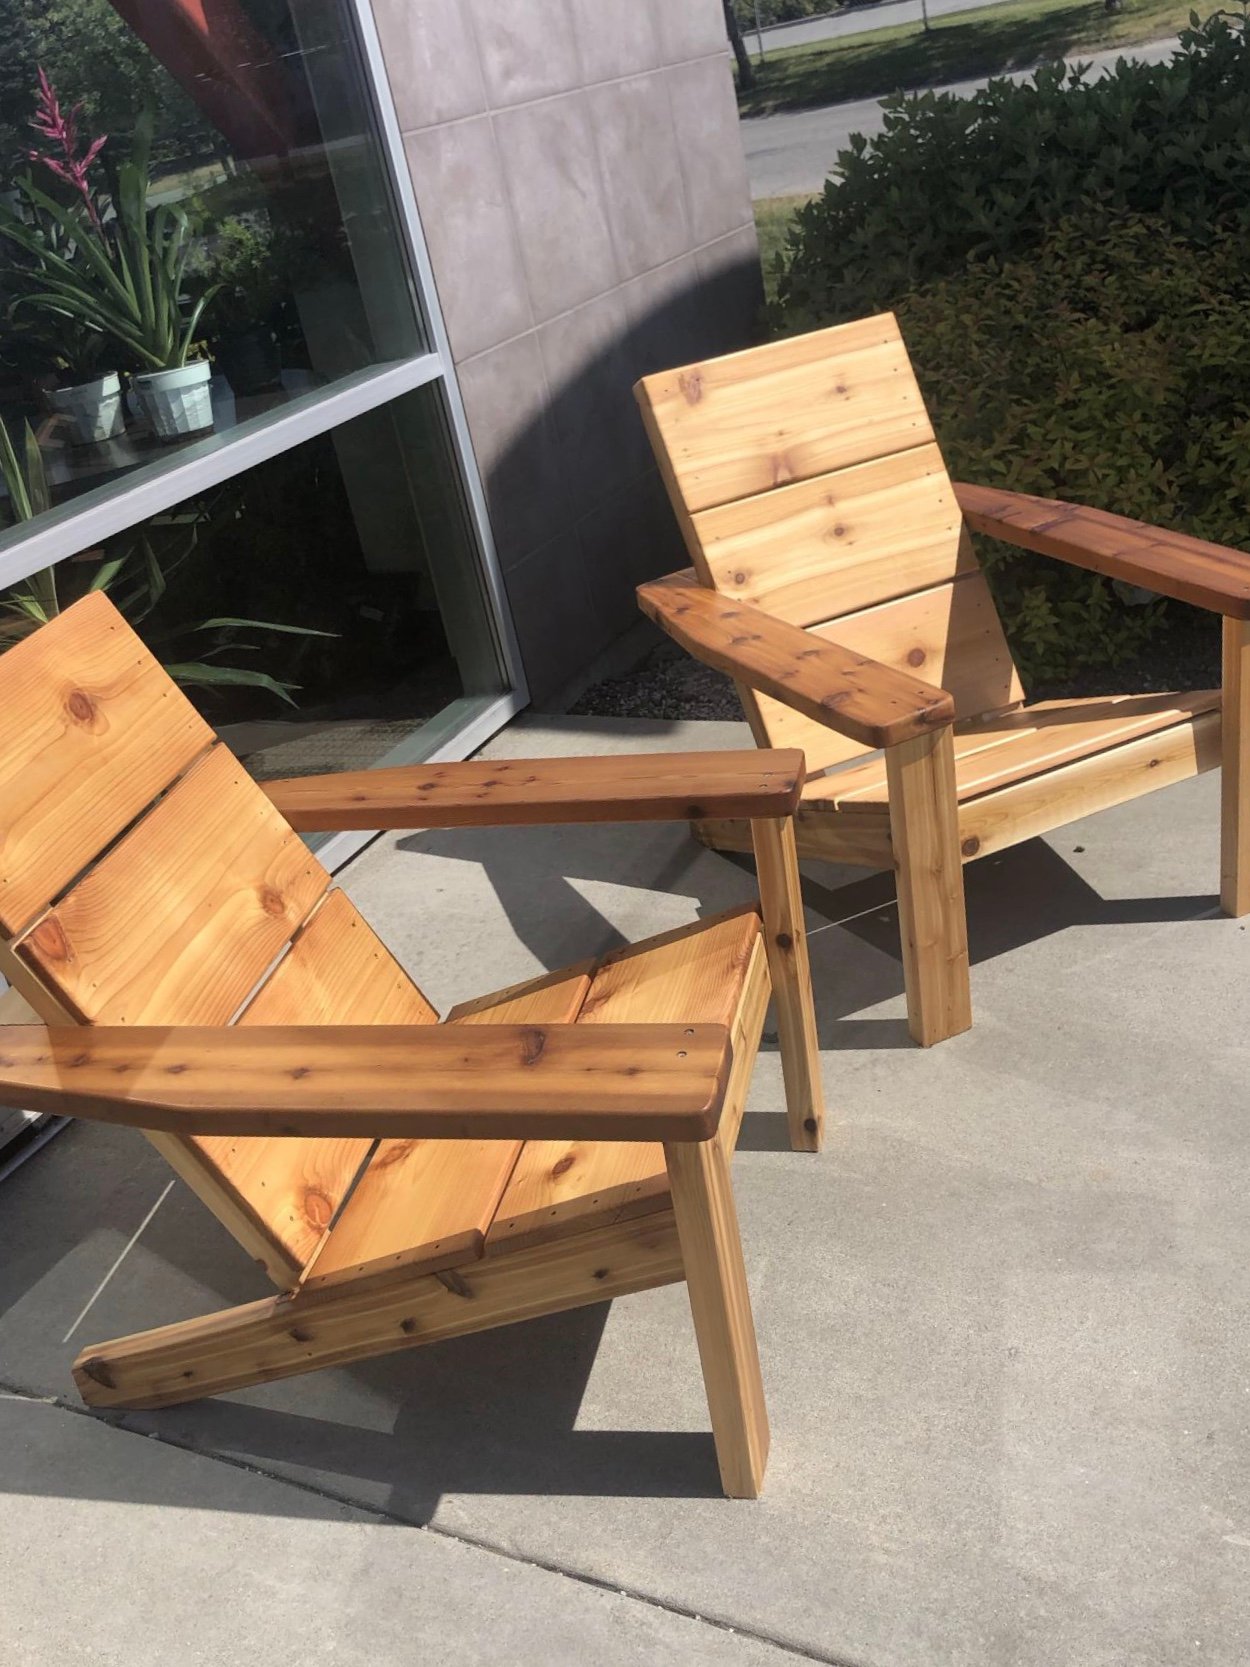
I made these modern Adirondack chairs for our business in Anchorage. GREAT and easy to build design by Ana - we upgraded the arms to tapered 2x6 and they're awesome!

Built from Plan(s)
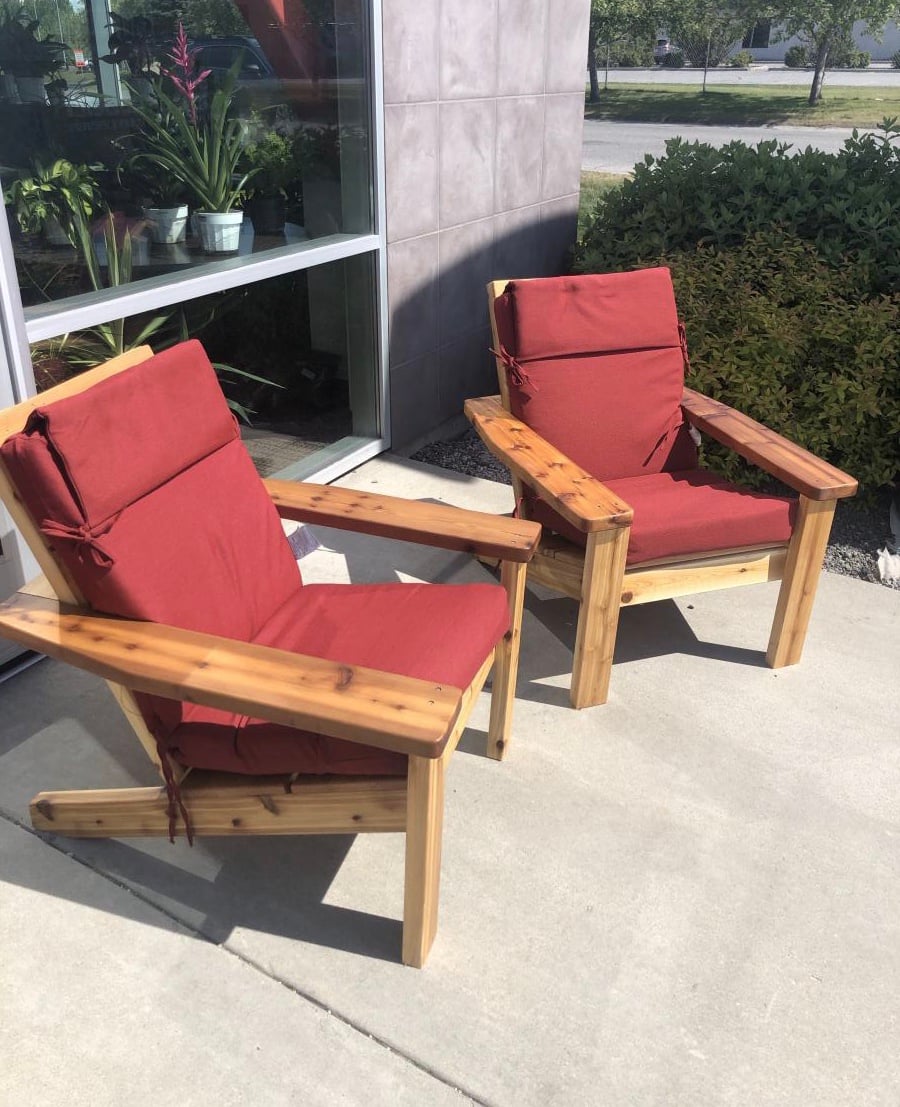
First Project
Well, I started with one chair and finished with a full set. Not bad for a first timer. Definitely room to improve. Little tip if you're going to make this amazing set... raise the backs as they are too low with thicker cushions. I built a casing to go on top after the fact. Pretty happy with how it all turned out. Thanks Ana for the plans... now onto the next project!

Comments

Fri, 04/28/2023 - 08:41
2X4 & 2X6 starting set
Very nice workmanship. I'm curious as to how comfortable they are with the straight 90* backs? Let me know please at [email protected]. Again nice workmanship.
Fri, 04/28/2023 - 08:41
2X4 & 2X6 starting set
Very nice workmanship. I'm curious as to how comfortable they are with the straight 90* backs? Let me know please at [email protected]. Again nice workmanship.
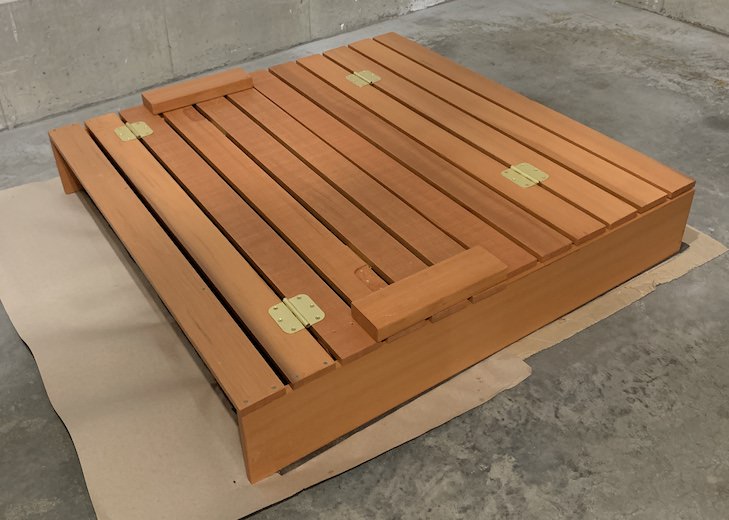
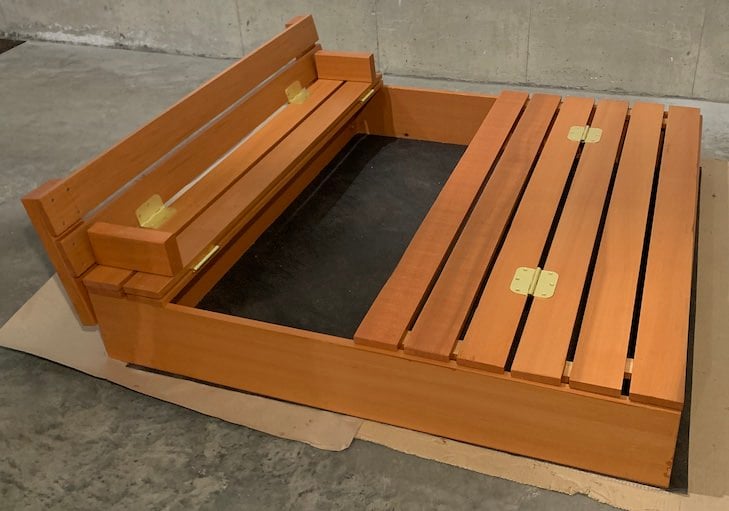
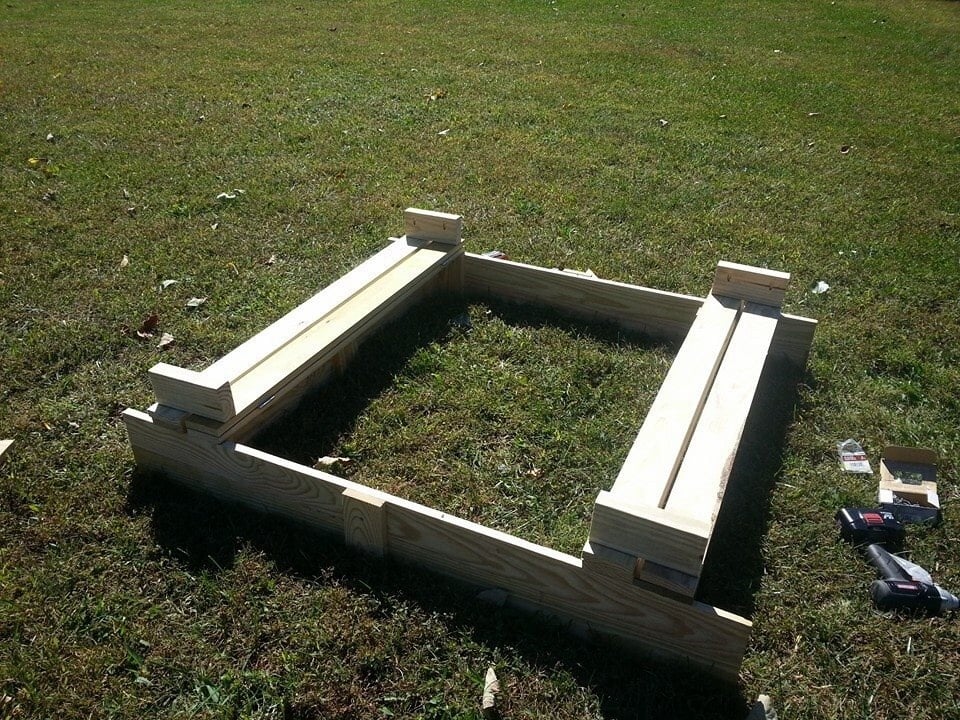
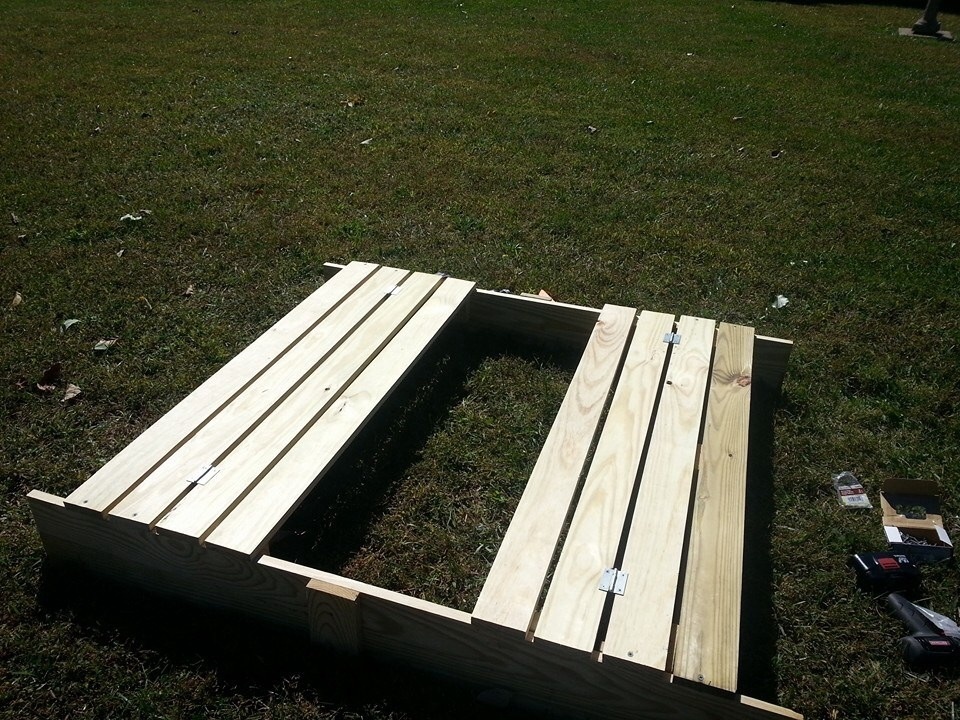
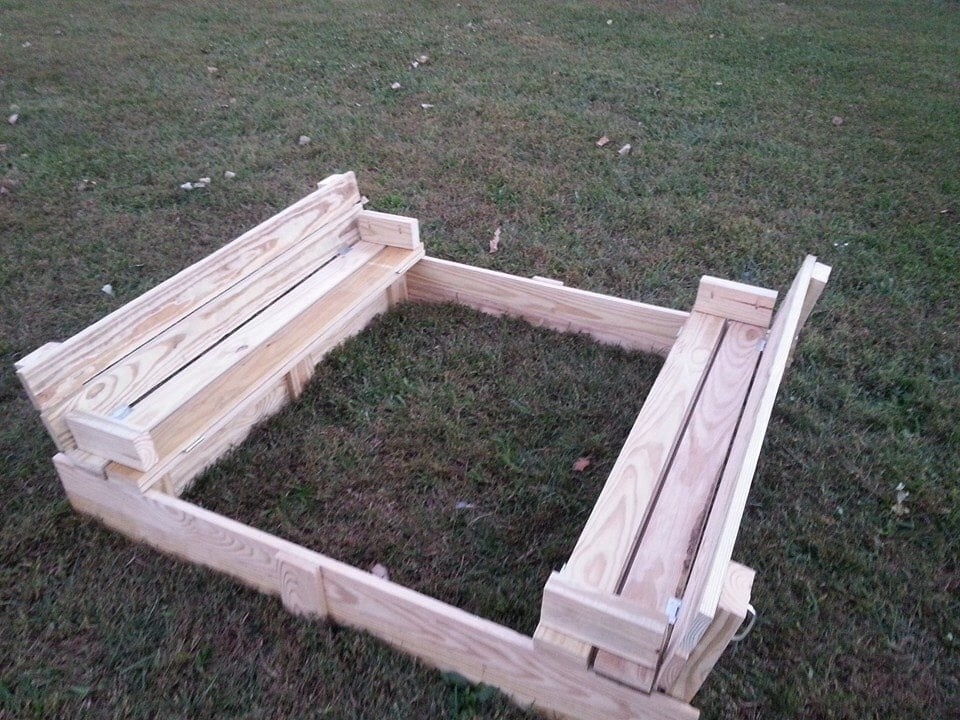
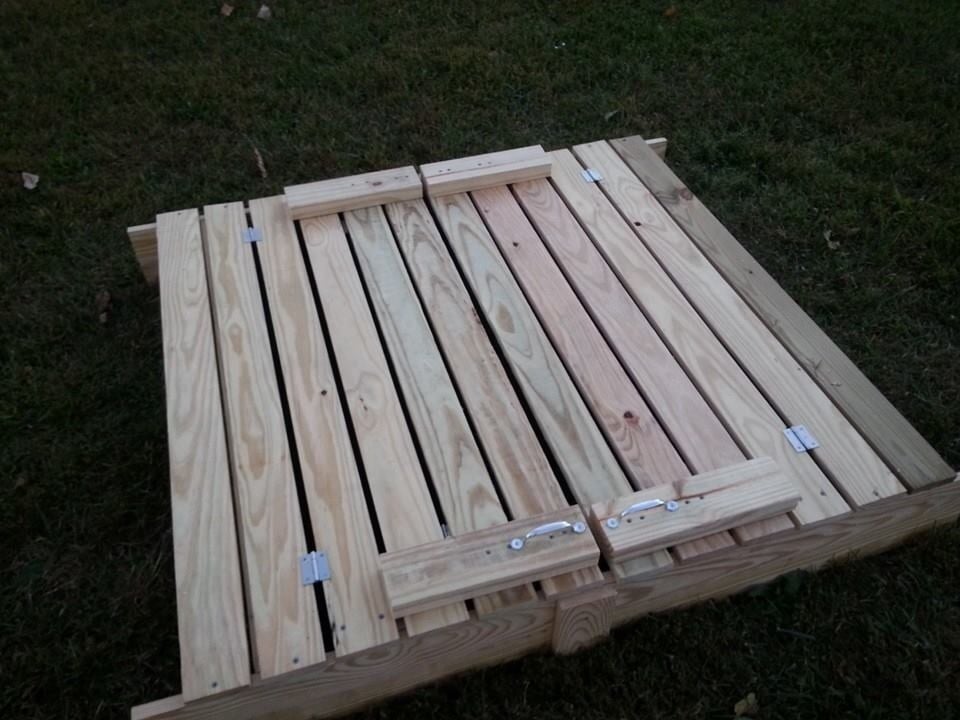
Sand Box with Built-In Seats using Cedar Wood and 1 Seat

Followed the original plan except below changes:
- Only one seat to make it more spacious
- Made 2 groups of 3 planks each and connected both using hinges so it can cover the end without seat
- Stapled Hardware Cloth with landscape fabric
Cedar wood was the most expensive thing in this project, since I would want it to last long.
Built from Plan(s)
Estimated Cost
150
Estimated Time Investment
Weekend Project (10-20 Hours)
Finish Used
Thompson's WaterSeal Stain & Sealer
Recommended Skill Level
Starter Project
Williams Sonoma Inspired Chicken Coop
We took some creative liberties on the Williams Sonoma inspired coop posted here. Because we don’t get a whole ton of sun in our backyard, we eliminated the herb garden planter and instead built a longer run. We also made the coop a bit wider to accommodate for the inevitable chicken math. And, you’ll notice the vent both shaped differently and is a bit higher. This was to increase air flow, avoid the dreaded draft, and to lend a more Scandinavian vibe. We also decided to place the chicken exit on the outside wall to allow for more living space under the coop itself. The project took about a month to complete, dedicated to only working weekends. And, it was very much over budget! Who knew wood is so expensive?! But overall, the outcome was even better than I expected. The chickens love it and I don’t mind looking at it!
P.S. this was a pretty advanced project. The fractions alone had me yelling “uncle!” Thankfully my husband is pretty handy, and my father-in-law (career in the construction industry) had a few pointers, so they took the lead in executing. I chose the paint colors and suggested the deviations from the original blue print. ;-)

Built from Plan(s)
Estimated Cost
$1000
Estimated Time Investment
Week Long Project (20 Hours or More)
Finish Used
Sherwin Williams Iron Ore in matte
Recommended Skill Level
Advanced
Comments
Wed, 11/18/2020 - 12:55
Thank you! Yes, I suppose…
Thank you! Yes, I suppose everyone is wanting wood for home improvement projects now that we're not leaving the house! Also, I didn't mean to post a picture of my son and his friends. Am I able to delete?
Thu, 01/14/2021 - 07:43
roof angle.
does this roof have the same angle as the 'Small Chicken Coop with Plans'? It seems to be 'less steep'. Wanting to start this project next weekend and trying to get my mind wrapped around everything!. Thanks.
Wed, 03/16/2022 - 09:53
Do you have a run side photo…
Do you have a run side photo? I am thinking about adding more run onto mine.....
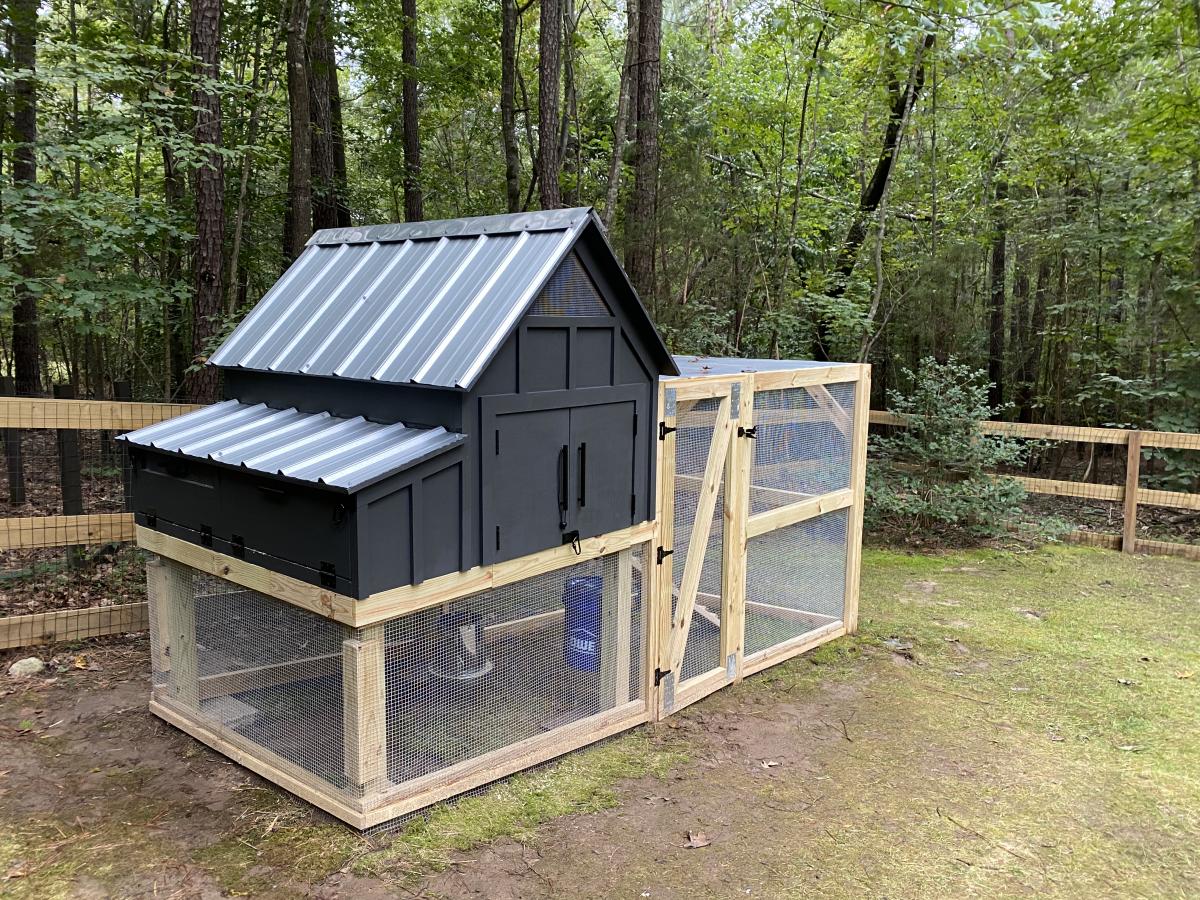
Larger A Frame Chicken Coop

A frame chicken coop with a few modifications- metal roof, insulation and slightly larger second floor.
By Chrystal
Built from Plan(s)
Kids table and chairs
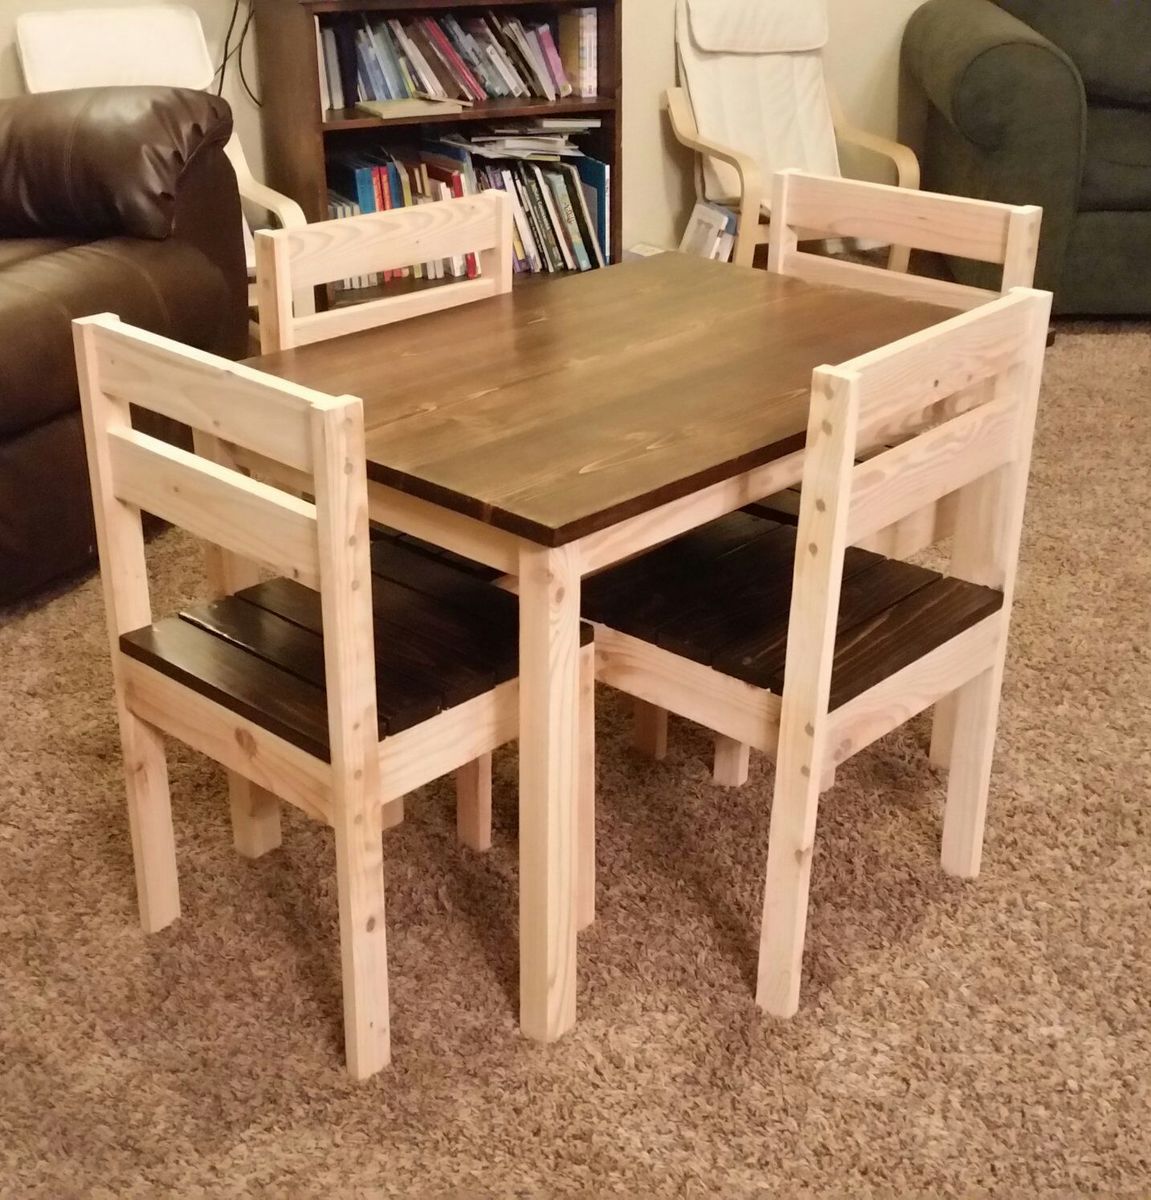
Great little project. Finished just in time for Thanksgiving.
Andy
Built from Plan(s)
Estimated Cost
50
Estimated Time Investment
Day Project (6-9 Hours)
Finish Used
Mirrowax, polyurethane semi gloss
Recommended Skill Level
Beginner
Comments
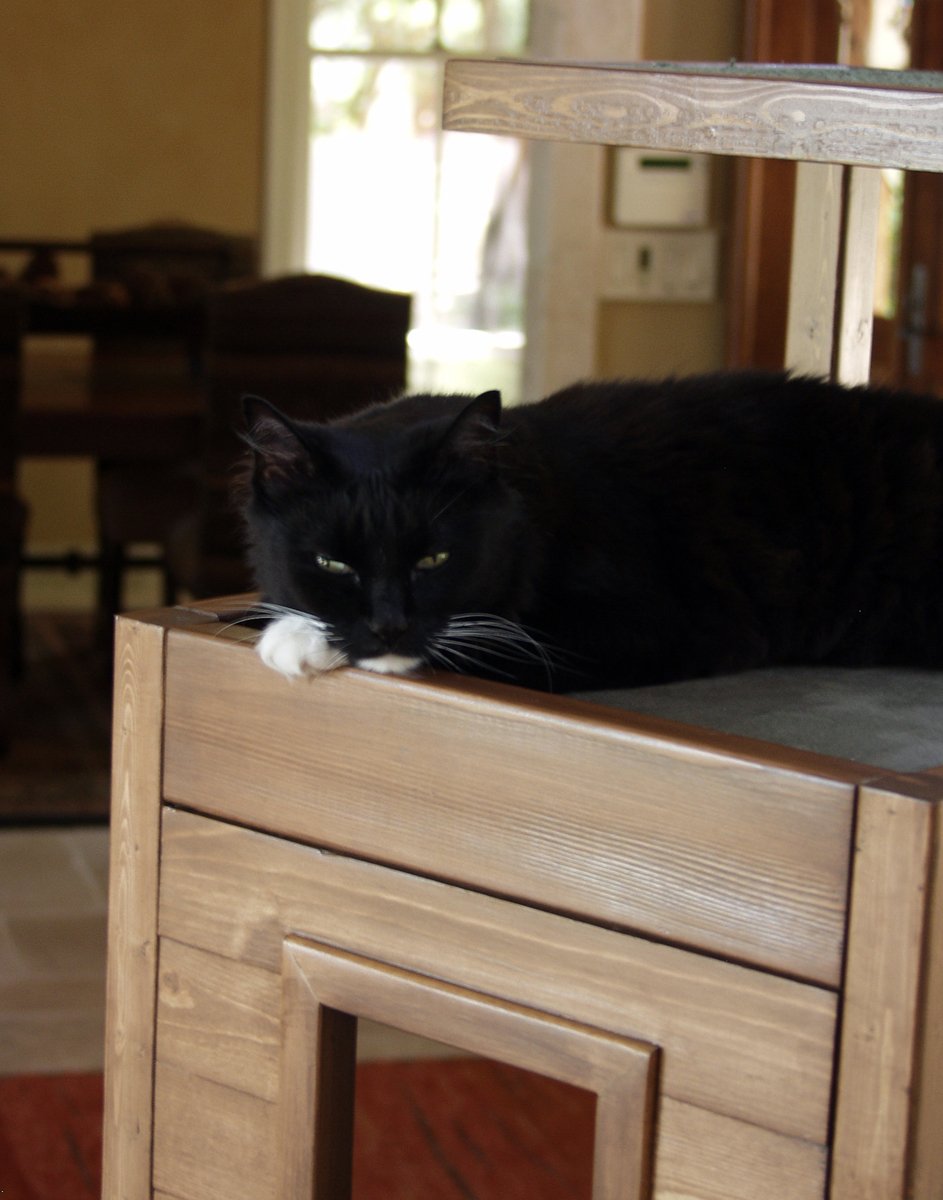
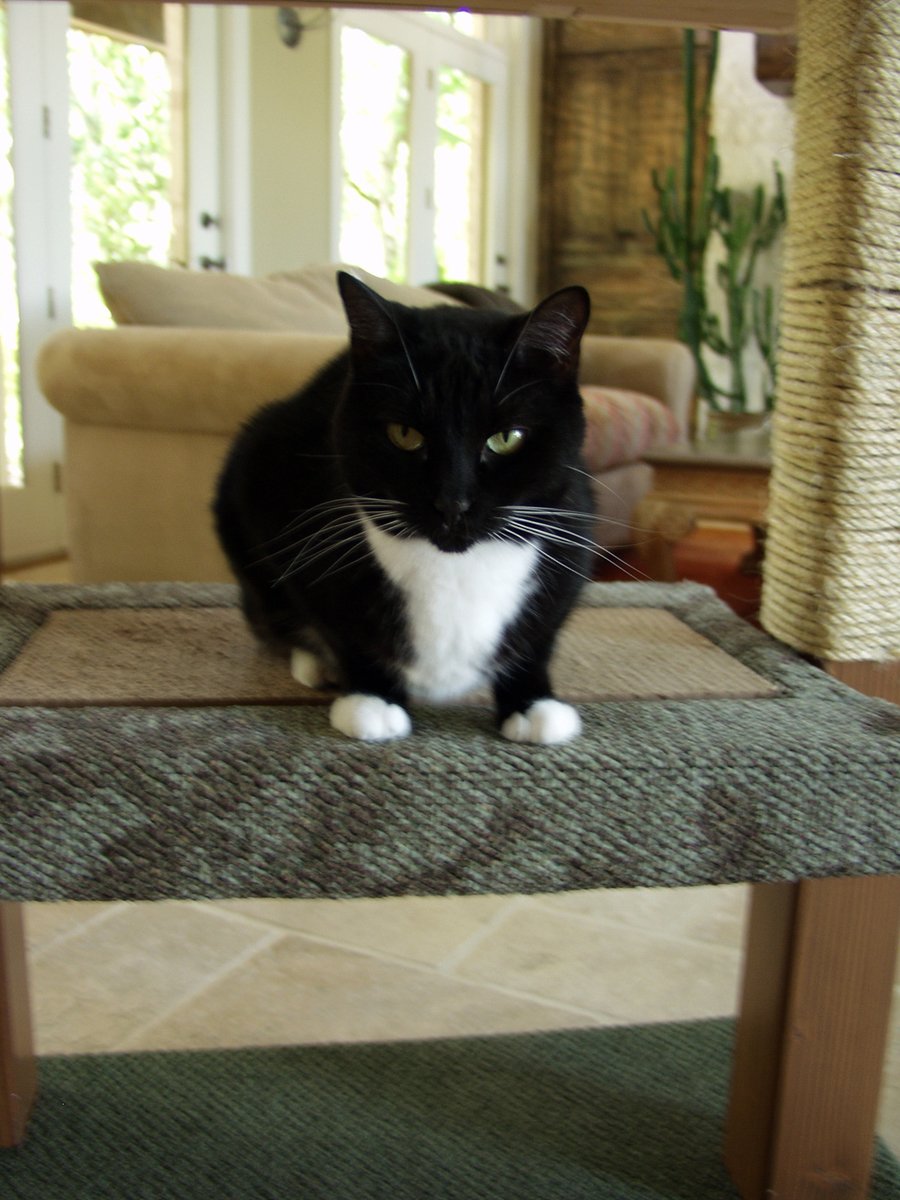
Cat Tree/Condo

I always wanted a cabin-type cat tree where my cats could crawl in and feel safe, but still have a great view of the birds out of a window. I tried to draw my vision on paper, but that had a hideous result. Learning Google SketchUp (at least the basics) was an absolute necessity. I could never have built this without drawing it in 3D first, and seeing how the boards would connect, etc.
For the scratch pad, I built a frame out of 2x4s on top of plywood, covered it with carpet, and dropped the standard size scratch pad in place. This is the cat's favorite feature. I put barn doors on the window with tiny hinges so that I can close for added privacy. The tree sits against a window so that the back side is totally open. I made cozy zippered cushions for the platforms (that can be taken off and washed). I covered the carpeted areas with spare carpeting.


Estimated Cost
Approx. $30 for can of paint, varnish and a 4x4 (all other was scrap material)
Estimated Time Investment
Weekend Project (10-20 Hours)
Finish Used
Combination of Minwax Water-based stains: 6 parts Colonial Pine: 1 part American Walnut, followed 3-4 coats Minwax Polycrylic
Recommended Skill Level
Intermediate
Comments
Fri, 07/12/2013 - 09:36
I love this
Would you mind sharing your dimensions for this? It is absolutely beautiful!
Sun, 08/25/2013 - 08:10
This is great!
Do you have the plans somewhere? I really want to build this (even got the okay from the hubby!) but I don't think I could do it without some serious guidelines...

Fri, 08/30/2013 - 15:55
Dimensions
First, sorry for the late notice; I just happened to look and saw the comments/questions.
I don't have plans...all I have is a google sketchup diagram that I created as a guideline for my construction (which is included in the photos), which is not to scale. Actual measurements are:
* Base (green carpeted base): 33.5" x 19"
* 4x4 legs: 35" tall
* 'Mezzanine' scratch pad level: 22" x 17.5"
* Mid-level base: 18" x 32"
* Enclosed cabin: 18.25" x 22.5" x 17" high
* Highest point: 56"
This has turned out to be a fantastic hit with the cats. They use all 5 levels, but the scratch pad and cabin are their favorite spots. If you need anything else or additional pics, please contact me.
Fri, 08/30/2013 - 18:15
Thank you!
Thanks for the dimensions, Joni! I'm trying to learn SketchUp so I can draw up my own plans, also. If I can't figure it out, I'll hand it off to my 12 year old, who is a pro at it (go figure). I know my cats will love it if I can manage to get it built!
Fri, 09/27/2013 - 10:15
we made one!
I used your pictures and diagram Joni and made one for my friend for her cats! I used 2x4's for the cabin which makes this thing so heavy but so sturdy! It holds my 60 lb child without budging... here's a pic of it almost done. My friend was not finished wrapping the posts with sisel rope though.
https://www.facebook.com/stephanie.brooks1975#!/photo.php?fbid=10151788…
Thu, 10/31/2013 - 14:30
That's AWESOME!
Bhoppy -- I looked at your cat tree on facebook. It's awesome! The sturdiness of it shocked me too. And I was initially worried that my cats might knock it down!!
The worst part of building it was getting that lower scratch pad level on straight with the 3 posts. I'd never want to do that again!
Thanks for sharing, Joni
Fri, 01/02/2015 - 01:18
Great Job!
Funny, almost every time I'm looking for ideas or inspiration when I want to build something, I end up back on this site. I was searching for pictures of cat trees and this was the only one that made me say "Holy crap, that's EXACTLY what I want!" My cat will love it!
Mon, 04/27/2020 - 20:41
Outstanding Tree/Condo!
Not sure if anyone is still around to see this, but I fell in love with this tree the second I saw it. Wondering if anyone created a detailed plan and might have it handy or possibly a detailed sketchup and wouldn't mind sharing the save file?
In the event nobody has either... I'm planning on having someone else build this for me as I don't have the tools nor skill to do it myself. I have a few questions:
1. The tree base/platform, what's a good recommended thickness?
2. The platform for the scratchpad... is there any certain reason it's so much thicker compared to the other platforms?
Thanks.
Sun, 09/12/2021 - 11:51
Reverse engineering
Reverse engineering this project, using just 2x4s. None of the photos show the undersides. How are the plywood pillow bases attached for the top and bottom of the cabin? and the base of the top viewing platform?
Sun, 09/12/2021 - 16:42
Stains do not exist
There are no Minwax water based stain colors with those names that I can find.
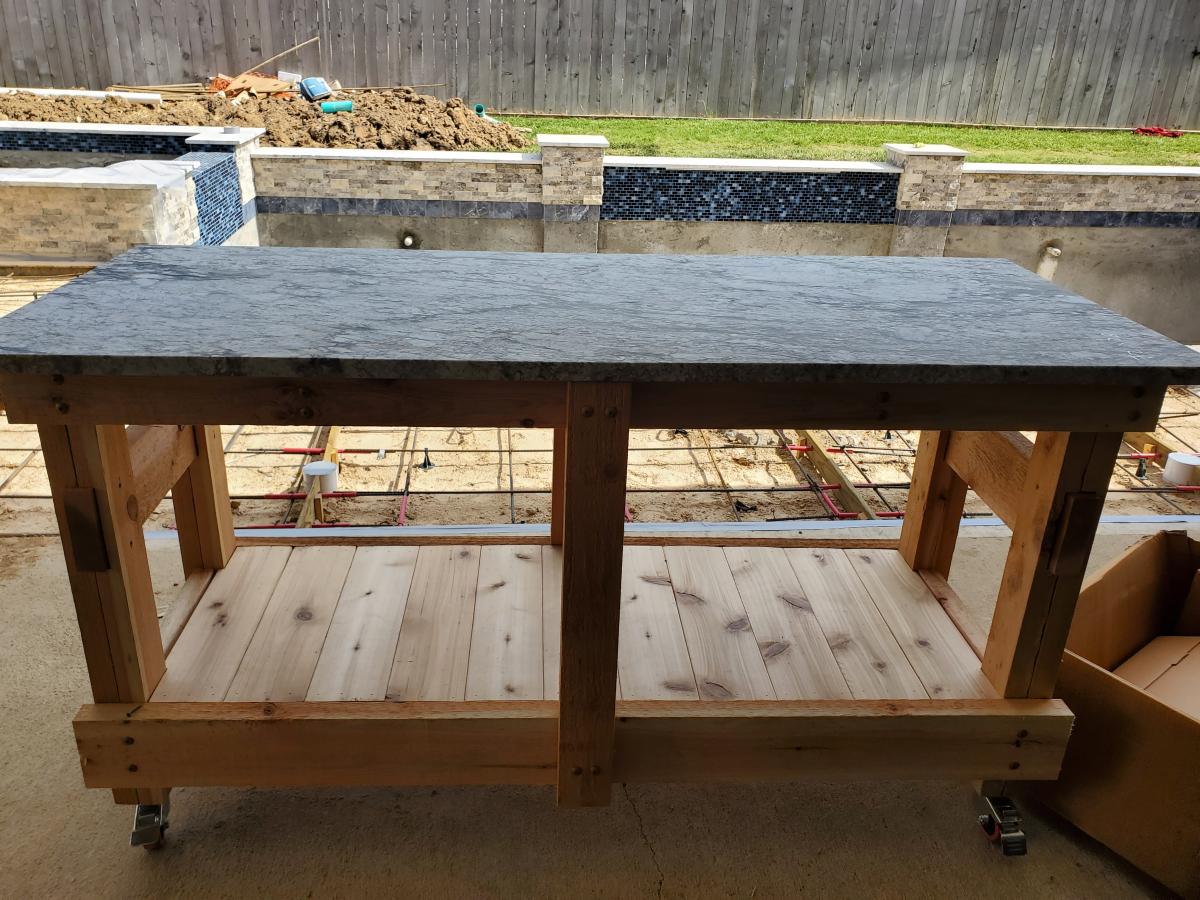
Outdoor rolling bar top
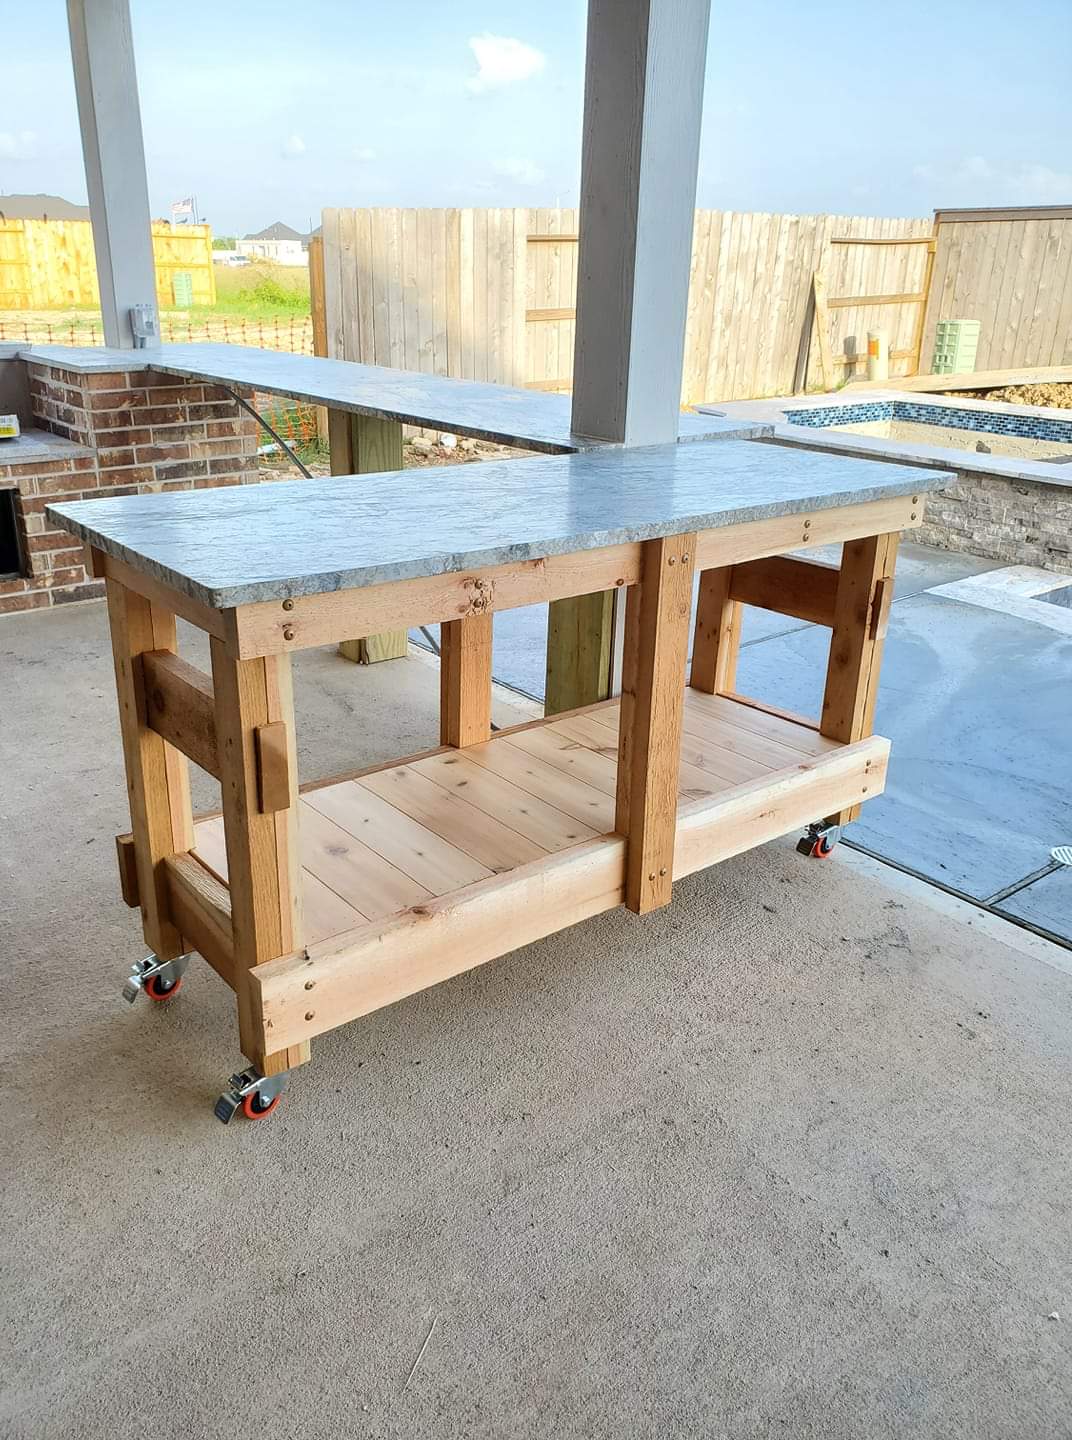
We had some leftover granite from an outdoor kitchen build and wanted to maximize the use of it. We loved the look of a rustic table from Pottery Barn and set out to find something that was asking the same aesthetic. I came across the Jilly and Mia workbench console and thought it would work great with some minor modifications. I shortened the overall length and height, went with some heavy duty casters to support the weight of the granite, and reinforced the cross beams that would support the 3/4" plywood sheet and granite. I went with cedar for this build since it was outdoors and I'll finish it with a clear sealant.
Built from Plan(s)
Estimated Cost
$300
Estimated Time Investment
Day Project (6-9 Hours)
Recommended Skill Level
Intermediate
Comments
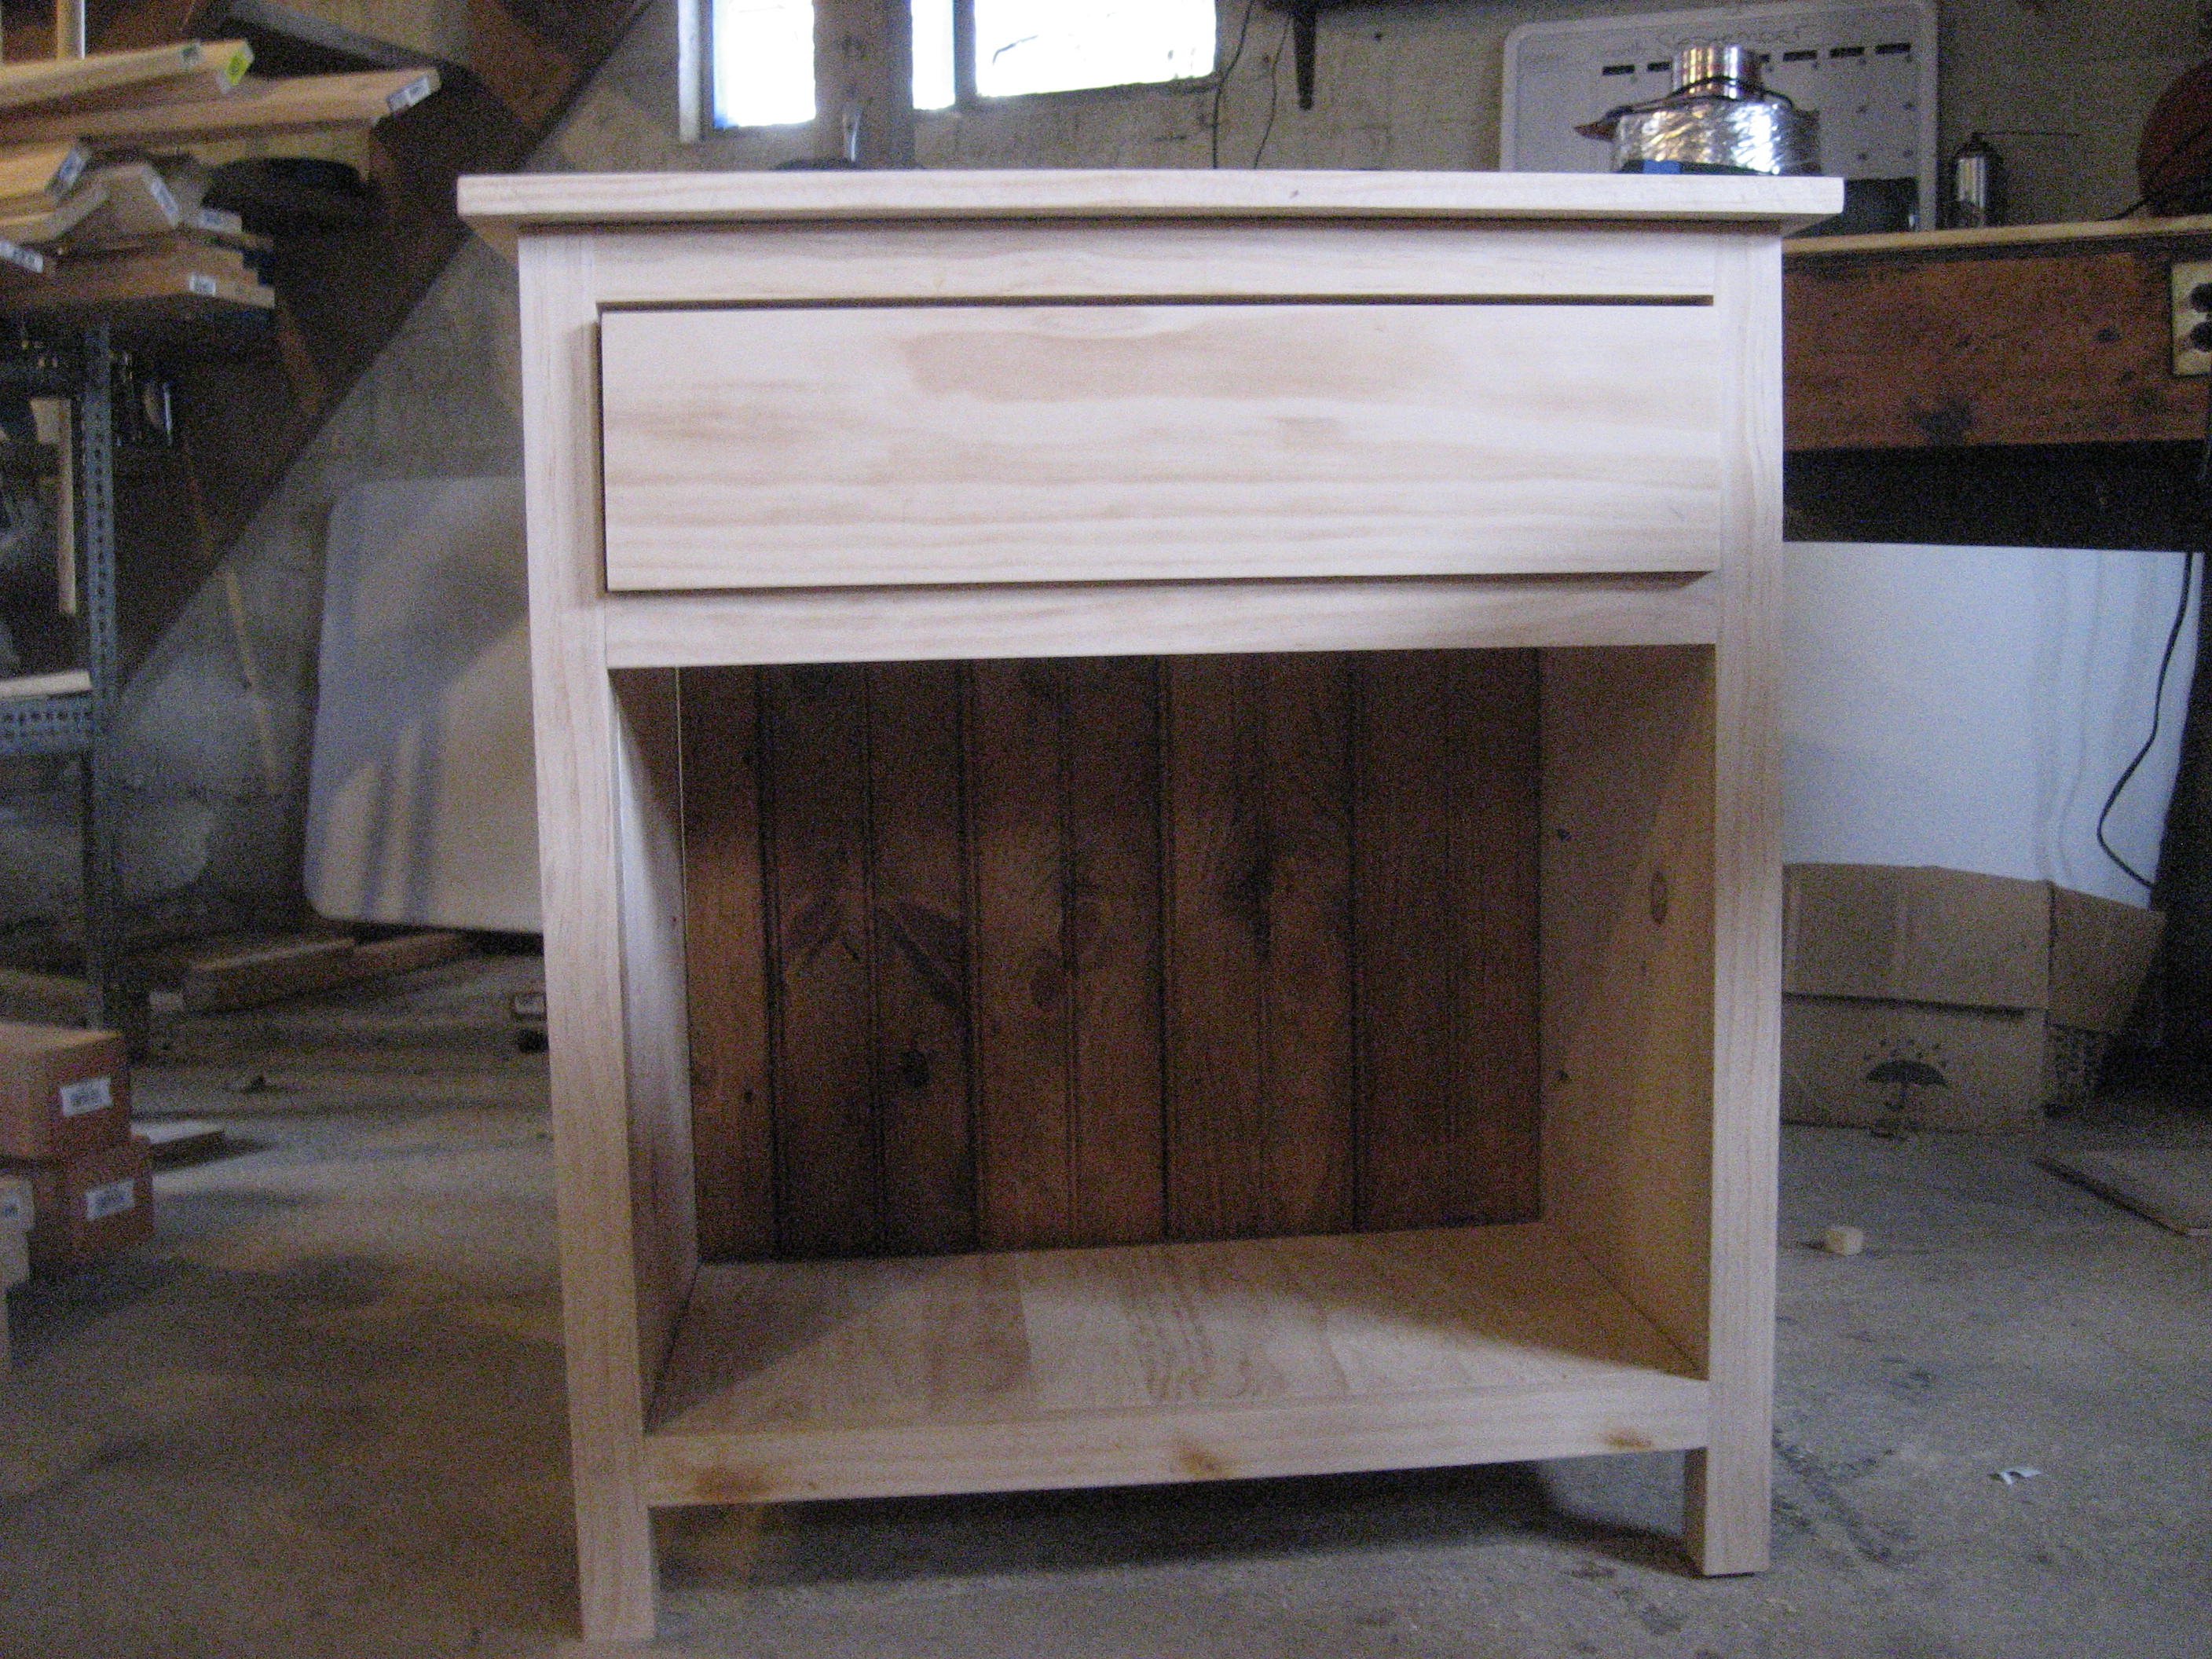
Laundry Station

We followed these plans, but instead of building two cabinets, we combined them with one side in the middle. We also used pine planks on top. The sides are painted with chalk paint, and the top is finished in dark wax.
Built from Plan(s)
Estimated Cost
$200
Estimated Time Investment
Afternoon Project (3-6 Hours)
Recommended Skill Level
Beginner
Comments
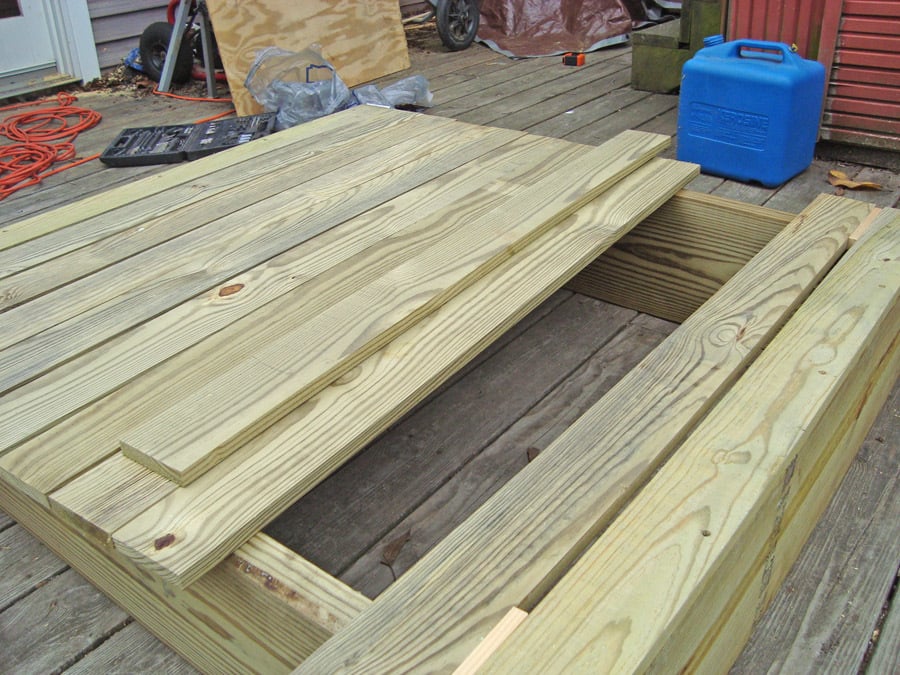
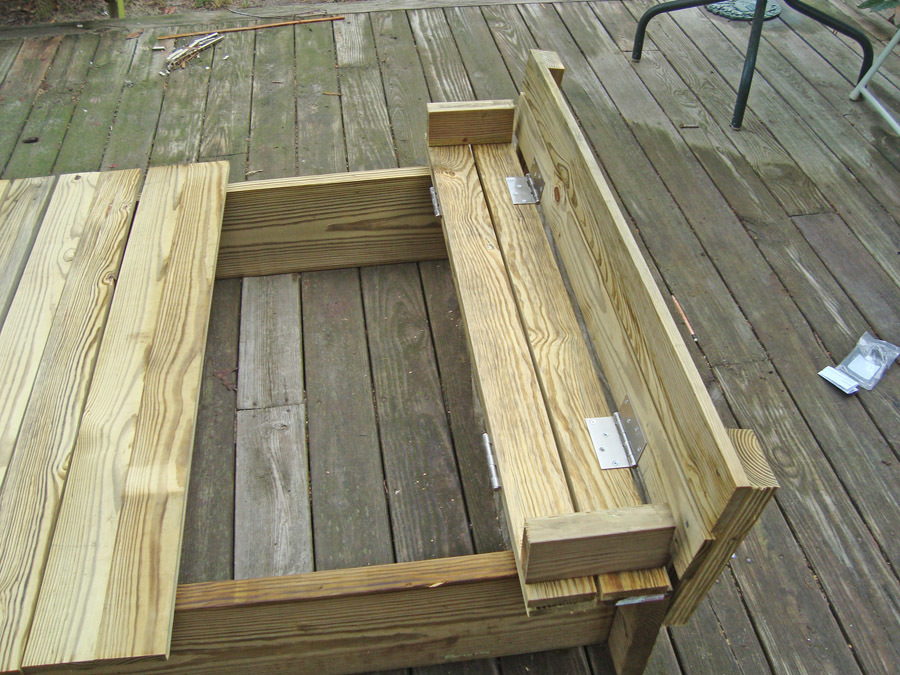
Sandbox with Built-In Seats
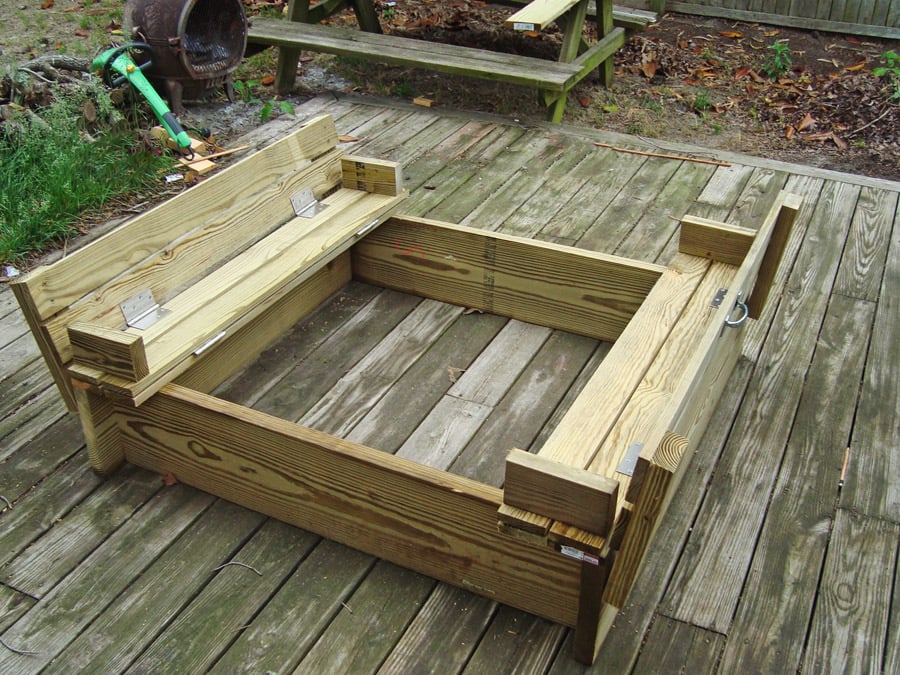
This is a fun project even for beginners. If you have an interest in building a sandbox, and have some tools, I'm sure you can make this easy enough!
I used 2" X 10" wood for my sides instead of the 1" as the plans call for. This gives extra strength and more depth. When you use 2" wood, you will have to turn your 1 X 4's the other way to match the 47½" width, because with the added width of the 2 side boards, your new width is now 49¼". It's not difficult, you just have to match your 1 X 4 X 47½ boards to the proper width. It will turn out fine, they just won't match the plans or pics of those using 1 X 8's for sides.
Sorry, I'm delivering this to my grandson's house for his birthday present, so no sand, but use landscaping cloth under this sandbox, then fill with sand.
One other thing, I'm toying with the idea of matching the angle the backrest is at and re-cut new pieces of 7½" arm rests. I think that may look a little better than the rectangle blocks.
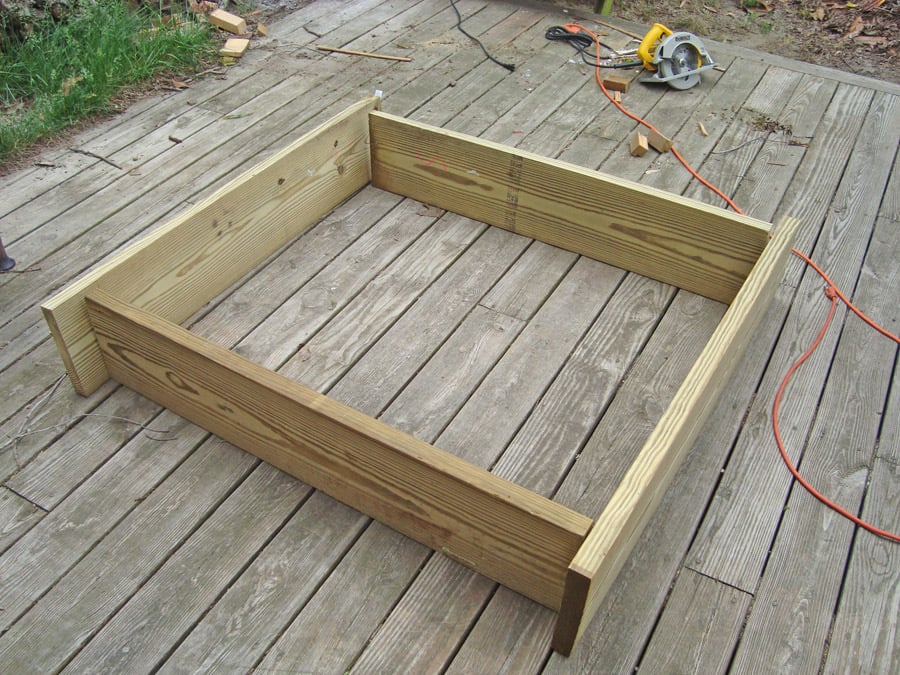
My added pics are as follows:
1. The side boards all cut, and sizing up the frame.
2. All other boards are cut; I laid them out for fit before screwing the pieces together.
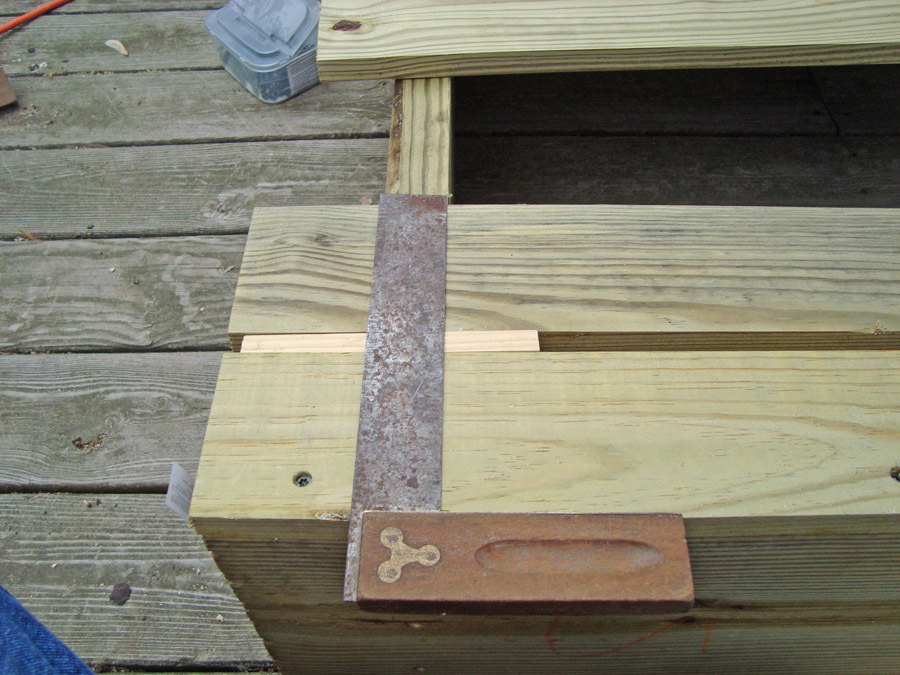
3. Using a square will help you keep everything at the correct angles. Also note in this picture and the next where I used two ½" pieces of wood I ripped to keep the ½" spacing uniform. Just rip any wood to the ½" width, make 2 pieces and butt against the next board on both sides, then screw them down. Makes it VERY easy to keep a uniform gap.
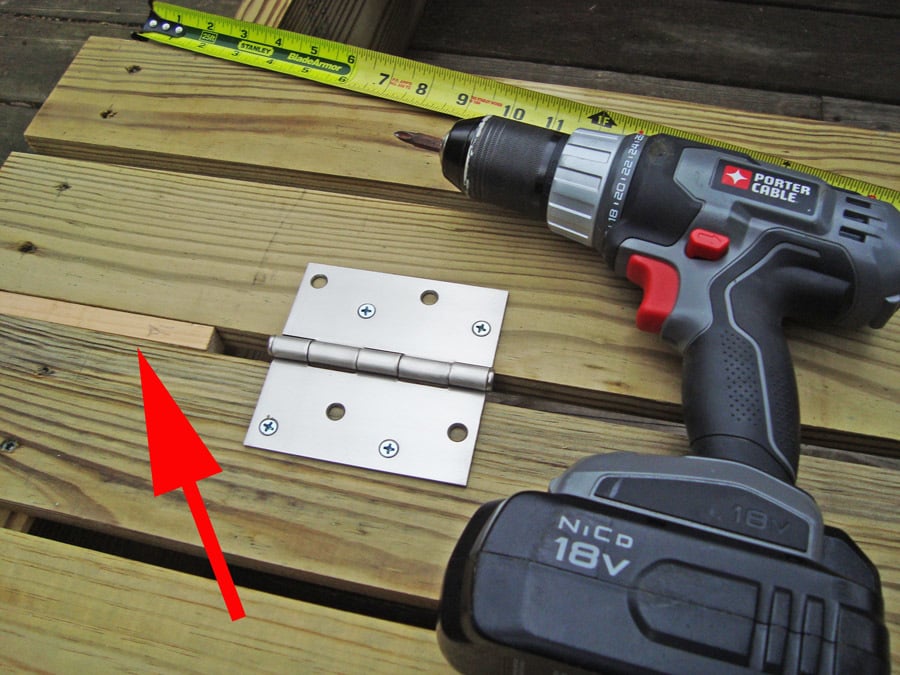
4. This picture shows me using the same "spacer" when putting the hinges in place. The red arrow points to the wood spacer.
5. The first bench is complete, and working fine!!
With the wood I used in my project, I used 2½" self tapping deck screws for the frame and attaching the 1X4's to the frame; I used 2" galvanized for attaching the 1X4's to any 2X4's; and for the hinges, I used ¾" wood screws. Using these sizes prevented the screws from coming through the other side.
I bought everything needed in this project at Lowe's and it was under $90 in costs; this is all the lumber (upgrading to 2 X 10's), hinges, screws, and handles.
Estimated Cost
$90 - Everything purchased new at Lowe's
Estimated Time Investment
Afternoon Project (3-6 Hours)
Finish Used
This is a gift, so I'll leave it to my daughter and son-in-law to use fence or deck stain to match their house. All pics are un-toned raw pressure treated lumber.
Recommended Skill Level
Beginner
Comments

Wed, 05/09/2012 - 16:25
Yay, you figured it out!
I was just going to tell you how to add a brag blog when I saw that you'd already done so! YAY! Your sandbox looks awesome! You guys are all making me wish I had a tolerable yard to put a full-sized box in!!!
In reply to Yay, you figured it out! by Lady Goats
Thu, 05/10/2012 - 13:49
Yeah, you made the plans easy
Yeah, you made the plans easy to follow. It was a lot of fun. I spanned it over 2 days, but still was only around 4 hours of work.
I'm considering cutting the "arm rests" at an angle to match the slope of the back rest. I may play with that this weekend.
Thanks for all the help!
Also, what did you use to make the sketch type pics for the plans? I know you mentioned something about not knowing how to put the hindges on them. If I can help, I can probably do it for you in PhotoShop.... Just let me know.
Thanks again!
Loral
In reply to Yeah, you made the plans easy by Loral
Thu, 05/10/2012 - 14:07
I used Google Sketch-Up
And didn't even think of putting the pics in PS to add the hinges. DUH! Thanks for the idea! ;-)
What do you mean about angling the armrests? So they sit right on the back, instead of the gap?
Thu, 05/10/2012 - 15:42
New Arm Rests
Something like this:
http://www.loraljohnson.com/sandbox/NewArmRests.jpg
I cut these at a 10º angle on both ends and 8" long.
Now, how did you make the "plans" images?? :)
Loral
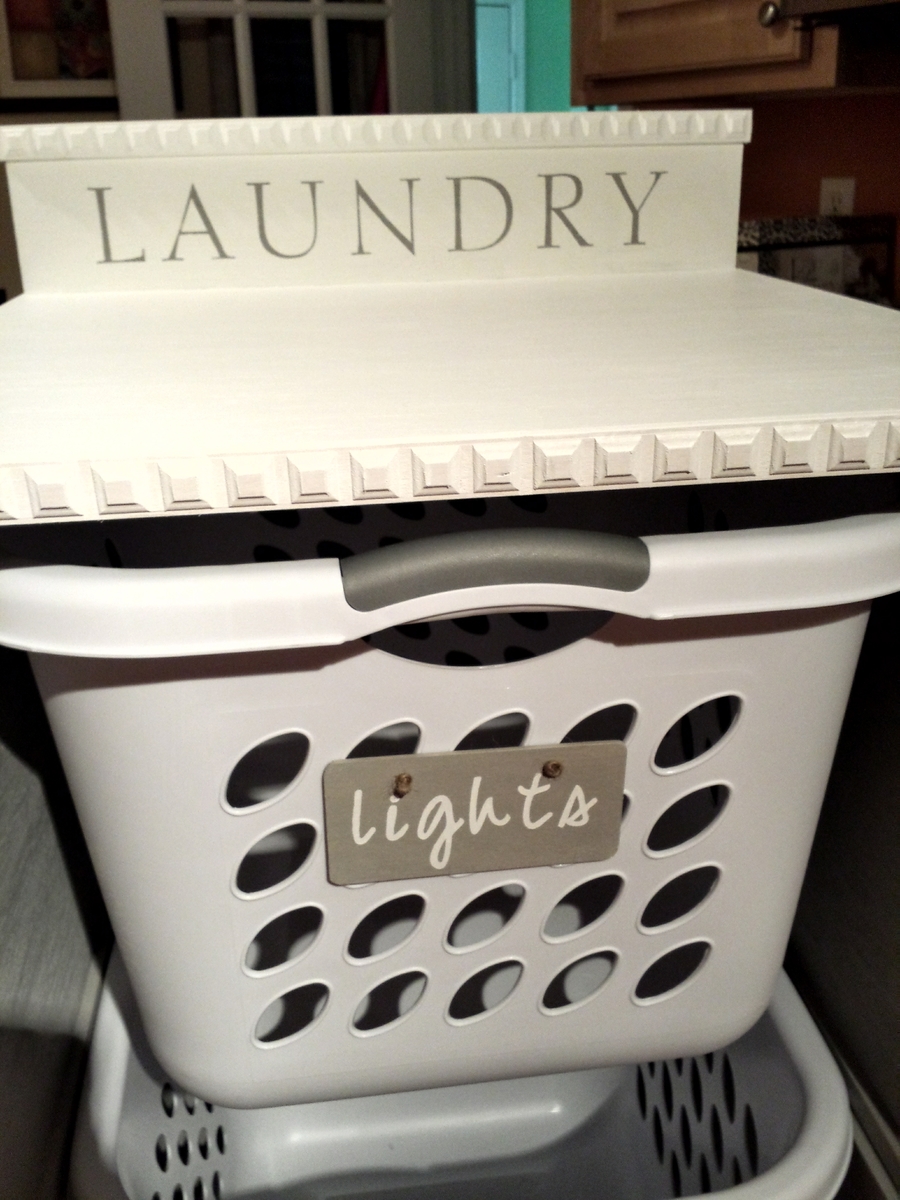
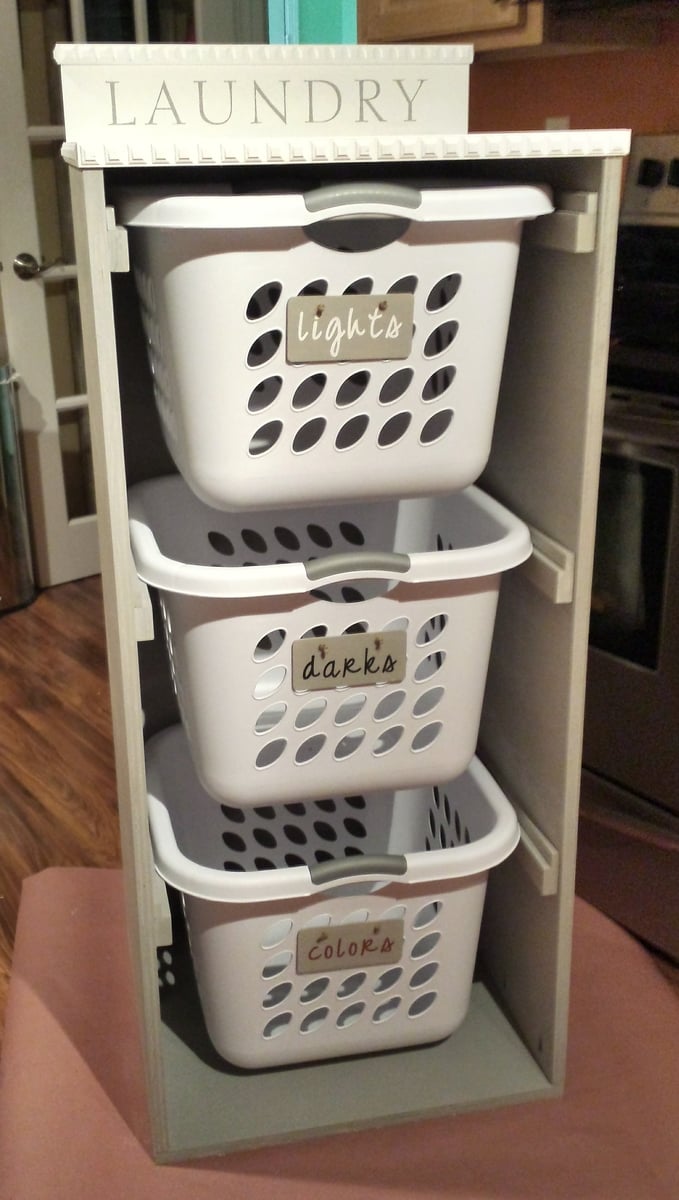
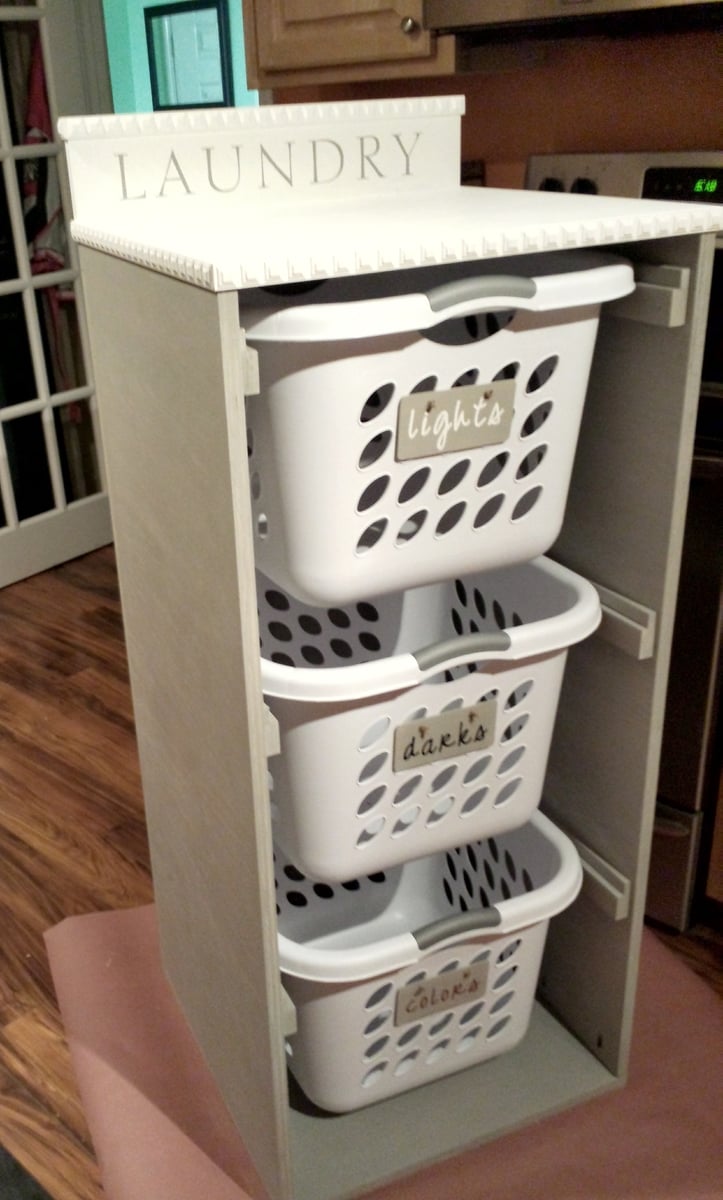
Brook Laundry Basket Dresser
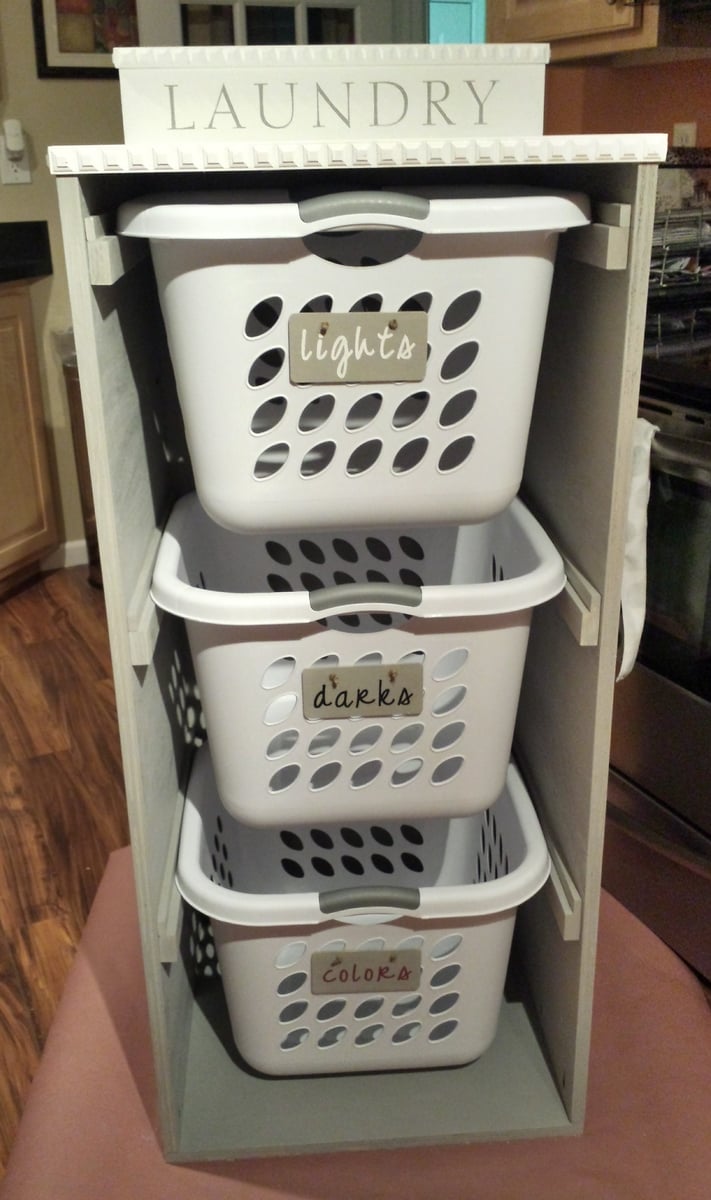
Used square laundry baskets instead of regular rectangular baskets. The square ones aren't as deep but are a bit taller so I had to modify the plans. I added a backsplash and some wooden tags to the baskets to designate them for certain colors. I also added some decorative trim and finished the bottom in a gray stain and used white chalk paint for the top.
Built from Plan(s)
Estimated Cost
$70
Estimated Time Investment
Day Project (6-9 Hours)
Finish Used
Weathered gray stain
White chalk paint
White chalk paint
Recommended Skill Level
Beginner
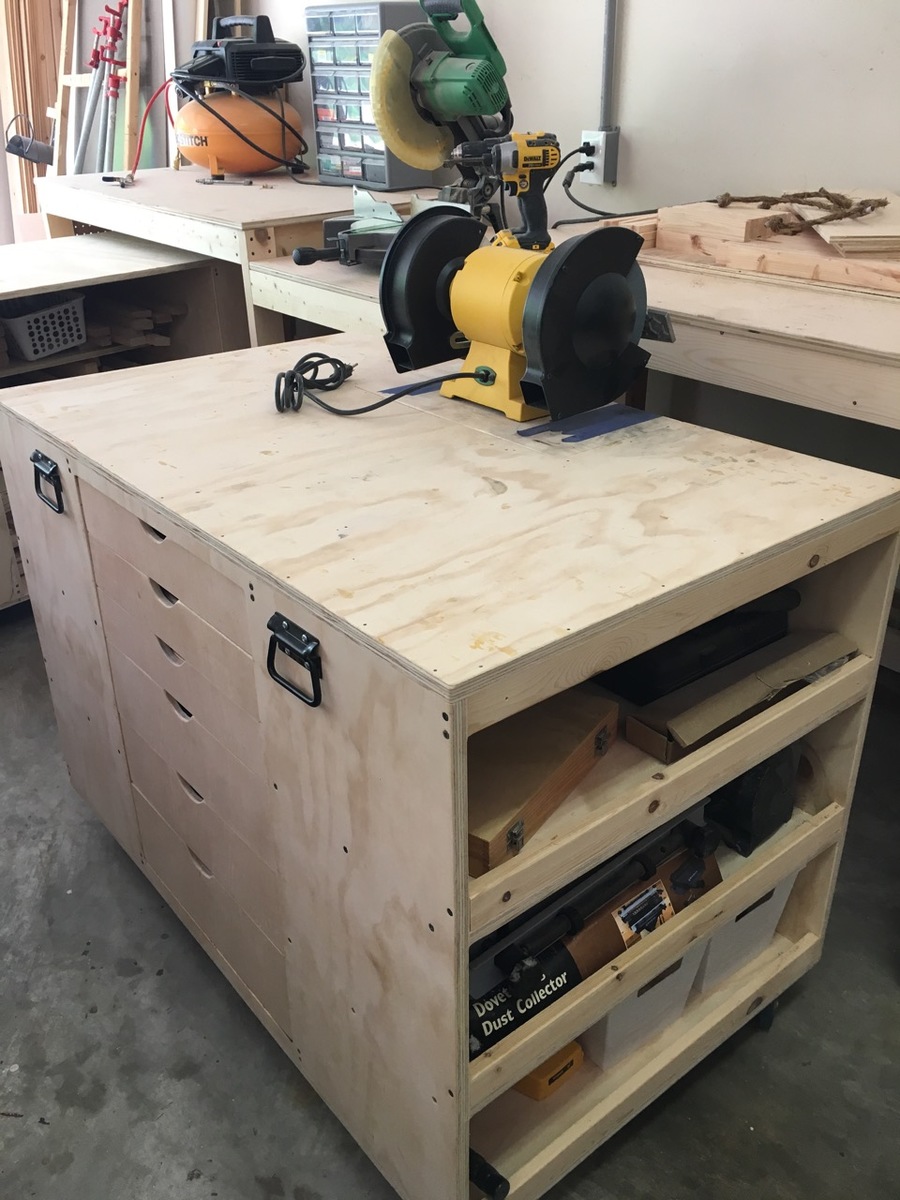
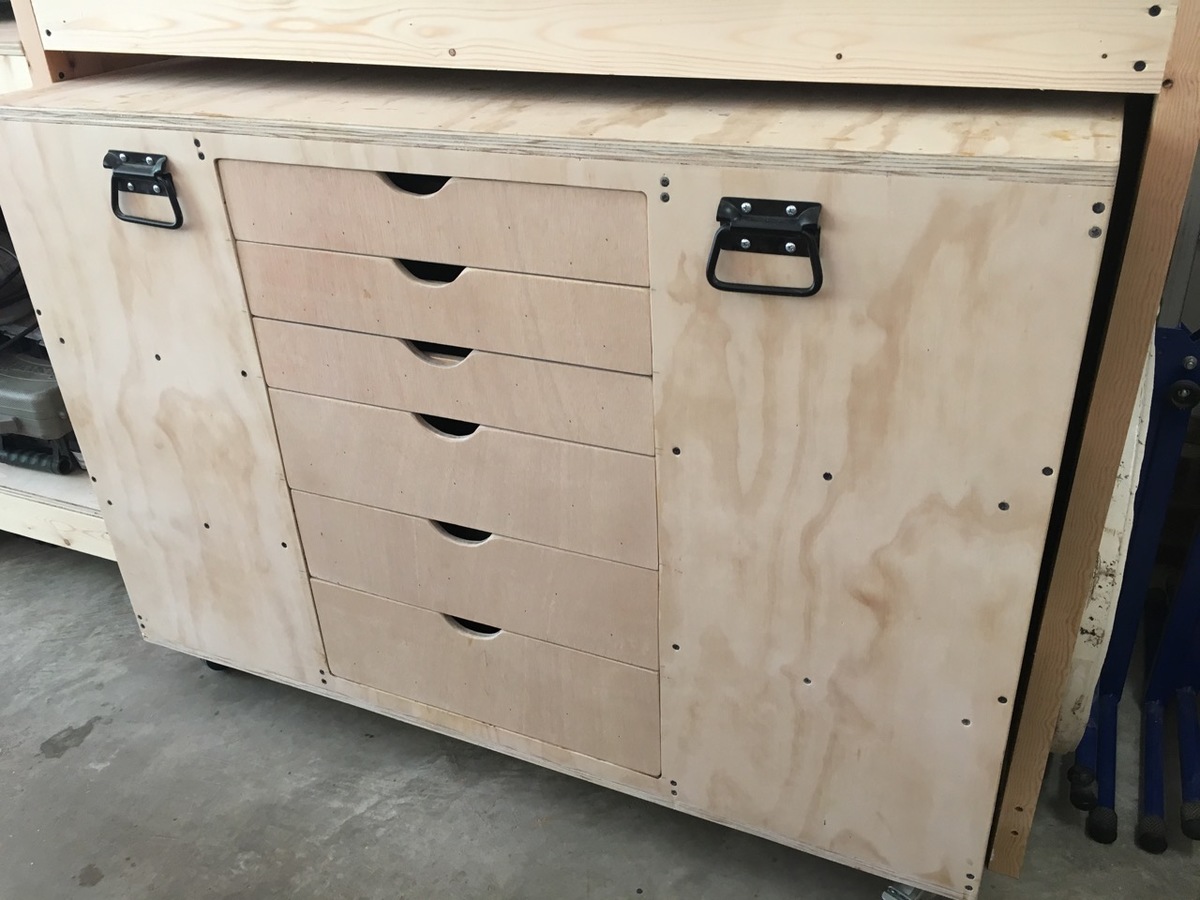
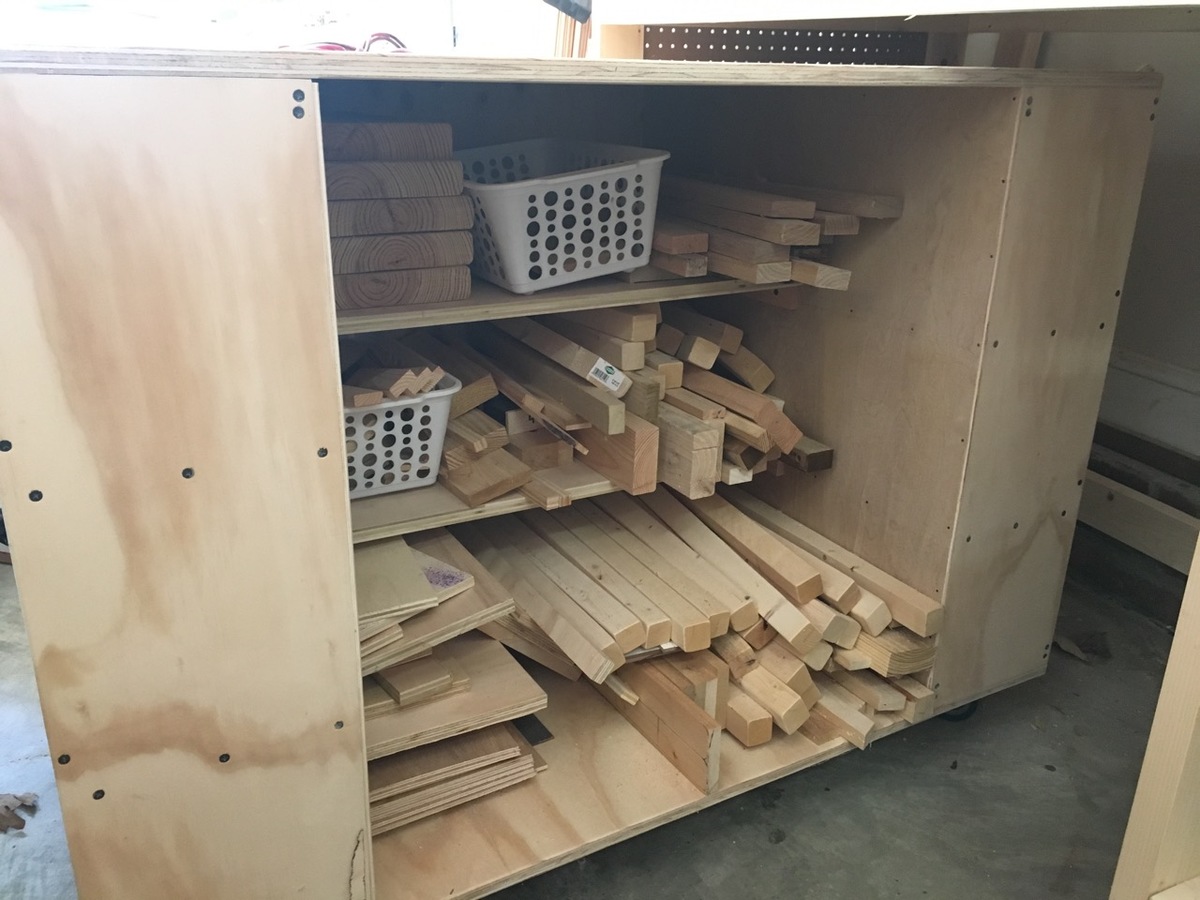
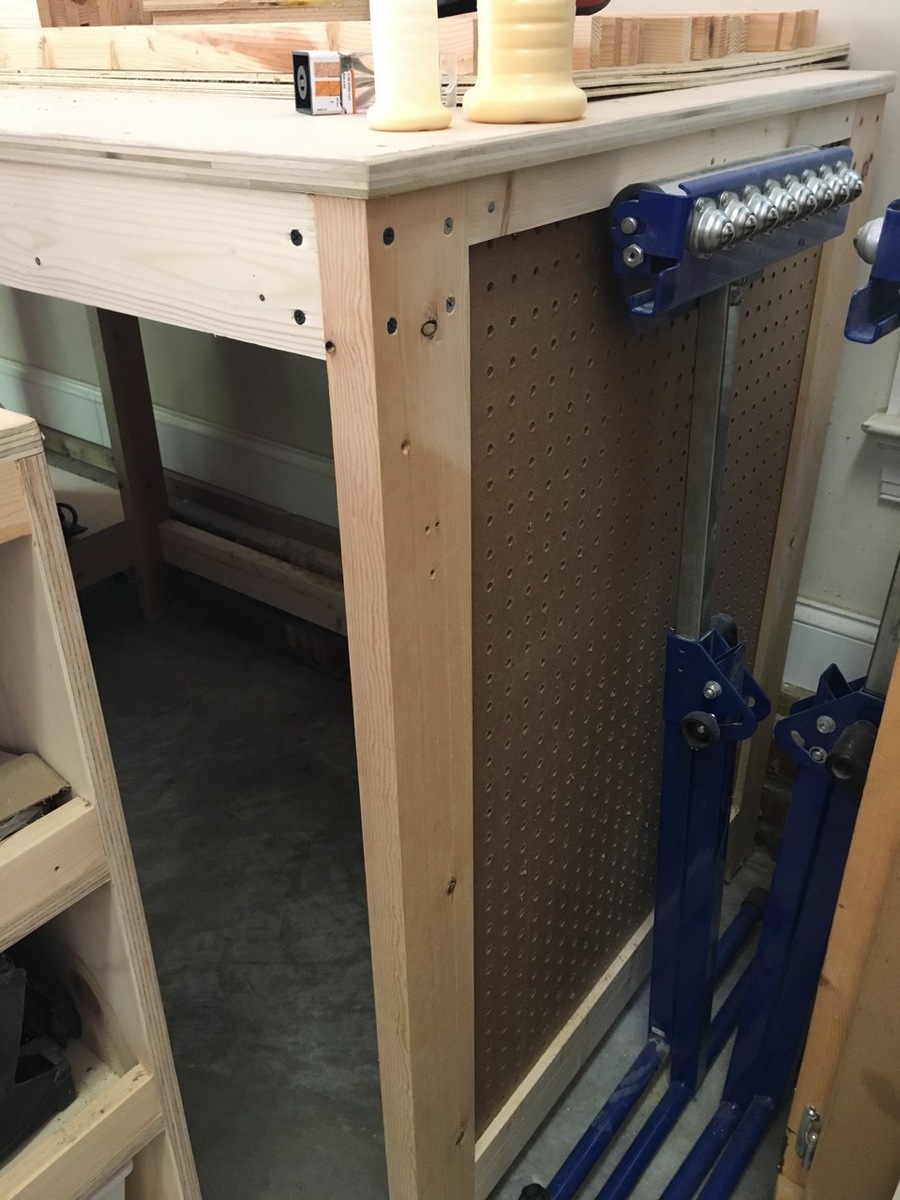
Miter Stand and Rolling Storage Carts
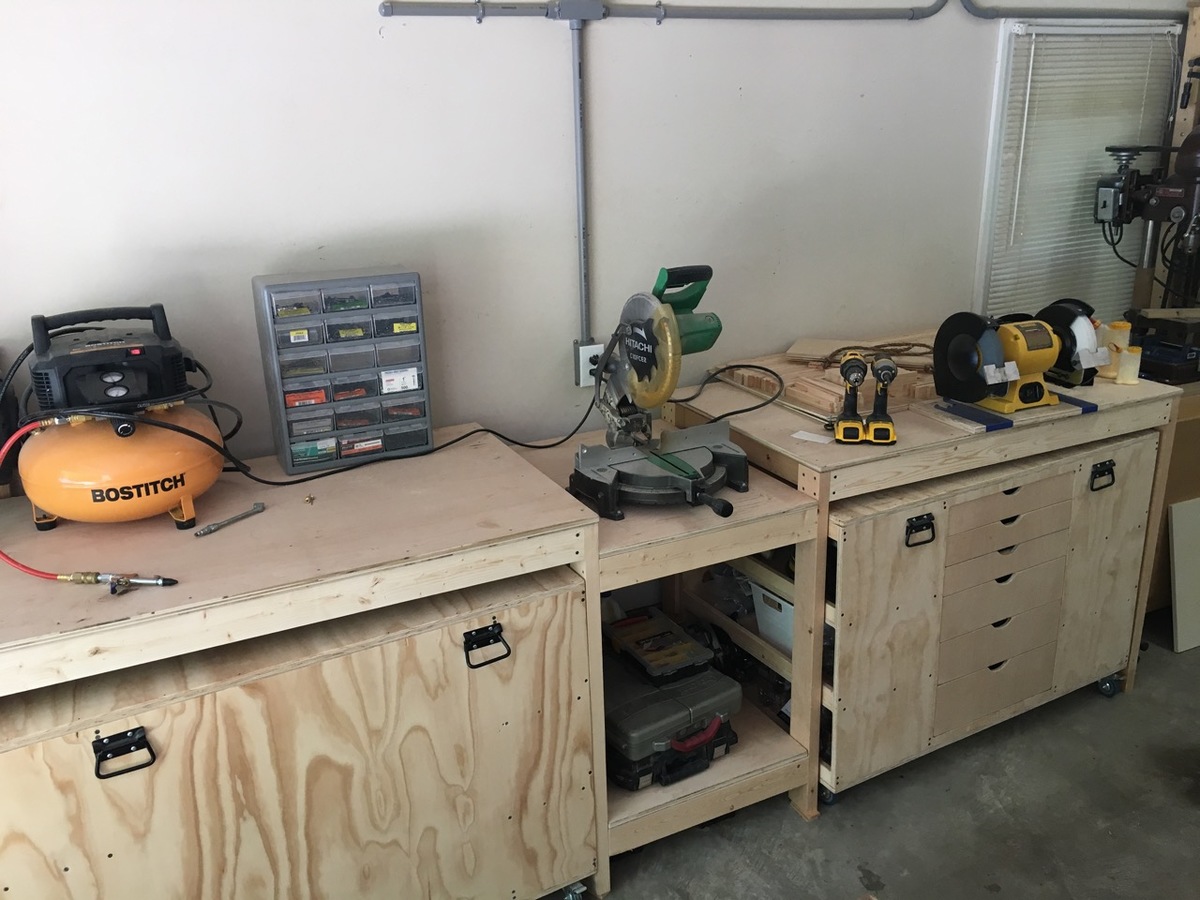
I'm so happy that I found the plans for Ana's miter stand and rolling carts! It was just what I needed for my garage shop... so everything can be organized and stored compactly but things can pull open and expand when I have a project (which is all the time, actually).
The actual miter stand was super easy to build - the carts took a few days working non-stop (when the kids permitted).
I made a few obvious changes from the plans:
-made deeper shelves on one of the carts
-added drawers on one of the carts
-added ped board on the end caps of miter stand
Something I didn't consider before building this was the slope of our garage floor. There's a 3" difference from one end of the legs to the other so I had to use riser blocks to get everything perfectly level. Unfortunately there's no way to level the carts as they aren't stationary but they slide in/out just fine.
I'd recommend this build to everyone! Check Home Depot clearance often for deals on plywood!

Built from Plan(s)
Estimated Cost
It's hard to say as I used wood I had on hand, tried to buy clearance, etc. I'm estimating $200.
Estimated Time Investment
Week Long Project (20 Hours or More)
Finish Used
None
Recommended Skill Level
Intermediate
Comments

Wed, 02/07/2018 - 11:35
I cannot find the plans
Would you be able to share the original plans? It seems that once the contest ended, the links to the plans stopped working.

Simple Outhouse
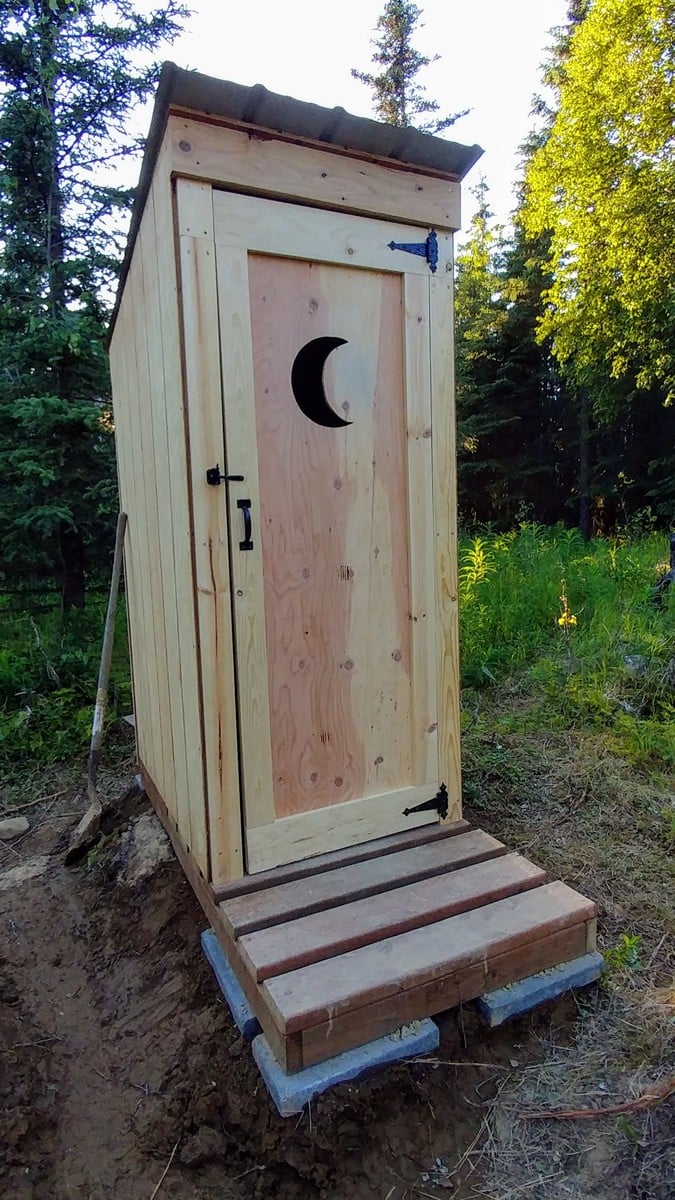
I built this outhouse to go with a dry cabin I'm working on, and also as an emergency backup for my house. I used treated lumber on the base/deck and splurged on T-111 for the siding. I wanted to use greenhouse polycarbonate for the roof, but found a piece of metal roofing in my shed that was exactly the right size so I used that instead. I thought about doing a fancy cutout on the door but ended up going with a half moon because it was easy. I'm thinking about cutting out stars of different sizes all over the rest of the door to let in more light. I'll trim and stain it next summer.
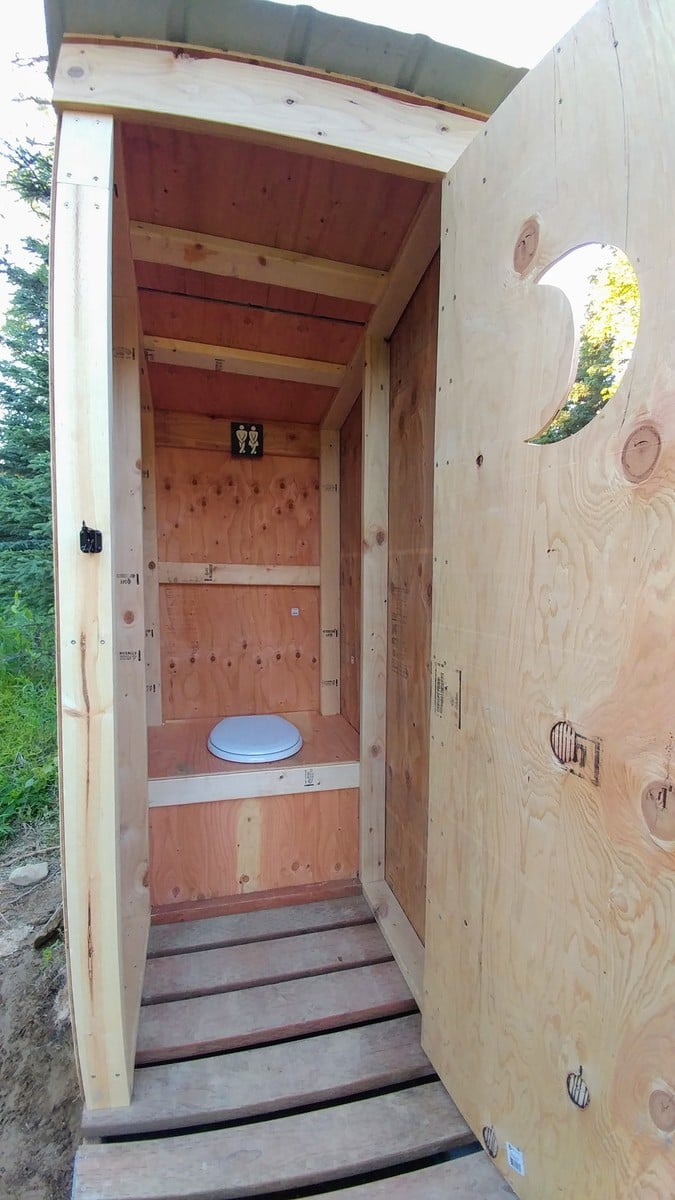
Built from Plan(s)
Estimated Cost
$450 - I used T-111 which is $40/sheet here in Alaska. I also used treated lumber where recommended and stainless steel screws.
Estimated Time Investment
Weekend Project (10-20 Hours)
Recommended Skill Level
Beginner
Comments
Farmhouse Railing Upgrade - by Sara and Chris
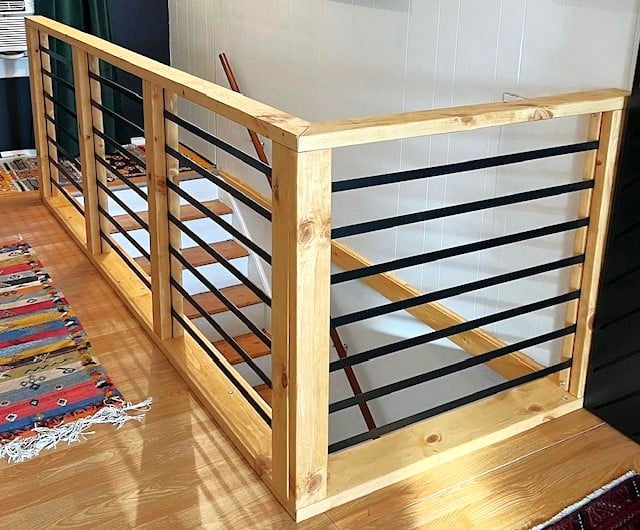
Amazing stair railing upgrade shared by Sara and Chris!
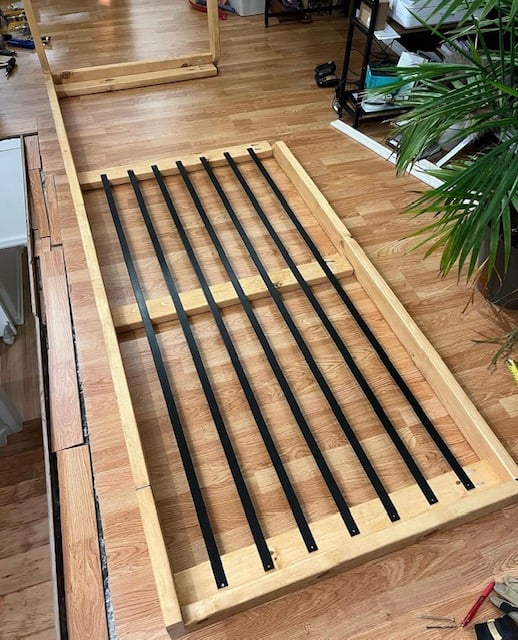
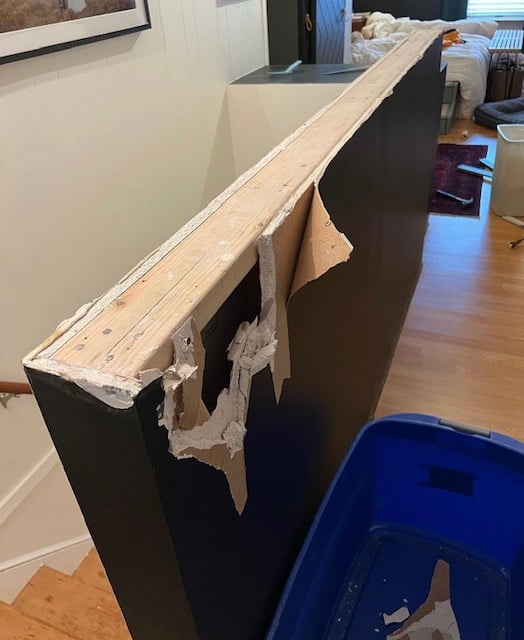

Built from Plan(s)
Sandbox with built-in seats
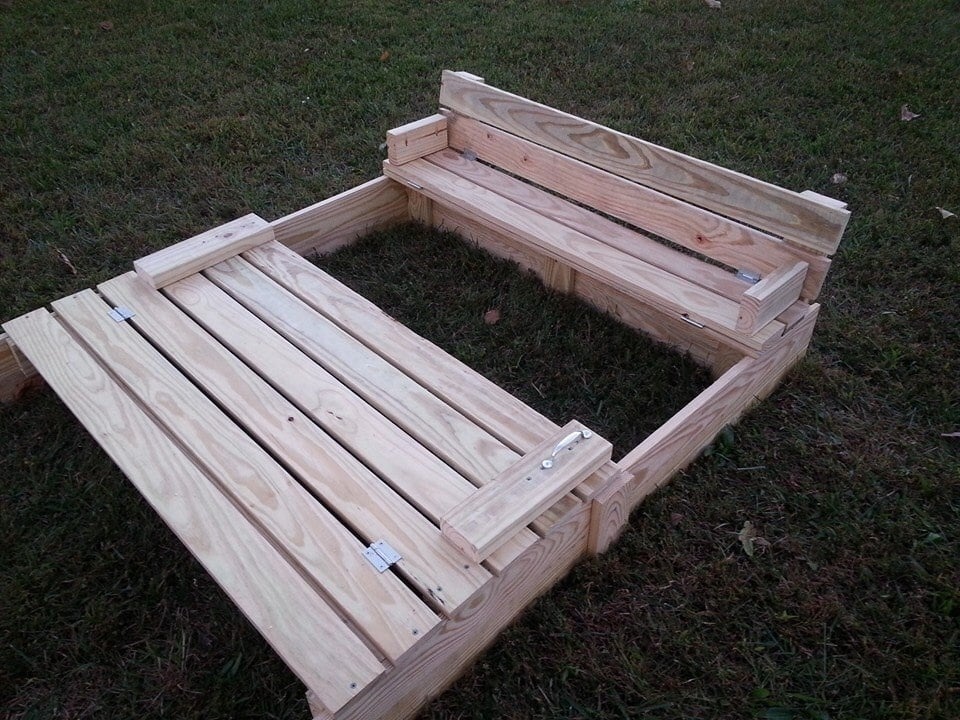
I modified this a tad from the original plans to suit my needs. I will eventually be adding a platform with attached slide and swing set.
Plans were easy to follow. My store didn't have 1x8's so I stacked 1x4's and used my Kreg jig to join them together and then I added extra bracing.
I had seen this on Pinterest a couple years ago and thought it was the coolest thing! Io excited I was able to build it myself!
Built from Plan(s)
Estimated Cost
About $40
Estimated Time Investment
Day Project (6-9 Hours)
Finish Used
None yet. I will stain and seal everything when I get the entire play set finished.
Recommended Skill Level
Beginner
Truss and Beam Table by This Rustic Soul

Kitchen Island with Farmhouse Table Top

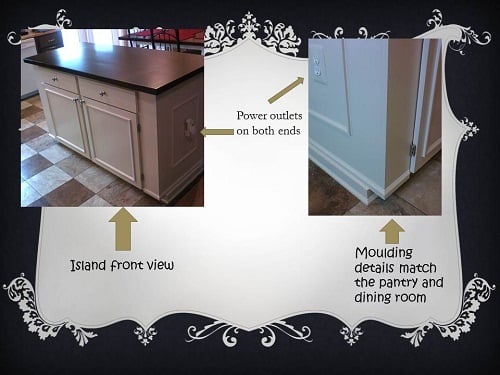
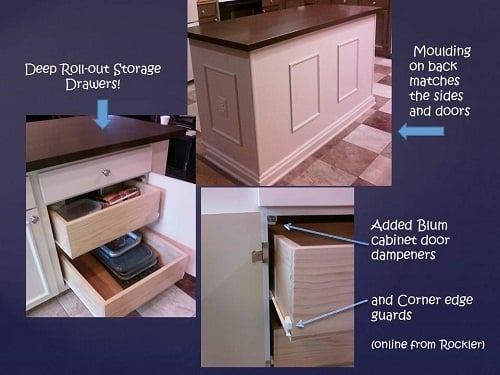
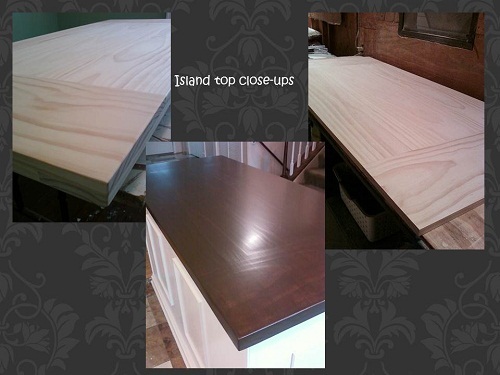
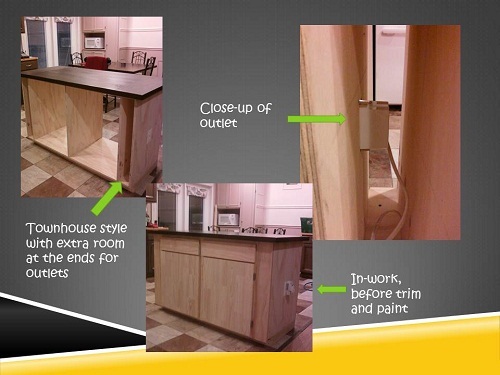
I’ve wanted a new island for awhile but wasn’t quite sure what I wanted it to look like, until I saw Ana’s cabinet plans for the Momplex kitchen! We wanted a fairly large island, so we did two 24” base cabinets “townhouse style” (from Ana’s Kitchen Cabinet Base 101 post) plus we added a little extra space at both ends, so Hubby could install some electrical outlets and we’d still have plenty of room for the drawers. The old island had power already, so he got the outlets wired pretty fast. Behind the doors are some deep pull-out drawers to hold all the stuff you’d usually have to bend down and reach for. Now it’s so convenient! I built a Farmhouse Table top for it and love it! We built flat doors and trimmed them up to match the island sides and back (also matches our pantry and dining room). This project took us about 40 hours to build and finish, and it was so worth it! Ana, you are a rockstar in our house! We now have a real showpiece for our kitchen, thanks to Ana White!
Built from Plan(s)
Estimated Cost
$550
Estimated Time Investment
Week Long Project (20 Hours or More)
Finish Used
Cabinet: 3 coats of Ace Royal semi gloss in Crushed Peanut, sanded between coats. Top: 2 coats Minwax Color Express in Walnut (1st coat brushed on, 2nd coat rubbed on), plus 3 coats of Minwax Oil Modified Water Based Polyurethane in Satin (sanded between coats); and on the drawer boxes, 2 coats of Minwax Polycrylic in clear satin (the clear water base poly doesn’t add any color to the natural pine)
Recommended Skill Level
Intermediate
Comments
Fri, 03/30/2012 - 21:14
Absolutely stunning! I'm in
Absolutely stunning! I'm in the process (sooo sooo close to being done) of making a banquette seating area with the creamy colored drawer base and the top stained in walnut. I put the same half round trim on my drawer fronts too. I saw a vanity on display at Lowes with this detail and had to copy it. I love the look! I am also building a trestle table from plans from www.thisoldhouse.com to match. I bought some beautiful matching chairs from Target.com. I can't wait to get it finished. I'm about to go paint the drawers right now. The table components were just primed 15 minutes ago. :-)


Sat, 03/31/2012 - 08:04
Thank you!
Brigitte and Pam, thank you very much for the nice comments! :) I'm having a ball building projects from this site. This is our favorite one so far (we say that every time haha). I have to smile and run my hand across the top whenever I walk past it - I guess when the novelty wears off I'll stop doing that :) Now I'm ready to add those door dampeners to all the cabinet doors in my house (so cool not hearing a slam when you shut them). Brigitte, your project sounds beautiful, can't wait to see the pictures of it!
Sat, 03/31/2012 - 18:57
This is beautiful!
Absolutely gorgeous! I really love the colors. I've never tried the color express stain - and I have to try it now! The top is so seamless. Love it!
Sun, 04/01/2012 - 05:33
Thank you!
Mebohn, thanks very much for the nice comment! You'll love the color express when you try it. Walnut is my favorite and I've used it for lots of projects. I like brushing it on to get a nice dark first coat, and then on this one, rubbed on a 2nd coat (needed to wait an extra hour for the first coat to dry). I used lots of wood glue and Kreg screws to assemble this top (it's 5 pieces of 1x10, 3 across and 1 at each end) and then added 1x4 underneath (around the edges and across the center for attaching) to make it 1 1/2 inches thick. Then a whole lot of sanding :)

Sat, 05/26/2012 - 06:46
Thank you!
Mariah, Thanks very much for the nice comment! I'm really happy with how this turned out. Now I want to re-do all my kitchen cabinets with Ana's plans. :) PS -- I saw your jugsaw puzzle table this morning on the brag board -- super creative!!
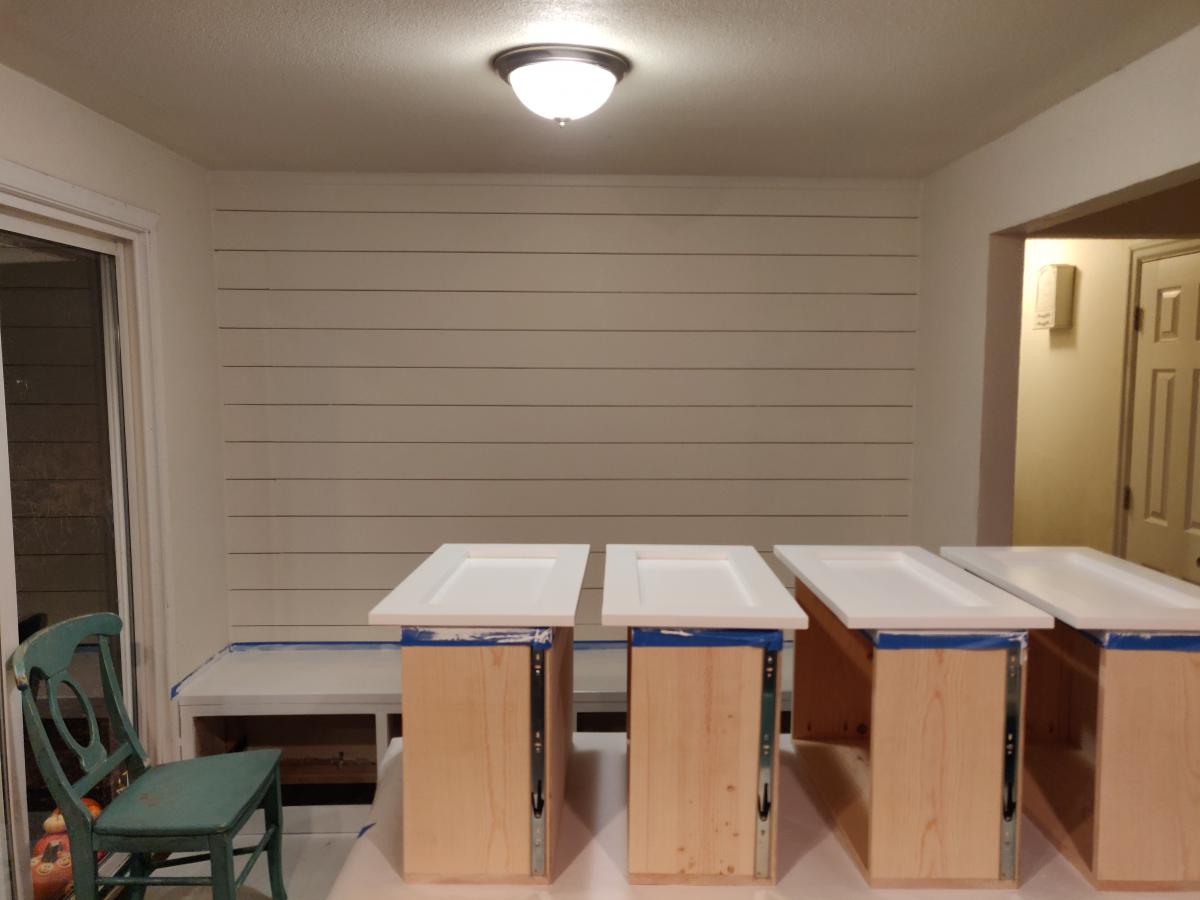
Mudroom Bench with Easy Drawers
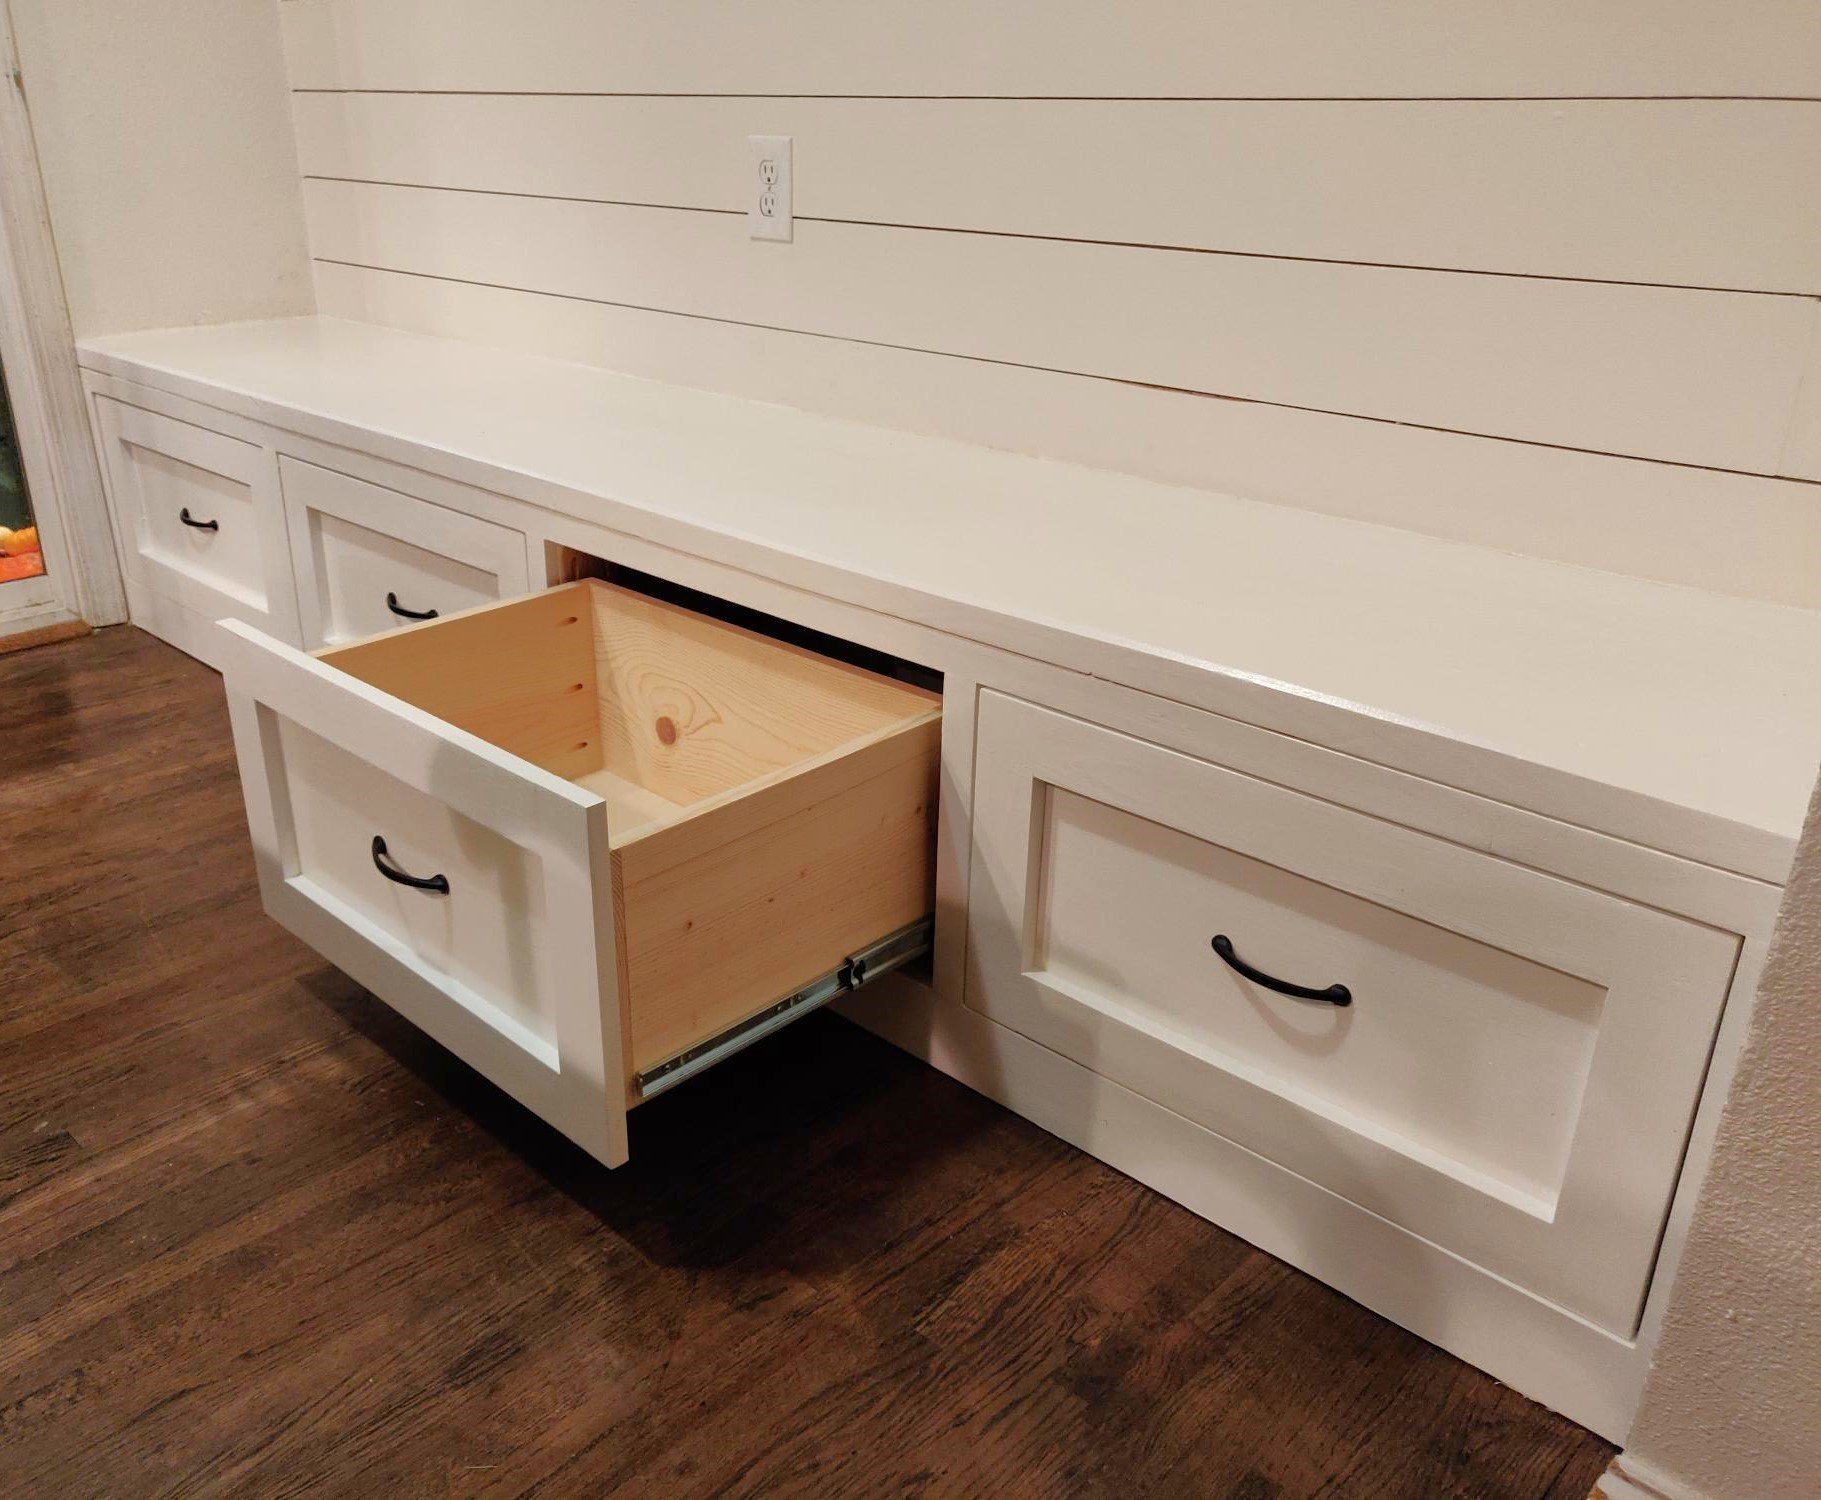
We've been desperate for more storage in our little house and this build really helped. The whole bench is 103“ wide and each drawer gives us 24"x17" of usable space. We had to do some custom shaping for the benchtop (two joined fir 2x12's) fit as the walls are not square but in the end we were really pleased.
The hardest part of the project was getting all of this built and in place while working around a busy family as this is our only meal space and the majority of cutting/forming was done either on the weekends or after bedtimes. If I were to do this again I'd prioritize sending the kids to grandparents for the weekend and know king everything except for paint out in one go.
We could have spent less time with the benchtop by using plywood like in the plans but we wanted the look of a separate benchtop. We may replace the fir with stained oak down the line but this should be plenty sturdy for the next several years.
Built from Plan(s)
Estimated Cost
$300
Estimated Time Investment
Week Long Project (20 Hours or More)
Finish Used
Valspar paint, minwax clear poly
Recommended Skill Level
Intermediate
Comments
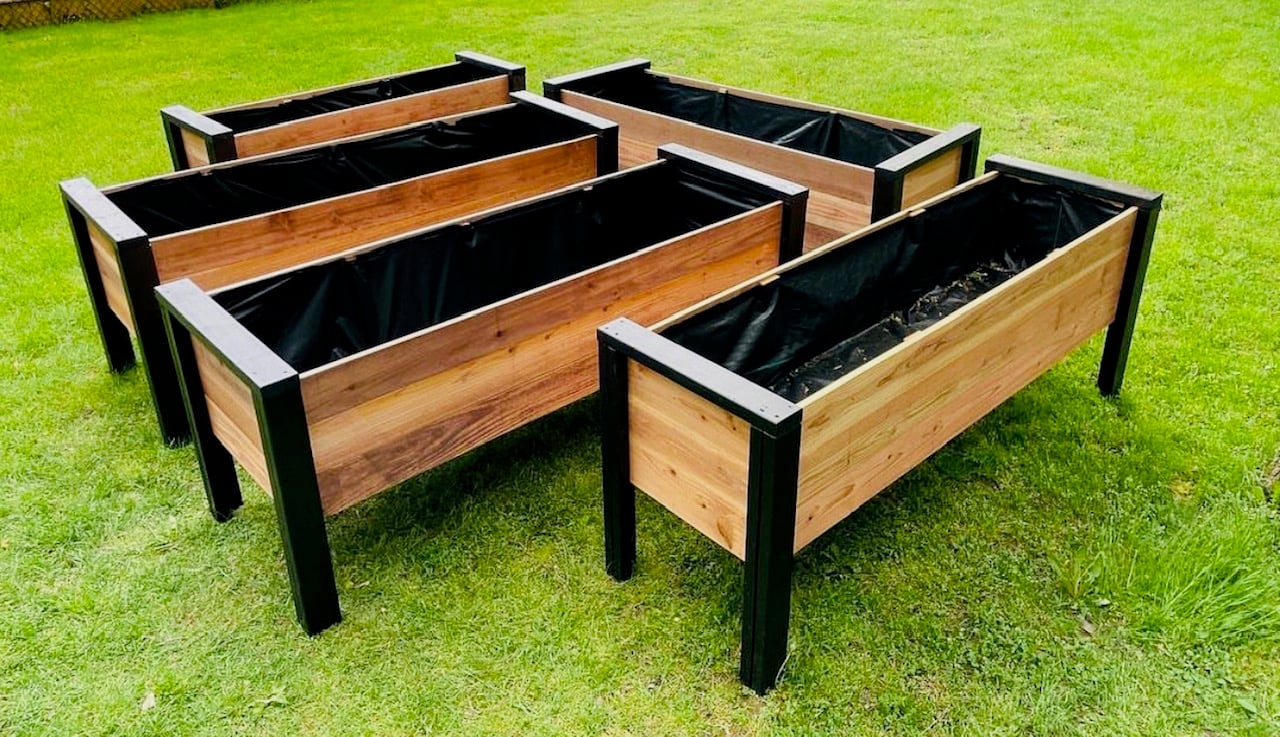
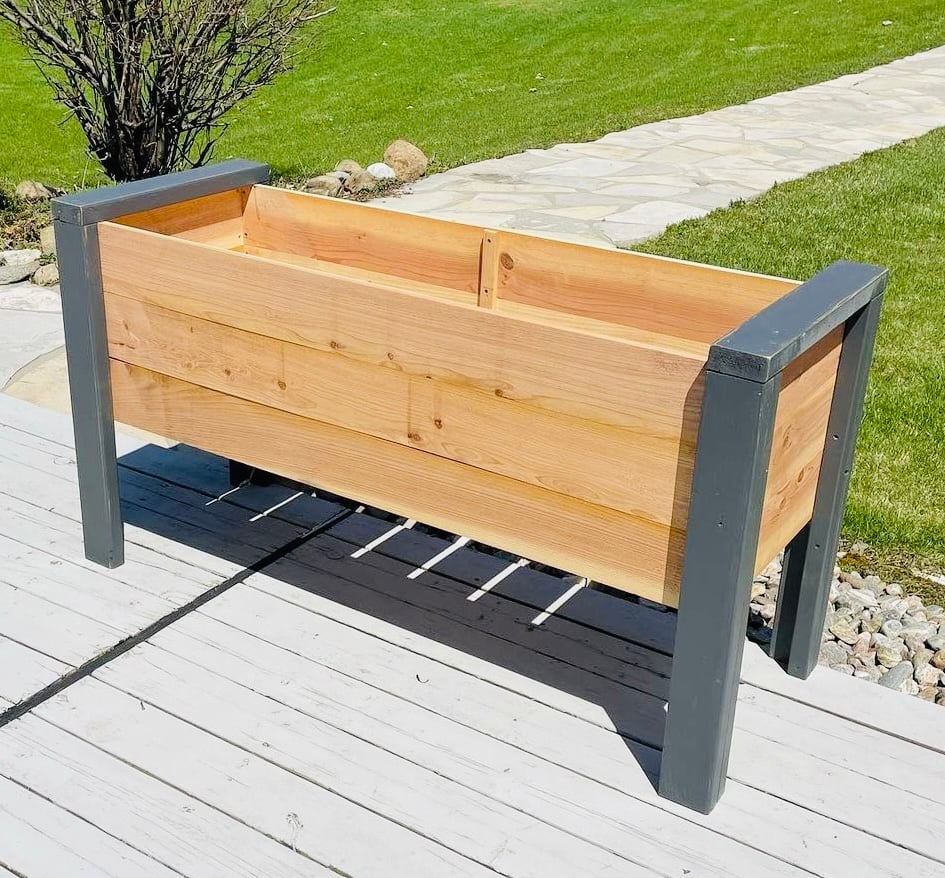
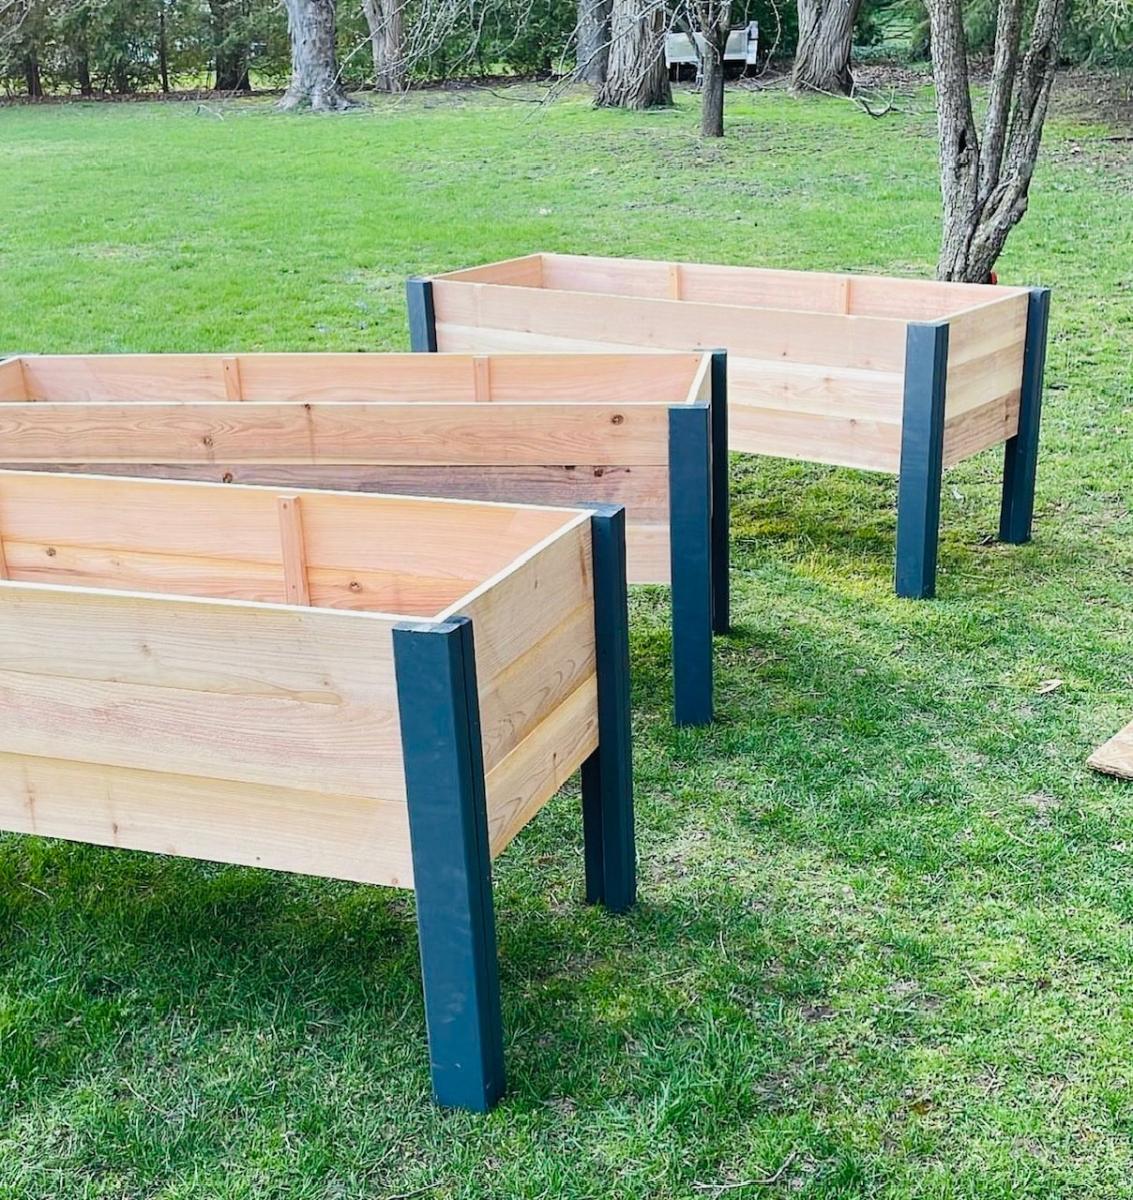
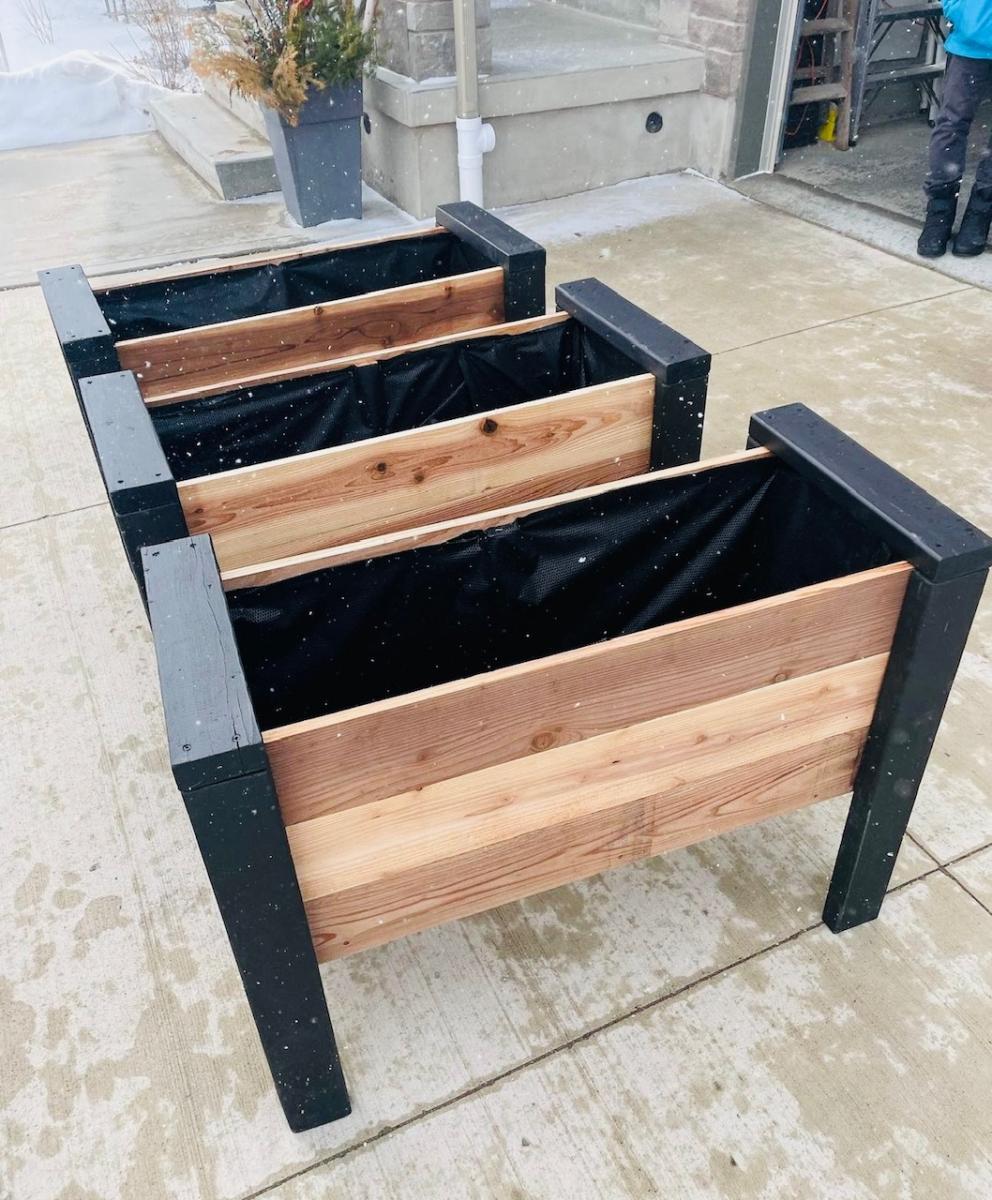
Rentzm
Fri, 03/31/2023 - 04:23
These are incredible. They…
These are incredible. They look a little deeper, and would be good for vegetables. How deep are they?