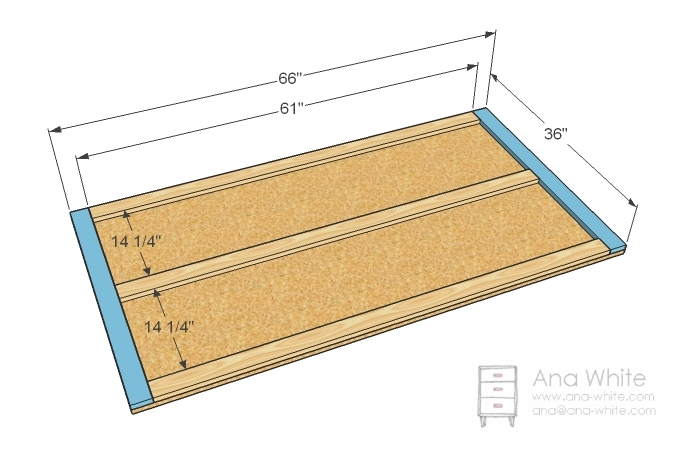
Modern Farmhouse Bed Frame

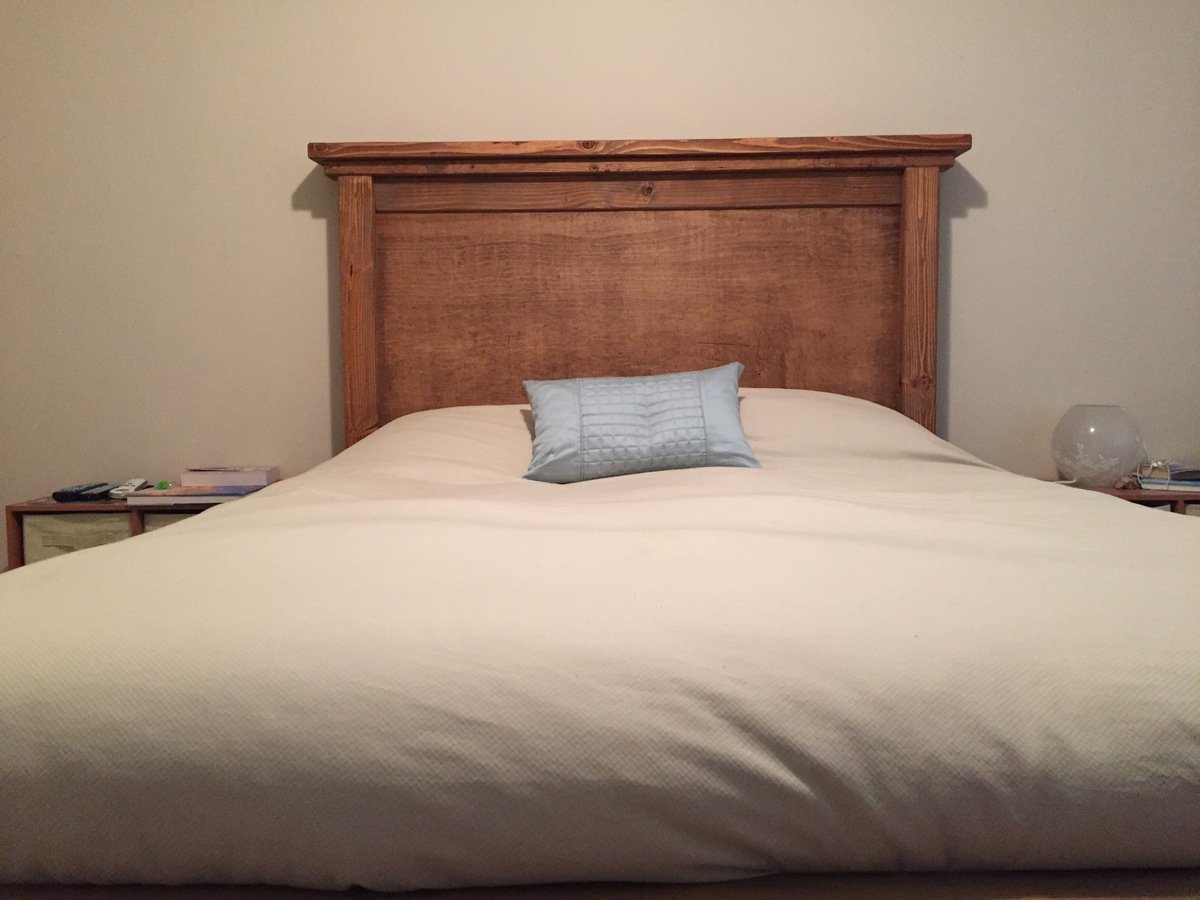
I love how this bed frame turned out! Everywhere that has stain is cedar and the rest is all scrap spruce. Thanks for another great plan Ana!

Built from Plan(s)
I love how this bed frame turned out! Everywhere that has stain is cedar and the rest is all scrap spruce. Thanks for another great plan Ana!
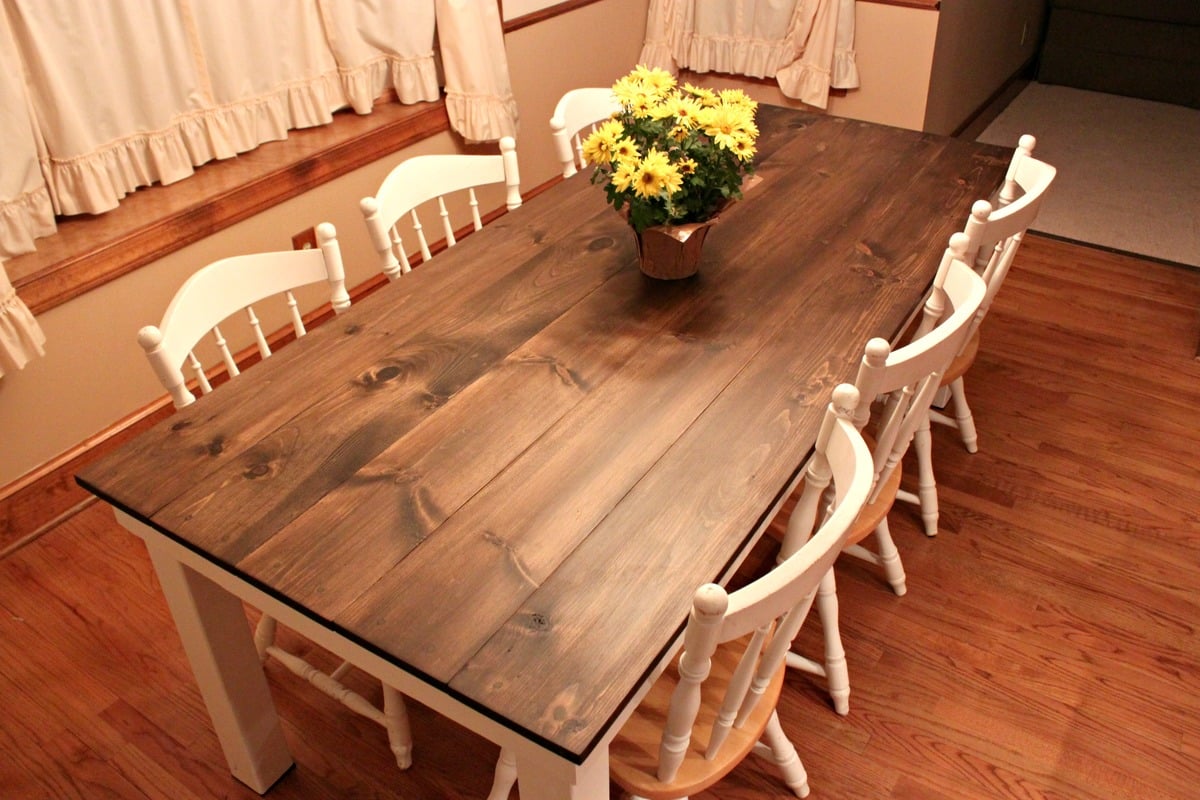
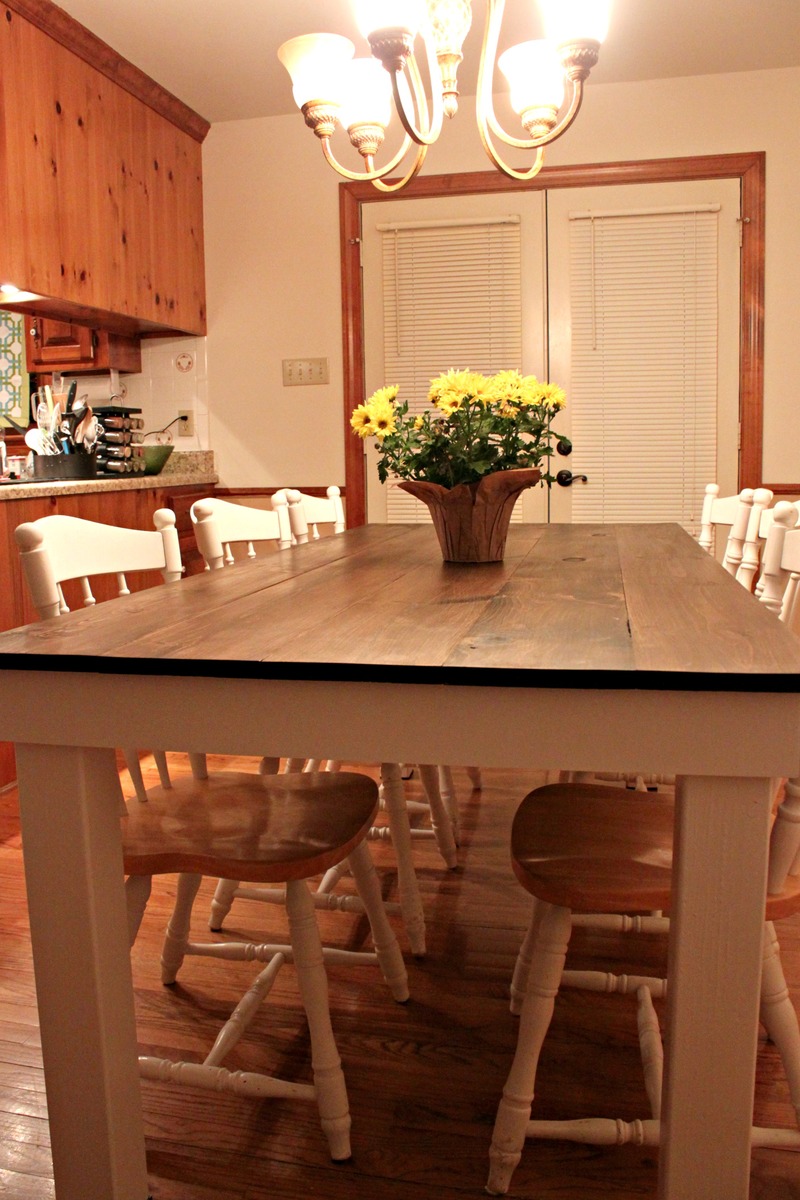
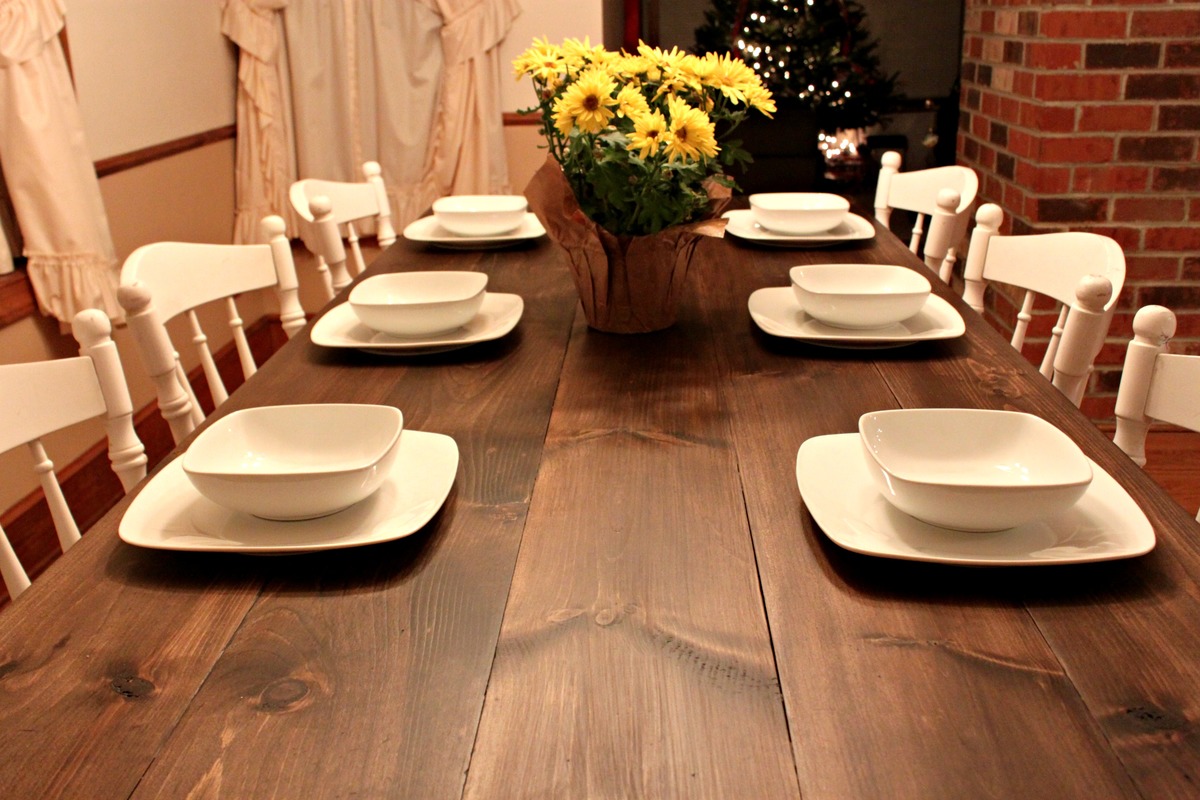
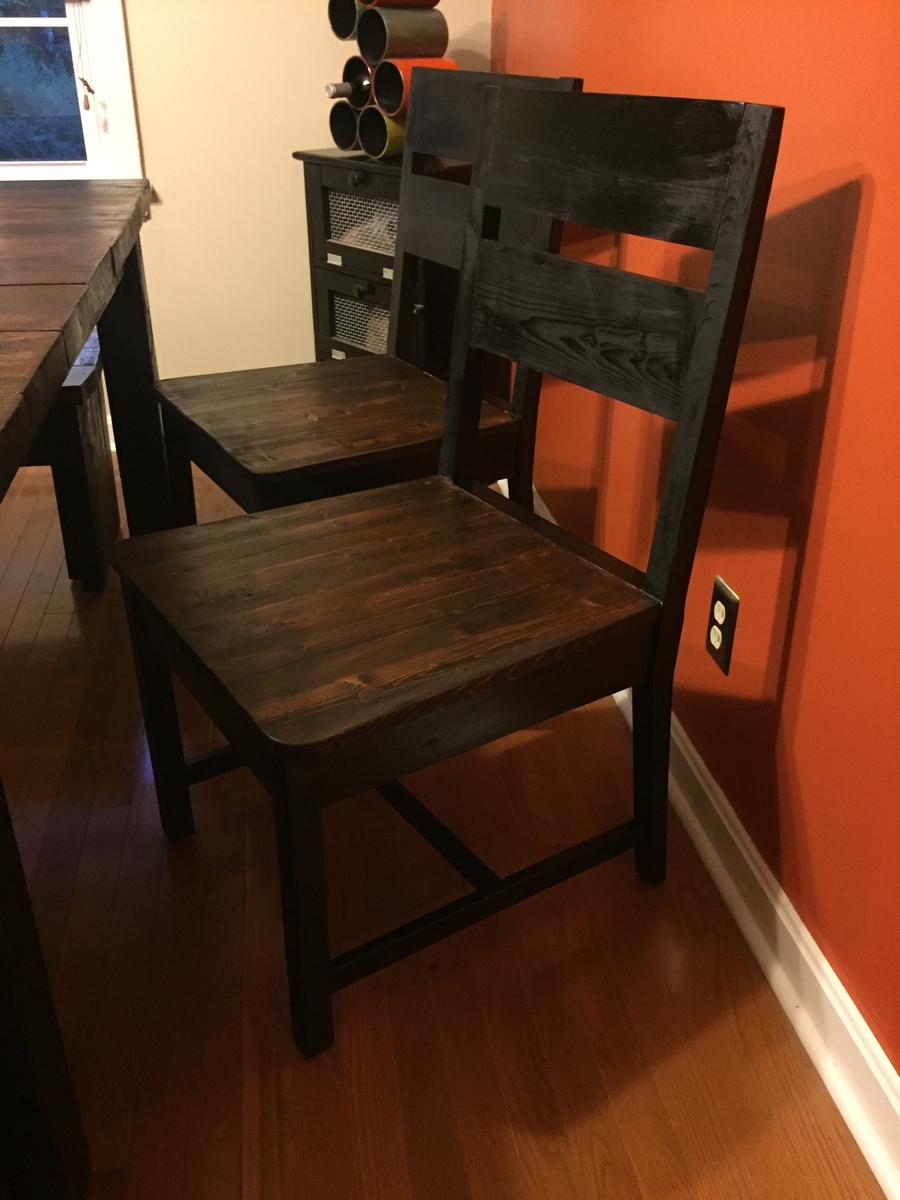
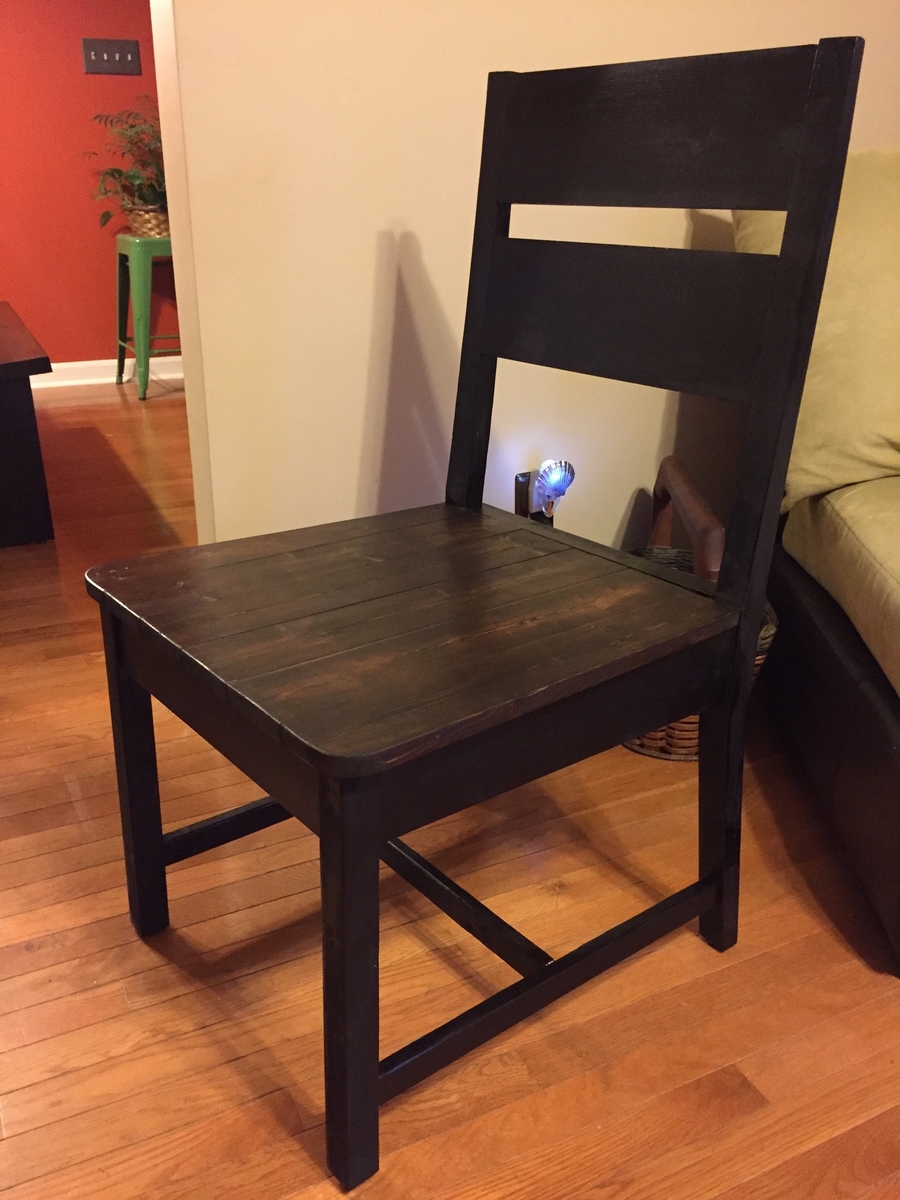
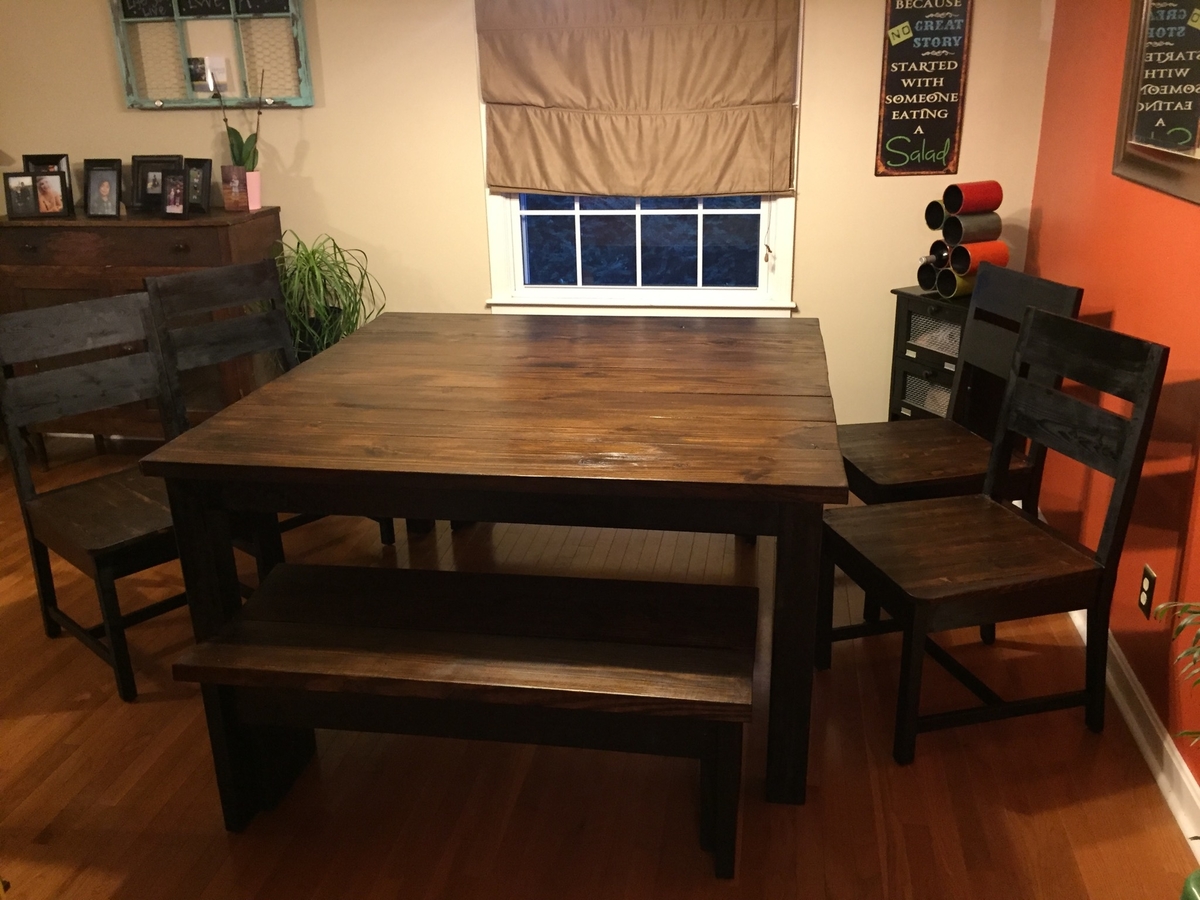
My husband and I love entertaining, but our small kitchen table was just not cutting it for both our space and our hosting abilities. We decided that instead of searching for the perfect table and spending a ton of money, we would just build our own table. We found that Ana's Rustic Table plans best matched what we were looking for, but my husband being the detailed person that he is didn’t just want to take her measurements and run with them. So we taped off the floor around our old table to decide how large we wanted our own table to be.
 We basically followed Ana White’s plans to a T.
  Until it got to the legs. Ana White used 2×4′s for her legs, but we decided we liked the look of chunkier 4×4 legs instead.
  We also did things in a different order, like attaching the legs to the apron before attaching the table top. This did make everything way easier when it came to painting, no tape needed.
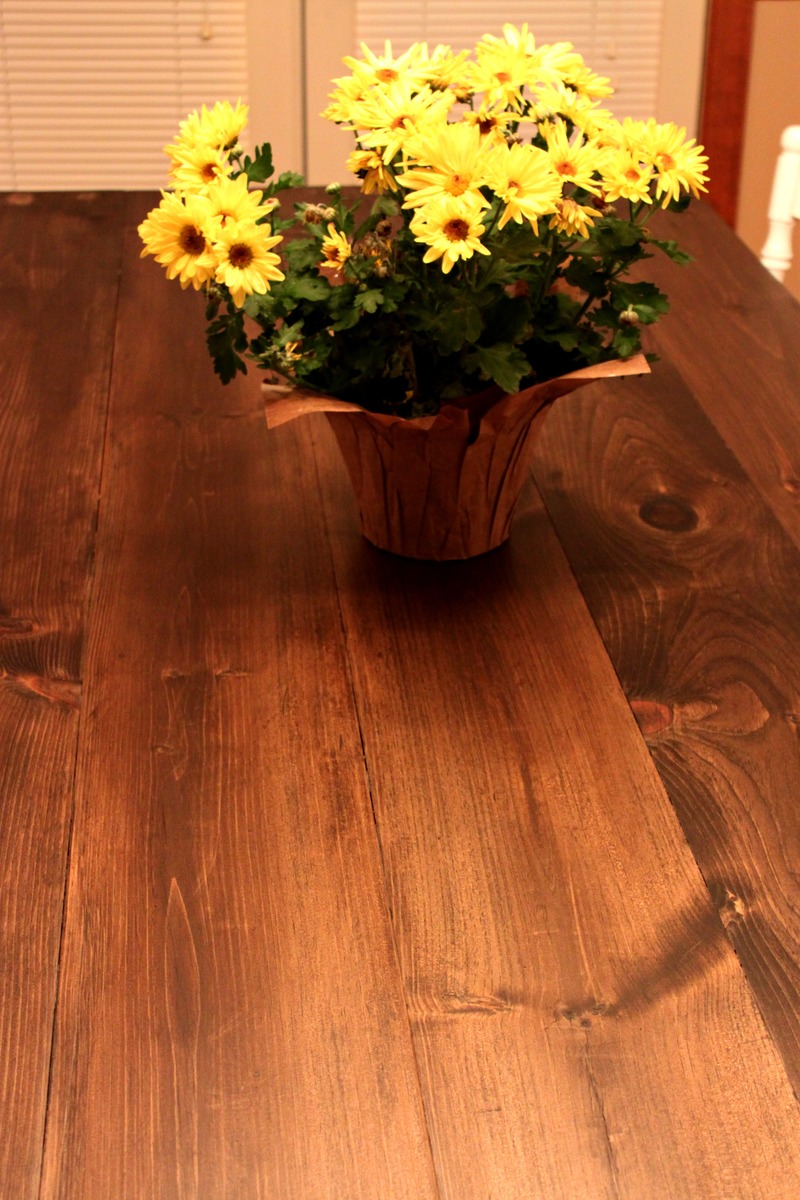
  We also stained the bottoms and sides of the tabletop boards before attaching them to the apron. After the top was attached I stained the top side and applied about 3-4 coats of Matte polyurethane. I like the matte finish because it doesn’t add any sheen and makes things look even more rustic; however, we’ll have to add a regular coat of poly as well because the matte is too soft for something that will see such rough use over the years.
  And now for what you’re all wondering about, how much did this project cost us?

Mon, 12/31/2012 - 09:43
Your table is gorgeous! You did an amazing job.
I am getting ready to attempt my first two projects, bookshelves and a buffet table. I had a couple of questions about how you got such a consistent stain.
1) The Stain - What kind of stain did you use? How many coats did it take? Did you use a conditioner first?
2) Wood filler - How did you get the wood filler to match the stained areas so well? What kind did you use?
Thanks for the advice! I was thinking I would have to paint the buffet but after seeing your table I think I may actually attempt the stain.
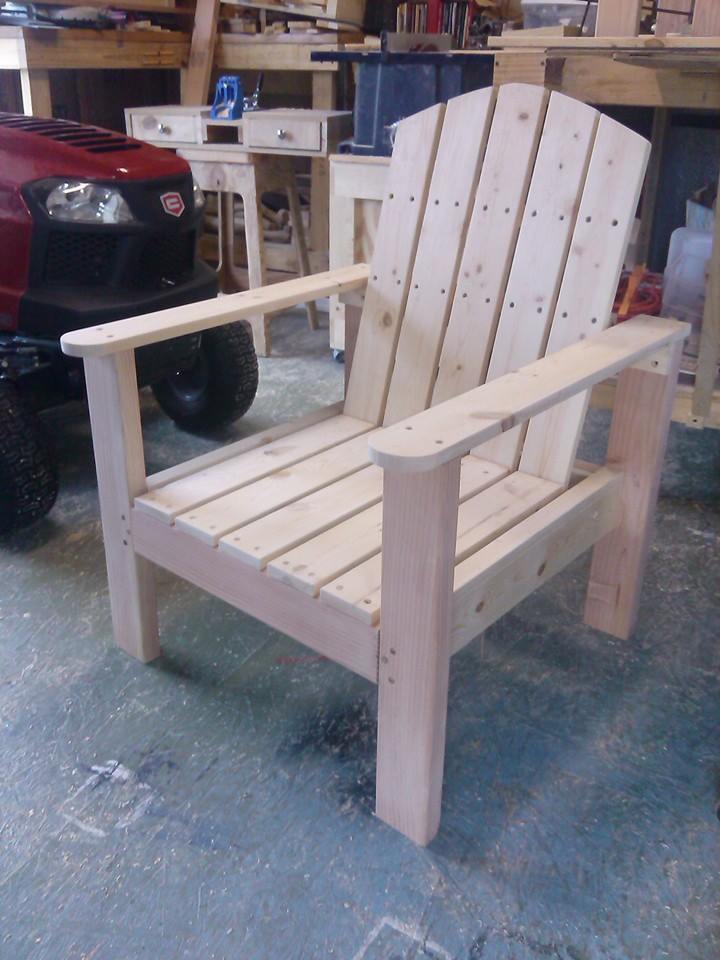
Modified the arm rest and the back to my liking.
Tue, 06/23/2020 - 08:59
Hi, are plans available for this modified chair design? I like that the seat pan appears to be flat and the Adirondack style to the back slate.
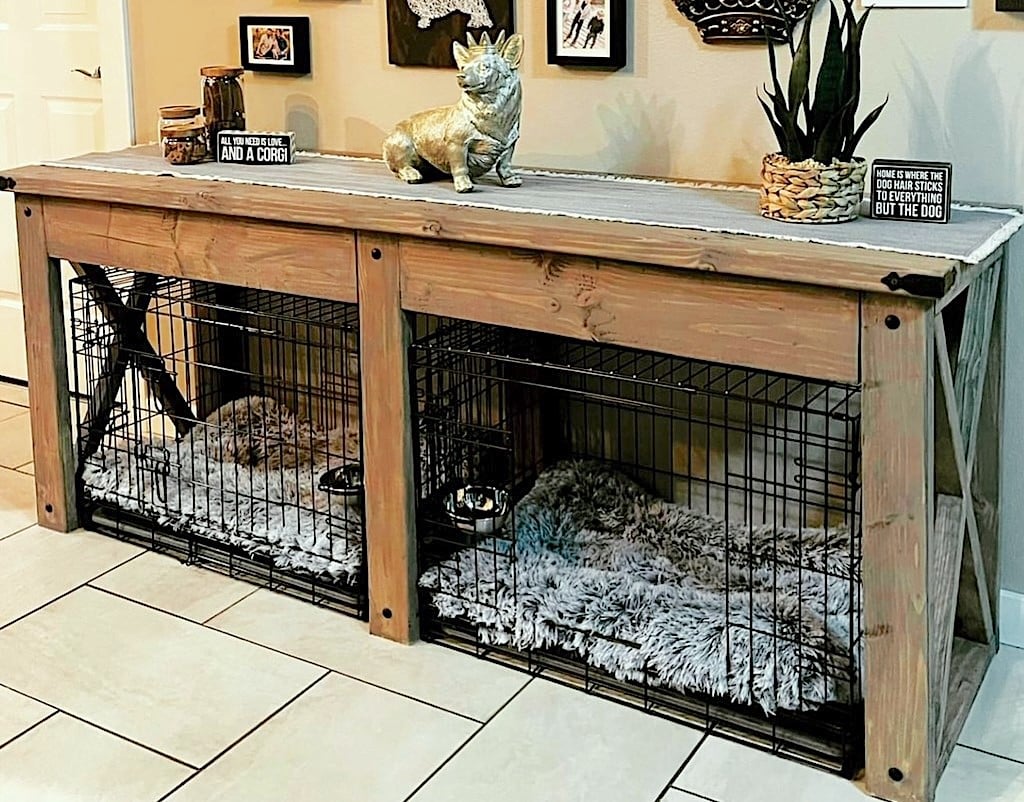
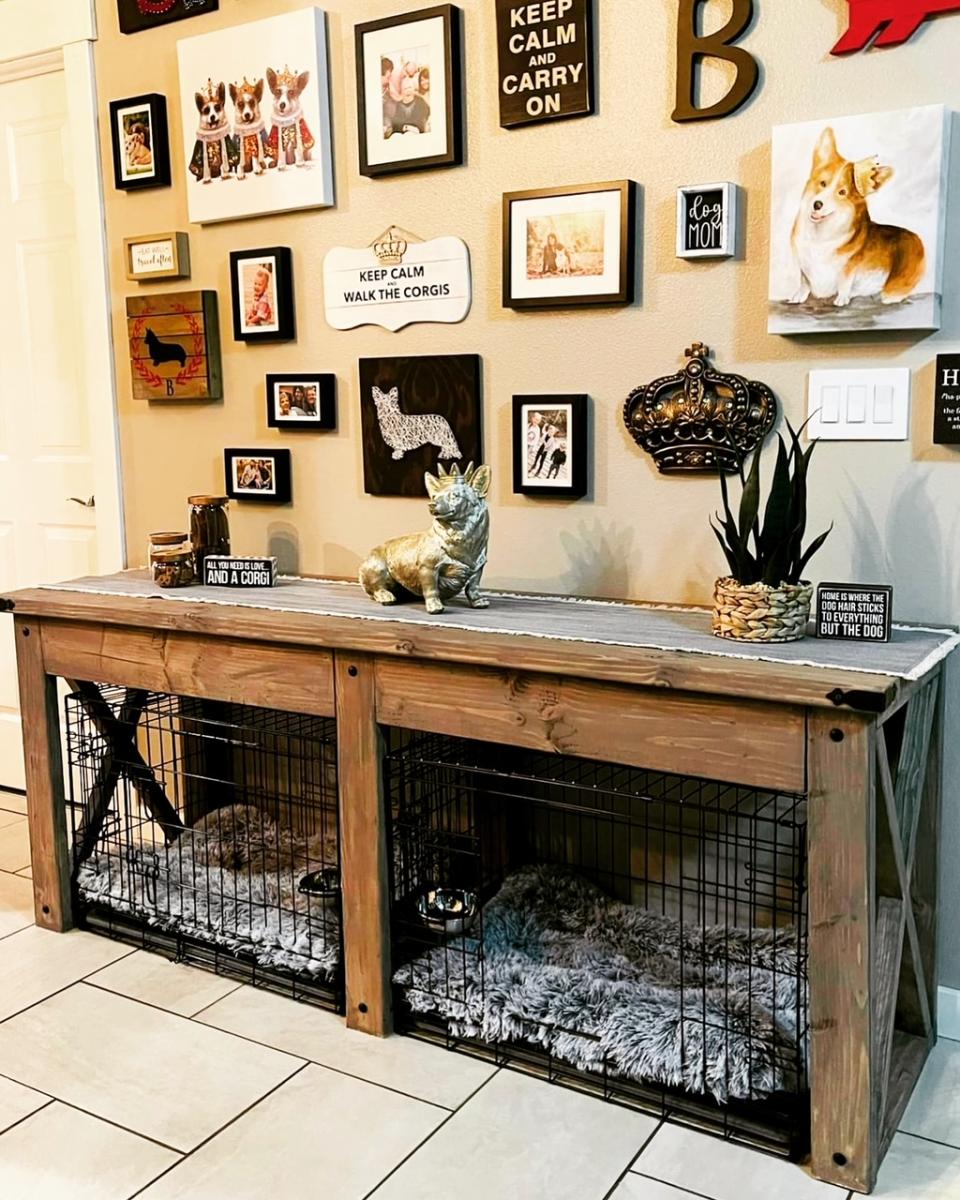
"I modified the Farmhouse X Console to become a surround for my dog crates. Thanks for the project plan!"
Sheena
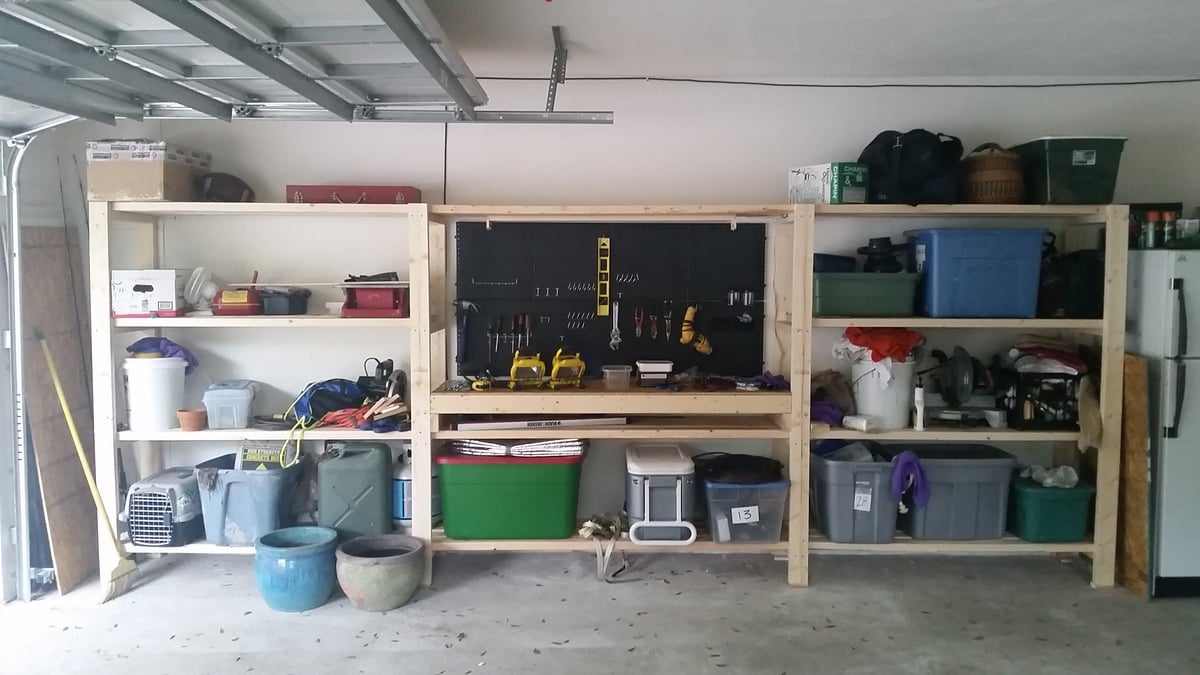
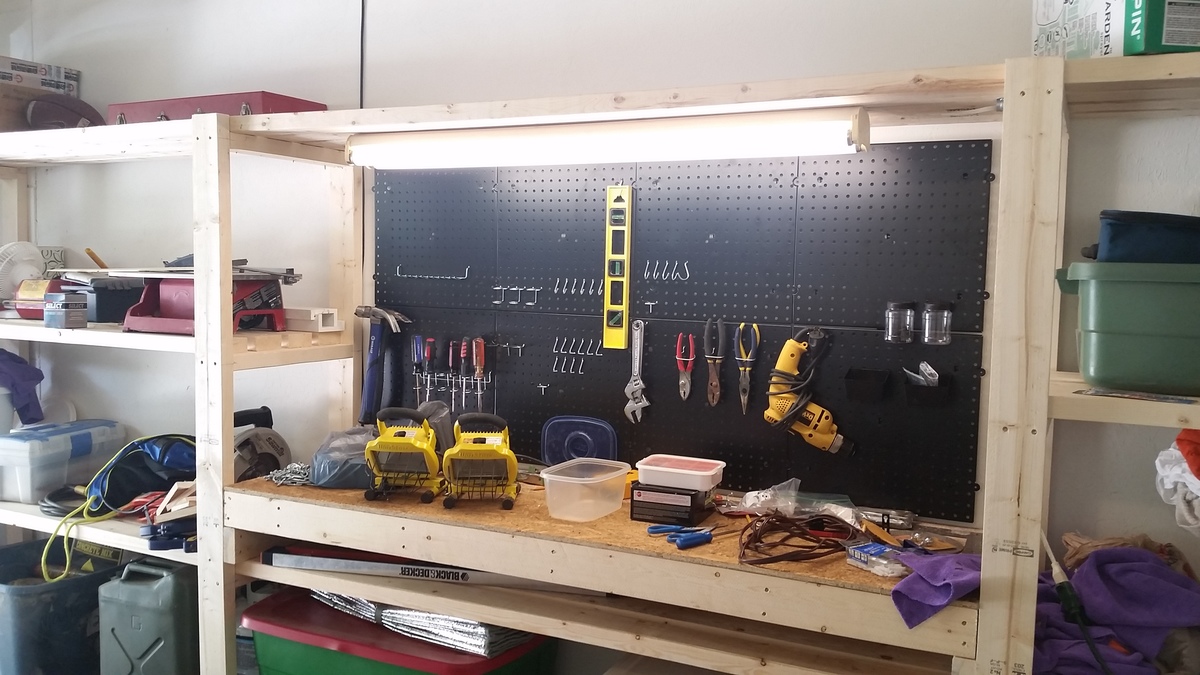
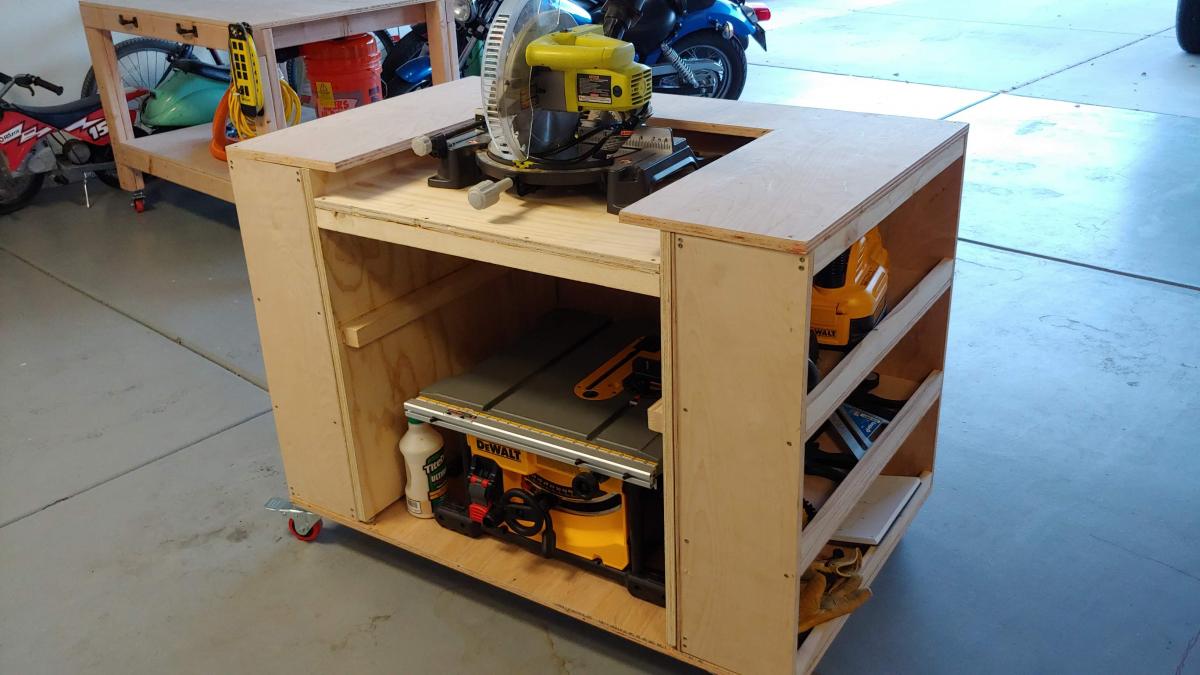
Great plans allow for versatility and easy customization. Put the whole thing together in a day w/ one other person. My set up is 16' long - 5' on the side shelves and 6' for the workbench. Added a pegboard and fluorescent light under the top middle shelves. I'm also designing a slim drawer to go under the workbencheck area. Thanks a bunch!
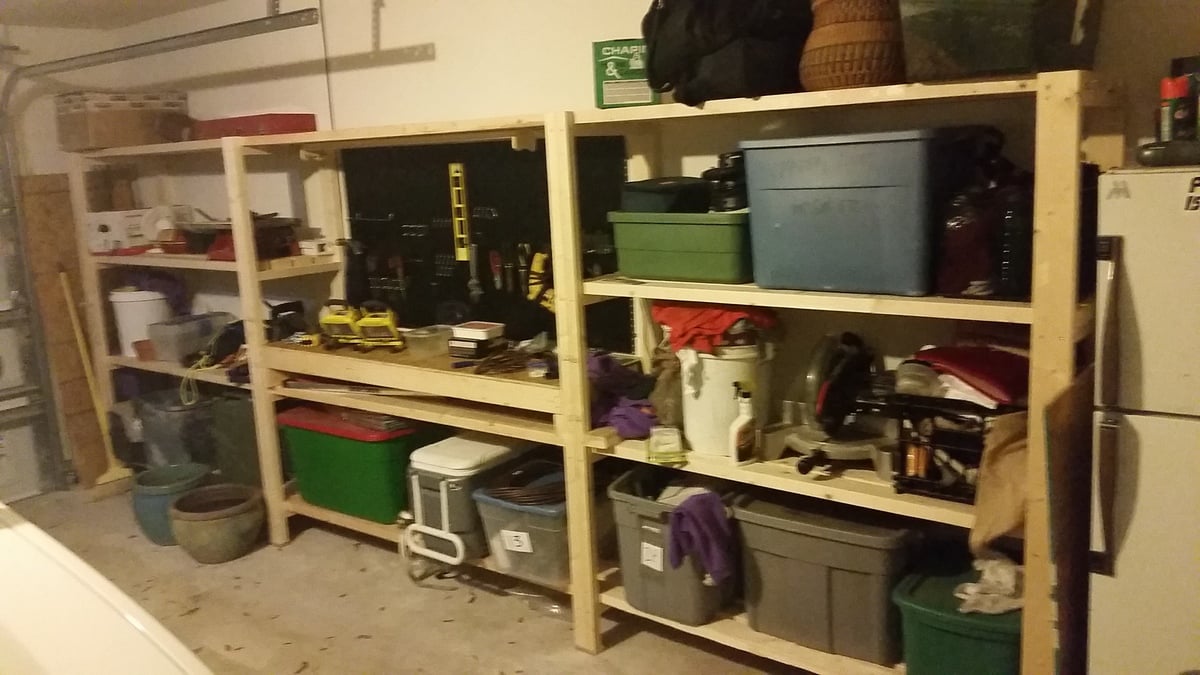

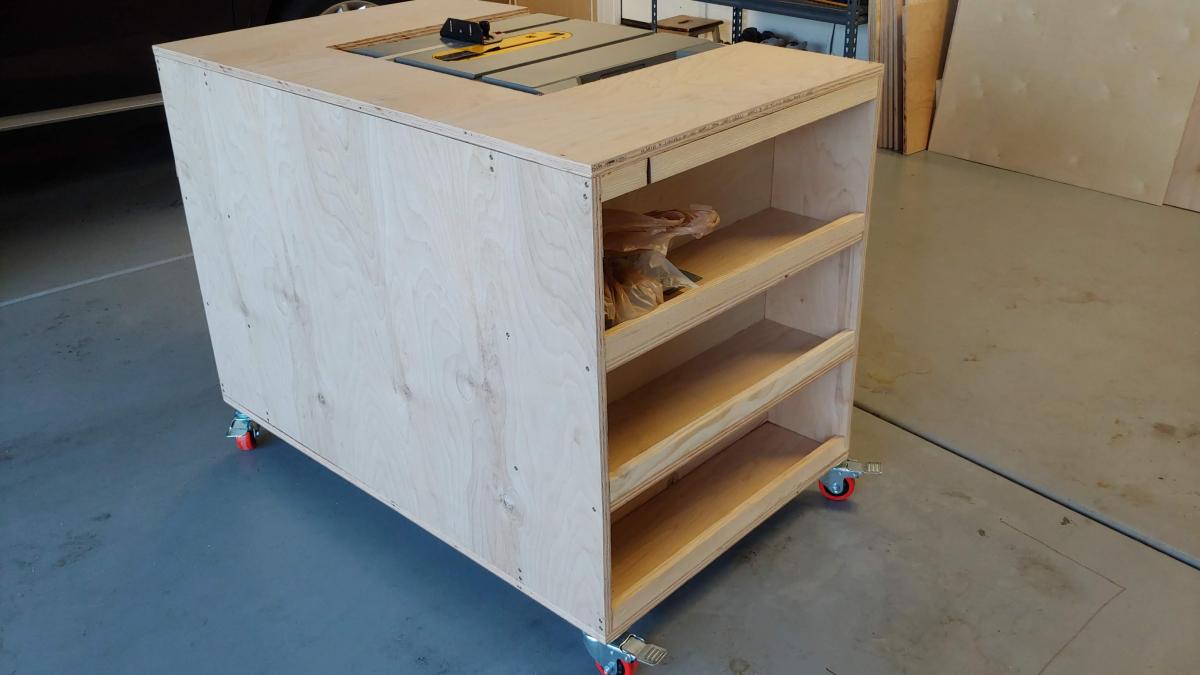
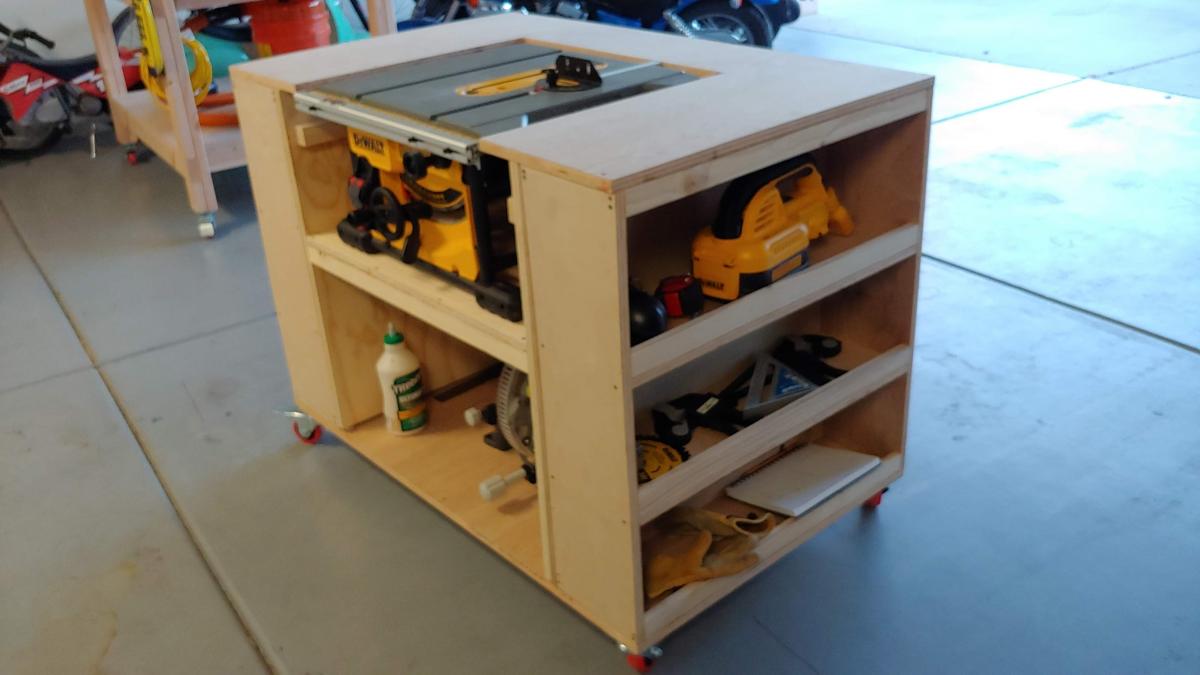
Used part of the Ultimate Roll Away Workbench with Miter Saw Stand to just build one of the roll-away workbenches to work with my miter saw and table saw. I'm very happy with how it turned out.
Sun, 04/28/2024 - 12:57
Hi, I am planning on getingt a dewalt 10 inch table saw as well. I am wondering what you did to adapt it for extending the rails with the fence? Curious if there were more photos. I would very much like to adapt my station to be similar to yours. Thanks. .
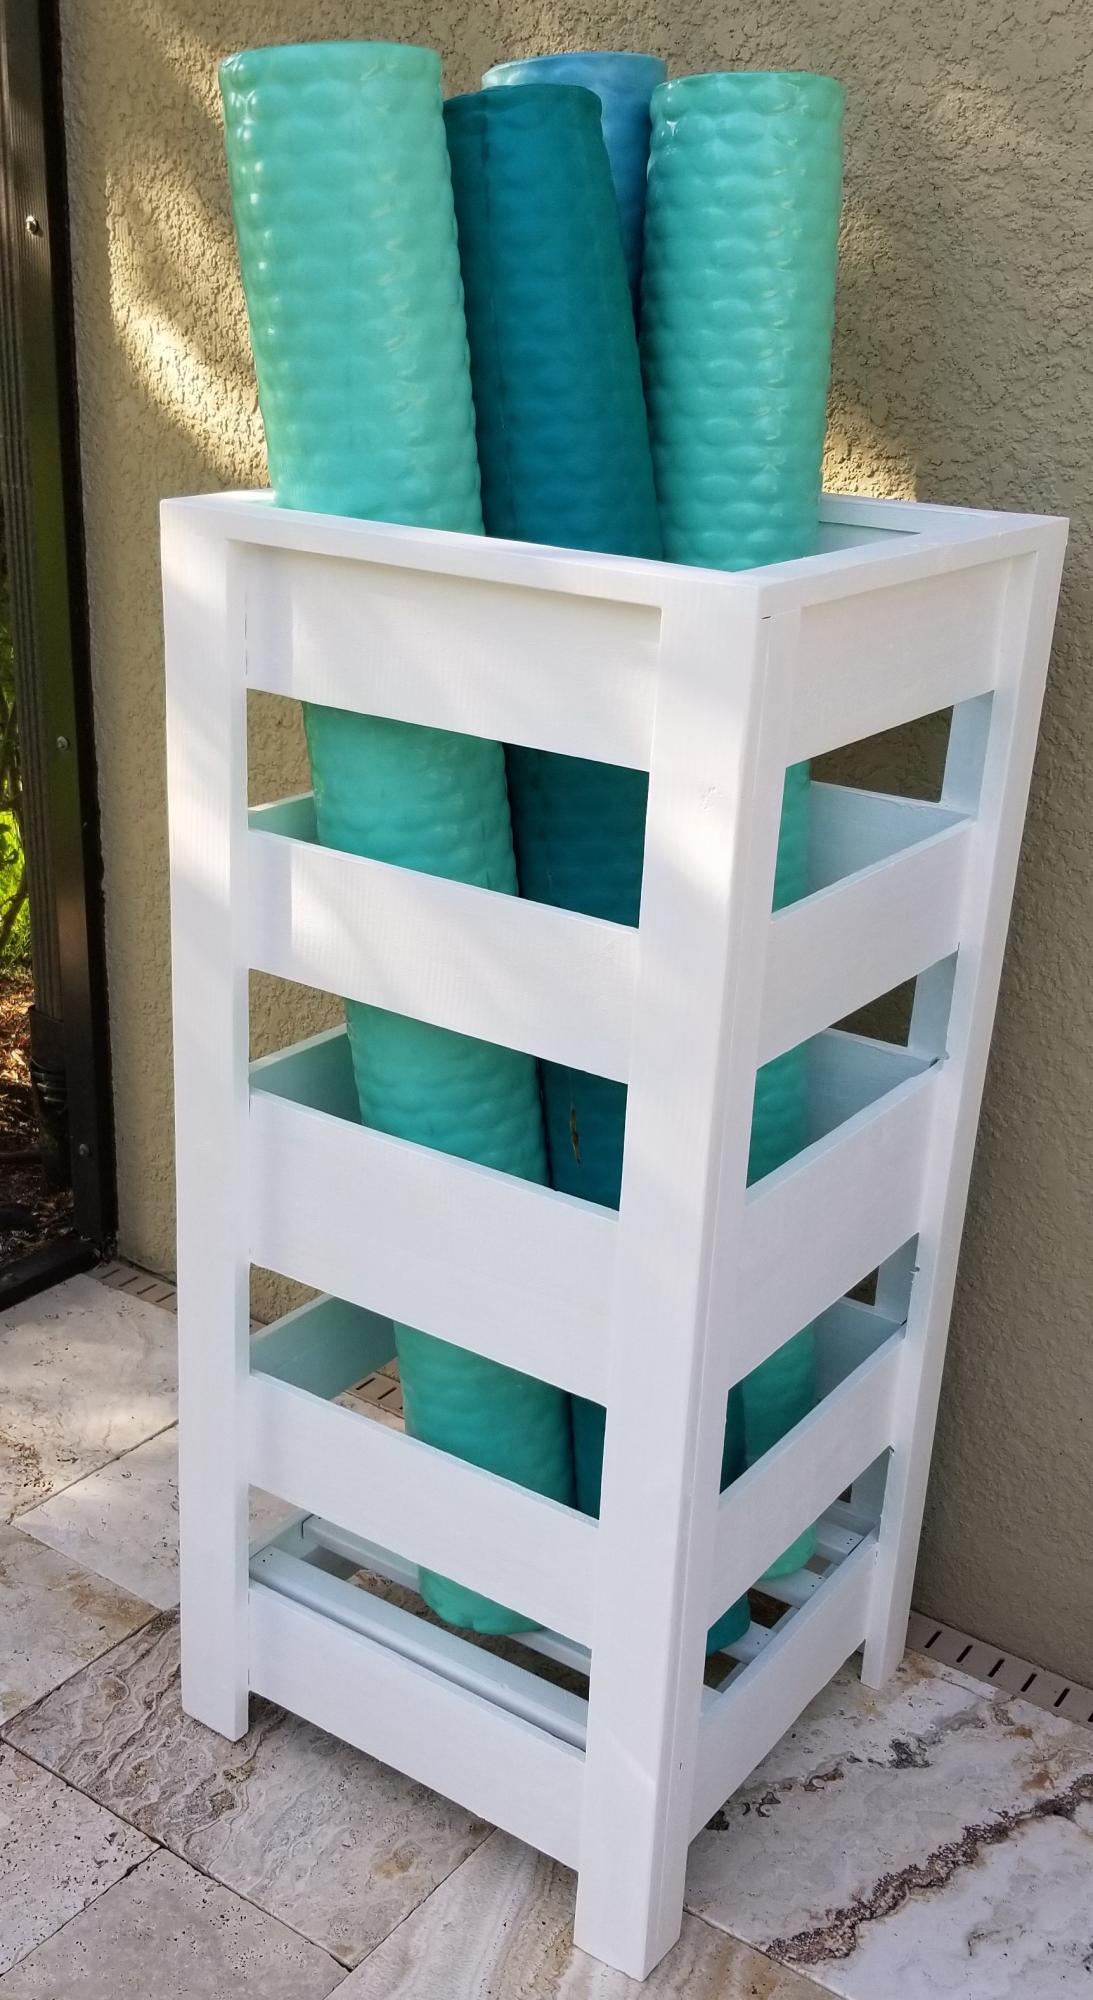
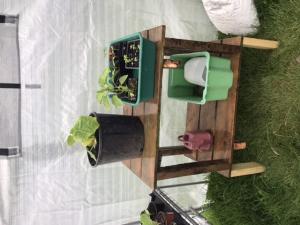
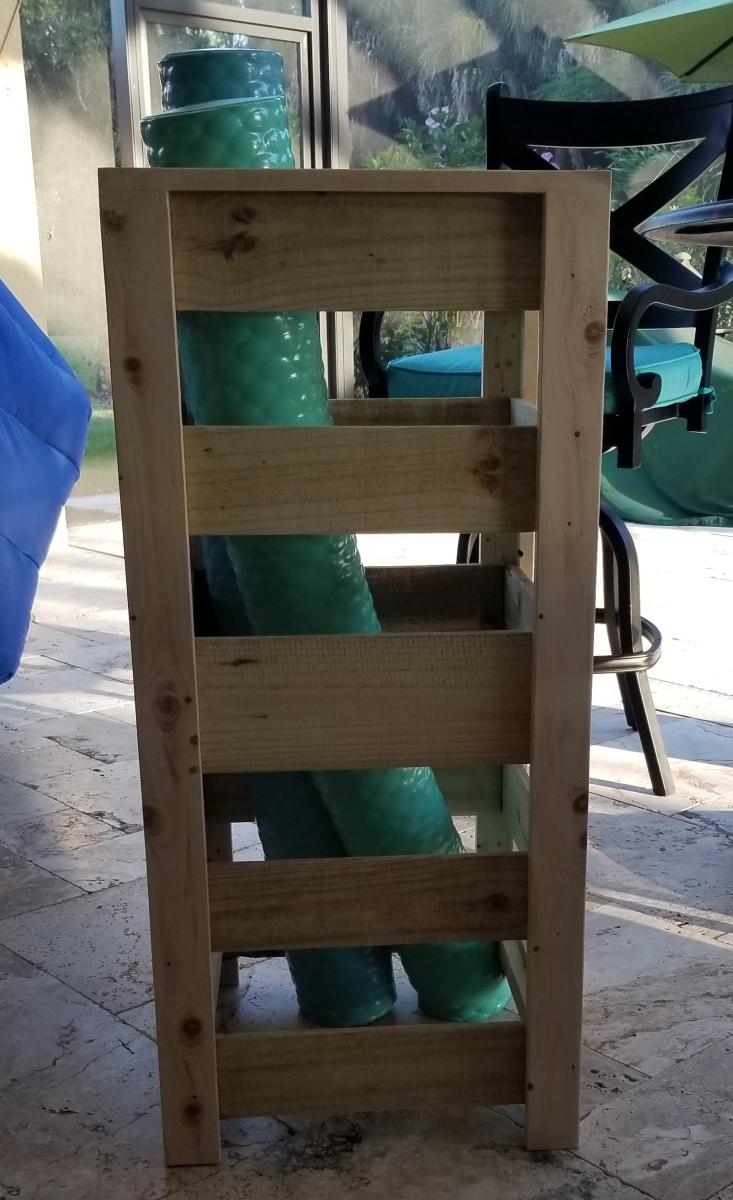
I modified the plans for the planter box to make a holder for Pool Noodles. I made it 40" tall and used 4-4" fence pickets and 1-5.5" fence pickets. I used a 4" spacer and the openings worked out perfect. I stained inside and out since it would show with 2 coats of the solid stain. It is perfect! Thank you so much for the inspiration and plans!
Mon, 06/06/2022 - 14:04
This is so smart and looks great too, thank you for sharing!
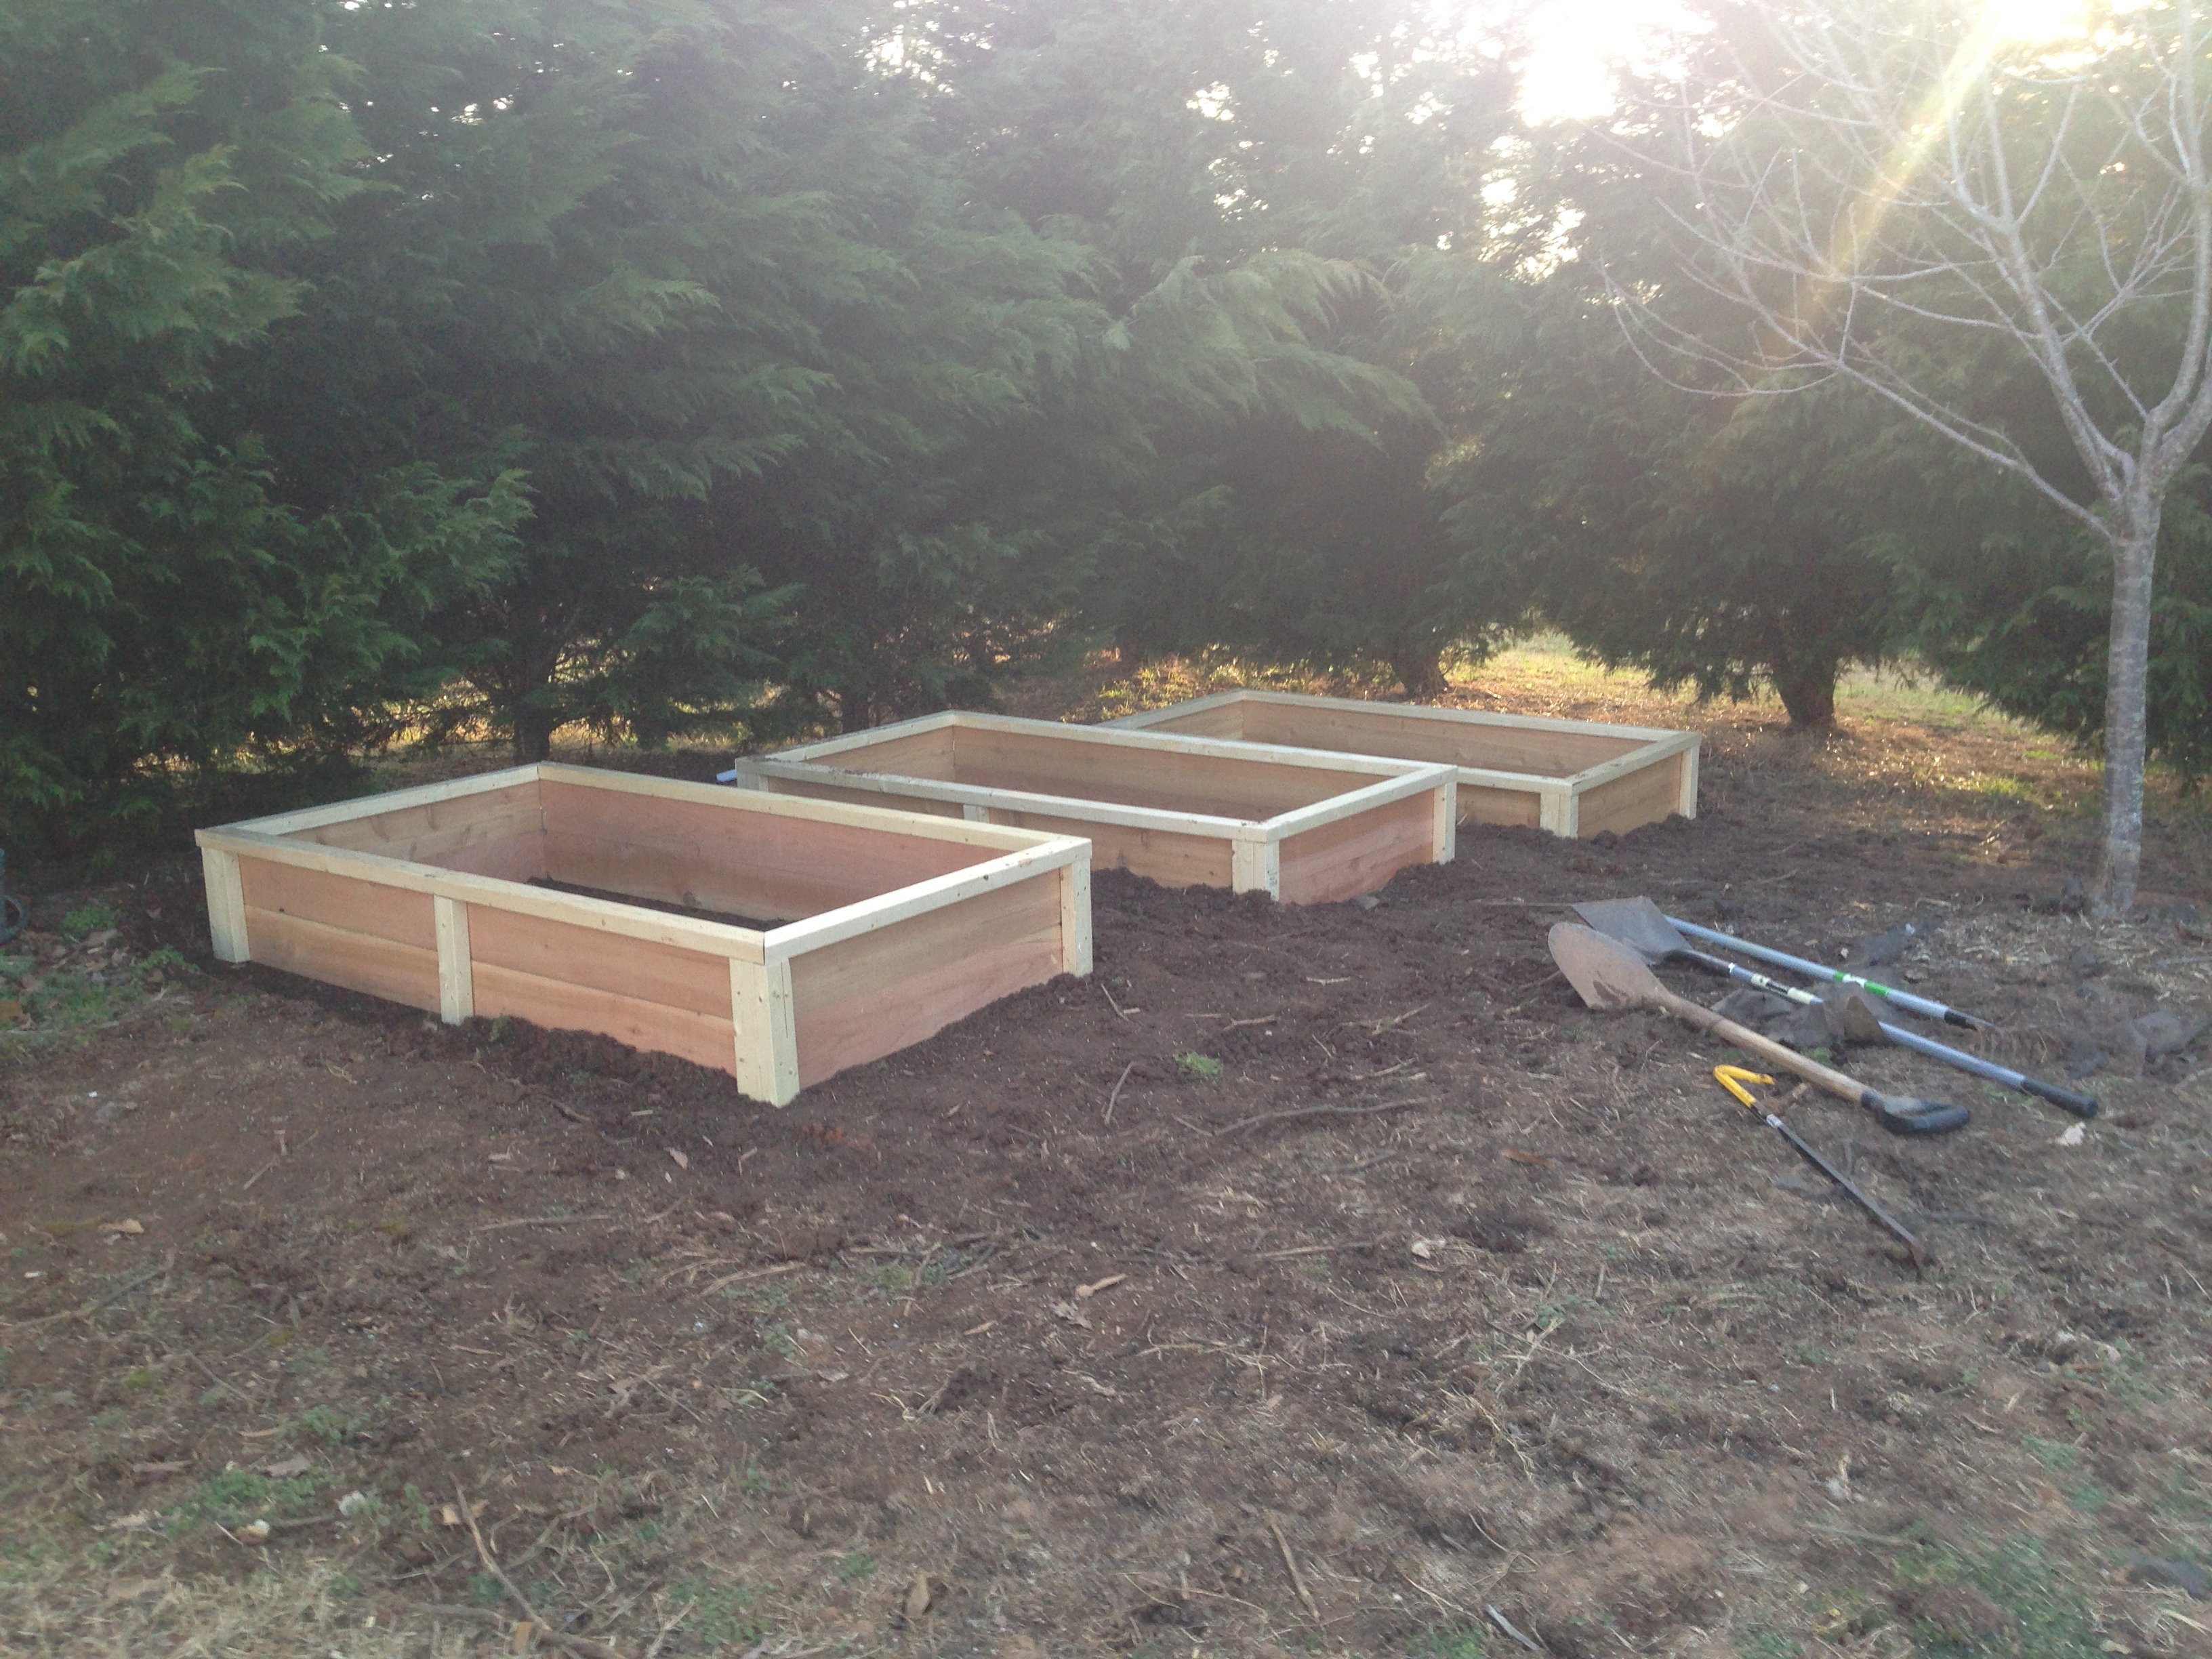
Using Ana's 10 dollar raised garden planter box idea, I made my own using the cedar fence boards and then used 2 x 3 x 8 studs for the L corner supports and mid center support along with top rail. This photo is the first 3, I will have a total of 6 boxes. Will post more as I progress.
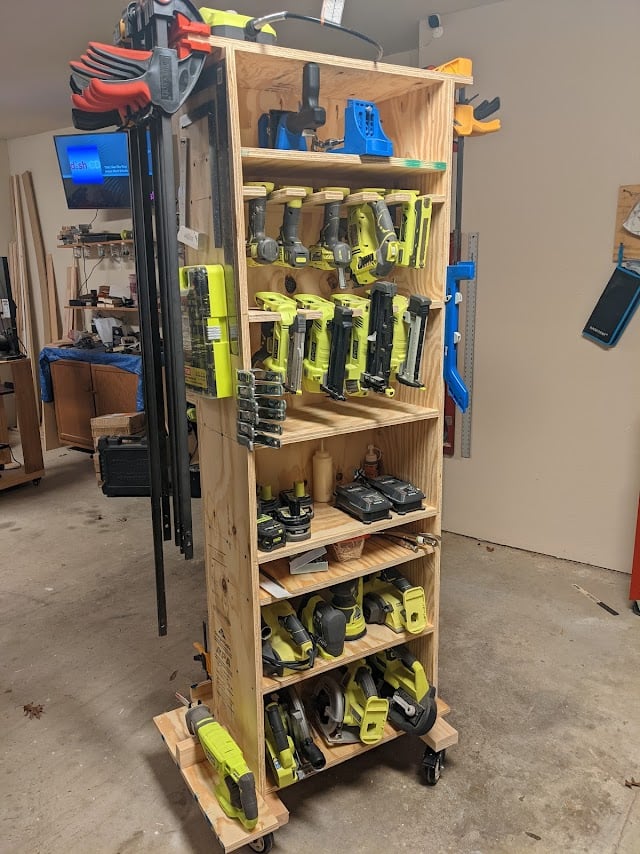
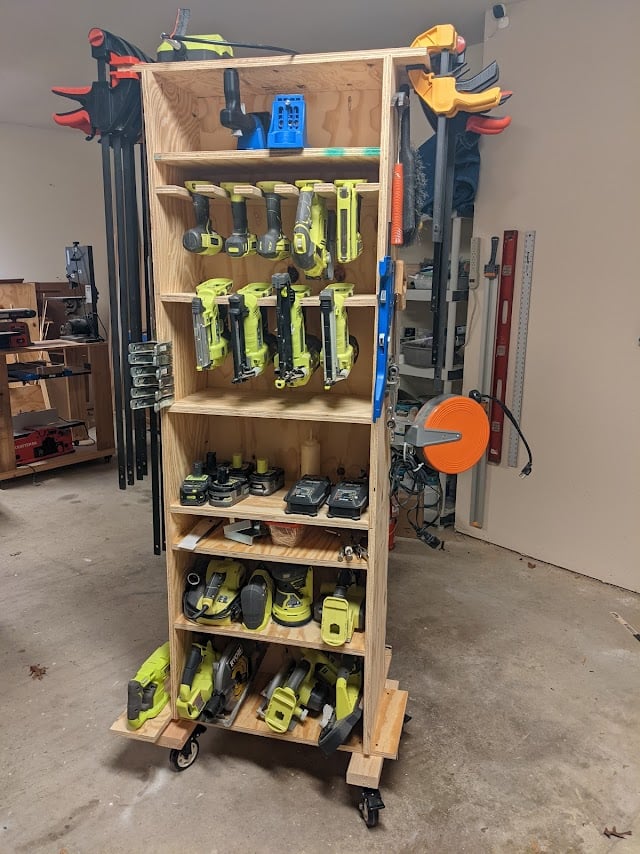
I repurpose furniture as a hobby and I got tired of having my tools hanging on a wall on the other side of the garage so I bult this rolling tool caddy. It is made out of 3/4" plywood, a couple of 2x4's and some heavy-duty casters. I built one about 3 years ago and realized that there were some things I wanted to do differently so I sold it and bult this one. My wife gave me a subscription to SketchUp and I had fun drawing it up and tweaking it. I left an over hang of 3" on both sides so I could store my clamps. I also attached an electrical cord reel on the right side and reversed the ends so the male end can plug into the wall and I can roll the unit across the room allowing me to be able to charge my batteries. The back side has a 44 drawer storage organizer and also a few shelves for additional tools like a router and a multi-tool. I'm not nearly the craftsman many of you are and I'm sure you could do a much better job. I didn't build it to look pretty but to be functional and it works for me.
Fri, 01/21/2022 - 08:28
This is EXACTLY what my husband needs!! Are you willing to share your plans so I can build it for him?
Fri, 01/21/2022 - 09:16
I really like this idea. I have my tools hung up neat all around the garage, but I keep walking back and forth for tools and batteries. It would be great to roll this over to a project and have everything you need right there. Nice work. I will modify one for my needs.

Fri, 01/21/2022 - 10:06
there are some very thoughtful features on this, notably the wings at the top and the bottom for clamps and extra tools and the different shelf heights. Well done! I'm going to build one just like it and a power strip for battery storage.
Fri, 01/21/2022 - 11:25
This is awesome - great job.
please post plans!
Fri, 01/21/2022 - 14:21
Very cool!!! I would appreciate it if you would share your plans…so that I could attempt to make me one.
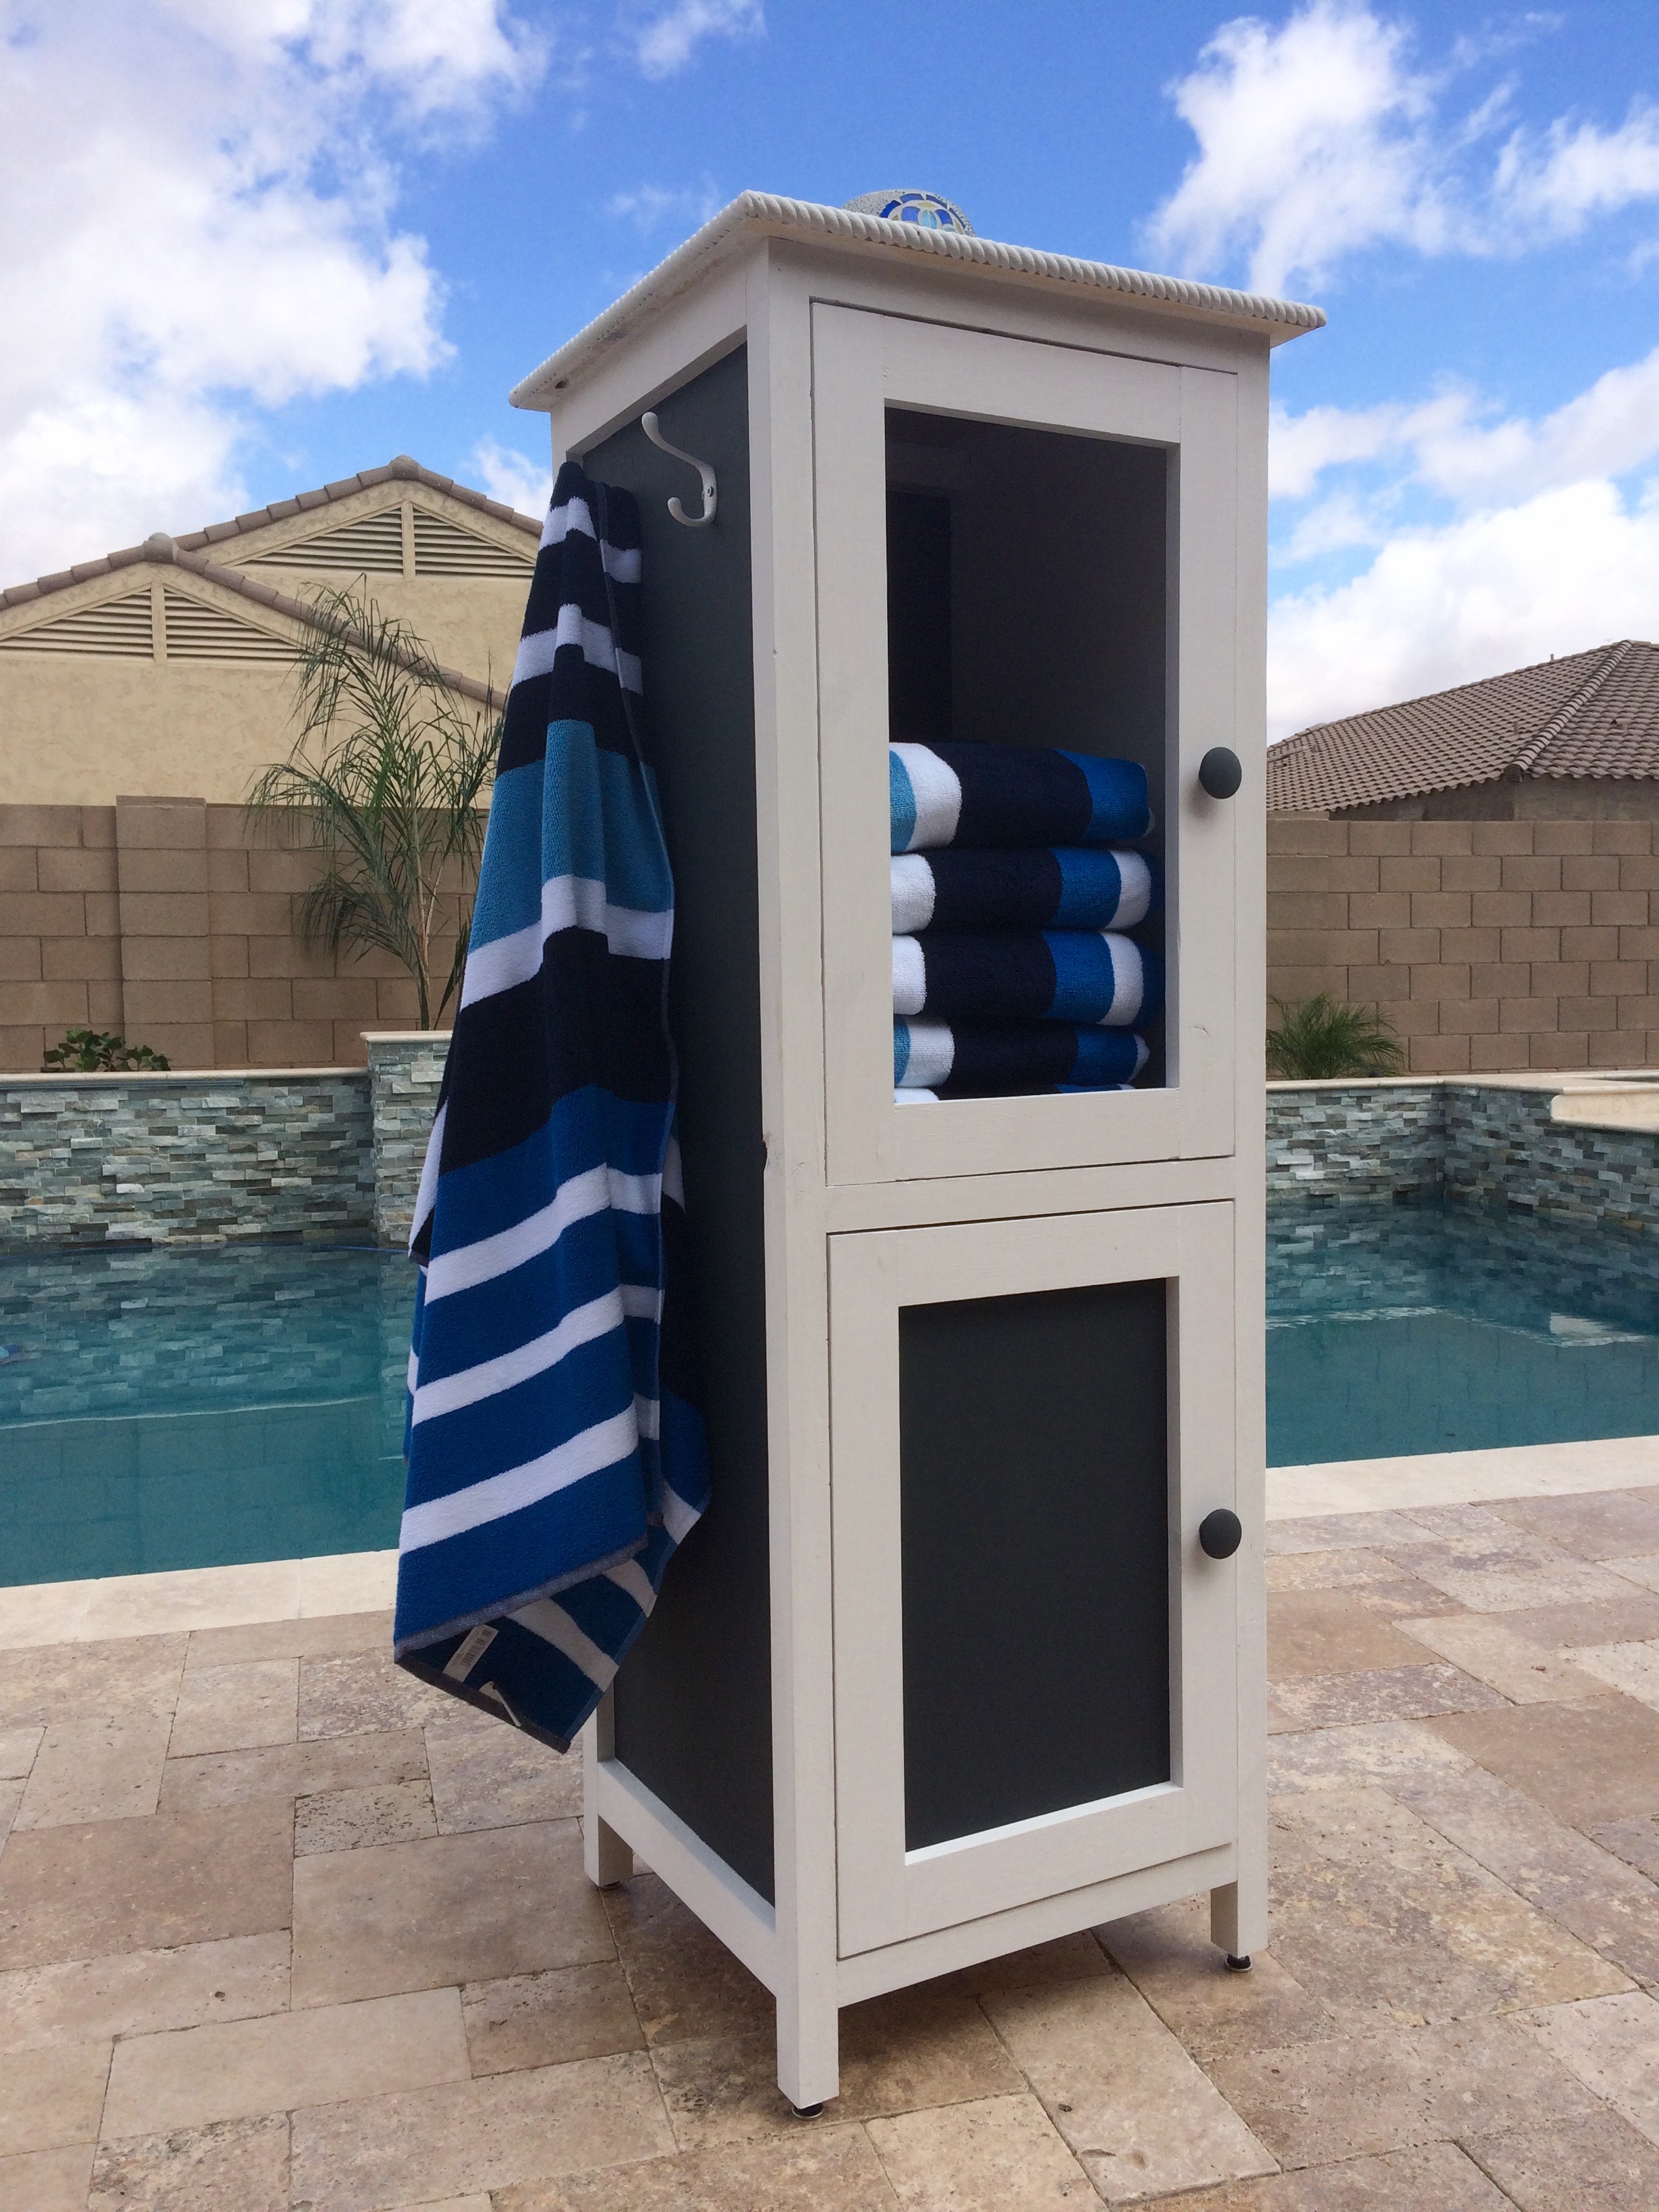
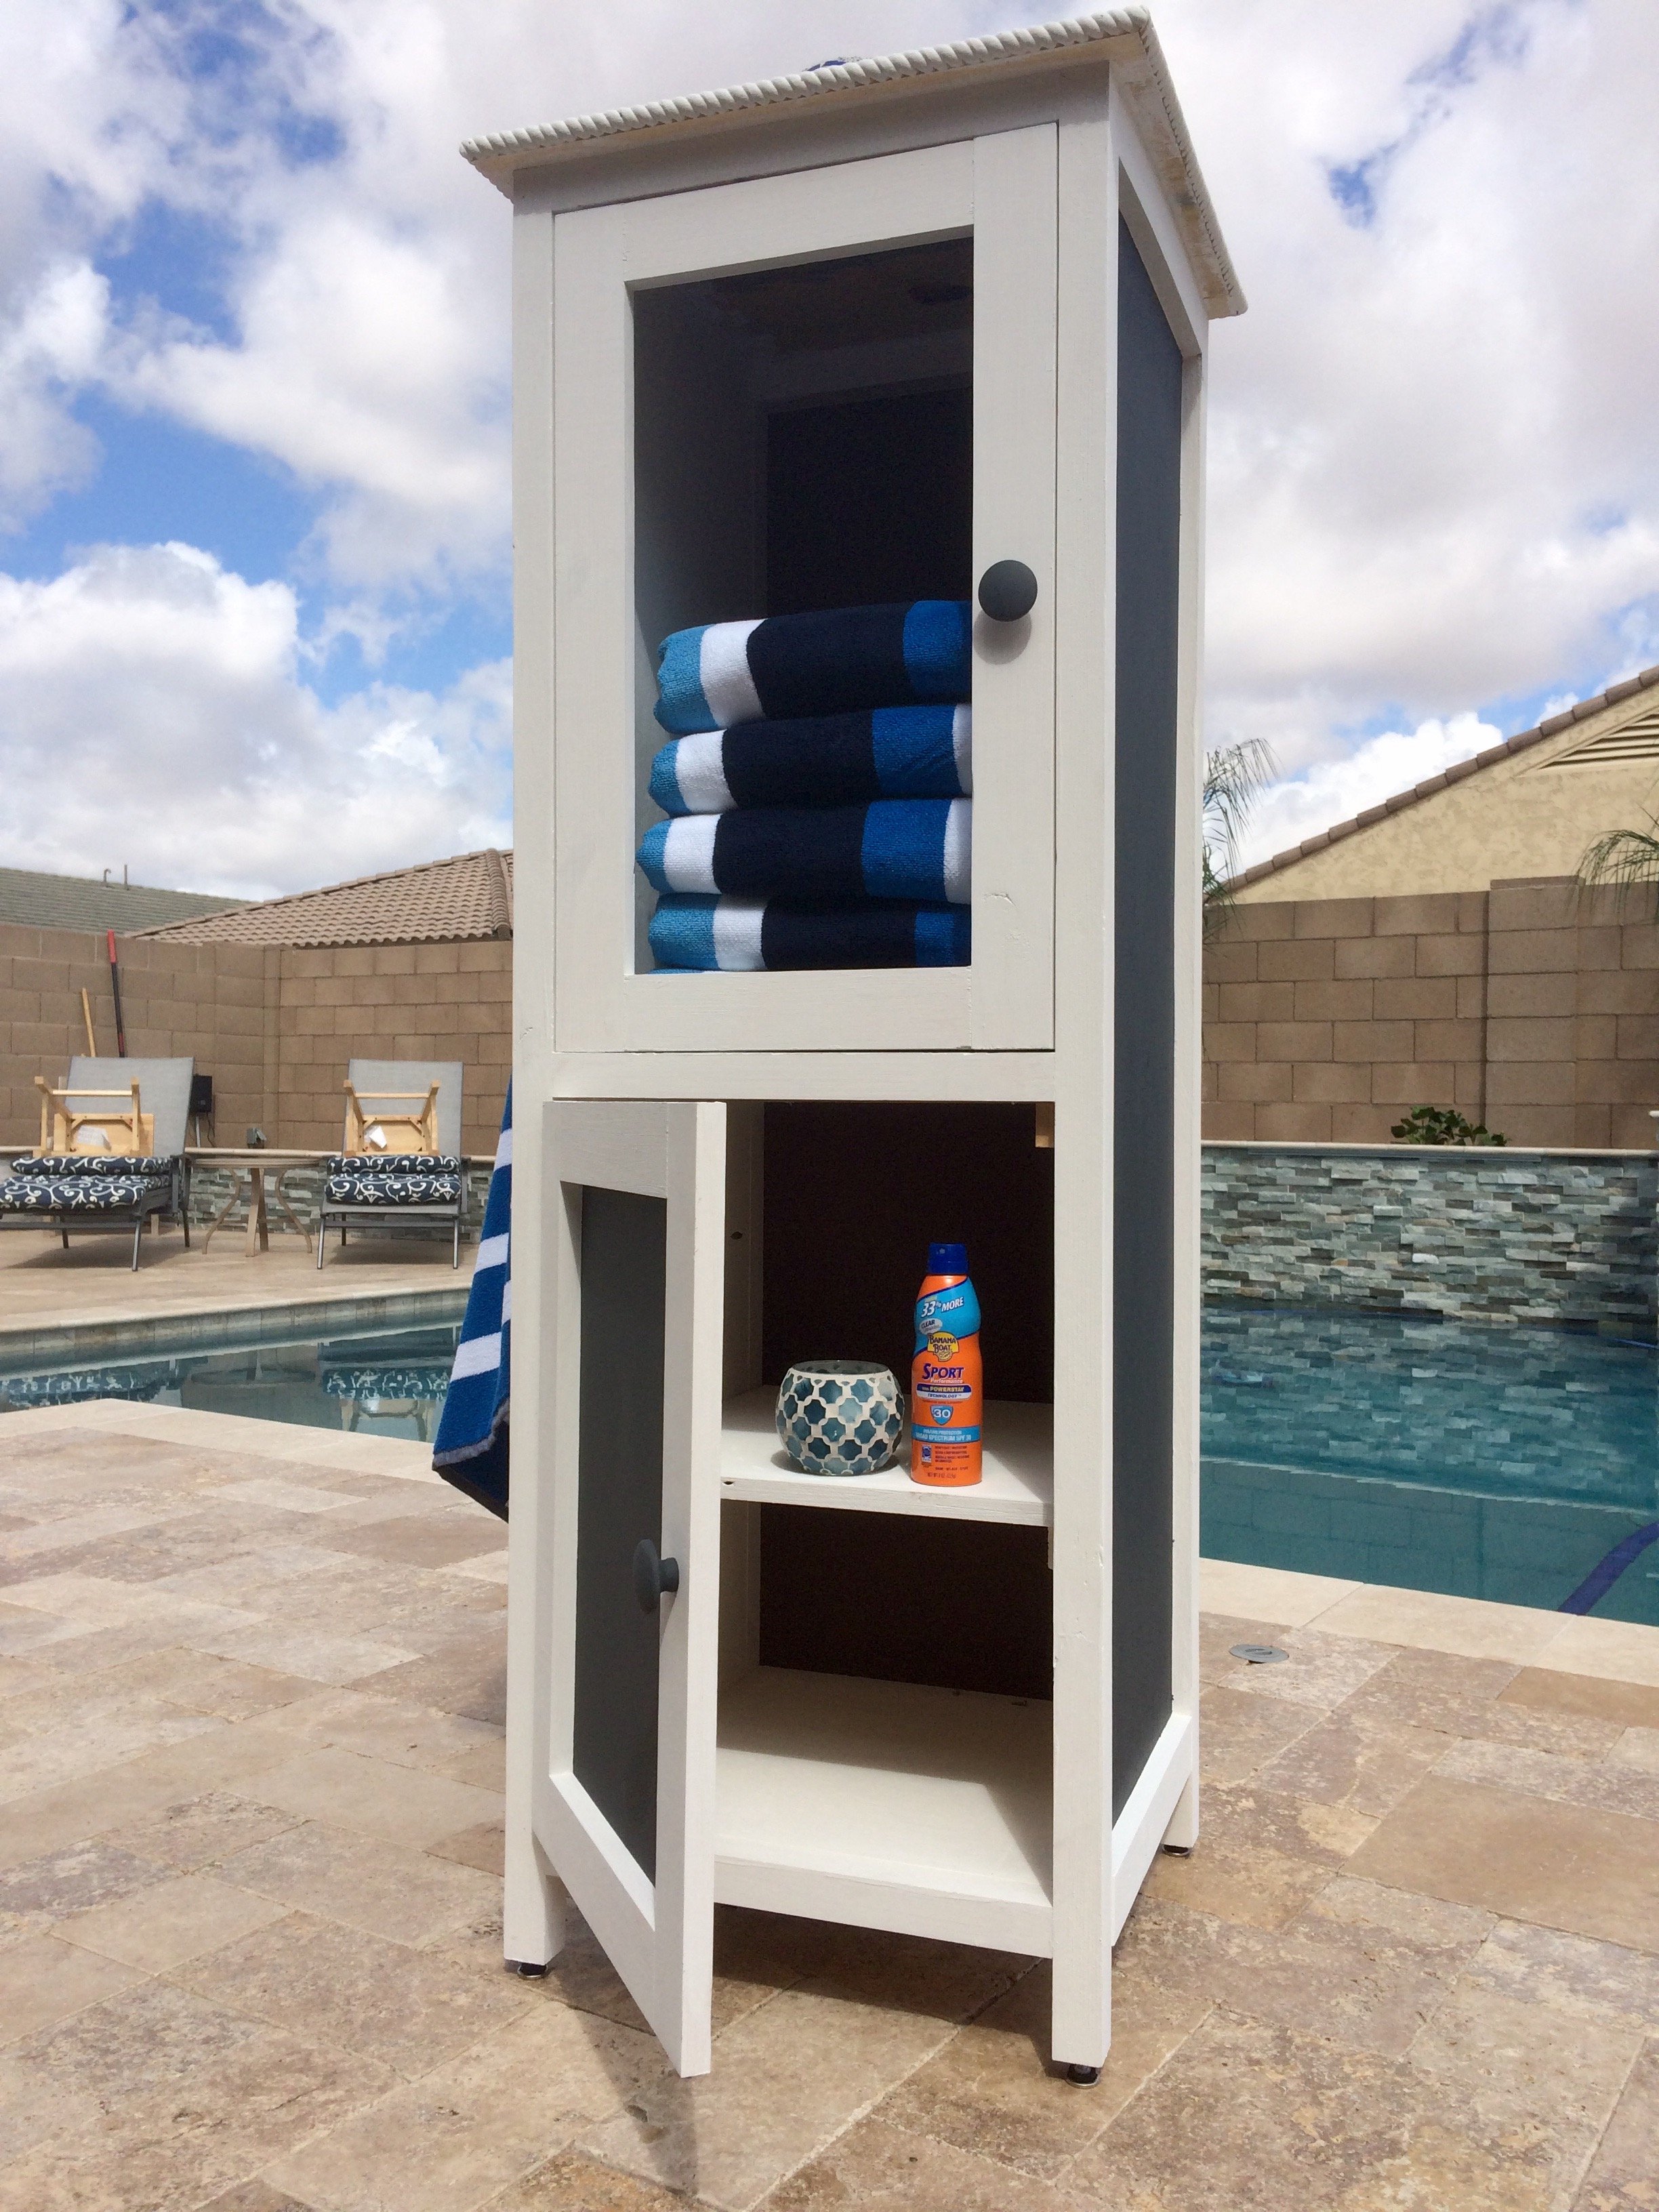
My father and I made this awesome poolside towel cabinet using the Benchmark Cabinet plans. A super easy 1 day build and it looks amazing on the patio. Bring on the pool weather!
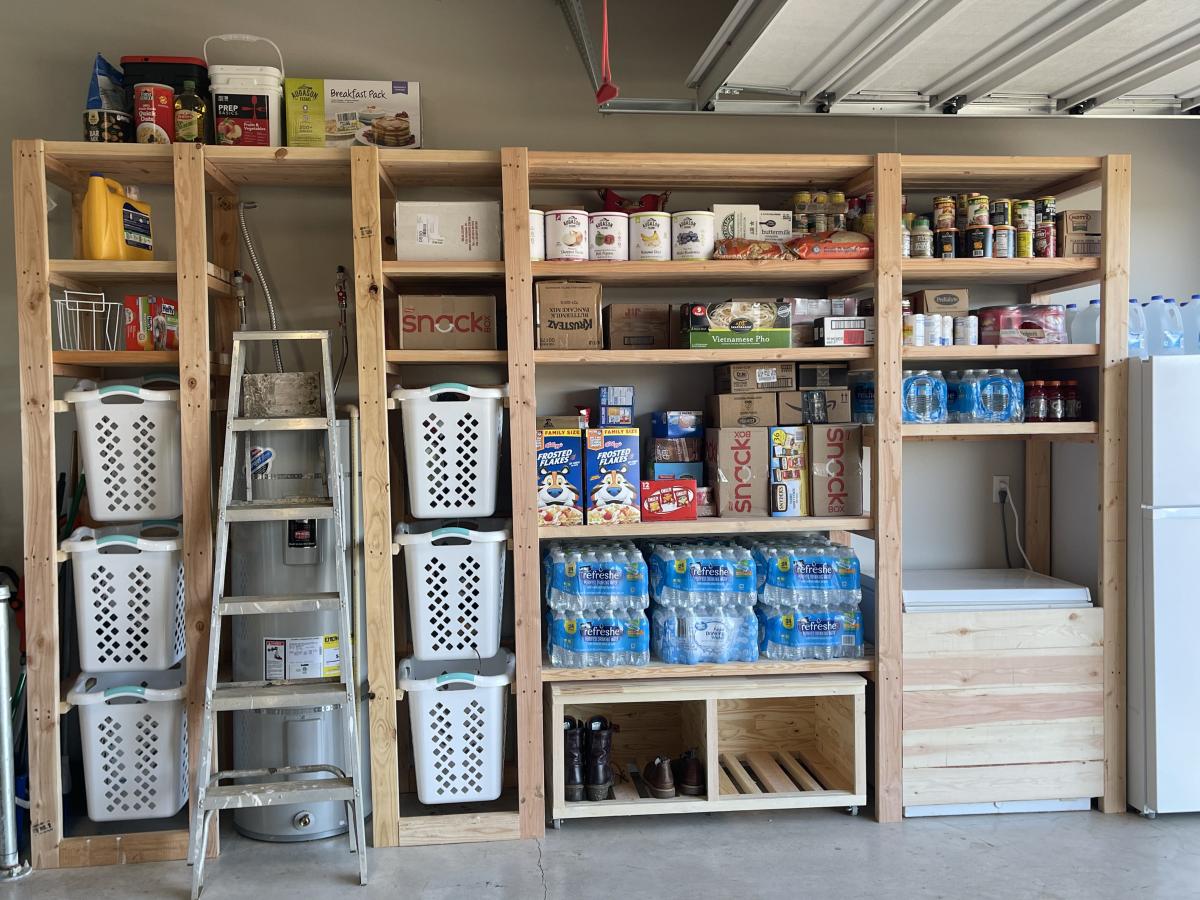
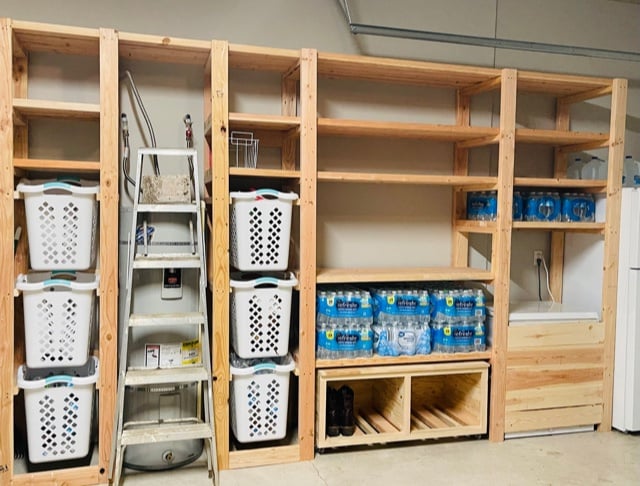
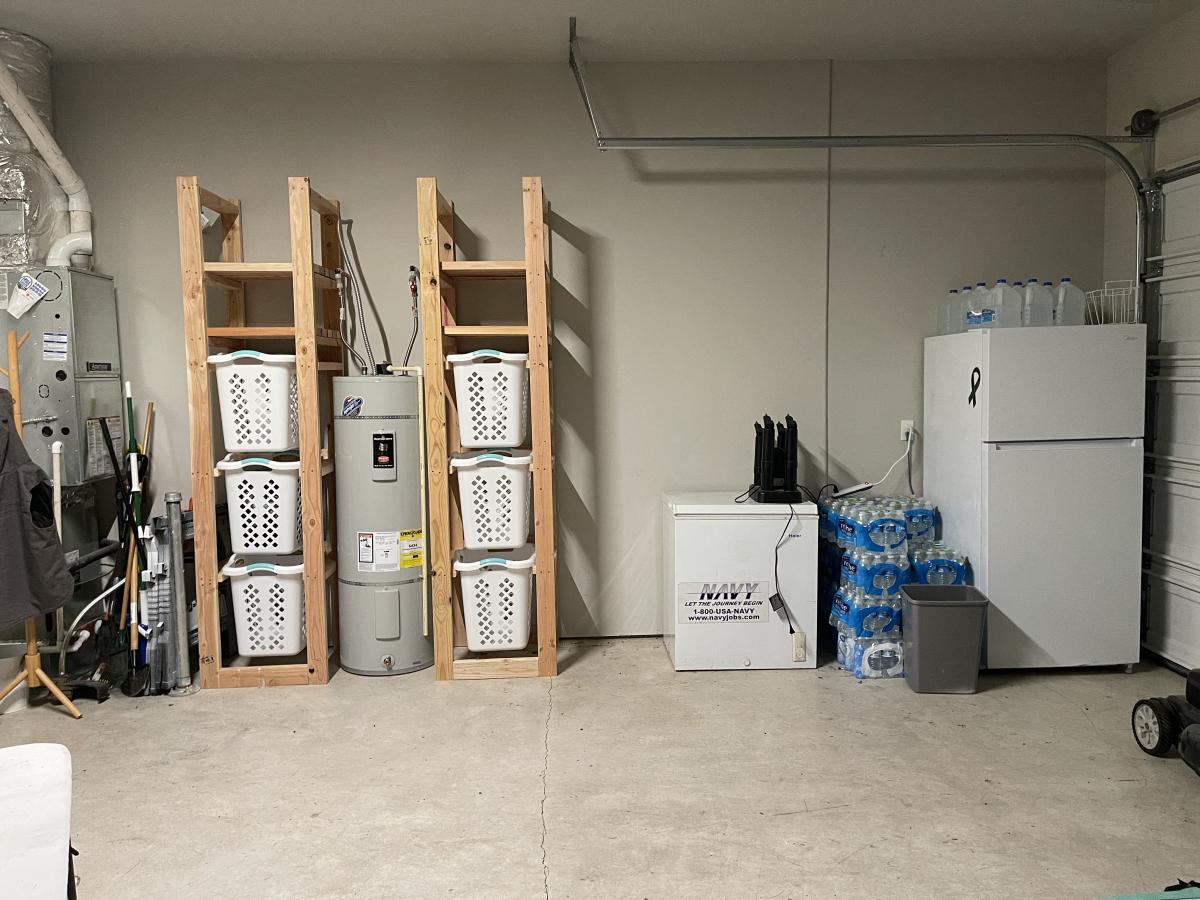
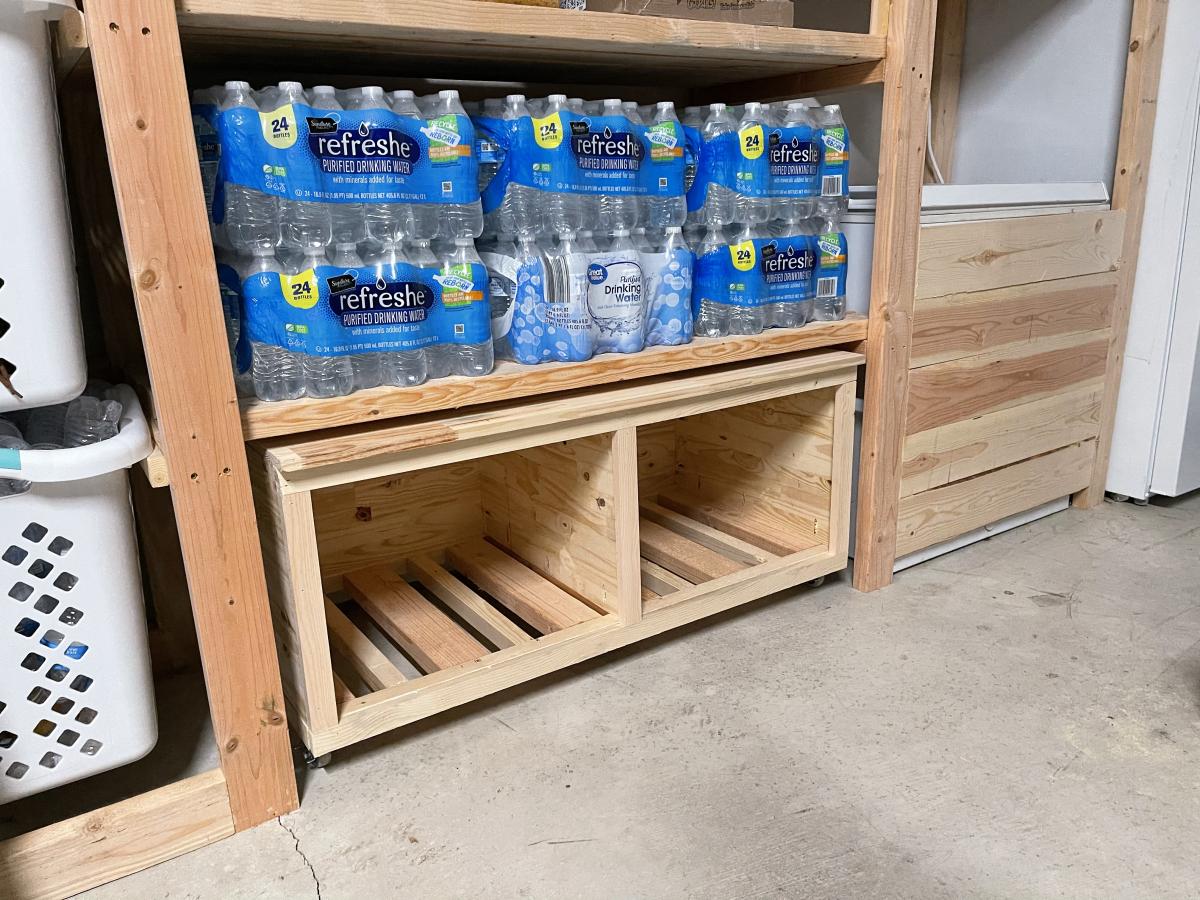
I used Ana's Freestanding Shelf plan and customized it to fit my needs. I incorporated laundry and recycle storage, a rolling bench and built in for our chest freezer. If you want to see it being built with some added tips, that video is available here https://www.youtube.com/watch?v=N8w7XGiVMbs&t=258s
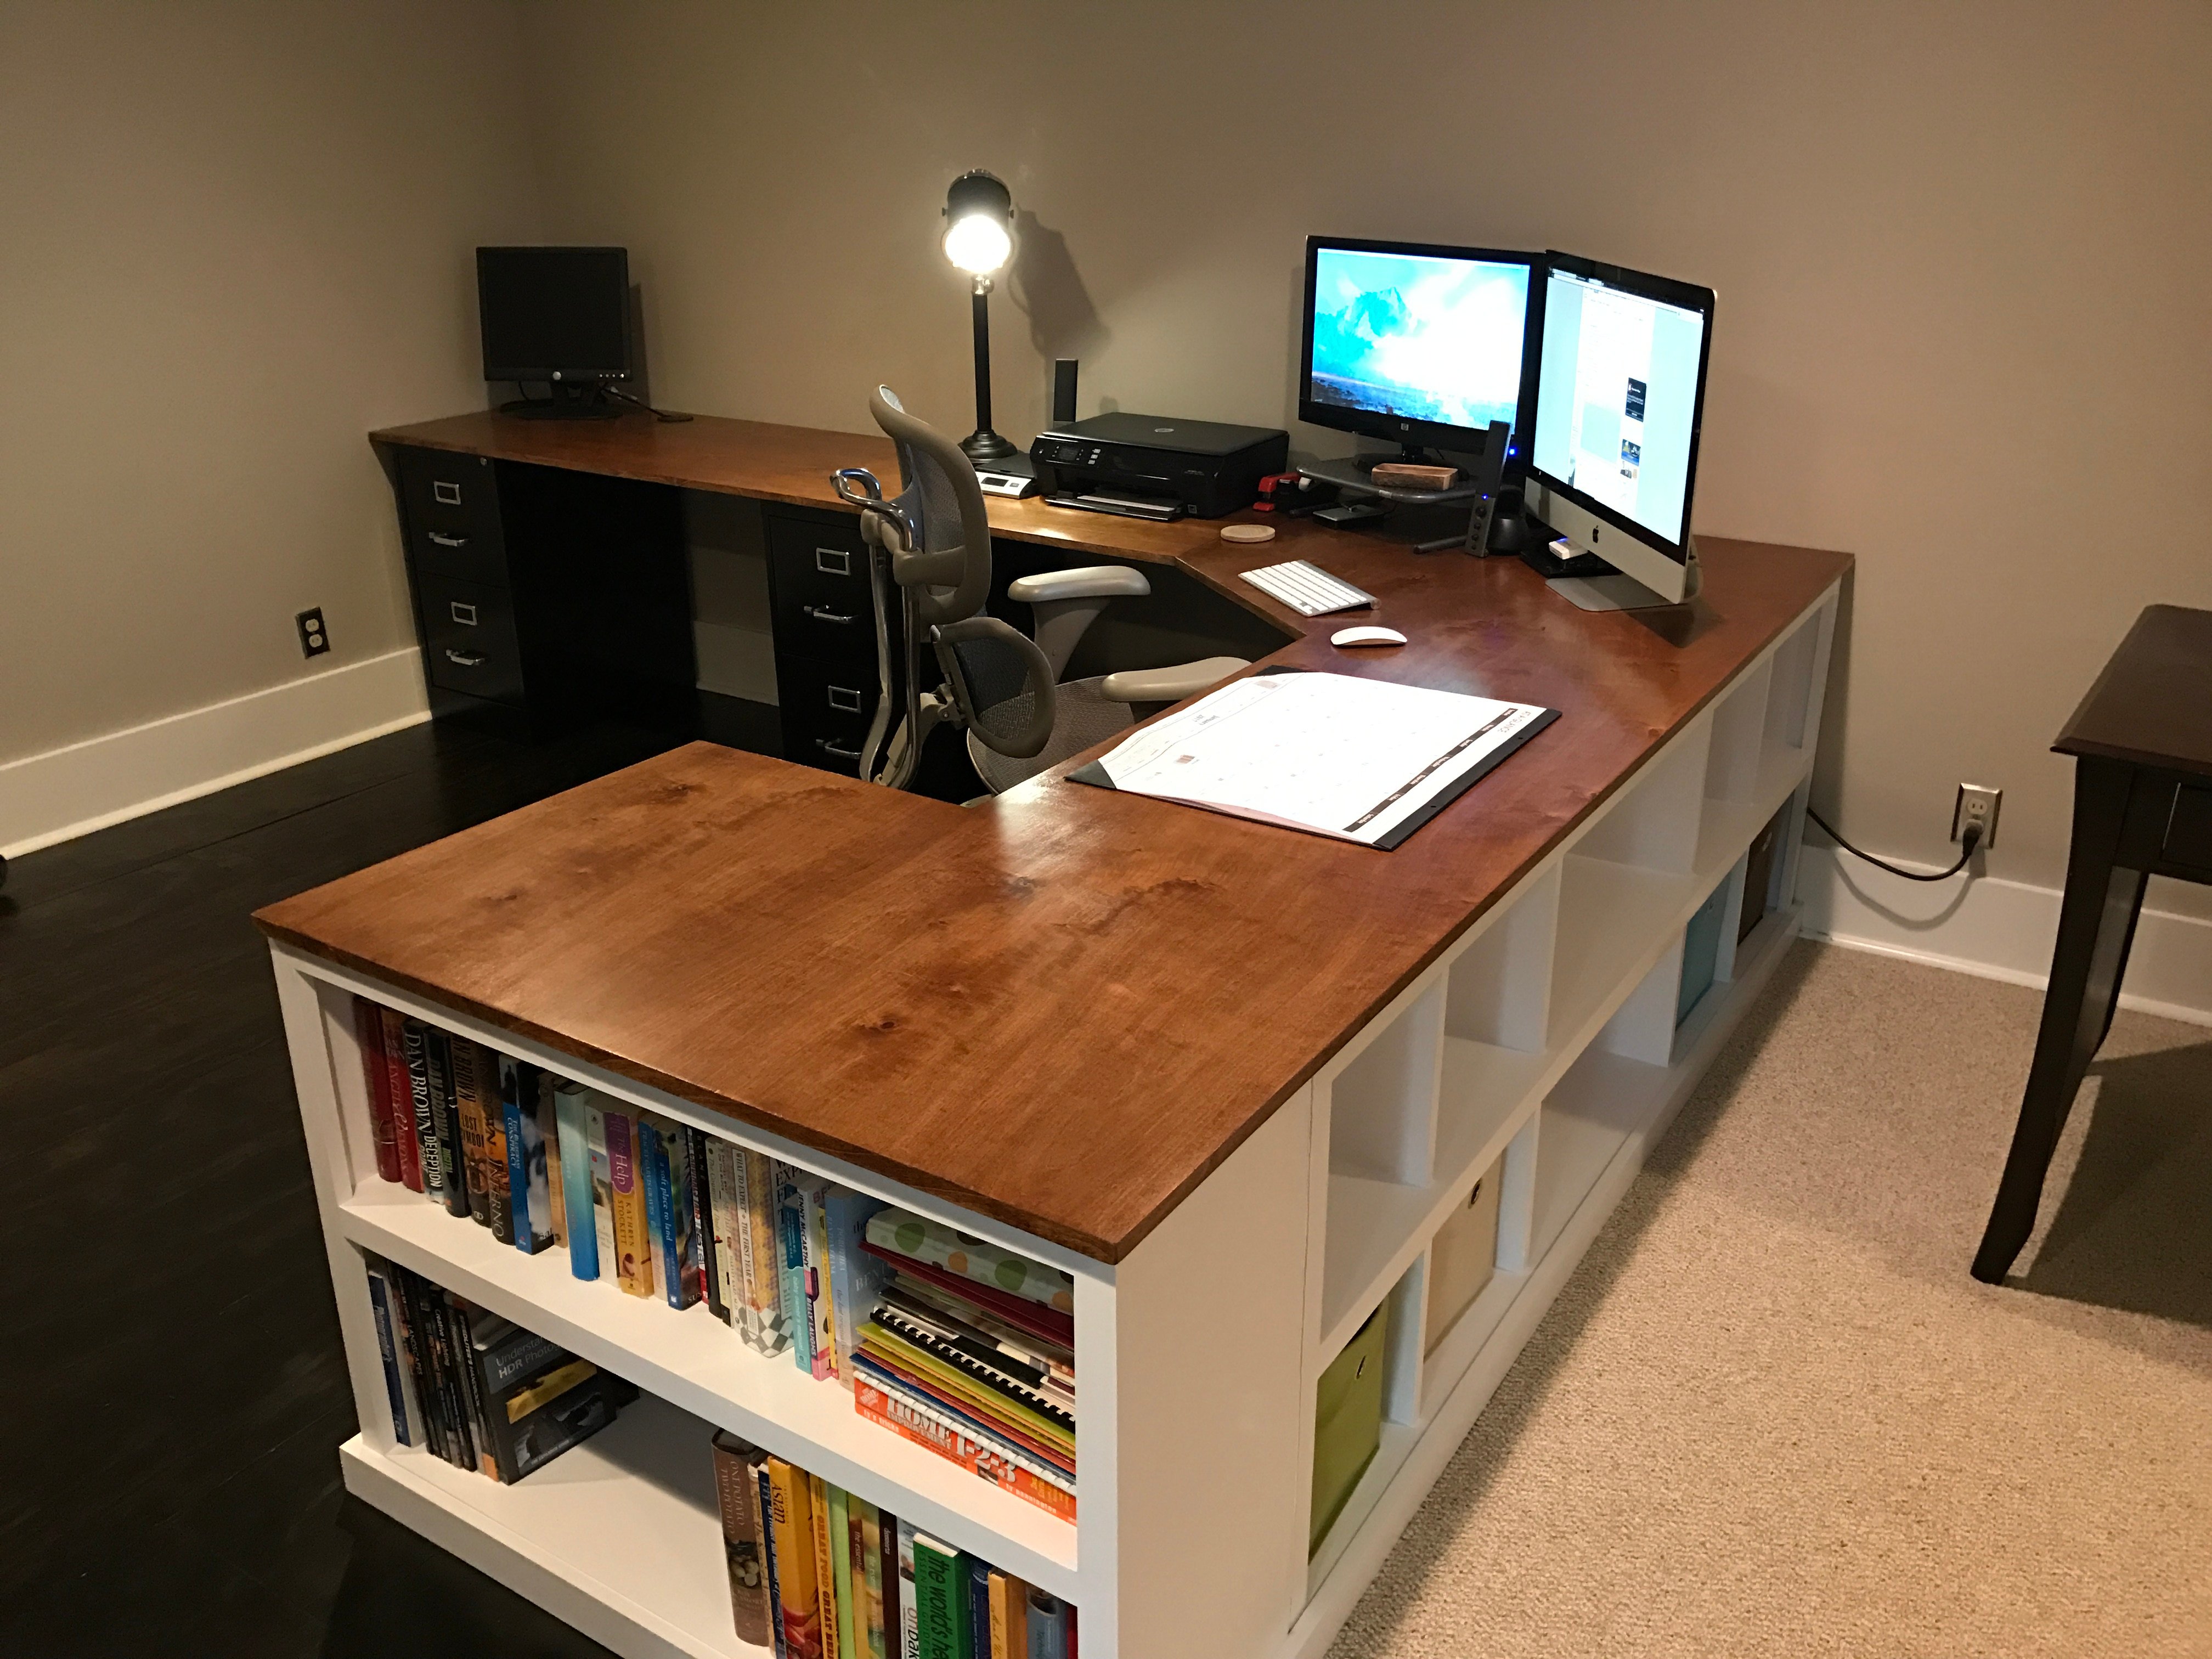
This is a mashup of several plans, combined into one big, bad ass, office desk. I've had a little experience years ago in high school woodworking classes, but haven't really built much since. This reminded me how much I enjoy working with wood. So rewarding to be typing this message at my new office desk!

Wed, 08/19/2020 - 06:25
This is amazing! So amazing could I ask you to share with me what prices from the collection of plans you used and how? I’m looking at your pic trying to figure out how to incorporate the plans you used. I want to build one for myself lol fantastic job!!!!
This was my first attempt at making furniture...but it turned out GREAT! My fiance was about to buy a VERY similar dining room set for $1300 before I stopped her and insisted that I could build it myself, finish it to match our kitchen/dining room, and save a TON of money!

I built this outdoor daybed to add a cozy and inviting space to my backyard. It was a fairly easy build, which I managed to tackle by myself. Head over to the blog for more details.


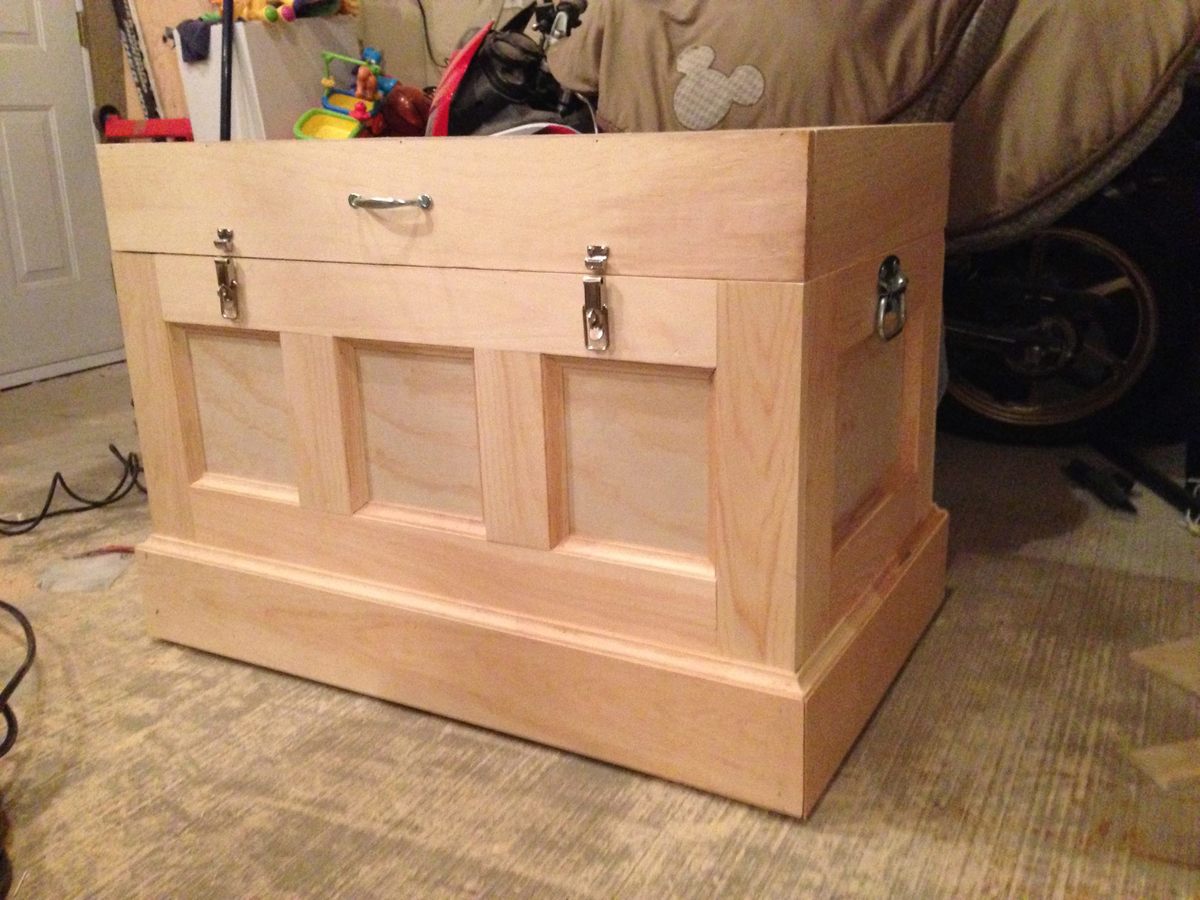
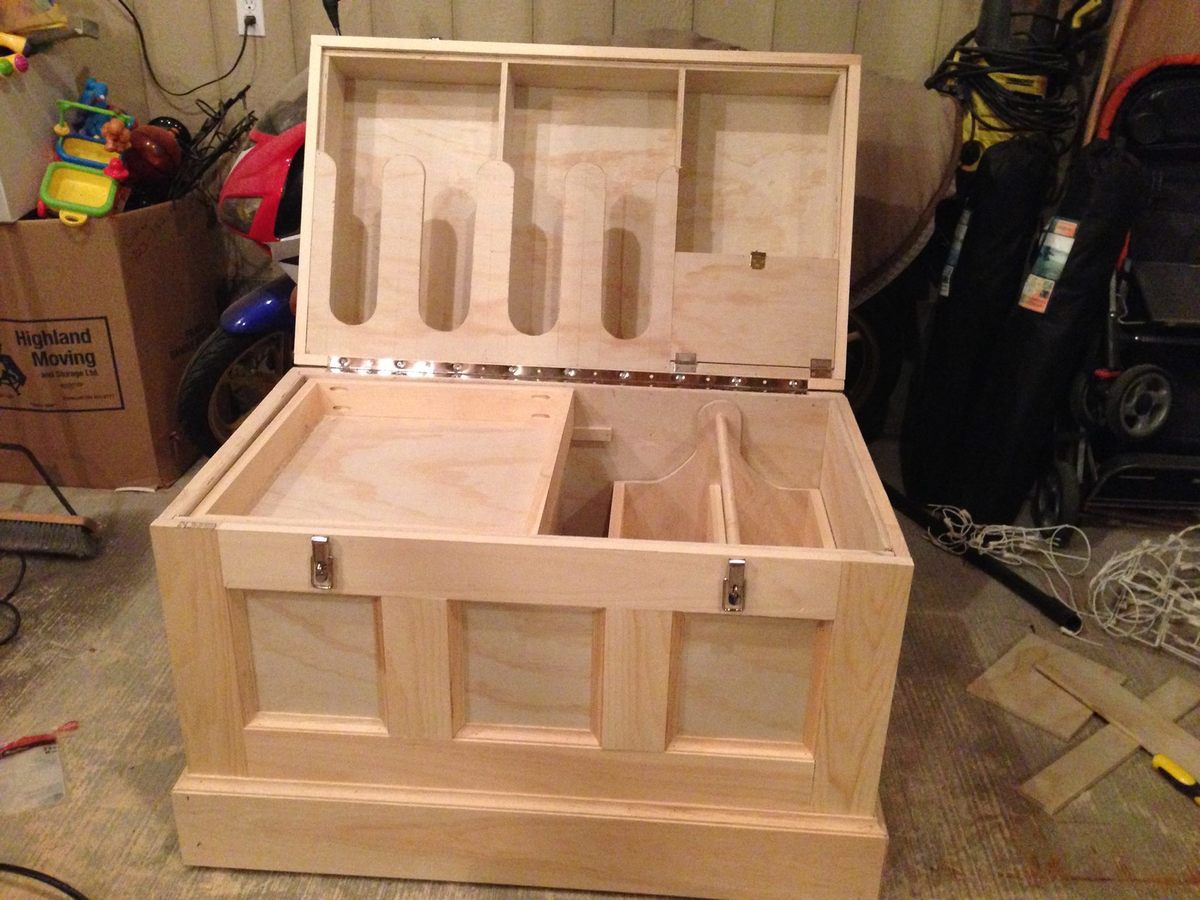
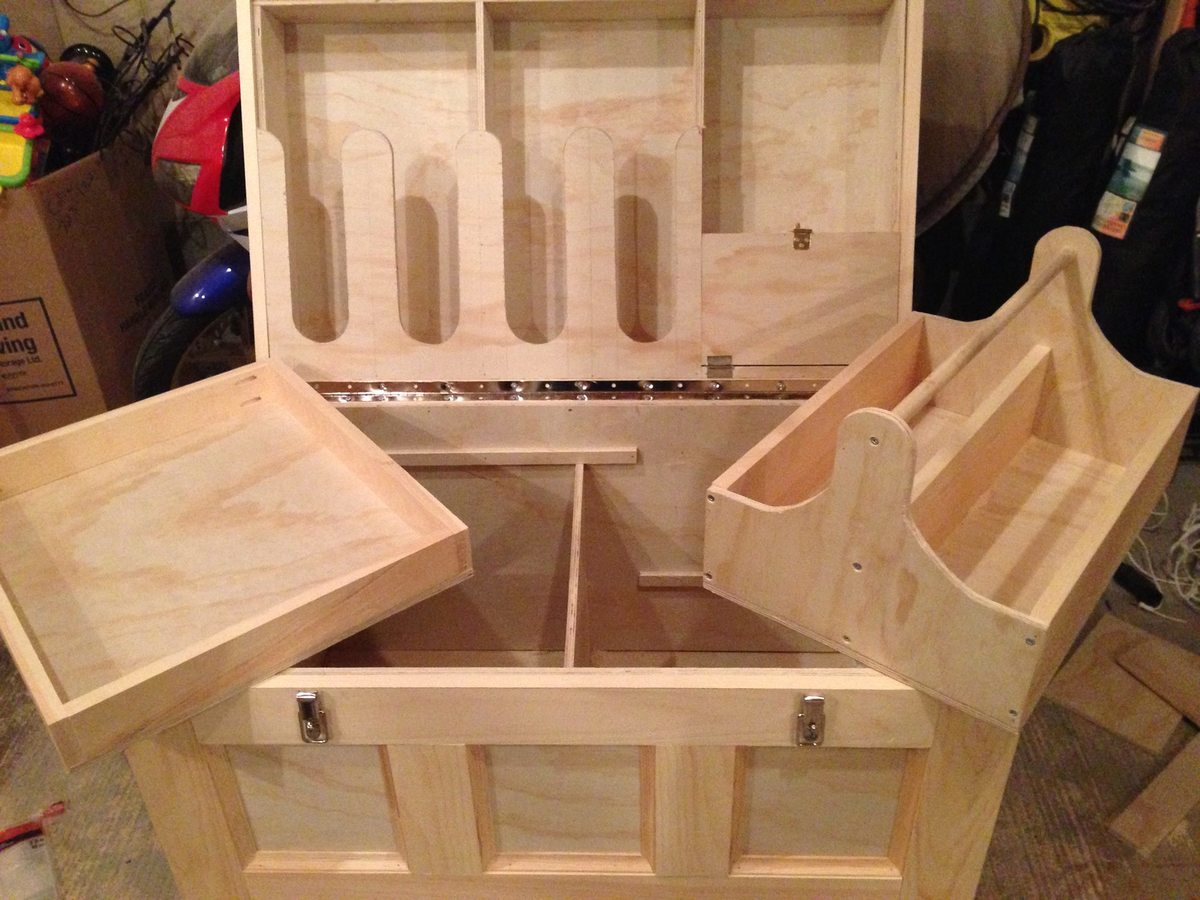
I made this box for my wifes christmas present. She has been riding horses for sometime and is planning on doing some shows. I built this box from Mimi's storage bench design, made it bigger, added a deeper box top and created the rest from looking at pictures online. Its all made of pine plywood and pine boards to keep it light. I added 4 castors to the bottom to make it easily moveable and hid them with the moulding around the bottom. Still has to be sanded and stained before it hits the barn. Its 39W X 24D X 29H. I used a piano hinge and routered the back to set the hing in. Added cove moulding around the bottom and to all the boxes around the front and side. Used a lot of pocket holes and finsh nails. Took me longer than it could have, because I planned everything as I went. I will add more pictures when its finsihed. I would rate it intermediate to advanced depending on your skills with certain tools.

Wed, 12/31/2014 - 09:02
Wow - that's a lot of work and well done. Great job! I'm sure your wife adores it.
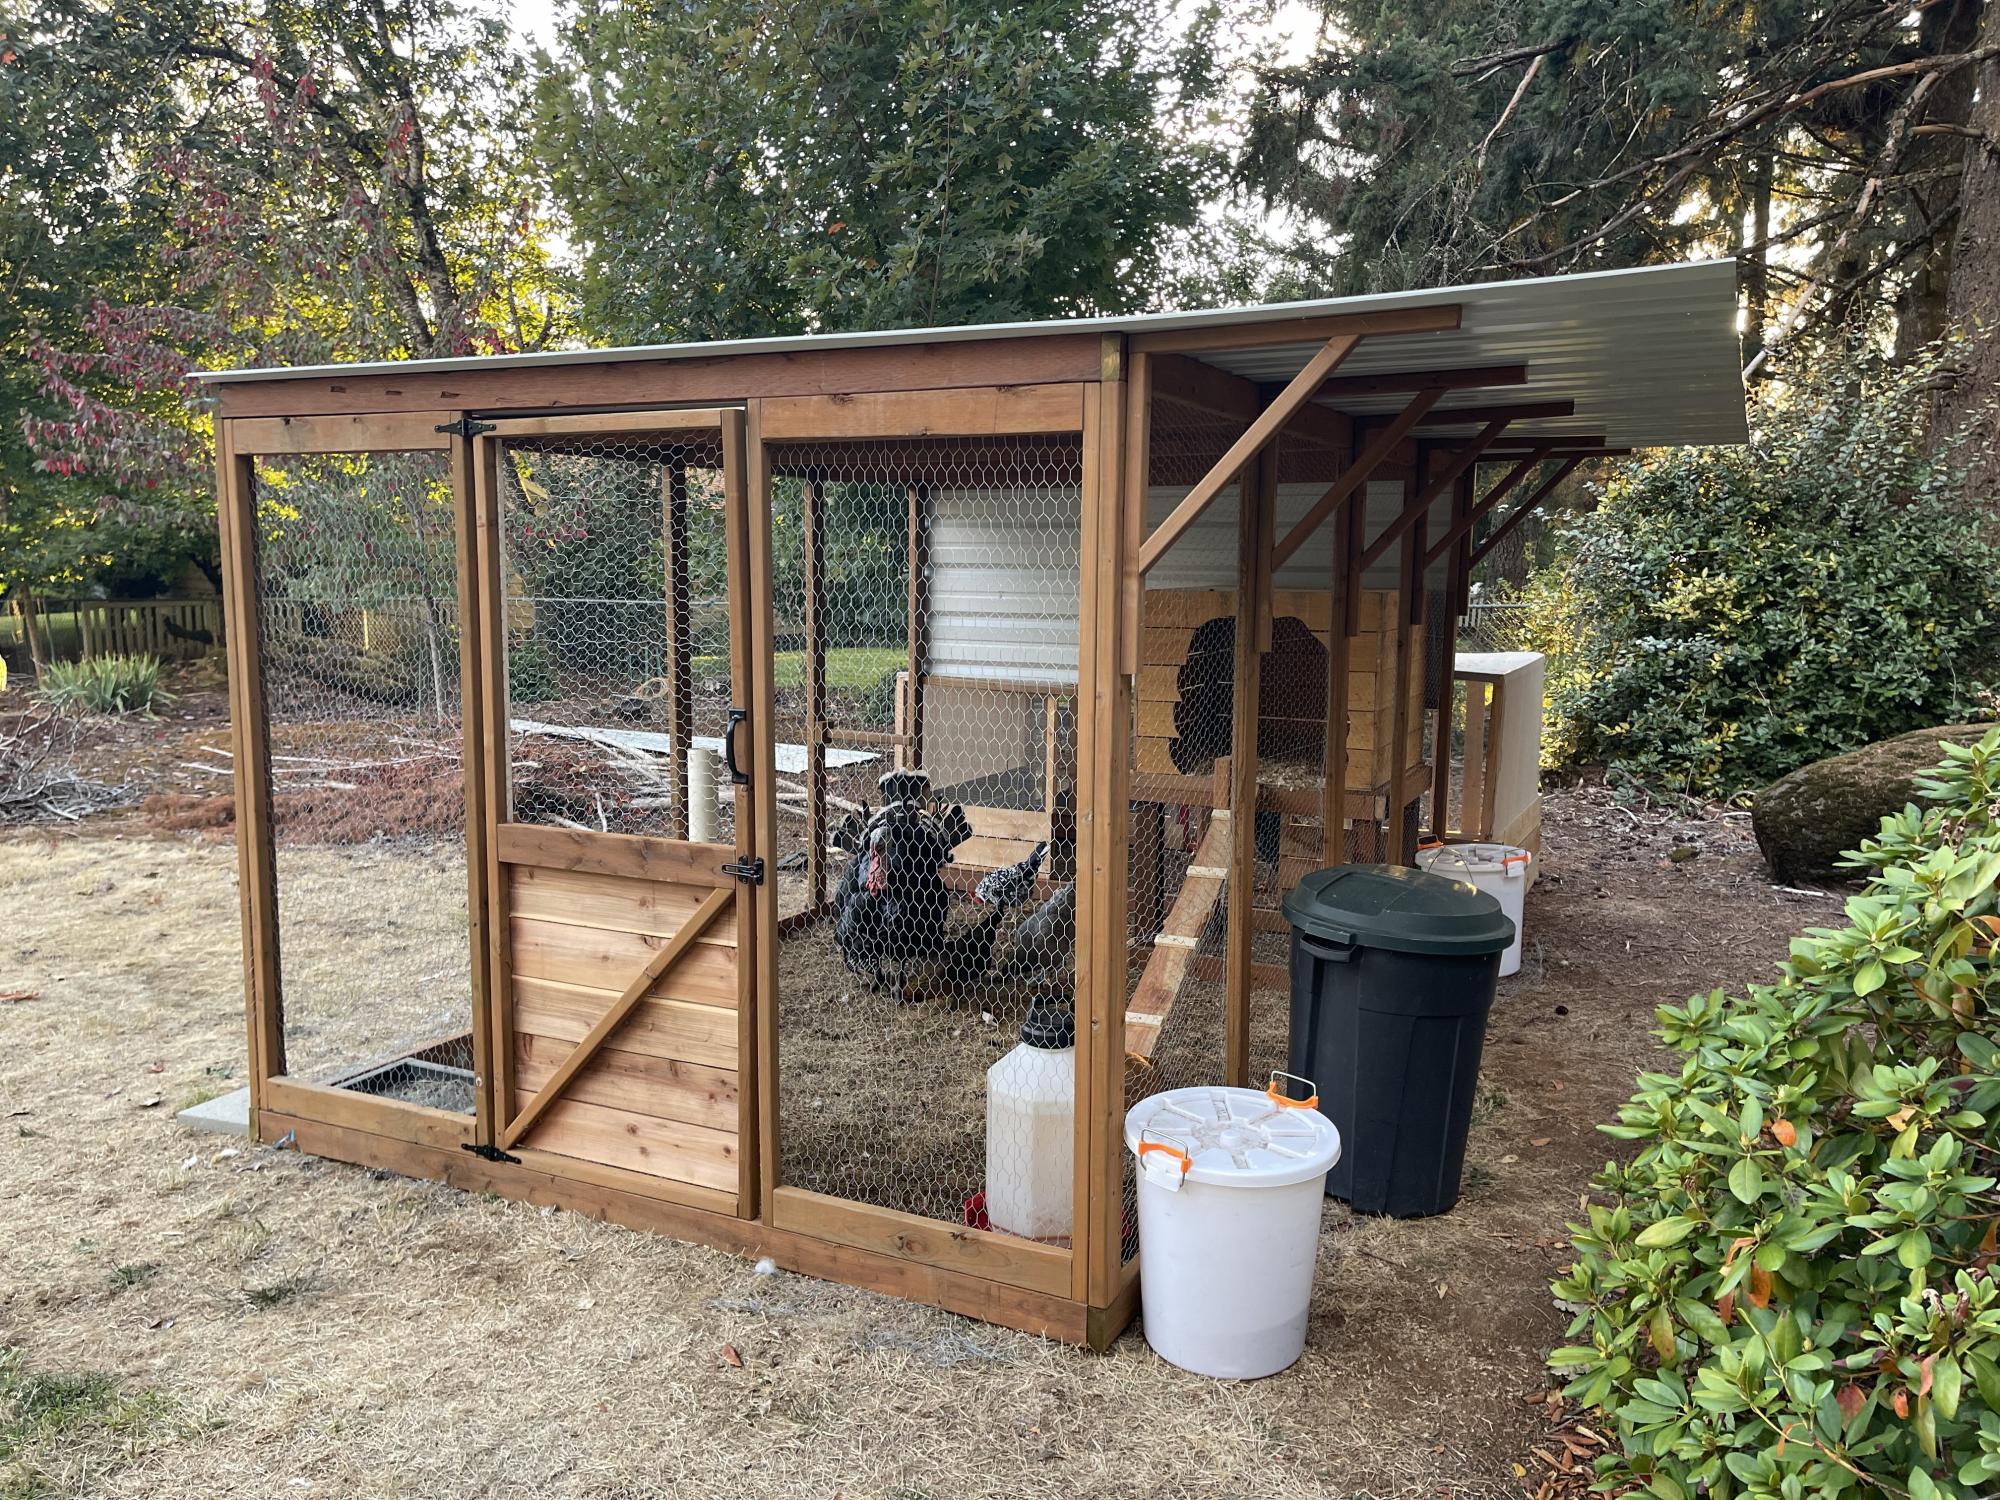
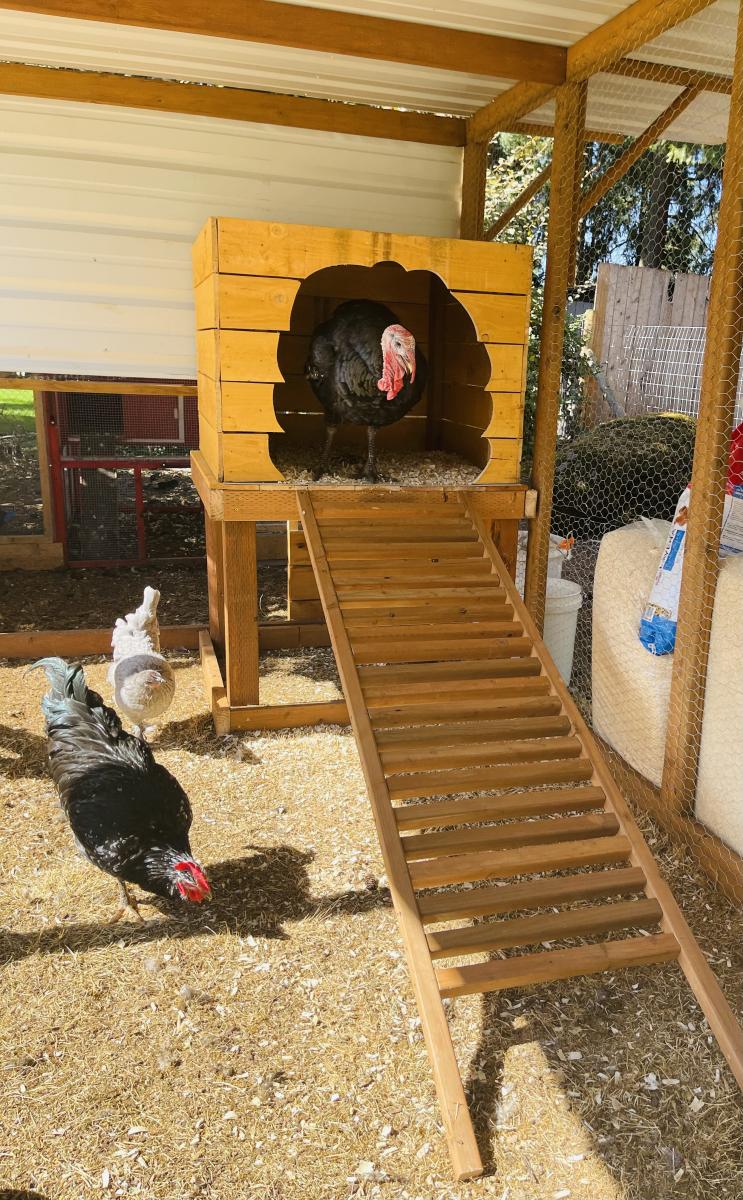
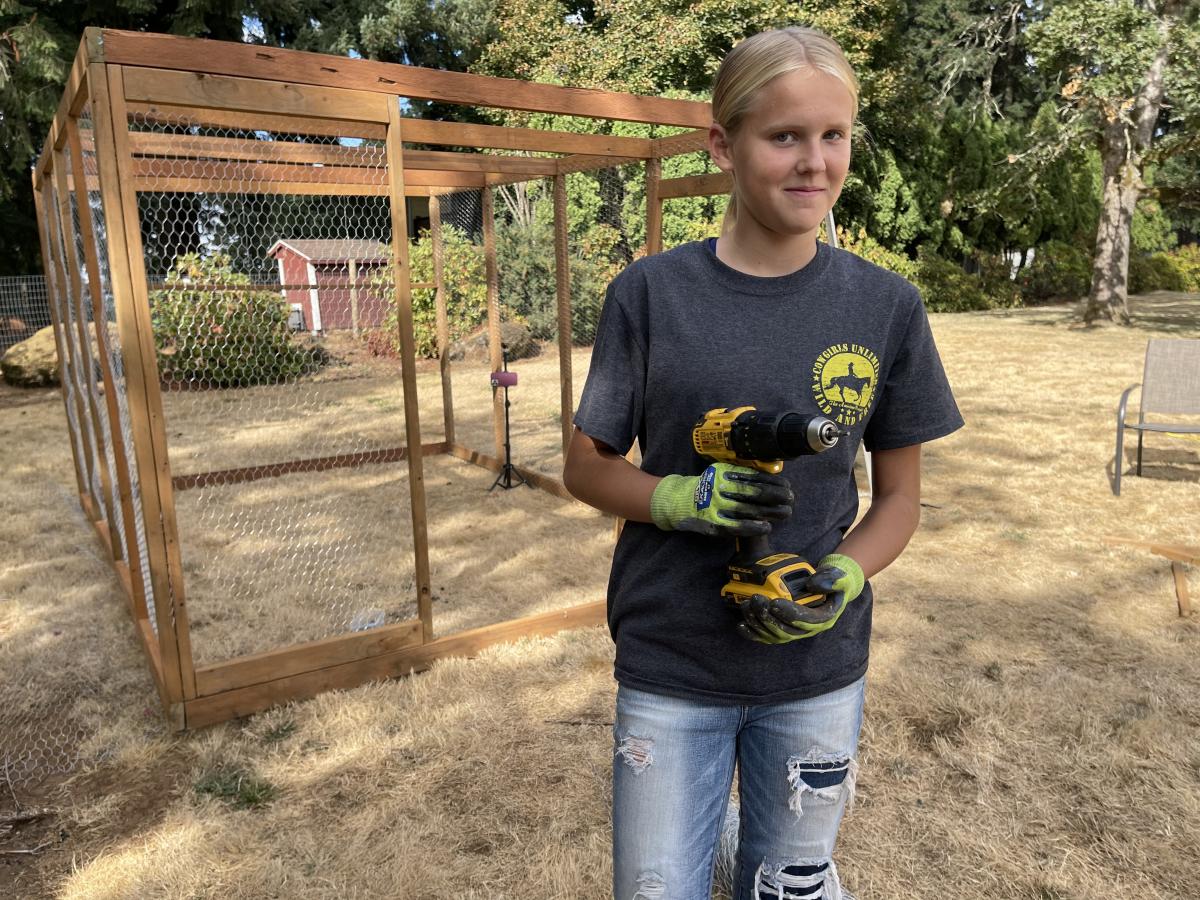
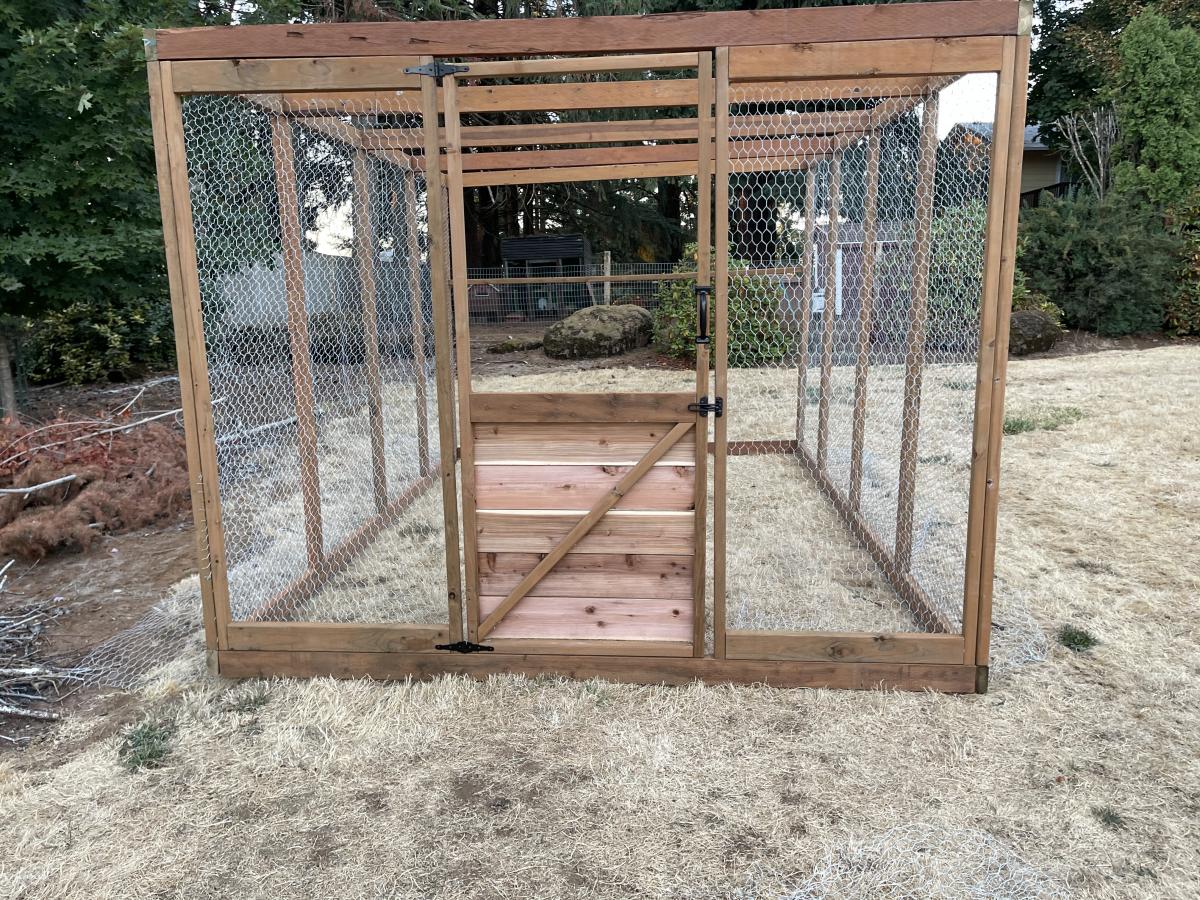
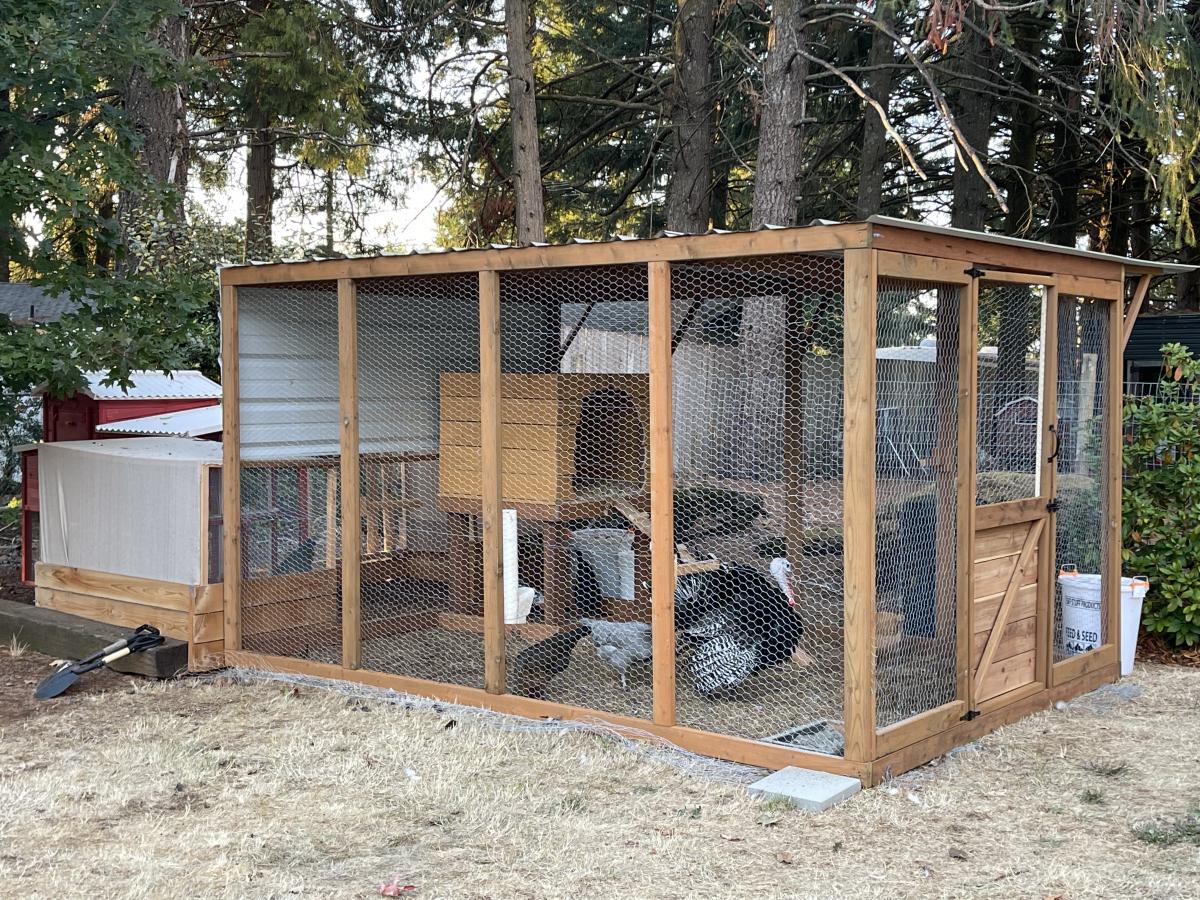
My daughter helped me build this enclosure. We used Ana's chicken run plan, but just made it taller so we could walk in easily. We added an overhang to store food and pellets under, for the supports we used Ana's easy shelves angle support plan, and finally we used the playhouse base plan for the base of turkeys house. All plans used are linked below. We ran the chicken wire out under the structure and still need to bring in some large rocks or pavers, but so far no issues with predators. Turkey was getting too big to fit in the smaller coop, so we decided to have fun with his house and used cedar fence pickets and some treated 2x4's, built a box and jig sawed the shape of a turkey. As you can see in the first photo the ladder for turkey wasn't big enough, all the other chickens were in his house, lol. So I beefed up the ladder and he happily can put himself up at night now:) Overall a super successful project, I wasn't sure what to do with the top and just at that point, the neighbor walked over and offered the metal, talk about a huge win and the perfect solution! We attached the run to the previous smaller structure and now they have so much more room and are laying like crazy:) Finally, I think this would make a great dog kennel as well...
My laudry never looked so good! I love these plans from shanty2chic and anawhite. I spent a few days in the garage building, and now, my laundry can be hidden away in any room of my house.
Thanks shanty2chic and anawhite for your excellent plans.
http://www.shanty-2-chic.com/2014/08/diy-laundry-basket-dresser.html
http://www.ana-white.com/2011/04/wood-tilt-out-trash-or-recycling-cabin…
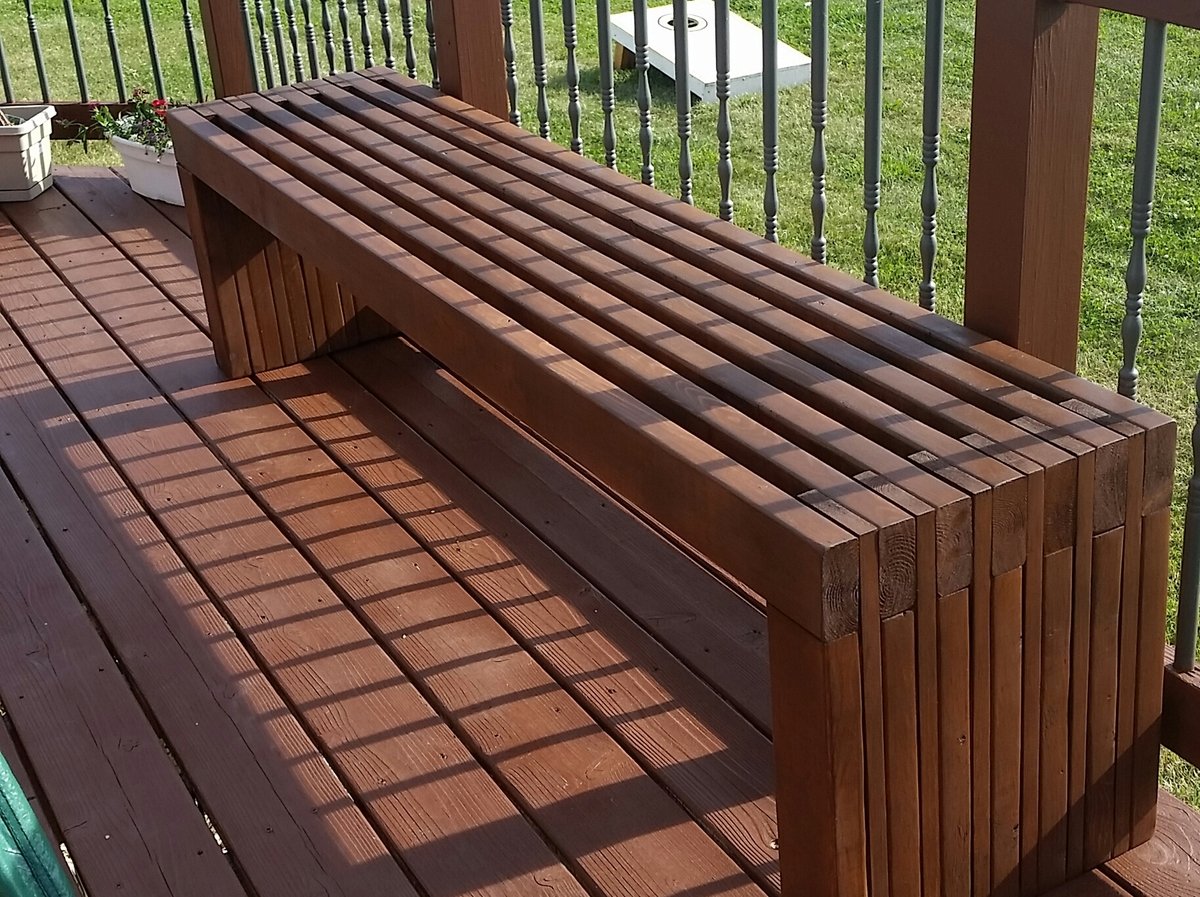
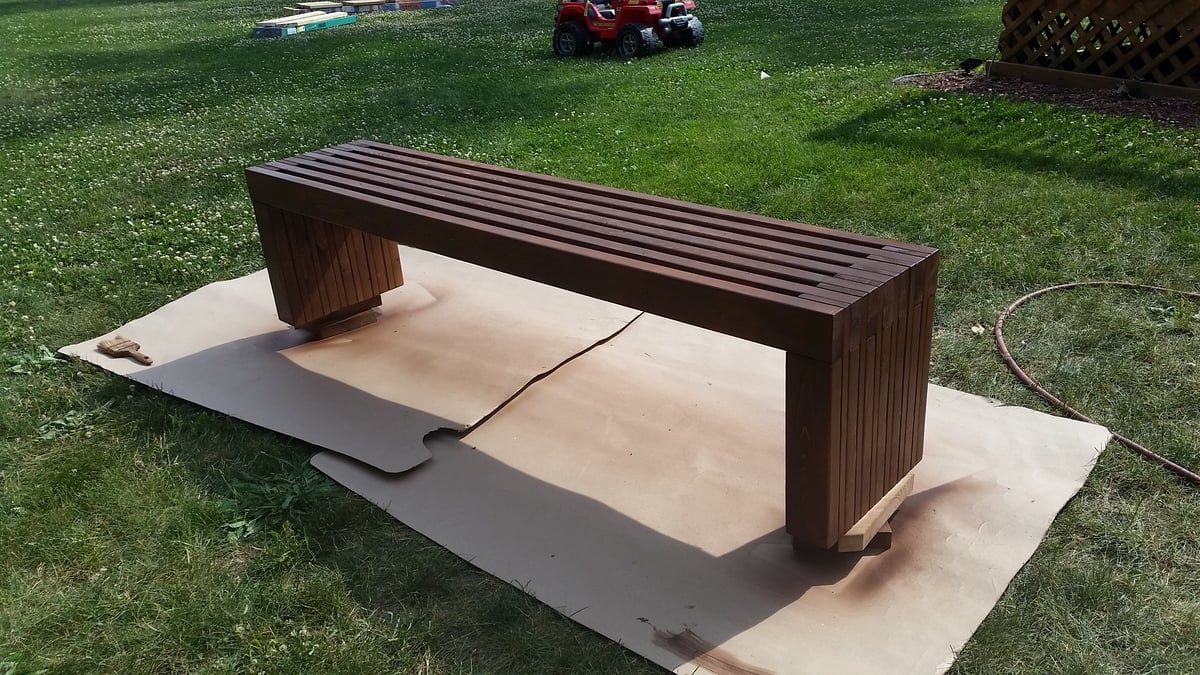
I made this for my sister the day before her house warming party. It was a pretty easy build. I used wood glue and 2" nails. Using a nail gun, this came together pretty quickly. I do wish that I had wide enough clamps to hold everything in place while it dried, because there were a few gaps due to some imperfect boards. I used 104" stud length boards, so I only need to purchase 7 instead of 9. this was enough to make the cuts for the top and both leg pieces from each board. the price was the same and we had limited space in our van for boards, so this was a better option for us. I used a sprayer hooked up to an air compressor to apply the stain and was able to get in between the slats fine with this method, brushing over it as I sprayed. Luckily I chose the same color as her deck not knowing, so it matches great. Now I need to make one for myself! :)

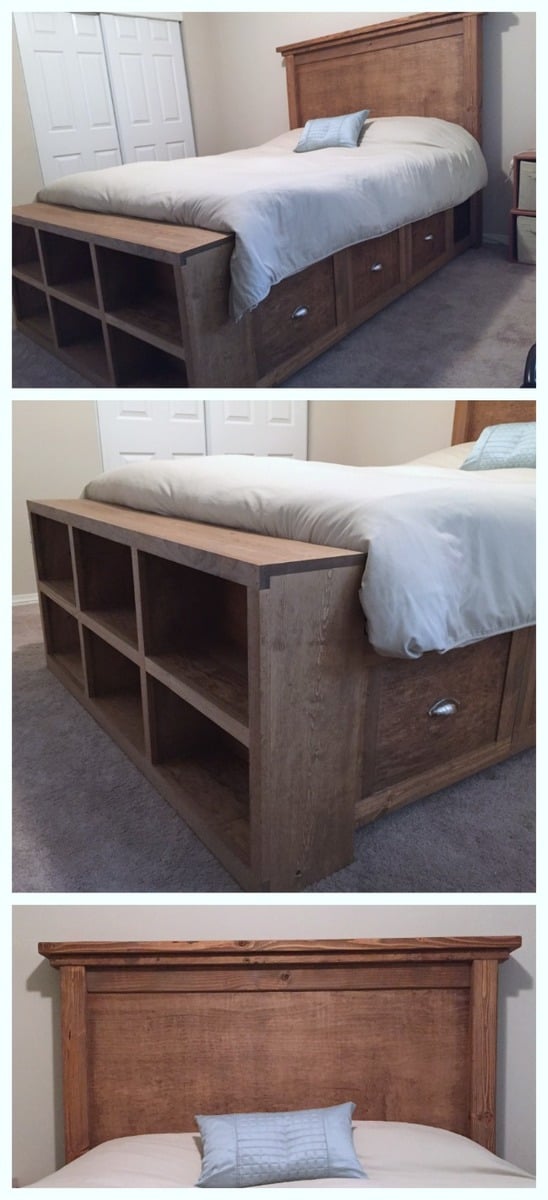
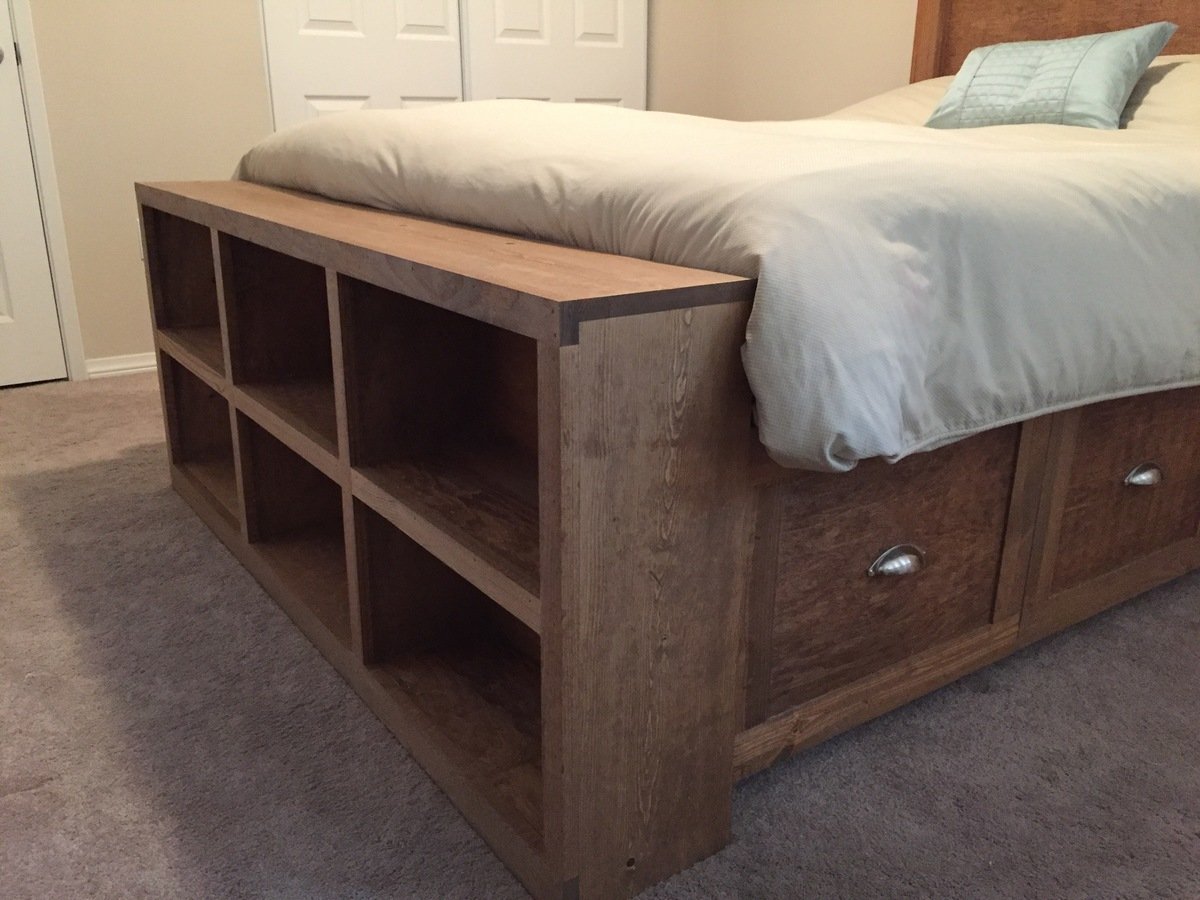
I altered the plans just a bit so that I could make use of the drawer closest to the headboard, while using bedside tables as well (not the ugly ones in the pictures, but some that only exist in my mind as of now). With the plan as is, I didn't think that first drawer would be able to open if you have a nightstand. So I left about a 17" gap that can be used as an open shelf for storage, and still had room for 3 drawers. I also wanted to include a bookshelf as the footboard to make it multifunctional. We have a ton of books and no place to store them (fear not, a large bookshelf/media center is coming soon!) I also altered the top of the headboard just a bit to give it more texture and visual appeal (hopefully, but beauty is in the eye of the beholder so I've been told). Lastly, I did not put the 1/4" plywood backing on the drawer carcasses. They were pretty sturdy as is, and only got more sturdy as they were attached to the headboard and footboard; I'm not worried about racking at all. Leaving the back off also allows me to pull the drawers out and access some hidden storage in between the two drawer carcasses.
I wanted a simple finish, so I rubbed it with dark walnut Danish oil. Super simple finish and I think it'll hold up as the bed is not like a desk that needs poly or something.

Sun, 08/28/2016 - 19:50
This bed turned out amazing. I love the modifications and agree the first drawer will be more usable.
Thu, 05/28/2020 - 06:11
Could you please tell me how you attached the footboard on this one? I thought about using some bolts and counter sinking them from inside the self. How did you do it?

I used the basic framing plan for the project, but extended roof overhangs, added engineered siding / trim and cedar shake roofing. I put 2x4 bracing on for the platform.


Comments
Ana White Admin
Fri, 01/07/2022 - 09:17
Gorgeous bed!
Love the whole looks, way to go!