Community Brag Posts

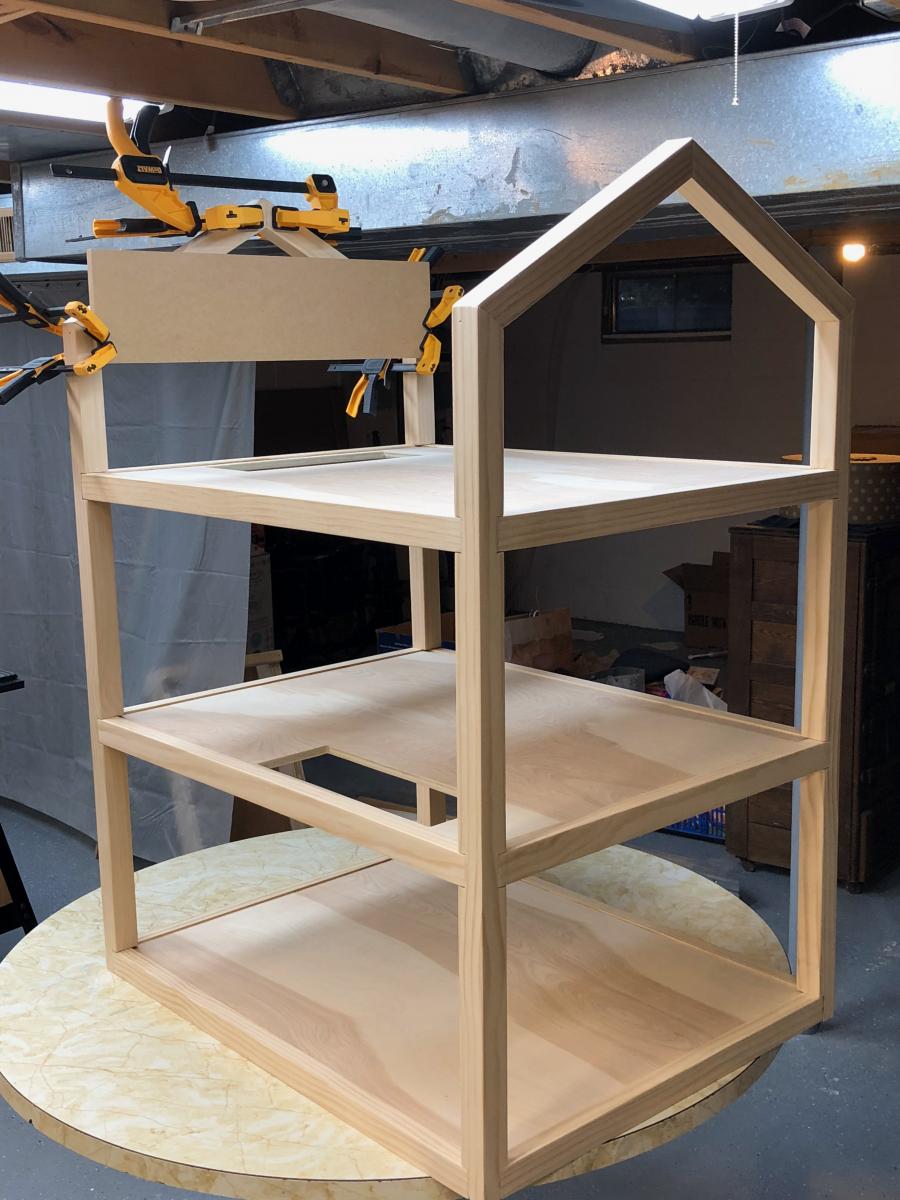
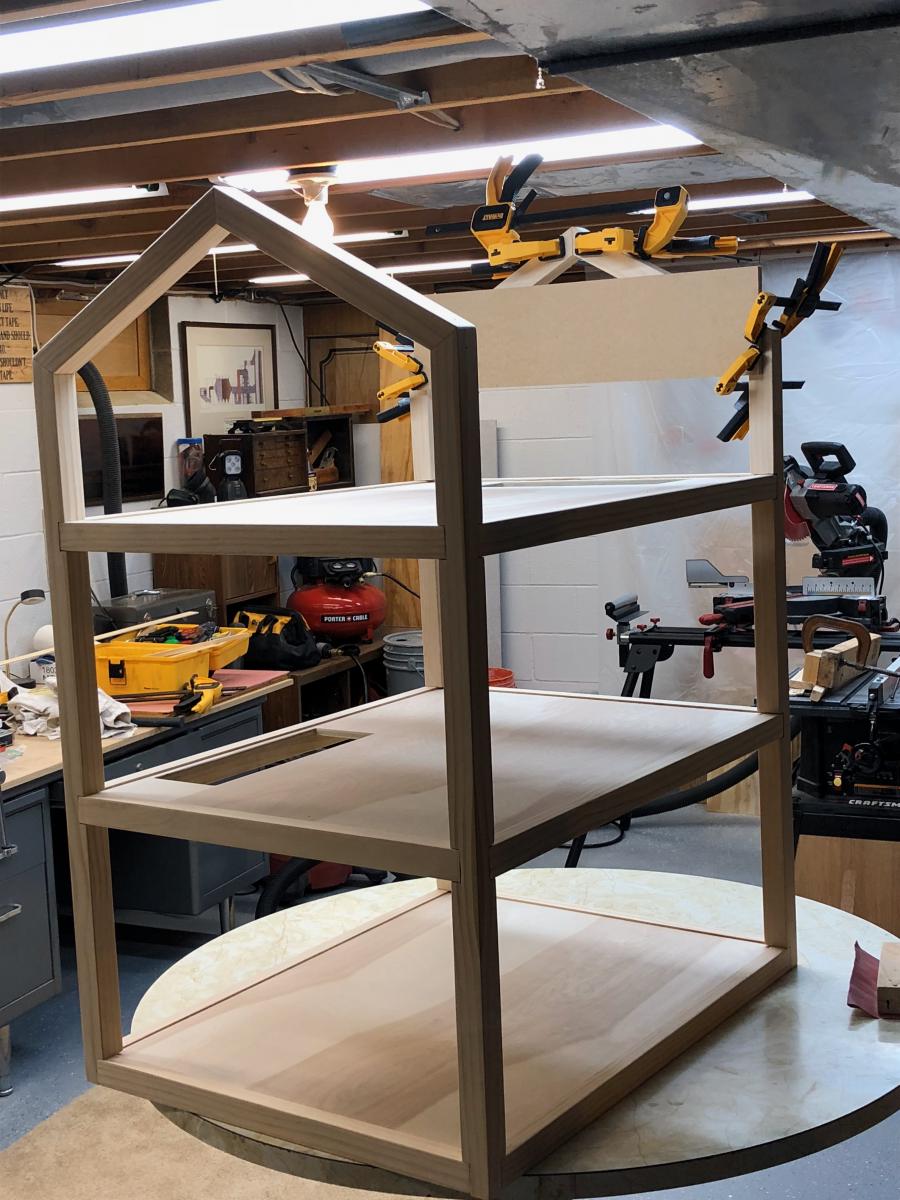
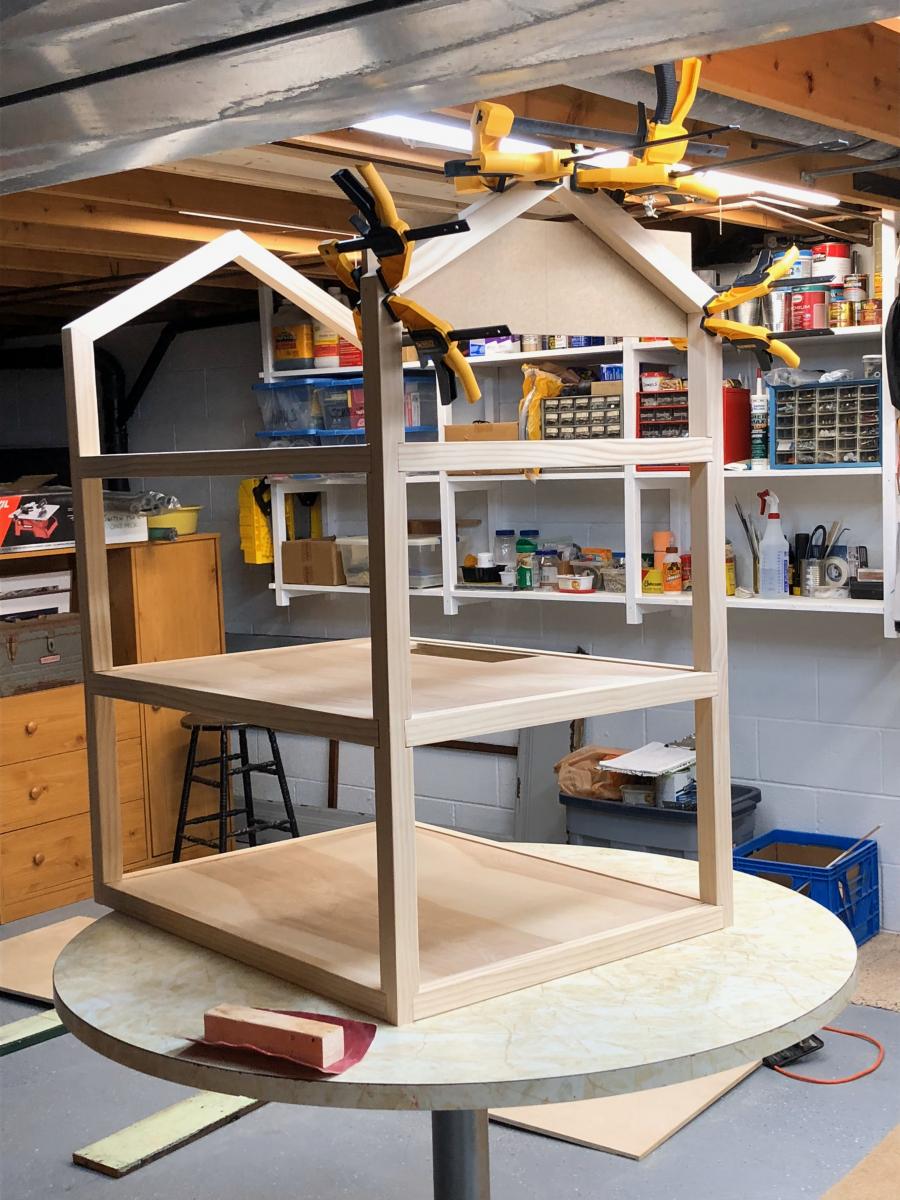
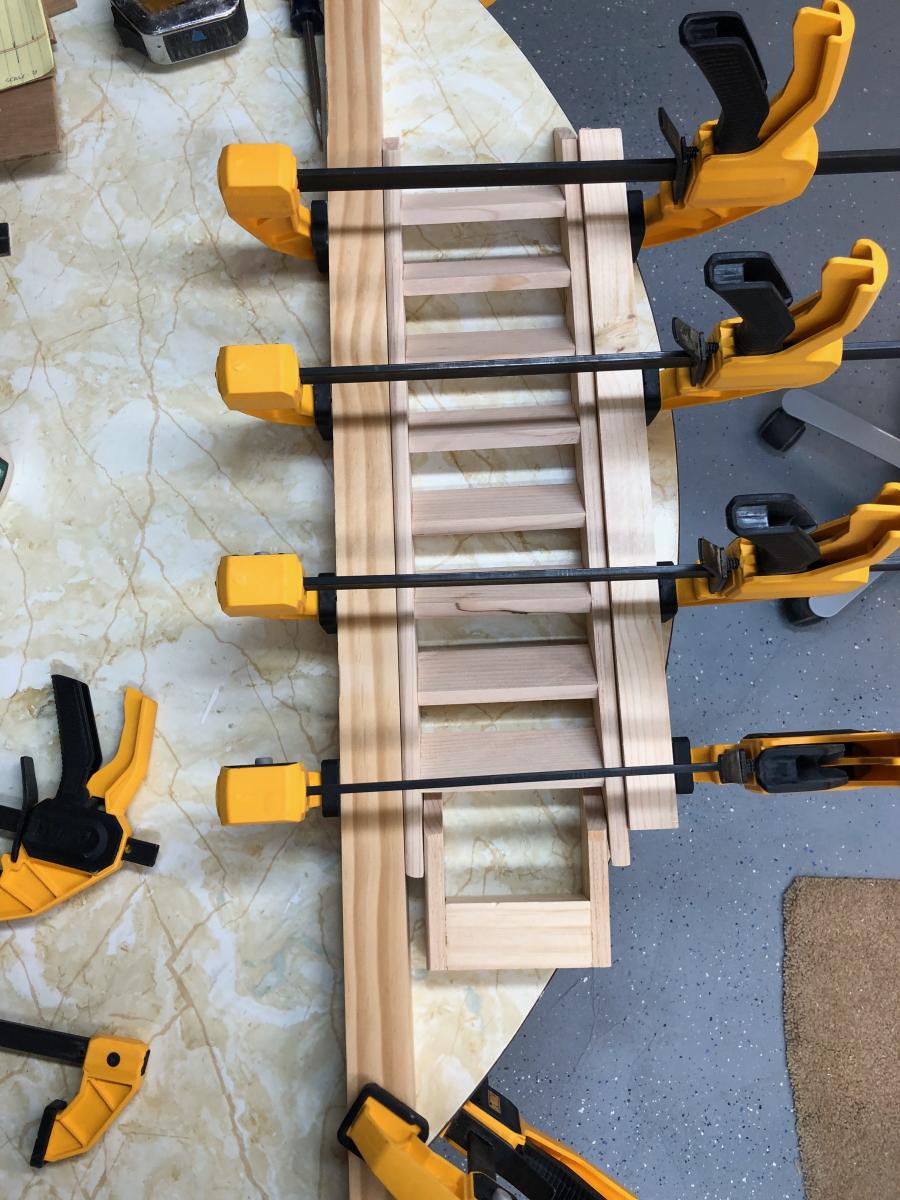
Three story doll house for my granddaughter

Here's my version of the Dream Doll House. Three stories, made with birch plywood and pine, featuring realistic stairs, baseboards, crown molding, exterior corner battens, and left in the natural state with just a few coats of water-based poly. Put the whole thing on casters for ease of rolling around the playroom. Fun project and the hugs were all the reward I needed!

Estimated Cost
Maybe around $100.
Estimated Time Investment
Weekend Project (10-20 Hours)
Finish Used
Water-based polyurethane
Recommended Skill Level
Beginner

Comments

Modern Adirondack Chairs!

My mom and I made these together as our first Ana White project! So much fun making both these chairs and memories! Next up is the three pedestal farm table and bench!

Comments

Seasonal And Holiday

My First Project: Spinning DVD Rack

Submitted by Dan Y. on Sat, 07/13/2013 - 20:19

I was looking online for a spinning DVD rack to buy when I stumbled across a picture of a custom built rack. I decided to give it a try and this is the result. This is the first project I've done outside of basic shelves and it was a great learning experience. The overall fit and finish isn't quite where I'd like it to be but overall I think it turned out pretty well. I was able to find a 12" lazy Susan at a hardware store that supports over 300lbs and worked perfectly for this project.

I used pocket holes for the shelves, finishing nails for the top and screws for the bottom and lazy Susan. I also used pocket holes to attach the shelf backs and hid them behind the shelves. One thing I definitely won't use next time is spray paint/enamel. The finish isn't nearly as nice as I wanted and it cost far more than I was expecting.

This is also my first time using SketchUp and I'm really impressed with it. I've uploaded a copy of the plans.

Criticism and suggestions are appreciated.

-Dan

Estimated Cost
$170
Estimated Time Investment
Weekend Project (10-20 Hours)
Finish Used
Rust-Oleum Universal Satin Spray Paint - Espresso Brown
Rust-Oleum Crystal Clear Enamel
Recommended Skill Level
Starter Project

Comments

Val Manchuk

Sun, 07/14/2013 - 11:35

I like this spinning DVD unit! Coincidentally, I just finished using spray enamel to redo some cupboard door handles. It's horrible stuff! I ended up sanding it off, and doing it over in flat black. I roughed up the edges with 180 grit to antique them a bit. Looks much better!

Altered 8 seater table

Submitted by Spayton821 on Sat, 01/16/2016 - 08:58

I fell in love with the truss beam table, but realized that it would be too small for our family of 7. With a little altering and using ideas from the pub/counter table, my husband and I were able to complete this lovely square table!! It stands about 36 inches high and is about 60 inches across. I am in love!

Estimated Cost
About $300
Estimated Time Investment
Week Long Project (20 Hours or More)
Finish Used
Weathered grey stain
Recommended Skill Level
Beginner

Comments

DIY Home Coffee Station

Submitted by Anonymous (not verified) on Thu, 11/02/2023 - 08:14

Had a bunch of scrap wood from other projects and random pieces we found in our barn after we moved into our new house so decided to make a new coffee bar to use it up. Modified the Potting Bench plans and pretty happy with how it turned out!

Nate B

Built from Plan(s)

Cedar planter boxes

Submitted by JavaJoe on Fri, 06/06/2014 - 20:00

I used the main plan for ideas, but opted to use 3.5 inch pickets instead, which allowed for a smaller planter that wasn't as big. Also chose to miter 1x3s for the top which I think really finishes it off. Sanded everything with a belt sander to 220 grit. Used min wax golden pecan plus three coats of poly inside and out. Finished size was about 17x17. Tile spacers work great to keep the gaps even!

Built from Plan(s)
Estimated Time Investment
Afternoon Project (3-6 Hours)
Finish Used
Min wax golden pecan
Recommended Skill Level
Intermediate

Comments

6' Square Sandbox

I've been wanting to buy or make a sandbox for my son for a couple of years now. Since seeing this on Ana White I knew I had to make it. My son is 4 yo and I didn't think the 4' square sandbox would be big enough for him, so I made it bigger. Ours is 6' square.

Materials:
4@1x8x6'
12@1x6x6'
2x4 - used leftovers from another project
8 hinges
4 handles
decking screws

Cut lengths:
2@1x8 cut to 71.5 (long sides of the box)
2@1x8 cut to 70.5 (short sides of the box)
did not cut the 1x6 boards (top planks) - actually designed the other boards to fit their length to prevent cutting (saving time) (note that original plan uses 1x4 planks - I used 1x6s so I could use the same number of planks but cover a larger area)
4@2x4 cut to 11.5 (arm rests)
4@2x4 cut to 18.5 (back supports)

followed instructions for assembly otherwise. At my husbands suggestion we put the handles on the sides and can easily open from either side - prevents having to lean over to the middle to open (back saver)

I finished the project in 4 hours including clean up and a couple of small breaks. This is my first Ana White project. It was a lot of fun to build and I hope my son will enjoy it for years to come!

Built from Plan(s)
Estimated Cost
$190
Estimated Time Investment
Day Project (6-9 Hours)
Finish Used
Sand and stain with sealer included
Recommended Skill Level
Beginner

Comments

Mrs. Chellebelle

Sat, 09/01/2012 - 20:59

Wow, this is just what I need! I've been wanting to make a sandbox for under the playhouse but the other plan was too small. This would be great for the little guys. Thanks!

Classic Bunk Beds Re-Imagined With Stairs

Submitted by edeboode on Mon, 04/03/2017 - 07:57

I modified the plans for the Classic Bunk beds by making them 74" tall instead of 63" and added a fourth slat all the way around to add more protection from potential falls.  I created one opening in the front for my youngest to get into the bottom bunk, and built slats about 2/3's across the front to act as a gaurd rail. I created another opening on the side for my oldest to get into the top bunk with stairs instead of ladders to again prevent falls.  I had to modify the Sweet Pea stairs to accomodate for the extra height in the bunk beds, simplified the railings, and I created each cubby to be big enough to use cloth storage totes that were 11x11x11.  Sanded the whole bed and stairs so the corners and edges were all rounded and smooth, and put two coats of white Deck and Porch paint to stand up to the the boys running up and down.  I used brackets to secure the stairs to the bed, and sixteen 3" bolts to bind the bed together.  Precut and drilled 17 slats for each bed seperated them 2" apart.  Spent a few hours every night during the week measuring, cutting, glueing, drilling and assembling the bed and stairs.  Spent an entire weekend sanding and painting.  Very happy with the way these beds turned out.  Overall cost of the project including the paint was around $400.  

Estimated Cost
$400
Estimated Time Investment
Week Long Project (20 Hours or More)
Finish Used
Porch and Deck Paint
Recommended Skill Level
Beginner

Comments

Industrial Bookshelves

Submitted by Anonymous (not verified) on Thu, 04/08/2021 - 17:03

My husband made these gorgeous, inexpensive bookshelves for my classroom. We modified the plans to create a couple of different sizes. I love them, and they work perfectly for the classroom library.

https://www.ana-white.com/woodworking-projects/30-industrial-bookshelf

Built from Plan(s)
Estimated Cost
$75
Estimated Time Investment
Afternoon Project (3-6 Hours)
Finish Used
Varathane Woodstain- Sunbleached
Recommended Skill Level
Beginner

Comments

DIY Murphy Wall Bed

Submitted by Dstor22 on Sun, 03/15/2015 - 07:05

Just finished up my Murphy Bed project. Hope you like.

Estimated Cost
280.00
Estimated Time Investment
Weekend Project (10-20 Hours)
Finish Used
Weathered Oak Stain
Recommended Skill Level
Intermediate

Comments

Patio Furniture

Submitted by Anonymous (not verified) on Mon, 10/04/2021 - 14:18

The Anna White patio set (2 chairs & love seat combo).
I added seat backs for comfort, painted them white and distressed the edges…
They are perfect for lake front-windy areas… They are heavy duty and will never blow away!

Comments

mh6558

Thu, 02/29/2024 - 07:29

I absolutely love the curved backs! I live in a semi-windy area and really like this look and the idea of more durability. Did you just add three vertical 1x6's and use a jigsaw to round them? Please advise as I would love to use this technique.

Wooden Play Parking Garage

Submitted by DMax2010 on Fri, 06/21/2013 - 14:23

I was looking for a wooden parking garage plan for my little guy, but couldn't find one! I looked a bunch of the dollhouse plans for inspiration and found a wooden toy garage online that I based my plans on. I still need to add the ramps and a few more parking spots, but my son loves it! It has an elevator (need to refine it) and helicopter landing zone!

Estimated Time Investment
Weekend Project (10-20 Hours)
Finish Used
Chalkboard paint for parking levels, regular orange craft paint for the elevator
Recommended Skill Level
Beginner

Comments

DMax2010

Sat, 06/29/2013 - 09:53

My son loves little cars and parking garages, so it was fun to do.

terdickison

Mon, 07/01/2013 - 11:26

I love this! I want one. Better hide this screen before the kid sees it and gets some ideas :)

snoopy369

Tue, 02/25/2014 - 10:05

Hi, curious if you ever finished the project. I'm planning to do something similar next week and would love to see the finished project (and plans if you made them!)

$10 Ledges Reading Nook

Submitted by kelli224 on Wed, 06/29/2011 - 15:22

We needed something to help with our book storage problem - something easier for the kiddos to get to and also clean up. We've made the ten dollar ledges before for our kitchen, but this project was way more fun!

Built from Plan(s)
Estimated Cost
$10
Estimated Time Investment
An Hour or Two (0-2 Hours)
Recommended Skill Level
Starter Project

Comments

Sandbox with Cover

The cover is a tonneau cover for a pickup truck. It's for a 6.5' truck bed so if you notice, I had to ad a 2x4 and one more picket on top to accommodate the extra length. 

The cover would add a ridiculous amount of money to the project but it was repurposed.  I found it on a truck that was in an accident and going to the scrap yard. I think it it came out great and my grandson loves it.

John

Built from Plan(s)

Farmhouse Arch Nightstand

Submitted by Anonymous (not verified) on Mon, 01/27/2020 - 14:06

I built a pair of these nightstands to go with the Farmhouse Headboard that I made from plans elsewhere on this site.
I used tongue and groove bead board for the tops and drawer fronts.
Decent 2 x 2's are hard to find so I ripped down 2 x 4's for the legs on my table saw.

Built from Plan(s)
Estimated Cost
$60 per nightstand
Estimated Time Investment
Weekend Project (10-20 Hours)
Finish Used
Honey Oak Stain
Water based polyurethane.
Recommended Skill Level
Intermediate

Modular Office L-Shaped Desk

I used baltic birch ply (two sheets) plus some 1x3s and 1x2s. I had to modify the dimensions to suit my space (a wall space between a window and sliding glass door.

The dimensions of the 1x2"s we a little hard to adjust. Mostly my math.

 I still need to add drawers, but I like the color contrast between the top, base and trim.

I used General Finishes Java gel stain for the top. General Finishes driftwood for the bottom trim. Basic white paint for the bases. I also used General Finishes High Performance Poly (2 coats). 

If I had to do it again, I would paint the bases in the Driftwood color and wax the whole thing. Also, I wouldn't apply the stain in hot sun. It came out really dark and was impossible to wipe off the excess. Also, never leave a ironed on edge banding in the sun. This lost adhesion and I had to re-iron it on.

Fun project. First use of pocket holes. 

I love the fact that it's modular and the angle gives you twice as much surface area. I get the feeling this will be with me for years to come in some room or another.

-Dallas

Built from Plan(s)
Estimated Cost
140
Estimated Time Investment
Weekend Project (10-20 Hours)
Finish Used
General Finishes Java Gel Stain
General Finishes Milk Paint - Driftwood
White Paint
General Finishes High Performance Polyurethane
Recommended Skill Level
Beginner

Comments

jackie scinto

Wed, 08/27/2014 - 21:01

So glad to have seen this post. I am thinking of making this desk for my daughter. Have been looking for a corner desk unit with open file bases. I found Ana's site and have made the sandbox w/bench plan, and it was not that hard. Of course I some help from a family member, and I think he would be help out with this plan as well. I am not sure of what a pocket hole is, can you tell me in laywoman's terms what that would be. Just to be sure, these plans consist of Office Corner Desktop Plan and the Modular Office Narrow Open File Base Plan. Also, did you use a Kreg Jig? I have found one at a local woodworking hobby shop, but i am wondering if the expense is worth it, any thoughts?

saelmc

Thu, 08/28/2014 - 10:38

Hi Jackie,

Ana has provided an informative video about drilling pocket holes with the Kreg jig, for those who are wondering how it's done. You'll find it here: http://ana-white.com/2011/11/drilling-your-first-pocket-hole and then you can decide if you think it will be worth it to spend the money on a jig.

Also, if you're concerned about the price, look around on the internet (like Amazon.com for example) and you'll see that there are different models available at various prices. The junior model is quite inexpensive and you might be able to buy it at a better price than the hardware store sells it for.

Good luck with your project!

Back